Embed Size (px)
Citation preview
Questions?
Contact Jenny Shoykhet or Tina Dennis with Concur questions. Updated February 2011
Access Concur Tutorials, Guides, and FAQ at http://www.concurtraining.com/customers/corpedtraining/index.asp For Internal Use Only
Importing Credit Card Expenses into Concur
For faster expense reporting and less manual data entry, try importing your credit card charges into Concur.
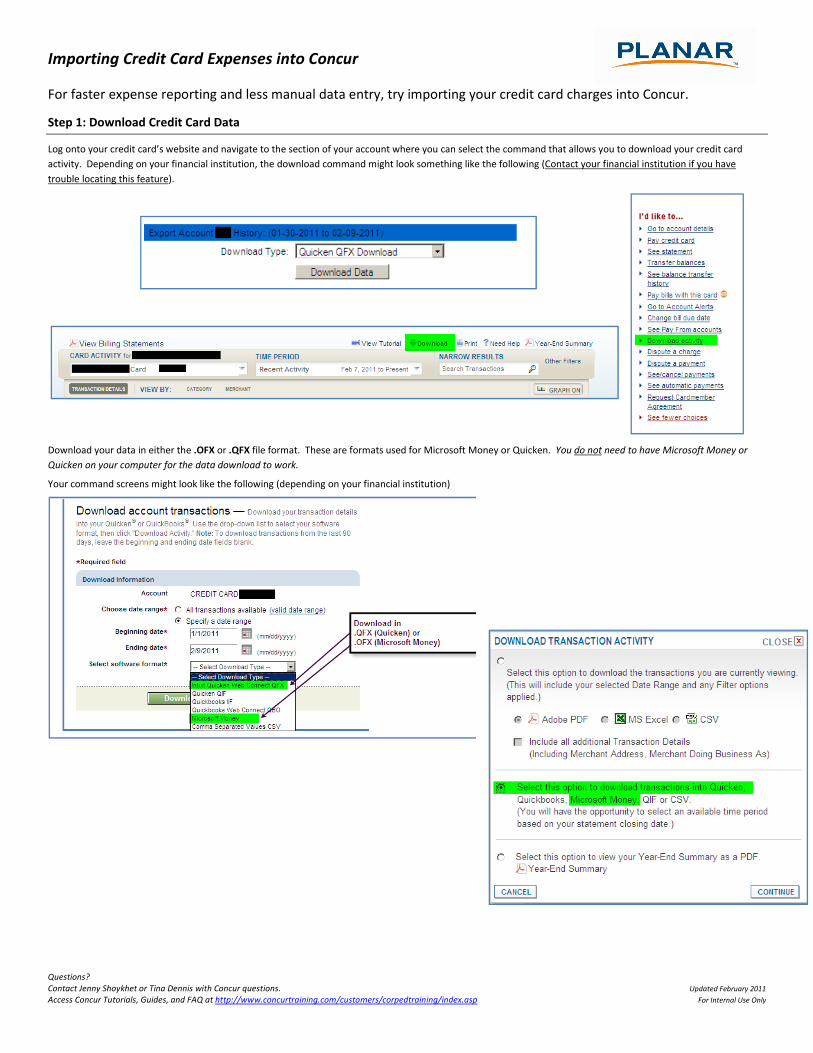
Step 1: Download Credit Card Data
Log onto your credit card’s website and navigate to the section of your account where you can select the command that allows you to download your credit card
activity. Depending on your financial institution, the download command might look something like the following (Contact your financial institution if you have
trouble locating this feature).
Download your data in either the .OFX or .QFX file format. These are formats used for Microsoft Money or Quicken. You do not need to have Microsoft Money or
Quicken on your computer for the data download to work.
Your command screens might look like the following (depending on your financial institution)

Questions?
Contact Jenny Shoykhet or Tina Dennis with Concur questions. Updated February 2011
Access Concur Tutorials, Guides, and FAQ at http://www.concurtraining.com/customers/corpedtraining/index.asp For Internal Use Only
Step 2: Save downloaded data to your Computer
When prompted, select Save to save the file on a convenient place on your computer (ie: Desktop, My Documents, etc).
When the Download Complete window appears, select Close
(If you select Open it will try to open the file in Quicken or Microsoft Money, which are likely not installed on your computer).
Step 3: Import Data into Concur
Log into your Concur account and open the expense report to which you would like to add the credit card charges. Select Import and then select From File
Questions?
Contact Jenny Shoykhet or Tina Dennis with Concur questions. Updated February 2011
Access Concur Tutorials, Guides, and FAQ at http://www.concurtraining.com/customers/corpedtraining/index.asp For Internal Use Only
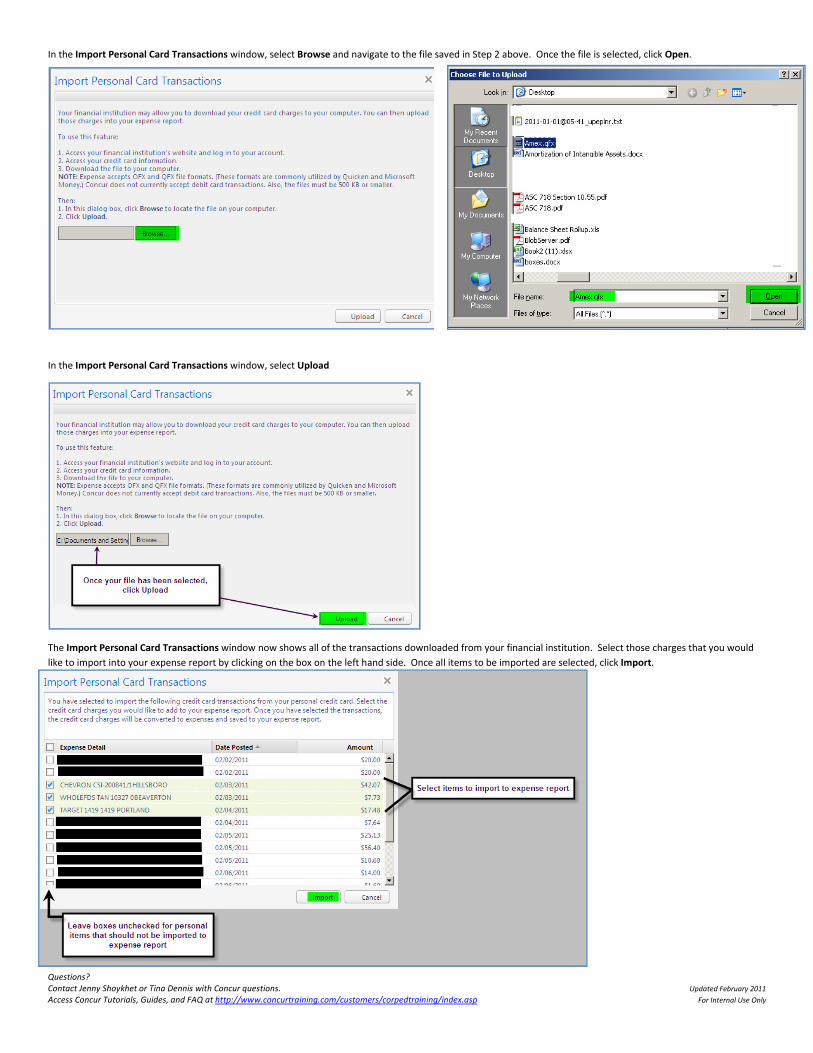
In the Import Personal Card Transactions window, select Browse and navigate to the file saved in Step 2 above. Once the file is selected, click Open.
In the Import Personal Card Transactions window, select Upload
The Import Personal Card Transactions window now shows all of the transactions downloaded from your financial institution. Select those charges that you would
like to import into your expense report by clicking on the box on the left hand side. Once all items to be imported are selected, click Import.
Questions?
Contact Jenny Shoykhet or Tina Dennis with Concur questions. Updated February 2011
Access Concur Tutorials, Guides, and FAQ at http://www.concurtraining.com/customers/corpedtraining/index.asp For Internal Use Only
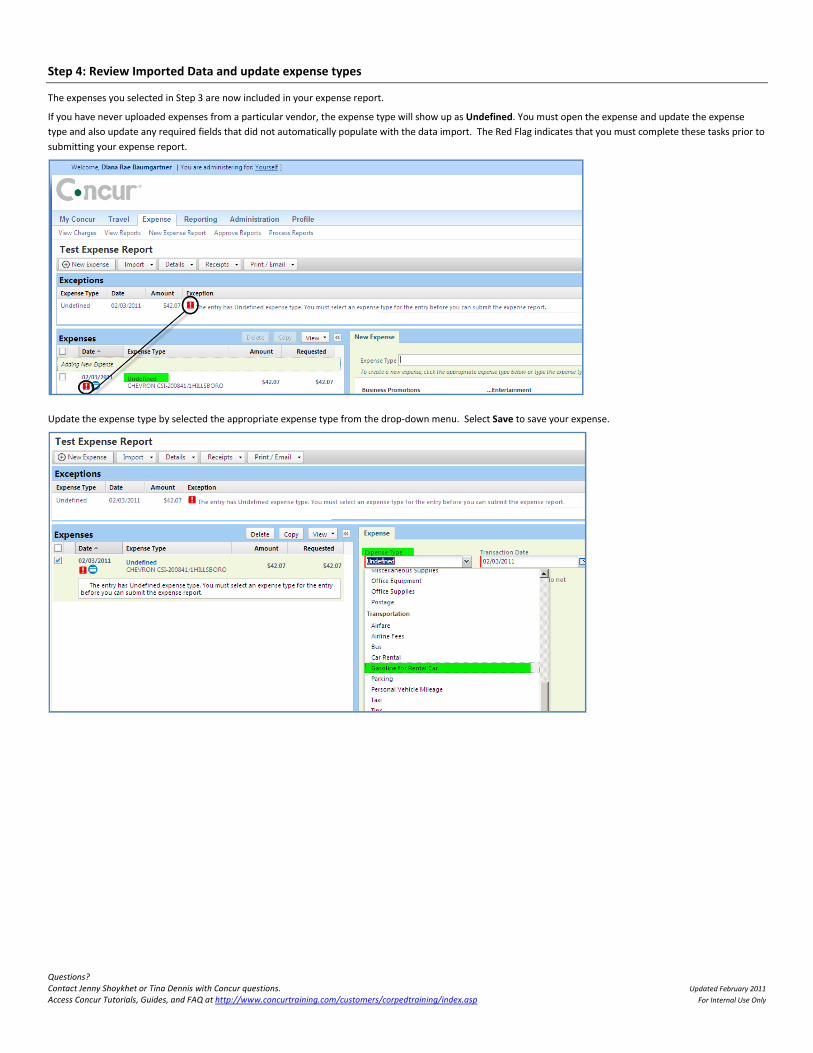
Step 4: Review Imported Data and update expense types
The expenses you selected in Step 3 are now included in your expense report.
If you have never uploaded expenses from a particular vendor, the expense type will show up as Undefined. You must open the expense and update the expense
type and also update any required fields that did not automatically populate with the data import. The Red Flag indicates that you must complete these tasks prior to
submitting your expense report.
Update the expense type by selected the appropriate expense type from the drop-down menu. Select Save to save your expense.
Questions?
Contact Jenny Shoykhet or Tina Dennis with Concur questions. Updated February 2011
Access Concur Tutorials, Guides, and FAQ at http://www.concurtraining.com/customers/corpedtraining/index.asp For Internal Use Only
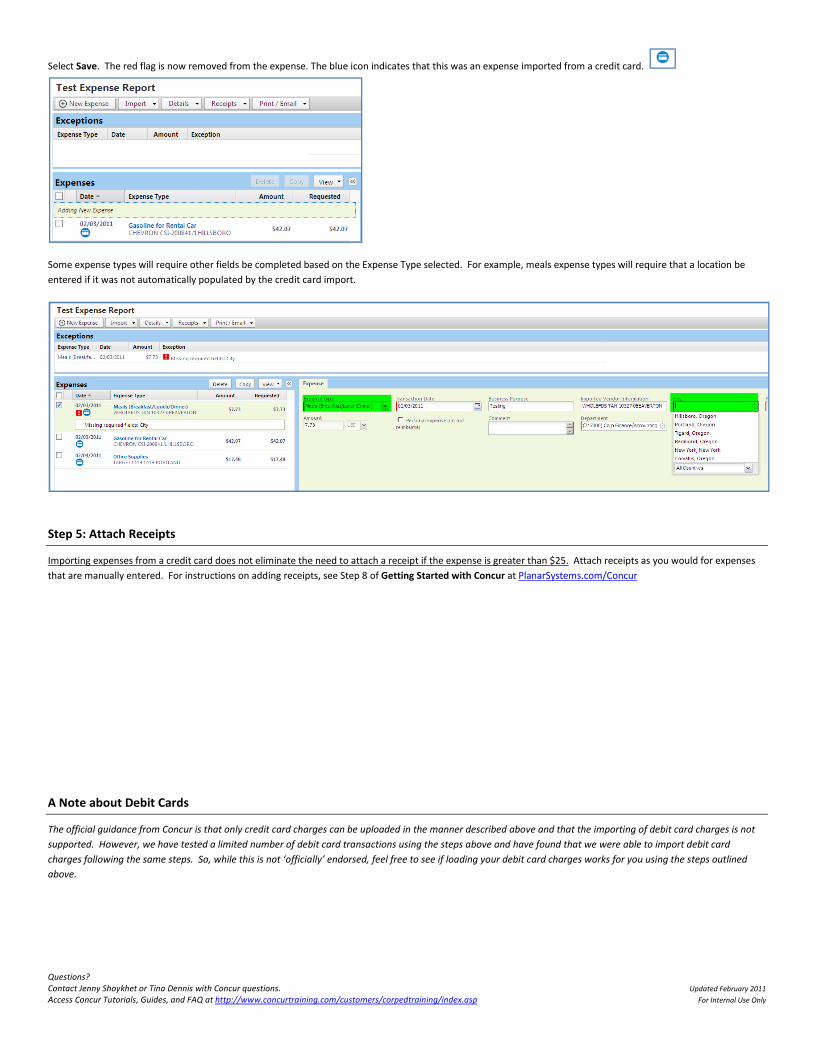
Select Save. The red flag is now removed from the expense. The blue icon indicates that this was an expense imported from a credit card.
Some expense types will require other fields be completed based on the Expense Type selected. For example, meals expense types will require that a location be
entered if it was not automatically populated by the credit card import.
Step 5: Attach Receipts
Importing expenses from a credit card does not eliminate the need to attach a receipt if the expense is greater than $25. Attach receipts as you would for expenses
that are manually entered. For instructions on adding receipts, see Step 8 of Getting Started with Concur at PlanarSystems.com/Concur
A Note about Debit Cards
The official guidance from Concur is that only credit card charges can be uploaded in the manner described above and that the importing of debit card charges is not
supported. However, we have tested a limited number of debit card transactions using the steps above and have found that we were able to import debit card
charges following the same steps. So, while this is not ‘officially’ endorsed, feel free to see if loading your debit card charges works for you using the steps outlined
above.


![CREDIT CARD AUTHORIZATION - LA Film Rentals · 2019-03-11 · CREDIT CARD AUTHORIZATION CUSTOMER INFO PHOTO ID CREDIT CARD CREDIT CARD INFO BILLING ADDRESS PICKUP CONSENT [ ] HAVE](https://img.pdfslide.net/doc/110x75/5f05b4857e708231d4144a44/credit-card-authorization-la-film-rentals-2019-03-11-credit-card-authorization.jpg)