Embed Size (px)
Citation preview

I S S U E 3 1 1 A P R I L 2 4 , 2 0 1 2
Apogee Components, Inc. — Your Source For Rocket Supplies That Will Take You To The “Peak-of-Flight”3355 Fillmore Ridge Heights
Colorado Springs, Colorado 80907-9024 USAwww.ApogeeRockets.com e-mail: [email protected]
Phone: 719-535-9335 Fax: 719-534-9050
Using Fiberglass in Rocketry
In This Issue
Cover Photo: The Next Manned Rocket: The Space Launch System.www.ApogeeRockets.com/Rocket_Kits/Skill_Level_5_Kits/Space_Launch_System

Page 2 I S S U E 3 1 1 A P R I L 2 4 , 2 0 1 2
You can subscribe to receive this e-zine FREE at the Apogee Components web site (www.ApogeeRockets.com), or by sending an e-mail to: [email protected] with “SUB-SCRIBE” as the subject line of the message.
About this Newsletter Newsletter Staff
Writer: Tim Van MilliganLayout / Cover Artist: Tim Van MilliganProofreader: Michelle Mason
By Chris Dondanville
Continued on page 3
Using Fiberglass in Rocketry
What is fiberglass?Fiberglass is a type of composite material. Composite
materials are substances that are made up of two or more base materials which have widely different physical and chemical properties. When combined these ingredients remain separate and distinct in the finished product at either the macroscopic or microscopic level. Some other examples of composite materials would be carbon fiber, duct-tape, disc brake pads, plywood, and even concrete. Composites are created to take advantage of the proper-ties of all the constituents and produce a material that is stronger than any of the components.
In the case of fiberglass we are dealing with two constituent parts. These are glass and plastic.The glass is actually in the form of cloth that comes on a roll. Yes, it is real glass, like you’d find in a window. But it is drawn out into a tiny wisker that is very flexible. If it was very short, it is brittle, just like you’d find in a window pane. The nice characteristic is that it is incredibly strong too.
Because of its fexibility, it can be woven on a loom into a cloth. This makes it very convenient to handle, rather that trying to work with the tiny individual strands.
Pictured in Image 1 is a roll of 7.5 oz. e-glass in a 50” width. While this sounds confusing it is really referring to
the weight. Seven and one half ounces refers to the weight of the cloth for one square yard, or about 0.83 oz. per square foot. The nomenclature “e-glass” refers to the type of glass that is used. E-glass is “electrical glass,” which means it is transparent to electrical signals. It is often used in radomes on aircraft and missiles. Manufacturers can also put additives into the glass to make it stronger. S-glass refers to “structural glass,” which is a little bit stronger, but also a bit more expensive. So typically, e-glass is used, and if it needs more strength, more layers of fabric are applied.
Just like any woven fabric, it is composed of bundles of fibers or roving that are woven into the fabric. The fibers that are used to create the roving are actually made out of glass. Each of the fibers that make up the roving are sev-eral times smaller than a human hair.
Non-Woven FiberglassFilament winding is a manufacturing process used to
create hollow circular parts, like tubes and nose cones. Instead of using woven pieces of glass cloth to form the nosecone and create the substrate for the epoxy, the tubes are actually formed by wrapping a glass filament coated with epoxy around a mold. Where and how the winding is done is controlled by a computer and done in such a manner as to increase the strength in exactly the direction needed in each area of the nose cone.
The advantage of wound parts is that parts can be produced faster, and the filaments are continous, so the strength is maximized. But it takes sophisticated machinery to wind the strands of glass around the mold in a uniform and consistent way. So most parts made for model rockets are created with woven cloth.
How Fiberglass is MadeSilica sand, limestone and a mixture of minerals are
melted in a furnace to create molten glass. This molten glass is then extruded through a nozzle to create individual fibers that is 5-25 microns across. It is the fibers that give the fiberglass its strength. The high tensile strength of the glass fibers combined with the strength introduced
Image 1: Woven fiberglass cloth.

Page 3I S S U E 3 1 1 A P R I L 2 4 , 2 0 1 2
Using Fiberglass in RocketryContinued from page 2
Continued on page 4
by roving and weaving make the glass cloth very strong. However, the cloth is also very soft and flexible. How do we make it into a hard, solid material? To make it rigid we add the other ingredient in our composite, plastic.
The plastic used in fiberglass is a polymer that cures or is thermoset from a liquid, usually an epoxy or polyester. These liquids are usually in a 2-part mixture. One part is the resin, which is really a bunch of little plastic molecules with an active chemical group on each end. The other part is the curing agent or hardener. This hardener chemically reacts with the plastic molecules joining them together into long chains. The formation of the long chains of plastic molecules is what makes the plastic solidify. These long
chains of plastic molecules actually work their way be-tween the individual strands of the glass fibers, stiffening it by locking them together. It is like wrapping your fingers together with tape - by locking them together, you can no longer bend them.
The cured resin also gives it hardness. By taking the cloth and coating it with a liquid plastic, which then hard-ens, we end up with a finished material that is stronger than either ingredient. The plastic is reinforced by the woven cloth and the woven cloth is stiffened by the plastic!
We’re Paying CashFor Great Articles for This Newsletter
Are you a writer looking for some serious pocket change? We’re paying up to $350 for good how-to articles for this newsletter. If you’re interested, see our submission guidelines on the Apogee web site.
www.ApogeeRockets.com/Newsletter/Newsletter_Guidelines
Image 2: Epoxy Resin
Image 3: How strong is fiberglass? This fiberglass rocket did a core-sample about 5 inches deep into hard dirt. Other than being scuffed up, it is ready to fly again.
Some of you may be curious if this “epoxy” is the same as the glue that you are used to using on your high power rocketry projects. The answer to that is yes! Though this application is generally slower curing and thinner than the 5 or 10 minute epoxies that are used in adhesive applica-

Page 4 I S S U E 3 1 1 A P R I L 2 4 , 2 0 1 2
Continued from page 3
Using Fiberglass in Rocketrytions, the chemical composition and curing action is identi-cal to the glues.
Fiberglass uses in RocketryFiberglass, like all composites, has to be molded to
shape when it is curing. This is what allows us to create fiberglass applications that range from car hoods to stor-age tanks, boat hulls and airplanes. In rocketry we can use fiberglass for any structural part of the rocket.
A very common application of fiberglass in rocketry is the fabrication of fins. You will often see fiberglass fins advertised as G-10 sheets or some similar specification. G-10 is a flat sheet of epoxy with a glass fiber substrate. In other words, fiberglass! G-10 comes in many thicknesses, usually measured in decimal fractions of an inch, like 0.125”, which is 1/8” thickness.
This material is desirable for fins because of its chemi-cal and physical properties. It has a high strength to weight ratio. It has a similar strength to materials with much great-er densities and much greater strength than most materials of similar density. It is very durable and resistant to most forms of moisture and corrosion. This is good as we know that rocket fuel and exhaust can be quite corrosive and the fins are in close proximity to the fuel and exhaust.
Another key advantage of fiberglass over a wood rocket fin is that wood has a grain that must be taken into account when cutting, shaping and mounting the fin (not for plywood). Woven fiberglass cloth does not have an inher-ent “grain”, and it strong in most any direction you lay it down.
Besides fins, rocket airframes (tubes) are often made of fiberglass for high power rockets. Fiberglass tubes are more rigid and stronger than other materials and lighter than some. Fiberglass can also be easy to work with and
finish. Fiberglass tubes (and sheets for that matter) can be machined with the same tools that you use to work with cardboard, wood and plywood. You can also sand and finish fiberglass tubes as you would wood or cardboard. Since fiberglass is an epoxy composite,
epoxy is the adhesive of choice. Just make sure that you rough up the surfaces that you are joining.
Fiberglass nose cones are very desirable for their strength. Along with fins, the nose cone is often the first component to get the fiberglass treatment. Since the nose
Continued on page 5
Ride Your Rocket SkywardStrap it on. Turn it on. Rocket Skyward!
Experience And Hear TheTrue Power Of Your Rocket
“GearCam” High-DefVideo
ww
w.A
pogeeRock
ets.co
m
Image 4: Naked fiberglass air-frame tube
Image 5: A typical fiberglass nose cone is made from woven cloth.

Page 5I S S U E 3 1 1 A P R I L 2 4 , 2 0 1 2
Continued on page 6
Continued from page 4
Using Fiberglass in Rocketry
Space Foundation certified as an excellent teaching aid. For further information, call Apogee Components at: 719-535-9335.
www.RockSim.comv9
Your Cool Rocket Designs Look So Much Better In
RockSim Version 9!
Design It.Launch It.
cone is the recipient of some of the most violent treatment of the airframe it makes sense to use a strong durable material.
Fiberglass sheets are created in a process that is known as the layup, or simply laying up. The process is quite simple once you have all the materials and a few simple tools. You will need a very smooth, very flat surface to layup the sheet on, and another similar surface to create a sandwich for your fiberglass sheet to cure. Once you have your surface you simply alternate layers of fiberglass cloth and epoxy until you have the desired thickness and press tightly while your sheet cures.
Many people use glass sheets for the layup surface.
You can get some cheap window glass at your local home improvement store of choice. People also use very smooth tiles, like granite, to layup their fiberglass sheets on. The size of the surface of the glass will determine the size of the sheet of fiberglass that you can layup. Also remember that you need two surfaces to create your sandwich. You can coat your surfaces to make them release the epoxy easier, but I have found this unnecessary with glass. (Originally I taped wax paper to the glass, but found out that only put a wax coating on the fiberglass and glass and created more work for me, instead of saving any!)
Determine what size of sheet you are creating and begin cutting sections of the fiberglass cloth of that size. The number of sheets that you will need are determined by the desired thickness of the finished fiberglass. As an example, say you would like to create a sheet of fiberglass to use for rocket fins. You would like this sheet to be 0.1” thick (about 7/64”). You are going to use 6 oz. e-glass woven cloth. We can look at the specifications for the e-glass and see that it has a thickness of 0.0093”. Dividing 0.1/0.0093 = 10.75, or about 11 thicknesses. Since the epoxy will add a little thickness to our finished product, I would probably go with 10 thicknesses, so we need to cut 10 sheets of fiberglass cloth.
To make things simple, let’s say we are making a 12”x12” sheet of fiberglass. Since we are making a one foot square, we know that we are using 10 square feet of fiberglass cloth. Since we know that our cloth weighs 6 oz. per square yard and that there are 9 square feet in a yard we know that our fiberglass cloth weighs 6.67 oz. or about 187 grams. We need to know this to calculate the amount of epoxy that we will need.
I have found that you will use slightly less than a 1 to 1 ratio of cloth-weight to epoxy-weight. Remember that most
Image 6: The inside of the nose cone is rough, and shows the layers of fiberglass cloth

Page 6 I S S U E 3 1 1 A P R I L 2 4 , 2 0 1 2
Continued from page 5
Using Fiberglass in Rocketry
Continued on page 7
epoxy is mixed by volume not weight. You might want to mix a “batch” of epoxy and measure the weight of each component volume, that way you can calculate the weight ratio of the epoxy components and mix exactly how much you need so you do not waste epoxy.
Other tools you will need before we begin are nitrile gloves (these work better than latex gloves when using epoxy), a cheap paintbrush around 2” wide, a disposable plastic container to mix the epoxy in, and some stir sticks to thoroughly mix the epoxy. I have found that paper soup bowls or disposable plastic margarine containers work for epoxy, but Styrofoam does NOT as the epoxy will melt the
AltimeterOne
ww
w.A
pogeeRock
ets.co
mYour Source For Everything
Rock
etry
• Records peak speed and acceleration using 3-axis accelerometer.
• Also tells you how high the rocket flew.
“The one altimeter you’ll use in every rocket you fly.”
AltimeterOne - See how high your rocket flew
Penny shown for size comparisonwww.ApogeeRockets.com
NEW!
AltimeterTwo - See how fast and high your rocket went
• Records peak altitude up to 29,000 feet (ASL). Displays in meters too!
• Easy-to-read LCD display. No need to count beeps or flashes of light.
Image 7: Basic supplies used in fiberglassing.
Styrofoam as it cures. Also, the really cheap “chip” brushes found at hardware store tend to shed bristles and you probably ought to go up a notch or two in quality. Popsicle sticks of various sizes that you can get at the hobby store are great for mixing and other various tasks around the shop. You will also need some heavy weights of some sort to make sure that we keep even pressure on the sandwich during the cure.
So once we have the tools ready, the fiberglass cloth cut, and the epoxy mixed, we are ready to begin. We start by laying the glass pane on a flat surface and painting a 12x12 square of epoxy onto the glass. Then we take a piece of fiberglass cloth onto the epoxy and smooth it out using our gloved hands. Once the cloth is flat and mostly saturated with the epoxy, we then brush on more epoxy to fill in any “dry” areas to make sure that we have com-plete saturation of the cloth by the epoxy. Don’t be afraid to lay that epoxy on, it is better to have too much that will squeeze out, than to have too little that will leave us with dry spots and pitting.
We are then ready to put on our next layer of cloth and smooth it down. We repeat this process 10 times, laying up all the layers of the sheet.
To finish the sheet, make sure that you have plenty of epoxy on the top layer. Remember that this will sit and cure and gravity will tend to settle the epoxy to the bottom leav-ing dry places and pitting on the top surface of the sheet if you do not have enough epoxy in the mixture.
Page 7I S S U E 3 1 1 A P R I L 2 4 , 2 0 1 2
Continued from page 6
Using Fiberglass in Rocketry
Continued on page 8
ww
w.A
pogeeRock
ets.co
m
Guillotine Fin Alignment Jig
• Get Perfectly Aligned Fins Every Time• Holds the Tube In a Horizontal Orientation
to Prevent Glue Drips• Self Adjusts to ANY Size Tube From 13mm
(BT-5) to 66mm (BT-80) • Securely Holds The Fin While The Glue Dries• Kid-Friendly! Helps Them Make Stronger
Fins, Resulting in Straighter Flights • Can Accomodate Fins Up To 1/2” Thick • Allows Any Number of Fins on the Tube
www.ApogeeRockets.com
The Most Versatile Alignment Jig Ever Manufactured
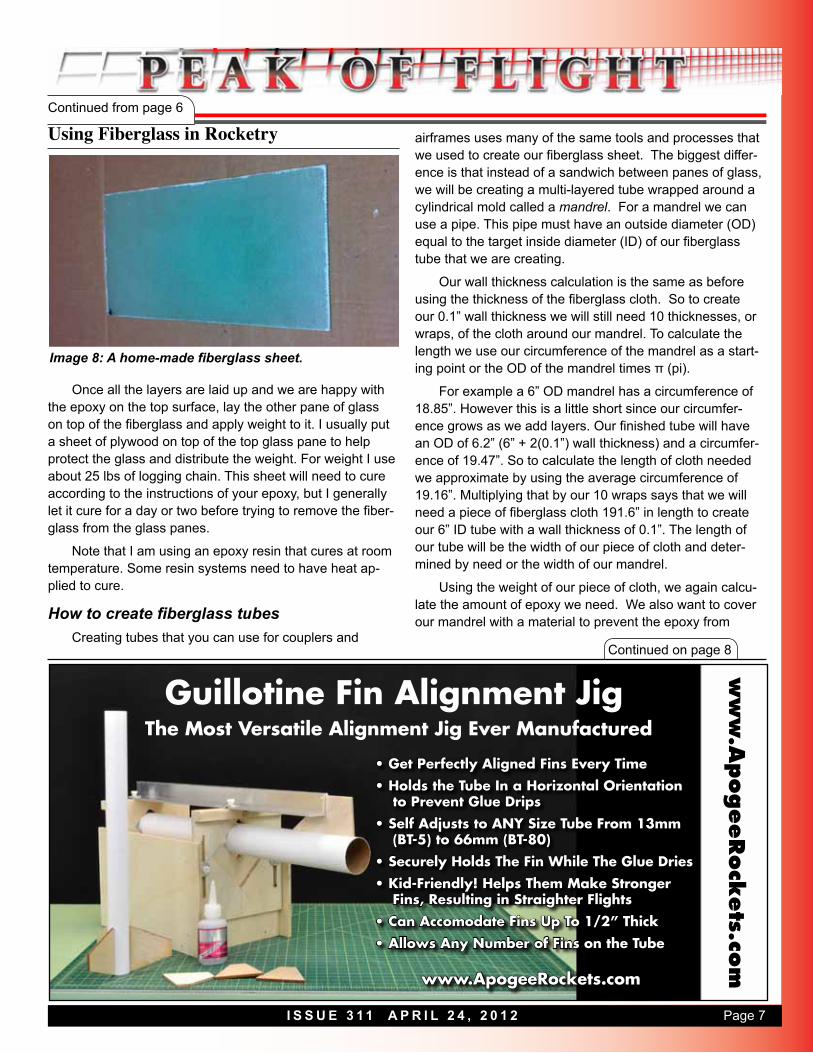
Image 8: A home-made fiberglass sheet.
Once all the layers are laid up and we are happy with the epoxy on the top surface, lay the other pane of glass on top of the fiberglass and apply weight to it. I usually put a sheet of plywood on top of the top glass pane to help protect the glass and distribute the weight. For weight I use about 25 lbs of logging chain. This sheet will need to cure according to the instructions of your epoxy, but I generally let it cure for a day or two before trying to remove the fiber-glass from the glass panes.
Note that I am using an epoxy resin that cures at room temperature. Some resin systems need to have heat ap-plied to cure.
How to create fiberglass tubesCreating tubes that you can use for couplers and
airframes uses many of the same tools and processes that we used to create our fiberglass sheet. The biggest differ-ence is that instead of a sandwich between panes of glass, we will be creating a multi-layered tube wrapped around a cylindrical mold called a mandrel. For a mandrel we can use a pipe. This pipe must have an outside diameter (OD) equal to the target inside diameter (ID) of our fiberglass tube that we are creating.
Our wall thickness calculation is the same as before using the thickness of the fiberglass cloth. So to create our 0.1” wall thickness we will still need 10 thicknesses, or wraps, of the cloth around our mandrel. To calculate the length we use our circumference of the mandrel as a start-ing point or the OD of the mandrel times π (pi).
For example a 6” OD mandrel has a circumference of 18.85”. However this is a little short since our circumfer-ence grows as we add layers. Our finished tube will have an OD of 6.2” (6” + 2(0.1”) wall thickness) and a circumfer-ence of 19.47”. So to calculate the length of cloth needed we approximate by using the average circumference of 19.16”. Multiplying that by our 10 wraps says that we will need a piece of fiberglass cloth 191.6” in length to create our 6” ID tube with a wall thickness of 0.1”. The length of our tube will be the width of our piece of cloth and deter-mined by need or the width of our mandrel.
Using the weight of our piece of cloth, we again calcu-late the amount of epoxy we need. We also want to cover our mandrel with a material to prevent the epoxy from

Page 8 I S S U E 3 1 1 A P R I L 2 4 , 2 0 1 2
Using Fiberglass in RocketryContinued from page 7
Continued on page 9
adhering. For smaller tubes we can use wax paper. For larger tubes we have to switch to very thin mylar sheets or a similar material. It is also important to make sure that we have a way of suspending our mandrel so that it is as a good working height and we can turn it with ease and without fear of knocking it over.
mately one half turn at a time. An optional step is to cover the outside of your tube with a layer of Dacron polyester cloth. This layer acts as a containment layer for the tube materials. This layer will be peeled off when cured. A sec-ondary benefit of the Dacron is that when removed it leaves a nearly smooth surface for finishing later.
When you are done laying up your tube it has to cure. It is vitally important that your turn the tube during the cur-ing process. The epoxy will tend to pool at the bottom of the tube, so turning the tube as the epoxy cures will keep the epoxy even, the tube round and the wall of uniform thickness. Turning your tube a quarter turn every five min-utes or so during the cure will do the trick. A better method is to continuously turn the tube during the cure. A modified BBQ rotisserie is perfect for this!
Another addition to the cure process is a curing box.
www.ApogeeRockets.com
Quick-Change Motor Adapters• Allows you to use smaller diameter motors in
your rocket kits (adds versatility)• Change out motors in seconds• Works with all single-use and reloadable motors • Four sizes available
ww
w.A
pogeeRock
ets.co
m
Image 9: Layup of a fiberglass tube.
Image 10: A BBQ rotisserie to slowly turn the mandrel
Once we are ready with our materials and tools, coat the mandrel with epoxy and then take the end of our piece of fiberglass cloth and lay it on the mandrel in the epoxy as straight as we can get it along the axis of the mandrel. We are going to alternate layers of cloth and epoxy just as we did with our sheet, but this time it will be done as we roll the cloth onto the mandrel. Again we are making sure to get our fiberglass laid out smooth and we are making sure that we get good coverage of the cloth with the epoxy (full saturation.) We do this by alternately rolling the cloth on and smoothing it down and painting on the epoxy, approxi-
While most epoxy doesn’t need heat to cure, all epoxy will cure faster if heat is applied to the process. A simple cur-ing box can be made from sheets of Styrofoam insulation
Page 9I S S U E 3 1 1 A P R I L 2 4 , 2 0 1 2
Using Fiberglass in RocketryContinued from page 8
Experienced HPR Builders Use Thrust Plates
• Eliminates Shear Forces on Centering Rings• Mates with AeroPacks Flanged Engine Retainers• Fits Standard HPR Tubes, Blue Tubes, and Fiberglass Tubes• Made from Aircraft Grade Aluminum
www.ApogeeRockets.com/thrust_plates.asp
ww
w.A
pogeeRock
ets.co
m
Continued on page 10
and foil tape. Light bulbs on a dimmer switch and a simple kitchen thermometer can be used to maintain a tempera-ture around 150° Fahrenheit.
Once cured, the tube must be removed from the mandrel. This is not usually a problem with smaller tubes; however it can be tricky with larger tubes. This is when we benefit from having a metal mandrel. The differences in thermal properties between metal and fiberglass can be used to aid in removing the tube from the mandrel. When we cool the metal it contracts slightly, creating a tiny gap between the mandrel and the tube allowing us to remove it easily. We can cool the mandrel by filling it with ice water, or even just setting it upright on a cool concrete floor.
Working with and finishing fiberglass compo-nents
Completed fiberglass materials like our fiberglass sheet
Image 11: A curing box made from Styrofoam sheets.
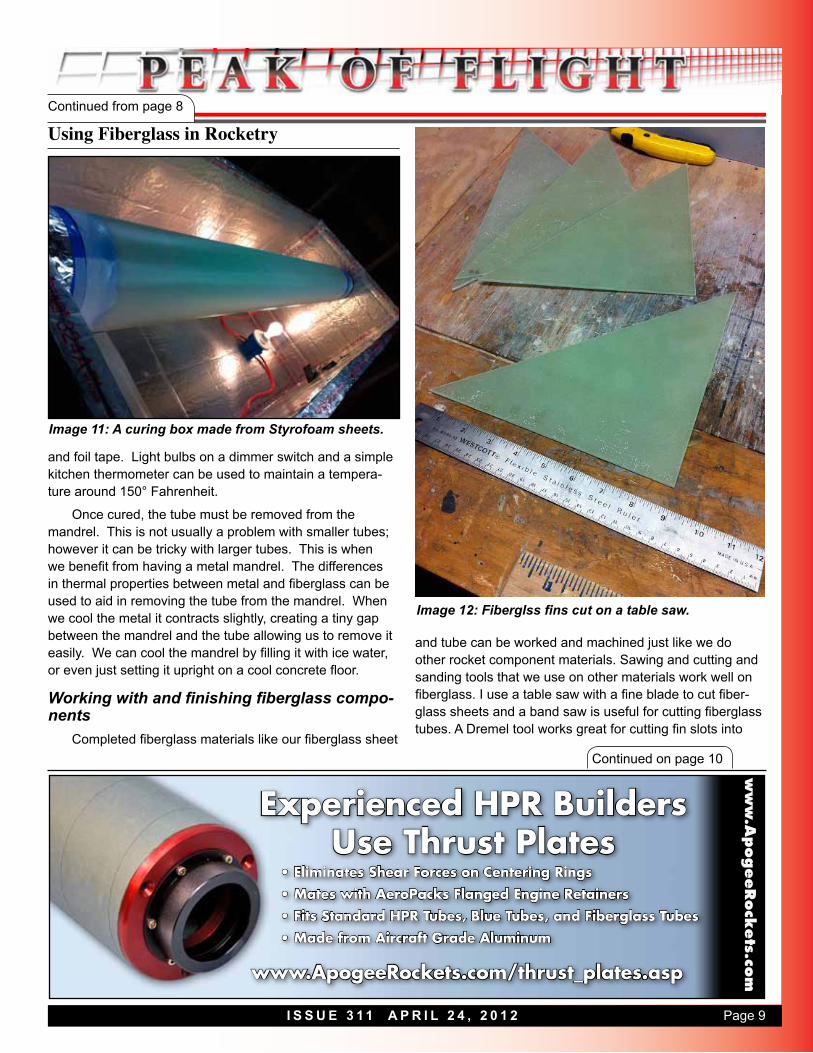
Image 12: Fiberglss fins cut on a table saw.
and tube can be worked and machined just like we do other rocket component materials. Sawing and cutting and sanding tools that we use on other materials work well on fiberglass. I use a table saw with a fine blade to cut fiber-glass sheets and a band saw is useful for cutting fiberglass tubes. A Dremel tool works great for cutting fin slots into

Page 10 I S S U E 3 1 1 A P R I L 2 4 , 2 0 1 2
Using Fiberglass in RocketryContinued from page 9
fiberglass airframes, and your normal drill bits work great too.
One big difference, however, in working with fiber-glass is the safety difference. You have to remember when cutting and sanding fiberglass that the dust that you are producing is composed of tiny particles of glass fibers and epoxy resin. Needless to say this mixture can be an irritant to your skin and something that you really do not want to breathe at all. You must take precautions like gloves, goggles and even a mask to filter the particulate out of the air that you are breathing.
Sanding fiberglass is done with the same sandpaper as we use on wood. You will find that the same grits are used to get the same approximate finishes. I like to use Elmer’s carpenter’s filler to fill in any scratches or voids in fiberglass just as I do wood as well. When you have the surface pre-pared you can paint the fiberglass just as you would wood, paper or blue tube, giving you an attractive, strong, durable rocket!
About the AuthorChris Dondanville is the NAR Sr. Adviser for the Nash-
ville based Music City Missile Club and a member of Phoe-nix Missile Works in Birmingham. He is currently repairing
a 100% scratch-built, all fiberglass rocket to try again for his Level 3 HPR certification. When he is not flying rockets with his friends and family he can be found working as an IT Infrastructure Architect for the IBM Corporation.
Launch controller for mid-power rockets.
Hooks right up to your car’s battery.No more dead AA batteries!
Plenty of electricity to set off any type of rocket motor igniter.
24 foot cord, allows you to stand far backfor launch safety.
Audible continuity buzzer lets you know the circuit is armed and ready for launch.
Flat-jaw alligator clips(for easy hook-up of igniter.)
Pratt Hobbies GO BOX Launch Controller
Brought to you by:
www.ApogeeRockets.com/Launch_Accessories/Launch_Controllers/Go_Box_Launch_Controller