Embed Size (px)
Citation preview

�
�
�
�
Read installation guide in illustration and word filecarefully, and install the tank according toinstructions in the guide to avoid product damageand installation inconvenience caused byinappropriate operation.All data contained is based upon the last productinformation available at the time of publication.Kohler Co. Reserves the right to implement changesof product characteristics, packaging and availabilityat any time without further notice.Do not apply erosive cleanser and solvent in the
tank, which will damage tank spares and result inleakage in the tank. Kohler will not be responsiblefor any damage related to above mentionedcleanser or solvent.Do not apply spares that are not provided by Kohler,and please note that glass adhesive tape shall notbe applied to the installation of Kohler spares.Kohler will not be responsible for any damagerelated to installation with spares not provided byKohler.
Ordering Information
OVE Tank Cover...........................................K-6288T-** OVE In-Wall Tank II (Without Iron Rack For Wall-HungToilet) ........................................................K-6287IN-NAOVE In-Wall Tank With Flexible Outlet ..K-6287IN-F-NA
Function Explanation
�
� �
Anti flow-backwards
Adjustment of inlet water level Single/double gear
� Adjustment of flushing volume
flushing
Design And Installation Concept Of In-wall
Tank
�
�
Installation of shorten in-wall tank is much easier
and nice-looking comparative to that of traditional
tank. Meanwhile, the space layout will be more
reasonable due to the application of in-wall tank
pipes and connectors.
The most remarkable advantage of shorten in-wall
that the installation will never be limited to
certain area, and can be installed wherever as you wish,
which will make the bathroom layout more reasonable
and nice-looking, and make good use of every inch of
the bathroom space.
tank is
Advantages Of In-wall Tank
�
�
�
�
�Will not affect the structure of the wall and providesexcellent sound insulation.
Easy installation and time efficient..
.Clean, garbage free, and space .
�
�
Made ofmacromolecular materials thatpreventscorrison and leaking.Adjustable dual flush design which conserves water.
Do notneed toprepare any other spare partsEasymaintenance and servicing
saving
INSTALLATIONINSTRUCTIONS
-1- Copyright 2010 Kohler Co.C
IN-WALL TANK II
WITHOUT IRON RACKK-6288T/K-6287IN-NA/K-6287IN-F-NA
OVE
1078530-K02-C

ROUGHING-IN
UNIT: mmInstallation dimensions without iron rack for wall-hung K-6287IN-NA
Installation dimensions without iron rack for wall-hung K-6287IN-F-NA
-2-
400kg
440
140
190
348
700-8
00
94
196
0-48
0-48
440
190
348
100
135
140
40
520
620
(Adjustable Range)
1078530-K02-C

INSTALLATION
Installation Method
K-6287IN-NA K-6287IN-F-NA
100 Flexible
1.Drill four holes with diameter of 12mm and depth of60mm as shown in Fig. A, fix expanding bolt, then installthe fixing frame and tighten the long screw.
Align tank with fixing hole of the fixing frame as shown inFig. B, adjust and wrap it with washer, and then tightenscrews.
A.Install the in-wall tank
Expanding bolt
Long screw
Fixing frame
WasherScrews
A
B
2. Adjust the tank to level position with leveller as shownin the below figure and tighten screws with hex keywrench.
Note: it is necessary to keep the tank balanced.
Leveller
Tank
Loosen
Hex Key Wrench
Screws
-3-
OVE In-Wall Tank With Flexible OutletIn-wall Tank II Without Iron RackFor Wall-Hung Toilet
1078530-K02-C

B. Installation methods for front push andtop push buttons
The product features two kinds of push buttons, toppush and front push respectively.
-4-
1. Installation method for top push buttons
1) Use scissors to cut the protective panel as shown inthe figure.
Cover
Knife
Connecting hose for tank
Water hose
3. Connect the water hose to tank supply pipe and fill thewater. (Note: inlet valve shall be shut off at this time)
1078530-K02-C

2) Fix the square mask into the roof panel of the tank,and then tighten four screws to make the mask fit thetank enough. For flexible outlet (K-6287IN-F-NA), pushthe pipe up or down to get proper height of outlet.
3) Fix protective cap to the drain hole as shown in thefigure.
4) Clear the finished wall as shown in the figure. Takethe protective cap out and use scissors to cut the part ofthe square mask that protrudes out of the wall.
Square mask
Screws
Square mask
Small protective cap
-5-
Scissors
Protective panel
2. Installation method for front push
1) Use scissors to cut the protective panel as shown inthe figure.
Push up (For flexible outlet)
Push down (For flexible outlet)
Protective cap
1078530-K02-C

-6-
3) Fix the protective cap on the drain hole as shown inthe figure.
4) Clear the finished wall as shown in the figure. Takethe protective cap out and use scissors to cut the part ofthe square mask that protrudes out of the wall.
Square mask
Small protective cap
2) Fix the square mask into the roof panel of the tank andtighten four screws to make it fit the tank.
Roof Panel
Screw
Square mask
Protective cap
1078530-K02-C
1) Install the adjusting panel on the wall, then turn thelocking pipe manually to fix the panel. Alignmentbetween the locking pipe and "LOCK" logo indicates thepanel is right in position.(Please refre to the alignmentmark on the adjusting panel during installation.)
2) Insert the long screw through the fixing hole andtighten screws.Note: Mark on the long screw shall be alighed with thefixing hole during the process.)
3. Installation method for front push buttons
3) Align the groove of the panel with tab of the adjustingpanel, then push upward and lock them forward. Theinstallation shall be carried out from the bottom to the top.
4) Complete the installation and the in-wall tank is readyto be put into use.
-7-
Adjusting panel
Locking pipe
Fixing hole
Mark
Long screw
Panel
Groove
PanelAdjusting panel
Big push buttonSmall push button
1078530-K02-C

REMOVE AND MAINTENANCE OF OUTLET VALVEREMOVE AND MAINTENANCE OF OUTLET VALVE
1. Hold the cover with both hands and push upward totake down the cover.
Cover
Cover
Long Screw
2. Loosen the long screw as shown.
3. Tighten the locknut to the marked position ofOPEN to take out the adjustable board.
Locknut
Adjustable Board
-8-1078530-K02-C
Adjustable Board
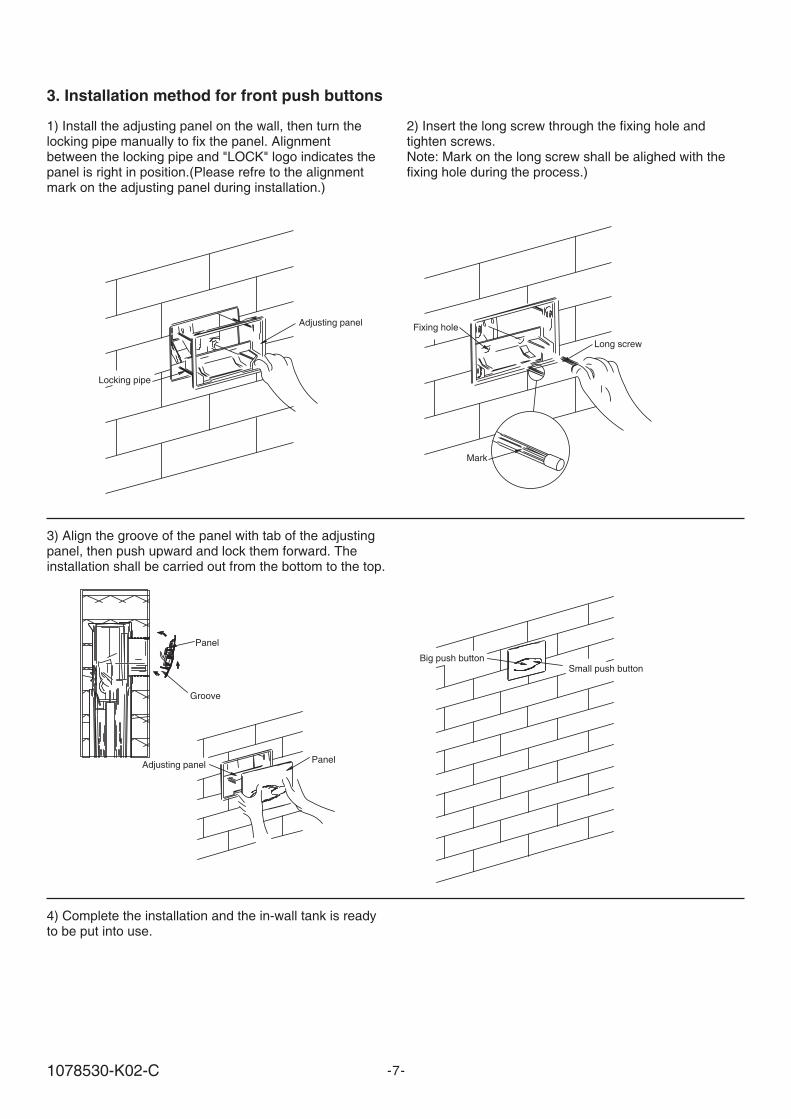
4. Take out the adjustable board as shown.
5. Take out the pole lock and the reversed lock asshown.
Reversed Lock
Pole Lock
6. Take out the inlet valve as shown. Loosen theterminal of the pipe, then grasp the top of the inletvalve and push back.
Pipe
Top
Inlet Valve
-9-1078530-K02-C

9. Turn the outlet valve in according to the arrowdirection, then the outlet valve can be taken out.Installing and removing the outlet valve will click.
Outlet Hole
Outlet Valve
7. Hole the pole bracket with your hands as shown.Then take out the pole bracket by pulling it.
Pole Bracket
Cover
Close
Lock
8. Move the lock on or off by hand.
Move the lock on and open the cover, then theoutlet valve can be loosen.
Note:
Open
-10-1078530-K02-C

A. Wash Filtration Net
Close corner valve first, then loosen and take out the
tighten nut, and wash the waste on filtration net with
clean water. Then reset the tighten nut to the original
position.
Tighten
Close
Open
Corner
Open
A
Tighten
Close
C
Filtration Net
B
Floating Box
Drainage valve
Adjustment Switch
B. Adjust Drainage Valve
Drainage volume and overflow level of the tank can
be adjusted by drainage valve: 1) Heavy drainage
adjustment: Open adjustment switch to open the
small hole. 2) Slight drainage adjustment: adjust the
height of floating box and the water level of slight
drainage will be at the bottom of the floating box.
Control Pole
Inlet Valve
Floating Box
C. Adjust Inlet Valve
Hoist and reduce the water level in the tank by
adjusting the control pole. Turn the control pole
counterclockwise to lower down the floating box and
reduce the water level of the tank. Turn the control
pole clockwise to hoist the floating box and increase
the water level in the tank.
-11-1078530-K02-C

TROUBLE SHOOTING PROCEDURESTROUBLE SHOOTING PROCEDURES
No water fills in via inletvalve
The inlet valve is closed Open inlet valve (refer to page 14)
Floating box of inlet valve is blocked by tankwall
Adjust floating box to appropriateposition
Floating box of inlet valve is block by waste Wash the floating box with clean water
Long screw is tighten too far. Loosen the long screw, make sure thesign the long screw accords with thehole on (refer to page 7).
Pole lock is not locked tight enough with thereversed lock.
Relock the pole lock with the reversedlock.
Water level of the inlet valve is not appropriate
No drainage whenpressing the heavy andslight drainage button
Too high or too lowwater level
Leak of the toilet andsquat
Symptoms Probable Causes Recommended Action
The outlet valve is not installed tight enoughwith the outlet hole.
The rubber gasket of the outlet valve isblocked by waste.
Toilet swing Hexagonal nut is loose
Readjust water level (refer to page 14)
Retighten the outlet valve (refer to page13)
Clean the rubber gasket of the outletvalve.
Tighten the hexagonal nut (refer to page9)
Kohler plumbing fixtures and fittings are warranted tobe free of manufacturing defects.
To obtain warranty service, contact Kohler eitherthrough your Dealer or Plumbing Contractor or bywriting Kohler Co., Attn: Consumer Affairs Department,Kohler, WI 53044 U.S.A.
Some states do not allow limitations on how long animplied warranty lasts or the exclusion or limitation ofincidental or consequential damages, so this limitationand exclusion may not apply to you. This warrantygives you specific legal rights. You may also haverights which vary from state to state.
This is our exclusive written warranty.
Kohler Co., Kohler, Wisconsin 53044
Kohler Co. will, at its election repair, replace, or makeappropriate adjustment where Kohler Co. inspectiondiscloses any such defects occurring in normal usagewithin one year after installation.
Co.
Kohler Co. is notresponsible for installation costs.
Implied warranties, including that ofmerchantability and fitness for a particular purpose,are expressly limited in duration to the duration of
this warranty. To the extent permitted by law,Kohler Co. disclaims all implied warrantiesincluding merchantability and fitness for aparticular purpose. Kohler Co. disclaims anyliability for special, incidental, or consequentialdamages.
LIMITED ONE-YEAR WARRANTYLIMITED ONE-YEAR WARRANTY
-12-1078530-K02-C

SHORTEN IN-WALL TANKK-6288T/K-6287IN-NA
OVE
-13-
Service Parts
1045070G12 Filter
KL01
KL02
KL03
KL05
KL06
KL04
1059145Filter Connection1045071G06 Valve1045072Tank Inlet Connection1045073Washer1045074Locknut
1059146Tank, Top
1059147Paster, Front
1059148Wrap
1059149Paster, Rear
1059668Cap
1059150Tank, Bottom
1059151Bracket, Right
1059152Bracket, Left
1059153Tank, Carve
1111013Melt Seal
1045140Rubber Gasket
1045142Outlet Pipe
1045092Rubber Gasket
1045143Plug, Small
1059154Pipe
1045129Joint Nut
1045096747 Side Fill Valve
1059155Hook, Left
1059156Hook, Right
1111019Tundish
1059157P60A Flush Valve
1045102Rubber Gasket
1045081Expanding Bolt Cap
1078341 Fixing Frame Assembly
1045161Washer1045082Self-tapping Screw1045080Washer1051401Screw A
1078342Fixing Frame
1078530-K02-C

SHORTEN IN-WALL TANKK-6287IN-F-NA
OVE
Service Parts
-14-
1045070G12 Filter
KL01
KL02
KL03
KL05
KL06
KL04
1059145Filter Connection1045071G06 Valve1045072Tank Inlet Connection1045073Washer1045074Locknut
1059146Tank, Top
1059147Paster, Front
1059148Wrap
1059149Paster, Rear
1059668Cap
1059150Tank, Bottom
1059151Bracket, Right
1059152Bracket, Left
1045138O Ring
1045088Connection Pipe
1111013Melt Seal
1045137 Tank Outlet Pipe
1045140Rubber Gasket
1045139Adjustment Pipe
1045142Outlet Pipe
1045092Rubber Gasket
1045143Plug, Small
1059154Pipe
1045129Joint Nut
1045096747 Side Fill Valve
1059155Hook, Left
1059156Hook, Right
1111019Tundish
1059157P60A Flush Valve
1045102Rubber Gasket
1045081Expanding Bolt Cap
1078341 Fixing Frame Assembly
1045161Washer1045082Self-tapping Screw1045080Washer1051401Screw A
1078342Fixing Frame
1078530-K02-C

SHORTEN IN-WALL TANKK-6288T/K-6287IN-NA/K-6287IN-F-NA
OVE
Service Parts
-15-
1059169Fixation Shank
1059170Location Panel
1059172Push Bar
1059132Spring
1059133ST3 X 8 Screw
1059134Fixation Cover
1059137Cover
1045119Screw
1059166Roof Panel
1059167ST3.5 Screw
1059168Square Mask
1059136Big Push Button
1059159Clip
1059158Location Block
1059160Push Arm
1059161Location Piece
1059162Tank Bracket
1059163Small Push Pole
1059164Screw Sheath
1059165Big Push Pole
Big Push Arm1065474
Small Push Arm1065473
1065472Foam Baffle
1059135Small Push Button
1053792Cap
1053793Rubber Gasket
1084328PE Outlet Pipe
1053796Elow Rubber Gasket
KL11
KL10
KL09KL07
KL08
1045170Outlet Pipe, Rear
1045171Rubber Gasket
Straight Outlet Pipe System
1045172Outlet Pipe, Front
1045173Outlet Pipe
1045174Rubber Gasket1045175Plug, Big
1078530-K02-C