Embed Size (px)
Citation preview

INFINITI PLUS Analyzer Operator’s Manual
EM-34041 Rev. G (CO 3943, March 2017) Page 1 of 39
INFINITI® PLUS Analyzer Operator’s Manual
For In Vitro Diagnostic Use
Manufactured by AutoGenomics, Inc., 1600 Faraday Avenue, CA USA 92008
Authorized EU Agent: Medical Device Safety Service GmbH (MDSS)
Schiffgraben 41, 30175 Hannover, Germany
INFINITI PLUS Analyzer Operator’s Manual
EM-34041 Rev. G (CO 3943, March 2017) Page 2 of 39
CONTENTS
CAUTION AND SAFETY WARNINGS ------------------------------------------------------------------ 4
EQUIPMENT MAINTENANCE---------------------------------------------------------------------------- 5
WARRANTY AND ASSISTANCE--------------------------------------------------------------------------6
TRAINING------------------------------------------------------------------------------------------------------- 6
1 INTRODUCTION ----------------------------------------------------------------------------------- 7
1.1 Intended Use
1.2 INFINITI® PLUS Analyzer
1.3 BioFilmChip® Magazine
1.4 Intellipac® Reagent Module
2 INFINITI® PLUS ANALYZER SPECIFICATIONS---------------------------------------- 10
2.1 Reagent Management Module (Pipetting System)
2.2 Processor
2.3 Optical System
3 INSTALLATION REQUIREMENTS----------------------------------------------------------- 11
3.1 Environmental Requirements
3.2 Space Requirements
3.3 Electrical Requirements
4 OPERATION FLOW------------------------------------------------------------------------------- 12
4.1 INFINITI PLUS® Analyzer Operation
4.2 Optical Measurement
4.3 Continuous Access
5 OPERATING SOFTWARE----------------------------------------------------------------------- 13
6 DIRECTIONS FOR USE--------------------------------------------------------------------------- 14
6.1 INFINITI PLUS® Analyzer Shutdown
6.2 Start Up
6.3 INFINITI PLUS® Analyzer Initialization
6.4 Main Screen Menu Description
6.5 WORKLIST

INFINITI PLUS Analyzer Operator’s Manual
EM-34041 Rev. G (CO 3943, March 2017) Page 3 of 39
6.6 Unloading, Loading and Editing Inventory
6.6.1 Pipette Tip Box
6.6.2 Waste Tray
6.6.3 Sample Tray
6.6.4 Intellipac Reagent Tray
6.6.5 Buffer Bottles
6.6.6 BioFilmChip Magazine
6.7 Start the Run
6.7.1 Status
6.8 End of Run
6.9 Results
7 MESSAGE DISPLAY------------------------------------------------------------------------------ 36
8 OPTICS CALIBRATION------------------------------------------------------------------------- 37
9 ROUTINE MAINTENANCE---------------------------------------------------------------------- 38
9.1 Lid Cleaning Procedure
9.2 Daily
9.3 Weekly
9.4 Monthly
10 DISPOSAL--------------------------------------------------------------------------------------------- 39

INFINITI PLUS Analyzer Operator’s Manual
EM-34041 Rev. G (CO 3943, March 2017) Page 4 of 39
US: The INFINITI PLUS Analyzer is cleared when used with FDA cleared assays.
EU: The INFINITI PLUS Analyzer is CE-marked.
CAUTION AND SAFETY WARNINGS
Danger Before opening the INFINITI
® PLUS Analyzer, turn the main power switch OFF and remove the power
cable from the power outlet.
Do not replace components or attempt any repair with the INFINITI PLUS Analyzer switched ON.
Do not operate the INFINITI PLUS Analyzer in an atmosphere containing explosive gases; components of
the INFINITI PLUS Analyzer could possibly generate sparks.
Caution Read the INFINITI PLUS Analyzer Operator's Manual. Failure to follow directions for use could result in
erroneous and/or misdiagnosis.
If the INFINITI PLUS Analyzer is used in a manner not described in this manual, the protection provided
by the equipment may be impaired.
The INFINITI PLUS Analyzer is ONLY for use with AutoGenomics assays.
Follow the package Insert for the specific assay for operations/steps outside of the INFINITI PLUS
Analyzer.
Avoid spilling fluid on or into the INFINITI PLUS Analyzer at any time. Spills should be wiped up
promptly.
When working with biological samples, all accessible parts of the INFINITI PLUS Analyzer must be
considered bio-hazardous. The pipette tip trays, sample tray and the waste drawer should be routinely
disinfected.
Follow Universal Precautions when handling all samples. Wear safety equipment or clothing such as
gloves, safety glasses, and lab coats when working with biological samples in and around the equipment.
INFINITI PLUS Analyzer Operator’s Manual
EM-34041 Rev. G (CO 3943, March 2017) Page 5 of 39
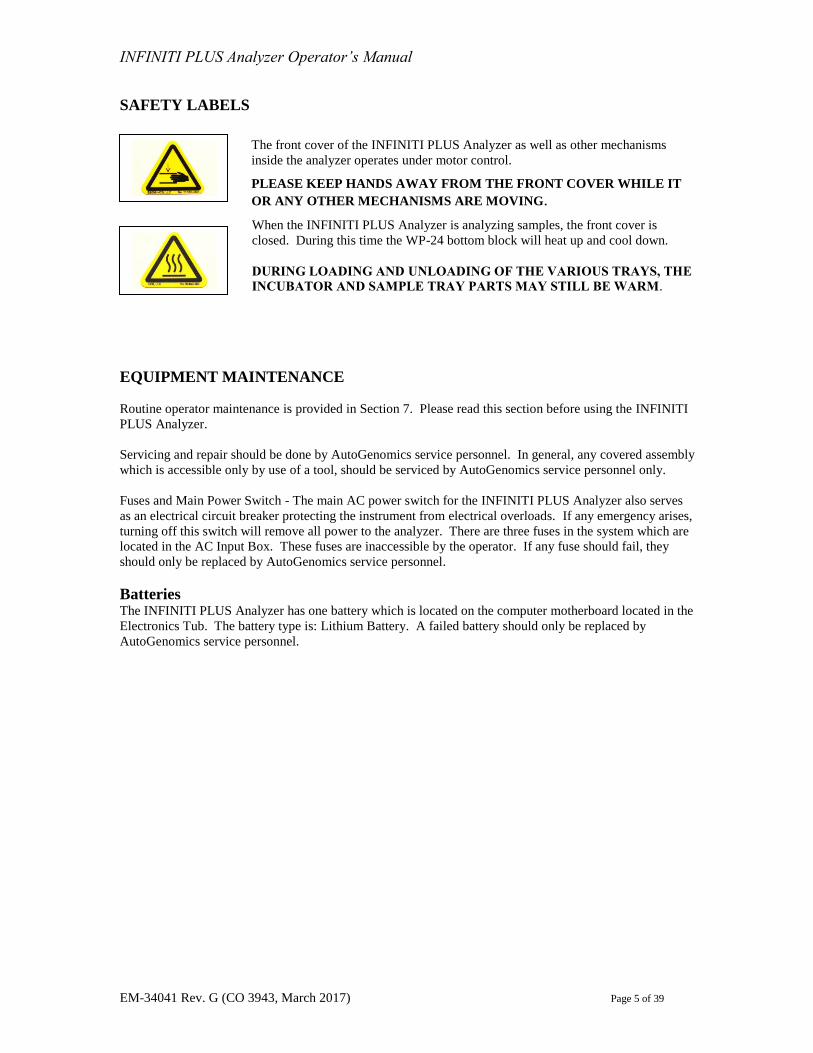
SAFETY LABELS
The front cover of the INFINITI PLUS Analyzer as well as other mechanisms
inside the analyzer operates under motor control.
PLEASE KEEP HANDS AWAY FROM THE FRONT COVER WHILE IT
OR ANY OTHER MECHANISMS ARE MOVING.
When the INFINITI PLUS Analyzer is analyzing samples, the front cover is
closed. During this time the WP-24 bottom block will heat up and cool down.
DURING LOADING AND UNLOADING OF THE VARIOUS TRAYS, THE
INCUBATOR AND SAMPLE TRAY PARTS MAY STILL BE WARM.
EQUIPMENT MAINTENANCE
Routine operator maintenance is provided in Section 7. Please read this section before using the INFINITI
PLUS Analyzer.
Servicing and repair should be done by AutoGenomics service personnel. In general, any covered assembly
which is accessible only by use of a tool, should be serviced by AutoGenomics service personnel only.
Fuses and Main Power Switch - The main AC power switch for the INFINITI PLUS Analyzer also serves
as an electrical circuit breaker protecting the instrument from electrical overloads. If any emergency arises,
turning off this switch will remove all power to the analyzer. There are three fuses in the system which are
located in the AC Input Box. These fuses are inaccessible by the operator. If any fuse should fail, they
should only be replaced by AutoGenomics service personnel.
Batteries The INFINITI PLUS Analyzer has one battery which is located on the computer motherboard located in the
Electronics Tub. The battery type is: Lithium Battery. A failed battery should only be replaced by
AutoGenomics service personnel.

INFINITI PLUS Analyzer Operator’s Manual
EM-34041 Rev. G (CO 3943, March 2017) Page 6 of 39
WARRANTY AND ASSISTANCE
Warranty AutoGenomics warrants that the INFINITI PLUS Analyzer shall meet the required performance
specifications to perform the assays as described in the operator’s manual for a time period of twelve (12)
months from the unit installation date. The extent of AutoGenomics’ liability under this warranty is limited
to repairing or at the discretion of AutoGenomics, replacing a defective INFINITI PLUS Analyzer. The
foregoing warranty shall not apply:
(a) if the INFINITI PLUS Analyzer is not used and/or maintained in accordance with the guidelines and
procedures set forth in this operator’s manual;
(b) if the INFINITI PLUS Analyzer is used with reagents and supplies not expressly authorized by
AutoGenomics;
(c) if the INFINITI PLUS Analyzer is repaired or altered by a party other than AutoGenomics without
AutoGenomics prior written approval;
(d) if the operator has installed commercial or non-AutoGenomics software on the analyzer; or
(e) if the INFINITI PLUS Analyzer has been subject to misuse, negligence, or accident.
THE FOREGOING WARRANTIES ARE IN LIEU OF ALL OTHER WARRANTIES, EXPRESS OR
IMPLIED, ARISING BY OPERATION OF LAW OR OTHERWISE, INCLUDING, WITHOUT
LIMITATION, THE IMPLIED WARRANTIES OF MERCHANTABILITY, FITNESS FOR A
PARTICULAR PURPOSE, AND NONINFRINGEMENT AND THOSE ARISING FROM COURSE OF
DEALING OR USAGE OR TRADE.
To request for service or for technical assistance, call AutoGenomics Tech Support:
Toll Free Number: 1-866-STAT MDx (1-866-782-8639)
Or 760-477-2248 between 8:00 am to 5:00 pm Pacific Standard Time
Website: www.AutoGenomics.com
TRAINING
Training in the use of the INFINITI PLUS Analyzer is provided by AutoGenomics Technical Support at its
Carlsbad, CA facility. Training may also be provided by individuals trained and authorized by
AutoGenomics, and may be provided at the customer’s facility as authorized by AutoGenomics.
The AutoGenomics Training Program is typically a 3-day program which provides the trainee at a
minimum:
Background knowledge of the INFINITI® platform
Operation and function of the INFINITI® PLUS Analyzer
Hands-on training on sample preparation followed by running the assay on the INFINITI® PLUS
Analyzer
Interpretation of assay report and results
Maintenance and troubleshooting
INFINITI PLUS Analyzer Operator’s Manual
EM-34041 Rev. G (CO 3943, March 2017) Page 7 of 39
1 Introduction
1.1 Intended Use
The INFINITI PLUS Analyzer is an upgraded version of the INFINITI
PLUS Analyzer.
The intended use remains unchanged. The INFINITI PLUS Analyzer is instrumentation
used for clinical multiplex systems intended to measure and sort multiple signals from
samples. The INFINITI PLUS Analyzer is designed to measure fluorescent signals of
labeled DNA target hybridized to BioFilmChip® microarrays. The INFINITI PLUS
Analyzer automates the assay and integrates all the discrete processes of sample (PCR
amplicon) handling, reagent management, hybridization, detection, and results analysis.
The assays are processed automatically and read by the built-in confocal microscope.
Results are analyzed and presented as genotype calls.
1.2 INFINITI® PLUS Analyzer
The INFINITI PLUS Analyzer is an upgraded version of the INFINITI PLUS Analyzer.
The INFINITI PLUS Analyzer was modified to increase throughput to meet the demands
of high-volume laboratories.
This section of the operator’s manual provides a full description of the INFINITI PLUS
Analyzer and is very similar to the section in the INFINITI PLUS Analyzer Operator’s
Manual. The INFINITI PLUS Software Manual can be found from the Qmatic screen
(INFINITI screen) under HELP by clicking Qmatic Help.
The bench top INFINITI PLUS Analyzer is completely self-contained and automates all
processes for genomic analysis or detection of viral or bacterial nucleic acid following
sample preparation. The INFINITI PLUS Analyzer generates fluorescent labeled DNA
which hybridizes to oligonucleotides arrayed on BioFilmChip® microarrays. The
INFINITI PLUS Analyzer automates and integrates all the discrete steps of the chosen
assay including sample (PCR amplicon) handling, reagent management, hybridization,
detection, and results analysis. Results are analyzed and presented as genotype calls.
The INFINITI PLUS Analyzer has two main components: reagent management and
optics modules. A variety of electronic components inside the instrument are used for its
operation. These include multiple stepper motors, heating and cooling devices, a barcode
reader, and a camera--all connected to USB ports.
Reagent Management Module The reagent management module performs all the operations related to the dispensing
and aspiration of reagent and the processing of the amplified sample to be dispensed on
the microarray. When the sample has been processed and hybridized to the microarray, it
is transferred to the optics module for scanning and reading. Optics Module
The optics module is comprised of a 3-axis stage and a camera. It is the enclosed
casement into which the microarray is transported automatically after being processed on
the stringency station. The optics’ stage follows X-Y-Z motions that are stepped at a
very precise rate. Using excitation wavelengths of 760nm, the camera takes a picture for
each registration spot of a fluorescent dye. Analysis of these pictures allows the
determination of the location of three registration spots. With respect to the position of
the three registration spots, coordinates of all the bio-spots can be calculated. While
scanning, the stage moves along the Z-axis to focus the chip and the X and Y-axes to
locate the individual spots on the microarray.

INFINITI PLUS Analyzer Operator’s Manual
EM-34041 Rev. G (CO 3943, March 2017) Page 8 of 39
QMATIC® Operating Software
The INFINITI PLUS Analyzer hardware is controlled by the Qmatic® operating software,
which is installed within the on-board computer and utilizes a LCD screen display. The
INFINITI PLUS Analyzer modules are controlled by multitasking real time software.
The operator specifies the sample locations and clicks “Run.” Results are available for
review via the LCD screen. The operator can also print the displayed results (printer is
not included with INFINITI® PLUS Analyzer).
The Qmatic® operating software has a schedule manager that is capable of controlling all
operations of the INFINITI PLUS Analyzer such as assay protocol, fluid handling,
robotics, optical detection and result analysis.
The INFINITI PLUS Software Manual can be found on the INFINITI Plus in the Qmatic
screen (INFINITI screen) under HELP by clicking Qmatic Help.
Consumables
The following are INFINITI PLUS Analyzer consumables which can be replenished
when required.
48 well plates (48WP), cat# 11-0100-00: 10 plates /pack used for processing and
storing of up to 48 different samples. Get 5 packs/case.
24 well plates (24WP) silicone lids (need 2 ea. for 48WP), cat#11-0030-00: 10 lids
/pack used for thermocycling processing and storing of up to 24 different samples.
Get 5 packs/case.
Reusable Silicone Lid, cat# 11-0110-00, 48WP Lids, 1 each, used to cover samples
during INFINITI PLUS use.
Disposable tips, cat # 11-0010-00: Six trays containing 126 tips each/pack. Get 6
packs per case.
Buffer, cat # 12-0330-00: Stored in four bottles of 125 ml each. Some assays may
call for other specific buffers.
Waste tray liners, cat# 11-0020-00: Twenty five plastic liner that collects all used
tips and microarrays.
Tip Barrel Plugs, cat # 110070-00, prevent liquid from entering the nozzle. 12 each
in a pack.
Stir Bars, cat # 11-0060-00, 5 ea./pack.
BioFilmChips: These are assay specific.
Intellipac Reagent Modules: These are assay specific.
INFINITI PLUS Analyzer Operator’s Manual
EM-34041 Rev. G (CO 3943, March 2017) Page 9 of 39
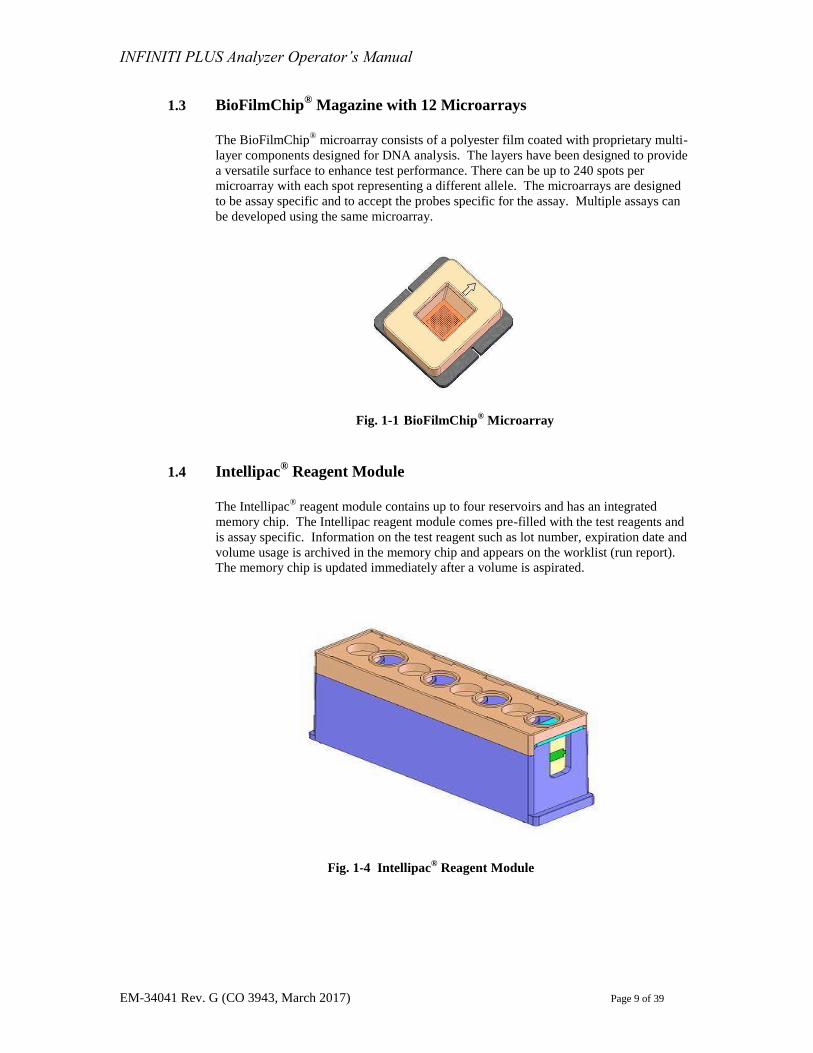
1.3 BioFilmChip® Magazine with 12 Microarrays
The BioFilmChip
® microarray consists of a polyester film coated with proprietary multi-
layer components designed for DNA analysis. The layers have been designed to provide
a versatile surface to enhance test performance. There can be up to 240 spots per
microarray with each spot representing a different allele. The microarrays are designed
to be assay specific and to accept the probes specific for the assay. Multiple assays can
be developed using the same microarray.
Fig. 1-1 BioFilmChip
® Microarray
1.4 Intellipac® Reagent Module
The Intellipac
® reagent module contains up to four reservoirs and has an integrated
memory chip. The Intellipac reagent module comes pre-filled with the test reagents and
is assay specific. Information on the test reagent such as lot number, expiration date and
volume usage is archived in the memory chip and appears on the worklist (run report).
The memory chip is updated immediately after a volume is aspirated.
Fig. 1-4 Intellipac
® Reagent Module
INFINITI PLUS Analyzer Operator’s Manual
EM-34041 Rev. G (CO 3943, March 2017) Page 10 of 39
2 INFINITI® ANALYZER SPECIFICATIONS
2.1 Reagent Management Module (Pipetting System)
Equipment Type: Automated genomic system in continuous-flow.
Modes of Operation: Simultaneous random and continuous access processing of genomic
samples.
Incubation temperature: 39°C (±0.5°)
Stringency temperature: 40°C (±1.5°)
Throughput: 48 tests/run
Waste drawer capacity: Sufficient for waste materials for processing 48 samples
Reagent tray capacity: Four modules with four wells each
Maximum storage capacity of reagent well: 2.7 ml
Sample tray capacity: A 48WP and two bottles of buffer
Maximum storage capacity of each sample well: 0.35 ml
Maximum storage capacity of each buffer bottle: 30 ml
Disposable tip tray capacity: 4 boxes
Reagent volume requirement: > 200 µl dead volume required by assay
Automatic pipettor: 15 μl to 100 μl
2.2 Processor: Minimum Specification
Mac OS-X operating system/ computer with the following minimum requirements:
1 GHz CPU
1 GB RAM
160 GB HDD
Bluetooth keyboard and mouse
3 USB ports
Ethernet port
Other Information:
15” LCD screen (1024 x 768)
Recommended Printer (not supplied with INFINITI PLUS Analyzer):
HP LaserJet 1022 - USB connection.
2.3 Optical System
Main detector: Camera
Red LED, 632.8nm
Emission Filter: 590nm and 700nm
Image size: 1200µm×1200µm
INFINITI PLUS Analyzer Operator’s Manual
EM-34041 Rev. G (CO 3943, March 2017) Page 11 of 39
3 Installation Requirements
Upon receiving the INFINITI PLUS Analyzer, inspect the exterior of the shipping container for any
damages. If there is obvious exterior damage to the container, notify your shipping department and
contact AutoGenomics customer service immediately.
An authorized representative from AutoGenomics must install the INFINITI PLUS Analyzer. Prior
to the representative’s arrival, ensure the following requirements are met.
3.1 Environmental Requirements
Relative Humidity: Between 35% and 85% RH
Operating Temperature: 15°C - 30°C (59°F -86°F)
Storage Temperature: 0°C - 60°C (32°F -140°F)
3.2 Space Requirement
The INFINITI PLUS Analyzer should be installed on a flat, non-flexing table top.
The instrument dimensions are:
Length: 44 in (111.76 cm)
Depth: 25 in (63.5 cm)
Height: 25 in (63.5 cm)
Weight: 275 lb. (124.74 kg) approximately
Allow at least 24 inches (61cm) of clearance on all sides and top of the INFINITI PLUS
Analyzer. Also allow at least 4 inches (10.2 cm) clearance in back of the INFINITI PLUS
Analyzer to ensure proper cooling.
Note:
Reserve a level and solid bench-top space with a minimum of 24 inches clearance on
the sides and top and 4 inches at the back of the instrument. All six of the supporting
feet of the INFINITI PLUS Analyzer must be resting on the bench top.
3.3 Electrical Requirements
The INFINITI PLUS Analyzer must be operated with the following power specifications:
Input Voltage: 100-240 VAC
Dedicated line 15A minimum
Circuit Breaker: 12 amp (on/off switch)
Frequency: 47-63 Hz
Input Power: 1000 VA
EMI: Complies with FCC Part 15 Class A requirements
The INFINITI PLUS Analyzer can be used with a (main) power voltage of 100-240 VAC
(47-63 Hz). Check the voltage and current requirements shown on the S/N label located
at the rear of the instrument. Verify that the power outlet has sufficient current and will
not be overloaded when the INFINITI PLUS Analyzer is connected. It is recommended,
but not mandatory, that the INFINITI PLUS Analyzer be plugged into a wall outlet
having its own separate circuit breaker that is not shared with other equipment.
Always plug the INFINITI PLUS Analyzer into a grounded outlet.

INFINITI PLUS Analyzer Operator’s Manual
EM-34041 Rev. G (CO 3943, March 2017) Page 12 of 39
Warning: Only an authorized representative of AutoGenomics is authorized to install
the INFINITI PLUS Analyzer. The warranty agreement may be declared void if the
instrument is installed by an unauthorized person.
4 Operation Flow
The INFINITI PLUS Analyzer is a fully automated system offering genotyping and / or viral or
bacterial nucleic acid detection. The PCR amplicons are automatically processed to generate
probes which are pipetted onto the appropriate BioFilmChip microarray. After hybridization of
probes to oligonucleotides on the microarray, the BioFilmChip is washed and scanned. The
microarray information is then processed by software that displays easy to interpret results.
4.1 INFINITI PLUS Analyzer Operation
To operate the INFINITI PLUS Analyzer, the operator loads pipette tips, the sample plate
containing the amplified DNA or cDNA samples, reagent packs, buffer, and magazines,
containing the BioFilmChip® microarrays as directed on the INFINITI
PLUS Analyzer
dropdown menus. Following a series of reagent and volume checks performed by the
INFINITI PLUS Analyzer, the operator is directed to the worklist where the sample name
is entered. A unique identification, comprised of operator-entered information plus date
and time, is attached to each worklist sample identifier (ID) in order to distinguish one
run from another. For simplified sample ID entry, a bar-code reader may be used to enter
sample IDs.
Once the worklist is submitted, all pipetting, detection primer extension, hybridization,
washing, drying, scanning, and result display are completed without manual intervention.
The INFINITI PLUS Analyzer run begins by pushing the required number of microarrays
from the magazine into the incubator. This is followed by pipetting of Analyte Specific
reagent mix that contains primers and fluorescent nucleotide into the sample wells using
an individual tip for each sample. Then the samples are subjected to 40 thermocycling
steps which allow for detection primer extension. Following thermocycling:
The pipettor moves to pick up a new pipette tip, and dispenses hybridization
buffer into the extended and labeled primer reaction.
The pipettor moves to pick up a new pipette tip, and dispenses reaction mixture
onto the microarray.
The microarrays are incubated allowing extended labeled primer to anneal to
oligonucleotide spots on the microarray.
The microarrays are washed to remove unbound primer and unincorporated
label.
The pipettor adds and removes wash buffer from the microarray.
The microarray is transferred to the stringency station to undergo a drying
phase.
The microarray is then transferred to the optics station.
The optics stage moves such that the individual fluorescent spots can be located
and scanned.
The pusher arm then retrieves the microarray and places it on the stringency
station and causes the microarray to fall down the chute and into the waste
compartment.
INFINITI PLUS Analyzer Operator’s Manual
EM-34041 Rev. G (CO 3943, March 2017) Page 13 of 39
Results are analyzed by Qmatic® Software, and are displayed showing the sample’s
genotype. Alternatively, in diagnostic tests, the results page displays viral or bacterial
genetic material that has been detected.
4.2 Optical Measurement
From the stringency station, the microarray is pushed through the open optics door for
registration on the 3-axis stage. There are three registration spots at different positions on
the microarray. The coordinates of the three registration spots are calculated from the
camera’s images. The time required for registration of all three spots is less than 20
seconds. Using the registration spot coordinates as map-points, the coordinates of all 240
spots are computed.
4.3 Continuous Access
The continuous access feature allows the operator to access specific features on the
INFINITI PLUS Analyzer at virtually all times. Even while assays are in progress, the
operator can access results. The INFINITI PLUS Analyzer is designed to operate in a
random access manner. Random access permits the ability to run 48 microarrays
simultaneously to accommodate 48 different patient samples.
5 Operating Software
The INFINITI® operating software is a multitasking application that runs under the Mac OS-X
operating system software and uses a graphical user interface (GUI).
The operating software identifies samples, queries which assays are to be run, and integrates all
discrete processes of sample handling, reagent management, hybridization, and identification of the
genotype(s). During sample processing, the INFINITI PLUS Analyzer can deliver results of
already scanned microarrays.

INFINITI PLUS Analyzer Operator’s Manual
EM-34041 Rev. G (CO 3943, March 2017) Page 14 of 39
6 DIRECTION FOR USE
Definitions:
Cover: Opens and closes the instrument cover for adding or removing consumables to the instrument.
Inventory: Accesses the inventory menu for editing the amount and type of reagents, tips, buffers and
microarray magazines loaded on the instrument.
Worklist: Accesses the “worklist” menu to select and submit assays and samples to the INFINITI PLUS
Analyzer.
Status Screen: Displays the progress of assays, as well as temperatures, in various sections of the
instrument. The status of disposables in the INFINITI PLUS Analyzer can also be viewed.
Results: Displays a chronological storage of various sample results along with sample ID, assay and the
reagents used.
Error: Displays errors for rejection or abnormal shutdown of the instrument.
Help: Provides help on all operating software topics.
Exit: Allows the operator to exit the main screen menu and the operating software.
6.1 INFINITI PLUS Analyzer Shutdown
The system power should not be exited or turned off, as salts would crystallize in the nozzle. If the
power is required to turn off during a run, then it should immediately be turned back on and the INFINITI
PLUS Analyzer system should be started following the instructions. In the Idle state, the system primes
automatically every 36 hours. It uses 500 L of wash buffer every time it primes.
To Shutdown:
If there is a need for the INFINITI PLUS Analyzer to be shutdown, then exit the INFINITI PLUS Analyzer
software and then shutdown the computer. Turn the power off to the instrument by switching off the power
switch on the right side of the instrument.
Note: A message will be shown if the operator tries to shut down the machine while the microarray is
still in process, or in the optics station.
Click “OK” to shut down the system anyway or “Cancel” to continue operation.
Do not shutdown the system during microarray processing. May sure that the button is green
[IDLE] and not red [BUSY].
INFINITI PLUS Analyzer Operator’s Manual
EM-34041 Rev. G (CO 3943, March 2017) Page 15 of 39
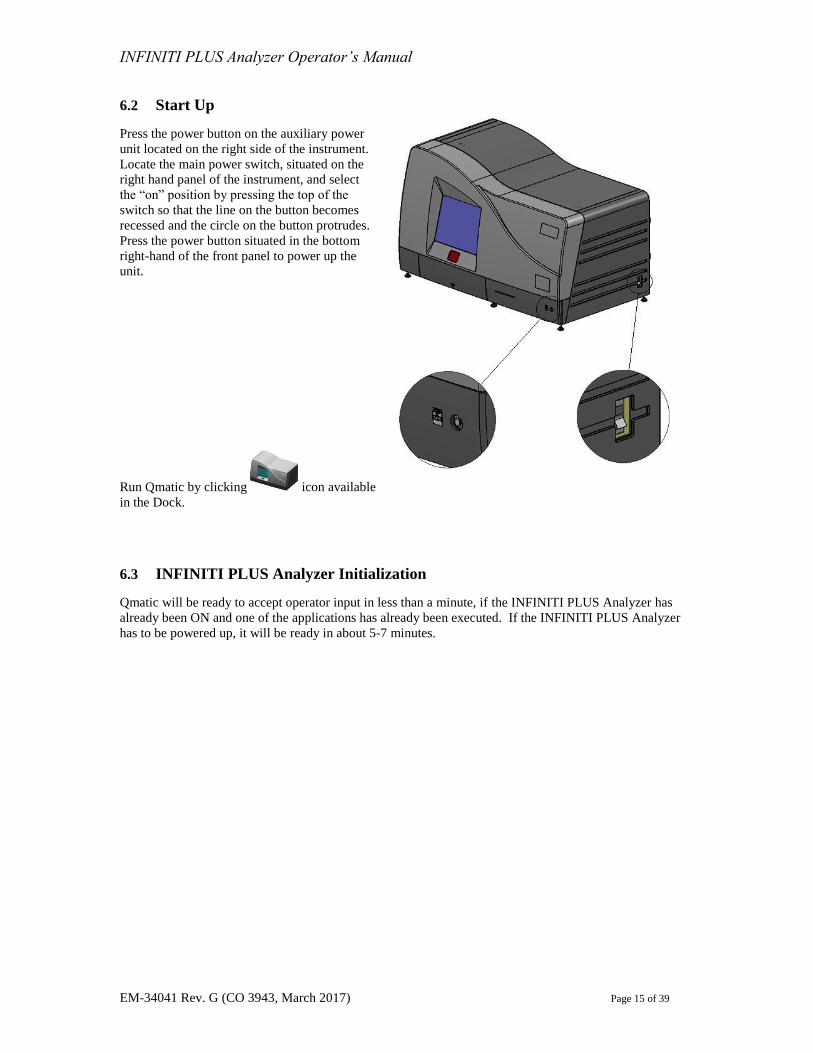
6.2 Start Up
Press the power button on the auxiliary power
unit located on the right side of the instrument.
Locate the main power switch, situated on the
right hand panel of the instrument, and select
the “on” position by pressing the top of the
switch so that the line on the button becomes
recessed and the circle on the button protrudes.
Press the power button situated in the bottom
right-hand of the front panel to power up the
unit.
Run Qmatic by clicking icon available
in the Dock.
6.3 INFINITI PLUS Analyzer Initialization
Qmatic will be ready to accept operator input in less than a minute, if the INFINITI PLUS Analyzer has
already been ON and one of the applications has already been executed. If the INFINITI PLUS Analyzer
has to be powered up, it will be ready in about 5-7 minutes.
INFINITI PLUS Analyzer Operator’s Manual
EM-34041 Rev. G (CO 3943, March 2017) Page 16 of 39
6.4 Main Screen Menu Description
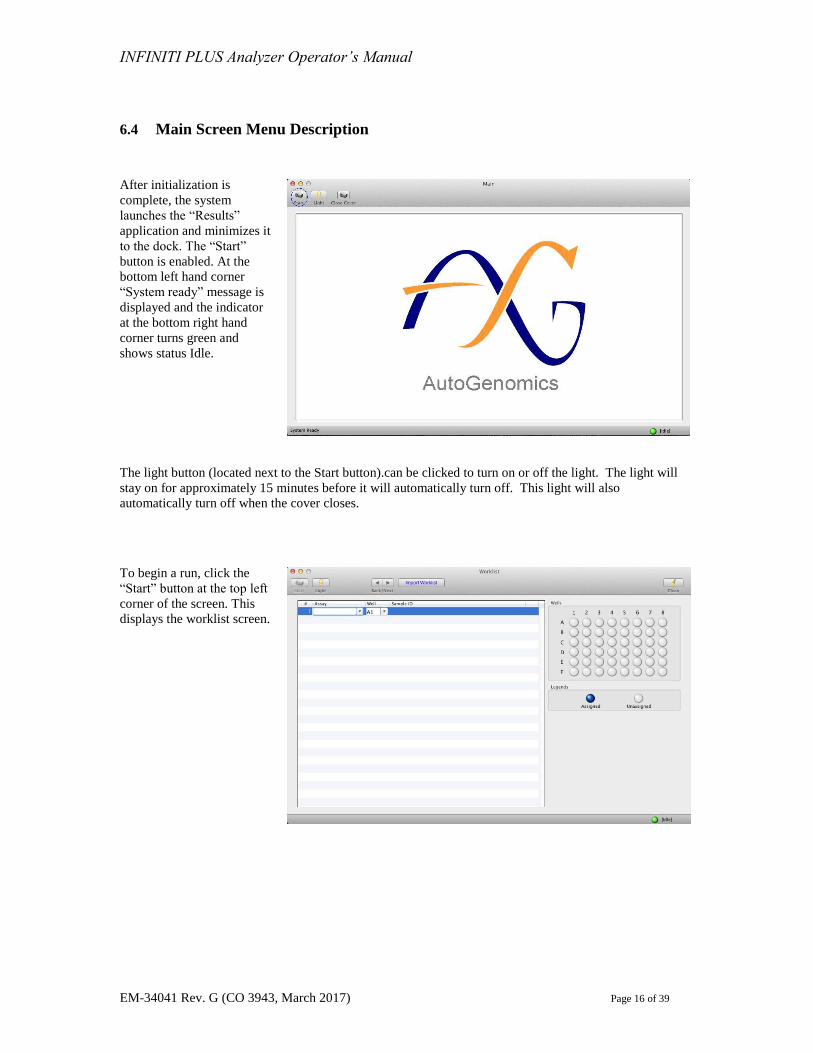
After initialization is
complete, the system
launches the “Results”
application and minimizes it
to the dock. The “Start”
button is enabled. At the
bottom left hand corner
“System ready” message is
displayed and the indicator
at the bottom right hand
corner turns green and
shows status Idle.
The light button (located next to the Start button).can be clicked to turn on or off the light. The light will
stay on for approximately 15 minutes before it will automatically turn off. This light will also
automatically turn off when the cover closes.
To begin a run, click the
“Start” button at the top left
corner of the screen. This
displays the worklist screen.

INFINITI PLUS Analyzer Operator’s Manual
EM-34041 Rev. G (CO 3943, March 2017) Page 17 of 39
6.5 WORKLIST
Select the assay you want to run
with the “Assay” drop down list.
Multi sample assays (Duplex/
Quad/ Hex) require items to be
submitted in multiple of number of
samples per micro-array without
skipping wells. (e.g. for QUAD
assays, number of worklist items is
to be in multiple of 4).
Select well number from well
dropdown list. Select consecutive
wells for multi sample assay.
Enter your Sample ID in the field
provided for each sample.
Maximum of 31 characters are
allowed in the Sample ID.
The Handheld Barcode
Scanner can also be used to
enter Sample ID. Point the
scanner on the item barcode
and click trigger button. This
saves the entry and opens a
new item for the next entry.
INFINITI PLUS Analyzer Operator’s Manual
EM-34041 Rev. G (CO 3943, March 2017) Page 18 of 39
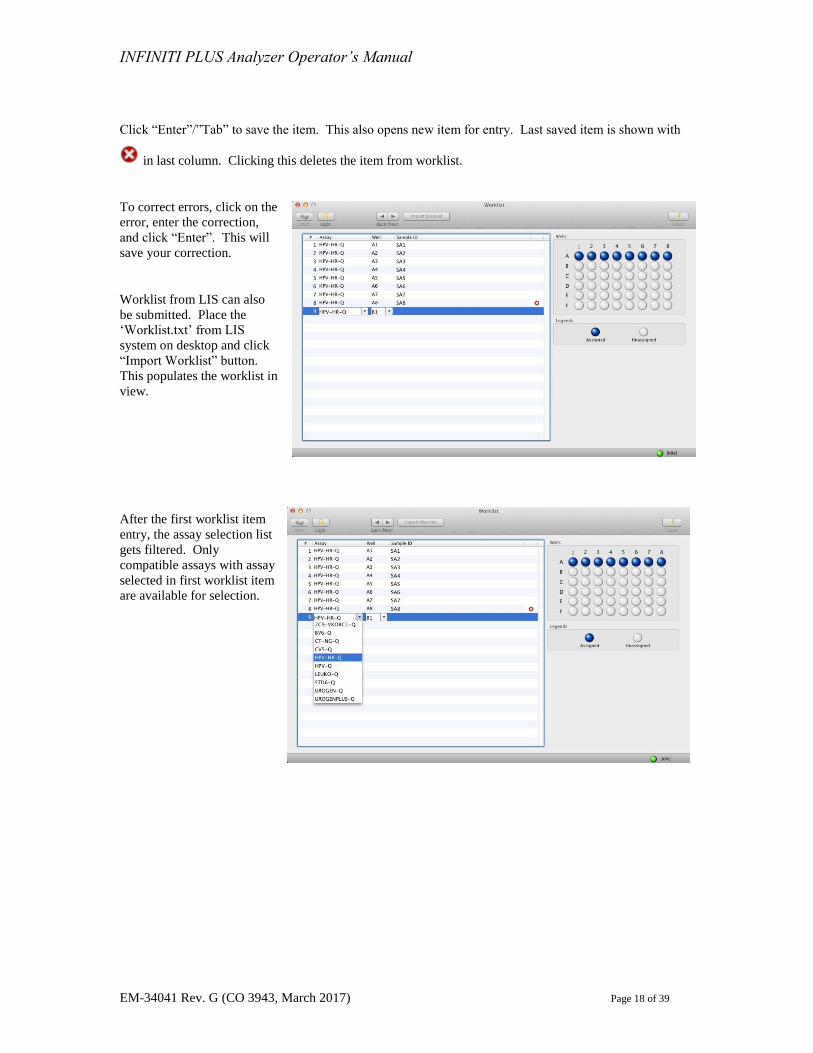
Click “Enter”/”Tab” to save the item. This also opens new item for entry. Last saved item is shown with
in last column. Clicking this deletes the item from worklist.
To correct errors, click on the
error, enter the correction,
and click “Enter”. This will
save your correction.
Worklist from LIS can also
be submitted. Place the
‘Worklist.txt’ from LIS
system on desktop and click
“Import Worklist” button.
This populates the worklist in
view.
After the first worklist item
entry, the assay selection list
gets filtered. Only
compatible assays with assay
selected in first worklist item
are available for selection.
INFINITI PLUS Analyzer Operator’s Manual
EM-34041 Rev. G (CO 3943, March 2017) Page 19 of 39
6.6 Loading & Unloading Inventory
6.6.1 Pipette Tip Box
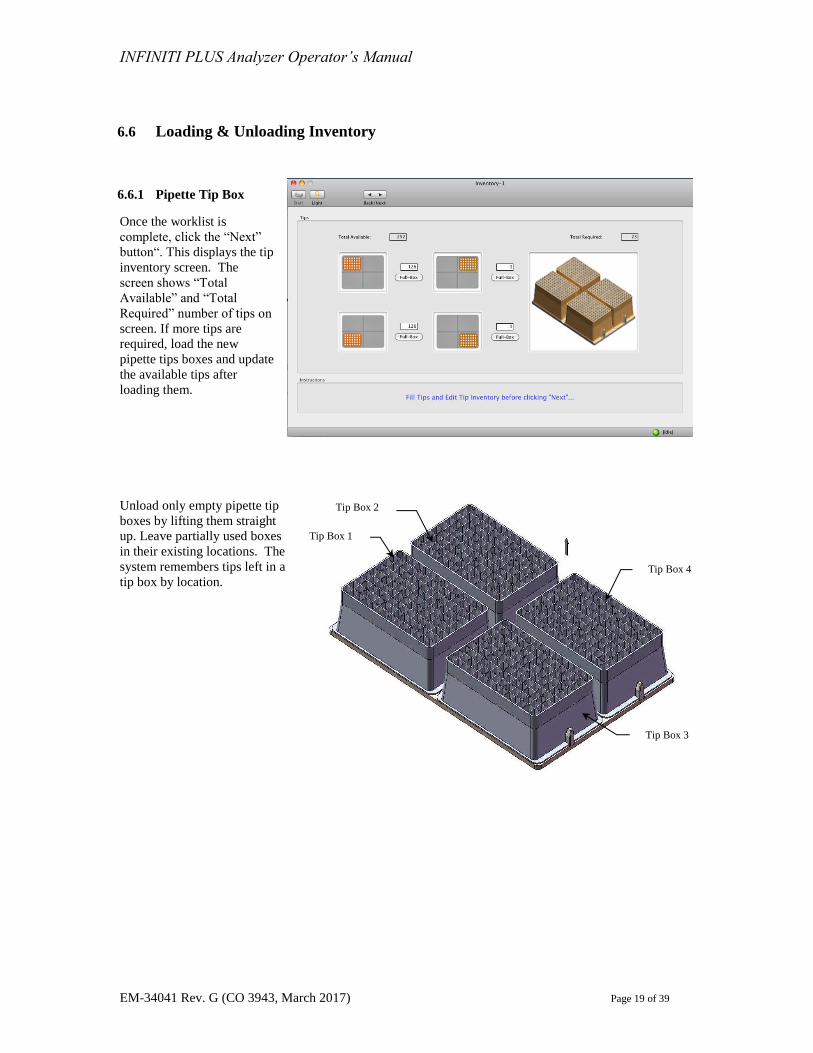
Once the worklist is
complete, click the “Next”
button“. This displays the tip
inventory screen. The
screen shows “Total
Available” and “Total
Required” number of tips on
screen. If more tips are
required, load the new
pipette tips boxes and update
the available tips after
loading them.
Unload only empty pipette tip
boxes by lifting them straight
up. Leave partially used boxes
in their existing locations. The
system remembers tips left in a
tip box by location.
Tip Box 2
Tip Box 1
Tip Box 4
Tip Box 3

INFINITI PLUS Analyzer Operator’s Manual
EM-34041 Rev. G (CO 3943, March 2017) Page 20 of 39
Load full pipette tip boxes by
lining up the two notches on the
tip box with the posts on the tray.
Click the “Full box” button when
adding a full tip box. It will
automatically change to 126 tips.
If the available tips are less than
the total tips required to process
the worklist items, load additional
tip boxes.
Click the "Next” button to fill
the Magazines, Reagent, Buffer
and Samples.
The pipette barrel plug should
be replaced after 100 samples
have been run.
6.6.2 Waste Tray
If necessary, empty the waste tray and dispose of the waste per your lab policy. Clean the stir bar and
replace waste tray liner. After cleaning, click the ‘Empty Waste’ button to update the system information
that the waste tray has been emptied.
INFINITI PLUS Analyzer Operator’s Manual
EM-34041 Rev. G (CO 3943, March 2017) Page 21 of 39
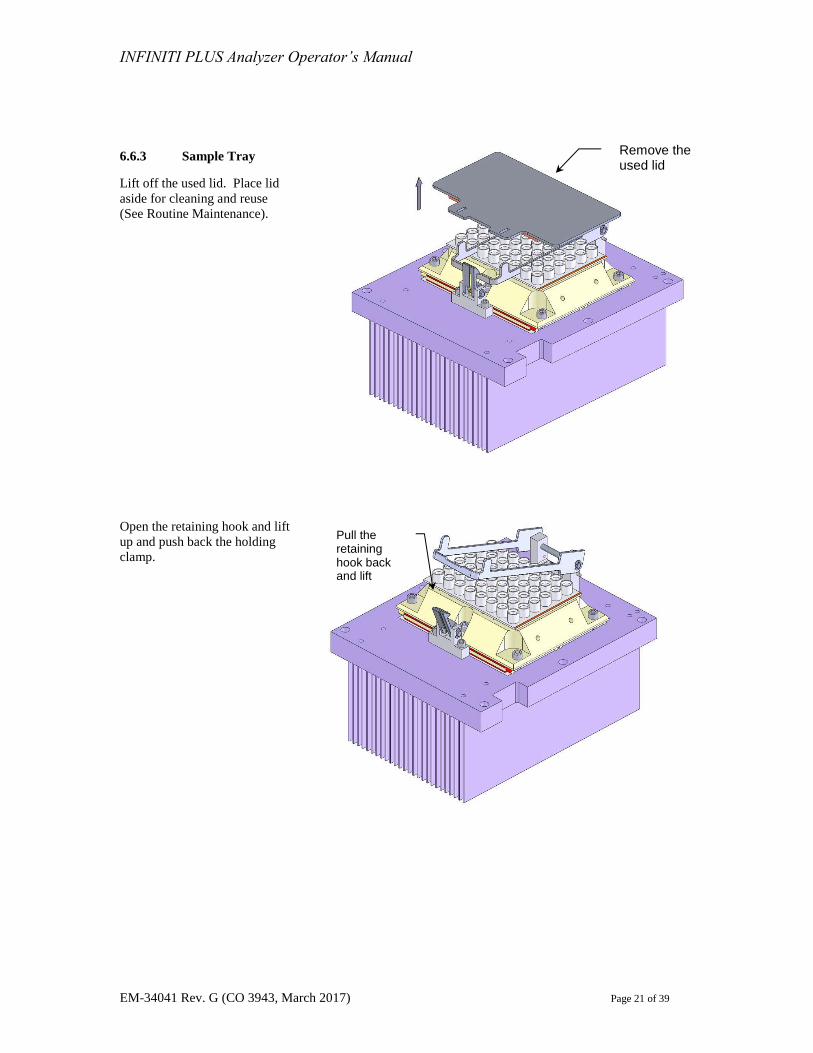
6.6.3 Sample Tray
Lift off the used lid. Place lid
aside for cleaning and reuse
(See Routine Maintenance).
Open the retaining hook and lift
up and push back the holding
clamp.
Remove the used lid
Pull the retaining hook back and lift

INFINITI PLUS Analyzer Operator’s Manual
EM-34041 Rev. G (CO 3943, March 2017) Page 22 of 39
Lift out the used sample plate, if
present, and discard the sample
plate per your lab policy.
Load a new sample
plate with the A-1 well
oriented toward the
back left of the tray.
Close the clamp by
pushing it against the
hook.
Remove used sample
plate
Load new sample plate & close.
Holding Clamp
Hook
Colored Stripe

INFINITI PLUS Analyzer Operator’s Manual
EM-34041 Rev. G (CO 3943, March 2017) Page 23 of 39
Cover the sample plate with a clean
lid. See Routine Maintenance for
the lid cleaning procedure.
6.6.4 Intellipac® Reagent Tray
Unload the used Reagent modules by
unscrewing the locking plate and
releasing the hinged bar.
Load clean lid with silicon
facing down
Unscrew locking plate
Open
Remove packs

INFINITI PLUS Analyzer Operator’s Manual
EM-34041 Rev. G (CO 3943, March 2017) Page 24 of 39
Load the reagent modules
from the left side of the tray
sequential (do not skip
positions) from position 1
(front) to 4 (back). Slide
each individual module
inside, until it touches the
right edge of the tray.
Note: Hex assays like
HPV-HR-H requires two
reagent modules for
processing. Keep these
two modules contiguously e.g. position 1 and 2, in reagent tray.
To close the loaded modules, rotate the hinged bar
back to its original position and screw in the
captive screw.
I-Button position
Insert new packs
Close Tighten screw
INFINITI PLUS Analyzer Operator’s Manual
EM-34041 Rev. G (CO 3943, March 2017) Page 25 of 39
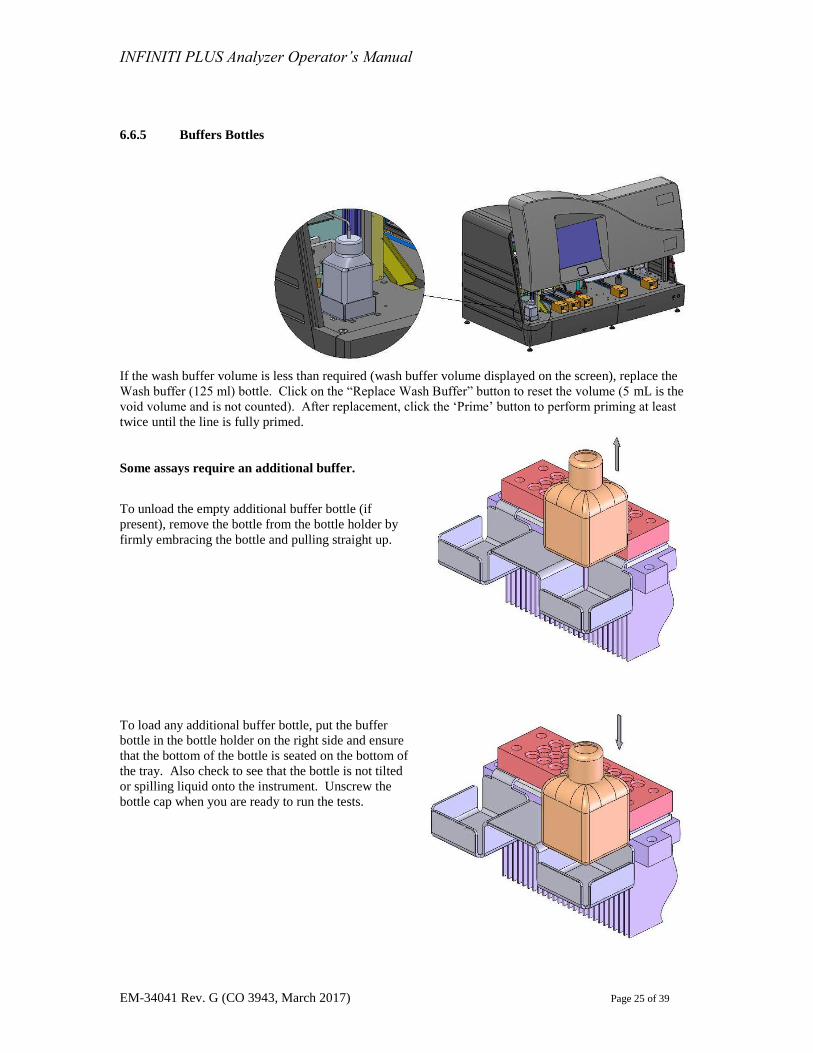
6.6.5 Buffers Bottles
If the wash buffer volume is less than required (wash buffer volume displayed on the screen), replace the
Wash buffer (125 ml) bottle. Click on the “Replace Wash Buffer” button to reset the volume (5 mL is the
void volume and is not counted). After replacement, click the ‘Prime’ button to perform priming at least
twice until the line is fully primed.
Some assays require an additional buffer.
To unload the empty additional buffer bottle (if
present), remove the bottle from the bottle holder by
firmly embracing the bottle and pulling straight up.
To load any additional buffer bottle, put the buffer
bottle in the bottle holder on the right side and ensure
that the bottom of the bottle is seated on the bottom of
the tray. Also check to see that the bottle is not tilted
or spilling liquid onto the instrument. Unscrew the
bottle cap when you are ready to run the tests.

INFINITI PLUS Analyzer Operator’s Manual
EM-34041 Rev. G (CO 3943, March 2017) Page 26 of 39
6.6.6 BioFilmChip Magazine
Remove the used magazines by carefully lifting upwards. If
the magazine is not empty, slide the sleeve downwards until
a snapping sound is heard to keep any unused chips from
falling out.
To load the magazine, place it on the magazine tray
top and slide it down inside. Ensure that the
magazine is well seated in the space by exerting
slight pressure on the magazine from the top and
wiggling back and forth. Load sequential for the
front to the back.
Lift the magazine body to unload the magazine To load, place the
new magazine on magazine tray top
Press down the magazine from top
Magazine tray with used magazines

INFINITI PLUS Analyzer Operator’s Manual
EM-34041 Rev. G (CO 3943, March 2017) Page 27 of 39
After all of the materials
have been loaded, click
“Next”.
The software checks the
available resources and
shows all the details of
Reagent, Magazine and
Buffer. The volume of
Buffer required for the
run is also shown.
If sufficient resources for
the submitted tests are not
available, the system
shows what and how
much is missing. If more
inventory is required click
the “Back” button and
resubmit the additional
inventory.
Click “Next” to start the run.
6.7 START THE RUN
At the start of the run, the
“Cover” and system status
changes to “Busy” and the idle
indicator turns red at the bottom
right hand corner.
6.7.1 Status
While the system is in process,
the operator can see the
progress and status of the
submitted tests. The status
screen displays the current
status of submitted tests.
During thermal cycling, the
temperature is displayed for
all stations along with the
number of thermal cycles
completed. It also monitors
the sample progress.

INFINITI PLUS Analyzer Operator’s Manual
EM-34041 Rev. G (CO 3943, March 2017) Page 28 of 39
In case of “chip load error”, the
cover is opened, the magazine tray
is moved to the fill position, and the
system displays the message box
Operator has to take out the
magazine as shown in message
box. He needs to count and enter
number of micro-arrays left in the
magazine.
If entered number of micro-arrays
does not match with micro-arrays in
the magazine, system displays
message to give operator one more
chance.
If same mismatch happens again,
the system displays this message
and aborts the run when the OK is
clicked.
Qmatic displays the message to let
the operator know how many
micro-arrays chips are to be loaded.
Operator will load the magazine
with the required number of micro-
arrays chips and click OK.
When the OK button is clicked, the system checks the magazine resources. The same message will be
prompted again if the correct number of microarray chips are not found. The operator can reload the
magazine again or click “Quit” to abort the run.
If the sufficient amount of resources are found, the cover will close and the run starts from where it
stopped.
INFINITI PLUS Analyzer Operator’s Manual
EM-34041 Rev. G (CO 3943, March 2017) Page 29 of 39
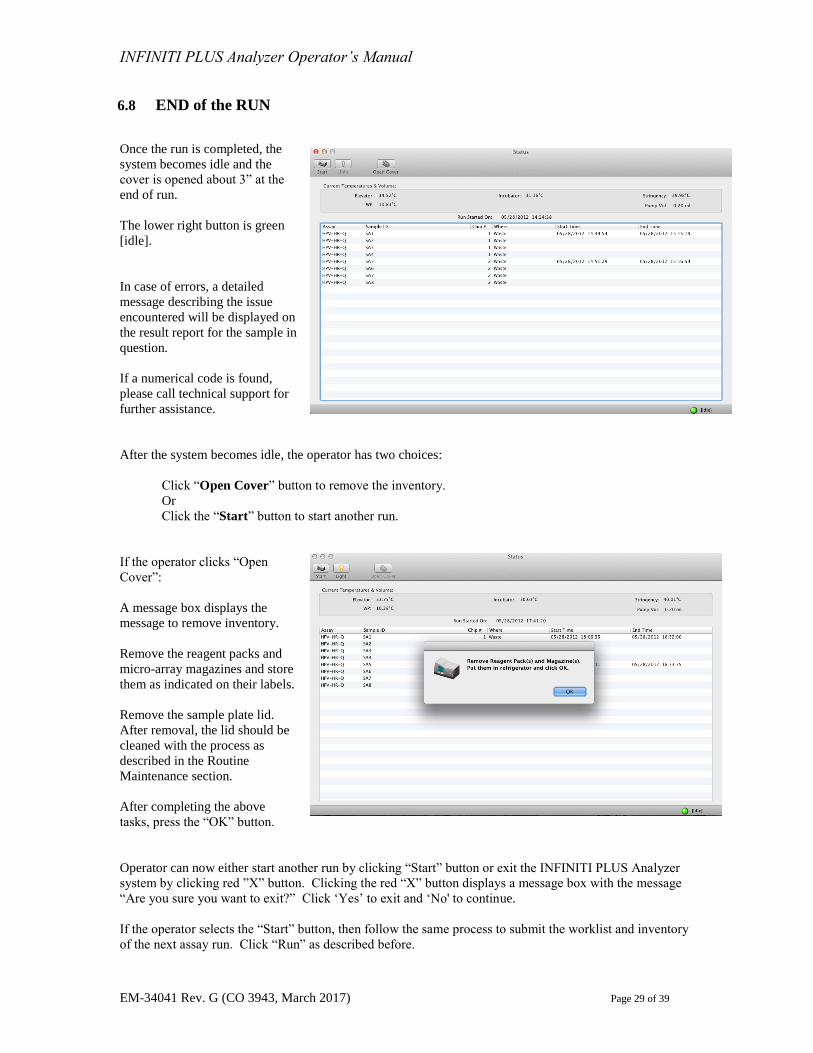
6.8 END of the RUN
Once the run is completed, the
system becomes idle and the
cover is opened about 3” at the
end of run.
The lower right button is green
[idle].
In case of errors, a detailed
message describing the issue
encountered will be displayed on
the result report for the sample in
question.
If a numerical code is found,
please call technical support for
further assistance.
After the system becomes idle, the operator has two choices:
Click “Open Cover” button to remove the inventory.
Or
Click the “Start” button to start another run.
If the operator clicks “Open
Cover”:
A message box displays the
message to remove inventory.
Remove the reagent packs and
micro-array magazines and store
them as indicated on their labels.
Remove the sample plate lid.
After removal, the lid should be
cleaned with the process as
described in the Routine
Maintenance section.
After completing the above
tasks, press the “OK” button.
Operator can now either start another run by clicking “Start” button or exit the INFINITI PLUS Analyzer
system by clicking red ”X” button. Clicking the red “X” button displays a message box with the message
“Are you sure you want to exit?” Click ‘Yes’ to exit and ‘No' to continue.
If the operator selects the “Start” button, then follow the same process to submit the worklist and inventory
of the next assay run. Click “Run” as described before.
INFINITI PLUS Analyzer Operator’s Manual
EM-34041 Rev. G (CO 3943, March 2017) Page 30 of 39
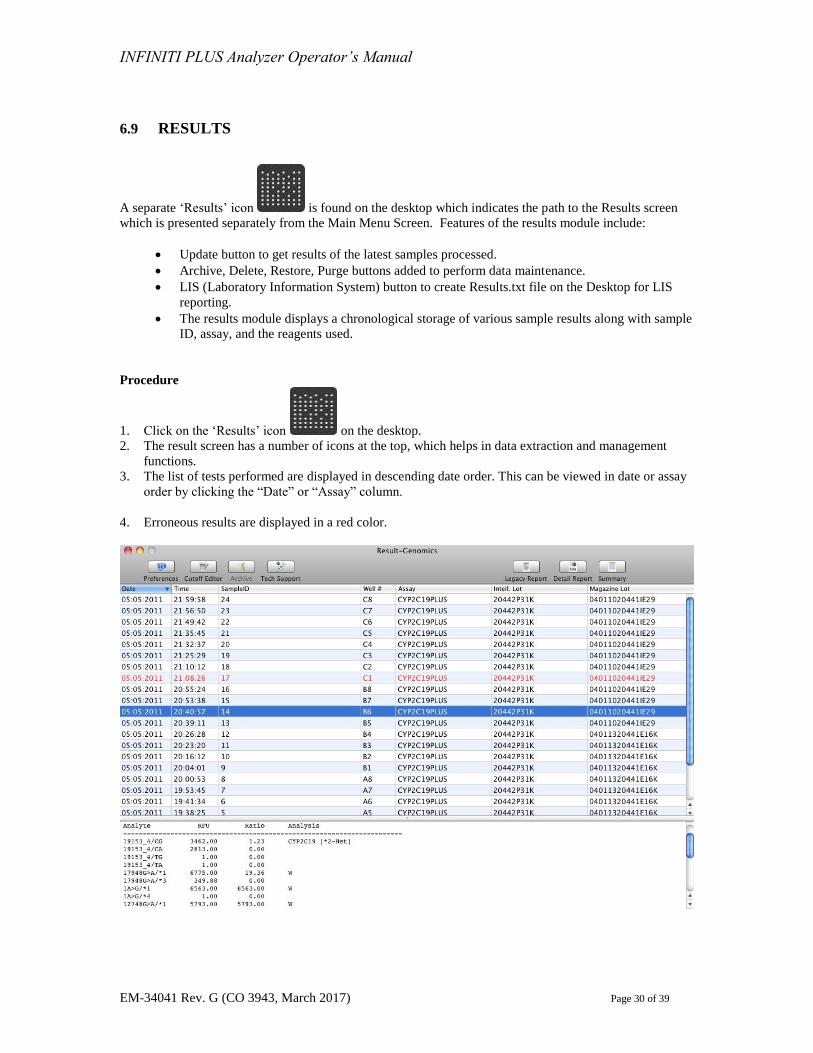
6.9 RESULTS
A separate ‘Results’ icon is found on the desktop which indicates the path to the Results screen
which is presented separately from the Main Menu Screen. Features of the results module include:
Update button to get results of the latest samples processed.
Archive, Delete, Restore, Purge buttons added to perform data maintenance.
LIS (Laboratory Information System) button to create Results.txt file on the Desktop for LIS
reporting.
The results module displays a chronological storage of various sample results along with sample
ID, assay, and the reagents used.
Procedure
1. Click on the ‘Results’ icon on the desktop.
2. The result screen has a number of icons at the top, which helps in data extraction and management
functions.
3. The list of tests performed are displayed in descending date order. This can be viewed in date or assay
order by clicking the “Date” or “Assay” column.
4. Erroneous results are displayed in a red color.
INFINITI PLUS Analyzer Operator’s Manual
EM-34041 Rev. G (CO 3943, March 2017) Page 31 of 39
5. The following reports can be created at the end of a run:
a) Legacy report
b) Detail report
c) Summary report
6. The following reports may be set up as an option:
a) LIS report in various optional layouts
b) A run finished, or a run aborted notification.
c) Message log and the signals.txt file
d) The Technical Support folder
e) Optional emails
a. Emails run finished mail to desired address at the end of the run
b. Emails message log and signals.txt at the end of the run
c. Emails tech support files on button click
d. Emails run aborted mail at the end of the run
Highlight the data that you want in a report and press the desired report format button at the top to
create the report.
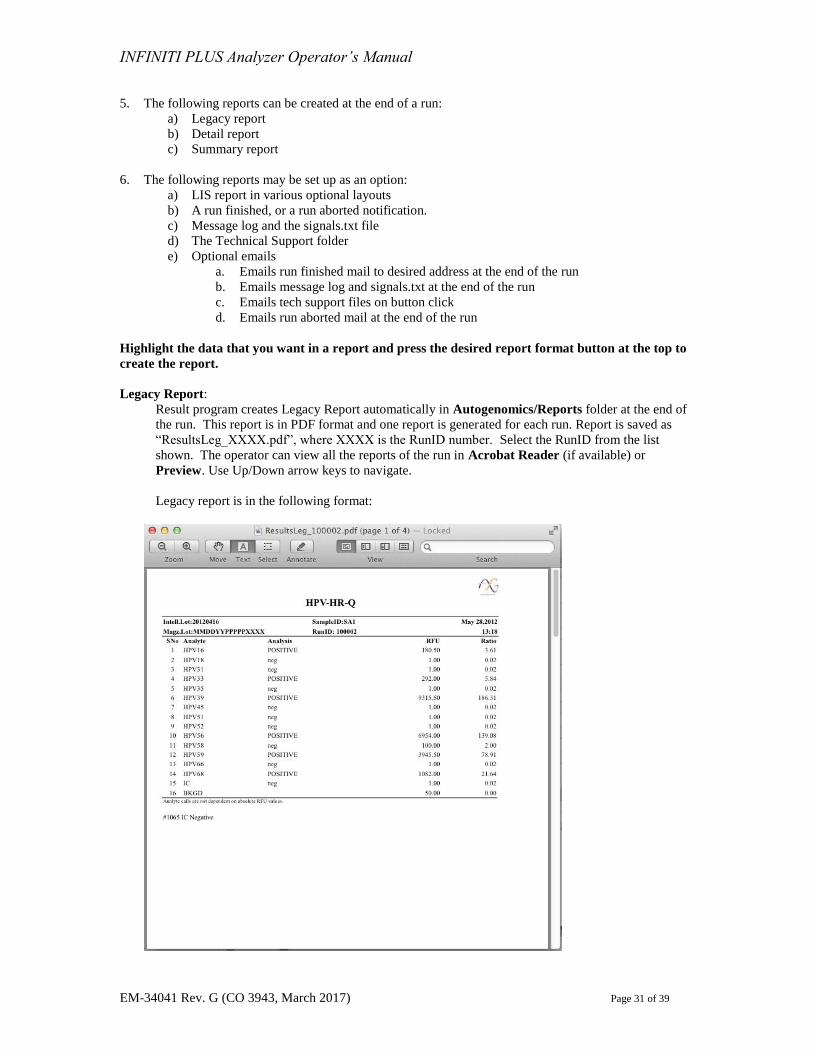
Legacy Report:
Result program creates Legacy Report automatically in Autogenomics/Reports folder at the end of
the run. This report is in PDF format and one report is generated for each run. Report is saved as
“ResultsLeg_XXXX.pdf”, where XXXX is the RunID number. Select the RunID from the list
shown. The operator can view all the reports of the run in Acrobat Reader (if available) or
Preview. Use Up/Down arrow keys to navigate.
Legacy report is in the following format:

INFINITI PLUS Analyzer Operator’s Manual
EM-34041 Rev. G (CO 3943, March 2017) Page 32 of 39
Detail Report:
This report is generated at the end of each run and saved on desktop in a folder name “Reports-
YYYYMMDD”. There will be only one “Reports-XXXXXX” folder on desktop. This report can
also be produced any time by selecting records from result view and clicking the “Detail Report”
Icon. The folder name can be changed to save keep the past results.
Infiniti-0102 QMatic:8.2E Header:8.2F Results:8.2F
RunID_Well:12472_A1 SampleID:2011122012144001 Date:Dec 20,2011 Time:16:42:23
Assay:HPV-Q Intell.Lot:20493T51K Magz.Lot:10011220492W34J
Analyte RFU Ratio Analysis
-----------------------------------------------------------------------
beta-globin 1.00 0.02 neg
HPV16 1688.00 33.76 POSITIVE
HPV18 1.00 0.02 neg
HPV31 1.00 0.02 neg
HPV33 1.00 0.02 neg
HPV45 1.00 0.02 neg
HPV35/68 1.00 0.02 neg
HPV39/56 1.00 0.02 neg
HPV51/59 1.00 0.02 neg
HPV52/58 1.00 0.02 neg
HPV6/11 1.00 0.02 neg
BKGD 50.00 0.00
-----------------------------------------------------------------------
Summary Report
This report is produced for Virus assays only. This report is also generated in “Reports-YYYYMMDD”
on the desktop. It can also be produced later by selecting only records from a single batch run. This one
report consists of following three sub reports:
First page shows results that have at least 1 positive analyte as shown below:

INFINITI PLUS Analyzer Operator’s Manual
EM-34041 Rev. G (CO 3943, March 2017) Page 33 of 39
Second page has results of all samples:
Third page has results that have all analytes negative:

INFINITI PLUS Analyzer Operator’s Manual
EM-34041 Rev. G (CO 3943, March 2017) Page 34 of 39
Buttons on the Result screen:
Preferences: Changes LIS preferences for Results and various Qmatic operations preferences.
o Click the "Preferences" button available on the toolbar. This opens the LIS preference
window. Select the required preference and make the changes.
o To change the Qmatic operation preferences, click the "Operation" button available on
the toolbar. Select the required preference and make changes.
o Click the "Close" button to save the changes.
Archive: The “Archive” button is enabled when the number of results in the result file exceeds
3000. “Results” also prompt the message to archive the data. When the operator clicks the
“Archive” button, files (e.g. Genomics_Dec08-Mar10.bin) are created in the Archives folder.
Tech Support: Creates support files to be sent to technical support. This report is produced only
when the operator clicks the “Tech-Support” icon.
o Click the “Tech Support” button available on the toolbar.
o The last 100 or one-month records (Whichever is less) are selected.
o Before sending mail, a message appears “Sending mail to AutoGenomics Tech Support”.
o A zip file “AGTechsupport.zip” is sent automatically to an email address as defined by tech-
support.
o After sending the email, a message appears “Sent mail to AutoGenomics Tech Support”.
“AGTechsupport.zip” contains following files:
a. Worklist.txt
b. Temperature Log (Temperature.txt)
c. LLS.txt
d. Cmndtime.xls
e. Commandlog.txt
f. Signal-Report (Signals.txt)
g. Message-Log (Expanded message log file)
h. Images of two micro-arrays with errors (RunID_sr.tiff)
i. Instcal.bin (If changed after last Tech-support mail)
j. Assyname_print.txt (Assay of selected results)

INFINITI PLUS Analyzer Operator’s Manual
EM-34041 Rev. G (CO 3943, March 2017) Page 35 of 39
6.10 Lab Information System (LIS)
At the end of each run “ResulLIS.txt” is created at the LIS
path as defined in the LIS preferences. Depending on the
options (Show assay name, Show RFU and Ratio in LIS
preferences) multiple formats of report can be generated.
Internet Access
The software uses the Internet to send pertinent information about the instrument performance to
AutoGenomics. If the customer agrees, the following notices are sent to the email ids mentioned in the LIS
and Tech-support preferences:
Sent to customer with subject “Run Finished on: XXXX at HH:MM Assay: AAAA Results: NN”,
where XXXX is the instrument name. This notice is sent at the end of the run.
Sent to AutoGenomics with subject “Run Finished on: XXXX at HH:MM Assay: AAAA Results:
NN”, where XXXX is the instrument name. This email has the MessageLog.txt and Signals.txt
(optional) attached. This notice is sent at the end of each run.
Run abort email sent to the customer and AutoGenomics with subject “Run Aborted on: XXXX at
HH:MM Assay: AAAA Results: NN Err #NNN”, where XXXX is the instrument name.
Note: Click on the Preference icon in the Results screen for settings.
Sending images of selected micro-arrays manually
Retrieving images of desired result:
a) Select the result in view. Note: RunID of result from bottom view and the time of result creation
from top view.
b) Go to /Library/Application Support/Autogenomics/Images/RunID folder. Select the image that is
created around the noted time.
c) Copy the image in the “sendmail” folder on the desktop.
Repeat the above steps for all the results for which you want to send images. After getting all the images in
the “sendmail” folder, zip the folder and send an e-mail to AutoGenomics.
INFINITI PLUS Analyzer Operator’s Manual
EM-34041 Rev. G (CO 3943, March 2017) Page 36 of 39
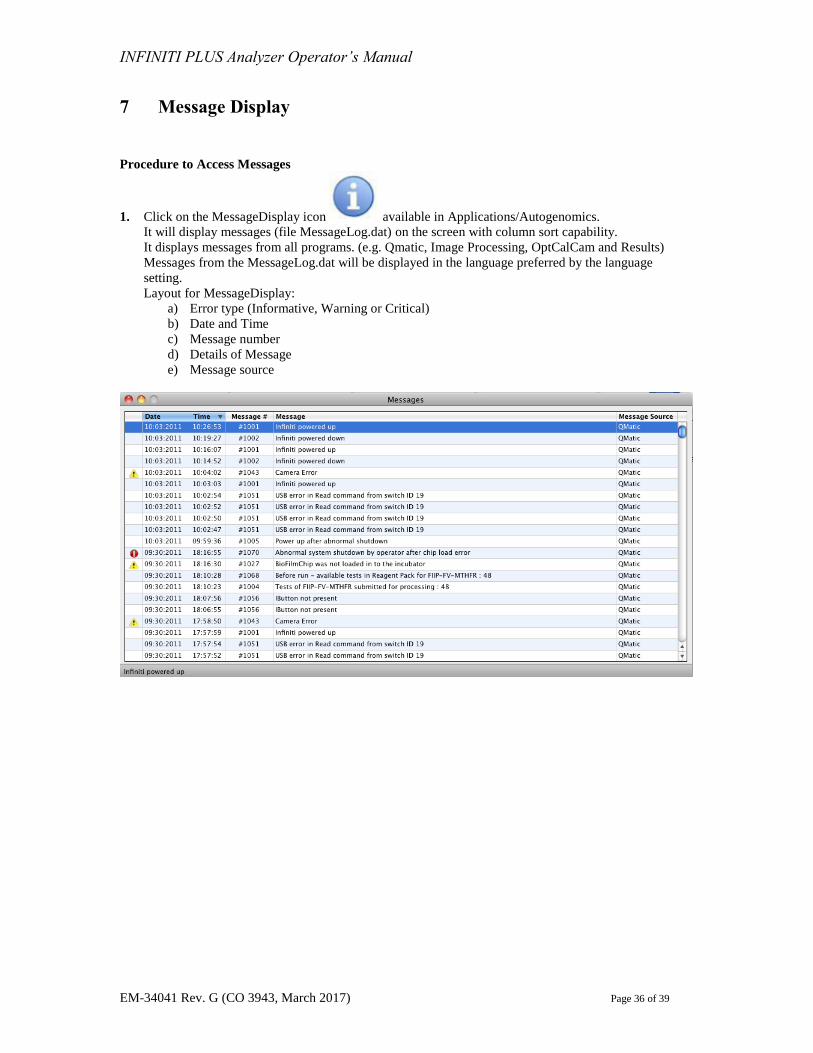
7 Message Display
Procedure to Access Messages
1. Click on the MessageDisplay icon available in Applications/Autogenomics.
It will display messages (file MessageLog.dat) on the screen with column sort capability.
It displays messages from all programs. (e.g. Qmatic, Image Processing, OptCalCam and Results)
Messages from the MessageLog.dat will be displayed in the language preferred by the language
setting.
Layout for MessageDisplay:
a) Error type (Informative, Warning or Critical)
b) Date and Time
c) Message number
d) Details of Message
e) Message source
INFINITI PLUS Analyzer Operator’s Manual
EM-34041 Rev. G (CO 3943, March 2017) Page 37 of 39
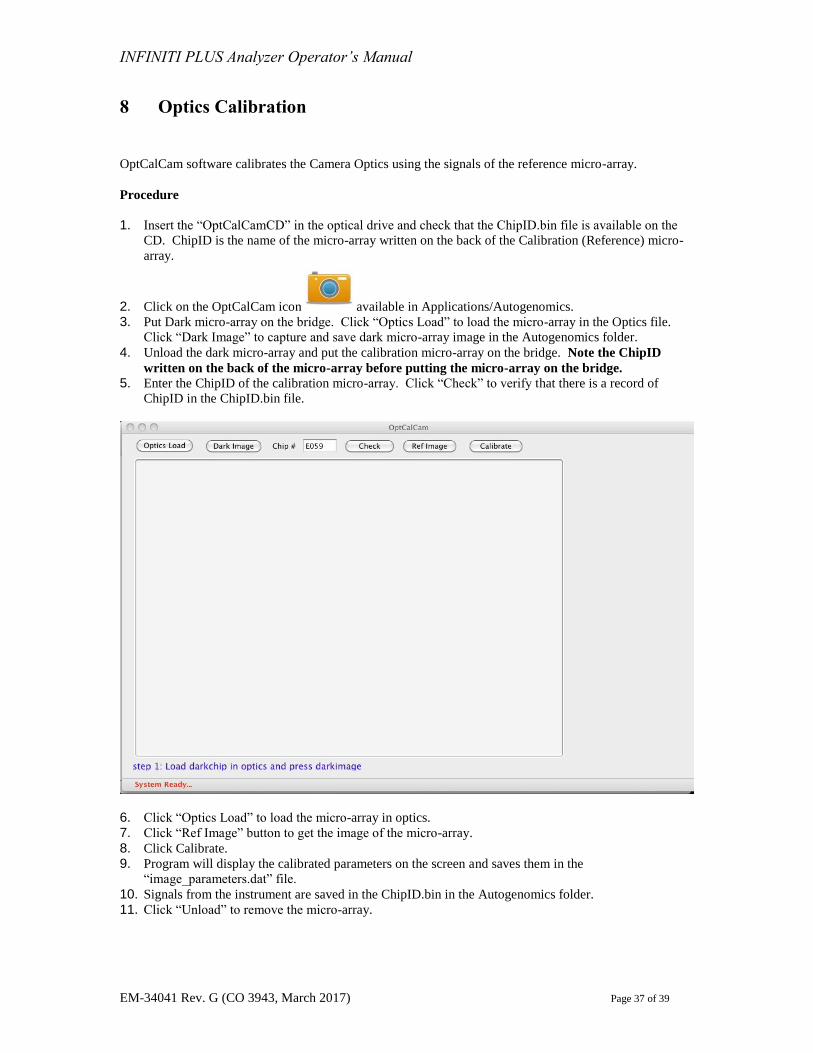
8 Optics Calibration
OptCalCam software calibrates the Camera Optics using the signals of the reference micro-array.
Procedure
1. Insert the “OptCalCamCD” in the optical drive and check that the ChipID.bin file is available on the
CD. ChipID is the name of the micro-array written on the back of the Calibration (Reference) micro-
array.
2. Click on the OptCalCam icon available in Applications/Autogenomics.
3. Put Dark micro-array on the bridge. Click “Optics Load” to load the micro-array in the Optics file.
Click “Dark Image” to capture and save dark micro-array image in the Autogenomics folder.
4. Unload the dark micro-array and put the calibration micro-array on the bridge. Note the ChipID
written on the back of the micro-array before putting the micro-array on the bridge.
5. Enter the ChipID of the calibration micro-array. Click “Check” to verify that there is a record of
ChipID in the ChipID.bin file.
6. Click “Optics Load” to load the micro-array in optics.
7. Click “Ref Image” button to get the image of the micro-array.
8. Click Calibrate.
9. Program will display the calibrated parameters on the screen and saves them in the
“image_parameters.dat” file.
10. Signals from the instrument are saved in the ChipID.bin in the Autogenomics folder.
11. Click “Unload” to remove the micro-array.

INFINITI PLUS Analyzer Operator’s Manual
EM-34041 Rev. G (CO 3943, March 2017) Page 38 of 39
9 Routine Maintenance
9.1 Lid Cleaning Procedure
Clean the silicone sample lid with 10% bleach.
Remove the bleach with 70% isopropyl alcohol or ethanol and wipe the lid with a lint-free wipe.
Let dry in a clean area without DNA which could contaminate the lid.
CAUTION: If the bleach is not removed, DNA in your sample could be eliminated.
9.2 Daily (when in use)
Using lint free cloth, wipe down the Plus base thoroughly, removing any dust.
Ensure the Plus cover closes during system operations.
9.3 Weekly
Replace the waste tray liner every week. (NOTE: Repeated usage of the same liner will cause a
waste tray stir bar malfunction error)
Wipe down the Plus monitor with a lint free cloth - Do not use any chemicals.
Click the “Clean”
button to move
trays out for
cleaning. Visually
inspect the
incubator and
stringency station
for salt deposits.
Remove the salt
deposits using a lint
free cloth with 70
% alcohol solution.
If salt deposits are present on the pipette barrel, replace the nozzle barrel plug immediately.
Otherwise, replace the nozzle barrel plug after approximately 100 samples have been run.
9.4 Monthly
Wipe down the incubator base and lid using a lint-free cloth with 70% alcohol.
Visually inspect the pipette nozzle for salt deposits. Remove any observed salt deposits and clean
the nozzle using a lint free cloth with 70% alcohol.

INFINITI PLUS Analyzer Operator’s Manual
EM-34041 Rev. G (CO 3943, March 2017) Page 39 of 39
10 Disposal
The INFINITI PLUS Analyzer and accessories are made of materials commonly used in laboratories,
computers, and electromechanical devices. The materials are considered non-hazardous, non-degradable,
and recyclable plastics and metals. These can be disposed of following the same laboratory standard
operating procedures set up for similar products and samples.
As part of our compliance to WEEE regulations, please call Tech support for instructions on how to
package and ship the INFINITI PLUS Analyzer back to AutoGenomics, Inc.