Embed Size (px)
Citation preview
Infor LN Exchange User Guide
Copyright © 2015 Infor
Important NoticesThe material contained in this publication (including any supplementary information) constitutes andcontains confidential and proprietary information of Infor.
By gaining access to the attached, you acknowledge and agree that the material (including anymodification, translation or adaptation of the material) and all copyright, trade secrets and all otherright, title and interest therein, are the sole property of Infor and that you shall not gain right, title orinterest in the material (including any modification, translation or adaptation of the material) by virtueof your review thereof other than the non-exclusive right to use the material solely in connection withand the furtherance of your license and use of software made available to your company from Inforpursuant to a separate agreement, the terms of which separate agreement shall govern your use ofthis material and all supplemental related materials ("Purpose").
In addition, by accessing the enclosed material, you acknowledge and agree that you are required tomaintain such material in strict confidence and that your use of such material is limited to the Purposedescribed above. Although Infor has taken due care to ensure that the material included in this publicationis accurate and complete, Infor cannot warrant that the information contained in this publication iscomplete, does not contain typographical or other errors, or will meet your specific requirements. Assuch, Infor does not assume and hereby disclaims all liability, consequential or otherwise, for any lossor damage to any person or entity which is caused by or relates to errors or omissions in this publication(including any supplementary information), whether such errors or omissions result from negligence,accident or any other cause.
Without limitation, U.S. export control laws and other applicable export and import laws govern youruse of this material and you will neither export or re-export, directly or indirectly, this material nor anyrelated materials or supplemental information in violation of such laws, or use such materials for anypurpose prohibited by such laws.
Trademark AcknowledgementsThe word and design marks set forth herein are trademarks and/or registered trademarks of Infor and/orrelated affiliates and subsidiaries. All rights reserved. All other company, product, trade or servicenames referenced may be registered trademarks or trademarks of their respective owners.
Publication Information
Release: Infor LN Exchange 10.4
Publication Date: January 6, 2015
Document Code: U8405G US

Contents
About this guide..............................................................................................................7Contacting Infor.........................................................................................................................................8
Chapter 1: Introduction..................................................................................................9Overview....................................................................................................................................................9Exchange compared to Database Management.....................................................................................10Designing a data exchange.....................................................................................................................10Activating the data exchange...................................................................................................................11Exchange modules..................................................................................................................................11
Chapter 2: Master data.................................................................................................13Introduction..............................................................................................................................................13Data exchange based on audit................................................................................................................13Setting up a data exchange.....................................................................................................................14Master Data sessions..............................................................................................................................14
Exchange Schemes (daxch0501m000)...............................................................................................15ASCII Files (daxch0102m000).............................................................................................................20ASCII File Fields (daxch0503m000)....................................................................................................20Batches (daxch0104m000)..................................................................................................................22Conditions (daxch0114m000)..............................................................................................................23Parameters by Condition (daxch0113m000).......................................................................................24
Advanced file handling using common directories..................................................................................25Advanced file handling for regular exports...........................................................................................25Advanced file handling for regular imports...........................................................................................25
Chapter 3: Export module............................................................................................27Introduction..............................................................................................................................................27Setting up an export process...................................................................................................................27Export module sessions...........................................................................................................................28
Table Relations (Export) (daxch0531m000)........................................................................................28Field Relations (Export) (daxch0532m000).........................................................................................30Ranges (daxch0112m000)...................................................................................................................32Create Export Programs (daxch0228m000)........................................................................................33Export Data (on a Regular Basis) (daxch0234m000)..........................................................................34Export Data (Non-Regular) (daxch0233m000)....................................................................................36
Checking the results................................................................................................................................38
Infor LN Exchange User Guide | 3
Contents

Chapter 4: Import module............................................................................................39Introduction..............................................................................................................................................39Regular and non-regular data exchange.................................................................................................39Using the Data Access Layer (DAL)........................................................................................................40Setting up an import process...................................................................................................................41Import module sessions...........................................................................................................................42
Table Relations (Import) (daxch0521m000)........................................................................................42Field Relations (import) (daxch0522m000)..........................................................................................45Conversion Tables (daxch0105m000).................................................................................................49Conversions per Field (daxch0106m000)............................................................................................49Create Import Program (daxch0227m000)..........................................................................................50Import Data (on a Regular Basis) (daxch0224m000)..........................................................................51Import Data (Non-Regular) (daxch0223m000)....................................................................................53
Start and end date and time....................................................................................................................54During the data exchange........................................................................................................................54
Chapter 5: Multisite control..........................................................................................57Introduction..............................................................................................................................................57
Audit trail..............................................................................................................................................57About multisite exchange in LN...............................................................................................................58Export process.........................................................................................................................................58
Export Done message..........................................................................................................................59File transport specifications..................................................................................................................59
Import process.........................................................................................................................................59Import Done message..........................................................................................................................60
Setting up a multisite exchange...............................................................................................................61Prerequisites........................................................................................................................................61Setting up a multisite exchange...........................................................................................................61
Multisite Control sessions........................................................................................................................62Environments (daxch4100m000).........................................................................................................62Exchange Links (daxch4501m000)......................................................................................................63Activate/Deactivate Exchange Links (daxch4201m000)......................................................................64Resend Rejected Messages (daxch4203m000)..................................................................................66Subscriptions (daxch4502m000).........................................................................................................68Receive Remote Procedure Calls (daxch4200m000)..........................................................................69
Chapter 6: Miscellaneous.............................................................................................71Introduction..............................................................................................................................................71Logging sessions.....................................................................................................................................71
Print Log File (daxch0215m000)..........................................................................................................72Remove Log Files (daxch0216m000)..................................................................................................73
4 | Infor LN Exchange User Guide
Contents
Log Table (Batch Level) (daxch0508m000).........................................................................................74Log Table (Batch Line Level) (daxch0509m000).................................................................................75Clear Log Table (daxch0208m000).....................................................................................................76
Tools sessions.........................................................................................................................................77Copy Exchange Scheme (daxch0201m000).......................................................................................78Delete Exchange Scheme (daxch0222m000).....................................................................................79Rename ASCII File (daxch1202m000)................................................................................................80Create ASCII File Fields and Relations (daxch0203m000).................................................................80Create Definition Files (daxch0204m000)............................................................................................81Print ASCII File (daxch0202m000)......................................................................................................83Remove ASCII Files (daxch2202m000)...............................................................................................83Check Syntax of Conditions (daxch0206m000)...................................................................................84Predefined Functions/Variables (daxch0510s000)..............................................................................85Print Exception Report for Table Fields (daxch0423m000).................................................................86Generate Audit Configuration (daxch1201m000)................................................................................87
Export/import sessions............................................................................................................................88Export Exchange Schemes (daxch5201m000)....................................................................................88Import Exchange Schemes (daxch5202m000)....................................................................................89Export Exchange Schemes for Delivery (daxch5203m000)................................................................90Import Delivered Exchange Schemes (daxch5204m000)....................................................................91
Chapter 7: Generating an exchange scheme.............................................................93Creating an exchange scheme................................................................................................................93Regenerating parts of an exchange scheme...........................................................................................94
Chapter 8: Using audit trail in the Exchange module................................................97Exchange based on audit trail.................................................................................................................97Prerequisites............................................................................................................................................97
Export...................................................................................................................................................97Import...................................................................................................................................................98
Limitations of the Exchange (XCH) module based on audit....................................................................98Introduction..........................................................................................................................................98Restrictions on exchange models........................................................................................................99Export...................................................................................................................................................99Import...................................................................................................................................................99
Chapter 9: Exchange scheme delivery.....................................................................101Introduction............................................................................................................................................101Installation..............................................................................................................................................101Modifying and copying exchange schemes...........................................................................................102Creating export/import programs...........................................................................................................102
Infor LN Exchange User Guide | 5
Contents
6 | Infor LN Exchange User Guide
Contents
About this guide
This document is a User’s Guide that is intended to assist developers who want to transfer data in andout of Infor LN applications. This document assumes that users have a thorough knowledge of the datamodel structure of the LN system and of the LN application. Users must also be familiar with the basicprogramming concepts of 3GL programming, ASCII files, and applications such as Microsoft Excel.
This document fully describes the Exchange module in LN and how to use the functionality that thismodule offers. Each module in Exchange is described in a chapter in this document. Each chapterbegins with a description of the module, followed by sections that describe all of the sessions in eachmodule. Each session description contains the following:
• An overview of the session• The procedure for using the session• An illustration of the session in LN• A table that lists each of the fields in the session and the use of each of these parameters.
This document consists of these chapters:
• Chapter 1, “Introduction,” describes what data exchange is and provides a brief overview of the LNExchange module.
• Chapter 2, “Master data,” describes how to set up an exchange scheme, which is the basis for alldata exchanges.
• Chapter 3, “Export module,” describes how to set up an export of data from an LN application toanother application.
• Chapter 4, “Import module,” describes how to set up an import of data into an LN application.• Chapter 5, “Multisite control,” describes how to set up data exchanges between multiple companies.• Chapter 6, “Miscellaneous,” describes a variety of other tools in Exchange, including tools for logging,
administration, conversion, export, and import.• Chapter 7, “To generate an exchange scheme,” describes how to quickly create a new exchange
scheme.• Chapter 8, “To use audit trail in the Exchange module,” describes how you can use audit trail to
exchange only updates in a specific period, rather than exchange the complete data set.• Chapter 9, “Exchange scheme delivery,” describes how to import exchange schemes in LN.
Infor LN Exchange User Guide | 7
Contacting InforIf you have questions about Infor products, go to the Infor Xtreme Support portal at http://www.infor.com/inforxtreme.
If we update this document after the product release, we will post the new version on this Web site.We recommend that you check this Web site periodically for updated documentation.
If you have comments about Infor documentation, contact [email protected].
8 | Infor LN Exchange User Guide
About this guide
1Introduction
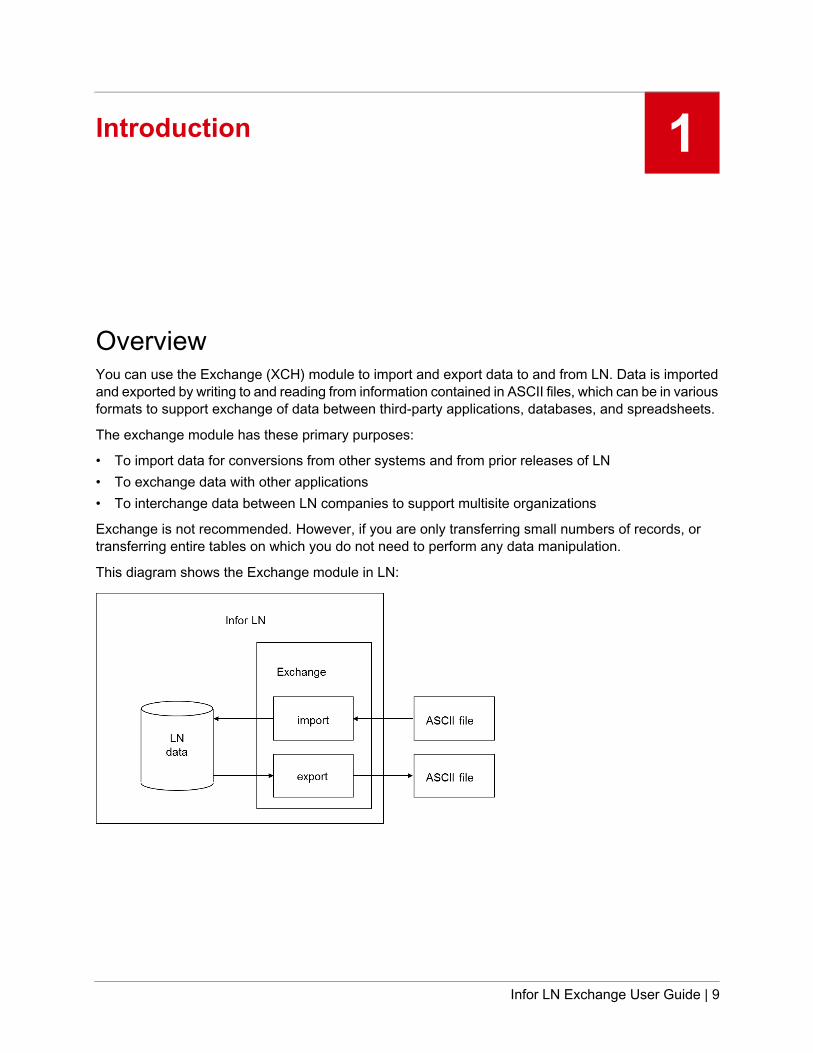
OverviewYou can use the Exchange (XCH) module to import and export data to and from LN. Data is importedand exported by writing to and reading from information contained in ASCII files, which can be in variousformats to support exchange of data between third-party applications, databases, and spreadsheets.
The exchange module has these primary purposes:
• To import data for conversions from other systems and from prior releases of LN• To exchange data with other applications• To interchange data between LN companies to support multisite organizations
Exchange is not recommended. However, if you are only transferring small numbers of records, ortransferring entire tables on which you do not need to perform any data manipulation.
This diagram shows the Exchange module in LN:
Infor LN Exchange User Guide | 9

Exchange compared to Database ManagementThe Database Management module of LN Tools also enables you to create ASCII files from LN dataand to load data from an ASCII file into LN. You can use these tools for basic data exchanges that donot require any special handling. These tools are contained in the Create Sequential Dump of Table(ttaad4226m000) and Create Table from Sequential Dump (ttaad4227m000) sessions. You can alsoactivate these tools from the UNIX prompt (bdbpre6.2 and bdbpost6.2).
If you use both tools one after the other, you can transfer data from one LN company to another.
The main difference between the Database Management and Exchange modules is that the Exchangemodule provides more flexibility in specifying which data must be read or written and in which format.In the Database Management module, you must import or export entire tables. The advantages ofusing the Exchange module rather than the database tools include the ability to do the following:
• Specify the exact data to be exchanged by table and field.• Convert and calculate data during an exchange.• Export based on an audit only the data that has changed since the last exchange.• Specify the order in which fields are imported.• Read data from other tables.
Designing a data exchangeThe way that you design your exchange scheme depends on how often you want to run the processand which data you want to have at each site.
If your data changes often and must be kept up-to-date, you must schedule frequent updates so thatyou have a near real-time environment. On the other hand, you might want to schedule less frequentupdates if keeping communication costs down is important to you.
If your data only needs to be updated in the event of predictable changes, you can schedule theexchange accordingly. For example, if the stock data only changes when an inventory control is doneat the end of the month, you only need to run an exchange after the inventory control is performed.
For less frequent changes, or if the changes are not predictable, you can also perform the exchangeon demand instead of on a fixed schedule.
Not all sites require updates of all data, and you can minimize your communication costs by exactlyspecifying the data to be exchanged. For example, all bank sites must have up-to-date currencyexchange rates, but not all sites must have all the customer data for the entire bank.
10 | Infor LN Exchange User Guide
Introduction
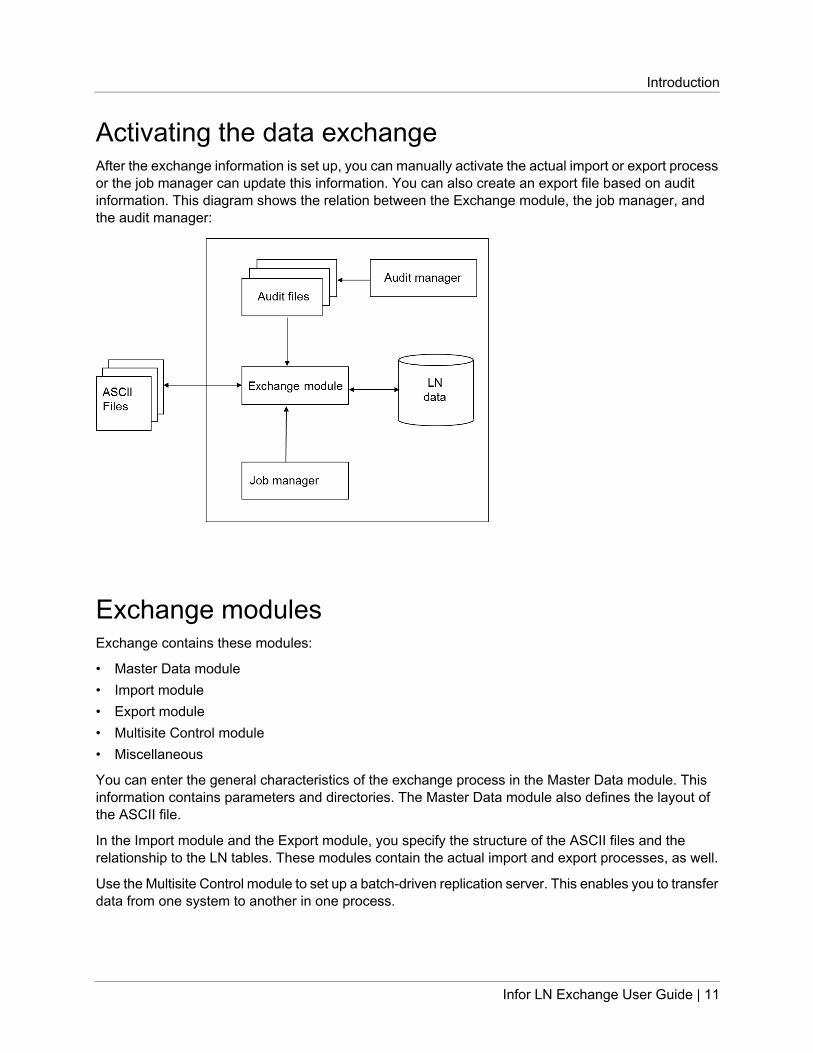
Activating the data exchangeAfter the exchange information is set up, you can manually activate the actual import or export processor the job manager can update this information. You can also create an export file based on auditinformation. This diagram shows the relation between the Exchange module, the job manager, andthe audit manager:
Exchange modulesExchange contains these modules:
• Master Data module• Import module• Export module• Multisite Control module• Miscellaneous
You can enter the general characteristics of the exchange process in the Master Data module. Thisinformation contains parameters and directories. The Master Data module also defines the layout ofthe ASCII file.
In the Import module and the Export module, you specify the structure of the ASCII files and therelationship to the LN tables. These modules contain the actual import and export processes, as well.
Use the Multisite Control module to set up a batch-driven replication server. This enables you to transferdata from one system to another in one process.
Infor LN Exchange User Guide | 11
Introduction
The Miscellaneous module provides particular utilities and informative sessions, such as utilities tocopy or delete particular master data. You can use the Miscellaneous module to query the results andstatus of previous export and import processes.
12 | Infor LN Exchange User Guide
Introduction
2Master data
IntroductionYou can use the Exchange module to import and export data to and from LN and to import and exportdata between LN and other applications. The procedure consists of setting up the exchange schemeand file layout for the exchange, and then performing the actual import and/or export of data to andfrom ASCII files.
An exchange scheme defines the general parameters used during an import or export such as thelocation of files, use of an audit trail, and other default settings. The exchange scheme contains alldefinitions of data that must be imported or exported. The ASCII files, conditions, batches, table andfield relations, ranges, and conversions are grouped together in an exchange scheme.
The result of an import process is the data imported into LN tables, and the result of an export processis the LN data exported to ASCII files. You can then use these ASCII files in various applications toimport data that originated in LN.
Data exchange based on auditAn exchange scheme can be based on audit trail. In an export, this means that only changes in thetable are exported, as opposed to the entire table. The export provides information on insertions,updates, and deletions. If import is based on an audit, the insertions, updates, and deletions areprocessed in the importing company.
To export based on an audit, the audit must be turned on for the table. To generate the audit settingsfor the tables in an exchange scheme, you can run the Generate Audit Configuration (daxch1201m000)session.
For more information, refer to "Using audit trail in the Exchange module" on page 97.
Multisite data exchanges are always based on audit trail.
For details, refer to "Multisite control" on page 57.
Infor LN Exchange User Guide | 13
Setting up a data exchangeBoth the export and import procedures begin by setting up an exchange scheme. After the exchangescheme is ready, you set up table relations, field relations, and export or import data parameters.
To set up an exchange scheme:
1 Define an exchange scheme.2 Define an ASCII file.3 Define the fields for the ASCII file.4 Create a batch.5 Add conditions, if required.
To export or import LN data, to begin, you can set up an exchange scheme using the ExchangeSchemes (daxch0501m000) session in the Master Data module.
Because other applications store data in different formats, LN cannot always directly exchange datawith these other applications. The best way to perform a data exchange is to convert data into ASCIItext, which is readable both by LN and other applications. The Exchange module handles the conversionof data between LN and ASCII, the selection of the data, and the sequencing of the data in the ASCIIfile.
After you create an exchange scheme, you must define the ASCII file to which your exchange schemewill export or import data. To define this ASCII file, you can use the ASCII Files (daxch0102m000)session.
The ASCII file consists of fields. To define the fields contained in the ASCII file, you can use the ASCIIFile Fields (daxch0503m000) session.
After you define the ASCII file fields, run the Batches (daxch0104m000) session to define the batchfor the export or import. Each exchange scheme can contain more than one batch. A batch is a groupof related table operations. After you define the batches, you can run the export or import by batch,instead of running the entire exchange scheme at once.
If required, you can write scripts to further customize the exchange, and add these scripts to yourexchange scheme as conditions.
Master Data sessionsThe Master Data module includes the following sessions:
• Exchange schemes (daxch0501m000)• ASCII files (daxch0102m000)• ASCII file fields (daxch0503m000)• Batches (daxch0104m000)• Conditions (daxch0114m000)• Parameters by Condition (daxch0113m000)
14 | Infor LN Exchange User Guide
Master data
Exchange Schemes (daxch0501m000)Use the Exchange Schemes (daxch0501m000) session to view and maintain exchange schemes. Anexchange scheme is the basis for every import and export. All import procedures and export proceduresare related to an exchange scheme, which is identified by a unique exchange-scheme code.
On the File menu, click New to start the Exchange Schemes (daxch0101s000) session, which you useto create a new exchange scheme.
Complete the exchange scheme by choosing the commands on the Specific menu to start thesesessions:
• ASCII Files (Ctrl+Shift+A):Starts the ASCII Files (daxch0102m000) session.
• Batches (Ctrl+Shift+B):Starts the Batches (daxch0104m000) session.
• Conditions (Ctrl+Shift+C):Starts the Conditions (daxch0114m000) session.
To add more information, click Edit Text on the toolbar to start the text editor.
To set up an exchange scheme:
1 Choose New from the File menu to start the Exchange Schemes (daxch0101s000) details session.2 Enter the name and description of the exchange scheme you are creating.3 Enter the full path of the directories where Exchange files are to be stored.4 Set up the ASCII file configuration to indicate whether the exchange is to be based on audit, based
on indicators, and how the fields in the ASCII file are separated.If this exchange scheme is copied from an existing exchange scheme, take the following step:
5 Enter the parent exchange scheme on the Special tab.If you want to use the same directory for import and export on a regular basis, take the followingstep:
6 Enter the names of the subdirectories that must overrule the default subdirectory.7 Enter the settings for text, multibyte, float, and log.
To add more information, click Edit Text on the toolbar to start the text editor.
This table shows the fields in the Exchange Schemes (daxch0101s000) session:
DescriptionField
General tab
Enter the name of the exchange scheme.Exchange Scheme
Enter a description of the exchange scheme.Description
General group box
Infor LN Exchange User Guide | 15
Master data
DescriptionField
Enter an owner for the exchange scheme.With the Owner field, you can group and sort exchange schemes in a company.On the Exchange Schemes (daxch0501m000) overview session’s View menu,click Sort By > Exchange Scheme by Owner.
Owner
You can use the Owner field to filter records by means of the Filters(ttadv9593m000) session. To access filter options, on the View menu, selectFilters.The default value is your LN user code. This enables identification of the userwho creates an exchange scheme.The value you define does not have to be an LN user. You can use any nameto group your company’s exchange schemes, for example, Test, for your testexchange schemes, or Actual for exchange schemes currently used in yourcompany.
If this check box is selected, additional information is available for this exchangescheme. The information is generated in the text editor.Click Edit Text to start the text editor.
Exchange SchemeText
Paths group box
Enter the absolute path name, starting from the root directory, of the directoryin which to write Exchange programs. Exchange uses the path name enteredhere on all the fields where the path name is required.
Exchange Programs
Enter the absolute path name, starting from the root directory, of the directoryfor error files and log files. Exchange uses the path name entered here on allthe fields where the path name is required.
Errors / Log Files
Enter the absolute path name, starting from the root directory, of the directoryfor ASCII files. Exchange uses the path name entered here on all the fieldswhere the path name is required.
ASCII Files
Enter the absolute path name, starting from the root directory, of the directoryfor definition files. Exchange uses the path name entered here on all the fieldswhere the path name is required.
Definition Files
ASCII File Configuration group box
Select this check box to export only the changed data, that is, data that is im-ported or exported from audit files instead of LN tables. This improves the per-
Based on Audit
formance of data exchange. Auditing the files slows system performance,however, which you must consider when setting up LN.Select when you want to set up a multisite exchange. This option only showsthat an audit is carried out on one or more tables that are imported or exported.LN does not check whether audit is set for the tables to be exported.You can overrule the audit procedure for batches in an exchange scheme byusing the Batches (daxch0104m000) session. For example, the audit is overruledif a batch contains tables that do not use the audit procedure.
16 | Infor LN Exchange User Guide
Master data
DescriptionField
Select to include an indicator to display whether the following record is an auditaction code. Codes include:
Based on Indicators
• i = insert or add• d =delete• u = update or modify• n = new value
If the Based on Audit check box is selected, this check box is also automati-cally selected. You can also select this option independently, which enablesExchange to receive information from other systems that also produce netchange reports.
Enter a value here if you want to use variable-length fields in the ASCII file. Thevalue you enter here is used to separate the ASCII file fields. The default isfixed-length fields.Allowed values are characters such as \, ], ^, and _, and letters in the range [A-Z] if the Control Character check box is selected. Do not use characters thatare used in the data fields that must be exchanged.
Separator Character
If a control character is part of the separator character, enter the control char-acter’s value here.This option is only activated if the Separator Character field contains a valuethat indicates that the ASCII file field uses variable lengths.
Control Character
Enter the character you want to use to enclose strings, for example, string.Enclosing character
Define the default format for the date. The date format is defined for each fieldin the ASCII file that is used in an exchange scheme. If no date format is definedfor an ASCII file field, Default Date Format is selected.If the ASCII file field is created using LN audit files, the Default Date Formatis set to Date Number.
Default Date Format
Special tab
Enter the name of the exchange scheme that is used as the parent in a multilevelexchange scheme. A parent exchange scheme is useful if you want to make
Parent ExchangeScheme
small changes to an existing exchange scheme. You only copy those parts ofthe scheme that you want to change. The batches and table relations that youdo not copy are inherited from the parent exchange scheme.
Overrule Subdirectories group box
Enter the subdirectory that must overrule the default subdirectory for a dataimport on a regular basis. This enables you to use the same directory for import
Regular Import Direc-tory
and export on a regular basis. If the run numbers of the import and export runare identical, you need not move the ASCII files.During a data export on a regular basis, if an overrule subdirectory is notspecified, the ASCII files are placed in the default subdirectory (<exchange
Infor LN Exchange User Guide | 17
Master data
DescriptionFieldscheme>.<run number>.i). If an overrule subdirectory is specified, thespecified subdirectory is used instead.The subdirectory is located in the ASCII file directory. Exchange reads this pa-rameter at run time.The subdirectory can only be overruled if the ASCII file name specified in theTable Relations (Import) (daxch0121s000) session does not contain an absolutepath.
Enter the subdirectory that must overrule the default subdirectory for a dataexport on a regular basis. This enables you to use the same directory for import
Regular Export Direc-tory
and export on a regular basis. If the run numbers of the import and export runare identical, you do not have to move the ASCII files.During a data export on a regular basis, if no overrule subdirectory is specified,the ASCII files are placed in the default subdirectory (<exchange scheme>.<run number>.i). If an overrule subdirectory is specified, the specified sub-directory is used instead.If the overruling subdirectory already contains files, these files are overwritten.The subdirectory is located in the ASCII file directory. Exchange reads this pa-rameter at run time.The subdirectory can only be overruled if the ASCII file name specified in theTable Relations (Export) (daxch0131s000) session does not contain an absolutepath.
Common Directories group box
Enter the common directory from which you want to import your exchangescheme’s regular import data. If you want to import the data of another exchange
Copy Files beforeRegular Import From
scheme’s regular export, enter the directory defined for the export exchangescheme’s Copy Files after Regular Export To field, as described in the follow-ing section.If you define a common directory from which to copy your exchange scheme’sregular import files:LN only copies files with a file name used in one of your regular import’s activetable relations.LN copies the files to the subdirectory of the current import run.If any files already exist in the subdirectory of the regular import run with thesame file name as the files you want to import, the files you import overwritethe existing files.
Enter a common directory to which LN can copy the files of an exchangescheme’s regular export run. Other LN exchange schemes, and external appli-
Copy Files after Reg-ular Export To
cations can then access (import) the files from the directory. If you define acommon directory for your exchange scheme’s regular exports:LN overwrites existing files from your exchange scheme’s previous regular exportrun.
18 | Infor LN Exchange User Guide
Master data

DescriptionFieldLN only overwrites files whose file name occurs in the regular export’s activetable relation. This enables you to copy more than one exchange schemesregular export files to the same common directory, so that another LN exchangescheme or external application can combine files of more than one exchangescheme.Combined with advanced file handling for regular imports functionality, LN canautomatically export and import the required files between exchange schemes.If an error in the regular export results in the failure to create a file, the file inthe common directory from the regular export’s previous export run is still re-moved. This prevents the re-importation of the same (old) file from the commondirectory that was not replaced with the failed file. The error log shows the filecreation failed, in which case you must run a non regular export (and a corre-sponding non regular import) to exchange the data in the failed file.The files of your exchange scheme’s regular export are also exported and storedin a subdirectory (identified by the run number) of the directory you specify inthe ASCII Files field of the Exchange Schemes (daxch0501m000) details ses-sion. LN does not overwrite the files in the ASCII Files directory. You can onlyremove the files explicitly using the Remove ASCII Files (daxch2202m000)session, which ensures the safety of your regular export data. You can use theASCII Files directory to check previous regular export runs.
Text, Multibyte, Float, and Log Settings group box
Select this check box to increase the text numbers when the text tables areimported. Otherwise, the text numbers remain the same. Existing texts are
Increase Text Num-ber
overwritten if permitted in the table and field relations. As a result, text tablesare handled like other tables.
Select to convert table field data types from multibyte string to the local charactertype. The conversion is carried out directly after reading the characters in the
Multi-Byte Conver-sions
ASCII file during a data import. When you export, a conversion is performedjust before the value is written to the ASCII file. Errors during multibyte conver-sions are not logged.To convert the characters in the ASCII file to/from UTF8 format, do not selectthis check box. Instead, use this environment variable setting:-set XCH_UTF8=1
Select to convert the values of the db.float and db.double table fields. Use thisoption if you have trouble exporting data based on the audit procedure in a
Convert Floats/Dou-bles
client/server environment that combines a non-Intel application server with anIntel database server.
This check box is not used in the current release.Do Additional Log-ging
Infor LN Exchange User Guide | 19
Master data

ASCII Files (daxch0102m000)Run the ASCII Files (daxch0102m000) session to maintain logical ASCII files in an exchange scheme.You can maintain these files either automatically or manually.
If you use the name of an LN table for the ASCII file name, LN can automatically enter the fields forthat table when you use the ASCII File Fields (daxch0503m000) session.
The Specific menu includes these options:
• ASCII File Fields (Ctrl+Shift+1):Starts the ASCII File Fields (daxch0503m000) session.
• Create ASCII Files (Ctrl+Shift+G):Starts the Create ASCII File Fields and Relations (daxch0203m000) session. Use this option tocreate ASCII files automatically.
To create an ASCII file manually:
1 Define a unique logical ASCII file name with a description.2 In the Definition File field, define a definition file from which used to copy the ASCII file fields.3 If you want to add more information, click the Edit Text button on the toolbar to start the text editor.
This table shows the fields in the ASCII Files (daxch0102m000) session:
DescriptionField
Enter the name of the ASCII file.ASCII File
Enter a description of the ASCII file.Description
Enter the name of the definition file, if you are using one. A definition file is usedto load preset ASCII file format information into the current ASCII file. LN usu-
Definition File
ally retrieves this definition file from another LN system that has used the ex-change tools to export some data. To make a definition file, you can run theCreate Definition Files (daxch0204m000) session. You can reuse definition filesin other ASCII files.You can also leave this field blank, in which case LN uses the definition file thatyou enter in the ASCII File Fields (daxch0503m000) session.
This file indicates whether the ASCII file includes text.Text
ASCII File Fields (daxch0503m000)After you define the ASCII file, you must define the ASCII file fields. Run the ASCII File Fields(daxch0503m000) session to list the available ASCII file fields in a logical ASCII file.
The ASCII file fields define the layout of the ASCII file and are identified by a unique number and name.
The Specific menu contains these options:
20 | Infor LN Exchange User Guide
Master data
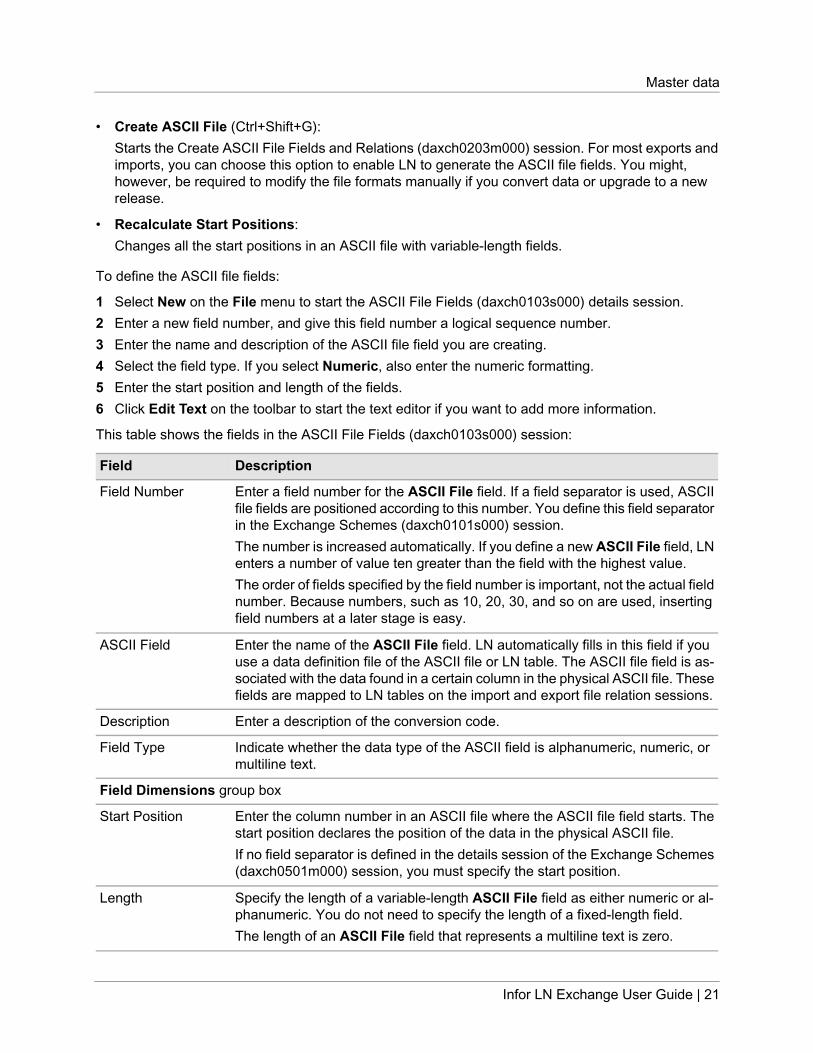
• Create ASCII File (Ctrl+Shift+G):Starts the Create ASCII File Fields and Relations (daxch0203m000) session. For most exports andimports, you can choose this option to enable LN to generate the ASCII file fields. You might,however, be required to modify the file formats manually if you convert data or upgrade to a newrelease.
• Recalculate Start Positions:Changes all the start positions in an ASCII file with variable-length fields.
To define the ASCII file fields:
1 Select New on the File menu to start the ASCII File Fields (daxch0103s000) details session.2 Enter a new field number, and give this field number a logical sequence number.3 Enter the name and description of the ASCII file field you are creating.4 Select the field type. If you select Numeric, also enter the numeric formatting.5 Enter the start position and length of the fields.6 Click Edit Text on the toolbar to start the text editor if you want to add more information.
This table shows the fields in the ASCII File Fields (daxch0103s000) session:
DescriptionField
Enter a field number for the ASCII File field. If a field separator is used, ASCIIfile fields are positioned according to this number. You define this field separatorin the Exchange Schemes (daxch0101s000) session.
Field Number
The number is increased automatically. If you define a new ASCII File field, LNenters a number of value ten greater than the field with the highest value.The order of fields specified by the field number is important, not the actual fieldnumber. Because numbers, such as 10, 20, 30, and so on are used, insertingfield numbers at a later stage is easy.
Enter the name of the ASCII File field. LN automatically fills in this field if youuse a data definition file of the ASCII file or LN table. The ASCII file field is as-
ASCII Field
sociated with the data found in a certain column in the physical ASCII file. Thesefields are mapped to LN tables on the import and export file relation sessions.
Enter a description of the conversion code.Description
Indicate whether the data type of the ASCII field is alphanumeric, numeric, ormultiline text.
Field Type
Field Dimensions group box
Enter the column number in an ASCII file where the ASCII file field starts. Thestart position declares the position of the data in the physical ASCII file.
Start Position
If no field separator is defined in the details session of the Exchange Schemes(daxch0501m000) session, you must specify the start position.
Specify the length of a variable-length ASCII File field as either numeric or al-phanumeric. You do not need to specify the length of a fixed-length field.
Length
The length of an ASCII File field that represents a multiline text is zero.
Infor LN Exchange User Guide | 21
Master data
DescriptionField
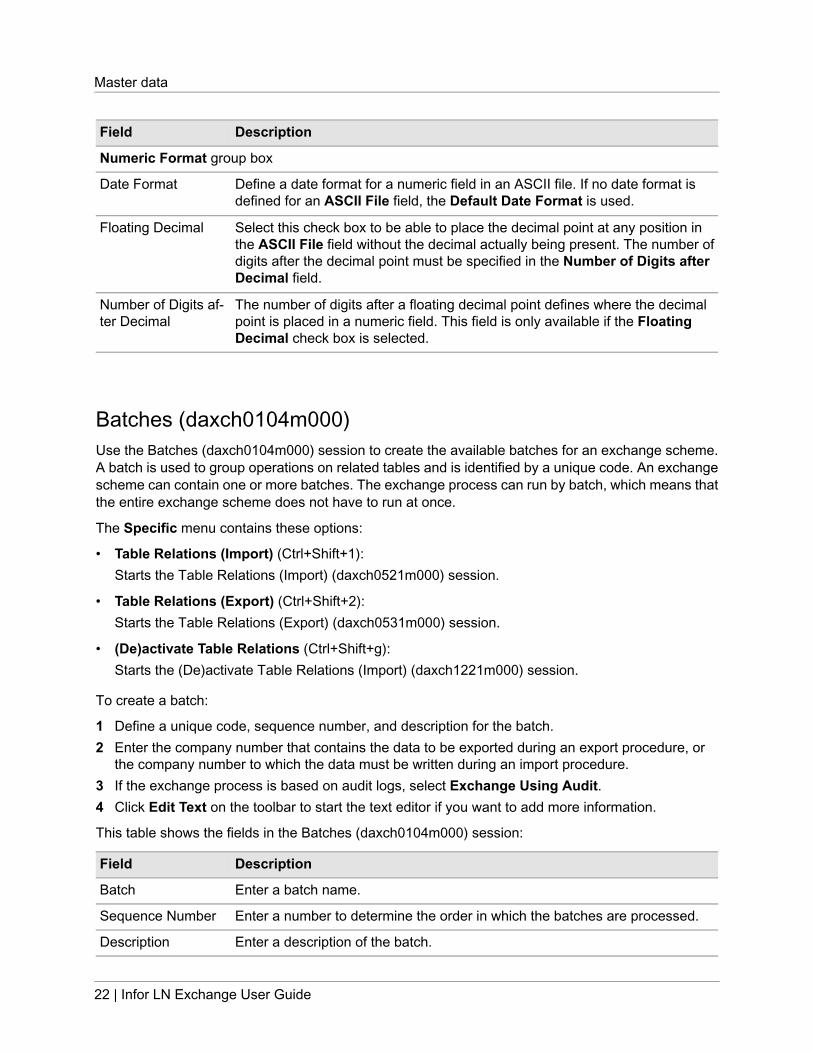
Numeric Format group box
Define a date format for a numeric field in an ASCII file. If no date format isdefined for an ASCII File field, the Default Date Format is used.
Date Format
Select this check box to be able to place the decimal point at any position inthe ASCII File field without the decimal actually being present. The number of
Floating Decimal
digits after the decimal point must be specified in the Number of Digits afterDecimal field.
The number of digits after a floating decimal point defines where the decimalpoint is placed in a numeric field. This field is only available if the FloatingDecimal check box is selected.
Number of Digits af-ter Decimal
Batches (daxch0104m000)Use the Batches (daxch0104m000) session to create the available batches for an exchange scheme.A batch is used to group operations on related tables and is identified by a unique code. An exchangescheme can contain one or more batches. The exchange process can run by batch, which means thatthe entire exchange scheme does not have to run at once.
The Specific menu contains these options:
• Table Relations (Import) (Ctrl+Shift+1):Starts the Table Relations (Import) (daxch0521m000) session.
• Table Relations (Export) (Ctrl+Shift+2):Starts the Table Relations (Export) (daxch0531m000) session.
• (De)activate Table Relations (Ctrl+Shift+g):Starts the (De)activate Table Relations (Import) (daxch1221m000) session.
To create a batch:
1 Define a unique code, sequence number, and description for the batch.2 Enter the company number that contains the data to be exported during an export procedure, or
the company number to which the data must be written during an import procedure.3 If the exchange process is based on audit logs, select Exchange Using Audit.4 Click Edit Text on the toolbar to start the text editor if you want to add more information.
This table shows the fields in the Batches (daxch0104m000) session:
DescriptionField
Enter a batch name.Batch
Enter a number to determine the order in which the batches are processed.Sequence Number
Enter a description of the batch.Description
22 | Infor LN Exchange User Guide
Master data
DescriptionField
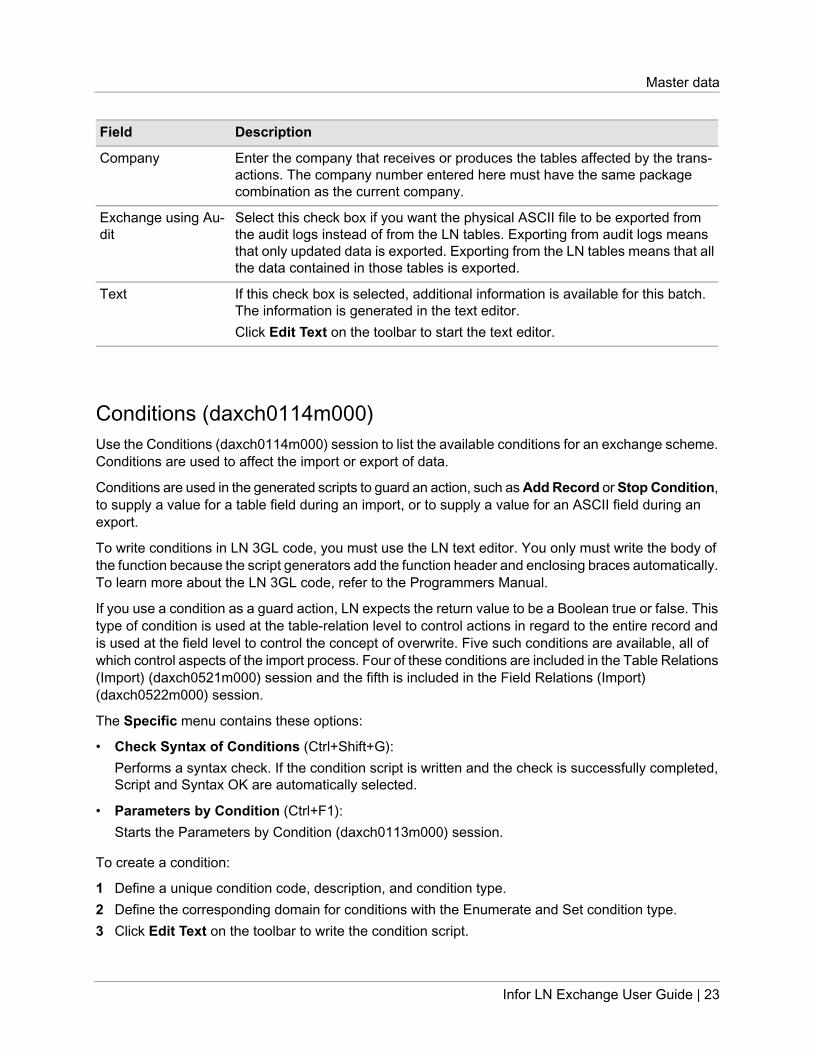
Enter the company that receives or produces the tables affected by the trans-actions. The company number entered here must have the same packagecombination as the current company.
Company
Select this check box if you want the physical ASCII file to be exported fromthe audit logs instead of from the LN tables. Exporting from audit logs means
Exchange using Au-dit
that only updated data is exported. Exporting from the LN tables means that allthe data contained in those tables is exported.
If this check box is selected, additional information is available for this batch.The information is generated in the text editor.
Text
Click Edit Text on the toolbar to start the text editor.
Conditions (daxch0114m000)Use the Conditions (daxch0114m000) session to list the available conditions for an exchange scheme.Conditions are used to affect the import or export of data.
Conditions are used in the generated scripts to guard an action, such as Add Record or Stop Condition,to supply a value for a table field during an import, or to supply a value for an ASCII field during anexport.
To write conditions in LN 3GL code, you must use the LN text editor. You only must write the body ofthe function because the script generators add the function header and enclosing braces automatically.To learn more about the LN 3GL code, refer to the Programmers Manual.
If you use a condition as a guard action, LN expects the return value to be a Boolean true or false. Thistype of condition is used at the table-relation level to control actions in regard to the entire record andis used at the field level to control the concept of overwrite. Five such conditions are available, all ofwhich control aspects of the import process. Four of these conditions are included in the Table Relations(Import) (daxch0521m000) session and the fifth is included in the Field Relations (Import)(daxch0522m000) session.
The Specific menu contains these options:
• Check Syntax of Conditions (Ctrl+Shift+G):Performs a syntax check. If the condition script is written and the check is successfully completed,Script and Syntax OK are automatically selected.
• Parameters by Condition (Ctrl+F1):Starts the Parameters by Condition (daxch0113m000) session.
To create a condition:
1 Define a unique condition code, description, and condition type.2 Define the corresponding domain for conditions with the Enumerate and Set condition type.3 Click Edit Text on the toolbar to write the condition script.
Infor LN Exchange User Guide | 23
Master data

Predefined functions and variables are available in the Predefined Functions/Variables (daxch0510s000)session.
Conditions are used in the table and field relations:
• Set the conditions at table level by means of the Table Relations (Import) (daxch0521m000) sessionand the Table Relations (Export) (daxch0531m000) session.
• Set the conditions on field level by means of the Field Relations (Import) (daxch0522m000) sessionand the Field Relations (Export) (daxch0532m000) session.
This table shows the fields in the Conditions (daxch0114m000) session:
DescriptionField
Enter the name of the condition.Condition
Enter a description of the condition.Description
Choose the data type of this condition.Type
Enter the domain that corresponds to this condition.Domain
Indicates whether a script is present. To add a script, on the Edit menu, clickTexts or click Edit Text on the toolbar.
Script
Indicates whether the syntax of the condition script has been checked. To selectthe syntax check, on the Specific menu, point to Check Syntax and clickConditions.
Syntax OK
Parameters by Condition (daxch0113m000)Run the Parameters by Condition (daxch0113m000) session to list the parameters used in a conditionscript of an exchange scheme.
The ASCII File fields of a record to be imported or exported are not automatically defined in a conditionscript. To use the value of an ASCII File field, you must use that field as a parameter in the conditionscript. The parameter name must be the same as the ASCII File field name in the record to whichparameter name refers.
To create a parameter:
1 Define a unique parameter name.2 Select a parameter type.
This table shows the fields in the Parameters by Condition (daxch0113m000) session:
DescriptionField
Enter the name of the parameter. The parameter name must be the same asan ASCII field name.
Parameter
Enter either numeric or alphanumeric for the parameter type.Parameter Type
24 | Infor LN Exchange User Guide
Master data
Advanced file handling using common directories
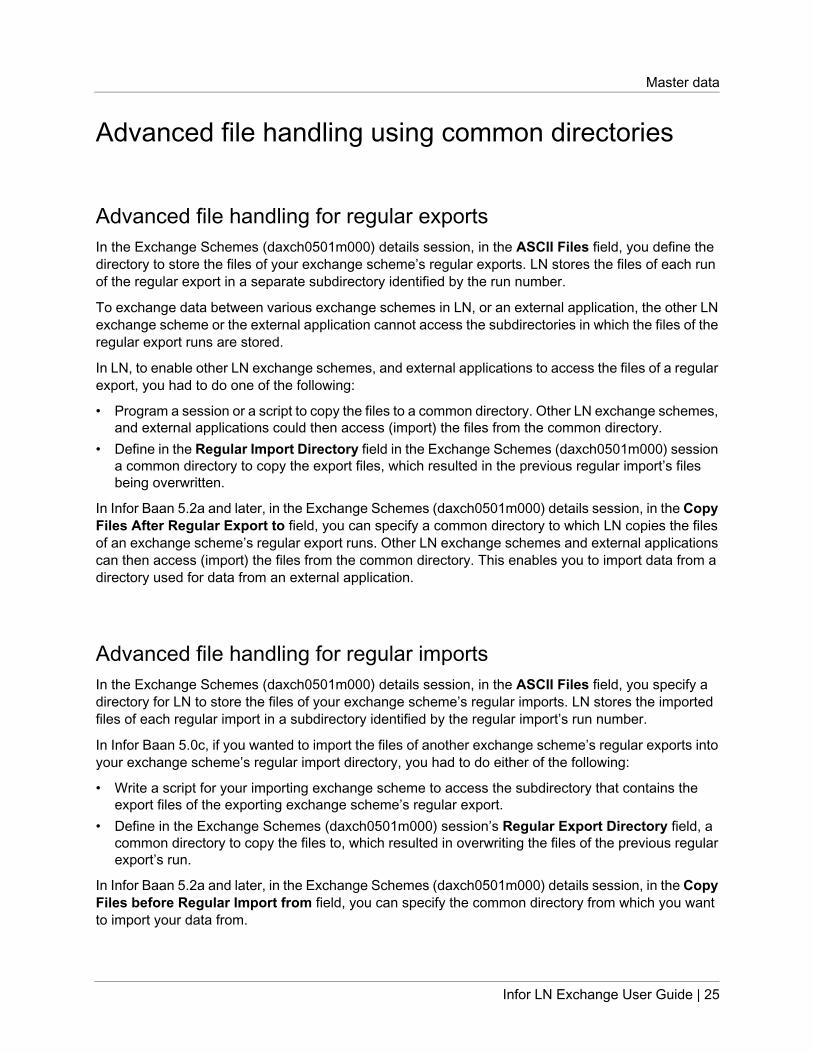
Advanced file handling for regular exportsIn the Exchange Schemes (daxch0501m000) details session, in the ASCII Files field, you define thedirectory to store the files of your exchange scheme’s regular exports. LN stores the files of each runof the regular export in a separate subdirectory identified by the run number.
To exchange data between various exchange schemes in LN, or an external application, the other LNexchange scheme or the external application cannot access the subdirectories in which the files of theregular export runs are stored.
In LN, to enable other LN exchange schemes, and external applications to access the files of a regularexport, you had to do one of the following:
• Program a session or a script to copy the files to a common directory. Other LN exchange schemes,and external applications could then access (import) the files from the common directory.
• Define in the Regular Import Directory field in the Exchange Schemes (daxch0501m000) sessiona common directory to copy the export files, which resulted in the previous regular import’s filesbeing overwritten.
In Infor Baan 5.2a and later, in the Exchange Schemes (daxch0501m000) details session, in the CopyFiles After Regular Export to field, you can specify a common directory to which LN copies the filesof an exchange scheme’s regular export runs. Other LN exchange schemes and external applicationscan then access (import) the files from the common directory. This enables you to import data from adirectory used for data from an external application.
Advanced file handling for regular importsIn the Exchange Schemes (daxch0501m000) details session, in the ASCII Files field, you specify adirectory for LN to store the files of your exchange scheme’s regular imports. LN stores the importedfiles of each regular import in a subdirectory identified by the regular import’s run number.
In Infor Baan 5.0c, if you wanted to import the files of another exchange scheme’s regular exports intoyour exchange scheme’s regular import directory, you had to do either of the following:
• Write a script for your importing exchange scheme to access the subdirectory that contains theexport files of the exporting exchange scheme’s regular export.
• Define in the Exchange Schemes (daxch0501m000) session’s Regular Export Directory field, acommon directory to copy the files to, which resulted in overwriting the files of the previous regularexport’s run.
In Infor Baan 5.2a and later, in the Exchange Schemes (daxch0501m000) details session, in the CopyFiles before Regular Import from field, you can specify the common directory from which you wantto import your data from.
Infor LN Exchange User Guide | 25
Master data
To import the regular export data of another LN exchange scheme, in the Copy Files before RegularImport From field, you specify the export exchange scheme’s common directory for regular exports.You define the common export directory for an exchange scheme in the Copy Files After RegularExport to field, as described in the previous section, of the Exchange Schemes (daxch0501m000)session. Your exchange scheme’s regular export data for each run is still stored in the separatesubdirectory you specify in the ASCII Files field.
26 | Infor LN Exchange User Guide
Master data

3Export module
IntroductionOften you must export data from LN to another application, for example, if:
• Data must be shown in a specific way, such as in a spreadsheet.• Text is to be maintained by using a word processor.• The data and procedures in a company are handled partly by LN.
The result of the export process is an ASCII file, which other applications, including other LNenvironments, can read.
To exchange data between two LN companies, you export the LN data to ASCII files, and then importthe data into the LN database. Exchange can use the same master data information for import that ituses for export, because the ASCII file format will be the same.
Setting up an export processTo export data, you start by setting up an exchange scheme as described in "Master data" on page13. Next, you go on to define the details of the tables to be exported.
To begin, you must create the relationship at the table level between the LN tables and the ASCII filesby using the Table Relations (Export) (daxch0531m000) session in the Export module. You then createthe relationship at the field level by setting up the relations between logical ASCII file fields and LNtable fields. To set up these relations, you must run the Field Relations (Export) (daxch0532m000)session.
To control which records are exported, you can use operators to create range limitation expressions.To do this, you must run the Ranges (daxch0112m000) session.
After you define the table relations, field relations, and conversions, you must compile an object thatExchange can use to run the export. To compile these objects, you can run the Create Export Programs(daxch0228m000) session.
Infor LN Exchange User Guide | 27
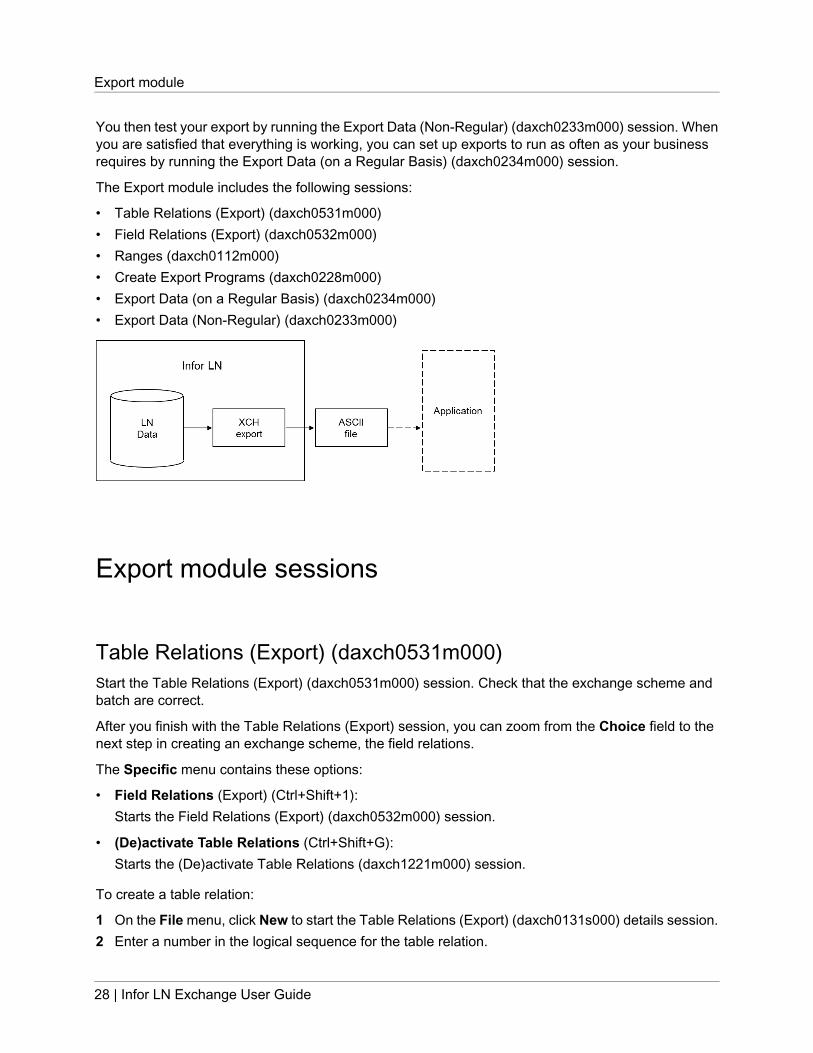
You then test your export by running the Export Data (Non-Regular) (daxch0233m000) session. Whenyou are satisfied that everything is working, you can set up exports to run as often as your businessrequires by running the Export Data (on a Regular Basis) (daxch0234m000) session.
The Export module includes the following sessions:
• Table Relations (Export) (daxch0531m000)• Field Relations (Export) (daxch0532m000)• Ranges (daxch0112m000)• Create Export Programs (daxch0228m000)• Export Data (on a Regular Basis) (daxch0234m000)• Export Data (Non-Regular) (daxch0233m000)
Export module sessions
Table Relations (Export) (daxch0531m000)Start the Table Relations (Export) (daxch0531m000) session. Check that the exchange scheme andbatch are correct.
After you finish with the Table Relations (Export) session, you can zoom from the Choice field to thenext step in creating an exchange scheme, the field relations.
The Specific menu contains these options:
• Field Relations (Export) (Ctrl+Shift+1):Starts the Field Relations (Export) (daxch0532m000) session.
• (De)activate Table Relations (Ctrl+Shift+G):Starts the (De)activate Table Relations (daxch1221m000) session.
To create a table relation:
1 On the File menu, click New to start the Table Relations (Export) (daxch0131s000) details session.2 Enter a number in the logical sequence for the table relation.
28 | Infor LN Exchange User Guide
Export module

3 Enter the table from the ASCII file and the name of the ASCII file to be used during an export.4 Enter the physical ASCII file to be written.5 Enter the other parameters that define this table relation.6 Click Edit Text on the toolbar to start the text editor if you want to add more information.
This table shows the fields in the Table Relations (Export) (daxch0131s000) session:
DescriptionField
Enter the number that represents the table relation in the batch during an ex-change process. The table relation shows the correspondence between adatabase table and an ASCII file.The number increases automatically. If you define a new table relation, LN entersa number of value ten greater than the table relation with the highest value.
Table Relation (Ex-port)
Enter the table that contains data from the ASCII file to be read during an exportprocedure. One batch line can only read one LN table. If you must use the same
Table
LN table to create more than one physical file, you can use multiple batch lines.The various batch lines may or may not use the same ASCII file layout.Use multiple table relations to write data from more than one physical ASCIIfile to one LN table.The LN table name is defined by a package code, a module code, and a tablenumber, for example, tccom001.
Enter the name of the ASCII file that contains data to be transferred to a LNtable during an export procedure.To create the field relations of the table relation automatically, the ASCII filename must be the same as the LN table name. You can create these relationsif you do not have a data definition file of the ASCII file.
ASCII File
The ASCII file name represents the logical ASCII file. You can create the ASCIIfile name in the ASCII Files (daxch0102m000) session.
Enter the name of the physical ASCII file where the data is to be written. Thefile name can be a maximum of eleven characters in length.The file name you enter here is an extension of the default path. The defaultpath is defined in the Path for ASCII Files field under Paths on the Generaltab in the Exchange Schemes (daxch0101s000) session.
ASCII File Name
If this is an absolute path, the default path is not used. If this is not an absolutepath, the file is stored in the directory for sequential files as defined in the ex-change scheme header record.
Select this check box to activate the table relation to enable this table relationto be used for data processing in an export process. If this check box is cleared,
Active
the table relations are kept for reference purposes but are not used during theexport process.You can also use this check box as a debugging tool by turning off all table re-lations except one to test a new change. Select this check box if you want totest the exchange scheme, a single table relation, or simply a few table relations.
Infor LN Exchange User Guide | 29
Export module
DescriptionField
Select this check box to ignore the layout of the ASCII file and enable thestandard bdbpre program create the ASCII file. The range, sort index, andASCII file fields are not considered.Clear this check box to create the sequential ASCII file using the ASCII filefields that are created in the ASCII File Fields (daxch0103s000) session.
Use bdbpre
This check box is not applicable for an exchange based on audit. If you changethe setting of this parameter, you must generate the exchange program again.
Enter a condition code. The condition must be of type Boolean.The export of data depends on the return value of this condition. If the returnvalue of the condition is true, the data of the LN table is written to the ASCII
Condition
file. If the return value of the condition is false, the data of the LN table is notwritten, that is, the export is not carried out.Conditions are also used during an exchange based on audit.
Select this check box to enable LN to process the table relation, using the limi-tations defined in the Ranges (daxch0112m000) session. Clear this check box
Range Active
if you do not want LN to use the limitations defined in the Ranges(daxch0112m000) session.The range is not active if the export is part of an audit procedure or if Usebdbpre is selected.
To export the data using any of the indexes from the table listed in the Tablefield, enter the index number of the ASCII file that will contain data from the LN
Sort Index
table. If the table is read, this index is used and the ASCII file is sorted accordingto this index.
If this check box is selected, additional information is added to the table relation.The text is maintained in the text editor.
Table Relations Text
Click Edit Text to start the text editor.
Field Relations (Export) (daxch0532m000)After you define the table relations using the Table Relations (Export) (daxch0531m000) session, youmust define the field relations.
Use the Field Relations (Export) (daxch0532m000) session to list the available relations between logicalASCII files fields and LN table fields by batch in an exchange scheme. Use the details session to specifywhich data must be passed to the physical ASCII files.
The Specific menu contains these options:
• Create Default Field Relations (Ctrl+Shift+1):Creates the field relations automatically. Make sure that the code of the LN table is the same as thecode of the ASCII file table. Use this option if the definition file of the LN table is not available.
30 | Infor LN Exchange User Guide
Export module

To create a field relation, take the following steps:
1 On the File menu, click New to start the Field Relations (Export) (daxch0132s000) details session.2 Enter a serial number and give this number a logical sequence number.3 Enter the name of the ASCII field for which you are creating field relations.4 Define the table field, condition script name, or constant, on which this field is based. If the ASCII
field is based on a table field that is defined as an array in the data dictionary, enter the array elementnumber.
5 Click Edit Text on the toolbar to start the text editor if you want to add more information.
This table shows the fields in the Field Relations (Export) (daxch0132s000) session:
DescriptionField
Enter a serial number to make the field relation unique in the table relation. Theserial number is only used as an identifier and need not be sequential.The number increases automatically: If you define a new field relation, LN entersa number of value ten greater than the field relation with the highest value.
Serial Number
Because numbers such as 10, 20, 30, and so on are used, you can easily insertfield relations at a later stage.
Enter the code of the ASCII file field to contain the data transferred from a fieldin the LN table during an export procedure.The ASCII file code represents the logical ASCII file. This is code is created inthe ASCII Files (daxch0102m000) session.
ASCII Field
Based on
Select this check box to indicate that the content of a LN table field must beexported.Enter the name of this table field in the following field. The value of the tablefield is passed to the physical ASCII file in the position designated by the ASCIIField.
Table Field
Enter the element number of an array field if the table field specified in the TableField is defined as an array in the data dictionary. The elements in an arraycan be filled individually. The element number cannot exceed the array depth.
Array Element
Select this check box if the export process must be based on a condition.Enter the name of this condition in the following field. The return value of thecondition will be used to fill the ASCII file field.
Condition
You use a condition either if the data to be exported resides in a table otherthan the table defined at the Table Relation level, or if the data does not existin any LN table. You can use a condition to access the different table or tablefields necessary to calculate the value that must be exported.The conditions are created in the Conditions (daxch0114m000) session.
Infor LN Exchange User Guide | 31
Export module

DescriptionField
Select this check box to export a constant to an ASCII file field. Enter this con-stant value in the following field.Use this field to extend the ASCII file with additional data if the receiving systemrequires additional data fields.
Constant
You can only use a constant if the export is not based on a table field or on acondition.
Ranges (daxch0112m000)Usually, even if the entire table is not required, all the data is exported anyway and only the desiredrecords are read in during import. This control is achieved by writing conditions that are used at thetable relation (import) level.
LN also provides a tool to limit which records are exported to begin with. The Ranges (daxch0112m000)session enables you to use relational and logical operators to create range-limitation logic expressionsthat control the export process. Only active records that match the condition are exported, which enablesyou to transfer a smaller file between systems. The drawback is that the filter cannot be as complex,because the range limitation logic is not as powerful as conditions.
To start this session, select the Range Active check box in the Table Relations (Export)(daxch0531m000) session.
The following are the data type restrictions per data type of the LN table field:
• Date data type:
• The Entered Date field must be of the default date format.• The plus (+) or minus (-) signs enable you to change the current date. For example, +2 adds two
days to the current date.• The number sign (#) can be used for the current date.
• String/multibyte data type:The domain of the LN table field determines whether a field is justified to the left, right, or center, oris converted to uppercase or lowercase.
• Numeric data type:Only numeric values can be entered.
For the operators in or not in, you must enter the value as follows:
• The set of values must be placed in parentheses.• For string data type, each item in the set of values must be placed in double quotation marks (“”).
ExamplesFor a numeric field, place the values in parentheses: (1,2,5,7).
32 | Infor LN Exchange User Guide
Export module
For a string or multibyte string, add double quotes: ("a","b").
To create a range:
1 Enter a serial number in the logical sequence order.2 Enter the rule that specifies the range of table fields to be checked.3 Enter a relational or logical operator to create range-limitation logic expressions to control the export.4 Enter the From and To values that apply to the table field.
This table shows the fields in the Ranges (daxch0112m000) session:
DescriptionField
The serial number that makes the range unique in the table relation. The serialnumber is only used as an identifier and it forces the correct sorting sequence.
Serial Number
Note: Use an interval, for example, 10, 20, 30, so that you can add ranges later.
The code of the field in a LN table that contains the data that will be exportedinto an ASCII file field during an export procedure.
Table Field
The relational or logical operator that is used for creating an expression, forexample, Equal, Not Equal, Greater, or Between.
Operator
Enter the value to which the operator will apply.Only if the operator type is Between or Not Between, the entered value is thestart value of a range.
Value (From)
Enter the end value of the range.Note: This field can only be entered if the operator is Between or Not Between.
Range Value To
The operator that is used to combine several relational expressions into onerange condition.If the range rules need more than one line to be expressed properly, enter an‘and’ or an ‘or’ to join the multiple lines.
And/or/end
The last line in an expression must end with end of expression.If a range expression exceeds one line, the sequence number is the only deter-mination of which line is to be read next.
Create Export Programs (daxch0228m000)To use an exchange scheme, you must pull together all the data in the sessions you have just filled,place the data into one program script, and compile the program script into an executable object. TheCreate Export Programs (daxch0228m000) session performs all of these actions for export scripts.
Before you create the export programs, check the syntax of the condition scripts that are used in thetable and field relations.
Syntax errors in the condition script cause compilation errors. You can check the syntax with the CheckSyntax of Conditions (daxch0206m000) session.
Infor LN Exchange User Guide | 33
Export module
To create an export program:
1 Select a range of exchange schemes and batches.2 Select the check boxes in the Compile Options to specify how the import program must be created.3 Click Create to start the creation of the export program.4 Click Export Data to start the Export Data (Non-Regular) (daxch0233m000) session that will run
the export program that is created in this session.
This table shows the fields in the Create Export Programs (daxch0228m000) session:
DescriptionField
Selection Range
Enter an exchange scheme.Exchange Scheme
Enter a batch.Batch
Compile Options
Select this check box to go through a condition script step by step.Compile in DebugMode
Select this check box to compile with the profiler. After the import runs, theprofiler generates a report that provides information about the performance timerequired for each function.
Compile with Profiler
Select this check box to view a detailed list of errors that shows the exactproblem with each line of code.
Display Errors
Export Data (on a Regular Basis) (daxch0234m000)After you set up and test the exchange schemes by run the Export Data (Non-Regular) (daxch0233m000)session, you can set up a regular export to facilitate the recurring exchange of data. An export on aregular basis is especially useful in a multisite environment, in which no run must be lost or overwritten.The export can also run as part of a batch job.
Run the Export Data (on a Regular Basis) (daxch0234m000) session to run the export program totransfer data on a regular basis from LN tables to sequential ASCII files.
All of the input fields in the Export Data (on a Regular Basis) (daxch0234m000) session are alsocontained in the Export Data (Non-Regular) (daxch0233m000) session. In a regular export, however,you cannot enter a range for batch and batch lines, which prevents you from running part of an exchangescheme. This ensures that one period of audit information is not missed for one batch line while therest of the batch lines are complete.
If you use the regular export session, you must pay extra attention to your directory management. Ifyou use the Export Data (on a Regular Basis) (daxch0234m000) session to export data, the ASCII fileis placed in an additional directory in the sequential file directory to keep the various runs separate.The name of this additional directory is <exchange scheme name>.<run number>.e.
34 | Infor LN Exchange User Guide
Export module
The Import Data (on a Regular Basis) (daxch0224m000) session uses a similar directory namingconvention to search for incoming data. The only difference is the last letter, which is an i for imports.
The export can also run as part of a batch job.
To create a regular export:
1 Select a range of exchange schemes.2 Select the processing type.3 Enter the start and end time of the audit range if the export is based on audit.4 Select the Overrule Batch Company check box if the data is exported from a company other than
the batch company.5 Enter another company if the current company is overruled.6 Define the details of the export procedure in the Processing Details group box.7 Click Export Data to start the export procedure.8 Click Log Table to view the contents of the log table. A log table provides an overview of the results
of the export procedure.
This table shows the fields in the Export Data (on a Regular Basis) (daxch0234m000) session:
DescriptionField
Selection Range
Enter a range of exchange schemes.Exchange Scheme
Processing Settings
Choose the type of run for this data exchange:Processing Type
• New run.• Restart previous run: This option enables you reuse the last run number
to import data. You usually use this field in the Import Data (on a RegularBasis) (daxch0224m000) session, in which each run number provides differ-ent data sets. Only the log files are affected in this session, because thedata to be loaded into LN is the same for both the last run number used andthe first free run number.
• Reprocess rejected records: If records are rejected during an import pro-cess, LN creates two additional files to hold the rejected records. Recordsthat are rejected due to index or domain errors (database problems) areplaced in the Rejected due to Error file and records that are rejected if acondition returns a false status are placed in the Rejected due to Conditionfile. LN places these files in the same directory as the data file in which therejected file was read and appends the suffixes .e01 or .c01. If more recordsare rejected during reprocessing, LN creates new files with the next sequentialnumber. If you choose this option, you can use the following two fields tochoose which records to reprocess.
• Continue interrupted run: If an exchange scheme run stops in the middleof the run, you can restart the import. You can, however, only restart theimport if more than one batch line exists and the restart can begin at the
Infor LN Exchange User Guide | 35
Export module
DescriptionFieldstart of an incomplete batch line. If only one batch line exists, this option isthe same as a complete restart of the import.
Select this check box to override the value in the Company field in the Batches(daxch0104m000) session.
Overrule Batch Com-pany
Enter the company to be used during this session instead of the batch company.This field can only be defined if the Overrule Batch Company is selected.
Company
Processing Details
Select this check box to specify that messages remain on screen until you pressenter. Clear this check box if you want the export program to continue without
Wait for <CR> withMessages
any interaction from you. You can use this option for an export that runsovernight.
Select this check box if you want the export to finish without checking for mes-sages that indicate that the export procedure is complete. If you clear this check
Suppress ExportDone Messages
box, the Export Done message is sent, but only if a subscription exists for thebatch.You can use this option to test or run the export, which is useful when you testan export in a multisite environment.
Select this check box if you want to compress files after export. Only use thisoption if the ASCII files to be exported are compressed using the LN compressprogram.
Compress ASCIIFiles
Export Based on Audit
Enter the start date and time of the audit range.Start of Audit Range
Select to set the end date and time of the audit range to the current date andtime.All transactions between the specified start time and date and the current timeand date are exported, which is important if the export procedure is part of a
End of Audit Range
job. Every time the job is started, the end of the audit range will be the currenttime and date. The length of the interval is, therefore, not fixed.The ends of audit range fields do not have to be specified.
Select this check box to have this export continue until the current date andtime.
Export to CurrentDate/Time
Export Data (Non-Regular) (daxch0233m000)Use the Export Data (Non-Regular) (daxch0233m000) session to run the export program to transferdata from LN tables to sequential ASCII files. This process is useful for one time only exports and totest exchange schemes that will be run on a regular basis, to ensure the proper function of the exportprocedure.
36 | Infor LN Exchange User Guide
Export module
All of the input fields in the Export Data (on a Regular Basis) (daxch0234m000) session are alsocontained in the Export Data (Non-Regular) (daxch0233m000) session. In a non-regular export, however,you can specify a range for Batch and Batch Lines, which enables you to run part of an exchangescheme.
However, you cannot run part of an exchange scheme in a regular export, because you can miss oneperiod of audit information for one batch line while the rest of the batch lines are complete.
The export can also run as part of a batch job.
To run the export program:
1 Select a range of exchange schemes, batches, and/or batch sequence numbers.2 Select the processing type.3 Select the Overrule Batch Company check box if the data is exported from a company other than
the current company. In this case, define that company in the next field.4 Select the Wait for <CR> with Messages check box if the export program must stop after a message.5 Enter the start and end time of the audit range if the export is based on audit.6 Click Export Data to start the export procedure. The screen changes and a status window displays
the progress of the export. For each batch line that completes, LN displays the exchange scheme,the batch, and the batch line. The numbers of records read, processed, rejected due to error, andrejected due to conditions also appear.
7 Click Log Table to view the contents of the log table. A log table shows an overview of the resultsof the export procedure.
This table shows the fields in the Export Data (Non-Regular) (daxch0233m000) session:
DescriptionField
Selection Range
Enter a range of exchange schemes.Exchange Scheme
Enter a range of batches.Batch
Enter a range of sequence numbers.Batch SequenceNumber
Processing Settings
Choose the type of run for this data exchange:Processing Type
• New run.• Restart Previous Run: This option enables you to reuse the last run number
to import data. You usually use this field in the Import Data (on a RegularBasis) (daxch0224m000) session, in which each run number provides differ-ent data sets. The log files are the only thing that is affected in this session,because the data to be loaded into LN is the same both for the last runnumber used and the first free run number.
• Reprocess Rejected Records: If records are rejected during an importprocess, LN creates two additional files to contain the rejected records.Records that are rejected due to index or domain errors (database problems)are placed in the Rejected due to Error file and records that are rejected due
Infor LN Exchange User Guide | 37
Export module
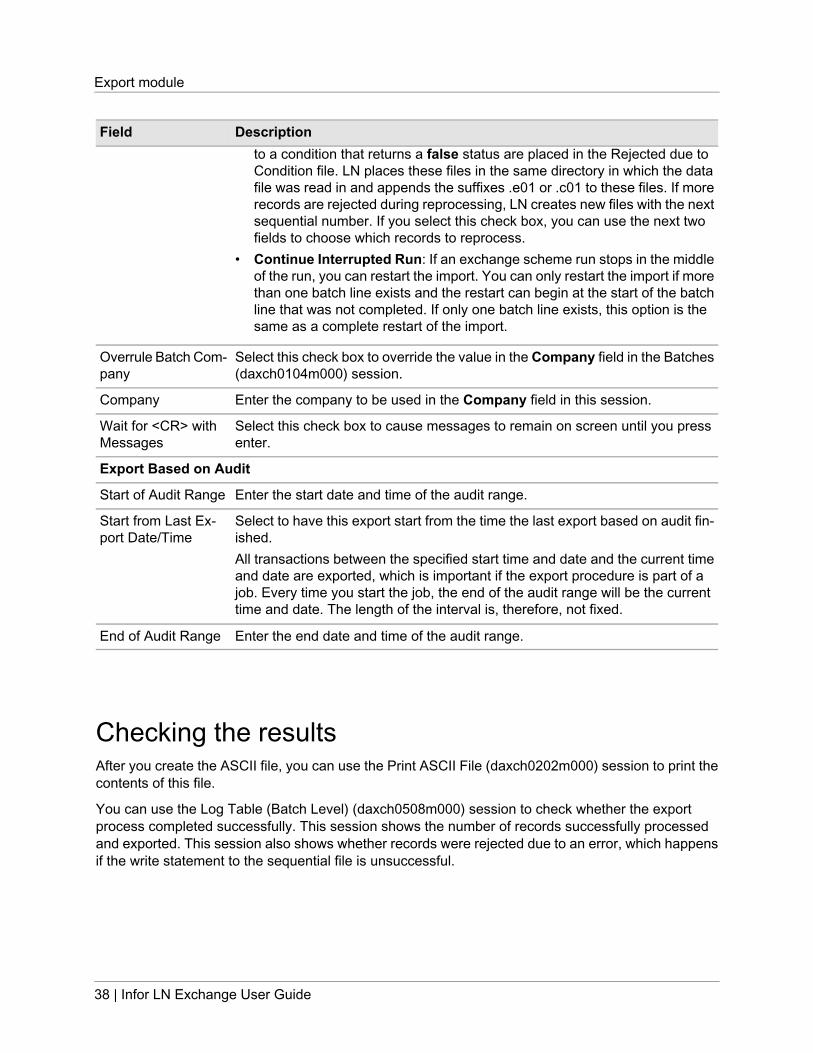
DescriptionFieldto a condition that returns a false status are placed in the Rejected due toCondition file. LN places these files in the same directory in which the datafile was read in and appends the suffixes .e01 or .c01 to these files. If morerecords are rejected during reprocessing, LN creates new files with the nextsequential number. If you select this check box, you can use the next twofields to choose which records to reprocess.
• Continue Interrupted Run: If an exchange scheme run stops in the middleof the run, you can restart the import. You can only restart the import if morethan one batch line exists and the restart can begin at the start of the batchline that was not completed. If only one batch line exists, this option is thesame as a complete restart of the import.
Select this check box to override the value in the Company field in the Batches(daxch0104m000) session.
Overrule Batch Com-pany
Enter the company to be used in the Company field in this session.Company
Select this check box to cause messages to remain on screen until you pressenter.
Wait for <CR> withMessages
Export Based on Audit
Enter the start date and time of the audit range.Start of Audit Range
Select to have this export start from the time the last export based on audit fin-ished.All transactions between the specified start time and date and the current timeand date are exported, which is important if the export procedure is part of a
Start from Last Ex-port Date/Time
job. Every time you start the job, the end of the audit range will be the currenttime and date. The length of the interval is, therefore, not fixed.
Enter the end date and time of the audit range.End of Audit Range
Checking the resultsAfter you create the ASCII file, you can use the Print ASCII File (daxch0202m000) session to print thecontents of this file.
You can use the Log Table (Batch Level) (daxch0508m000) session to check whether the exportprocess completed successfully. This session shows the number of records successfully processedand exported. This session also shows whether records were rejected due to an error, which happensif the write statement to the sequential file is unsuccessful.
38 | Infor LN Exchange User Guide
Export module

4Import module
IntroductionTo exchange data between two LN companies, you export the LN data to ASCII files, and then importthe data into the LN database. Exchange can use the same master data information for import as forexport, because the ASCII file format must be the same.
If you must modify data during an import, you can use a conversion. The Exchange module includesthree options:
• Condition scripts• Conversion tables• Constant values
You can include a formula with the script to calculate new values based on the contents of the ASCIIfile or data from other LN tables.
Regular and non-regular data exchangeYou can import and export data in LN on either a regular or a non-regular basis. A regular data exchangerefers to a run that is scheduled on a regular basis. A non-regular data exchange is one that you runon demand, on an as-required basis. The results of both types are the same, but are used differently,depending on the situation and your business needs.
The sessions that you use for regular or non-regular data exchange are the following:
• Import Data (on a Regular Basis) (daxch0224m000)• Import Data (Non-Regular) (daxch0223m000)• Export Data (on a Regular Basis) (daxch0234m000)• Export Data (Non-Regular) (daxch0233m000)
Non-regular data exchange is useful when critical data has changed that must be updated, or if not allof the data has changed and you want to update only the changed data. You can also use Non-regulardata exchange if you want to test an exchange scheme before you approve the scheme for regular
Infor LN Exchange User Guide | 39

data exchange. For a non-regular data exchange, you can select a range of batches or a range ofbatch sequence numbers to import. The data exchange is restricted to these ranges.
You can use Regular data exchange if you want to maintain several sites whose data changesperiodically. Regular data exchange is also useful in multisite situations in which it is critical that no runis lost, overwritten, imported twice, or imported in the incorrect order. Only complete exchange schemescan be imported and exported in a regular run, which ensures that no part is missed.
Regular data exchange uses the run number. The run number is unique and consecutive for acombination of exchange scheme and exchange type and is based on the contents of the log table.Each redo is stored under a new try number, which is unique within a run number, exchange scheme,and exchange type combination.
Regular and non-regular data exchange differ in where they place the physical ASCII files. A non-regulardata exchange places the data in the sequential file directory, named at the exchange scheme level,in a file named in the Table Relations (daxch0531m000) session.
A regular data exchange builds an extra directory for each run of an export to retain a history of allexported files.
Using the Data Access Layer (DAL)During an Exchange import, you can use all the functionality programmed into the Data Access Layer(DAL). If you use the DAL, Exchange carries out all the constraint checks, integrity checks, and sideeffects, for example, updates on other tables, that are programmed into the DAL. Database integrityis guaranteed automatically.
Using the DAL reduces the costs of interface development. You can use the DAL to import standardinterfaces developed by Infor for partner products, as well as for specific interfaces built by customers,for example, to integrate LN with legacy systems. You can use the DAL in both single site and multisiteenvironments.
The checks or additional actions specified in the DAL are carried out for each row that is imported.Database errors are logged in the same way for DAL and non-DAL import. DAL hook errors are alsologged. You can specify whether the DAL property checks are or are not carried out.
If you specify the use of the DAL for a table relation for an import, the dal.new, dal.update, anddal.destroy functions are used instead of db.insert, db.update, and db.delete. You can choose to useDAL for particular tables and not for other tables, therefore, an import batch can contain both types oftable relations simultaneously. The import through DAL works for both the import based on audit orindicators (inserts, updates, deletes), and the full import (inserts only).
DAL settings are run time aspects, which means you can change these aspects without having toregenerate the import program. DAL settings are also logged in the log table at batch line level, toenable you to find out what the DAL settings were when the import was run.
Important to realize is that an update through the DAL can result in a number of side effects. Actionsperformed by the DAL must not be carried out twice. For example, if the DAL updates the available to
40 | Infor LN Exchange User Guide
Import module

promise (ATP) quantity for an item when importing order data, the ATP quantity must not be updatedin a condition script as well.
For this reason, you must not add any actions in condition scripts, or import additional data, that arealready handled in the DAL.
Setting up an import processTo import data, you start by setting up an exchange scheme, as described in "Master data" on page13. Next, you go on by defining the details of the tables to be imported.
To begin, you must use the Table Relations (Import) (daxch0521m000) session to create the relationshipat the table level between the LN tables and the ASCII files. You then create the relationship at thefield level, by setting up the relations between logical ASCII file fields and LN table fields. To set up therelations, you can use the Field Relations (Import) (daxch0522m000) session.
Often, you must convert data from one system for use by another. In this case, you can use theConversion Tables (daxch0105m000) and Conversions per Field (daxch0106m000) sessions to setup the conversions.
After you define the table relations, field relations, and conversions, you must run the Create ImportPrograms (daxch0227m000) session to compile an object that Exchange can use to run the import.
You then run the Import Data (Non-Regular) (daxch0223m000) session to test your import. When youare satisfied that everything is working, in the Import Data (on a Regular Basis) (daxch0224m000)session, you can set up imports to run as often as your business requires.
The Import module contains the following sessions:
• Table Relations (Import) (daxch0521m000)• Field relations (import) (daxch0522m000)• Conversion Tables (daxch0105m000)• Conversions per Field (daxch0106m000)• Create Import Program (daxch0227m000)• Import Data (on a Regular Basis) (daxch0224m000)• Import Data (Non-Regular) (daxch0223m000)
Infor LN Exchange User Guide | 41
Import module
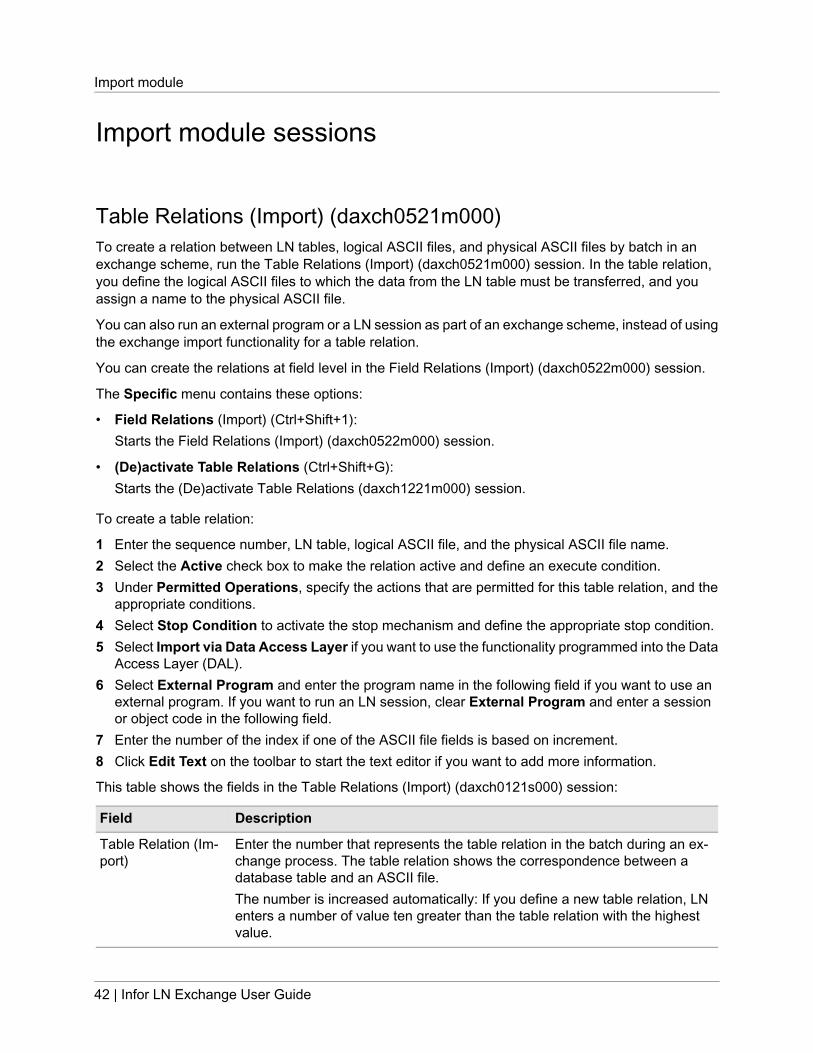
Import module sessions
Table Relations (Import) (daxch0521m000)To create a relation between LN tables, logical ASCII files, and physical ASCII files by batch in anexchange scheme, run the Table Relations (Import) (daxch0521m000) session. In the table relation,you define the logical ASCII files to which the data from the LN table must be transferred, and youassign a name to the physical ASCII file.
You can also run an external program or a LN session as part of an exchange scheme, instead of usingthe exchange import functionality for a table relation.
You can create the relations at field level in the Field Relations (Import) (daxch0522m000) session.
The Specific menu contains these options:
• Field Relations (Import) (Ctrl+Shift+1):Starts the Field Relations (Import) (daxch0522m000) session.
• (De)activate Table Relations (Ctrl+Shift+G):Starts the (De)activate Table Relations (daxch1221m000) session.
To create a table relation:
1 Enter the sequence number, LN table, logical ASCII file, and the physical ASCII file name.2 Select the Active check box to make the relation active and define an execute condition.3 Under Permitted Operations, specify the actions that are permitted for this table relation, and the
appropriate conditions.4 Select Stop Condition to activate the stop mechanism and define the appropriate stop condition.5 Select Import via Data Access Layer if you want to use the functionality programmed into the Data
Access Layer (DAL).6 Select External Program and enter the program name in the following field if you want to use an
external program. If you want to run an LN session, clear External Program and enter a sessionor object code in the following field.
7 Enter the number of the index if one of the ASCII file fields is based on increment.8 Click Edit Text on the toolbar to start the text editor if you want to add more information.
This table shows the fields in the Table Relations (Import) (daxch0121s000) session:
DescriptionField
Enter the number that represents the table relation in the batch during an ex-change process. The table relation shows the correspondence between adatabase table and an ASCII file.The number is increased automatically: If you define a new table relation, LNenters a number of value ten greater than the table relation with the highestvalue.
Table Relation (Im-port)
42 | Infor LN Exchange User Guide
Import module

DescriptionField
Enter a number to determine the process sequence order of the table relationin the batch during an exchange process. The sequence number does not have
Sequence Number
to be unique in a table relation. If two table relations with an identical sequencenumber are used in a batch, the relation with the lower table relation numberis processed first.The number is increased automatically: If you define a new table relation, LNenters a number of value ten greater than the table relation with the highestvalue.
Enter the LN table that contains data from the ASCII file to be read during animport procedure. One batch line can only read one LN table. If you need to
Table
use the same LN table to create more than one physical file, you can use mul-tiple batch lines. The various batch lines may or may not use the same ASCIIfile layout.To write data from more than one physical ASCII file to one LN table, use mul-tiple table relations.The LN table name is defined with the package code, a module code, and atable number, for example, tccom001.
Enter the name of the ASCII file that contains data to be transferred to a LNtable during an import procedure. To create the field relations of the table relation
ASCII File
automatically, the ASCII file name must be the same as the LN table name.You can do this if you do not have a data definition file of the ASCII file.The ASCII file name represents the logical ASCII file. You can create the ASCIIfile name in the ASCII Files (daxch0102m000) session.
Enter the name of the physical ASCII file where the data is to be written. Themaximum length of the file name is 11 characters.The file name you enter here is an extension of the default path. You can definethe default path in the Path for ASCII Files field under Paths on the Generaltab in the Exchange Schemes (daxch0101s000) session.
ASCII File Name
If an absolute path exists, the default path is not used. If this default is not anabsolute path, the file is stored in the directory for sequential files as defined inthe exchange scheme header record.
Select this check box to make the table relation active to enable the relation tobe used for data processing in an import process. If this check box is cleared,
Active
the table relations are kept for reference purposes but are not used during theimport process.You can also turn off all table relations except one to test a new change to usethis check box as a debugging tool. Select this check box if you want to test theexchange scheme, a single table relation, or only a few table relations.
Use this field to check whether the table relation must be carried out when yourun the import process. If the Active check box is selected, LN checks the exe-
Execute Condition
cute condition before running the table relation. If the execute condition returnstrue, the table relation is carried out. The execute condition is carried out beforethe table relation is started but after the previous table relations are finished. If
Infor LN Exchange User Guide | 43
Import module
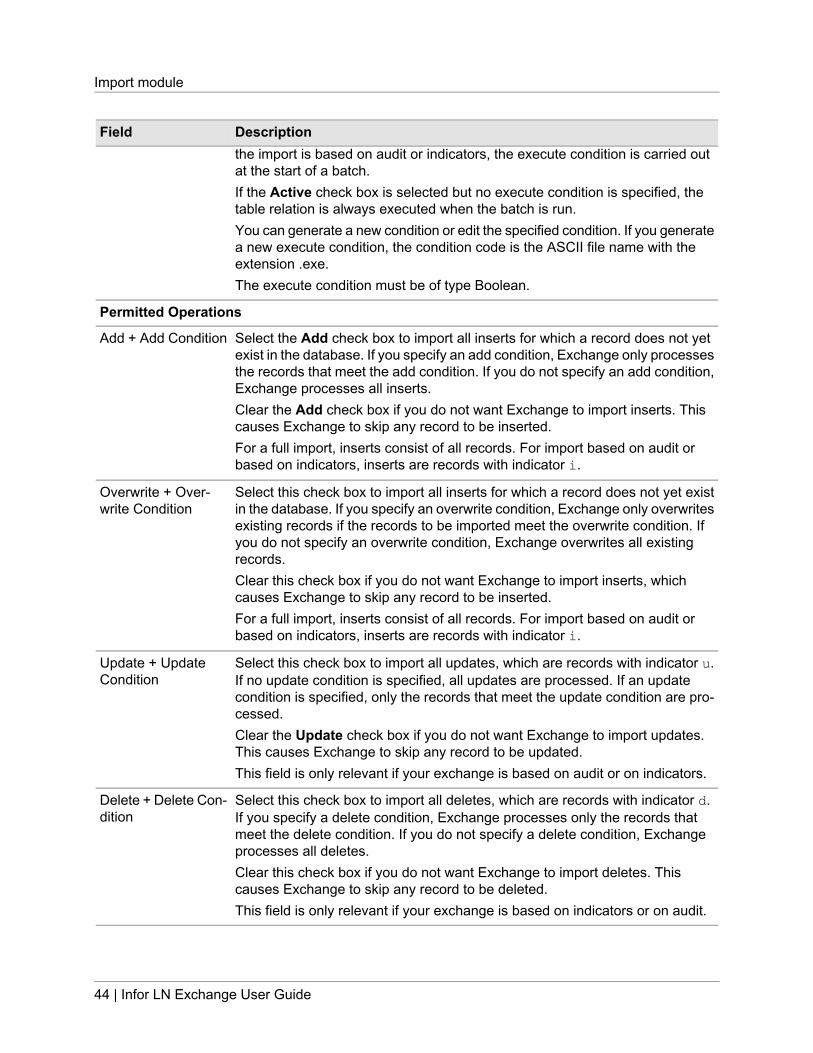
DescriptionFieldthe import is based on audit or indicators, the execute condition is carried outat the start of a batch.If the Active check box is selected but no execute condition is specified, thetable relation is always executed when the batch is run.You can generate a new condition or edit the specified condition. If you generatea new execute condition, the condition code is the ASCII file name with theextension .exe.The execute condition must be of type Boolean.
Permitted Operations
Select the Add check box to import all inserts for which a record does not yetexist in the database. If you specify an add condition, Exchange only processes
Add + Add Condition
the records that meet the add condition. If you do not specify an add condition,Exchange processes all inserts.Clear the Add check box if you do not want Exchange to import inserts. Thiscauses Exchange to skip any record to be inserted.For a full import, inserts consist of all records. For import based on audit orbased on indicators, inserts are records with indicator i.
Select this check box to import all inserts for which a record does not yet existin the database. If you specify an overwrite condition, Exchange only overwrites
Overwrite + Over-write Condition
existing records if the records to be imported meet the overwrite condition. Ifyou do not specify an overwrite condition, Exchange overwrites all existingrecords.Clear this check box if you do not want Exchange to import inserts, whichcauses Exchange to skip any record to be inserted.For a full import, inserts consist of all records. For import based on audit orbased on indicators, inserts are records with indicator i.
Select this check box to import all updates, which are records with indicator u.If no update condition is specified, all updates are processed. If an update
Update + UpdateCondition
condition is specified, only the records that meet the update condition are pro-cessed.Clear the Update check box if you do not want Exchange to import updates.This causes Exchange to skip any record to be updated.This field is only relevant if your exchange is based on audit or on indicators.
Select this check box to import all deletes, which are records with indicator d.If you specify a delete condition, Exchange processes only the records that
Delete + Delete Con-dition
meet the delete condition. If you do not specify a delete condition, Exchangeprocesses all deletes.Clear this check box if you do not want Exchange to import deletes. Thiscauses Exchange to skip any record to be deleted.This field is only relevant if your exchange is based on indicators or on audit.
44 | Infor LN Exchange User Guide
Import module

DescriptionField
Select this check box if you want the import process to stop when the returnvalue of the stop condition is true.
Stop Mechanism
Enter a stop condition. A stop condition causes the exchange process to stopif the return value of the stop condition is true. If the return value is false, the
Stop Condition
import process continues with the next batch line. The stop condition is carriedout at the end of each table relation.You can automatically generate a stop condition, in which case the stop conditioncode is the same as the ASCII file code with the .stp extension.This condition is of the Boolean type.
Data Access Layer
Select to use the Data Access Layer (DAL) for the current table. Using the DAL,an import carries out all the constraint checks, integrity checks and side effects,
Import via Data Ac-cess Layer
such as updates on other tables, that are programmed into the DAL. Thisguarantees database integrity, saves programming time, and avoids the errorsthat can occur in condition scripts.
Select to use the Data Access Layer (DAL) property checks. The user of prop-erty checks is safer, but you can turn these checks off to boost performance.
DAL property checks
Select to update dependent fields through the DAL. If this check box is selected,it is important that these dependent fields are not included in the Field Relations(import).
Update DependentFields
User Defined Program
Select to use an external program and enter the program’s name in the nextfield. Clear this check box to run an LN session, and enter a session or objectcode in the following field.
External Program
Enter the name of the external program to be used, or enter a session or objectcode to run an LN session.
Program Name
Enter the number of the index on which you want to sort.Sort on Index
Indicates whether this table relation includes text.Text
Field Relations (import) (daxch0522m000)After you run the Table Relations (Import) (daxch0521m000) session to define the table relations, youdefine the field relations.
Run the Field Relations (Import) (daxch0522m000) session to set up the relations between logicalASCII file fields and LN table fields by batch in an exchange scheme. Use the details session to specifythe data to be passed to the physical ASCII files.
After you import data using Exchange, for best results, enter a record in this session to represent allthe fields in the table.
Infor LN Exchange User Guide | 45
Import module
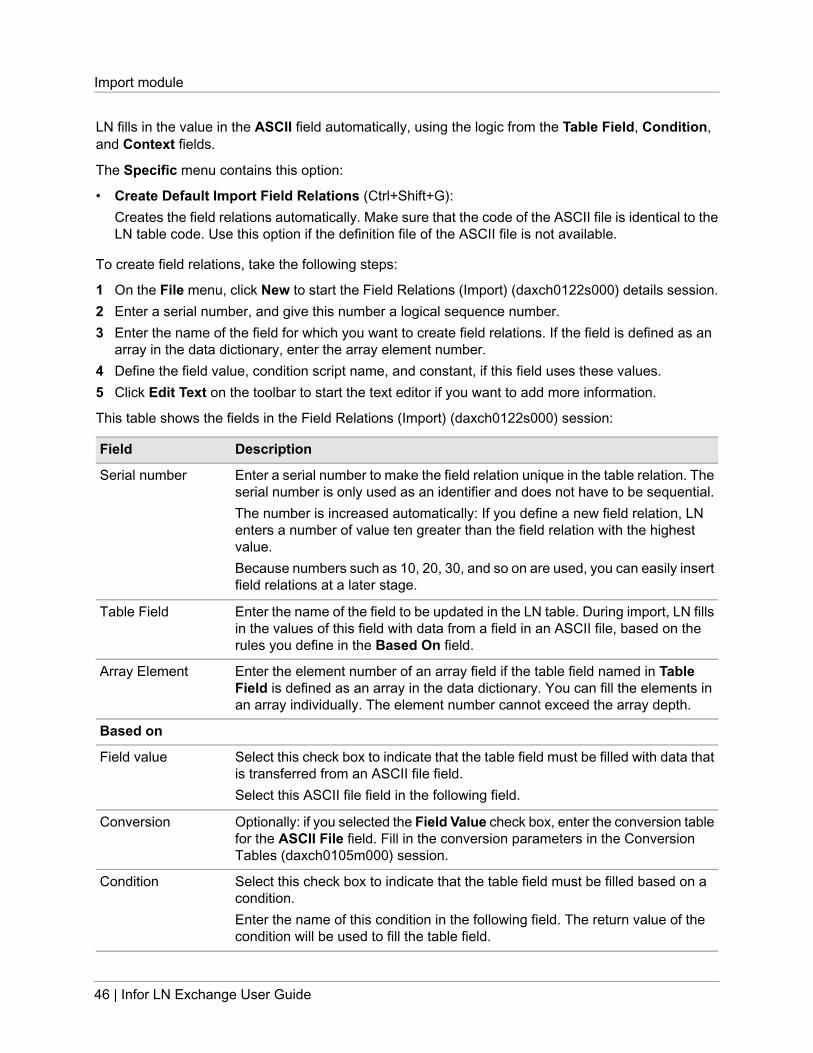
LN fills in the value in the ASCII field automatically, using the logic from the Table Field, Condition,and Context fields.
The Specific menu contains this option:
• Create Default Import Field Relations (Ctrl+Shift+G):Creates the field relations automatically. Make sure that the code of the ASCII file is identical to theLN table code. Use this option if the definition file of the ASCII file is not available.
To create field relations, take the following steps:
1 On the File menu, click New to start the Field Relations (Import) (daxch0122s000) details session.2 Enter a serial number, and give this number a logical sequence number.3 Enter the name of the field for which you want to create field relations. If the field is defined as an
array in the data dictionary, enter the array element number.4 Define the field value, condition script name, and constant, if this field uses these values.5 Click Edit Text on the toolbar to start the text editor if you want to add more information.
This table shows the fields in the Field Relations (Import) (daxch0122s000) session:
DescriptionField
Enter a serial number to make the field relation unique in the table relation. Theserial number is only used as an identifier and does not have to be sequential.The number is increased automatically: If you define a new field relation, LNenters a number of value ten greater than the field relation with the highestvalue.
Serial number
Because numbers such as 10, 20, 30, and so on are used, you can easily insertfield relations at a later stage.
Enter the name of the field to be updated in the LN table. During import, LN fillsin the values of this field with data from a field in an ASCII file, based on therules you define in the Based On field.
Table Field
Enter the element number of an array field if the table field named in TableField is defined as an array in the data dictionary. You can fill the elements inan array individually. The element number cannot exceed the array depth.
Array Element
Based on
Select this check box to indicate that the table field must be filled with data thatis transferred from an ASCII file field.Select this ASCII file field in the following field.
Field value
Optionally: if you selected the Field Value check box, enter the conversion tablefor the ASCII File field. Fill in the conversion parameters in the ConversionTables (daxch0105m000) session.
Conversion
Select this check box to indicate that the table field must be filled based on acondition.Enter the name of this condition in the following field. The return value of thecondition will be used to fill the table field.
Condition
46 | Infor LN Exchange User Guide
Import module

DescriptionFieldThe conditions are created in the Conditions (daxch0114m000) session.
Optionally: if you selected the Condition check box, enter a conversion tablein this field. Use a conversion code to modify data in a field relation before thereturn value of a condition is transferred to the LN table field.You can create conversion tables in the Conversion Tables (daxch0105m000)session.
Conversion
Select this check box to indicate that the table field must be filled with a constantvalue.Specify this constant value in the following field.
Constant
In the Conversion field that follows, enter the conversion table that modifiesthe data in a field relation before the constant value is transferred to the LN tablefield.
Optionally: if you selected the Constant check box, use this field to enter thename of the conversion table that modifies the field relation data before theconstant value is transferred to the LN table field.You create the conversion tables in the Conversion Tables (daxch0105m000)session.
Conversion
Select this check box to base the import on increment. The table field is incre-mented with the value in the Increment field. You can only use this field fornumeric fields that are part of the primary index.
Increment
Enter the initial value of the series for the table field. You can only maintain thisfield if the Based On field has the value Increment. During processing, when-
Start Value
ever one of the higher fields of the primary index changes, the table field hasthe value Start Value.
Enter the increment value of the series for the table field. You can only maintainthis field if the Based On field has the value Increment. During processing, if
Increment Value
the higher fields of the primary index do not change, the table field is incrementedwith the Increment Value.
Select this check box to transfer the default value as defined in the data dictio-nary to the LN table field.
Default
Indicates whether this field relation includes text.Text
Text Settings
Select this check box to handle the field as a text number without updating theactual text. Use this setting only if you are sure the text number in the file refersto the appropriate text in the company to which you are importing.
Text Number
Select this check box to append the imported text to the existing text.Append Text
Select this check box to overrule the text language with a fixed language. Forexample, if a text was exported from language 3, but you set Text Languageto 2, the text will be added in language 2 when importing.
Text Language
Infor LN Exchange User Guide | 47
Import module
DescriptionField
Specify an ASCII file field that contains the text language. If you fill this field,the result is the same as if you select the Text Language check box, however,
Text Languageield
the text language will not be fixed, but will depend on the contents of the ASCIIfile field.
Permitted Operations
Select this check box to overwrite the field based on the condition defined inthe following field. If you insert an existing record, if no condition is specified,or if the return condition returns true, the field is overwritten.
Overwrite Field
If the Overwrite Field check box is selected, enter a condition in this field. Ifyou insert an existing record, if the return value of the overwrite condition istrue, the value of the field is overwritten.To generate a condition automatically, click Create/Edit. The condition foroverwriting code contains the ASCII file code with the .ovr extension.
Condition
The condition must be of the Boolean type. Preconditions for the overwritecondition are:
• The type of action is Insert.• All ASCII fields are filled.• The record already exists.• LN table fields are filled with this record.
Select this check box to update a record if the return value of the update condi-tion is true. Enter the update condition in the following field.
Update Field
If the Update Field check box is selected, enter a condition code. The field isupdated if the return value of the update condition is true.During an import based on indicators or an import based on audit, records thatmust be updated start with the letter u.
Condition
If you click Create/Edit, you can automatically generate a condition. In thatcase, the condition for overwriting code contains the ASCII file code with the.upd extension.This condition is of the Boolean type. Preconditions for the update conditionare the following:
• The type of action is update (old values).• ASCII file fields are filled: primary key fields of the source table on the export
site and values that are changed.• The record that must be updated exists.• LN table fields are filled with an existing record.
48 | Infor LN Exchange User Guide
Import module

Conversion Tables (daxch0105m000)Data from other systems does not always match the data on the local LN system. For example, thelocal LN system can refer to the English language with the code EN, while other systems use the codeENG, GB, or US. Before you use Exchange to load data into LN, you must synchronize the data onthe two systems.
You can use the Conversion Tables (daxch0105m000) session to store the relationships between theold and new values of fields of data. Using these relationships when importing data, LN converts theold to new before writing the rows.
You can use the code you set up here in the following sessions:
• Field Relations (Import) (daxch0122s000)• Field Relations (Export) (daxch0132s000)• Conversions per Field (daxch0106m000)
To set up conversion tables:
1 On the File menu, click New to create a conversion relation.2 Enter the relation’s name and description.3 Double-click the existing conversion relation to change a conversion relation.4 On the File menu, click Print to print the conversion relations.
This table shows the fields in the Conversion Tables (daxch0105m000) session:
DescriptionField
Enter the relation name. All the relations for one exchange scheme are storedtogether in this table. For LN to know which rules to use for a particular field,
Relation
specify the same relation name to all translation rules that are logically groupedtogether.
Enter a description of the conversion table.Description
Enter the source system value.Old Value
Enter the LN value.New Value
Conversions per Field (daxch0106m000)After you use the Conversion Tables (daxch0105m000) session to define a conversion code, you canuse the Conversions per Field (daxch0106m000) session to assign the conversion code to an LN tableand field.
The Specific menu contains this option:
Load Conversions per Field:
Conversions per Field (daxch0106m000) session, which you can use to convert data in LN table fields,according to a conversion table.
Infor LN Exchange User Guide | 49
Import module
To create a conversion:
1 On the File menu, click New to create a new conversion for an LN table.2 Enter the exchange scheme for which you want to create conversions.3 Enter the names of the LN table, field, and conversion relation.4 Double-click an existing conversion for a LN table field to change an existing conversion.
This table shows the fields in the Conversions per Field (daxch0106m000) session:
DescriptionField
Enter the name of the table whose contents are to be converted. This overridesthe rule in the Field Relations (Import) (daxch0522m000) session.
Table
Enter the field whose contents are to be converted. This overrides the rule inthe Field Relations (Import) (daxch0522m000) session.
Table Field
Enter the field to be used during data exchange.Conversion
Create Import Program (daxch0227m000)To be able to use an exchange scheme, you must pull together all the data in the sessions you havejust filled, put the data into one program script, and compile the program script into an executableobject. The Create Import Programs (daxch0227m000) session does all of that for import scripts.
To print the actual data contained in the ASCII file to be imported, you can use the Print ASCII File(daxch0202m000) session. This enables you to ensure, for example, that separators are correct andto see whether any data must be converted.
To create an import program:
1 Enter the range of exchange schemes and batches for which you want to create import programs.2 Specify the compile options.
This table shows the fields in the Create Import Programs (daxch0227m000) session:
DescriptionField
Selection Range
Enter the exchange scheme to be compiled.Exchange Scheme
Enter the exchange scheme’s batch number.Batch
Compile Options
Select to go through a condition script step by step.Compile in DebugMode
Select to compile with the profiler. After the import runs, the Profiler generatesa report that provides information about the performance time required for eachfunction.
Compile with Profiler
50 | Infor LN Exchange User Guide
Import module
DescriptionField
Select this check box to view a detailed list of errors that show the exact problemwith each line of code.
Display Errors
Import Data (on a Regular Basis) (daxch0224m000)Use the Import Data (on a Regular Basis) (daxch0224m000) session to run the import program totransfer data on a regular basis from sequential ASCII files to LN tables. The import can also run aspart of a batch job.
To run the import program, take the following steps:
1 Select a range of exchange schemes.2 Select the processing type.3 Select the Overrule Batch Company check box if the data is imported from a company other than
the batch company.4 Enter another company if the current company is overruled.5 Define the details of the import procedure in the Processing Details group box.6 Click Import Data to start the import procedure.7 Click Log Table to view the contents of the log table. A log table provides an overview of the results
of the import procedure.
This table shows the fields in the Import Data (on a Regular Basis) (daxch0224m000) session:
DescriptionField
Selection Range
Enter the name of the exchange scheme.Exchange Scheme
Processing Settings
Choose the type of run for this data exchange:Processing Type
• New run.• Restart previous run: This option enables you to reuse the last run number
to import data. You usually use this field in the Import Data (on a RegularBasis) (daxch0224m000) session, in which each run number provides differ-ent data sets. This session affects only the log files, because the data to beloaded into LN is the same for both the last run number used and the firstfree run number.
• Reprocess rejected records: When records are rejected during an importprocess, LN creates two additional files to hold the rejected records. Recordsthat are rejected due to index or domain errors (database problems) areplaced in the Rejected due to Error file and records that are rejected due toa condition returning a false status are placed in the Rejected due to Condi-tion file. LN places these files in the same directory as the data file that was
Infor LN Exchange User Guide | 51
Import module

DescriptionFieldread in and appends the suffixes .e01 or .c01 to them. If more records arerejected during reprocessing, LN creates new files with the next sequentialnumber. When you choose this option, you can use the next two fields tochoose which records to reprocess.
• Continue interrupted run: If an exchange scheme run stops during the run,you can restart the import, but only if more than one batch line exists and ifthe restart can begin at the start of the batch line that was not completed. Ifonly one batch line, exists, this option is the same as a complete restart ofthe import.
This check box is only available if you choose Reprocess Rejected Recordsfrom the Processing Type list.
Reprocess rejecteddue to errors
This check box is only available if you choose Reprocess Rejected Recordsfrom the Processing Type list.
Reprocess rejecteddue to Conditions
Select this check box to override the value in the Company field in the Batches(daxch0104m000) session.
Overrule Batch Com-pany
Enter the company to be used during this session instead of the batch company.You can only specify a value in this field if the Overrule Batch Company checkbox is selected.
Company
Processing Details
Select this check box to quit if the return value of a stop condition is true. Clearthis check box if you want the import to continue to run and write a message to
Really Quit on StopCondition
the log file. You define the stop condition in the Table Relations (Import)(daxch0121s000) session.
Select this check box to specify that messages must remain on screen until youpress enter. Clear this check box if you want the import program to continue
Wait for <CR> withMessages
without any interaction from you. You can use this option for an import that runsovernight.
Select this check box if you want the import to finish without checking for otherimport batches. You can use this option to test or run the import without using
Ignore Batches toImport
data that is awaiting import at the export site. This option is useful if you testan import in a multisite environment.If you clear this check box and an active exchange link exists for a batch, thatbatch will only run if data is awaiting import. For example, if no batch exists toimport.This field is only relevant if you use multisite control, and the batch is used inone or more exchange links.
Select this check box if you want to restore compressed ASCII files to theiroriginal format before the import procedure.
Uncompress ASCIIFiles
Only use this check box if the ASCII files that will be imported were compressedusing the LN compression program.
52 | Infor LN Exchange User Guide
Import module

Import Data (Non-Regular) (daxch0223m000)Use the Import Data (Non-Regular) (daxch0223m000) session to run the import program to transferdata on a non-regular basis from sequential ASCII files to LN tables. You can use this session to testexchange schemes that will be run on a regular basis, to make sure that the import procedure functionsproperly.
You can define the details of an exchange scheme in the master data and import Business Objects.
To run the import program:
1 Select a range of exchange schemes, batches, and/or batch sequence numbers.2 Select the processing type.3 Enter the start and end time of the audit range if the import is based on audit.4 Select the Overrule Batch Company check box if the data is imported from a company other than
the current company.5 Enter another company if the current company is overruled.6 Select the Wait for <CR> with Messages check box if the import program must stop after a message.7 Click Import Data to start the import procedure.8 Click Log Table to view the contents of the log table. A log table provides an overview of the results
of the import procedure.
This table shows the fields in the Import Data (Non-Regular) (daxch0223m000) session:
DescriptionField
Selection Range
Enter the exchange scheme.Exchange Scheme
Enter the batch in the exchange scheme.Batch
Enter the batch sequence number.Batch SequenceNumber
Processing Settings
Choose the type of run for this data exchange:Processing Type
• New run.• Restart previous run: This option allows you to import data using the last
run number over again. This field is usually used in the Import Data (on aRegular Basis) (daxch0224m000) session, where each run number providesdifferent data sets. Only the log files are affected in this session, becausethe data to be loaded into LN is the same for both the last run number usedand the first free run number.
• Reprocess rejected records: When records are rejected during an importprocess, LN creates two additional files to hold the rejected records. Recordsthat are rejected due to index or domain errors (database problems) areplaced in the Rejected due to Error file and records that are rejected due toa condition returning a false status are placed in the Rejected due to Condi-tion file. LN places these files in the same directory as the data file that was
Infor LN Exchange User Guide | 53
Import module
DescriptionFieldread in and appends the suffixes .e01 or .c01 to them. If more records arerejected during reprocessing, LN creates new files with the next sequentialnumber. If you choose this option, you can use the next two fields to choosewhich records to reprocess.
• Continue interrupted run: If an exchange scheme run stops in the middleof the run, you can restart the import if there is more than one batch line andthe restart can begin at the start of the batch line that was not completed. Ifthere is only one batch line, this option is the same as a complete restart ofthe import.
Enter Yes to override the value in the Company field in the Batches(daxch0104m000) session.
Overrule Batch Com-pany
Enter the company to be used in the Company field in this session.Company
Processing Details
Select to quit on a stop condition, or clear if you want the import to continuerunning and only return an error message if it meets the stop condition.
Really Quit on StopCondition
Select this check box to have messages remain on screen until you press enter.Wait for <CR> withMessages
Start and end date and timeFor regular data exchange, the start date and time are taken from the log table and you usually cannotspecify this information. If the start date and time are the same for all selected Exchange Schemes,the data and time appear in all the schemes. You can only fill in the start date and time yourself thefirst time you export an Exchange Scheme using audit files.
For non-regular data exchange, you can specify whether the start date and time is based on the contentsof the log table, which is useful if not all selected exchange schemes have the same latest end dateand time.
You can fill in the end date and time for both regular and non-regular data exchange.
During the data exchangeAfter you complete the data exchange session and choose Import Data or Export Data, a statuswindow appears and displays the progress of the data exchange. For each batch line that completes,LN displays the exchange scheme, the batch, and the batch line. The numbers of records read,processed, rejected due to error, and rejected due to conditions are also displayed. To view the importedor exported data, start the Display Log Tables (Batch line level) (daxch0509m000) session. This session
54 | Infor LN Exchange User Guide
Import module
shows the number of records processed from the ASCII file, the number of records imported successfully,and the number of records rejected due to an error or a condition.
If records are rejected due to validation checks or errors, LN writes these records to a log file. You canrepeat the data exchange for those rejected records alone. To print the rejected records stored in thelog file, you can use the Print Log File (daxch0215m000) session.
LN verifies the imported values according to the referential integrity and validation rules, such as fieldtype, length, range, and format. This information is available in the data dictionary.
Infor LN Exchange User Guide | 55
Import module
56 | Infor LN Exchange User Guide
Import module

5Multisite control
IntroductionWith LN, you can now use the Exchange module to set up a batch-driven replication server. Thisenables you to maintain the same data at multiple sites.
Data replication can be synchronous or asynchronous. In synchronous replication, data is sent fromone system to another as soon as the data changes. Asynchronous replication is batch-driven, that is,occurs at set time intervals or on demand.
In LN, data replication is asynchronous and can be accomplished as follows:
• The source system runs an export process.• The source system sends a message to the target system or systems that notifies them that new
data is available.• The target system runs an import process to assimilate the new data received from the source
system.
In Exchange, a site is defined as an application server on which one or more exchange schemes forexporting or importing data are stored.
Audit trailOptionally, you can define a multisite Exchange that is based on audit, so that only the updates in aspecific period are exchanged, which leads to an improvement in performance.
If the export is based on audit, the corresponding import must be based on audit as well.
Before you can begin an exchange process that is based on audit, you must activate audit trail for thetables in your exchange schemes, which you can do by means of the Generate Audit Configuration(daxch1201m000) session. For more details, refer to "Using audit trail in the Exchange module" onpage 97.
Infor LN Exchange User Guide | 57
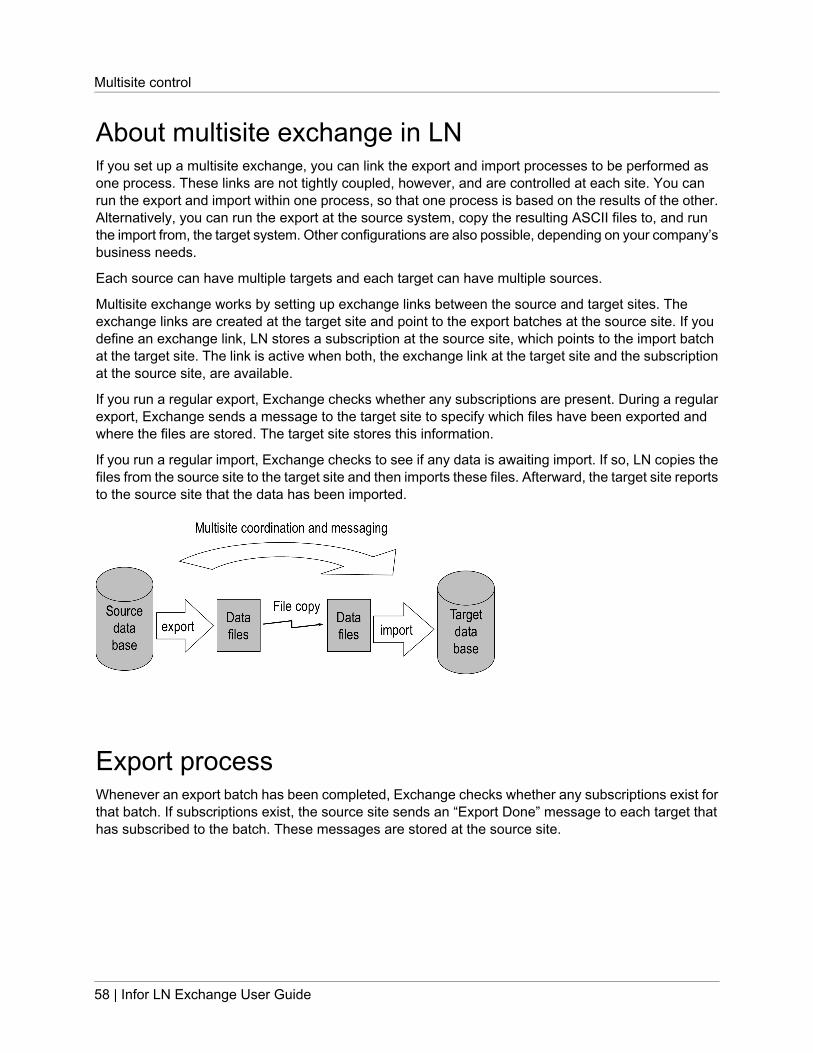
About multisite exchange in LNIf you set up a multisite exchange, you can link the export and import processes to be performed asone process. These links are not tightly coupled, however, and are controlled at each site. You canrun the export and import within one process, so that one process is based on the results of the other.Alternatively, you can run the export at the source system, copy the resulting ASCII files to, and runthe import from, the target system. Other configurations are also possible, depending on your company’sbusiness needs.
Each source can have multiple targets and each target can have multiple sources.
Multisite exchange works by setting up exchange links between the source and target sites. Theexchange links are created at the target site and point to the export batches at the source site. If youdefine an exchange link, LN stores a subscription at the source site, which points to the import batchat the target site. The link is active when both, the exchange link at the target site and the subscriptionat the source site, are available.
If you run a regular export, Exchange checks whether any subscriptions are present. During a regularexport, Exchange sends a message to the target site to specify which files have been exported andwhere the files are stored. The target site stores this information.
If you run a regular import, Exchange checks to see if any data is awaiting import. If so, LN copies thefiles from the source site to the target site and then imports these files. Afterward, the target site reportsto the source site that the data has been imported.
Export processWhenever an export batch has been completed, Exchange checks whether any subscriptions exist forthat batch. If subscriptions exist, the source site sends an “Export Done” message to each target thathas subscribed to the batch. These messages are stored at the source site.
58 | Infor LN Exchange User Guide
Multisite control
Export Done messageExchange only sends and stores an “Export Done” message if the batch contains at least one activetable relation (export). To create and send an “Export Done” message, Exchange requires thisinformation:
• Source environment, company, exchange scheme, and batch• Run and try number of the export process: required for the sequence order at the target site• Target environment, company, exchange scheme, and batch• Separator and enclosing character of the source exchange scheme• Whether the ASCII files were compressed after export• Batch line and file name, including the directory, for each batch line completed
At the target site, Exchange checks whether an exchange link that specifies the source environment,company, exchange scheme, and batch exists. If so, Exchange stores the information in Batches toImport and Batch Lines to Import.
File transport specificationsWith regular export, you can choose whether to compress the ASCII files. After Exchange copies thefiles to the target site, the files are decompressed.
Exchange does not provide additional security; that is, the files to be transported are not encrypted.
When copying the files, any previously existing files are overwritten. This does not often happen,however, because usually you would use a separate subdirectory for each run for the regular exportand the regular import.
Import processA batch to import refers to a target batch that you can run because the source batch has already beenrun.
Before you run a regular import batch, Exchange checks whether an active exchange link exists forthat batch at the target site. If no exchange link exists, Exchange runs an ordinary import. If an activeexchange link is available, Exchange checks the batches to import. If no batches await import, Exchangedoes not perform an import. If a batch is awaiting import, Exchange performs the following functions,and repeats the process for subsequent batches to import:
• Copies the files from the source site.• Removes the run from the batches to import and deletes the run’s batch lines to import.• Runs the import.• Sends an Import Done message to the source site.
Infor LN Exchange User Guide | 59
Multisite control
The import process takes some time to complete, which means that while Exchange is busy processingone batch to import, new batches to import can arrive. Exchange continues to check for new batchesuntil all the batches are imported.
Exchange usually runs a regular import only if no exchange link exists or if one or more batches areawaiting import. You can overrule this, however, and initiate an import batch without having Exchangeperform these checks.
Note: Each batch to import is processed in order of the run number and the try number within eachrun. The run number refers to the sequence order of a process within an exchange scheme. The trynumber is the number of attempts made for each run. If Exchange cannot process one import batch,Exchange stops and does not continue processing subsequent batches. If required, you can deletethe problematic batch so that Exchange can continue with the subsequent batches.
Import Done messageThe Import Done message reports to the source site that the data has been successfully imported atthe target site. The files at the export site are deleted only after all of the target sites that need thosefiles have copied and imported the files.
If you send the Import Done message, Exchange checks whether any rejected Import Done messagesexist, and if so, sends these messages, as well. The sequence in which the Import Done messagesare delivered to the source site is not relevant.
If the files were successfully imported but the Import Done message could not be delivered to thesource site, Exchange writes the Import Done message to the rejected Import Done messages andlogs an error message.
To create and send an Import Done message, Exchange must have the following information:
• Source environment, company, exchange scheme, and batch• The run number and try number of the export• Target environment, company, exchange scheme, and batch
When Exchange receives the Import Done message at the source site, Exchange removes the storedcurrent Export Done message to which the Import Done message refers.
When you are ready to clean up the ASCII files, the Remove ASCII Files (daxch2202m000) sessionchecks whether all targets that have subscribed to the source have already processed the files. A fileis only deleted if the run and try that created the file do not occur in the current Export Done messages.
60 | Infor LN Exchange User Guide
Multisite control

Setting up a multisite exchange
PrerequisitesTo set up a multisite exchange, you must have an export exchange scheme on the source system andan import exchange scheme on the target system.
In addition, to prepare the multisite exchange, you must take the following steps:
Preparation steps on the source system1 Run the Systems (ttaad0550m000) session to define the target system as a remote system. You
must specify the target system’s name and BSE path. The BSE path is the directory (on the targetsystem) on which the LN software is installed, for example, /usr2/bse.
2 Run the Remote User Data (ttaad2501m000) session to create (for the user account that will runthe export scheme on the source site) a remote user account that provides access to the targetsystem.
Preparations on the target system1 Run the Systems (ttaad0550m000) session to define the source system as a remote system. You
must specify the source system’s name and BSE path. The BSE path is the directory on the sourcesystem on which the LN software is installed, for example, /usr4/bse.
2 Run the Remote User Data (ttaad2501m000) session to create, for the user account that will runthe import scheme on the target site, a remote user account that provides access to the sourcesystem.
Setting up a multisite exchange1 Create a target environment:
On the source system, create a multisite target environment through the Environments(daxch4100m000) session. You can define this environment by the name and BSE path of the targetsystem.
2 Create a source environment:On the target system, create a multisite source environment in the Environments (daxch4100m000)session. This environment is defined by the name and BSE path of the source system.
3 Create an exchange link:On the target system, create an exchange link to define the relation between source and target site:in the Exchange Links (daxch4501m000) session, link the target exchange scheme and target batchto the source environment, source company, source exchange scheme and source batch.
4 Start receiving – source system:
Infor LN Exchange User Guide | 61
Multisite control
On the source system, start the Receive Remote Procedure Calls (daxch4200m000) session andclick Start Receiving.
5 Start receiving – target system:On the target system, start the Receive Remote Procedure Calls (daxch4200m000) session andclick Start Receiving.
6 Activate the exchange link:On the target system, activate the exchange link by means of the commands on the Specific menuin the Exchange Links (daxch4501m000) session.
7 Check for the subscription:On the source system, run the Subscriptions (daxch4502m000) session to check whether asubscription was generated.
The multisite setup is now ready for use: to start to exchange data between source and target system,you can run the export/import scripts of the exchange schemes on the source and target system.
Note: For details on the sessions described in the previous procedure, refer to "Multisite Controlsessions" on page 62, and to the online Help.
Multisite Control sessionsThe Multisite Control Business Object contains the following sections:
• Environments (daxch4100m000)• Exchange Links (daxch4501m000)• Activate/Deactivate Exchange Links (daxch4201m000)• Resend Rejected Messages (daxch4203m000)• Subscriptions (daxch4502m000)• Receive Remote Procedure Calls (daxch4200m000)
Environments (daxch4100m000)To set up a multisite exchange, you must define all the source environments and target environmentsthat are used in the multisite exchange. Use the Environments (daxch4100m000) session to find, list,and maintain sites to be used to exchange data between various sites.
Although this session is especially designed for data exchanges between separate sites, you can alsouse this session if you use multisite exchange in a single BSE environment. The target environmentand source environment are then the same.
To set up an environment:
1 Enter the name of the environment.
62 | Infor LN Exchange User Guide
Multisite control
2 Enter the system on which the environment resides, and the path for the directory of the environment.
This table shows the fields in the Environments (daxch4100m000) session:
DescriptionField
Enter the name of the environment.Environment
Enter the system on which the environment resides.System
Enter the path for the directory of the environment.BSE Path
Exchange Links (daxch4501m000)After you define the source environments and target using the Environments (daxch4100m000) session,you must define the exchange links and subscriptions so that you can link the target environment andsource environment.
Run the Exchange Links (daxch4501m000) session to view a list of the exchange links you have alreadydefined. Use the details session to create new links. The exchange link code defined at the target sitemust be the same as the subscription defined at the source site.
You can only delete an exchange link if the link’s status is inactive at both the source and target sites.
For more information on how to activate and deactivate exchange links, see "Activate/DeactivateExchange Links (daxch4201m000)" on page 64.
The Specific menu contains the following:
• Activate (Ctrl+Shift+A):Activates a single exchange link.
• Deactivate (Ctrl+Shift+D):Deactivates a single exchange link.
• Activate/Deactivate Exchange Links:Activates or deactivates a range of exchange links.
• Batches to Import:Enables you to view or delete the batches to import.
• Rejected Import Done Messages:Enables you to view the Rejected Import Done messages.
To set up an exchange link:
1 On the File menu, click New to start the Exchange Links (daxch4101s000) session.2 Enter a name and description for the link that you want to create.3 Enter the target exchange scheme and batch.4 Enter the source information.5 Click Edit Text on the toolbar to start the text editor if you want to add more information.
Infor LN Exchange User Guide | 63
Multisite control
This table shows the fields in the Exchange Links (daxch4101s000) session:
DescriptionField
Enter the name of the link you want to create.Exchange Link
Enter a description for this exchange link.Description
Enter the name of the target exchange scheme.Target ExchangeScheme
Enter the batch number of the target exchange scheme.Target Batch
Enter the source environment.Source Environment
Enter the number of the source company.Source Company
Enter the name of the source exchange scheme.Source ExchangeScheme
Enter the batch number in the source exchange scheme.Source Batch
This field is unavailable until links at both the target and source sites are setup, and you activate this exchange link.
Exchange Link Sta-tus
Indicates whether this exchange link includes text.Exchange Link Text
Activate/Deactivate Exchange Links (daxch4201m000)After you use the Exchange Links (daxch4501m000) session to create exchange links, you must activatethe links before you can use the links in a multisite exchange. To activate and deactivate a range ofexchange links between the source and target batches, you can use the Activate/Deactivate ExchangeLinks (daxch4201m000) session. The link must be active to make the exchange link available at thetarget site and the subscription available at the source site. If the link is not active, you cannot use themultisite functionality.
When you activate an exchange link, the target site sends a Subscribe message to the source site.The subscription is checked and stored at the source site. Subsequently, whenever the batch definedin the subscription is carried out, the source site sends an Export Done message to the target site. Ifthis message is not processed successfully, the link is stored at the target site, but the status changesto Inactive.
If you deactivate an exchange link at the target site, Exchange sends an Unsubscribe message to thesource site. The subscription is then deleted and the target batch can no longer automatically processdata from the source site. The Current Export Done messages are also deleted.
You can only delete an exchange link if the link’s status is Inactive at both the source and target sites.
This process can also run as part of a job.
To activate or deactivate an exchange link:
1 Under Action Type, choose whether to activate or to deactivate the link.2 Under Selection Type, choose how to make a selection of links.
64 | Infor LN Exchange User Guide
Multisite control
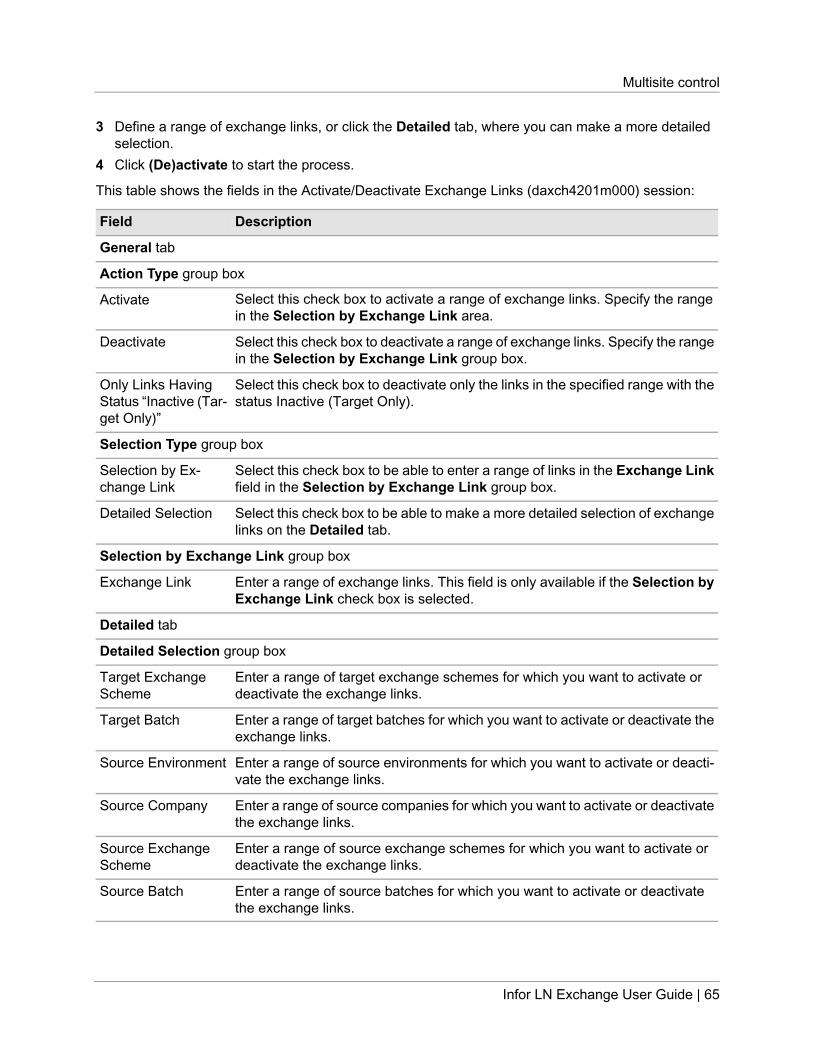
3 Define a range of exchange links, or click the Detailed tab, where you can make a more detailedselection.
4 Click (De)activate to start the process.
This table shows the fields in the Activate/Deactivate Exchange Links (daxch4201m000) session:
DescriptionField
General tab
Action Type group box
Select this check box to activate a range of exchange links. Specify the rangein the Selection by Exchange Link area.
Activate
Select this check box to deactivate a range of exchange links. Specify the rangein the Selection by Exchange Link group box.
Deactivate
Select this check box to deactivate only the links in the specified range with thestatus Inactive (Target Only).
Only Links HavingStatus “Inactive (Tar-get Only)”
Selection Type group box
Select this check box to be able to enter a range of links in the Exchange Linkfield in the Selection by Exchange Link group box.
Selection by Ex-change Link
Select this check box to be able to make a more detailed selection of exchangelinks on the Detailed tab.
Detailed Selection
Selection by Exchange Link group box
Enter a range of exchange links. This field is only available if the Selection byExchange Link check box is selected.
Exchange Link
Detailed tab
Detailed Selection group box
Enter a range of target exchange schemes for which you want to activate ordeactivate the exchange links.
Target ExchangeScheme
Enter a range of target batches for which you want to activate or deactivate theexchange links.
Target Batch
Enter a range of source environments for which you want to activate or deacti-vate the exchange links.
Source Environment
Enter a range of source companies for which you want to activate or deactivatethe exchange links.
Source Company
Enter a range of source exchange schemes for which you want to activate ordeactivate the exchange links.
Source ExchangeScheme
Enter a range of source batches for which you want to activate or deactivatethe exchange links.
Source Batch
Infor LN Exchange User Guide | 65
Multisite control
Resend Rejected Messages (daxch4203m000)The Resend Rejected Messages (daxch4203m000) session is relevant at both the source site and thetarget site. You can use this session to resend these rejected messages:
• Current Export Done• Import Done• Subscription Destroyed
Messages can be rejected for these reasons:
• The target system does not use LN Exchange.• The target system is not operational.• Network connections are slow.• No remote user is present in the target environment or in the source environment.• The Receive Remote Procedure Calls (daxch4200m000) session did not run in the source
environment or target environment.
If a message cannot be delivered to the receiving site, the message is stored at the sending site andreceives the status Rejected.
To resend the rejected message:
1 Select one or more message types in the Messages to Resend group box. This opens the relevanttab.
2 Use the check boxes in the Selection Type group box to make either a global or a detailed selectionof messages to resend.
3 Define the range on the appropriate tab.4 Click Resend to start the process.
After the messages are successfully sent, the messages are removed.
This process can also run automatically as part of a job. As a result, if you perform this procedureregularly, you do not have to check manually for rejected messages.
This table shows the fields in the Resend Rejected Messages (daxch4203m000) session:
DescriptionField
Selection tab
Messages to Resend group box
Select this check box to activate the fields contained on the Current ExportDone Messages tab.
Current Export DoneMessages
Select this check box to activate the fields contained on the Import DoneMessages tab.
Import Done Mes-sages
Select this check box to activate the fields contained on the Subscription De-stroyed Messages tab.
Subscription De-stroyed Messages
Selection Type group box
66 | Infor LN Exchange User Guide
Multisite control
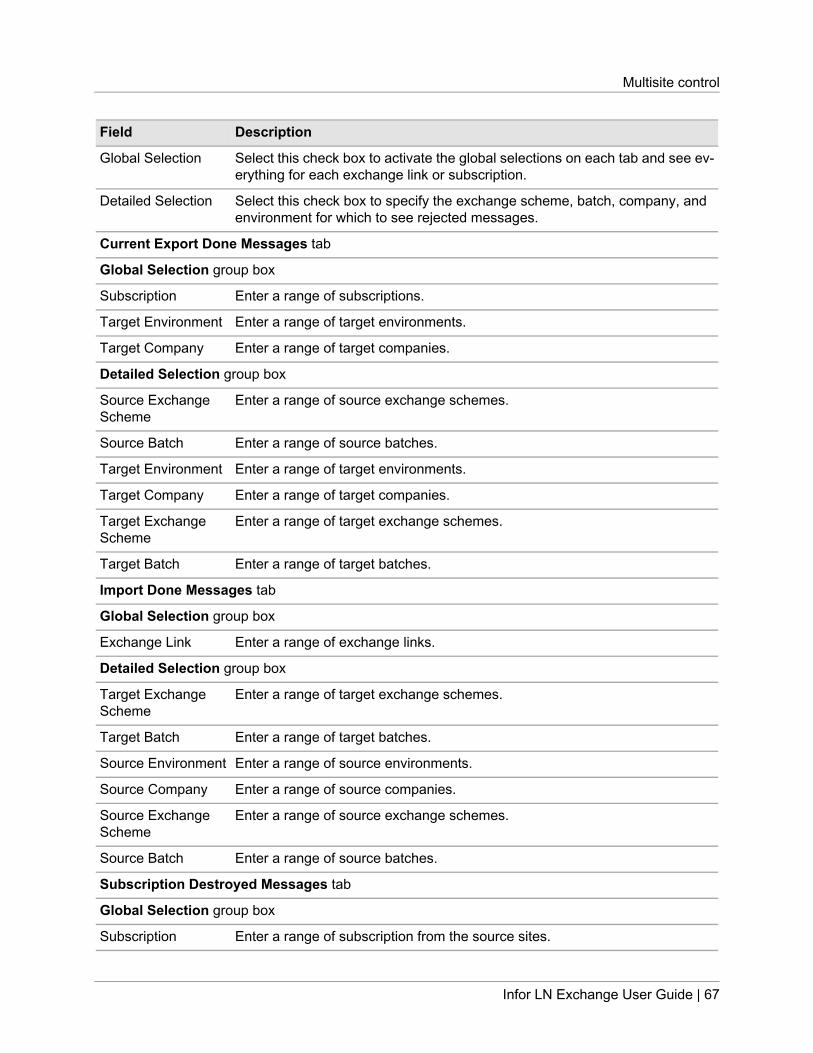
DescriptionField
Select this check box to activate the global selections on each tab and see ev-erything for each exchange link or subscription.
Global Selection
Select this check box to specify the exchange scheme, batch, company, andenvironment for which to see rejected messages.
Detailed Selection
Current Export Done Messages tab
Global Selection group box
Enter a range of subscriptions.Subscription
Enter a range of target environments.Target Environment
Enter a range of target companies.Target Company
Detailed Selection group box
Enter a range of source exchange schemes.Source ExchangeScheme
Enter a range of source batches.Source Batch
Enter a range of target environments.Target Environment
Enter a range of target companies.Target Company
Enter a range of target exchange schemes.Target ExchangeScheme
Enter a range of target batches.Target Batch
Import Done Messages tab
Global Selection group box
Enter a range of exchange links.Exchange Link
Detailed Selection group box
Enter a range of target exchange schemes.Target ExchangeScheme
Enter a range of target batches.Target Batch
Enter a range of source environments.Source Environment
Enter a range of source companies.Source Company
Enter a range of source exchange schemes.Source ExchangeScheme
Enter a range of source batches.Source Batch
Subscription Destroyed Messages tab
Global Selection group box
Enter a range of subscription from the source sites.Subscription
Infor LN Exchange User Guide | 67
Multisite control
DescriptionField
Enter a range of target environments.Target Environment
Enter a range of target companies.Target Company
Detailed Selection group box
Enter a range of source exchange schemes.Source ExchangeScheme
Enter a range of source batches.Source Batch
Enter a range of target environments.Target Environment
Enter a range of target companies.Target Company
Enter a range of target exchange schemes.Target ExchangeScheme
Enter a range of target batches.Target Batch
Subscriptions (daxch4502m000)Run this session to view, list, or delete subscriptions.
Subscriptions are stored on the source system. The subscriptions are not created manually, but aregenerated when you activate exchange links on the target system.
The subscription code is the same as the corresponding exchange-link code at the target site.
If you delete a subscription, the source site sends a Subscription Destroyed message to the target site,which deactivates the exchange link.
The Specific menu contains these options:
• Current Export Done Messages:Enables you to view the Export Done messages.
• Rejected Subscriptions Destroyed Messages:Enables you to view the rejected Subscription Destroyed messages.
This table shows the fields in the Subscriptions (daxch4502m000) session:
DescriptionField
The subscription code. This code is identical to the code of the correspondingexchange link on the target site.
Subscription
The code of the (export) exchange scheme on the source site.Source ExchangeScheme
The source batch.Source Batch
The target environment.Target Environment
68 | Infor LN Exchange User Guide
Multisite control

DescriptionField
The target company.Target Company
The target exchange scheme.Target ExchangeScheme
The target batch.Target Batch
Receive Remote Procedure Calls (daxch4200m000)Run the Receive Remote Procedure Calls (daxch4200m000) session on the target site to read theremote procedure calls. You can use remote procedure calls to indicate that messages have beenreceived in regard to the export or import.
To receive remote procedure calls:
1 Click Start Receiving to read the messages.2 Click Stop Receiving to stop the end reading the messages.3 Click Clean Up to remove the messages that were not automatically removed after reading the
messages.
This table shows the commands in the Receive Remote Procedure Calls (daxch4200m000) session:
DescriptionCommand
Select this check box to begin to receive remote procedure calls.Start Receiving
Select this check box to stop receiving remote procedure calls.Stop Receiving
Infor LN Exchange User Guide | 69
Multisite control

70 | Infor LN Exchange User Guide
Multisite control

6Miscellaneous
IntroductionThe sessions in the Miscellaneous Business Object provide useful utilities and sessions related to thestatus of the export and import processes performed. The utilities do not belong to a specific procedure,but can be used at any time in the Exchange Module.
The functions in the Miscellaneous module are divided into the following groups:
• Logging:The Logging functions enable you to set up and maintain a log table, so that you can monitor whathappens during the exchange process.
• Tools:The Tools functions enable you to perform administrative activities on the following:
• Exchange schemes• ASCII files• ASCII file fields and relations• Table fields• Definition files• Conditions
You can also view a list of predefined functions and variables.
• Export/Import:You can use the export/import sessions to export and import exchange schemes from/into LN.
Logging sessionsThe Logging functions enable you to track the activities during an exchange by maintaining andmonitoring a log table. The Logging sessions consist of the following:
• Print Log File (daxch0215m000)• Remove Log Files (daxch0216m000)
Infor LN Exchange User Guide | 71
• Log Table (Batch Level) (daxch0508m000)• Log Table (Batch Line Level) (daxch0509m000)• Clear Log Table (daxch0208m000)
Print Log File (daxch0215m000)During the import process, you have the option of printing a detailed log file. This file is located in thesame directory as the exchange scheme. Run the Print Log File (daxch0215m000) session to print thelog file that is created during processing of the Import Data (Non-Regular) (daxch0223m000) or theImport Data (on a Regular Basis) (daxch0224m000) session. Using this session, the log file is printedfor the run number selected, which is useful in locating errors.
The print process can also run as part of a job.
To print the log file:
1 Enter the type of exchange.2 Enter a range of exchange schemes.3 Enter a range of batches.4 Enter a range of run numbers.5 Enter a range of try numbers.6 Enter a range of table relations.7 Enter the error type.8 Enter a range of error codes.9 Select one of the check boxes to print the error report. You have the option to print either a short
description or a complete description of the error message.10 Use the check box to suppress messages for non-existing files.11 Click Print to start the process.
This table shows the fields in the Print Log File (daxch0215m000) session:
DescriptionField
Selection Range group box
Enter whether this is a regular or non-regular export or import.Type of Exchange
Enter the exchange scheme to be logged.Exchange Scheme
Enter the batch number of the exchange scheme.Batch
Enter the run number of this batch.Run Number
Enter the try number of this batch.Try Number
Enter the batch line.Batch Line
Use this field to specify a type of error, if preferred.Error Type
Enter the error code, if known.Error Code
72 | Infor LN Exchange User Guide
Miscellaneous

DescriptionField
Print Options group box
Select this check box if you want to see an overview of all the errors that showonly the first 30 characters of the error message. This option is easy to read
Print Short Error De-scriptions
but might not display sufficient information, for example, referential errors. Tobe sure that you have a complete error report, select the Print Long ErrorDescriptions check box.
Select this check box to see the entire error description.Print Long Error De-scriptions
Select this check box if you do not want to see messages in regard to log filesthat you have already deleted or that no longer exist.Clear this check box if you want to see an error message for each log file in thespecified range that no longer exists.
Suppress Messagesfor Non-existing Files
Remove Log Files (daxch0216m000)Use the Remove Log Files (daxch0216m000) session to remove log files that you no longer need,which helps you clean up your system. This session removes the log files that are created in the ImportData (Non-Regular) (daxch0223m000) and the Import Data (on a Regular Basis) (daxch0224m000)sessions. This process can also run as part of a job.
To remove the log files:
1 Define the type of exchange.2 Enter a range of exchange schemes.3 Enter a range of batches.4 Enter a range of run numbers.5 Enter a range of try numbers.6 Click Remove to start the process.
This table shows the fields in the Remove Log Files (daxch0216m000) session:
DescriptionField
Selection Range group box
Specify whether the log files of regular or non-regular exports or imports mustbe removed.
Type of Exchange
Enter the exchange scheme whose log file you want to remove.Exchange Scheme
Enter the batch number of the exchange scheme.Batch
Enter the run number of this batch.Run Number
Enter the try number of this batch.Try Number
Infor LN Exchange User Guide | 73
Miscellaneous
Log Table (Batch Level) (daxch0508m000)Run the Log Table (Batch Level) (daxch0508m000) session to view the log table that contains theresults of the exchange process at the batch level.
The Specific menu contains this option:
Log Table (Batch Line Level):
Starts the Log Table (Batch Line Level) (daxch0509m000) session.
To view the log table at batch level:
1 On the Edit menu, click Find.2 Enter the type of exchange: regular or non-regular import or export.3 Enter the exchange scheme name and run number.4 Confirm that the remaining information is correct.
This table shows the fields in the Log Table (Batch Level) (daxch0508m000) session:
DescriptionField
The type of exchange: a regular or non-regular export or import.Type of Exchange
The code of the exchange scheme.Exchange Scheme
The run number of the batch.Run Number
You can use this sequence number for identification in case of multiple triesper run. The try number is required for logging purposes.A new try number is created if you use one of the following options to performan export or import:
Try Number
• Restart previous run• Reprocess rejected rec's• Continue interrupted run
The code of the batch.Batch
The sequence number of the batch in an exchange process.Batches are processed in a sequential order. Batches with identical sequencenumber are processed in alphabetical order.
Sequence Number
The type of exchange process, which can be:Processing Type
• New run• Restart previous run• Reprocess rejected records, or• Continue interrupted run.
The control type depends on the exchange scheme as at the moment the exportor import was run, which can be:
Control Type
• Full exchange
74 | Infor LN Exchange User Guide
Miscellaneous

DescriptionField• Based on indicators• Based on audit
The name of the user who ran the exchange program.User Name
The number of the LN company involved in the exchange process.CompanyDuring an export process, this field represents the company that exports data.During an import process, this field represents the company that receives data.
Log Table (Batch Line Level) (daxch0509m000)Run the Log Table (Batch Line Level) (daxch0509m000) session to view the log table that containsthe results of the exchange process at the batch line level.
To view the log table at batch line level, take the following steps:
1 On the Edit menu, click Find.2 Specify whether this export or import is regular or non-regular.3 Enter the exchange scheme of the log file. Enter the batch information.4 For each table relation, Exchange displays the import or export information.
This table shows the fields in the Log Table (Batch Line Level) (daxch0509m000) session:
DescriptionField
The type of exchange: a regular or non-regular export or import.Type of Exchange
The code of the exchange scheme.Exchange Scheme
The run number of the batch.Run Number
The try number of this batch.Try Number
The code of the batch.Batch
The date the batch of an exchange process starts.Batch Start Date
A sequential number that identifies the table relation and the relation’s processingorder. This number makes the table relation unique in the batch.
Table Relation
The sequence number of the table relation in the batch during an import process.The sequence number of the table relation does not have to be unique. If tworelations have the same sequence number, the relation with the lowest sequencenumber is processed first.
Sequence Number
The code of the LN table from which data was exported, or in which the datais imported. The LN table is defined by a package code, module code, and atable number, for example, tccom001.
Table
Infor LN Exchange User Guide | 75
Miscellaneous

DescriptionField
The code of the logical ASCII file from which data was read during an import,or to which data was written during an export.
ASCII File
The number of records read from the ASCII file during an import procedure orfrom the LN table during an export procedure.The number of records read is the same as the number of processed records,plus the number of error rejected messages, plus the number of condition re-jected records, plus the number of skipped records.
Records Read
The number of records processed successfully.Records Processed
The number of rejected records due to errors. These records are written to thelog file
Error Rejected
The number of records rejected due to an add, update, overwrite, or deletecondition with the return value, false.These records are written to the log file.
Conditions Rejected
The number of skipped records.A record can be skipped during an import for the following reasons:
Records Skipped
• The table relation is not active.• The record was already imported during a previous try.• The options Add, Overwrite, Update, or Delete were not selected in the
Table Relations (Import) (daxch0121s000) session.
A record can be skipped during an export if the function "do.not.export.record()"is used in a condition.
The date and time, according to Coordinated Universal Time, that the tablerelation in a batch of an exchange process ended.
Batch Line End Dateand Time
The import process has used the Data Access Layer (DAL) scripts of the involvedtables. That is: the import process carried out all the constraint checks, integrity
Use DAL
checks and side effects, such as updates on other tables, that are programmedinto the DAL. This guarantees database integrity, saves programming time, andavoids the errors that can occur in condition scripts.
The import process has used the property hooks that are defined in the DALscripts of the involved tables. Property hooks contain logical integrity rules for
DAL Checks
table fields. For example: the net weight of an item cannot be less than thegross weight.
Clear Log Table (daxch0208m000)To delete the result of export and import runs, run the Clear Log Table (daxch0208m000) session.Because the data of the last run is sometimes used later, retain the highest run number of both theimport and export.
76 | Infor LN Exchange User Guide
Miscellaneous

This process can also run as part of a job.
To clear the log tables of a specified range:
1 Define the type of exchange.2 Enter a range of exchange schemes.3 Enter a range of run numbers.4 Enter a range of batch end dates.5 Select the check box if you want to clear the log data of the last run.6 Click Clear to start the process.
This table shows the fields in the Clear Log Table (daxch0208m000) session:
DescriptionField
Selection Range group box
Enter whether this export or import is regular or nonregular.Type of Exchange
Enter the exchange scheme of the log table.Exchange Scheme
Enter the run number of the batch.Run Number
Enter the date of the end of this batch.Batch End Date
Options group box
Select this check box to clear the last run, as well as the log table.Also Clear Last Run
Tools sessionsThe Tools functions enable you to work at a more detailed level and fully customize the Exchangemodule to meet your business needs. The Tools sessions consist of the following:
• Copy Exchange Scheme (daxch0201m000)• Delete Exchange Scheme (daxch0222m000)• Rename ASCII File (daxch1202m000)• Create ASCII File Fields and Relations (daxch0203m000)• Create Definition Files (daxch0204m000)• Print ASCII File (daxch0202m000)• Remove ASCII Files (daxch2202m000)• Check Syntax of Conditions (daxch0206m000)• Predefined Functions/Variables (daxch0510s000)• Print Exception Report for Table Fields (daxch0423m000)• Generate Audit Configuration (daxch1201m000)
Infor LN Exchange User Guide | 77
Miscellaneous

Copy Exchange Scheme (daxch0201m000)If you run the Copy Exchange Scheme (daxch0201m000) session, you can copy an exchange scheme,as well as the full structure such as the following:
• Conditions• ASCII files• ASCII file fields• Ranges• Table relations• Field relations for import or for export
You can also selectively copy particular elements of the structure and copy these elements to anotherscheme within the same company or to another company.
Rather than use this session to copy existing exchange schemes, you can also use parent exchangeschemes in multilevel exchange schemes. The process can also run as part of a job.
To copy exchange schemes:
1 Select how to copy the exchange schemes in the Copy field.2 Enter the company number to where you want to copy the exchange schemes.3 Select the exchange schemes, batches and table relations for import or export, depending on the
chosen option.4 Click Copy to start the process
This table shows the fields in the Copy Exchange Scheme (daxch0201m000) session:
DescriptionField
Select the object type to be copied:Copy
• Complete Exchange Scheme: The complete exchange scheme is pro-cessed. All conditions, ASCII files, ASCII file fields, batches, table relations,and field relations will be processed.
• Batch: Only the structure of the batch including, table and field relations areprocessed.
• Relations: Only the table and field relations are processed.
If you copy an exchange scheme, the existing target exchange schemes aredeleted and overwritten.If the conditions codes or relation codes used in the relations are not alreadypresent in the new exchange scheme, the condition code/conversion relationcode is initialized as empty.
Enter the company number to which you want to copy this exchange scheme.The default is the current company number.
Copy to CompanyNumber
You can also copy part of the exchange scheme.
Selection group box
Enter the source and target exchange schemes.Exchange Scheme
78 | Infor LN Exchange User Guide
Miscellaneous
DescriptionField
If you specify Batch in the Copy field, you can enter the batch name here.Batch
If you specify Relations in the Copy field, you can enter the table relation namehere.
Table Relation (Im-port)
If you specify Relations in the Copy field, you can enter the table relation namehere.
Table Relation (Ex-port)
Delete Exchange Scheme (daxch0222m000)The Delete Exchange Scheme (daxch0222m000) session deletes a selected range of exchangeschemes for the current company. If files, batches, and relations are still defined in an exchange scheme,you cannot use the Exchange Scheme (daxch0501m000) session to delete the exchange scheme.The Delete Exchange Scheme session offers you the option to delete selected elements of the exchangestructure or to delete the entire exchange scheme with all components. The process can also run aspart of a job.
To delete the exchange scheme, or part of the exchange scheme, take the following steps:
1 Select, in the Delete field, how to delete the exchange scheme.2 Select the exchange schemes, batches, and table relations for import or export, depending on the
chosen option.3 Click Delete to start the process.
This table shows the fields in the Delete Exchange Scheme (daxch0222m000) session:
DescriptionField
Select the object type to be deleted:Delete
• Complete Exchange Scheme: The complete exchange scheme is pro-cessed. All conditions, ASCII files, ASCII file, fields, batches, table relations,and field relations will be processed.
• Batch: Only the structure of the batch, including table and field relations,are processed.
• Relations: Only the table and field relations are processed.
Selection Range group box
Enter a range of exchange schemes.Exchange Scheme
If you specify Batch in the Delete field, you can enter the batch name here.Batch
If you specify Relations in the Delete field, you can enter the table relationname here.
Table Relation (Im-port)
If you specify Relations in the Delete field, you can enter the table relationname here.
Table Relation (Ex-port)
Infor LN Exchange User Guide | 79
Miscellaneous

Rename ASCII File (daxch1202m000)Run the Rename ASCII File (daxch1202m000) session to rename logical ASCII files, if required, in anexchange scheme. The codes of the logical ASCII files are replaced in the ASCII files, the ASCII filefields, and the table relations (export and import).
The process can also run as part of a job.
To rename logical ASCII files:
1 Enter the exchange scheme.2 Enter the old ASCII file code and the new ASCII file code.3 Click Rename to start the process.
This table shows the fields in the Rename ASCII File (daxch1202m000) session:
DescriptionField
Enter the exchange scheme to be renamed.Exchange Scheme
Selection
Enter the old name of the ASCII file and enter the new name you desire.ASCII File
Create ASCII File Fields and Relations (daxch0203m000)ASCII file definitions are representations of the structure of an ASCII file. Before you import data, thisdefinition file is loaded. You can use the Create ASCII File Fields and Relations (daxch0203m000)session to generate ASCII file fields and relations for an exchange scheme automatically. Using thissession, you can skip the Table Relations (Import) (daxch0121m000) and Field Relations (Import)(daxch0122m000) sessions.
You can copy ASCII file fields from definition files and LN table definitions, however, the definition fileshave precedence over the LN table definitions.
During an import procedure, if a LN table field and an ASCII file field do not match, the LN table fieldreceives the value based on default. For example, if the ASCII file contains fewer fields than the LNtable, the value specified in the data dictionary is used for this field.
During an export procedure, if the ASCII file and LN table do not match, the LN table field remainsempty.
This process can also run as part of a job.
To generate ASCII file fields and relations, take the following steps:
1 Enter the code of the exchange scheme.2 Select a range of ASCII files.3 Use the check boxes to define how to create the ASCII file fields.4 Use the check boxes to define how to create the table and field relations.5 Click Create to start the process.
80 | Infor LN Exchange User Guide
Miscellaneous

This table shows the fields in the Create ASCII File Fields and Relations (daxch0203m000) session:
DescriptionField
Enter the exchange scheme.Exchange Scheme
Selection Range group box
Enter the range of ASCII files for which you want to create file fields and rela-tions.
ASCII File
ASCII File Fields group box
If you select this check box, the existing ASCII file fields will be overwritten.Overwrite ASCII FileFormats
If you select this check box, the ASCII file fields are copied from the definitionfile.
Create from Defini-tion Files
If you select this check box, ASCII file fields and relations are generated basedon LN table definitions, if a definition file is not available.
Create Based on Ta-ble Definitions
If an LN table with a name identical to the name of an ASCII file exists, theASCII file fields are copied from the data dictionary.
Table and Field Relations group box
If you select this check box, a batch is created. You can define the batch codeand description in the following fields.
Create Batch
You can only create import and export relations if this check box is selected.The import and export relations are created in the defined batch.
If you select this check box, table and field relations for import of data will becreated.
Create Import Rela-tions
Relations are only created if the ASCII file codes are the same as existing LNtable names.
If this check box is selected, table and field relations for export of data will becreated.
Create Export Rela-tions
Relations are only created if the ASCII file codes are equal to existing LN tablenames.
If this check box is selected, existing relations are overwritten.Overwrite ExistingRelations
Create Definition Files (daxch0204m000)Run the Create Definition Files (daxch0204m000) session to create definition files automatically. Thissession dumps the ASCII file structure into sequential files. The sequential files are specified in theASCII file code table in the ASCII Files (daxch0102m000) session. To use definition files in otherenvironments where you copy these files, you can use the Create ASCII File Fields and Relations(daxch0203m000) session.
Infor LN Exchange User Guide | 81
Miscellaneous
The created definition file is entered in the definition file field in the ASCII Files (daxch0102m000)session. If the absolute path is not entered in that field, the path is taken from the Path for DefinitionFiles field in the Exchange Schemes (daxch0101s000) session. If the Definition File Field is empty,the definition file is identified by a code that consists of the letter d followed by the ASCII file code.
The created sequential dump has the following fields:
Field NumberColumn 1 - 4
Field NameColumn 5 - 12
Description of fieldColumn 13 - 42
Start position of fieldColumn 43 - 46
Length of fieldColumn 47 - 50
Type of Field Indicator:Column 51 - 51
• 1 - Alphanumeric• 2 - Numeric
Date FormatColumn 52 - 53
Floating Decimal:Column 54 - 54
• 1 – Yes• 2 - No
Position of Decimal PointColumn 55 - 56
Note:
• The exporting site generally uses this session. The created definition files are transferred to theimporting site.
• Existing definition files are overwritten.• This process can also run as part of a job.
To create definition files:
1 Enter the code of the exchange scheme.2 Enter the code of the ASCII files.3 Click Create to start the process.
This table shows the fields in the Create Definition Files (daxch0204m000) session:
DescriptionField
Selection Range group box
Enter a range of exchange schemes for which you want to create definitionfiles.
Exchange Scheme
Enter a range of ASCII files whose structure you want to copy into sequentialfiles.
ASCII File
82 | Infor LN Exchange User Guide
Miscellaneous
Print ASCII File (daxch0202m000)Run the Print ASCII File (daxch0202m000) session to print an ASCII file with ASCII file fields of anexchange scheme. You can use this session to test the readability of an ASCII file prior to importing.You can also use this session to view the contents of a file created by the Export module.
This session uses the ASCII file format of the exchange scheme. Therefore, you must set up the MasterData module before you can use this session.
The table and field relations are not required to run this session. If an ASCII file is being examined priorto import, the table relations (import) can be useful but are not required. Because table relations arenot required, you must specify the physical ASCII file name.
If the field numbers to be printed are not specified, all the fields in the ASCII file are printed.
This process can also run as part of a job.
To print the ASCII file and ASCII file fields:
1 Enter the code of the exchange scheme and ASCII file. The physical ASCII file is automaticallyentered.
2 Enter a range of field numbers with a valid range of values if you want to print part of the physicalASCII file.
3 Define the field numbers that must be printed.4 Click Print to start the process.
This table shows the fields in the Print ASCII File (daxch0202m000) session:
DescriptionField
Enter the exchange scheme to be printed.Exchange Scheme
Enter the ASCII file in that exchange scheme.ASCII File
LN automatically enters the ASCII file name.ASCII File Name
Selection Range group box
To print only part of the physical ASCII file, enter a range of field numbers.Field Number
Print What group box
To print only part of the ASCII file, enter a field number of the ASCII file.Field Numbers
Remove ASCII Files (daxch2202m000)Run the Remove ASCII Files (daxch2202m000) session to delete the physical ASCII files an exchangeprocess uses. This does not affect the log files that were created by the exchange process.
The physical ASCII files used or created by the selected exchange runs are deleted. To delete the logfiles, however, you can use the Clear Log Table (daxch0208m000) session.
This process can also run as part of a job.
Infor LN Exchange User Guide | 83
Miscellaneous
To remove the physical ASCII files:
1 Define the type of the exchange.2 Enter a range of exchange schemes.3 Enter a range of run numbers.4 Enter a range of try numbers.5 Enter a range of batch codes.6 Enter a range of table relations.7 Specify a time period between two dates.8 Click Remove to start the process.
This table shows the fields in the Remove ASCII Files (daxch2202m000) session:
DescriptionField
The type of exchange: a regular or non-regular export or import.Exchange Type
Enter a range of exchange schemes whose ASCII files must be removed.Exchange Scheme
Enter a range of run numbers.Run Number
Enter a range of try numbers.Try Number
Enter a range of batch codes.Batch
Enter a range of batch lines (table relations).Batch Line
Enter a range of creation dates of the ASCII files to be removed.Date
Check Syntax of Conditions (daxch0206m000)Run the Check Syntax of Conditions (daxch0206m000) session to check the syntax of a range ofcondition scripts used in an exchange scheme. You can use this session rather than compile theconditions individually in the Conditions (daxch0111m000) session. If errors occur during compilation,this session displays the errors.
The errors found in the condition script are stored in the path condition errors specified in the ExchangeSchemes (daxch0101s000) session. The error file name is structured as e<condition>. The errorsfound in the condition script also appear onscreen.
Due to the limitations of this session, and because the conditions are checked individually, irrelevanterrors might be reported.
If an error is reported on a specific condition in this session, but the Create Import Programs(daxch0227m000) and Create Export Programs (daxch0228m000) sessions do not report any errorswith this condition, the syntax of the condition is correct.
This table shows the fields in the Check Syntax of Conditions (daxch0206m000) session:
84 | Infor LN Exchange User Guide
Miscellaneous

DescriptionField
Enter the name of the exchange scheme.Exchange Scheme
Selection Range group box
Enter the range of conditions for which you want to check the syntax.Condition
Options group box
Select to display the syntax errors.Display Errors
Predefined Functions/Variables (daxch0510s000)The LN Tools programming language is used in condition scripts. Particular functions and variablesare also available to write condition scripts in Exchange that overrules generated condition scripts.
You can use the Predefined Functions/Variables (daxch0510s000) session to display these predefinedfunctions, variables, and libraries.
Note that, with the exception of import.company, export.company and startup.company, the variablesare implemented as a define, and cannot directly be used in queries. For example, do not write: wheredaxch008.runn = :run.number, but write instead: where daxch008.runn = :1 wherebind(1, run.number)
For more information about a particular function, variable, or library, click Help in this session. In thesession Help text, click Functions, Variables, or Libraries, and then click on the name of the individualfunction, variable or library.
The online Help provides information on these functions, variables, and libraries:
• Functions
• get.xch.scheme• get.batch• get.batch.line• get.default.dateformat• qdb.search• read.table• read.table.once• read.table.company• log.mess• do.not.log.condition• do.not.export.record
• Variables
• triton.table• triton.field
Infor LN Exchange User Guide | 85
Miscellaneous
• element.no• ascii.file• ascii.file.name• run.number• try.number• xch.type• redo.type• cntl.type• import.company• export.company• startup.company• no.rec.read• no.rec.write• no.err.rejects• no.cond.rejects• no.rec.skip
• Main Libraries
• dadllcommon• dadlldate-line• dadlldate_time• dadllfile_path• dadlllink_com• dadlllink_def• dadlllink_file• dadlllink_run• dadlllogging• dadllmultiline• dadll_predefine• dadllxch2
Print Exception Report for Table Fields (daxch0423m000)You can use the Print Exception Report for Table Fields (daxch0423m000) session to print an exceptionreport and to compare the data dictionary (table fields) to the import field relations. You can use thislist to check the table fields that do not occur in the exchange scheme. Undefined fields remain emptyif a new record is added, and old values are retained in case of overwriting.
This process can also run as part of a job.
86 | Infor LN Exchange User Guide
Miscellaneous
To print the exception report, take the following steps:
1 Enter a range of exchange schemes.2 Enter a range of batches.3 Enter a range of table relations (import).4 Click Print to start the process.
This table shows the fields in the Print Exception Report for Table Fields (daxch0423m000) session:
DescriptionField
Selection Range group box
Enter a range of exchange schemes.Exchange Scheme
Enter a range of batch numbers.Batch
Enter a range of table relations to import for which you want to print exceptionreports.
Table Relation (Im-port)
Generate Audit Configuration (daxch1201m000)You can use the Generate Audit Configuration (daxch1201m000) session to activate audit trail for thetables in one or more exchange schemes. Use this session only for exchange schemes that are basedon an audit procedure.
To generate an audit configuration:
1 Specify the range of exchange schemes whose tables must be included in the audit configuration.2 Specify the name of the audit profile in which the generated audit configuration will be stored. You
can select whether you want to generate a new audit profile or to overwrite an existing one.3 Optionally, specify an audit category in which the audit profile will be included.4 Click Generate.
This table shows the fields in the Generate Audit Configuration (daxch1201m000) session:
DescriptionField
Selection Range group box
Enter a range of exchange schemes.Exchange Scheme
Audit Settings group box
Specify the audit profile in which the generated audit configuration will be stored.From this field, you can zoom to the Audit Profiles (ttaud3110m000) session,which, however, is not intended to select an audit profile, unless you want tooverwrite an existing profile.
Audit Profile
If this check box is selected, and you specify an audit profile name that alreadyexists, the existing profile is overwritten after you confirm. If this check box is
Replace existing pro-file
Infor LN Exchange User Guide | 87
Miscellaneous

DescriptionFieldcleared, and you specify an existing profile, the audit configuration cannot becreated.
Optionally, you can specify an existing audit category.Audit Category
Note: You must convert the new audit settings to runtime through the Create Runtime Audit Definitions(ttaud3200s000) session.
Export/import sessionsYou can use the export/import sessions to export and import exchange schemes from/into LN.
The Logging sessions consist of the following:
• Export Exchange Schemes (daxch5201m000)• Import Exchange Schemes (daxch5202m000)• Export Exchange Schemes for Delivery (daxch5203m000)• Import Delivered Exchange Schemes (daxch5204m000)
Export Exchange Schemes (daxch5201m000)You can use the Export Exchange Schemes (daxch5201m000) session to export exchange schemesto an XML file.
To export exchange schemes:
1 Specify the range of exchange schemes that must be exported.2 Specify whether log data must be included in the XML file.3 Specify the path and name for the XML file to be generated.4 Specify whether an existing XML file must be overwritten.5 Click Export Schemes.
This table shows the fields in the Export Exchange Schemes (daxch5201m000) session:
DescriptionField
Selection Range group box
Enter a range of exchange schemes.Exchange Scheme
If this check box is selected, the log data is also exported.Include Log DataTo view the log data, use the following sessions:
• Log Table (Batch Level) (daxch0508m000)
88 | Infor LN Exchange User Guide
Miscellaneous
DescriptionField• Log Table (Batch Line Level) (daxch0509m000)
Target group box
The name of the export file, including the path.File
If this check box is selected, and a file with the same name as specified in theFile field already exists, that file is overwritten. Before the file is overwritten,you are prompted to confirm whether you want to continue.
Overwrite if Existing
Note:
• The exchange schemes are exported as XML files.• Multisite exchange links are not included.• Texts that are linked to the configuration are included in the exchange scheme. If a text is present
in several languages, these texts are all included.• Use the Import Exchange Schemes (daxch5202m000) session to import the exchange schemes.• Use the Export Exchange Schemes for Delivery (daxch5203m000) session instead of the current
session if you want to export exchange schemes to deliver as additional files, which you can dofrom LN and later.
Import Exchange Schemes (daxch5202m000)You can run the Import Exchange Schemes (daxch5202m000) session to import exchange schemes,from an XML file, into LN.
To import exchange schemes, take the following steps:
1 Specify the path and name of the XML file that contains the exchange schemes to be imported.2 Specify whether existing exchange schemes must be overwritten.3 Click Import Schemes.
This table shows the fields in the Import Exchange Schemes (daxch5202m000) session:
DescriptionField
Source group box
The path and name of the file that contains the exchange schemes.File
Target group box
If this check box is selected, and the imported exchange schemes already ex-isted, the existing schemes are overwritten. The user is asked to confirm whena scheme is overwritten.
Overwrite if Existing
Note:
• The exchange schemes that are imported are XML files.
Infor LN Exchange User Guide | 89
Miscellaneous
• The contents of exchange schemes are not checked. For example, if a scheme for sales order tablesfrom Baan IVc is imported into LN, the specified sales order tables might be changed or might nolonger exist. This problem will not be detected.
• The files that contain the exchange schemes were exported using the Export Exchange Schemes(daxch5201m000) session.
• To import exchange schemes that are delivered as an additional file, you must use the ImportDelivered Exchange Schemes (daxch5204m000) session instead of the current session.
Export Exchange Schemes for Delivery (daxch5203m000)You can use the Export Exchange Schemes for Delivery (daxch5203m000) session to export exchangeschemes that must be delivered as an additional file. These additional files are XML files that are storedin a specific package, module, and package VRC. These files are delivered with the LN software.
If you install a package, all delivered exchange schemes for that package are installed as well. However,to install exchange schemes manually, you can run the Import Delivered Exchange Schemes(daxch5204m000) session, which enables you to select and import a specific additional file into yourcurrent company.
For more information, refer to "Exchange scheme delivery" on page 101.
To export exchange schemes for delivery:
1 Specify the range of exchange schemes to be exported.2 Specify the module for which the exchange schemes are delivered.3 Specify the path and name for the additional file in which the exchange schemes are delivered.4 Specify the description for the additional file.5 Specify whether an existing additional file must be overwritten.6 Click Export Schemes.
This table shows the fields in the Export Exchange Schemes for Delivery (daxch5203m000) session:
DescriptionField
Selection Range group box
The range of exchange schemes to be exported.Exchange Scheme
Target group box
The package code of your current package VRC. The additional file will be de-livered with this package.You can select another package VRC in the Change Current Package VRC ofUser (ttadv0140m000) session. Click Refresh pVRC to display the new currentpackage VRC if you changed the VRC after the current session started.
Package
90 | Infor LN Exchange User Guide
Miscellaneous

DescriptionField
Your current package VRC. The additional file will be delivered with this packageVRC.You can select another package VRC in the Change Current Package VRC ofUser (ttadv0140m000) session. Click Refresh pVRC to display the new currentpackage VRC if you changed the VRC after the current session started
Current VRC
The module for which the exchange schemes are delivered.Module
The additional file in which the exchange schemes are delivered.Additional File
The description of the additional file.Additional File De-scription
If this check box is selected, the additional file that is generated overwrites anexisting file with the same name.
Overwrite if Existing
Note:
• The additional files are XML files with the extension .xch.• Multisite exchange links are not included.• Texts that are linked to the configuration are included in the exchange scheme. If a text is present
in several languages, these texts are all included.• The additional files functionality is only available in LN and later.• If you want to export exchange schemes that are not delivered as additional files, you must run the
Export Exchange Schemes (daxch5201m000) session instead of the current session.
Import Delivered Exchange Schemes (daxch5204m000)In some cases, predefined exchange schemes for specific integrations are delivered as additional fileswith the LN software. These additional files are XML files that belong to a specific package, module,and package VRC.
You can use the Import Delivered Exchange Schemes (daxch5204m000) session to select a specificadditional file and import the file into your current company.
Note: The additional files are already imported, in the base data company (050), during the installationof LN: when you install a package, all delivered exchange schemes for that package are installed aswell. Therefore, you only have to use the Import Delivered Exchange Schemes (daxch5204m000)session if you want to import one or more additional files in another company.For more information, refer to "Exchange scheme delivery" on page 101.
To import delivered exchange schemes:
1 Specify the package to which the delivered exchange schemes belong.2 Specify the module to which the delivered exchange schemes belong.3 Specify the path and name of the additional file that contains the exchange schemes to be imported.4 Specify whether existing exchange schemes must be overwritten.
Infor LN Exchange User Guide | 91
Miscellaneous
5 Click Import Schemes.
This table shows the fields in the Import Delivered Exchange Schemes (daxch5204m000) session:
DescriptionField
Source group box
The package for which the exchange schemes are delivered.Package
The module for which the exchange schemes are delivered.Module
The additional file in which the exchange schemes are delivered.Additional File
Target group box
If this check box is selected, the exchange schemes that are imported overwriteexisting exchange schemes with the same name.
Overwrite if Existing
Note:
• The additional files are XML files with the extension .xch.• The contents of exchange schemes are not checked. For example, if a scheme for sales order tables
from Baan IVc is imported into LN, the specified sales order tables might be changed or might nolonger exist. This problem will not be detected.
• The files that contain the exchange schemes were exported using the Export Exchange Schemesfor Delivery (daxch5203m000) session.
• To import exchange schemes that are not delivered as an additional file, you must use the ImportExchange Schemes (daxch5202m000) session rather than the current session.
92 | Infor LN Exchange User Guide
Miscellaneous

7Generating an exchange scheme
This chapter describes an easy way to create a new exchange scheme.
Creating an exchange schemeTo generate an exchange scheme:
1 Select Exchange > Master Data > Exchange Schemes to start the Exchange Schemes(daxch0501m000) session. Click the New ( ) icon, to start the Exchange Schemes (daxch0101s000)details session.Refer to "Master data" on page 13, for details about these sessions.
2 Define the necessary details of your new exchange scheme. If you want your exchange scheme tobe based on the audit trail, select the Based on Audit check box.
3 Save your new scheme, close the details session, and return to the Exchange Schemes(daxch0501m000) overview session.
4 In the Exchange Schemes (daxch0501m000) overview session, select your new exchange scheme,and on the Specific menu, click ASCII Files to start the ASCII Files (daxch0102m000) session.
5 Click the New icon to define a new ASCII File for your exchange scheme. In the ASCII File field,you must enter the name of the table you want to export. LN fills the Description field with thedescription of the table. Define all of your exchange scheme’s required files.
6 Click Create ASCII Files… on the Specific menu to start the Create ASCII File Fields and Relations(daxch0203m000) session.
7 In the fields of the Selection Range group box, define the range of your exchange scheme’s ASCIIfiles for which you want to create table relations, and field relations.
8 In the ASCII File Fields group box, select the Create Based on Table Definitions check box.
Note: You can use definition files to exchange file formats between exchange schemes.
9 In the Table and Field Relations group box, select the Create Batch check box.10 Click Create.
Note:
Infor LN Exchange User Guide | 93
• This procedure does not make use of the multiline text feature. To use multiline texts, you mustchange the Field Type of the involved fields in the ASCII File Fields (daxch0503m000) session,and on the Specific menu, click Recalculate Start Positions to recalculate the start positions ofthe file fields.
• If your exchange scheme is based on audit, you must activate the audit trail for the involved tablesthrough the Generate Audit Configuration (daxch1201m000) session. You can start this sessionfrom the Specific menu in the Exchange Schemes (daxch0501m000) session. Subsequently, youmust convert the new audit settings to runtime through the Create Runtime Audit Definitions(ttaud3200s000) session.
• Before you can run the new exchange scheme, you must generate the export and/or import scriptsthrough the Create Export Programs (daxch0228m000) session and/or the Create Import Programs(daxch0227m000) session.
Regenerating parts of an exchange schemeYou can use the Create ASCII File Fields and Relations (daxch0203m000) session to regenerate partsof an existing exchange scheme. If you do so:
• The ASCII File Fields group box contains the following check boxes, which, if you click, has thefollowing results:
• Overwrite ASCII File Formats: If you click Create, LN overwrites any of your exchange scheme’spreviously defined ASCII file formats.
• Create From Definition Files: LN creates your exchanges scheme’s ASCII file’s fields from thedefinition files of the directory you specify in the Definition Files field of the Exchange Schemes(daxch0501m000) details session.
• Create Based on Table Definitions: LN creates your exchange scheme’s ASCII files, basedon the tables you defined for your exchange scheme in the ASCII File fields of the ASCII Files(daxch0102m000) session.
• In the Table and Field Relations group box, if you select the:
• Create Batch check box: In the adjacent fields, you can define a batch for your exchangescheme’s ASCII files. If you do not use the check box, and adjacent fields to define a batch foryour exchange scheme’s ASCII files, you must use the Batches (daxch0104m000) session todefine a batch manually.
• Create Import Relations check box: If you click Create, for each of your exchange scheme’sASCII files, LN creates a table relation in the Table Relation (Import) (daxch0521m000) session,and for each of your exchange scheme’s ASCII file fields, a file field relation in the Field Relations(Import) (daxch0522m000) session. If you do not select this check box, you must manually createyour exchange scheme’s import table relations, and import field relations manually in the TableRelations (Import) (daxch0521m000) session, and the Field Relations (Import) (daxch0522m000)session respectively.
• Create Export Relations check box: If you click Create, for each of your exchange scheme’sASCII files, LN creates a table relation in the Table Relation (Export) (daxch0531m000) session,and for each of your exchange scheme’s ASCII file fields, a file field relation in the Field Relations
94 | Infor LN Exchange User Guide
Generating an exchange scheme

(Export) (daxch0532m000) session. If you do not select this check box, you must manually createyour exchange scheme’s export table relations, and export field relations manually in the TableRelations (Export) (daxch0531m000) session, and the Field Relations (Export) (daxch0532m000)session respectively.
• Overwrite Existing Relations check box: If you click Create, LN overwrites any table relations,and field relations previously defined for your exchange scheme.
Infor LN Exchange User Guide | 95
Generating an exchange scheme
96 | Infor LN Exchange User Guide
Generating an exchange scheme

8Using audit trail in the Exchange module
Exchange based on audit trailThe audit server logs all database actions that change the contents of a table in so-called audit files.The Exchange module can use these audit files, which are useful in a multisite environment becausethe databases on all sites must have identical data. These audit files can also be used in dataconversions.
Only the updates in a specific period are exchanged, which leads to an improvement in performance.Specify this period in the Export Data (Non-Regular) (daxch0233m000) and Export Data (on a RegularBasis) (daxch0234m000) sessions. Changes such as insert, update, and delete are processed andwritten into the ASCII files. Actions such as drop, clear, and create tables are ignored.
Audit control data is added to the resulting ASCII file. This data consists of a batchline ID, transactionID, sequence ID, and an indicator. The control data is added at the beginning of each line and isformatted like other data fields such as the enclosing and separator characters.
An update writes two lines to the ASCII file. One line contains the key fields and old values of theupdated fields. The other line contains the new values of the key fields and updated fields, even if akey field does not change.
The batchline ID is used for recognition when processing the ASCII files. The transaction and sequenceIDs are used to make sure that the transactions are replayed in the same order as on the exportingsite. The indicator defines the type of action that is executed on the table. Use the letter I to insert; usethe letter D to delete; use the letter U to update with old values; and use the letter N to update with newvalues.
Prerequisites
ExportBefore you can export data based on audit trail, you must make sure of the following:
Infor LN Exchange User Guide | 97
• The exchange scheme and the batches that contain the tables that use the audit procedure arebased on audit: Select the Based on Audit check box in the Exchange Schemes (daxch0101s000)details session and the Exchange Using Audit check box in the Batches (daxch0104m000) session.Refer to "Master data" on page 13, for a detailed description of these sessions.
• Audit trail is activated for the involved tables. Use the Generate Audit Configuration (daxch1201m000)session to generate the audit settings for the tables in your exchange scheme. Refer to"Miscellaneous" on page 71, for a detailed description of this session. You can start this sessionfrom the Specific menu in the Exchange Schemes (daxch0501m000) session.
To be sure that all changes made in the database are audited, a transaction notification is created inthe database for each database transaction being audited. The transaction notification is inserted withinthe user transaction, and used by Exchange to collect the audit data, to ensure that all changes areprocessed.
ImportBefore you can import data based on audit trail, you must make sure of the following:
• The exchange scheme and the batches, that contain the tables that use the audit procedure, arebased on audit: Select the Based on Audit check box in the Exchange Schemes (daxch0101s000)details session and the Exchange Using Audit check box in the Batches (daxch0104m000) session.For a detailed description of these sessions, refer to "Master data" on page 13.
• Sufficient space is available in the $BSE_TMP directory because all ASCII files are merged into onefile during an import. This file contains the audit control data and is sorted on transaction ID andsequence ID.
Limitations of the Exchange (XCH) module based onaudit
IntroductionIf exchange is based on audit, the sequence in which the database actions are imported must be thesame as the sequence in which users performed those database actions on the original database. TheExchange module based on audit guarantees that the sequence of the transactions and the sequenceof the database actions in each transaction are preserved. This is also the case for transactions inwhich multiple tables are involved.
98 | Infor LN Exchange User Guide
Using audit trail in the Exchange module
Restrictions on exchange modelsThe batchline IDs must be identical on the export and import sites. Do not use conditions for updatesthat integrate two fields into one field. The audit server only logs key fields and changed fields. Therefore,if only one field changes the other value will not be present in the ASCII field.
Be careful when you use conditions in the import part of exchange models that are used for auditing.These conditions can create unsolvable problems. For example, you cannot use a condition thatintegrates two fields into one field for updates. The audit server only logs key fields and changed fields,therefore, if only one field has changed, the other value will not be present in the ASCII field.
Export• The table and ASCII file definition do not have to match. Table fields that are not attached to an
ASCII field are ignored and ASCII fields that are not attached to a table field are left empty.• The names do not have to match anymore (as in earlier releases), the data maintained in Field
Relations (Export) (daxch0132s000) session is used to link table fields with ASCII fields.• Conditions cannot be used.• Constants cannot be used (at this moment).
Import• The names no longer must match, as in earlier releases. The data maintained in the Field Relations
(Import) (daxch0122s000) session is used to link table fields with ASCII fields.• For inserts the full functionality is available, such as constants, conditions, and relations.• Full functionality is also available for overwrite (inserting an already existing record), as long as the
Condition field returns true.• Full functionality is also available for deletes, however, note that only the key fields are assigned
their values. For this reason, conditions, that are attached to non-key-fields and that have sideeffects, will most likely not work correctly.
• Note that relations based on Increment are meaningless for deletes.
Providing the full functionality for updates is extremely difficult:
• Relations for which the Based On field is defined as Default, Fixed Value, or Increment are ignoredbecause these relations are not useful.
• Relations based on Field Value or Conv. Table can be used without any restrictions. However,these relations will only be applied on key-fields (old values) and changed fields (new values).
• Because the audit server only logs key-fields and changed fields for an update, the other fields arenot known. As a result, many fields in the ASCII file will remain empty. If conditions are used, youcannot see whether all accessed fields have valid values. If not, you most likely must not run thecondition. To ensure flexibility of conditions, even if you use audit, you can use the Condition fieldcondition to guard conditions. It is assumed that this condition decides whether the condition (at
Infor LN Exchange User Guide | 99
Using audit trail in the Exchange module

field value level) can return a proper value. For this the function changed (<ascii_file>_<field>) canbe used in your condition.
• Note that, by the introduction of parameters by condition, all accessed ASCII fields are known and,as a result, you can determine whether all ASCII fields have valid values. However, this knowledgehas not been explored in the current version.
• You can access the former value of the ASCII field by means of not.curr(<ascii_file>_<field>) old.value= <ascii_file>_<field> not.curr(<ascii_file>_<field>) | restore new value! The former value of thetablefield is in the table field itself (first the condition is executed, and only on returning the value isassigned to the tablefield.
Note: You are not required to configure the auditing manually. Instead, the required audit profile canbe generated using the Generate Audit Configuration (daxch1201m000) session, which you can startfrom the Specific menu of the Exchange Schemes (daxch0501m000) session.
Regarding the logging of values that have not been changed, the behavior of the audit server can beadapted. By changing the audit profile, you can force the audit server to log values for one or moretable fields even if the fields have not been changed in an update action. For more information, referto the Audit Configuration Management topic in the LN Tools section in the Web Help.
100 | Infor LN Exchange User Guide
Using audit trail in the Exchange module
9Exchange scheme delivery
This chapter describes how to import exchange schemes in LN.
Note: To access all sessions related to export and import of exchange schemes, on the Exchangemenu, select Miscellaneous > Export/Import.For a detailed description of these sessions, see "Miscellaneous" on page 71.
IntroductionExchange schemes contain configurations for export or import of data from LN. In many cases, customerscreate exchange schemes to implement integrations or for other purposes. In some cases, InforDevelopment creates exchange schemes for specific integrations. To deliver these types of schemes,you can export the exchange schemes to XML and deliver the schemes as additional files. Theadvantage of this procedure is that additional files have version control and are automatically includedwhen an Installable Unit is delivered. The XML files include the condition scripts and other texts linkedto the exchange schemes.
This chapter describes the procedure to install delivered exchange schemes at a customer's site.
InstallationWhen you install an Installable Unit, the delivered exchange schemes from that Installable Unit areimported into LN. The data in LN must not be changed/customized, because customizations are lostwhen the exchange scheme is installed again, for example, when you install a Service Pack. Instead,if you want to change/customize the schemes, you must copy the required schemes to another company.
You can only install the exchange schemes after the LN Data Director (DA) Installable Unit is installed.To guarantee this, you can install the da Installable Unit after the tt Installable Unit, but before theapplication Installable Units.
The installation procedure follows the proper installation order.
Infor LN Exchange User Guide | 101
If you install an Installable Unit, all delivered exchange schemes for that Installable Unit are alsoinstalled. You cannot install only some of the schemes. You can use the Import Delivered ExchangeSchemes (daxch5204m000) session to install exchange schemes manually. In this session, you canselect a specific additional file to import into your current company.
Modifying and copying exchange schemesWhen you install a new version of a standard exchange scheme, any customizations for that schemeare overwritten. To prevent this, perform one of these actions before you perform a customization:
• Rename the exchange scheme you want to customize.• Copy the scheme to another company:
• If the package combinations of the company that contains the exchange scheme and the targetcompany match, use the Copy Exchange Scheme (daxch0201m000) session.
• If the package combinations of the companies do not match, use the Export Exchange Schemes(daxch5201m000) and Import Exchange Schemes (daxch5202m000) sessions.
Creating export/import programsAfter the installation, the imported schemes are available, but the programs are not yet generated.Therefore, after you copy the exchange schemes to the company from which you want to use them,complete these steps:
1 Optionally, run the Exchange Schemes (daxch0501m000) session to check whether all options forthe schemes, including the correct paths, are properly set.
2 Run the Create Import Programs (daxch0227m000) session and/or the Create Export Programs(daxch0228m000) session.
102 | Infor LN Exchange User Guide
Exchange scheme delivery