Embed Size (px)
Citation preview

Infor LN Studio Administration Guide

Copyright © 2016 Infor
Important NoticesThe material contained in this publication (including any supplementary information) constitutes andcontains confidential and proprietary information of Infor.
By gaining access to the attached, you acknowledge and agree that the material (including anymodification, translation or adaptation of the material) and all copyright, trade secrets and all otherright, title and interest therein, are the sole property of Infor and that you shall not gain right, title orinterest in the material (including any modification, translation or adaptation of the material) by virtueof your review thereof other than the non-exclusive right to use the material solely in connection withand the furtherance of your license and use of software made available to your company from Inforpursuant to a separate agreement, the terms of which separate agreement shall govern your use ofthis material and all supplemental related materials ("Purpose").
In addition, by accessing the enclosed material, you acknowledge and agree that you are required tomaintain such material in strict confidence and that your use of such material is limited to the Purposedescribed above. Although Infor has taken due care to ensure that the material included in this publicationis accurate and complete, Infor cannot warrant that the information contained in this publication iscomplete, does not contain typographical or other errors, or will meet your specific requirements. Assuch, Infor does not assume and hereby disclaims all liability, consequential or otherwise, for any lossor damage to any person or entity which is caused by or relates to errors or omissions in this publication(including any supplementary information), whether such errors or omissions result from negligence,accident or any other cause.
Without limitation, U.S. export control laws and other applicable export and import laws govern youruse of this material and you will neither export or re-export, directly or indirectly, this material nor anyrelated materials or supplemental information in violation of such laws, or use such materials for anypurpose prohibited by such laws.
Trademark AcknowledgementsThe word and design marks set forth herein are trademarks and/or registered trademarks of Infor and/orrelated affiliates and subsidiaries. All rights reserved. All other company, product, trade or servicenames referenced may be registered trademarks or trademarks of their respective owners.
Publication Information
Release: 10.5
Publication Date: June 22, 2016
Document number: devstudioag (U9420)
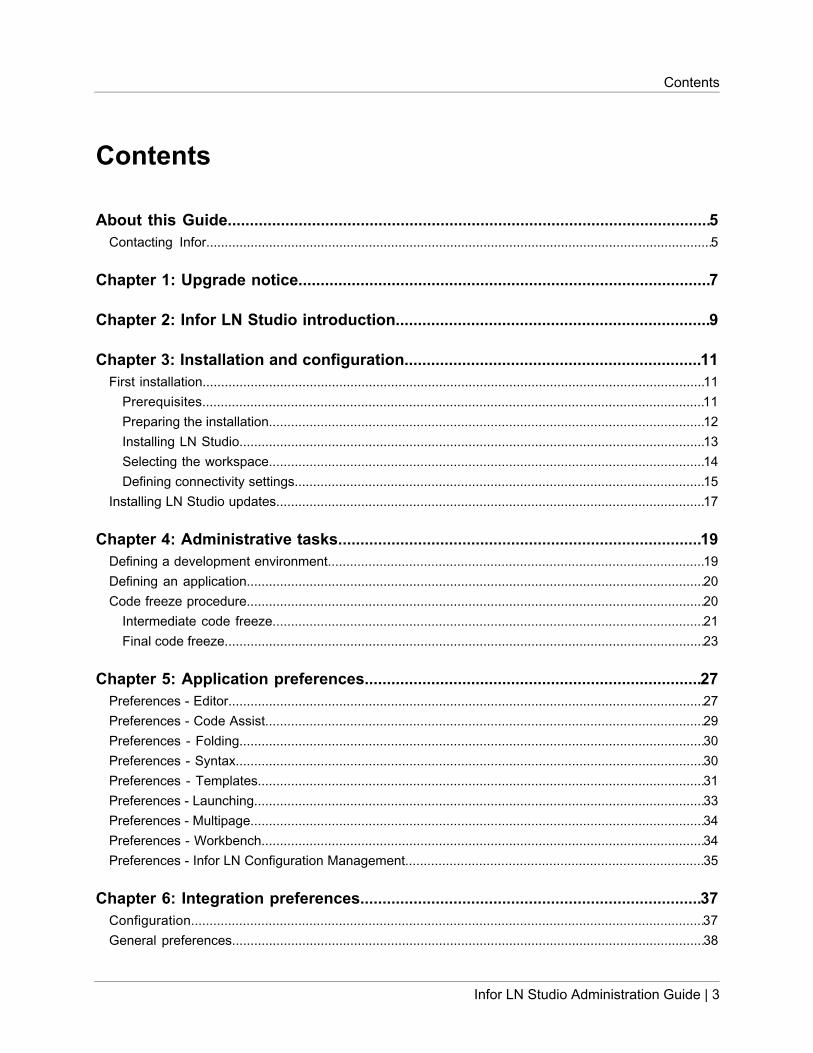
Contents
About this Guide.............................................................................................................5Contacting Infor.........................................................................................................................................5
Chapter 1: Upgrade notice.............................................................................................7
Chapter 2: Infor LN Studio introduction.......................................................................9
Chapter 3: Installation and configuration...................................................................11First installation........................................................................................................................................11
Prerequisites........................................................................................................................................11Preparing the installation......................................................................................................................12Installing LN Studio..............................................................................................................................13Selecting the workspace......................................................................................................................14Defining connectivity settings...............................................................................................................15
Installing LN Studio updates....................................................................................................................17
Chapter 4: Administrative tasks..................................................................................19Defining a development environment......................................................................................................19Defining an application............................................................................................................................20Code freeze procedure............................................................................................................................20
Intermediate code freeze.....................................................................................................................21Final code freeze..................................................................................................................................23
Chapter 5: Application preferences............................................................................27Preferences - Editor.................................................................................................................................27Preferences - Code Assist.......................................................................................................................29Preferences - Folding..............................................................................................................................30Preferences - Syntax...............................................................................................................................30Preferences - Templates.........................................................................................................................31Preferences - Launching..........................................................................................................................33Preferences - Multipage...........................................................................................................................34Preferences - Workbench........................................................................................................................34Preferences - Infor LN Configuration Management.................................................................................35
Chapter 6: Integration preferences.............................................................................37Configuration...........................................................................................................................................37General preferences................................................................................................................................38
Infor LN Studio Administration Guide | 3
Contents
Business Interface Test Tool preferences...............................................................................................38Color preferences....................................................................................................................................38Defining a set of default libraries.............................................................................................................39Defining a default set of related software projects...................................................................................39Preferences of Infor LN Studio Implementation Generator.....................................................................40
Chapter 7: Connectivity preferences..........................................................................41Connection Points Configuration.............................................................................................................41Log Configuration....................................................................................................................................42
Chapter 8: Infor LN Project Server..............................................................................45Infor LN Project Server introduction........................................................................................................45Procedures..............................................................................................................................................45
Defining a software project...................................................................................................................45Dialogs.....................................................................................................................................................46
New Development Environment..........................................................................................................46Create a new Application.....................................................................................................................46Create a Software Project....................................................................................................................50Create a new Activity...........................................................................................................................51Compile activity overview.....................................................................................................................53Project Server View Filter.....................................................................................................................53
Perspectives............................................................................................................................................54Project Server perspective...................................................................................................................54
Views.......................................................................................................................................................54Application Explorer view.....................................................................................................................54Software Project Explorer view............................................................................................................56
Glossary.........................................................................................................................59
4 | Infor LN Studio Administration Guide
Contents
About this Guide
Document SummaryThis document describes how administrators can install and configure Infor LN Studio and Infor LNProject Server.
Related documentsYou can find the documents in the product documentation section of the Infor Xtreme Support portal,as described in "Contacting Infor".
• Infor LN Studio Application Development Guide
Contacting InforIf you have questions about Infor products, go to the Infor Xtreme Support portal.
If we update this document after the product release, we will post the new version on this website. Werecommend that you check this website periodically for updated documentation.
If you have comments about Infor documentation, contact [email protected].
Infor LN Studio Administration Guide | 5

6 | About this Guide
About this Guide
1Upgrade notice
Important note for users upgrading from Application Studio 8.4.2 to Infor LN Studio 10.5
If you have implemented Application Studio 8.4.2 already, the following additional steps must beperformed before you can start to use version 10.5:
1 Define the development environment(s). This is a one-time action for the system administrator. Inversion 8.4.2 you could only use one development server per workspace. This was changed inversion 8.5: you can now connect to multiple development servers using the same workspace.To define those development servers:
a Install LN Studio 10.5 (note that the development server and project server must have beenupgraded already to Enterprise Server 8.5 or higher). See "Installing LN Studio" on page 13.
b Start LN Studio, using a new workspace.c Configure the Project Server connection. See "Defining connectivity settings" on page 15.d Define the development environment(s) in the Application Explorer view. See "Defining a
development environment" on page 19.
2 The system administrator must update the projects in the Software Project Explorer: For each project,fill the Development Environment field.
3 All developers must perform the following steps:
a Start in a new workspace.b Specify Project Server and Debug connections. See "Defining connectivity settings" on page 15.c Open the activities they were working on in the new workspace.d Use the recover workspace functionality to retrieve the modified components from the development
server. See "Recovering an activity".
Note that LN Studio will ask to define the dynamic connection points when they are needed. Fordetails on dynamic connection points, see "Defining dynamic connection points".
Infor LN Studio Administration Guide | 7

8 | Infor LN Studio Administration Guide
Upgrade notice

2Infor LN Studio introduction
LN Studio is a development platform for LN and is implemented in the Eclipse framework.
Eclipse is a Java based development environment with many plug-ins available. LN Studio adds severalplug-ins to Eclipse that supply additional functionality such as editors, views, wizards, and perspectives.
You can use LN Studio to perform these actions:
• Create and edit LN software components through the Eclipse workbench. You create componentsthrough the Create a New Infor LN Software Component wizard. You can edit components throughvarious multipage editors.
• Run and debug sessions through the Eclipse workbench.• Create and test Infor Business Interfaces.
Caution: The Java Connector Architecture (JCA) JCAAdapter4ERPln.jar library that isembedded in this product is copyright and proprietary to Infor Global Solutions and containsinterfaces and/or APIs that are strictly private to Infor. These interfaces and/or APIs cannot beused by external applications, devices, and/or software libraries. Usage of the JCA library willbe monitored and, if used illegal, will cause a non-compliancy situation.
Note: A number of screenshots in the documentation may be based on previous application releases.They can differ slightly from your application screens. However, the described functionality is similar.
Infor LN Studio Administration Guide | 9

10 | Infor LN Studio Administration Guide
Infor LN Studio introduction
3Installation and configuration
First installation
PrerequisitesThis section describes the prerequisites to run LN Studio.
LicensesTo use LN Studio, you need these licenses:
• A license for the Adapter for LN. Take care of the following:
• If you already have an Adapter for LN license for product ID 7013, you do not need a new license.• If you do not have a license yet, obtain a license for product ID 7056.
• An LN Development license, product ID 10146. This is required if you want to create or modifytables, domains, UI scripts, functions, or libraries. This license is also required if you want to modifyand generate Business Interface implementations.
To obtain a license, add the corresponding product ID in the Infor Solution License Manager (SLM)and request a license for it.
Prerequisites for the LN server(s)For the LN server the following is required:
• Infor Enterprise Server 8.5 or higher.• Infor Enterprise Server AddOn 8.5 or higher.
Note: The development repository and the development projects and activities, that are defined inProject Server, can reside on the same LN server. However, you can also configure a dedicated serverto store the project data. The prerequisites for such a dedicated project server are:
• Infor Enterprise Server 8.5 or higher.
Infor LN Studio Administration Guide | 11
• Infor Enterprise Server AddOn 8.5 or higher.
Note: On the LN server(s), the FGL_STUDIO_ENABLED environment variable must be set to 1.
Prerequisites for the client PCPrerequisites for the client PC are as follows:
• 2 GB RAM memory (recommended)• Microsoft Windows 7 or higher• Java Runtime Environment (JRE) 1.7 (Java 7) or higher
You can download the JRE software from the http://java.com/download website.
Preparing the installationNote: This section is intended for system administrators.
Preparing the first installationBefore users can install LN Studio, the system administrator must complete these steps:
1 Download or copy the zip files with the LN Studio software.These zip files are available:
• InforLNStudio_10.5.0.nnn-x86.zip (32-bits)You can download this file from solution 1561993 on the http://www.infor.com/inforxtreme site.
• InforLNStudio_10.5.0.nnn-x86_64.zip (64-bits)You can copy this file from the installation medium.
nnn represents a build number, such as "0023".
Note: The selection of the zip file depends on the JRE version. If you use a 32-bits JRE on a 64-bitsmachine, you must select the 32-bits zip file.
2 Ensure users can access the zip files. For example, put the files on a network share.
Preparing the installation of updatesBefore users can install updates of the LN Studio software, the system administrator must completethese steps:
1 Download new LN Studio zip files from the http://www.infor.com/inforxtreme site.2 Ensure the users can access the zip files.3 Notify the users that new updates are available.
12 | Infor LN Studio Administration Guide
Installation and configuration
Installing LN StudioThis section describes how you can install LN Studio.
Note:
• For information on the prerequisites for the installation of LN Studio, see "Prerequisites" on page11.
• Before you can install LN Studio, the system administrator must give you access to the zip file withthe LN Studio software.See "Preparing the installation" on page 12.
To install LN Studio:
1 Create an installation folder.Create a new folder on your machine.The recommended installation directory is: C:\Infor\LN\LNStudio.
Note: On Windows 7, do not install LN Studio in a Windows protected folder, such as C:\ProgramFiles or C:\Program Files (x86).
2 Extract the LN Studio zip file.Open the zip file that contains the LN Studio software, and extract all contents of the file to the newinstallation folder.For LN Studio 10.5 these zip files can be available:
• InforLNStudio_10.5.0.nnn-x86.zip (32-bits)• InforLNStudio_10.5.0.nnn-x86_64.zip (64-bits)
nnn represents a build number, such as "0023".
Note: The selection of the zip file depends on the JRE version. If you use a 32-bits JRE on a 64-bitsmachine, you must select the 32-bits zip file.
Note: If you upgrade from Application Studio 8.4.2 to LN Studio 10.5, you must perform the actionsdescribed in the "Upgrade notice" on page 7.
Post installation steps1 Select the workspace.
See "Selecting the workspace" on page 14.
2 Configure static connection points.When you have installed LN Studio, you must configure these static Connection Points:
• Project Server• Debug
See "Defining connectivity settings" on page 15.
3 Configure dynamic connection points.
Infor LN Studio Administration Guide | 13
Installation and configuration
For each LN server, on which you want to perform administrative tasks, you must configure thefollowing dynamic connection point:AdministratorFor each software project you develop software in, you must configure these dynamic connectionpoints:
• Development Address• Runtime Address
Note: You cannot define these connection points in advance. When working in LN Studio, a promptis displayed whenever such a connection is required, but not yet configured. At that moment a wizardto configure the required connection point is started.
4 Configure connection points for Business Interface development.To use interface projects, configure these connection points:
• RuntimeRepositoryConnection• TestServerConnection
See "Defining connectivity settings" on page 15.
Note: These connection points are not required if the interface project is using "related softwareprojects".
5 Define LN Studio preferences for Application development.
a Select Window > Preferences.b In the left pane of the Preferences window, select Infor LN Studio Application. For details about
the preferences, see the "Application Preferences" section in this guide or the dialog's onlinehelp.
6 Define LN Studio preferences for Business Interface development.
a Select Window > Preferences.b In the left pane of the Preferences window, select Infor LN Studio Integration. For details about
the preferences, see the "Integration Preferences" section in this guide or the preference page'sonline help.
Selecting the workspaceTo select the workspace:
1 To start LN Studio, run the eclipse.exe executable in the LN Studio installation folder.The Workspace Launcher dialog box is displayed.
2 Specify this information:
WorkspaceThe location of the workspace. The workspace is the directory, usually on your own PC, whereyour work will be stored.
14 | Infor LN Studio Administration Guide
Installation and configuration
It is discouraged to locate the workspace in the directory where the LN Studio software or theEclipse software is installed. It is better to select a different directory, for example under C:\data. This results in a better overview of the directory structure on your desktop, and makes theworkspace independent of the versions of the LN Studio and Eclipse software.
Use this as the default and do not ask againSelect this check box to prevent that the Workspace Launcher dialog box is displayed again.
3 Click OK.4 Allow installation of BW and Dynamic Form Editor.
LN Studio requires Infor LN BW activation for the development and runtime addresses. LN Studioalso requires the Infor LN Dynamic Form Editor (DFE) to develop session forms.If BW and DFE are not installed on your computer, or older versions are installed, an automaticinstallation of these components is performed when you start LN Studio for the first time.If User Account Control (UAC) is enabled, confirmation dialog boxes are displayed during the BWand DFE installations: you are prompted to allow the BW and DFE setup programs to make changesto your computer.Click Yes in both dialog boxes.
A single Workbench window is displayed.Note: If you want to select another workspace after the Workbench is started, select File > SwitchWorkspace > Other.
Defining connectivity settingsThis section describes the procedure to define connectivity settings for the LN Studio.
Infor LN Studio uses Connection Points to connect to the LN server that contains the LN applicationsand the development repository, and to the server on which the software projects are stored.
This table shows the static connection points you must configure to define the connectivity settings:
DescriptionConnection point
This connection point is used to connect to the Project Server. The ProjectServer contains projects and activities that are used in the Infor LN Studio.The Project Server connection point is used, for example:
ProjectServer
• When a project manager creates a new project, or a new activity in theSoftware Project Explorer view.
• When a software engineer starts the Open an Activity wizard from theActivity Explorer view.
When a software engineer debugs a session from the LN Studio, the debuggeron the LN server uses this connection point to send messages to the LNStudio on the client PC.
Debug
Infor LN Studio Administration Guide | 15
Installation and configuration
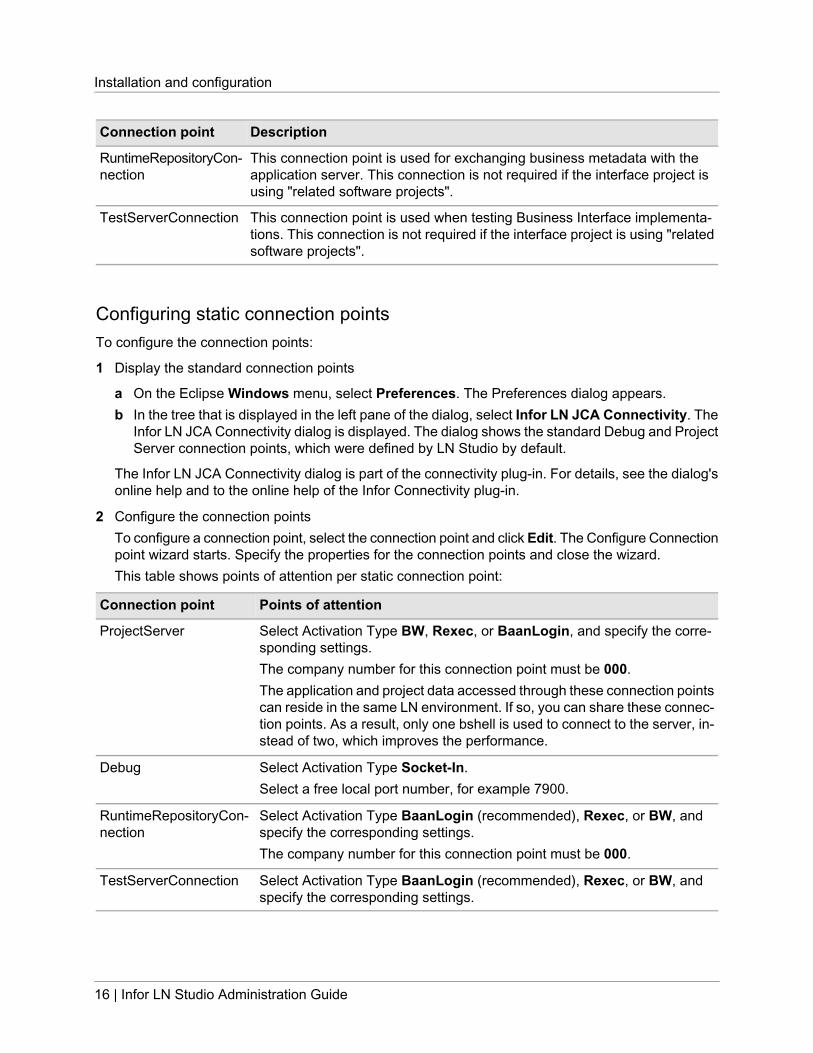
DescriptionConnection point
This connection point is used for exchanging business metadata with theapplication server. This connection is not required if the interface project isusing "related software projects".
RuntimeRepositoryCon-nection
This connection point is used when testing Business Interface implementa-tions. This connection is not required if the interface project is using "relatedsoftware projects".
TestServerConnection
Configuring static connection pointsTo configure the connection points:
1 Display the standard connection points
a On the Eclipse Windows menu, select Preferences. The Preferences dialog appears.b In the tree that is displayed in the left pane of the dialog, select Infor LN JCA Connectivity. The
Infor LN JCA Connectivity dialog is displayed. The dialog shows the standard Debug and ProjectServer connection points, which were defined by LN Studio by default.
The Infor LN JCA Connectivity dialog is part of the connectivity plug-in. For details, see the dialog'sonline help and to the online help of the Infor Connectivity plug-in.
2 Configure the connection pointsTo configure a connection point, select the connection point and click Edit. The Configure Connectionpoint wizard starts. Specify the properties for the connection points and close the wizard.This table shows points of attention per static connection point:
Points of attentionConnection point
Select Activation Type BW, Rexec, or BaanLogin, and specify the corre-sponding settings.The company number for this connection point must be 000.
ProjectServer
The application and project data accessed through these connection pointscan reside in the same LN environment. If so, you can share these connec-tion points. As a result, only one bshell is used to connect to the server, in-stead of two, which improves the performance.
Select Activation Type Socket-In.Select a free local port number, for example 7900.
Debug
Select Activation Type BaanLogin (recommended), Rexec, or BW, andspecify the corresponding settings.The company number for this connection point must be 000.
RuntimeRepositoryCon-nection
Select Activation Type BaanLogin (recommended), Rexec, or BW, andspecify the corresponding settings.
TestServerConnection
16 | Infor LN Studio Administration Guide
Installation and configuration
The Configure Connection point wizard is part of the connectivity plug-in. For details, see the wizard'sonline help and the online help of the Infor Connectivity plug-in.
Note: You can use the Preferences dialog box to set various other user preferences for the LN Studioworkbench.See "Application preferences" on page 27, "Integration preferences" on page 37, and "Connectivitypreferences" on page 41.If you want to run or debug sessions after creating or modifying the Debug connection point, you mustrestart LN Studio.
Installing LN Studio updatesThis section describes how you can install updates for LN Studio.
Note: Before you can install updates, the system administrator must provide a new LN Studio zip file.See "Preparing the installation" on page 12.
To install updates:
1 Open the LN Studio zip fileOpen the zip file that contains the new software.For LN Studio 10.5 these zip files can be available:
• InforLNStudio_10.5.0.nnn-x86.zip (32-bits)• InforLNStudio_10.5.0.nnn-x86_64.zip (64-bits)
nnn represents a build number, such as "0023".
Note: The selection of the zip file depends on the JRE version. If you use a 32-bits JRE on a 64-bitsmachine, you must select the 32-bits zip file.
2 Extract the LN Studio zip fileExtract all contents of the file to your existing LN Studio installation folder, such as C:\Infor\LN\LNStudio. Ensure the Overwrite existing files check box is selected!
Infor LN Studio Administration Guide | 17
Installation and configuration

18 | Infor LN Studio Administration Guide
Installation and configuration
4Administrative tasks
Defining a development environmentThis topic describes how to define a development environment. For each development environment,you can define one or more Applications.
To define a development environment:
1 Start LN Studio2 Open the Project Server perspective.
Select Window > Open Perspective > Other. A list of perspectives is displayed. Select ProjectServer and click OK.The Application Explorer is displayed.
3 Specify the development environment propertiesOn the view's toolbar, click Create a new development environment. The New DevelopmentEnvironment dialog is displayed. In this dialog, specify the development environment properties,such as Hostname and BSE path. See the dialog's online help.Save the environment and close the dialog. The new environment is displayed in the ApplicationExplorer view.
4 Configure the Administrator connection point for the new environmentComplete these steps:
a Click on the triangle icon of the new development environment. Two sub folders, Applicationsand Localizations, are displayed.
b Click on the triangle icon of the Applications or Localizations folder. You are promptedto configure an Administrator Connection Point.
c In the question window, click Yes.The Configure Connection point wizard starts.d Specify the properties for the connection point.
Points of attention
• Select Activation Type BW, Rexec, or BaanLogin, and specify the corresponding settings.• Select company number 000.• The application and project data can reside in the same LN environment. If so, you can share
the Administrator and ProjectServer connection points. As a result, only one bshell is used toconnect to the server, instead of two. This improves the performance.
Infor LN Studio Administration Guide | 19
For details, see the wizard's online help.
Defining an applicationThis topic describes how to define an Application. For each application, you can define a project inwhich the software engineers can develop their software components.
Note: Before you can define an application, you must define one or more development environmentsand the corresponding Administrator Connection Points.See "Defining a development environment" on page 19.
To define an LN application:
1 Start LN Studio2 Open the Project Server perspective.
Select Window > Open Perspective > Other. A list of perspectives is displayed. Select ProjectServer and click OK.The Application Explorer is displayed.
3 Specify the application propertiesComplete these steps:
a In the view, right-click the development environment for which you want to define an application.b On the shortcut menu, select New Application. The New Application dialog is displayed.c Specify the application properties, such as application name, description, and release.
For details, see the dialog's online help.
Note: You can now define one or more projects for the new application. See "Defining a softwareproject" on page 45.
Code freeze procedureA code freeze is done when the development process reaches a certain milestone. Development isstopped in the current VRC and started in a new derived VRC. Certain activities might still be openand developers may want to continue working in the new VRC, on the components in these activities.
The code freeze procedure handles the move of these components and the update of the involvedactivities and configuration management settings.
Two types of code freeze are distinguished:
• Intermediate code freeze.
20 | Infor LN Studio Administration Guide
Administrative tasks

An existing software project is linked to a new VRC, which is used as the export VRC for theapplication.See "Intermediate code freeze" on page 21.
• Final code freeze.A new application and project and a corresponding VRC are created. All activities are moved to thenew project.See "Final code freeze" on page 23.
Intermediate code freezeWhen you perform an intermediate code freeze, the current project is linked to a new project VRC,which is used as the export VRC for the application.
Note:
• The code freeze creates new activity VRCs derived from the new project VRC and, if SCM is active,new private VRCs derived from the new activity VRCs.
• All involved activities stay linked to the current project.• The application and its Base VRC do not change.
ExampleThis diagram shows a VRC structure before an intermediate code freeze. SCM is active.
This diagram shows the VRC structure after an intermediate code freeze.
Infor LN Studio Administration Guide | 21
Administrative tasks
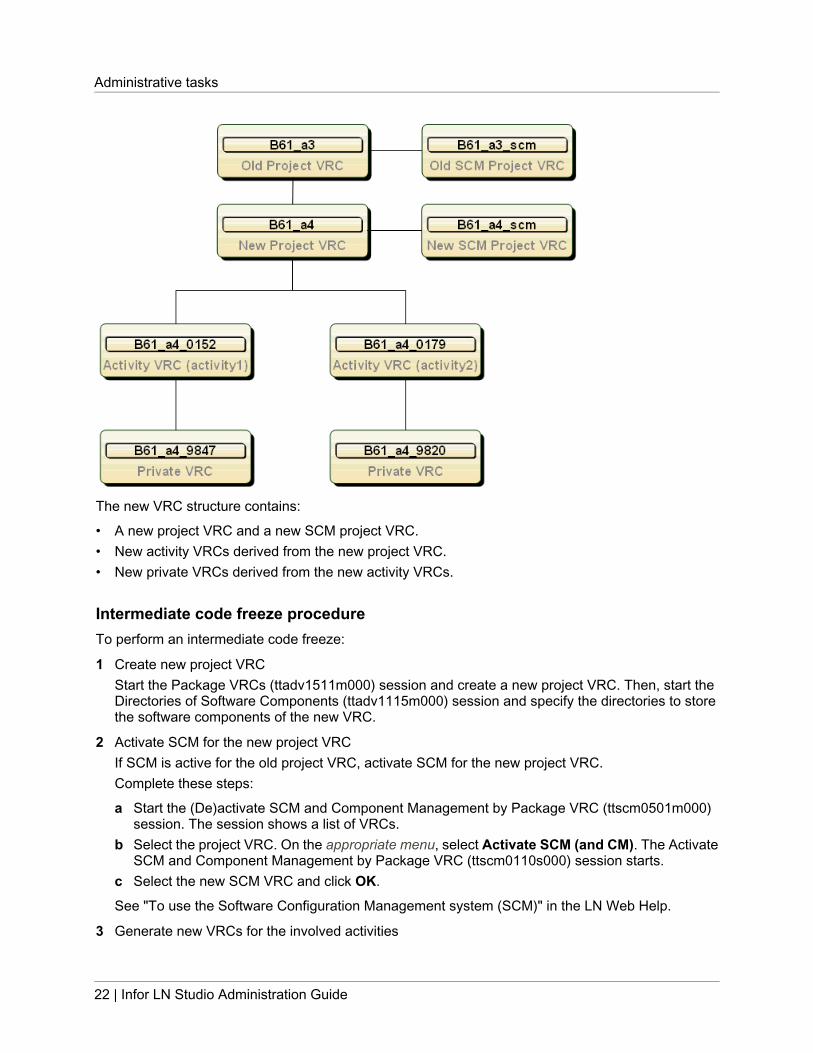
The new VRC structure contains:
• A new project VRC and a new SCM project VRC.• New activity VRCs derived from the new project VRC.• New private VRCs derived from the new activity VRCs.
Intermediate code freeze procedureTo perform an intermediate code freeze:
1 Create new project VRCStart the Package VRCs (ttadv1511m000) session and create a new project VRC. Then, start theDirectories of Software Components (ttadv1115m000) session and specify the directories to storethe software components of the new VRC.
2 Activate SCM for the new project VRCIf SCM is active for the old project VRC, activate SCM for the new project VRC.Complete these steps:
a Start the (De)activate SCM and Component Management by Package VRC (ttscm0501m000)session. The session shows a list of VRCs.
b Select the project VRC. On the appropriate menu, select Activate SCM (and CM). The ActivateSCM and Component Management by Package VRC (ttscm0110s000) session starts.
c Select the new SCM VRC and click OK.
See "To use the Software Configuration Management system (SCM)" in the LN Web Help.
3 Generate new VRCs for the involved activities
22 | Infor LN Studio Administration Guide
Administrative tasks
Complete these steps:
a Start the Code Freeze (ttadv1222m000) session.b Clear the Final Code Freeze check box.c In the Source VRC field, select the old project VRC.d In the Target VRC field, select the new project VRC.e Select the full range of activities.f Select the Update Export VRC in Base VRC's check box, so the new project VRC becomes
the export VRC of the application's base VRC.If this check box is cleared, you must use the Base VRC's (ttpmc0110m000) session to assignthe new project VRC as the export VRC.Note: LN Studio users must not recover their activities before the new project VRC is assignedas the export VRC.
g Click Move. The session performs the following actions:
• Creates new activity VRCs, derived from the new project VRC.• Creates, if SCM is active, new private VRCs derived from the new activity VRCs.• Moves components from the old activity and private VRCs to these new VRCs.• Removes the old activity and private VRCs.
4 Inform LN Studio usersInform the LN Studio users the code freeze is finished.The users must recover their workspace.
• Note: This recovery must be done after the new project VRC is assigned as the export VRC forthe application's base VRC. See step 3 in this procedure.
• The users must select the Recover existing activity files check box in the Recover activitydialog box.See "Recovering an activity".
Final code freezeWhen you perform a final code freeze, you must create a new application and a new project. The newproject is linked to a new project VRC, which is used as the export VRC for the application.
Note:
• The code freeze creates new activity VRCs derived from the new project VRC and, if SCM is active,new private VRCs derived from the new activity VRCs.
• All involved activities are moved to the new project.
Final code freeze procedureTo perform a final code freeze:
Infor LN Studio Administration Guide | 23
Administrative tasks
1 Create new project VRCStart the Package VRCs (ttadv1511m000) session and create a new project VRC. Then, start theDirectories of Software Components (ttadv1115m000) session and specify the directories to storethe software components of the new VRC.
2 Activate SCM for the new project VRCIf SCM is active for the old project VRC, activate SCM for the new project VRC.Complete these steps:
a Start the (De)activate SCM and Component Management by Package VRC (ttscm0501m000)session. The session shows a list of VRCs.
b Select the project VRC. On the appropriate menu, select Activate SCM (and CM). The ActivateSCM and Component Management by Package VRC (ttscm0110s000) session starts.
c Select the new SCM VRC and click OK.
See "To use the Software Configuration Management system (SCM)" in the LN Web Help.
3 Define new base VRCStart the Base VRCs (ttpmc0110m000) session and create a new Base VRC. In the Export VRCfield, select the new project VRC.
4 Define new applicationStart LN Studio and define a new application.Note: Take care of the following when you specify the properties of the new application in the NewApplication dialog box:
• In the Release field, select the new base VRC created in the previous step.• If SCM is active for the new project VRC, select the Use SCM check box. If SCM is not active,
clear the check box.• In the lower part of the dialog box, specify the appropriate packages and languages.
See "Defining an application" on page 20.
5 Create new projectStart LN Studio and define a new software project.Note: In the Application field in the Create a Software Project dialog box, select the new applicationcreated in the previous step.See "Defining a software project" on page 45.
6 Move activities to the new projectComplete these steps:
a Log on to the project server and start the Final Code Freeze (tlprj1220m000) session.b In the Source Project field, select the old project.c In the Target Project field, select the new project.d Select the full range of activities.e Click Move. The session moves the activities to the new project.
7 Generate new VRCs for the involved activitiesComplete these steps:
24 | Infor LN Studio Administration Guide
Administrative tasks
a Start the Code Freeze (ttadv1222m000) session.b Select the Final Code Freeze check box.c In the Source VRC field, select the old project VRC.d In the Target VRC field, select the new project VRC.e Select the full range of activities.f Click Move. The session performs the following actions:
• Creates new activity VRCs derived from the new project VRC.• Creates, if SCM is active, new private VRCs derived from the new activity VRCs.• Moves components from the old activity and private VRCs to these new VRCs.• Removes the old activity and private VRCs.
8 Inform LN Studio usersInform the LN Studio users the code freeze is finished.For each activity involved, users must complete these steps:
a Delete the activity, including all files, from the local workspace. To do this, right-click the activityin the Activity Explorer and select Delete. A confirmation question appears. Select Also deletecontents... and click Yes.
b Open the activity again.Note: In the Open an Activity - Select Project dialog box, the users must first select the newsoftware project from the list, and then select the activity.
c Recover the activity.Note: The users must select the Recover existing activity files check box in the Recover activitydialog box.See "Recovering an activity".
Infor LN Studio Administration Guide | 25
Administrative tasks

26 | Infor LN Studio Administration Guide
Administrative tasks
5Application preferences
Under Infor LN Studio Application in the preference pages, you can specify preferences related toapplication development. To open the preference pages, in Eclipse, select Windows > Preferences.
Preferences - EditorUse this dialog window to specify your script editor preferences.
These settings only apply to the LN Studio Script Editor.
Marker IdentifierDetermines the text that will be added in the source code, when you add maintenance comments.Allowed values
The name of the current Activity.Activity Name
The ID of the business requirement to which the current activity belongs.Activity Requirement ID
The name of the current Software Project.Project Name
The ID of the business requirement to which the current project belongs.Project Requirement ID
Example
Marker Identifier = "Activity Name", and your current activity is "myactivity".In the Script Editor, you mark lines as new. The following maintenance comments are added:
• Behind the first new line: " |#myactivity.sn ".• Behind the last new line: " |#myactivity.en ".
See "Comments" in the Infor LN Studio Application Development Guide.
Show Mark OccurrencesIf this check box is selected, Mark Occurrences is enabled, so occurrences of the selected elementare marked in the source code. See "Mark Occurrences" in the Infor LN Studio Application DevelopmentGuide.
Infor LN Studio Administration Guide | 27
Highlight Matching BracketsIf this check box is selected, the script editor can highlight matching brackets in the source code.
Usage: Place the cursor directly behind a bracket. The corresponding bracket is highlightedautomatically.This functionality applies to the following types of brackets:
• Parentheses: (, ).• Braces: {, }.
Remove Trailing Whitespaces on SaveIf this check box is selected, the script editor removes trailing whitespaces (space and tab) of eachline in the source code during save actions.
Delay key managerThe number of milliseconds after which the editor's parser will react to the last key-event.
This only works if the editor is in asynchronous mode.
Max LOC of syn. behaviourThe maximum number of lines of code for which the editor can run in synchronous mode. For theremaining lines, the editor switches to asynchronous mode.
Note: In synchronous mode, the parser directly reacts to each key-event. As a result, all changes are coloredimmediately.If you enter 0 in this field, the editor always runs in asynchronous mode.
Max LOC of parserThe maximum number of lines of code the parser can handle.
If a script has more lines, the parser does not react anymore. As a result, all editor functionality thatneeds the parser's output drops out. This is done to enhance the performance when editing very largescripts.
Max LOC of syntax highlightingThe maximum number of lines of code to which syntax highlighting can be applied.
If a script has more lines, the parser does not react anymore. As a result, all editor functionality thatneeds the parser's output drops out. This is done to enhance the performance when editing very largescripts.
Background ColorUse this field to set the background color for your editor.
Choose one of the following options:
The default background color is white.System Defaults
Choose the color from a basic color schema or define custom colors.Custom
Note:
28 | Infor LN Studio Administration Guide
Application preferences
The editor only uses this color for source code of checked out components. If a component is notchecked out, the source code is read-only and the editor uses the ReadOnly color.
ReadOnlyUse this field to set the background color for read-only source code, such as source code of componentsthat are not checked out.
Choose the color from a basic color schema or define custom colors.
Preferences - Code AssistUse this dialog window to specify your Code assist preferences.
These settings only apply to the LN Studio Script Editor.
See "Code Assist" in the Infor LN Studio Application Development Guide.
Code Assist
Enable Code AssistSelect this check box to enable the code assist feature.
Present proposals in alphabetical orderIf this check box is selected, Code assist presents the list of suggested completions in alphabeticalorder.
Automatically insertIf this check box is selected, and if there is only one completion proposal for the string you enteredin the Script Editor, code assist will automatically insert the proposal at the cursor position.Example
In the Script Editor, you type " she " and press CTRL+SPACE. Code assist automatically inserts thefollowing text, because this is the only completion proposal available: " shell(command,mode) ".
Completion proposal backgroundThe background color for the completion proposal.
Completion proposal foregroundThe foreground color (text color) for the completion proposal.
Auto Activation
Enable auto activationIf this check box is selected, Code Assist starts automatically when you type the auto activation triggercharacter.
Auto activation delayThe delay in milliseconds between the moment you type the auto activation trigger character, and themoment Code assist starts automatically.
Infor LN Studio Administration Guide | 29
Application preferences
Auto activation trigger Char for Infor LNThe character that triggers the auto activation of Code assist. The default is a dot (.).
Preferences - FoldingUse this dialog window to specify your Folding preferences.
These settings only apply to the LN Studio Script Editor.
See "Folding" in the Infor LN Studio Application Development Guide.
Enable foldingIf this check box is selected, you can fold and unfold the selected region types when you open a neweditor.
If this check box is cleared, you cannot fold and unfold any region type in the script editor.
Collapse all selected region types when opening the EditorIf this check box is selected, all selected region types are collapsed automatically when you open thescript editor.
Folding these region types:
FunctionsIf this check box is selected, folding is enabled for functions.
HeaderIf this check box is selected, folding is enabled for header comments.
Macro'sIf this check box is selected, folding is enabled for macros.
SectionIf this check box is selected, folding is enabled for script sections, such as the declaration section,the before.program section, and field sections in a UI script.
Preferences - SyntaxUse this dialog window to specify syntax coloring preferences.
These settings only apply to the LN Studio Script Editor.
30 | Infor LN Studio Administration Guide
Application preferences
LimitationsThe script editor does not recognize syntax patterns because no syntax parser is available in thisrelease. Therefore, if a variable has a name identical to a keyword such as "domain", "function", or"case", the variable is colored as a keyword. For example:
• You add the following code to the declaration section of a UI script: long case.• case is colored as a keyword, because the editor does not recognize it as a variable.
Syntax ColoringSpecify the syntax coloring settings for various elements in the program text.To specify the syntax coloring settings for an element:
1 Select the element from the list.2 Specify whether the element must be bold and/or italic.3 Click the color button.4 Select the color from a basic color schema or define custom colors.
PreviewShows a preview of your syntax coloring settings.
Preferences - TemplatesUse this dialog window to create, edit, and remove templates.
These settings only apply to the LN Studio Script Editor.
To insert a template in the script editor, use the Code Assist feature.
Overview windowUse the check boxes to enable and disable templates. If a check box is selected, you can use CodeAssist to insert the corresponding template in your source code.
Use these buttons to manipulate and configure templates:
DescriptionButton
Opens a dialog to create a new template.New
Opens a dialog to edit the currently selected template.Edit
Removes all selected templates.Remove
Restores any predefined templates that have been removed.Restore Removed
Restores any predefined templates to their default configuration.This action does not modify user-created templates.
Revert to Default
Imports templates from an XML file in the file system.Import
Infor LN Studio Administration Guide | 31
Application preferences
DescriptionButton
Exports all selected templates to an XML file in the file system.Export
Edit Template dialog window
NameThe name of the template.ContextThis is a standard Eclipse option that is not used by LN Studio.Automatically insertIf this check box is selected, code assist automatically inserts the template at the cursor position, ifthe template is the only completion proposal for the string you entered in the Script Editor.DescriptionThe description of the template.PatternThe pattern of the template. This is the text inserted in the editor when you select the template.
In the template pattern, you can use predefined template variables. Variables are resolved to theirconcrete value when the template is evaluated in its context. You can specify variables using simpleor full syntax. If there are multiple possible matches for a variable, they are presented as proposalsto the user.To add a variable to the template pattern, click Insert Variable and select the desired variable fromthe list.You can select general and LN-specific template variables.
This table shows the general template variables:
DescriptionVariable
Specifies the cursor position when you leave the template edit mode. Thisis useful if the cursor must jump to another place than to the end of thetemplate, on leaving template edit mode.
${cursor}
The current date.${date}
The dollar symbol '$'. Alternatively, you can use two dollar signs: '$$'.${dollar}
The content of all currently selected lines.${line_selection}
The current time.${time}
The user name.${user}
The content of the current text selection.${word_selection}
The current year.${year}
This table shows the LN-specific template variables:
32 | Infor LN Studio Administration Guide
Application preferences
DescriptionVariable
The name of the function which is used above this variable${name}
The arguments of the function which is used above this variable.${input_arg}
The return type of the function which is used above this variable.${returnType}
Place holder${output_arg}
Preferences - LaunchingUse this dialog window to specify your launching preferences.
When you launch a software component, the LN Studio checks whether the release of the correspondingapplication matches the package combination in which the component will be executed. If they do notmatch, you may encounter problems during debugging.
In this dialog, you can specify whether/how the launch should continue if release and packagecombination do not match.
Note:
• The application release is specified in the Create a new Application dialog. The release is identicalto the Base VRC on which the software development is based.
• The package combination depends on the runtime address connection points of the application'ssoftware projects. A runtime address connection point is linked to a .bwc file. You can find thepackage combination in the user data of the user account specified in this .bwc file. To view theuser data, run the User Data (ttaad2500m000) session. Alternatively, look in the Command fieldof the BW Configuration Properties dialog.
Default Launch ModeSpecify how sessions will be started by default.
Select an option. In the Configurations dialog, the corresponding launch mode is selected automatically.
Allowed values
• Launch in BW• Attach to running Web UI
Continue if release does not match package combinationUse this field to specify whether/how the launch will continue if release and package combination donot match.
Select one of the following options:
The session is launched anyway.Al-ways
Infor LN Studio Administration Guide | 33
Application preferences
The session is not launched.Never
A warning is displayed and you can choose whether you want to launch the session.Prompt
The default option is Prompt.
BFlow - Clear console before launchIf this check box is selected, the LN Studio Console is cleared before a BFlow run or debug configurationis launched.
Preferences - MultipageUse this dialog window to specify preferences for the Multipage Editors.
Display the TDE overview page for all editorsIf this check box is selected, a TDE Documentation tab is displayed in all multipage editors. This tabshows an XML tree with the technical information on the software component's Technical Data Entity.
The information displayed in the TDE Documentation tab is primarily intended for support andtroubleshooting purposes. Therefore it is recommended to display the tab only in case of problems.
Path for Additional File attachmentsThe directory where LN Studio stores the additional files that you edit in the Additional File Editor.
Preferences - WorkbenchUse this dialog window to specify whether the editor will be opened automatically each time you adda new resource to your workspace.
The script editor can start automatically, for example:
• When you use the Get command in the Component Explorer view to add a component to yourworkspace.
• When you use the Open Declaration (source) command in the script editor to view detailedinformation on a function that is called in your source code and not present in your workspace.
• During debugging, when you step into a function that is called in your source code, but not alreadypresent in your workspace.
Automatically open the editor for a new resourceUse this field to specify whether the corresponding editor will be opened automatically for a newresource.
This table shows the available options:
34 | Infor LN Studio Administration Guide
Application preferences
The editor starts automatically each time you add a component to your workspace.Al-ways
The editor does not start automatically when you add a component to your workspace.Never
When you add a component to your workspace, the following question is displayed:Prompt"Open editor for the new software component?"Click Yes or No to answer the question.Optionally, click the Remember my decision check box in the question window. Dependingon your answer to the question, this will change the Automatically open the editor for anew resource preference setting to "Always" or "Never".
The default option is Prompt.
Automatically check components after a changeIf this check box is selected, LN Studio automatically verifies software components each time acomponent is saved.
If this check box is cleared, components are not verified automatically. You must start the verificationmanually through the Verify Component command in the shortcut menu in the Activity Explorer view.For details, see "Verifying software components" in the Infor LN Studio Application Development Guide.
Preferences - Infor LN Configuration ManagementNote: This page is not located under Infor LN Studio Application preferences, but under Teampreferences.
Use this dialog window to specify your Configuration Management preferences.
Checkout while editingIndicates whether LN Studio must prompt you to checkout a software component when you edit thecomponent in the corresponding editor.
Select one of the following options:
You cannot check out a component while editing. To change a component, you must firstcheck out the component and then start the corresponding editor.
Never
You can check out a component while editing.PromptIf you try to change a component, which is not yet checked out, you are prompted whetheryou want to check out the component.If you click Yes, the component is checked out so you can change it.If you click No, the component is not checked out so you cannot change it.
The default option is Prompt.
Infor LN Studio Administration Guide | 35
Application preferences
Decorations
Append version information to resource nameIf this check box is selected, LN Studio appends the version and release information of the applicationto the resource names displayed in the Activity Explorer view.
For example: 7.6_a4
Show image decoration for dirty resourcesIf this check box is selected, LN Studio displays a decorator in the Activity Explorer view for eachresource not in sync with the LN server.
A resource is dirty if the version stored in your local workspace differs from the version on the LNserver.Resources can become dirty if the Build Automatically option is turned off: When you save changesyou make to a resource, the changes are saved in your local Eclipse workspace. However, the softwarecomponent on the LN server is not updated.
You must build the component to synchronize the local resource and the LN server. The decoratordisappears automatically.
Text decoration for dirty resourcesThe character entered here is displayed as a prefix to the names of dirty resources in the ActivityExplorer view.
A resource is dirty if the version stored in your local workspace differs from the version on the LNserver.Resources can become dirty if the Build Automatically option is turned off: When you save changesyou make to a resource, the changes are saved in your local Eclipse workspace. However, the softwarecomponent on the LN server is not updated.You must build the component to synchronize the local resource and the LN server. The prefixdisappears automatically.
End Activity Behavior
By default, close the activityIf this check box is selected, the activity is ended completely when you run the End Activity commandin the Activity Explorer. The activity disappears from the Activity Explorer.
If this check box is cleared, the activity is ended partially when you run the End Activity commandin the Activity Explorer. The activity is still present in the Activity Explorer.
36 | Infor LN Studio Administration Guide
Application preferences
6Integration preferences
ConfigurationThis section describes the configuration of Infor LN Studio related to the development of BusinessInterfaces.
These preference pages are available:
• Infor LN Studio IntegrationThis page contains some general preferences.
• Business Interface Test ToolOn this page you can set the configuration for testing Business Interface Implementations.
• ColorsWith the Colors preferences of LN Studio Integration, you can set the colors of the graphical modelersand textual editors that you use for Business Interface modeling.
• Default LibrariesOn this page you can specify some libraries that will automatically be included in new Interfaceprojects.
• Default Related Software ProjectsOn this page you can specify a set of related software projects.
• Generators - Infor LN ImplementationWith the Infor LN Implementation preferences of the Generators, you can set the VRC of the LNserver for which you generate the Business Interface Implementation.
To navigate to the preference pages of LN Studio, select Windows > Preferences. In the Preferenceswindow, expand the Infor LN Studio Integration folder and select one of the preference options.
Note: To generate proxies for old BDEs (version 6.1 only!)The Business Interfaces you develop with LN Studio do not use proxies. However, to remain backwardscompatible, LN Studio still contains functionality to generate BDE Proxies for the business interfacedefinitions (BIDs) that you created with Integration Studio 6.1.You can configure the involved Proxy Generators using the .NET Proxy and Java Proxy preferencesof the LN Studio Generators. For detailed information, see the online Help of LN Studio.
Infor LN Studio Administration Guide | 37
General preferencesUse this page to specify the location of the "output" and "model" folder in the Integration project. Thedefault values should suffice for most users.
The page contains these additional settings:
Automatically save dirty editors before refactoringIf this check box is selected, editors with unsaved changes are saved automatically when performinga refactoring action. If this check box is cleared, a warning window is displayed when you try to performa refactoring action.
Validate on differences between base and specialized Interface Definitions and generate warningsIf this check box is selected, an automatic check is performed when you save a specialized interfacedefinition. This reduces the performance. Optionally, to improve performance, clear this check box.
Prefer objects in libraries when automatically fixing references during importDuring an import, duplicate datatypes can be found because the same datatypes can exist in theimporter and in the libraries.If this check box is selected, in case of duplicates, the importer createsreferences to the datatypes from the library, rather than to the datatypes in the importer.
Number of import from folders in historyThe number of entries in the list in the Import page.
Business Interface Test Tool preferencesUse this page to set the configuration for testing Business Interface Implementations.
Allow a manual change of the request xml for a TestIf this check box is selected, you can manually edit the XML documents, which are used as a requestfor a Business Interface, such as a SyncBOD or a Request BDE message.
If this check box is cleared, you cannot edit the XML request documents LN Studio generated fromthe specified test parameters.
Note: We do not recommend that you manually edit a generated request. because this can result inan incorrect request and might cause problems when you execute the test. Therefore, this check boxis cleared by default.
Color preferencesUse this page to customize the colors that are used in the graphical modelers and text editors usedfor Business Interface modeling. Select the Graphical Modelers tab to define the colors of the graphicalelements in the modelers. Select the Editors tab to define the colors of the text-based editors. You
38 | Infor LN Studio Administration Guide
Integration preferences

can change any color by clicking on the colored button. A Color dialog box, in which you can selectthe desired color, is displayed.
Defining a set of default librariesWhen creating an interface project, default libraries are automatically included in the project.
To define default libraries:
1 In Eclipse, select Windows > Preferences.2 In the left-hand navigation pane of the Preferences window, select Infor LN Studio Integration >
Default Libraries.3 To add a library, click Add. A file selection dialog box, in which you can navigate to an existing
library, is displayed.4 Select the library and click Open.
You can include the default libraries in two different ways. If you select the Link the Libraries to theproject option, the new Interface project will contain links to the default libraries. If you select Copythe Libraries to the project, the new Interface project will contain copies of the libraries.
To remove a library from the set of default libraries, select the library in the list, and click Remove.
Defining a default set of related software projectsYou can define a default set of related software projects. When you create a new interface project,these default projects will be linked as related software projects. The related software projects arerelevant when developing business interface implementations. When you generate Infor LNimplementations, you can generate the libraries for those implementations in activities of these relatedsoftware projects.
Note: The following procedure is optional. We recommend that you define related projects, but this isnot mandatory.
To define the default set of related software projects:
1 In Eclipse, select Windows > Preferences. The Preferences window is displayed.2 In the left-hand navigation pane of the Preferences window, select Infor LN Studio Integration >
Default Related Software Projects. The Default Related Software Projects dialog box is displayed.3 To add a related software project, click Add.4 Specify this information:
NameSelect a software project from the list.
Infor LN Studio Administration Guide | 39
Integration preferences

Is IntegratedIf this check box is selected, you can use components of the software project when you are editinghooks in a business interface definition. For example, in the hook editor, you can use the OpenDeclaration command to open components of the related software project.
5 Click OK.
To remove a software project from the list, right-click the entry in the list and select Delete.
Preferences of Infor LN Studio ImplementationGeneratorThis section describes the preferences of the LN Studio Implementation Generator. With this generator,you can generate the runtime code for an implementation on an LN application server.
Before you can generate Business Interface runtime code, you must specify the version, in other words,the VRC in which the Business Interface runtime will be created. You must set the version on thePreferences page of the LN Studio Implementation Generator. To access this page, in the Preferencesdialog box, select Infor LN Studio Integration > Generators > Infor LN Implementation. To openthe Preferences dialog box, select Window > Preferences.
The Major Version, Minor Version and optional Subordinate Version refer to what is called the BaseVRC in LN. To view the available base VRCs, run the Base VRCs (ttpmc0110m000) session in LN. Ifno base VRC exists that corresponds to the VRC in which you must generate the Business Interfaceruntime, you must create a base VRC in LN.
To determine the actual package VRC that is used, the LN Studio Implementation Generator usesthese criteria:
• Takes the package from the value specified for the Implementation Identifier property of theBusiness Interface Implementation.
• Takes the VRC from the Export VRC, as defined in the Base VRCs (ttpmc0110m000) session.
Note: To develop in the resulting package VRC, you must have sufficient authorizations. In Infordevelopment, the VRC that you must use is a VRC that is open for development or maintenance. In acustomer environment, the VRC is a customization VRC, such as B61C_a_cust.
This table shows the preferences of the LN Studio Implementation Generator:
DescriptionPreference property
Version number of the Base VRC.Major Version
Release code of the Base VRC.Minor Version
Customer code of the Base VRC.Subordinate Version
40 | Infor LN Studio Administration Guide
Integration preferences
7Connectivity preferences
Under Infor LN JCA Connectivity in the preference pages, you can specify preferences related toJCA connectivity. To open the preference pages, in Eclipse, select Windows > Preferences. The mainpreference page contains the configuration of the connection points. There is a sub-page for configuringthe logging preferences.
Connection Points ConfigurationThis page contains the connection points that are required to connect to one or more LN servers. Someconnection points are static and are always present in the list: ProjectServer, Debug,RuntimeRepositoryConnection, and TestServerConnection. Other connection points are dynamic.Dynamic connection points are added, by starting a wizard, at the time they are required. You cannotadd new connection points on this preference page.
To change the settings of a connection point:
1 Select the connection point in the list.2 Click Edit. The configuration wizard starts.3 On the first wizard page, you can either choose to share the connection and specify the shared
connection point, or choose an activation type. The available activation types depend on theconnection point you are configuring.
4 Depending on the choices on the first page, you may need to click Next and complete a secondpage.
5 Specify the required data for the selected activation type.6 On the final wizard page, click Finish.
To test a connection point:
1 Select the connection point in the list.2 Click Ping. A dialog box shows whether the test succeeded.
Infor LN Studio Administration Guide | 41
Log ConfigurationUse this page to specify the settings for logging the connection-related information to a log file. In caseof problems, a support engineer may ask for this information.
You can specify these preferences:
Enable loggingIf this check box is cleared, no logging takes place. Select this check box to activate logging.
LocationSpecify the complete path of the log file. The file name must end in ".log". Use the browse button toselect the folder in which the log file must be stored.
Application log levelSelect the log level. This influences the amount of messages that are logged. These levels aresupported:
• ErrorOnly errors are logged.
• InfoErrors and informational messages are logged.
• DebugErrors, informational messages, and debug messages are logged.
Limit file sizeIf no limit is specified, the log file grows when new messages are logged. If you specify a limit, by sizeor by time, the log file does not grow indefinitely.
On sizeIf this check box is selected, the log file does not grow beyond a maximum size. If the maximum sizeis reached, the existing log file is renamed by appending ".1" to the name, and a new log file is opened.Existing log files that have previously been renamed are renamed to the next higher number: the ".1"file is renamed to ".2", the ".2" file is renamed to ".3", etc. If the maximum number of log files is reached,the oldest one is deleted.
• Maximum sizeSpecify the maximum size of the log in MB.
• Maximum numberSpecify the maximum number of log files that must be preserved. Example: if you specify "2" in thisfield, at most 3 log files will be present in the log file location: the current log file and two older logfiles with the extensions ".1" and ".2".
On timeIf this check box is selected, the log file is renewed periodically. If the specified interval has elapsed,the existing log file is renamed by appending a timestamp to the name, and a new log file is opened.Select one of these intervals:
• Daily
42 | Infor LN Studio Administration Guide
Connectivity preferences
• Half-daily• Hourly
Infor LN Studio Administration Guide | 43
Connectivity preferences
44 | Infor LN Studio Administration Guide
Connectivity preferences
8Infor LN Project Server
Infor LN Project Server introductionInfor LN Project Server is used to maintain Software Projects and Activities for Software Engineersthat develop software in LN Studio.
Project Server functionality is available in the Project Server perspective in LN Studio.
Note: A number of screenshots in the documentation may be based on previous application releases.They can differ slightly from your application screens. However, the described functionality is similar.
Procedures
Defining a software projectThis topic describes how to define software projects and activities. The projects and activities are storedin Project Server.
To define a software project:
1 Start LN Studio2 Open the Software Project Explorer view
On the Windows menu, select Open Perspective, and then click Project Server.The Software Project Explorer view is displayed in the Eclipse workbench.
3 Specify the project dataComplete these steps:
a On the view's toolbar, or on the shortcut menu, select New Software Project. The Create aSoftware Project dialog box is displayed.
b Specify the project properties. See the online help of the dialog box.c Save the project and close the dialog box.
Infor LN Studio Administration Guide | 45
4 Add one or more activities to the new projectComplete these steps:
a In the Software Project Explorer view, right-click the new project and select New Activity. TheCreate a new Activity dialog box is displayed.
b Specify the activity properties. See the online help of the dialog box.c Save the activity and close the dialog box.
The users, to which the activities are assigned, can now start developing software in the new project.They can select the assigned activities in the Application perspective in the LN Studio workbench.
Dialogs
New Development EnvironmentUse this dialog to define a new development environment.
NameThe name of the development environment.
HostnameThe TCP/IP hostname or IP address of the LN server.
BSE pathThe directory on the application server where the LN Software Environment resides.
BshellThe logical name of the bshell, as specified in the ${BSE}/lib/ipc_info configuration file.
Create a new ApplicationYou can use the New Application dialog box to create a new application.
New Application windowTo open the New Application dialog box, complete one of the following steps:
• Right-click the Application Explorer view of LN Studio and, on the shortcut menu, select NewApplication.
• Click the New Application button on the Application Explorer's toolbar.
46 | Infor LN Studio Administration Guide
Infor LN Project Server
To create a new LN Studio application, in the New Application dialog box, fill in the required fields andclick OK. The new application will be created in the currently connected LN server as indicated by theAdministrator Connection Point in the Infor LN JCA Connectivity window.
The following section describes the fields of the New Application dialog box.
Note: To view or modify the properties of an existing application, use the Application Properties dialogbox. This dialog box is identical to the window described here, except for the Application name field.When you create a new application, specify an application name. When you modify an existingapplication, you cannot change the application name (read-only field).
ApplicationUse the upper part of the dialog to specify basic application properties.
Application nameThe name of the application.
When you create a new application, it is mandatory to specify an application name.
Allowed values
The application name identifies the application. Therefore, the application name must be unique inthe context of the connected LN server. The name can be any ASCII text with a maximum length of30 characters.
DescriptionThe description of the application.
Specifying an application description is optional.
Allowed values
The description is a (multi byte) text with a maximum length of 50 characters.
ReleaseThe release of the application.For LN applications, the release is identical to the Base VRC on which the software development isbased.See "Applications".Specifying a release is mandatory.
Note: An LN Studio application is linked to the Base VRC of a PMC module. Within the PMC module,the package VRCs are linked to the export VRC of the PMC Base VRC.
Allowed values
To specify a value for this field, select a release from the drop-down list.
BaseThis field is not yet implemented.
Infor LN Studio Administration Guide | 47
Infor LN Project Server
Note: You can access the field and select a value from the list. However, this value is ignored by theLN Studio. Therefore, you are recommended to leave this field empty.
InContext Reference ModelThe application's InContext Reference Model.
Related topics
• "InContext Modeling" in the Infor LN Studio Application Development Guide• Infor Enterprise Server InContext Modeling Development Guide
Use SCMIf this check box is selected, the software components developed or modified in LN Studio are managedwith the Software Configuration Management (SCM) tool of the connected LN environment.
Use SCM to perform version management for packages linked to the application, or for the individualactivities of the application. To use SCM for the version management of the packages, SCM must beenabled for the associated Project VRC on the LN server. If SCM is not enabled, you cannot add apackage from this VRC to the application.See "Activity based development".
PackagesUse this tab to link packages to the application.
PackageA package linked to the application.
In LN Studio, you can link packages to an application. These packages must have a VRC thatcorresponds with the Export VRC of the Base VRC of the PMC module. This must also match theBase VRC of the application. This Export VRC contains the application data with the linked packages.LN Studio will automatically create such an Export VRC, if no such VRC is available.The Packages field displays a table with the packages that have been linked to the application. Thesepackages have the same Base VRC as the application. The table shows the name of the packagesand the package description. An additional field indicates whether the package is used.To link packages to the application:
1 Click Add. An empty package record is added to the Packages grid. Then, in the Package field,select a package from the drop-down list. This list contains all the packages linked to the application'sBase VRC. After you select a package, the package name and description are displayed in thegrid.
Note: To add all packages at the same time, click Add All.
2 To indicate whether a package is used in the application, select or clear the corresponding Activecheck box in the grid.
Note: You require special authorization to create or modify applications linked to a Base VRC of astandard LN release. To make a customization for a particular customer, copy the application to thecustomer's application.
48 | Infor LN Studio Administration Guide
Infor LN Project Server
DescriptionThe description of the package.
This field is read-only. The specified description is derived from the selected package.
ActiveIf this check box is selected, the package of the application will be changed or modified in LN Studio.Default valueThe check box is cleared.
LanguagesUse this tab to link software languages to the application.
LanguageA software language linked to the application during development time.ImportantIf you use the Language Translation Support functionality, to translate labels or other user interfacecomponents, do not add secondary software languages to an application. Only use secondary softwarelanguages for small translations performed by a software developer, outside the framework of the LTSexport/import mechanism.
The term "software language" refers to a language used by the application to communicate with theapplication user. Therefore, when you run the application, the text on the buttons, commands, menus,messages and so on, are expressed in one of the software languages linked to the application.You can link multiple languages to an application, depending on the language packs installed on theapplication's LN environment.An LN Studio application can have two types of languages: primary and secondary. Each applicationmust have only one primary language. This is the development language and used to display theeditable components throughout the user interface of LN Studio. If any references are made to anothercomponent, this reference will be expressed in the primary language. By default, the primary languageis 2. If you do not specify a primary language, English is used.Apart from the primary language, an application can possess multiple secondary languages. Thesecan be considered as translations of the expressions in the primary language. You can view and modifythese translations in the editor of the concerned software component. The translations are used whenrunning the application in a mode for a particular secondary language, determined by the languageof the user.The Languages field displays a table with all languages linked to the application. These languagesmust be installed on the LN server connected to LN Studio through the Administrator connection point.The table shows the name of the languages and the language descriptions. An additional field indicateswhether the language is a primary or secondary language.To link a new language to the application, complete the following steps:
1 Click Add. An empty language record is added to the Languages grid.
Infor LN Studio Administration Guide | 49
Infor LN Project Server
2 In the Language field, select a language from the drop-down list. This list contains all the packagesinstalled on the connected LN server. After you select a language, the language code and languagedescription are entered in the grid.
3 To indicate whether the language acts as primary language, select or clear the Primary check box.
DescriptionThe description of the language.
This field is read-only. The specified description is derived from the selected language.
PrimaryIf this check box is selected, the current language will act as the primary language of the application.If this check box is cleared, the current language is a secondary language.
Note: If you set the primary language of the application, any language that was previously the primarylanguage will automatically be marked as a secondary language.
Default valueThe check box is cleared.
DocumentationDocumentationUse this field to specify additional information.
Create a Software ProjectUse this dialog box to create a Software Project.
Project
Project nameThe project name.DescriptionThe project description.Requirement IDThe ID of the business requirement to which the project belongs (requirements are usually stored ina requirement management or defect tracking system).Partial End AllowedIf this check box is selected, you can partially end the activities linked to the project. When you endan activity, you can select the components for which the activity will be ended. These componentswill be checked in to the project VRC, while the other components stay available in the activity VRC.See "Developing software components".
50 | Infor LN Studio Administration Guide
Infor LN Project Server
If this check box is cleared, you can only end activities in their entirety.
Sharing Activities AllowedIf this check box is selected, each activity linked to the project can be assigned to multiple users.
If this check box is cleared, each activity can be assigned to only one user.
Note: When you open a shared activity, the components developed by other users are not displayedautomatically. To display these components, recover the activity. See the online help of the Recoveractivity dialog.If sharing activities is used in combination with activity context, all assignees of an activity must usethe same context. Otherwise, the assignees will get different results when they recover an activity, orwhen they launch or debug a session.
Integration With PMCIf this check box is selected, you can create delivery activities in the project, and deliver componentsfrom Project Server. When you end a development activity, you are prompted to deliver the activityand create a PMC solution.See "Delivering software components".
If this check box is cleared, the PMC integration is disabled. You cannot deliver the components fromProject Server. You can perform the PMC delivery from the LN server instead.
Repository
Development EnvironmentThe LN environment in which the software for the project will be developed. Select the environmentfrom a drop-down list.ApplicationThe application to which the project belongs. Select the application from a drop-down list.
DocumentationUse this field to enter additional documentation about the project.
Create a new ActivityUse this dialog box to create an activity.
Project
Project nameThe software project to which the activity belongs. Select a project from the drop-down list.DescriptionThe description of the selected project.
Infor LN Studio Administration Guide | 51
Infor LN Project Server
Activity
NameEnter an activity name.DescriptionEnter an activity description.TypeSelect an activity type from the drop-down list.If the activity is intended for software development, select one of the following types:
• Enhancement• Change request• Miscellaneous• Defect (intern)• Defect (extern)
If the activity is intended for software delivery through PMC, select the "Delivery" type.
Note: You can only select the "Delivery" type if the Integration With PMC check box is selected inthe properties of the project to which the activity belongs.
Requirement IDThe ID of the business requirement to which the activity belongs (requirements are usually stored ina requirement management or defect tracking system).OwnerThe software engineer who owns the activity. Select a software engineer from the drop-down list.
The owner can open the activity, develop components in the activity, reassign the activity, and endthe activity.
Assignees
AssigneeThe software engineers to which the activity is assigned. The assignees can open the activity anddevelop components in the activity. However, only the owner can end the activity.
To add an assignee, click Add and select a software engineer from the drop-down list.The Assignees grid is only available if the Sharing Activities Allowed check box in the softwareproject's properties is selected.If sharing activities is not allowed, the Add button is disabled, and the system automatically adds theowner of the activity as assignee. This change is displayed only after you re-open the dialog box.
DocumentationEnter documentation about the activity.
FinishSaves the new activity and closes the dialog box.
52 | Infor LN Studio Administration Guide
Infor LN Project Server
Finish and OpenSaves the new activity and closes the dialog box. Automatically switches to the Application perspectiveand opens the new activity in the Activity Explorer view.
Compile activity overviewThis dialog box shows an overview of the components that were compiled, for example when youclosed an activity.
Project Server View FilterUse this dialog box to specify filter criteria for the Software Project Explorer view. To apply the filter,click OK. The filter criteria are stored. The next time you open the view, the filter is applied automatically.
Show Projects with statusSelect one or more project statuses. The view only shows projects that have one of these statuses.
Show empty projectsUse this field to easily recognize empty projects in the view.
If this check box is cleared, a + sign is displayed before all projects in the view.If this check box is selected, the + sign is not displayed before empty projects.
Show Activities with statusSelect one or more activity statuses. The view only shows activities that have one of these statuses.
Show Activities of all usersIf this check box is selected, the view shows activities of all users. If this check box is cleared, the viewonly shows your own activities.
Name starts withIf you select the check box, you can specify one or more characters. The view shows activities whosenames start with the specified characters.
Note: The filter is case sensitive.
Infor LN Studio Administration Guide | 53
Infor LN Project Server
Perspectives
Project Server perspectiveThe Project Server perspective provides functionality for project managers and administrators.
This table shows the views in the perspective:
Project managers use this view to maintain software projects and ac-tivities on the Project Server.For details on the procedure to define projects and activities, see"Defining a software project" on page 45.
"Software Project Explorerview" on page 56
Administrators use this view to create and maintain the applicationsfor which the software projects are defined.For more information on the administrator's tasks, see "Defining anapplication" on page 20 and "Create a new Application" on page 46.
"Application Explorer view" onpage 54
Views
Application Explorer viewUse the Application Explorer view to add, maintain, and remove development environments andapplications.
An application is a software application developed in the LN Studio. Each application is linked to aBase VRC . For each application, one or more projects can be defined, in which the software engineersdevelop their software components.
A development environment is a BSE environment on an Infor LN server, in which the software engineersdevelop software components.
The Application Explorer view is part of the Infor Project Server perspective.
ToolbarThe toolbar of the Application Explorer view includes the following buttons:
54 | Infor LN Studio Administration Guide
Infor LN Project Server
Starts a dialog box where you can view or modify the properties of theselected item.
Properties
Starts the New Development Environment dialog box. Here, you mustenter the properties for a new development environment.
Create a new developmentenvironment
Starts the Create a new Application dialog box. Here, you must enterthe name, release, and other properties for a new application.
New Application
Contains the New Application command.Menu
Note: The remaining buttons are standard Eclipse commands. For details on these buttons, see "Userinterface information" in the Workbench User Guide.
Shortcut menuTo open the shortcut menu, right-click on a resource in the view:
This menu provides the following LN Studio-specific commands:
Starts the New Development Environment dialog box. Here, you mustenter the properties for a new development environment.
New Development Environ-ment
Starts the Create a new Application dialog box. Here, you must enterthe name, release, and other properties for a new application.
New Application
Starts a dialog box where you can view or modify the properties of theselected item.
Properties
Removes the selected item.Delete
For details on the remaining commands, see "User interface information" in the Workbench User Guide.
IconsThe following icons are displayed in the Application Explorer view:
Infor LN Studio Administration Guide | 55
Infor LN Project Server
Software Project Explorer viewThe Software Project Explorer view provides a hierarchical view of the projects, activities, and modifiedsoftware components in the Project Server. See the following figure for an example.
This table describes the different nodes in the previous figure:
DescriptionNr. in figure
Project1
Development Activity2
Modified LN software component3
Delivery Activity4
ToolbarThe toolbar of the Software Project Explorer view contains the following buttons:
Shows the properties of the selected project or activity.For details on the project and activity properties, see the descriptionof the Create a Software Project and Create a new Activity dialogboxes.
Properties
Adds a project on the project server.New Software Project
Adds a new activity to the selected project.New Activity
56 | Infor LN Studio Administration Guide
Infor LN Project Server
Compiles the software components in the selected closed activity.Use this command if the automatic compilation during the endingof the activity has failed, and the problem that caused the compila-tion error is solved.
Compile closed activity at devel-opment system
Example:
• Activity B is part of the context of activity A. A UI script in activityA calls a DLL that belongs to activity B. The DLL is not compiledyet.
• Activity A is ended by its owner. The compilation of the UI scriptfails, because the DLL in activity B is not compiled. Activity A isclosed anyway.
• Activity B is ended by its owner. The DLL is compiled automati-cally and the activity is closed.
• The owner of activity A can now use the Compile closed activ-ity at development system option to compile the UI script inthe closed activity A.
Deletes the selected project or activity.
Note:
Delete selected item
• You cannot delete a project, if the project status is Created orActive.
• This option does not undo the software modifications performedwithin the project or activity that are already checked in.
Contains these menu items:Menu
• New Software Project• New Activity• Compile closed activity• Filters
This command starts a dialog box where you can specify filtercriteria for the Software Project Explorer view.See "Project Server View Filter" on page 53.
Note: The remaining buttons are standard Eclipse commands. For details on these buttons, see "Userinterface information" in the Workbench User Guide.
Shortcut menuTo open the shortcut menu, right-click on a resource in the view.
This menu contains most of the toolbar commands.
Infor LN Studio Administration Guide | 57
Infor LN Project Server
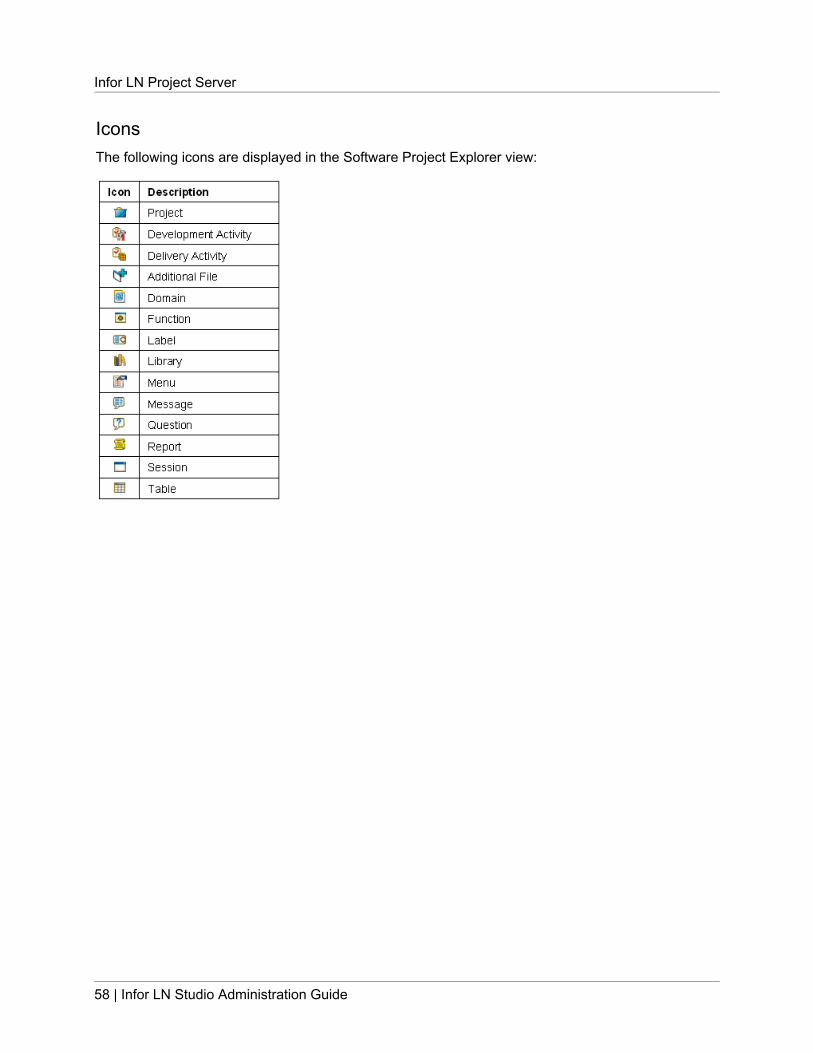
IconsThe following icons are displayed in the Software Project Explorer view:
58 | Infor LN Studio Administration Guide
Infor LN Project Server
Glossary
3GL scriptA Program script that can be linked to sessions withoutforms, or not linked to a session. 4GL statements andsections cannot be used in 3GL scripts. The entire programflow and the main function must be specified.
4GL engineThe program that provides default functionality for a sessionto prevent application programmers from developing asession from the beginning. The 4GL Engine, formerlycalled standard program (STP), is used because sessionsare alike. The 4GL Engine also provides a mechanism tochange the 4GL Engine's default behavior, and to programdedicated functionality for a specific session. When asession is started, a separate 4GL Engine instance isactivated to handle the session.Synonym: standard program
4GL scriptAn event-oriented Program script linked to a session. Theinstructions can be specified in program sections, formsections, field sections, main table input/output sections,choice sections, zoom from sections, and functions.
ActivityAn activity in which software components are developedor delivered. Each activity is part of a Software Project andassigned to a user (software engineer). Activities andsoftware projects are stored on the Project Server.This table shows the types of activities you can define:
For softwaredevelopment
• Enhancement• Change Request• Miscellaneous• Defect (intern)• Defect (extern)
Use these types to develop soft-ware components.
DeliveryUse this type to group develop-ment activities and to deliver the
For softwaredelivery
corresponding software compo-nents through a PMC solution.
During its life cycle an activity can have these statuses:
• Created – The activity is created in Project Server.• Opened – The activity is opened, at least once, in the
Activity Explorer.• Cancelled – The activity is cancelled. To re-use the
activity, you can open the activity again through theActivity Explorer.
• Closed – The activity is closed through the End Activitycommand in the Activity Explorer.
• Finalized - The activity is delivered through a PMCsolution.
Project Managers can create software projects andactivities through the Software Project Explorer.
Activity VRCA VRC that contains software components for an activity.The activity VRC is generated automatically when you openthe activity for the first time.By default, the components in this VRC are only accessiblefor the software engineer to which the activity is assigned.Optionally other software engineers can access thesecomponents if they put this activity in the activity contextof their own activity. See "Activity based development".
Additional fileA generic component, such as an XML schema file, a GIFimage, and so on. From LN 6.0a onwards, additional filesare stored in a specific package, module, and packageVRC.
AdministratorThe administrator creates and maintains the "applications"on page 46 for which the Software Projects are defined.For more information on the administrator's tasks, refer to"Defining an application" on page 20.
ApplicationA software application is a consistent set of packages thatfunctionally belong together, and developed in the LNStudio. Each application is linked to a Base VRC, whichdetermines the environment on the LN server in which theapplication's software components are stored. For eachapplication, one or more projects can be defined, in whichthe software engineers develop their software components.
appropriate menuCommands are distributed across the Views, References,and Actions menus, or displayed as buttons. In previous
Infor LN Studio Administration Guide | 59
LN and Web UI releases, these commands are located inthe Specific menu.
ArrayA list of data items of the same type with the same name.An element in the array can be referenced by an expressioncomposed of the array name and an index expression.Multilevel arrays are used for data storage in tables.
Base VRCA way in PMC to identify products in a unique way. Updatesat the distributor side are provided with the base VRCidentifier. A base VRC can contain the code of the physicalVRC in which the related master product is installed, forexample, B61_a. However, it can also be a code unrelatedto a physical VRC, for example, 7.6_a_tt. At the recipientside, every update VRC is linked to a base VRC identifier.The installation process checks if the base VRC identifierof the update matches with the base VRC identifier of theupdate VRC. If not, you cannot install the update in thatupdate VRC.
Base VRC combinationA Base VRC combination is defined at the PMC distributorside and consists of a set of related base VRCs. A baseVRC combination controls the creation of co-requisitesbetween base VRCs. You can only define co-requisitesbetween base VRCs that are part of the same base VRCcombination. Base VRC combinations prevent theunwanted creation of co-requisites between base VRCs.
Business ObjectA Business Object is an object understood by the business,such as a purchase order or an organizational unit. ABusiness Object has information stored in the BusinessObject attributes, such as the purchase order number orthe organizational unit name. A Business Object alsocontains a set of actions, known as Business Objectmethods. These can manipulate the Business Objectattributes, such as create purchase order and listorganizational units.From a development perspective, a Business Object is acollection of tables and functions that manipulate tablesimplemented simultaneously as one group during thedevelopment phase. A Business Object is identified by thecombination of a package code, module code, andBusiness Object code.
Business Object InterfaceBusiness Object interfaces provide a connection betweenpartner applications, third-party applications, and the LNsoftware. They also connect LN functional components.Business Object interfaces are developed for situations
where the LN software acts principally as a server, and aclient software invokes the methods in the objects.
BW ConfigurationA configuration that contains data to connect a client PCto an LN server. You can maintain configurations with theInfor LN BW Environment and Configuration Selector (BECS). A configuration is stored in a file with a .bwcextension.
CA structured programming language. C is a compiledlanguage that contains a small set of built-in functions thatare machine dependent. The rest of the C functions aremachine independent and contained in libraries that canbe accessed from C programs. C programs are composedof one or more functions defined by the programmer.
ChartA graphic or diagram that displays data or the relationshipsbetween sets of data in pictorial, rather than numeric form.The data can be presented in a graph, a line, or a pie, andcan include titles, legends, and footnotes.
Chart applicationA program used to send data from an LN session to theChart Manager. A chart application is linked to a packageVRC to customize the attributes specified in the chart.
Chart typeThe chart type determines what the chart looks like.For example, it defines the type of graph, thickness of lines,size of bars, and colors. The following default chart typesare present in LN:
• Bar• Layer• Line• Pie• Scatter• Stacked bar
Check inA process that releases a checked out software componentwithin an activity.See "Activity based development".
Check outA process that locks the software component for otherdevelopers. During the check out phase, the componentcan be updated and tested.
60 | Infor LN Studio Administration Guide
Glossary
See "Activity based development".
Child fieldA table field that is part of a combined field. A combinedfield contains two or more table fields, which are the childfields of the same table field.
ClassIn Object Oriented Programming, a class is a generalizedcategory that describes a group of more specific items,called objects, that can exist within it. A class is a templatedefinition of the methods and properties (variables) in aparticular kind of object. Therefore, an object is a specificinstance of a class that contains real values instead ofvariables. The class is one of the defining ideas ofobject-oriented programming.The important ideas about classes are as follows:
• A class can have subclasses that can inherit all or someof the characteristics of the class.
• In relation to each subclass, the class becomes thesuperclass.
• Subclasses can also define their own methods andvariables that are not part of their superclass.
• The structure of a class and its subclasses is called theclass hierarchy.
Code assistCode assist provides a list of suggested completions forpartial character strings in the LN Studio Script Editor.See "Code Assist".
CollectionIn PMC, a collection is a group of individual solutions. Atthe PMC distributor side, you can perform grouping invarious ways. For example, manual grouping based on afunctional topic, or grouping based on solutions created ina particular period and so on. You cannot definedependencies between collections. At the recipient side,the entity collection is not available. When a collection isscanned, the individual solutions are added to the PMCregistry and can be processed individually.
Combined fieldTwo or more child fields of the same Table.
Connection PointA logical endpoint in the JCA connectivity architecture. Aconnection point mainly contains an identifier andconnection properties, such as host name, user, password,BSE, and bshell name. Client applications use the identifierto connect to a particular server.
LN Studio uses these connection points:
• ProjectServer• Administrator• Debug• Development Address• Runtime Address• RuntimeRepositoryConnection• TestServerConnection
Co-requisiteIn general, co-requisites are defined between solutions ofa standard product and derived products. Co-requisitesguarantee that related products are updated simultaneouslyunder the condition that the update VRCs of the relatedproducts are linked to the same VRC combination. Theorder of installation is not relevant. The solutions can havethe same Base VRC, or different base VRCs.
Data Access LayerA Dynamic Link Library linked to an LN database table.
Data TypeThe internal representation of data, such as a string, long,double, date or UTC.
DebuggingThe process of identifying and addressing the cause fordefective behavior of a system.These debugging techniques are available:
• Definition of conditions that suspend a running process,so you can inspect it more closely
• Navigation through a suspended process, to discoverthe flow and identify any problems
• Inspection, to validate the state of the process andidentify any problems
Debug targetAn execution context, such as a process or virtual machine,that can be debugged. In Infor 4GL, a debug targetrepresents a session started in debug mode.
DependencyIn PMC, the relation between solutions. Dependencies aredefined at the PMC distributor side and are part of the metadata of a PMC solution and guarantee that PMC solutionsare installed in the correct configuration and sequence atthe PMC recipient side.The following values indicate the dependency type betweensolutions.
Infor LN Studio Administration Guide | 61
Glossary
These dependency types are available:
• Pre-requisites• Co-requisites• Post-requisites
You can only install solutions that are dependent on othersolutions if the other solutions are already present, or arealso installed.The same dependency types exist between Patches.However, to keep the descriptions readable, only solutionsare mentioned, but patches are meant as well. Oneexception applies: the post-requisite type is not applicableto patches.
Details sessionA dialog box that shows all the details (fields) of the line(record) selected in the associated overview session. Usea details session to view, enter, or change the data of onerecord.A details session can contain a number of tabs to grouprelated fields.
Development VRCIn PMC a physical VRC, derived from the Export VRC, inwhich checked-out software components are temporarilystored during a change process.
DomainA domain describes the properties of table fields. The mainproperty of a field is the data type, such as string, long,double, date, UTC. Other properties are the length of astring, the alignment of a string, and the date and timeformat.Domains indicate the valid values for an attribute and areused to define the scale division of the axes or to verifydata.
Dynamic formA form with a dynamic form definition.The developer does not need to determine exactly wherefields must be placed, or what they must look like. Instead,the developer defines the following:
• The form contents.• The form structure.• The sequence of the objects on the form.
At runtime, the dynamic form displays only those fields forwhich the user is authorized.
Dynamic Link LibraryA way to share common functions between programs. Thislibrary contains functions for common use. The library canbe linked to the object as a function call at run time.Implementing a dynamic link library reduces the size ofobjects to a minimum, because dynamic link libraries arenot included in a program's object.
Dynamic sessionA session with a dynamic form definition.Depending on settings, a dynamic session can start as oneof the following:
• A details session.• An overview session.
In the dynamic form definition, the developer does not needto determine exactly where fields must be placed, or whatthey must look like. Instead, the developer specifies thisinformation:
• The form contents.• The form structure.• The sequence of the objects on the form.
At runtime, the dynamic form shows fields for which theuser is authorized.
EclipseEclipse is an open platform for tool integration built by anopen community of tool providers. Operating under an opensource paradigm, with a common public license thatprovides royalty free source code and world wideredistribution rights, the Eclipse platform provides tooldevelopers with ultimate flexibility and control over theirsoftware technology. Eclipse is used as a platform for LNStudio.
Eclipse TaskEclipse tasks are displayed in the Tasks view. Each Eclipsetask represents an action that needs to be done, such asto modify a particular line in a script. If a task is associatedto a line in an Infor 4GL script or library, double-click thetask to edit the script or library. The editor opens the scriptor library at the involved line.Create Eclipse tasks through the Tasks view and the LNStudio script editor. For more information, refer to "Tasksview", "Source Tab", and "ToDo Comments".
EditorAn editor is a visual component within the LN Studioworkbench used to edit or browse a resource, such as aProgram script or a library. Modifications made in an editorfollow an open-save-close life cycle model. Multiple
62 | Infor LN Studio Administration Guide
Glossary
instances of an editor type may exist within a LN Studioworkbench window.
Export VRCThe physical VRC from which components that belong toa PMC solution must be exported at the PMC distributorside. Each base VRC has an export VRC linked, socomponents for different products are exported fromdifferent physical VRCs.
Feature PackSee Service Pack.
FieldIn table definitions, a field refers to a column. In a session,a field is a specified area of a record used for a particularcategory of data.
FloatA data type name used to declare variables that can storefloating-point numbers. A floating-point number is a numbercontaining a decimal point, with a maximum of 15 significantdigits (8 bytes).
FoldingThe LN Studio script editor supports folding of code regions.If you hover over a folded element, the hidden code isdisplayed.
FormA screen that appears when a session is started. A forminteracts with the database, and provides the user interfaceused to manipulate the data on the form.
Form commandA form command starts a session, function or (sub)menuby means of which a user can carry out a particular task.A form command, as opposed to standard menu commandssuch as the Exit command, must be especially defined fora session tab.
Form fieldA field shown on a form. A form field is selected from theavailable fields of an input table and its reference tables.
FunctionA piece of program code that makes up part of a programscript.A function is a self-contained software routine that canperform a task for the program in which the function iswritten, or for another program.
GroupA set of form objects grouped together, such as form fieldsand child groups.
Group-by fieldA field on an overview form positioned above the grid. TheGroup-by field determines what is shown in the grid of anoverview form. Only the records that belong to the Group-byfields are shown in the grid, such as all orders that belongto a specific customer. The name of the customer is shownin the Group-by field, the records are shown in the grid.
IndexOne or more table fields used to sort and search recordsin a table. A table must have at least one index. The firstindex is always the primary key.
Infor 3GLA third-generation proprietary programming language thatis a mix of Basic and C.
Infor 4GLA fourth-generation programming language designed forinteracting with the programmer used with relationaldatabases. 4GLs are event-driven.
Installation runIn PMC, a group of solutions that were installed together.This can be a range of solutions, a solution withpre-requisites, or a combination of both.
Integrated sessionThe session and the session's form are integrated into oneobject. The form is a subcomponent of the session.When you perform an operation, such as copy, delete,check in, or check out, on an integrated session, you alsoperform the operation on the integrated session's form.A non-integrated session's form is a separate object.
LabelA code that is used instead of language-dependent text informs, reports, and menus. A label consists of a name anda content description. The content of a label can differ bylanguage, but the label name remains the same for alllanguages.
Language numberA conversion of the language code to a number between0 and 61. The language number eliminates problemscaused by the use of uppercase and lowercase languagecodes.
Infor LN Studio Administration Guide | 63
Glossary
This table shows how the language code corresponds tothe language number:
Correspondinglanguage numberrangeLanguage code range
0 to 90 to 9
10 to 35a to z
36 to 61A to Z
For example:
• Language code b = Language number 11• Language code B = Language number 37
LibraryA collection of files, computer programs, or subroutines.
LN StudioA platform for activity based development of LN software.LN Studio is implemented in the Eclipse framework andmakes use of the Software Configuration Managementfunctionality on the LN server. The LN Studio workbenchcontains various powerful features, such as an advancedscript editor, various multipage editors, an outline view, atask list, and commands to debug and run softwarecomponents.
LongA data type specified in LN as any whole number from-2147483648 to 2147483647.
MenuA list of options from which a user can perform a desiredaction, such as starting sessions, other menus, and queries.A start-up menu is defined for each user. Using this start-upmenu, the user can access all sub-menus attached to thestart-up menu tree.
MessageA notification that informs you about something. A messageattends you to an event, error, warning, and so on.Messages usually appear in a message window or arelogged in a file. If displayed in a window, a messagerequires a confirmation: Click OK. Messages are differentfrom questions, as questions always require a choiceresponse.
ModuleA part of a package consisting of a number of relatedsoftware components, such as sessions, tables, program
scripts, reports, forms and menus. For example, theGeneral Ledger module in Financials.A module code consists of three characters. For example,the General Ledger has the code "gld".
Obsolete solutionObsolete solutions are an administrative aid to managethe synchronization of updates at the PMC recipient sidewhen you install a Service Pack. An obsolete solution doesnot contain software components.
Original VRCThe VRC that contains the software components that haveto be modified. If SCM is active, these components will bechanged in the Private VRC. If SCM is not active, thesecomponents will be changed in the Activity VRC.
Overview sessionA session that lists the available elements or records ofone type, and some of their details (fields). Use an overviewsession to view, sort, add, change, copy, and removerecords.When you add or change a record a details session usuallystarts. Sometimes, you can add and change records directlyusing the overview session.
PackageA set of related modules that implements a complete partof the functionality, such as Enterprise Planning, Financials,or Warehouse Management. Packages are designed tofunction as independent as possible, to enable a customerto implement only particular packages.A package code consists of two characters. For example,tt is the code of the Tools package.Each package has a unique VRC version structure.
Package combinationA combination of several different packages with specificVRCs. A package combination represents a completeusable version of LN.In the User Data (ttaad2500m000) session, each user islinked to a package combination. This determines whichversion of the software the user can use.In the Companies (ttaad1100m000) session, each companyis linked to a package combination. This indicates whichversion of LN is appropriate to handle the data in thatcompany.
Package VRC
A version of a package, such as tc B61O a cus1.Usually, one version of a software component, such as a
64 | Infor LN Studio Administration Guide
Glossary
session, a table, or a form, is stored in one particularpackage VRC.A developer can usually only modify software componentsin a particular package VRC.The code of a package VRC consists of these components:
• Package code, such as tc• A version (VRC) code, such as B61O a cus1, built
up of these components:
• Version• Release• Customer
PatchIn PMC, a patch is a collection of Solutions. In general apatch contains solutions created in a larger time period.The patch entity is both known at the PMC distributor andPMC recipient side. Patches are an indivisible set ofsolutions. You cannot install or uninstall individual solutionsthat belong to a patch at the PMC recipient. You can onlyinstall or uninstall patches as a whole. Yo can definedependencies between patches. Patches leave the BaseVRC that is linked to the update VRC at the PMC recipientunchanged. The existing PMC registry will remain and willbe extended with data of the newly installed patch. Patchesonly permit the most recent version of software componentsto be maintained. Patches in general mainly containcorrective solutions.
Note: In PMC versions earlier than LN 6.1, the synonym ServicePacks was often used for patches.
PerspectiveA perspective is a group of views and editors in the Eclipseworkbench. Each perspective provides a set of functionalityaimed at accomplishing a specific type of task or workswith specific types of resources. For example, theApplication perspective combines views you would normallyuse while editing 4GL scripts and libraries. The Debugperspective contains the views you would use whiledebugging programs. As you work in the workbench, youwill probably switch perspectives frequently.In LN Studio, these perspectives are used:
• Application• Debug• Integration• Integration Test• Project Server
PMC distributorThe functional part of PMC that manages the creation ofUpdates. PMC Distributor is especially used by softwarevendors who create updates.
PMC recipientThe functional part of PMC that manages the installationof Updates. Customers, who install updates in particularuse PMC recipient.
PMC versionThe PMC version is linked to every Update and is intendedto quarantee that various formats of PMC solution dumpsare handled by the right version of the PMC software.
• PMC version 0 : does not support Service Packs• PMC version 1 : supports Service Packs
Note: Dumps created for a higher PMC version cannot beprocessed at the recipient side if PMC recipient has notbeen upgraded to that PMC version.Dumps of lower PMC versions can always be processed.
Post-requisitePost-requisites are mainly meant to prevent the installationof bad solutions. In Project Server, a post-requisite is a linkfrom a more recent, correct, solution to an earlier, bad,solution.
Pre-requisitePre-requisites mainly steer the sequence in which solutionsare installed. In general a pre-requisite is the link from amore recent solution to a predecessing solution.Pre-requisites are the most common type of dependencies.A pre-requisite dependency exists between two solutionsif one solution must have been installed before the othersolution is installed. In that case, the first solution is apre-requisite for the other solution. Typically, pre-requisitedependencies exist between a solution and a previoussolution, if these solutions have one or more componentsin common. Pre-requisite dependencies can only becreated to solutions in the same Base VRC.
Primary keyThe unique identification for a record in a table.
Private VRCThis VRC is derived from the activity VRC and containschecked out components the software engineer is workingon. The components in this VRC are only accessible bythe software engineer to which the activity is assigned. The
Infor LN Studio Administration Guide | 65
Glossary
private VRC is generated automatically when you open theactivity for the first time.Private VRCs are only used if SCM is active for theapplication to which the activity belongs.
Product Maintenance and ControlProduct Maintenance and Control (PMC) is a tool that helpsa customer manage the updates of the Infor LN system.With the PMC tool, you can check all patches against thecustomer's Infor LN system to verify their completeness,check any potential interference with the customization,and detect dependencies.These capabilities ensure the complete and accurateinstallation of each software patch and Service Pack. Usingthe PMC tool also enhances the quality of the customersupport.PMC consists of a PMC distributor part and a PMC recipientpart.
Programmer's GuideThe Infor ES Programmer's Guide. Access this guidethrough the LN Studio online help.
Program scriptA sequence of instructions used to program a number ofactions that must take place in addition to the standardprogram. The different program script types available are3GL scripts and 4GL scripts.Synonym: UI script
Project ManagerProject managers create and maintain the SoftwareProjects and Activities in which the software componentsare developed. The Project manager assigns each activityto a Software Engineer.The projects and activities are stored on the Project Server.For more information on the project manager's tasks, see"Defining a software project" on page 45.
Project ServerThe Project Server contains the Software Projects for LNStudio. Each software project contains one or moreActivities in which the Software Engineers develop theirsoftware components.
Project VRCThe VRC that contains all finished software componentsfor a Software Project. From this VRC, deliveries tocustomers are done when the project is completed.The project VRC is the Export VRC linked to the Base VRCof the Application to which the project belongs. This VRC
also contains finished software components for otherprojects defined for the same application.
QueryThe process of extracting information from a database andpresenting it in a report.
QuestionA notification that requires a choice response. For example,a question can prompt you to confirm or cancel a deleteaction. If you do not respond to a question, the processthat prompted the question cannot continue. Questions aredistinguished from messages. Messages offer no choiceand do not necessarily require a response.
Reference modeThe way in which a reference restricts the contents of atable field.A reference can have one of the following reference modes:
• MandatoryThe field must contain a code found in the referencetable.
• Mandatory unless emptyThe field can be empty. If not, it must contain a codefound in the reference table.
• Not mandatoryThe field can be filled with a code not found in thereference table. The reference speeds up queries.
Reference tableThe table to which some table field refers.Example:
• One of the fields of the Items – General table is theCountry of Origin (coor) field. This field can containa country code. (The field can also be left empty.) LNstores country codes in the Countries table. To controlthis connection, the Country of Origin table field in theItems – General table has a reference to the Countriestable.
• Items – General is the referral table and Countries isthe reference table.
Referral tableThe table that has a field that refers to another table.Example:
• One of the fields of the Items – General table is theCountry of Origin (coor) field. This field can containa country code, but can also be left empty. LN stores
66 | Infor LN Studio Administration Guide
Glossary
country codes in the Countries table. To control thisconnection, the Country of Origin table field in theItems – General table has a reference to the Countriestable.
• Items – General is the referral table and Countries isthe reference table.
ReportA report is used to present data from the database, usuallyon paper. The report can be sent to a device, such as aphysical printer, a display, or a file.
Revision Control SystemA tool used by LN Tools to store revisions of scripts,libraries, includes, and report scripts.
ruleA criterion to measure the quality of software components.The rules used by VSC are based on the Infor LN SoftwareCoding Standards (SCS), the Infor LN SoftwareProgramming Standards (SPS), and the Infor LNPerformance Guide.These are examples of rules:
• A table code must have the following structure: ppmmm s xx, where pp is the package code, mmm isthe module code, s is the submodule code (only whennumeric), and xx is the sequence number.
• A message called in a script should not be expired.• A query that performs an update must have a 'with retry'
clause.
Most rules are hardcoded in the VSC software. However,some rules used to analyze scripts are implemented assource analyze codes.
rule databaseA database with detailed information about rules.The rule database contains this information:
• Detailed information about the rules implemented inVSC.
• Information about rules that might be added to futureVSC versions.
This database is intended for internal use by the LNdevelopment department. It is therefore not delivered withthe VSC software.
SCM groupA Software Configuration Management group in LN thatidentifies a development group with a separatedevelopment environment.
Service PackIn PMC, a Service Pack is a collection of solutions. Ingeneral, a Service Pack contains solutions created in alarger time period. In PMC the term 'patch' is also appliedfor Service Packs. The patch entity is both known at thePMC distributor and PMC recipient side. A property in thepatch entity makes the difference between patches andService Packs. Service Packs are an indivisible set ofsolutions. You cannot install or uninstall solutions thatbelong to a Service Pack at the PMC recipient. You canonly install or uninstall Service Packs as a whole. You candefine dependencies between Service Packs. ServicePacks are intended to enable you to maintain multiple BaseVRCs in parallel. Service Packs change the base VRC thatis linked to the update VRC at the PMC recipient. Theexisting PMC registry for the update VRC will be moved tohistory and a new registry will be started for the updateVRC. This type of patch in general contains a significantamount of functional changes.
Note: Service Packs as described in the preceding definition donot exist in PMC versions earlier than LN 6.1.
SessionA part of LN the user can start to run an application'sfunctionality. Usually, a session is linked to a main databasetable and a program script. In addition, a session uses zeroor more forms, reports, and charts.The code of a session consists of a package code, amodule code, four digits that indicate the main table numberand the session type, an m or an s, and three additionaldigits, such as Countries (tcmcs0510m000).
Software componentThe LN software consists of these separate softwarecomponents:
• Message• Report• Label• Function• Business Object• Chart• Integrated session• Additional file• Question
Infor LN Studio Administration Guide | 67
Glossary
• Session• Domain• Table• Menu• Form• Program script• Library
Software Configuration ManagementWith software configuration management, developers canmodify and test their own revision of a software component.Using a check out and check in functionality, a softwarecomponent is locked for other developers. This guaranteesno more than one developer can modify the same softwarecomponent simultaneously.
Software EngineerSoftware engineers develop software components throughthe LN Studio. Before editing a component, engineers mustfirst open an Activity the Project Manager assigned to them.
Software ProjectA software project for LN Studio. Each software projectcontains one or more Activities in which the SoftwareEngineers develop their software components. Eachsoftware project is linked to an Application. Multiple projectscan be defined per release. Software projects are storedon the Project Server.During its life cycle a project can have these statuses:
• Created• Active• Cancelled• Closed• Finalized
Project Managers can create software projects andactivities through the Software Project Explorer.
SolutionIn PMC, the smallest, indivisible type of update. A solutionis identified both at the distributor and recipient side by aunique solution code. The term individual solution is alsofrequently used and has the same meaning.
Note: In the PMC software the term solution is often used as analternative for the term update. A solution can then be anindividual solution, which is the smallest, indivisible typeof an update, or a patch.
Solution status distributorThe status describes the progress of the maintenance ofsolutions.
Solution status recipientThe following statuses indicate the progress of theinstallation or uninstallation of a solution or Patch.These statuses are only used at the recipient side, andmust not be confused with the Solution status distributorat the distributor side.
• AvailableThe solution or patch is scanned and available on thesystem.
• To InstallThe solution or patch is checked and is ready to beinstalled.
• SavingA backup of the components is being saved.This status is not applicable for patches.
• InstallingDuring the installing process the solution or patch hasthis status.
• InstalledThe solution or patch is installed.
• To UninstallThe solution or patch is checked to be uninstalled.
• UninstallingDuring the uninstalling process, the solution or patchhas this status.
source analyze codeA code used by VSC to perform user-defined checks onscripts, such as UI scripts, DLLs and DALs.Each source analyze code is linked to an expression textand to a warning message. The expression text containsa search pattern, which is used to find errors.See "Source Analyze Codes" in the Web Help on the LNserver.
Stack frameAn execution context in a suspended session containinglocal variables and arguments. In Infor 4GL terms, a stackframe represents the function calls of the sources (scriptsand includes) related to the debugged session.
68 | Infor LN Studio Administration Guide
Glossary
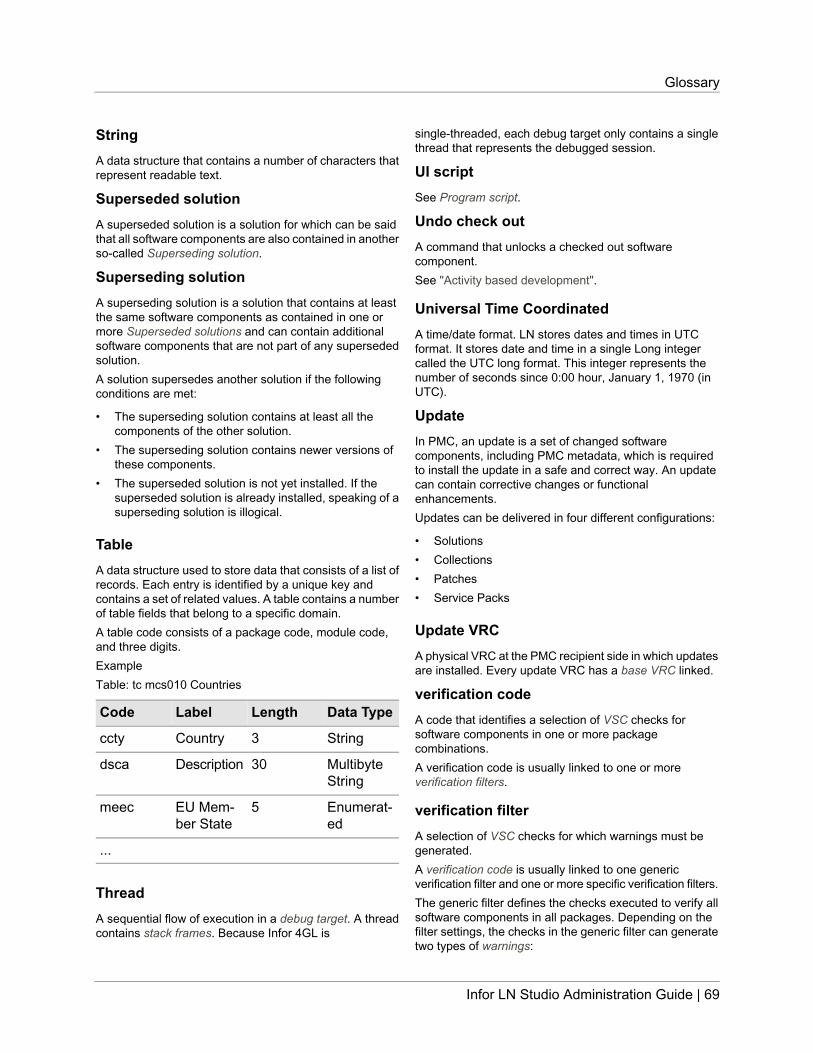
StringA data structure that contains a number of characters thatrepresent readable text.
Superseded solutionA superseded solution is a solution for which can be saidthat all software components are also contained in anotherso-called Superseding solution.
Superseding solutionA superseding solution is a solution that contains at leastthe same software components as contained in one ormore Superseded solutions and can contain additionalsoftware components that are not part of any supersededsolution.A solution supersedes another solution if the followingconditions are met:
• The superseding solution contains at least all thecomponents of the other solution.
• The superseding solution contains newer versions ofthese components.
• The superseded solution is not yet installed. If thesuperseded solution is already installed, speaking of asuperseding solution is illogical.
TableA data structure used to store data that consists of a list ofrecords. Each entry is identified by a unique key andcontains a set of related values. A table contains a numberof table fields that belong to a specific domain.A table code consists of a package code, module code,and three digits.ExampleTable: tc mcs010 Countries
Data TypeLengthLabelCode
String3Countryccty
MultibyteString
30Descriptiondsca
Enumerat-ed
5EU Mem-ber State
meec
...
ThreadA sequential flow of execution in a debug target. A threadcontains stack frames. Because Infor 4GL is
single-threaded, each debug target only contains a singlethread that represents the debugged session.
UI scriptSee Program script.
Undo check outA command that unlocks a checked out softwarecomponent.See "Activity based development".
Universal Time CoordinatedA time/date format. LN stores dates and times in UTCformat. It stores date and time in a single Long integercalled the UTC long format. This integer represents thenumber of seconds since 0:00 hour, January 1, 1970 (inUTC).
UpdateIn PMC, an update is a set of changed softwarecomponents, including PMC metadata, which is requiredto install the update in a safe and correct way. An updatecan contain corrective changes or functionalenhancements.Updates can be delivered in four different configurations:
• Solutions• Collections• Patches• Service Packs
Update VRCA physical VRC at the PMC recipient side in which updatesare installed. Every update VRC has a base VRC linked.
verification codeA code that identifies a selection of VSC checks forsoftware components in one or more packagecombinations.A verification code is usually linked to one or moreverification filters.
verification filterA selection of VSC checks for which warnings must begenerated.A verification code is usually linked to one genericverification filter and one or more specific verification filters.The generic filter defines the checks executed to verify allsoftware components in all packages. Depending on thefilter settings, the checks in the generic filter can generatetwo types of warnings:
Infor LN Studio Administration Guide | 69
Glossary
• "Filtered to Handle" warnings. You must solve or acceptthese filtered warnings immediately.
• "Non-filtered" warnings you do not have to handleimmediately.
Specific filters are used to reduce the number of "FiIteredto Handle" warnings for a specific package, module or VRC.Each specific filter is derived from the generic filter, andtherefore executes exactly the same checks as the genericfilter. In a specific filter, indicate for each check whetheryou want to generate "FiItered to Handle" warnings or"Non-filtered" warnings.
Note: You cannot disable checks, or add extra checks ina specific filter. If you select a check which is not presentin the generic filter, VSC ignores this check.
Verify Software ComponentsA utility to perform a quality check on the softwarecomponents developed or changed in Infor LN.
Version - Release - CustomerThe version - release - customer (VRC) code is anidentification of a stage in the development of the LNsoftware, such as B61_a_ams.A VRC code consists of these components:
• VersionA stage in the development in which a major part of thesoftware is modified.
• ReleaseA stage in the development in which a minor part of thesoftware is modified.
• CustomerAn extension, localization, or customization of thesoftware for a single customer or a small group ofcustomers.
A VRC can be derived from a preceding VRC. Everysoftware component contained in the preceding VRC, and
not explicitly modified or set to expired in the current VRC,will be available in the current VRC.Synonym: package VRC
ViewA view is a visual component within the LN Studioworkbench. It is used to navigate a hierarchy of information,open an editor, or display properties for the active editor.Modifications made in a view are saved immediately.Usually, only one instance of a particular type of view mayexist within a workbench window.These are typical LN Studio views:
• Activity Explorer• Software Project Explorer• Component Explorer
warningA message that explains an error found during a VSCcheck.Depending on the verification filter settings, VSC generatesthe following:
• "Filtered to Handle" warnings. You must solve or acceptthese filtered warnings immediately.
• "Non-filtered" warnings you do not have to handleimmediately.
Zoom sessionThe session in which you can browse through the availablerecords and select a record. A zoom session is an overviewsession in read-only mode.Use a zoom session to enter the code of an existing record,such as an item, order type, or warehouse in anothersession.To start a zoom session, click the browse arrow buttonbehind the field or press CTRL+B.
70 | Infor LN Studio Administration Guide
Glossary