Embed Size (px)
Citation preview

Information Technology Services
Quick Start Guide for GIMP Photo Editing
QuickStartGuideSections:What is GIMP? ........................................................................................................................................................ 2
Download GIMP Software ...................................................................................................................................... 2
Copy Images to your Desktop ................................................................................................................................. 2
Starting GIMP .......................................................................................................................................................... 3
Transform the Image (Resize/Scale, Crop, Flip, etc.) .............................................................................................. 4
Save Your Work in the .XCF Format ........................................................................................................................ 5
Filters ....................................................................................................................................................................... 6
Undo ........................................................................................................................................................................ 6
Adding Layers .......................................................................................................................................................... 7
Working with Layers ............................................................................................................................................... 9
Scaling the Size of Layers ...................................................................................................................................... 10
Changing Opacity .................................................................................................................................................. 11
Brightness, Contrast and Color ............................................................................................................................. 11
Selecting Contiguous Regions ............................................................................................................................... 11
Clean Up Image Borders Using Tools .................................................................................................................... 13
Changing the Order of Layers ............................................................................................................................... 15
Adding Text to Images .......................................................................................................................................... 16
Saving Files in Formats Other Than .XCF .............................................................................................................. 17
2
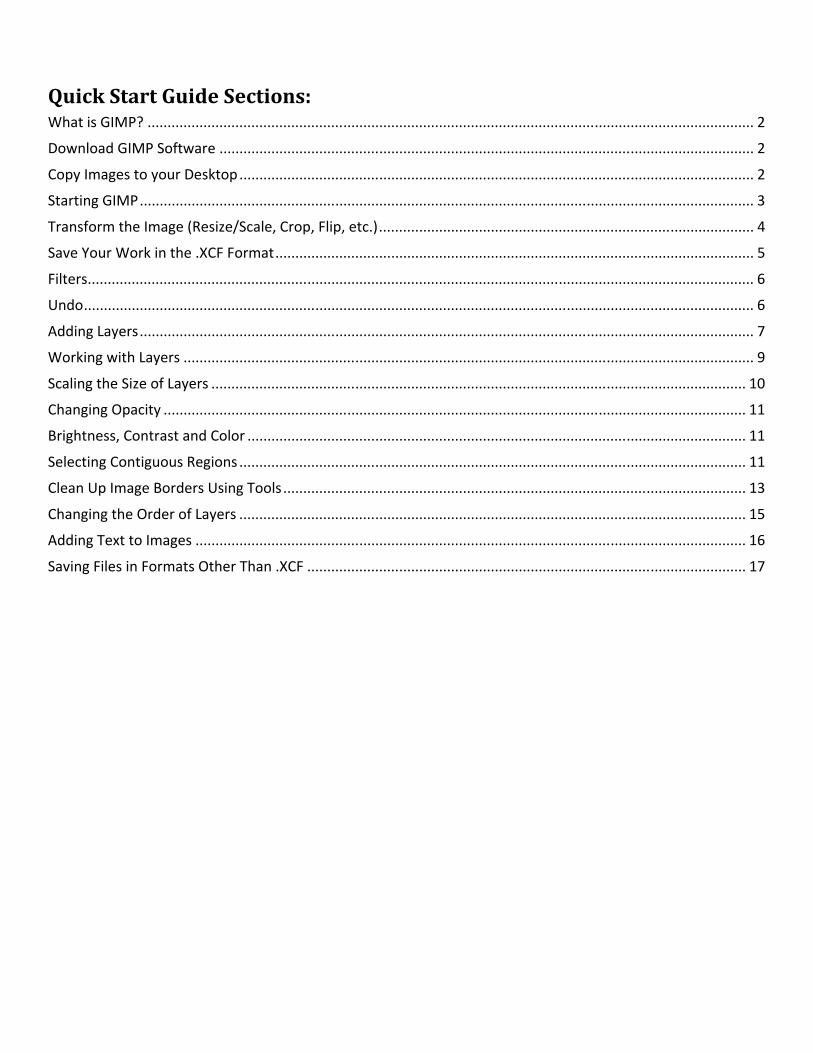
WhatisGIMP? GIMP is a free image retouching and editing tool, very much like Adobe’s Photoshop. Tools include
free‐form drawing, resizing, cropping, photo‐montages, converting between different image formats (i.e. from .tiff to .jpg), and more specialized tasks. There are versions for Windows, OS X, and Linux.
DownloadGIMPSoftware Navigate to: www.gimp.org/downloads
If using Windows, download the Windows installer and follow the prompts on the installation process.
CopyImagestoyourDesktop For this tutorial, download the GIMP Workshop folder under “Resources” from the ITS Training
Services webpage (http://www.udmercy.edu/about/its/help/training.php) to your computer’s desktop. This folder contains the image files used in the tutorial.
3
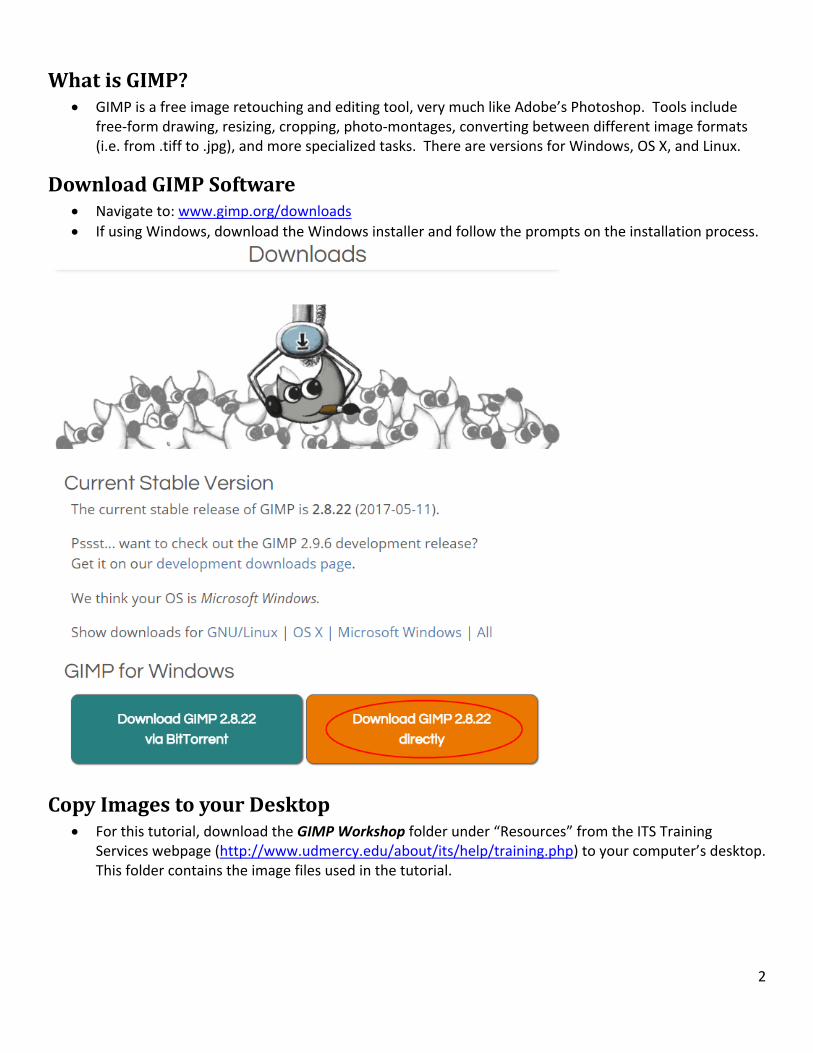
StartingGIMP To start GIMP, click on the Start Menu. Select “All Programs,” and “GIMP 2.”
When you start GIMP, two windows appear: the Toolbox window, which gives you access to the many tools you will use:
and the Layers, Channels, Paths, Undo window, which lets you access and manipulate these image/file management tools, and access the Undo history:
4
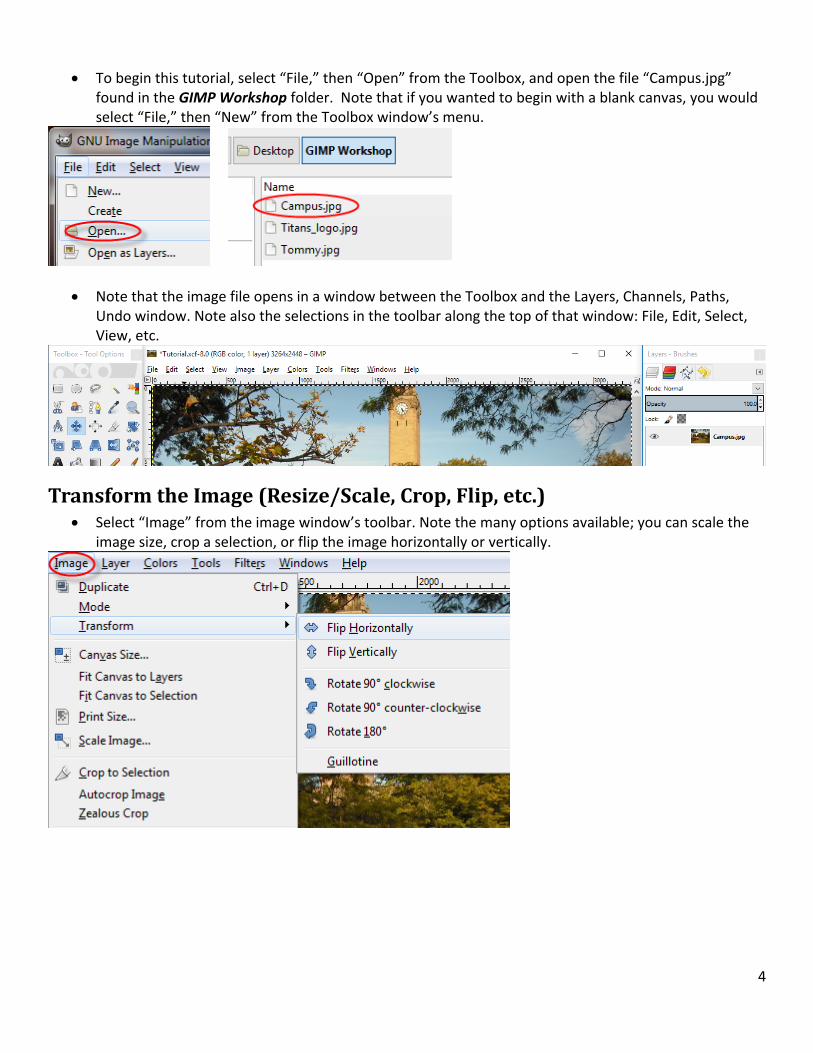
To begin this tutorial, select “File,” then “Open” from the Toolbox, and open the file “Campus.jpg” found in the GIMP Workshop folder. Note that if you wanted to begin with a blank canvas, you would select “File,” then “New” from the Toolbox window’s menu.
Note that the image file opens in a window between the Toolbox and the Layers, Channels, Paths, Undo window. Note also the selections in the toolbar along the top of that window: File, Edit, Select, View, etc.
TransformtheImage(Resize/Scale,Crop,Flip,etc.) Select “Image” from the image window’s toolbar. Note the many options available; you can scale the
image size, crop a selection, or flip the image horizontally or vertically.

5
SaveYourWorkinthe.XCFFormat GIMP allows you to save your work in many popular image file formats, such as .jpg or .gif. GIMP also
has its own file format, .xcf, which allows you to save information about layers, channels or paths, so you can work with your file later. When you begin a project, you should save your work in this .xcf format.
From the “File” menu, select “Save As” from the dropdown menu in the toolbar.
Select a name for the file (“Tutorial.xcf”), and choose where you would like to save the file on your computer (for this tutorial, you can save to the desktop).
6
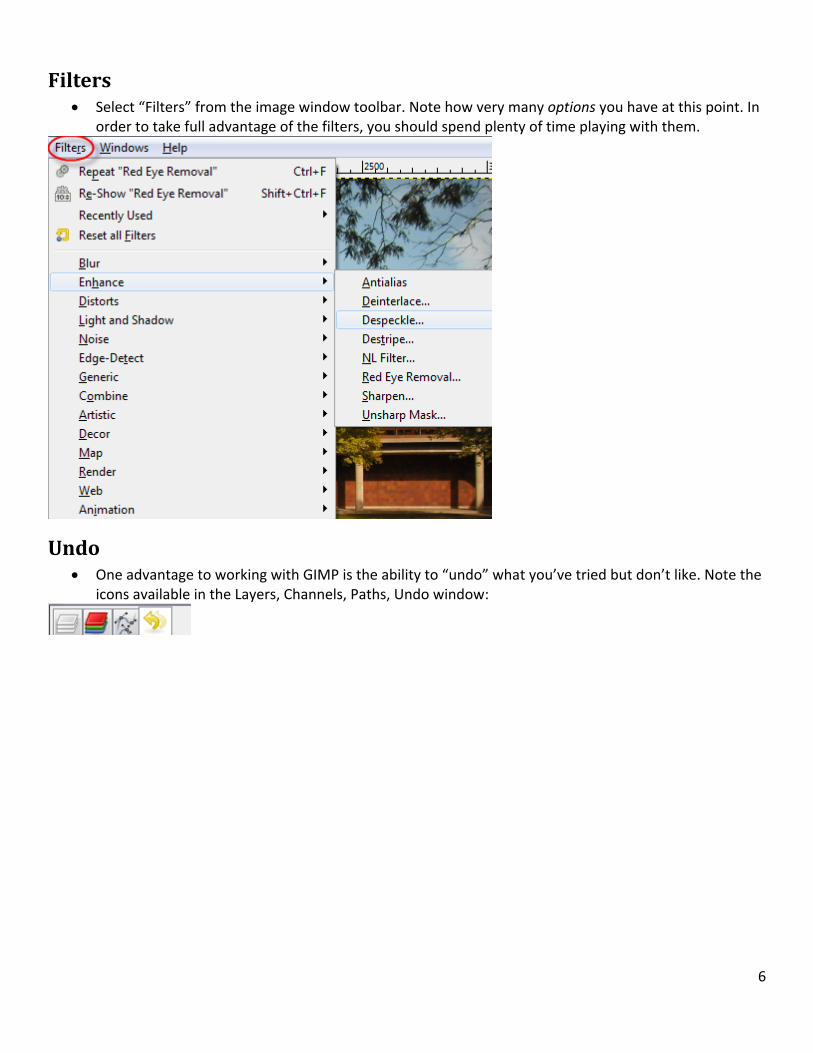
Filters Select “Filters” from the image window toolbar. Note how very many options you have at this point. In
order to take full advantage of the filters, you should spend plenty of time playing with them.
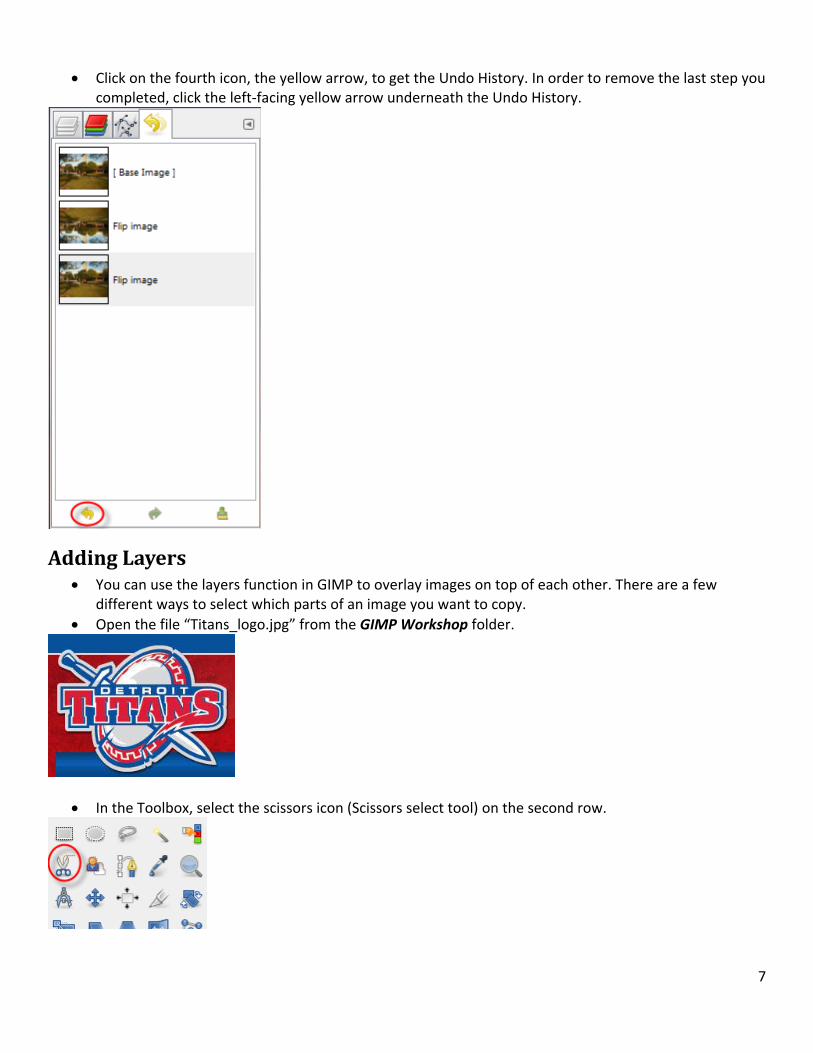
Undo One advantage to working with GIMP is the ability to “undo” what you’ve tried but don’t like. Note the
icons available in the Layers, Channels, Paths, Undo window:
7
Click on the fourth icon, the yellow arrow, to get the Undo History. In order to remove the last step you completed, click the left‐facing yellow arrow underneath the Undo History.
AddingLayers You can use the layers function in GIMP to overlay images on top of each other. There are a few
different ways to select which parts of an image you want to copy.
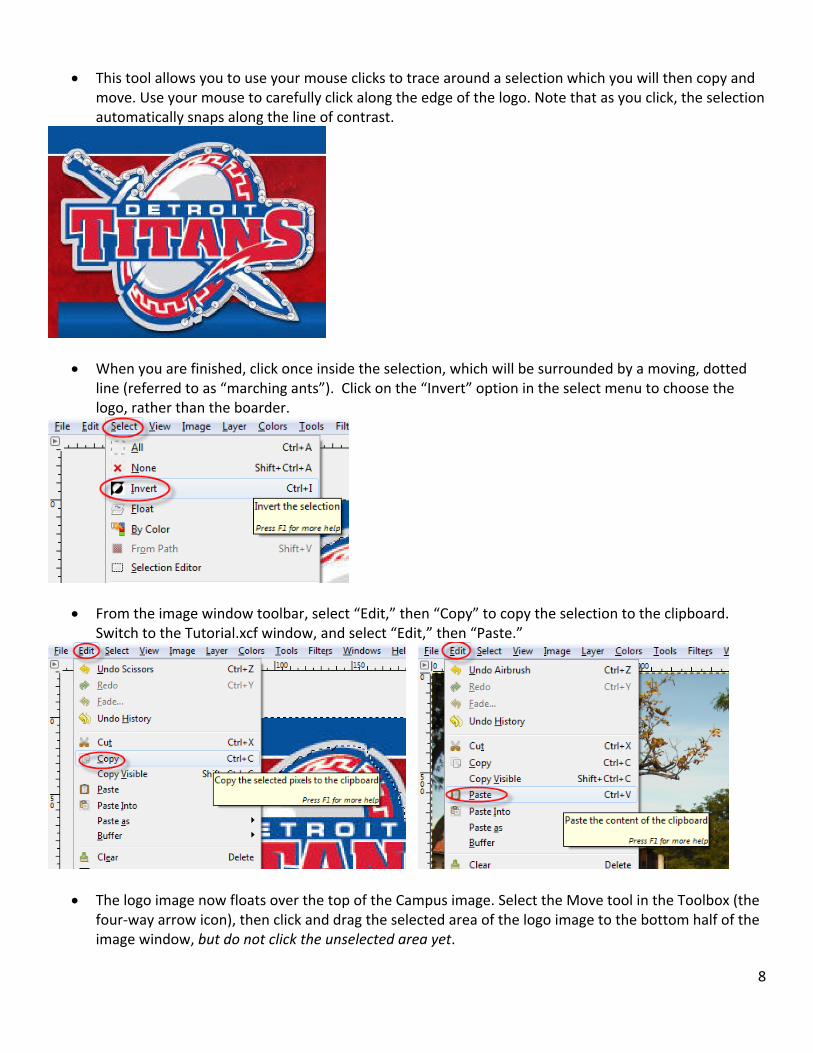
Open the file “Titans_logo.jpg” from the GIMP Workshop folder.
In the Toolbox, select the scissors icon (Scissors select tool) on the second row.
8
This tool allows you to use your mouse clicks to trace around a selection which you will then copy and move. Use your mouse to carefully click along the edge of the logo. Note that as you click, the selection automatically snaps along the line of contrast.
When you are finished, click once inside the selection, which will be surrounded by a moving, dotted line (referred to as “marching ants”). Click on the “Invert” option in the select menu to choose the logo, rather than the boarder.
From the image window toolbar, select “Edit,” then “Copy” to copy the selection to the clipboard. Switch to the Tutorial.xcf window, and select “Edit,” then “Paste.”
The logo image now floats over the top of the Campus image. Select the Move tool in the Toolbox (the four‐way arrow icon), then click and drag the selected area of the logo image to the bottom half of the image window, but do not click the unselected area yet.
9
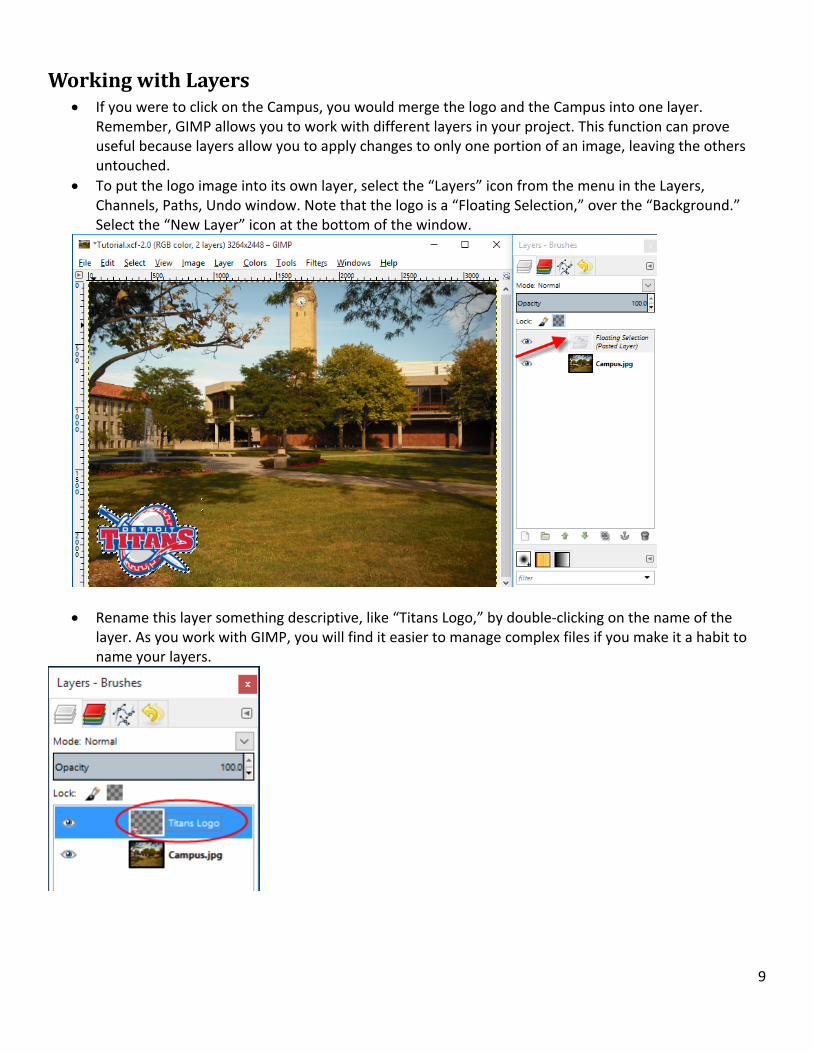
WorkingwithLayers If you were to click on the Campus, you would merge the logo and the Campus into one layer.
Remember, GIMP allows you to work with different layers in your project. This function can prove useful because layers allow you to apply changes to only one portion of an image, leaving the others untouched.
To put the logo image into its own layer, select the “Layers” icon from the menu in the Layers, Channels, Paths, Undo window. Note that the logo is a “Floating Selection,” over the “Background.” Select the “New Layer” icon at the bottom of the window.
Rename this layer something descriptive, like “Titans Logo,” by double‐clicking on the name of the layer. As you work with GIMP, you will find it easier to manage complex files if you make it a habit to name your layers.
10
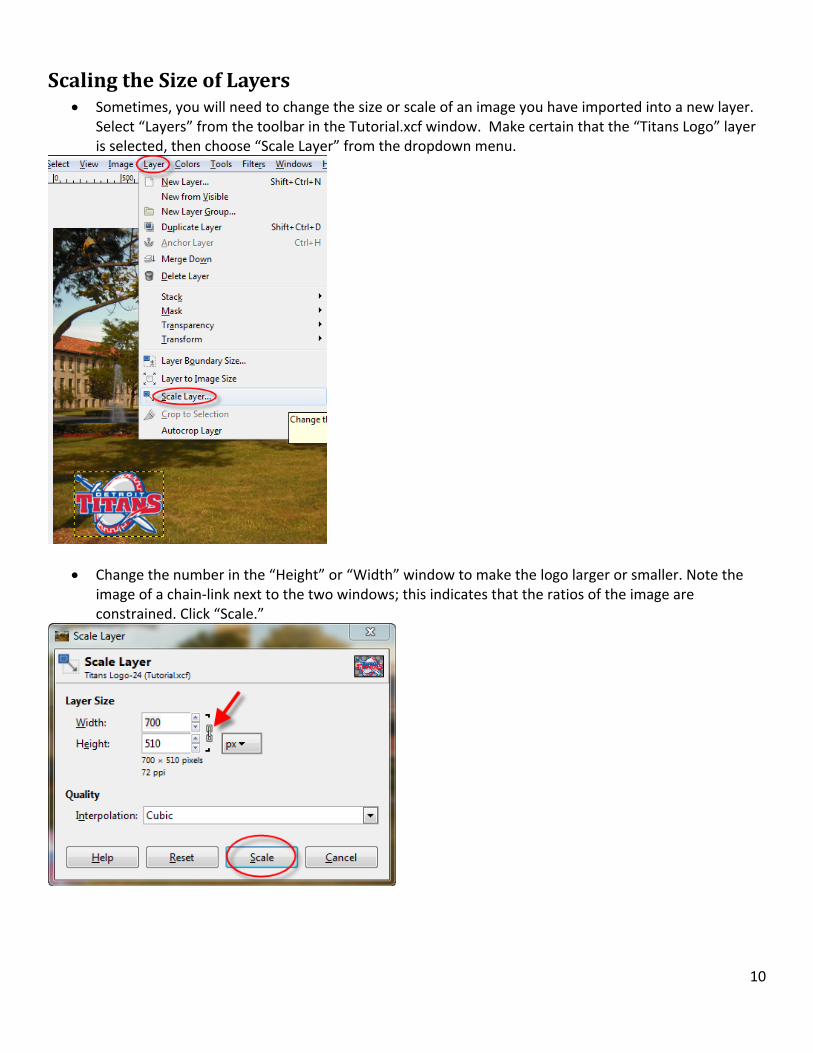
ScalingtheSizeofLayers Sometimes, you will need to change the size or scale of an image you have imported into a new layer.
Select “Layers” from the toolbar in the Tutorial.xcf window. Make certain that the “Titans Logo” layer is selected, then choose “Scale Layer” from the dropdown menu.
Change the number in the “Height” or “Width” window to make the logo larger or smaller. Note the image of a chain‐link next to the two windows; this indicates that the ratios of the image are constrained. Click “Scale.”
11
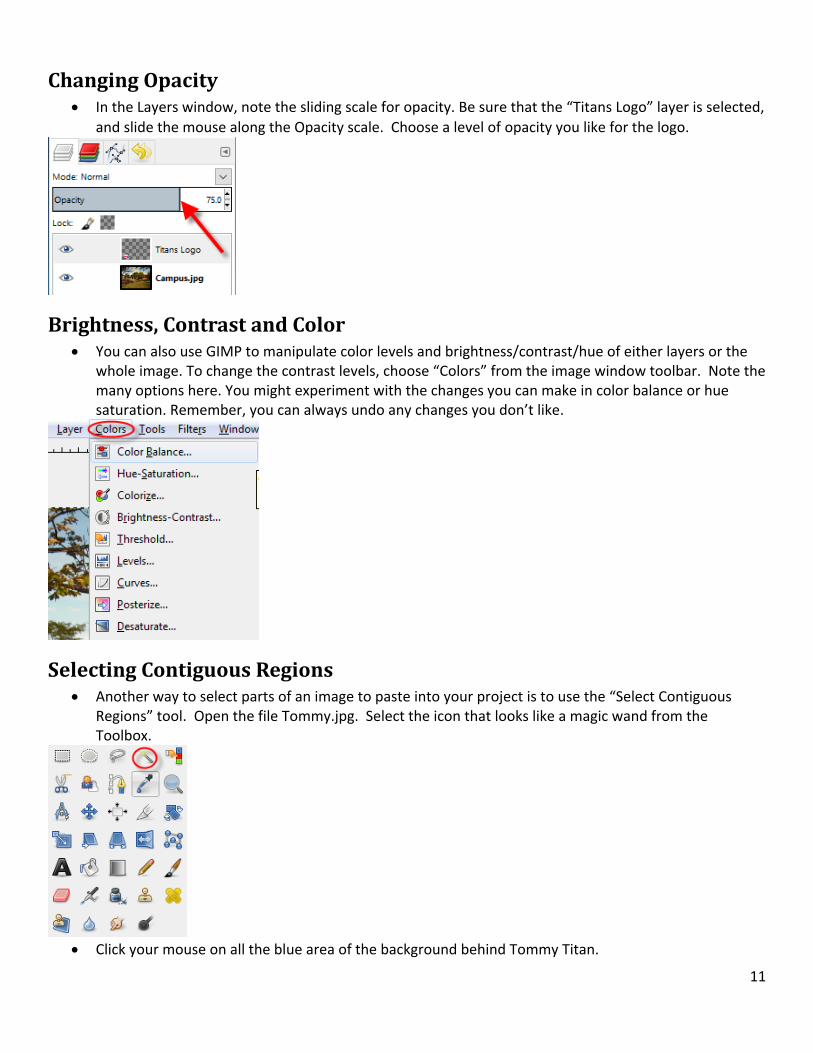
ChangingOpacity In the Layers window, note the sliding scale for opacity. Be sure that the “Titans Logo” layer is selected,
and slide the mouse along the Opacity scale. Choose a level of opacity you like for the logo.
Brightness,ContrastandColor You can also use GIMP to manipulate color levels and brightness/contrast/hue of either layers or the
whole image. To change the contrast levels, choose “Colors” from the image window toolbar. Note the many options here. You might experiment with the changes you can make in color balance or hue saturation. Remember, you can always undo any changes you don’t like.
SelectingContiguousRegions Another way to select parts of an image to paste into your project is to use the “Select Contiguous
Regions” tool. Open the file Tommy.jpg. Select the icon that looks like a magic wand from the Toolbox.
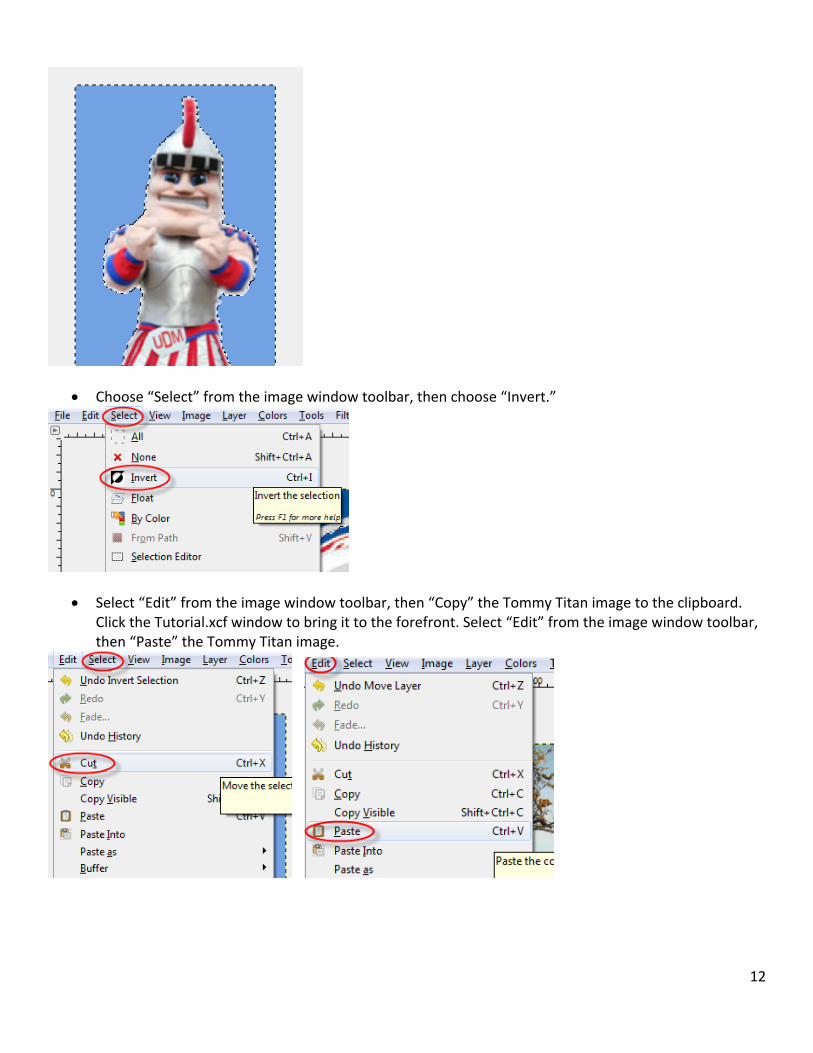
Click your mouse on all the blue area of the background behind Tommy Titan.
12
Choose “Select” from the image window toolbar, then choose “Invert.”
Select “Edit” from the image window toolbar, then “Copy” the Tommy Titan image to the clipboard. Click the Tutorial.xcf window to bring it to the forefront. Select “Edit” from the image window toolbar, then “Paste” the Tommy Titan image.
13
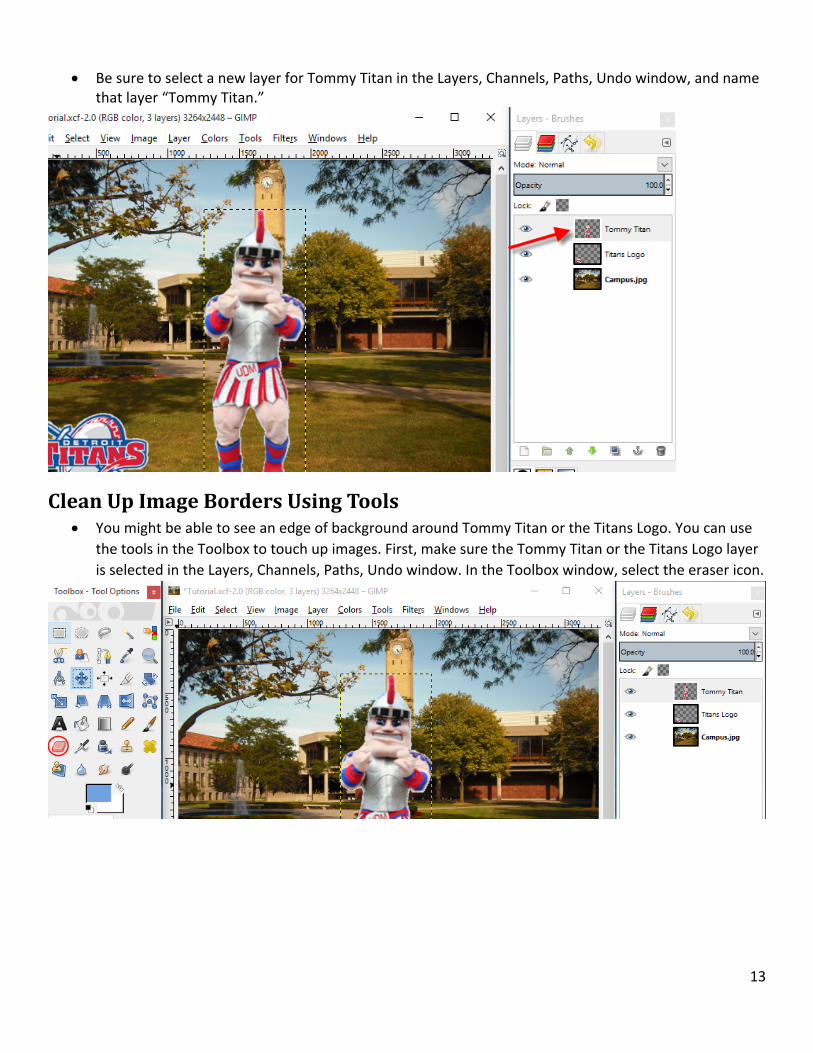
Be sure to select a new layer for Tommy Titan in the Layers, Channels, Paths, Undo window, and name that layer “Tommy Titan.”
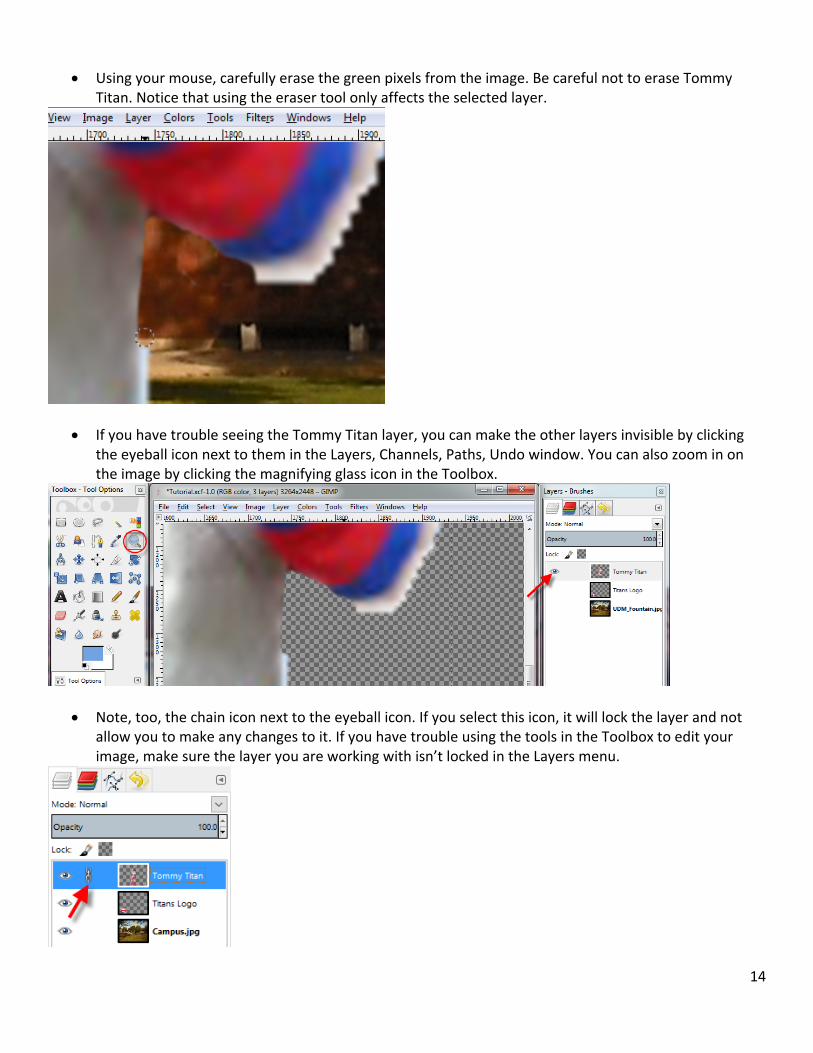
CleanUpImageBordersUsingTools You might be able to see an edge of background around Tommy Titan or the Titans Logo. You can use
the tools in the Toolbox to touch up images. First, make sure the Tommy Titan or the Titans Logo layer
is selected in the Layers, Channels, Paths, Undo window. In the Toolbox window, select the eraser icon.
14
Using your mouse, carefully erase the green pixels from the image. Be careful not to erase Tommy Titan. Notice that using the eraser tool only affects the selected layer.
If you have trouble seeing the Tommy Titan layer, you can make the other layers invisible by clicking the eyeball icon next to them in the Layers, Channels, Paths, Undo window. You can also zoom in on the image by clicking the magnifying glass icon in the Toolbox.
Note, too, the chain icon next to the eyeball icon. If you select this icon, it will lock the layer and not allow you to make any changes to it. If you have trouble using the tools in the Toolbox to edit your image, make sure the layer you are working with isn’t locked in the Layers menu.
15
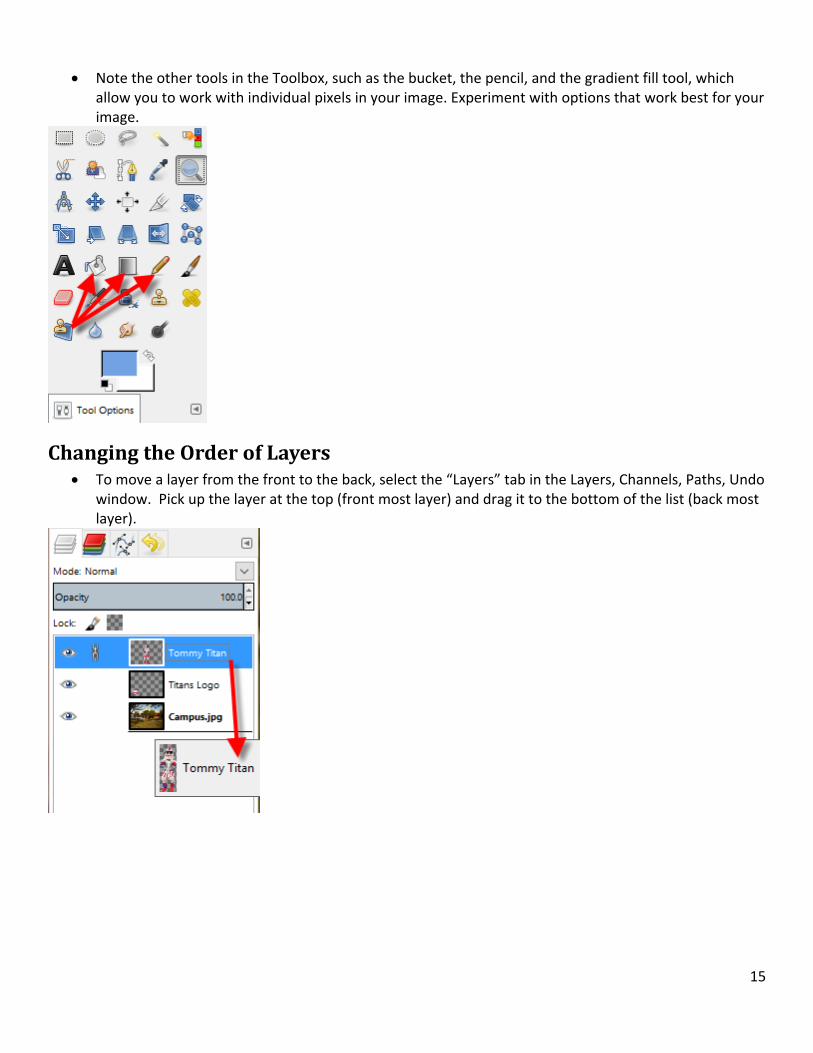
Note the other tools in the Toolbox, such as the bucket, the pencil, and the gradient fill tool, which allow you to work with individual pixels in your image. Experiment with options that work best for your image.
ChangingtheOrderofLayers To move a layer from the front to the back, select the “Layers” tab in the Layers, Channels, Paths, Undo
window. Pick up the layer at the top (front most layer) and drag it to the bottom of the list (back most layer).
16
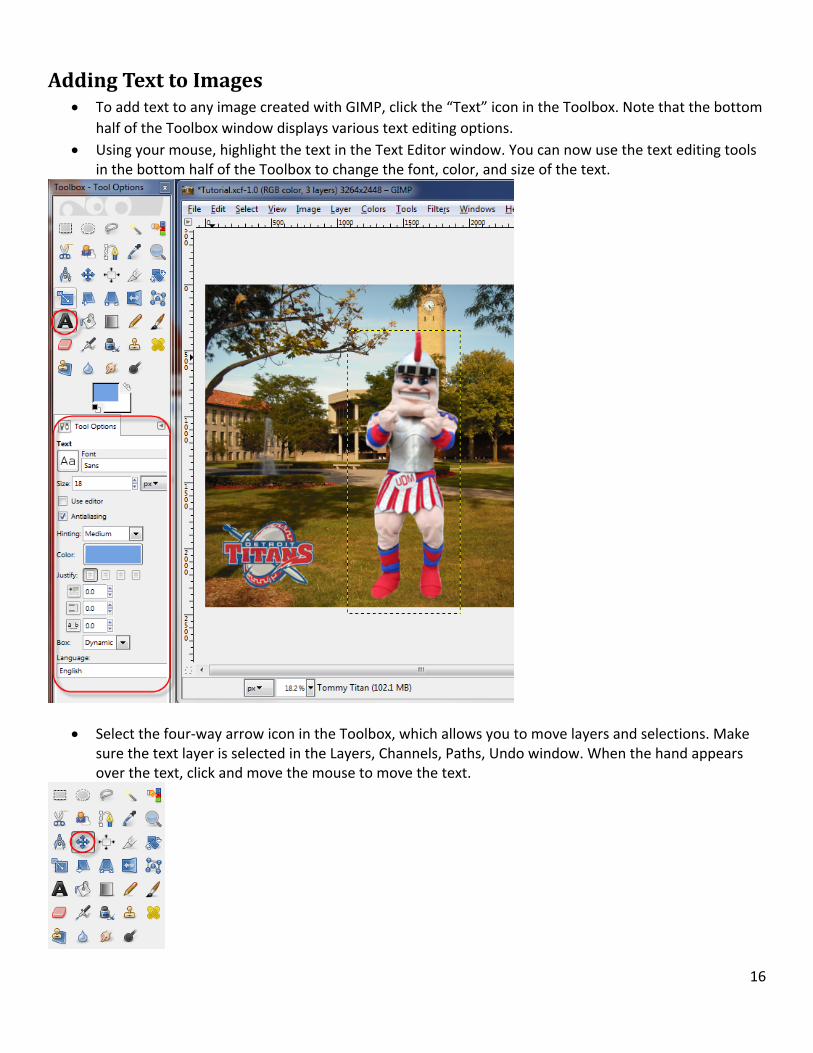
AddingTexttoImages To add text to any image created with GIMP, click the “Text” icon in the Toolbox. Note that the bottom
half of the Toolbox window displays various text editing options.
Using your mouse, highlight the text in the Text Editor window. You can now use the text editing tools in the bottom half of the Toolbox to change the font, color, and size of the text.
Select the four‐way arrow icon in the Toolbox, which allows you to move layers and selections. Make sure the text layer is selected in the Layers, Channels, Paths, Undo window. When the hand appears over the text, click and move the mouse to move the text.
17
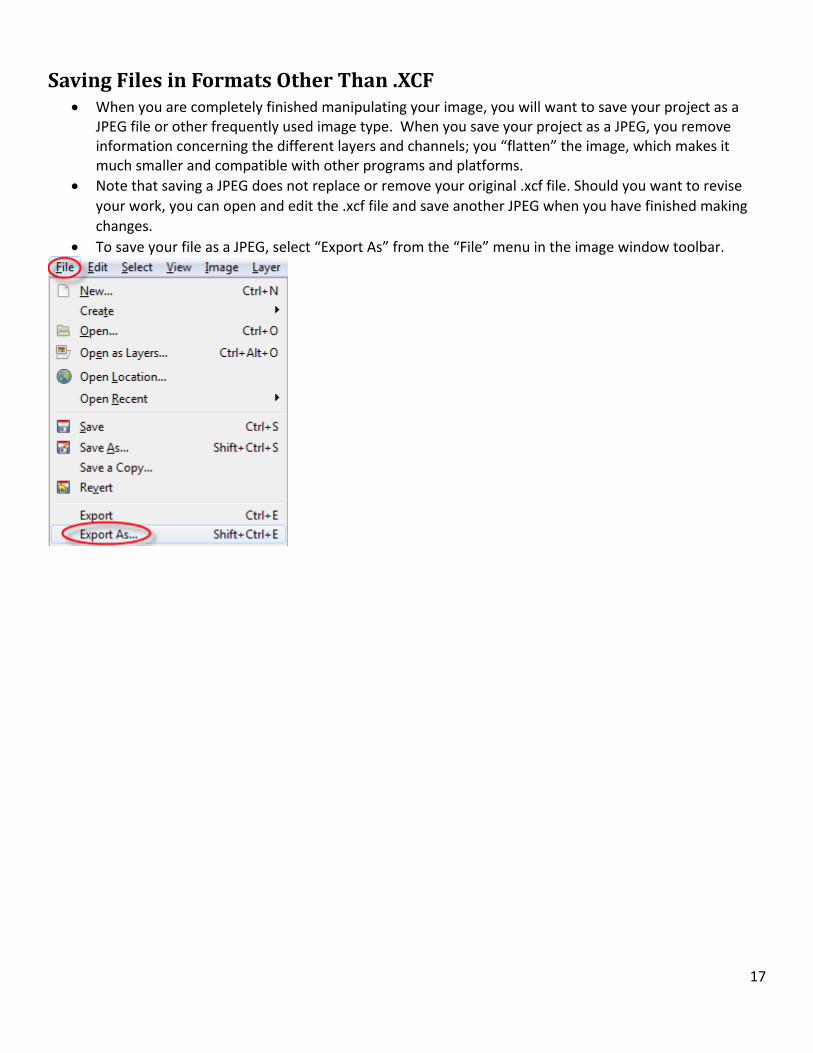
SavingFilesinFormatsOtherThan.XCF When you are completely finished manipulating your image, you will want to save your project as a
JPEG file or other frequently used image type. When you save your project as a JPEG, you remove information concerning the different layers and channels; you “flatten” the image, which makes it much smaller and compatible with other programs and platforms.
Note that saving a JPEG does not replace or remove your original .xcf file. Should you want to revise
your work, you can open and edit the .xcf file and save another JPEG when you have finished making
changes.
To save your file as a JPEG, select “Export As” from the “File” menu in the image window toolbar.
18
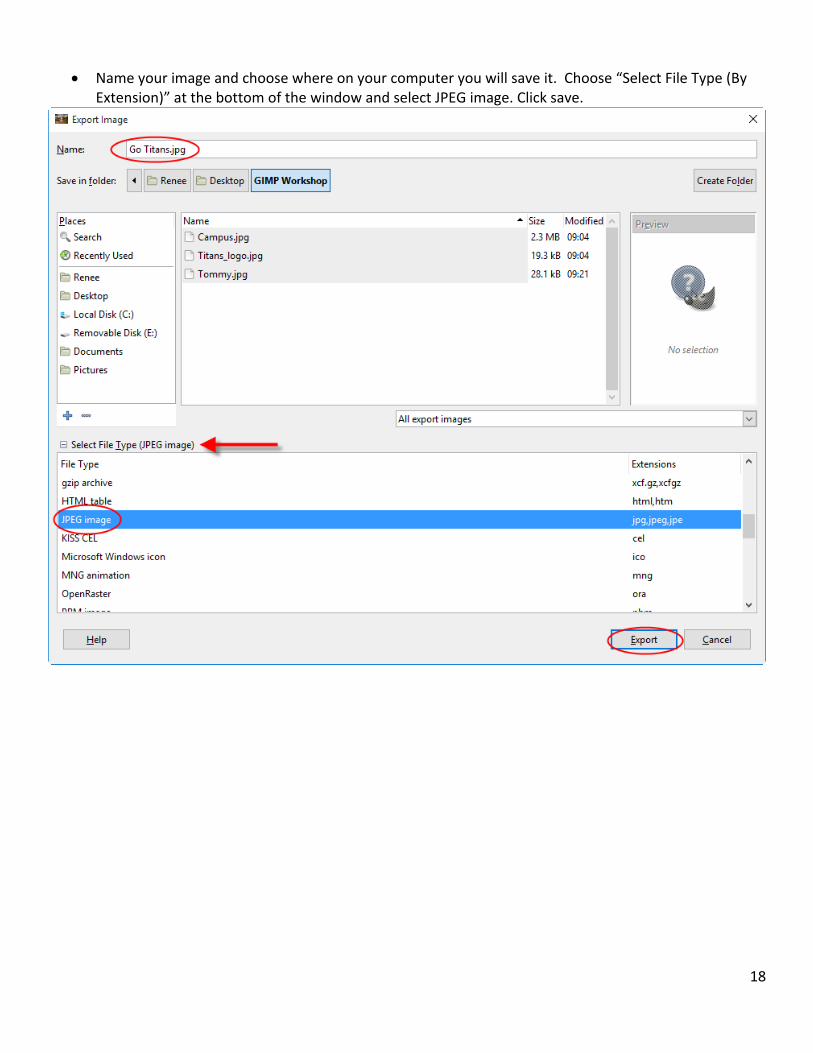
Name your image and choose where on your computer you will save it. Choose “Select File Type (By Extension)” at the bottom of the window and select JPEG image. Click save.
19
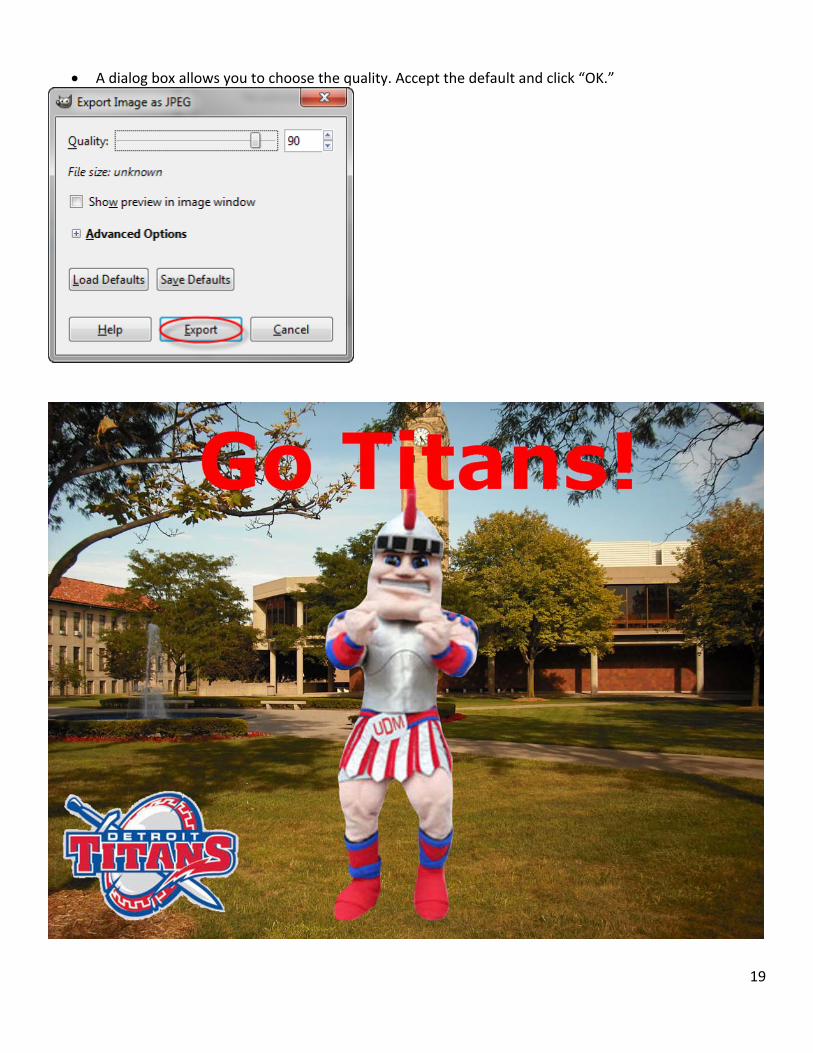
A dialog box allows you to choose the quality. Accept the default and click “OK.”