Embed Size (px)
Citation preview

InformationNOW – Students
Overview A student is defined in InformationNOW as a person who is currently receiving or has received educational services from a school or district. The student is a central component of every student information system. A student enters the system by being enrolled into a school and leaves the system by being withdrawn from all schools. In the Student module, a user with appropriate access privileges may work with the following features:
Contents InformationNOW – Students 1
Overview ................................................................................................................................... 1 Contents..................................................................................................................................... 1 Search Census............................................................................................................................ 2
Simple Search.............................................................................................................. 2 Search Results ............................................................................................................. 3
Add a Student ............................................................................................................................ 4 Student Main Tab ........................................................................................................ 5 Student Summary Tab................................................................................................. 7 Student Misc. Tab ....................................................................................................... 7 Student Custom Tab .................................................................................................. 10 Student Contacts Tab ................................................................................................ 10 Student Access Tab ................................................................................................... 16 Student Addresses Tab .............................................................................................. 16 Student School Tab ................................................................................................... 17 Student Enrollment Tab............................................................................................. 19
Search for a Student................................................................................................................. 22 View a Student ........................................................................................................................ 23 Delete a Student....................................................................................................................... 24 Additional Student Functions .................................................................................................. 24
Tasks ......................................................................................................................... 24 Manage...................................................................................................................... 25 Reports ...................................................................................................................... 26
Enrollment ............................................................................................................................... 27 Student Maintenance ................................................................................................. 27 Enrollment................................................................................................................. 27 Mass Enrollment ....................................................................................................... 28
Registration.............................................................................................................................. 29 Register ..................................................................................................................... 30
Quick Reference Guide STI_0323101410 InformationNOW – Students • 1

Unregister .................................................................................................................. 30 Filters....................................................................................................................................... 31 Medical .................................................................................................................................... 31 District-Wide Students ............................................................................................................ 31 Reports..................................................................................................................................... 31
Search Census Before adding a new student, it is best to search the census to see if this student already exists in the database. To do so, go to Census | People.
Simple Search Enter all or part of the first and/or last name and then click Search.
Advanced Search Enter one or more of the search criteria available and then click Search.
Quick Reference Guide STI_0323101410 InformationNOW – Students • 2
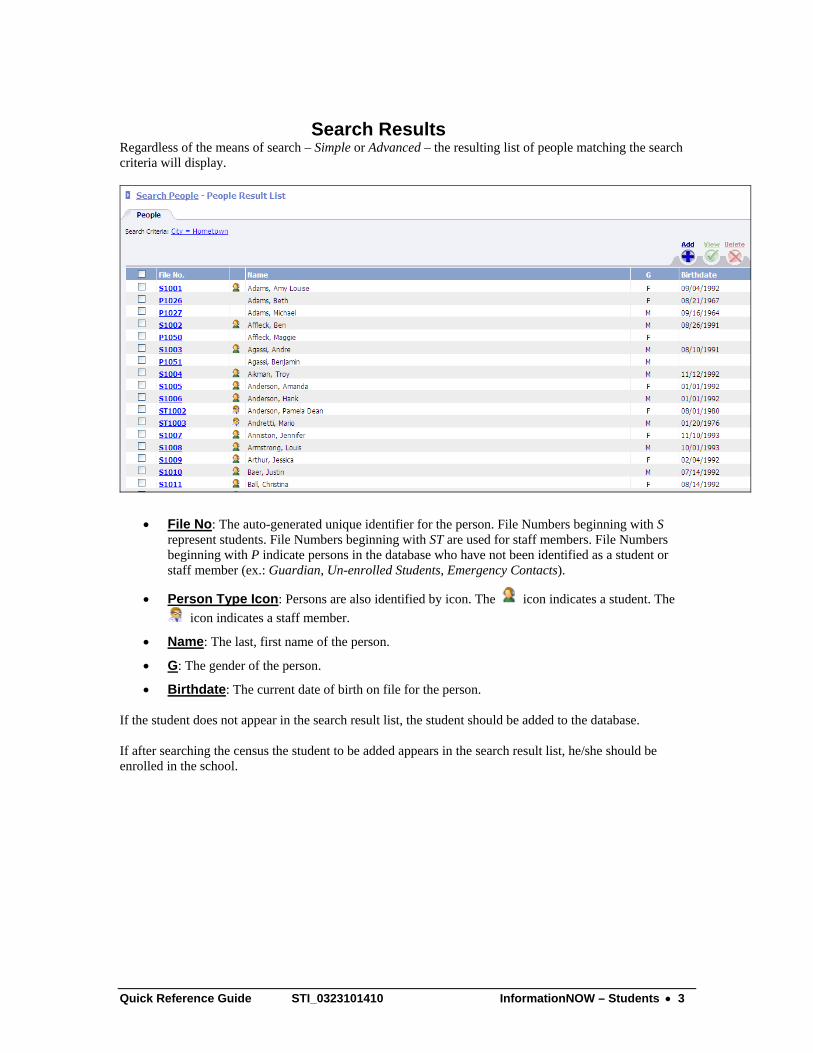
Search Results Regardless of the means of search – Simple or Advanced – the resulting list of people matching the search criteria will display.
• File No: The auto-generated unique identifier for the person. File Numbers beginning with S represent students. File Numbers beginning with ST are used for staff members. File Numbers beginning with P indicate persons in the database who have not been identified as a student or staff member (ex.: Guardian, Un-enrolled Students, Emergency Contacts).
• Person Type Icon: Persons are also identified by icon. The icon indicates a student. The icon indicates a staff member.
• Name: The last, first name of the person.
• G: The gender of the person.
• Birthdate: The current date of birth on file for the person. If the student does not appear in the search result list, the student should be added to the database. If after searching the census the student to be added appears in the search result list, he/she should be enrolled in the school.
Quick Reference Guide STI_0323101410 InformationNOW – Students • 3

Add a Student If the user has searched the Census and the student to be added to the database was not found, the student may then be added. To add a new student, go to Students | Student Maintenance. It is not necessary to enter search criterion. Click Add.
The Add Student screen will appear.
Complete the data fields as needed on the student’s Main tab. Required fields are indicated with an asterisk (*).
Quick Reference Guide STI_0323101410 InformationNOW – Students • 4

Student Main Tab Note: InformationNOW required fields are indicated with an asterisk (*). Refer to State Guidelines for data elements that are required for state reporting purposes.
• * First Name: Enter the student’s first name as indicated by a record of birth or other acceptable documentation.
• Middle Name: Enter the student’s middle name as indicated by a record of birth or other acceptable documentation.
• *Last Name: Enter the student’s last name as indicated by a record of birth or other acceptable documentation.
• Generation: Select the suffix for the student (ex.: Jr., Sr., III). Generation codes may be created by going to Students | Setup or to System Preferences | Setup.
• Preferred Name: Enter the name by which the student prefers to be addressed.
• *Date Of Birth: Enter the student’s birth date as indicated by a record of birth or other acceptable documentation.
• Age: This field is display only and is calculated based on the student’s date of birth and the date indicated on the server where the InformationNOW database resides.
• Phone: Enter the primary phone number for the student. Click the More link to insert additional phone numbers for the student.
• Social Security Number: Enter the student’s Social Security Number on file.
• *Gender: Select the student’s gender. Gender codes may be created by going to Students | Setup or to System Preferences | Setup.
• *Ethnicity: Select the primary ethnicity of the student. Click the More link to insert additional ethnicities for the student. Percentages must be assigned if the student has multiple ethnicities. The highest percentage ethnicity will display on the student’s Main tab. Ethnicity codes may be created by going to Students | Setup or to System Preferences | Setup.
• School Next Year: Select the school to which the students will transfer. Schools are created by going to School/District | School. During the end of year procedures, students may be automatically transferred to their next schools by assigning the School Next Year here. For details regarding assigning groups of schools in one process to enroll students in their next schools, refer to the InformationNOW – Scheduling Quick Reference Guide.
• Photograph: To attach a photo to a student, click Change. Click Browse to locate the student’s photograph file. Click OK to save the changes. To remove a photo, click Remove.
• Special Instructions: Enter any unique instructions pertaining to this student (ex.: Mother not allowed to pick up).
• Mailing/Physical Address: It is recommended that users wait to enter the student address until after the record has been created so that the user may search the existing addresses to see if the address already exists. Once the student record is saved, the user may edit the student record and use the More link above the address to search existing addresses. See “Assigning an Address” on page 6.
• Flags: Flags for the student will display next to the student name at the top of the student screen.
o Student Number: The student number that displays is determined by the selection under School/District | Setup on the Settings tab and under the Student Identifier Display section.
Quick Reference Guide STI_0323101410 InformationNOW – Students • 5
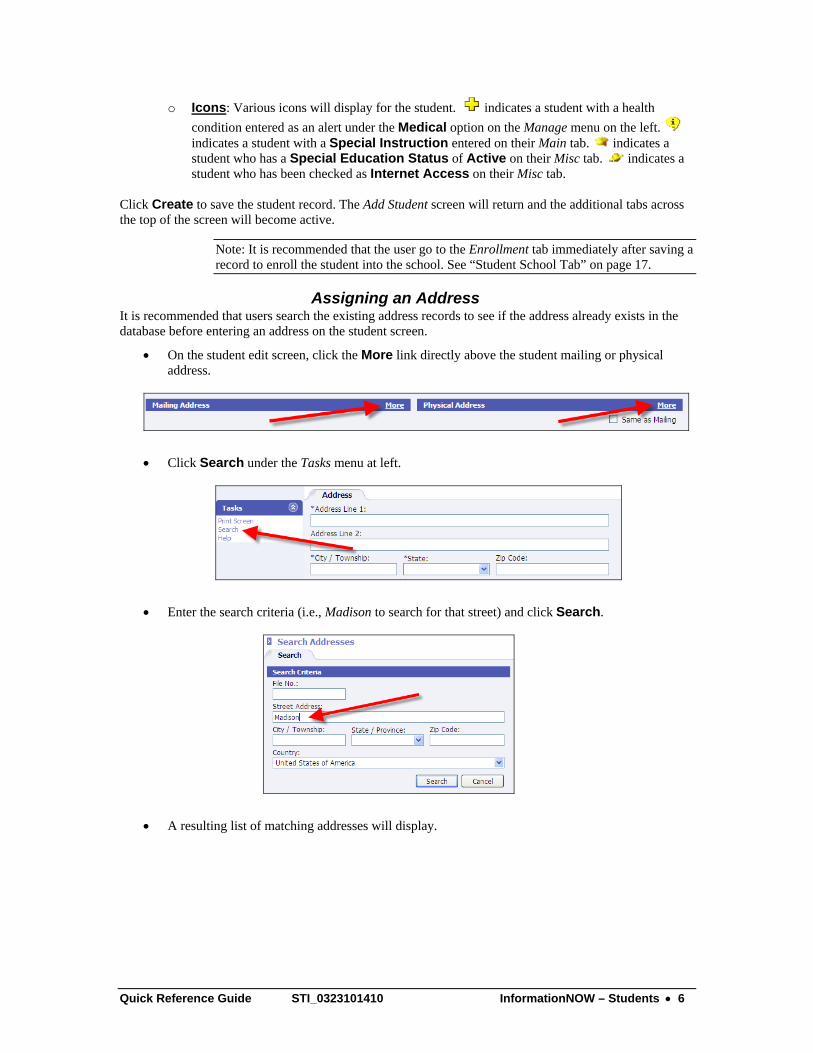
o Icons: Various icons will display for the student. indicates a student with a health condition entered as an alert under the Medical option on the Manage menu on the left. indicates a student with a Special Instruction entered on their Main tab. indicates a student who has a Special Education Status of Active on their Misc tab. indicates a student who has been checked as Internet Access on their Misc tab.
Click Create to save the student record. The Add Student screen will return and the additional tabs across the top of the screen will become active.
Note: It is recommended that the user go to the Enrollment tab immediately after saving a record to enroll the student into the school. See “Student School Tab” on page 17.
Assigning an Address It is recommended that users search the existing address records to see if the address already exists in the database before entering an address on the student screen.
• On the student edit screen, click the More link directly above the student mailing or physical address.
• Click Search under the Tasks menu at left.
• Enter the search criteria (i.e., Madison to search for that street) and click Search.
• A resulting list of matching addresses will display.
Quick Reference Guide STI_0323101410 InformationNOW – Students • 6

• To select the address from the list of existing addresses, either bullet the address and click OK or click the File No. of the address, which appears as a blue link. The address edit screen will display. Make any necessary changes and click OK.
Note: Any changes made to the address will affect all persons in the database with this address. To view the list of people who will be changed, click Associated People under the Tasks menu at left.
• If the address does not appear in the search result list, click Cancel. Enter the address detail. Select if it is mailing or physical address and click OK.
Student Summary Tab The Summary tab is a display-only tab showing basic student information.
Student Misc. Tab Note: Refer to State Guidelines to determine the fields that may be required for state reporting purposes.
Lookups (or codes) must be created to populate the data fields that appear as drop-lists. These lookups may be created by going to either Students | Setup or to System Preferences | Setup. For more details, refer to the InformationNOW – Lookups Quick Reference Guide.
Note: Depending on the state, the following screen may contain different data elements.
Quick Reference Guide STI_0323101410 InformationNOW – Students • 7

• Marital Status: Select the current Marital Status for the student.
• Religious Affiliation: Select the appropriate Religious Affiliation lookup.
• Employer Name: Enter the name of the student’s employer.
• Birth Certificate #: Enter the Birth Certificate number of the student.
• Birth Certificate Verification #: Enter a note concerning the Birth Certificate verification (i.e., Copy on file).
• Citizenship/Nationality: Select the student’s country of citizenship/nationality from the drop-list. Click More to assign additional citizenship/nationality codes.
• Migrant: Assign the student’s migrant code, where applicable.
• Country of Residency: Select the student’s country of residency from the drop-list.
• Residency Status: Select the student’s residency status from the available drop-list.
• Foreign Exchange Student: Check this box if the student is a foreign exchange student.
• Immigrant: Check this box if the student is considered an immigrant.
• Resides Outside Of District: Check if this student currently resides outside of the district in which services are provided.
Quick Reference Guide STI_0323101410 InformationNOW – Students • 8
• Language: Select the student’s primary language. Additional languages may be associated with the student by clicking the More link.
• Section 504 Qualification: Select Qualified504 if the student has a mental or physical disability that qualifies under Section 504 of the Rehabilitation Act of 1973.
• Homeless: Check this box if the student is homeless.
• Home Schooled: Check if the student is home-schooled but is still included in the district’s database for state reporting purposes.
• Tuition: Check if the student is considered a tuition student.
• Reporting School: If this student is being included in state reporting exports for a different school, select the school from the list. Schools are created under School/District | School.
• Special Education Status: Select the student’s current Special Education status.
• Eligibility Date: Enter the date on which the student was eligible for Special Education services.
• Reevaluation Date: Enter the date on which the student is to be or was reevaluated for Special Education services.
• Primary Exceptionality: Select the student’s primary exceptionality. Click More to insert additional exceptionalities for the selected student.
• Special Education Exit Date: Enter the date the student exited the Special Education program.
• IEP Begin Date: Enter the date on which the student began participating in an individual education plan.
• IEP End Date: Enter the date on which the student ended participation in an Individual Education Plan.
• Special Education Exit Reason: Select the reason the student exited the special education program.
• Case Manager: Click Find to search the staff members for the student-assigned case manager.
• Date Enrolled in LEA: Enter the date on which the student was enrolled in an LEA.
• LRE (Least Restrictive Environment): Select the student’s Least Restrictive Environment.
• LEP: Select the student’s Limited English Proficiency (LEP) status.
• Student Number: The Student Number is used to uniquely identify a student within the district. The system will automatically assign a unique student number.
• State ID Number: Enter the state-assigned unique ID number for the student.
• Alternate Student Number: Enter a unique Alternate Student ID number.
• Email: Enter an e-mail address for the student. Additional e-mail addresses may be added by clicking the More link.
• Messenger Provider and Internet Messenger: For Messenger Provider, select the provider for the instant messenger service (ex.: Yahoo, AOL, Windows Live Messenger). In the Internet Messenger field, enter the account name (ex.: [email protected]) of the selected Messenger Provider. To associate a student with multiple IM’s, click the More link.
• Internet Access: Check this box if the student is allowed Internet access at school.
• Internet Password: Enter the password the student will use to access the Internet at school.
• Telephone PIN Number: The PIN used by the student for all STI telephony-based applications.
Quick Reference Guide STI_0323101410 InformationNOW – Students • 9

Student Custom Tab The Custom tab may contain fields that are required for state reporting purposes, along with custom fields which have been created by the school or district. Refer to State Guidelines for a list of state-mandated fields.
Student Contacts Tab
The person number, name, gender and relationship of the person related to this student will display along with the following:
• Pu: Can this contact pick up the student?
• EC: Is this contact an emergency contact for the student?
• Rec Mail: Does this contact receive mailings?
• Resp Bill: Is this contact responsible for the bill/outstanding fee balance?
• Rec Bill: Is this contact to receive bills?
• Fam: The FAM column on the contact list display indicates the family relationship, if any, the contact has with the student.
o Pri indicates the contact marked as Is Family Member and who resides at the same physical address.
o Ext indicates the contact marked as Is Family Member but who resides at a different physical address.
o N/A indicates no direct family relationship
• Gn: Is this contact a guardian/custodian? Contacts will display in the following order:
1. Primary family member who is the student's guardian and the head of household.
2. Other primary family members, sorted by display name.
3. All extended family members, sorted by display name.
4. All other non-family-member emergency contacts, sorted by display name.
5. All other contacts that do not fall into one of the above categories, sorted by display name. From the Contacts tab, various people associated with the student (i.e., a guardian, physician, emergency contact) may be added.
• To insert a new contact for the student, click Add.
Quick Reference Guide STI_0323101410 InformationNOW – Students • 10

• It is recommended that the user perform a simple or advanced search to be sure the person does not already exist in the database. See “Search Census” on page 2 for information on searching.
o If, when searching, the person to be added as a contact for this student is found in the database, click the blue link to select the person from the search result list and update any data fields as needed.
o If, when searching, the person to be added as a contact for this student is not found in the database, click Add at the bottom of the search result screen.
Enter the criteria for the contact. Required fields are indicated with an asterisk (*).
Lookups must be created to populate the data fields that appear as drop-lists including required fields of Gender and Relationship. These codes (lookups) may be created by going to System Preferences | Setup. For more details, refer to the InformationNOW – Lookups Quick Reference Guide.
• Title: Select the title from the available list.
• First Name: Enter the first name of the contact.
• Middle Name: Enter the middle name of the contact.
• *Last Name: Enter the last name of the contact.
• Generation: Select the generation from the available list (i.e., Jr, Sr, III).
• Preferred Name: Enter the preferred first name of the contact.
• Date Of Birth: Enter the date of birth of the contact
• Age: This is a read-only field. The age is automatically calculated based on the date of birth and current system date.
Quick Reference Guide STI_0323101410 InformationNOW – Students • 11

• Phone: Enter the primary phone number for the contact. Additional phone numbers may be added by clicking the More link.
• Social Security Number: Enter the Social Security Number for the contact.
• *Gender: Select the gender of the contact.
• Ethnicity: Select the ethnicity of the contact. Additional ethnicities along with the percentage may be added by clicking the More link.
• Photograph: To attach a photo to a contact, click Change. Click Browse to locate the contact’s photograph file. Click OK to save the changes. To remove a photo, click Remove.
• Mailing/Physical Address: It is recommended that the user wait to enter the student address until after the record has been created so that the user may search the existing addresses to see if the address already exists. Once the student record is saved, the user may edit the student record and use the More link above the address to search existing addresses. Steps are explained under “Assigning an Address” on page 6.
• *Relationship: Required. Select the relationship between the contact and the student.
• Is Family Member: Check this box if the contact is a family member of the student.
• Is Emergency Contact: Check this box if the contact should be notified in an emergency.
• Is Responsible For Bill: Indicates whether or not the contact is ultimately responsible for the payment of bills from the school/district. Only one contact may be marked as Is Responsible For Bill.
• Allowed To Pickup Student: Check this box if the contact may pick up and sign the student out from school.
• Student Is Visible In Home Access: Check if this student is person should be able to access the information for this student using the parent portal.
• Is Custodian: Check this box if the contact is the legal custodian of the student. Is Custodian must be checked in order to activate the Home Login option.
• Receives Mailings: Check this box if the contact should be sent mailings for the student including letters and report cards.
• Receives Bills: Indicates whether or not the contact is to receive billing related materials. This field does not imply that the contact is responsible for the bill, only that they are to receive copies.
• Description: A brief description of the contact.
• Copy Address(es) From Student: Check to copy any existing mailing or physical address from the student to this contact.
Click Create. The Miscellaneous, Addresses and Access tabs become active.
Quick Reference Guide STI_0323101410 InformationNOW – Students • 12

Contact Miscellaneous Tab
Note: Check State Guidelines to determine if any fields are required for state reporting purposes.
Enter the criteria for the contact.
• Marital Status: Select the contact’s marital status.
• Religious Affiliation: Select the contact’s religious affiliation.
• Go Green: Select this option to not print a hard copy of the report card for any student/guardian (contact) who has elected to Go Green. An alert will be created instead which can be used to generate an e-mail to the student/contact to let them know the report is available for viewing via the home portal.
• Citizenship/Nationality: Select the contact’s citizenship/nationality from the list of available countries. Additional citizenship/nationalities may be assigned to the contact by clicking the More link.
• Country Of Residence: Select the country of residence from the list of available countries.
• Residency Status: Select the contact’s current residency status.
• Language: Select the contact’s primary language. Additional languages may be assigned to the contact by clicking the More link.
• Homeless: Check if this contact is considered homeless.
• Person Number: Displays the system-assigned unique identifier for this person record.
• Alternate Person Number: An alternate person number may be assigned to this person record. This number is at the district’s discretion.
• Email: Enter the contact’s e-mail address. Additional e-mail addresses may be assigned to the contact by clicking the More link.
• Messenger Provider and Internet Messenger: For Messenger Provider, select the provider for the instant messenger service used by this contact (ex.: Yahoo, AOL, Windows Live
Quick Reference Guide STI_0323101410 InformationNOW – Students • 13

Messenger). In the Internet Messenger field, enter the account name (ex.: [email protected]) of the selected Messenger Provider. To associate a contact with multiple IM’s, click the More link.
• Employer Name: Enter the name of the contact’s employer.
• Education Level: Select the contact’s highest education level.
Contact Addresses Tab Enter any address information for the contact. It is recommended that the user perform a search of addresses to be assigned to the contact. Refer to “Assigning an Address” on page 6.
Note: The mailing address and/or physical address entered on the contact’s Main tab will display. Additional addresses may be entered by clicking the Add button.
Hint: After an address has been assigned to a contact, users may view the other persons associated with that address. While on the Addresses tab, place a check next to the address and click View. Click Associated People under the Tasks menu at left. A list of other persons with the same address will display.
Contact Access Tab Select the appropriate User Account and Password options for this contact. Also view the students whose information may be accessed via the parent portal for this contact.
• Account Disable: Check if this person should no longer be able to access the parent portal.
Quick Reference Guide STI_0323101410 InformationNOW – Students • 14
• User must change password at next login: Check if this user should be required to change their password the next time they log in to the parent port. Users will be required to enter the old password and then enter the new password.
• Password never expires: Check if the password is to never expire for this contact.
• User Name: Enter a unique user name for this contact or click Generate to have InformationNOW create a unique user name.
• Password: Enter the password for the contact. Reenter the password in the Retype Password field.
• Home Access Available for the following students: View the list of students whose data this contact may access via the parent portal. Click the blue student number link to access the demographic information for the student.
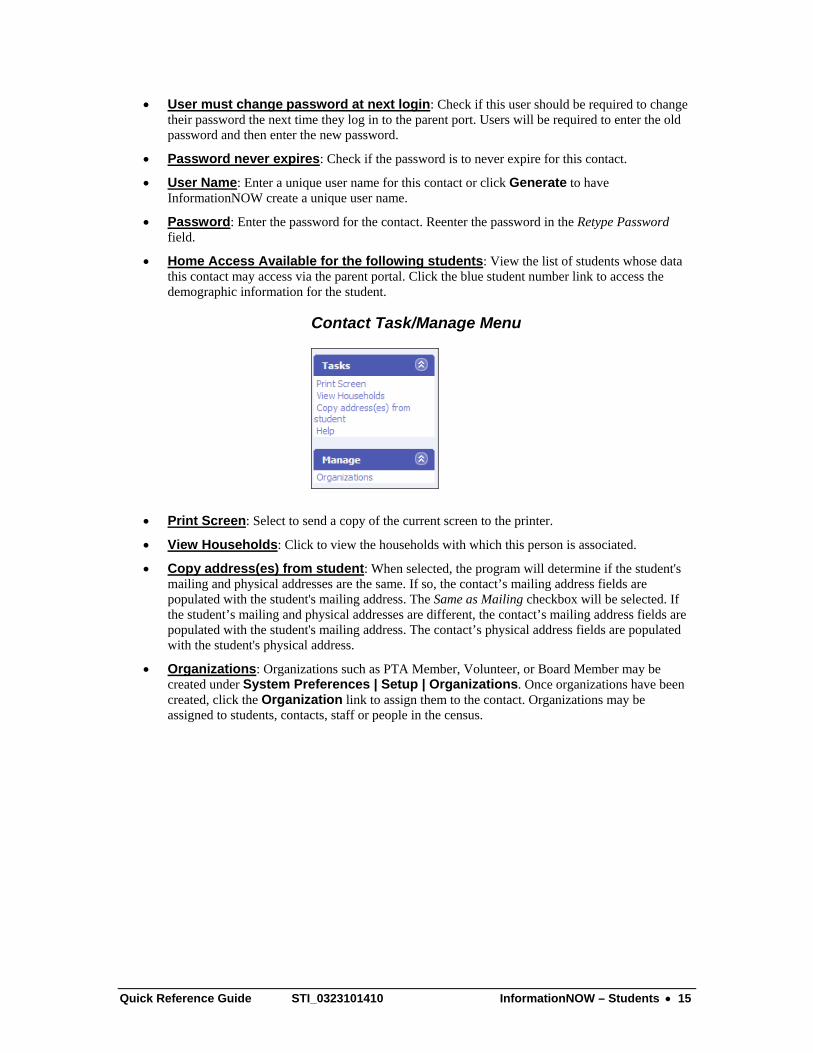
Contact Task/Manage Menu
• Print Screen: Select to send a copy of the current screen to the printer.
• View Households: Click to view the households with which this person is associated.
• Copy address(es) from student: When selected, the program will determine if the student's mailing and physical addresses are the same. If so, the contact’s mailing address fields are populated with the student's mailing address. The Same as Mailing checkbox will be selected. If the student’s mailing and physical addresses are different, the contact’s mailing address fields are populated with the student's mailing address. The contact’s physical address fields are populated with the student's physical address.
• Organizations: Organizations such as PTA Member, Volunteer, or Board Member may be created under System Preferences | Setup | Organizations. Once organizations have been created, click the Organization link to assign them to the contact. Organizations may be assigned to students, contacts, staff or people in the census.
Quick Reference Guide STI_0323101410 InformationNOW – Students • 15

Student Access Tab The student’s Access tab displays User Account and Password details.
• Account Disabled: Check if this user is not to access InformationNOW.
• User Must Change Password At Next Login: If this option is selected, the next time the student logs in to InformationNOW, he or she will be required to change their password.
• Password Never Expires: Check this box if the user will never be required to change his or her password.
• User Name: Enter a unique user name the person will use to access the program. Click Generate to have the program generate a user name.
• Password/Retype Password: Enter the password the user will enter to access the program. Reenter the password in the field provided.
Student Addresses Tab The mailing address and/or physical address entered on the student’s Main tab will display. Additional addresses may be entered. From this tab, click Add to associate addresses with the student. It is recommended that the user click Search at left to search existing addresses in the database before entering a new address. See “Assigning an Address” on page 6. After the address has been selected from a search result or entered, the address edit screen will appear. A few additional fields are available:
Quick Reference Guide STI_0323101410 InformationNOW – Students • 16

• Subdivision: Enter the name of the subdivision in which the address is located.
• Latitude/Longitude: Enter the latitude and longitude by degree.
• Unlisted: Checking this box will ensure that this address is not listed.
• Head of Household: Check this box if the student is the head of the household of the address. Head of Household is used to determine which person to print for the Family Mailing Label report
• *Address Type: This is a required field. Select Mailing, Physical or Other.
• Description: Enter a description of the address.
Student School Tab The School tab is used to enter school, transportation and locker information.
Quick Reference Guide STI_0323101410 InformationNOW – Students • 17

• School – Academic Session: Select the academic session for which to view the school information.
Note: Changing the academic session on the School tab will only affect the data displayed on the School tab. Other tabs and links under the menus at left (i.e., Manage) will display the current academic session information as normal.
• Title 1: Check if the student is considered Title 1 for the selected academic session.
• Counselor: Click to Find the counselor for the selected academic session from the staff file. Click Clear to remove the counselor from the student.
• Homeroom: This is a view-only field. Homeroom is assigned in the student’s enrollment record on the Enrollment tab. Click the Hist link to view the student’s previous homerooms.
• Grading Scale: If the selected student follows a unique grading scale for the selected academic session, select it from the list. Grading scales are created under Grades | Setup or System Preferences | Setup.
• Parking Number: Enter the parking number assigned to the student.
• Reported FTE: Enter the reported FTE for the student for the selected academic session. For example, a full-day student should have a 1.00 entered. A half-day kindergarten student should have a 0.50. Refer to State Guidelines for possible additional instructions that are state-mandated.
• Resides Out Of School Zone: Check if the student currently lives outside the school zone.
• Exclude From Class Rank: Check if this student is to be excluded from class rank calculations.
• Exception Calendar: If this student follows a unique calendar separate from the regular student body, select the calendar from the list (ex.: out-of-district students who attend on different days).
• Transportation Code: Select the appropriate code for the student and the selected academic session. Click Hist to view the student’s previous transportation codes.
• Miles From School: Enter the number of miles for which the student is transported.
• AM/PM Bus: Click Find to select the student’s bus. Bus routes must first be created under School/District | Setup or System Preferences | Setup, indicating whether or not the route will use bus stops (ex.: 1st stop, 4th stop) or bus stop times (7:45 am, 3:20 pm). Next create buses under School/District | Setup or System Preferences | Setup and assign drivers and routes. Once routes and buses are created, they may be assigned to students.
• AM/PM Bus Stop: Enter the bus stop or bus stop time, depending on the option selected when the bus route was created.
• Locker: Click Find to locate the locker. School locations to be used for locker locations must first be created under School/District | Setup or System Preferences | Setup. Lockers are then created under School/District | Lockers.
• Locker Combination: If combinations are assigned to lockers under School/District | Lockers, this file will be populated when the locker is selected. Otherwise, enter the locker combination here. Click Clear to remove the locker from the student.
• Student Responsible For Lock: Check if using padlocks for shared lockers. Check this box to indicate the student who is responsible for replacing the lock of the shared locker.
• Index Override: If lockers are created under School/District | Lockers and multiple indexes of combinations are entered, user may select an alternate index to use for this student only.
Quick Reference Guide STI_0323101410 InformationNOW – Students • 18

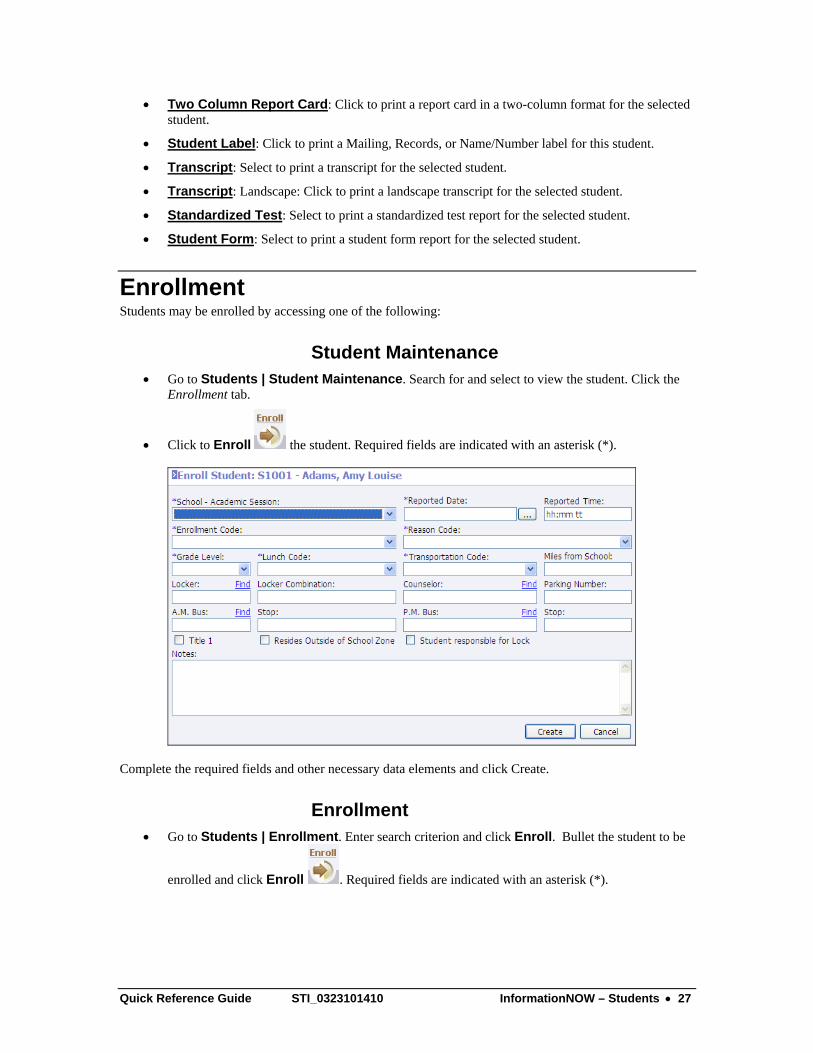
Student Enrollment Tab The Enrollment tab is used to enter school enrollment records including entries, re-entries and withdrawals.
Perform the following actions using this tab:
“No Show’s”
Note: Not to be used in all states. Refer to State Guidelines to determine if this is to be used.
Users may mark students that were enrolled, en-mass or otherwise, as a "No Show" student. No show students are students who had intended to go to a particular school, identified through registration in InformationNOW, but did not show up to attend that school. Typically schools enroll students as part of the start-of-year process and then make corrections for no shows per district or state policy.
Users may click the No Show button to update a student's enrollment information and mark them as a no show.
Warning! Clicking the No Show button will mark a student as a “No Show”. This process may not be undone. If a student is incorrectly marked as a “No Show,” a new enrollment record must be created to re-enroll the student.
Enroll a Student
Enroll the student by clicking the Enroll button. Required fields are indicated with an asterisk (*).
Quick Reference Guide STI_0323101410 InformationNOW – Students • 19

• *School - Academic Session: Select the academic session in which to enroll the student.
• *Reported Date: Select the date on which the student is to be enrolled. This is typically the first day of attendance for the student. The date must be a date in the calendar for the selected school/academic session.
• Reported Time: Enter the time at which the student is to be enrolled (usually the start of the school day).
• *Enrollment Code: Select the appropriate enrollment code for the student.
• *Reason Code: Select the appropriate enrollment reason code for the student.
• *Grade Level: Select the grade level for the student. Only grade levels available for the selected school/academic session will display in the available list.
• *Lunch Code: Select the lunch code for the student for the selected academic session (ex.: Free, Reduced).
• *Transportation Code: Select the appropriate code for the student and the selected academic session. Click Hist to view the student’s previous transportation codes.
• Miles From School: Enter the number of miles for which the student is transported.
• Locker: Click Find to locate the locker. School locations to be used for locker locations must first be created under School/District | Setup or System Preferences | Setup. Lockers are then created under School/District | Lockers.
• Locker Combination: If combinations are assigned to lockers under School/District | Lockers, this file will be populated when the locker is selected. Otherwise, enter the locker combination here.
• Counselor: Click to Find the counselor for the selected academic session from the staff file.
• Parking Number: Enter the parking number assigned to the student.
• AM/PM Bus: Click Find to select the student’s bus. Bus routes must first be created under School/District | Setup or System Preferences | Setup, indicating whether or not the route will use bus stops (ex.: 1st stop, 4th stop) or bus stop times (7:45 am, 3:20 pm). Next, create buses under School/District | Setup or System Preferences | Setup and assign drivers and routes. Once routes and buses are created, they may be assigned to students.
• AM/PM Bus Stop: Enter the bus stop or bus stop time, depending on the option selected when the bus route was created.
Quick Reference Guide STI_0323101410 InformationNOW – Students • 20

• Title 1: Check if the student is considered Title 1 for the selected academic session.
• Resides Out Of School Zone: Check if the student currently lives outside the school zone.
• Student Responsible For Lock: Check if using padlocks for shared lockers. Check this box to indicate the student who is responsible for replacing the lock of the shared locker.
• Notes: Enter desired notes concerning this enrollment record.
Withdraw a Student An enrolled student may be withdrawn from the Enrollment tab. User must bullet the most recent entry
record from which to withdraw the student and click the Withdraw button. Required fields are indicated with an asterisk (*).
• *Reported Date: Select the date on which the student is to be withdrawn. The date must be a date in the calendar for the selected school/academic session.
o The date to be used depends on the option selected concerning enrollment records under School/District | Setup. Click the Setup tab and select when the withdrawal is to become effective.
o The last day of attendance: If a student’s last day of attendance was 9/16/08, the student should be withdrawn with a date of 9/16/08, indicating this was his/her last day of attendance.
o The first day of non-attendance. Unless otherwise specified in the State Guidelines, select first day of non-attendance. If the student’s last day of attendance was 9/16/08, the student should be withdrawn with a date of 9/17/08 indicating they were withdrawn the day after their last day of attendance.
• Reported Time: Enter the time the student is to be withdrawn.
• *Enrollment Code: Select the appropriate withdrawal code for the student.
• *Reason Code: Select the appropriate withdrawal reason code for the student.
• Note: Enter any applicable notes for the withdrawal record. Click Create to withdraw the student.
Delete an Enrollment/Withdrawal Record An enrollment or withdrawal record may be deleted. Only the most recent enrollment/withdrawal record may be deleted.
Quick Reference Guide STI_0323101410 InformationNOW – Students • 21

Bullet the record to be deleted and click Delete . Click OK to confirm deletion or Cancel to exit the message screen without deleting.
View an Enrollment/Withdrawal Record
To view an existing enrollment or withdrawal record, bullet the record to be deleted and click View .
Make any necessary changes and click OK to save changes or click Cancel to exit without saving.
Search for a Student To view a student’s information, go to Students | Student Maintenance.
Quick Reference Guide STI_0323101410 InformationNOW – Students • 22

Enter the search criterion and click Search.
• The search is not case-sensitive. In other words, users may enter search criteria in upper or lower case or any combination thereof and the system will return any records matching the criteria regardless of the case of the actual data.
• Each criterion entered will be combined with any other criteria.
• Searches may be used to locate all records that meet “Starts With…” criteria. For example, if 12 is entered the Student Number field and Smith in the Student Name field, the only students displayed in the Search Results screen will be those for which the Student Number starts with 12 and the Student last name begins with Smith.
The resulting list of students will display. To modify the search criteria, click the blue Search Criteria link
to return to the search screen. Make modifications and click Search.
View a Student After performing a student search, the resulting list of matching students will display.
To view a student, either place a check next to his/her File No (Number) and click View, or click the student’s file number (which appears as a blue link).
Note: To view several students, place a check next to each student and click View. The
first student will display along with a scroll option in the lower left corner. Use the arrows to navigate from student to student. Changes made to a student record will be saved as the user navigates to the next student record.
Quick Reference Guide STI_0323101410 InformationNOW – Students • 23

Delete a Student After performing a student search, the resulting list of matching students will display. To delete a student, place a check next to the student’s File No (Number) and click Delete.
A warning message will display indicating the number of students to be deleted. The user must enter his or her unique user password and click OK to complete the deletion.
Additional Student Functions After performing a student search, the resulting list of matching students will display. Select to view one or more students to access additional functions:
Tasks
• Print Screen: Click to send a copy of the current screen to the printer.
• Student Locator: Click to locate the student based on the current time, based on his/her class schedule
• View Households: Click to view the households with which this student is associated.
• Help: Click to access online help.
Quick Reference Guide STI_0323101410 InformationNOW – Students • 24

Manage
• A+ Tracking: (MO Only) Refer to MO State Guidelines for details. Click to access the options for enrolling students into A+ and/or Career Pathway programs. Options include the ability to track A+ Program Start and End, Agreement, Citizenship and Interest dates, along with whether or not the student has applied for financial aid or selective services.
• Attendance: Click to access the student’s daily, period and check in/out records. Refer to the InformationNOW – Attendance Quick Reference Guide for more details.
• Counseling: Click to access the student’s counseling session records. Refer to the InformationNOW – Counseling Quick Reference Guide for more details.
• Schedule: Click to access the student’s schedule for the current academic session. Refer to the InformationNOW – Scheduling Quick Reference Guide for more details.
• Requests: Click to access the student’s requests for the current academic session. Refer to the InformationNOW – Scheduling Quick Reference Guide for more details.
• Grades: Click to access the student’s posted graded items for the current academic session. Refer to the InformationNOW – Grading Quick Reference Guide for more details.
• Discipline: Click to access the student’s individual discipline or commendation records. Refer to the InformationNOW – Discipline Quick Reference Guide for more details.
• Letters: Click to view the list of letters sent to the selected student. Refer to the InformationNOW – Letters Quick Reference Guide for more details.
• School Programs: Click to access the programs in which the student is currently participating (ex.: French Club, Soccer Team).
• Services: Click to access the services the student currently receives from the school (ex.: Reading Enrichment, Title 1 Language).
• Transcript: Click to access the historical grade information for the student. Refer to the InformationNOW – Transcripts Quick Reference Guide for more details.
• Medical: Click to access the student’s immunizations, health conditions, screening and fitness data. Refer to the InformationNOW – Medical Quick Reference Guide for more details.
• Standardized Tests: Click to access the student’s standardized test data.
Quick Reference Guide STI_0323101410 InformationNOW – Students • 25

• Fees: Click to view student’s fee history, add fees, apply payments and/or make adjustments or refunds. Refer to the InformationNOW – Fees Quick Reference Guide for more details.
• Goals Sought: Click to access the student’s progress toward academic goals (ex.: Core 40). Refer to the InformationNOW – Transcripts Quick Reference Guide for more details.
• Forms: Click to assign forms to the student such as internet access approval, field trip or registration form. Track the date the student returned the form and who received the form.
• Organizations: Organizations such as Tutors, Volunteers or Class Officers may be created under System Preferences | Setup | Organizations. Once organizations have been created, click the Organization link to assign them to the student. Organizations may be assigned to students, contacts, staff or people in the census.
• Impact Aid: Click to insert records regarding student Impact Aid including aid where a student lives on federal property (such as a military base) or Indian reservation where the normal tax base is lessened because property taxes are not collected for those students. This program provides assistance to local school districts with concentrations of children residing on Indian lands, military bases, low-rent housing properties, or other Federal properties and, to a lesser extent, concentrations of children who have parents in the uniformed services or who are employed on eligible Federal properties who do not live on Federal property.
Reports
• Student Schedule: Click to print a schedule for the selected student.
• Profile: A one-per student report including basic demographic data with options to include the following: Student Contact, Parent/Guardian Contact, Locker, Transportation, Medical, School Programs, Special Education, Services, Special Instructions, Enrollment, Graduation Goals and a Parent/Guardian Signature Line. Ideal for printing before registration so that guardians may confirm data when enrolling their children.
• Request Verification: Click to print a report of the requests for the current academic session for the selected student.
• Standards Report Card: Click to print a standard-based report card for the selected student.
• Comprehensive Progress: Click to print a progress report for the selected student.
• Missing Assignments: Click to print a report of assignments that are marked with a blank score from the teacher’s grade book.
• Attendance Profile: Click to print a report of all student attendance records for the specified terms and reasons.
Quick Reference Guide STI_0323101410 InformationNOW – Students • 26
• Two Column Report Card: Click to print a report card in a two-column format for the selected student.
• Student Label: Click to print a Mailing, Records, or Name/Number label for this student.
• Transcript: Select to print a transcript for the selected student.
• Transcript: Landscape: Click to print a landscape transcript for the selected student.
• Standardized Test: Select to print a standardized test report for the selected student.
• Student Form: Select to print a student form report for the selected student.
Enrollment Students may be enrolled by accessing one of the following:
Student Maintenance • Go to Students | Student Maintenance. Search for and select to view the student. Click the
Enrollment tab.
• Click to Enroll the student. Required fields are indicated with an asterisk (*).
Complete the required fields and other necessary data elements and click Create.
Enrollment • Go to Students | Enrollment. Enter search criterion and click Enroll. Bullet the student to be
enrolled and click Enroll . Required fields are indicated with an asterisk (*).
Quick Reference Guide STI_0323101410 InformationNOW – Students • 27

Complete the required fields and other necessary data elements and click Enroll. See “Add a Student” on page 4 and “Enroll a Student” on page 19 for a description of all fields.
Mass Enrollment • Go to Students | Mass Enrollment. Enter search criterion and click Enroll. Place a check
next to the student(s) to be enrolled and click Enroll . Required fields are indicated with an asterisk (*).
Note: When using the Mass Enrollment option, all selected students must be enrolling in the same school on the same date and time and for the same code, reason, lunch status and transportation code.
Quick Reference Guide STI_0323101410 InformationNOW – Students • 28

Required fields are indicated with an asterisk (*). Complete the fields as needed and click OK. All selected students will be enrolled with the selected values.
• *Reported Date: Enter the date the student first attended at the school.
• Reported Time: Enter the time the student first attended at the school.
• *Enrollment Code: Select the appropriate enrollment code.
• *Enrollment Reason: Select the appropriate reason the student enrolled.
• Notes: Enter any applicable notes that pertain to the student’s enrollment.
• Copy From Previous Academic Session: Select the data elements that should be copied from the student if they were enrolled in a previous academic session.
• *Default Enrollment Values: Select the lunch and transportation codes to be assigned to students during the enrollment process. These options will not be assigned to previously enrolled students if selecting options under the Copy From Previous Academic Session section.
• Exclude From Class Rank: Select if the students are to be marked to be excluded from class ranking during the enrollment process. Once students are enrolled, this value may be changed on the student’ School tab.
Registration This menu allows users to register a student(s) or to remove a registration status from a student(s). When searching using the Registration menu, select to include only those students who are not currently registered, those students who are currently registered or both. Users must be logged into the academic session to which to register the student.
Note: If the student is not currently in the census (people) database, click Add to add the new student and then register them into the current academic session.
When searching, the following rules apply to the options concerning Registered, Not Registered or Both.
• Registered: All students currently registered in the current academic session are included in the search results.
• Not Registered
Quick Reference Guide STI_0323101410 InformationNOW – Students • 29

o Staff members are excluded.
o All students in the current academic session will be excluded.
o All students in other academic sessions will be included.
• Both o Staff members are excluded.
o Only registered students in the current academic session are included.
o All students in other academic sessions will be included.
Register Search for the student. Once a student(s) is selected, the following screen will appear.
Complete the required fields, including Date of Birth, Gender, Ethnicity, Grade Level, Lunch Code and Transportation Method. Click OK to register the student.
Unregister To remove a student from the registered status, search for the student under the Registration menu. Be sure to select to include Registered in the search. Place a check next to the student and click Unregister.
Note: Only the registration transaction along with any schedule and requests for the student will be deleted.
Quick Reference Guide STI_0323101410 InformationNOW – Students • 30

The search will return a list of all “people” in the system, with the following caveats: When a student is unregistered, the following occurs:
• Student Schedule records are deleted.
• Student Schedule Request records are deleted.
• Student Academic Session records are deleted.
Filters For detailed instructions concerning student filters, please refer to the InformationNOW – Filters Quick Reference Guide.
Medical For detailed instructions concerning the tracking of student immunizations, health conditions, screenings and fitness data, please refer to the InformationNOW – Medical Quick Reference Guide.
District-Wide Students Users with the appropriate permissions may access all students within the district. Go to Students | District-Wide Students. Search, Add, View and Delete options work similar to the options found under Students | Student Maintenance.
Reports • A+ Eligibility: (Missouri Only) Generate a report of student eligibility and program participation
data which was entered on the student’s A+ Tracking menu under Students | Student Maintenance.
• Birthday Listing: Generate a birthday list of students either by year or by calendar month.
• Counseling Session: Generate a report of the details of student counseling sessions.
• Goal Checking: Generate a report of the requirements that have been met and also the requirements that are still outstanding for students as they approach graduation.
• Eligibility: Generate a list of eligible or ineligible students based on grade, credit, discipline and/or attendance criteria.
• Enrollment History: Generate a report of student enrollment history.
• Profile: A one-per student report including basic demographic data with options to include the following: Student Contact, Parent/Guardian Contact, Locker, Transportation, Medical, School Programs, Special Education, Services, Special Instructions, Enrollment, Graduation Goals and a Parent/Guardian Signature Line. Ideal for printing before registration so that guardians may confirm data when enrolling their child.
• Returning Students: Produce a summary of returning students by grade level. A student is “returning” if he/she was enrolled on the Date to Check of the previous academic session and, in the current academic session, falls under one of the following conditions: Currently enrolled, Registered (optional selection for user) or Withdrawn (optional selection for user).
• Standardized Test: Print a report of student standardized test results. Includes the ability to print students who have or have not met the requirements.
Quick Reference Guide STI_0323101410 InformationNOW – Students • 31
• Student Envelopes: Print envelopes for a selected filter of students or for all students.
• Student Forms: Print a report of student forms. Includes the option to print students With all selected forms, Without all selected forms or those who are Missing any of the selected forms.
• Student Labels: Print mailing labels for a selected filter of students or for all students. Utilizes the 3 across/10 down label format.
• Student Letters: Print letters for a selected filter of students or for all students. For details regarding creating and generating letters, please refer to the InformationNOW – Letters Quick Reference Guide.
• Student Listing: Generate a basic listing of students with options to include ethnicity, photograph, lunch code, and unlisted information (i.e., address, phone numbers which have been marked as unlisted).
• Immunization Compliance: Print a report of students who are non-compliant for selected immunizations. Options include the ability to print shot dates or a summary.
• Two Column Report Card: Click to print a report card in a two-column format.
Quick Reference Guide STI_0323101410 InformationNOW – Students • 32