Embed Size (px)
Citation preview
Inkscape
Dibuja Libremente
Autor del Manual: Roberto Gastón LescanoCorreo Electrónico: [email protected]
Versión del Software Utilizado: Inkscape 0.48.3.1 r9886
Copyright (C) 2012 Lescano Roberto Gastón. Permission is granted to copy, distribute and/or modify this document under the terms of the GNU Free Documentation License, Version 1.3
or any later version published by the Free Software Foundation; with no Invariant Sections, no Front-Cover Texts, and no Back-Cover Texts.
A copy of the license is included in the section entitled "GNU Free Documentation License".
Página 2 de 33

Índice de Contenido
Autor del Manual 5Versión del Software y Licencia 5Algunas palabras sobre Inkscape 5 Capítulo 1. Introducción a Inskape 6 1.1. Introducción a Inskape 6 Capítulo 2. Instalando Inskape 6 2.1. En GNU/Linux, desde Consola o Terminal 6 2.1.1. Utilizando los repositorios oficiales de Ubuntu 6 2.1.2. Para instalar la última versión. 6 2.2. En GNU/Linux, utilizando interfaz gráfica, a través del Gestor de Paquetes Synaptics. 7 2.3. Utilizando interfaz gráfica, a través del Centro de Software. 7 2.4. Para instalar Inkscape en Windows 8 2.5. Para instalar Inkscape en MAC OS. 11 Capítulo 3. Pantalla Inicial o Interfaz de Trabajo 11 3.1. Barra de Menú: 11 3.1.1. Menú Archivo: 11 3.1.2. Menú Edición 12 3.1.3. Menú Ver 12 3.1.4. Menú Capa 13 3.1.5. Menú Objeto 13 3.1.6. Menú Trayecto 14 3.1.7. Menú Texto 14 3.1.8. Menú Filtros 15 3.1.9. Menú Extensiones 15 3.1.10. Menú Ayuda. 16 3.2. Barra de Controles o Ajustes de Herramientas 16 3.3. Hoja de Trabajo 16 3.4. Reglas 16 3.5. Barras de Desplazamiento del área de Trabajo 16 3.6. Barra de Herramientas y Edición: 16 3.7. Barra de Comandos 17 3.8. Barra Controles de Ajustes 17 3.9. Paleta de Colores 17 3.10. Barra de Estado/Información. 17 Capítulo 4. Descripción de las diferentes Herramientas, 17 4.1. Descripción de las diferentes Herramienta. 17 4.1.1. Herramienta Selección. 17 4.1.2. Herramienta Nodos 18 4.1.3. Herramienta Retoque 18 4.1.4. Herramienta Zoom o Lupa 18 4.1.5. Herramienta Rectángulo 19 4.1.6. Herramienta Caja en 3D 19 4.1.7. Herramienta Círculo 19
Página 3 de 33
4.1.8. Herramienta Estrella y Polígono 20 4.1.9. Herramienta Espiral 20 4.1.10. Herramienta Trazo a Mano Alzada 20 4.1.11. Herramienta Curvas Bézier y Rectas 20 4.1.12. Herramienta Trazos Caligráficos o Pinceladas 21 4.1.13. Herramienta Texto 21 4.1.14. Herramienta Spray de Objetos 21 4.1.15. Herramienta Borrador o Goma 22 4.1.16. Herramienta Relleno 22 4.1.17. Herramienta Relleno en Degradé 22 4.1.18. Herramienta Cuenta Gotas 22 4.1.19. Herramienta Conector 22 Capítulo 5. Algunos ejemplos realizados con éste programa 23Conclusión 24Bibliografia 25GNU Free Documentation License 26
Página 4 de 33
Autor del Manual: Roberto Gastón LescanoCorreo Electrónico de Contacto: [email protected]
Versión del Software Utilizado: Inkscape 0.48.3.1 r9886
Licencia del Software Utilizado:
GNU GENERAL PUBLIC LICENSE Version 2, June 1991
Copyright (C) 1989, 1991 Free Software Foundation, Inc. 59 Temple Place, Suite 330, Boston, MA 02111-1307 USA Everyone is permitted to copy and distribute verbatim copies of this license
document, but changing it is not allowed.
Link de descarga: http://inkscape.org/
Unas Palabras sobre Inkscape:Inkscape es un software para realizar gráficos, que aprovecha las ventajas de los
gráficos vectoriales (SVG – Scalable Vectorial Graphic) para su entandar de trabajo; es un software libre y multi plataforma.
Este programa surgió de una bifurcación del proyecto Sodipodi (otro graficador que utiliza SVG).
El estándar SVG nos permite realizar gráficos muy complejos, partiendo de figuras regulares como son los círculos y cuadrados, pasando por textos y trazos libres, hasta llegar a rellenos degradados, modificación de nodos, transformaciones de todo tipo de elementos, exportación a PNG entre otras características.
La ventaja de utilizar archivos vectoriales radica en lo siguiente:La diferencia entre una imagen de mapa de bits y una imagen vectorial es que, la
imagen de mapa de bits está formada por pequeños cuadros (píxeles) que a una determinada escala parecen una línea única, pero al acercarnos podemos ver cada cuadro como un píxel individual; en cambio los gráficos vectoriales son recreados cada vez que abrimos el archivo, ya que se almacenan los parámetros, las coordenadas, las características individuales de los diferentes elementos y sus propias cualidades (relleno, trazo, etc.), de ésta forma, al acercarnos, las líneas serán nuevamente graficadas utilizando los parámetros, y en éste punto es donde los periféricos de salida (monitor, impresora, plotter, etc.) tomaran las decisiones necesarias para representar dichos trazos, a de ésta manera se nos mostrarán como una línea completa y no como un conjunto de píxeles, aumentando la exactitud de las imágenes.
El objetivo de Inkscape es que exista la disponibilidad para los usuarios de herramientas libres de un software que utilice la precisión del estándar SVG para sus imágenes y que cumpla con los requisitos de XML (soporte para compartir datos), SVG (Imágenes Vectoriales Escalables) y CSS2 (independizar la estructura de un documento de su presentación).
Página 5 de 33

Capítulo 1.Introducción a Inkscape 1.1. Introducción a Inkscape.Inkscape es un poderoso programa para realizar gráficos del tipo vectoriales escalables (SVG), similar a
Corel Draw, Xara X o Adobe Illustrator.La ventaja de utilizar SVG es que el programa almacena los datos vectoriales de cada gráfico, con lo
cual un sub proceso convierte esos datos en las líneas y curvas, recreándolas cada vez que se abre el archivo, y dibujadas de acuerdo a la escala elegida, con lo cual se obtienen líneas y no píxeles cuando se realizan grandes aumentos sobre una imagen; y de ésta manera se obtienen los mismos detalles siempre, y la misma precisión.
Se puede apreciar la diferencia en la imagen siguiente.
En éste poderoso software, se pueden realizar líneas, curvas, unirlas y realizar objetos o utilizar herramientas para dibujar rectángulos, círculos, textos, etc. y aplicarles numerosas modificaciones, desde colores hasta cambiar sus formas libremente.
Utiliza librerías gráficas GTK, y está integrado en los escritorios de Gnome y Xfce.GTK es la sigla de GIMP ToolKit, que a su vez significa GNU Image Manipulation Program, éstas
librerías son herramientas gráficas, que en un principio fueron creadas para entornos Windows, pero en la actualidad son multiplataforma.
Actualmente Inkscape puede ser instalado en Windows, Macintosh, y GNU/Linux y Sistemas Operativos derivados de Unix.
Capítulo 2. Instalando Inkscape: Inkscape puede ser instalado de diferentes formas, dependiendo del Sistema Operativo
2.1. En GNU/Linux, desde Consola o Terminal:Debido a que es nativo de Ubuntu, ya viene pre-instalado, pero si no lo posee lo puede instalar utilizando los siguientes repositorios:2.1.1. Utilizando los repositorios oficiales de Ubuntu, aquí algunos de ellos:• deb http://archive.canonical.com/ubuntu hardy partner• deb-src http://archive.canonical.com/ubuntu hardy partner• deb http://security.ubuntu.com/ubuntu hardy main restricted universe multiverse• deb-src http://security.ubuntu.com/ubuntu hardy main restricted universe multiverse• deb http://security.ubuntu.com/ubuntu hardy-security main restricted universe multiverse• deb-src http://security.ubuntu.com/ubuntu hardy-security main restricted universe multiverse• deb http://security.ubuntu.com/ubuntu hardy-updates main restricted universe multiverse• deb-src http://security.ubuntu.com/ubuntu hardy-updates main restricted universe multiverse• deb http://security.ubuntu.com/ubuntu hardy-backports main restricted universe multiverse• deb-src http://security.ubuntu.com/ubuntu hardy-backports main restricted universe multiverse• deb http://security.ubuntu.com/ubuntu hardy-proposed main restricted universe multiverse• deb-src http://security.ubuntu.com/ubuntu hardy-proposed main restricted universe multiverse2.1.2. Para instalar la última versión: se utiliza el siguiente repositorio y los comandos que a
continuación se mencionan; cabe aclarar que se debe ser Superusuario/Root (o anteponiendo SUDO).
Para agregar el repositorio de la versión más actualizada:$ sudo add-apt-repository ppa:ricotz/ppa
Página 6 de 33

Y para finalmente instalarlo: con los siguientes comandos:$ sudo aptitude update$ sudo aptitude install -y Inkscape
2.2. En GNU/Linux, utilizando interfaz gráfica, a través del Gestor de Paquetes Synaptics:Haciendo clic en Menú, luego en Administración y luego en Gestor de Paquetes Synaptics;
antes de abrir la ventana correspondiente, pedirá la clave de root.Una vez en la ventana, debemos colocar en Campo de Búsqueda/Filtro Rápido la palabra INKSCAPE y presionar en BUSCAR para realizar la búsqueda.
En la lista nos aparecerán varios paquetes, pero debemos asegurarnos de marcar para instalar (Botón Derecho en la Casilla del Paquete y seleccionar Para Instalar) los que a continuación se detallan:
• Inkscape (Programa específico)• ink-generator (Es una extensión para reemplazar texto y datos automáticamente generando
archivos del tipo PDF, PS, JPG, etc. basándose en plantillas SVG y datos de archivos CSV)• fonts-opendin (Son tipos de letras realizadas con herramientas de código abierto).• create-resources (Aquí encontramos un paquete con pinceles, muestras de dibujos, colores en
degradé, etc. que estarán disponibles tanto para Inkscape como para cualquier otro programa que utilice dichas herramientas/datos; evitando tener que instalar cada una por separado).
• Python-scour (Este es un módulo que realiza una limpieza de archivo generados con Graficadores por Vectores (como por ejemplo Inkscape o Adobe Illustrator) antes de guardarlo, quitando cualquier información innecesaria y asegurando que el resultado final Gráfico sea idéntico al original; no se recomienda el uso en archivos que no han sido creados con Graficadores por Vectores, debido a que puede se pueden obtener resultados NO satisfactorios).Se puede apreciar con más detalles en la porción de captura de pantalla siguiente:
Luego damos clic en aplicar cambios.
2.3. Utilizando interfaz gráfica, a través del Centro de Software:Haciendo clic en Menú, luego en Administración y luego en Gestor de Softwares/Programas,
luego colocamos la palabra INKSCAPE en el campo de búsqueda, y nos aparecerá el programa en una línea junto con una breve descripción del mismo y la valoración dada por los usuarios. A continuación hacemos doble clic sobre el programa, y nos mostrará más información del mismo (Descripción general del programa y sus características, Detalles del programa y Valoraciones en diferentes áreas junto con una imagen de su pantalla principal por defecto).
Hacemos clic sobre el botón instalar y esperamos a que finalice la instalación.
Página 7 de 33

Aquí se observa el programa ya instalado:
2.4. Para instalar Inkscape en Windows:Vamos a la página oficial (www.inkscape.org), en la lista de la izquierda seleccionamos
Descarga; nos mostrará los lanzamientos oficiales de Inkscape, tipos de archivos dependiendo del Sistema Operativo en el que se instalará, y entre otros datos una pequeña sección destinada a Windows, donde debemos prestar especial atención que, hasta el momento, sólo se posee una versión aplicable a versiones de 32 bits y en archivo ejecutable (del tipo .EXE).
Seleccionar (en las primeras líneas) el link que dice Windows Instaler/Ejecutable o similar.
Una vez descargado, vamos a la carpeta donde se encuentra y lo ejecutamos; nos irá preguntando:
Página 8 de 33
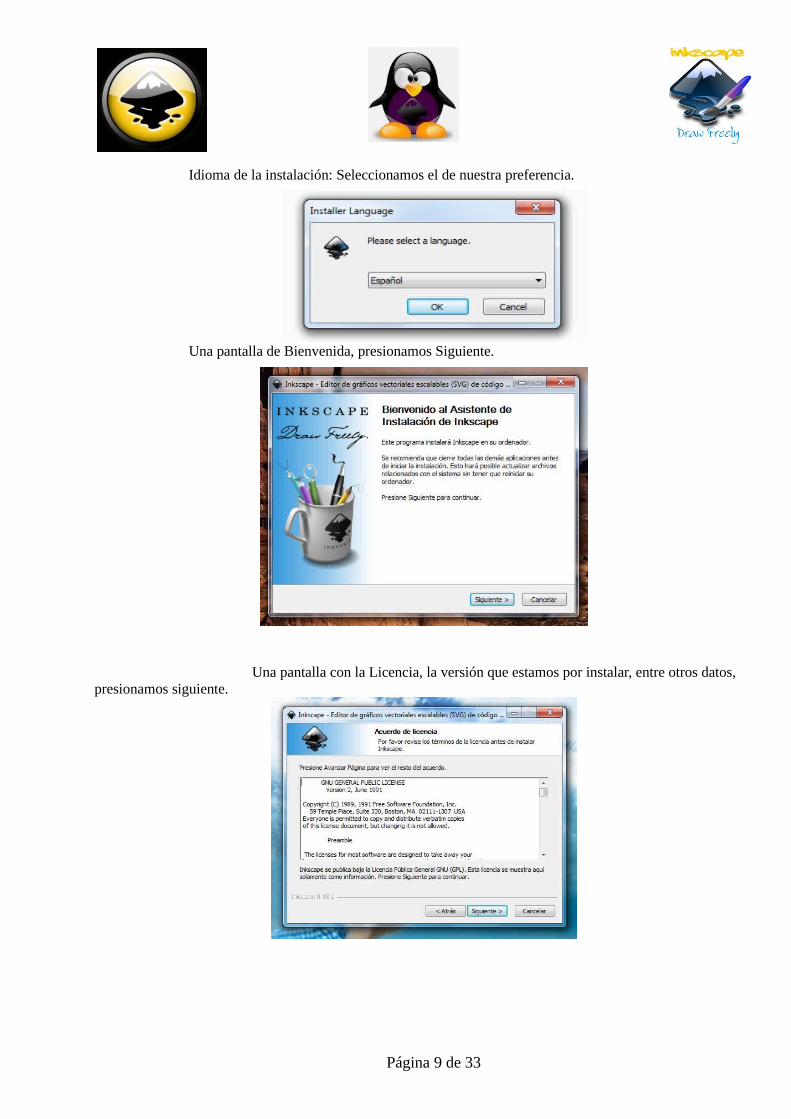
Idioma de la instalación: Seleccionamos el de nuestra preferencia.
Una pantalla de Bienvenida, presionamos Siguiente.
Una pantalla con la Licencia, la versión que estamos por instalar, entre otros datos, presionamos siguiente.
Página 9 de 33
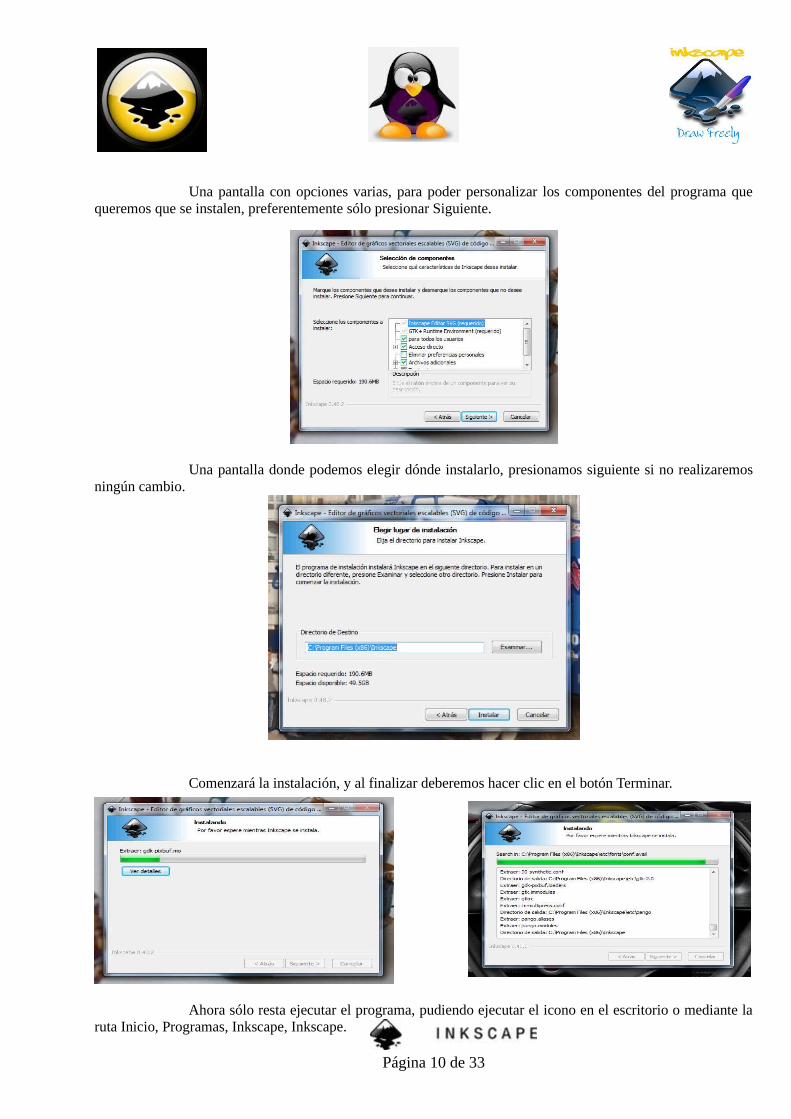
Una pantalla con opciones varias, para poder personalizar los componentes del programa que queremos que se instalen, preferentemente sólo presionar Siguiente.
Una pantalla donde podemos elegir dónde instalarlo, presionamos siguiente si no realizaremos ningún cambio.
Comenzará la instalación, y al finalizar deberemos hacer clic en el botón Terminar.
Ahora sólo resta ejecutar el programa, pudiendo ejecutar el icono en el escritorio o mediante la ruta Inicio, Programas, Inkscape, Inkscape.
Página 10 de 33

2.5. Para instalar Inkscape en MAC OS:La instalación de Inkscape en MAC no la he realizado, por tal motivo no colocaré ningún comentario al
respecto.
Capítulo 3. Pantalla Inicial o Interfaz de Trabajo : En ésta pantalla podremos
encontrar menús y herramientas varias, debajo del menú se encuentra la Barra de Controles o Ajustes de Herramientas, la cual se adapta al objeto y herramienta seleccionada, también encontraremos una Paleta de colores con una gran cantidad de Agrupación de Tonos, y a nuestra derecha dos barras con los comandos más comunes y ajustes más utilizados, a continuación una breve descripción de cada una de ellas y otras:
3.1. Barra de Menú: Aquí podemos encontrar muchos menús conocidos, a continuación una breve descripción de ellos:
3.1.1. Menú Archivo: En él podemos Abrir, Guardar, Importar, Exportar, Imprimir y ver las propiedades del archivo actual, entre otras opciones.
Página 11 de 33
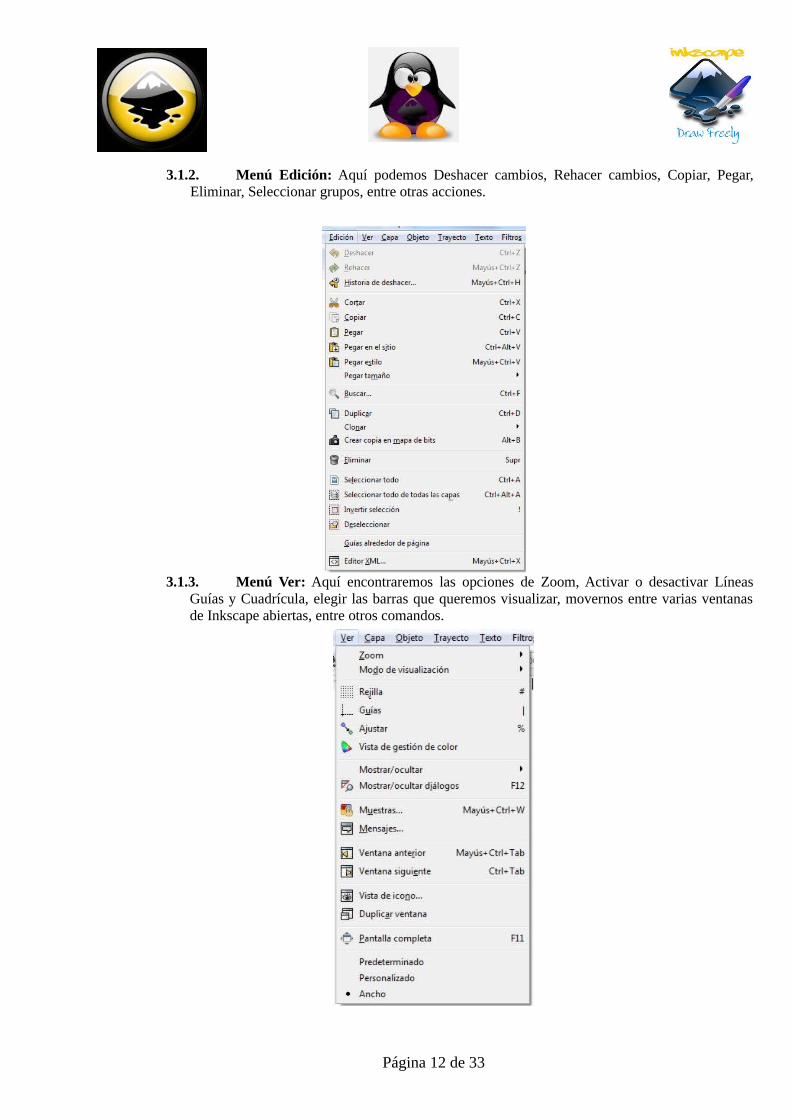
3.1.2. Menú Edición: Aquí podemos Deshacer cambios, Rehacer cambios, Copiar, Pegar, Eliminar, Seleccionar grupos, entre otras acciones.
3.1.3. Menú Ver: Aquí encontraremos las opciones de Zoom, Activar o desactivar Líneas Guías y Cuadrícula, elegir las barras que queremos visualizar, movernos entre varias ventanas de Inkscape abiertas, entre otros comandos.
Página 12 de 33
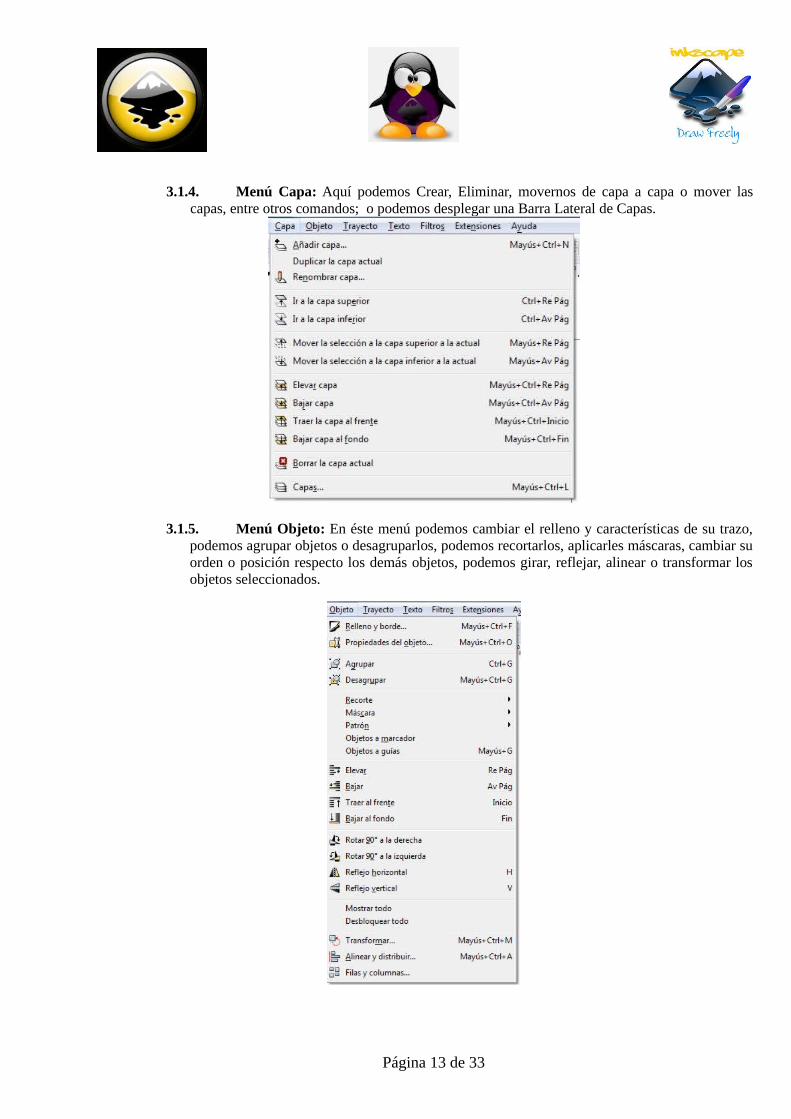
3.1.4. Menú Capa: Aquí podemos Crear, Eliminar, movernos de capa a capa o mover las capas, entre otros comandos; o podemos desplegar una Barra Lateral de Capas.
3.1.5. Menú Objeto: En éste menú podemos cambiar el relleno y características de su trazo, podemos agrupar objetos o desagruparlos, podemos recortarlos, aplicarles máscaras, cambiar su orden o posición respecto los demás objetos, podemos girar, reflejar, alinear o transformar los objetos seleccionados.
Página 13 de 33

3.1.6. Menú Trayecto: En ésta parte podemos transformar una figura regular a trayectos editables, y luego realiza numerosas operaciones entre dos o más gráficos, tales como unión, sustracción, intersección, y otras, también podemos combinar y des combinar elementos, modificar sus nodos, entre otras opciones.
3.1.7. Menú Texto: En esta sección podemos personalizar nuestros textos, adaptarlos a trayectos, entre otras opciones.
Página 14 de 33

3.1.8. Menú Filtros: Aquí podemos encontrar una gran variedad de efectos aplicables a los objetos seleccionados, también podemos editar dichos filtros o efectos, o eliminarlos.
3.1.9. Menú Extensiones: Aquí se encuentran programas extras, que no forman parte del propio programa, pero pueden ser agregados para aumentar la funcionalidad y sus herramientas.
Página 15 de 33
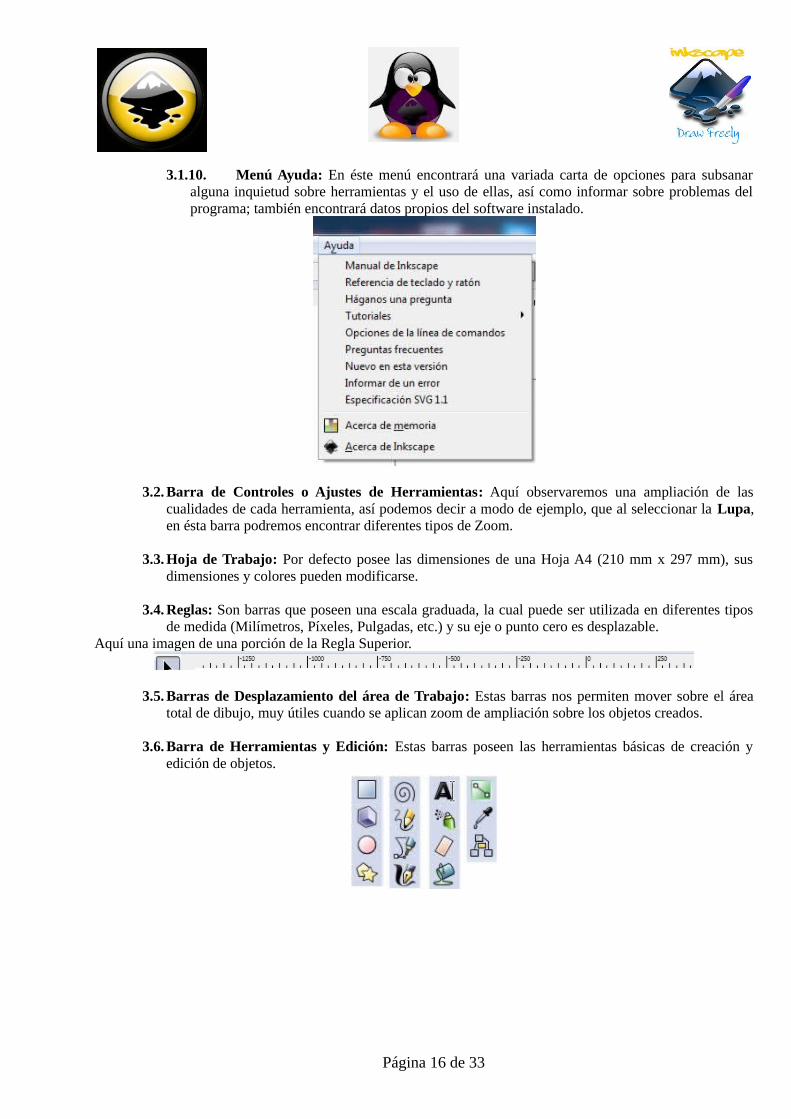
3.1.10. Menú Ayuda: En éste menú encontrará una variada carta de opciones para subsanar alguna inquietud sobre herramientas y el uso de ellas, así como informar sobre problemas del programa; también encontrará datos propios del software instalado.
3.2. Barra de Controles o Ajustes de Herramientas: Aquí observaremos una ampliación de las cualidades de cada herramienta, así podemos decir a modo de ejemplo, que al seleccionar la Lupa, en ésta barra podremos encontrar diferentes tipos de Zoom.
3.3. Hoja de Trabajo: Por defecto posee las dimensiones de una Hoja A4 (210 mm x 297 mm), sus dimensiones y colores pueden modificarse.
3.4. Reglas: Son barras que poseen una escala graduada, la cual puede ser utilizada en diferentes tipos de medida (Milímetros, Píxeles, Pulgadas, etc.) y su eje o punto cero es desplazable.
Aquí una imagen de una porción de la Regla Superior.
3.5. Barras de Desplazamiento del área de Trabajo: Estas barras nos permiten mover sobre el área total de dibujo, muy útiles cuando se aplican zoom de ampliación sobre los objetos creados.
3.6. Barra de Herramientas y Edición: Estas barras poseen las herramientas básicas de creación y edición de objetos.
Página 16 de 33

3.7. Barra de Comandos: Aquí se encuentran los comandos más utilizados, es un resumen de los menús Archivo, Edición y Ver.
3.8. Barra Controles de Ajustes: Aquí se pueden activar o desactivar ayudas o Snaps, como por ejemplo utilizar líneas guías, cuadrículas, etc.
3.9. Paleta de Colores: Esta paleta de colores posee una amplia gama de colores, y posee un gran número de agrupación de los mismos. A continuación unos ejemplos:
Paleta Green:
Paleta InkScape:
Paleta SVG:
Paleta WebHex:
3.10. Barra de Estado/Información: En ésta parte podemos obtener datos del objeto seleccionado, datos como su relleno, su color de trazo, capa en la que se encuentra (pudiendo ver u ocultar dicha capa, o bloquearla ante cambios) y una breve descripción y ayuda del objeto. Luego las coordenadas de puntero y el porcentaje de Aumento actual.
Capítulo 4.Descripción de las diferentes Herramientas: 4.1. Descripción de las diferentes Herramientas: Aquí se describirá brevemente cada una de las
Herramientas que se encuentran a la Izquierda en el área de Trabajo; en la Barra de Herramientas.4.1.1. Herramienta Selección: Esta herramienta es utilizada para seleccionar el elemento
(objeto, texto, imagen o conjunto de ellos) y tratarla como una unidad, pudiendo modificar su tamaño, girarlo, moverlo tanto en su plano, como también colocarlo en un plano diferente, es decir debajo o sobre otro objeto.
Herramienta:
Página 17 de 33

Información mostrada en la Barra de Controles o Ajustes de Herramientas:
Información mostrada en la Barra de Estado: Varía con el objeto seleccionado.
4.1.2. Herramienta Nodos: Son pequeños cuadraditos que indican la unión entre dos segmentos, los cuales pueden ser rectas o curvas; moviendo éstos nodos podemos modificar la figura, también podemos agregarlo, quitarlos, unirlos o separar ambos segmentos creando dos nodos.
Herramienta:
Información mostrada en la Barra de Controles o Ajustes de Herramientas:
Información mostrada en la Barra de Estado:
4.1.3. Herramienta Retoque: Esta herramienta realiza una modificación del objeto seleccionado equivalente al deformado que obtendríamos al utilizar una goma, la cual no borra sino que difumina o estira los bordes, el experimentar con ella dará un mejor entendimiento de su destreza.
Herramienta:
Información mostrada en la Barra de Controles o Ajustes de Herramientas:
Información mostrada en la Barra de Estado:
4.1.4. Herramienta Zoom o Lupa: Con ésta herramienta podemos acercarnos o alejarnos a los objetos dentro del área de trabajo, también posee comandos para acercarnos a un área seleccionada mediante un rectángulo, o ver nuestros gráficos a escala 1:1 (tamaño real), ver la hoja de trabajo, entre otros.
Herramienta:
Información mostrada en la Barra de Controles o Ajustes de Herramientas:
Información mostrada en la Barra de Estado:
Página 18 de 33
4.1.5. Herramienta Rectángulo: Esta herramienta nos permite crear rectángulos, pero si mantenemos presionada la tecla CTRL crearemos un cuadrado o un rectángulo de medidas enteras; y si mantenemos presionada la tecla SHIFT crearemos nuestro rectángulo/cuadrado alrededor del punto central.Además, si movemos los nodos cuadrados podremos cambiar sus medidas, pero si movemos el nodo circular podremos redondear sus extremos sin cambiar de herramienta.
Herramienta:
Información mostrada en la Barra de Controles o Ajustes de Herramientas:
Información mostrada en la Barra de Estado:
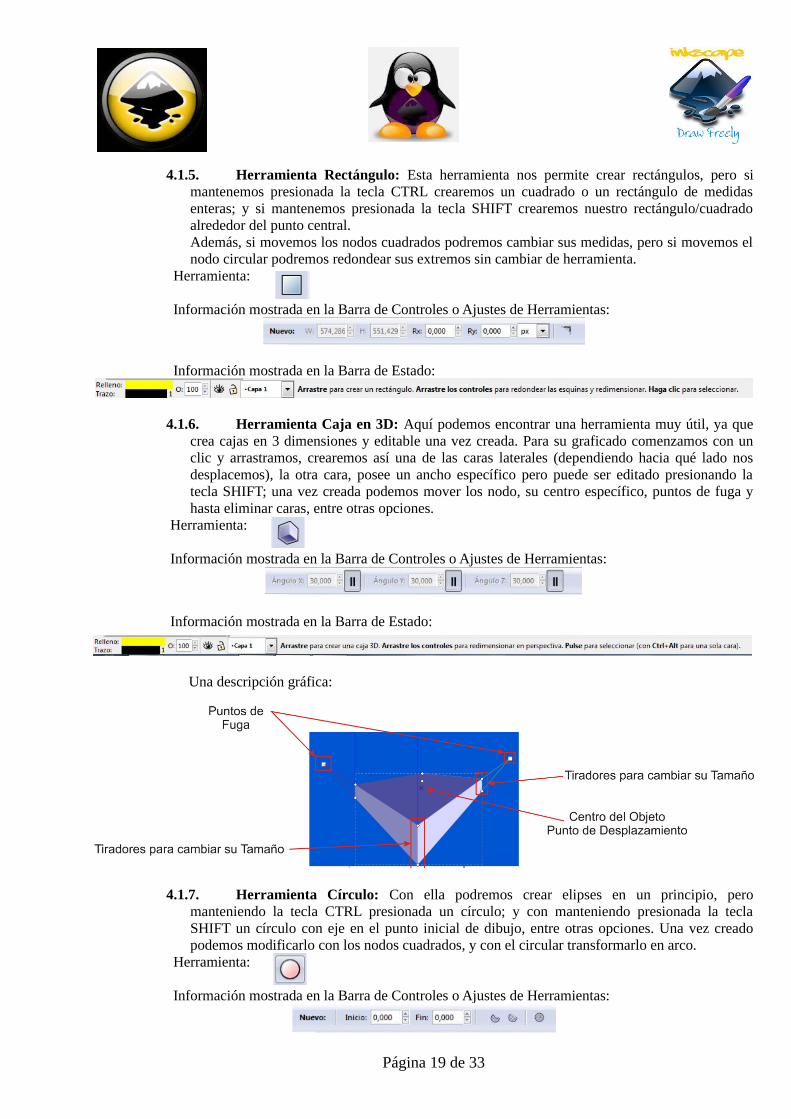
4.1.6. Herramienta Caja en 3D: Aquí podemos encontrar una herramienta muy útil, ya que crea cajas en 3 dimensiones y editable una vez creada. Para su graficado comenzamos con un clic y arrastramos, crearemos así una de las caras laterales (dependiendo hacia qué lado nos desplacemos), la otra cara, posee un ancho específico pero puede ser editado presionando la tecla SHIFT; una vez creada podemos mover los nodo, su centro específico, puntos de fuga y hasta eliminar caras, entre otras opciones.
Herramienta:
Información mostrada en la Barra de Controles o Ajustes de Herramientas:
Información mostrada en la Barra de Estado:
Una descripción gráfica:
4.1.7. Herramienta Círculo: Con ella podremos crear elipses en un principio, pero manteniendo la tecla CTRL presionada un círculo; y con manteniendo presionada la tecla SHIFT un círculo con eje en el punto inicial de dibujo, entre otras opciones. Una vez creado podemos modificarlo con los nodos cuadrados, y con el circular transformarlo en arco.
Herramienta:
Información mostrada en la Barra de Controles o Ajustes de Herramientas:
Página 19 de 33
Información mostrada en la Barra de Estado:
4.1.8. Herramienta Estrella y Polígono: Con ésta herramienta podemos dibujar polígonos regulares o estrellas, pudiendo especificar la cantidad de lados o puntas, y luego de generados podemos redondear sus puntas y mediante el nodo lateral cambiar su diámetro, y si movemos el nodo interior modificaremos la profundidad de las esquinas.
Herramienta:
Información mostrada en la Barra de Controles o Ajustes de Herramientas:
Información mostrada en la Barra de Estado:
4.1.9. Herramienta Espiral: Mediante ella podremos realizar espirales, partiendo desde el interior hasta su diámetro fina, y luego pudiendo modificar algunos parámetros como sus vueltas, su diámetro interior entre otros.
Herramienta:
Información mostrada en la Barra de Controles o Ajustes de Herramientas:
Información mostrada en la Barra de Estado:
4.1.10. Herramienta Trazo a Mano Alzada: Con ésta herramienta podremos realizar trazos libres, pero podemos mejorarlos con un alisado, o agregarle la forma determinada al trazo, entre otros.
Herramienta:
Información mostrada en la Barra de Controles o Ajustes de Herramientas:
Información mostrada en la Barra de Estado:
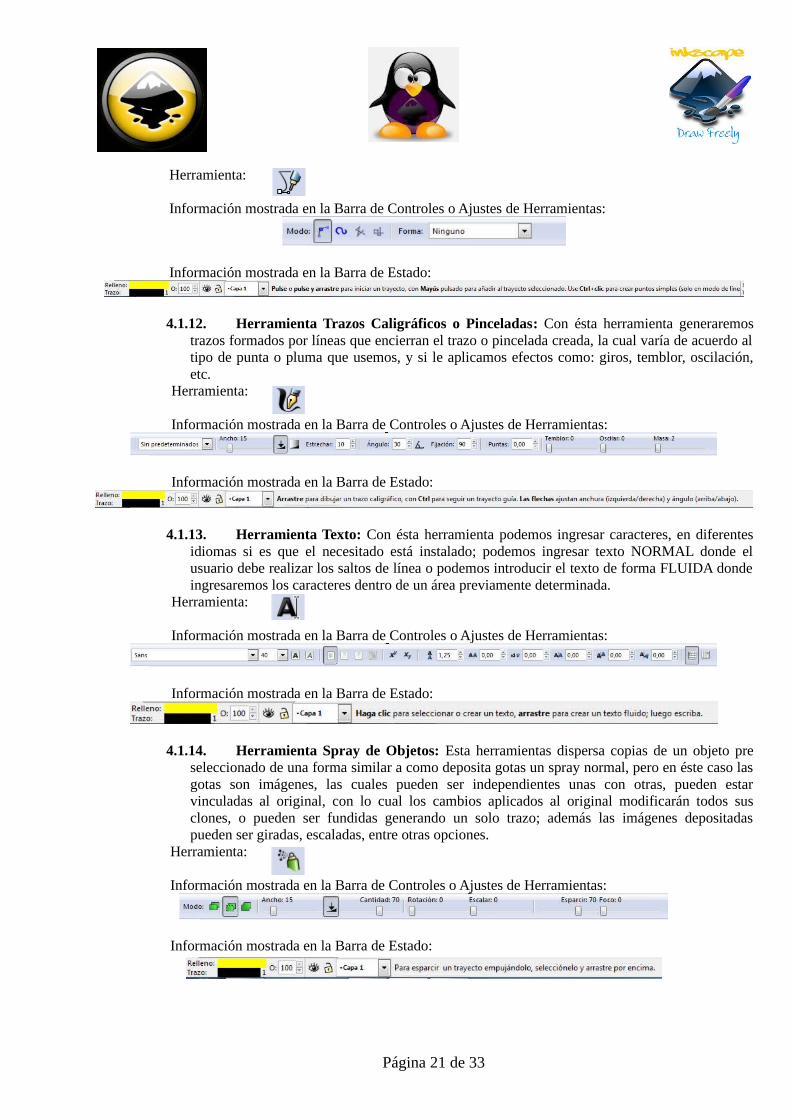
4.1.11. Herramienta Curvas Bézier y Rectas: Esta herramienta crea trazos de dos formas, una es haciendo clic y arrastrando para así crear un sentido de trazo controlado por el punto de control de ese nodo; y la otra es mediante clics individuales para crear rectas. Los nodos pueden transformar los trazos que lleguen a él en curvas o rectas, y dichas curvas pueden modificarse utilizando los puntos de control.
Página 20 de 33
Herramienta:
Información mostrada en la Barra de Controles o Ajustes de Herramientas:
Información mostrada en la Barra de Estado:
4.1.12. Herramienta Trazos Caligráficos o Pinceladas: Con ésta herramienta generaremos trazos formados por líneas que encierran el trazo o pincelada creada, la cual varía de acuerdo al tipo de punta o pluma que usemos, y si le aplicamos efectos como: giros, temblor, oscilación, etc.
Herramienta:
Información mostrada en la Barra de Controles o Ajustes de Herramientas:
Información mostrada en la Barra de Estado:
4.1.13. Herramienta Texto: Con ésta herramienta podemos ingresar caracteres, en diferentes idiomas si es que el necesitado está instalado; podemos ingresar texto NORMAL donde el usuario debe realizar los saltos de línea o podemos introducir el texto de forma FLUIDA donde ingresaremos los caracteres dentro de un área previamente determinada.
Herramienta:
Información mostrada en la Barra de Controles o Ajustes de Herramientas:
Información mostrada en la Barra de Estado:
4.1.14. Herramienta Spray de Objetos: Esta herramientas dispersa copias de un objeto pre seleccionado de una forma similar a como deposita gotas un spray normal, pero en éste caso las gotas son imágenes, las cuales pueden ser independientes unas con otras, pueden estar vinculadas al original, con lo cual los cambios aplicados al original modificarán todos sus clones, o pueden ser fundidas generando un solo trazo; además las imágenes depositadas pueden ser giradas, escaladas, entre otras opciones.
Herramienta:
Información mostrada en la Barra de Controles o Ajustes de Herramientas:
Información mostrada en la Barra de Estado:
Página 21 de 33
4.1.15. Herramienta Borrador o Goma: Esta herramienta posee dos formas de borrar, una es borrando el objeto completo con el cual tiene contacto; y la otra forma es borrando sólo la parte por donde ella pasa. Se puede variar su diámetro.
Herramienta:
Información mostrada en la Barra de Controles o Ajustes de Herramientas:
Información mostrada en la Barra de Estado:
4.1.16. Herramienta Relleno: Con ésta herramienta no solo podemos rellenar figuras cerradas, sino también cambiar el color seleccionado con dicha herramienta por otro color, degrade o imágenes. Posee varios parámetros para delimitar el alcance de los cambios.
Herramienta:
Información mostrada en la Barra de Controles o Ajustes de Herramientas:
Información mostrada en la Barra de Estado:
4.1.17. Herramienta Relleno en Degradé: Esta herramienta utiliza un relleno que va de un color a otro, luego se pueden editar los colores, el grado de transparencia, entre otros valores.
Herramienta:
Información mostrada en la Barra de Controles o Ajustes de Herramientas:
Información mostrada en la Barra de Estado:
4.1.18. Herramienta Cuenta Gotas: Aquí tenemos una herramienta de captura de color, con opciones para seleccionar el relleno, el trazo, el promedio de un área, entre otras opciones.
Herramienta:
Información mostrada en la Barra de Controles o Ajustes de Herramientas:
Información mostrada en la Barra de Estado:
4.1.19. Herramienta Conector: Con ésta herramienta podemos unir dos elementos, pero posee la particularidad de que al moverlos permanecerán unidos.
Herramienta:
Página 22 de 33
Información mostrada en la Barra de Controles o Ajustes de Herramientas:
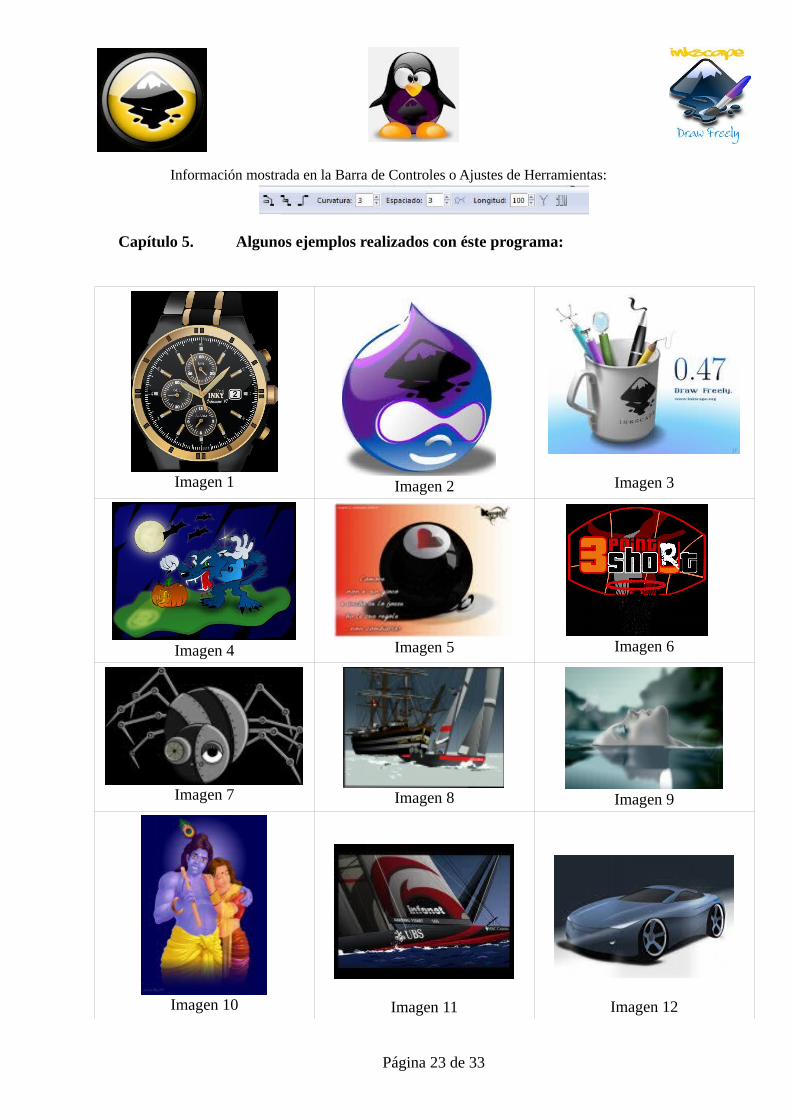
Capítulo 5. Algunos ejemplos realizados con éste programa:
Imagen 1 Imagen 2 Imagen 3
Imagen 4 Imagen 5 Imagen 6
Imagen 7 Imagen 8 Imagen 9
Imagen 10 Imagen 11 Imagen 12
Página 23 de 33

Conclusión
Como comentario particular, quedé sorprendido!. Habitualmente utilizaba otro programa de diseño, y lo complementaba con uno para edición de imágenes, y ahora puedo utilizar todo eso y más en un solo software; el gran abanico de herramientas y las gráficas que se pueden obtener con Inkscape son excelentes; además está disponible en múltiples plataformas y utiliza varios tipos de extensiones para sus archivos, fuera de su principal SVG, con lo cual nos podemos transportar a cualquier sistema operativo y quedarnos tranquilos que vamos a poder ver y editar nuestras imágenes, y si el software no esta instalado, podremos instalarlo fácilmente.
No hay mejor manera de aprender que basándose en un manual básico y luego experimentar, de ésta forma nos podemos dar una mejor idea de lo que puede hacer cada herramienta y cómo cambia su comportamiento al modificar los parámetros de ella.
Página 24 de 33
BibliografiaOrigen de las ImágenesImágen de la Portada
http://cursorlibre.com/wp-content/uploads/2010/08/inkscape-048.jpgImágen Derecha de los Enabezados
http://inkscapegallery.net/en/node/22994Imágen Central de los Enabezados
http://inkscapegallery.net/en/node/218Imágen Izquierda de los Enabezados
http://inkscapegallery.net/en/node/194830Imágen Diferencia entre Mapa de Bits y SVG (Pag. 6)
http://en.wikipedia.org/wiki/File:Bitmap_VS_SVG.svgHerramienta Curvas Bézier y Rectas (Pag. 20)
http://www.corelclub.org/tutoriales/curva.gifImágenes en Algunos ejemplos realizados con éste programaImagen 1 http://inkscapegallery.net/en/node/143458Imagen 2 http://inkscapegallery.net/en/node/220Imagen 3 http://fc01.deviantart.net/fs44/i/2009/133/f/4/Inkscape_0_47_contest_entry_by_sko.pngImagen 4 http://inkscapegallery.net/en/node/141Imagen 5 http://inkscapegallery.net/en/node/23001Imagen 6 http://inkscapegallery.net/en/node/255Imagen 7 http://inkscapegallery.net/en/node/444Imagen 8 http://inkscapegallery.net/en/node/210Imagen 9 http://inkscapegallery.net/en/node/154896Imagen 10 http://inkscapegallery.net/en/node/22975Imagen 11 http://inkscapegallery.net/en/node/209Imagen 12 http://inkscapegallery.net/en/node/22988Las capturas y fracciones de imágenes restantes son propias.
Bibliografía utilizadahttp://inkscape.org/doc/http://es.wikipedia.org/wiki/Inkscapehttp://wiki.inkscape.org/wiki/index.php/Características_de_Inkscape
Página 25 de 33
GNU Free Documentation License Version 1.3, 3 November 2008
Copyright (C) 2000, 2001, 2002, 2007, 2008 Free Software Foundation, Inc. <http://fsf.org/> Everyone is permitted to copy and distribute verbatim copies of this license document, but changing it is not allowed.
0. PREAMBLE
The purpose of this License is to make a manual, textbook, or otherfunctional and useful document "free" in the sense of freedom: toassure everyone the effective freedom to copy and redistribute it,with or without modifying it, either commercially or noncommercially.Secondarily, this License preserves for the author and publisher a wayto get credit for their work, while not being considered responsiblefor modifications made by others.
This License is a kind of "copyleft", which means that derivativeworks of the document must themselves be free in the same sense. Itcomplements the GNU General Public License, which is a copyleftlicense designed for free software.
We have designed this License in order to use it for manuals for freesoftware, because free software needs free documentation: a freeprogram should come with manuals providing the same freedoms that thesoftware does. But this License is not limited to software manuals;it can be used for any textual work, regardless of subject matter orwhether it is published as a printed book. We recommend this Licenseprincipally for works whose purpose is instruction or reference.
1. APPLICABILITY AND DEFINITIONS
This License applies to any manual or other work, in any medium, thatcontains a notice placed by the copyright holder saying it can bedistributed under the terms of this License. Such a notice grants aworld-wide, royalty-free license, unlimited in duration, to use thatwork under the conditions stated herein. The "Document", below,refers to any such manual or work. Any member of the public is alicensee, and is addressed as "you". You accept the license if youcopy, modify or distribute the work in a way requiring permissionunder copyright law.
A "Modified Version" of the Document means any work containing theDocument or a portion of it, either copied verbatim, or withmodifications and/or translated into another language.
A "Secondary Section" is a named appendix or a front-matter section ofthe Document that deals exclusively with the relationship of thepublishers or authors of the Document to the Document's overallsubject (or to related matters) and contains nothing that could falldirectly within that overall subject. (Thus, if the Document is inpart a textbook of mathematics, a Secondary Section may not explainany mathematics.) The relationship could be a matter of historicalconnection with the subject or with related matters, or of legal,commercial, philosophical, ethical or political position regarding
Página 26 de 33

them.
The "Invariant Sections" are certain Secondary Sections whose titlesare designated, as being those of Invariant Sections, in the noticethat says that the Document is released under this License. If asection does not fit the above definition of Secondary then it is notallowed to be designated as Invariant. The Document may contain zeroInvariant Sections. If the Document does not identify any InvariantSections then there are none.
The "Cover Texts" are certain short passages of text that are listed,as Front-Cover Texts or Back-Cover Texts, in the notice that says thatthe Document is released under this License. A Front-Cover Text maybe at most 5 words, and a Back-Cover Text may be at most 25 words.
A "Transparent" copy of the Document means a machine-readable copy,represented in a format whose specification is available to thegeneral public, that is suitable for revising the documentstraightforwardly with generic text editors or (for images composed ofpixels) generic paint programs or (for drawings) some widely availabledrawing editor, and that is suitable for input to text formatters orfor automatic translation to a variety of formats suitable for inputto text formatters. A copy made in an otherwise Transparent fileformat whose markup, or absence of markup, has been arranged to thwartor discourage subsequent modification by readers is not Transparent.An image format is not Transparent if used for any substantial amountof text. A copy that is not "Transparent" is called "Opaque".
Examples of suitable formats for Transparent copies include plainASCII without markup, Texinfo input format, LaTeX input format, SGMLor XML using a publicly available DTD, and standard-conforming simpleHTML, PostScript or PDF designed for human modification. Examples oftransparent image formats include PNG, XCF and JPG. Opaque formatsinclude proprietary formats that can be read and edited only byproprietary word processors, SGML or XML for which the DTD and/orprocessing tools are not generally available, and themachine-generated HTML, PostScript or PDF produced by some wordprocessors for output purposes only.
The "Title Page" means, for a printed book, the title page itself,plus such following pages as are needed to hold, legibly, the materialthis License requires to appear in the title page. For works informats which do not have any title page as such, "Title Page" meansthe text near the most prominent appearance of the work's title,preceding the beginning of the body of the text.
The "publisher" means any person or entity that distributes copies ofthe Document to the public.
A section "Entitled XYZ" means a named subunit of the Document whosetitle either is precisely XYZ or contains XYZ in parentheses followingtext that translates XYZ in another language. (Here XYZ stands for aspecific section name mentioned below, such as "Acknowledgements","Dedications", "Endorsements", or "History".) To "Preserve the Title"of such a section when you modify the Document means that it remains asection "Entitled XYZ" according to this definition.
The Document may include Warranty Disclaimers next to the notice which
Página 27 de 33
states that this License applies to the Document. These WarrantyDisclaimers are considered to be included by reference in thisLicense, but only as regards disclaiming warranties: any otherimplication that these Warranty Disclaimers may have is void and hasno effect on the meaning of this License.
2. VERBATIM COPYING
You may copy and distribute the Document in any medium, eithercommercially or noncommercially, provided that this License, thecopyright notices, and the license notice saying this License appliesto the Document are reproduced in all copies, and that you add noother conditions whatsoever to those of this License. You may not usetechnical measures to obstruct or control the reading or furthercopying of the copies you make or distribute. However, you may acceptcompensation in exchange for copies. If you distribute a large enoughnumber of copies you must also follow the conditions in section 3.
You may also lend copies, under the same conditions stated above, andyou may publicly display copies.
3. COPYING IN QUANTITY
If you publish printed copies (or copies in media that commonly haveprinted covers) of the Document, numbering more than 100, and theDocument's license notice requires Cover Texts, you must enclose thecopies in covers that carry, clearly and legibly, all these CoverTexts: Front-Cover Texts on the front cover, and Back-Cover Texts onthe back cover. Both covers must also clearly and legibly identifyyou as the publisher of these copies. The front cover must presentthe full title with all words of the title equally prominent andvisible. You may add other material on the covers in addition.Copying with changes limited to the covers, as long as they preservethe title of the Document and satisfy these conditions, can be treatedas verbatim copying in other respects.
If the required texts for either cover are too voluminous to fitlegibly, you should put the first ones listed (as many as fitreasonably) on the actual cover, and continue the rest onto adjacentpages.
If you publish or distribute Opaque copies of the Document numberingmore than 100, you must either include a machine-readable Transparentcopy along with each Opaque copy, or state in or with each Opaque copya computer-network location from which the general network-usingpublic has access to download using public-standard network protocolsa complete Transparent copy of the Document, free of added material.If you use the latter option, you must take reasonably prudent steps,when you begin distribution of Opaque copies in quantity, to ensurethat this Transparent copy will remain thus accessible at the statedlocation until at least one year after the last time you distribute anOpaque copy (directly or through your agents or retailers) of thatedition to the public.
It is requested, but not required, that you contact the authors of theDocument well before redistributing any large number of copies, togive them a chance to provide you with an updated version of the
Página 28 de 33
Document.
4. MODIFICATIONS
You may copy and distribute a Modified Version of the Document underthe conditions of sections 2 and 3 above, provided that you releasethe Modified Version under precisely this License, with the ModifiedVersion filling the role of the Document, thus licensing distributionand modification of the Modified Version to whoever possesses a copyof it. In addition, you must do these things in the Modified Version:
A. Use in the Title Page (and on the covers, if any) a title distinct from that of the Document, and from those of previous versions (which should, if there were any, be listed in the History section of the Document). You may use the same title as a previous version if the original publisher of that version gives permission.B. List on the Title Page, as authors, one or more persons or entities responsible for authorship of the modifications in the Modified Version, together with at least five of the principal authors of the Document (all of its principal authors, if it has fewer than five), unless they release you from this requirement.C. State on the Title page the name of the publisher of the Modified Version, as the publisher.D. Preserve all the copyright notices of the Document.E. Add an appropriate copyright notice for your modifications adjacent to the other copyright notices.F. Include, immediately after the copyright notices, a license notice giving the public permission to use the Modified Version under the terms of this License, in the form shown in the Addendum below.G. Preserve in that license notice the full lists of Invariant Sections and required Cover Texts given in the Document's license notice.H. Include an unaltered copy of this License.I. Preserve the section Entitled "History", Preserve its Title, and add to it an item stating at least the title, year, new authors, and publisher of the Modified Version as given on the Title Page. If there is no section Entitled "History" in the Document, create one stating the title, year, authors, and publisher of the Document as given on its Title Page, then add an item describing the Modified Version as stated in the previous sentence.J. Preserve the network location, if any, given in the Document for public access to a Transparent copy of the Document, and likewise the network locations given in the Document for previous versions it was based on. These may be placed in the "History" section. You may omit a network location for a work that was published at least four years before the Document itself, or if the original publisher of the version it refers to gives permission.K. For any section Entitled "Acknowledgements" or "Dedications", Preserve the Title of the section, and preserve in the section all the substance and tone of each of the contributor acknowledgements and/or dedications given therein.L. Preserve all the Invariant Sections of the Document, unaltered in their text and in their titles. Section numbers or the equivalent are not considered part of the section titles.M. Delete any section Entitled "Endorsements". Such a section may not be included in the Modified Version.N. Do not retitle any existing section to be Entitled "Endorsements" or to conflict in title with any Invariant Section.
Página 29 de 33

O. Preserve any Warranty Disclaimers.
If the Modified Version includes new front-matter sections orappendices that qualify as Secondary Sections and contain no materialcopied from the Document, you may at your option designate some or allof these sections as invariant. To do this, add their titles to thelist of Invariant Sections in the Modified Version's license notice.These titles must be distinct from any other section titles.
You may add a section Entitled "Endorsements", provided it containsnothing but endorsements of your Modified Version by variousparties--for example, statements of peer review or that the text hasbeen approved by an organization as the authoritative definition of astandard.
You may add a passage of up to five words as a Front-Cover Text, and apassage of up to 25 words as a Back-Cover Text, to the end of the listof Cover Texts in the Modified Version. Only one passage ofFront-Cover Text and one of Back-Cover Text may be added by (orthrough arrangements made by) any one entity. If the Document alreadyincludes a cover text for the same cover, previously added by you orby arrangement made by the same entity you are acting on behalf of,you may not add another; but you may replace the old one, on explicitpermission from the previous publisher that added the old one.
The author(s) and publisher(s) of the Document do not by this Licensegive permission to use their names for publicity for or to assert orimply endorsement of any Modified Version.
5. COMBINING DOCUMENTS
You may combine the Document with other documents released under thisLicense, under the terms defined in section 4 above for modifiedversions, provided that you include in the combination all of theInvariant Sections of all of the original documents, unmodified, andlist them all as Invariant Sections of your combined work in itslicense notice, and that you preserve all their Warranty Disclaimers.
The combined work need only contain one copy of this License, andmultiple identical Invariant Sections may be replaced with a singlecopy. If there are multiple Invariant Sections with the same name butdifferent contents, make the title of each such section unique byadding at the end of it, in parentheses, the name of the originalauthor or publisher of that section if known, or else a unique number.Make the same adjustment to the section titles in the list ofInvariant Sections in the license notice of the combined work.
In the combination, you must combine any sections Entitled "History"in the various original documents, forming one section Entitled"History"; likewise combine any sections Entitled "Acknowledgements",and any sections Entitled "Dedications". You must delete all sectionsEntitled "Endorsements".
6. COLLECTIONS OF DOCUMENTS
You may make a collection consisting of the Document and other
Página 30 de 33

documents released under this License, and replace the individualcopies of this License in the various documents with a single copythat is included in the collection, provided that you follow the rulesof this License for verbatim copying of each of the documents in allother respects.
You may extract a single document from such a collection, anddistribute it individually under this License, provided you insert acopy of this License into the extracted document, and follow thisLicense in all other respects regarding verbatim copying of thatdocument.
7. AGGREGATION WITH INDEPENDENT WORKS
A compilation of the Document or its derivatives with other separateand independent documents or works, in or on a volume of a storage ordistribution medium, is called an "aggregate" if the copyrightresulting from the compilation is not used to limit the legal rightsof the compilation's users beyond what the individual works permit.When the Document is included in an aggregate, this License does notapply to the other works in the aggregate which are not themselvesderivative works of the Document.
If the Cover Text requirement of section 3 is applicable to thesecopies of the Document, then if the Document is less than one half ofthe entire aggregate, the Document's Cover Texts may be placed oncovers that bracket the Document within the aggregate, or theelectronic equivalent of covers if the Document is in electronic form.Otherwise they must appear on printed covers that bracket the wholeaggregate.
8. TRANSLATION
Translation is considered a kind of modification, so you maydistribute translations of the Document under the terms of section 4.Replacing Invariant Sections with translations requires specialpermission from their copyright holders, but you may includetranslations of some or all Invariant Sections in addition to theoriginal versions of these Invariant Sections. You may include atranslation of this License, and all the license notices in theDocument, and any Warranty Disclaimers, provided that you also includethe original English version of this License and the original versionsof those notices and disclaimers. In case of a disagreement betweenthe translation and the original version of this License or a noticeor disclaimer, the original version will prevail.
If a section in the Document is Entitled "Acknowledgements","Dedications", or "History", the requirement (section 4) to Preserveits Title (section 1) will typically require changing the actualtitle.
9. TERMINATION
You may not copy, modify, sublicense, or distribute the Documentexcept as expressly provided under this License. Any attempt
Página 31 de 33

otherwise to copy, modify, sublicense, or distribute it is void, andwill automatically terminate your rights under this License.
However, if you cease all violation of this License, then your licensefrom a particular copyright holder is reinstated (a) provisionally,unless and until the copyright holder explicitly and finallyterminates your license, and (b) permanently, if the copyright holderfails to notify you of the violation by some reasonable means prior to60 days after the cessation.
Moreover, your license from a particular copyright holder isreinstated permanently if the copyright holder notifies you of theviolation by some reasonable means, this is the first time you havereceived notice of violation of this License (for any work) from thatcopyright holder, and you cure the violation prior to 30 days afteryour receipt of the notice.
Termination of your rights under this section does not terminate thelicenses of parties who have received copies or rights from you underthis License. If your rights have been terminated and not permanentlyreinstated, receipt of a copy of some or all of the same material doesnot give you any rights to use it.
10. FUTURE REVISIONS OF THIS LICENSE
The Free Software Foundation may publish new, revised versions of theGNU Free Documentation License from time to time. Such new versionswill be similar in spirit to the present version, but may differ indetail to address new problems or concerns. Seehttp://www.gnu.org/copyleft/.
Each version of the License is given a distinguishing version number.If the Document specifies that a particular numbered version of thisLicense "or any later version" applies to it, you have the option offollowing the terms and conditions either of that specified version orof any later version that has been published (not as a draft) by theFree Software Foundation. If the Document does not specify a versionnumber of this License, you may choose any version ever published (notas a draft) by the Free Software Foundation. If the Documentspecifies that a proxy can decide which future versions of thisLicense can be used, that proxy's public statement of acceptance of aversion permanently authorizes you to choose that version for theDocument.
11. RELICENSING
"Massive Multiauthor Collaboration Site" (or "MMC Site") means anyWorld Wide Web server that publishes copyrightable works and alsoprovides prominent facilities for anybody to edit those works. Apublic wiki that anybody can edit is an example of such a server. A"Massive Multiauthor Collaboration" (or "MMC") contained in the sitemeans any set of copyrightable works thus published on the MMC site.
"CC-BY-SA" means the Creative Commons Attribution-Share Alike 3.0 license published by Creative Commons Corporation, a not-for-profit corporation with a principal place of business in San Francisco, California, as well as future copyleft versions of that license
Página 32 de 33
published by that same organization.
"Incorporate" means to publish or republish a Document, in whole or in part, as part of another Document.
An MMC is "eligible for relicensing" if it is licensed under this License, and if all works that were first published under this License somewhere other than this MMC, and subsequently incorporated in whole or in part into the MMC, (1) had no cover texts or invariant sections, and (2) were thus incorporated prior to November 1, 2008.
The operator of an MMC Site may republish an MMC contained in the siteunder CC-BY-SA on the same site at any time before August 1, 2009,provided the MMC is eligible for relicensing.
ADDENDUM: How to use this License for your documents
To use this License in a document you have written, include a copy ofthe License in the document and put the following copyright andlicense notices just after the title page:
Copyright (c) YEAR YOUR NAME. Permission is granted to copy, distribute and/or modify this document under the terms of the GNU Free Documentation License, Version 1.3 or any later version published by the Free Software Foundation; with no Invariant Sections, no Front-Cover Texts, and no Back-Cover Texts. A copy of the license is included in the section entitled "GNU Free Documentation License".
If you have Invariant Sections, Front-Cover Texts and Back-Cover Texts,replace the "with...Texts." line with this:
with the Invariant Sections being LIST THEIR TITLES, with the Front-Cover Texts being LIST, and with the Back-Cover Texts being LIST.
If you have Invariant Sections without Cover Texts, or some othercombination of the three, merge those two alternatives to suit thesituation.
If your document contains nontrivial examples of program code, werecommend releasing these examples in parallel under your choice offree software license, such as the GNU General Public License,to permit their use in free software.
Página 33 de 33