Embed Size (px)
Citation preview

Inside Coaching Hockey
2
Inside Coaching Hockey
by Richard K. Bercuson
Richard K. Bercuson, 2010, Some Rights Reserved
ISBN 978-0-9809613-1-7 This work is licensed under the Creative Commons Attribution-NonCommercial-NoDerivs 2.5 Canada License. To view a copy of this license, visit http://creativecommons.org/licenses/by-nc-nd/2.5/ca/deed.en or send a letter to Creative Commons, 171 Second Street, Suite 300, San Francisco, California, 94105, USA. You are free to share: to copy, distribute and transmit the work. Attribution — You must attribute the work in the manner specified by the author or licensor (but not in any way that suggests that they endorse you or your use of the work). Noncommercial — You may not use this work for commercial purposes. No Derivative Works — You may not alter, transform, or build upon this work The Ottawa District Hockey Association fully endorses "Inside Coaching Hockey" as a valuable resource. However, the ideas, opinions, and suggestions presented in this book are entirely those of its author, Richard K. Bercuson. They do not necessarily reflect either the views or any official stance of the ODHA.
Cover design by Shannon King
Inside Coaching Hockey
3
Table of contents
Chapter Page
Warm-Up 4
1 The Coach as Kleptomaniac 7
2 How kids learn 10
3 Stages of skill acquisition 16
4 Skill acquisition progressions 21
5 Drill design for the mind: Types of drills 25
6 Drill design for the mind: The nitty gritty 30
7 Drill design for the mind: Getting creative 33
8 KTPs and F.I.T. 36
9 Drill progressions 42
10 The famous Rule of 3s 48
11 Control-Intervention-Feedback 52
12 "And now for something completely different..." 57
13 LOGs and SAGs 63
14 SAGs Plus! 69
15 In-betweens 76
16 Practice preparation 78
17 The practice template 80
18 The practice variety pack 86
19 The not-so-itty-bitty details 89
20 Half the ice - Twice the planning 91
21 Half-ice solutions 94
22 Half-ice templates 97
23 Planning the plan 101
24 Segmenting the season 104
25 Inside the segment 107
26 The coaching staff 112
27 Orchestrating the bench 115
28 Player evaluation 120
Overtime 126
Acknowledgments & About the author 128
Inside Coaching Hockey
4
Warm-up A Coach’s Credo: Coaching, like teaching, is a sacred trust. It is not so much the imparting of knowledge as giving, sharing, and guiding. A coach can create hope from despair and triumph from dejection. A coach can transform the mundane into excitement. A coach is empowered to help the child do what could not be done, should not have been done, and would not have been done. Good coaches seem to share one key characteristic: the joy of teaching kids. After a season with such leaders, players will have set aside losses, slumps or personal disappointments. What they remember is how the coach treated them. They know instinctively, without skill-testing or evaluation reports, if they learned anything. That can range from specific skills to tactics to simply how to function on a team as a team. It should include, too, (or most importantly in the eyes of many) learning how to become a responsible citizen. Players don’t need to be told by parents or anyone else if their coaches were good ones. They know if it was a positive experience. They feel ready for the next season even as the previous one is waning. The summer can’t slide by quickly enough. Whether the next season’s preparation includes hockey schools, physical training, other sports or just resting, youngsters will continue to want to play so long as their coaches are enthusiastic, communicative, knowledgeable, and helpful. The truth is, the vast majority of coaches have exactly those characteristics. If they didn’t, their motivations to coach kids would be misplaced and likely they wouldn’t last long. Besides, who’d want to spend hours each week with someone else’s kids in what is often a pressured, fast-paced environment? While great coaches are mostly nature’s gift, plenty more can be nurtured. All they need is to like kids, love hockey, revel in teaching, and want to learn themselves. It’s not a tall order since the first two are usually a given, the third grows on them, and the fourth soon becomes important if they want to improve. There aren’t many coaches I’ve come across over the decades whom I’d describe as not belonging in coaching. What often happens is that coaches, like people in any setting, sometimes take the simplest, most expedient path to tasks. It might be by falling back on time-worn drills or tactics. It might be due to external pressures from associations, parents or peers. It’s often because they don’t know better, haven’t searched for alternatives, or there’s no one (like a mentor) to provide advice or help. What great coaches do This isn't a trade secret. Great coaches are creative and innovative. They investigate, plan, and act. These are the ones who do their research and homework and are inquisitive to a fault. Yet the gap between great coaches and ordinary ones isn’t that wide. To bridge it, coaches need some tools and people to help them.
Inside Coaching Hockey
5
Coaching minor hockey is not for the faint of heart. It is the one team sport that feeds off its own emotions with barely a timeout to breathe. The sheer flow of the game and the inordinate number of events, shall we say, occurring in a single shift are staggering to count. To someone seeing a game for the first time, it must seem like chaos. Players fly up and down the ice, usually in the same direction, sometimes smacking the object as if no one really wants it. They clamber over the boards (or jam up at the doors) and join the fray seemingly at random. Meanwhile, behind the bench stand adults who gesticulate or shout or scribble on bits of paper with strange markings on them. They orchestrate what would best be called a jumbled jam session of uncoordinated out-of-tune musicians. The most challenging sport Hockey isn’t just challenging to coach. It’s the most difficult of all team sports to coach. There are no outs. There are no long stoppages to chat with players. There is no time to think in a game, just react better or worse. Getting kids on and off the bench effectively is a science. Ask anyone coaching kids under age 12 about that adventure. Being able to communicate with youngsters in less than ten seconds and send the right message is practically an art form. These days, with players wearing cages and mouth guards, communication is mostly one way, from coach to player. Expecting a dialogue within a decent time frame is fantasy. Games aren’t just scheduled; they’re exact. A country’s transportation system would do well to watch the efficiency of game management. The coach gets just a few minutes to have the team warm-up on the ice. In some cases, it’s as little as two or three minutes. Between periods, perhaps a minute. When the allotted time is over, no matter the score, no matter the time left on the score clock, the game ends. The doors for the resurfacing machine monster are swung open nary a moment after the last player has left the ice. Within this tight framework, minor hockey coaches have to implement plans and follow up on tactics. They need to react not just quickly but ahead of the play as it happens. There isn’t a single team sport in which coaches have so little time to do so much and still control their emotions. This is exclusive of a minor hockey game’s current bizarre rule structure in which youngsters are subjected to nearly identical rules as the professionals. Only the length of games differs. How does the minor coach soften the blow of a child getting a 10-minute misconduct, which in effect is nearly the entire playing period? The games may be shorter, but penalty length, types of infractions and rules such as offside and icing are virtually identical to the adults. The expectations in games are often out of whack with what a child is capable of handling. Then there is the puck, 4 oz in the Initiation Program for 4-6 year olds, regulation 6 oz for everyone else. Now the minor coach is trying to figure out how to get his ten year olds to clear the defensive zone by shooting “high and hard” off the glass. Except with this age group and an adult-weighted puck, the kids can neither shoot high nor hard anywhere, let alone off the glass. In the only major team sport that has failed to adapt its playing object to children, the coach has to come up with game time remedies that will work.
Inside Coaching Hockey
6
If a hockey coach’s practice is slow, players freeze. Generally, practices are under the same time constraints as games. Icetime is precious and expensive. Whereas in some sports you can dawdle on a court or field for a few moments, in hockey, too much down time chills the muscles, bores the kids, and kills the enthusiasm. Everyone knows more As if any of that wasn’t enough, hockey’s niche in Canadian culture is vast and deep. Even those who’ve never played or coached believe they know what should be taught, when, and how. Everyone seems to have an opinion and the coach is left to bear the brunt of the commentary. One wonders then why people coach minor hockey. But that question was answered at the outset, wasn’t it? With it all comes the need for coaches to have effective tools at their disposal. This is not because using teaching tools might minimize criticism. Instead, they are needed to improve the coach’s technique regardless of whether or not his/her skills were nature or nurture. Of course, by improving one’s coaching skills, one does more for the players. That leads to the most important objectives for coaches and minor hockey organizations: to provide a valuable and enjoyable learning experience for kids. This book, therefore, hopes to add to the coach’s toolbox by employing the best tool available: the coach's mind. With imagination, planning, and enthusiastic action, coaches will be able to design plans, practices, and line-ups. They’ll learn what kids need to know and when they need to know it. They’ll discover that much of what we might have instinctively been aware of as adults, through our own great hockey experiences, lays the foundation upon which our very own creative bents can flourish. Hockey may indeed be a challenge to coach. Inside Coaching Hockey will make it more fun. It’s time to take to the ice…
Inside Coaching Hockey
7
1 The Coach as Kleptomaniac It’s not enough for a coach to steal or even to steal often. It’s far more important to steal the right material then adapt it to the situation. There are well-meaning coaches who make a point of sitting in on junior or pro practices, attending symposia where professional coaches are speakers, or buying materials (DVDs, books, etc.) that provide the latest research and drill and practice recipes. All of this is laudable from a personal development standpoint. But how much is immediately usable? And of the information the coach picks up, is there an innate understanding that it must be adapted? This is not a criticism of learning for learning’s sake. However, the coach who merely fills his head with data and drills is not necessarily a better coach, just a more up-to-date, albeit enthusiastic, one. A typical symposium invites professional coaches to share their tactical experiences and knowledge both of which are usually extensive. So they set about describing their forechecking systems and options, what players they want in what situations to handle which forecheck against which dangerous opposing players. Occasionally, they provide drills to illustrate how they present these. This is analogous to a bestselling novelist showing middle school teachers the complexities of plot development, setting and research that may take months or years to become a book. Meanwhile, the teacher really needs to know how to get the class to write two decent narrative paragraphs on a single topic that makes sense. And they need this to happen next week. The importance of context Coaches must consider the context of what they see or read. For instance, when a coach observes a junior team practice, consider the following: What is the practice’s “big idea” or theme? It may very well be designed simply to fix problems from the last game and/or address issues for the next one. If just a tactical practice, are the tactics geared for anyone? Not likely. The time of year, position in standings, previous practice themes, player conditioning, and even the coach’s mood play roles. Look at this illustration of higher level tactics that would need considerable review in trying to adapt them to minor hockey. The diagrams are part of a presentation made in 1994 in Quebec City by renowned Swedish coach Bjorn Kinding, an expert on transition hockey. The presentation’s text portion is chock full of important ideas on where and how the puck is won or lost in games and how to deal with these. As you can see, Kinding offers a solution for each zone on how to go from offence to defence. This is fine in theory. With kids, even elite level teenagers, it’s an altogether different challenge. The smart coach would pose more questions than have answers, not

Inside Coaching Hockey
8
the least is wondering if players have the technical and game awareness skills to apply these solutions.
Meanwhile, at that same Hockey Canada seminar, George Kingston provided an in-depth analysis of individual defensive tactics and skills. It included a number simple skill drills to teach defensive tactics. This was exactly the kind of material nearly any coach at any level could steal and feel comfortable including in practice. The critical eye Here's one sweeping arc of a statement about minor coaches in general: the status quo or tradition in teaching or approach is deemed sufficient. It isn’t. And it’s not because what has been done is necessarily poor. But we know much more about how kids learn and how skills are developed than we knew 20 or 30 years ago. The classroom is different today from when coaches were kids and thus so, too, must be the classroom of sport. Developing the ability to critique and arrive at solutions is a two-fold process. As already mentioned, stealing is easy. Honing in on the elements pertinent to your team is altogether different. How to teach the tactic and skills is what it’s all about. Coaches have to be willing to develop their own skills at critiquing books, presentations and the like if they are to gain a deeper understanding of how to improve their own coaching. It doesn’t come from watching TV analysts who need to provide only the
Inside Coaching Hockey
9
salient points in just a few seconds. It requires analyzing beyond the superficial. Kinding’s diagrams, for instance, do not stand by themselves. They are but one small portion of an in-depth analysis of transition play. Yet if you were to flip through the manual and fix your eyes on the diagrams without critically reading the text, your view of transition might be simplistic and likely negative. The true critic approaches the teaching of minor hockey with an understanding of two vital components: how kids learn and how we acquire skills. Being able to apply these means the coach can tackle just about anything he steals and do the right thing with it.

Inside Coaching Hockey
10
2 How kids learn Some years ago, a video circulated among coaching theory instructors of a talk given in the United States by well-known sports psychologist, Dr. Thomas Tutko. During a question and answer session, he made one point clear. The paraphrase is, “Folks, if your child is good enough to participate in sport at a higher level, it does not mean you are a better parent." It may be that the fundamental skills required to raise a child are in our DNA. Whether or not these skills are appropriately used is another matter. Nearly all the time, they are. This may come as a surprise to the parent of a child playing the lowest level of house league or recreational hockey. That a child does not have the skills to compete like the handful playing AA or AAA is not a statement about one’s parenting. Wearing the elite club’s jacket with “Dad” embroidered on the sleeve may seem arrogant (recall the bumper stickers that read “Proud Parent of an XYZ Middle School Honours Student”). And it only appears worse as the child grows up and edges towards a potential run at junior hockey or higher. Perhaps the parents of these kids are merely displaying pride in their child’s achievements and the skills acquired along the way. There’s no doubt that some parents have the financial tools to provide their children more training. Others have the drive, or push as some may argue. Regardless of the mix and the percentage of parents who involve themselves in their children’s activities, it is an inescapable fact that a child’s learning is also in the DNA. The prodigies How often do we hear of sports stars or entertainment personalities whose parents or siblings describe them as having long had an innate drive, even as toddlers? In hockey, we can watch film (because everything can be filmed all the time!) of Sidney Crosby scoring a goal at age 3 or Wayne Gretzky dancing through pylons on his backyard rink at age 4. If Howie Morenz’s parents had been prescient, they would have filmed him doing his thing as a child, too. Small matter that when he was born in 1902, movie cameras didn’t exist. What separates these prodigies from normal humans is not so much what they were taught but what was in them. Gretzky, for instance, was said to have been a good baseball player as a kid. If he’d grown up two hours south, he might have set major league hitting records instead of NHL scoring ones. But we don’t deal with such athletes often. Minor hockey coaches rarely get kids whose skills are on the verge of stunning. What they have are children or teens who are ready and willing to learn. As one successful elite minor coach used to state while teaching coaching clinics, “All children want to learn. They just need good coaches to show them how.” Both statements are not only correct but also important to remember. For a number of years, Canada’s national coaching program included in its manuals and presentations what was widely accepted as being a topic almost as dry as what paint colour to use in the garage: growth and development. Ironically, it was just about the
Inside Coaching Hockey
11
most important. Everything coaches do with their players at any age is based upon knowing the age group’s characteristics. This is where the volunteer-based system has a crack in its armor. The majority of coaches are parents, at least at the outset. They know their own children better than they know themselves. There’s no certification or degree parents could possibly obtain that would make them understand their offspring better. Yes, for their own kids. Not necessarily for the others whom the coach may see for only a few hours per week. Even then, much of the contact is at arm’s length. The coach cannot be around every player during every minute in the room or corridors. Often what the coach knows about the age group is limited to an extension of what is known of his own child. Observe the teachers To truly understand the depth of knowledge required to work with an age group means observing teachers at work. Professionals in dealing with youth, they are marvels of communication with the succeeding generation. No, this doesn’t mean every teacher is wonderful nor does it suggest we should have teachers as coaches. Let’s take the statement at face value. Teachers know the kids they work with. Now as adults, we are more inclined to recall our high school years than much before it. This leaves us with a gaping observational hole about the interaction between adults and children, the very interaction we need to develop in coaching. We are left then to resort to visits to our children’s schools to volunteer with activities. Those who have done this can attest to what constitutes group control, discipline, and teaching. How on earth does a grade 2 teacher manage to keep 25-30 seven year olds in line? Is it hypnosis? It’s certainly a trick coaches of novice age kids could learn from? What makes the grade 9 science teacher able to keep a group of new teenagers from blowing up a lab, and leave it clean at the end of a class? Our bantam coaches might want to learn some of this, especially the part about leaving the work environment (the dressing room) clean when done. Indeed, training and experience play roles. It has to do as well with knowing what you’re working with. Hardly any hockey books written in the last 30 years have acknowledged much about the importance of age group considerations. As mentioned in the Warm-Up, Canada’s national game would do well to look at these factors with regard to penalty lengths, types of infractions, and even the puck. Some publication references A handful of authors have touched on it. In the preface to his seminal 1973 work Howie Meeker’s Hockey Basics, Meeker wrote, “…Mom and Dad hollering for goals while their eight-year-old youngster tries desperately not to fall on his keester when shooting the puck. That poor little tyke isn’t ready for a shot on goal yet; he’s not even ready to take part in a passing play…There’s lots of time to teach a boy game tactics when he reaches his teens…” Meeker was correct about many things in his approach and some of it was likely through his own basic observations. Somehow he knew – he knew! – that child development led to skill and tactical development, not the other way around. Remember this was in 1973!
Inside Coaching Hockey
12
In 1983, the Swedish Ice Hockey Association Education Committee, a marvelous moniker for a youth hockey body, produced a 300-page manual for coaches. It included drills of course. But more importantly it provided important information about each group and tailored the drills accordingly. Its preface acknowledged that, at the time, it owed much of its development programs to what was done in other countries, likely Canada being at the top of the list. It admitted how Sweden’s coaches hadn’t been considering long term development because there was too much focus on tactics and team play. Then it added, “The drills in the plan are selected so that the degree of difficulty and load should increase as the child becomes older.” Further on, the manual stated, “With well-adapted and properly selected drills for each age group, the youths are developed best. If one doesn’t follow an age-adapted teaching of training then one can get negative consequences in training, such as too severe or too one-sided loading…Training must be suited according to the level of maturity and prior achieved training.” At the turn of the 21st century, Hockey Canada published its Skill Development manuals for age groups. Each manual has recipes for practices and important skill development hints. However, there’s virtually nothing about the needs of each age group. Yet years before, coaching clinics contained an entire module on the topic, even at the former Level IV and then Advanced I levels. While there remains a short module in the current Developmental I coaching clinic, there is none at the first level clinic, where the vast majority of coaches’ educations begin and end. Here’s what we know “Children think in ways adults can no longer remember, and make errors in ways adults can’t predict.” In the one-size-fits-all world of minor hockey, we need to make clear distinctions among these four terms: Chronological age Developmental age Growth Maturation It's interesting sometimes to hear people talk about, for instance, the effectiveness of an atom (age 10-11) player who handles the puck well. “Yes, but he’s awfully small,” is a common refrain. How observant. Except, ten year olds are small by definition. They’re children. They’re supposed to be small. The taller, heavier ones are the anomalies. So while this child may be short or light, he may well be in the right zone for the age group in terms of his growth. It would seem, too, that developmentally he is able to perform hockey skills better than most. But if he spends all his time watching cartoons, we could state that his maturation is somewhat behind the other atom players.
Inside Coaching Hockey
13
This is an identical issue faced by junior coaches whose players have the widest age range of any in amateur hockey, ages 16-21 in some cases. So one could have a grade 11 student who has not yet dated sharing the dressing room or bus with a 3rd university student who may be a parent. Say what you want about a 16 year old having the developmental skill to handle junior hockey, the maturation range is enormous. This presents the coach with a myriad of problems, which in one way or another do lead to success or failure in tactics. The 20-21 year old who is more mature, experienced, better educated, and physically more adept is going to have an obvious advantage over the much younger player especially over the long term. What’s more, the 16-19 year olds are still physically developing. They are very much older adolescents whereas the 20-21s are young adults. The distinction is stark. Every player on a team is first a child or adolescent and then a hockey player. The challenge for minor coaches is figuring out how to deal with the myriad of differences both among the players and within each one. It’s a tall order. Keys to learning As daunting a task as it is to figure out how best to get players to learn, some general points will help. Active participation: Kids are not passive beings. They want and need to move. They want and need to use their brains. Thus it’s extremely important that coaches find ways to keep them active in the learning process. That should include speaking less to describe drills or tactics, asking questions in the dressing room, and allowing them to discuss topics. Experiential learning: Give them opportunities to try new things with minimal direction. Allow them to experiment, especially with new skills or simple tactics. Not everything has to be a formal drill. Sometimes five minutes alone with a puck darting around pylons is sufficient “instruction” for kids to improve basic puckhandling manoeuvres. This form of instruction will be further explained in the chapter on skill acquisition. However, an easy analogy for adults is how we approach learning ourselves. Give an adult a new golf club in a sports store and what do we observe? The adult will finger the club and grip it loosely a few different ways. The adult will wave it a bit, take a few half-swings, and simulate the approach and stance as if standing on the golf course. This is experiential learning. A general idea of what to do with the club is sufficient for the learner to play with it, to experiment with it. Young hockey players learn the same way. They must first tinker with the skill or tactic before it becomes a semblance of its true self. For instance, first time body checkers are hesitant to apply new skills at anything beyond slow speed. Then when they’ve got the confidence and have tried different degrees of slow, they’re able to edge towards game speed checks. Goalsetting: Obviously, this varies widely for age groups and caliber. Still, it will help if the coach sits down with each player and sets realistic non-performance goals (those
Inside Coaching Hockey
14
not including goals, assists, tournament wins, first place, etc.). Examples could include learning how to defend a 2 on 1, improving back skating, learning how to play the point on the power play and so on. Whether or not the goals are met may be subjective, however, it does give both the coach and player something to aim for. Connecting knowledge: Just because something’s been taught doesn’t mean it’s been learned. Any coach who has tried to introduce a tactic once can vouch for that. And that’s why it’s so important to carry over knowledge and instruction from session to session. A form of spiral teaching is the best approach to ensure that knowledge of previous material is at least repeated. For example, look at this progression to teach a breakout. a) Turning and puck retrieval for defence + transition skating for forwards b) Above including giving and receiving passes c) a) and b) plus doing it with speed on both sides of rink d) a), b), c) plus against one passive forechecker e) a) , b), c), d) against one active (pressure) forechecker
Each step includes components from the previous one. In this way, the players get to see the value of prior knowledge and its role in subsequent steps. Whether or not these steps are all done in one teaching session or over many is another matter. That, too, will be addressed in the skill acquisition chapter. The more important task is to remember that kids’ heads are not vials we pour knowledge into and expect it to be retained right away. There is always seepage. Repetition in some form along with a connection to prior instruction aids learning. Teaching for understanding: Nine year olds will not understand why they’re being taught tight turns with a puck until they’re provided situations (drills?) where they must apply them. Similarly, 14 year olds will not realize the importance of one-timer shooting until they try the power play set up in which the off wing shooter is the trigger man. In other words, a coach must challenge himself to try to get players to understand why they’re being taught something. This does not mean every drill or exercise must be preceded with an explanation. That’s a surefire turn-off. Most of the time, the best explanation is by sliding the kids from technical or tactical exercise into an application. Time is always a factor in coaching hockey and frequently intermediate steps that might otherwise be used in schools need to be skipped. But not ignored. Transference: This is almost a corollary to the previous item. Whatever is taught must be able to be transferred to practical or “real-life” situations. In other words, no skill or tactic should be left to stand on its own without an attempt to connect it with what happens in a hockey game. Obviously, with younger children, this is at a basic level. We teach puckhandling weaves partly to develop agility and confidence with the puck, but partly to slide the player into introductory 1 against 1 skills where the weave could be used. For a youngster, that may be as close to game-like as is necessary. With midget age 15-17 year olds, transference is more easily extrapolated because they have playing experience. So they are able to see how angling drills will help them learn containment checking. In such cases, not as much time needs to be spent on explanation.

Inside Coaching Hockey
15
Effective practice: It cannot be stressed enough that an effective practice, incorporating the above factors, helps children learn. By the same token, poor practices hinder learning, but dwelling on those isn’t the idea here. In later chapters, we’ll look at what constitutes an effective practice. For now, suffice to say that kids learn when practices are fun, engaging, challenging, and reflect the best of pedagogical approaches. Since coaching and teaching are mostly synonymous, the ability to recognize the group’s and individuals’ needs is central to coaching kids. Parents hand us their kids with an expectation that whatever their DNA has or doesn’t have, the coach is going to try to get the best out of the child. Even when the coach is a parent, the norm in most associations, there is that same expectation. We know children can and will learn aspects of the game often in spite of parental interference or inadequate coaching. But when coaches know their pupils and how to deal with them, the learning is limited only by the length of the season.
Inside Coaching Hockey
16
3 Stages of skill acquisition Kids first. Then everything else. "Everything else" means a blizzard of items. Coaches often feel overwhelmed at the enormity of the task they face. So much to teach in so short a time. And of course many coaches begin their seasons by looking at the talent and wondering if predecessors had done anything at all. How come these kids don’t know how to forecheck? Why don’t they know the principles of power play? Why do the defencemen have such poor mobility? How can so many kids from one group be such weak passers? Go ahead. Ask the previous coach who likely posed the same questions a year earlier. Back it goes to when the kids began playing. Was every coach weak at teaching skills? Did every coach leave huge gaps in instruction? The answer is yes and no. Yes. There are coaches who are weak at teaching skills or tactics. Some do well at one and not the other. Some are great skating teachers but don't know how to improve shooting. Many consider themselves wonderful at the vaunted Xs and Os yet they know only the fundamental team tactics without much of an idea how to break them down. Others are excellent communicators but mediocre teachers. There are even those who have extensive knowledge of the game but just can’t seem to teach it well. No. Most hockey associations have no plan, progressions, or vision on how it will provide its kids with the proper fundamentals. They leave this up to coaches and hope for the best. No wonder there are gaps from year to year because, as the saying goes, if you don’t know where you’re going, any road will take you there. No road map means no clue what each age group or level should be presented. Later chapters will deal with planning. The issue here is to develop an understanding of just how skills (and tactics) are acquired. Knowing this means ascertaining just what can be accomplished at each level. If a coach has a handle on how skills develop, he will develop the patience and confidence, even in the absence of a proper plan, to know that skills evolve over time. The coach will see that the nature of the presentation (skills instruction, for instance) runs parallel with how children learn. Obviously the coach must still know how to be a technician and tactician (for higher levels or older kids). Yet this is tempered by the understanding that for our players to acquire the necessary skills, it is our job to know what stages skill learning goes through. The time factor In the previous chapter, we saw this: Just because it’s been taught doesn’t mean it’s been learned. There are two prongs to the sentence. One refers to how kids learn anything. But the other relates to the inescapable fact that skills are rarely learned on the first try. Even if we could accurately measure learning in hockey, a tall order, we’d see that what seems to be learning in one shift becomes a disaster in the next one. It’s only
Inside Coaching Hockey
17
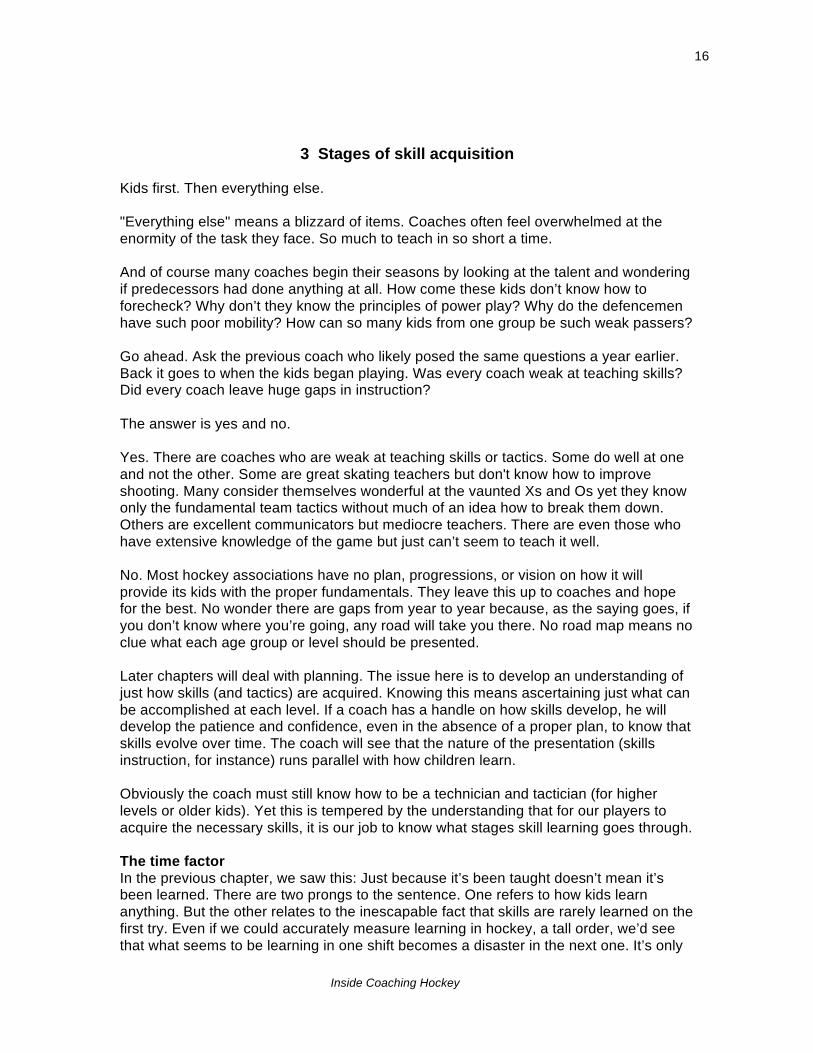
after many dozens of shifts over what could be months that the coach begins to see a pattern of learning. Finally – finally! – that little forward knows which player to cover in his own zone. No wait, but don’t do it like that on the penalty kill, Joey! Physical skills are acquired over long periods of time, the length determined by a great many factors out of the coach’s control: the player’s personal characteristics, learning style, developmental stage, maturation, growth, external factors like parents or peers, previous experiences, etc. Sometimes kids latch onto a skill or tactic quickly. The coach would like to believe it was the teaching. Undoubtedly this plays a major role. But readiness to learn is another important factor. Kids who don’t want to learn or are not trained to be ready to learn won’t. The best drills and finest teaching can’t change this truism. Stage 1 – The Jagged Edges Nevertheless, setting aside the aforementioned factors, how skills are acquired doesn’t change much for kids or adults. You’ll recall the example of the adult experimenting with the new golf club in the sports store. Imagine then if our golfer in the store is a novice. The club – any club really – is being manipulated by someone who has never played the game. Where to place the fingers and hands, how to stand, how to balance, the arc of the swing – all of these would be painfully slow to watch. In fact, the entire exercise of swinging this new instrument, acquiring the new skill of holding and swinging a golf club then hitting a ball (hopefully not in the store) resembles this jagged “circle.”
This is the first stage of skill acquisition. Timing is slow and awkward. Movement is deliberate. The person needs to “think” through the movements. In order to have a clue how to do them, a mental picture is important, too, like a photo or video. In hockey, that is what your team’s breakout looks like the first time they try it in practice. It is also what kids look like when they first learn how to stop, turn, or go backwards. It’s your team’s initial attempts at doing a complex 3 on 0 weave drill with passing. All newly acquired or taught skills pass through this stage with varying amounts of time spent in it. Kids doing a new skating skill might take a number of practices to get a handle on it. Watch five year olds skating in hockey equipment for the first time. Their attempts to get up from the ice are cute and comical. But often by the end of one ice session, they're able to get to one knee and rise to their feet. Those kids have just passed through Stage 1 of falling and getting up. Similarly, if you set up a puckhandling weave drill with pylons, there will be a few who just can’t seem to make it beyond one or two pylons without losing the puck or turning improperly. Those players are in Stage 1 of learning how to weave with a puck.
Inside Coaching Hockey
18
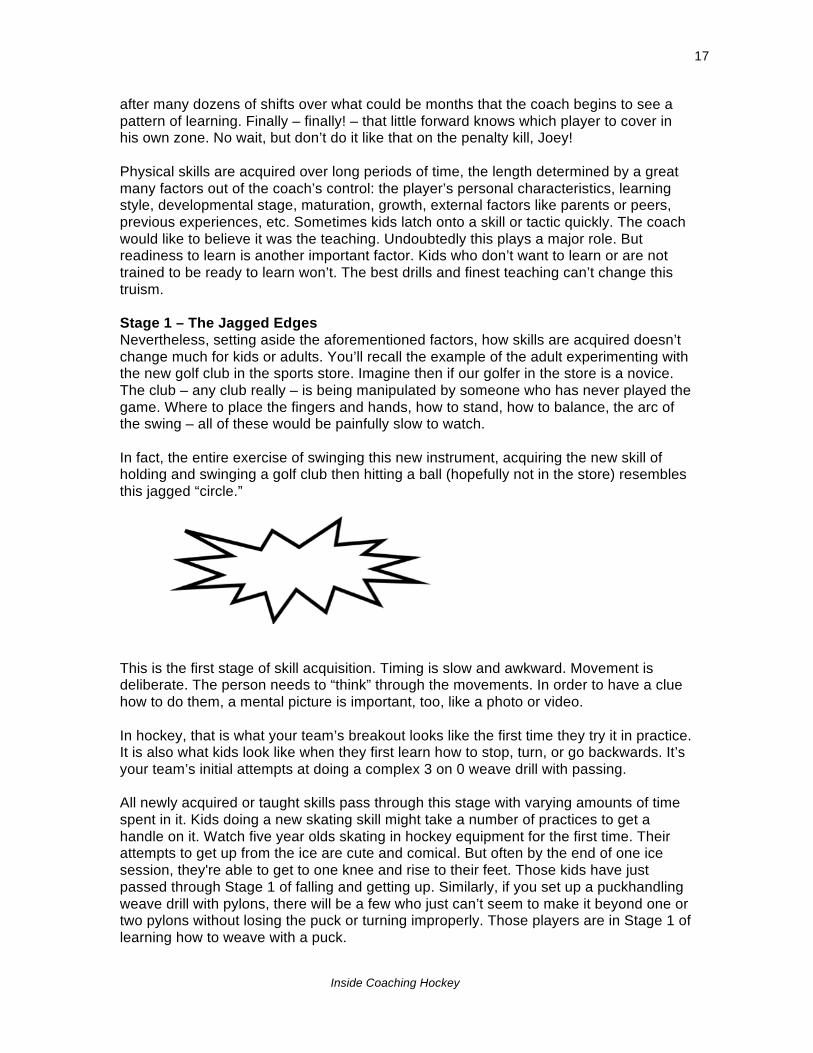
We can see that it’s very much relative to the skill and situation. Let's extend the situation to a golfer with some experience now on the driving range. Here’s what we might observe. The golfer would continue to grip the new club in various ways and then at some point take a few swings at the air. Because it’s a new club and perhaps a type the golfer has never before tried, the swings will be slow and tentative. When the golfer tries to hit the ball, it likely will not be the full and focused swing we’d see on the course. Again, it might be slow, tentative and even with a jerky motion. Here, too, this golfer is at Stage 1 with the new club. Of course, this golfer won’t be in that stage for long. Nor will the kids bumbling the pylon drill. How long one stays in this stage is dependent on motivation, experience, and quality of teaching. Stage 2 – The Blob
No, this is not an amoeba. It’s just a much less jagged circle. As we progress with skills, the movements become a little less ridged. Though still inconsistent and likely well below the level needed to apply in competition, skills in this stage have allowed the player the confidence to start doing more than one at a time. It’s the combination of skills and their execution that make a hockey player look like, well, a hockey player. The first few times kids go through that pylon drill, they may have a tough time with turns or puck control. But as their confidence and skill progress past Stage 1, the coach can begin adding components to the skill set. For instance, there might be a shot on goal at the end or a give-and-go pass with a coach in the middle of the drill. These kinds of options could not be attempted when the skill is new. It would be information and skill overload. Instead of developing some level of competence in one skill, the kids would be forced into trying many things in a short time that they’re just not ready for. Notice how readiness rears its head again. Let’s use adults again as guinea pigs since we, too, pass through these skill acquisition stages. You play pick-up hockey with friends each week. Every warm-up, you attempt slow and unsteady spinoramas with the puck. This is the skill where you’re skating backwards then suddenly spin with a tight turn on your backhand side and step up the ice. You’ve never tried it in a game though. Would you? Not unless you’d practiced it many times first in the warm-up to get past that jagged stage. Why? Because a game situation involves not just the spinorama skill but it also deals with the pressure of the player forechecking you and then the pass you should make after completing the skill. In other words, it’s the multi-tasking in a game situation that elevates the level of difficulty. This is one reason why hockey practices, where time is tight, need to include mostly multi-tasking drills. More about that in the chapters dealing with practices and drill
Inside Coaching Hockey
19
design. However, the reality of minor hockey practices is that skills need to be acquired in conjunction with others. This may slow down some parts of the practice. Yet it will allow kids a greater opportunity to slide from Jagged Edge to the Blob for most of the skills they need. Another aspect of this stage is that with some simpler skills there is evidence of kids doing things without the deliberate movement and thought evident earlier. This is particularly clear when you teach a small group tactic, like a three-player rush, for the first time. The players will move with your directions fairly slowly at first till they have a handle on your expectation of where to go. It doesn’t take long though for their speed to pick up and they’re able to rush fairly competently. Of course, this all changes once you add resistance. Throw in a defenceman or even just a backchecker and suddenly the rush breaks down. So what started out in Stage 1 and became Stage 2 has reverted to Stage 1 simply by altering the parameters of the exercise. Stage 3 – Auto-pilot
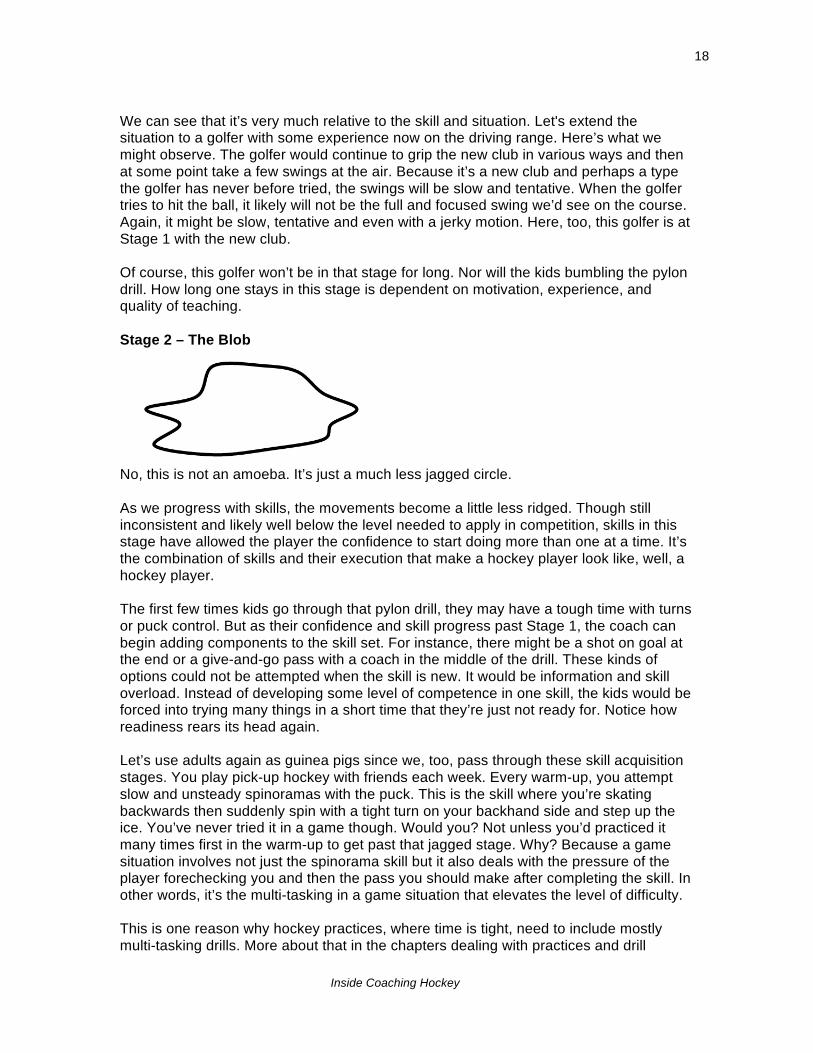
Smooth-looking, isn’t it? Here, skills or tactics are performed without much thought. The kids are now going on instinct developed through their previous experiences, progressions leading to this point, and the coach’s proper feedback. This is the stage where kids will correctly zip through a puckhandling course and be able to accomplish a couple of other tasks at the same time. This is the stage where the golfer will use that new club on the first hole of the local tournament because there’s been sufficient practice with it elsewhere. Here, when you ask those little ones to come to you on the ice, they can get to their feet themselves and glide over. In this auto-pilot stage, your defenceman knows exactly what to do when he goes behind the net, no matter the pressure. Why? Because to get there, every player has had to first muddle through the uneasiness and uncertainty associated with learning a new skill. For that defenceman, it may have taken the entire season. For the five year old, three weeks. For the golfer, a month. It varies wildly. The problem with the auto-pilot stage is that the skill is executed according to what the player knows and can do, not necessarily according to what is exactly right. Here’s an illustration using the often employed “one-off,” a term that describes inviting a guest instructor or teacher onto the ice (or the dressing room) to present expertise in a single
Inside Coaching Hockey
20
area. Power skating is the one seen most often. Vitally important to teach the kids, but if it’s only once per season, how useful was it? The instructor takes the kids through a series of fast-paced and demanding drills. There is some good instruction but obviously with an entire team, there can’t be much individual fine-tuning. The kids can already execute the skills decently enough; they’re probably between Stages 2 and 3. The “one-off” teacher forces them to go faster, but at the expense of technique simply because there just isn’t the time in a single hour to do more. In the end, the kids are faster at the skill from pushing harder but not necessarily more efficient. They can perform the skill on auto-pilot faster than before. However, correcting their skating errors now will be a major challenge for the coach since they’ve already seen they’re faster. Isn’t faster better? In Stage 3, players often feel they can already do the skill or tactic well and don’t need to improve. They can do that three-player attack under pressure, so why worry about adjusting position or looking for creative options? In this stage, while kids’ basic skills may allow them to focus more on tactics, it’s darned hard to change behaviour that is already perceived to be efficient. Let’s return to our golfer and his new club in the tournament. After nine holes, someone gives the golfer a few tips on how to improve his stroke with that club on the back nine. But to do this means a sea change in approach. Using the club is one matter; having to adjust one’s stroke is quite another. Now the golfer opts to stick with what is known rather than attempt the unknown, even if in the long run it means improved scores. The challenge for the minor hockey coach is complex. The aim is to get from one stage to the next, or at least to the doorstep of the next one. But once you get them to auto-pilot, what then? How does one refine and improve skills? Not surprisingly, this is where many coaches plateau and resort to higher tempo drills and harder practices, minus the refinement and correction so desperately needed. Skills can always get better because in a fluid, dynamic sport like hockey, every situation is different. In short, players never fully acquire all the skills and even when in the third stage, the coach must try to challenge himself to challenge them.
Inside Coaching Hockey
21
4 Skill acquisition progressions The stages of acquiring physical skills are common to all ages and activities. As stated, only the time spent in each stage and the relative complexity of the skills being learned vary. What’s just as important for minor hockey coaches to realize is that the learning of skills also passes through a clearly defined series of progressions. As with the stages, these progressions are true for acquiring any physical skill. The main difference is this: The Jagged Edge, Blob and Auto-Pilot stages will exist with or without instruction or guidance. However, the progressions for learning skills are linked to the nature of instruction and leadership. For example, a pee wee team needs to learn to exit its zone. The coach flips the puck into the corner, the kids retrieve it and come out of the zone with no direction from the coach whatsoever. It may be slow and awkward, or even quick and efficient. Yet because the coach has given no instruction, he is allowing the kids to naturally progress from Jagged Edge to Blob and perhaps even to Auto-pilot. They would have done this with or without his flipping the puck into the zone. Watch kids on any outdoor rink and we can see them working through these stages. The coach is required to understand how these stages work and that every skill must pass through them. But for the progression of skill acquisition, the coach has a direct impact on learning as a result of the kind of teaching approach. (The 3 Stages do not need a teaching approach; they exist regardless). General to Specific AND Simple to Complex General----------------------- Specific One of the great errors coaches make is to be too technical too early. As long as players are still in Stage 1, and even into Stage 2 in some cases, it’s best to “guide from the side.” This is because young players will improve their skills better if they begin with a general idea of what it involves. As confidence builds and opportunities to perform the skill increase, kids will be more ready to handle the technical help coaches love to provide. Let’s use the teaching of shooting as an illustration. We already know that providing kids a picture of what the skill should resemble is helpful. This can be with a demonstration or video. Wrist shots will be weak and erratic at the outset even though there may be someone on the ice who can demonstrate perfectly. These shooters are still in Stage 1. But as long as they have an idea of what the motion looks like and the puck arrives somewhere "in the same time zone," true technical help will only confuse the issue. When the kids have good balance, decent control before release, and so on, then the coach can modify components. This is when you would check the grip, stance and other key factors that make the shots work.
Inside Coaching Hockey
22
In fact, it’s the similar approach to be used for teaching many tactics. The first time a coach tackles 2 on 1s with the team, it’s best to just let the kids try a few attacks before narrowing down the responsibilities of each player. Simple-----------------------Complex Concurrent with the general to specific approach is the one where skills (and, yes, tactics) are presented in simplified forms. Complexities are added over time. Taking a wrist shot against the boards is a simple task, even with some instruction. It becomes a far more challenging skill when a pass reception is added or the player must shoot on net, while moving, from either wing. Imagine the increased level of difficulty when there’s a defender in front or a backchecker chasing. Now the skill has become quite complex indeed. This remains true for teaching tactics. That same 2 on 1 in a flow drill with no resistance and plenty of space to wheel and deal becomes a much more difficult tactic when the space is reduced or the attackers have to start from a standing position or transition play is incorporated. These two concepts overlap. Mostly, coaches need to begin with general, simple instruction and work their way along the continuum. Now keep in mind this is relative to the age group and caliber. The AA or AAA competitive team coach will have an entirely different perspective on what’s simple or not. To those kids, with a strong skills base that’s in Stage 3, simple may mean a power play with one option. Complex may mean four options. Understanding skill progression The three stages outlined in the previous chapter capture the essence of how skills are acquired. It’s also important for the coach to understand that the continuum within these stages looks like this: ExplorationDiscoveryCombinationSmoothing outRefinement New skills need to be explored. Our novice golfer in the sports store is a prime example. But for hockey it may mean little more than giving a child a puck and stepping back. Shortly, kids acquire a certain amount of proficiency in the skill, or at least enough for it to resemble what the coach hoped it would. Next comes the ability to combine skills (multi-task) and experiment with them in various ways. In the smoothing out phase, informal competition and modified games can enhance learning since they are motivators. Here, the coach needs to make sure not to get too technical and teach “over their heads.” Finally, in refined skill we see kids trying things in a competitive environment. This may or may not mean an actual game. They may first need to experience success at the skill or tactic in a competitive practice environment such as a high tempo, small space drill. Refining performance does not come automatically to kids. All they manage to do is perfect what they’ve got at perhaps a higher speed. The coach needs to know how to
Inside Coaching Hockey
23
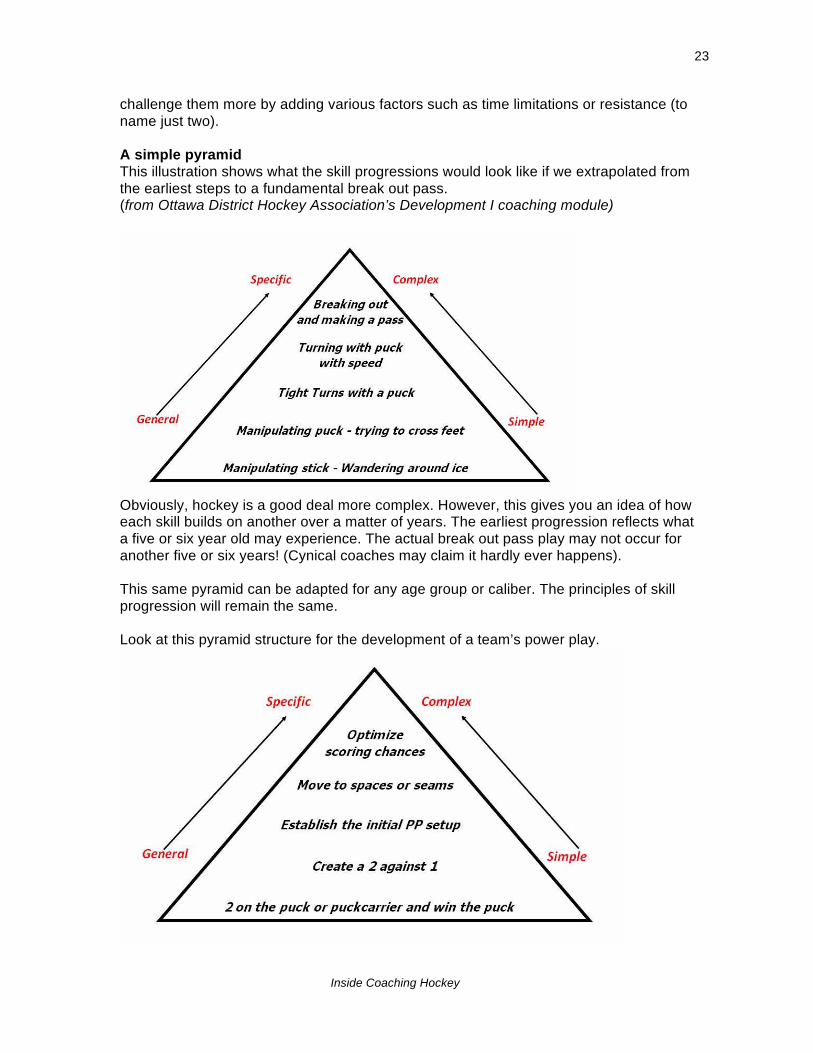
challenge them more by adding various factors such as time limitations or resistance (to name just two). A simple pyramid This illustration shows what the skill progressions would look like if we extrapolated from the earliest steps to a fundamental break out pass. (from Ottawa District Hockey Association’s Development I coaching module)
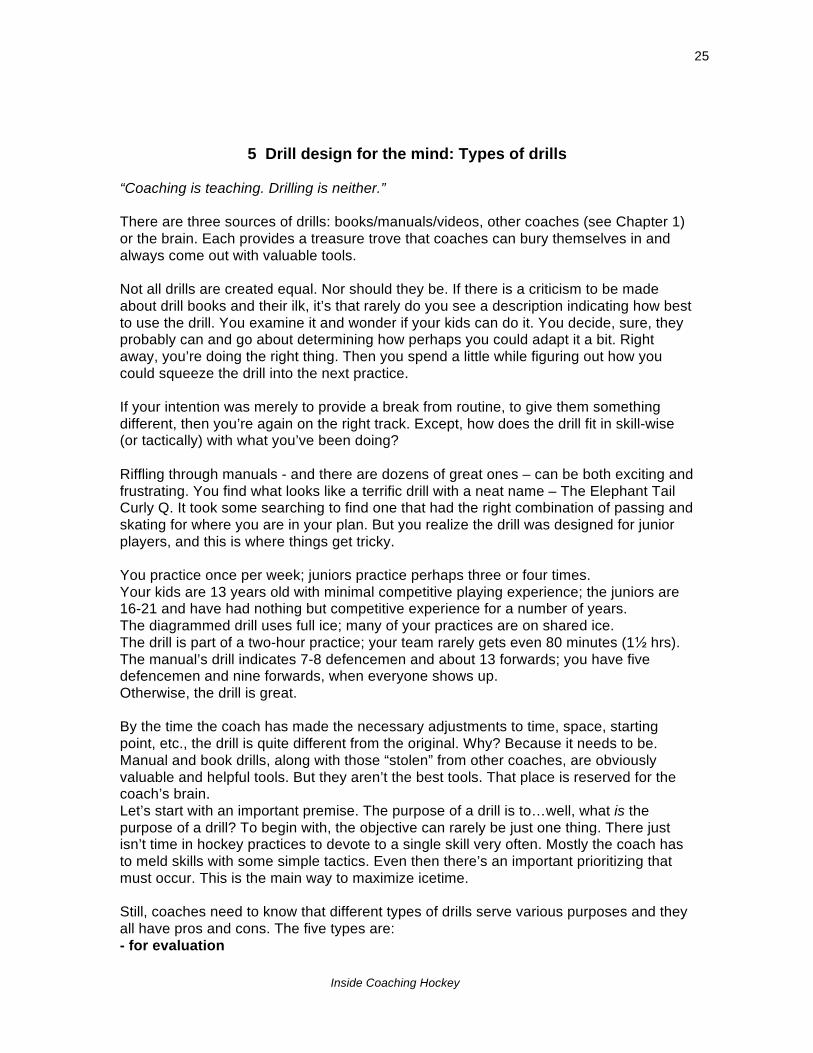
Obviously, hockey is a good deal more complex. However, this gives you an idea of how each skill builds on another over a matter of years. The earliest progression reflects what a five or six year old may experience. The actual break out pass play may not occur for another five or six years! (Cynical coaches may claim it hardly ever happens). This same pyramid can be adapted for any age group or caliber. The principles of skill progression will remain the same. Look at this pyramid structure for the development of a team’s power play.

Inside Coaching Hockey
24
At the top is the ultimate objective of obtaining the best scoring chance possible. To accomplish it, the coach will have to take the team through a series of skill learning progressions that must begin with puck possession. And how do you get the puck on the power play? By outnumbering the opposition around it, preferably two against one (broken down to its simplest component). In this case though, the progression may only take the team a few practices. Nevertheless, to ensure success, the coach needs to get them to understand and apply the basic tenets of power play before the set up can be used. The players will quickly move from being in the Jagged Edge stage to Blob, but it may yet be a while before they’re completely comfortable with doing a power play in a game. It doesn’t matter. They still need to be brought through the progressions at a pace that allows them to succeed along each step but still challenges them. Every team tactic (and of course every skill) needs to be approached this way. Regardless of our opinions of the school system, it functions on a similar basis. Single digit addition at the beginning to algebraic functions at the end. Simple sentences at the beginning to persuasive essays at the end.
Inside Coaching Hockey
25
5 Drill design for the mind: Types of drills “Coaching is teaching. Drilling is neither.” There are three sources of drills: books/manuals/videos, other coaches (see Chapter 1) or the brain. Each provides a treasure trove that coaches can bury themselves in and always come out with valuable tools. Not all drills are created equal. Nor should they be. If there is a criticism to be made about drill books and their ilk, it’s that rarely do you see a description indicating how best to use the drill. You examine it and wonder if your kids can do it. You decide, sure, they probably can and go about determining how perhaps you could adapt it a bit. Right away, you’re doing the right thing. Then you spend a little while figuring out how you could squeeze the drill into the next practice. If your intention was merely to provide a break from routine, to give them something different, then you’re again on the right track. Except, how does the drill fit in skill-wise (or tactically) with what you’ve been doing? Riffling through manuals - and there are dozens of great ones – can be both exciting and frustrating. You find what looks like a terrific drill with a neat name – The Elephant Tail Curly Q. It took some searching to find one that had the right combination of passing and skating for where you are in your plan. But you realize the drill was designed for junior players, and this is where things get tricky. You practice once per week; juniors practice perhaps three or four times. Your kids are 13 years old with minimal competitive playing experience; the juniors are 16-21 and have had nothing but competitive experience for a number of years. The diagrammed drill uses full ice; many of your practices are on shared ice. The drill is part of a two-hour practice; your team rarely gets even 80 minutes (1½ hrs). The manual’s drill indicates 7-8 defencemen and about 13 forwards; you have five defencemen and nine forwards, when everyone shows up. Otherwise, the drill is great. By the time the coach has made the necessary adjustments to time, space, starting point, etc., the drill is quite different from the original. Why? Because it needs to be. Manual and book drills, along with those “stolen” from other coaches, are obviously valuable and helpful tools. But they aren’t the best tools. That place is reserved for the coach’s brain. Let’s start with an important premise. The purpose of a drill is to…well, what is the purpose of a drill? To begin with, the objective can rarely be just one thing. There just isn’t time in hockey practices to devote to a single skill very often. Mostly the coach has to meld skills with some simple tactics. Even then there’s an important prioritizing that must occur. This is the main way to maximize icetime. Still, coaches need to know that different types of drills serve various purposes and they all have pros and cons. The five types are: - for evaluation
Inside Coaching Hockey
26
- for teaching news skills or tactics - for application and eventual mastery - for conditioning - for the pure fun of it For evaluation: Drills designed to evaluate hockey skills are time-consuming and, as we already know, time is tight and expensive. You need to be very well organized to conduct such sessions. Plus, given the fluid nature of the sport’s skills, how important is one specific skill evaluated by itself? Other questions you need to ask when using evaluation drills: What skills are being evaluated? - Yes, there are simple drills to isolate single skills. If the aim is simply to determine how well a child does at this one skill, then it makes sense. But even here, how in fact does one evaluate a skill? It’s not like a math test where the right or wrong answers, plus the processes, are clear indicators of knowledge. Even with a well-designed skill drill, it remains a subjective call. And if speed is part of the exercise, is speed at the skill the priority, or skill competence? What space on the ice best illustrates the skill? - Kids don’t require much space, nor do their skills, for evaluation. If one is measuring speed, for example, a youngster may take half the space of an adult to reach top speed. What speed is required? - Is speed important, or quickness? There’s quite a difference. And if child A is faster in a straight line than child B, what’s the conclusion? How many tries are needed to evaluate effectively? - The number of tries needed to execute a drill will be covered in more detail in a later chapter. However, note that kids doing evaluation drills may need repeated chances to ensure they’ve done it correctly. Keep in mind that it’s tough to keep secrets in a rink; everyone knows it’s an evaluation session and so nerves play a role. If a child falls down or misses pylons, what does this say about the child’s ability? Or is it the environment? How much time is required to allow for these tries? - Ice is expensive and rarely plentiful. Are pure evaluation drills the best use of icetime? Would more be gained with hybrid drills or scrimmages? Does the drill actually show the skill being performed in a manner consistent with the needs of the player/team/level? - The most common error in evaluation drills is using ones that are either far too simple or too difficult for the kids. A good evaluation drill needs to be reflective of what the kids have been taught or should be able to perform. As a guideline, pure evaluation drills are to be used judiciously. If timed, the need for speed is questionable. If judged, the adjudicators’ decisions are questioned. It’s also been argued that probably the best way to evaluate hockey skills among kids is in scrimmages. This, too, will be expanded upon in the chapter about player evaluation. But drills used solely to evaluate don’t necessarily paint the whole picture of what a youngster is capable of. Certainly there seems to have been an attempt in recent times
Inside Coaching Hockey
27
to “statisticize” hockey, to attach the same kind of import to player stats as might be used in other major sports like basketball or baseball. Speed to first base to beat an infield grounder may be significant because it’s a single skill. The same may be said for foul shot percentage or rebounds. But hockey players possess not just one single but an amalgam of many. How to measure these is a challenge? For teaching new skills or tactics We’re often our own worst enemies insofar as teaching is concerned. Coaches are eager, bent on sharing knowledge and helping the kids improve. In the constraints of a hockey practice, we tend to feel rushed. “Quickly now, let’s pour more skills and tactics into their brains and get them doing these right away. Sooner if possible.” Of course, this is unrealistic. You can’t teach kids basic math skills one day and expect them to solve two-step algebraic equations the next. You can’t have them learn to play basic scales on the piano then jump to Mozart right away. We need to use and apply drills in the similar sensible way we would for any other skill. Suggestions: - When teaching anything new, drills should be at a slower pace, within the comfort zone (you can’t learn new skills at a high speed) - A non-competitive drill (no races or body/stick checking etc.). Competition is seen to impede performance when something new is being learned. - Limit multi-skill or multi-tactics – focus must be on 1-2 things being taught (recall the stages of skill acquisition) - Must be in small groups or individually - Always stop to correct major errors (identify the key teaching points – KTPs - before starting) - Connect skills to tactics through progressions over numerous practices – Repetition is important but some variance in how the skill is presented works best. The same drill every practice, or even every couple of practices, can become drudgery and no longer challenging. For application or mastery: Somewhere along the learning continuum, your players will need drills that force them to apply their new skills or tactics. It used to be these were called game-like drills. It’s a misleading name because replicating game conditions in any drill is difficult. There isn’t the same intensity; patterns are predictable; teammates won’t work so hard against each other; and usually you can’t effectively incorporate enough players into a drill to make it work. However, you do need drills that “up the ante.” In other words, they’re more challenging and generally give the players the idea that you’ve taken them to a higher level. Here are some suggestions on how to have drills to accomplish this: - As close to “game speed” as possible - Use wider, longer spaces – small space accelerates the pace and can frustrate performance if done too early in the skill acquisition - Use varied and gradually increased resistance (without over-training) from side, front or rear – reducing space increases the pace, not the resistance level
Inside Coaching Hockey
28
- Infrequent stoppages – let the players work out the kinks by giving them individual correction rather than group – sometimes saying less goes further - As players improve, vary the drill environment – players learn better when put in different situations to apply the same skill/tactic. They may have “mastered” it in one type of space, so you need to put them in others. For conditioning: Drills alone cannot condition effectively unless teams practice multiple times per week. It’s far more effective to have up-tempo practices. Hockey is steeped in many traditions and some, while tried and true 30 years ago or more, require revisiting. With one practice per week, kids cannot get in shape through on-ice training alone. The training effect has mostly worn off within 48 hours. It’s especially important to recognize this when applying conditioning drills. It’s not uncommon to see coaches do such drills for the last 10 or 15 minutes of practice, figuring (wrongly) that the hard skating will whip the kids into shape. In fact, it will whip them into exhaustion. Aside from such drills being mostly repetitive or boring, the notion that you can condition any athlete in 15 minutes per week is nonsense. Most minor hockey teams practice once or twice per week. As soon as the coach lets on a conditioning drill is coming, there is usually a negative reaction. It’s not hard to understand why. They aren’t normally fun and if at the end of practice, kids are already tired. But there are other considerations. When tired, there is the increased risk of injury since players are expected to go as hard as they can. And, since speed is the expectation, all the bad habits the kids have been trying to break (or the coach is attempting to break) return with a vengeance because the brain is just too tired to think about the wonderful new skills recently learned. Drills for the sake of conditioning have a place in certain environments. Camps specifically designed to condition players are an obvious one. Teams with frequent practices can devote portions of practice time to pure conditioning, though again, higher tempo, challenging practices will usually accomplish the same thing. For the pure fun of it: Yes, it’s just fine to do something silly, to use a drill or activity that may not have anything to do with the skills you’ve presented, but is just fun. This is not to say all drills shouldn’t be fun. They need to be enjoyable, well-designed, and purposeful. But there comes a time when a break from the norm is just what the doctor ordered. It can be in the form of a drill or a Low Organization Game (LOG) or even a mini-scrimmage. Take 5 minutes or 20 minutes. Do it at the beginning or middle or end of the practice. No one understands your team’s culture and mood better than the coach. And sometimes, for whatever nebulous reason you can dream up, a fun activity is right. Some years ago, one of Hockey Canada’s instructional videos was about teaching techniques. It began with a clip of Dave King running a Team Canada practice in the days before the pros represented the country. The practice began with King throwing a puck on the ice and allowing the players to scrimmage, with everyone on at one time. Meanwhile, he floated around the periphery, whistling and laughing, “Hey, it’s 11 vs. 11, let’s go now, boys!”

Inside Coaching Hockey
29
Everyone likes to play. Your fun drill doesn’t need to be highly structured nor particularly brilliant. Do something different in a different way at a different time of the practice. It always pays off.
Inside Coaching Hockey
30
6 Drill design for the mind: The nitty gritty Knowing the types of drills is handy for those occasions when a particular type is required, such as during a tryout phase. However, drills will mostly be a mixed bag, usually because of time and space constraints. This is a fact of life minor hockey coaches accept. The result is that drill design and selection is more difficult since each one must be multi-purpose. What’s more, these drills need to link with each other to form an effective practice. One crummy or boring drill can ruin the rest of a practice. There are a host of “nitty gritty” things about drills coaches have to pay attention to. Effective coaches seem to understand instinctively the importance of using the right drill at the right time and moving easily from one to another. Beginnings and ends The traditional beginning of a drill sees the coach gather players to a spot on the ice, diagram the drill, toss in the key points, then disperse them to execute it. Mostly, this works. Still, coaches have to work at ensuring the drill is clear and the players ready. Too often this is assumed, a grievous error. Here’s how to ensure the drill will go as desired: The meeting spot: The younger the kids, the more important it is to have a regular meeting spot. Everyone likes consistency and habit. Sometimes the meeting spot is determined by where the rink diagram is posted. A team of novices (age 7-8) may take 20-30 seconds or more to reach a spot whereas midgets, a third of that. And some of this depends on where the last drill ended. With younger kids, it’s very important to arrange drills so that the previous one ends as close to the meeting spot as possible. Look at the math. If you do five drills in a practice and it takes 30 seconds or so to gather the kids and ready them for the explanation each time, you’ve lost more than two valuable minutes of practice for nothing other than poor planning. The teaching technique: Readiness to learn applies not just to skill acquisition but also to listening skills. Ideally, kids should be instructed to drop to one knee at the meeting spot. And don’t forget to tell them they are to arrive standing up, then kneel. Too often kids barrel into the spot and slide through their teammates. Aside from the obvious injury risk, it’s quite disruptive to the group and the coach’s need to have them ready to listen. Next up is the presentation. Generally, the shorter the better. The attention span of kids on a rink is short. They want to get going. Who can blame them? If a drill takes long to explain, it’s likely inappropriate. Similarly, one that needs a few demonstrations or walk-throughs may be telling you the kids aren’t ready for it. Clear-clear-clear!: Maybe some coaches should take mini-courses in art, graphic design or drawing because it’s so important the rink diagram explanation is clear. We know we have to be better attuned these days to kids’ learning styles. One of these is obviously that not everyone is a visual learner. Some players will require not just seeing the diagram but also trying the drill a few times. Others will never make the transference from diagram to ice. The onus is on the coach to make the presentation such that any child could at least get a handle on the drill. Along with the diagram is the use of hockey shorthand. Kids need to be shown that 2/1 next to a drill is not a fraction; it’s shorthand
Inside Coaching Hockey
31
for a 2 against 1. Every coach has his own way of describing these things, but the kids need to know it, too. Take the time to explain it. Water breaks: The best moments for kids to be given their specific water breaks is just before they’re gathered to the coaching spot. This is because the water will refresh them and wake them up, making them better able to listen attentively. This doesn’t preclude them having water during drills as they pass the bench. To the drill: Everything is ready to get the drill going. Send the kids to where they need to be. This is not the time to discuss things with other coaches or pull aside a group of kids. Get started! Once underway, it can be stopped or the coaches can discuss (coach! teach!) it with kids as it’s being done. So when does the drill start? There are numerous ways: Shouting “Go!” – Blowing the whistle – Telling the first player to go when ready – After a countdown (5-4-3…) – When the goalies slap their sticks indicating they’re ready. The important question to ask – and this will be addressed shortly in more detail – is how much do you want players to decide for themselves. Is it better for them to learn the cues to start a drill without the coach always yelling “GO!” Probably, yes. At the end: How do you know when a drill is “done”? You could put a time limit on it. Or decide to stop when each player has had X number of tries at it. Many coaches do it “by feel.” Time and numbers of tries play roles, but an effective drill is over when it’s still effective, when the kids are still enjoying it, when it hasn’t really slowed down. The kids leave the drill excited about what they just accomplished and eager to move to another one. Often, players will ask the coach to continue it or do it next practice. This is a sure sign of drill success. Ending the drill means preparing to link it to the next one. In other words, it’s over, bring them in for a drink and to the meeting spot and move on. If the drill is scattered over the entire rink, be aware that it will take longer for them to come in. This is particularly true if the kids are younger or weaker caliber. Last drill of the practice: The coach should end the practice, not the rink attendant buzzing the team off the ice. A team should not be in the middle of a drill when it’s time to clear the ice. It usually happens when everyone gets caught up in a drill and loses track of time. It would be more effective if the coach cut down the time of the last activity to allow a minute at the end to gather equipment and give the kids a cool-down skate of even a lap or two. Coaches need to keep an eye on the clock, or have an assistant do it. Linking the Parts Let’s assume the practice has a theme and objectives (to be covered in the section on practice planning). Each drill and activity in a practice needs to be related to the theme. A theme of developing team passing drills would not include a backchecking drill unless the backcheckers are meant to offer resistance to the passing. And of course, you’d have to have a drill showing what backcheckers do before adding them to the passing. Practices don’t need to have such narrow themes, of course. Sometimes it’s sufficient to state a general theme or objective related to improving communication or quickness to react. We might refer to these as the softer skills or tactics. Regardless, these drills also need to be linked to each other. There must be a forward, or at the very least, lateral progression in drills. What do these mean?
Inside Coaching Hockey
32
Lateral progression seems like an oxymoron. How can you progress laterally? A tactic can indeed progress laterally because the mental skills associated will improve. Here’s an example. You want to work on outnumbering opponents around the puck in numerous places on the rink to establish offensive foundations. So you create a series of 2 against 1 drills: from the blueline, in the corners, at centre ice, etc. Each situation has a 2 against 1 play built into a specific drill. Now the coach could opt to spend 40 minutes on these. While they’re all the same tactic, they’re being done differently in new situations, perhaps even with differing positions (2 forwards vs. 1 defenceman or 1 forward+1 defenceman vs. 1 defenceman, etc.) This is a lateral progression. There’s been no change in numbers of players in the drills. However, the tactic being highlighted does change and thus the players’ views of the tactic progress from the staid, simplistic 2 vs. 1 to a myriad of choices. The downsides to this approach include boredom with the same tactic and lack of variety in practice. On the other hand, it certainly does drive home the understanding of what the tactic involves how much it changes depending on other factors. In this type of sequence of drills, there would be little if any build up to the tactic. Forward progression (which now seems redundant) means that during any one practice, there is indeed a building from a certain level of skill or tactics to a higher or more complex and challenging one. The aforementioned 2 against 1 series offers little if any alteration in space, time, or resistance. With a forward progression link, a coach may begin with basic puckhandling and passing drills, build to a bit of keepaway/light resistance drills, and then pick one or two situations involving the 2 against 1. Why? Because the coach recognizes the kids first need the skill foundation, then an understanding of finding open space before they can conquer the more complex 2 against 1s. This principle would work even with higher level players. For instance, if a key objective were to teach defensive zone play, a proper progression might include drills for some of the following: stick checking, angling, body position, body checking, containment checks, agility skating and then the concepts behind playing 1 against 1 or 2 against 2 in the defensive zone. How long such a forward progression would take depends on many factors. However, in minor hockey, trying to teach almost any complex skill or basic tactic without a similar forward progression is doomed for limited success, if not failure. It’s now easier to see why using good drills require far more thought than just copying and pasting from a manual.
Inside Coaching Hockey
33
7 Drill design for the mind: Getting creative Many a drill (and probably many a practice as well) has been scribbled on a napkin or sticky note. Who hasn’t run a practice, discovered one drill just isn’t working, and hastily drew up something in the margin of the original plan? These weren’t researched drills. They’re either ones tried and tested in some previous time, or made up on the spot. Panic happens and maybe when coaches are under pressure (eg. get this thing drawn before the kids return from their water break!) they need to resort to creativity to solve a problem. A wee digression: In his powerful short story “To build a fire,” Jack London describes a man lost in the Yukon in winter trying to find his way back to base camp. But from the outset, the author writes, he was doomed for he was “without imagination.” This was a man unfamiliar with survival techniques and not creative enough to solve problems in that harsh environment. Fortunately, hockey coaches do not face life or death, unless you count restless kids slapping pucks around the boards as death by a thousand wobbly shots. What coaches do possess is the power of their experiences and knowledge to use their imaginations to create effective drills. A coach “without imagination” would be the one who doggedly pursues drill book answers and doesn’t know how to adapt. Woe to the kids on that team. Every coach has faced the situation where the practice plan has a good outline but needs a couple of specific items. It might take hours to search the home library for just the right drill, so the coach is left to his own devices. Where to start? No one knows the team better than the coach and therein lies the advantage. The coach knows what and how much the kids can handle. The coach knows the players’ histories’ from that season, what’s been taught, how they perform in games, what they respond positively to, and mostly what their needs are. Given all this, the best place to start when creating a drill from scratch is to look at the objective straight in the eye. Let’s take an example: A competitive bantam team coach wants his players to be able to pass under pressure in the offensive zone and get a decent scoring chance. A clear objective that hasn’t yet specified numbers, location or even the type of tactic. But it’s specific enough to lead to a few conclusions. These are: - Passing against resistance – to start, use only one defender – maybe add one later - Easiest play to get the message across is out of the corner - Defender should be a defenceman – later, if the drill works, change the location and make it a forward - Use two attackers only – if they can’t find a hole or seam, how will 3? - Small space increases the pace – but how small? – let’s say from the corner to the top of the circle to the net, about ¼ of the zone Does everyone start from a standing position or what? Nothing in hockey begins from a standing still position, except faceoffs. So we need to create a situation where the attackers get a bit of a lead but move to an open puck while being chased. This will force

Inside Coaching Hockey
34
them to look before they get there to gauge the resistance and react accordingly. Once they get the puck, they can turn and attack. The defender moves, well, when? If we want the attackers to have any chance of success, make the defender wait for a 2-count or when the puck is touched. This can be changed once the coach determines the kids understand the timing. How does the drill start? With the puck chipped into the corner by the coach. Older players like to do this themselves and will challenge teammates with tougher situations. This is fine so long as the challenge isn’t too hard. How does the drill end? Shot on net? Goal? Time limit? When the puck has left a specific space? Each of these is effective, but start with the one most likely to replicate game possession time in the offensive zone. Change parameters after a few minutes. Remember there are other kids who need to try the drill and they all need multiple reps at it. What does this drill look like now? Here it is…The group of Os on the A side are waiting their turn as are the group across the rink on the B side. The defencemen (∆) await in the high slot.
There’s a coach (©) for each part of the zone. One defender starts at the hash mark while two attackers begin in the circle on the defender’s side of the faceoff dot. The coach flips a puck into the corner and away they go. Problems? The only major one is that there are a lot of players waiting their turns. This would be much more effective by splitting the team to each end of the rink. That way 3 defencemen and, say, 4-5 forwards have more reps in their zones. The downside to this is that if the head coach (or the one running the drill) doesn’t have confidence in the other coach, there will be mixed messages sent to the two ends.
Inside Coaching Hockey
35
Simple drill. But it includes the necessary elements to address the coach’s objective. Drills don’t need to be fancy or flow beautifully. They need to work. A second example: An atom coach wants to improve his kids’ ability to handle the puck in traffic. It’s tough to find a drill for this since most puckhandling drills involving going around objects or defenders. Objects like pylons are obviously passive – inert is more accurate – and so may be a decent place to start because they offer no resistance. On the other hand, the sameness of moves needed to go around them doesn’t challenge the player’s puckhandling. A traditional pylon drill won’t cut it. Then how about a non-traditional one? No diagram needed for this; the drill is simple. The team is split in half, one group goes at a time for about 15 seconds. The time frame is an illustration but it’s fairly close to what atoms could handle without getting too fatigued. The coach holds a handful of small pylons. He skates anywhere in the zone and indiscriminately tosses pylons in the zone as the players stickhandle. Meanwhile, an assistant coach is also skating in the zone and with his stick gently bats pylons to different spots. What’s happening in this drill? The kids are skating anywhere, making decisions according to changing space and pylon placement. Their puckhandling skills are being challenged by the constant changes in where the pylons are. Nothing is predictable. To make it more interesting, the coach tells the group that their skating has to switch from forward to backward to forward, etc., every 3 seconds. Now skating agility and puckhandling have been challenged. As before, a simple drill but one that forces the kids to be creative every second. Of course there is no resistance yet, but the objective was to improve puckhandling in traffic. If the play space is shrunk, the amount of traffic is increased. So far, the resistance has been non-existent. The coach wants this to progress to a point where the kids have to make some moves against defenders without it being impossible. The solution: Instead of half the team waiting its turn, these kids drop to one knee anywhere in the zone. As puckhandlers go by, they try to stickcheck them. The checkers are not permitted to get up, dive, trip, slash, or wave their sticks like broadswords. When the time limit is reached, the puckhandlers drop to one knee wherever they are and the checkers take up the pucks. Are the pylons still used? They could. That depends how difficult the coach wants the exercise to be. Will this drill work? Indeed. Because the kids are constantly moving, they’re being challenged to read and react to find the holes in traffic and avoid checkers, and because the drill has a light competitive aspect that makes it fun. After a couple of tries, the coach can stop the group, throw in some instruction on puckhandling and then allow the kids to put it into practice right away. Creativity at work? That atom coach has strayed from the normal weaves or patterned drills with defined start and stop points. The drill creates something that puts the kids into a situation where they must apply and adapt throughout the drill.
Inside Coaching Hockey
36
8 KTPs and F.I.T. KTPs No matter the drill nor where it came from, the fundamental principle underlying its very existence is that it is a teaching tool. There are other tools available. Films, photos, talks all play roles. But none is as effective to illustrate what’s being taught as a well-designed, creative drill. The foundation of what the drill is supposed to illustrate lies in the Key Teaching Points, or KTPs. (These are referred to in various books and manuals as teaching points or key points or key instructional points, etc. They all mean the same thing.) A KTP is that part of a skill or tactic which the drill is meant to highlight AND which the coach is going to teach or review. Every drill must have at least one KTP. In other words, a drill for drill’s sake serves no purpose. Even a fun game like the time-worn Tag has a KTP. Its objective is to help agility skating as well as read and react skills. Both might be taught by the coach at various times in such an activity. When you design a drill – or “steal” one – you need to keep in mind what specific things will be taught. Just as importantly, you have to be careful not to stray from these into teaching things the kids aren’t ready for, haven’t heard/seen, or are only peripherally connected to the drill. What is a KTP? Essentially it’s the skill component or tactic component being taught or reviewed. Each of these has numerous parts. The KTP is merely one. However, it is the most important part needed for that time and place. When teaching kids slapshots, a KTP could be how and where to strike the puck. That may not be the most important part of the skill overall. However, for perhaps that team and given the coach’s analysis of their shooting, it may be the one thing they must focus on. It’s up to the coach to figure out if this particular KTP is one that will help the players right now. Let’s return to the 2 against 1 drill of the previous chapter. For the two attackers, vital KTPs could be a list including: - puck retrieval skills and tight turns (if they can’t turn and dig out the puck, how does an attack even start?) - finding open space when there isn’t much - this KTP is a tactic and a cognitive skill – the kids need to be shown both where the open spaces may be and how to get there - the kinds of passes to make, assuming the passing skills are decent and the players can make the right kind of pass at the right time Not all of these should be presented in one practice. It would be information overload. So the coach must prioritize according to the current and short-term needs. The drill has been designed for its simplicity and ability to highlight some skills. But it also needs to be able to focus on the right KTPs.
Inside Coaching Hockey
37
Same drill, but from the defender’s standpoint: What are the KTPs? They might include: - transition skating, ie. how far and fast to go up or back - stickchecking skills - decisions on when to pressure the puck/puckcarrier - force the play to where on the ice? Here again, the coach should get the defender to work on just one or two skills at a time. Indeed, older better skilled players may be able to handle more, but only if they’ve been first told what to work on. It’s not productive, and will be frustrating for the player, to explain the importance of stickchecks, then correct the skating skills. "Hey coach," the child may wonder, "what was my objective in this?" Another example: There was the puckhandling drill for atoms in which we created two groups, one for puckhandling and the other for kneeling and stickchecking. Can you list the KTPs for these puckhandlers? Which ones would need to be presented first? Why? The drill is only valuable if what’s being taught in it is appropriate. More KTP bits: Remember the objective: to design creative drills that “force” kids to think, make decisions, then react effectively. But how…? - Drills must highlight Key Teaching Points (KTPs) by putting players in situations or environments where they must use KTPs to succeed. - Determine space requirements to highlight a KTP – it’s less than you think! - Use more drills where stopping, starting, restarting, are cued visually rather than aurally. Let the players make some decisions. These decisions themselves become KTPs With a well-designed drill, formal instruction could be minimized. Eg. When a player skates around a circle doing crossovers, do you need to actually teach the crossover itself, or some other KTP? Eg. If a player skates down the opposite wing in a shooting drill, there are only two different ways a forehand shot can be taken effectively. If you’ve taught both and they try both, isn’t it then just a matter of gaining confidence and coordination for the shot? The coaches’ locations during a drill are vital for providing the right feedback on KTPs at the right moment of execution, even if the feedback is a nod. Eg. Where do you stand to teach slapshots from the blueline? Self-help questions about KTPs You teach stickhandling to lower-skilled kids. You want them to “roll the wrists” in order learn the proper grip and technique. Other than a puck, what else can be used to illustrate proper grip and hand/arm movement, and why? What’s the role of hand placement on the stick or stick length? You’ve been teaching your kids backward skating through wave drills and the like, but they’ve haven’t progressed much and can’t get the concept of c-cuts. What simple exercise can you create in which they have no choice but to do c-cuts to succeed?
Inside Coaching Hockey
38
You teach your players good shooting technique on the move from various spots on the rink. However, in the drills, few are scoring and many are missing the net. What was your objective again? Was it shooting technique, or scoring? Your team is not passing well, not working together, especially on the attack and into the offensive zone. How confident are the kids with their passing skills? What can you do about that? Can you think of a simple low organization game (LOG) in which passing and teamwork are essential? How much space do you expect your kids to use on the attack? Your team is allowing too many goals and scoring chances against. You’ve shown the kids where to be in the defensive zone, but it hasn’t helped. Have you identified the prime scoring area(s)? Have you tried to exclude/ignore traditional coverage areas not pertinent to this level? Have you done drills at the 1 vs. 1 or 2 vs. 2 levels? How much space do you expect the kids to cover in the defensive zone? F.I.T. Work:rest Conditioning principles need to be built into an entire practice, even if it is only once per week. Doing this means applying the principles of work:rest ratios. A work:rest ratio is the approximate amount of time a player will be active (working) in a drill vs. doing nothing (resting, awaiting a turn, etc.). It could be 5 seconds of work followed by 15 seconds of rest or 20 seconds of work to 60 seconds of rest (each a ratio of 1:3). Though the ratios are the same, that’s quite a difference. What things would you want your players to do in a drill for 20 straight seconds that would be so tiring as to require a full minute rest? How often would they do the drill? On the other hand, 5 seconds of work isn’t demanding and 15 seconds rest doesn’t seem like a lot. But what if this were done unabated for 5 minutes? The ratio will vary from drill to drill within a practice and also from one time of the season to another. As you can also see, the nature of your drill and its expectations must be part of the equation. It’s a tricky balance between a drill that is too short to be effective versus one that’s too long and too tough. While you can’t condition kids in a single practice, you can certainly improve their fitness levels to perform certain tasks. A bodychecking drill couldn’t go on for 20 or 30 seconds because it’s exhausting, let alone unrealistic. And once fatigue sets in, technique suffers and safety becomes an issue. The drill may be brilliant, but… Over a season, a coach might want players to be able to handle ratios of 1:3 or 1:4. Yet as they approach playoffs, the need to hold off fatigue (what’s known as the anaerobic threshold) yet still execute well becomes more important. Thus the ratio in practices would need to change to 1:2 or even 1:1. Work time may increase and rest intervals
Inside Coaching Hockey
39
shortened. This is a classic approach to training in any sport and one that works. The danger is in adjusting these too soon or with new skills/tactics. Tired kids are not able to execute well. Mind you, if there’s not much physical challenge, the drill will drift into slumberland, too. Every drill needs to be designed with the work:rest ratio in mind. To accomplish this means understanding the principles of F.I.T. What is F.I.T.? F = Frequency of training/practicing: How often are they on the ice (or alternate training venue)? I = Intensity of the drill: How hard do they need to work (keeping in mind the work:rest ratio)? T = Time it takes to do the drill: How long will they spend in the drill? With infrequent minor hockey practice schedules, drills solely for conditioning are not very effective. It’s far more useful to apply proper conditioning principles throughout all drills. F.I.T. helps govern not just the design of the drill but its effectiveness in challenging the players mentally and physically. This is an important consideration when “stealing” from manuals or making up drills. A fundamental understanding of how and when young bodies can get into shape underlies drill use. For instance, not all drills in a practice can have the same intensity (such as a work:rest ratio of 1:2), especially if the frequency of practices is, say, three days in four. Moreover, if the coach sets aside 20 minutes for an intense drill, will this be too much just for that drill? Let’s break down the three F.I.T. components a little more and apply them to practice situations. Frequency (F): Lack of practice time is everyone’s complaint. The more infrequent the practices, the more thought that needs to be put into each drill so there is some conditioning. Often coaches are so intent on teaching that they use drills that are slow and wonderful for teaching. With only one practice per week, shortcuts need to be taken. Forego some of the less important teaching (ie. priorize the KTPs) and design a drill that offers more physical challenges. This is especially important for older players, like bantams and midgets, who often need enticement to return for each practice. With frequent practices, such as 2-3 per week, the coach can now afford to isolate skills and tactics a little more and vary the drill difficulty. The very fact that the kids are on the ice more often builds a conditioning base. Intensity (I): The connection to Frequency is vital. Intensity and the use of proper work:rest ratios is directly related to how often the team practices. With one practice per week, intense drills, while demanding, won’t have much of a conditioning effect especially if the practice is comprised of mostly this type. The intensity needs to vary. Consider trying this approach when designing drills and a practice. Assign H for High, M for Medium and L for Low to describe each drill in practice.
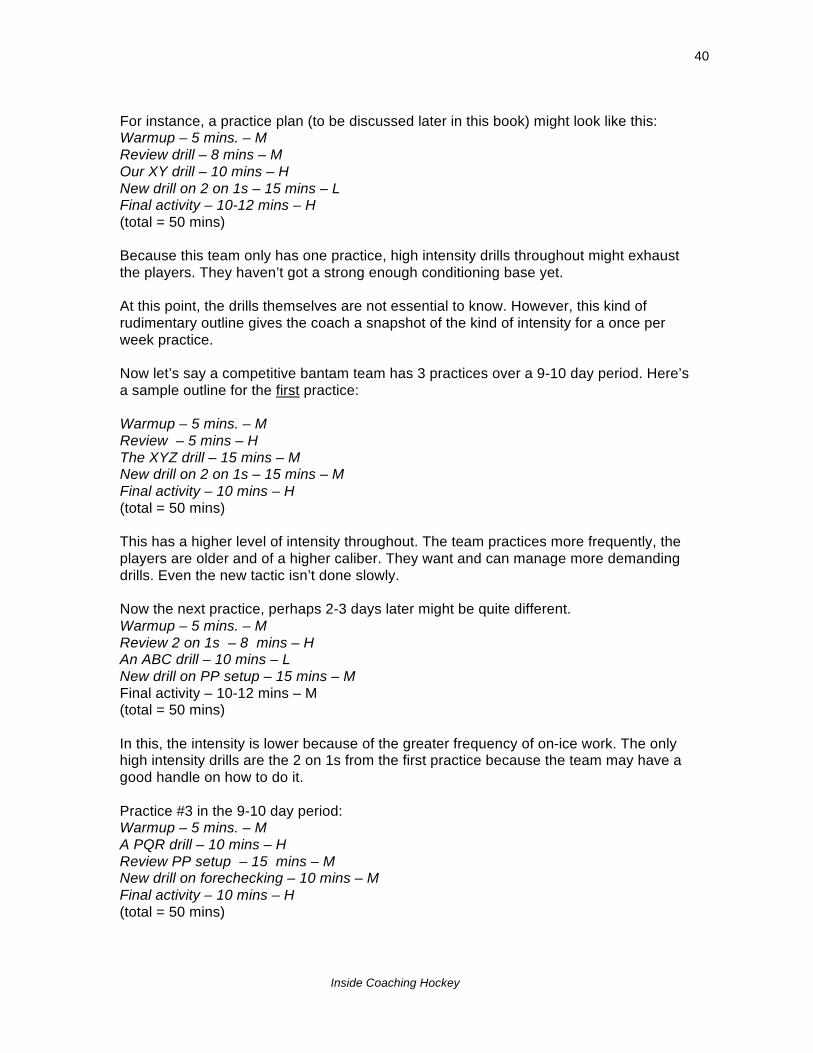
Inside Coaching Hockey
40
For instance, a practice plan (to be discussed later in this book) might look like this: Warmup – 5 mins. – M Review drill – 8 mins – M Our XY drill – 10 mins – H New drill on 2 on 1s – 15 mins – L Final activity – 10-12 mins – H (total = 50 mins) Because this team only has one practice, high intensity drills throughout might exhaust the players. They haven’t got a strong enough conditioning base yet. At this point, the drills themselves are not essential to know. However, this kind of rudimentary outline gives the coach a snapshot of the kind of intensity for a once per week practice. Now let’s say a competitive bantam team has 3 practices over a 9-10 day period. Here’s a sample outline for the first practice: Warmup – 5 mins. – M Review – 5 mins – H The XYZ drill – 15 mins – M New drill on 2 on 1s – 15 mins – M Final activity – 10 mins – H (total = 50 mins) This has a higher level of intensity throughout. The team practices more frequently, the players are older and of a higher caliber. They want and can manage more demanding drills. Even the new tactic isn’t done slowly. Now the next practice, perhaps 2-3 days later might be quite different. Warmup – 5 mins. – M Review 2 on 1s – 8 mins – H An ABC drill – 10 mins – L New drill on PP setup – 15 mins – M Final activity – 10-12 mins – M (total = 50 mins) In this, the intensity is lower because of the greater frequency of on-ice work. The only high intensity drills are the 2 on 1s from the first practice because the team may have a good handle on how to do it. Practice #3 in the 9-10 day period: Warmup – 5 mins. – M A PQR drill – 10 mins – H Review PP setup – 15 mins – M New drill on forechecking – 10 mins – M Final activity – 10 mins – H (total = 50 mins)
Inside Coaching Hockey
41
High intensity overall so that now the three practices’ drills have gone from high to medium to high. Remember: this team is on the ice a fair amount. Time (T): The time spent on a drill is variable. The above examples give timelines but even these are flexible. Instead of five activities in a practice, as each of the above has, the coach may find that four on any given day is sufficient. It’s important to remember though that drills are rarely successful if they only take a few minutes (except for the warmup). This is because the players need opportunities to work on what’s been taught. Insufficient time means poor skill development and maybe even player frustration. The time spent on a drill is determined by many factors: drill difficulty, conditioning, what’s being taught, player readiness, skill/tactical base, location in that practice plan, time of the season, etc. A guideline is to assign more time to a drill than less. You can always cut it short, which is easier than trying to add time to something that isn’t working. If we return to picking a drill out from a manual, rarely is time affixed to the drill description. It can’t be. There are just too many unknowns. But when designing your own drill, you have the advantage of knowing the team’s needs. You are no longer trying to fit a pre-arranged pattern into your vision. The question that arises from the application of the F.I.T. principle is this: In any drill, how do you know when the players have done enough or had sufficient attempts at your drill?
Inside Coaching Hockey
42
9 Drill Progressions There’s an old manual dexterity game called “Pick up sticks.” You hold a bunch of identical thin sticks or straws then drop them on the table. One by one, you remove sticks from the pile without allowing others to be touched or moved. You count the number of sticks and then try to beat your own count or your opponent’s. Sad to say, but this is often the approach coaches take with their drill choices. What should I do today? What were we weak at in the last two games? Isn’t it time we did 3 on 2 rushes? Maybe I should do more passing stuff in the next couple of practices. Here, the coach is taking the expedient path. Whichever drills (sticks) come to the forefront of his mind (on top of the stick pile) are the ones to use that day. It’s an easy habit to get into. It may seem like problem solving, but when we compare it with anything else we do in life, it makes no sense. Everything we learn, every skill we acquire passes through progressive steps. Hockey must be the same. Therefore the coach must ensure he has a progressive approach to his teaching and drills. It takes a bit of courage to take such an approach in a sport in which immediate results are too often the gauge. We’ve already seen how skills are acquired, how to design effective drills and what key teaching points need to be applied in them. Now comes the next building block: having drill progressions that maximize player development. In a previous chapter, we also saw that learning must go from simple to complex and general to specific. This section will now build upon those concepts for proper drill progressions. Single task……….to……….Multi-task This is similar to the basic idea of simple to complex. A single skill/tactic to work on is obviously easier than a few. A drill may very well look complicated with a number of things happening, yet the coach has determined that only one skill (and its KTPs) will be the focus. For instance, when teaching angling as part of a body checking progression, the checker's foot and body position are vital. Let’s say we place a puckcarrier with his back to the boards on the hash marks of an offensive zone circle. The defender stands on the circle’s faceoff dot. The attacker, who starts when he sees the defender is in position, must carry the puck and touch any part of the net with it without shooting. The defender’s job is to ward him off without initiating contact (checking). This then is the single task. Get the body in the right position. Let’s leave the stick out of it for now. The progression from this would be to add stick position, include contact, or begin the drill with movement. All of these force the defender into doing more than one thing to complete the drill. A danger in multi-task drills, or getting to them too soon, is that the kids have not yet developed the base skills or tactics needed to accomplish the drill. They have to build up to it. This is true even of higher caliber kids. They may have strong fundamental skills
Inside Coaching Hockey
43
like skating and puckhandling but their cognitive development and understanding of their roles in a multi-task situation are not necessarily evident. The single to multi-task principle may occur in just one drill, or extensions of a main one. Nevertheless, a coach cannot move on to more complex items until the base is established. We wouldn’t expect our children to read, understand and write about Shakespeare until they can make sense of the language then and now. Static……….to……….Active A coach’s definition of static will vary. For instance, teaching wrist shots might ideally be done standing near the boards and firing away. Perhaps. But not for a midget team where kids already have basic shooting mechanics. Static to this team might mean doing a give and go with a partner then shooting on the boards. Active means movement. But how much? That midget team working on shooting couldn’t spend more than a few minutes on the first drill before they’d need to be able to apply it on the fly, heading to the net, getting a pass, then shooting. Newcomers to shooting could not be that active. Both terms then are relative. What is important to remember is that the more movement there is in a drill, the more complex it becomes. The coach’s challenge is to decide if this transition from little or no movement to activity should be done in one practice or over several. A rule of thumb is that, while static-form drills have their place, application should be done soon after, preferably within the same practice. It’s a good way to show kids that the KTPs from the static drill play a role in how they go to the next step. The static to active principle is the same for individual or group tactics. If you want to improve a defender’s ability to stop a 1 on 1 attack, you need to create a drill where there’s little movement for both players, then gradually increase the skating. It’s not just a matter of confidence; it’s also how the skill will be best developed. As the practice goes on, the same drill can be stretched to progress to more skating and thus more decision-making for the defender. Small space……….to……….Large…AND Vice Versa! On the face of it, this doesn’t make sense. How can drill progressions work in both directions? Well, it depends entirely what your objective is. Small to Large: In any drill or series of drills, when you increase the size of the playing area, you make the drill much more complex with more multi-task operations required. Why? The complexity doesn’t have to come from adding players or objects to a drill. You can keep the same number and the drill takes on a whole new hue. For instance, if you want to teach your kids individual checking responsibilities in penalty killing in your own zone, you might start by having them play 1 vs. 2 in just the corner. You have your KTPs and have prioritized the tasks. If that space is increased to half the zone, the defender must now contend with: more territory to cover and so more skating, less chance to deflect or block passes, more decision-making about body position and when to commit to a check or note, etc. The drill progression has made the simple tactic darn challenging. If that was the objective, then the progression works. There’s a tendency for coaches to increase the space and add things to the drill. This isn’t necessary. On the other hand, increasing space to a size that is just plain unrealistic
Inside Coaching Hockey
44
or inappropriate is another issue. Example: a passing drill with decently skilled atom kids takes up most of one zone. Why make it the whole rink? How many more effective passes would be accomplished? That drill’s next progression would need to be different in other ways. Large to Small: “Decrease the space – Increase the pace.” This is generally true. In the previous example of the 1 vs. 2 drill, the small space might indeed make the drill quicker. That presents its own challenges. The defender, while in a small area, has to think and react quickly, but has few multi-task decisions. After all, the two attackers can’t go very far nor do a great deal. If this coach had begun with a large space, such as half a zone, then shrunk it to the corner, the players would have been faced with a jump in speed. Too much too soon? That depends on the objective. When pace increases, the level of competitiveness, even for a simple skill drill, also increases. This isn’t necessarily a bad thing if this was the coach’s objective. Whether or not an increased pace in a drill is warranted depends on the drill before and the drill after, in other words, the nature of the desired progression. How the coach wants a skill or tactic to progress will determine the space requirements. In summation, when using a small space, there are fewer decisions and factors, but speed tends to increase. Start with a large space and speed is no longer a factor, yet sheer expanse may not be suitable to what’s being taught. No resistance……….to……….Full resistance As resistance is added to a drill, making it progress to a point closer to game replication, a number of factors come into play. a) What is the nature of the resistance? b) Is it also progressive? c) Does it offer too much too early in the development of the skill or tactic? d) How ready are the players for resistance? e) Is the resistance itself being taught (such as bodychecking) at the same time? Resistance in drills is a form of competition. However, unlike keeping score in a scrimmage or similar activity, resistance is meant to help the skill or tactic progress. It shouldn’t be added to any drill until the players are moving towards that auto-pilot stage. Consider for a moment a teenager taking driving lessons. All’s well heading down a quiet suburban street. But ask the student to merge into highway traffic or parallel park on a busy avenue and things get a good deal more difficult. Reactions slow, nerves become frayed, mistakes are made. That’s because resistance in the form of other vehicles, decreased space, etc. have been added. Not all drills though should begin without resistance. Higher level players are able to gauge the levels of difficulty and make proper decisions based on their more extensive experiences and ability to function on auto-pilot. So then line rushes for these players without any resistance would likely be counter-productive since they need and want the extra challenge.
Inside Coaching Hockey
45
Types of Resistance: Space – As we saw earlier with the progression of small to large or vice versa, space changes what a drill requires. The coach has to carefully determine the starting point for a group or a skill and where he wants to go with it. Even without anyone chasing or checking anyone, merely changing the drill’s space greatly affects its execution. Objects – Pylons, chairs, hula hoops or bicycle tires – any of these dotting a drill landscape will force players to change their approach, and so the drill changes with it. Here’s a great example of a simple LOG (Low Organization Game) that younger kids (6-9) love, and it revolves around the use of resistance. The LOG is called Switch. It’s a form of musical chairs. Set out bicycle tires or hula hoops in the playing space, such as a faceoff circle. There should be one less object than the number of kids (eg. 8 kids = 7 tires). Players skate without sticks. The coach allows them to skate anywhere in the circle till he shouts, “Switch!” Each player tries to place one foot in a tire, but only one tire per player, so someone will be left out. Nothing happens to this player since the game is meant to be inclusive and challenges their skill. When the coach next says “Switch!” the players must leave their tire and go somewhere, which means someone else will be left without a tire. Every couple of minutes, the coach first removes a tire from the game (8 with 6 tires, etc) and increases the space to go beyond the circle. This new resistance forces the kids to skate more, stop better, work on balance, and be more alert to which tires become available. The game can be altered in any number of ways, but you have the idea. Time – Putting a time limit on a drill or an objective in a drill really pushes kids. If – IF! – getting them to go faster is the aim. Just remember that technique always suffers as speed increases. The time frame has to be fair. When teaching a power play set up, it would not be fair to give kids 20 seconds to set up and shoot. Even juniors would have a tough time with that limitation. Player – The most obvious and often best way to offer resistance is by having players resist. It’s difficult to tell kids to only resist a little. It’s better to create a drill where the players don’t need to hold back artificially yet the objective can still be reached. And this is an important point. No matter how much resistance is added, there still needs to be a way for the drill to succeed. a) Increase the number of players resisting – This is obvious. It greatly complicates
matters for those doing the drill. A 3 against 1 keepaway exercise becomes very much more challenging when it is 3 against 2.
b) Players resist from different directions – This means employing one of three options: front, side or rear resistance. Front resistance is what a defenceman provides a forward who is trying to work on moves and shooting to advance to the net. We call it a 1 on 1. Side resistance might have a checker shadowing a player who is trying to find space to get a pass. Rear resistance is a chase, such as a breakaway drill where a defender needs to pressure from the back. Each provides different challenges for those doing the drill. The coach needs to expose players to all three in order to best round out their experiences with the kind of resistance they’ll see in a game.
Practice speed……….to……….Game speed For the vast majority of players, speed kills!

Inside Coaching Hockey
46
It kills technique, creativity, reactions, and the body. It puts players in a position they’re not acclimatized to unless they’ve had great amounts of training. If we return to the new driver scenario, even when the driver has managed to merge onto the highway, he’s not going to be zipping along at the speed of traffic. More than likely, he’ll inch along below the speed limit. Why? The coordination in the “cockpit” is far from mastered; the driver has not yet learned how to predict traffic patterns and find one that he can ease the vehicle into safely; driving faster means needing to react faster to the unexpected; and since trying any new activity is fraught with tension, it’s physically more tiring. You don’t see 17 year olds, even great athletes, handling long haul trucking routes. The impact of speed on drills has to be respected. Just like marathoners respect the distances they must run, so, too, must the hockey coach respect the speed at which his drills can be properly performed. None of this is to say there isn’t a place in hockey practices for what’s known as overspeed training. American hockey teacher and researcher Jack Blatherwick wrote an outstanding manual to teach overspeed. But it is designed for elite athletes who mostly have the fundamental skill base, training frequency and time (remember F.I.T.?). What is practice speed? Like so much else covered so far, it’s variable. In general, drills (or a drill sequence) should begin at a pace at which players can succeed. If the drill is sufficiently but not overly demanding, most kids must be able to experience success by the end of a drill. Otherwise it’s not at an appropriate level. Progressing to a next drill related to this one should be the same. For example, the coach wants to work on attacking the offensive zone. He might begin with a 2 on 0 drill where players pass the puck, switch places once on their way into the zone, then go to the net for a shot. This isn’t a difficult drill. Yet are the kids capable of successfully meeting the drill’s KTP objectives? These might include: staying onside, puckcarrier has head up, non-puckcarrier opens up to receive pass on off-wing, feet moving and not slowing down as they enter the zone, etc. A progression from this drill done at a comfortable speed would be to add either a defenceman for front resistance or a backchecker for rear resistance. In either case, the drill will speed up because of the “competition” being added. If it speeds up too much, the forwards may not succeed much and thus not have sufficient good tries to learn the KTPs. The problem then was not the actual progression but the way in which it’s structured. Will the attackers slow down against a defenceman? Does the backchecker start the drill too close to the attackers and make it impossible for them to succeed. These kinds of drill adjustments alter the speed though they don’t change the drill’s objectives. The coach’s decisions about the drill and how fast the kids go will directly impact their success and whether or not the objectives will be met. Often kids will try to do a drill quickly simply because they believe they can. Yes, the drill can be done quickly, says the coach, but that is not synonymous with doing it right. This requires interventions, not to tell them to slow down, but to point out what they must do which will force them to slow down. The next drill in a progression needs to illustrate that idea, too.

Inside Coaching Hockey
47
What is game speed? Game intensity is nearly impossible to replicate in practice, especially with drills. Even the most competitive “battle” drills can never quite get there. However, it’s still important to move drills progressively higher in intensity (and consider that work:rest ratio!). Game speed means doing drills at a pace and intensity that pushes players beyond their comfort zones. They may succeed less in these drills, but the opportunity to do so is there if they apply themselves. During these kinds of drills, the coach needs to back off a little more and offer fewer interventions. Players need to experience the higher intensity frequently to feel better in it. When they do, they've just created a new comfort zone to work past. Building towards game speed is rarely accomplished in a single practice. There are just too many variables that need to be considered for drills to go from one extreme to the next. The number of progressions, or drills, that lead to game speed drills is a function of how many practices there are and how often. The greater the time frame from one practice to the next, the less effective will be the progression towards game speed. If we assign simple letters to drills, we can develop a progressive approach using spiral teaching. (Spiral teaching means skill 1 is taught, then skill 1 + 2, then skill 1 + 2 +3, etc.) Legend: Drill A = practice speed Drill B = practice speed + Drill C = practice speed ++ Drill D = practice speed +++ Drill E = game speed Practice 1: Drills A and B Practice 2: Drills B and C Practice 3: Drills B, C, D Practice 4: Drills D and E Practice 5: Drill E reviewed In the above example, it has taken 4 practices to develop a series of drills to get to game speed. Then a 5th practice was used to review the skill/tactic, again at game speed. But how frequent were the practices? How similar were the drills to each other? The advantage of the spiral approach is that even with only weekly practices, drill progressions are revisited. It may also occur that kids will never reach game speed in a drill series. They aren’t ready and this, again, is central to how the coach approaches his drill selection and teaching. In fact, especially with younger players, attaining game speed in drills may not happen for a couple of years with some skills or tactics. Creating effective drill progressions requires forethought, planning and creativity. But when done properly, the reward is seeing well-executed skills and tactics. We call it learning.
Inside Coaching Hockey
48
10 The famous Rule of 3s Go ahead. Start designing a drill that illustrates the right teaching points, incorporates conditioning principles, is relevant to the age group and level, challenges the players, and slides in comfortably with the drills before and after. Assign it a few minutes of time for the kids to do it. Presto! Success. Wrong. The most beautifully designed drills are useless unless the players have had sufficient opportunities in them to reach a certain level of competency. Indeed, this is in the eyes of the beholder. In other words, it’s the coach’s call if the darn thing works. Hockey practices are challenging enough without having to worry about the clock. While time is an inescapable limitation, knowing how to work effectively within the time slot will be one, but only one, determination of a drill’s worth. Certainly, it’s simpler to allot specific minutes to drills than stop when the time is up. The obvious limitation of this approach is that you halt a drill after X number of minutes, regardless of how well the kids have picked up the skill/tactic or how successful the drill was. The most important consideration in time spent on a drill is whether or not your players have grasped the concepts. Given the varied ways in which they learn, expecting this to be accomplished within a pre-determined time frame is often unrealistic. A more studied approach would be to allow the kids sufficient opportunities to try the drill. A given time frame then becomes a guideline. Time here is not the engine driving the machine; it is the number of tries at a drill. Hence the Rule of 3s. (Keep in mind this is a generalization. The “Rule” varies according to the age and calibre of players.) The Rule of 3s is based on the principle that, in most skill learning situations, kids first try to do the drill as instructed. Then they need to apply the new skill in this situation. Finally, once they’re comfortable in the situation, there should be an attempt to reach “mastery.” In other words, are they ultimately able to execute the skill/tactic in the drill without slowing much to think about it? (Of course, true skill mastery occurs only in game situations where we can see a skill or tactic mastered against full resistance.) A common problem in hockey practice drills is that the kids have insufficient tries. In the Rule of 3s, a guideline is that every player would have about 9 attempts or 3 x 3s. This is broken down as follows: a) 3 tries to learn the drill Most kids need about 3 tries in a drill to figure out what the expectations are, where to go, how long to spend doing something, etc. Some will get it straight off and these are the ones who should begin a drill for teammates to follow or watch. Others, likely the more kinesthetic (touch, feel, try) learners, need a few attempts to get a handle on it. It’s important that, during this initial stage, minimal instruction be given on the skill or tactic. The kids first need to figure out where to go and when.
Inside Coaching Hockey
49
For a team of 15 skaters doing a puckhandling drill that includes a give and go pass with the coach, it might take 3-4 minutes to get through it. But at least the 3-4 minute investment has produced a group ready to apply the skills because they no longer need to think about where to go. Comparison: In the school play, the student actors first read the entire script. Then their second reading focuses on their lines, usually marked with a highlighter pen. b) 3 tries to properly apply a skill or tactic Once they figure out the drill, the players then have to know how to apply what they’ve been taught. It may take about 6 tries in all for a typical player at most levels to feel confident enough and have developed enough proficiency to do a drill competently at average speed. NOTE: When speed or competition is added, much of what has been learned stalls or even regresses. This is especially true for more complex skills or tactics. Eg. At higher or older levels, breakout patterns are easily done at half speed against no forecheckers. Toss in even a half-hearted one-man forecheck and the whole drill may crumble. This is usually because of insufficient time and/or tries in these first two stages. 3 coach interventions: During these first two sets of 3, a coach should expect to intervene for feedback or re-instruction about 3 times. This will help ensure the drill is done correctly and the skills applied the way they were meant. Eg. If you’re teaching tight turns and want the focus to be on turning the head in the direction of the turn, do NOT stray by commenting on other key teaching points. It’s confusing and you may end up with kids who accomplish little of the skill in any manner. Interventions may involve stopping the entire group, stopping sections of the group, re-demonstrating or re-teaching. All of these are fine and should be done early in the drills. However, this should be done only if major errors are commonplace. If most kids are doing it right, intervene only with those having trouble. Always use positive comments. Do not teach what they should not do (which is exactly what this sentence has done, right?). Back to the school play. The student actors now know their lines and are being walked through the set by the director (coach!). In theatre parlance, this is called blocking a scene. The actors try to apply the lines in conjunction with how the scene will be played. Marrying the knowing of lines (“off book”) with movement on the set is slow and time-consuming. c) 3 tries to approach mastery, free of coach intervention At this point, the players both understand the drill and are able to apply what’s been taught. They’ve been through it now about 6 times, an adequate number of tries for most to guarantee a grasp leading to mastery. Of course, true mastery only comes in a game situation. Short of that, in drills where resistance has been added or space changed, the players may exhibit as close to mastery as one can expect in a practice.
Inside Coaching Hockey
50
During the final 3 tries per player, avoid saying much other than offering ongoing positive comments. Limit formal interventions. Give the players the chance to explore what they’ve learned. Sometimes stepping back and shutting up accomplishes more since the players are on auto-pilot in the drill. If they’re doing it just fine, the coach’s silence can serve as tacit approval for their performance. The school play again: the actors know their lines and mostly know where to go and what to do. They must now rehearse various scenes and refine everything. There will be subtle differences in how scenes are played from one run-through to the next, but the main objectives will be met. Only the actual performance will allow them to fully apply everything they’ve learned. When the rule of 3s is applied to a typical drill, a team may take 15-20 minutes to do it properly, allowing for sufficient tries by each player. The key – and this cannot be stressed strongly enough – is that each player gets plenty of opportunities to try it. All at once? No. The Rule of 3s guideline doesn’t suggest that all three parts be applied in a single practice. On the contrary, mostly they won’t be. Here are other important considerations for its application: Start at a), b), or c)? Even for a new skill or tactic, some groups will be quite capable to begin at b). Perhaps the team is a higher caliber or older. Perhaps they’re just quicker to grasp new things. In either case, a coach shouldn’t feel compelled to force a team to “walk through” a drill even once if this step is easily bypassed. Some teams may be capable of skipping right to c). The danger here is in assuming players will know how to apply a tactic from the get-go, then pushing them to step c) as the starting point, followed by numerous interventions that frustrate everyone. The safer route is to give the players at least 1-2 tries at the middle stage first. But once at the third step, the number of tries needed to indicate mastery may have to be increased. This is where we often see “flow drills” with older teams. Back and forth they go for 15-20 minutes. They began at the third step and the coach knows they can fairly well do the skill/tactic. Over how many practices? This varies wildly. The atom house league coach trying a skating plus passing exercise may find he doesn’t get past the first step in a practice – and has had to let his kids have 8 tries each doing it! The bantam AA coach spends three practices on the first two steps, at 15 minutes per drill per practice, and still can’t get the kids to go with much speed or against any resistance. Whatever number of practices it takes to do the drill, or a variation of it, the one main point never changes: give the kids sufficient tries to work at it. The only thing to be careful of is spending too much time on a stage. When that happens, and if there is still no clear indication of readiness for the next one, the drill or skill may be inappropriate. Problem-solving: Question: A handful of your players are able to zip through the drill fairly easily.
Inside Coaching Hockey
51
The rest struggle. What should you do? Answer: Assuming the drill itself is satisfactory, it’s perfectly OK to challenge the better players by allowing them to “advance” to the 3rd set while others on the team are stuck on the 2nd. The better ones may figure everything out in 2 tries; why hold them back? You can get them to work on some fine-tuning skill points that are beyond the scope of others. For instance, in a puckhandling weave and pass drill, get the better players to work on quickness and accuracy, two things still a bit beyond the scope of their teammates. Question: What if your players are beyond that first stage and can jump right to skill application and mastery? Answer: Don’t hold them back. Get right to the application and mastery and allow them to do a few more tries. Even pick up the speed a bit. The key is there are no hard and fast rules about how your players will learn. If they grasp something right away, then by all means scrap your original intention and challenge them. It will also give you a better opportunity to do more skill or tactic instruction and less on how to actually do the drill, which is always a bit tedious. Question: How much time does it take for each player to have 3 tries? Answer: Again, this is variable. But for argument’s sake, suppose we have a team of 15 players (excluding goalies). We want to keep the work:rest ration at 1:3, which means about 4 players need to be moving through the drill at any one time. If it takes these 4 kids 15 seconds (as a group), it will take the entire team about a minute for everyone to have one attempt at the drill. This is without any coach interventions or stoppages. For the first set of 3 tries, it may be about 3-4 minutes. So you can see this is not an extraordinary amount of time for a well-designed drill. To go through the first two steps might be about 10 minutes if we include some coach intervention. Question: Does the Rule of 3s apply to all drills? Answer: Not at all. Some skills need nothing but repetition. Some tactical drills require on-going adjustments. But the principle remains. Players need numerous tries at a drill to feel comfortable and confident. Note that numerous tries is not synonymous with overdone repetition. Having kids doing anything in a hockey practice the same way ten times in a row is not productive. The game and its complex skills are not enhanced by such an approach. Besides, it’s boring.
Inside Coaching Hockey
52
11 Control-Intervention-Feedback Over the years, the manner in which coaches conduct drills has been generally referred to as teaching techniques. The term is adequate and certainly hits home the message that teaching is not automatic, that it requires specific skills, ie. techniques. However, here, the intention is to delve into the area, to break down these techniques and apply them to the very drills that have been so carefully designed. Control The marvel of watching classroom teachers at work, especially in elementary school, is something every coach should make a point of discovering. Try sitting through a drama or music class. Normal humans can’t quite fathom how adults are able to control groups of kids who might otherwise run amok. Have you ever been in a school assembly where a teacher or administrator stands up in front of a massive throng and within seconds has the place quiet? How do they do it? The quick answer might be that these are professionals, trained and experienced over years, with a knack for understanding and dealing with kids. Yes, some are better than others and some are better with certain age groups than others. The latter is no different from minor hockey coaches. The major differences are that, in minor hockey, coaches are not professionals, have not been trained to the same extent at all, and have far less experience. Then it behooves the coach to learn from the professionals and employ “tricks of the trade.” Controlling the group, or the drill? The best designed drill, one that uses all of the points mentioned in previous chapters, won’t work if the group isn’t under control. Coaches often spend inordinate amounts of time getting kids “in order” before or during a drill to ensure the drill runs smoothly. Lines need to be straight, groups even, pucks controlled or out of reach, etc. Little of this is necessary if the group control is good. There’s no denying that for a puckhandling drill, the very presence of pucks near the kids are a draw. But unless they’re slapping pucks at each other or against the boards, is there any real harm done in the kids touching them? Not likely. When a group (team) is properly controlled, from the dressing room onto and including the ice session and back, the coach can ask the kids to do just about any drill and they’ll respond appropriately. What remains is how to accomplish it. Tried and true methods: Be organized: In the room, sticks in one spot, easily accessible. Bags pushed to the side or under benches for safe exit and entry. Kids leave and re-enter in single file. When skates are on, no one walks around the room. The practice is planned. Other coaches/aides briefed on their roles. Equipment prepared beforehand. Parents told to stay away from about 10-15 mins. before practice till afterwards. When you get on the ice, the practice begins almost immediately. The signal: Players come to the coach or designated meeting place on the ice with the same signal – whistle, call-out, hand clap, etc. Even the whistle blow should be loud with
Inside Coaching Hockey
53
only one tweet. It should be obvious that this means the drill is over and to come in to the spot. (if sharing ice with another team, arrange with that team’s coach who will use a signal vs. a whistle.) Calling out "STOP!" works well, too, if you have a strong voice and the rink acoustics support it. But shouting multiple times erodes the message. A stick being slapped against the boards is fine. The gathering: Players come in skating, then stop and drop to one knee. Do NOT let them slide or speed in to the group. Taller players kneel at the back. They may need to stand to see a short demonstration, but otherwise every player must have an unobstructed view of the coach. Insist they look at you. Assistant coaches should be to the side or back. Players should be here for a short time. Generally less than a minute, including the diagramming of the drill. Disperse players. Do NOT let them go themselves. Water break: Either just before they come to the gathering spot (this is a better solution) or as they leave to begin a drill. Demonstration: Always show how it should look. Preferably, a demo done by a coach. If a drill requires a demo in addition to being diagrammed, chances are it’s too complicated. One or the other. Takes too long otherwise. Perhaps have 2-3 kids follow the coach through the drill. Explain as they go. Then disperse the kids to their starting points. You can always make corrections during the intervention stage. Beginning the drill: Only two ways: a) the coach tells them when and signals, or b) the players decide. If a), it may be for a drill that takes a little more focus and organization. Here, the coach checks everyone is ready then tells them to start. Avoid the whistle to start a drill. Use voice or hand commands to get the kids working to pay attention. If b) often the kids can start the drill themselves. Tell them how to check others are ready such as the goalie. Tell the first players in the drill to look at the goalie. Is he in his ready position and watching the group? Then, start. Giving kids at the front some responsibility for beginning a drill teaches leadership and decision-making. Whose turn is next? Here’s an aggravating and entirely non-teaching scenario. The drill starts. After the first player, wave or group goes, it is the coach who shouts for the next ones to leave. Sometimes he blows the whistle to signal the start (but wait, wasn’t the whistle used to stop or bring the kids in?). This means no kids have to make decisions about when to begin their turns; the coach does it for them. No kids need to really pay attention to the drill; the coach will tell them the right time to go. The aggravation comes from listening to the whistle or shouts every few seconds. Meanwhile, with the coach so occupied with whose turn it is, he can’t possibly do what he’s there for, to coach and teach. It’s the supreme example of drilling for the drill’s sake, not for the kids’ sake. Indeed there are times when the coach has to be a little more in control of the group starts. But kids can be taught what to decide and when. If we want our players to learn to read and react, we can begin the process with the very act of choosing when to go in a drill. Which is, therefore, when? Cues can include when the puck or a player reach a certain ice marking, or after X number of seconds, or after the shot on net is taken or when puck possession is lost…In other words, there are innumerable ways for kids to make these choices based on the coach’s direction.
Inside Coaching Hockey
54
It ends when…the kids have had sufficient tries over the right period of time to reach a modicum of success in the skill or tactic; when it’s clear the kids are enjoying the drill; when it’s obvious the thing isn’t working and it’s time for a switch; when the drill’s objective has been reached by about 75% of the group. If a drill works and the kids know it, controlling them and readying them for the next one is easy. Intervention One could argue that intervention really means when to teach. This is only partly true. In fact, the word is used in this section to be the umbrella under which the coach teaches, re-teaches, emphasizes, repeats, reviews, advises, and probably more. The teaching of skills or tactics cannot of course be complete during the brief gathering time around the rink board. Otherwise there’d be no time left for actual practice. The purpose there is to introduce the objective and what will be done in the drill. Once the drill is underway, intervention begins. This can be done in three ways: by speaking to the entire team, a group (such as just the forwards), or individuals. Regardless, coaches who stand by the boards watching the kids fly by is either assuming all is well - and it hardly ever is - or just hasn’t a clue what to do. Even without a deep knowledge of the skill or tactic or which KTP is to be the focus, a coach can always find reasons to intervene in a drill and make the kids feel positive. The nature of feedback will be discussed shortly. With the team: The drill is underway but either it’s not being done correctly, or a KTP is being missed. The coach has to make sure this isn’t happening with everyone after the first couple of tries. If after two or three, it’s obvious a problem exists, there has to be an intervention. If done too soon, kids get frustrated because they feel they might have gotten the hang of it with a tad more time and patience. When the properly timed intervention does occur, the coach has to stop the drill, gather the group, and fix what’s not working. When a second such intervention is required, something is wrong with the drill or the explanation. The entire team should be able to have the problem fixed after one explanation. With a group: Intervening with groups of players is done to repair isolated problems. The group may be defencemen, the forecheckers, all the attackers on a power play setup or even, in the case of skill drill, a few kids who don’t grasp the idea. A problem with this kind of intervention is what to do with the others. A coach might sidle up to an assistant and suggest that while one group is being addressed, the rest can be with the assistant working on or discussing X or Y. Just don’t leave them alone doing nothing. Group intervention can be effective since it isolates a problem in a drill common to a few players and requiring their individual attention. This builds a strong bond with these players who may be struggling. In this case though, it’s important the intervention is direct and to the point. There’s generally less time here than with the whole group. With an individual: Coaching really is about teaching and helping individuals so this kind of intervention is particularly important. When a player is struggling in a drill – and he may be the only one – a coach must intervene to help. How much help is given depends on the situation. But a few words of instruction on the KTP or where to go in the drill is
Inside Coaching Hockey
55
often sufficient. What is true though is that the ability of all players to execute a drill is dependent upon each one knowing what and how to do it. Some kids need to be given that extra push. After the drill is too late. It must be done right away. Mid-drill interventions must be done in a short timeframe. It’s not just because of drill or practice time limits. It’s because they interrupt the drill flow. Drill flow may be hampered by groups not doing it right. But if there are constant and/or long interventions, players will become frustrated with their own execution, sensing that no matter what they do, the coach will stop the drill to yak at them. That’s hardly the sensation we want to create. Feedback So much has been written and preached about the nature of feedback and positive reinforcement that the terms are in danger of becoming clichés. There are guidelines to giving proper feedback in drills but hard and fast rules are another story. Positive? Yes. Negative? Well… Everyone flourishes on positive feedback. Mostly this is true. Occasionally we come across players who thrive on the verbal kick in the butt. There are also players who inwardly roll their eyes every time a coach shouts a happy “Waytago!” Too positive comes across as almost saccharin. Negative sounds like bullying. For most coaches, figuring out which is which and for whom is a minefield. The truth is to lean on the side of being more positive. Much more importantly however, feedback has to be directed to the act, not the person. For instance, a kid who is too aggressive in a forecheck drill and constantly overskates his check can’t be faulted for not being exuberant. What’s he guilty of? He misjudged. It may be his judging of defencemen is on a par with his judgment of when to shoot or not or when to change lines. In other words, his instincts are weak. This kind of player needs direct intervention on decision-making. Telling him “Good try” with a pat on the back doesn’t help him improve his judgment. During any of the three types of interventions mentioned above, feedback rarely needs to be done about effort. Yes, that may be a problem at times, but if so, it’s likely due to much grander and more depressing issues that can’t be solved with directed feedback on the ice. Kids respond well to proper feedback. They often know when they’ve done something wrong but don’t know how to fix it or what the alternatives are. Even when they don’t know, the light goes on when the coach… …Poses questions… Ask them! This is one of the most effective ways to elicit and give feedback. Ask the kids pointed questions during drill interventions? What was the point of this drill? Where were you supposed to be? Was your stick on the ice? Were you facing the right direction? Who did you see on that attack? What are you supposed to do when you lose the puck going around the pylons? Etc.
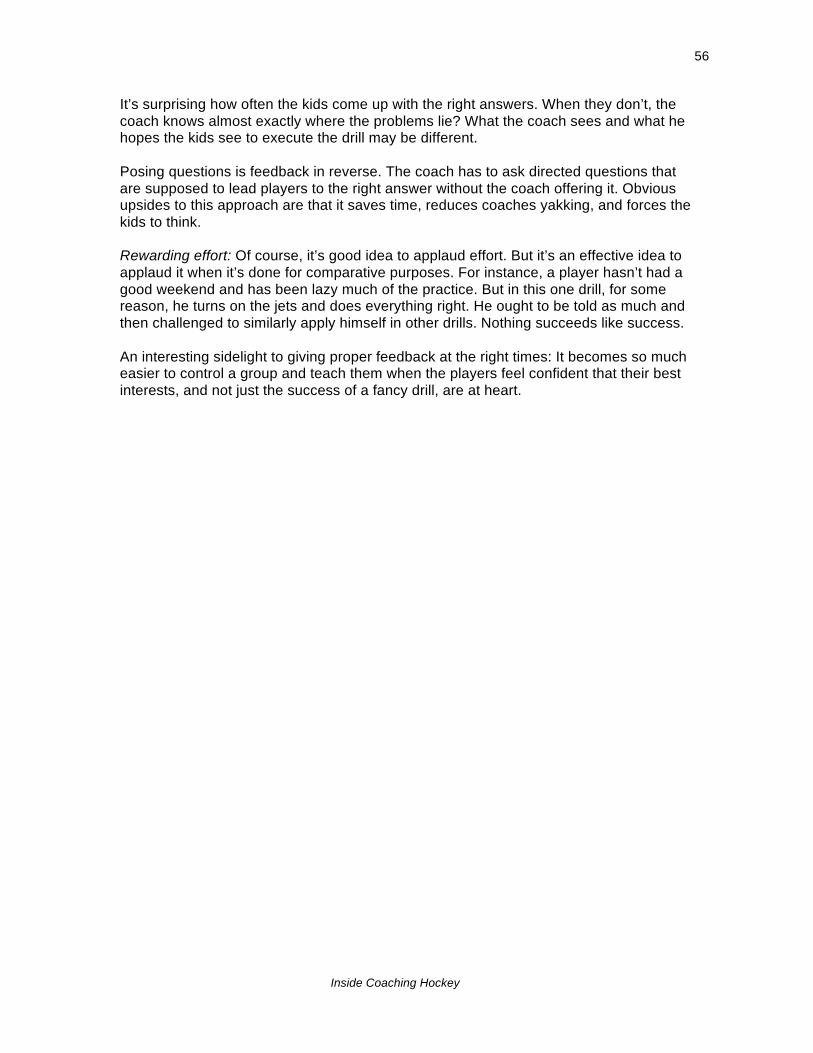
Inside Coaching Hockey
56
It’s surprising how often the kids come up with the right answers. When they don’t, the coach knows almost exactly where the problems lie? What the coach sees and what he hopes the kids see to execute the drill may be different. Posing questions is feedback in reverse. The coach has to ask directed questions that are supposed to lead players to the right answer without the coach offering it. Obvious upsides to this approach are that it saves time, reduces coaches yakking, and forces the kids to think. Rewarding effort: Of course, it’s good idea to applaud effort. But it’s an effective idea to applaud it when it’s done for comparative purposes. For instance, a player hasn’t had a good weekend and has been lazy much of the practice. But in this one drill, for some reason, he turns on the jets and does everything right. He ought to be told as much and then challenged to similarly apply himself in other drills. Nothing succeeds like success. An interesting sidelight to giving proper feedback at the right times: It becomes so much easier to control a group and teach them when the players feel confident that their best interests, and not just the success of a fancy drill, are at heart.

Inside Coaching Hockey
57
12 “And now for something completely different” – Monty Python In the not-too-distant past, some minor hockey coaches lamented how their peers seemed to resort to the “same ol’ same ol’” types of drills. The warm-ups were the same, the conditioning drills the same, the passing and shooting drills the same. They varied a bit from practice to practice but some still moaned, “Good grief, do these people not have any sense of creativity at all!?” Alas, they formed the International Federation of Frustrated Hockey Coaches, the IFFHC. At first there were few members. But over the years, more and more coaches, having been shown the errors of their ways and alternatives, have joined the Federation to spread the word. Proselytizing against something is always more difficult though. In this case, tradition, expediency, and even laziness are major stumbling blocks. The IFFHC’s mandate has always been straightforward. As written in its official charter, the Federation aims: To help coaches reap the benefits of exploring their own vivid, even warped, imaginations To ensure that hockey coaches around the world no longer resort to six particular drills. The six drills mentioned in the charter are not the only ones, as the list has expanded over time. Amendments to the charter are made regularly. However, these six are the key ones. Because they are enshrined in the IFFHC charter, they’ve been banned for use by any Federation member. Those who resort to them, even by accident or absence of thought, risk sanctions. These sanctions may include (but are not limited to) being ostracized by other members, being snickered at in rinks, and not being offered coffee before or after ice sessions. So obviously members take this seriously. The banning of drills is indeed a serious measure. However, we must first examine the reasons for a drill being banned. Why then would this happen? What would make a drill inappropriate or bad or just not work? Seven reasons: A Too many or too complex skills at one time B Not game like, or not realistic as a lead-up drill C Does not reflect what has been taught D Too much inactivity (low intensity - work:rest ratio is too high) E Too difficult or complex, too tiring F Does not accomplish what coach thinks it accomplishes G Boring: has been done too many times the same way to spark interest. Here are the aforementioned banned drills: 1 - The 5 circle drill 2 - The Lightning Drill 3 - The Board-to-Board Drill 4 - The Loop or Horseshoe Drill 5 - The skate-around-the-rink-and-speed-up-between-the-bluelines drill 6 - The Butterfly or Corner Drill
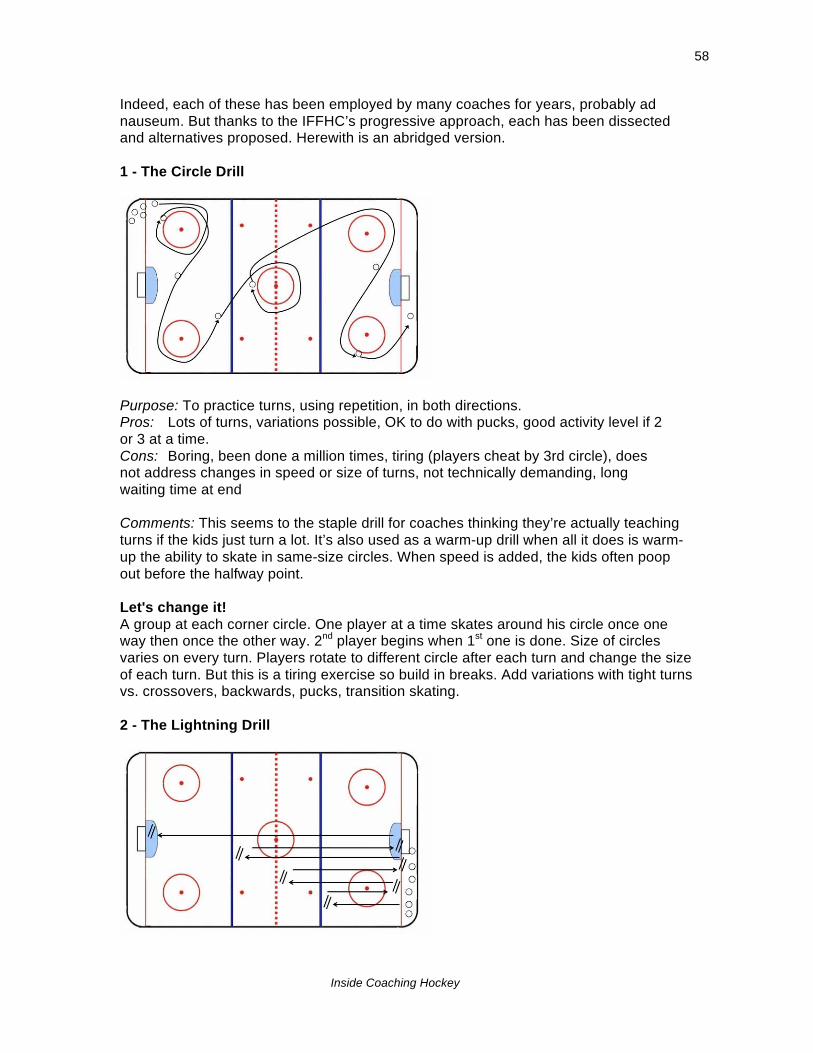
Inside Coaching Hockey
58
Indeed, each of these has been employed by many coaches for years, probably ad nauseum. But thanks to the IFFHC’s progressive approach, each has been dissected and alternatives proposed. Herewith is an abridged version. 1 - The Circle Drill
Purpose: To practice turns, using repetition, in both directions. Pros: Lots of turns, variations possible, OK to do with pucks, good activity level if 2 or 3 at a time. Cons: Boring, been done a million times, tiring (players cheat by 3rd circle), does not address changes in speed or size of turns, not technically demanding, long waiting time at end Comments: This seems to the staple drill for coaches thinking they’re actually teaching turns if the kids just turn a lot. It’s also used as a warm-up drill when all it does is warm-up the ability to skate in same-size circles. When speed is added, the kids often poop out before the halfway point. Let's change it! A group at each corner circle. One player at a time skates around his circle once one way then once the other way. 2nd player begins when 1st one is done. Size of circles varies on every turn. Players rotate to different circle after each turn and change the size of each turn. But this is a tiring exercise so build in breaks. Add variations with tight turns vs. crossovers, backwards, pucks, transition skating. 2 - The Lightning Drill
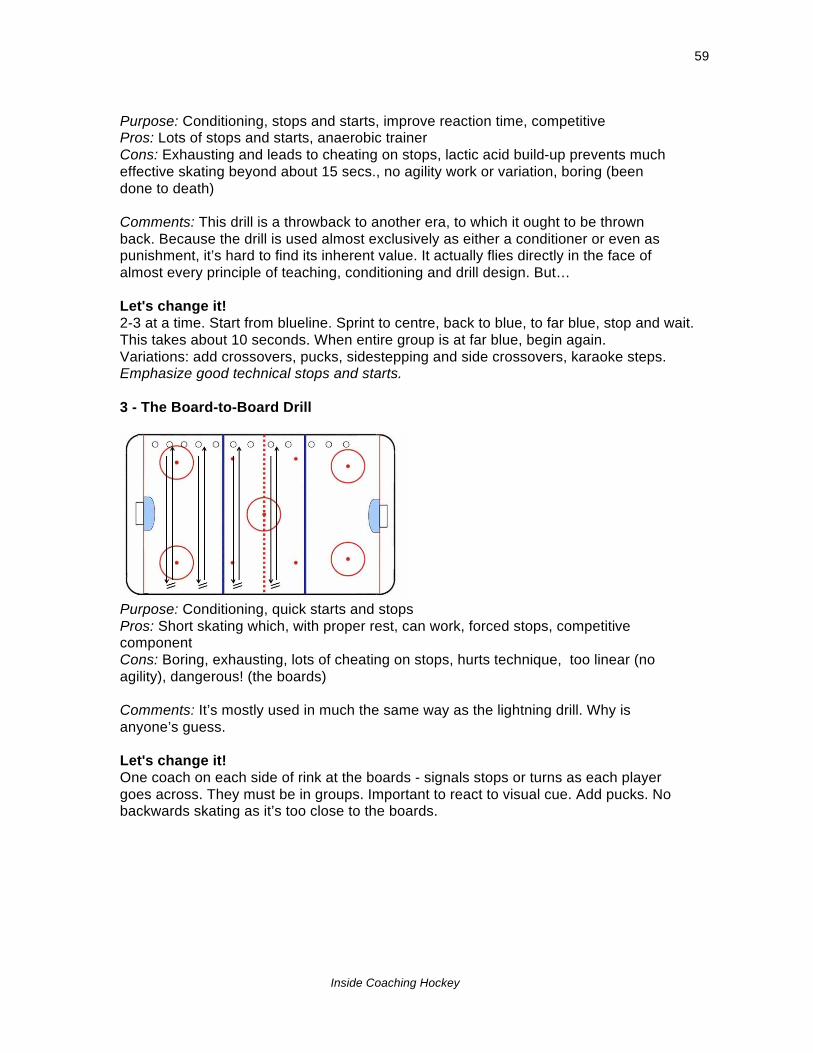
Inside Coaching Hockey
59
Purpose: Conditioning, stops and starts, improve reaction time, competitive Pros: Lots of stops and starts, anaerobic trainer Cons: Exhausting and leads to cheating on stops, lactic acid build-up prevents much effective skating beyond about 15 secs., no agility work or variation, boring (been done to death) Comments: This drill is a throwback to another era, to which it ought to be thrown back. Because the drill is used almost exclusively as either a conditioner or even as punishment, it’s hard to find its inherent value. It actually flies directly in the face of almost every principle of teaching, conditioning and drill design. But… Let's change it! 2-3 at a time. Start from blueline. Sprint to centre, back to blue, to far blue, stop and wait. This takes about 10 seconds. When entire group is at far blue, begin again. Variations: add crossovers, pucks, sidestepping and side crossovers, karaoke steps. Emphasize good technical stops and starts. 3 - The Board-to-Board Drill
Purpose: Conditioning, quick starts and stops Pros: Short skating which, with proper rest, can work, forced stops, competitive component Cons: Boring, exhausting, lots of cheating on stops, hurts technique, too linear (no agility), dangerous! (the boards) Comments: It’s mostly used in much the same way as the lightning drill. Why is anyone’s guess. Let's change it! One coach on each side of rink at the boards - signals stops or turns as each player goes across. They must be in groups. Important to react to visual cue. Add pucks. No backwards skating as it’s too close to the boards.
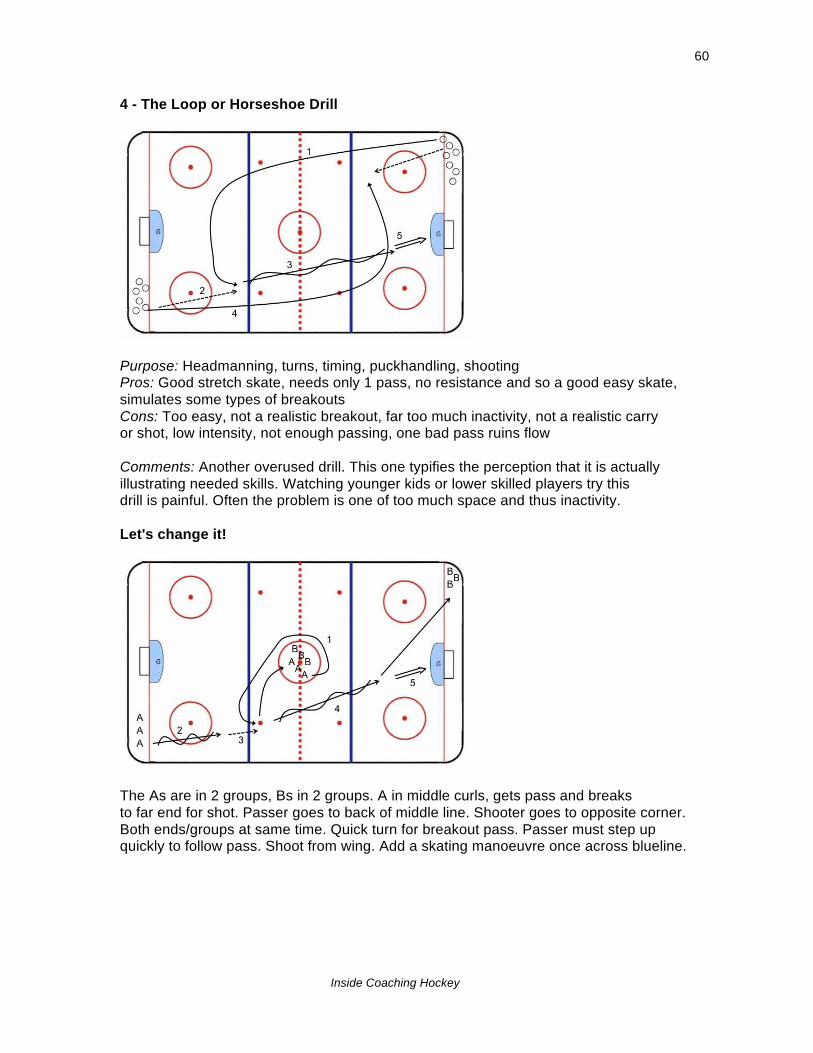
Inside Coaching Hockey
60
4 - The Loop or Horseshoe Drill
Purpose: Headmanning, turns, timing, puckhandling, shooting Pros: Good stretch skate, needs only 1 pass, no resistance and so a good easy skate, simulates some types of breakouts Cons: Too easy, not a realistic breakout, far too much inactivity, not a realistic carry or shot, low intensity, not enough passing, one bad pass ruins flow Comments: Another overused drill. This one typifies the perception that it is actually illustrating needed skills. Watching younger kids or lower skilled players try this drill is painful. Often the problem is one of too much space and thus inactivity. Let's change it!
The As are in 2 groups, Bs in 2 groups. A in middle curls, gets pass and breaks to far end for shot. Passer goes to back of middle line. Shooter goes to opposite corner. Both ends/groups at same time. Quick turn for breakout pass. Passer must step up quickly to follow pass. Shoot from wing. Add a skating manoeuvre once across blueline.
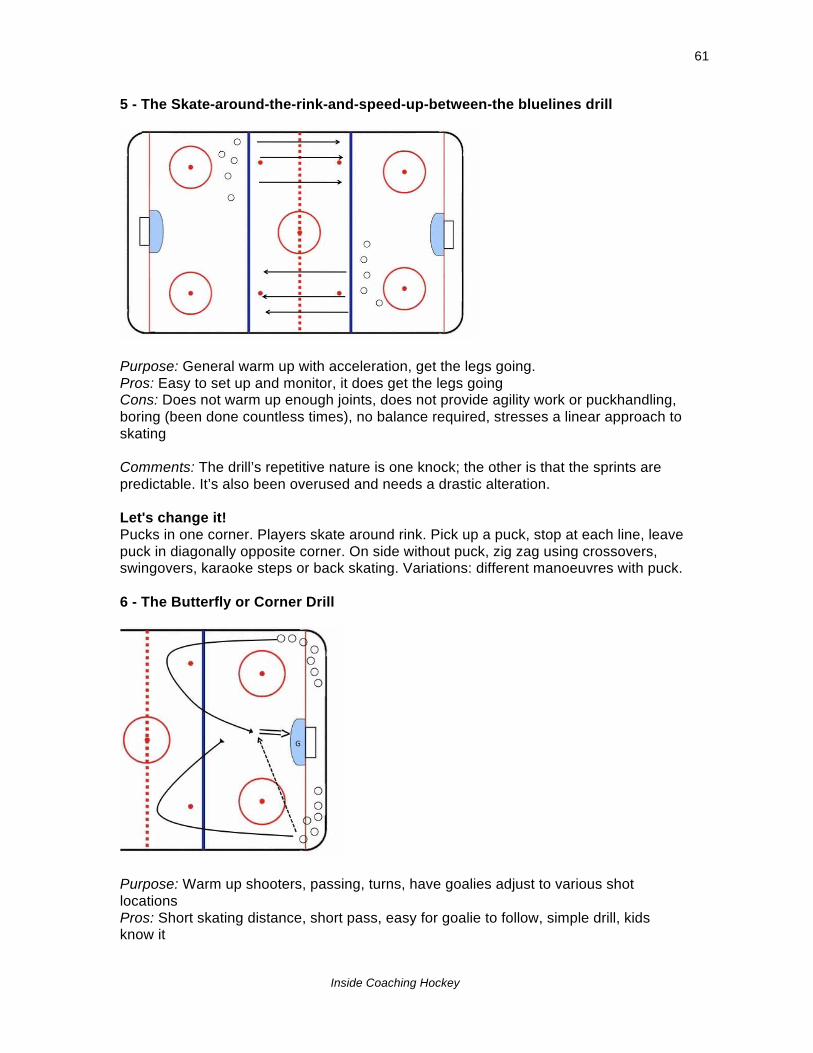
Inside Coaching Hockey
61
5 - The Skate-around-the-rink-and-speed-up-between-the bluelines drill
Purpose: General warm up with acceleration, get the legs going. Pros: Easy to set up and monitor, it does get the legs going Cons: Does not warm up enough joints, does not provide agility work or puckhandling, boring (been done countless times), no balance required, stresses a linear approach to skating Comments: The drill’s repetitive nature is one knock; the other is that the sprints are predictable. It’s also been overused and needs a drastic alteration. Let's change it! Pucks in one corner. Players skate around rink. Pick up a puck, stop at each line, leave puck in diagonally opposite corner. On side without puck, zig zag using crossovers, swingovers, karaoke steps or back skating. Variations: different manoeuvres with puck. 6 - The Butterfly or Corner Drill
Purpose: Warm up shooters, passing, turns, have goalies adjust to various shot locations Pros: Short skating distance, short pass, easy for goalie to follow, simple drill, kids know it

Inside Coaching Hockey
62
Cons: Passes go across slot, which is unrealistic, too much waiting for next shot, shots from same area, no variation in skating or types of shot Comments: Given the short time most teams have for a pre-game warm-up, surely coaches can create drills with more varied activity. This one sputters every time a pass is missed. No one really gets what they need. Let's change it! Simplest solution is to give different activities to groups on the team. They can either rotate to a new activity every 30 seconds or stay with the same one. Samples of activities: 3-player passing triangles, sprints to net from blueline or from corner for a shot, skating up and back around half a circle with puck, 2 on 0 attacks, etc. The entire team rarely needs to do the same drill in the short minor hockey warm up time. Conclusion: Even though these have been banned, it’s not unusual to see coaches resorting to them. Once you read the reasons why a drill would be on the list, it’s easy to see how they and others are worthy of exile. But like everything else in coaching, criticizing is easy; finding good alternatives is another matter. How to join the IFFHC: Membership is always open. There is neither an initiation fee nor dues (on the assumption that any coach who has used banned drills has paid his dues the hard way). To become a member, a coach needs only to swear that the above drills will never be used in practice again. Also, if a member sees someone using them, advice and help are to be readily donated.
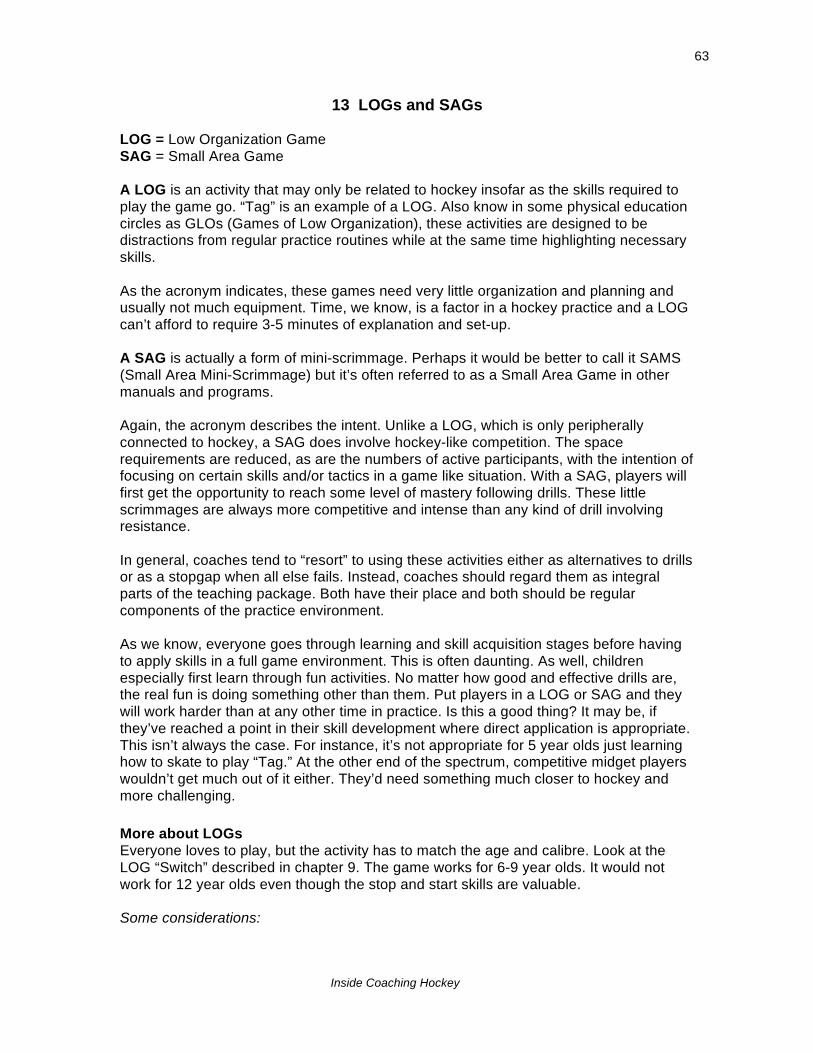
Inside Coaching Hockey
63
13 LOGs and SAGs LOG = Low Organization Game SAG = Small Area Game A LOG is an activity that may only be related to hockey insofar as the skills required to play the game go. “Tag” is an example of a LOG. Also know in some physical education circles as GLOs (Games of Low Organization), these activities are designed to be distractions from regular practice routines while at the same time highlighting necessary skills. As the acronym indicates, these games need very little organization and planning and usually not much equipment. Time, we know, is a factor in a hockey practice and a LOG can’t afford to require 3-5 minutes of explanation and set-up. A SAG is actually a form of mini-scrimmage. Perhaps it would be better to call it SAMS (Small Area Mini-Scrimmage) but it’s often referred to as a Small Area Game in other manuals and programs. Again, the acronym describes the intent. Unlike a LOG, which is only peripherally connected to hockey, a SAG does involve hockey-like competition. The space requirements are reduced, as are the numbers of active participants, with the intention of focusing on certain skills and/or tactics in a game like situation. With a SAG, players will first get the opportunity to reach some level of mastery following drills. These little scrimmages are always more competitive and intense than any kind of drill involving resistance. In general, coaches tend to “resort” to using these activities either as alternatives to drills or as a stopgap when all else fails. Instead, coaches should regard them as integral parts of the teaching package. Both have their place and both should be regular components of the practice environment. As we know, everyone goes through learning and skill acquisition stages before having to apply skills in a full game environment. This is often daunting. As well, children especially first learn through fun activities. No matter how good and effective drills are, the real fun is doing something other than them. Put players in a LOG or SAG and they will work harder than at any other time in practice. Is this a good thing? It may be, if they’ve reached a point in their skill development where direct application is appropriate. This isn’t always the case. For instance, it’s not appropriate for 5 year olds just learning how to skate to play “Tag.” At the other end of the spectrum, competitive midget players wouldn’t get much out of it either. They’d need something much closer to hockey and more challenging. More about LOGs Everyone loves to play, but the activity has to match the age and calibre. Look at the LOG “Switch” described in chapter 9. The game works for 6-9 year olds. It would not work for 12 year olds even though the stop and start skills are valuable. Some considerations:
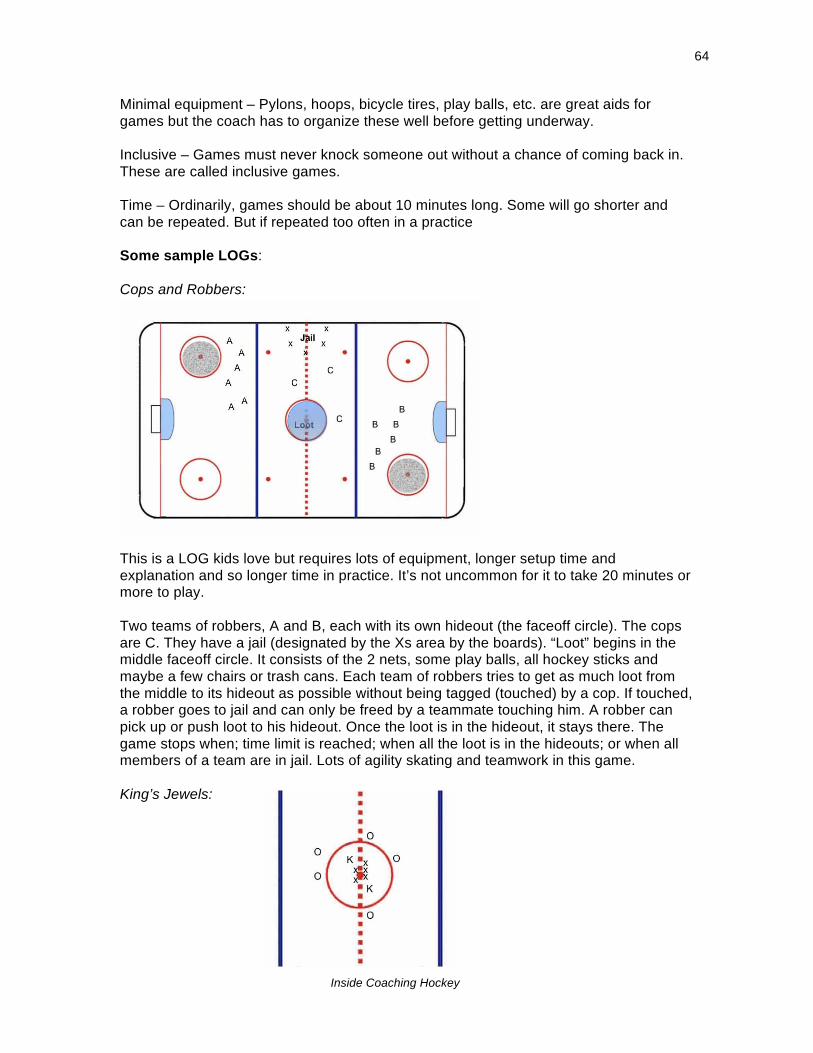
Inside Coaching Hockey
64
Minimal equipment – Pylons, hoops, bicycle tires, play balls, etc. are great aids for games but the coach has to organize these well before getting underway. Inclusive – Games must never knock someone out without a chance of coming back in. These are called inclusive games. Time – Ordinarily, games should be about 10 minutes long. Some will go shorter and can be repeated. But if repeated too often in a practice Some sample LOGs: Cops and Robbers: This is a LOG kids love but requires lots of equipment, longer setup time and explanation and so longer time in practice. It’s not uncommon for it to take 20 minutes or more to play. Two teams of robbers, A and B, each with its own hideout (the faceoff circle). The cops are C. They have a jail (designated by the Xs area by the boards). “Loot” begins in the middle faceoff circle. It consists of the 2 nets, some play balls, all hockey sticks and maybe a few chairs or trash cans. Each team of robbers tries to get as much loot from the middle to its hideout as possible without being tagged (touched) by a cop. If touched, a robber goes to jail and can only be freed by a teammate touching him. A robber can pick up or push loot to his hideout. Once the loot is in the hideout, it stays there. The game stops when; time limit is reached; when all the loot is in the hideouts; or when all members of a team are in jail. Lots of agility skating and teamwork in this game. King’s Jewels:
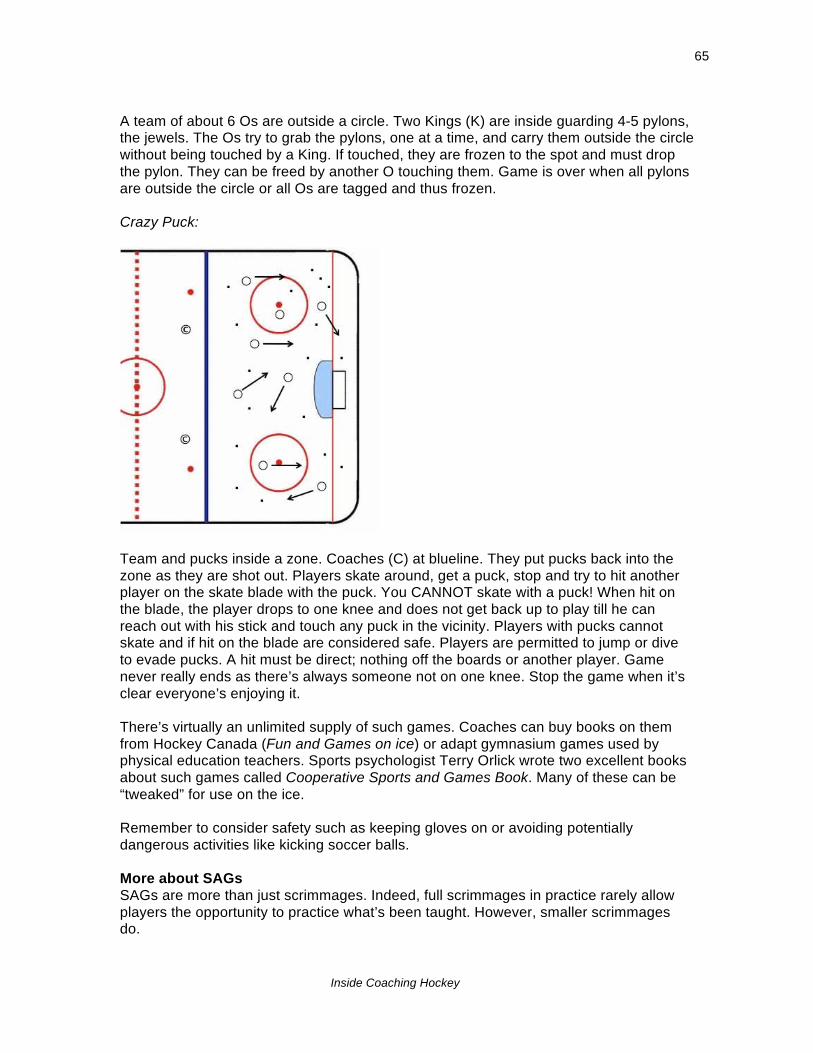
Inside Coaching Hockey
65
A team of about 6 Os are outside a circle. Two Kings (K) are inside guarding 4-5 pylons, the jewels. The Os try to grab the pylons, one at a time, and carry them outside the circle without being touched by a King. If touched, they are frozen to the spot and must drop the pylon. They can be freed by another O touching them. Game is over when all pylons are outside the circle or all Os are tagged and thus frozen. Crazy Puck:
Team and pucks inside a zone. Coaches (C) at blueline. They put pucks back into the zone as they are shot out. Players skate around, get a puck, stop and try to hit another player on the skate blade with the puck. You CANNOT skate with a puck! When hit on the blade, the player drops to one knee and does not get back up to play till he can reach out with his stick and touch any puck in the vicinity. Players with pucks cannot skate and if hit on the blade are considered safe. Players are permitted to jump or dive to evade pucks. A hit must be direct; nothing off the boards or another player. Game never really ends as there’s always someone not on one knee. Stop the game when it’s clear everyone’s enjoying it. There’s virtually an unlimited supply of such games. Coaches can buy books on them from Hockey Canada (Fun and Games on ice) or adapt gymnasium games used by physical education teachers. Sports psychologist Terry Orlick wrote two excellent books about such games called Cooperative Sports and Games Book. Many of these can be “tweaked” for use on the ice. Remember to consider safety such as keeping gloves on or avoiding potentially dangerous activities like kicking soccer balls. More about SAGs SAGs are more than just scrimmages. Indeed, full scrimmages in practice rarely allow players the opportunity to practice what’s been taught. However, smaller scrimmages do.
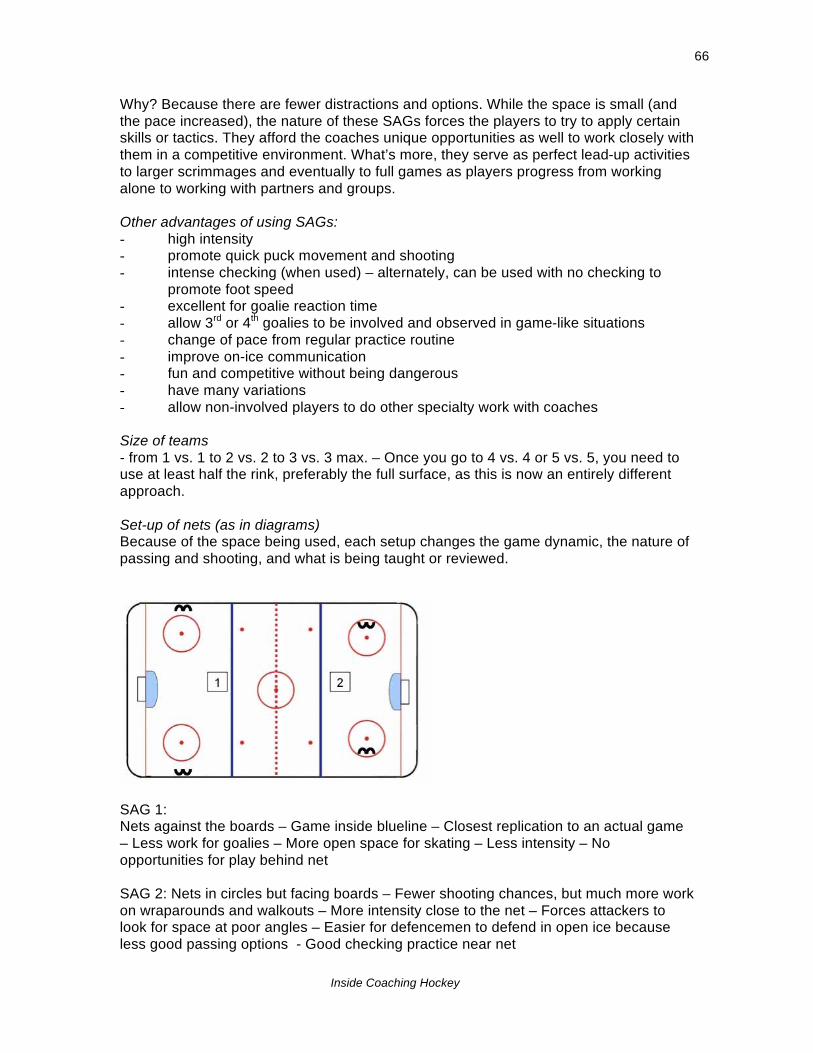
Inside Coaching Hockey
66
Why? Because there are fewer distractions and options. While the space is small (and the pace increased), the nature of these SAGs forces the players to try to apply certain skills or tactics. They afford the coaches unique opportunities as well to work closely with them in a competitive environment. What’s more, they serve as perfect lead-up activities to larger scrimmages and eventually to full games as players progress from working alone to working with partners and groups. Other advantages of using SAGs: - high intensity - promote quick puck movement and shooting - intense checking (when used) – alternately, can be used with no checking to
promote foot speed - excellent for goalie reaction time - allow 3rd or 4th goalies to be involved and observed in game-like situations - change of pace from regular practice routine - improve on-ice communication - fun and competitive without being dangerous - have many variations - allow non-involved players to do other specialty work with coaches Size of teams - from 1 vs. 1 to 2 vs. 2 to 3 vs. 3 max. – Once you go to 4 vs. 4 or 5 vs. 5, you need to use at least half the rink, preferably the full surface, as this is now an entirely different approach. Set-up of nets (as in diagrams) Because of the space being used, each setup changes the game dynamic, the nature of passing and shooting, and what is being taught or reviewed.
SAG 1: Nets against the boards – Game inside blueline – Closest replication to an actual game – Less work for goalies – More open space for skating – Less intensity – No opportunities for play behind net SAG 2: Nets in circles but facing boards – Fewer shooting chances, but much more work on wraparounds and walkouts – More intensity close to the net – Forces attackers to look for space at poor angles – Easier for defencemen to defend in open ice because less good passing options - Good checking practice near net
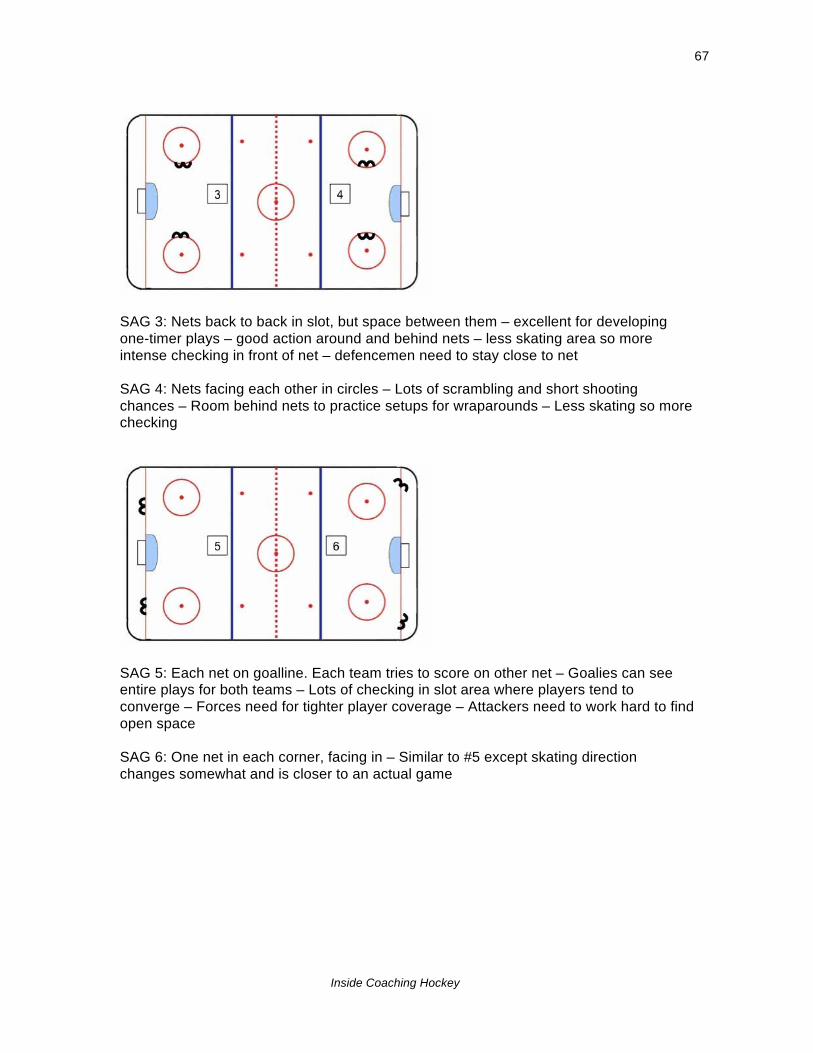
Inside Coaching Hockey
67
SAG 3: Nets back to back in slot, but space between them – excellent for developing one-timer plays – good action around and behind nets – less skating area so more intense checking in front of net – defencemen need to stay close to net SAG 4: Nets facing each other in circles – Lots of scrambling and short shooting chances – Room behind nets to practice setups for wraparounds – Less skating so more checking
SAG 5: Each net on goalline. Each team tries to score on other net – Goalies can see entire plays for both teams – Lots of checking in slot area where players tend to converge – Forces need for tighter player coverage – Attackers need to work hard to find open space SAG 6: One net in each corner, facing in – Similar to #5 except skating direction changes somewhat and is closer to an actual game
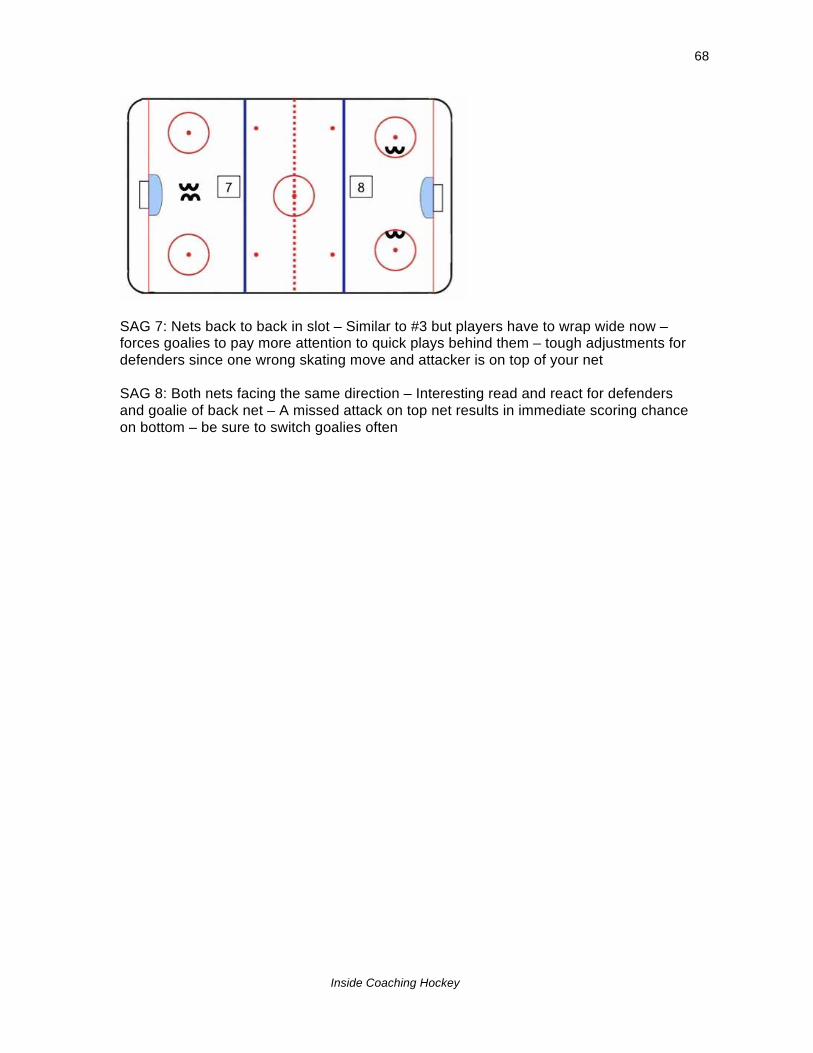
Inside Coaching Hockey
68
SAG 7: Nets back to back in slot – Similar to #3 but players have to wrap wide now – forces goalies to pay more attention to quick plays behind them – tough adjustments for defenders since one wrong skating move and attacker is on top of your net SAG 8: Both nets facing the same direction – Interesting read and react for defenders and goalie of back net – A missed attack on top net results in immediate scoring chance on bottom – be sure to switch goalies often

Inside Coaching Hockey
69
14 SAGs Plus Small area games (SAGs) are a marvelous way to reinforce previously taught or introduced skills. As good a tool as they can be, there is the risk of doing them for too long too often and turning a practice into a variety pack of scrimmages. Each SAG needs to be able to provide something different, apart from just a change in pace. The ones outlined in the previous chapter offered basic scrimmage ideas. Here are SAGs that offer a wider variety of challenges. As you comb through them, you need to ask yourself how and why any might be used. Certainly not all are applicable to every level or age. Many focus heavily on checking skills and one-on-one coverage. Some employ lots of in-close shooting which may not be suitable for younger or less confident goalies. Each game involves a multitude of KTPs that the coach needs to identify before playing. It is left to the coach to determine what these are. SAG 1: 1 vs. 1 x 3
Three As and three Bs prepare to play each other in individual 1 vs. 1 games (3 pucks). Each time a goal is scored in one of these games, the losing player is replaced by a teammate waiting outside the blueline. You could replace both players in the game. Lots of action for the goalies and intense play in the mini-games.
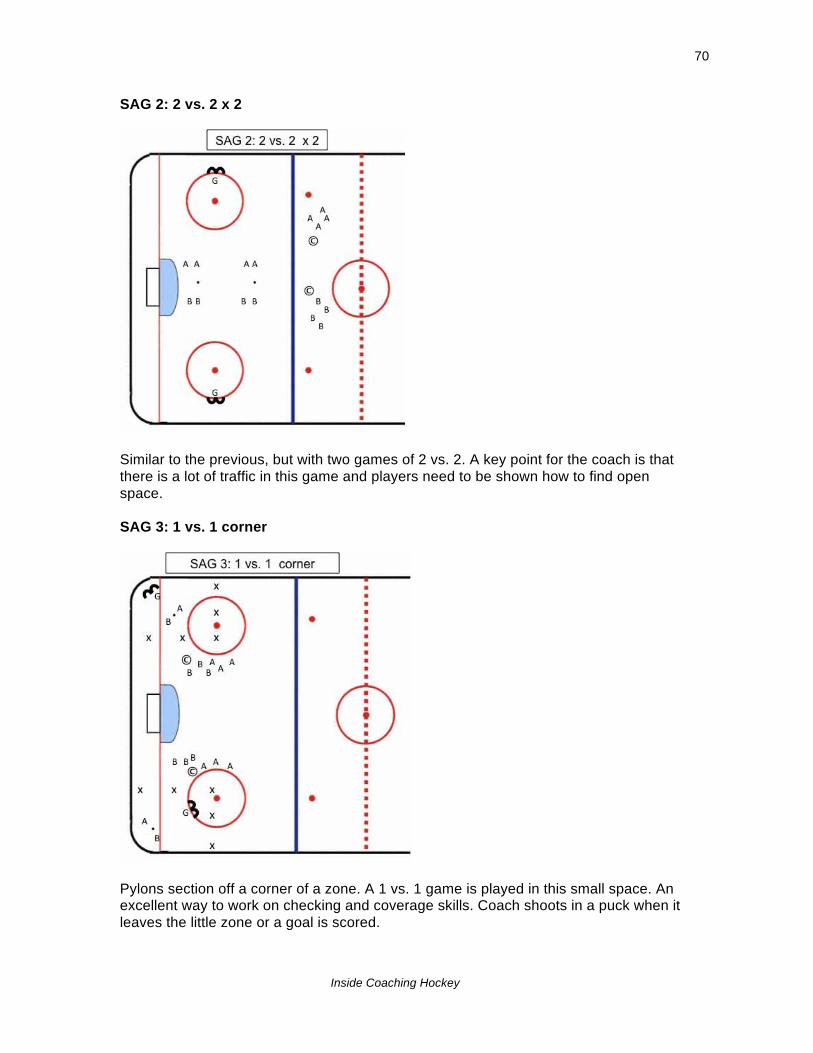
Inside Coaching Hockey
70
SAG 2: 2 vs. 2 x 2
Similar to the previous, but with two games of 2 vs. 2. A key point for the coach is that there is a lot of traffic in this game and players need to be shown how to find open space. SAG 3: 1 vs. 1 corner
Pylons section off a corner of a zone. A 1 vs. 1 game is played in this small space. An excellent way to work on checking and coverage skills. Coach shoots in a puck when it leaves the little zone or a goal is scored.
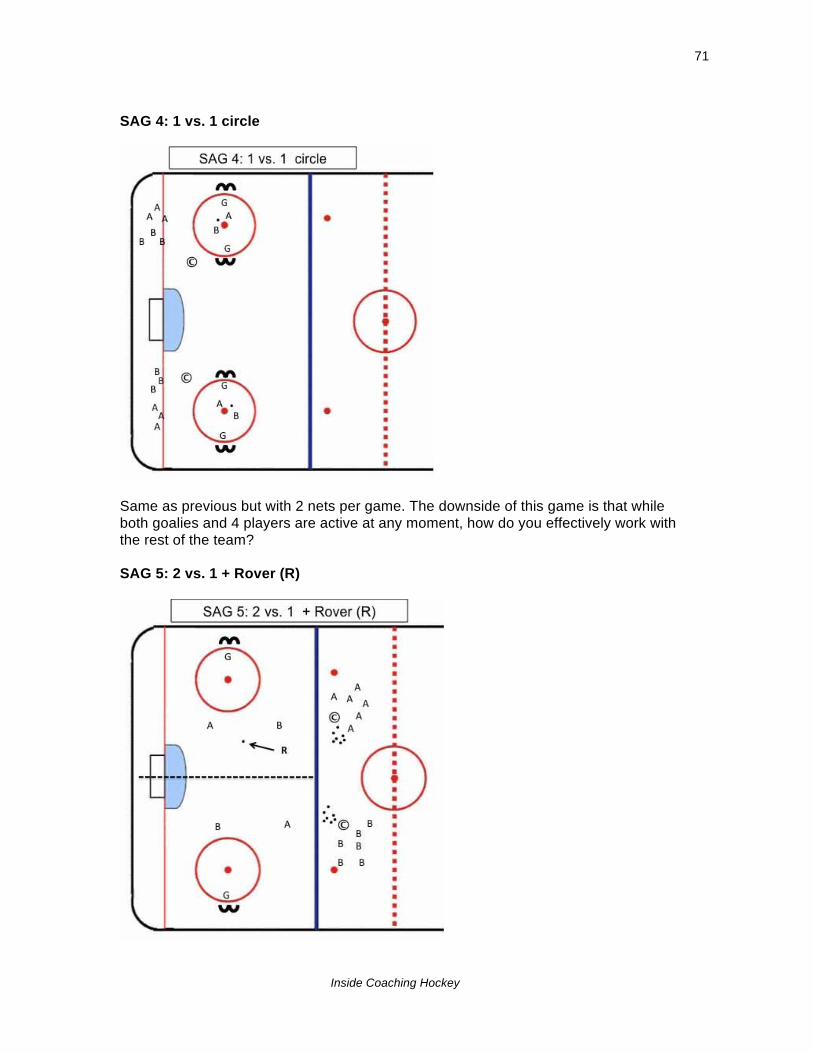
Inside Coaching Hockey
71
SAG 4: 1 vs. 1 circle
Same as previous but with 2 nets per game. The downside of this game is that while both goalies and 4 players are active at any moment, how do you effectively work with the rest of the team? SAG 5: 2 vs. 1 + Rover (R)
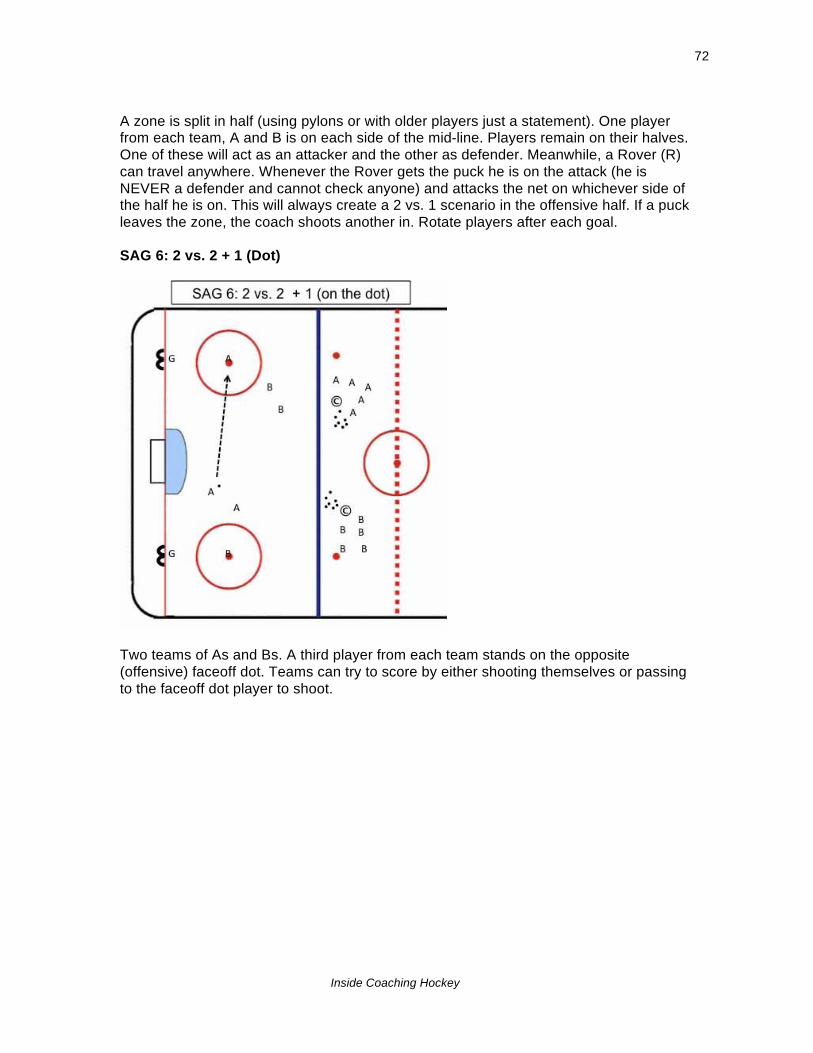
Inside Coaching Hockey
72
A zone is split in half (using pylons or with older players just a statement). One player from each team, A and B is on each side of the mid-line. Players remain on their halves. One of these will act as an attacker and the other as defender. Meanwhile, a Rover (R) can travel anywhere. Whenever the Rover gets the puck he is on the attack (he is NEVER a defender and cannot check anyone) and attacks the net on whichever side of the half he is on. This will always create a 2 vs. 1 scenario in the offensive half. If a puck leaves the zone, the coach shoots another in. Rotate players after each goal. SAG 6: 2 vs. 2 + 1 (Dot)
Two teams of As and Bs. A third player from each team stands on the opposite (offensive) faceoff dot. Teams can try to score by either shooting themselves or passing to the faceoff dot player to shoot.
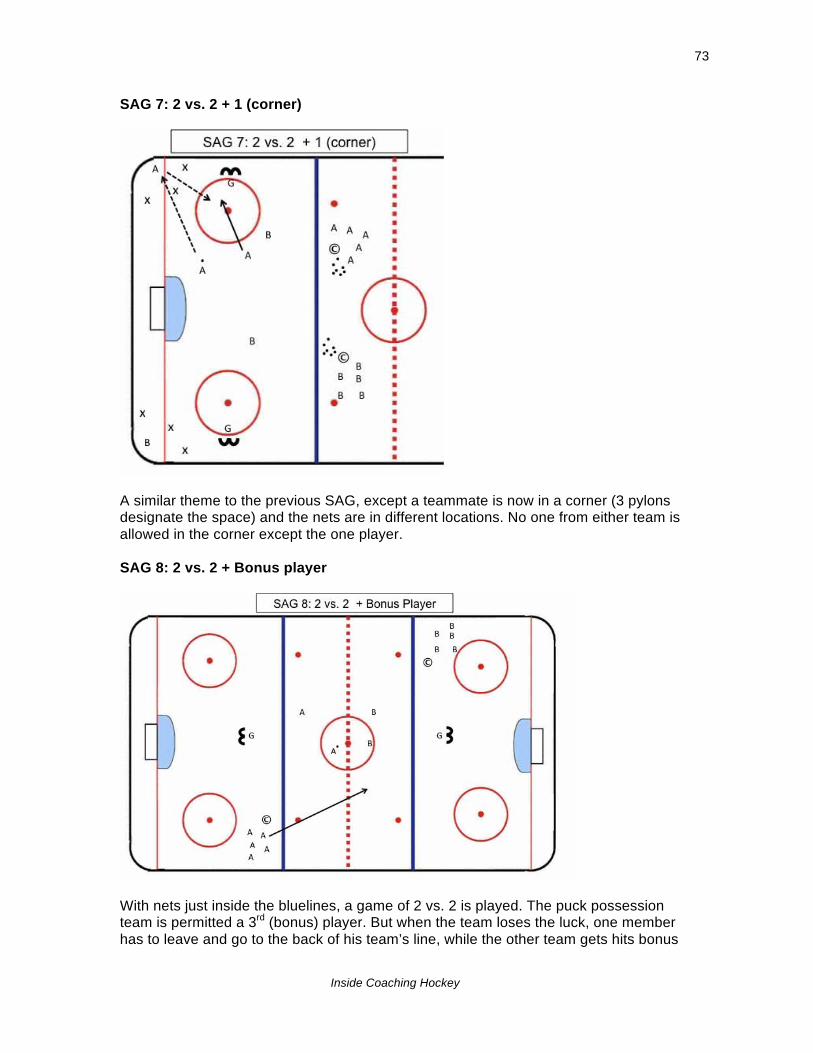
Inside Coaching Hockey
73
SAG 7: 2 vs. 2 + 1 (corner)
A similar theme to the previous SAG, except a teammate is now in a corner (3 pylons designate the space) and the nets are in different locations. No one from either team is allowed in the corner except the one player. SAG 8: 2 vs. 2 + Bonus player
With nets just inside the bluelines, a game of 2 vs. 2 is played. The puck possession team is permitted a 3rd (bonus) player. But when the team loses the luck, one member has to leave and go to the back of his team’s line, while the other team gets hits bonus
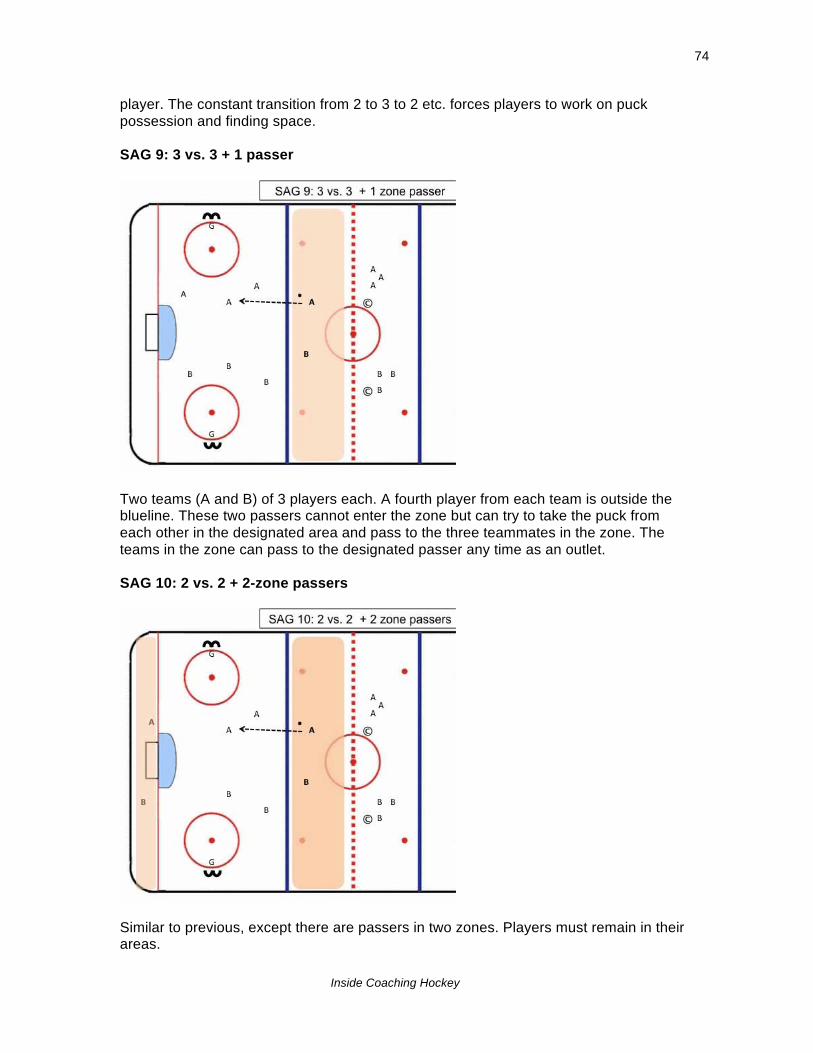
Inside Coaching Hockey
74
player. The constant transition from 2 to 3 to 2 etc. forces players to work on puck possession and finding space. SAG 9: 3 vs. 3 + 1 passer
Two teams (A and B) of 3 players each. A fourth player from each team is outside the blueline. These two passers cannot enter the zone but can try to take the puck from each other in the designated area and pass to the three teammates in the zone. The teams in the zone can pass to the designated passer any time as an outlet. SAG 10: 2 vs. 2 + 2-zone passers
Similar to previous, except there are passers in two zones. Players must remain in their areas.
Inside Coaching Hockey
75
When to use SAGs in practice will be covered in one of the upcoming practice planning chapters. Generally, they shouldn’t be done every practice. Instead, guidelines for their use include: - as a fun “filler” when drills come up short or don’t work - as a high intensity end (or beginning) to a practice - as an on-going intra-team tournament format - as a reinforcer of specific skills or tactics - as a means to help evaluate certain players

Inside Coaching Hockey
76
15 In-betweens The transition from one drill or activity to another in a hockey practice is generally accepted to be down or dead time. In fact, as much as 10% of a hockey practice is sacrificed in order to organize, speak with players, provide water, etc. In a 50- minute practice, 5 minutes may vanish. For less experienced coaches, or those dealing with young kids who don’t respond as swiftly, this dead time is almost a given. One can expect only so much to get kids from point A to point B regardless of how well organized a drill may be. The same is not true though for coaches of older players or higher calibre teams. With these, a 10% loss of time is pushing the limits of wastage. Furthermore, coaches of these players often need to find ways to keep the intensity high and use more teachable moments. This is where in-betweens come in. In-betweens are short, intense mini-exercises used when a practice drill is completed and before the next one is diagrammed or described. They are best done immediately after a drill and prior to water breaks. What are their objectives:
• To help maintain practice intensity. • To enhance skill development through the use of short bursts of skill practice • To maintain fitness • To provide a fun diversion • To allow coach a few moments to discuss, gather thoughts, prepare next drill,
etc. How much time does an in-between use? Max. about 10-30 secs. each Frequency: 4-8 times per practice (depending on practice length and how many activities comprise the practice). The coach needs to be careful how often to do them otherwise they become like regular drills. Also, if done too often, they can be tedious and intensity drops. Intensity: Should be at medium to maximum – their short duration should not cause undue fatigue (note: exercises MUST be safe to do) Process: Players are told before practice what the day’s in-between(s) will be. So when a drill is stopped and the coach signals, players immediately launch into the exercise wherever they are on the ice.
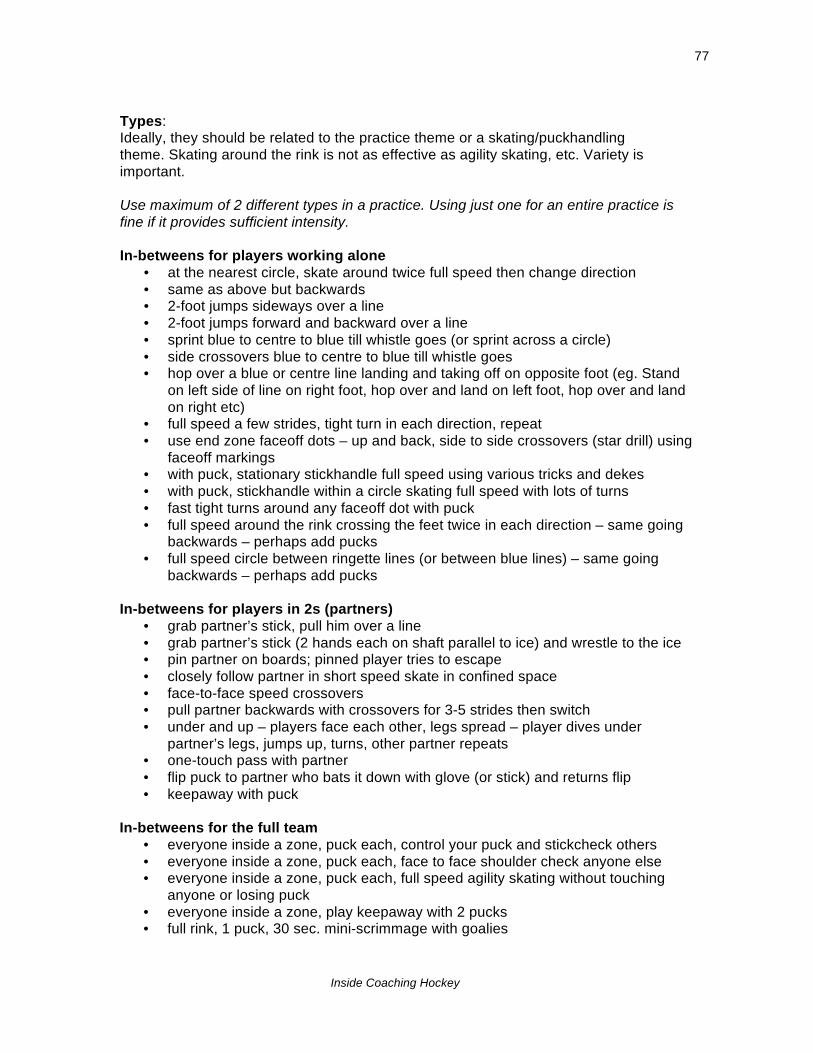
Inside Coaching Hockey
77
Types: Ideally, they should be related to the practice theme or a skating/puckhandling theme. Skating around the rink is not as effective as agility skating, etc. Variety is important. Use maximum of 2 different types in a practice. Using just one for an entire practice is fine if it provides sufficient intensity. In-betweens for players working alone
• at the nearest circle, skate around twice full speed then change direction • same as above but backwards • 2-foot jumps sideways over a line • 2-foot jumps forward and backward over a line • sprint blue to centre to blue till whistle goes (or sprint across a circle) • side crossovers blue to centre to blue till whistle goes • hop over a blue or centre line landing and taking off on opposite foot (eg. Stand
on left side of line on right foot, hop over and land on left foot, hop over and land on right etc)
• full speed a few strides, tight turn in each direction, repeat • use end zone faceoff dots – up and back, side to side crossovers (star drill) using
faceoff markings • with puck, stationary stickhandle full speed using various tricks and dekes • with puck, stickhandle within a circle skating full speed with lots of turns • fast tight turns around any faceoff dot with puck • full speed around the rink crossing the feet twice in each direction – same going
backwards – perhaps add pucks • full speed circle between ringette lines (or between blue lines) – same going
backwards – perhaps add pucks In-betweens for players in 2s (partners)
• grab partner’s stick, pull him over a line • grab partner’s stick (2 hands each on shaft parallel to ice) and wrestle to the ice • pin partner on boards; pinned player tries to escape • closely follow partner in short speed skate in confined space • face-to-face speed crossovers • pull partner backwards with crossovers for 3-5 strides then switch • under and up – players face each other, legs spread – player dives under
partner’s legs, jumps up, turns, other partner repeats • one-touch pass with partner • flip puck to partner who bats it down with glove (or stick) and returns flip • keepaway with puck
In-betweens for the full team
• everyone inside a zone, puck each, control your puck and stickcheck others • everyone inside a zone, puck each, face to face shoulder check anyone else • everyone inside a zone, puck each, full speed agility skating without touching
anyone or losing puck • everyone inside a zone, play keepaway with 2 pucks • full rink, 1 puck, 30 sec. mini-scrimmage with goalies
Inside Coaching Hockey
78
16 Practice preparation True or False: A practice begins as soon as the first player or coach hits the ice. False. A practice begins long before. Some coaches maintain it actually starts in the dressing room. To a certain extent, that’s true. More accurately though, a practice begins at the end of the previous team gathering, whether it was a practice, game or off-ice session. Players have to want to come to practice. They need to look forward to it. They need to feel that practice will be fun, challenging, and an opportunity to improve. Not every practice will hit that mark but coaches must strive for it nonetheless. This means leaving the team session prior to the next practice informing players that there will be something to look forward to, that whatever ails the team will be addressed in a positive manner on the ice at practice. If the relationship between the coach and players is a good one anyway, it’s likely this won’t be hard to do. But things can get strained over a long season, so the coach needs to work at rebuilding and then maintaining a positive rapport so that coming to practice is a positive. Normally, we'd assume the coach has to be enthusiastic about being at practice. That’s hard to do after a string of losses, when parents have been complaining, or when life’s other issues get in the way. The fact is, the coach must find a way to indicate to the team that the practice is where he’d rather be than anywhere else at a given moment. What to prepare 1 – Obviously, a practice plan. When done at the last minute, practice plans can sometimes seem like they’ve been created as stop gaps to problems. The break-out is sputtering, so let’s spend 30 minutes on that tomorrow night. It may work in the short run, meaning for the next game. Likely, it won’t. While the detailed practice plan may not be filled out till the night before (or even the hour before), there has already been established season and segment plans to guide what will go into the practice. The plan has to incorporate the right kind of teaching and drills and have imbedded the fundamentals of learning, fitness, etc. that have been described in earlier chapters. Sticking with the plan is not carved in stone. There’s nothing wrong with adapting components from time to time to address consistent issues that weren’t evident before. If the breakout hasn’t been working all season long, indeed maybe it’s time to revisit it. 2 – Does it fit in? The practice has to fit into some larger plan, a segment plan as you’ll see later on. It’s a good idea to bring it along for reference, partly as a reminder of this being a piece of the whole and partly to stay on task, the task being the overall objectives for the season. 3 – Prepping other coaches. In today’s technological world, there’s not much excuse anymore for not sharing the practice plan with the other coaches at least the day before. Part and parcel of this is outlining what each person’s role is, which has to go beyond
Inside Coaching Hockey
79
merely starting and stopping drills. Unless the coach has worked with someone before, it’s often difficult to expect assistants to know what to do, let alone how to teach. The biggest danger is not to assume. Even if an assistant played a high level of hockey, the ability to teach the game to kids is a far different challenge. After sharing the plan, it’s wise to meet some time before going on the ice to address questions or concerns. 4 – Ice, equipment, rooms. Confirm the ice. Double bookings do happen. Who’s getting the rooms? Is an extra one needed for coaches if, in the case of boys teams, female players? Who’s bringing the pucks? Is the bucket split between two coaches in the event one doesn’t make it? Who has the pylons or other teaching aids? 5 – Player attendance. If there’s one thing a coach should take pride in, it’s practice attendance. How do you prepare attendance though? Simply, you check with the players to ensure who will at the next one. It’s frustrating showing up with a practice plan designed for X number of players, then discovering a bunch had a school project due the next morning and stayed home. If only you’d known. If only you’d asked. 6 – Appearance. Wear a tracksuit. Hopefully each coach has a team tracksuit or similar apparel. Yes, it does make a difference to have coaches at least look the part. In an image-conscious society, how one carries oneself and dresses for the occasion can speak a great deal for what might come. As harried and panicky as some practices may be due to ice hours, coaches who look like they mean business reflect the right attitude. 7 – Speaking of attitude. The most important things to bring to practice are enthusiasm and positivity. Even poor coaches with minimal teaching ability can infuse their players with a positive attitude about practice if they themselves have it.

Inside Coaching Hockey
80
17 The practice template In preparation for the 1984 Canada Cup tournament, the Swedish national team approached practice planning with what was then a novel concept. The obvious objective was to win the tournament. They didn’t win. But they did reach the finals against Canada, losing the best of three 2-0. So one could either laud their practice planning for getting them that far, or blame it for not getting them far enough. The plan began with a calendar outlining team testing dates and travel. This was followed by daily practice objectives and a list of drills, each of which had an assigned number and diagram. For instance, a practice on Aug. 4, 1984, listed nine drills for a two-hour ice session. This wasn’t an anomaly. It was the norm. The vast majority of the Swedes’ practices that summer included 8-10 drills. The entire outline, minus the diagrams and drill descriptions, is six pages long. This for a two-month training cycle prior to the tournament. Following the outline was the drill package, numbered with brief notes explaining each drill and its objective. Look at the following two pages. The first is a sample of practice plan outlines while the second shows some of the drills that were placed into the practices. Not knowing Swedish is immaterial as the summaries and diagrams are mostly self-explanatory.
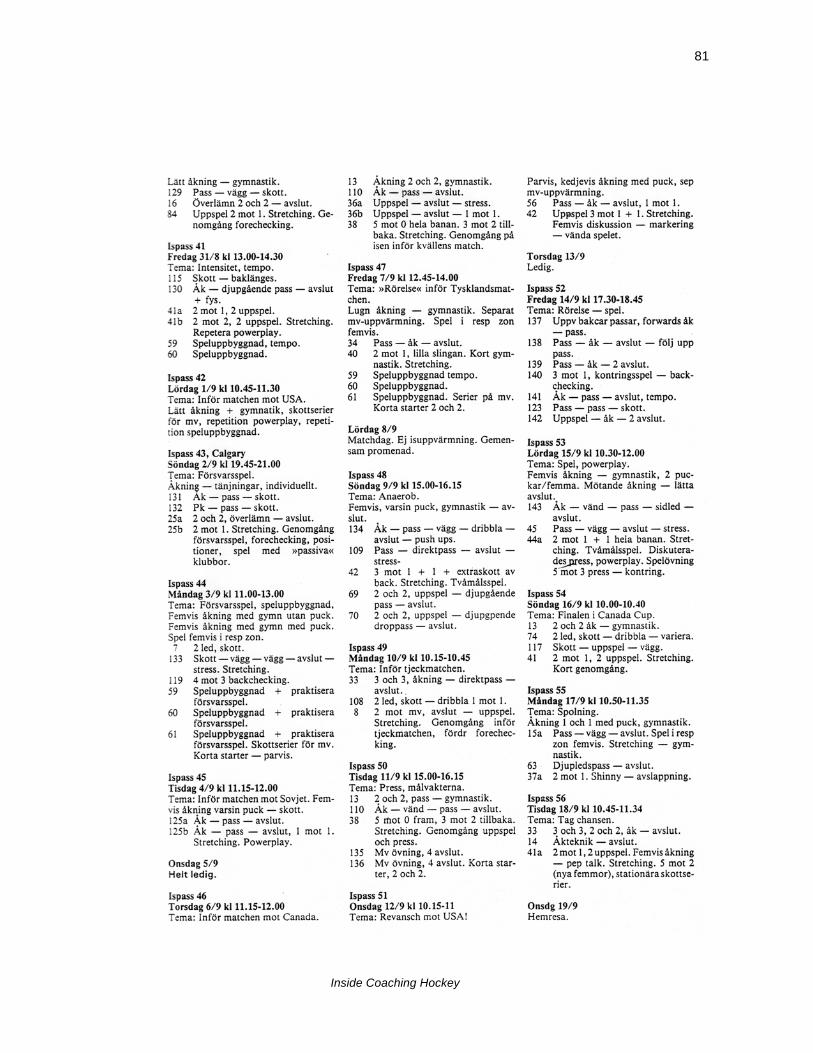
Inside Coaching Hockey
81
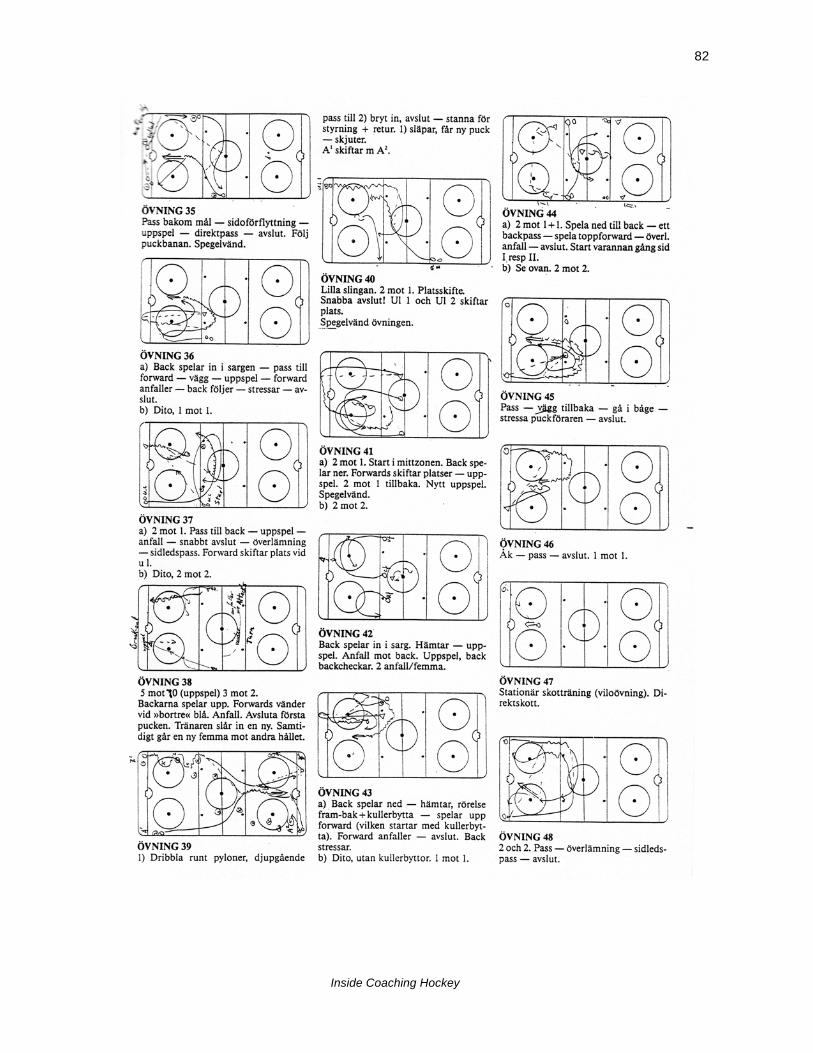
Inside Coaching Hockey
82

Inside Coaching Hockey
83
Such was the template for that professional team’s practice planning. It’s useful to note their approach for a number of reasons:
-‐ There was a high level of preparation and planning done at elite levels (in this case Sweden in the 1980s, but it is common these days)
-‐ Drills were given numbers, not names. Then again, these were pros, not kids. -‐ There was a wide variety of activities done in every practice, none much longer
than about 10 minutes. The obvious emphasis was on quality rather than quantity.
-‐ There were 144 drills in the Team Sweden “template” and no two were the same. Moreover, they all required considerable movement at varying intensities.
Obviously when coaching kids, the differences are obvious. The similarities and things we can learn from this and apply are less so. To begin, every practice had a warm-up that involved numerous skating drills with passing and shooting. There was hardly any formal team play done on-ice, unless you count two and three player offensive and defensive drills as team play. Each practice had a cool down activity. These happen to be the very same components our minor hockey players require. What’s different, aside from skill level and intensity, is the manner in which they are juggled and the order used. A general template For the most part, a minor hockey practice plan template might look like this (the percentages indicate approx. how much of the practice should be allotted to the activity): 1 – Warmup (10%) Full body activities. May include pucks. Work:rest ratio is not a factor since nearly all the kids should be involved most of the time. No specific instruction (teaching) is given, though reminders of previously taught skills are appropriate. The on-ice warmup can complement an off-ice warm-up. However, often off-ice warm-ups are awkward to do to any useful extent, which makes the on-ice portion that much more important. This is not a time for stretching; that should be done off-ice. Besides, you can’t effectively or properly stretch cold muscles. You have to heat up their engines first. 2 – Review (10-20%) When the kids are still fresh and eager, it’s useful to review one or two KTPs from the previous practice. The key here though is to prioritize the players’ needs. How useful is it to re-teach what they can already do fairly well? It’s better to examine some things they had difficulty with. Avoid using the same activity as last time. As mentioned in previous chapters about drill design, it will be more effective if you can find a drill that highlights the same skill or tactic done in a different way. 3 – New stuff (25-40%) Actually, this portion and the review are interchangeable. Some teams are best handled by giving them new challenges from the start before reviewing older ones. As indicated,
Inside Coaching Hockey
84
this “new stuff” should take up the bulk of a practice. However, it’s rarely a single activity. There are many ways to approach teaching new material using drill progressions and being mindful of the stages of skill acquisition. This is also a good opportunity to tinker with different teaching approaches. For instance, many coaches like using circuit teaching in practice. This is where X skills or tactics are presented in stations run by a different coach at each. For instance, in a 50-minute practice in which 20 minutes (40%) has been set aside for teaching new material, the head coach may spent 5 minutes on whole group instruction before setting up a 15-minute, 3-station circuit. The percentage of time spent here depends on many factors. A coach may feel that teaching two skills/tactics for short periods will be more beneficial than one for a longer period. Much of this is experimental with new teams, levels or age groups. It’s only after being with them a while that you really get to understand their needs and what they can absorb. Be wary of inching towards 50% of practice time on new skills. Enthusiasm to teach is wonderful but it needs to be tempered with the reality of throwing too much at a group at once. 4 – Closing activity (10-20%) Many books or manuals like to refer to this as the Fun Activity of the practice, which implies the rest of the practice might not have been. Yes, the end is vitally important. It can be a surprise SAG or LOG or even a favourite drill with a new twist. What’s important is that there is a connection to something taught in practice. While the game of Tag is fun, and it may serve as a nice break from routine, it’s not terribly useful after a full practice devoted to passing and give and go activities. Remeber: As stated in the LOG chapter, sometimes a complete break from the norm works wonder. If planned well, the closing should be quick and efficient. It’s not unusual to lose track of time in practice and find yourself with three minutes to go. Is that enough time to begin the activity? If not, weigh the alternatives. What’s your contingency? Is it to just continue the last drill and let the practice drift off into the sunset? Hopefully not. You’ll notice that each of these four activities was allotted a general percentage of time rather than a defined set of minutes. In this way you build flexibility into your plan. A plan – Start to Finish How to start? Let’s say we have a competitive minor pee wee team (11 year olds). The coach’s objectives for the year included improved skating agility and passing along with an understanding of offensive zone team play. How do we build this team’s first practice of the year? First, on a scrap of paper, we write the following (time in percent in brackets): WU – agility skate with pucks (10%) Review – none – get them passing (10%)

Inside Coaching Hockey
85
New 1 – passing in 2s (25%) New 2 – passing in 2s with puckhandling weaves (25%) New 3 – agility plus give and go (10%) Finale – 20% What then is the thinking behind this first practice template? It seems to be a bit of a departure from what was just described. Because… a – plenty of movement throughout b – a mix of shorter and longer activities (6 in all) to promote early interest c – skills mostly interlock from beginning to end d – variety of key skills – lots of time as the season wears on to work on these in more detail e – can employ various teaching techniques (circuit, whole group, etc.) This is not the practice plan. It’s just a rough template or outline. The actual plan involves the diagramming of drills, indicating what KTPs are the focus, and how much will be taught. That will be the time-consuming part of the plan. This was just a start.

Inside Coaching Hockey
86
18 The practice variety pack The beauty – and the frustration – of hockey is that nothing ever occurs twice. Just when you think you’ve got a handle on how to teach a concept, new ones develop on the next shift that can throw you, and the kids, for a loop. Similarly with skills. You’ve spent the last three practices developing their puckhandling and passing only to discover that the next few teams you play are so strong, your team will likely have puck possession for 50% of its normal time. Do you stick with the plan, or alter it a bit to teach kids the necessary checking and skating skills to allow them to increase puck possession time? Or is this just bowing to the immediate needs of a situation while ignoring your well-thought out practice goals? A coach can’t just ignore the realities of competition. If this particular team needed the puckhandling and passing work, then it’s probably because the coach knew the players needed it. There’s no sleight of hand here. The implication is there’s a lower expectation of their game puck possession time to begin with. Still, adapting to the requirements of a league where the coach wants the team to at least be competitive means a slightly different approach is warranted. And no, there is nothing wrong in wanting a team to be able to stand on its own, to be at least a little competitive. Different approaches don’t only mean teaching different things. The very nature of the practice, its construct, is at the core of the coach’s task. In the previous chapter, we saw a template that might be used 75% of the time. Even within that template were countless ways to approach a practice plan. Recall the use of a circuit teaching approach during the “new stuff” time block. A varied approach to practice planning can be warranted under many circumstances, such as: Time of the season: Early season practices should differ from mid and later season ones, not just in content but also in construction. Yes, there’s much to be said in favour of establishing routines and sticking with them for the season. But like the game itself, unpredictability in approach has its advantages. Players can see and feel how they’ve progressed from relatively straightforward activities to more complex and/or intense ones. The time of the season has to consider climate. Minor hockey teams often practice in very cold environments, even outdoors in some places. These practices just can’t have the same kind of inactive times or slower moving drills. As we’ll see later on in chapters about segment and yearly plans, practices within a certain portion of the season (like a particular month) will also be different. Typically seasons are front end loaded with practices. Then afterwards it’s not uncommon for teams to get sporadic practices. What was weekly may become only 2-3 occasions in a month, and then on difficult days, such as just after an out-of-town tournament. These practices have to consider fatigue from different angles. In the case of infrequent ones, the kids lose their edge and will run out of steam mid way through the same type of
Inside Coaching Hockey
87
practice plan they flew through two months ago when they were on the ice every third day. The competition schedule: Junior and many elite competitive leagues have pre-determined game or tournament dates. Usually, these are fixed. A reality of minor hockey is that games get rescheduled constantly and are rarely on the same day. Furthermore, travel requirements vary wildly from one association to the next. The 20-minute jaunt for one league’s games may be two hours in other cities. The cliché “ice time is at a premium” may be over-used but it is a fact. So practices are plunked where and when possible. Sometimes this means the night before a Saturday afternoon game an hour away. What the coach had preferred to be an intense practice plan now needs to be watered down a bit to avoid fatigue or injury. Similarly, as previously stated, having to practice the day after returning from a travel tournament is the bane of a coach’s planning. After playing perhaps 5-6 games in 72 hours (or less!), what will be the nature of the practice plan the very next night? Player progress: Hopefully, there’s plenty of it. Rare is the team where there isn’t some, and usually that’s because of practices being nearly non-existent. With player improvement comes the need to approach practices differently. Of course, drills and activities will change. We already know that from the drill design chapters. The practice template will, too, and must. The kids need to see that their improvement in skill and work ethic is being recognized as worthy of a different set-up. Some of it may be used as a form of intrinsic reward. But most is because the needs change, often drastically. The most obvious example of this occurs with new players age 5-7, whether they’re on formal novice teams or as part of a hockey school type of structure, such as Canada’s Initiation Program. Those who work with these kids know that you need to have "a goodie bag" of perhaps 10 activities to keep interest high and kids moving. They just can’t do formal drills as we know them. At the beginning, just being able to stand up from the ice is time-consuming. Three months later, this skill has gone from jagged to auto-pilot stage and so the time needed to be spent on it changes. Finally these kids can spend 10 minutes on an activity, an unimaginable timeframe when they started. At the other end of the spectrum, we could have a midget AA or AAA team being taught power play principles in the first few practices of a season. Finally, after four months, they’re able to pull the components together and work them as a single play for 20 minutes. That would have been chaos before they were taught in short progressions. In other words, the practice template altered according to their progress. Instinct: The truly effective coaches are creative, not just in drill design, line makeup or tactical approach. They seem to have an instinctive feel for when an approach warrants a change. It may have nothing to do with the team’s record or a particular game. It’s just a feel.
Inside Coaching Hockey
88
When Ernest Hemingway was asked why he rewrote the ending to “A Farewell to Arms" 39 times, he is reported to have said, “I had to get the words right.” So sometimes an explanation for changing the practice template is, well, inexplicable. An unfortunate corollary to this is that some coaches believe they think they’re being creative, or are challenging the kids, by having different practice templates many times. It’s as if the coach is trying to keep them on edge. This is a dangerous practice worth staying clear of because it’s confusing for the kids and strays from routines, which are important. It’s one thing to have varied drills or teaching approaches; it’s quite another to have every practice template different. Other types of templates: These are just examples. The mind being the home of infinite ideas, the coach can invent many others. SAGS, LOGS, and stuff: It’s OK sometimes for coaches to not teach too much. It’s OK for coaches to shut up for long stretches of time. It’s OK to step away from drills illustrating technical or tactical progressions. It’s OK to “test the waters” of the team and see what would happen if a group of practices were comprised of SAGS, LOGS, flow drills and similar activities which used to be the exceptions, not the template itself. Reviewing the review: The group of practices is a review of material taught by this coach. It would be similar to what a schoolteacher might do in the two weeks of classes prior to exams. Nothing new is presented. The pros and cons of this template approach for minor hockey are many. The coach needs to weigh these carefully, but the idea does have merit. Just don’t confuse a practice template of review material with doing the same drills as before, but more often and for longer. Pure techniques or tactics: As with every template that defines a collection of practices over a period of time, this one hones in on a single approach. Normally, coaches need to do a lot of multi-tasking in activities and try to meld skills with individual or group tactics. This template chooses one. It doesn’t however choose one skill or tactic (though that might happen in a single practice). The approach is perhaps more dependent on the age level and calibre of the players than other types. “Outside the box” time frames and order: Indeed, a warm-up starts the practice. After that, why review first? Why end with a LOG? Why not have it in the middle of some practices? What about spending half the time on drills they can do (review) and twice the time on ones that are new? Or even vice versa, if you think the kids are up for the challenge. Conclusion: Just as doing the same drills punctures enthusiasm, so does having the same approach to practices. As part of the planning process for a segment or the season, the coach should consider templates that stray somewhat from the norm the coach has created.
Inside Coaching Hockey
89
19 The not-so-itty-bitty details Dress the part: Billy Crystal’s memorable Saturday Night Live character Fernando almost had it right when he’d comment, “Friends, ees better to look good than to feel good.” Dressing properly (eg. tracksuit) for practice is a little like the theory surrounding eating the right or wrong meals before playing a game. Eating the right meal may not make you play better, but eating the wrong one will quite likely make you feel worse. Image in coaching is important. Greetings!: Greet every player in some way as they arrive. It seems like such a small thing, but kids like to know the coach is interested in them, let alone their hockey development. A greeting may be nothing more than a nod or wave, but even that’s enough to make a connection at times. Have a goal: Do you know what you’re trying to achieve in this practice and why? An observer should be able to watch the practice and state fairly accurately by the end of it what the practice goal was. If it’s obtuse to an observer (or a parent in the stands), it may very well be that way for the kids, too. Have a written plan: With copies for other coaches and affixed to a place where the kids (and yes, even the parents) can see it. Does the plan suit the time, segment, template, situation, calibre, etc.? Contingencies: For when drills go awry or don’t work. For when coaches don’t show up. For when there’s an odd number of players (like 11 instead of your normal 15). For when there’s only one goalie. For when someone forgets the pucks! Prepare: The team, the coaches, the equipment. Water bottles. Have enough pucks for about 3 per player. Set up teaching aids like rink boards or chart paper beforehand. Warm-up: Is there to be an off-ice warm-up? Where? How? For how long? Is it permitted to do activity in that particular rink’s corridors or rooms? Is the on-ice warm-up appropriate? Content: Is there an effective beginning and end to the practice? Is there at least one activity like a SAG or LOG? Feedback: Has there been directed, relevant, and mostly positive feedback from all coaches throughout the practice? The “good cop-bad cop” system of divvying up coaching approaches is not advisable for kids in most situations. This is not to say one coach, the head, shouldn’t have final say nor does it mean this person is the only one who will discipline the team/kids when needed. However, it’s the even-handedness of dispensing feedback that’s important, not which coach is assigned a role to play. Active coaching and teaching: Coaches need to teach, not participate in drills. They should demonstrate, advise, correct, re-teach, review and, indeed, sometimes cajole kids into trying something. These are all reflective of active coaching. NOTE: There are a number of dangers associated with coaches participating in drills beyond demonstration purposes. Putting adults into a “play” environment with kids is begging for injury to the children. Even if accidental, the risk remains high. Consider, too,
Inside Coaching Hockey
90
the physical danger for the coaches themselves of falling, getting struck by sticks or pucks, and so on. Without equipment and often minus the conditioning, coaches are not in a position to do what the kids might try. In either case, there may be problems with regards to the law and insurance. Furthermore, what does a coach need to prove by participating with kids? The argument in favour is a specious one and often dotted with assurances that the coaches will be careful or that the kids like it. The former is a given, yet still highly risky, while the latter is a poorly thought out assumption. Evaluation: Are you prepared to examine your practice afterwards with your coaching staff and do an objective critique?
Inside Coaching Hockey
91
20 Half the ice - Twice the planning In youth baseball, you can trim the base paths to make them shorter by literally yanking the bases from their roots and plunking them elsewhere. Presto! Kid-length base paths! Soccer is renowned for smartly adapting its rules, ball, and fields for kids. Smaller nets fashioned from plastic pipe, a few pylons and field paint turn adult pitches into kid-friendly ones. Hockey though is an entirely different problem. The rinks were built by adults for adults based on NHL specifications from many decades ago. Even though there exist complexes here and there which are specifically constructed to accommodate children, these are so few as to be inconsequential. We are stuck with a playing surface and markings that are largely unsuitable for children. Modifying them isn’t easy and even when done, we skate headlong into the monster called “Tradition.” Whereas soccer, baseball, and other team sports have properly convinced people to believe adaptations are appropriate, hockey hasn’t been so successful at it. The mainstream minor hockey public still believes in full surface games, though they don't see them in the other sports. As well, there seems to a feeling that anything other than a full surface practice cheats kids out of ice or hurts their learning the game. Certainly tradition and history play roles in this mindset. Anyone who grew up in the hockey culture prior to, say, the 1980s, didn’t have coaches or programs advocating smaller or sectioned ice surfaces. While most hockey governing bodies try to persuade its constituents of the logic of space appropriate to an age group, it remains a tough sell. People haven’t lived it and so don’t quite know what to make of something they perceive isn’t “real hockey.” But there may be another reason, one that is not easily admitted. The complexity of designing drills and practices has been documented in previous chapters. The undeniable fact is that organizing a practice for half a rink is much more challenging. Perhaps it’s natural to want to have space, that the more room we have, the better off we are. This may even be a North American mindset. On this continent, we have so much room, the very idea of sharing space, no matter how sensible, seems ill-conceived. These reasons may help explain why coaches tend to look at shared or half-ice practices with a grimace. They realize all too well the economics of the sport and sometimes can also convince themselves that perhaps eight year olds don’t always need a full sheet. But once the kids hit pee wee (age 11-12), well, heck, they absolutely must have full ice practices. Then they attend coaching clinics and have to participate in on-ice drills with about 30 other coaches. To their shock they discover that the vast majority of the drills and demonstrations used half the ice or less. Logic would dictate that if 30-plus adults can learn on half a rink, why not kids?
Inside Coaching Hockey
92
What’s so hard about it? Sharing ice for a hockey practice means the coach has to consider many more factors than for a full ice one. Noise: Two teams, two sets of coaches, often more than 30 players, at least half of whom are doing something different from your own players, extra whistles, puck noise you have no control over…This is now a much noisier environment. More noise = more distractions. See the next point. Distractions: Same as above, which means it’s more difficult to gain players’ attention. If the kids at the other end are doing what seems like a neat shooting drill, your group will find it tough to focus on you when you want to teach thrilling skills like backward c-cuts. It’s true that kids are easily distracted. But the shared ice situation almost makes it inevitable. Thus it’s not uncommon to see coaches spending more time than they’d like trying to control their players’ wandering eyes. Drill beginnings and endings: In a previous chapter about drill design, we saw how important it is to have drills that slide into each other nicely with minimal travel time. This is still important in shared ice practices, except now the tighter space means there needs to be more care given to how these are done. A drill that begins near the centre ice circle may very well be a terrific one. However, if the other team is also doing a drill in that area, the extra distraction may be a problem. This means moving the starting point of your drill, which in turn impacts its end point, and even where the next drill goes. SAGs and LOGs – by the other team!: You can’t control the other team’s practice plan. So if that group is doing a SAG or LOG activity and your team is doing a passing drill that requires focus, we’re back to the distraction problem. Congestion: This point would appear to be a contradiction to the statements made earlier. Kids don’t need much space. However, nearly every drill or activity done in half a rink does make the area more crowded. It forces the coach to be well organized in how assistants are deployed to manage the kid traffic and prevent them from interfering with each other. In other words, more planning. Reference markings: An advantage of the full rink is the wide array of on-ice markings available to help teach. For instance, with nine faceoff dots, a coach can effectively use all of these to teach a puckhandling exercise in which the idea is to keep the puck on a dot. Nine dots means two kids per dot and a 1:1 work:rest ratio. However, with just half a rink and only four dots (maybe five, if the other team’s coach allows the centre ice one to be used), the coach has to rethink how to use these and maintain a good ratio. Similarly, there are now only two circles available, one goal crease, a much smaller neutral zone, etc. Group tactic drills: There are obvious advantages to running tactical drills on a full sheet. With a half rink though, the drills will have less skating, fewer options and a greater chance of more inactivity (low work:rest ratio) if not broken down in groups or stations. Because of the smaller space, it’s more challenging to teach a wide array of options. As well, large group or team tactics really slow down a practice because not enough players are active. Essentially, these shouldn’t be done.
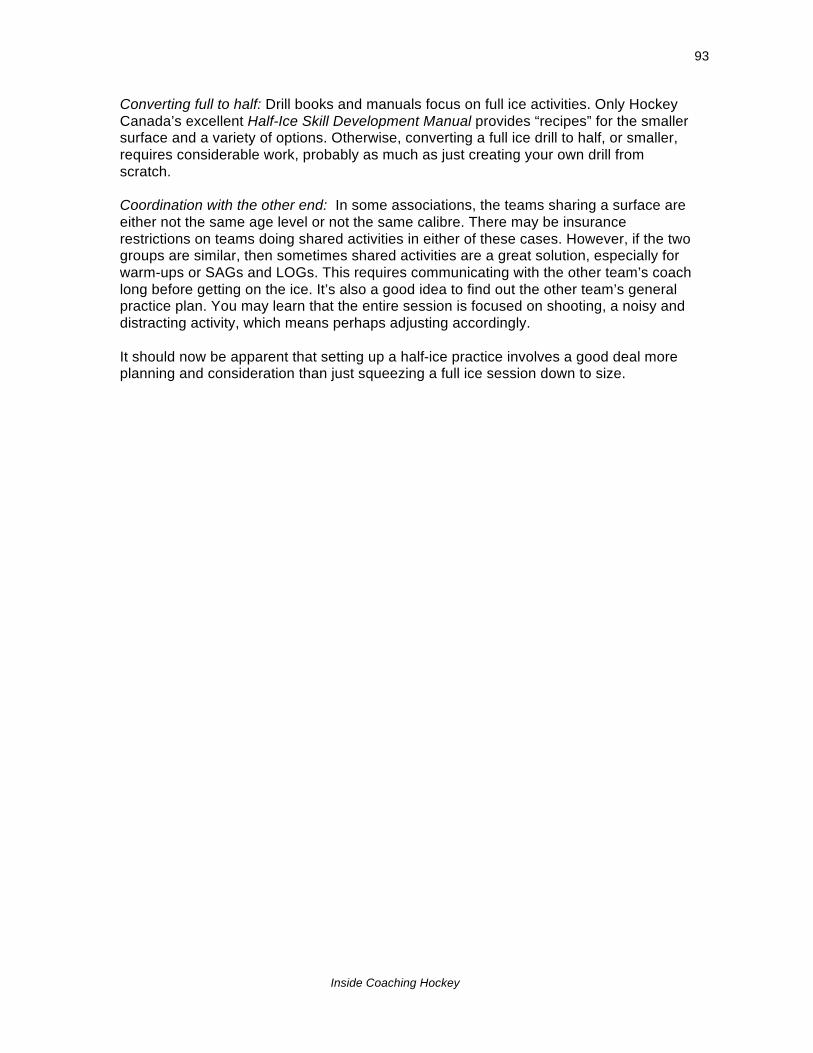
Inside Coaching Hockey
93
Converting full to half: Drill books and manuals focus on full ice activities. Only Hockey Canada’s excellent Half-Ice Skill Development Manual provides “recipes” for the smaller surface and a variety of options. Otherwise, converting a full ice drill to half, or smaller, requires considerable work, probably as much as just creating your own drill from scratch. Coordination with the other end: In some associations, the teams sharing a surface are either not the same age level or not the same calibre. There may be insurance restrictions on teams doing shared activities in either of these cases. However, if the two groups are similar, then sometimes shared activities are a great solution, especially for warm-ups or SAGs and LOGs. This requires communicating with the other team’s coach long before getting on the ice. It’s also a good idea to find out the other team’s general practice plan. You may learn that the entire session is focused on shooting, a noisy and distracting activity, which means perhaps adjusting accordingly. It should now be apparent that setting up a half-ice practice involves a good deal more planning and consideration than just squeezing a full ice session down to size.

Inside Coaching Hockey
94
21 Half-ice solutions A clarification. This chapter deals with team practices and presumes that children in programs for 5-6 year olds (like Canada’s Initiation Program) are not divided by teams, but by groups. Thus the ice is utilized in an entirely different way, often without clear space demarcations. One could also argue that 7 year olds playing their first year of organized hockey on teams could, in fact, share the ice in three groups, one per zone. However, for the sake of simplicity, this is a different topic and one requiring more association-based planning and organization than normal. The diagram illustrates the most common areas of the rink for division. It doesn’t include a diagonal split of the rink from corner to opposite corner. This is because such a division requires two groups whose coaches have similar philosophies and approaches. As well, it’s not too practical for doing many types of activities. It can be done, and has been, but it’s a tricky solution.
Most of the time, ice will be divided across the centre line: areas A-B-C-D and E-F-G-H. An alternative is to divide lengthwise, “net to net,” ie. A-B-E-F and C-D-G-H. Let’s look at the pros and cons of each type of division and the kinds of skills or tactics that could be comfortably taught in each. Across the centre line (A-B-C-D) Pros:
-‐ Doesn’t require cooperation with other team -‐ A more natural split, replicating game zones – The red line creates the split -‐ Easier for using benches -‐ Full use of an entire end zone and enough of the neutral zone for most levels -‐ Ideal space for all age groups’ skill sessions -‐ Sufficient to introduce most basic individual and group tactics at all levels -‐ Easy to monitor and direct
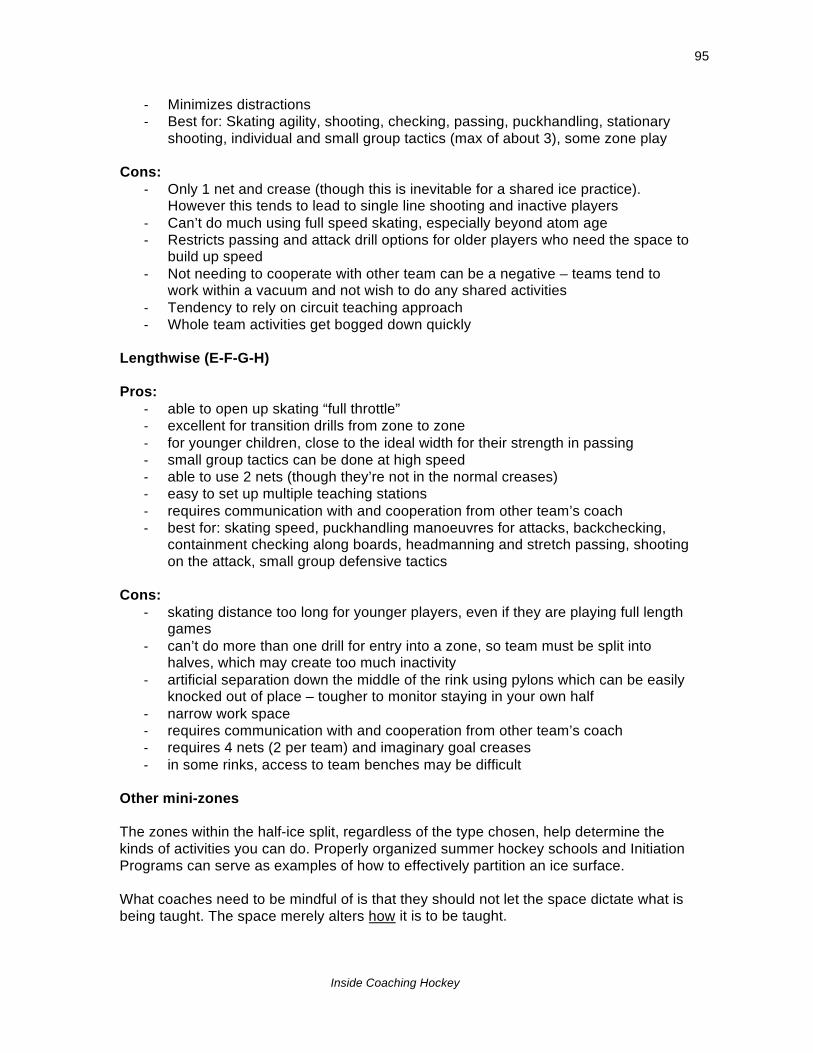
Inside Coaching Hockey
95
-‐ Minimizes distractions -‐ Best for: Skating agility, shooting, checking, passing, puckhandling, stationary
shooting, individual and small group tactics (max of about 3), some zone play Cons:
-‐ Only 1 net and crease (though this is inevitable for a shared ice practice). However this tends to lead to single line shooting and inactive players
-‐ Can’t do much using full speed skating, especially beyond atom age -‐ Restricts passing and attack drill options for older players who need the space to
build up speed -‐ Not needing to cooperate with other team can be a negative – teams tend to
work within a vacuum and not wish to do any shared activities -‐ Tendency to rely on circuit teaching approach -‐ Whole team activities get bogged down quickly
Lengthwise (E-F-G-H) Pros:
-‐ able to open up skating “full throttle” -‐ excellent for transition drills from zone to zone -‐ for younger children, close to the ideal width for their strength in passing -‐ small group tactics can be done at high speed -‐ able to use 2 nets (though they’re not in the normal creases) -‐ easy to set up multiple teaching stations -‐ requires communication with and cooperation from other team’s coach -‐ best for: skating speed, puckhandling manoeuvres for attacks, backchecking,
containment checking along boards, headmanning and stretch passing, shooting on the attack, small group defensive tactics
Cons:
-‐ skating distance too long for younger players, even if they are playing full length games
-‐ can’t do more than one drill for entry into a zone, so team must be split into halves, which may create too much inactivity
-‐ artificial separation down the middle of the rink using pylons which can be easily knocked out of place – tougher to monitor staying in your own half
-‐ narrow work space -‐ requires communication with and cooperation from other team’s coach -‐ requires 4 nets (2 per team) and imaginary goal creases -‐ in some rinks, access to team benches may be difficult
Other mini-zones The zones within the half-ice split, regardless of the type chosen, help determine the kinds of activities you can do. Properly organized summer hockey schools and Initiation Programs can serve as examples of how to effectively partition an ice surface. What coaches need to be mindful of is that they should not let the space dictate what is being taught. The space merely alters how it is to be taught.
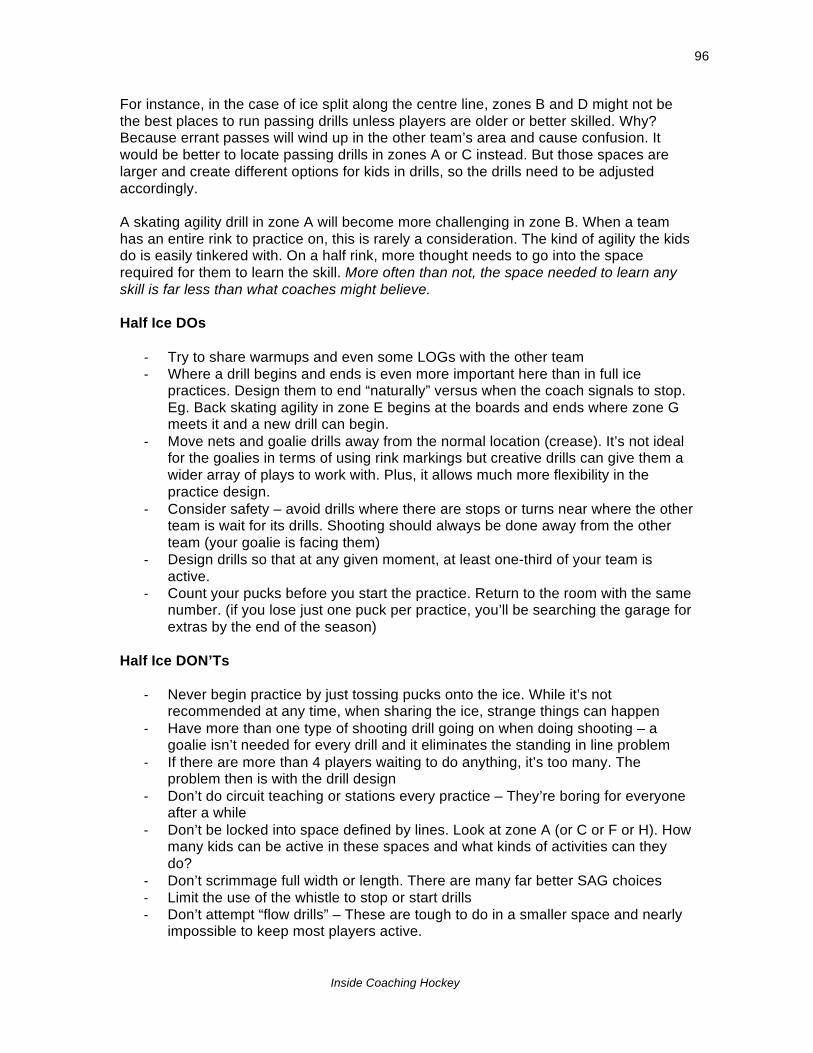
Inside Coaching Hockey
96
For instance, in the case of ice split along the centre line, zones B and D might not be the best places to run passing drills unless players are older or better skilled. Why? Because errant passes will wind up in the other team’s area and cause confusion. It would be better to locate passing drills in zones A or C instead. But those spaces are larger and create different options for kids in drills, so the drills need to be adjusted accordingly. A skating agility drill in zone A will become more challenging in zone B. When a team has an entire rink to practice on, this is rarely a consideration. The kind of agility the kids do is easily tinkered with. On a half rink, more thought needs to go into the space required for them to learn the skill. More often than not, the space needed to learn any skill is far less than what coaches might believe. Half Ice DOs
-‐ Try to share warmups and even some LOGs with the other team -‐ Where a drill begins and ends is even more important here than in full ice
practices. Design them to end “naturally” versus when the coach signals to stop. Eg. Back skating agility in zone E begins at the boards and ends where zone G meets it and a new drill can begin.
-‐ Move nets and goalie drills away from the normal location (crease). It’s not ideal for the goalies in terms of using rink markings but creative drills can give them a wider array of plays to work with. Plus, it allows much more flexibility in the practice design.
-‐ Consider safety – avoid drills where there are stops or turns near where the other team is wait for its drills. Shooting should always be done away from the other team (your goalie is facing them)
-‐ Design drills so that at any given moment, at least one-third of your team is active.
-‐ Count your pucks before you start the practice. Return to the room with the same number. (if you lose just one puck per practice, you’ll be searching the garage for extras by the end of the season)
Half Ice DON’Ts
-‐ Never begin practice by just tossing pucks onto the ice. While it’s not recommended at any time, when sharing the ice, strange things can happen
-‐ Have more than one type of shooting drill going on when doing shooting – a goalie isn’t needed for every drill and it eliminates the standing in line problem
-‐ If there are more than 4 players waiting to do anything, it’s too many. The problem then is with the drill design
-‐ Don’t do circuit teaching or stations every practice – They’re boring for everyone after a while
-‐ Don’t be locked into space defined by lines. Look at zone A (or C or F or H). How many kids can be active in these spaces and what kinds of activities can they do?
-‐ Don’t scrimmage full width or length. There are many far better SAG choices -‐ Limit the use of the whistle to stop or start drills -‐ Don’t attempt “flow drills” – These are tough to do in a smaller space and nearly
impossible to keep most players active.
Inside Coaching Hockey
97
22 Half-ice templates Clearly the components of a half-ice practice need to be different and thus so, too, must the organization. As we've seen, half-ice practices are not just, well, half the ice of a full sheet with no differences in approach. For one thing, it's nearly impossible to be an inactive coach in a half-ice practice. This may be a poor way of looking at it, however even with bad drills and no feedback, the coach is so close to the players and the distractions so numerous that just to survive requires a semblance of organization. At least on a full rink, a coach can stand back and let drills flow. It's not a good way to run a practice, but it can be done. Not with the half rink though. Basically, there's no escape. As well, the decreased space means that the kinds of drills and the ways in which they're linked must be altered. This means then that the practice template as a whole changes somewhat. Circuit teaching and skills: Also known as station teaching, the kids move from area to area, spending X time at each before moving on. This is different from the guidelines provided for full ice practices. There, we looked at approximate percentages of practice time and/or numbers of trials each player had in a drill. Circuits can be used in any practice. But they're actually more useful in half-ice situations simply because there needs to a greater emphasis on skill work. You just don't have the space to spread the team out and do tactics. Consider, too, that the vast majority of half-ice practices are reserved for the younger kids anyway. They need skill work, not tactics, so the half-ice circuit approach plays perfectly into their needs. Working in a circuit requires two methodologies, and the first leads to the second after a while. a) Players are stopped by the coach after X minutes at a station then are sent to the next one. Ideally, the number of players in each station along with the time allotment allows for sufficient trials at the skill. The Rule of 3s works nicely here. b) Once the coach has confidence in his players' listening and independence skills - and remember, we do want to teach read and react from the get-go - the time limit at a station is removed. Players go to the next station in a circuit after a pre-determined number of trials. Let's be clear about this: it is not easy. If the stations are improperly thought out with respect to about how much time kids need to spend to get X trials, then you'll have a backlog at one or more stations. That can be ugly. It can ruin the practice flow entirely, not to mention breeding goofy behaviours. Kids will find a way if given the opening. Here's an example of an incomplete 3-station circuit that poses some questions. The circuit (assumes a 15 player + 1-2 goalie team):

Inside Coaching Hockey
98
Station 1 - Up and back skating with or without reverse turns, with or without pucks Five players - One heads for each pylon - skate forward to your pylon, return backwards (or forwards after reverse turn) - then go to other pylon for other direction Station 2 - Double curly-Q tight turns, with or without pucks Five players - first player skates up, does a small tight turn, then begins a second but very large tight turn that includes scooting - meanwhile, the second player begins his small tight turn, etc. - on second turn, they go in the other direction Station 3 - ??? - The coach wants to do puckhandling and/or passing. But the goalies haven't had anything yet. Or should they be in a separate space by themselves? Where? Could the puckhandling and passing station be exchanged with Station 1 or 2? If so, and the goalies use the actual net/crease area, will this interfere? Right now, this circuit's first two stations are designed so that where players start and finish move smoothly into one another. Also, regardless of what is done in Station 3, there should be no problem moving into and out of it. However, the first two stations could be run according to methodology b) from earlier, ie. the kids take, for instance, two tries in each direction before moving on. How then will Station 3 need to be set up? By time? By numbers of passes? Just as importantly, how do these questions fit in with a section about templates? Multi-tasking drills work well on full ice practices. They're more challenging to do on half-ice. You'll recall how templates can change for periods of time or segments of a season. That same principle applies though the types of templates change.
Inside Coaching Hockey
99
The circuit template (note the use of minutes, not % of time!) At least three coaches are needed to make this template work well. You can get away with two, but it's tough. Each coach will do the same drill for different groups 2-3 times, so that makes it a bit boring for the coach. As well, if one of the coaches has trouble teaching or running a station, the entire circuit's worth sputters. On the plus side, each coach gets to teach all players on the team and is able to hone in well on strengths and weaknesses in specific skills. The head coach must keep track of time limits along with running a station, so this coach has to be alert. 1 - Warm-up (5 mins) The same principles apply as for full ice practices. 2 - Circuit 1: 3 stations (18 mins) The 3 stations should cover a wide range of individual skills with limited multi-tasking. Remember that half-ice practices are mostly reserved for young players. So in any single station, only two or three skills should be highlighted. In the sample incomplete circuit above, Station 1 used forward skating, transition then backward skating. These are tough for many kids to do well. Add a puck and it's even tougher. Why 18 minutes? Because really it's 5 mins. of work per station plus about 2-3 to explain the drill to each group as it arrives. Do NOT explain all three stations at once to the full team. Some will remember some of it, but none of them will remember all of it. This extra timeframe MUST be built into the planning (in full ice practices, we use about 10% of total practice time for explanations an demonstrations). As far as new instruction goes, perhaps one of these stations can offer it. Not all three though. As with full ice, there has to be a review component built into the beginning of the practice. Using two stations ensures about 10 minutes of review skills. This means, obviously, that the circuit must be designed with some review built in. 3 - Circuit 2: 2 stations (16 mins) Having just 2 stations creates variety and opens up the ice. It allows the kids to expand their horizons a bit and utilize some of the skills they've just learned or reviewed. One station can be for new skills. This allows a solid 7-8 mins of work on something new in addition to what might have been done in Circuit 1. 4 - LOG or LOG circuit (10-11 mins) A fun activity to end the practice nearly always works. You'll notice that SAGs aren't mentioned here. This doesn't mean to exclude them entirely. However, the space constraints and perhaps net availability make them difficult. If you have the opportunity to include one every now and then, do so. A LOG circuit means doing two small area LOGs for about 5 mins each. The kids play both. This requires careful research into which ones can be done in a small space and how to switch without too much explanation time.

Inside Coaching Hockey
100
The mini-team template The team is divided into groups, or mini-teams, each having a coach. Aside from the warm-up and perhaps final activity, the entire practice is spent with a coach and the mini-team. This is particularly worthwhile with younger or less skilled kids who need the familiarity of a single figure to help them through their progressions. For the approx. 35 mins of practice time, this one coach works with the group, taking them through a series of skill drills in one specific space. How much time is spent on these is determined by the particular coach. The total time of 35 mins. can be used in many ways, so long as the key principles of skill progression and numbers of trials are applied. This is also a good way to deal with multi-level teams that may have a few raw beginners mixed in with more "experienced" kids. In fact, it is a form of streaming that, in elementary schools, is not used much. A criticism on this mini-team approach is that it may detract from what is perceived to be the "team concept." This is because only 30% of the total practice time is with the team. It must be noted though that the word "team" has far greater meaning with older kids than with younger ones. Besides, their ability to work together, however superficial that may be, is predicated on the skill levels being on a par. That only happens when they've been taught and have had a chance to practice these, which is where the mini-team concept is important. Every few practices, it's a good idea to have coaches switch the groups they work with. This mini-team approach works nicely with older teams using half-ice. These kids may consider circuits "beneath them" and feel they're worthy of specialized instruction. Though space limits the variety of options, having one coach with one group of older kids is likely to strengthen bonds. Conclusion These two templates work best with half-ice practices. While indeed they can be used on full ice, the restrictions of smaller space require a more specialized approach. And yes, a blend of these two is fine as well. In short, just about any approach that is well organized and works is worthwhile. The caveat for half-ice situations is that not every approach can work easily. And all of this practice planning and drill design is based on one vital and fundamental notion: That there is a plan.
Inside Coaching Hockey
101
23 Planning the plan There are enough pithy maxims about planning to fill a hockey bag. "If you fail to plan, you plan to fail." "If you don't know where you're going, any road will take you there." "No matter what happens, there is always some smart ass who believes it happened according to the plan." "The first 90 percent of the plan takes 90 percent of the allotted time. The last 10 percent takes the other 90 percent." "No new plan is a complete failure; it can always be used as a bad example." "If at first you don't succeed, destroy all evidence that you tried." But this is a favourite: "When in charge, ponder. When in trouble, delegate. When in doubt, mumble." Hockey planning sometimes appears to be an oxymoron for most coaches. With only one or two practices per week, there's such a time lag from session to session that an overall plan doesn't seem to be worth the effort. Plan a practice? Certainly. Plan a season? Not so much. It probably doesn't resonate either that at the elite levels, like in junior or pro hockey, planning is an essential ingredient. Maybe it's the daily contact with and about the team that forces its leaders to plan to survive. Yet at the younger and lower levels, planning seems to occur by happenstance rather than as a foundation of coaching. Planning a hockey season though cannot begin with a team. It must start with the organization or association. While every coach has a rudimentary idea of what to do over the course of the season, is it consistent with the association's philosophy and plan? Of course, if one or the other doesn't exist, one could suggest that just about any plan a coach devises should be acceptable. The school system calls its planning models curriculum. Swim programs have step-by-step plans leading from being able to float to stroke correction and enhancement. This is also a curriculum. So then it behooves our hockey programs to have something of the same sort. Much of this is already available as resources through the Hockey Canada manuals. The Initiation Program for the youngest kids has a prescribed curriculum. The manuals for other age groups have recipe cards for season-long practices that cover skills essential to the age group. Each of these can be - and should be - adjusted according to the needs of a team or level. All of these are meant to identify two key components for a team: the coach's objectives and the curriculum. They are inexorably linked. Overall objectives
Inside Coaching Hockey
102
A coach begins the season with an idea of what the kids should learn and where they should be at season's end. Indeed, everyone would like to win the championship. But there's a very clear difference in approach between coaching to teach and coaching to win. Some are able to do both, but invariably coaching to win even at a minimum interferes with the teaching and learning process. The truth is, all teams but one fail to achieve the objective of winning a title. The coach's vision is central to what will happen from the outset. It is naturally affected by what the coach has seen the group do, who coached them before, how they've changed, and the coach's own skills and experience. A coach who knows little about teaching defensive hockey is not likely to choose that as the year's objective. The learning curve for the coach would be too steep and the self-confidence too shaky. Hand-in-hand with the coach's objectives are what the organization expects. This is where its leadership is so important. Associations with posted objectives, philosophies and curricula do their coaches and kids a great service. Here, a coach can confidently have a set of yearly objectives knowing that his predecessors and successors had/will have the same guidelines. Even without this leadership though, the coach must establish sound objectives, which are consistent with the group's needs. The curriculum The needs of any group are many and complex. Even for the youngest kids playing novice hockey at age seven, the introduction to the skills along with learning the game's rules and conventions is daunting. This doesn't lessen when they're 16-year old competitive midget players. As any midget coach will admit, this is a challenging age group with high demands, even though their skill base is solid and their understanding of the game's basics is established. The coach needs a curriculum. This isn't synonymous with a skills inventory as presented in the Hockey Canada programs. Skill (and tactical) inventories are essential. But there's far more to coaching than just the raw teaching of hockey. A skills inventory is simply a list of all the basic skills of the game. A tactics inventory includes individual, group, and team tactics. A curriculum includes: - skills and tactics inventories - physical and mental training plans - team conventions and rules - segment plans - tournament objectives - social functions - parent interactions Why a curriculum? Coaching a minor hockey team is virtually the same as delivering an educational program to kids. Even at the lowest levels of recreational hockey, kids are deserving of the best leadership and instruction they can get. This does not mean high-brow coaching with fancy tactics and pushy bench management. It means the coach is the leader of an educational program (albeit tempered) that encompasses a variety of

Inside Coaching Hockey
103
components. The ultimate objective is the improvement and enjoyment of every child on the team. To this end, therefore, the coach must be prepared to provide an all-inclusive package, not just a list of skills to be taught. Hence the term "curriculum."
Inside Coaching Hockey
104
24 Segmenting the season Yes, a season or yearly plan is a marvelous idea. It can be useful, engaging and informative. And lots of work. In practical terms, for the vast majority of minor hockey situations, a season plan should take a seat on the bench in favour of a segment plan. A season plan is difficult to do under any of the following scenarios: - limited practice time and/or numbers of games - first year with the group - inexperience of the coach - lack of association development guidelines or curriculum - team's age group or calibre Let's not confuse a lack of a season plan with a vision. Indeed, the coach has to have a vision for the team plus some major objectives. Examples: "The kids need to learn angling and checking this year." "Improve the offensive attack skills." "Work on agility skating." "Provide strong foundations in puckhandling and passing." Each of these is important. But the construction of a season-long plan to address them may very well get caught up in just those and may ignore other much needed parts of the curriculum. This is one reason why using segment planning is more beneficial. The major objectives are always at the forefront, but there's a vehicle to address the other important components, too. What's a segment? A segment is a piece of the season. This piece varies widely from one team situation to another, although all the teams in an association's particular age group and level could arguably use the same types of segments. For instance, in larger associations, all pee wee house league teams might have similar schedules and so might use the same type of segment. When you create a segment, you're creating a digestible chunk of the season in which the beginning and end are clearly within sight and so, too, are its objectives. It would be like studying a novel by chapters. Because a segment is shorter, it's easier to create objectives and learning content. Let's say improving the offensive attack skills, for instance, is an underlying theme for the year. But segment 1 can address a single component of it, segment 2 another, and so on. Even if not all objectives are met, some will be and thus so will at least some of the coach's vision of improving the attack skills. Segment planning is easier to work with in terms of goal-setting. Thus they're a more comfortable "sell" to the kids and parents. Parents will feel more comfortable with their children being taught in stages rather than the season as one long haul. Objectives aren't always met for many reasons. With segments, this isn't a real issue for the next one can be adjusted accordingly. And when they are met, kids slide confidently into the next one.
Inside Coaching Hockey
105
Furthermore, spiral teaching is better accomplished. While obviously important for the kids, segment planning forces the planner (ie. the coach) to draw connections between segments. These connections create the spiral. Segments also make it easier to address short and long term objectives as they relate to the coach's philosophy. Improving offensive attacks is a long term objective for a coach whose philosophy is more offence oriented. Short term objectives might have to do with passing, give and go options, etc. These are met nicely in any one segment. Types of segments There are a few options here and the coach needs to pick the one that best meets the team's schedule as well as overall philosophy. Some just don't work well at various levels. Coaches working with pro or young adult athletes regularly use short segments, often by numbers of games. In an interview a few years ago after his first season as head coach of the New York Rangers, Tom Renney described his season as being broken down into five-game segments. During Stanley Cup winner Bob Hartley's tenure as a junior A coach in Hawkesbury, Ontario, in the 1980s, he divided his club's season into six-game segments. Clearly though, when your team is playing lengthy intense seasons like theirs, these kinds of segments work better. Options By month - The easiest to design, adjust and follow, monthly segments tend to mesh nicely with most hockey schedules. This is especially true at the youngest or lower calibre levels. Once the month is over, the coach can push the reset button and whatever went wrong before is left behind. It also forces coaches to carefully consider other factors since they're likely dealing with infrequent games and practices, which are also often shorter. By stages - If we affix names to the stages of a season, we can create segments that are unrelated to the actual calendar. For example, pre-season, early season, mid-season, late season, and playoffs. This works with schedules that are inconsistent with the calendar. It can meld with weather, the school calendar, or special holidays. A house league team's early season may take it to Halloween. With fewer segments than other types, it appears a bit less intimidating and often a more natural approach. The downside is that when games or practices get bunched into one segment, other segments become sparse and objectives difficult to meet. By games - If you know your team is going to play a 36-game schedule spread out mostly evenly, then segments of four, six, or nine games might work. The games cannot include tournament games since that is a different option (coming up...). Besides, it's impossible to predict how many games a team may play in a tournament. Game segments provide clear-cut goal-setting so long as the time frame between them isn't long. A six-game segment that takes two months defeats the purpose. Teams with infrequent practices but consistent game schedules might use this option. Problems are identified fairly quickly. There are some negatives here though. Too many segments (eg. nine four-game segments) make it tedious and repetitive. It doesn't really take into consideration the many other things that occupy a player's life. Most importantly, as it's
Inside Coaching Hockey
106
tied into games played, there is a tendency to make objectives more performance-related, ie. wins-losses-goals scored, etc. Be wary. By tournaments - Most minor hockey teams play in a few tournaments each year. If designed well, segments that begin or end with a tournament can create a terrific atmosphere and make the tournaments more meaningful. In order for this to happen, the tournaments need to be spread out so as to create at least four segments. Hopefully, too, there are sufficient games or practices between tournaments to allow objectives to be met. With this option, there are fewer segments to design. The tournament acts as the grand finale, or big starter, and gets everyone excited at the prospect of trying to meet objectives in a true competitive environment. Segment content Regardless of the option, segments need to include the following: - practice objectives - game objectives (not related to performance) - team meetings or socials - parent communication (via meetings or e-mail, etc.) - individual player discussions or conferences (these don't need to be in every segment, but certainly at the beginning, middle and end of the season) - effective use of statistics (eg. in segment 3, we want to keep our goals against average under 3.5 and our penalty minutes under 14 per game) Remember: it's perfectly acceptable to adjust segments based somewhat on the successes and failures of the last one.
Inside Coaching Hockey
107
25 Inside the segment Coaching minor hockey shouldn't be laborious, laden with detailed paper work. Usually, coaches have no one to report to and no real incentive to plan their seasons, which results in practically no planning at all. There's not much question that the first time segment plans are done, it seems like a lot of effort. This is especially frustrating when, with the best of intentions, coaches set out their plans and find things don't pan out as expected. Scrap the plan? No, adjust it. Whichever type of segment you choose, it's a good idea to use simple templates for both the contents of the segment and to track previous ones. Track what? And why? Since segments need to link with each other and there's a need to teach through progressions, coaches should do a few things to ensure they stay on the right path. a - Keep your practice plans. There are coaches who have practices going back years. They make for interesting nostalgia, but not much more if they aren't used. If you don't mind a little extra work, try creating a spreadsheet or database of drill types and when they were done for easy reference. This is especially easy to do if you're relatively new to coaching or coaching, let's say, competitive hockey. You never know when you'll want to refer to previous practices to see how you taught 1 on 1s. You may want to use that drill or a variation of it. At worst, keep this season's practice plans handy. b - Use a segment tracking sheet. This is much like a calendar except it's done by segment. Here is a simple tracking sheet on which you can record the segment's events. This is used as a reminder. The "Result or Notes" column only needs to be a few words to be effective. When you get to January and you're trying to recall how the PP development went in October, the tracking sheet's short commentary will suffice. The tracking sheet serves as a handy snapshot of an entire segment. It illustrates what the segment contained, specifically the sequence, timeline between events, highlights and lowlights. It's simple and quick and an excellent reference for both the current season and in the future.
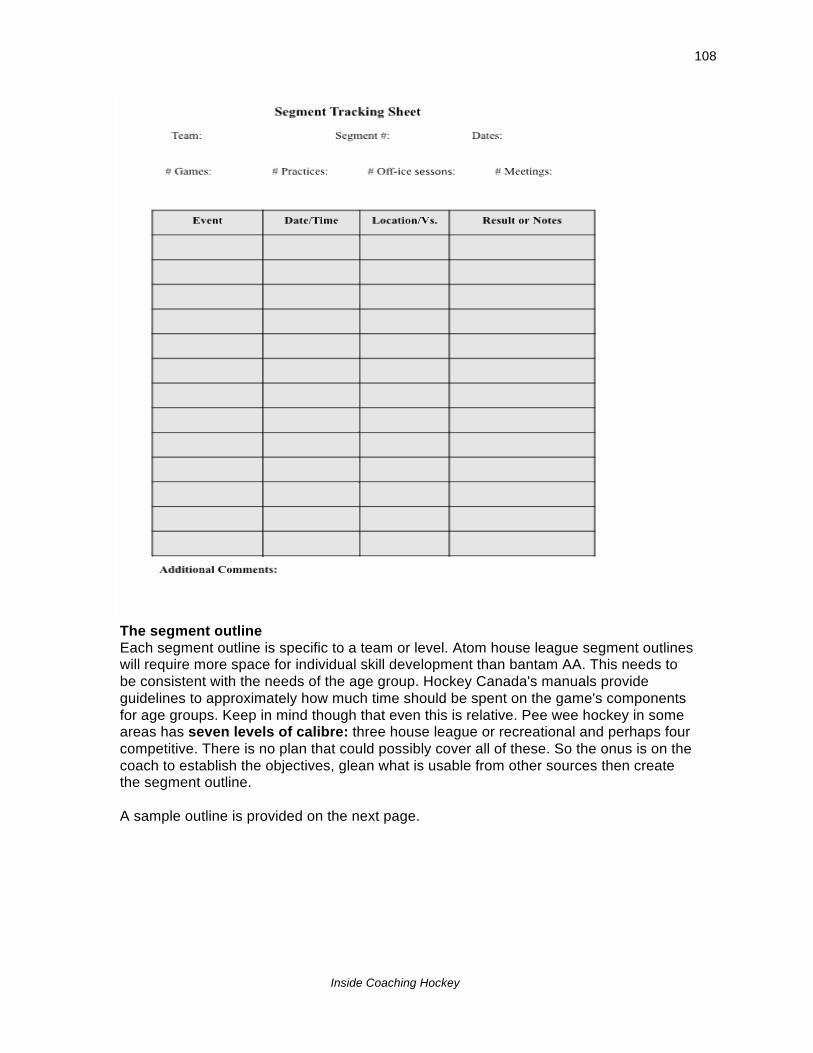
Inside Coaching Hockey
108
The segment outline Each segment outline is specific to a team or level. Atom house league segment outlines will require more space for individual skill development than bantam AA. This needs to be consistent with the needs of the age group. Hockey Canada's manuals provide guidelines to approximately how much time should be spent on the game's components for age groups. Keep in mind though that even this is relative. Pee wee hockey in some areas has seven levels of calibre: three house league or recreational and perhaps four competitive. There is no plan that could possibly cover all of these. So the onus is on the coach to establish the objectives, glean what is usable from other sources then create the segment outline. A sample outline is provided on the next page.

Inside Coaching Hockey
109
Key Objectives: Atom - Segment #______ - Dates:______________
Individual skills Small group tactics
Physical training
Individual tactics
Mental training
This is a template for an early season segment. The majority of space is allotted for individual skill and tactics instruction. What is not present includes specialty team work, social and/or parent meeting outlines, rules instruction, etc. Those can always be included or put in a different segment.
Inside Coaching Hockey
110
Note how the segment reflects the age group and level's priorities. At the top of the outline is where you write the key objectives. These may be quite general, but will guide the contents in a specific direction. If for example you wish to focus on offensive skills, then the majority of instruction in the plan should be centered on offensive skills. This does not preclude doing other things. It just defines where the focus will be. What to include The segment outline is mostly a plan for what will be taught in practice. You only need to jot a few words for each skill or tactic and, as stated, the items need to be connected to the objectives. Here is where access to a thorough skills and tactics inventory comes in handy. With such an inventory, tailored to the needs of the group, you can pick and choose which skills, tactics or training items are suitable. In the example of having improved offensive skills for this segment, you could list: - puckhandling in confined space - fakes and dekes - passing in 2s - tight (sharp) turns with the puck - introduction to 1 on 1 tactics - driving around defenders - attacking in 2s (2 on 0 then 2 on 1) For physical training, stretching, light calisthenics and perhaps on-ice balance drills (in a warm-up) could be added. Mental training might include emphasizing offside rules such as when the blueline is part of an onside or offside attack, plus preparation for games through pre-game mental rehearsal exercises. In fact, part of this education program includes what will be taught or re-emphasized before games. This can be placed in the box under small group tactics or mental training. You could also add a separate area for Game Preparation as part of a segment plan, especially for younger kids who need to be taught these skills. No performance objectives? The real danger in establishing performance goal-setting objectives is that in minor hockey, most of this out of the coach's control. You often get what you get in terms of talent, and this includes at tryouts. You can't control the officiating or that other associations are particularly strong (or weak) in any given year at an age group. You often can't control the practice schedule either so it's very challenging to maintain consistent learning patterns. As well, reaching or surpassing goals in a segment leads to what exactly? If in a segment an objective was to play .500 hockey with a goals against less than the goals for, and your team plays .800 hockey and doubles the goals for vs. goals against, what then? Match it? Beat it? This may be unreasonable. As for objectives which are out of reach, what's the point if it's unlikely the team will achieve these?

Inside Coaching Hockey
111
A few performance objectives are worth considering for other reasons. Penalty minutes is one even though officiating is not under the coach's control. A team that has taken a great many could have a goal of getting less each segment. This would not be reasonable for a team that doesn't have a penalty problem. Another example is seeking a slight improvement in goals for or against, worthwhile IF this is related to segment instruction and is achievable. A team unable to score more than one or two per game can't be expected to average three. However, it might be reasonable to try for one game a segment with three goals for and, if attained, then in the next segment try for two games. Sameness Never having the same practice or practice drills twice in a season is a great challenge for the coach. But segments with similar content are perfectly fine to have. In fact, especially with younger age groups, a great deal of content may carry over. It needs to; the very nature of spiral instruction is predicated on that basis. Segment plans may look similar with only a few key differences. As players get older and better, they are able to execute more skills and tactics and absorb more training principles. For instance, 1 on 1s may be written into every segment for a midget team, except that later segments will include more varied types and locations for 1 on 1s. Is this the curriculum? Indeed it is. Each practice, game, meeting, or session is part of the unit plan called a segment. These components together form the team's curriculum. In a school setting, each subject has a curriculum and objectives. We've done the same thing with hockey segments, breaking each one into "subjects" called "individual skills," "individual tactics," "small group tactics," etc.
Inside Coaching Hockey
112
26 The coaching staff Hockey associations concede how difficult it is to find and keep quality coaches, let alone qualified ones. The definition of "qualified" is best left to other domains. However, the majority of organizations require formal coaching certification and training before someone can work with a team. Yet, as organizations admit, people aren't banging on the arena doors to coach teams, even if it's their own kids' teams. So the natural extension is that it's tough to find quality people to work on a coaching staff in any capacity. "You get what you get" may be true about coaches, too. The problem with this is that head coaches tend to make assumptions about their new colleagues. Unless people have worked with each other before, it's difficult to know exactly what a coach's strengths and weaknesses are. Many a head coach has handed over a portion of a practice or drills to someone who seemed comfortable with them only to find disaster set in. These aren't intentional. Sometimes, a well-meaning assistant pushes too hard, confusing speed with the slower steps needed in the learning process, or isn't well-versed in teaching progressions. Then again, the reverse is true on occasion. Qualified assistants who felt unable to commit the time to be head coach find themselves working with a person in charge who is ill-suited for the role. As in dealing with the kids, initial communication and a dose of homework go a long way to prevent problems on a coaching staff. Even so, it's worth noting that minor hockey is volunteer-based and this won't change, nor necessarily should it. Professionalism and broad expertise among minor hockey coaches is often a tall order. What is more reasonable is that members of a staff work with each other's strengths and get past the notion that playing experience (or even playing inexperience) is indicative of coaching excellence. Qualities Assistant coaches need to complement the head coach. At the same time, they need to be loyal, trustworthy, reliable, adaptable, and patient. Notice how none of these addresses technical expertise, though that is certainly important. In fact, a crew of assistants should have a happy mixture of hockey teaching knowledge that add to what the head coach brings to the team. As such, these assistants may not actually run drills or do direct teaching but may be called upon to advise the head coach or work with specific issues. Establishing roles Who does what, when and how? These are important questions to address for three areas: the dressing room, the practice, and the game. Some coaches will be uncomfortable in certain roles, such as running the defence or demonstrating skating skills. Others will believe they can do almost anything well, and this may be true. However, one person can't be all things to all players. There needs to be a defined leader with the final say. the kids will benefit from being taught by different individuals as long as the approaches and content are appropriate.
Inside Coaching Hockey
113
Back to assumptions, let's not expect that because someone played junior hockey as a goalie that this person wants to be the goalie coach. However, defining this coach's role means identifying what he can provide the kids. This needs to be outlined by the head coach. "Here's what we need in terms of skill development. Colleagues, which skills do you believe you could teach? And here's my vision of how they might be presented this year." The dressing room There is no rule stating the head coach must have the only or last word. On the contrary, it's a good idea for kids to hear from other coaches. But of course there's far more to dressing room management than just saying something before going on the ice. Who will be in charge of equipment in the room? Who will take up "the hammer" to maintain order? Who will see to it that non-team personnel like parents are monitored? This is always a thorny subject, particularly with respect to young children and their skate tying, equipment fitting needs. One member of the coaching staff should be the person dealing with parents in these situations. In practice Coaches' roles can be divided easily once everyone is briefed on the practice plan, KTPs, and options. Practice roles can include: - ensuring safety and preparing equipment - controlling the team entering and exiting the ice - controlling the in-betweens and water breaks - demonstrations - providing individual feedback in drills - running specific types of drills (not just the warm-up!) Most importantly, the other coaches need to be active teachers. The teaching techniques applied by an assistant vary from those used by the head coach. The standard "good cop-bad cop" routine doesn't apply well in coaching kids. It's more important for each member of the coaching staff to provide a different personality from the head coach and offer something the kids won't get from another member of the staff. While the head coach sets the tone for the team in many ways, the assistants enrich that tone as well as adjust the mood. They, too, must set examples and abide by the same rules of decorum and convention as would be expected of any adult in a leadership position among kids. Other techniques assistants should apply: - stand in different locations from the head coach during drills - look for and correct the little things while the head coach identifies the major problems (the opposite approach works just as well so long as the coaches know who is doing what) - help those needing difficulty In games The next chapter will deal with game and bench management techniques in more detail. In games though, assistants' roles do not diminish. Minor hockey is not a sport where
Inside Coaching Hockey
114
adjustments during competition are easily done. Even line changes are an adventure for many groups. Usually, more coaches behind the bench does not ensure better bench management and feedback. Either coaches will fall over reach other trying to make a point to kids or will stand there doing little more than opening doors. Even that act has importance. Assistants can give positive feedback in the few seconds between shifts, limiting themselves to just enough commentary to strike home with the message. Remember, too, that the feedback has to be connected to what just occurred and to what has been taught. DOs and DON'Ts for assistant coaches: DO demonstrate slowly DO encourage proper behaviour DO become a positive influence DO help to keep the head coach on task DO advise on lines, game analysis, etc. DO shoot at (warm-up or teach) goalies at a speed consistent with the age level, not as an adult DO support the head coach (though privately, disagreements are fine) DON'T play with the kids DON'T shoot pucks or talk, etc. while the head coach is speaking to the team DON'T try to do more than is really necessary DON'T not communicate! (if you'll pardon the horrendous double negative)
Inside Coaching Hockey
115
27 Orchestrating the bench "My job is to get the right players on at the right time." - Scotty Bowman Would Hall of Fame NHL coach Scotty Bowman, who has a helmet full of Stanley Cup rings, have been able to handle an atom hockey team bench? Let's consider what he contended with in the pros. Teams with four lines (and maybe a 13th forward), six or seven defencemen, and the authority to play whomever in whatever situation warranted it. He could bench anyone he wanted for any length of time. He could create lines or units designed for offence, defence, traps, intimidation, faceoffs, certain moments in a period or anything else that came to mind. He could manipulate line changes to deal with penalties. He could talk to players before games, between periods, during time outs and TV commercial breaks. When injuries struck, he had a deep farm system to draw from. But if he coached his local atom competitive team, none of these would exist. If everyone showed up, he might have three lines and five or six defence. Many defencemen played the position under protest. By November, at least one parent would have fired off a missive to the association executive complaining about his child having to play out of position. Scotty would have perhaps a minute between periods and no time outs to talk to the kids. When they'd change lines, they'd scramble through the door, causing traffic and sometimes confusion. He'd have to yell at lines to come off because they'd forget or wouldn't hear him, this after two minutes in a 15-minute period. If there was a penalty, he'd have to juggle the lines so that no one, heaven forbid, got short-changed a shift. And there very well might be another parent with a stopwatch questioning why the association's equal ice time policy was not being applied on Scotty's team. If he talked too much, he'd be accused of over-coaching. Too little and he wasn't giving the kids enough feedback. If he survived the season, Scotty would then retire from coaching minor hockey. Most manuals refer to game work as bench management. To a degree, this is true. But in minor hockey, coaches are doing far more than managing. They're conducting a small orchestra, trying to keep kids engaged, happy, learning, intense, and focused while everyone multi-tasks. The kids are the priority but the coaching staff and trainer(s) need attention, too. There is little thinking time, just reaction time, and it's darned short. The previous chapter ended noting that communication is central to coaching staff solidarity. This includes game situations as well. So the focus here will be on "the science" of line make-up and changes. To do this, we'll approach from the angle that equal ice time is the expectation, even though the term is misleading. Equal or Fair? Equal playing time in a sport with unending flow is virtually impossible. The only way to ensure it is to: a) use a timed buzzer system, and/or b) eliminate players serving penalties since this completely messes up line balances. The former is used in some younger age groups; the latter is a fantasy.

Inside Coaching Hockey
116
To get as close to equal icetime as possible, you need to keep careful track of who's been on, who sat during the last penalty, who is owed a shift, and so on. Assistant coaches can help with this task. Fair, however, is in the eyes of the beholder. What's fair in competitive hockey may not be seen in the same light for house league, though why this holds true is arguable. Fair icetime really means giving kids opportunities to be in various game situations but subject to restrictions. It's the restrictions that define what is fair or not. Line creation Do you load up one line or defence pair or spread the wealth? Do you put a super player with two really weak kids? Do you move your best skaters to defence? What do you do with the puck hog, or lazy kid, or defenceman who can't skate backwards but insists on playing there? One kid takes lots of penalties and no one wants to play with him because their shifts tend to get butchered. No easy solutions to any of these. But coaches need to realize the following: - as one season in many, it's fairly certain no child's development will be crippled by playing on a particular line or in a different position. In fact, many experienced hockey people support kids trying various positions. - lines and pairings don't need to be "permanent" - they can be changed every segment or part of the season. - hockey is a team game - while the individual's development is paramount, the team's progress is important, too. - at many levels and age groups, positions are more like guidelines. Adults and the media have made more of the glory position of centre, for instance, than what it really means in a novice game. - coaches need to openly laud the worth of the "stay-at-home" defenceman or forward with "poor hands" but good checking skills. - coaches must teach kids how to deal with the perceived awkwardness of, for example, playing the off wing and getting a breakout pass in your own zone - happy kids play better and listen more. Shift length At older elite levels, shifts may be 20-40 seconds. A faceoff and off goes a guy after just 5 seconds. This isn't done in minor nor should it be. The best gauge for most minor levels is not so much time on the ice but intensity. For instance, a technically efficient skater can stay on the ice great lengths of time, yet show little intensity and involvement. Linemates may buzz and work and be pooped after 30 seconds while Smoothie is still going strong and reluctant to leave the ice. You get the line off and Smoothie's ready to go again after a brief rest. If it were pond hockey, this would be the kid who would never change with anyone. In your judgment then, the line mostly worked itself into needing a change, even if the time was shorter. The next line goes on for 45 seconds. This happens a few times during the game. Later, Smoothie's parent complains their shifts were shorter (and they were) and the kids have not been given equal icetime.
Inside Coaching Hockey
117
Equal? No. Fair in terms of intensity? Yes. So you must explain to this parent how and why you change lines. You need to explain that the line could not have stayed longer because they were exhausted from buzzing. And you must point out that while Smoothie might not have been completely spent, the other two were. If this were a 3 x 15-minute period game, and each line had about 20 shifts (at 45 secs. per shift), the difference in time of 10 seconds per shift is about three minutes in the game. Ten seconds is significant in junior hockey. At most lower levels, it's the time the kids take to get to the bench! Obviously, this is less important the younger the kids are. While shift lengths may vary for many reasons, your main task is to try to find ways to make up time. Smoothie and his buddies need to make up three minutes. Give them a little more time on the next power play. Or start them the next couple of periods since lines that start periods invariably play more in total. Even doing this once can drastically alter the difference in time lost because of shorter shifts. Special situation shifts Power plays, penalty kills, last minute, first minute, overtime: these situations may change shift length in minor hockey. In the pros or junior, a penalty killing unit may be on for only 30 seconds. A pro coach may go with unit 1, unit 2, unit 3, then unit 1 again, or somesuch. There are other coaches on staff who track everything using computer software and phone it down to the bench. In minor, with only three lines, you'd like to have six forwards used two at a time for 40 seconds each. Often though a pair may be stuck out there for a minute or more. Why? Because even though you've taught them to clear the puck high and hard off the glass in order to change, it takes every ounce of their strength and balance to do it. So what happens to the two kids on the line whose other player took the penalty. Do you change them immediately, or play the juggling game? Regardless, do you worry about which kids can actually kill the penalty properly? Or will you pair one who can with one who can't and hope for the best? And what does this do to actual line rotations since you're picking from different ones? It would not be unusual for your team to go through a few minutes of shifts after the penalty to get back to the original lines. Here's where bench help is important, either from an assistant coach or a trainer. They can track the pairings by number and actually illustrate about how many shifts it might take to get back to normal. It's not unlike that word game in which you start with a word like "puck" and, in as few changes as possible, one letter at a time, turn it into "rink." puck pick pink rink Charting lines Which brings us to the magic of charting lines. For simplicity's sake, let's use three forward lines, nine kids. We want equal icetime of course. The sweater numbers for each line are: 7,8,9 10,11,12 13,14,15
Inside Coaching Hockey
118
A typical period would look like this (the numbers after the players is the amount of time on the ice as measured when the last kid gets off) 7,8,9...45 10,11,12...55 13,14,15...30 7,8,9...20 then P8 (8 takes a penalty) 10,11...45 12,9...55 13,14...20 13,14, 8...30 15,7,9...55 10,11,12...40 13,14,15...50 7,8,9...50 This was about 8 1/2 minutes of the period. Once the penalty kill was over, it took two shifts to get back to the regular lines. Count the number of times each player was on the ice. It was either four or five times. #12 only got three shifts so he'll be owed one somewhere. The total time was fairly balanced, too. This is what goes on in the heads and on the notepads of coaches who need to keep things balanced. Every coach has a unique way of dealing with line charting and making up time. Yes, it will happen that a child gets short-changed and even forgotten. The above example was with a nice round nine. What happens when only seven forwards show up? You can have two lines and a third player at a position: 7,8,9 10,11,12 13 So 7, 10, and 13 will be on once every third shift while the others alternate shifts. Each period, you can change which player plays every third shift. But that requires juggling lines. Another alternative is to just list the kids: 7,8,9,10,11,12,13 The first three on the bench go on, then the next three and so on. As they come off, they return to the order they started with. In this scenario, positions mean little and it can be a bit confusing. A third alternative is to use one fixed and one rotating line. 7,8,9 10,11,12 7,8,9 10,11,13 7,8,9 11,12,13 7,8,9 10,12,13
Inside Coaching Hockey
119
After eight shifts, the 7,8,9 line has played four shifts, the other kids three each. One line gels, the other is a bid of a mish-mash of positions. To make up ice time, you can give the 10,11,12,13 group the first crack at all power play and penalty kill situations. This may upset your stomach though since clearly the 7,8,9 line was the best unit. Orchestral tones You can now see how much focus the head coach needs to have to keep players engaged and lines balanced. While handling these orchestral duties, he needs to find a way to give feedback to the kids and make sure the other coaches are on task as well. How many coaches need to do all this? Usually three is plenty, though two is probably just fine for most levels. If one coach handles the forwards and one the defence, the orchestra should play in tune. Certainly line changes shouldn't be affected. A third coach could perhaps give individual feedback to both forwards and defencemen. But one could argue that that is the role of the coach working with the units. Why the extra person? Because the additional pair of eyes and viewpoint, plus the tracking of lines, come in handy.
Inside Coaching Hockey
120
28 Player evaluation Not many undertakings in minor hockey are as contentious as player evaluation and selection. No one wants to hear that his/her child wasn't good enough for a level and so just about any process is fraught with problems before it begins. Therein lies the crux of the issue though. There needs to be a process, one that is fair, sensible, and open. This process has to be communicated to parents and players at its outset, long before if possible. It isn't enough to have an evaluation system if it does not carefully consider the age group and its needs, time constraints, and the frailty of everyone's emotions during the process, not to mention after when people can become downright surly and unruly when a child is "misplaced" or released. The objective in this chapter is to provide coaches with tools to both create a process and deal with the results. Whether an evaluation is designed for recreational or competitive teams is almost immaterial. The key is that something has been employed that, like the drills designed by the mind, can be adapted according to an association's needs. An evaluation system is meant to: a) provide a snapshot of a child's abilities b) highlight criteria specific to the situation (age, level) c) be simple and relatively quick, given the tight timelines d) take into consideration the subjectivity of evaluators and thus minimize the impact of any single person's scores or remarks e) provide some uniformity of approach Not including... Regardless of what anyone might say, it's impossible to completely discount a child's previous playing experience when considering someone for a certain level or team. How this might fit into an evaluation is quite another matter though. Some ambitious individuals have compiled complex statistical analyses of previous seasons and arrived at averages for a child's ability, attitude, game effectiveness and whatnot. Others have been content to merely state the player finished the previous season with an excellent, very good, fair, poor, etc. report, much like what a school would provide. A fundamental problem with comparing the end of one season with the beginning of another is noting how much kids change during the off-season. In particular in certain years, kids return vastly different developmentally. Growth spurts account for much of this. Plus, kids attend camps or play or other sports. How to figure these into a new season's evaluation is difficult, though they can't be just ignored. It's not unusual to see kids who are marvels during evaluations sessions or tryouts then flame out by December. Or at least that was last year. Coaches would do well to remember that kids react differently under different leadership styles. Unlike juniors or pros whose maturity and adulthood lead to a semblance of consistency, kids aren't necessarily that way. A different age level and coaching approach can drastically alter a young player's style and attitude.
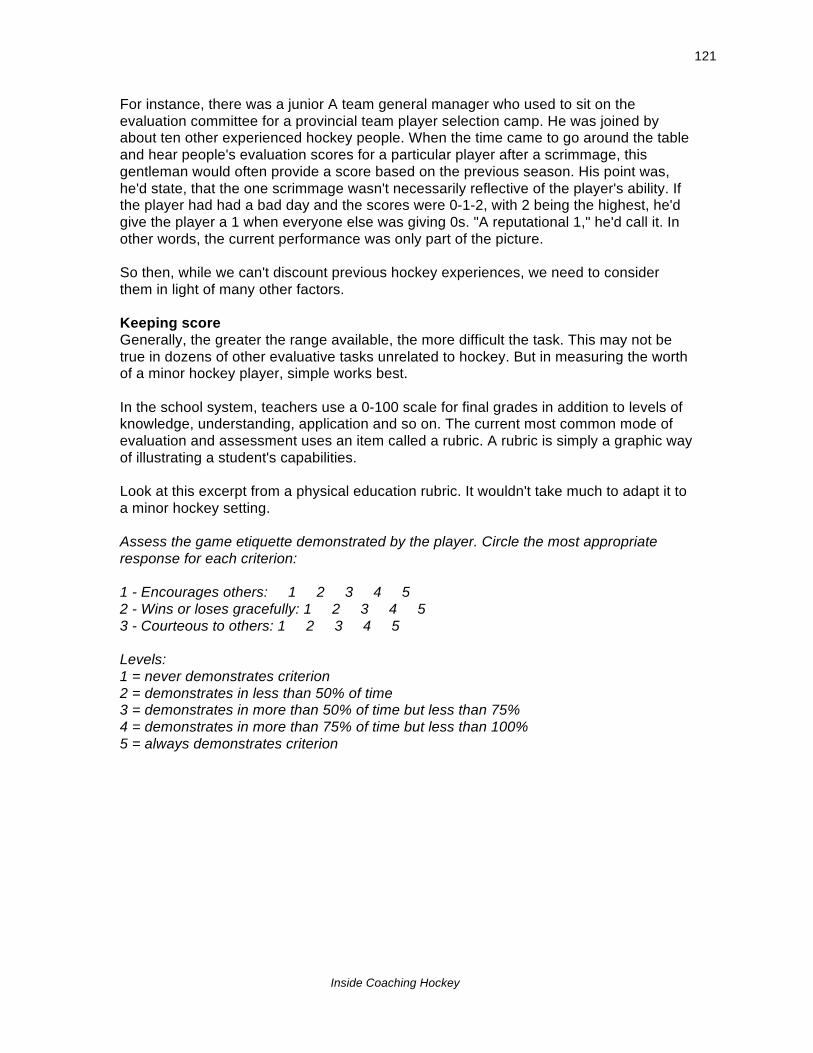
Inside Coaching Hockey
121
For instance, there was a junior A team general manager who used to sit on the evaluation committee for a provincial team player selection camp. He was joined by about ten other experienced hockey people. When the time came to go around the table and hear people's evaluation scores for a particular player after a scrimmage, this gentleman would often provide a score based on the previous season. His point was, he'd state, that the one scrimmage wasn't necessarily reflective of the player's ability. If the player had had a bad day and the scores were 0-1-2, with 2 being the highest, he'd give the player a 1 when everyone else was giving 0s. "A reputational 1," he'd call it. In other words, the current performance was only part of the picture. So then, while we can't discount previous hockey experiences, we need to consider them in light of many other factors. Keeping score Generally, the greater the range available, the more difficult the task. This may not be true in dozens of other evaluative tasks unrelated to hockey. But in measuring the worth of a minor hockey player, simple works best. In the school system, teachers use a 0-100 scale for final grades in addition to levels of knowledge, understanding, application and so on. The current most common mode of evaluation and assessment uses an item called a rubric. A rubric is simply a graphic way of illustrating a student's capabilities. Look at this excerpt from a physical education rubric. It wouldn't take much to adapt it to a minor hockey setting. Assess the game etiquette demonstrated by the player. Circle the most appropriate response for each criterion: 1 - Encourages others: 1 2 3 4 5 2 - Wins or loses gracefully: 1 2 3 4 5 3 - Courteous to others: 1 2 3 4 5 Levels: 1 = never demonstrates criterion 2 = demonstrates in less than 50% of time 3 = demonstrates in more than 50% of time but less than 75% 4 = demonstrates in more than 75% of time but less than 100% 5 = always demonstrates criterion

Inside Coaching Hockey
122
An achievement chart accomplishes a similar goal. Here is an example of a middle school Achievement Chart for a general physical education situation. It, too, is easily adapted to hockey. Levels of Achievement and Descriptors 0: The student does not reach a standard described by any of the descriptors given below. 1–2: The student attempts to apply physical responses in simple performance environments. 3–4: The student performs and applies some physical responses accurately in simple performance environments. 5–6: The student performs and applies a range of physical responses accurately in some complex performance environments. 7–8: The student performs and applies a range of physical responses fluently and with speed and/or accuracy in most complex performance environments. 9–10: The student performs, applies and adapts a wide range of physical responses fluently and consistently with speed and accuracy in complex performance environments. The obvious advantage to a scoring system is that it produces an average score and/or total. These are useful for separating players into levels or groups, establishing "cutoff" lines, and then providing parents (and the kids) a justification. This is only fair. In the same way that a parent may question a teacher about a child's mark in math, the parent also has a right to know the child's score in the evaluation. If the total marks given over an evaluation come to 50, for instance, and a player received 31, the parent has a right to know this. He/she also has a right to know what the criteria were and what the breakdown was. However, the parent should not be given other players' scores nor the cutoff level as this remains somewhat arbitrary and arguable. The simplest scoring system works best, such as 0-1-2, where 2 is the highest. If there are a few evaluators doing more than one session, the average for a player will be statistically similar whether the system was 0-1-2 ,1-2-3-4-5 or some other. Too often coaches and evaluators get hung up on having detailed scoring. The player falls between 0 and 1. What to give? The player falls between 4 and 5. Again, what to give? But if there are three evaluators doing, let's say, two sessions apiece, that will produce six scores. If you drop the highest and lowest and average the others, the player's score as an average out of 8 (4 x max. of 2) or 20 (4 x max. of 5) will be similar. As they say, it all comes out in the wash. Alongside scores, evaluators should write a few key anecdotal comments. A child may be given a particularly high score, for instance, but tended to hog the puck. Another barely touched the puck throughout the session, yet was a very effective checker. These must be noted as they may not fall exactly into a specified category. As well, it's not always possible to have the same evaluators for every ice session so everyone's notes become important.

Inside Coaching Hockey
123
Using rankings (or ratings) In addition to actual scores, a ranking method is helpful. Players can be ranked by period of a scrimmage. They can be numbered from 1 to last or separated into quartiles, like top 25%, second 25% and so on. The advantage of ranking is that it provides more depth to the evaluation scores. It also serves as further justification to roster development for parents. Sometimes ranking by itself does the job if all or most evaluators agree a player is ranked somewhere. For a team seeking nine forwards, scores may be close for the top 11, but the rankings could be quite different. What then? In such a case, additional tools or time may be needed. What to evaluate? We know time is limited and often space, too. Sometimes hockey associations have dozens upon dozens of youngsters to place with only a couple of hours on full sheets of ice to do it. So it's that much more important to establish criteria that are more general. Like drill design and practices, we're usually stuck with a situation where multi-tasking is required. It's not practical to isolate specific hockey skills for evaluation. The game is too fluid. Furthermore, no one skill readily singles out a player as being the best or worst. This can include skating. Many a great player in history got by on other skills when skating wasn't the best. Indeed, you can't be terribly effective without it, but some kids are, despite themselves. Besides, in our environment, we aren't only looking at what the kids can do but also how much they'll improve under good coaching. Poor skaters in the evaluation sessions may become solid ones by January. It is possible to separate hockey skills into categories such as: skating, puckhandling, passing, checking, team play, etc. But - and this is a big "but" - when you're faced with 30 kids on the ice and you need to evaluate all of them under 5,6, or more columns, with scores of whatever is designed, the task is daunting. You must first establish the criteria. What exactly are you looking at for the group at this level? This will be tied in to the coach's philosophy. Even if the evaluation is to separate kids into levels, a sorting out process, there must still be a determination of what constitutes a capable player from one who will struggle. Below is an example of criteria for kids trying out for a competitive team: Criteria questions for the evaluator to consider: What is the player’s impact with puck? What is the player’s impact without puck? Does the player get involved? Does the player support? Does the player have sound instincts? Is the player “in control” of himself/herself? Scoring 5 - Would definitely make the team – fulfills criteria 4 - Strong chance to make the team, except for a couple of or some criteria 3 - Needs further evaluation to confirm one way or the other 2 - Would not likely make team, but does fulfill a couple of criteria 1 - Would definitely not make the team – does not fulfill all or most of criteria Rank - Is the player in the position’s top 25%, 2nd top 25%, below average 25% or bottom 25%?
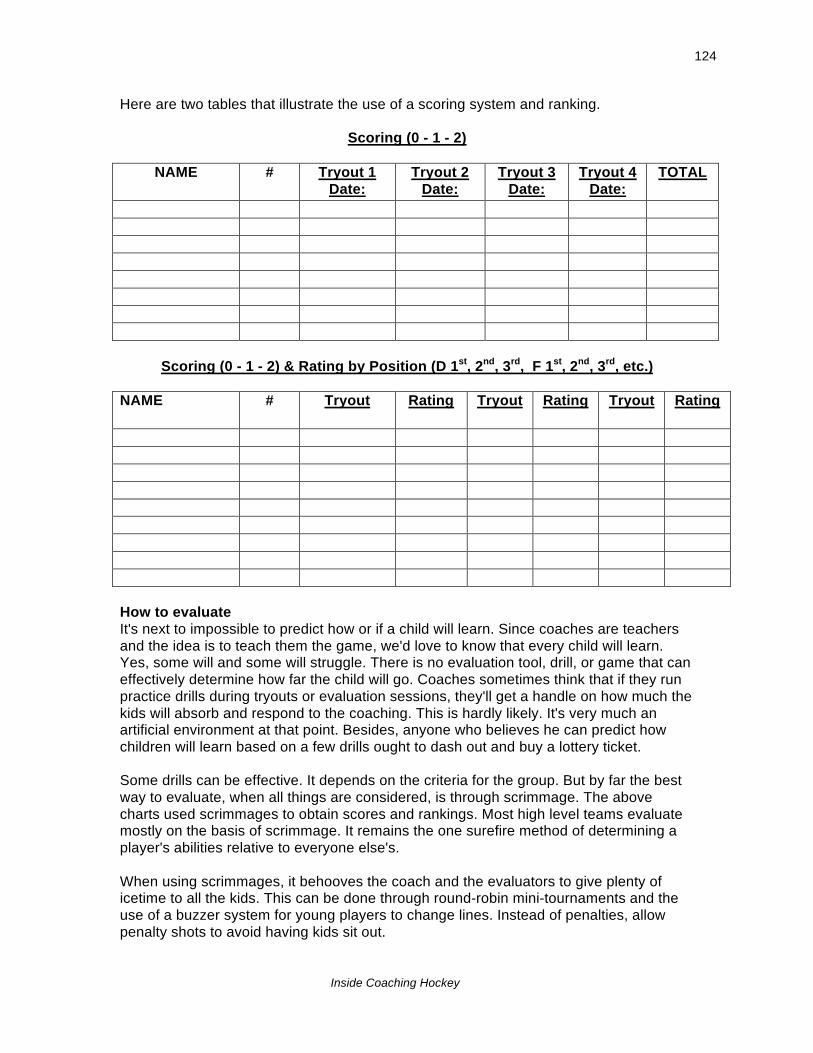
Inside Coaching Hockey
124
Here are two tables that illustrate the use of a scoring system and ranking.
Scoring (0 - 1 - 2)
NAME # Tryout 1 Date:
Tryout 2 Date:
Tryout 3 Date:
Tryout 4 Date:
TOTAL
Scoring (0 - 1 - 2) & Rating by Position (D 1st, 2nd, 3rd, F 1st, 2nd, 3rd, etc.)
NAME # Tryout Rating Tryout Rating Tryout Rating
How to evaluate It's next to impossible to predict how or if a child will learn. Since coaches are teachers and the idea is to teach them the game, we'd love to know that every child will learn. Yes, some will and some will struggle. There is no evaluation tool, drill, or game that can effectively determine how far the child will go. Coaches sometimes think that if they run practice drills during tryouts or evaluation sessions, they'll get a handle on how much the kids will absorb and respond to the coaching. This is hardly likely. It's very much an artificial environment at that point. Besides, anyone who believes he can predict how children will learn based on a few drills ought to dash out and buy a lottery ticket. Some drills can be effective. It depends on the criteria for the group. But by far the best way to evaluate, when all things are considered, is through scrimmage. The above charts used scrimmages to obtain scores and rankings. Most high level teams evaluate mostly on the basis of scrimmage. It remains the one surefire method of determining a player's abilities relative to everyone else's. When using scrimmages, it behooves the coach and the evaluators to give plenty of icetime to all the kids. This can be done through round-robin mini-tournaments and the use of a buzzer system for young players to change lines. Instead of penalties, allow penalty shots to avoid having kids sit out.
Inside Coaching Hockey
125
In scrimmages though, keep track of goals, assists, and penalties even if none is put on a scoresheet. Sometimes it's surprising to see at the end of an ice session that little Joey, who didn't seem do much, got five assists in a six-goal game. Evaluators There's a perception that those evaluating kids need to be either expert coaches or vastly experienced players. Neither is true. Besides, if coaches had to rely on finding only these people, they'd be hard-pressed to uncover enough evaluators given that everyone would be looking for the same types. On the contrary, evaluators need only be briefed on the criteria and have a rudimentary knowledge of the level of play. Obviously, hockey experience is necessary. You couldn't ask someone who's never played or seen much hockey to evaluate. But when you sit down with evaluators and share what you're looking for or how the league needs to sort out its players, you'll find that people are able to be quite objective. And even if a few aren't, the model or dropping the highest and lowest scores and averaging the others will take care of the other issues. Timeframe Coaches are mostly stuck with the timeframes handed them by their associations. These can be rather unwieldy and sometimes unfair. It's a lot to ask a coach to create a highly competitive team in six days of tryouts. As well, why does the process for some house league organizations stretch out over two months? A well-planned evaluation process should be able to place most kids within three ice sessions. If it's a competitive team tryout environment, the first set of releases will be more obvious. The last ones needs more time. In fact, this would be a good occasion to include some practice situations with scrimmages. They will give the coach a little more information about the players' practice habits. At the house league level, there is always the concern about trying to jam 40-60 kids onto one sheet of ice per ice session. There is a way to do this, by splitting the rink into smaller sections for 4 vs. 4 scrimmages and the like. Using three zones, with two shifts per zones, you could actually have 48 kids working. When this kind of approach is used, the amount of time for sorting out the players is lessened and thus there's more time for the regular season activities. It's a matter of planning. Conclusion Players may get frustrated, parents may voice anger, and even coaches will wonder what they've dragged themselves into once evaluation season begins. But when there's a logical, open process in place, the problems and debates are minimized. No one will agree with every choice. We aren't that way over the teams we watch on TV, and the people running those organizations are highly paid professionals. Professional is often a value judgment. We can be professional in the way in which we conduct these potentially difficult sessions. When handled the right away, people may leave wondering why their kids were or weren't at a certain level. But at least they'll agree that it was properly conducted and fair. No more need be asked.
Inside Coaching Hockey
126
Overtime The year I began coaching, 1971, coincided with Hockey Canada introducing its national coaching certification program. That Level 1 clinic took place every Monday night, three hours per night, for ten weeks. It was delivered in 12 Canadian centres and taught mostly by college coaches. My instructor was Dave Draper, then head coach of Loyola College (now Concordia University). Only a few weeks before, he'd cut (sorry, released) me from a tryout. With good reason, I might add. I wasn't good enough. My player evaluation anecdotal notes might have read, "Tries hard - good hands - no speed - will get killed - ho hum." It seemed at the time the clinic was just too short to cover the material I'd need for a full season. The focus was on practice organization, teaching fundamental skills and how to establish basic team play. I recall being nearly overwhelmed by the challenge. The dog-eared clinic notes and handouts remain in a binder on my shelf, among dozens of others, awaiting a museum's call. The coaching education "system" has evolved over the decades. It has more logic to its structure today, though content at the early levels has been diluted so as not to turn off aspiring coaches. This does coaches, and ultimately kids, a disservice. We assume coaching is an innate skill. The hockey culture wants to believe our understanding of the game or playing experience (even if "released" from a few teams!) automatically makes us able to effectively deal with kids in a teaching environment. I've never believed this to be true. The great coaches I've seen or known - and there are many - educate themselves, in addition to being quality people. Perhaps creative by nature, they understand what teaching and guiding mean. They're open to learning and experimenting. They value and seek mentorship. They "get it." Volume X During the creation of this book, I knew full well no single publication could possibly contain everything needed to effectively coach minor hockey. The encyclopedic knowledge experienced coaches acquire would fill more space than anyone has the time, or inclination, to pore through. Besides, there are plenty of drill books and DVDs available along with an endless supply of internet links, which serve as fine resources, especially Hockey Canada's age group manuals and specialty clinic outlines. Look at some of the most brilliant hockey teachers of the last 50 years: Ludek Bukac, Vladimir Kostka, Anatoli Tarasov, Bjorn Kinding, Lloyd Percival, Slavomir Lener, George Kingston, Dave Chambers, Howie Meeker, Dave King, Jack Blatherwick, Tom Watt, Vern Stenlund, Gaston Marcotte, Georges Lariviere and many others. Their voluminous works are fascinating, enlightening, progressive, instructive and sometimes even provocative. They tantalize in the same way a shop window of rich desserts beckons. A small sampling may suffice in the short term - till you long for more. Few of us are in coaching situations where we could apply even a fraction of the material. Outside hockey, we read books or take training courses both to enrich and to educate. It doesn't mean we will actually use it all. So the same holds for exploring hockey. Coaches need to enrich and educate themselves. Then sit back with an editing pencil...
Inside Coaching Hockey
127
As for this... Critiquing has to include Inside Coaching Hockey. As a writer, coach, and teacher, I'm not so naïve as to believe this may be without its detractors. For one thing - and I offer an apology here - I chose to write ICH using male gender references. It seemed awkward to me to switch genders throughout the book, write everything as "he/she," or use the indefinite pronoun "one," as in "one's team." I've read material that takes each of these approaches and found them ponderous. It goes without saying: Anything having to do with the teaching of hockey to children applies to both sexes (mind you, to destroy the cliché, if it goes without saying, then why say it?). I hope no female coaches or coaches of females take me to task more than I deserve. Goaltenders have been largely excluded because their training is much more specific. Outstanding goalie manuals abound and they address the technical aspects of the position far better than I ever could in my wildest fantasies. I spent about a week as a goalie when I was nine years old. A slapshot from a classmate, Chris, struck me mid-section where I hadn't donned important protection. That was the end of that. Thus I leave it to the goalie experts to determine where and how their young charges will fit in to the coaching development scenarios I present. Finally, not all coaches are great; I am far from a Pollyanna about what I see daily in arenas. My aim here was to provide a thought-provoking guide to help ordinary coaches become good and good ones better. I will never know if I've succeeded. But, coach, you will. - Richard K. Bercuson
Inside Coaching Hockey
128
Acknowledgments When I initially floated the idea of providing this book through the Ottawa District Hockey Association (ODHA), the reception was immediately positive and welcoming. A special thanks therefore goes to the ODHA's Richard Sennott, Ron McRostie, Bob Byrnes, and Jeff Baker for their unwavering support in this project. In particular, I must extend my gratitude to the many fine coaches and hockey teachers with whom I've shared a bench or ice session. Too numerous to name, each has had a profoundly positive effect on me as a person, as a coach, and as a teacher. I readily admit to have blithely stolen from them, both with and without their permission.
About the author (by the author) For nearly 40 years, I've coached every level and age group of minor hockey in addition to stints in junior A, B, and C. There have also been some great years in university hockey, high school, and senior AA. Along the way, my teams have won championships at various levels, some probably in spite of me. Once upon a time, I coached in France where, during that epoch, the food was better than the hockey. Highlights include being invited to Canada's Program of Excellence national team guest coach program and serving as an assistant with Team Ontario in the world under-17 tournament. I should note that about a third of my coaching experiences have been as an assistant. In addition to coaching, I've worked with various hockey associations to assist with development and mentorship programs and have been the ODHA's Coaching Coordinator and Mentor Coach. I've taught the national coaching program clinics for over 30 years and made presentations at major seminars in Ottawa, Toronto, and Montreal. I've written (and co-written) various teaching modules for both Hockey Canada and the ODHA. Honours include being a recipient of the ODHA Development Award, the branch's 75th Anniversary Commendation, and a Hockey Canada certificate for contributions to coaching development. As a writer, I authored "Assume the position: one guy's journey through prostate cancer." My columns have appeared in the Ottawa Citizen and various magazines and at one time I wrote for the Montreal Gazette and Hockey News. My published fiction includes winning Canada's Arthur Ellis crime short story award along with regional short story humour awards. I've also written and produced a number of plays. In my spare time, I teach adult high school and am an avid distance runner with a bunch of marathons and half marathons under my belt.