Embed Size (px)
Citation preview

InsideBusinessCorporate AdministratorUser guide
InsideBusiness Corporate Administrator User guide 2
Preface
With InsideBusiness Self Service you enjoy full control to manage your user administration tasks.
Before you begin your new Corporate Administrator function, ING will need you to sign a Corporate Administrator Power of Attorney form. Then you can manage your company users and their access rights to let them: 1. Add, modify or deactivate users in the Administration
module2. Maintain payments and reporting permissions in the
InsideBusiness Payments module3. Provide access to functionality for Cash balancing, Lending,
Financial markets, Order management and Service request in the Administration module
4. Request, activate or deactivate I-Dentity Cards, the InsideBusiness App or mToken in the Administration module
The exception to the available Self Service options, is the InsideBusiness Payments CEE (=Central and Eastern Europe) module. Access can only be provided by ING based on a signed set up request on paper.
These Corporate administrators can not create new corporate administrators themselves. This can only be done by ING based on a signed Corporate administrator power of attorney.
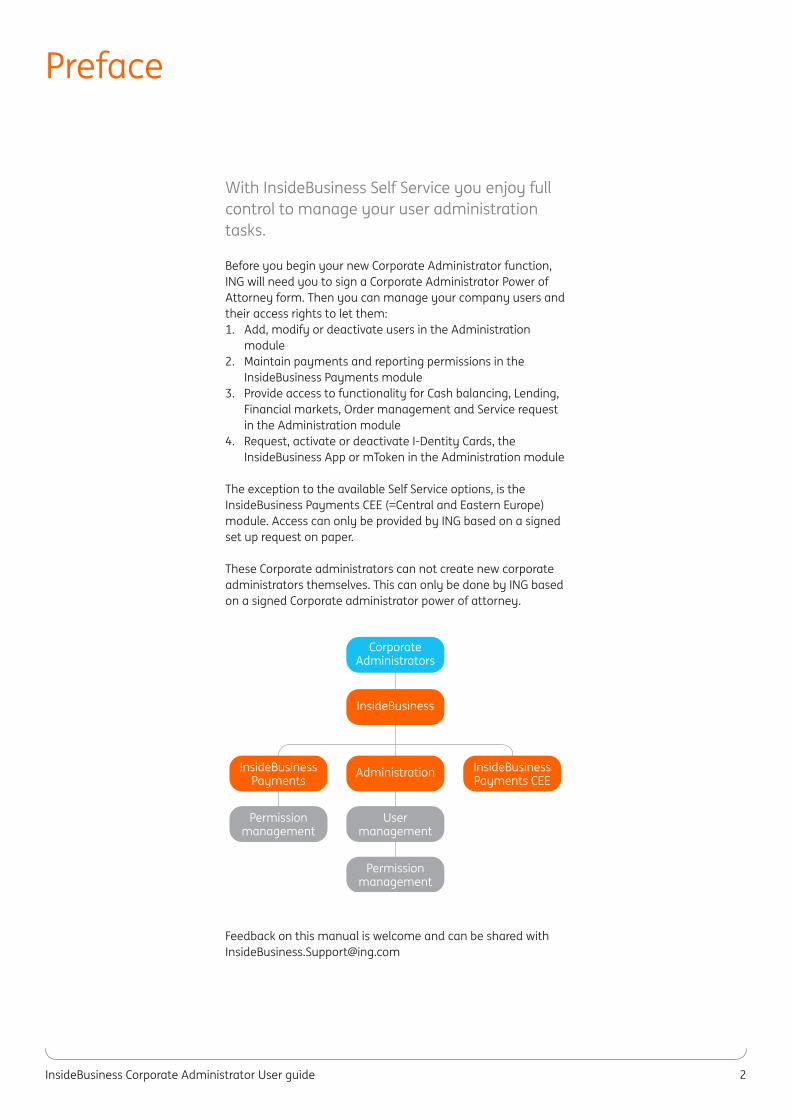
CorporateAdministrators
InsideBusiness
AdministrationInsideBusinessPayments
Usermanagement
Permissionmanagement
Permissionmanagement
InsideBusinessPayments CEE
Feedback on this manual is welcome and can be shared with [email protected]
InsideBusiness Corporate Administrator User guide 3
How can I?
1. Add users 4
2. Assign and modify permissions for InsideBusiness Payments 10
Profiles and account permissions 10Sign permissions 12New user – copy permissions from current user 14Modify User 17
3. Maintain permissions for Cash balancing, Lending, Financial markets, Order management and Service requests 23
Modify user group 24Modify user 24
4. Request new I-Dentity Card 25
5. Activate I-Dentity Card 27
6. Request mToken 29
7. Activate mToken 31
8. Deactivate I-Dentity Card or mToken 33
9. Deactivate user 35
Delete user in the InsideBusiness Payments module 35Deactivate a user in all other functions 38
10. Authorise admin changes in the Administration module 40
11. Authorise modifications in the InsideBusiness Payments module 41
Authorise modification – First signature 41Authorise modification – Second signature 43Reject modification 45Edit modification 46
12. Provide access to InsideBusiness CEE 47
13. Advanced Options for InsideBusiness Payments 48
Group profiles 48Account permissions 52Change subscription settings 54
14. Explanations 56
Profiles 56Frequently asked questions and answers 57Sign permissions 62
15. Multicompany Subcription in InsideBusiness Payments 63
Add service users within the main subscription 64Set up a service user within subsidiary subscription 65Change a user of the subsidiary subscription to a user of the main subscription 68
InsideBusiness Corporate Administrator User guide 4
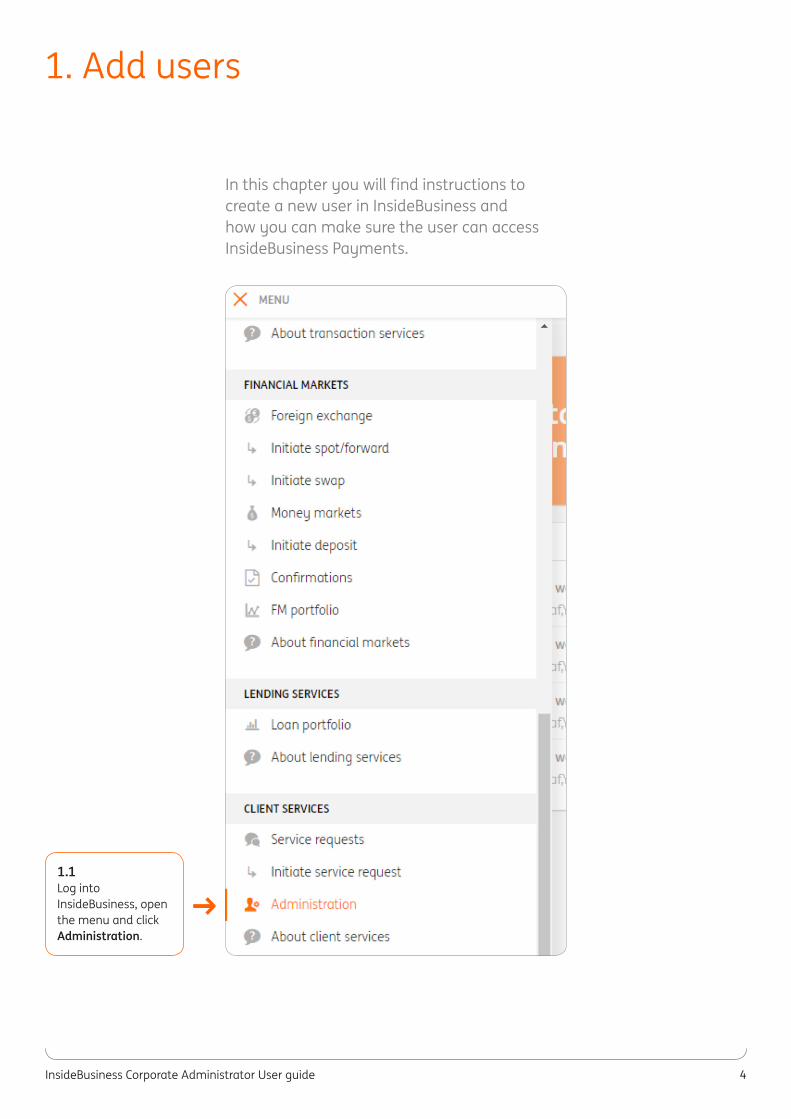
In this chapter you will find instructions to create a new user in InsideBusiness and how you can make sure the user can access InsideBusiness Payments.
1. Add users
→1.1Log into InsideBusiness, open the menu and click Administration.
InsideBusiness Corporate Administrator User guide 5
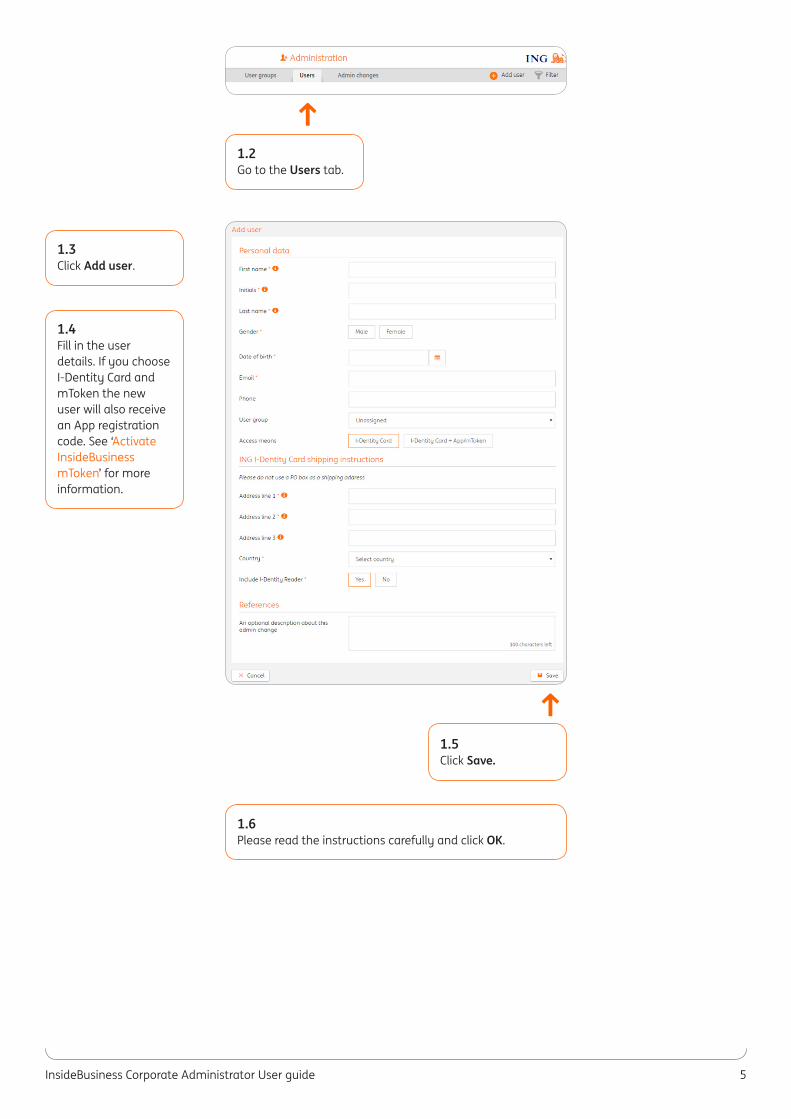
1.4Fill in the user details. If you choose I-Dentity Card and mToken the new user will also receive an App registration code. See ‘Activate InsideBusiness mToken’ for more information.
1.3Click Add user.
↑1.2Go to the Users tab.
↑
1.5Click Save.
1.6Please read the instructions carefully and click OK.
InsideBusiness Corporate Administrator User guide 6
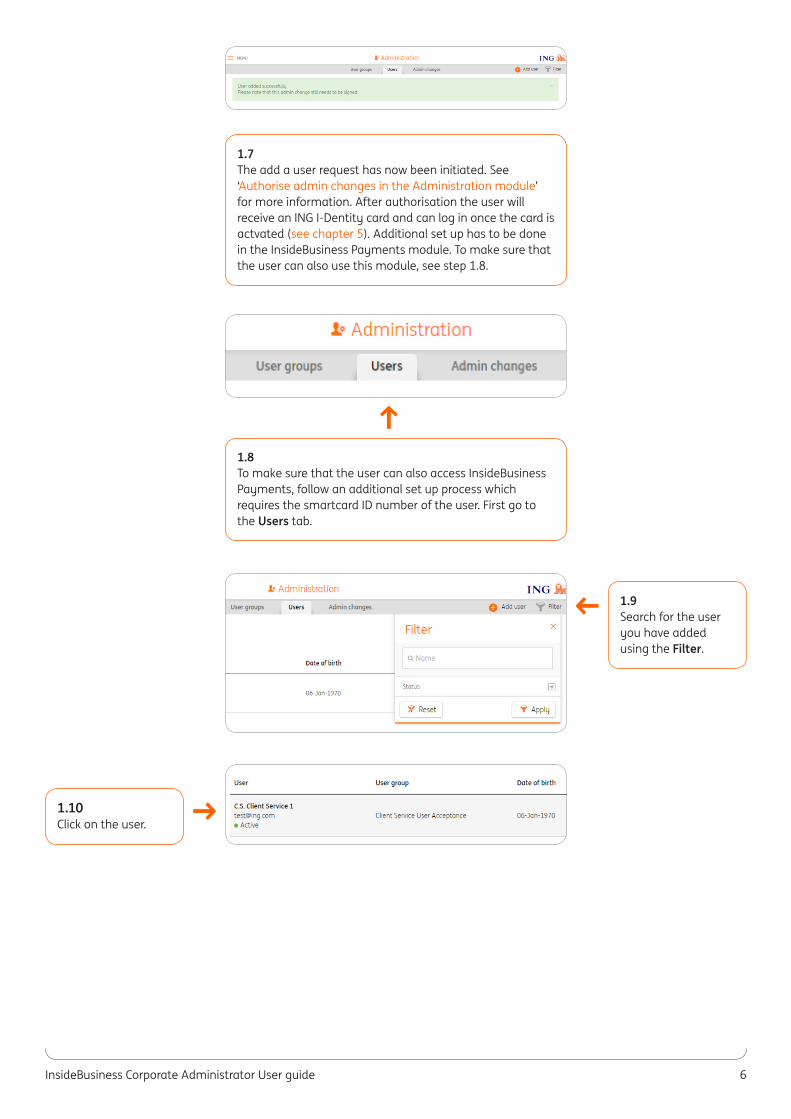
1.7The add a user request has now been initiated. See ‘Authorise admin changes in the Administration module’ for more information. After authorisation the user will receive an ING I-Dentity card and can log in once the card is actvated (see chapter 5). Additional set up has to be done in the InsideBusiness Payments module. To make sure that the user can also use this module, see step 1.8.
↑1.8 To make sure that the user can also access InsideBusiness Payments, follow an additional set up process which requires the smartcard ID number of the user. First go to the Users tab.
1.9 Search for the user you have added using the Filter.
→
→1.10Click on the user.
InsideBusiness Corporate Administrator User guide 7
→
→
→
→
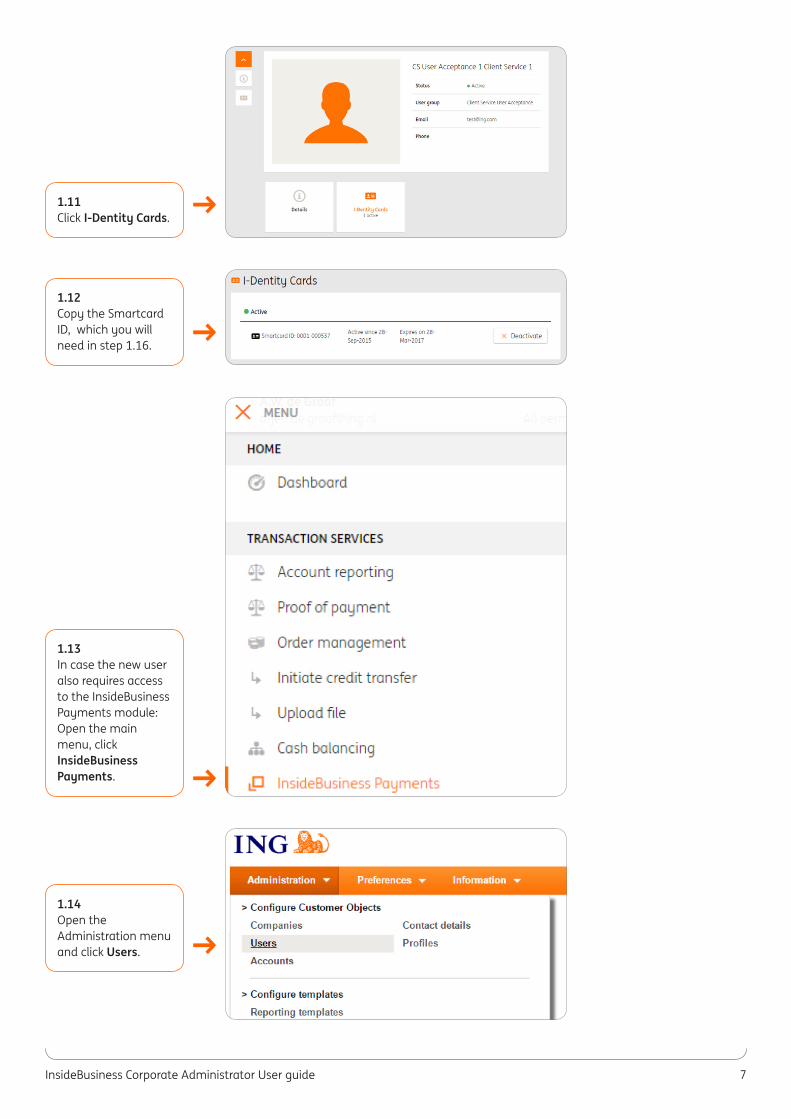
1.11Click I-Dentity Cards.
1.12Copy the Smartcard ID, which you will need in step 1.16.
1.13In case the new user also requires access to the InsideBusiness Payments module: Open the main menu, click InsideBusiness Payments.
1.14Open the Administration menu and click Users.
InsideBusiness Corporate Administrator User guide 8
↑
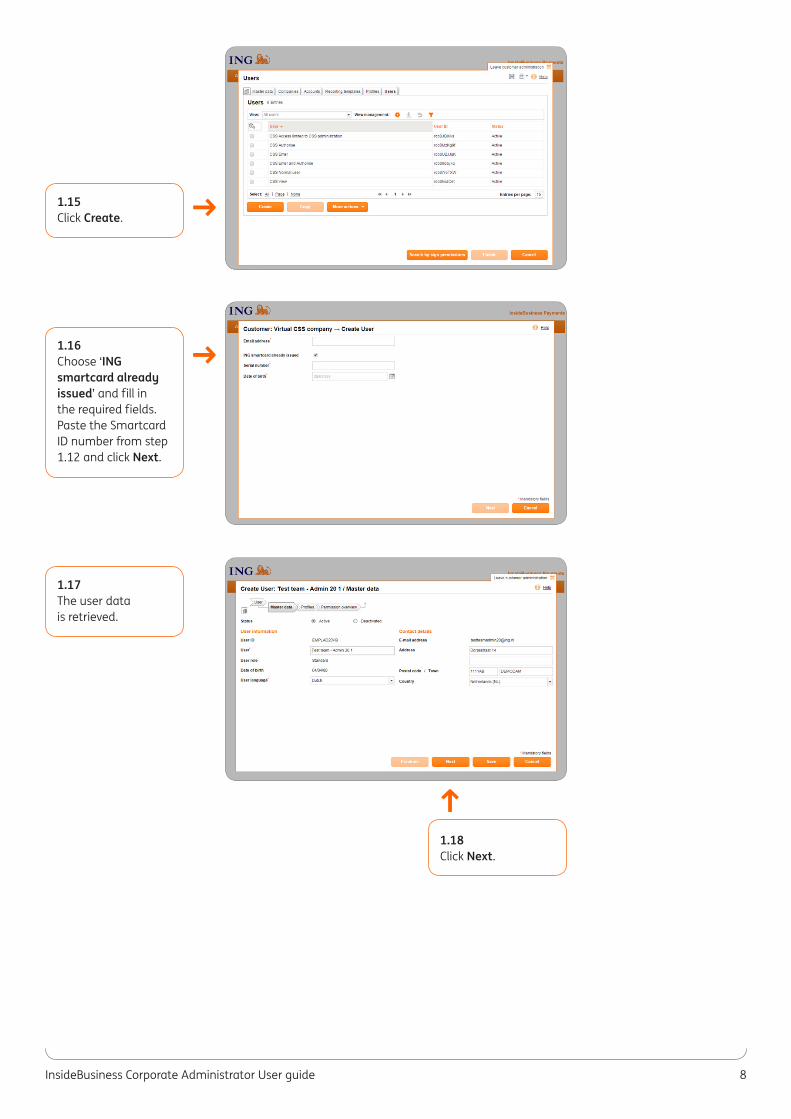
1.18Click Next.
→
→
1.15Click Create.
1.16Choose ‘ING smartcard already issued’ and fill in the required fields. Paste the Smartcard ID number from step 1.12 and click Next.
1.17The user data is retrieved.
InsideBusiness Corporate Administrator User guide 9
↑
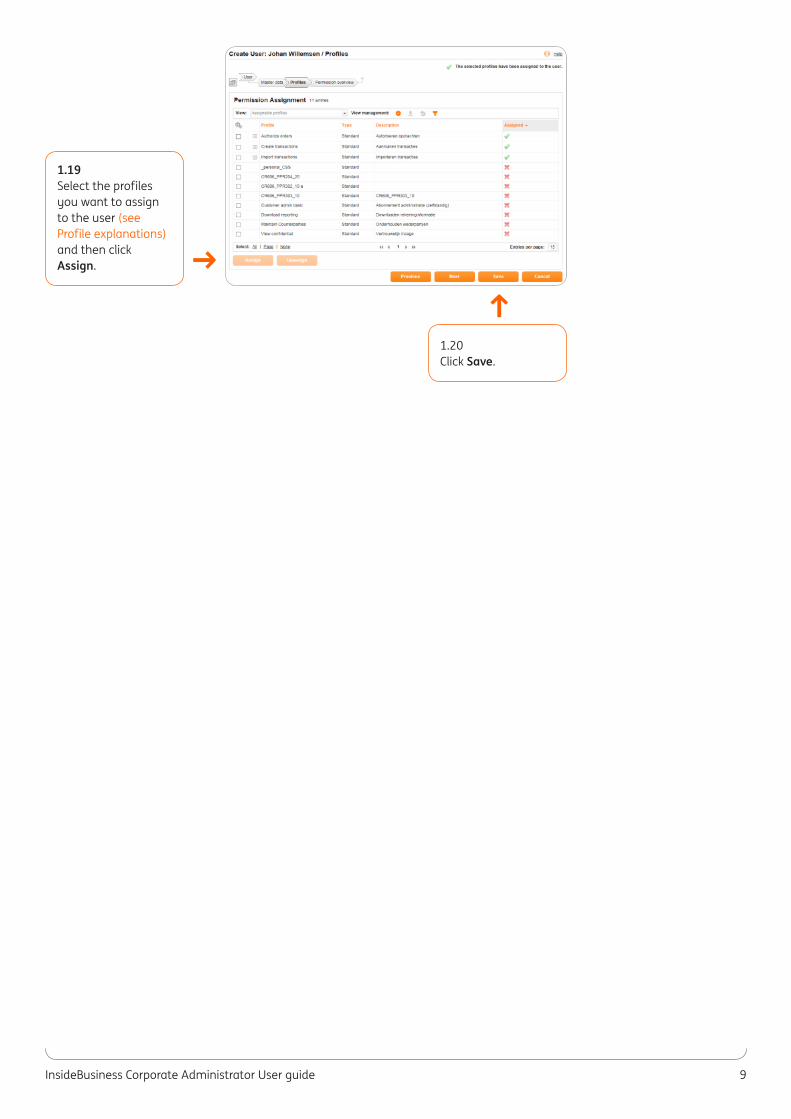
1.20Click Save.
→
1.19Select the profiles you want to assign to the user (see Profile explanations) and then click Assign.
InsideBusiness Corporate Administrator User guide 10
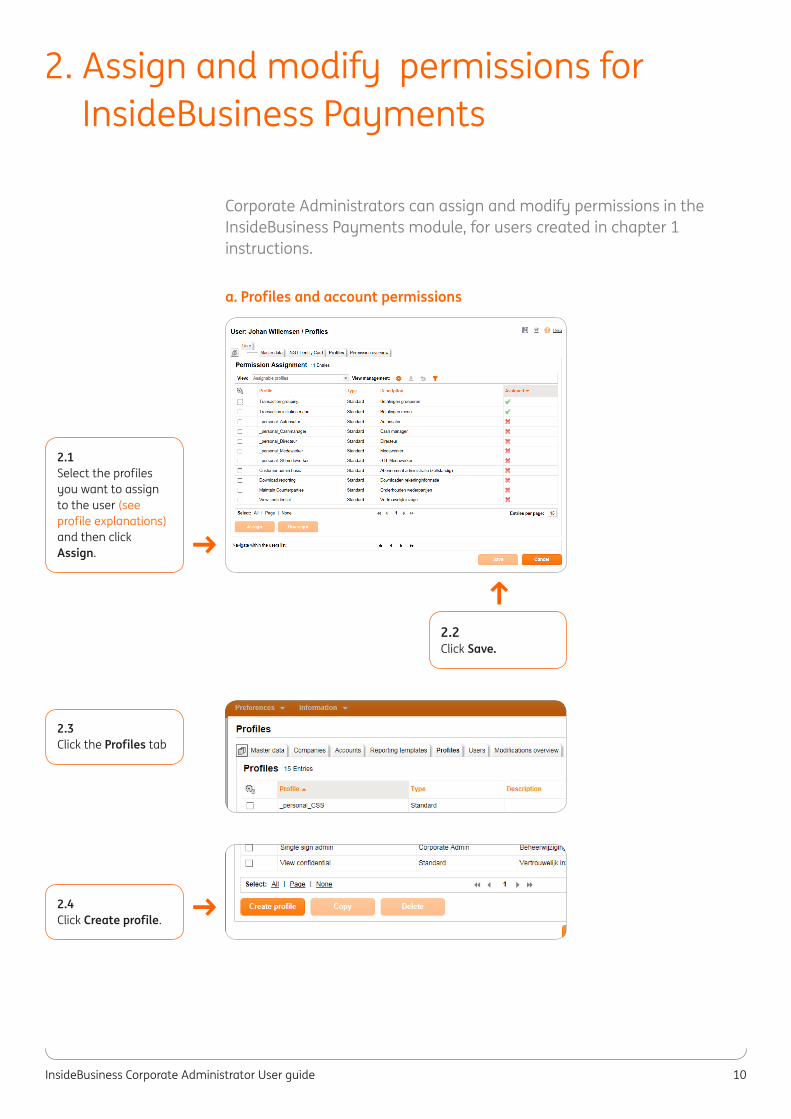
Corporate Administrators can assign and modify permissions in the InsideBusiness Payments module, for users created in chapter 1 instructions.
a. Profiles and account permissions
↑
2.2Click Save.
2. Assign and modify permissions for InsideBusiness Payments
→
→
2.1Select the profiles you want to assign to the user (see profile explanations) and then click Assign.
2.4Click Create profile.
2.3Click the Profiles tab
InsideBusiness Corporate Administrator User guide 11
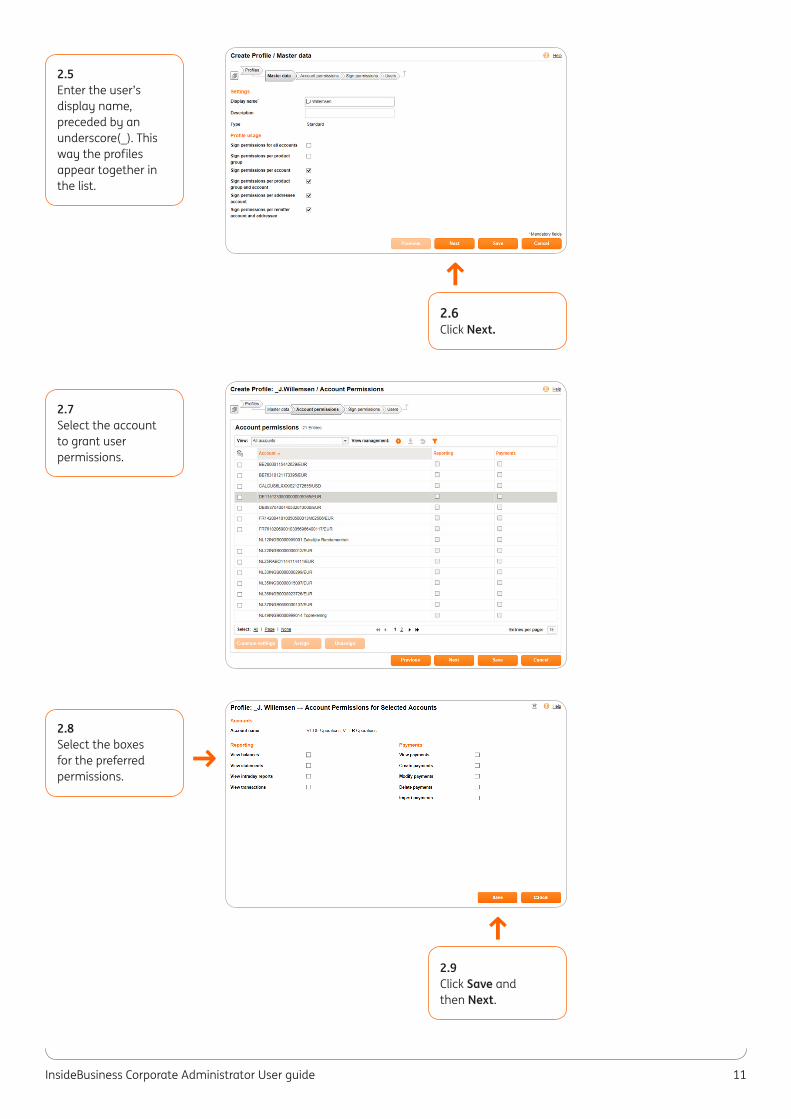
2.5Enter the user’s display name, preceded by an underscore(_). This way the profiles appear together in the list.
2.7Select the account to grant user permissions.
↑
2.6Click Next.
↑
2.9Click Save and then Next.
→2.8Select the boxes for the preferred permissions.

InsideBusiness Corporate Administrator User guide 12
b. Sign permissionsThere are several options for signing permissions by Account, Product Group, Addressee Account and Remitter Account. This section helps you to create the signing permissions applicable in your company.
→
→2.10 Click Create sign permissions with the required limit (see sign permissions explanations).
2.11Sign permissions per account: Select Type Sign permissions per account and then select the Account, Signature class and Limit.
2.12Sign permissions per product group and account: Select the product group, Account, Signature class and Limit.
2.13Sign permissions by Addressee Account: Select or search for Addressee. Select the Addressee account, Signature class and Limit.
InsideBusiness Corporate Administrator User guide 13
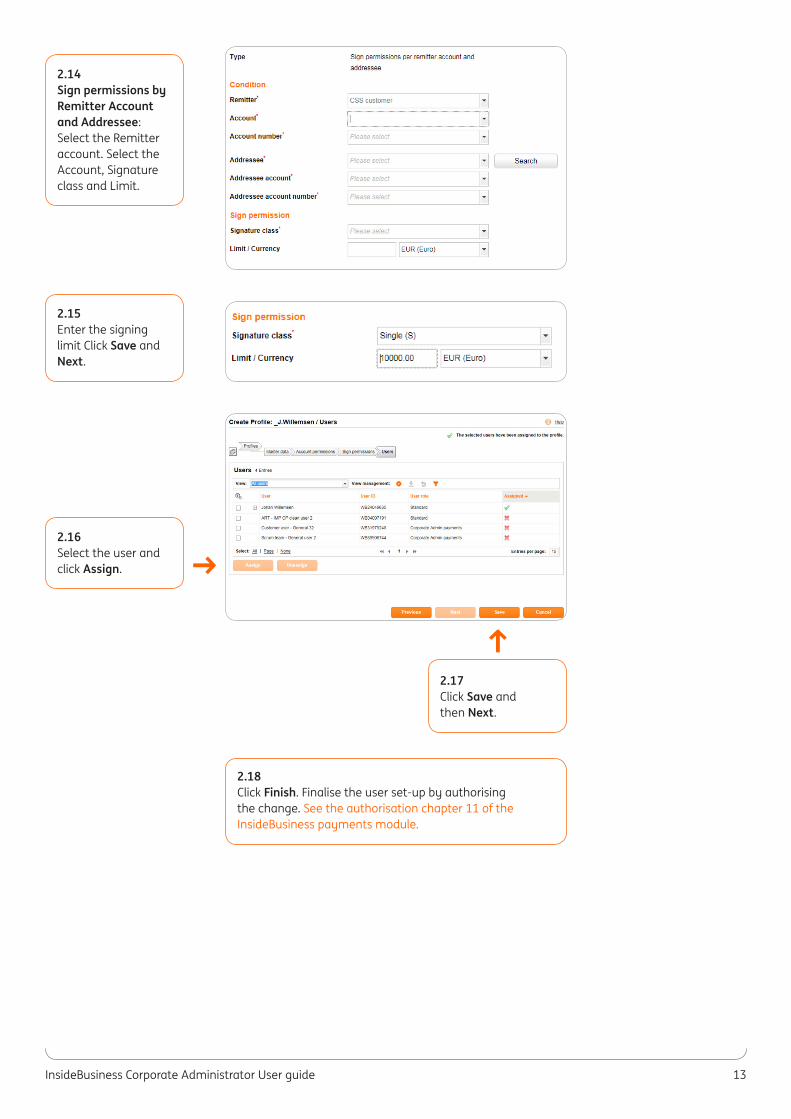
2.14Sign permissions by Remitter Account and Addressee: Select the Remitter account. Select the Account, Signature class and Limit.
2.15Enter the signing limit Click Save and Next.
↑
2.17Click Save and then Next.
2.18Click Finish. Finalise the user set-up by authorising the change. See the authorisation chapter 11 of the InsideBusiness payments module.
→2.16Select the user and click Assign.
InsideBusiness Corporate Administrator User guide 14
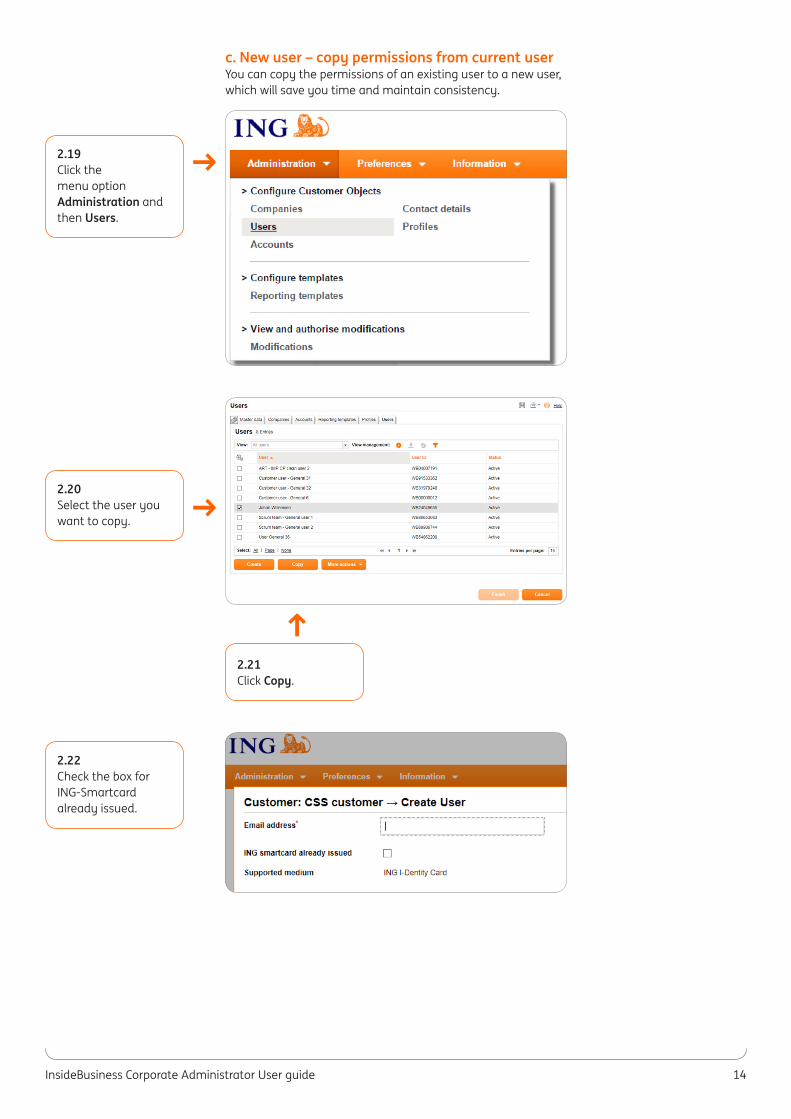
c. New user – copy permissions from current userYou can copy the permissions of an existing user to a new user, which will save you time and maintain consistency.
↑2.21Click Copy.
→
→
2.19Click the menu option Administration and then Users.
2.20Select the user you want to copy.
2.22Check the box for ING-Smartcard already issued.
InsideBusiness Corporate Administrator User guide 15
↑
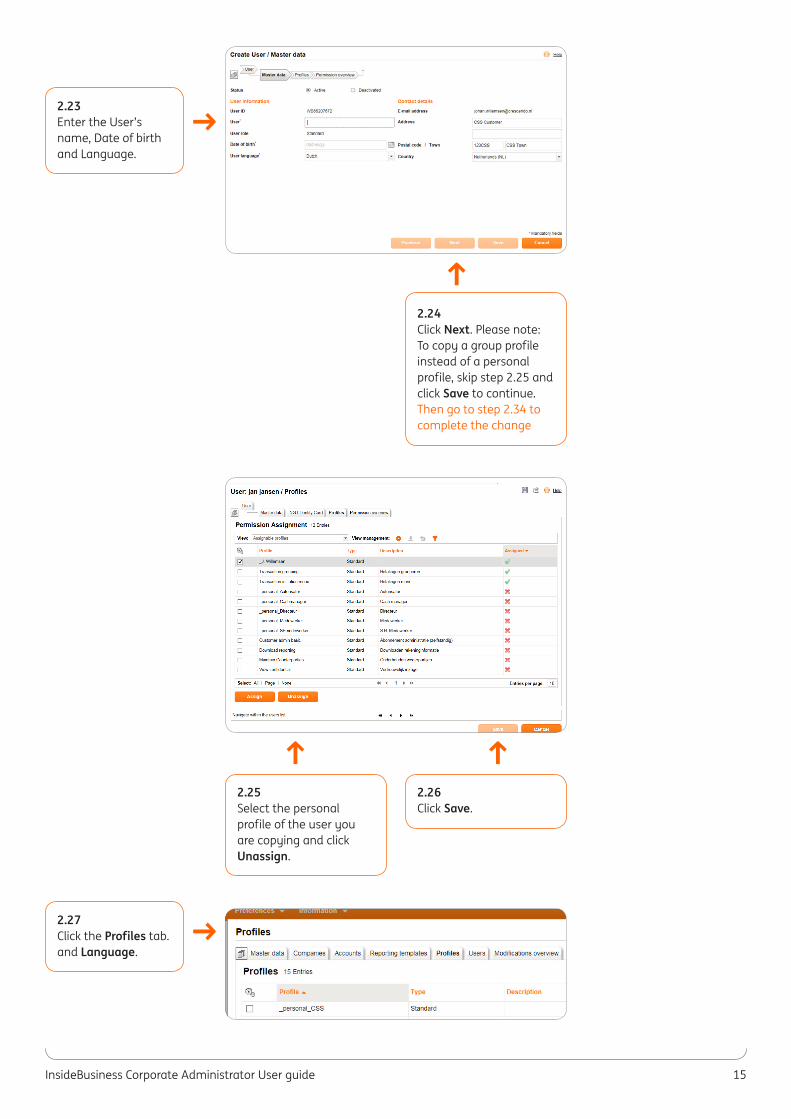
2.24Click Next. Please note: To copy a group profile instead of a personal profile, skip step 2.25 and click Save to continue. Then go to step 2.34 to complete the change
↑ ↑
2.26Click Save.
2.25Select the personal profile of the user you are copying and click Unassign.
→
→
2.23Enter the User’s name, Date of birth and Language.
2.27Click the Profiles tab.and Language.
InsideBusiness Corporate Administrator User guide 16
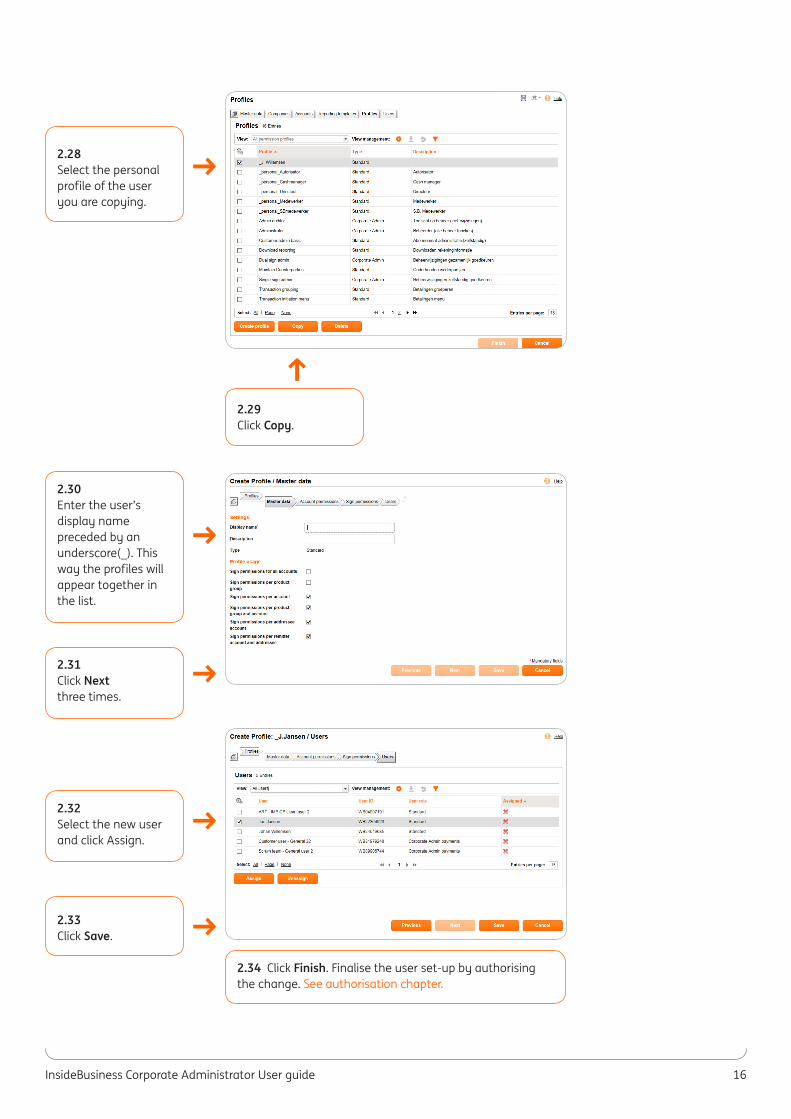
↑2.29Click Copy.
→
→
→
2.28Select the personal profile of the user you are copying.
2.30Enter the user’s display name preceded by an underscore(_). This way the profiles will appear together in the list.
→
→
2.32Select the new user and click Assign.
2.34 Click Finish. Finalise the user set-up by authorising the change. See authorisation chapter.
2.33Click Save.
2.31Click Next three times.

InsideBusiness Corporate Administrator User guide 17
→
→
→
2.35Click the menu option Administration and then Users.
2.37To update the name or address here, click the tab Profiles.
2.36Select the user name to modify.
d. Modify UserThis section shows how you can modify the user permissions within the InsideBusiness Payments module.
InsideBusiness Corporate Administrator User guide 18
→
→
→
→
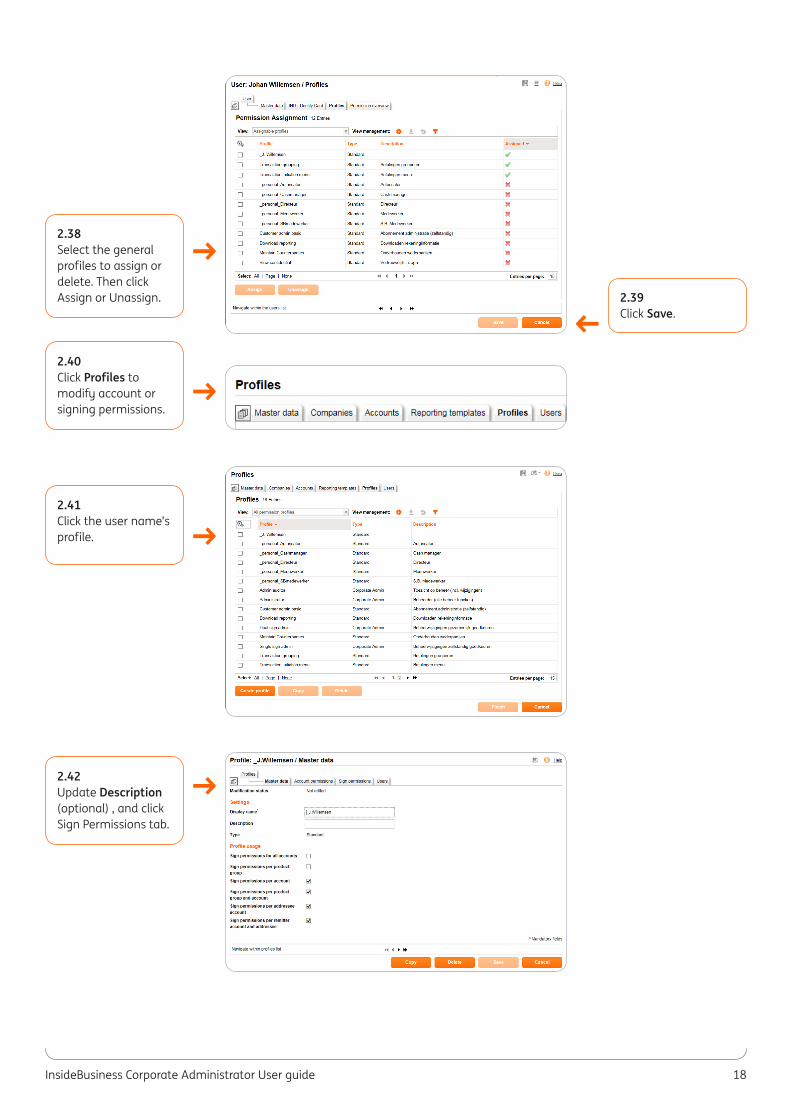
2.38Select the general profiles to assign or delete. Then click Assign or Unassign.
2.40Click Profiles to modify account or signing permissions.
2.41Click the user name’s profile.
2.42Update Description (optional) , and click Sign Permissions tab.
→2.39Click Save.
InsideBusiness Corporate Administrator User guide 19
→
→
→
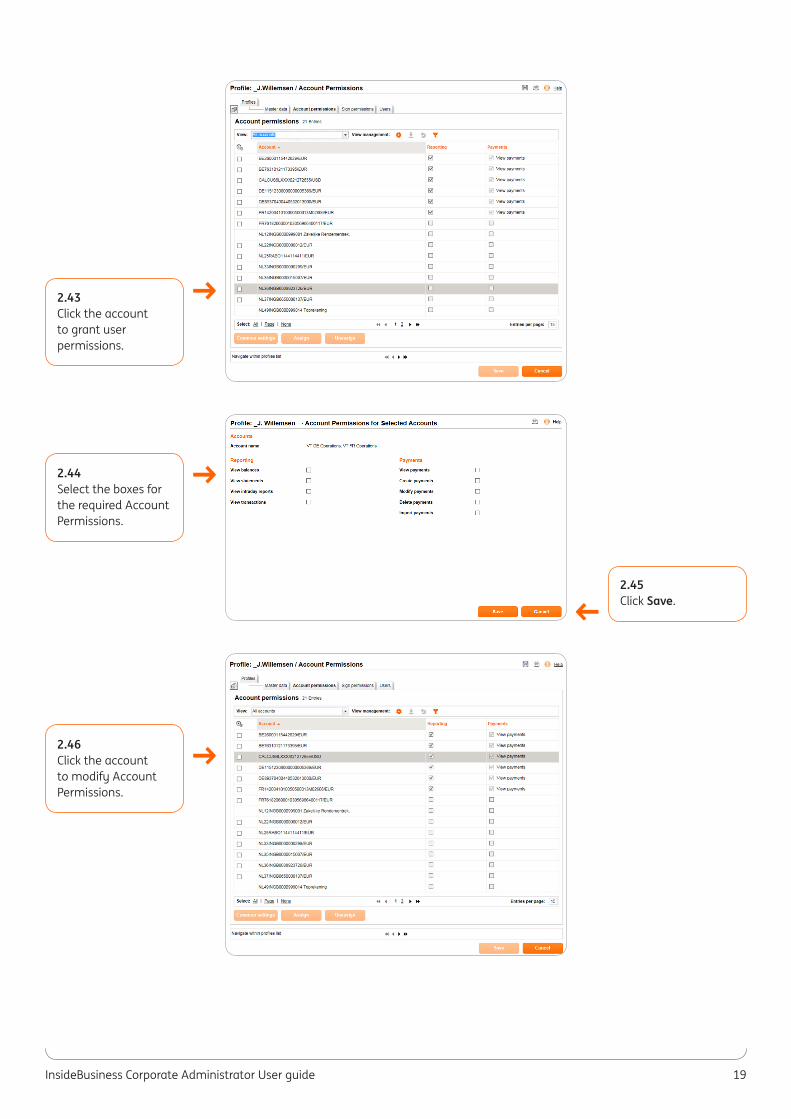
2.43Click the account to grant user permissions.
2.44Select the boxes for the required Account Permissions.
2.46Click the account to modify Account Permissions.
→2.45Click Save.
InsideBusiness Corporate Administrator User guide 20
→
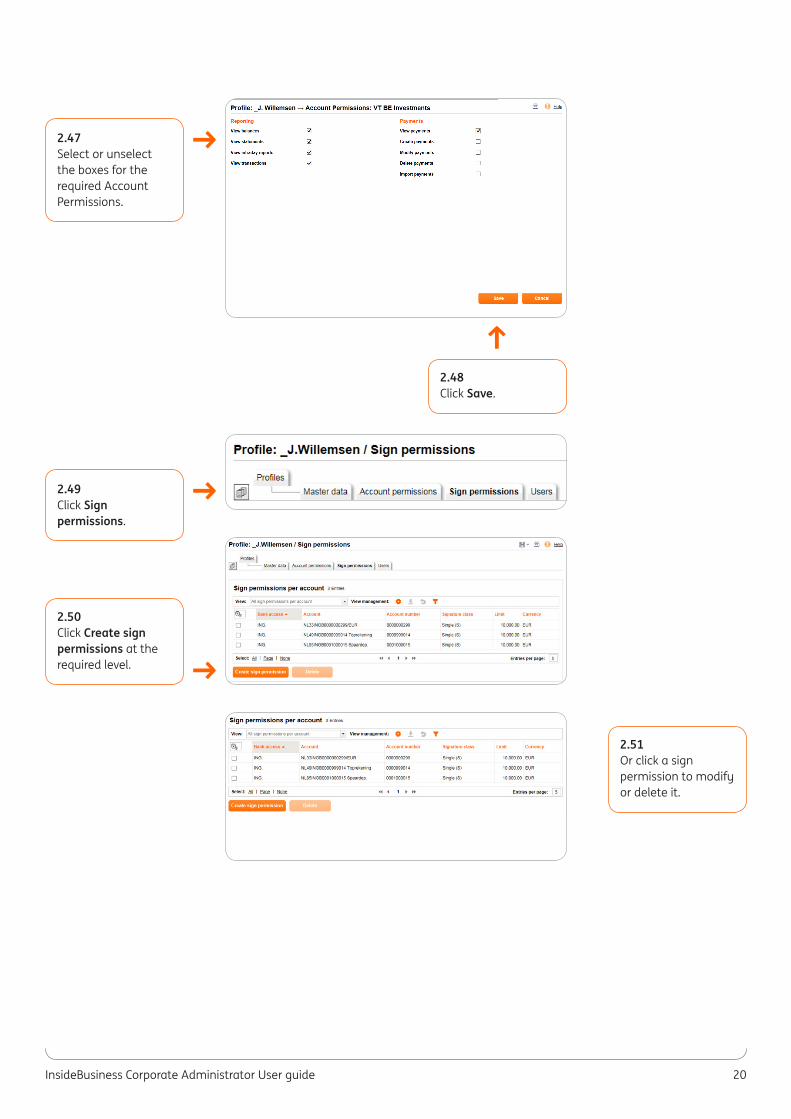
2.48Click Save.
→
→
→
2.47Select or unselect the boxes for the required Account Permissions.
2.49Click Sign permissions.
2.50Click Create sign permissions at the required level.
2.51Or click a sign permission to modify or delete it.
InsideBusiness Corporate Administrator User guide 21
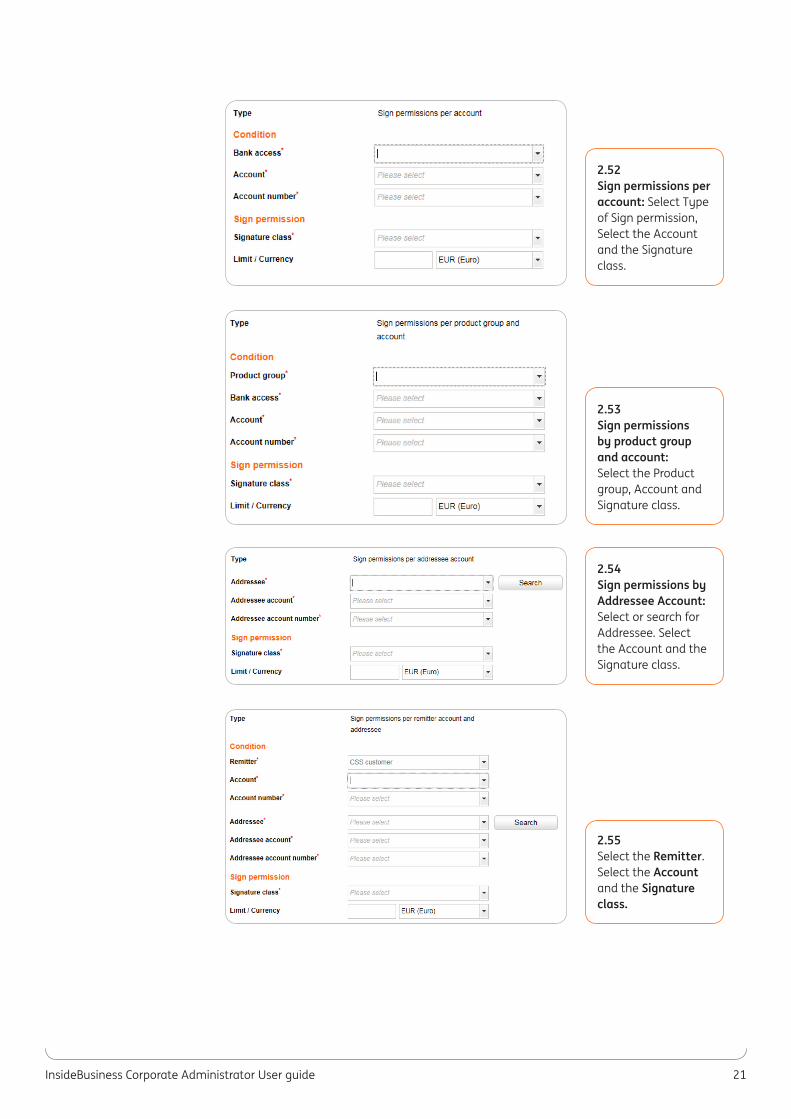
2.52Sign permissions per account: Select Type of Sign permission, Select the Account and the Signature class.
2.53Sign permissions by product group and account: Select the Product group, Account and Signature class.
2.54Sign permissions by Addressee Account: Select or search for Addressee. Select the Account and the Signature class.
2.55Select the Remitter. Select the Account and the Signature class.
InsideBusiness Corporate Administrator User guide 22
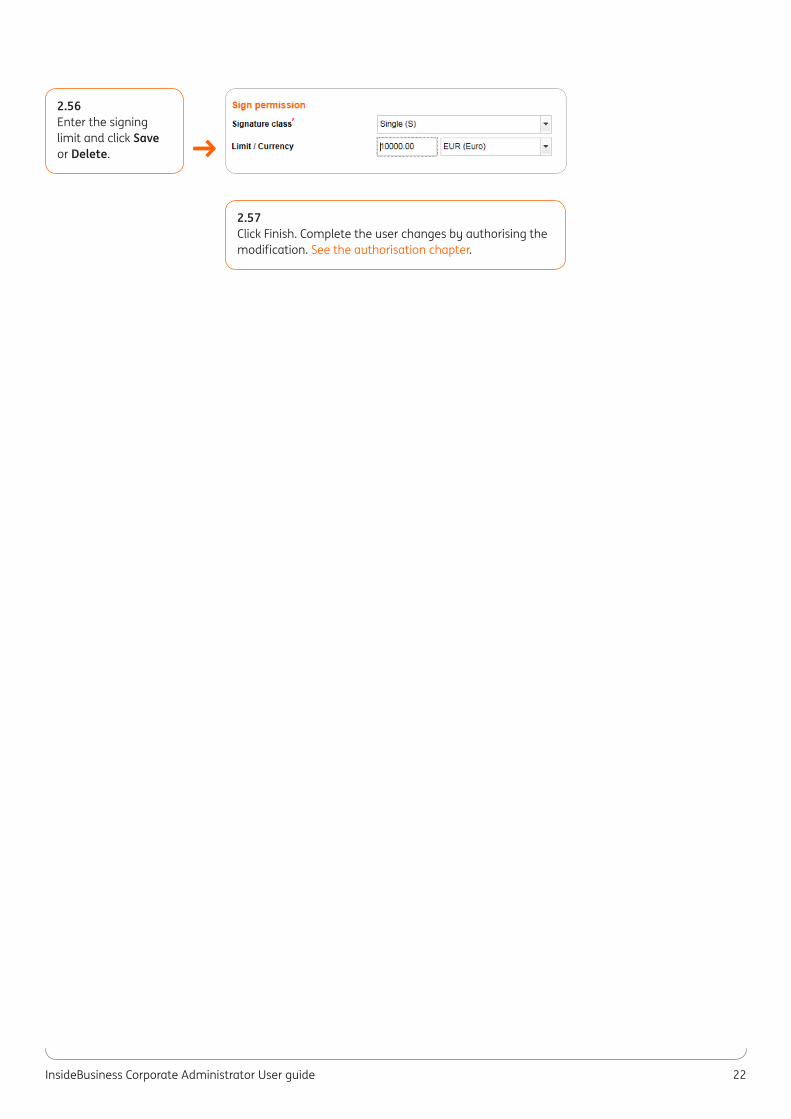
2.57Click Finish. Complete the user changes by authorising the modification. See the authorisation chapter.
→2.56Enter the signing limit and click Save or Delete.
InsideBusiness Corporate Administrator User guide 23
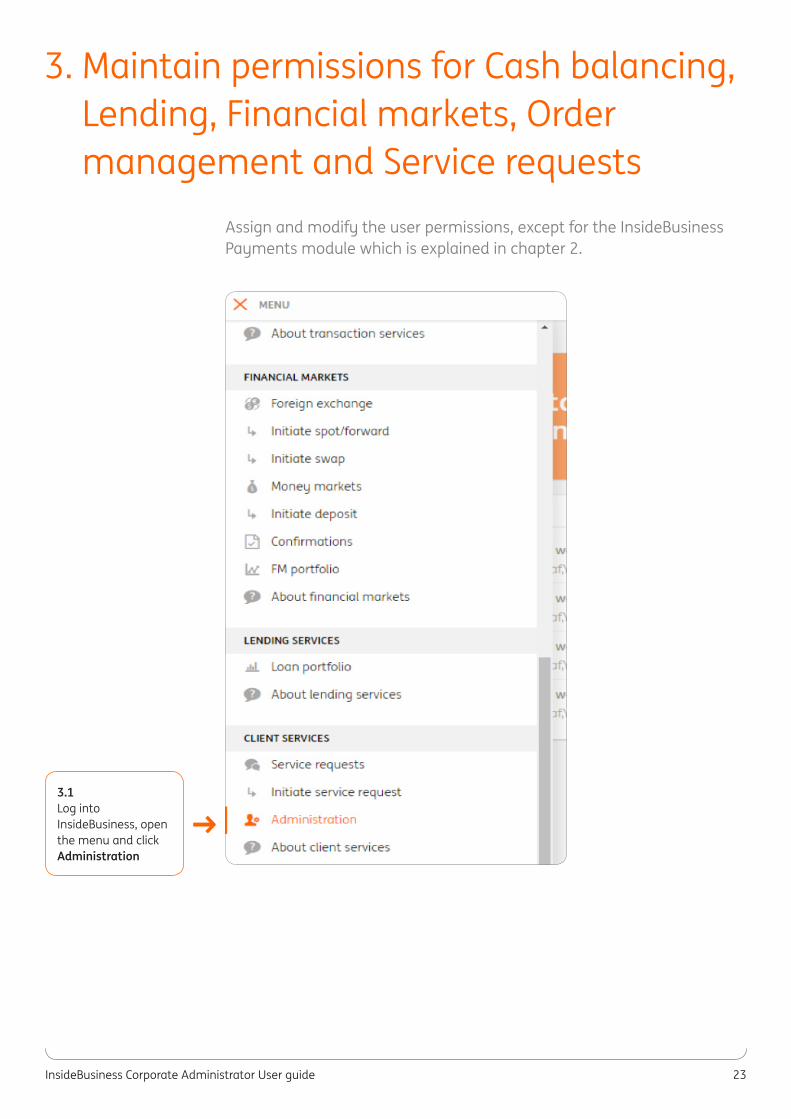
Assign and modify the user permissions, except for the InsideBusiness Payments module which is explained in chapter 2.
3. Maintain permissions for Cash balancing, Lending, Financial markets, Order management and Service requests
→3.1Log into InsideBusiness, open the menu and click Administration
InsideBusiness Corporate Administrator User guide 24
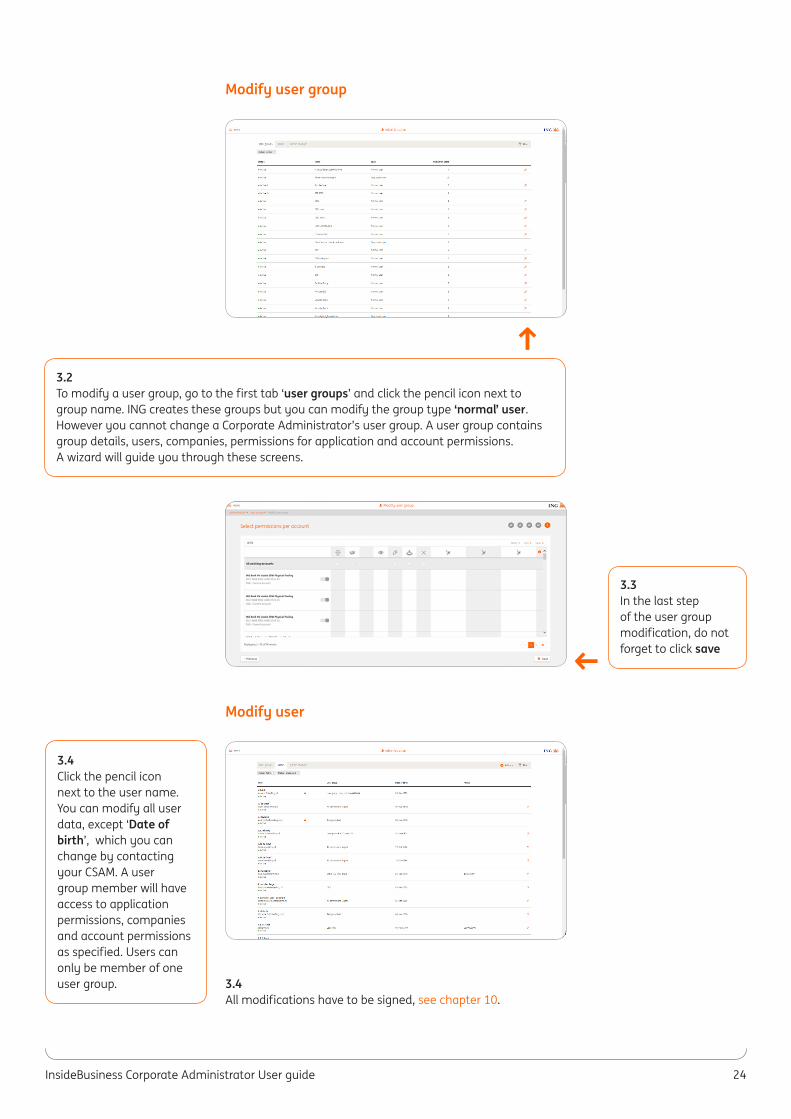
Modify user group
Modify user
3.4All modifications have to be signed, see chapter 10.
3.2To modify a user group, go to the first tab ‘user groups’ and click the pencil icon next to group name. ING creates these groups but you can modify the group type ‘normal’ user. However you cannot change a Corporate Administrator’s user group. A user group contains group details, users, companies, permissions for application and account permissions. A wizard will guide you through these screens.
3.4Click the pencil icon next to the user name. You can modify all user data, except ‘Date of birth’, which you can change by contacting your CSAM. A user group member will have access to application permissions, companies and account permissions as specified. Users can only be member of one user group.
→
→
3.3In the last step of the user group modification, do not forget to click save
InsideBusiness Corporate Administrator User guide 25
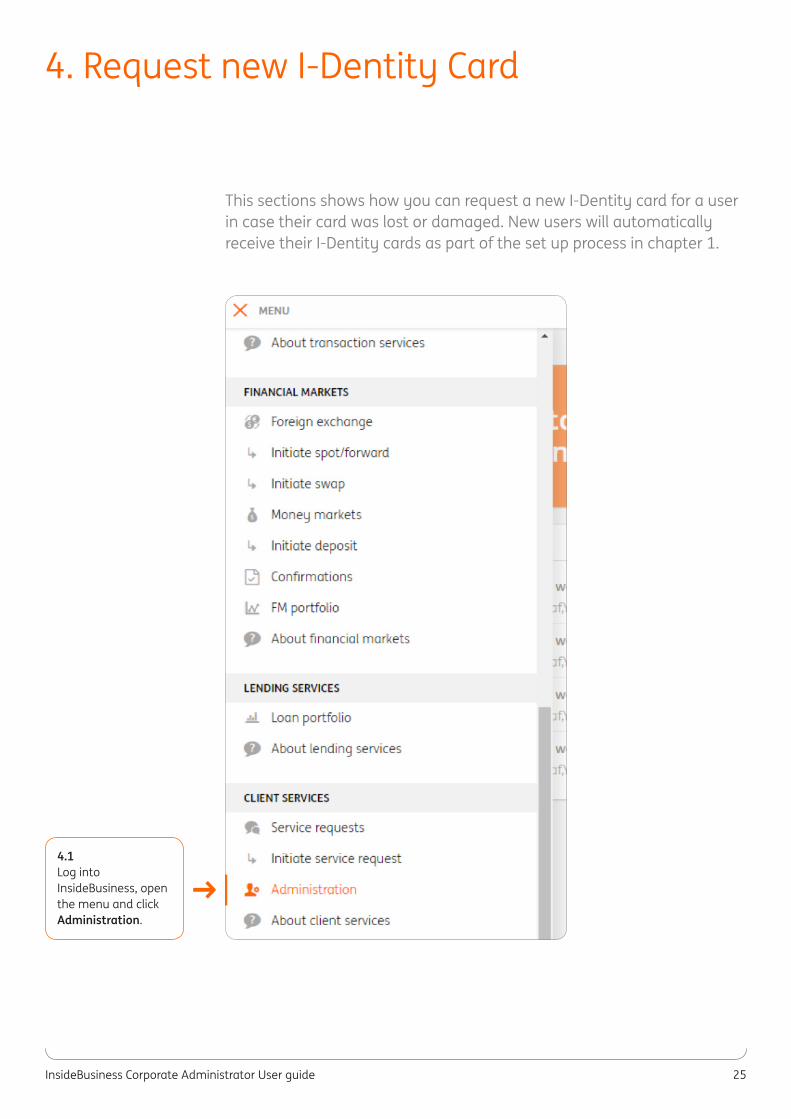
This sections shows how you can request a new I-Dentity card for a user in case their card was lost or damaged. New users will automatically receive their I-Dentity cards as part of the set up process in chapter 1.
4. Request new I-Dentity Card
→4.1Log into InsideBusiness, open the menu and click Administration.
InsideBusiness Corporate Administrator User guide 26
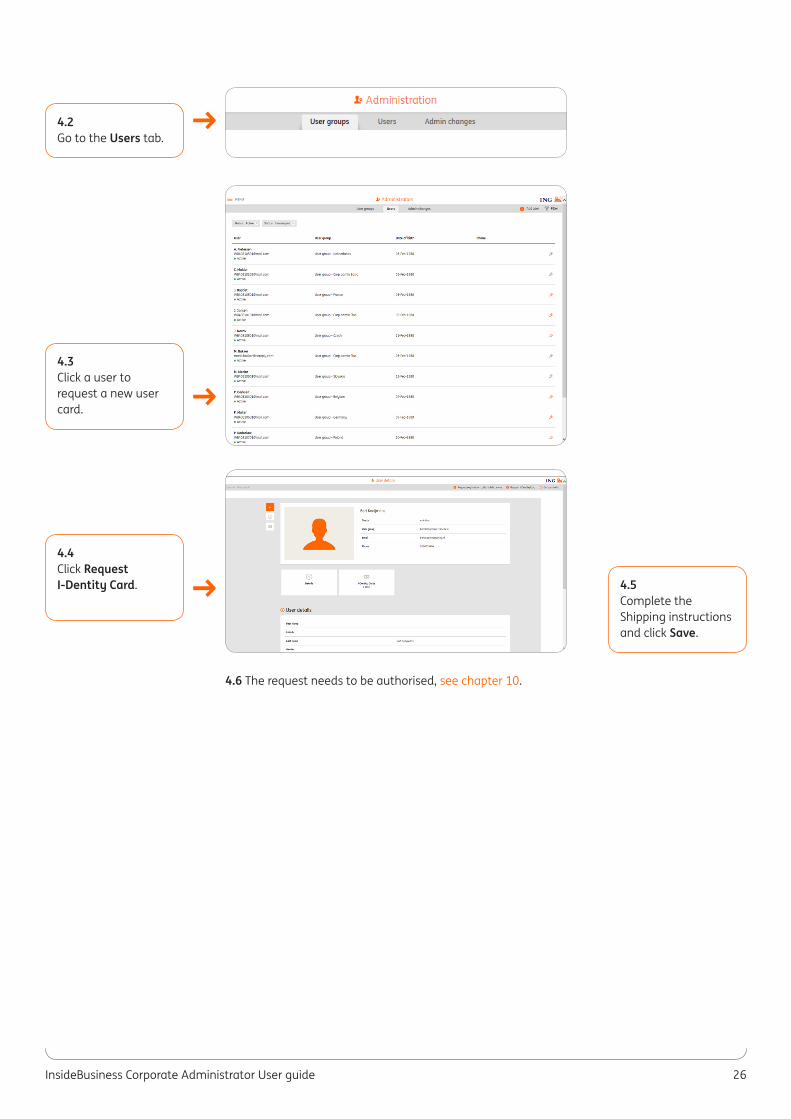
4.6 The request needs to be authorised, see chapter 10.
→
→
→
4.2Go to the Users tab.
4.3Click a user to request a new user card.
4.4Click Request I-Dentity Card. 4.5
Complete the Shipping instructions and click Save.
InsideBusiness Corporate Administrator User guide 27
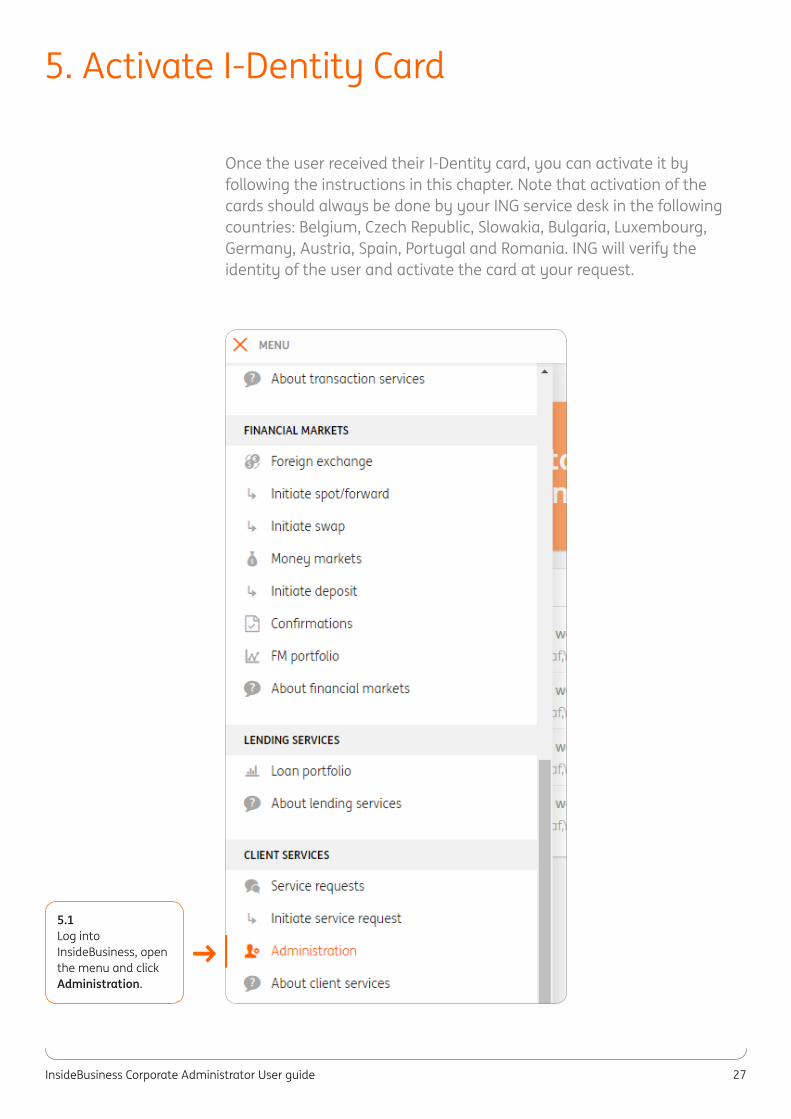
Once the user received their I-Dentity card, you can activate it by following the instructions in this chapter. Note that activation of the cards should always be done by your ING service desk in the following countries: Belgium, Czech Republic, Slowakia, Bulgaria, Luxembourg, Germany, Austria, Spain, Portugal and Romania. ING will verify the identity of the user and activate the card at your request.
5. Activate I-Dentity Card
→5.1Log into InsideBusiness, open the menu and click Administration.
InsideBusiness Corporate Administrator User guide 28
→
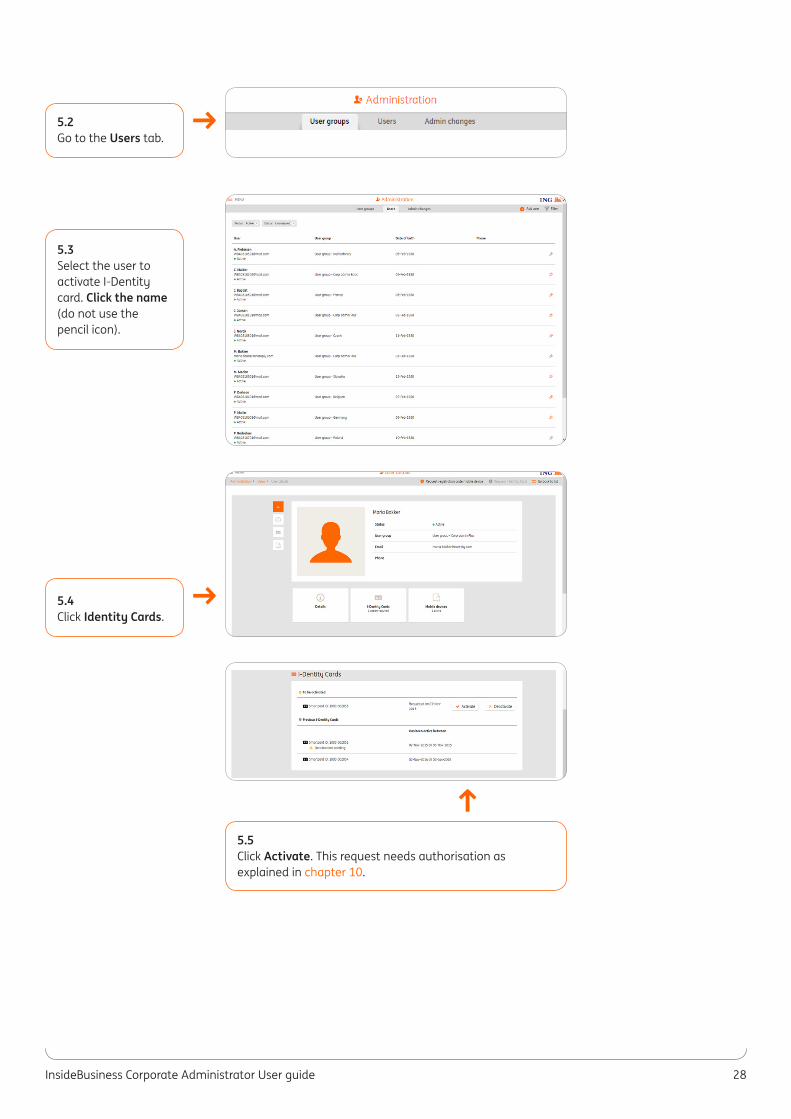
5.5Click Activate. This request needs authorisation as explained in chapter 10.
→
→
5.2Go to the Users tab.
5.3Select the user to activate I-Dentity card. Click the name (do not use the pencil icon).
5.4Click Identity Cards.
InsideBusiness Corporate Administrator User guide 29
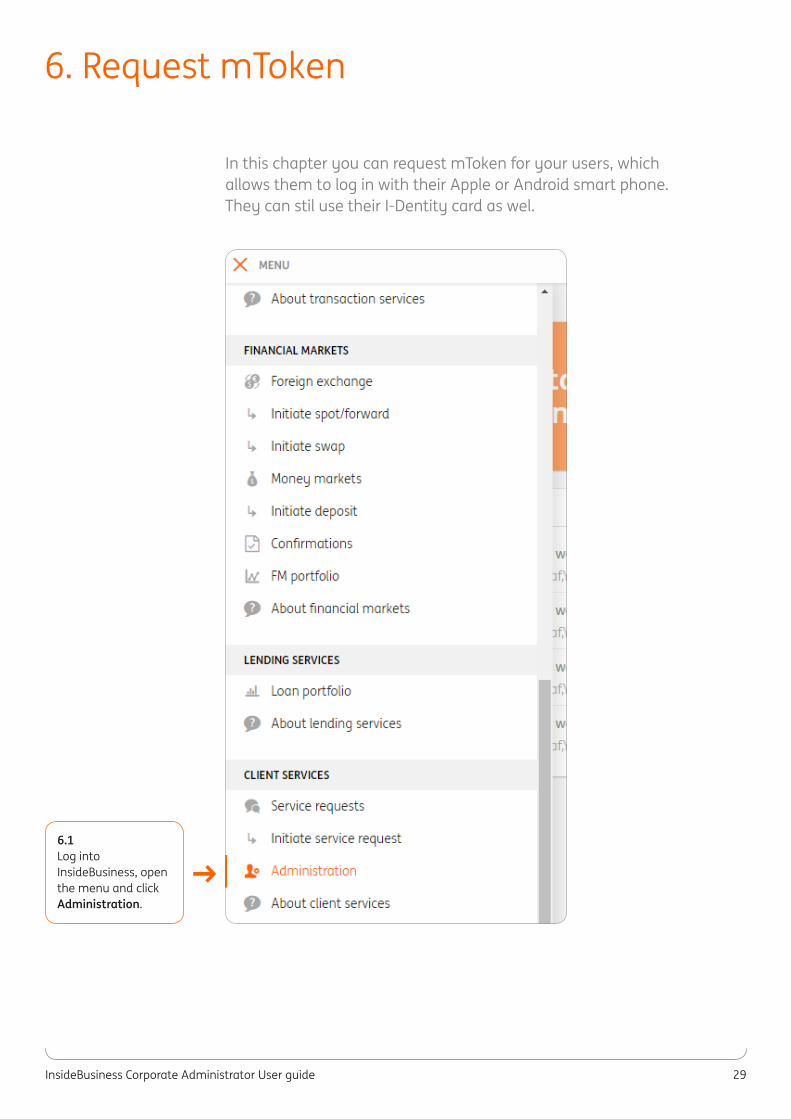
In this chapter you can request mToken for your users, which allows them to log in with their Apple or Android smart phone. They can stil use their I-Dentity card as wel.
6. Request mToken
→6.1Log into InsideBusiness, open the menu and click Administration.
InsideBusiness Corporate Administrator User guide 30
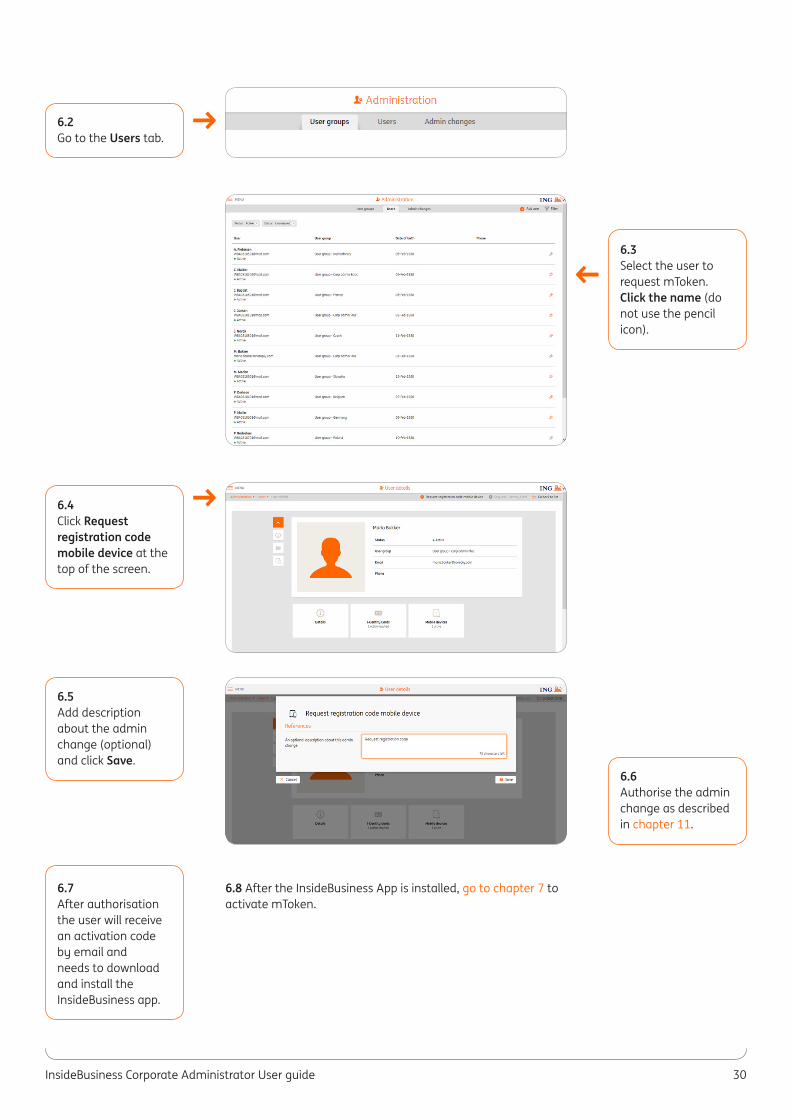
6.8 After the InsideBusiness App is installed, go to chapter 7 to activate mToken.
→
→
6.2Go to the Users tab.
6.3Select the user to request mToken. Click the name (do not use the pencil icon).
6.4Click Request registration code mobile device at the top of the screen.
6.5Add description about the admin change (optional) and click Save.
6.7After authorisation the user will receive an activation code by email and needs to download and install the InsideBusiness app.
6.6Authorise the admin change as described in chapter 11.
→
InsideBusiness Corporate Administrator User guide 31
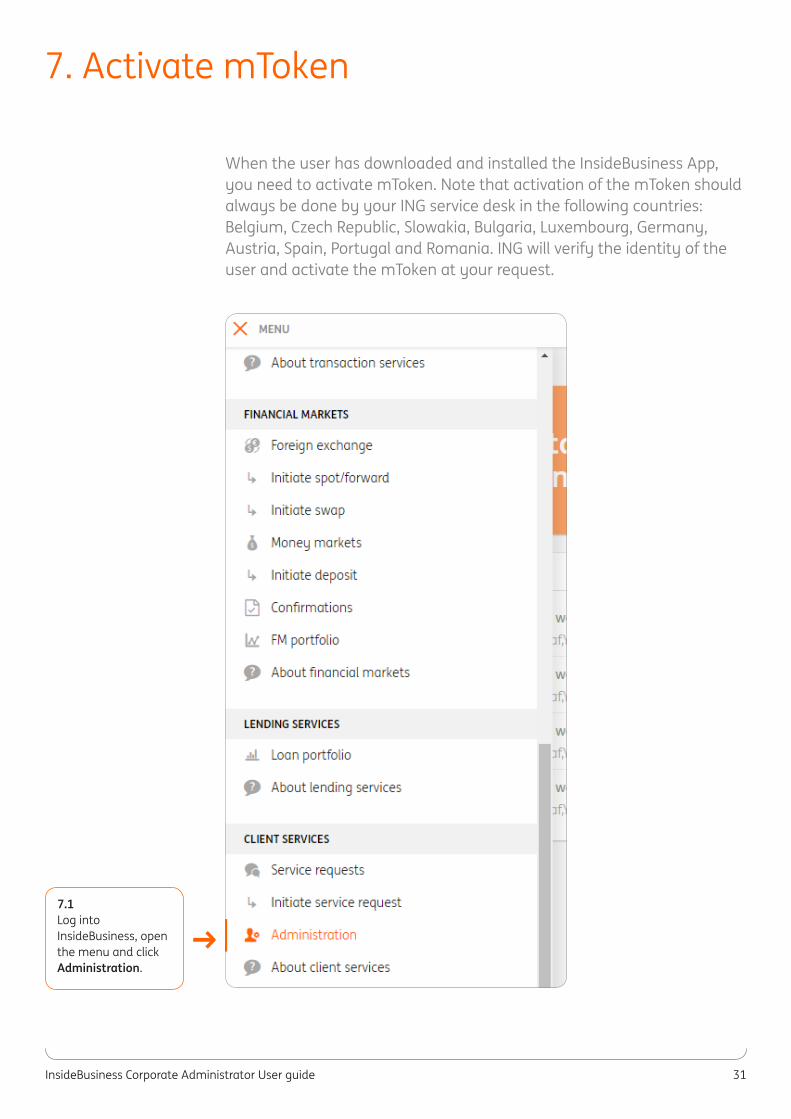
When the user has downloaded and installed the InsideBusiness App, you need to activate mToken. Note that activation of the mToken should always be done by your ING service desk in the following countries: Belgium, Czech Republic, Slowakia, Bulgaria, Luxembourg, Germany, Austria, Spain, Portugal and Romania. ING will verify the identity of the user and activate the mToken at your request.
7. Activate mToken
→7.1Log into InsideBusiness, open the menu and click Administration.
InsideBusiness Corporate Administrator User guide 32
→
→
→
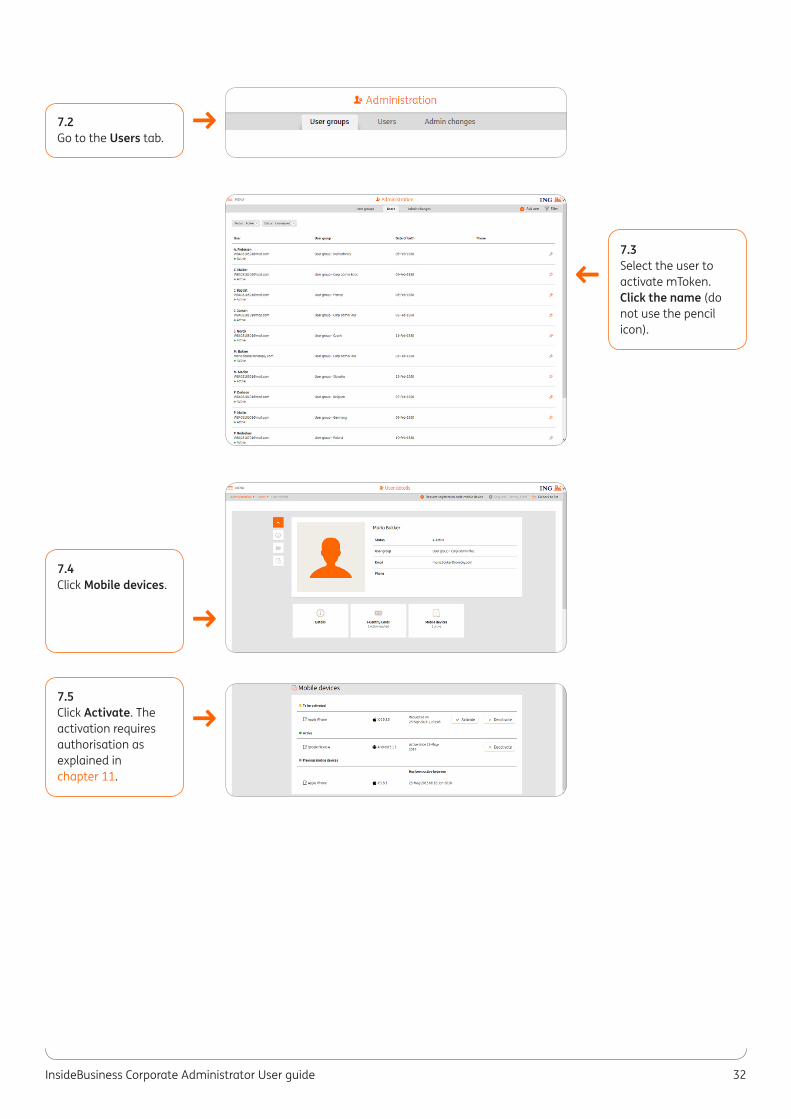
7.2Go to the Users tab.
7.4Click Mobile devices.
7.5Click Activate. The activation requires authorisation as explained in chapter 11.
7.3Select the user to activate mToken. Click the name (do not use the pencil icon).
→
InsideBusiness Corporate Administrator User guide 33
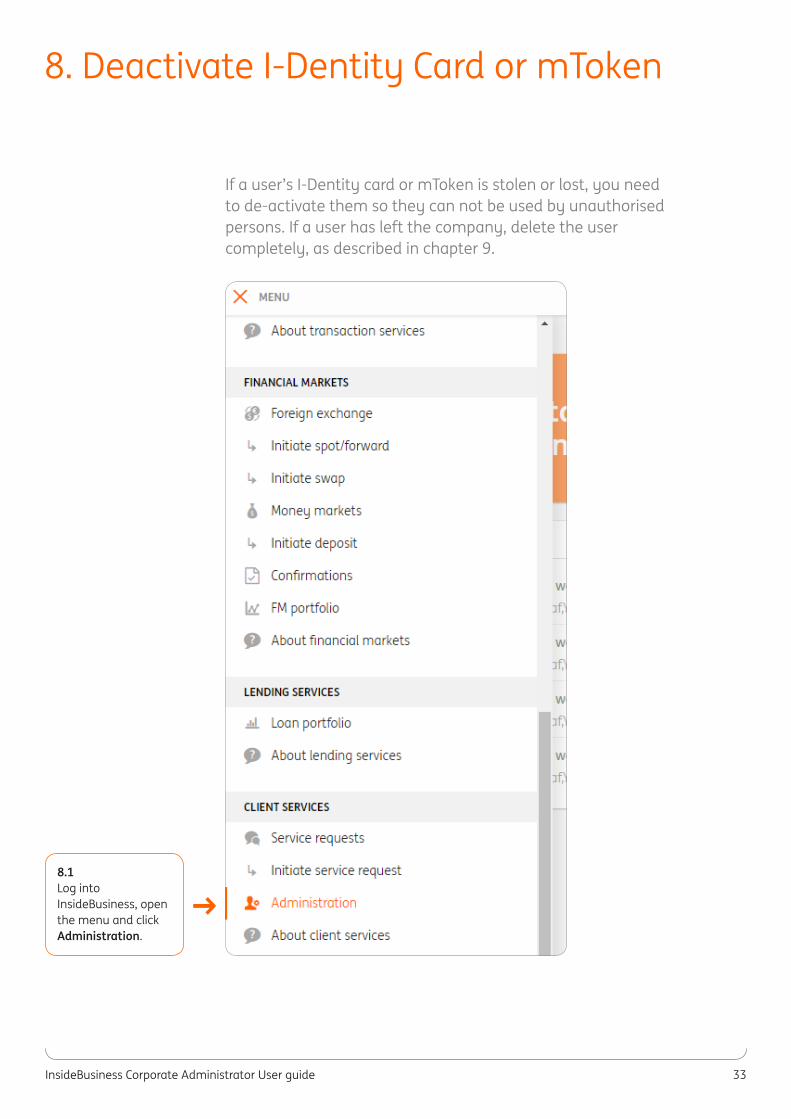
If a user’s I-Dentity card or mToken is stolen or lost, you need to de-activate them so they can not be used by unauthorised persons. If a user has left the company, delete the user completely, as described in chapter 9.
8. Deactivate I-Dentity Card or mToken
→8.1Log into InsideBusiness, open the menu and click Administration.
InsideBusiness Corporate Administrator User guide 34
→
→
→
→
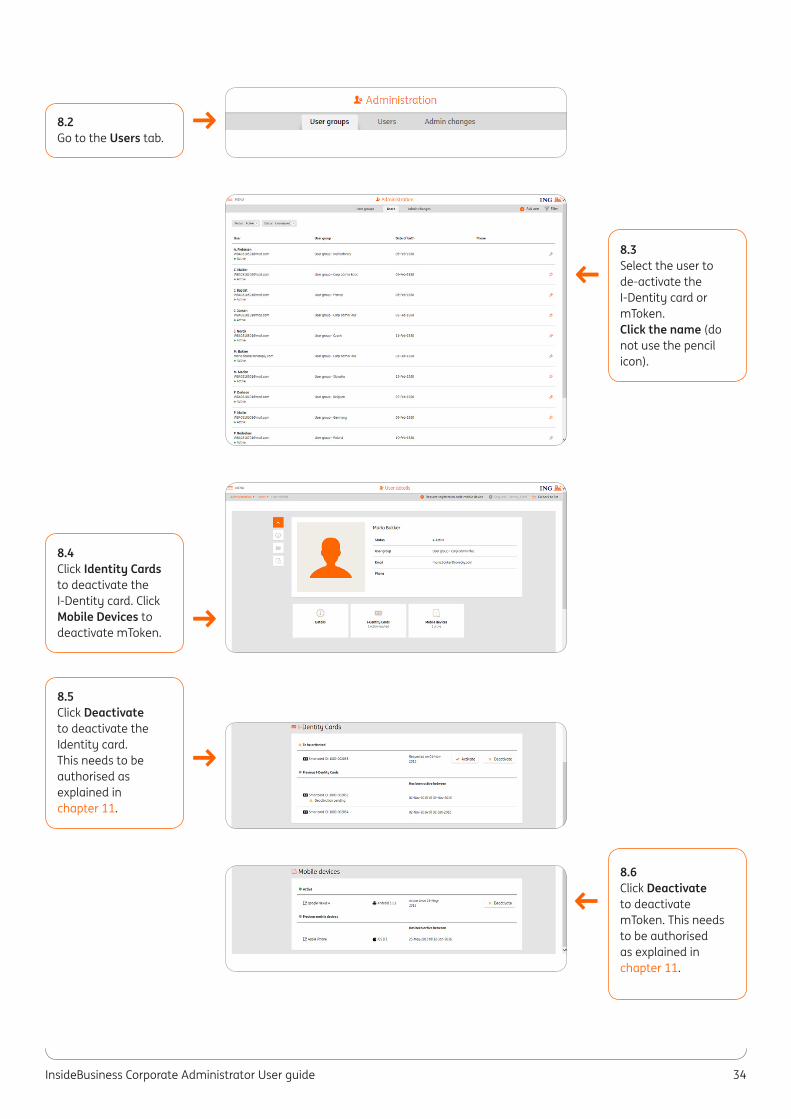
8.2Go to the Users tab.
8.4Click Identity Cards to deactivate the I-Dentity card. Click Mobile Devices to deactivate mToken.
8.5Click Deactivate to deactivate the Identity card. This needs to be authorised as explained in chapter 11.
8.6Click Deactivate to deactivate mToken. This needs to be authorised as explained in chapter 11.
8.3Select the user to de-activate the I-Dentity card or mToken. Click the name (do not use the pencil icon).
→
InsideBusiness Corporate Administrator User guide 35
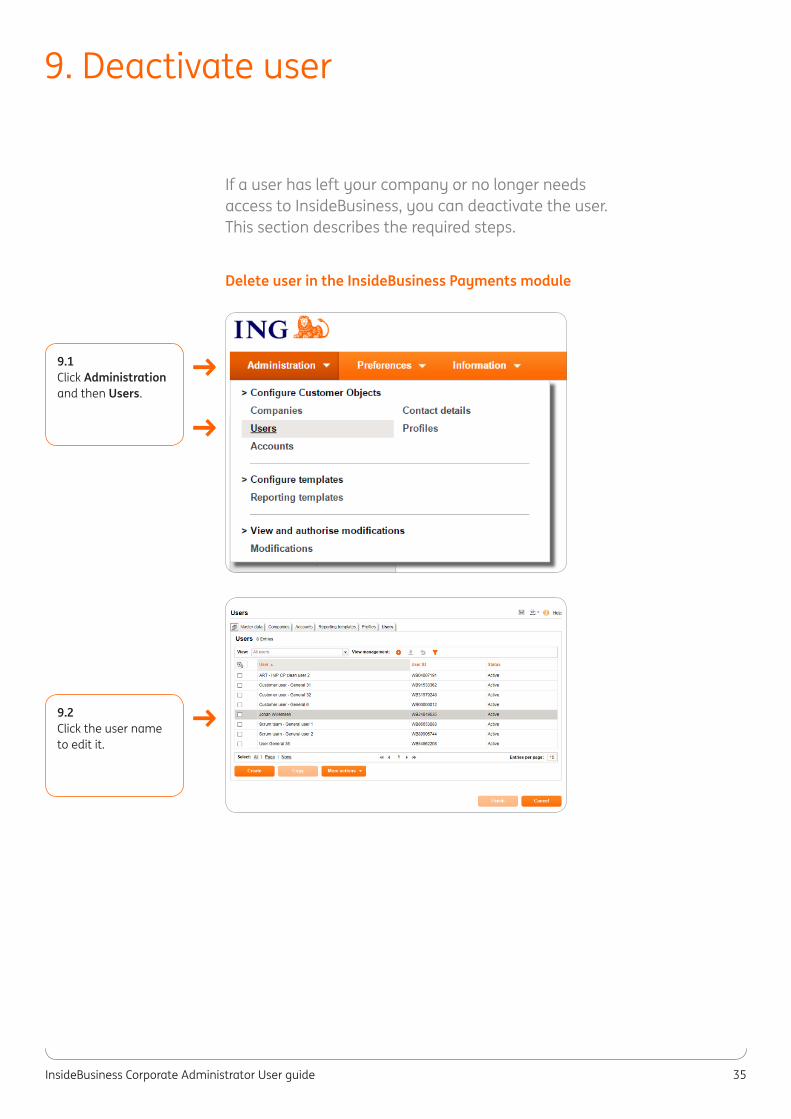
If a user has left your company or no longer needs access to InsideBusiness, you can deactivate the user. This section describes the required steps.
Delete user in the InsideBusiness Payments module
9. Deactivate user
→
→
→
9.1Click Administration and then Users.
9.2Click the user name to edit it.
InsideBusiness Corporate Administrator User guide 36
→
→
→
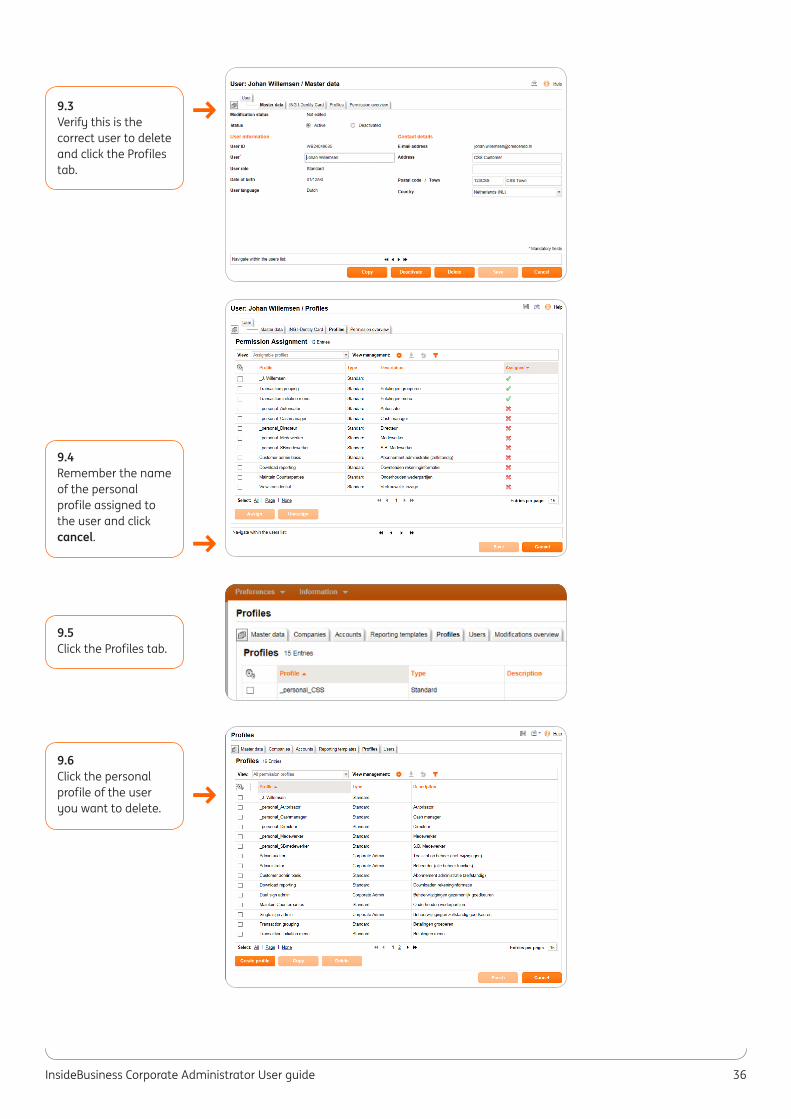
9.3Verify this is the correct user to delete and click the Profiles tab.
9.4Remember the name of the personal profile assigned to the user and click cancel.
9.6Click the personal profile of the user you want to delete.
9.5Click the Profiles tab.

InsideBusiness Corporate Administrator User guide 37
↑
9.8Click Cancel.
↑9.13Click Finish. Complete the deletion of the user by authorising the modifcation. See authorisation chapter 11.
→
→
→
→→
9.7Click the Users tab. Make sure that only the user to be deleted has been assigned to the profile as shown by the green checkmark in the last column.
9.9Select the personal profile of the user you want to delete by selecting the box in the first column.
9.11Click the Users tab. Select the user by selecting the box in the first column.
9.12Click More actions and Delete.
9.10Click Delete.
InsideBusiness Corporate Administrator User guide 38
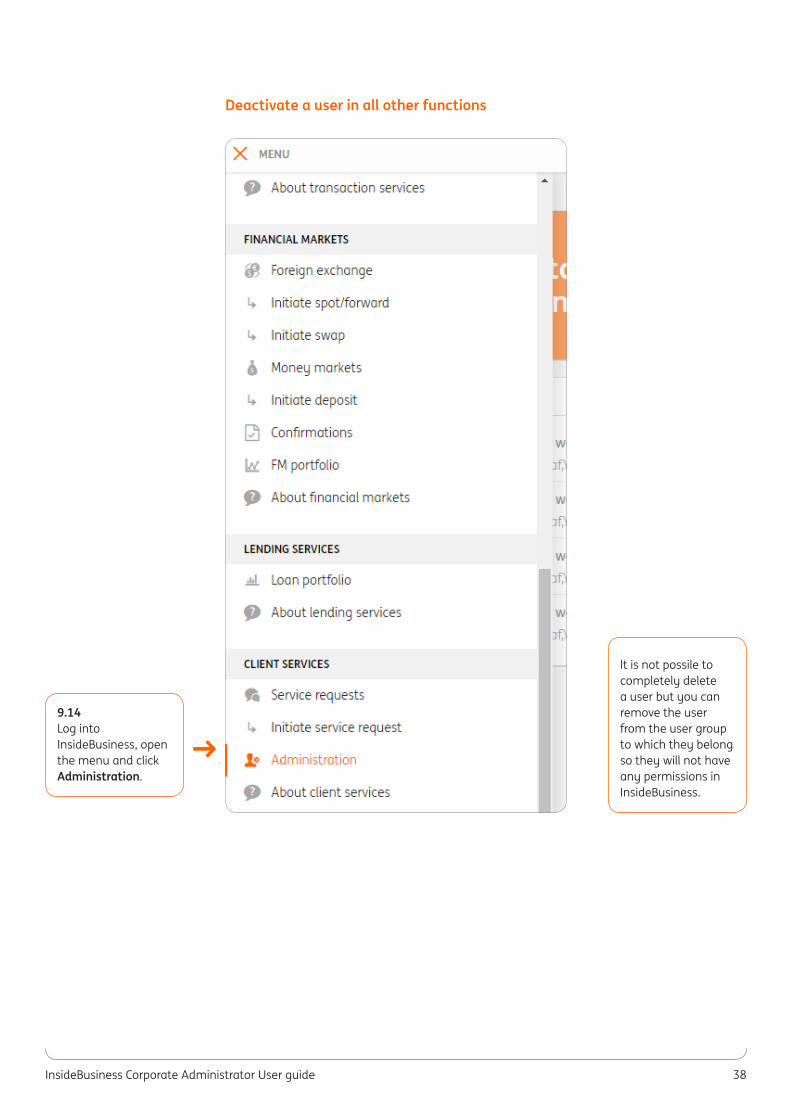
Deactivate a user in all other functions
→9.14Log into InsideBusiness, open the menu and click Administration.
It is not possile to completely delete a user but you can remove the user from the user group to which they belong so they will not have any permissions in InsideBusiness.
InsideBusiness Corporate Administrator User guide 39
→
→
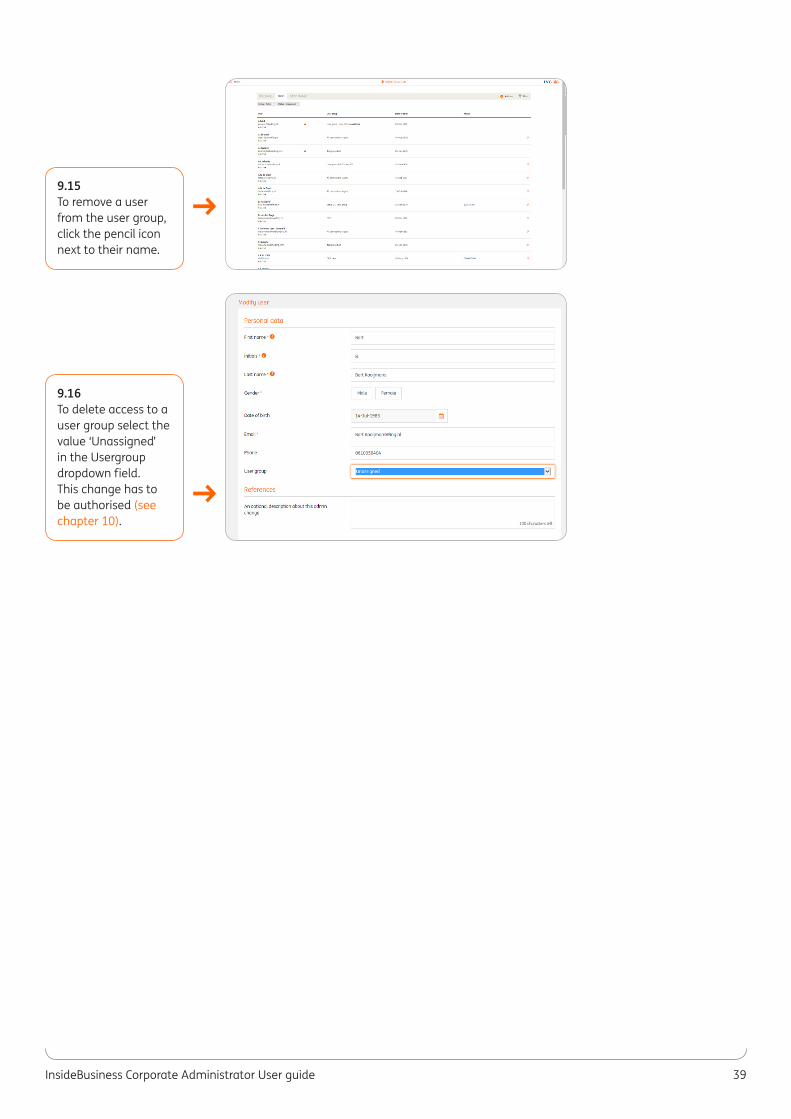
9.15To remove a user from the user group, click the pencil icon next to their name.
9.16To delete access to a user group select the value ‘Unassigned’ in the Usergroup dropdown field. This change has to be authorised (see chapter 10).
InsideBusiness Corporate Administrator User guide 40
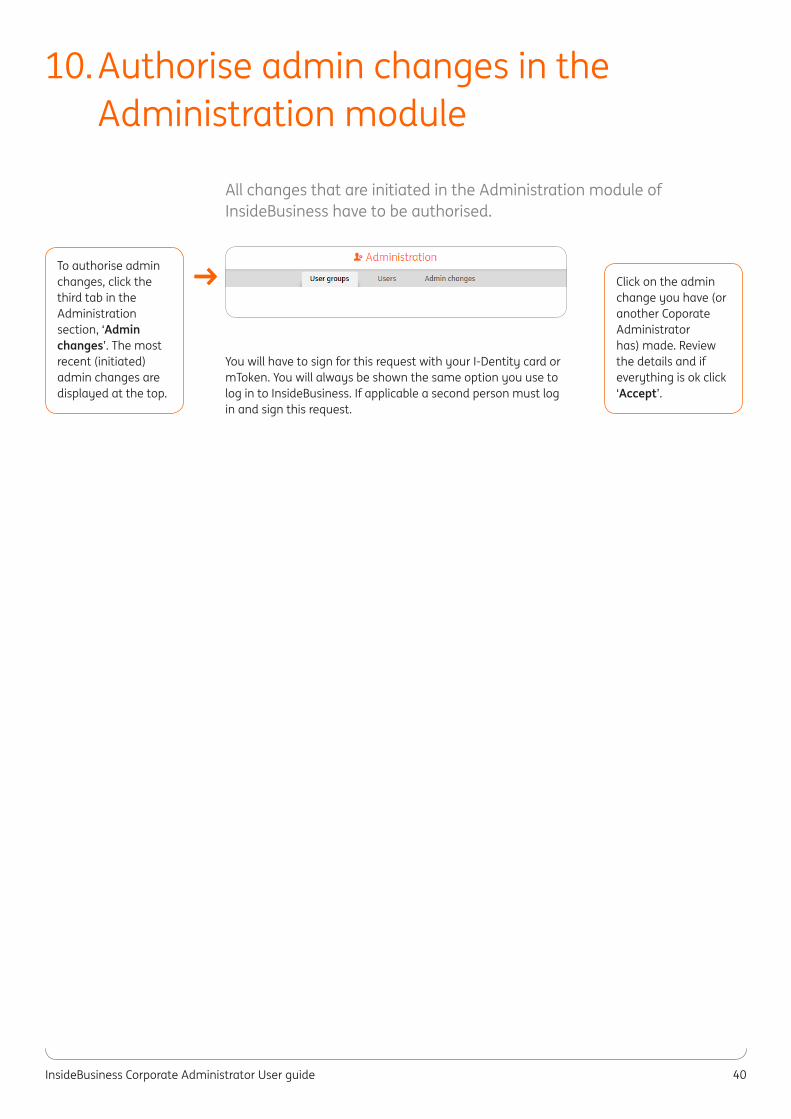
All changes that are initiated in the Administration module of InsideBusiness have to be authorised.
You will have to sign for this request with your I-Dentity card or mToken. You will always be shown the same option you use to log in to InsideBusiness. If applicable a second person must log in and sign this request.
10. Authorise admin changes in the Administration module
→To authorise admin changes, click the third tab in the Administration section, ‘Admin changes’. The most recent (initiated) admin changes are displayed at the top.
Click on the admin change you have (or another Coporate Administrator has) made. Review the details and if everything is ok click ‘Accept’.
InsideBusiness Corporate Administrator User guide 41
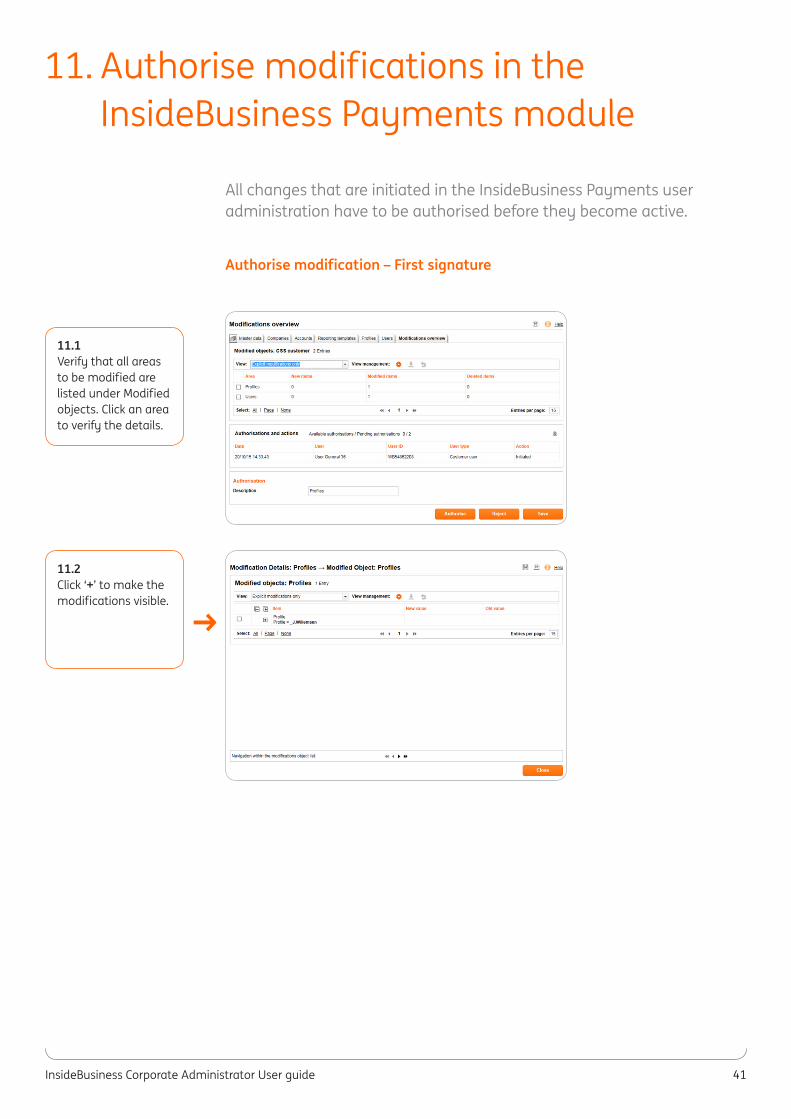
All changes that are initiated in the InsideBusiness Payments user administration have to be authorised before they become active.
Authorise modification – First signature
11. Authorise modifications in the InsideBusiness Payments module
11.1Verify that all areas to be modified are listed under Modified objects. Click an area to verify the details.
11.2Click ‘+’ to make the modifications visible.
→
InsideBusiness Corporate Administrator User guide 42
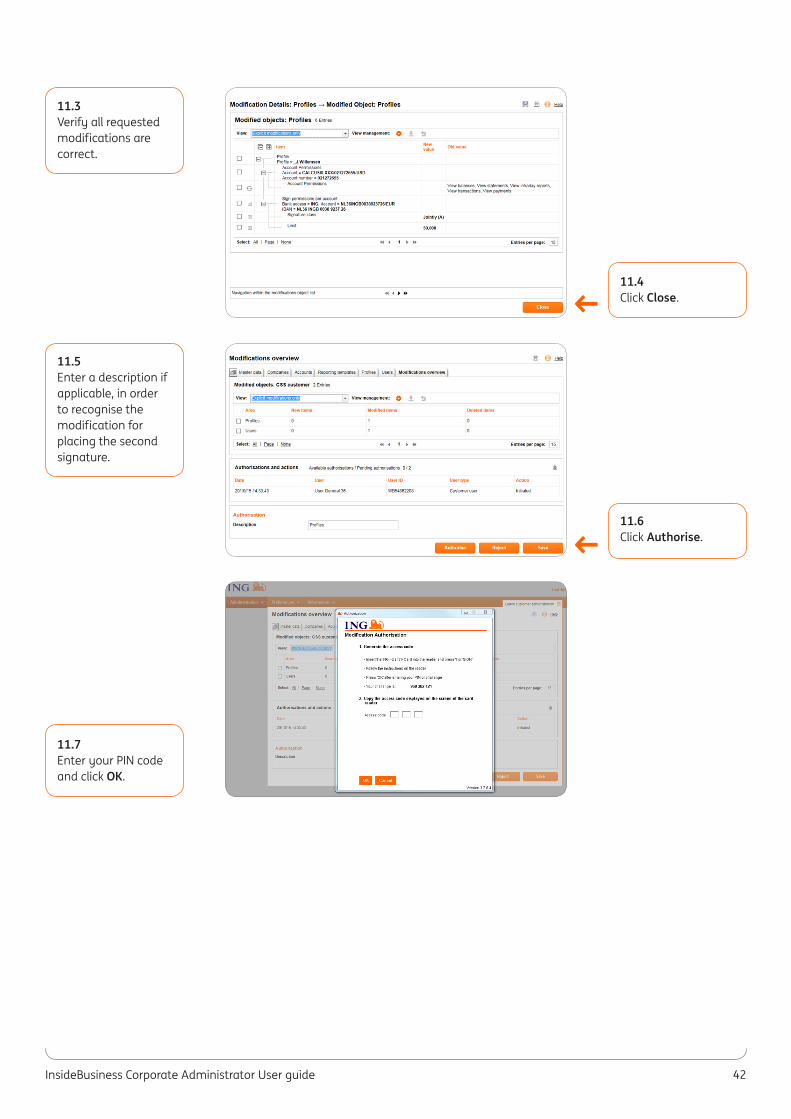
11.3Verify all requested modifications are correct.
11.5Enter a description if applicable, in order to recognise the modification for placing the second signature.
11.7Enter your PIN code and click OK.
11.4Click Close.
11.6Click Authorise.
→
→
InsideBusiness Corporate Administrator User guide 43
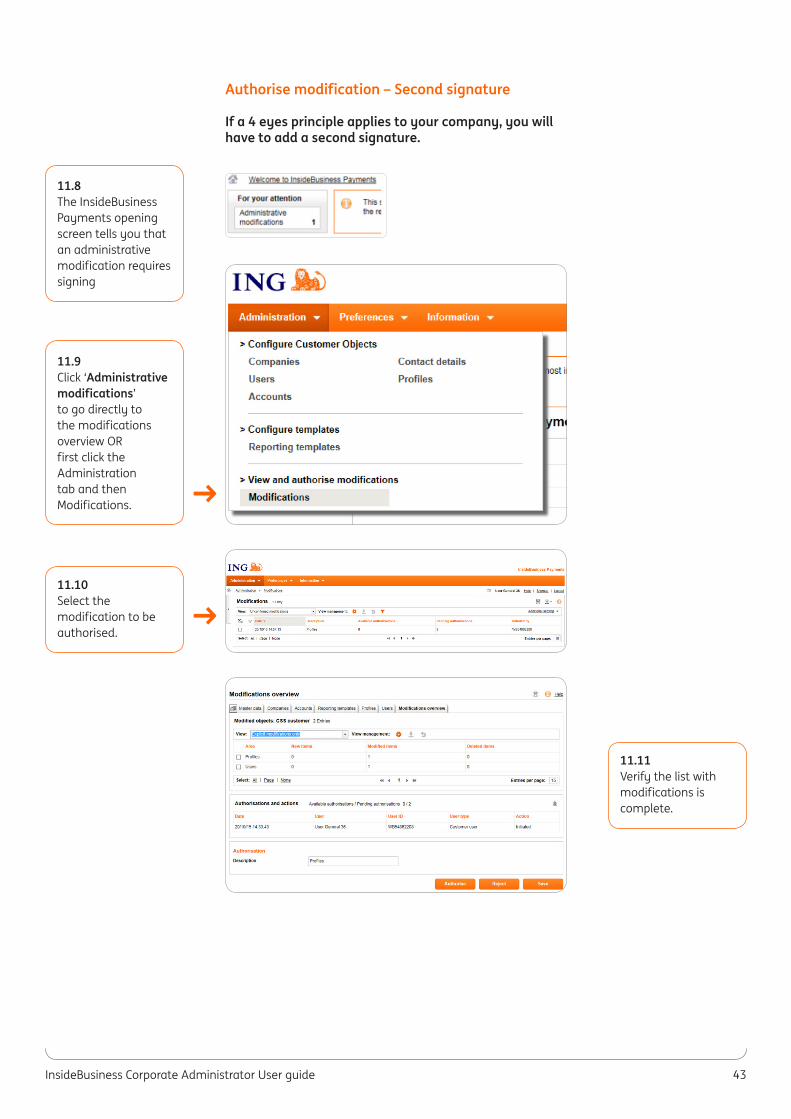
Authorise modification – Second signature
If a 4 eyes principle applies to your company, you will have to add a second signature.
11.8The InsideBusiness Payments opening screen tells you that an administrative modification requires signing
11.9Click ‘Administrative modifications’ to go directly to the modifications overview OR first click the Administration tab and then Modifications.
11.10Select the modification to be authorised.
11.11Verify the list with modifications is complete.
→
→
InsideBusiness Corporate Administrator User guide 44
↑
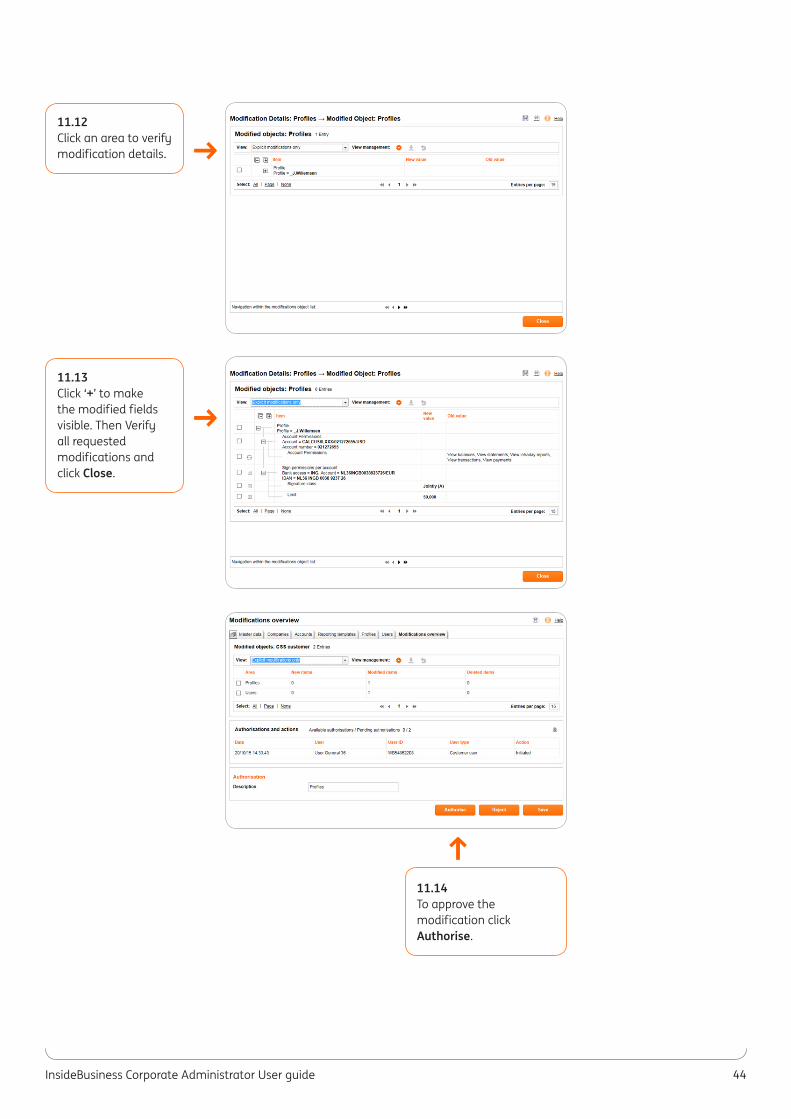
11.14To approve the modification click Authorise.
→
→
11.12 Click an area to verify modification details.
11.13 Click ‘+’ to make the modified fields visible. Then Verify all requested modifications and click Close.
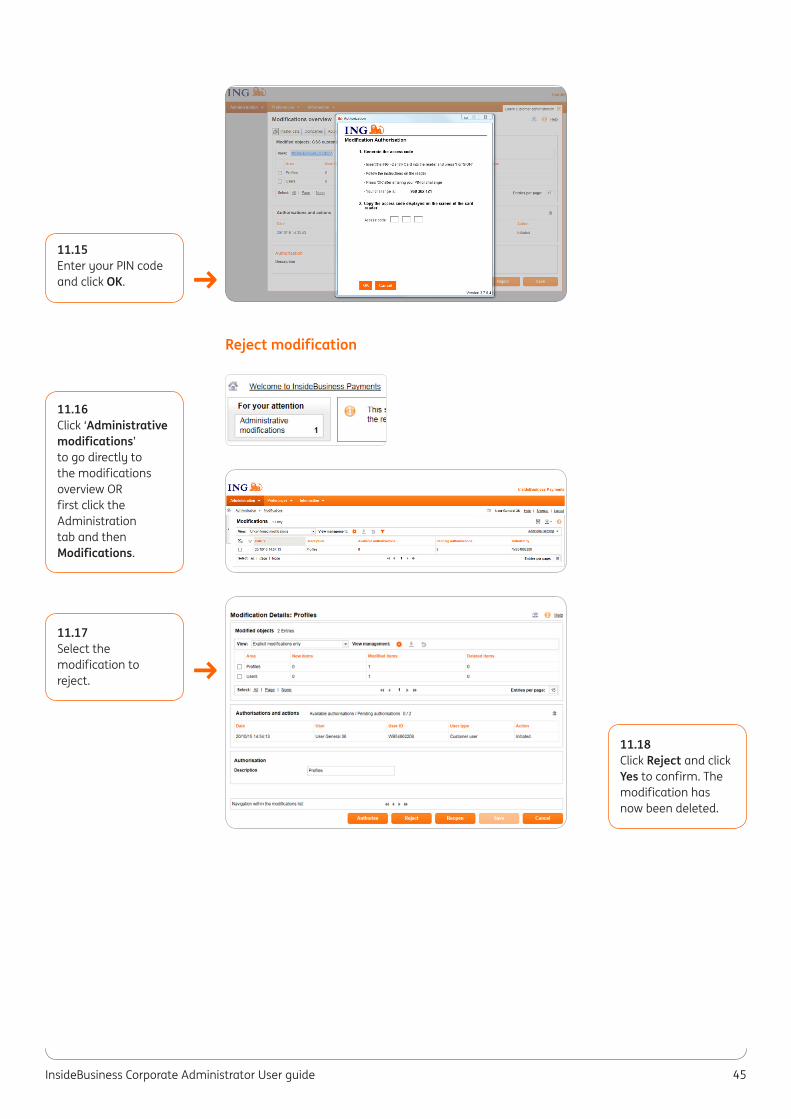
InsideBusiness Corporate Administrator User guide 45
Reject modification
→
→
11.15 Enter your PIN code and click OK.
11.16 Click ‘Administrative modifications’ to go directly to the modifications overview OR first click the Administration tab and then Modifications.
11.17 Select the modification to reject.
11.18Click Reject and click Yes to confirm. The modification has now been deleted.
InsideBusiness Corporate Administrator User guide 46
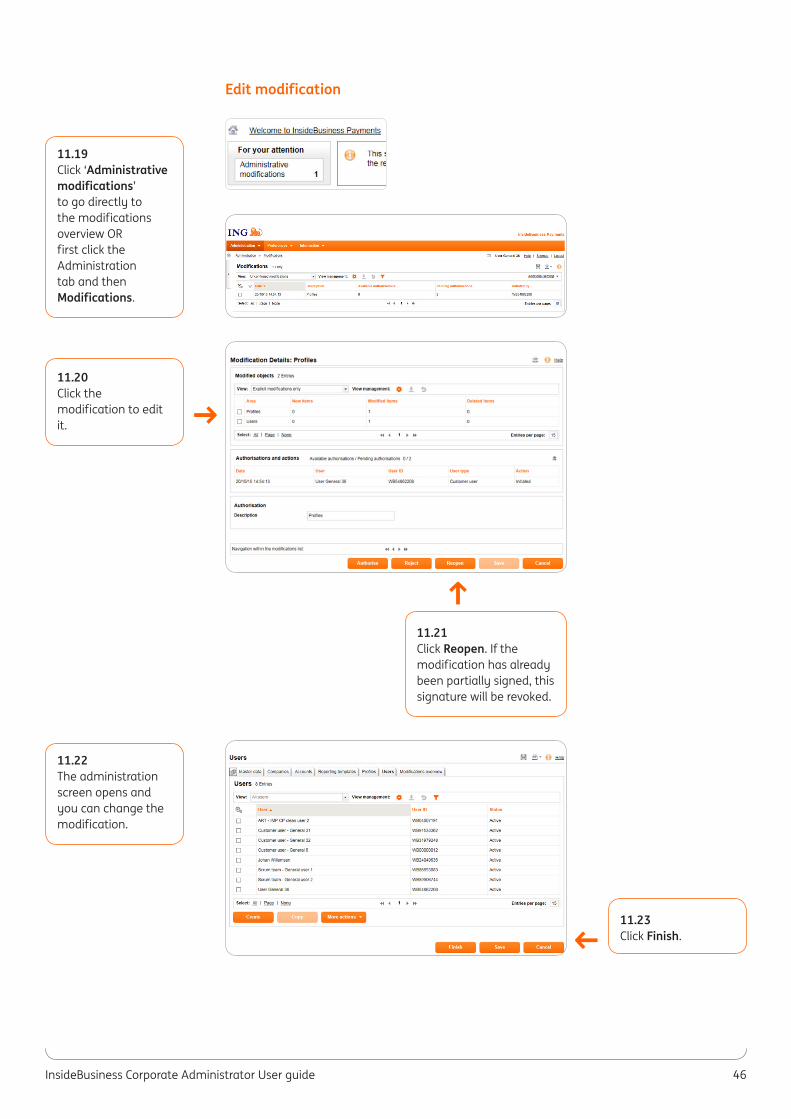
Edit modification
↑
11.21Click Reopen. If the modification has already been partially signed, this signature will be revoked.
→
11.19 Click ‘Administrative modifications’ to go directly to the modifications overview OR first click the Administration tab and then Modifications.
11.22 The administration screen opens and you can change the modification.
11.20 Click the modification to edit it.
11.23Click Finish.
→
InsideBusiness Corporate Administrator User guide 47
If a new user needs access to one of the Inside BusinessPayments CEE modules:
1. Create the new user in the Admin module
2. Add the user to a usergroup with the InsideBusiness CEE country permission the user requires.
3. Ask your ING client service contact person to prepare a set-up form, which needs to be signed by your company so ING can complete the access rights in InsideBusiness CEE.
4. When the new user logs in, one or more InsideBusiness CEE countries will appear in the user’s menu.
12. Provide access to InsideBusiness CEE
InsideBusiness Corporate Administrator User guide 48
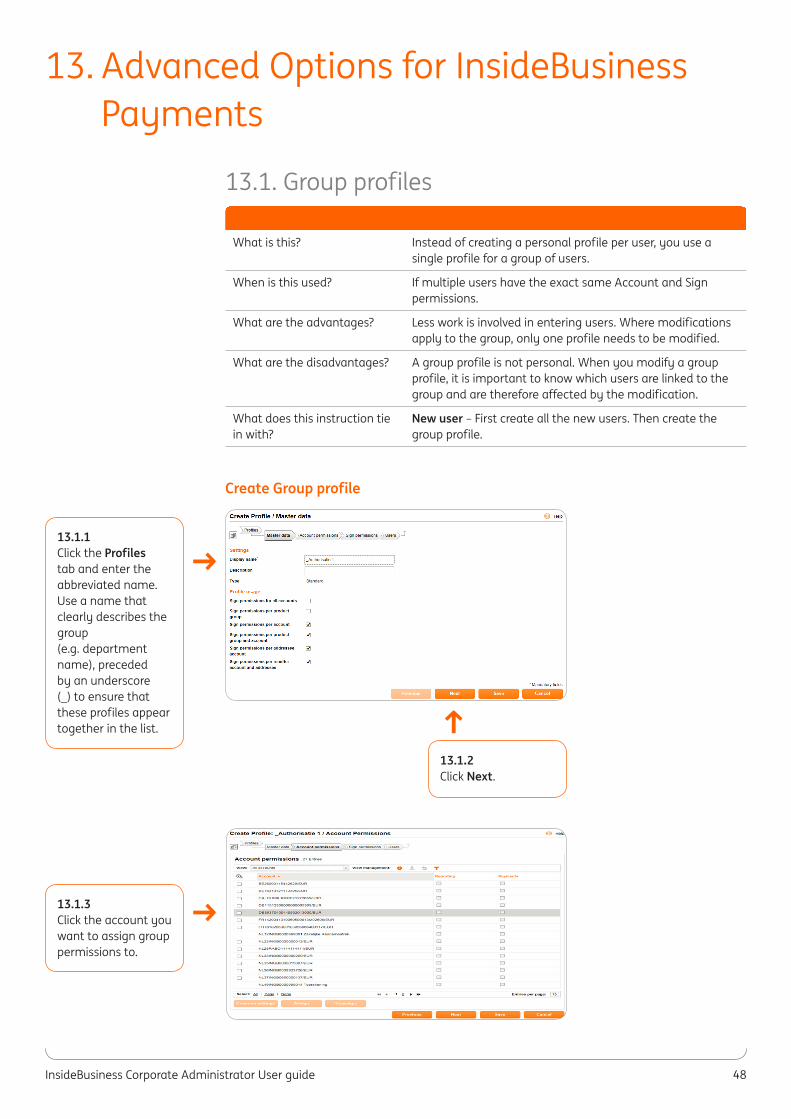
13.1. Group profiles
What is this? Instead of creating a personal profile per user, you use a single profile for a group of users.
When is this used? If multiple users have the exact same Account and Sign permissions.
What are the advantages? Less work is involved in entering users. Where modifications apply to the group, only one profile needs to be modified.
What are the disadvantages? A group profile is not personal. When you modify a group profile, it is important to know which users are linked to the group and are therefore affected by the modification.
What does this instruction tie in with?
New user – First create all the new users. Then create the group profile.
Create Group profile
→13.1.1Click the Profiles tab and enter the abbreviated name. Use a name that clearly describes the group(e.g. department name), preceded by an underscore (_) to ensure that these profiles appear together in the list.
13.1.2Click Next.
↑
→13.1.3Click the account you want to assign group permissions to.
13. Advanced Options for InsideBusiness Payments
InsideBusiness Corporate Administrator User guide 49
→
→
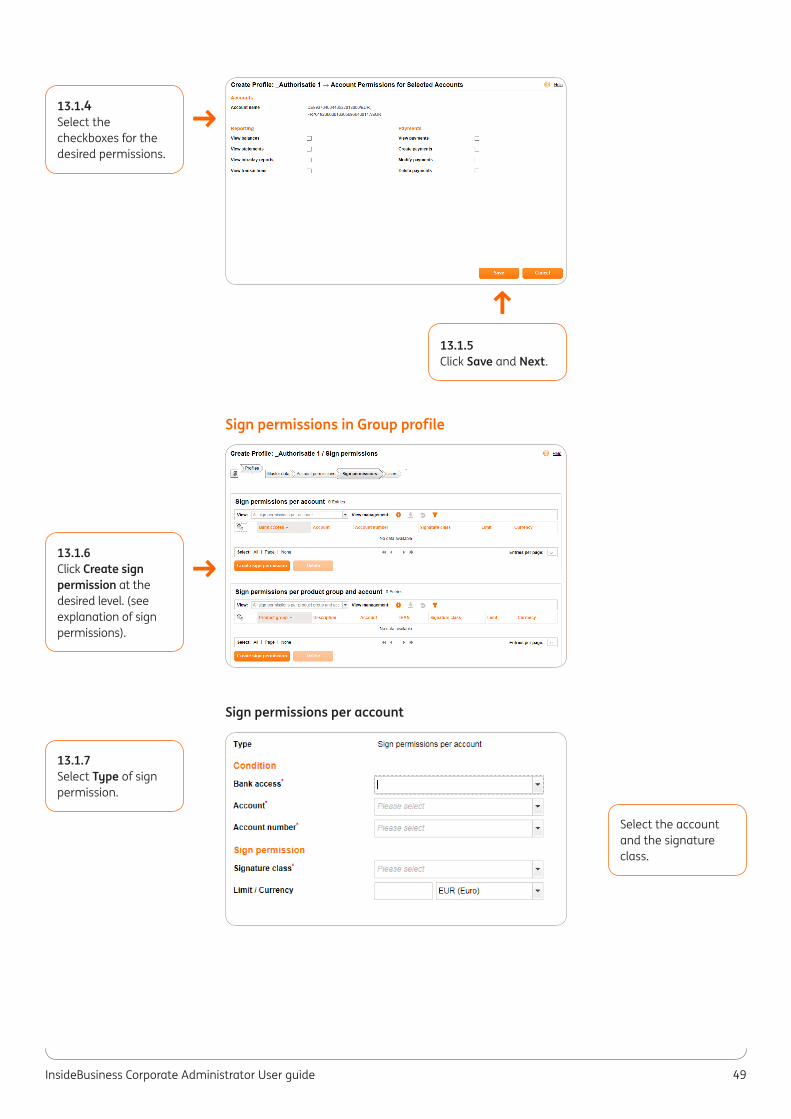
13.1.6Click Create sign permission at the desired level. (see explanation of sign permissions).
13.1.4Select the checkboxes for the desired permissions.
13.1.5Click Save and Next.
↑
13.1.7Select Type of sign permission.
Select the account and the signature class.
Sign permissions in Group profile
Sign permissions per account
InsideBusiness Corporate Administrator User guide 50
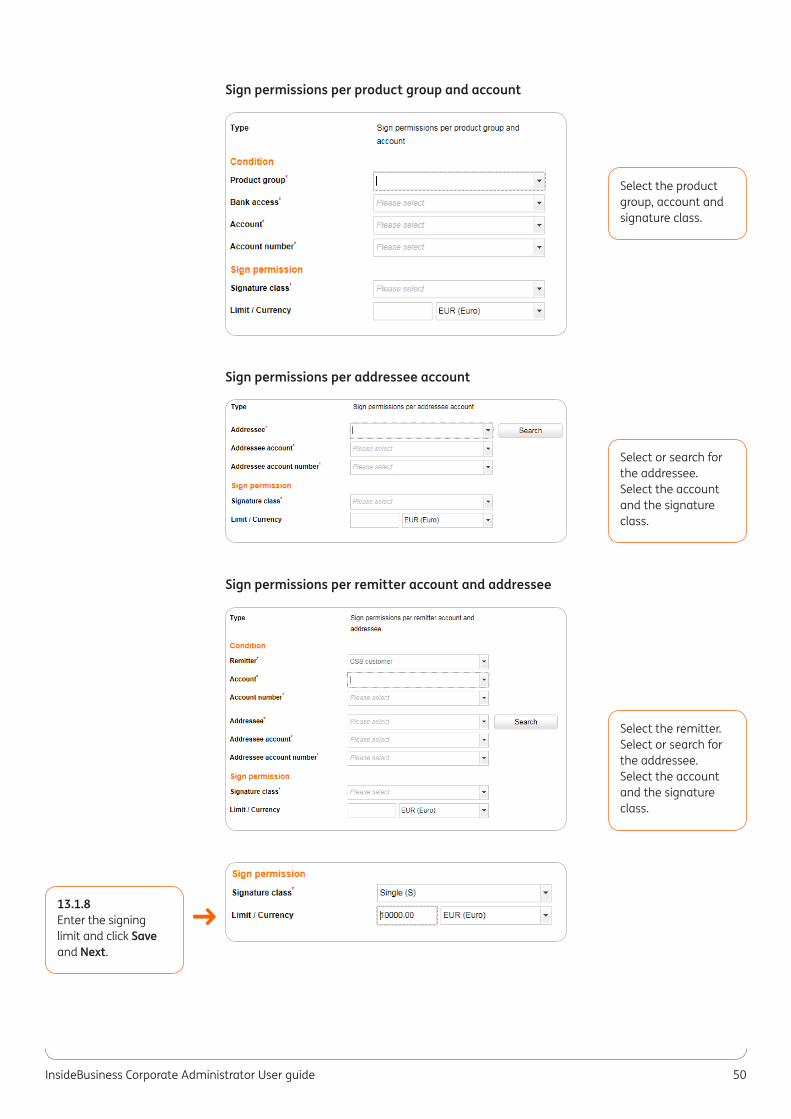
Sign permissions per product group and account
Sign permissions per addressee account
Sign permissions per remitter account and addressee
Select the product group, account and signature class.
Select or search for the addressee.Select the account and the signature class.
Select the remitter. Select or search for the addressee.Select the account and the signature class.
→13.1.8Enter the signing limit and click Save and Next.
InsideBusiness Corporate Administrator User guide 51
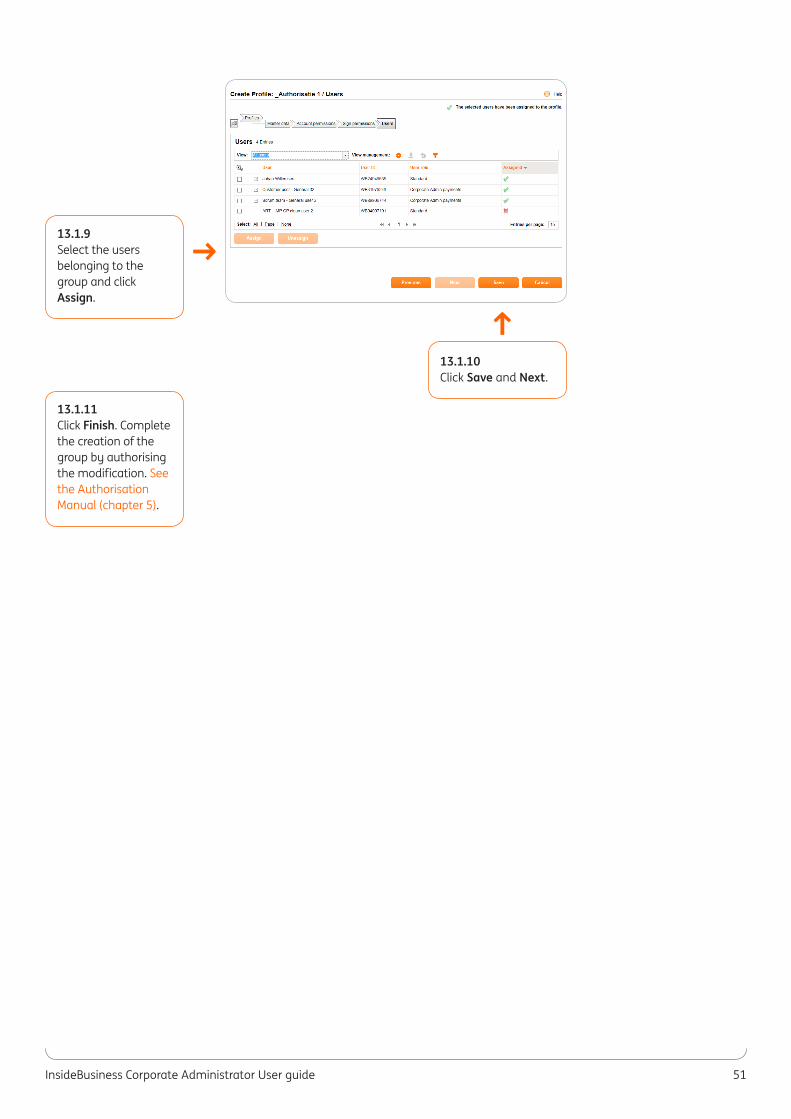
→13.1.9Select the users belonging to the group and click Assign.
13.1.11Click Finish. Complete the creation of the group by authorising the modification. See the Authorisation Manual (chapter 5).
13.1.10Click Save and Next.
↑
InsideBusiness Corporate Administrator User guide 52
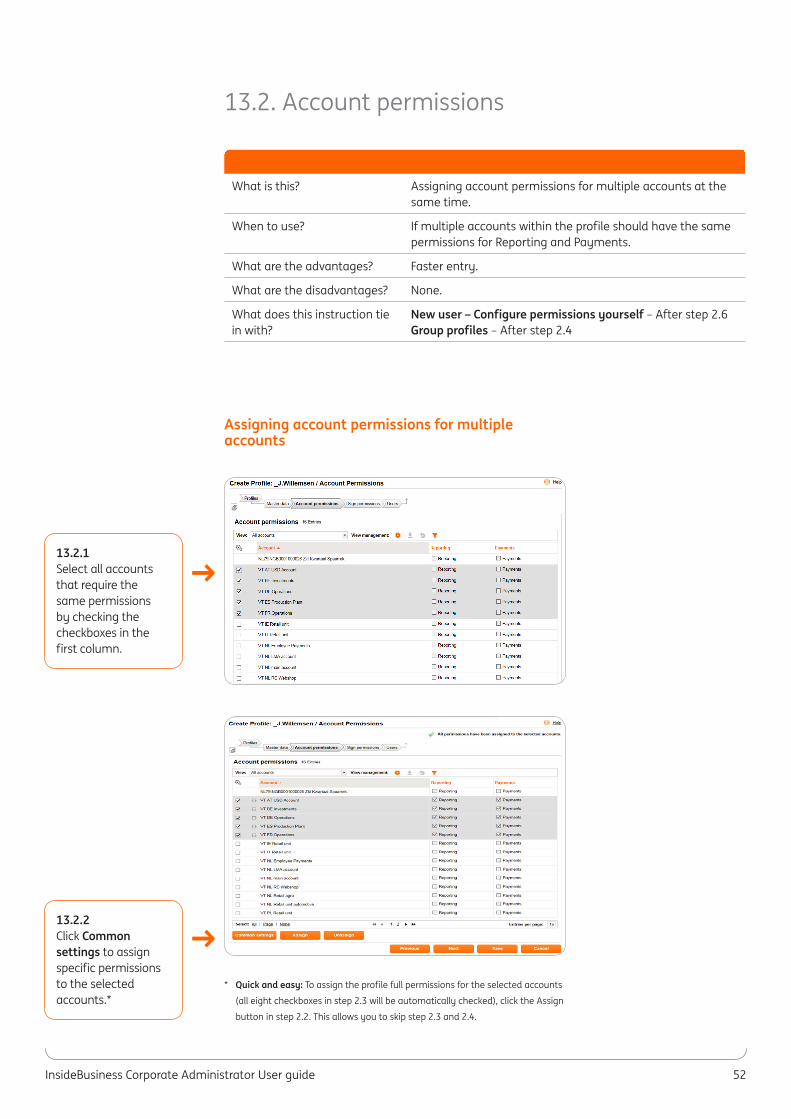
13.2. Account permissions
Assigning account permissions for multiple accounts
→
→
13.2.1Select all accounts that require the same permissions by checking the checkboxes in the first column.
13.2.2Click Common settings to assign specific permissions to the selected accounts.*
What is this? Assigning account permissions for multiple accounts at the same time.
When to use? If multiple accounts within the profile should have the same permissions for Reporting and Payments.
What are the advantages? Faster entry.
What are the disadvantages? None.
What does this instruction tie in with?
New user – Configure permissions yourself – After step 2.6 Group profiles – After step 2.4
* Quick and easy: To assign the profile full permissions for the selected accounts
(all eight checkboxes in step 2.3 will be automatically checked), click the Assign
button in step 2.2. This allows you to skip step 2.3 and 2.4.
InsideBusiness Corporate Administrator User guide 53
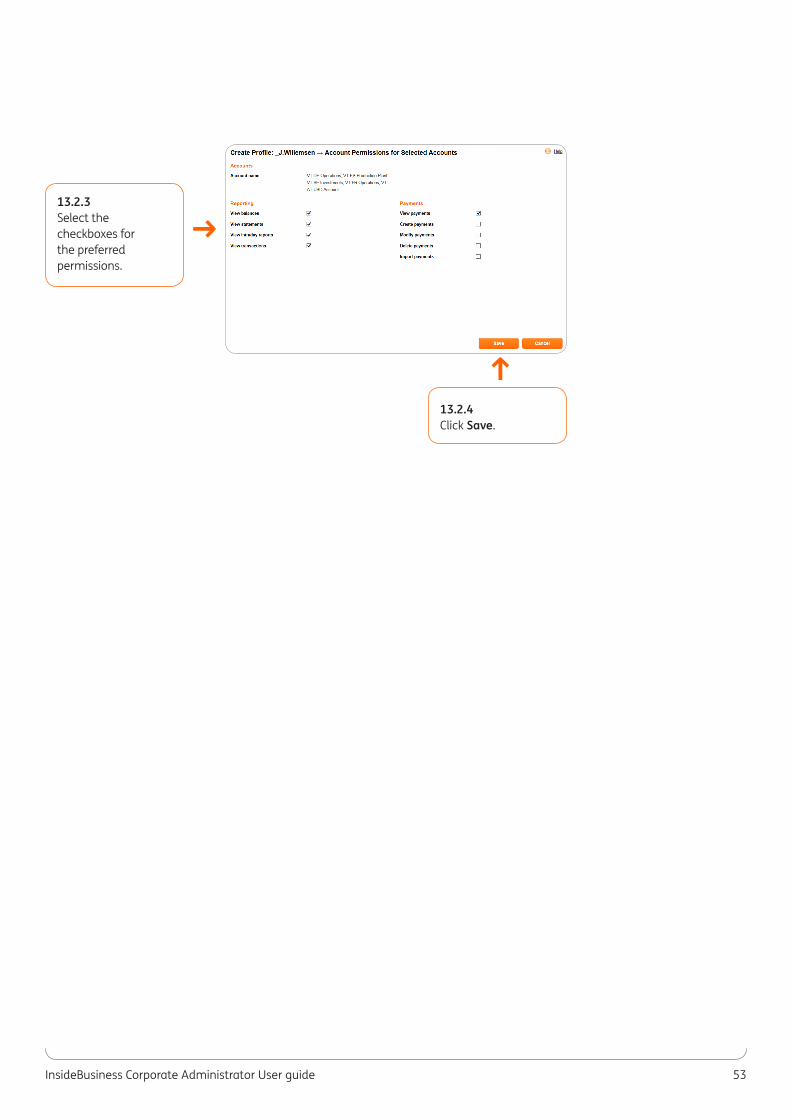
→13.2.3Select the checkboxes for the preferred permissions.
13.2.4Click Save.
↑
InsideBusiness Corporate Administrator User guide 54
13.3. Change subscription settings
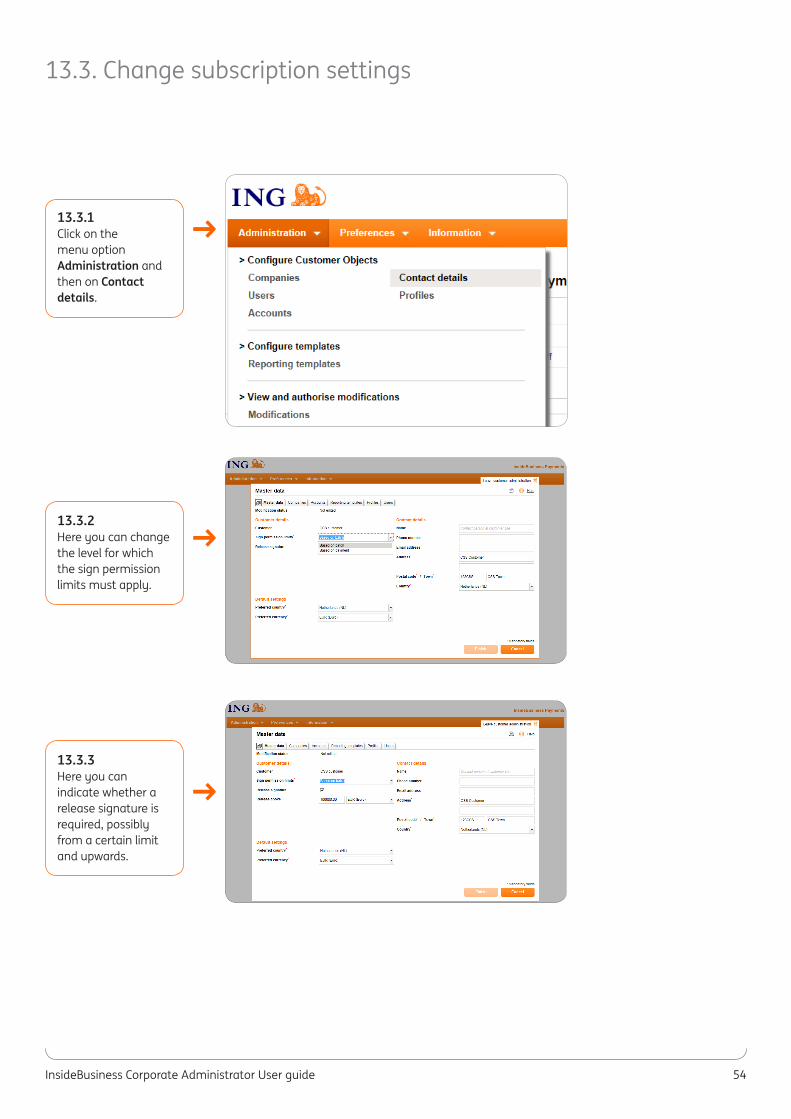
13.3.3Here you can indicate whether a release signature is required, possibly from a certain limit and upwards.
→
→
→
13.3.1Click on the menu option Administration and then on Contact details.
13.3.2Here you can change the level for which the sign permission limits must apply.
InsideBusiness Corporate Administrator User guide 55
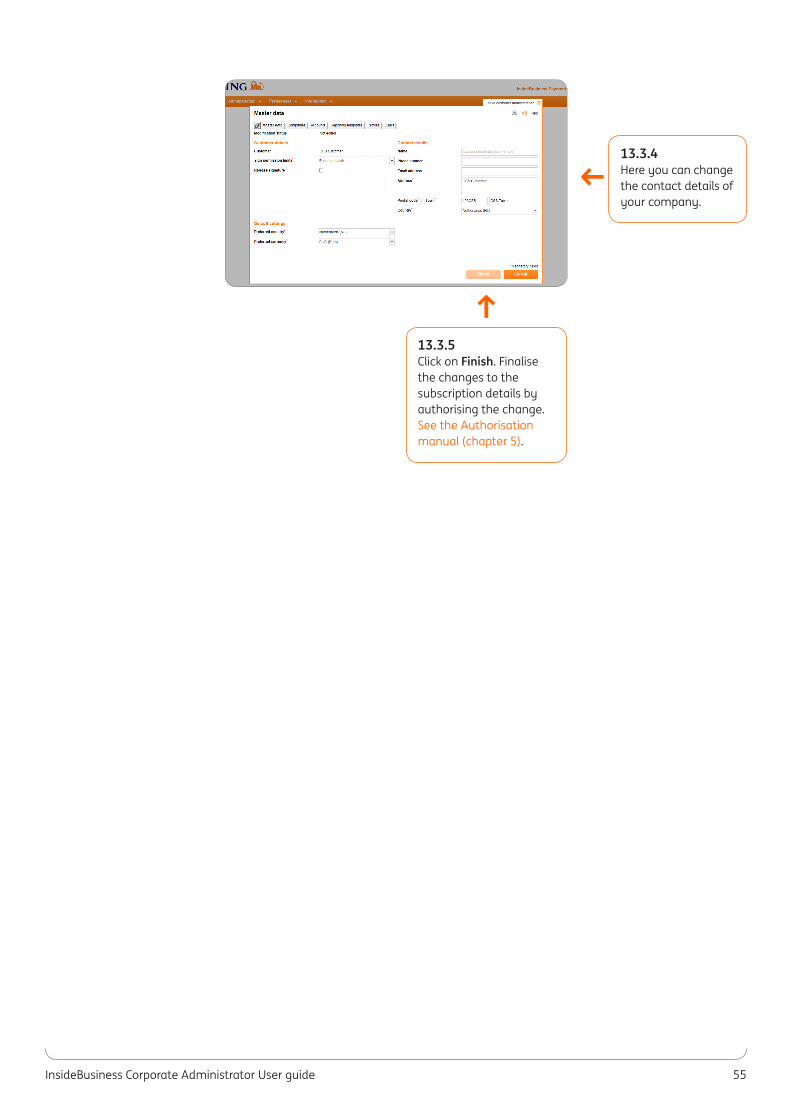
→13.3.4Here you can change the contact details of your company.
13.3.5Click on Finish. Finalise the changes to the subscription details by authorising the change. See the Authorisation manual (chapter 5).
↑
InsideBusiness Corporate Administrator User guide 56
14.1 Profiles
Profiles determine which actions a user may perform in IBP. There are two types of profiles: personal or group profiles and general profiles.
Personal or group profilesYou create these profiles yourself by setting the account permissions and the sign permissions.
Account permissions• For which accounts is the user allowed to make payments, import payments or initiate direct
debits?• For which accounts is the user allowed to view or download reports?
Sign permissions• For which remitter accounts is the user allowed to sign payments or batches?• Up to what amount is the user allowed to sign payments or batches?• Is the user allowed to sign independently or only together with another user?• Are there exceptional situations for which different sign permissions apply?• On intial setup of your subscription a signing scheme was chosen. This scheme has effect on
the way the signing classes are interpreted by IBP:- S or A + x (x=A,B) Signature A is allowed to sign with another A or with a B.
B is only allowed to sign together with A.- S or (A + B) Signature class A is only allowed to sign together with B.
B is only allowed to sign together with A.
In both schemes S is allowed to single sign.
A profile intended for a specific user is called a personal profile.A profile intended for a group of users is called a group profile.
General profilesYou do not create these profiles. They are included as standard in your subscription. If you assign them to a user, they give this user certain rights in IBP:
Transaction initiation menuManually create payments, periodic payments and templates. N.B.: The account permissions in the user’s personal or group profile determine which accounts he/she is allowed to select to create payments.
Transaction groupingCreate batches or unbatch already created batches. This profile is needed to authorize payments and import batches.
Download reportingDownload account statements and (intra-day) movements.
14. Explanations
InsideBusiness Corporate Administrator User guide 57
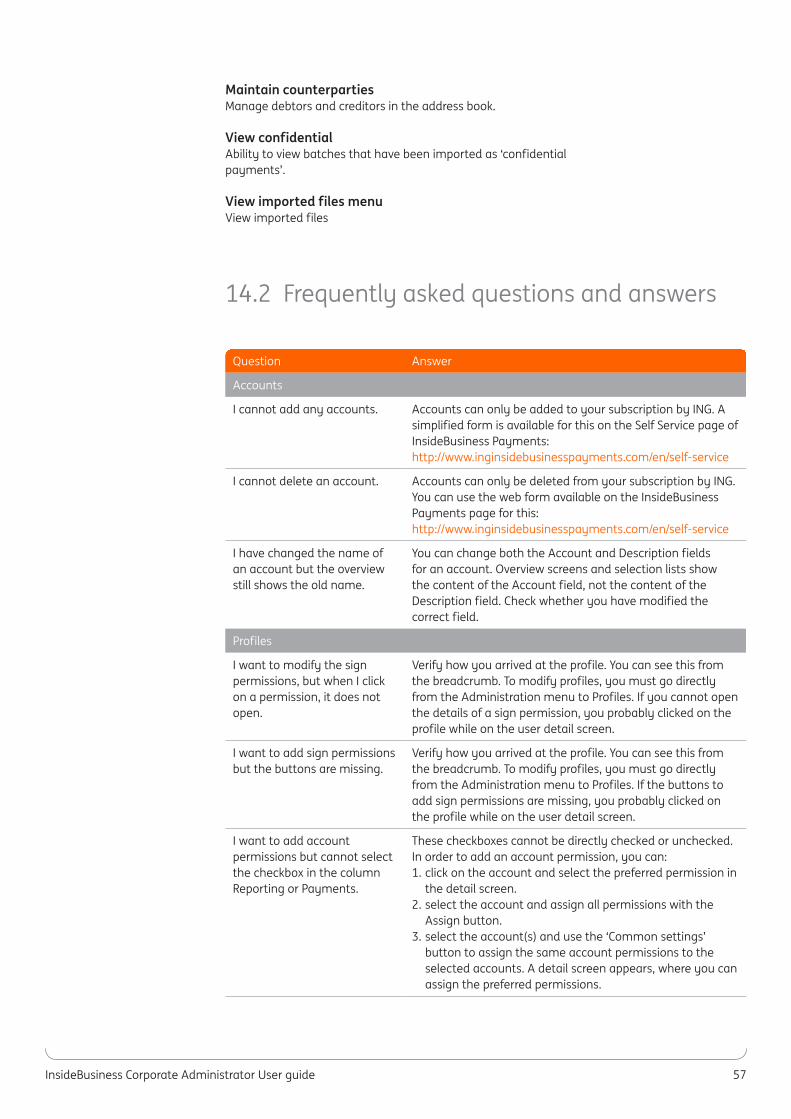
Maintain counterpartiesManage debtors and creditors in the address book.
View confidentialAbility to view batches that have been imported as ‘confidential payments’.
View imported files menuView imported files
14.2 Frequently asked questions and answers
Question Answer
Accounts
I cannot add any accounts. Accounts can only be added to your subscription by ING. A simplified form is available for this on the Self Service page of InsideBusiness Payments: http://www.inginsidebusinesspayments.com/en/self-service
I cannot delete an account. Accounts can only be deleted from your subscription by ING. You can use the web form available on the InsideBusiness Payments page for this: http://www.inginsidebusinesspayments.com/en/self-service
I have changed the name of an account but the overview still shows the old name.
You can change both the Account and Description fields for an account. Overview screens and selection lists show the content of the Account field, not the content of the Description field. Check whether you have modified the correct field.
Profiles
I want to modify the sign permissions, but when I click on a permission, it does not open.
Verify how you arrived at the profile. You can see this from the breadcrumb. To modify profiles, you must go directly from the Administration menu to Profiles. If you cannot open the details of a sign permission, you probably clicked on the profile while on the user detail screen.
I want to add sign permissions but the buttons are missing.
Verify how you arrived at the profile. You can see this from the breadcrumb. To modify profiles, you must go directly from the Administration menu to Profiles. If the buttons to add sign permissions are missing, you probably clicked on the profile while on the user detail screen.
I want to add account permissions but cannot select the checkbox in the column Reporting or Payments.
These checkboxes cannot be directly checked or unchecked. In order to add an account permission, you can:1. click on the account and select the preferred permission in
the detail screen.2. select the account and assign all permissions with the
Assign button.3. select the account(s) and use the ‘Common settings’
button to assign the same account permissions to the selected accounts. A detail screen appears, where you can assign the preferred permissions.
InsideBusiness Corporate Administrator User guide 58
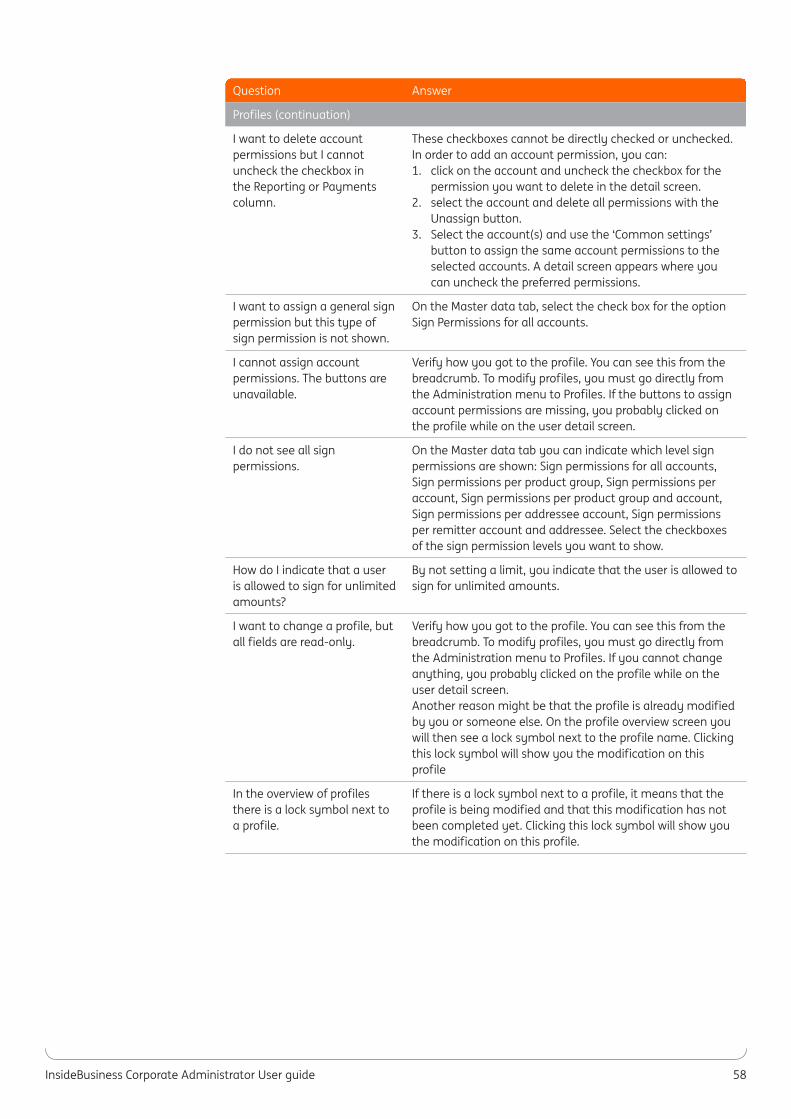
Question Answer
Profiles (continuation)
I want to delete account permissions but I cannot uncheck the checkbox in the Reporting or Payments column.
These checkboxes cannot be directly checked or unchecked. In order to add an account permission, you can:1. click on the account and uncheck the checkbox for the
permission you want to delete in the detail screen.2. select the account and delete all permissions with the
Unassign button.3. Select the account(s) and use the ‘Common settings’
button to assign the same account permissions to the selected accounts. A detail screen appears where you can uncheck the preferred permissions.
I want to assign a general sign permission but this type of sign permission is not shown.
On the Master data tab, select the check box for the option Sign Permissions for all accounts.
I cannot assign account permissions. The buttons are unavailable.
Verify how you got to the profile. You can see this from the breadcrumb. To modify profiles, you must go directly from the Administration menu to Profiles. If the buttons to assign account permissions are missing, you probably clicked on the profile while on the user detail screen.
I do not see all sign permissions.
On the Master data tab you can indicate which level sign permissions are shown: Sign permissions for all accounts, Sign permissions per product group, Sign permissions per account, Sign permissions per product group and account, Sign permissions per addressee account, Sign permissions per remitter account and addressee. Select the checkboxes of the sign permission levels you want to show.
How do I indicate that a user is allowed to sign for unlimited amounts?
By not setting a limit, you indicate that the user is allowed to sign for unlimited amounts.
I want to change a profile, but all fields are read-only.
Verify how you got to the profile. You can see this from the breadcrumb. To modify profiles, you must go directly from the Administration menu to Profiles. If you cannot change anything, you probably clicked on the profile while on the user detail screen. Another reason might be that the profile is already modified by you or someone else. On the profile overview screen you will then see a lock symbol next to the profile name. Clicking this lock symbol will show you the modification on this profile
In the overview of profiles there is a lock symbol next to a profile.
If there is a lock symbol next to a profile, it means that the profile is being modified and that this modification has not been completed yet. Clicking this lock symbol will show you the modification on this profile.
InsideBusiness Corporate Administrator User guide 59
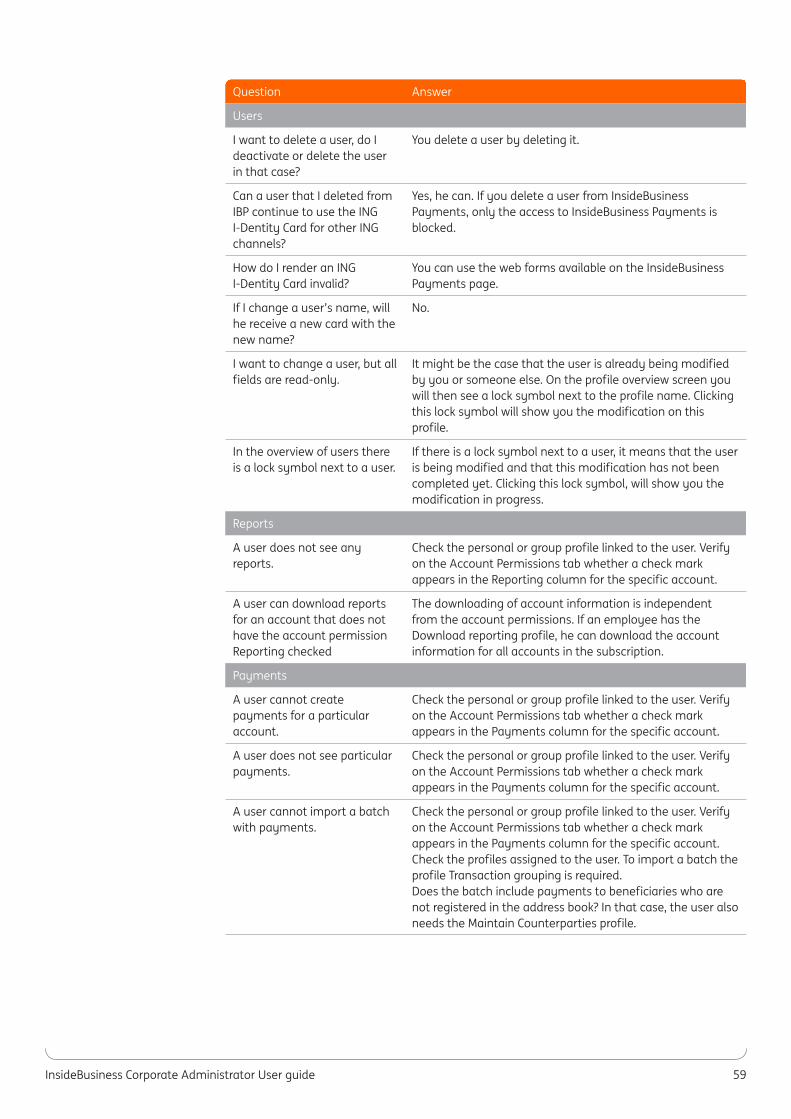
Question Answer
Users
I want to delete a user, do I deactivate or delete the user in that case?
You delete a user by deleting it.
Can a user that I deleted from IBP continue to use the ING I-Dentity Card for other ING channels?
Yes, he can. If you delete a user from InsideBusiness Payments, only the access to InsideBusiness Payments is blocked.
How do I render an ING I-Dentity Card invalid?
You can use the web forms available on the InsideBusiness Payments page.
If I change a user’s name, will he receive a new card with the new name?
No.
I want to change a user, but all fields are read-only.
It might be the case that the user is already being modified by you or someone else. On the profile overview screen you will then see a lock symbol next to the profile name. Clicking this lock symbol will show you the modification on this profile.
In the overview of users there is a lock symbol next to a user.
If there is a lock symbol next to a user, it means that the user is being modified and that this modification has not been completed yet. Clicking this lock symbol, will show you the modification in progress.
Reports
A user does not see any reports.
Check the personal or group profile linked to the user. Verify on the Account Permissions tab whether a check mark appears in the Reporting column for the specific account.
A user can download reports for an account that does not have the account permission Reporting checked
The downloading of account information is independent from the account permissions. If an employee has the Download reporting profile, he can download the account information for all accounts in the subscription.
Payments
A user cannot create payments for a particular account.
Check the personal or group profile linked to the user. Verify on the Account Permissions tab whether a check mark appears in the Payments column for the specific account.
A user does not see particular payments.
Check the personal or group profile linked to the user. Verify on the Account Permissions tab whether a check mark appears in the Payments column for the specific account.
A user cannot import a batch with payments.
Check the personal or group profile linked to the user. Verify on the Account Permissions tab whether a check mark appears in the Payments column for the specific account. Check the profiles assigned to the user. To import a batch the profile Transaction grouping is required. Does the batch include payments to beneficiaries who are not registered in the address book? In that case, the user also needs the Maintain Counterparties profile.
InsideBusiness Corporate Administrator User guide 60
Question Answer
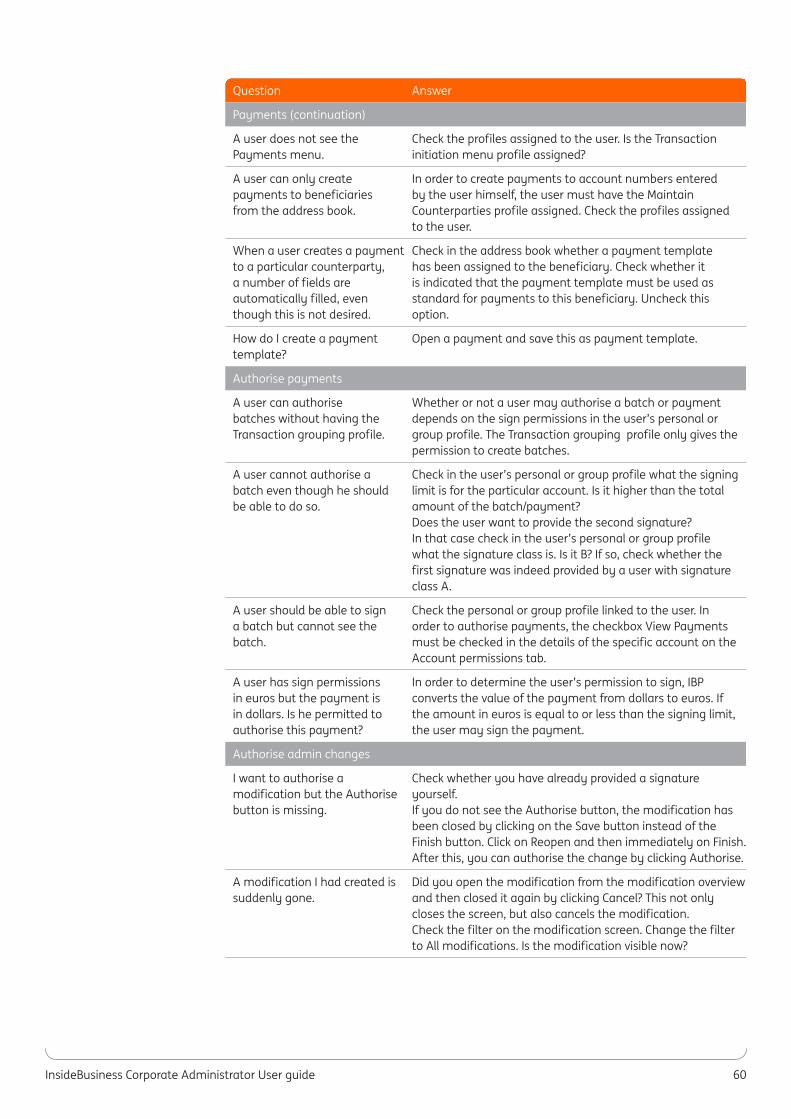
Payments (continuation)
A user does not see the Payments menu.
Check the profiles assigned to the user. Is the Transaction initiation menu profile assigned?
A user can only create payments to beneficiaries from the address book.
In order to create payments to account numbers entered by the user himself, the user must have the Maintain Counterparties profile assigned. Check the profiles assigned to the user.
When a user creates a payment to a particular counterparty, a number of fields are automatically filled, even though this is not desired.
Check in the address book whether a payment template has been assigned to the beneficiary. Check whether it is indicated that the payment template must be used as standard for payments to this beneficiary. Uncheck this option.
How do I create a payment template?
Open a payment and save this as payment template.
Authorise payments
A user can authorise batches without having the Transaction grouping profile.
Whether or not a user may authorise a batch or payment depends on the sign permissions in the user’s personal or group profile. The Transaction grouping profile only gives the permission to create batches.
A user cannot authorise a batch even though he should be able to do so.
Check in the user’s personal or group profile what the signing limit is for the particular account. Is it higher than the total amount of the batch/payment? Does the user want to provide the second signature? In that case check in the user’s personal or group profile what the signature class is. Is it B? If so, check whether the first signature was indeed provided by a user with signature class A.
A user should be able to sign a batch but cannot see the batch.
Check the personal or group profile linked to the user. In order to authorise payments, the checkbox View Payments must be checked in the details of the specific account on the Account permissions tab.
A user has sign permissions in euros but the payment is in dollars. Is he permitted to authorise this payment?
In order to determine the user’s permission to sign, IBP converts the value of the payment from dollars to euros. If the amount in euros is equal to or less than the signing limit, the user may sign the payment.
Authorise admin changes
I want to authorise a modification but the Authorise button is missing.
Check whether you have already provided a signature yourself. If you do not see the Authorise button, the modification has been closed by clicking on the Save button instead of the Finish button. Click on Reopen and then immediately on Finish. After this, you can authorise the change by clicking Authorise.
A modification I had created is suddenly gone.
Did you open the modification from the modification overview and then closed it again by clicking Cancel? This not only closes the screen, but also cancels the modification. Check the filter on the modification screen. Change the filter to All modifications. Is the modification visible now?
InsideBusiness Corporate Administrator User guide 61
Question Answer
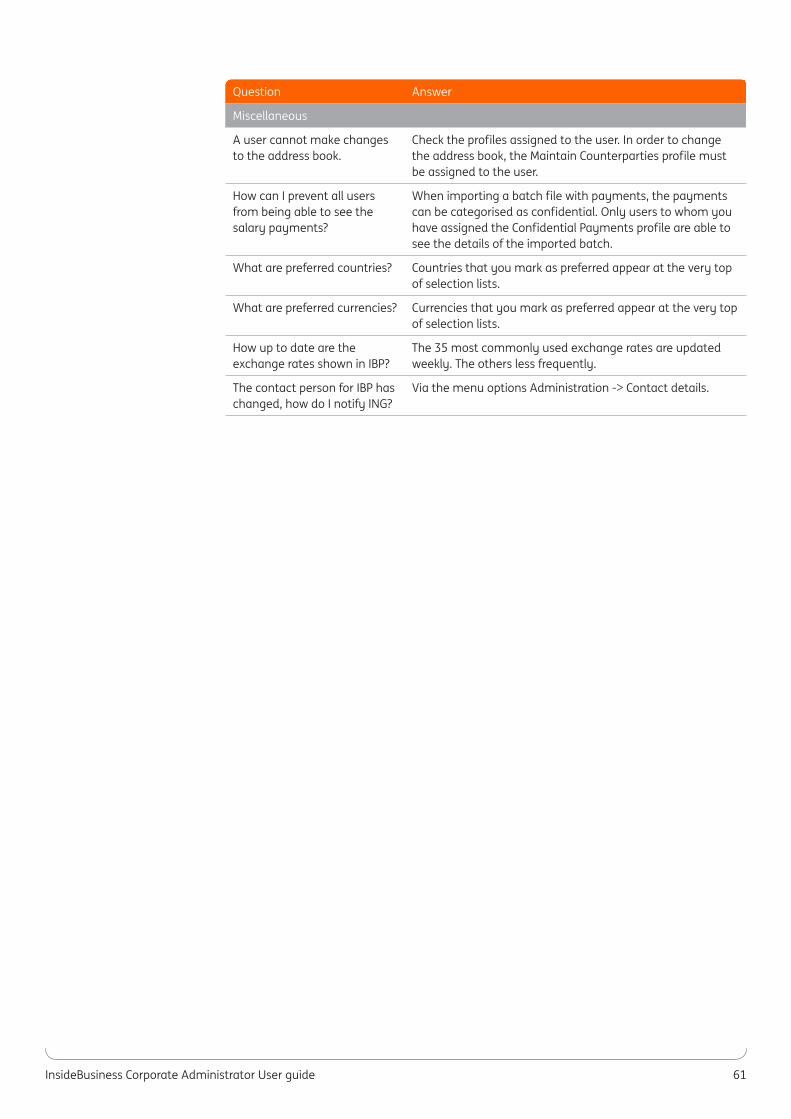
Miscellaneous
A user cannot make changes to the address book.
Check the profiles assigned to the user. In order to change the address book, the Maintain Counterparties profile must be assigned to the user.
How can I prevent all users from being able to see the salary payments?
When importing a batch file with payments, the payments can be categorised as confidential. Only users to whom you have assigned the Confidential Payments profile are able to see the details of the imported batch.
What are preferred countries? Countries that you mark as preferred appear at the very top of selection lists.
What are preferred currencies? Currencies that you mark as preferred appear at the very top of selection lists.
How up to date are the exchange rates shown in IBP?
The 35 most commonly used exchange rates are updated weekly. The others less frequently.
The contact person for IBP has changed, how do I notify ING?
Via the menu options Administration -> Contact details.
InsideBusiness Corporate Administrator User guide 62
The Sign permissions tab shows six levels of sign permissions, i.e. levels 1 to 6 as described below.
Levels 1 and 2 are shown for a number of profiles. We advise that you do not assign sign permissions to these levels. If you do, permissions will apply to all or many of your accounts.
Please note, a higher level takes priority over a lower level. For example, if you have set an independent limit for debits at level 3, but have set a joint limit at level 4 for the account from which the debit is initiated, the joint limit of level 4 applies.
Level 1 - Sign permissions for all accounts Sign permissions at level 1 apply to payments or debits initiated from all accounts in the subscription.
Level 2 - Sign permissions per product groupSign permissions at this level apply to specific product groups such as savings or debits. These sign permissions apply to all accounts.
Level 3 - Sign permissions per accountSign permissions at this level apply to all payments or debits initiated from a specific account. This is the level at which sign permissions are generally set.
Level 4 - Sign permissions for specific product groups and accountsSign permissions at this level apply to specific product groups such as savings or debits, initiated from specific accounts.
Use level 4 if you want to set a sign permission that is different from level 3 for a particular product. We advise to use this level to set up different sign permissions for savings and debits.
Level 5 - Sign permissions for specific addressee accountsSign permissions at level 5 apply to payments to a specific addressee.
Use this level if payments to particular addressees may be signed with a sign permission that differs from that set at earlier levels.
Level 6 - Sign permissions for specific remitter and addressee accountsSign permissions at level 6 apply to payments from a specific remitter account to an addresseeaccount.
This level is used if payments to particular addressees may be signed with a sign permission that differs from that set at earlier levels.
When using sign permissions at levels 5 and 6, remember that:• The addressee must be registered as a creditor in the Maintain Counterparties Profile.• A batch will be handled according to the sign permission for addressees if all payments in the
batch satisfy the conditions for the sign permission for addressees.• The limit set for a sign permission for addressees is a limit per transfer, not per batch.
A sign permission for addressees may be broader or more limited. However, a limited sign permission is easy for the user to get round. It is therefore not advisable to use addressee accounts for limiting sign permissions.
14.3 Sign permissions
InsideBusiness Corporate Administrator User guide 63
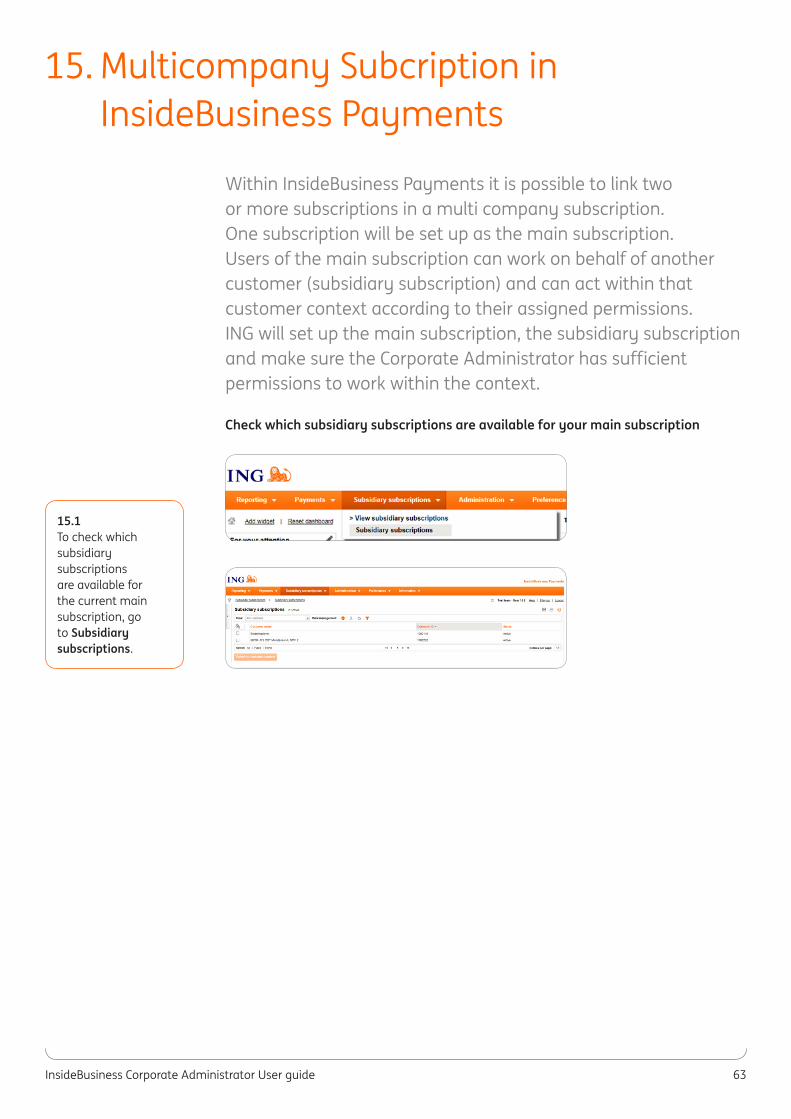
Within InsideBusiness Payments it is possible to link two or more subscriptions in a multi company subscription. One subscription will be set up as the main subscription. Users of the main subscription can work on behalf of another customer (subsidiary subscription) and can act within that customer context according to their assigned permissions. ING will set up the main subscription, the subsidiary subscription and make sure the Corporate Administrator has sufficient permissions to work within the context.
Check which subsidiary subscriptions are available for your main subscription
15. Multicompany Subcription in InsideBusiness Payments
15.1To check which subsidiary subscriptions are available for the current main subscription, go to Subsidiary subscriptions.
InsideBusiness Corporate Administrator User guide 64
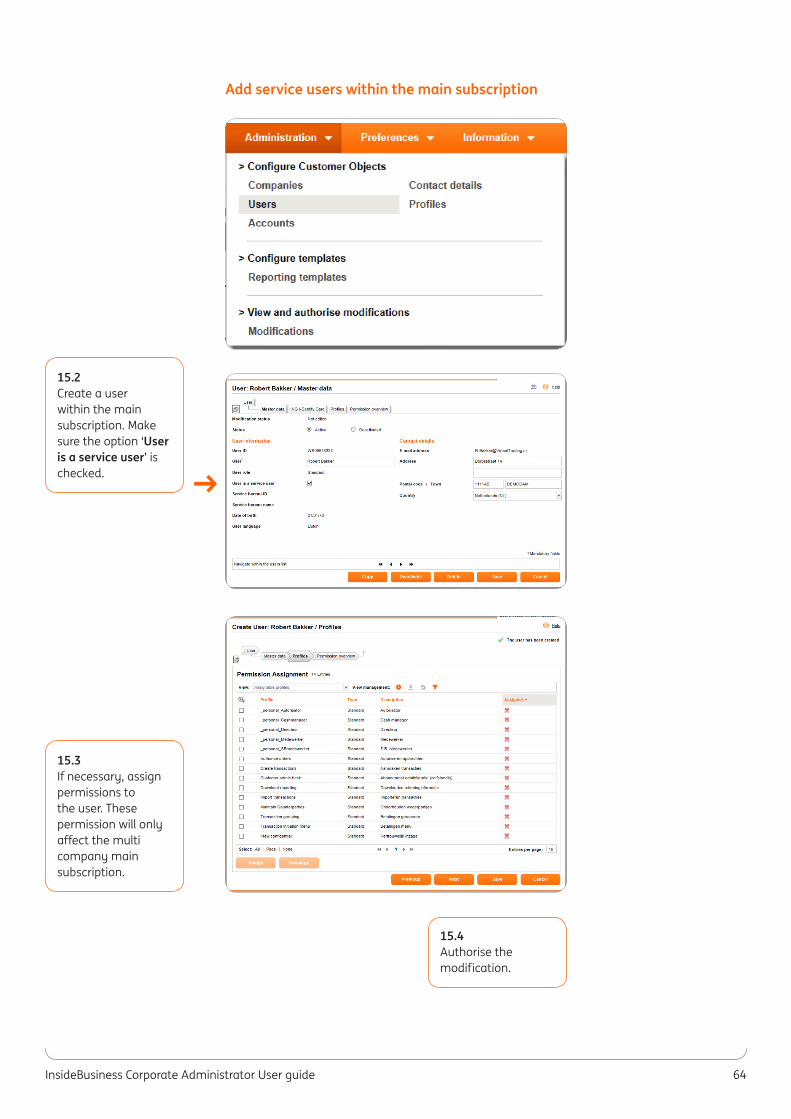
Add service users within the main subscription
15.2Create a user within the main subscription. Make sure the option ‘User is a service user’ is checked.
15.3If necessary, assign permissions to the user. These permission will only affect the multi company main subscription.
15.4Authorise the modification.
→
InsideBusiness Corporate Administrator User guide 65
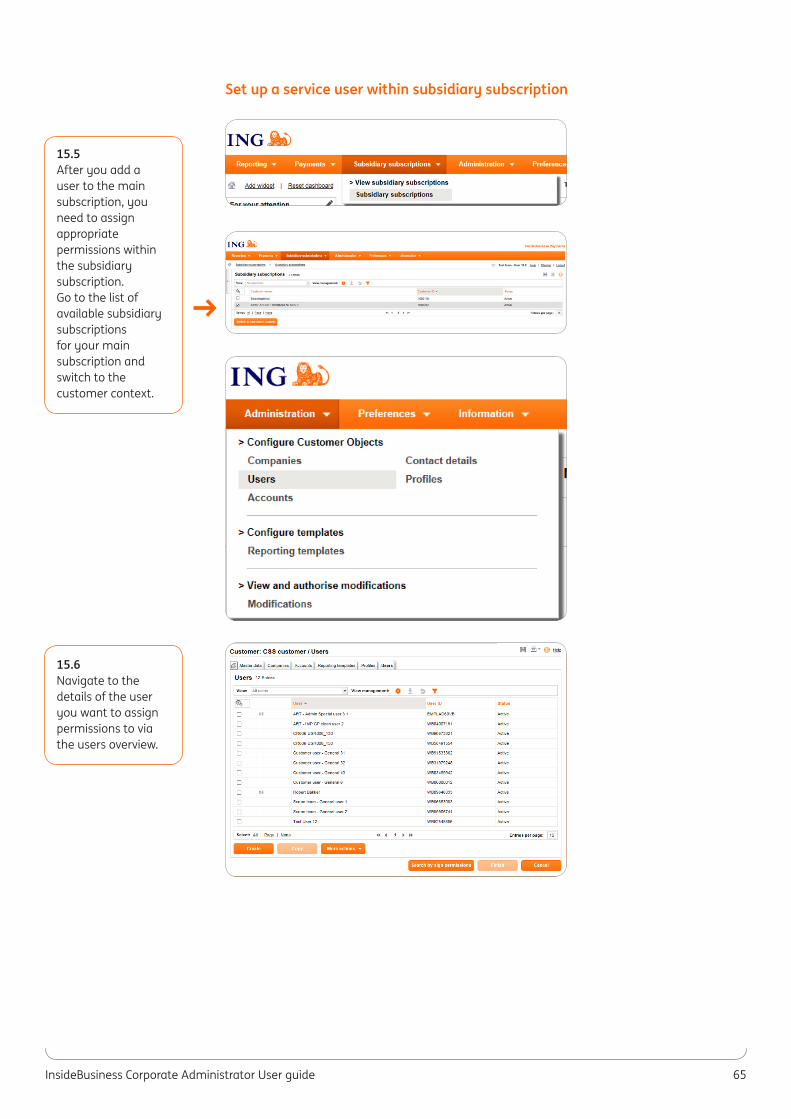
Set up a service user within subsidiary subscription
15.5After you add a user to the main subscription, you need to assign appropriate permissions within the subsidiary subscription. Go to the list of available subsidiary subscriptions for your main subscription and switch to the customer context.
15.6Navigate to the details of the user you want to assign permissions to via the users overview.
→
InsideBusiness Corporate Administrator User guide 66
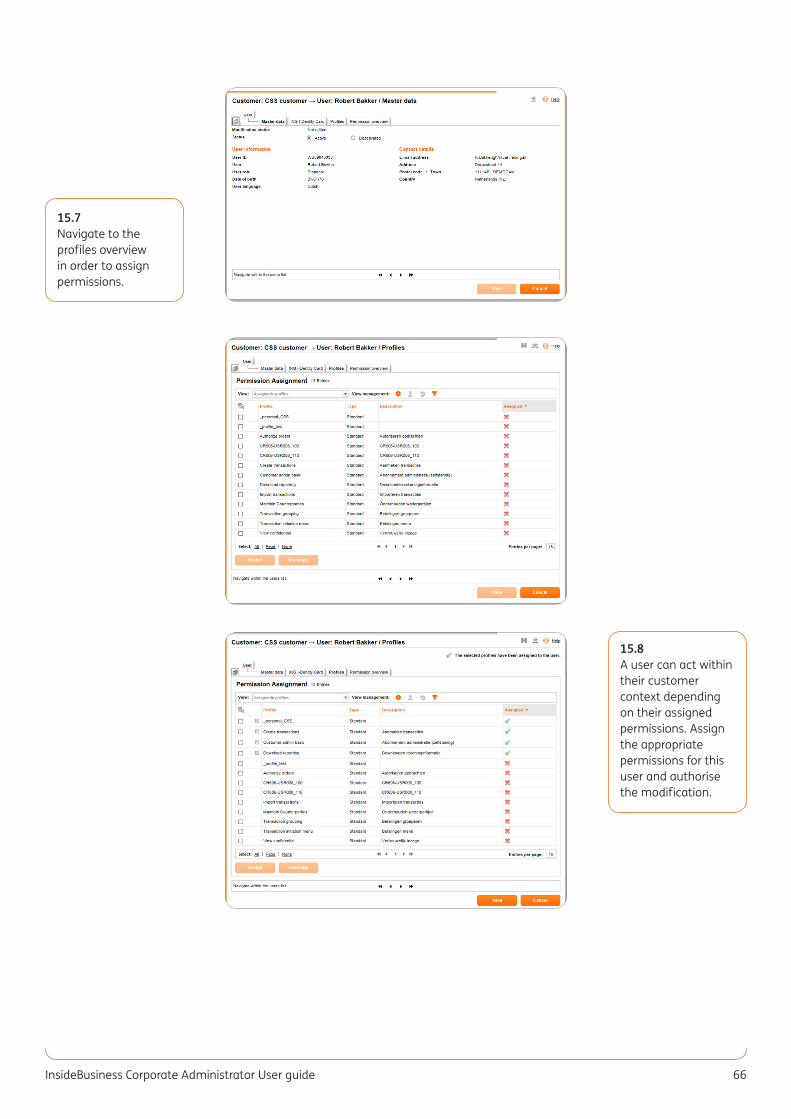
15.7Navigate to the profiles overview in order to assign permissions.
15.8A user can act within their customer context depending on their assigned permissions. Assign the appropriate permissions for this user and authorise the modification.
InsideBusiness Corporate Administrator User guide 67
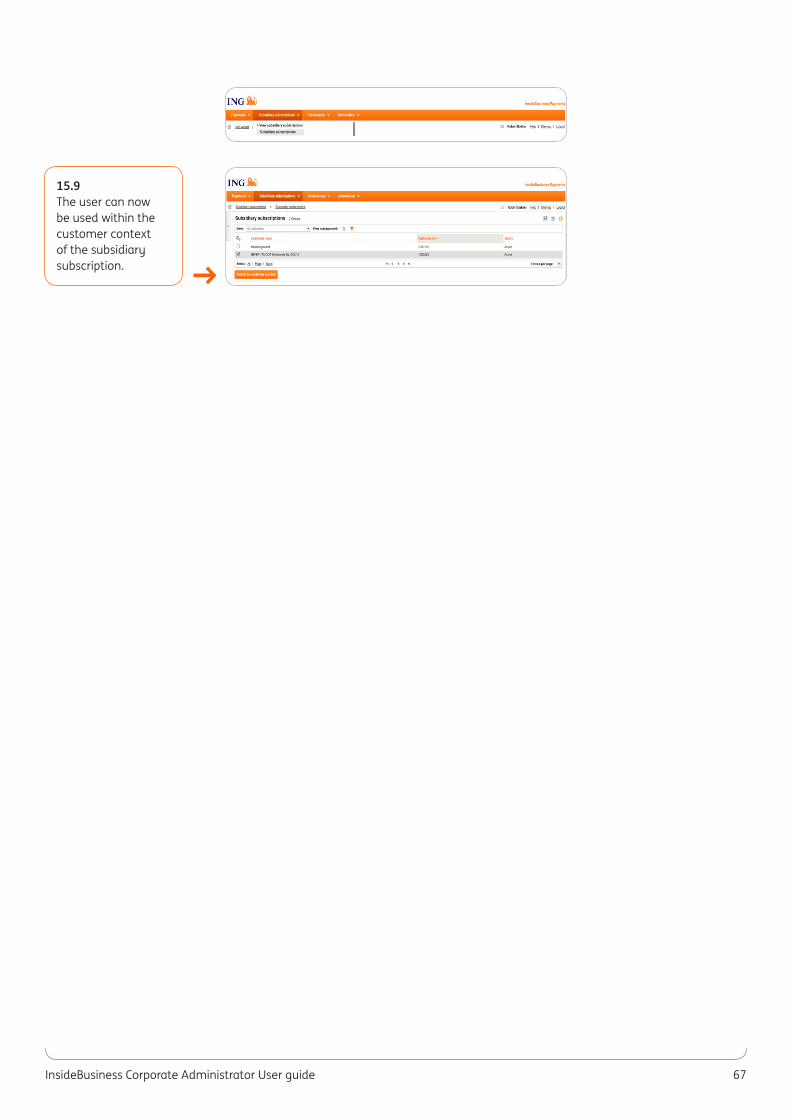
15.9The user can now be used within the customer context of the subsidiary subscription. →
InsideBusiness Corporate Administrator User guide 68
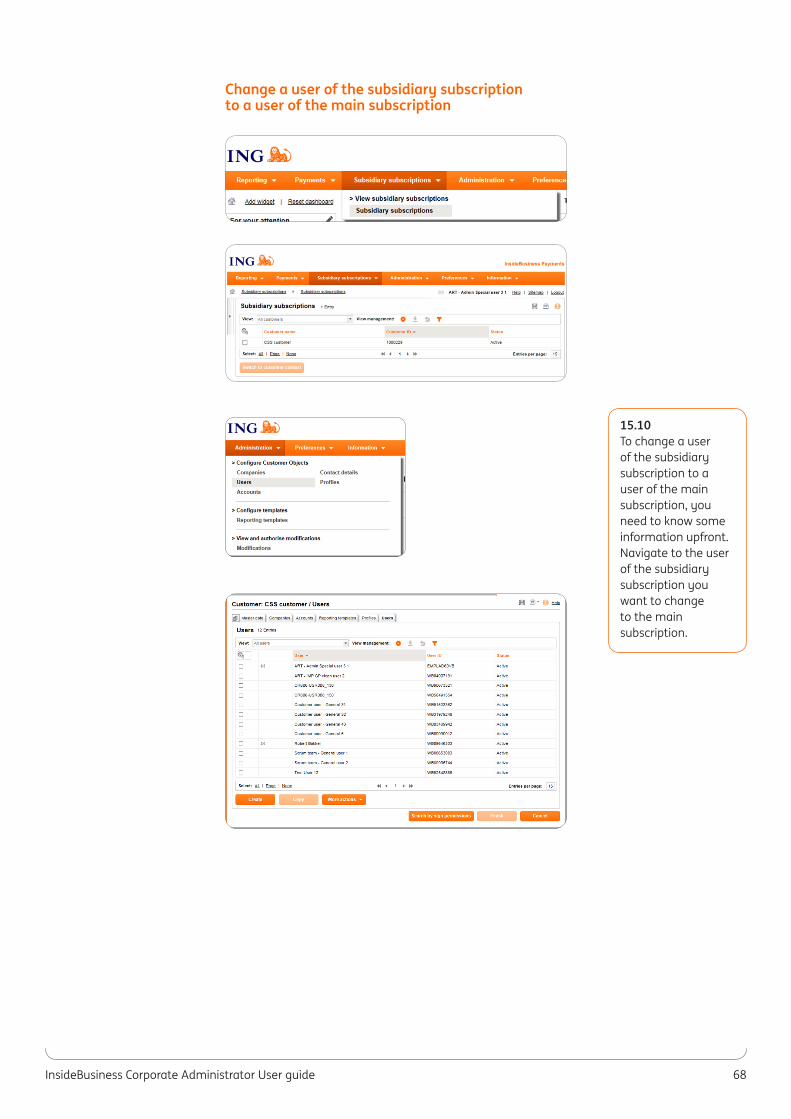
Change a user of the subsidiary subscription to a user of the main subscription
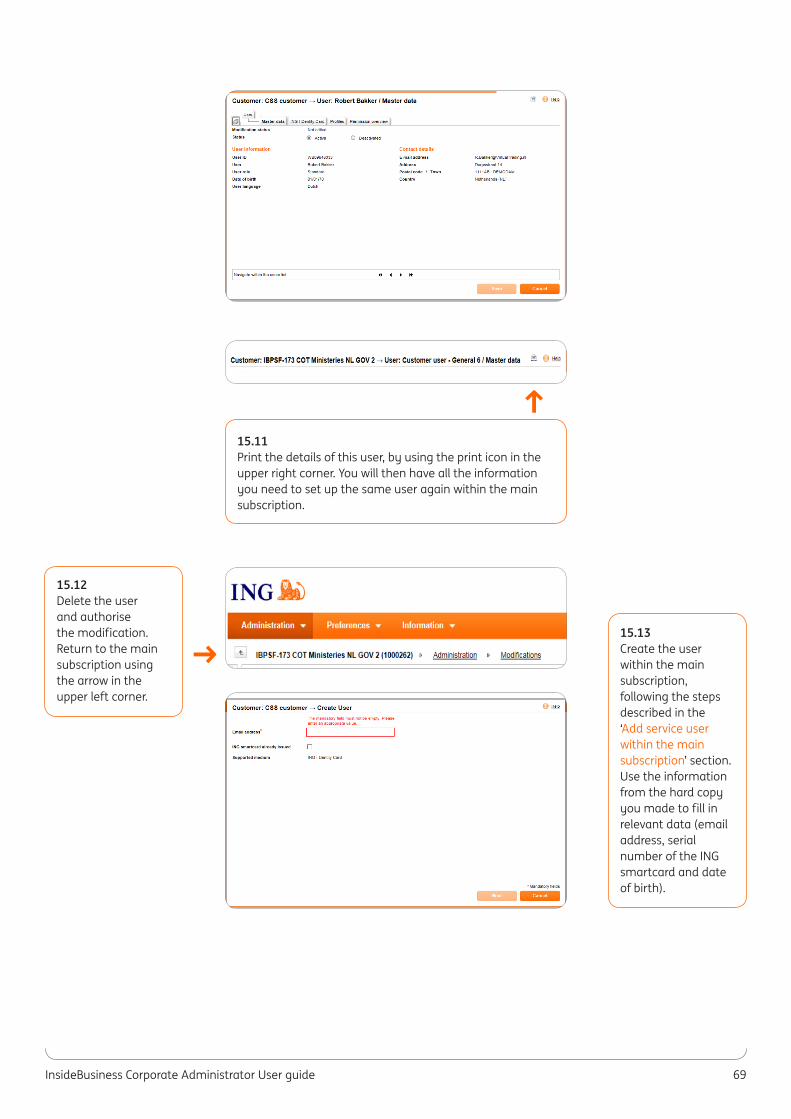
15.10To change a user of the subsidiary subscription to a user of the main subscription, you need to know some information upfront. Navigate to the user of the subsidiary subscription you want to change to the main subscription.
InsideBusiness Corporate Administrator User guide 69
→
15.11Print the details of this user, by using the print icon in the upper right corner. You will then have all the information you need to set up the same user again within the main subscription.
15.13Create the user within the main subscription, following the steps described in the ‘Add service user within the main subscription’ section. Use the information from the hard copy you made to fill in relevant data (email address, serial number of the ING smartcard and date of birth).
15.12Delete the user and authorise the modification. Return to the main subscription using the arrow in the upper left corner.
→

IBS0
12 0
217
© IN
G Ba
nk N
.V.