Embed Size (px)
Citation preview
Inspiration Workshop Tutorial
Note about Commands: This tutorial was designed for use on the Windows platform; however, Inspiration software for the Mac OS is also available and is similar in design to the Windows platform. In this tutorial, the Windows instructions for a keyboard command or menu command will appear first; Mac instructions will appear in parentheses immediately after the Windows command.
Note on Conventions Used: Commands will appear as bold in the instructions of this tutorial. If you are asked to type specific text, it will appear in bold with quotes. When the tutorial refers to a symbol or name that has already been typed, it will appear in italics.
Introduction to the Inspiration Screen
1. Open Inspiration by clicking upon the Start button, selecting Programs>Inspiration 6>Inspiration 6. (Macintosh: Open the folder that contains Inspiration and double-click the Inspiration icon)
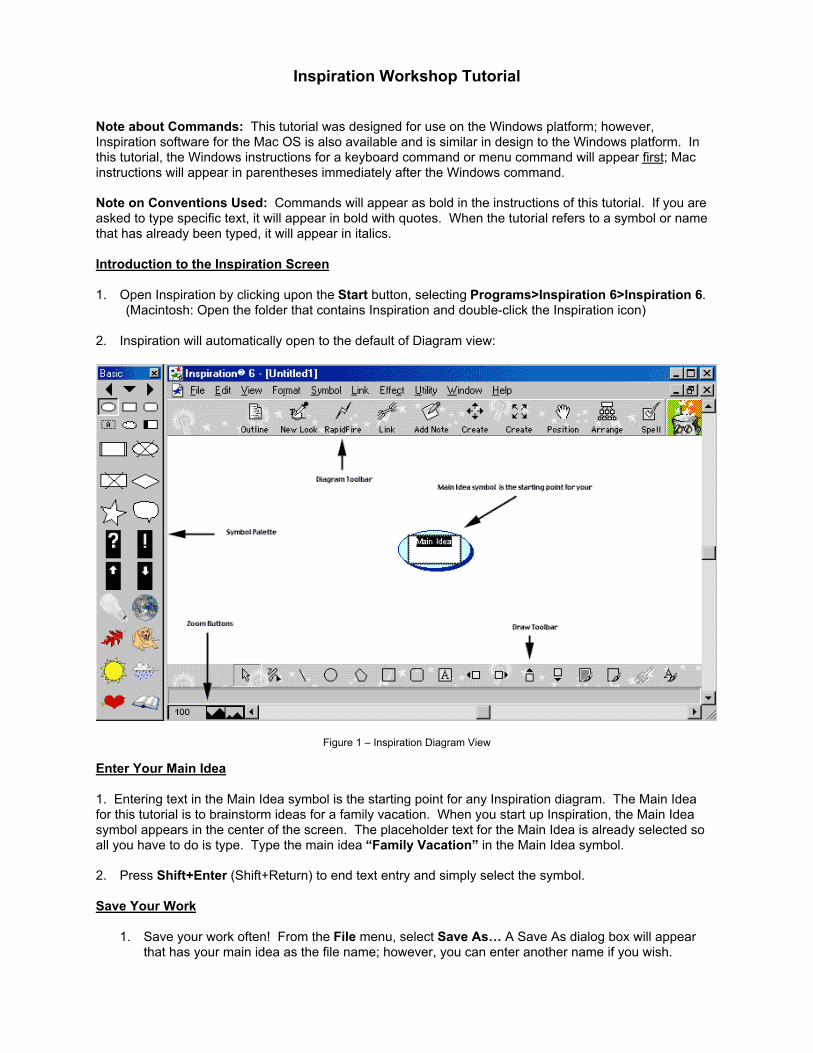
2. Inspiration will automatically open to the default of Diagram view:
Figure 1 – Inspiration Diagram View
Enter Your Main Idea
1. Entering text in the Main Idea symbol is the starting point for any Inspiration diagram. The Main Idea for this tutorial is to brainstorm ideas for a family vacation. When you start up Inspiration, the Main Idea symbol appears in the center of the screen. The placeholder text for the Main Idea is already selected so all you have to do is type. Type the main idea “Family Vacation” in the Main Idea symbol.
2. Press Shift+Enter (Shift+Return) to end text entry and simply select the symbol.
Save Your Work
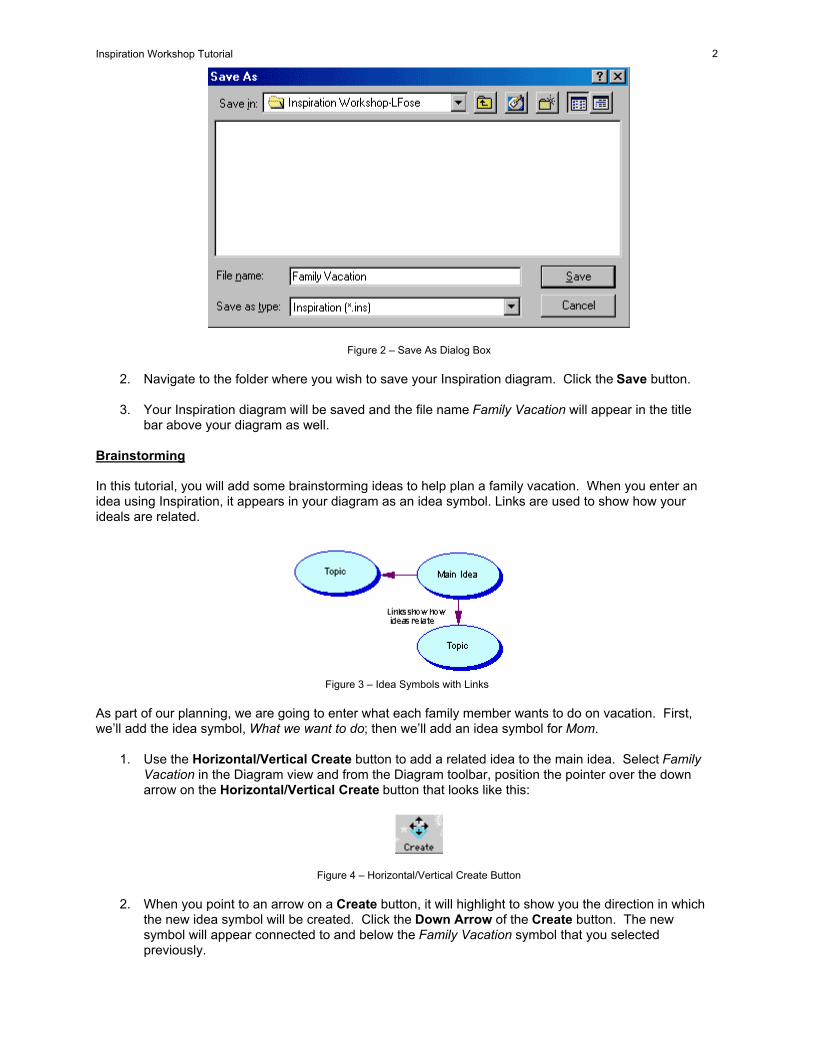
1. Save your work often! From the File menu, select Save As… A Save As dialog box will appear that has your main idea as the file name; however, you can enter another name if you wish.
2 Inspiration Workshop Tutorial
Figure 2 – Save As Dialog Box
2. Navigate to the folder where you wish to save your Inspiration diagram. Click the Save button.
3. Your Inspiration diagram will be saved and the file name Family Vacation will appear in the title bar above your diagram as well.
Brainstorming
In this tutorial, you will add some brainstorming ideas to help plan a family vacation. When you enter an idea using Inspiration, it appears in your diagram as an idea symbol. Links are used to show how your ideals are related.
Figure 3 – Idea Symbols with Links
As part of our planning, we are going to enter what each family member wants to do on vacation. First, we’ll add the idea symbol, What we want to do; then we’ll add an idea symbol for Mom.
1. Use the Horizontal/Vertical Create button to add a related idea to the main idea. Select Family Vacation in the Diagram view and from the Diagram toolbar, position the pointer over the down arrow on the Horizontal/Vertical Create button that looks like this:
Figure 4 – Horizontal/Vertical Create Button
2. When you point to an arrow on a Create button, it will highlight to show you the direction in which the new idea symbol will be created. Click the Down Arrow of the Create button. The new symbol will appear connected to and below the Family Vacation symbol that you selected previously.

3 Inspiration Workshop Tutorial
Figure 5 – Family Vacation Plus Additional Idea Symbol
3. As soon as you create a new symbol, you can enter text in it. Type: “What we want to do”
4. In order to enter what various family members wish to do, we’ll add the family members diagonally to the idea symbol What we want to do. On the Diagram toolbar, position the pointer over the lower right diagonal arrow on the Diagonal Create button and click on it.
Figure 6 – Diagonal Create Button
5. The new symbol will appear, connected to and diagonally below the What we want to do symbol. Type: “Mom”
6. Press Shift+Enter (Shift+Return) to end the text entry.
7. Select What we want to do
8. Click the lower left diagonal arrow on the Diagonal Create button and then type: “Dad”
9. Press Shift+Enter (Shift+Return) to end text entry.
The following is an illustration of what you should have so far:
Figure 7 – Main Idea with Related Idea and then Additional Related Ideas
Using the RapidFire Button for Quick Brainstorming
We’re going to use Inspiration’s RapidFire tool to quickly enter the things Mom wants to do while on vacation. RapidFire allows you to capture your ideas quickly without worrying about their order. You simply add ideas right into the selected symbol and Inspiration creates symbols and places them for you.
4 Inspiration Workshop Tutorial
1. Click the Mom symbol to select it. On the Diagram toolbar, click the RapidFire button.
Figure 8 – RapidFire Button
2. The RapidFire icon (lightning bolt) will appear in the symbol to show you that the tool is turned on. You’re ready to begin typing ideas.
3. Type: “Sun” and then press Enter (Return). For every idea you input with the RapidFire button, you should use the Enter (Return) key to separate your ideas.
4. Type “Scuba” and then click the RapidFire button to turn it off. Inspiration will place your new symbols in the diagram after you type your ideas and press Enter (Return).
5. Now, let’s continue to use the RapidFire button to enter Dad’s preferences. First, select the Dad symbol and drag him to the left approximately two inches to give yourself a little more space to work with.
6. With the Dad symbol selected, click the RapidFire button on the Diagram toolbar. The RapidFire icon will appear again in the symbol to remind you that the tool is turned on.
7. Type: “Play golf” and then press Enter (Return).
8. Type: “Fish” and then click on the RapidFire button to turn it off.
Now let’s take a look what you should have so far:
Figure 9 – Mom and Dad’s Preferences for Vacation
Notice that RapidFire places your ideas in a free-form structure. You don’t need to think about organizing your ideas just yet; you just want to get them all down. If you see that you’ve made a typo, simply double-click the text in the symbol, select the words you want to change and type over them. You can also insert text by clicking where you want to make the correction and entering the new text.
Changing the View Scale
It’s often helpful to zoom in and out when you are working on your diagram. Use the Zoom Out button to see more of the diagram in the window.
5 Inspiration Workshop Tutorial
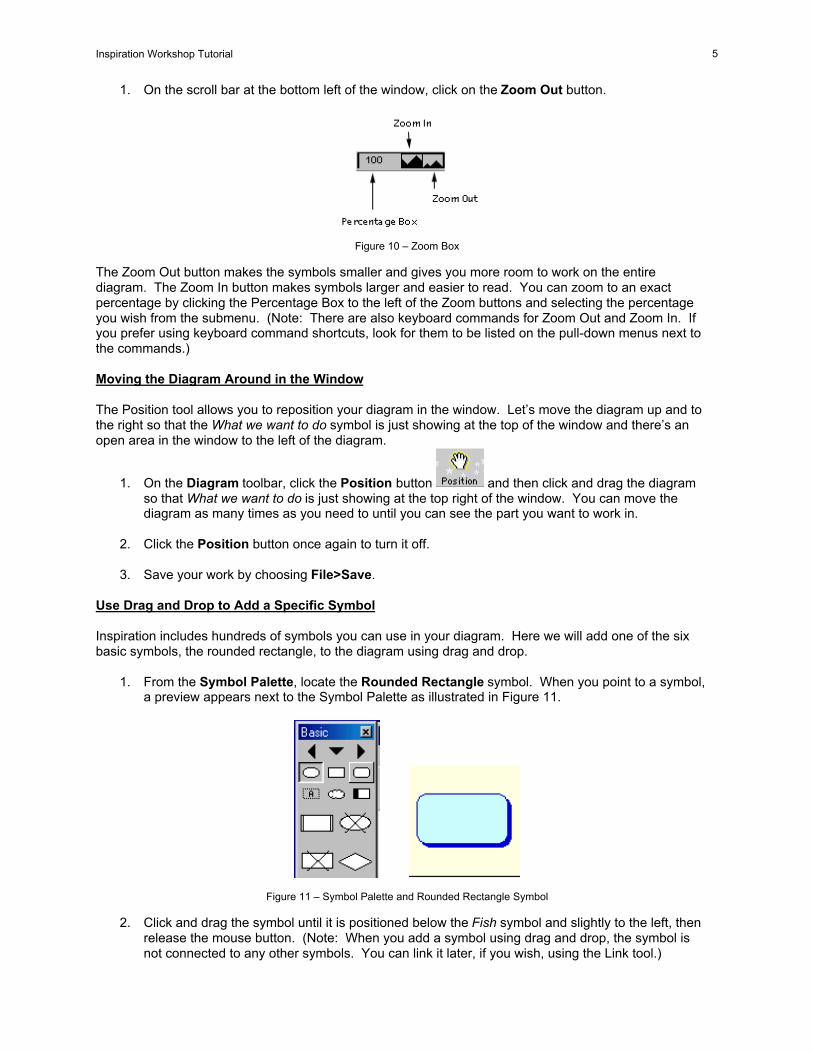
1. On the scroll bar at the bottom left of the window, click on the Zoom Out button.
Figure 10 – Zoom Box
The Zoom Out button makes the symbols smaller and gives you more room to work on the entire diagram. The Zoom In button makes symbols larger and easier to read. You can zoom to an exact percentage by clicking the Percentage Box to the left of the Zoom buttons and selecting the percentage you wish from the submenu. (Note: There are also keyboard commands for Zoom Out and Zoom In. If you prefer using keyboard command shortcuts, look for them to be listed on the pull-down menus next to the commands.)
Moving the Diagram Around in the Window
The Position tool allows you to reposition your diagram in the window. Let’s move the diagram up and to the right so that the What we want to do symbol is just showing at the top of the window and there’s an open area in the window to the left of the diagram.
1. On the Diagram toolbar, click the Position button and then click and drag the diagram so that What we want to do is just showing at the top right of the window. You can move the diagram as many times as you need to until you can see the part you want to work in.
2. Click the Position button once again to turn it off.
3. Save your work by choosing File>Save.
Use Drag and Drop to Add a Specific Symbol
Inspiration includes hundreds of symbols you can use in your diagram. Here we will add one of the six basic symbols, the rounded rectangle, to the diagram using drag and drop.
1. From the Symbol Palette, locate the Rounded Rectangle symbol. When you point to a symbol, a preview appears next to the Symbol Palette as illustrated in Figure 11.
Figure 11 – Symbol Palette and Rounded Rectangle Symbol
2. Click and drag the symbol until it is positioned below the Fish symbol and slightly to the left, then release the mouse button. (Note: When you add a symbol using drag and drop, the symbol is not connected to any other symbols. You can link it later, if you wish, using the Link tool.)
6 Inspiration Workshop Tutorial
3. Type: “Marlin” in the new Rounded Rectangle symbol.
Use Point and Type to Add an Unconnected Idea
Sometimes when you are working, you may want to add an idea but you may not be quite sure where it fits at the time. You can easily add an unconnected idea anywhere on the diagram without being concerned with how it relates to the other ideas, using Inspiration’s point and type method.
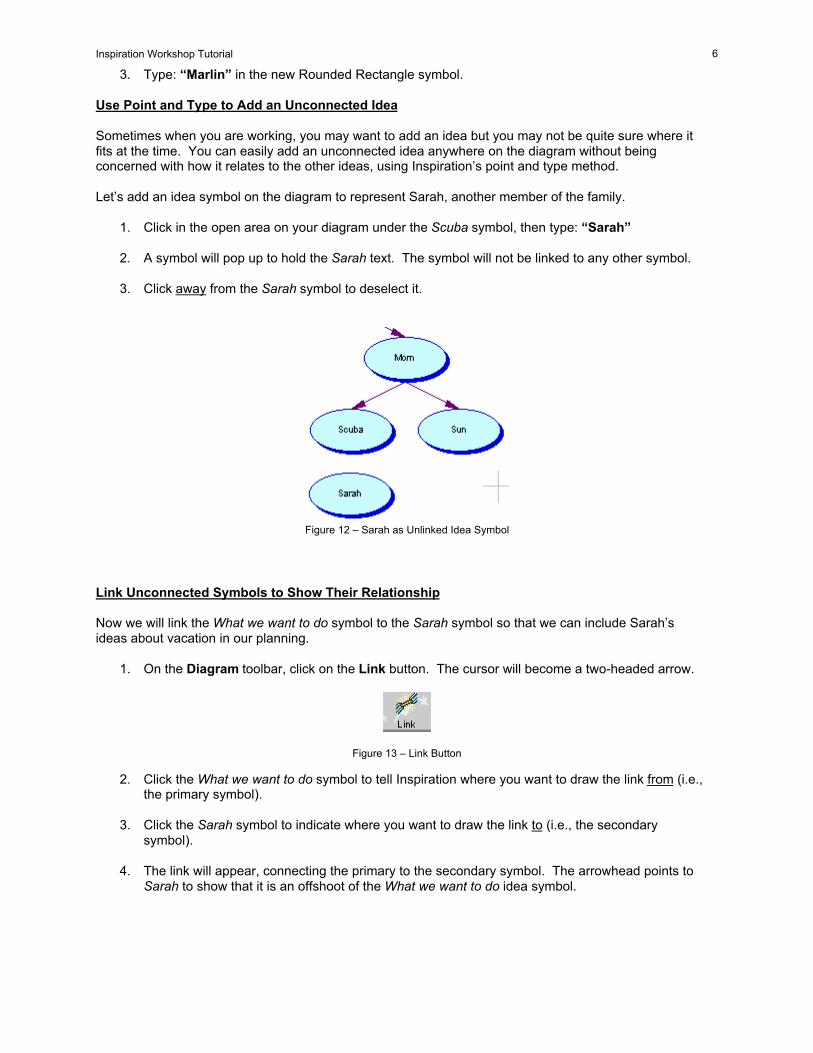
Let’s add an idea symbol on the diagram to represent Sarah, another member of the family.
1. Click in the open area on your diagram under the Scuba symbol, then type: “Sarah”
2. A symbol will pop up to hold the Sarah text. The symbol will not be linked to any other symbol.
3. Click away from the Sarah symbol to deselect it.
Figure 12 – Sarah as Unlinked Idea Symbol
Link Unconnected Symbols to Show Their Relationship
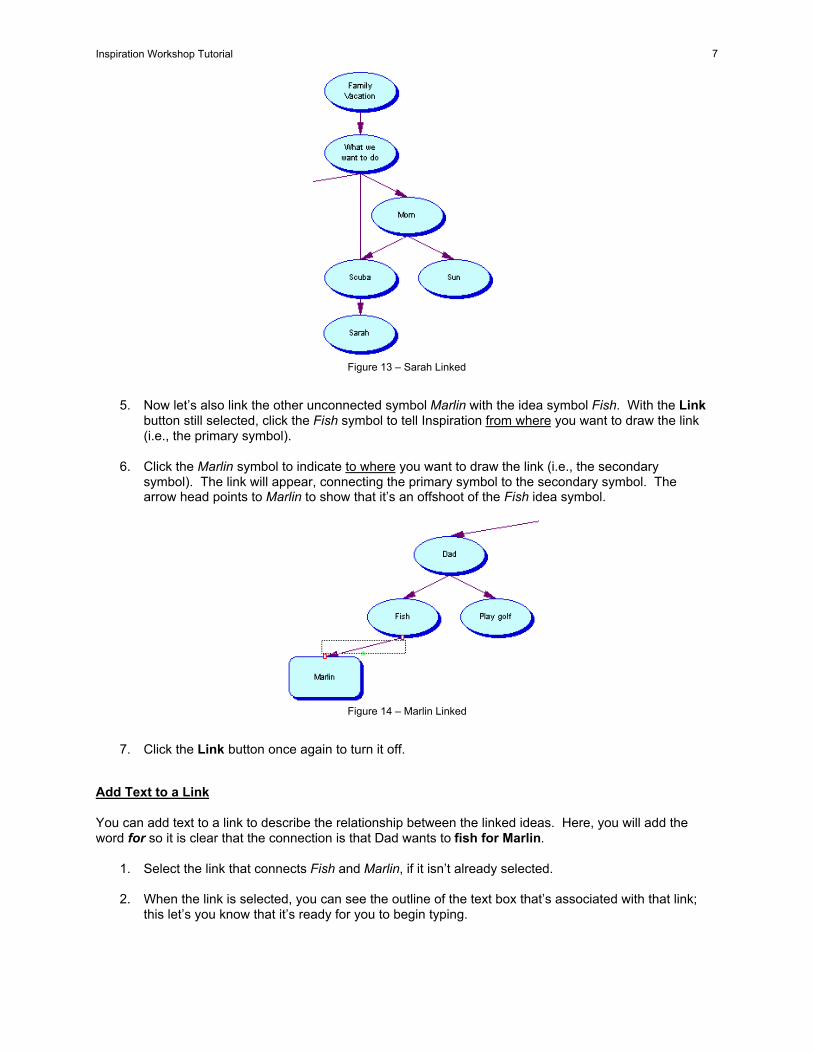
Now we will link the What we want to do symbol to the Sarah symbol so that we can include Sarah’s ideas about vacation in our planning.
1. On the Diagram toolbar, click on the Link button. The cursor will become a two-headed arrow.
Figure 13 – Link Button
2. Click the What we want to do symbol to tell Inspiration where you want to draw the link from (i.e., the primary symbol).
3. Click the Sarah symbol to indicate where you want to draw the link to (i.e., the secondary symbol).
4. The link will appear, connecting the primary to the secondary symbol. The arrowhead points to Sarah to show that it is an offshoot of the What we want to do idea symbol.
7 Inspiration Workshop Tutorial
Figure 13 – Sarah Linked
5. Now let’s also link the other unconnected symbol Marlin with the idea symbol Fish. With the Link button still selected, click the Fish symbol to tell Inspiration from where you want to draw the link (i.e., the primary symbol).
6. Click the Marlin symbol to indicate to where you want to draw the link (i.e., the secondary symbol). The link will appear, connecting the primary symbol to the secondary symbol. The arrow head points to Marlin to show that it’s an offshoot of the Fish idea symbol.
Figure 14 – Marlin Linked
7. Click the Link button once again to turn it off.
Add Text to a Link
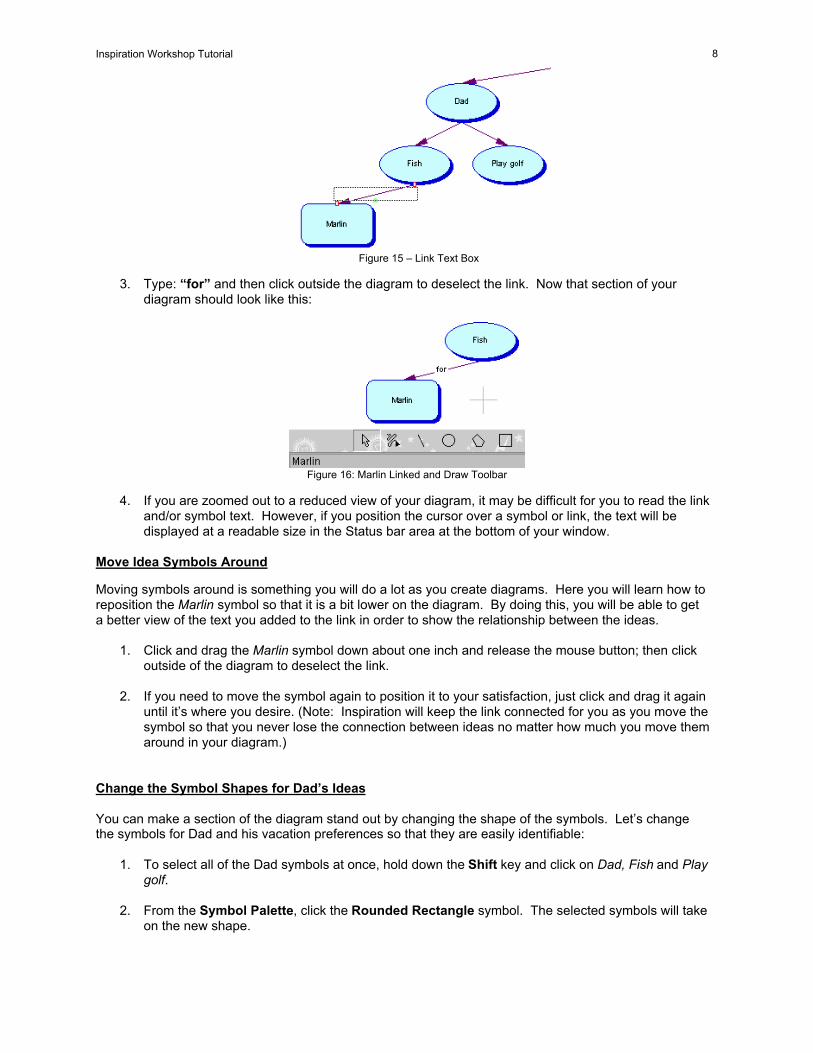
You can add text to a link to describe the relationship between the linked ideas. Here, you will add the word for so it is clear that the connection is that Dad wants to fish for Marlin.
1. Select the link that connects Fish and Marlin, if it isn’t already selected.
2. When the link is selected, you can see the outline of the text box that’s associated with that link; this let’s you know that it’s ready for you to begin typing.
8 Inspiration Workshop Tutorial
Figure 15 – Link Text Box
3. Type: “for” and then click outside the diagram to deselect the link. Now that section of your diagram should look like this:
Figure 16: Marlin Linked and Draw Toolbar
4. If you are zoomed out to a reduced view of your diagram, it may be difficult for you to read the link and/or symbol text. However, if you position the cursor over a symbol or link, the text will be displayed at a readable size in the Status bar area at the bottom of your window.
Move Idea Symbols Around
Moving symbols around is something you will do a lot as you create diagrams. Here you will learn how to reposition the Marlin symbol so that it is a bit lower on the diagram. By doing this, you will be able to get a better view of the text you added to the link in order to show the relationship between the ideas.
1. Click and drag the Marlin symbol down about one inch and release the mouse button; then click outside of the diagram to deselect the link.
2. If you need to move the symbol again to position it to your satisfaction, just click and drag it again until it’s where you desire. (Note: Inspiration will keep the link connected for you as you move the symbol so that you never lose the connection between ideas no matter how much you move them around in your diagram.)
Change the Symbol Shapes for Dad’s Ideas
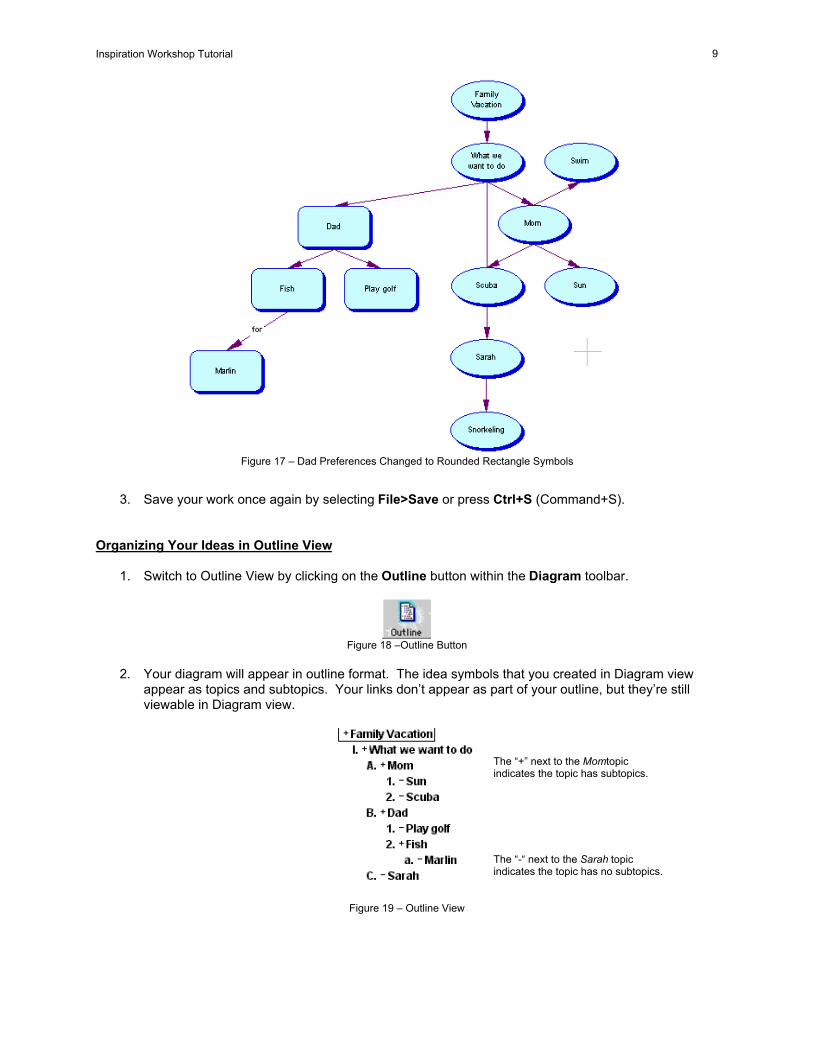
You can make a section of the diagram stand out by changing the shape of the symbols. Let’s change the symbols for Dad and his vacation preferences so that they are easily identifiable:
1. To select all of the Dad symbols at once, hold down the Shift key and click on Dad, Fish and Play golf.
2. From the Symbol Palette, click the Rounded Rectangle symbol. The selected symbols will take on the new shape.
9 Inspiration Workshop Tutorial
Figure 17 – Dad Preferences Changed to Rounded Rectangle Symbols
3. Save your work once again by selecting File>Save or press Ctrl+S (Command+S).
Organizing Your Ideas in Outline View
1. Switch to Outline View by clicking on the Outline button within the Diagram toolbar.
Figure 18 –Outline Button
2. Your diagram will appear in outline format. The idea symbols that you created in Diagram view appear as topics and subtopics. Your links don’t appear as part of your outline, but they’re still viewable in Diagram view.
Figure 19 – Outline View
The “+” next to the Momtopic indicates the topic has subtopics.
The “-“ next to the Sarah topic indicates the topic has no subtopics.
10 Inspiration Workshop Tutorial
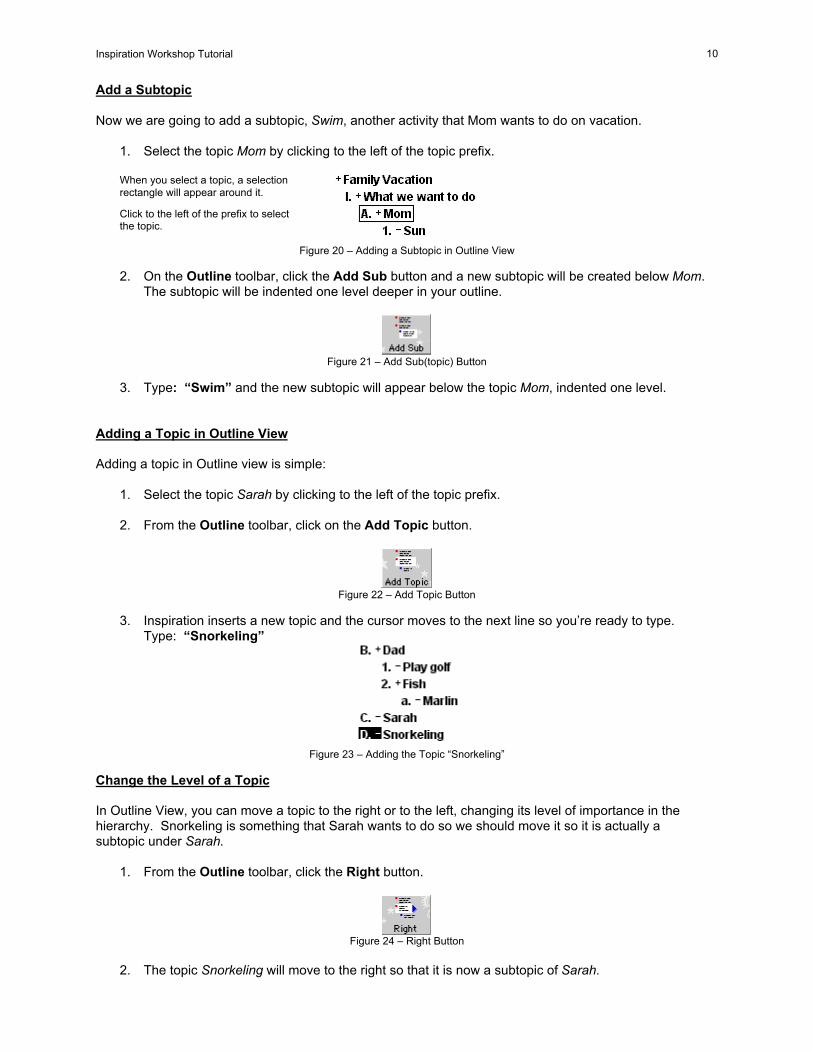
Add a Subtopic
Now we are going to add a subtopic, Swim, another activity that Mom wants to do on vacation.
1. Select the topic Mom by clicking to the left of the topic prefix.
Figure 20 – Adding a Subtopic in Outline View
When you select a topic, a selection rectangle will appear around it.
Click to the left of the prefix to select the topic.
2. On the Outline toolbar, click the Add Sub button and a new subtopic will be created below Mom. The subtopic will be indented one level deeper in your outline.
Figure 21 – Add Sub(topic) Button
3. Type: “Swim” and the new subtopic will appear below the topic Mom, indented one level.
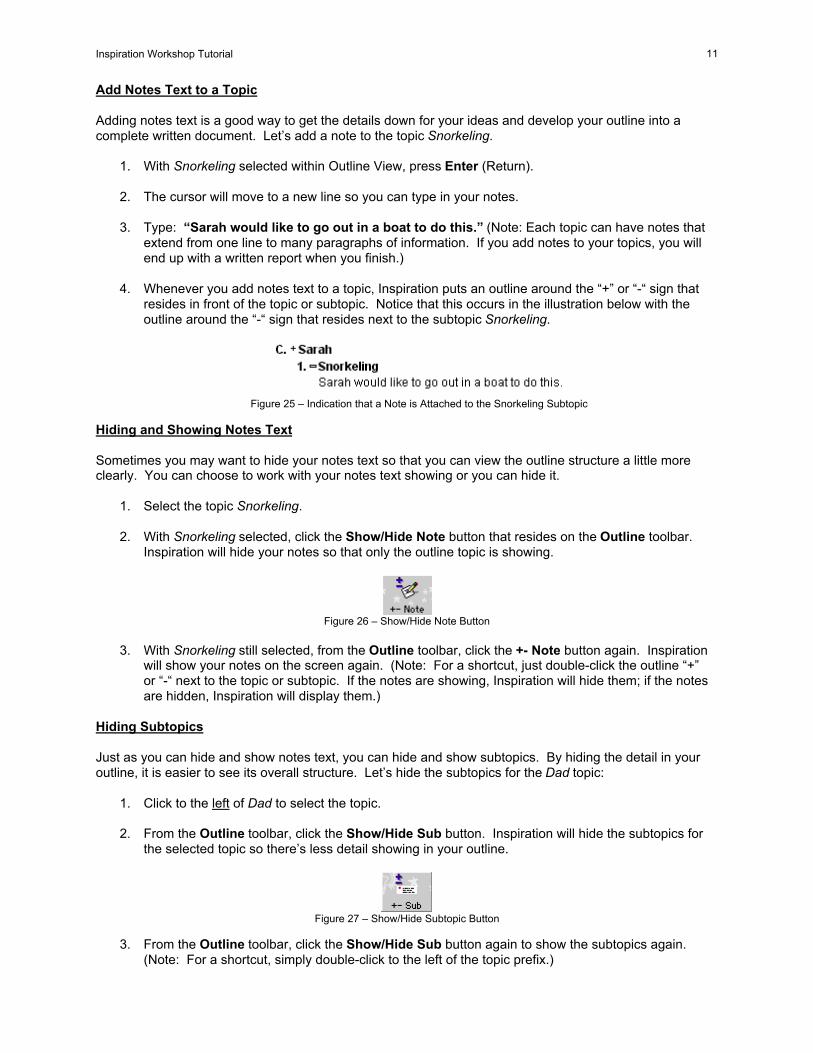
Adding a Topic in Outline View
Adding a topic in Outline view is simple:
1. Select the topic Sarah by clicking to the left of the topic prefix.
2. From the Outline toolbar, click on the Add Topic button.
Figure 22 – Add Topic Button
3. Inspiration inserts a new topic and the cursor moves to the next line so you’re ready to type. Type: “Snorkeling”
Figure 23 – Adding the Topic “Snorkeling”
Change the Level of a Topic
In Outline View, you can move a topic to the right or to the left, changing its level of importance in the hierarchy. Snorkeling is something that Sarah wants to do so we should move it so it is actually a subtopic under Sarah.
1. From the Outline toolbar, click the Right button.
Figure 24 – Right Button
2. The topic Snorkeling will move to the right so that it is now a subtopic of Sarah.
11 Inspiration Workshop Tutorial
Add Notes Text to a Topic
Adding notes text is a good way to get the details down for your ideas and develop your outline into a complete written document. Let’s add a note to the topic Snorkeling.
1. With Snorkeling selected within Outline View, press Enter (Return).
2. The cursor will move to a new line so you can type in your notes.
3. Type: “Sarah would like to go out in a boat to do this.” (Note: Each topic can have notes that extend from one line to many paragraphs of information. If you add notes to your topics, you will end up with a written report when you finish.)
4. Whenever you add notes text to a topic, Inspiration puts an outline around the “+” or “-“ sign that resides in front of the topic or subtopic. Notice that this occurs in the illustration below with the outline around the “-“ sign that resides next to the subtopic Snorkeling.
Figure 25 – Indication that a Note is Attached to the Snorkeling Subtopic
Hiding and Showing Notes Text
Sometimes you may want to hide your notes text so that you can view the outline structure a little more clearly. You can choose to work with your notes text showing or you can hide it.
1. Select the topic Snorkeling.
2. With Snorkeling selected, click the Show/Hide Note button that resides on the Outline toolbar. Inspiration will hide your notes so that only the outline topic is showing.
Figure 26 – Show/Hide Note Button
3. With Snorkeling still selected, from the Outline toolbar, click the +- Note button again. Inspiration will show your notes on the screen again. (Note: For a shortcut, just double-click the outline “+” or “-“ next to the topic or subtopic. If the notes are showing, Inspiration will hide them; if the notes are hidden, Inspiration will display them.)
Hiding Subtopics
Just as you can hide and show notes text, you can hide and show subtopics. By hiding the detail in your outline, it is easier to see its overall structure. Let’s hide the subtopics for the Dad topic:
1. Click to the left of Dad to select the topic.
2. From the Outline toolbar, click the Show/Hide Sub button. Inspiration will hide the subtopics for the selected topic so there’s less detail showing in your outline.
Figure 27 – Show/Hide Subtopic Button
3. From the Outline toolbar, click the Show/Hide Sub button again to show the subtopics again. (Note: For a shortcut, simply double-click to the left of the topic prefix.)
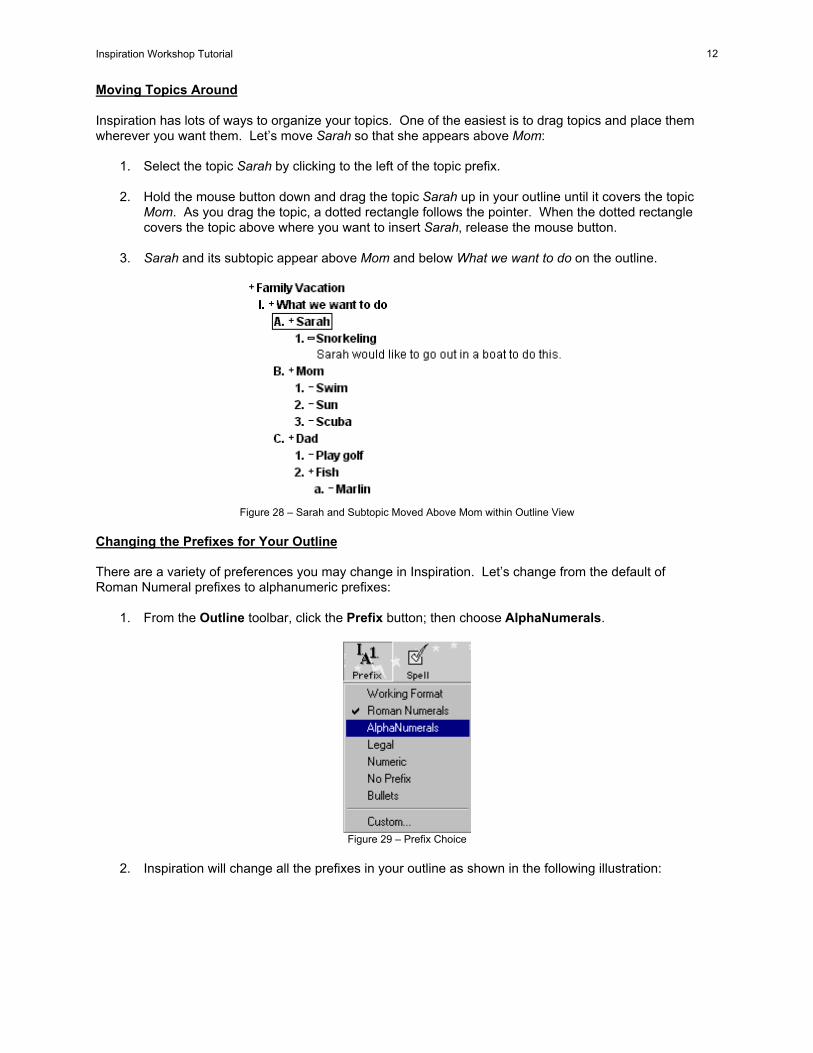
Changing the Prefixes for Your Outline
12 Inspiration Workshop Tutorial
Moving Topics Around
Inspiration has lots of ways to organize your topics. One of the easiest is to drag topics and place them wherever you want them. Let’s move Sarah so that she appears above Mom:
1. Select the topic Sarah by clicking to the left of the topic prefix.
2. Hold the mouse button down and drag the topic Sarah up in your outline until it covers the topic Mom. As you drag the topic, a dotted rectangle follows the pointer. When the dotted rectangle covers the topic above where you want to insert Sarah, release the mouse button.
3. Sarah and its subtopic appear above Mom and below What we want to do on the outline.
Figure 28 – Sarah and Subtopic Moved Above Mom within Outline View
There are a variety of preferences you may change in Inspiration. Let’s change from the default of Roman Numeral prefixes to alphanumeric prefixes:
1. From the Outline toolbar, click the Prefix button; then choose AlphaNumerals.
Figure 29 – Prefix Choice
2. Inspiration will change all the prefixes in your outline as shown in the following illustration:
13 Inspiration Workshop Tutorial
Figure 30 – Comparison of Roman Numeral Prefixes vs. Alphanumeric Prefixes
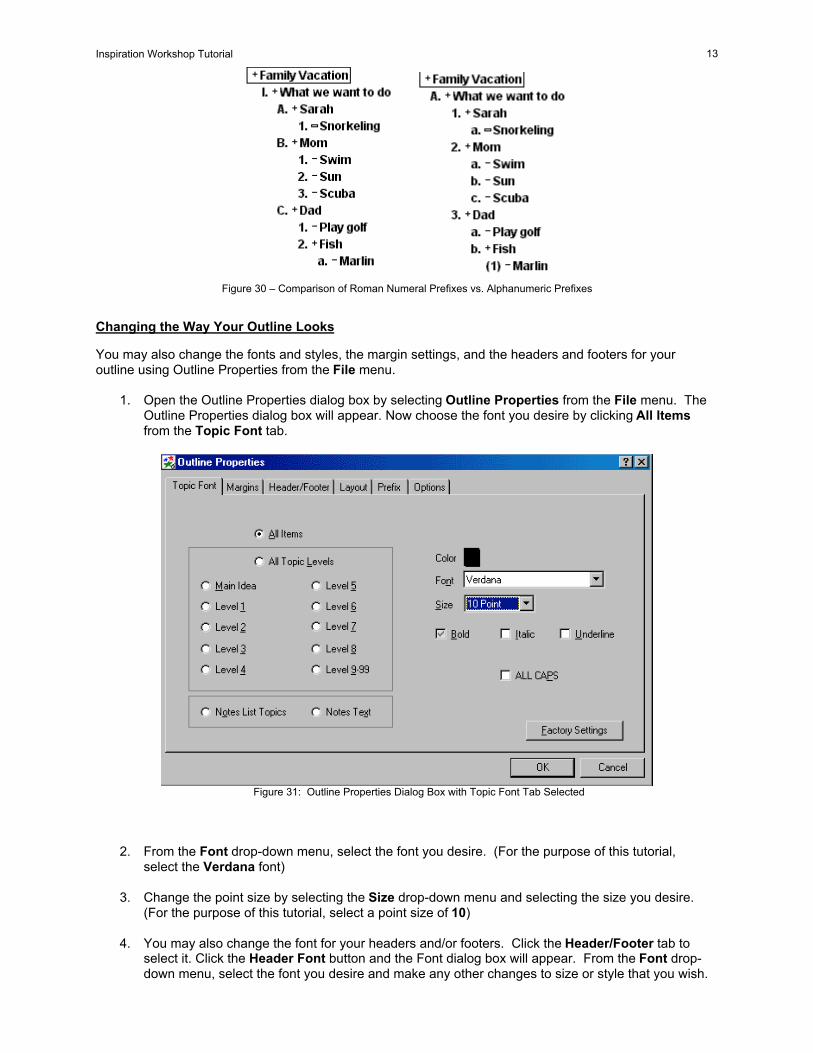
Changing the Way Your Outline Looks
You may also change the fonts and styles, the margin settings, and the headers and footers for your outline using Outline Properties from the File menu.
1. Open the Outline Properties dialog box by selecting Outline Properties from the File menu. The Outline Properties dialog box will appear. Now choose the font you desire by clicking All Items from the Topic Font tab.
Figure 31: Outline Properties Dialog Box with Topic Font Tab Selected
2. From the Font drop-down menu, select the font you desire. (For the purpose of this tutorial, select the Verdana font)
3. Change the point size by selecting the Size drop-down menu and selecting the size you desire. (For the purpose of this tutorial, select a point size of 10)
4. You may also change the font for your headers and/or footers. Click the Header/Footer tab to select it. Click the Header Font button and the Font dialog box will appear. From the Font drop-down menu, select the font you desire and make any other changes to size or style that you wish.

14 Inspiration Workshop Tutorial
Then click on the OK button to return to the Header/Footer tab. Click OK once more to accept your changes and return to your outline.
Figure 32 – Outline Properties Dialog Box with Header/Footer Tab Selected
5. You should be able to see all of your changes except for the ones that were made to your header. Header changes you can only see when you preview the outline before you print it, or when you actually print the document.
Printing Your Outline
When you print your outline, Inspiration automatically includes all topics, subtopics, and notes text as well as a header at the top of each page. Of course, you can change what appears in the header or choose to print your document without a header by changing the settings in the Outline Properties dialog box. To preview what your outline will look like and then print it, follow the steps below:
1. From the File menu, choose Print Preview. Your outline will appear on screen so you can see how it will look on the page.
2. If you position the pointer over the page, it becomes a magnifying glass. To take a closer look, click on the area you want magnified. To return to previewing the full page, click once again.
3. To print your outline, click Print.
4. When the Print dialog box appears, click OK (Print) and your outline will print out. (Note: You may also simply print the outline directly without previewing it. To do this, just choose Print from the File menu. When the Print dialog box appears, click OK (Print).
Return to Diagram View and Work with the Notes Text
1. Before returning to Diagram view, save the document with File > Save As.
2. While still in Outline view, select the topic Snorkeling so that it will be selected and you can find it quickly when you return to Diagram view. (If the Snorkeling topic isn’t showing on the screen, press Ctrl+M (Command+M) to select the Main Idea and to show the top portion of your outline in the window. You can then select Snorkeling.)
15 Inspiration Workshop Tutorial
3. To return to Diagram view, click the Diagram button on the Outline toolbar.
Figure 33 – Diagram Button
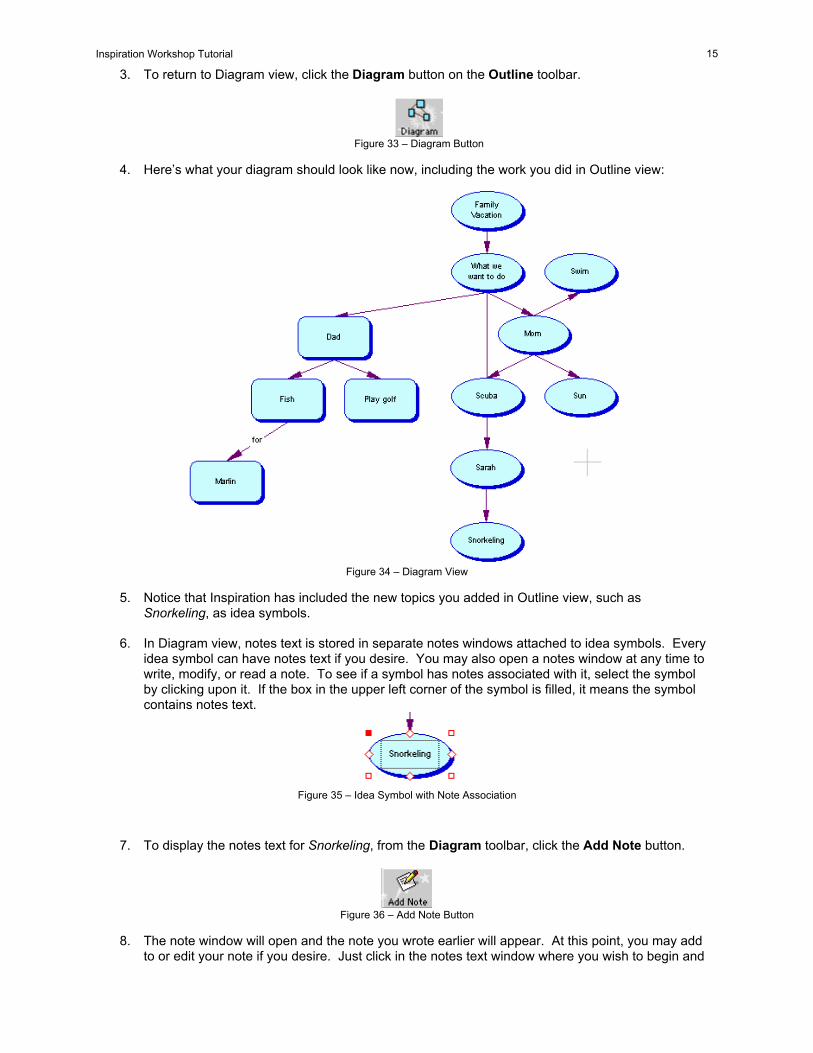
4. Here’s what your diagram should look like now, including the work you did in Outline view:
Figure 34 – Diagram View
5. Notice that Inspiration has included the new topics you added in Outline view, such as Snorkeling, as idea symbols.
6. In Diagram view, notes text is stored in separate notes windows attached to idea symbols. Every idea symbol can have notes text if you desire. You may also open a notes window at any time to write, modify, or read a note. To see if a symbol has notes associated with it, select the symbol by clicking upon it. If the box in the upper left corner of the symbol is filled, it means the symbol contains notes text.
Figure 35 – Idea Symbol with Note Association
7. To display the notes text for Snorkeling, from the Diagram toolbar, click the Add Note button.
Figure 36 – Add Note Button
8. The note window will open and the note you wrote earlier will appear. At this point, you may add to or edit your note if you desire. Just click in the notes text window where you wish to begin and
16 Inspiration Workshop Tutorial
start typing, or select the words you want to replace and type over them.
Figure 37 – Note Window
9. When you’re ready to close the notes text, simply click on the Close box on the notes text window (X) or click on the File menu and select Close. (Note: You may open a notes window – whether or not it has notes -- by double-clicking the box in the upper-left corner of the selected symbol.)
Changing the Font Used for Your Idea Symbols
You can also select your favorite font for your idea symbols. Let’s select all the symbols and change the font universally on the symbols.
1. To select all the symbols of your diagram, from the Edit menu, choose Select and then choose Symbols.
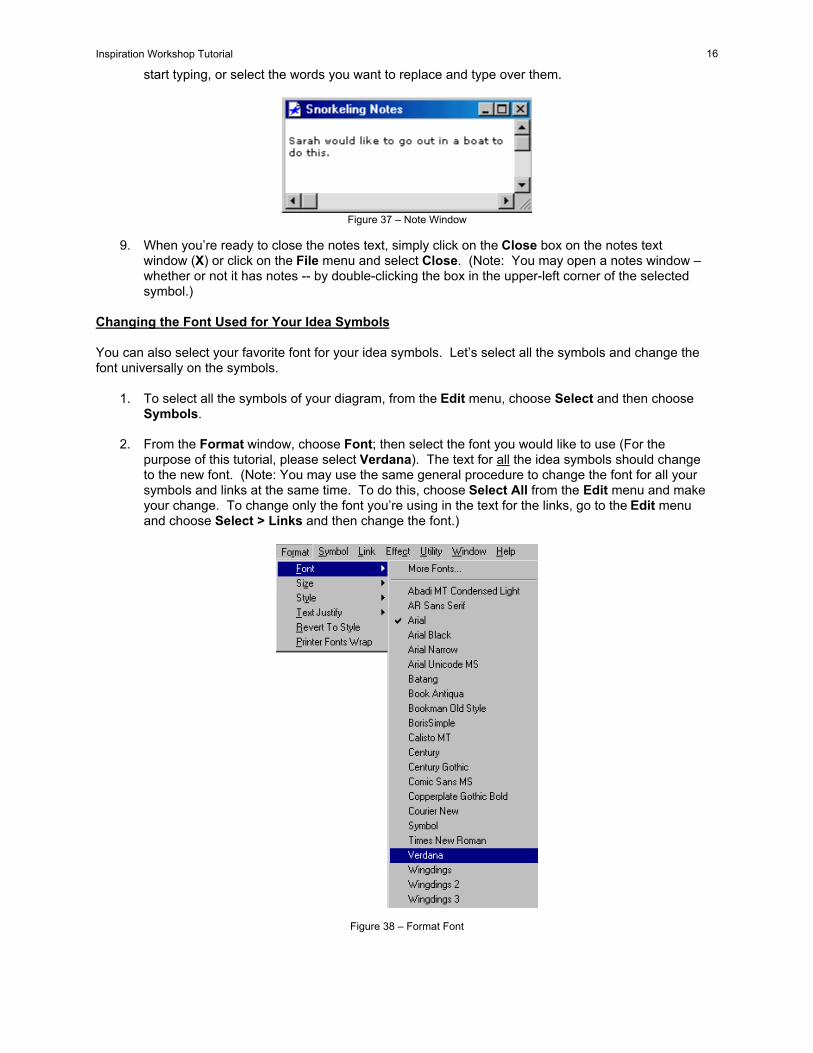
2. From the Format window, choose Font; then select the font you would like to use (For the purpose of this tutorial, please select Verdana). The text for all the idea symbols should change to the new font. (Note: You may use the same general procedure to change the font for all your symbols and links at the same time. To do this, choose Select All from the Edit menu and make your change. To change only the font you’re using in the text for the links, go to the Edit menu and choose Select > Links and then change the font.)
Figure 38 – Format Font
17 Inspiration Workshop Tutorial
Setting up a Default Look for New Symbols
Now that we have changed the way the idea symbols look, we can tell Inspiration to use this look for all new symbols that we create:
1. Start by selecting an idea symbol that already has the shape and the new font we want to use. Then we’ll set that as the new look so that the symbol’s characteristics will appear automatically whenever we create a new symbol. For the purpose of this tutorial, select the Play golf symbol, which has a rounded rectangle shape and Verdana font by clicking upon it.
2. From the Diagram toolbar, click the New Look button. Inspiration will set the new look and shows you a preview.
Figure 39 – New Look Button
3. If you wish to apply the new default look to existing symbols or links, select the symbols or links and from the Edit menu, select Paste New Look.
Add a New Symbol with the New Default Look
Now we will add a new symbol off the Main Idea symbol, Family Vacation. First we’ll select the Main Idea symbol and then create the symbol.
1. On the keyboard, press Ctrl+M (Command+M) to select the Main Idea symbol, Family Vacation.
2. On the Diagram toolbar, position the pointer over the left arrow of the Horizontal/Vertical Create button.
3. Click the left arrow to create a new symbol to the left of Family Vacation.
4. Type: “Possible places” and click outside the symbol to deselect it. You will notice that the new symbol contains the new default attributes.
Arranging Your Diagram into a Tree Chart
The Arrange tool will allow you to change your diagram into various kinds of charts. Let’s use the Arrange tool to change the format of the diagram from a Cluster chart to a Top Down Tree chart:
1. On the Diagram toolbar, click the Arrange button.
Figure 40 – Arrange Button
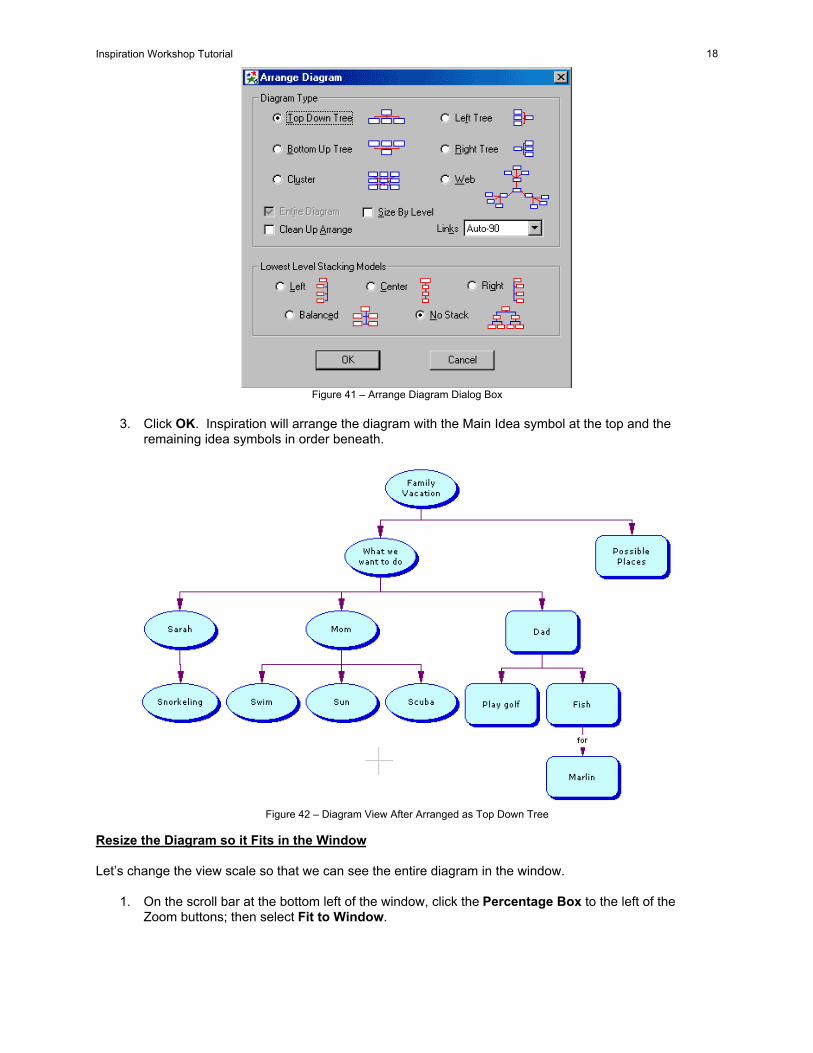
2. The Arrange dialog box will appear. You may use the Arrange dialog box to straighten up your current arrangement if you’ve been moving symbols around, or to completely rearrange the way your diagram is structured. Review the selections in the dialog box and use these default settings:
• Entire Diagram is selected (grayed out and selected) • Under Diagram Type, Top Down Tree is selected • In the Links drop-down list, Auto-90 is selected • Under Lowest Level Stacking Models, No Stack is selected
18 Inspiration Workshop Tutorial
Figure 41 – Arrange Diagram Dialog Box
3. Click OK. Inspiration will arrange the diagram with the Main Idea symbol at the top and the remaining idea symbols in order beneath.
Figure 42 – Diagram View After Arranged as Top Down Tree
Resize the Diagram so it Fits in the Window
Let’s change the view scale so that we can see the entire diagram in the window.
1. On the scroll bar at the bottom left of the window, click the Percentage Box to the left of the Zoom buttons; then select Fit to Window.

19 Inspiration Workshop Tutorial
Figure 43 – Percentage Box to Change View Scale
2. You may also resize your diagram to fit within the window by using the Zoom command on the View menu or by pressing Ctrl+E (Command+E) on your keyboard.
Using Color
Color can help to distinguish items on your diagram. You might use one color to easily identify a group of symbols (e.g., Sarah’s vacation preferences). You can either use the tools on the Draw toolbar or the commands from the Effect menu. First, let’s change the fill color of the symbols:
1. From the Edit menu, choose Select; then choose Symbols to select all the symbols in your diagram.
2. From the Draw toolbar, click the Fill Color button; then choose a color you wish from the palette. (Try a lighter color, such as light red; this will let your text continue to show up nicely against the symbols’ fill color.)
Figure 44 – Fill Color Button
3. Now let’s change the color of the symbol lines: From the Draw toolbar, select the Line Color button and then choose a color for the line. (Note: Line color affects both the symbol lines and shadow color. Try a dark red, or another dark color for contrast.)
Figure 45 – Line Color Button
Change a Symbol to a Multicolor Symbol Shape
You can change any normal symbol to a graphic if you desire. Let’s change the idea symbol Sun into a graphic image of the sun.
1. Click on the Sun idea symbol to select it.
2. From the Symbol Palette, click the sun symbol in the Basic Library. Notice that the Sun idea symbol changes to the image of the sun in your diagram.
Change the Colors of the Multicolor Symbol
1. Click the Sun symbol to select it.
2. Click the Multicolor button on the Draw toolbar and then choose the colors you desire from the palette.
20 Inspiration Workshop Tutorial
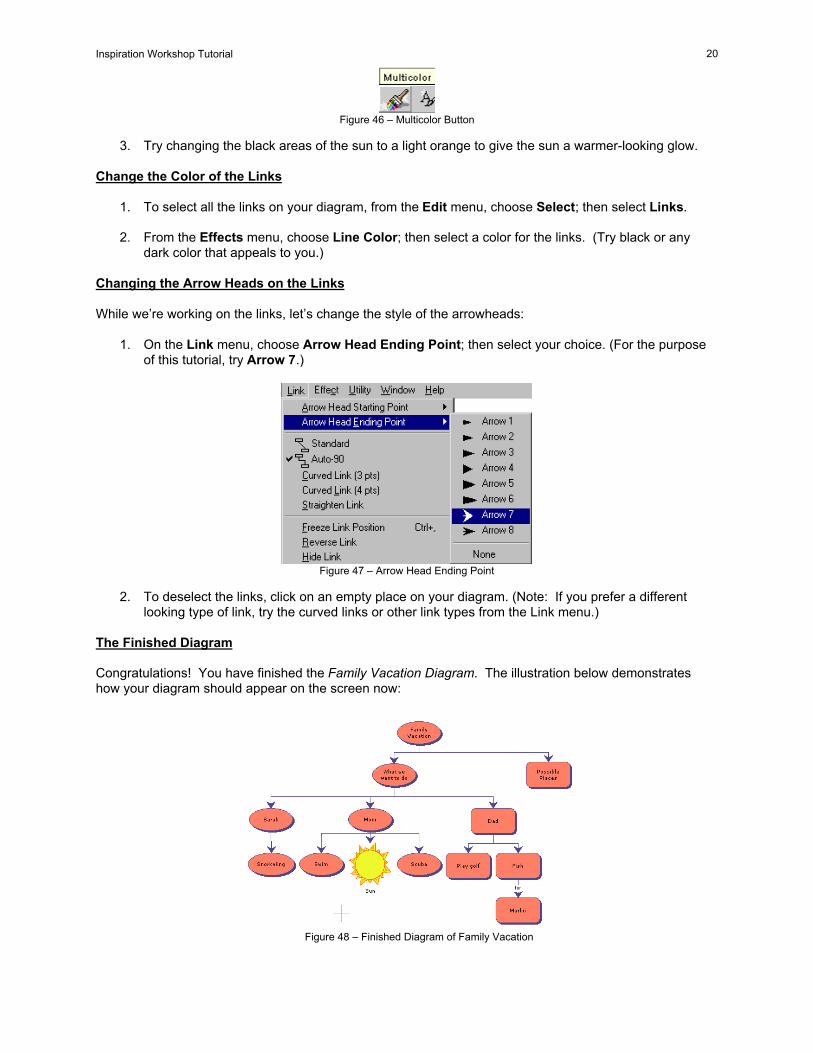
Figure 46 – Multicolor Button
3. Try changing the black areas of the sun to a light orange to give the sun a warmer-looking glow.
Change the Color of the Links
1. To select all the links on your diagram, from the Edit menu, choose Select; then select Links.
2. From the Effects menu, choose Line Color; then select a color for the links. (Try black or any dark color that appeals to you.)
Changing the Arrow Heads on the Links
While we’re working on the links, let’s change the style of the arrowheads:
1. On the Link menu, choose Arrow Head Ending Point; then select your choice. (For the purpose of this tutorial, try Arrow 7.)
Figure 47 – Arrow Head Ending Point
2. To deselect the links, click on an empty place on your diagram. (Note: If you prefer a different looking type of link, try the curved links or other link types from the Link menu.)
The Finished Diagram
Congratulations! You have finished the Family Vacation Diagram. The illustration below demonstrates how your diagram should appear on the screen now:
Figure 48 – Finished Diagram of Family Vacation
21 Inspiration Workshop Tutorial
Printing Your Diagram
Now that you’ve finished your diagram, you can print it:
1. First, preview your diagram. From the File menu, select Print Preview. Inspiration will show you what your printed page will look like so you can return to your diagram and make adjustments, if necessary or move on to step 2 below to print.
2. From the Print Preview window, click Print.
3. When the printer dialog box appears for your printer, make your choices and then click OK (Print).
4. When you print your diagram, the notes text for your diagram prints as a separate document after your diagram prints. (Note: To turn off notes text printing, from the File menu, select Print Options and in the Print Options dialog box, uncheck the Notes List check box.
5. (Note: You may also simply print your diagram directly without previewing it. To do this, just choose Print from the File menu. When the Print dialog box appears, click OK (Print).
Review Templates
Inspiration comes with a variety of templates already made that may be helpful to your particular project. Take a few moments to review them within the Inspiration Templates folder. Inspiration includes specific templates for topics in Language Arts, Science, Social Studies, Teacher Planning, and Thinking (Brainstorming).
22 Inspiration Workshop Tutorial
Additional Features in Inspiration There are quite a lot of other features in Inspiration that our tutorial didn’t touch upon. The following pages discuss a few features you might want to know about.
Importing Graphics for Symbols
You can use a graphic from a draw or paint program to represent an idea. You can also use a scanned photograph or any other graphic image as an idea symbol. On the Macintosh, you can import PICT, JPEG and GIF files. In Windows, you can import BMP, WMF, JPEG and GIF files. Inspiration automatically assigns a captioned text area below an imported graphic, making the graphic a captioned symbol. You can also position the caption inside the graphic, if you desire.
To insert a graphic from a file:
1. Click on the diagram where you want to place the graphic. 2. From the Edit menu, choose Insert Graphic. 3. Select the file you want to insert, and then click Open. 4. The graphic appears on the diagram.
Adding Hyperlinks to Access the Internet
A hyperlink is a “hot spot” that allows you to jump from Inspiration to a location on the Internet. To add a hyperlink, you can type an Internet address (URL) where you want the hyperlink to appear or you can assign a URL to selected text in the outline. When you click a hyperlink, your browser starts and opens the URL.
You can add hyperlinks to topics, subtopics, and notes text. The hyperlinks are active in Diagram view and Notes List view as well. When you export your outline to a Web page, the hyperlinks are also active in the exported document.
To automatically add a hyperlink:
(Note… To add a hyperlink, URL Hyperlink Auto-detection must be turned on. To turn on URL hyperlink Auto-detection, choose Internet on the Utility menu, and then choose URL Hyperlink Auto-detection.)
• Type the Internet address (URL) where you want the hyperlink to appear. For example: http://www.inspiration.com Inspiration automatically detects the Internet address and displays a hyperlink with blue, underlined text. After you complete adding the hyperlink, when you move the mouse pointer over the link, the pointer becomes a hand icon. This icon indicates the hyperlink is “live” and ready to start your browser.
To add a hyperlink to selected text:
1. Select the text to which you want to assign the Internet address (URL).
2. From the Utility menu, choose Internet, and then select URL Hyperlink. The URL Hyperlink dialog box appears. The text you selected appears in the Hyperlink Text box. Tip… You can edit the text in the Hyperlink Text box if you wish.
3. In the Hyperlink Address box, enter the Internet address (URL) that you want to assign to the text. For example: http://www.inspiration.com
4. Click OK. (Note… When you assign a URL hyperlink at the end of a text area (for example, at the end of a topic), text you type after the hyperlink becomes part of the hyperlink. To prevent text following a hyperlink from becoming part of the hyperlink, type all the text to be included in the topic, and then add the hyperlink.)
23 Inspiration Workshop Tutorial
To edit a hyperlink:
1. Click directly before the first character in the link or directly after the last character.
2. Drag the mouse pointer across the link, and then release the mouse button. (Tip… You can also use the arrow keys to move the cursor inside the link.)
3. Edit the text, and then click away from the link. (Note… You can also turn off hyperlinks when you want to edit a hyperlink. Turning off hyperlinks prevents you from unintentionally starting your browser while you are editing a hyperlink. See “To turn off hyperlinks” below.)
To remove a hyperlink:
Select the hyperlink, and then press Delete. —Or—
1. Select the text to which the Internet address (URL) is assigned.
2. From the Utility menu, choose Internet, and then select URL Hyperlink.
3. The URL Hyperlink dialog box appears.
4. Click Remove Hyperlink.
To turn off automatic detection of URL hyperlinks:
You can turn off automatic detection of URL hyperlinks if you do not want Internet addresses (URLs) that you add to your document to be automatically formatted as hyperlinks. Do one of the following:
• From the Utility menu, choose Internet, and then select URL Hyperlink Autodetection to clear the check mark and turn off the feature.
—Or—
• On the File menu, choose Application Properties. Clear the URL Hyperlink Auto-detection check box.
To turn off hyperlinks:
You can turn off hyperlinks if you do not want Internet addresses (URLs) that you add to your document to be active. This can be useful when you want to edit Internet addresses in the document. Do one of the following:
• From the Utility menu, choose Internet, and then select Live Hyperlinks to clear the check mark and turn off the feature.
—Or— • From the File menu, choose Application Properties. Clear the Live Hyperlinks check
box.
24 Inspiration Workshop Tutorial
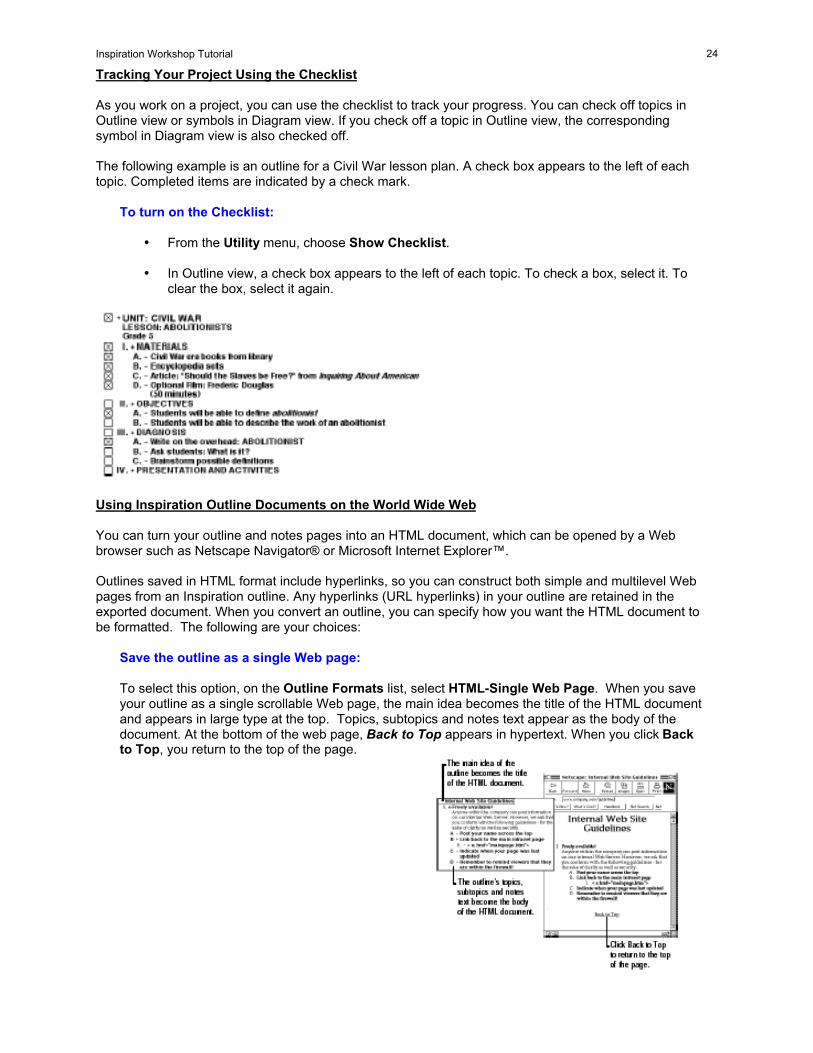
Tracking Your Project Using the Checklist
As you work on a project, you can use the checklist to track your progress. You can check off topics in Outline view or symbols in Diagram view. If you check off a topic in Outline view, the corresponding symbol in Diagram view is also checked off.
The following example is an outline for a Civil War lesson plan. A check box appears to the left of each topic. Completed items are indicated by a check mark.
To turn on the Checklist:
• From the Utility menu, choose Show Checklist.
• In Outline view, a check box appears to the left of each topic. To check a box, select it. To clear the box, select it again.
Using Inspiration Outline Documents on the World Wide Web
You can turn your outline and notes pages into an HTML document, which can be opened by a Web browser such as Netscape Navigator® or Microsoft Internet Explorer™.
Outlines saved in HTML format include hyperlinks, so you can construct both simple and multilevel Web pages from an Inspiration outline. Any hyperlinks (URL hyperlinks) in your outline are retained in the exported document. When you convert an outline, you can specify how you want the HTML document to be formatted. The following are your choices:
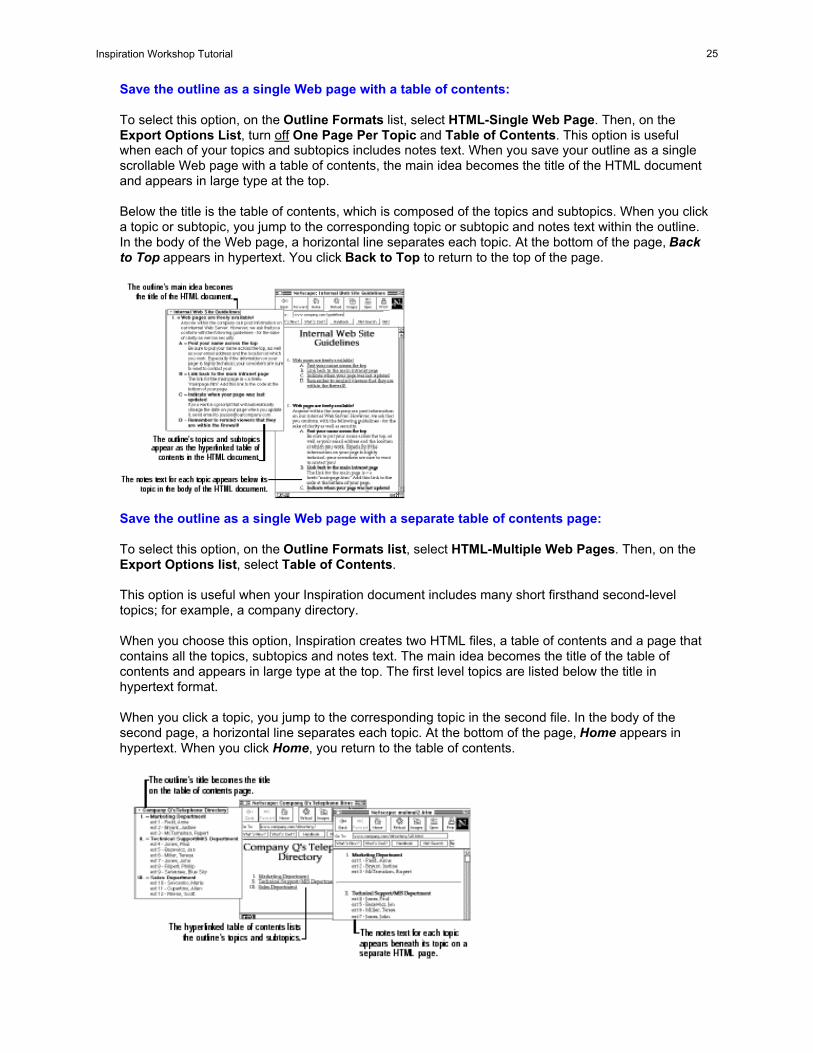
Save the outline as a single Web page:
To select this option, on the Outline Formats list, select HTML-Single Web Page. When you save your outline as a single scrollable Web page, the main idea becomes the title of the HTML document and appears in large type at the top. Topics, subtopics and notes text appear as the body of the document. At the bottom of the web page, Back to Top appears in hypertext. When you click Back to Top, you return to the top of the page.
25 Inspiration Workshop Tutorial
Save the outline as a single Web page with a table of contents:
To select this option, on the Outline Formats list, select HTML-Single Web Page. Then, on the Export Options List, turn off One Page Per Topic and Table of Contents. This option is useful when each of your topics and subtopics includes notes text. When you save your outline as a single scrollable Web page with a table of contents, the main idea becomes the title of the HTML document and appears in large type at the top.
Below the title is the table of contents, which is composed of the topics and subtopics. When you click a topic or subtopic, you jump to the corresponding topic or subtopic and notes text within the outline. In the body of the Web page, a horizontal line separates each topic. At the bottom of the page, Back to Top appears in hypertext. You click Back to Top to return to the top of the page.
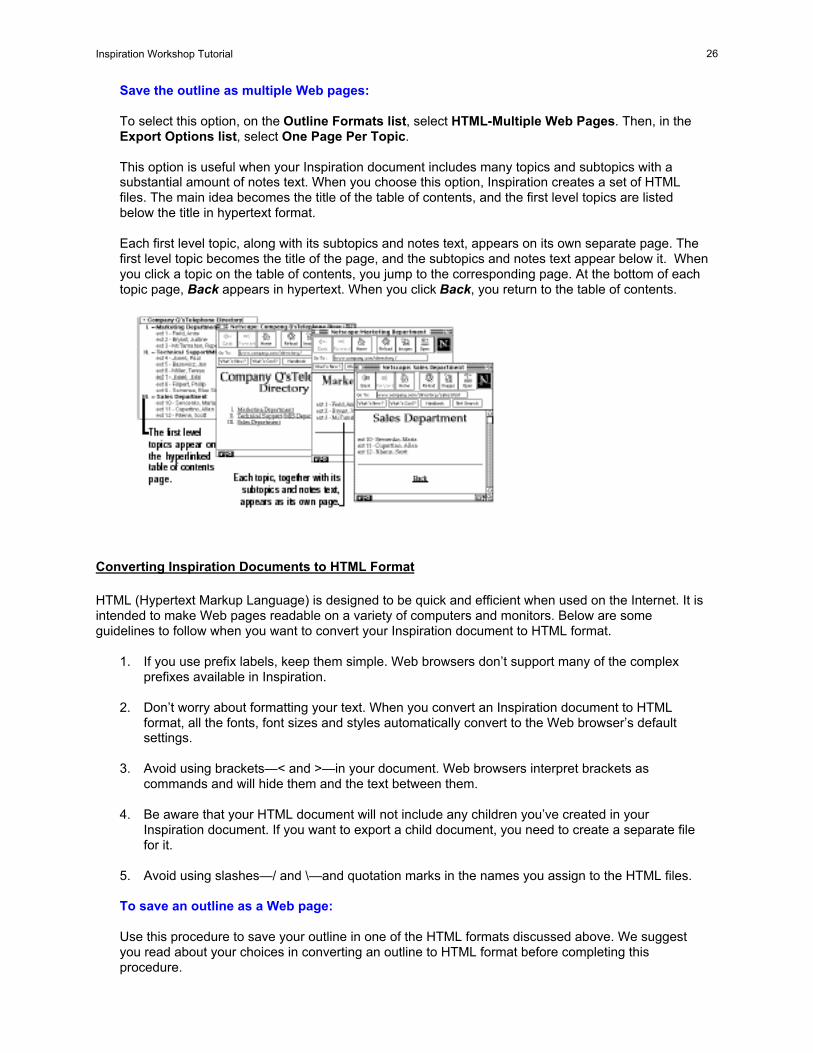
Save the outline as a single Web page with a separate table of contents page:
To select this option, on the Outline Formats list, select HTML-Multiple Web Pages. Then, on the Export Options list, select Table of Contents.
This option is useful when your Inspiration document includes many short firsthand second-level topics; for example, a company directory.
When you choose this option, Inspiration creates two HTML files, a table of contents and a page that contains all the topics, subtopics and notes text. The main idea becomes the title of the table of contents and appears in large type at the top. The first level topics are listed below the title in hypertext format.
When you click a topic, you jump to the corresponding topic in the second file. In the body of the second page, a horizontal line separates each topic. At the bottom of the page, Home appears in hypertext. When you click Home, you return to the table of contents.
26 Inspiration Workshop Tutorial
Save the outline as multiple Web pages:
To select this option, on the Outline Formats list, select HTML-Multiple Web Pages. Then, in the Export Options list, select One Page Per Topic.
This option is useful when your Inspiration document includes many topics and subtopics with a substantial amount of notes text. When you choose this option, Inspiration creates a set of HTML files. The main idea becomes the title of the table of contents, and the first level topics are listed below the title in hypertext format.
Each first level topic, along with its subtopics and notes text, appears on its own separate page. The first level topic becomes the title of the page, and the subtopics and notes text appear below it. When you click a topic on the table of contents, you jump to the corresponding page. At the bottom of each topic page, Back appears in hypertext. When you click Back, you return to the table of contents.
Converting Inspiration Documents to HTML Format
HTML (Hypertext Markup Language) is designed to be quick and efficient when used on the Internet. It is intended to make Web pages readable on a variety of computers and monitors. Below are some guidelines to follow when you want to convert your Inspiration document to HTML format.
1. If you use prefix labels, keep them simple. Web browsers don’t support many of the complex prefixes available in Inspiration.
2. Don’t worry about formatting your text. When you convert an Inspiration document to HTML format, all the fonts, font sizes and styles automatically convert to the Web browser’s default settings.
3. Avoid using brackets—< and >—in your document. Web browsers interpret brackets as commands and will hide them and the text between them.
4. Be aware that your HTML document will not include any children you’ve created in your Inspiration document. If you want to export a child document, you need to create a separate file for it.
5. Avoid using slashes—/ and \—and quotation marks in the names you assign to the HTML files.
To save an outline as a Web page:
Use this procedure to save your outline in one of the HTML formats discussed above. We suggest you read about your choices in converting an outline to HTML format before completing this procedure.
27 Inspiration Workshop Tutorial
1. In Outline view, display the outline that you want to convert to HTML format.
2. From the File menu, choose Export. The Export dialog box appears.
3. Choose your desired options.
4. Click Save. The Save As dialog box appears.
5. Navigate to the folder where you want to save the document.
6. Enter a name for the document. Inspiration automatically uses your main idea as the name and assigns the appropriate file extension. You can change the name of the file if you want.
7. Click Save. You can now open the document in a Web browser and use it as a Web page on the Internet. (Note… The HTML export may create many files, including JPEG files for any graphics you have in the outline. These files need to be kept together in order to browse them. The additional files are named based on the first file name you select.)
Try Creating Your Own Inspiration Diagram
Now that you have become an expert in using Inspiration, why don’t you try creating your own Inspiration diagram? Consider the topic: “All About Me” as the main idea of your diagram and begin linking ideas to it (e.g., education, research interests, classes taught, department/colleagues, hobbies, etc.). Here are some things to try:
1. Try various methods of idea entry such as RapidFire 2. Link idea symbols to one another 3. Include text on your links to demonstrate the relationships 4. Add a hyperlink or two to the idea symbols 5. Change the colors of idea symbols and links 6. Change the shape of some of the idea symbols 7. Convert some idea symbols into graphics 8. Insert a graphic from outside of Inspiration 9. Change the font of idea symbols 10. Arrange the diagram into a tree chart 11. Change to Outline view and add a subtopic 12. Add a few notes (both in Outline and Diagram view) 13. Save the file and then export the diagram as an HTML file


![Database Management System [DBMS] Tutorial - Tutorials Point](https://img.pdfslide.net/doc/110x75/613cb270a3339922f86ed730/database-management-system-dbms-tutorial-tutorials-point.jpg)