Embed Size (px)
Citation preview

install4jManual
© 2018 ej-technologies GmbH. All rights reserved.
Index
install4j help .......................................................................................................................................... 7
Licensing ................................................................................................................................................ 8
A Help topics .......................................................................................................................................... 9
A.1 Concepts ...................................................................................................................................... 9
A.1.1 Projects ................................................................................................................................. 9
A.1.2 File sets and components ................................................................................................. 11
A.1.3 Screens and actions .......................................................................................................... 13
A.1.4 Form screens ...................................................................................................................... 17
A.1.5 Layout groups .................................................................................................................... 20
A.1.6 Styles ................................................................................................................................... 24
A.1.7 Variables ............................................................................................................................. 30
A.1.8 VM parameters .................................................................................................................. 40
A.1.9 JRE bundles ......................................................................................................................... 43
A.1.10 Services ............................................................................................................................. 46
A.1.11 Elevation of privileges ..................................................................................................... 49
A.1.12 Merged projects ............................................................................................................... 52
A.1.13 Auto-update functionality ............................................................................................... 55
A.1.14 Code signing ..................................................................................................................... 60
A.1.15 Styling of DMGs on macOS ............................................................................................. 63
A.2 Generated installers ................................................................................................................. 67
A.2.1 Installer modes .................................................................................................................. 67
A.2.2 Command line options ..................................................................................................... 69
A.2.3 Response files .................................................................................................................... 74
A.2.4 JRE search ........................................................................................................................... 76
A.2.5 Downloads .......................................................................................................................... 78
A.2.6 Updates ............................................................................................................................... 80
A.2.7 Error handling .................................................................................................................... 82
A.3 Extending install4j .................................................................................................................... 84
A.3.1 Using the install4j API ........................................................................................................ 84
A.3.2 Extensions .......................................................................................................................... 87
B Reference ......................................................................................................................................... 89
B.1 Configuration steps .................................................................................................................. 89
B.2 Step 1: General Settings ........................................................................................................... 90
B.2.1 Overview ............................................................................................................................. 90
B.2.2 Application info .................................................................................................................. 91
B.2.3 Java version ........................................................................................................................ 92

B.2.4 Languages ........................................................................................................................... 94
B.2.5 Media file options .............................................................................................................. 96
B.2.6 Code signing ....................................................................................................................... 98
B.2.7 Merged projects ................................................................................................................. 99
B.2.8 Compiler variables ........................................................................................................... 100
B.2.9 Project options ................................................................................................................. 101
B.2.10 Dialogs ............................................................................................................................ 102
B.2.10.1 Search sequence dialog ......................................................................................... 102
B.2.10.2 Language selection dialog ..................................................................................... 102
B.2.10.3 Variable selection dialogs ...................................................................................... 102
B.2.10.4 Variables edit dialogs ............................................................................................. 103
B.2.10.5 Input dialog ............................................................................................................. 104
B.2.10.6 Configure JDKs dialog ............................................................................................. 104
B.2.10.7 Merged projects edit dialog .................................................................................. 105
B.3 Step 2: Files .............................................................................................................................. 106
B.3.1 Overview ........................................................................................................................... 106
B.3.2 Defining the distribution tree ......................................................................................... 107
B.3.2.1 Overview .................................................................................................................... 107
B.3.2.2 File wizard .................................................................................................................. 110
B.3.2.3 Wizard steps .............................................................................................................. 112
B.3.2.3.1 Select directory .................................................................................................. 112
B.3.2.3.2 Select files ........................................................................................................... 112
B.3.2.3.3 Compiler variable ............................................................................................... 112
B.3.2.3.4 Install options ..................................................................................................... 113
B.3.2.3.5 Exclude files and directories ............................................................................. 115
B.3.2.3.6 Exclude suffixes .................................................................................................. 115
B.3.3 Viewing the results .......................................................................................................... 116
B.3.4 File options ....................................................................................................................... 117
B.3.5 Defining installation components ................................................................................. 120
B.3.6 Dialogs .............................................................................................................................. 122
B.3.6.1 Distribution file chooser dialog ............................................................................... 122
B.3.6.2 Folder properties dialog ........................................................................................... 122
B.4 Step 3: Launchers ................................................................................................................... 123
B.4.1 Overview ........................................................................................................................... 123
B.4.2 Launcher wizard .............................................................................................................. 125
B.4.3 Wizard steps ..................................................................................................................... 126
B.4.3.1 Executable ................................................................................................................. 126
B.4.3.2 Icon ............................................................................................................................. 128
B.4.3.3 Java invocation .......................................................................................................... 129
B.4.3.4 VM options file .......................................................................................................... 131
B.4.3.5 Splash screen ............................................................................................................ 132
B.4.3.6 Advanced options ..................................................................................................... 133
B.4.3.6.1 Redirection .......................................................................................................... 133
B.4.3.6.2 Windows version info ........................................................................................ 134
B.4.3.6.3 Windows manifest options ............................................................................... 135
B.4.3.6.4 UNIX options ...................................................................................................... 136
B.4.3.6.5 macOS options ................................................................................................... 137
B.4.3.6.6 Menu integration ............................................................................................... 139
B.4.3.6.7 Auto-update integration ................................................................................... 140
B.4.3.6.8 Native libraries ................................................................................................... 141
B.4.3.6.9 Preferred VM ...................................................................................................... 142
B.4.3.6.10 Text lines on splash screen ............................................................................. 143
B.4.3.7 Dialogs ....................................................................................................................... 144
B.4.3.7.1 Main class selection dialog ............................................................................... 144
B.4.3.7.2 Class path dialog ................................................................................................ 144
B.4.3.7.3 Native libraries entry dialog ............................................................................. 145
B.4.3.7.4 Visual positioning ............................................................................................... 145
B.5 Step 4: Installer ....................................................................................................................... 147
B.5.1 Overview ........................................................................................................................... 147
B.5.2 Screens & actions ............................................................................................................ 148
B.5.3 Configuring applications ................................................................................................. 151
B.5.4 Configuring screens ......................................................................................................... 166
B.5.5 Available screens ............................................................................................................. 169
B.5.6 Configuring actions ......................................................................................................... 180
B.5.7 Available actions .............................................................................................................. 182
B.5.8 Screen and action groups ............................................................................................... 246
B.5.9 Configuring form components ...................................................................................... 250
B.5.10 Layout groups ................................................................................................................ 252
B.5.11 Available form components ......................................................................................... 260
B.5.12 Custom code .................................................................................................................. 313
B.5.13 Styles ............................................................................................................................... 314
B.5.14 Update options .............................................................................................................. 316
B.5.15 Auto-update options ..................................................................................................... 317
B.5.16 Dialogs ............................................................................................................................ 319
B.5.16.1 Custom code entry ................................................................................................. 319
B.5.16.2 Class selector dialog ............................................................................................... 319
B.5.16.3 Registry dialog ......................................................................................................... 320
B.5.16.4 Application template dialog .................................................................................. 320
B.5.16.5 Link selection dialog ............................................................................................... 320
B.5.16.6 String edit dialog ..................................................................................................... 320
B.5.16.7 Java code editor ...................................................................................................... 321
B.5.16.8 Java editor settings ................................................................................................. 324
B.5.16.9 Code gallery ............................................................................................................. 325
B.5.16.10 Key map editor ..................................................................................................... 325
B.5.16.11 ID selection dialog ................................................................................................ 325
B.5.16.12 Integration wizard ................................................................................................ 326
B.6 Step 5: Media .......................................................................................................................... 327
B.6.1 Overview ........................................................................................................................... 327
B.6.2 Media file types ................................................................................................................ 328
B.6.3 Media file wizard .............................................................................................................. 330
B.6.4 Wizard steps ..................................................................................................................... 331
B.6.4.1 Platform ..................................................................................................................... 331
B.6.4.2 Installer options ........................................................................................................ 332
B.6.4.3 Data files .................................................................................................................... 335
B.6.4.4 Bundled JREs ............................................................................................................. 337
B.6.4.5 Customize project defaults ...................................................................................... 339
B.6.4.6 32-bit or 64-bit (Windows) ....................................................................................... 341
B.6.4.7 Executable processing (Windows) .......................................................................... 342
B.6.4.8 Launcher (macOS single bundle) ............................................................................ 343
B.6.4.9 64-bit settings (macOS) ............................................................................................ 344
B.6.4.10 Additional files in DMG (macOS) ........................................................................... 345
B.6.4.11 DMG options (macOS) ............................................................................................ 346
B.7 Step 6: Build ............................................................................................................................ 347
B.7.1 Overview ........................................................................................................................... 347
B.7.2 Build options .................................................................................................................... 347
B.8 JRE download wizard .............................................................................................................. 349
B.9 JRE bundle wizard ................................................................................................................... 350
B.10 Preferences ........................................................................................................................... 353
B.11 Command line compiler ...................................................................................................... 354
B.11.1 Overview ......................................................................................................................... 354
B.11.2 Options ........................................................................................................................... 355
B.11.3 Using install4j with ant .................................................................................................. 358
B.11.4 Using install4j with gradle ............................................................................................ 362
B.11.5 Using install4j with maven ........................................................................................... 366

B.11.6 Relative resource paths ................................................................................................ 367
B.12 Launcher API ......................................................................................................................... 368
B.12.1 Controlling the splash screen ...................................................................................... 368
B.12.2 Receiving startup notifications .................................................................................... 368
Welcome To Install4j
Thank you for choosing install4j. To help you get acquainted with install4j's features, this manualis divided into two sections:
• Help topics [p. 9]
Help topics present important concepts in install4j. They are not necessarily tied to a singleconfiguration step. Help topics are recommended reading for all install4j users.
The help topics section does not cover all aspects of install4j. Please turn to the referencesection for an exhaustive explanation of all features that can be found in install4j.
• Reference [p. 89]
The reference section covers all configuration step, all dialogs and all features of install4j. Itis highly hierarchical and not optimized for systematic reading.
The reference section is the basis for install4j's context sensitive help system. Each configurationstep and each dialog have one or more corresponding items in the reference section.
We appreciate your feedback. If you feel that there's a lack of documentation in a certain areaof if you find inaccuracies in the documentation, please don't hesitate to contact us [email protected].
7
Install4j Licensing
With a 60-day evaluation license (1) you can integrate install4j into your build process beforepurchasing it. The evaluation period can be renewed until you actually start distributing installers.
install4j licenses can be purchased easily and securely online (2). We accept a large variety ofpayment methods including credit cards, checks and purchase orders. Pricing information is
available online (3).
install4j licenses are either
• Per-developer licenses
With one license a single user is allowed to install install4j on multiple machines.
For automated builds, you have to ensure that the install4j IDE is not running when runningyour build, otherwise the GUI will terminate and the build will fail.
• Floating licenses
A floating license purchase includes a license server which allows amaximumconcurrent usercount. An arbitrary number of developers may install install4j.
A floating license includes an unlimited number of automated build agents.
install4j comes in two editions
• Windows Edition
This edition can only generate installers for Microsoft Windows. The install4j IDE and thecommand line compiler themselves can run on other supported platforms as well.
• Multi-Platform Edition
This edition can generate installers for all supported platforms.
Please read the included file license.txt to learn more about the scope of the license. For
licensing questions, please contact [email protected] (4).
You can enter your license key by invoking Help->Enter license key from install4j's main menu. Tomake it easier for you to enter the license key, you can use the Paste from clipboard button, aftercopying any text fragment which contains the license key to your system clipboard. If a validlicense key can be found in the clipboard content, it is extracted and displayed in the dialog.
If a license has been entered, the licensing information is visible in the about dialog (Help->Aboutinstall4j). The install4j command line compiler [p. 354] also prints licensing information exceptwhen invoked with the quiet option [p. 355] .
Your license contains the information whether is is a license for the Multi-Platform or Windowsedition. If the evaluationmode is different than the scope of your license, you will have to restartinstall4j.
(1) https://www.ej-technologies.com/redir.php?product=install4j&target=trial(2) https://www.ej-technologies.com/redir.php?product=install4j&target=order(3) https://www.ej-technologies.com/redir.php?product=install4j&target=prices(4) https://www.ej-technologies.com/redir.php?product=install4j&target=sales&type=sales
8
A Help Topics
A.1 Concepts
A.1.1 Install4j Projects
Project files
A project in install4j is the collection of all information required to build media files. A project issaved to a single XML file with an .install4j extension. Project files are platform-independent,you can open and compile them on any supported platform. Any paths that you enter in install4jare saved as absolute paths by default. This allows you to move the project file to a differentlocation on your computer and the compilation will still work. If you wish to use your project fileon multiple computers or platforms or compile your launchers by automatic build agents, it ismore convenient to use relative paths. install4j provides an option to convert all paths to relativepaths [p. 101] when you save your project.
install4j keeps a list of recently opened projects under Project->Reopen. By default, install4j opensthe last project on startup. This behavior can be changed in the preferences dialog [p. 353] . Youcan pass the nameof a project file as a command line parameter to install4j to open it on startup.Also, the command line compiler [p. 354] expects the project file name as its argument.
Contents of a project
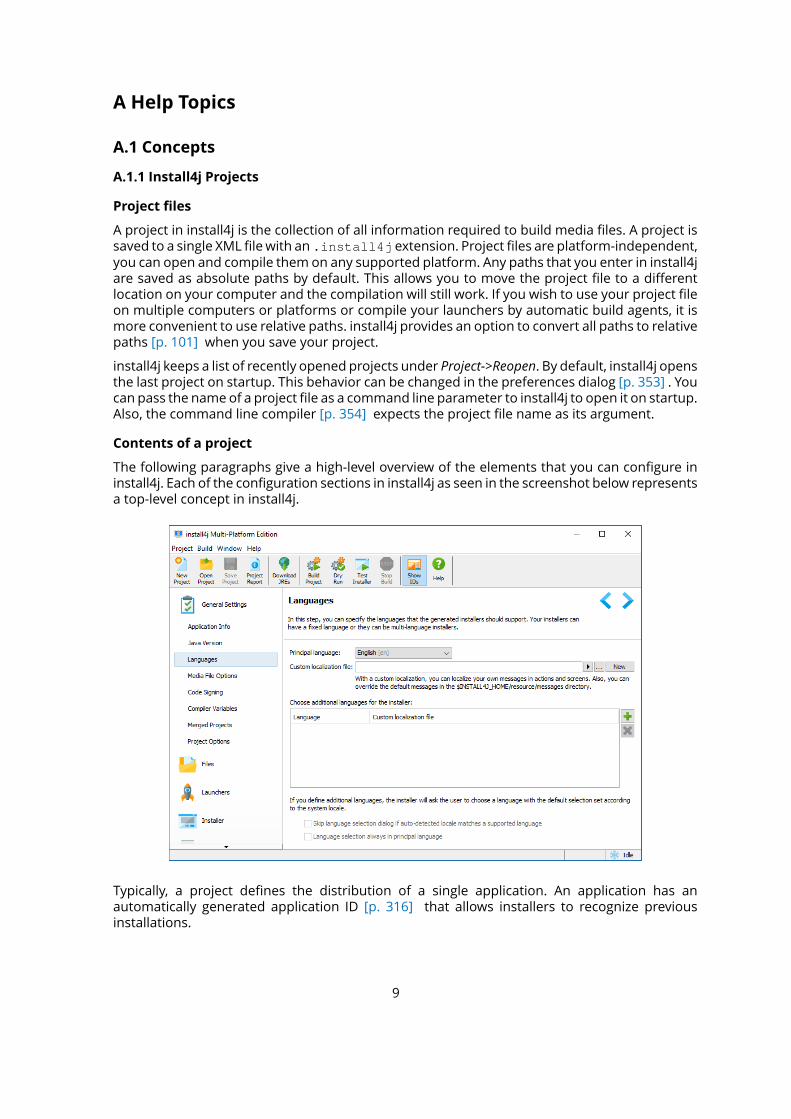
The following paragraphs give a high-level overview of the elements that you can configure ininstall4j. Each of the configuration sections in install4j as seen in the screenshot below representsa top-level concept in install4j.
Typically, a project defines the distribution of a single application. An application has anautomatically generated application ID [p. 316] that allows installers to recognize previousinstallations.
9
At the core of the project definition is the sequence of installer screens and actions [p. 13] . Theydetermine what the users see, what information they can enter and what the installer does.install4j offers a lot of flexibility regarding the configuration of of your installer. Besides creatingtraditional application installers, install4j is equally suited to create small applications thatmodifythe target system in some way. The install4j runtime is localized into many languages. You canconfigure your installers to support one or multiple languages [p. 94] .
Most installers install files to a dedicated directory and optionally to several existing directorieson the target computer. That's what the "Files" section [p. 106] in the install4j IDE is for. Here,you define a "distribution tree", and optionally "installation components" which can also bedownloaded on demand [p. 335] . The actual installation of these files is handled by a specialaction (the "Install files" action) which is part of the default project template. If your installersshould not install any files, you can remove that action and ignore the "Files" configurationsection. When the "Install files" action is executed, it creates an uninstaller. The uninstaller offersthe same flexibility as the installer and is configured in the same way.
Unless the installed files are only static data, you will need application launchers to allow theuser to start your application. You can define one or several application launchers in the"Launchers" section [p. 123] . Launchers generated by install4j have a rich set of configurationoptions including an optional splash screen or advanced features like a single instance mode.Configured launchers can also be "services" that run independently of logged-on users. install4joffers special installation screens and actions for services.
install4j has many advanced features concerning the runtime-detection or bundling of JREs. Youdefine Java version constraints and a search sequence [p. 92] for both your installers and yourgenerated launchers. In this way, you ensure that the launchers run with the same JRE as yourinstallers. Bundling of JREs is configured on a per-media set basis [p. 337] and includes an optionalon-demand download of a JRE.
Finally, the media file definitions define the actual executables that you distribute. They captureplatform-specific information and provide several ways to override project settings. You typicallydefine onemedia file for each platform.Multiplemedia files for the same platform can be addedas needed. Media files are either installers or archives. Archives simply capture the launchersand the distribution tree. Archives are a limited way to create a distribution and might not besuitable if you rely on the flexibility that is offered by installers.
Project reports
A project, and especially the definition of the installer and uninstaller, is very hierarchical andpossibly quite complex. In order to check all your projects settings on a single page, or to printout your project definition, install4j offers a project report. This action is available from themenu and toolbar. When you generate a report, an HTML file is written to disk. In addition, adirectory named install4j_images is created which holds all required icons. The exportdirectory for project reports is remembered across restarts of install4j. install4j will suggest afile name based on the project name. If that file already exists, a number will be appended tomake the file name unique.
10
A.1.2 File Sets And Installation Components
Introduction
install4j offers two mechanisms to group files: File sets and installation components. File setsare configured in the distribution tree and can be used in a variety of use cases as building blocksfor your installers. Installation components are presented to the user at runtime andmark certainparts of the distribution tree that have to be installed if the user chooses an installationcomponent.
Both file sets and installation components are optional concepts that can be ignored if they arenot required for an installer project: There is always a "Default file set" to which you can add filesin the distribution tree and on the installation components tab you do not have to add anycomponents.
File sets
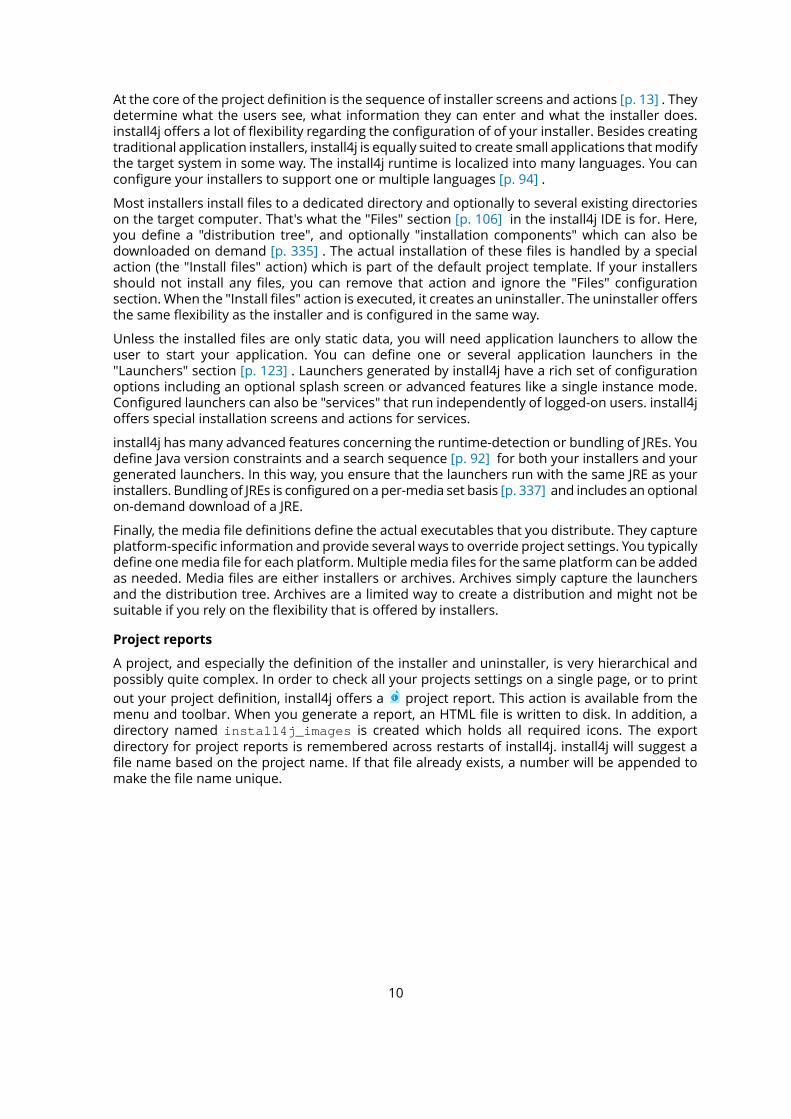
File sets are a way to group files in the distribution tree. When you need to select files in otherparts of the install4j IDE, you can select the file set node instead of selecting single files anddirectories. Each file set has a special "Installation directory" child node that maps to theinstallation directory selected by the user at run time. Custom installation roots are definedseparately for different file sets. If you require the same installation root in two different file sets,you simply define the same root twice.
The installation of file sets can be toggled programmatically at run time. The code snippet todisable the installation of a file set at run time is context.getFileSetById("123").setSelected(false); if the ID of the file set is "123". You could insert this snippet into a "Runscript" action that is placed before the "Install files" action on the screens & actions tab [p. 148] .File set IDs are displayed when the "Show IDs" toggle button in the lower right corner of thedistribution tree is selected.
A common use case is to exclude platform-specific files from certain media files. You can definefile sets for different platforms and exclude all unneeded file sets in the media wizard [p. 339] .This is an example of how to use file sets at design time in the install4j IDE.
Within one file set, all relative paths must be unique. However, the same relative path can bepresent in different file sets. Suppose you have different DLL files forWindows 7 and forWindows8 and higher. You can create two file sets so that the installer contains both alternative versions.Once you find out whether you run on Windows 7 or on Windows 8 and higher, you can disablethe file set that should not be installedwith the code snippet shown above. By default, all includedfile sets are installed. If the same relative path occurs twice, it is undefinedwhich version is used.In this case you have to make sure to disable the file sets that are not appropriate.
11
Installation components
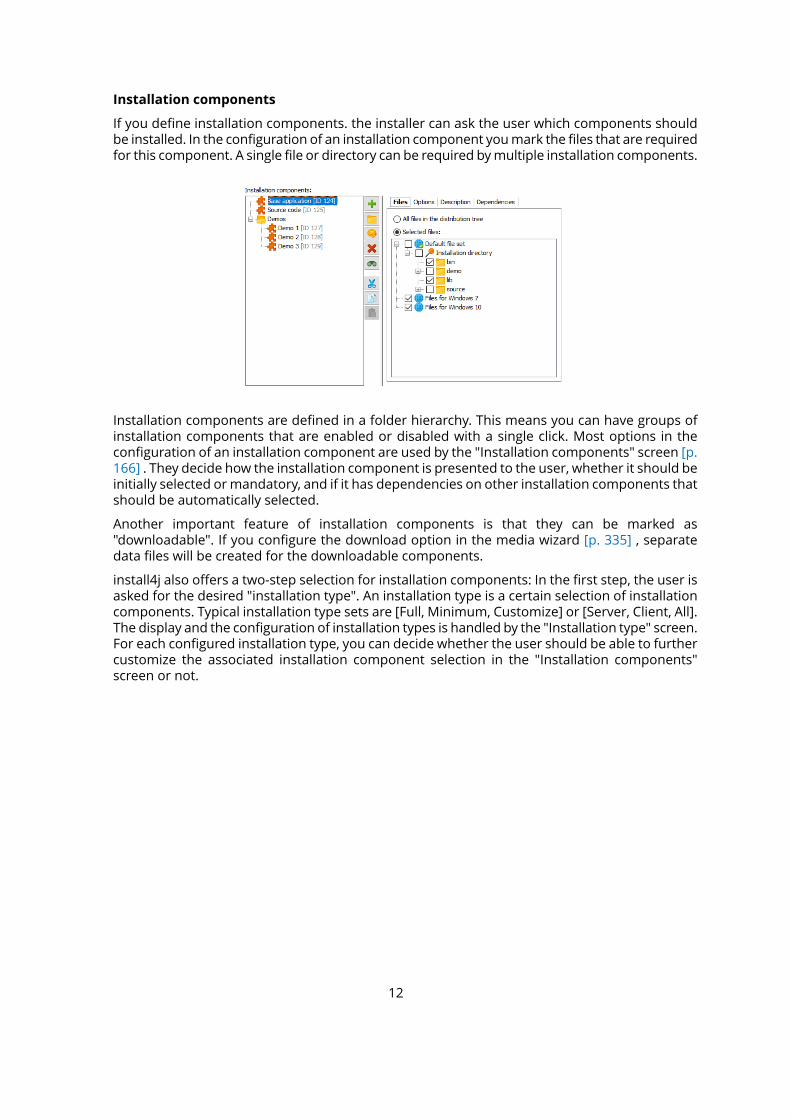
If you define installation components. the installer can ask the user which components shouldbe installed. In the configuration of an installation component youmark the files that are requiredfor this component. A single file or directory can be required bymultiple installation components.
Installation components are defined in a folder hierarchy. This means you can have groups ofinstallation components that are enabled or disabled with a single click. Most options in theconfiguration of an installation component are used by the "Installation components" screen [p.166] . They decide how the installation component is presented to the user, whether it should beinitially selected ormandatory, and if it has dependencies on other installation components thatshould be automatically selected.
Another important feature of installation components is that they can be marked as"downloadable". If you configure the download option in the media wizard [p. 335] , separatedata files will be created for the downloadable components.
install4j also offers a two-step selection for installation components: In the first step, the user isasked for the desired "installation type". An installation type is a certain selection of installationcomponents. Typical installation type sets are [Full, Minimum, Customize] or [Server, Client, All].The display and the configuration of installation types is handled by the "Installation type" screen.For each configured installation type, you can decide whether the user should be able to furthercustomize the associated installation component selection in the "Installation components"screen or not.
12
A.1.3 Screens And Actions
Introduction
With screens and actions you configure two separate aspects of the installer: the user interfacethat is displayed by your installer and uninstaller and the actual installation and uninstallation.Every screen can have a list of actions attached that are executed when the user advances tothe next screen. install4j offers a wide variety of pre-defined screens and actions that you canarrange according to your needs. Some of these screens and actions are quite generic and canbe used as programming elements, such as the "Configurable form" [p. 17] screen and the "Runscript" action.
Installer applications
Building an install4j project createsmedia files which are either installers or archives. An installeris defined as a sequence of screens an actions and is executedwhen the user executes themediafile. Installers usually install an uninstaller which removes the installation. The uninstaller, too,is a freely configurable sequence of screens and actions. Archives do not have an installer oruninstaller and the user extracts the contained data with other tools.
In addition to the installer and uninstaller, you can define custom installer applications [p. 151]that are added to the distribution tree. These custom installer applications can use the samescreens and actions that the installer can use. Unlike installer and uninstaller, they are also addedto archives. They can be used to write separate maintenance applications for your installationsthat are either invoked directly by the user or programatically by your application.
An important use-case for custom installer applications is to create a first-run installer for archives.While there is no need to install files to the installation directory in the case of an archive, therewill usually be screens and actions that set up the environment of your application. In order toavoid the duplication of screens and actions, install4j offers the possibility to create links toscreens and actions. In this way, a custom installer application can include a partial set of thescreens and actions in the installer. Such a first-run installer should be added to the .install4jruntime directory in order to no expose it as part of the application. This is done by specifyingits executable directory property as the empty string. You can invoke the first-run installerprogramatically with the com.install4j.api.launcher.ApplicationLauncherutility class.Please see the Javadoc for more information. You can query if any of the generated launchersof an installed archive are run for the first time by calling ApplicationLauncher.isNewArchiveInstallation() at the beginning of your main method to decide whether tolaunch the first-run installer or not.
Another common use case for custom installer applications is to create auto-updaters.Auto-updaters are described in detail in a separate help topic [p. 55] .
Control flow
At runtime, install4j instantiates all screens and actions and organizes the screen flow and actionexecution. There are a number of aspects regarding this control flow that you can customize inthe install4j IDE. Both screens [p. 166] and actions [p. 180] have anoptional "Condition expression"property that can be used to conditionally show screens and execute actions. Screens have a"Validation expression" property that is invokedwhen the user clicks on the "Next" button allowingyou to check whether the user input is valid and whether to advance to the next screen. Theseare the most commonly used hooks in the control flow for "programming" the installer. All"expression" properties in install4j can be simple Java expressions or scripts of Java code asdescribed on the help page for the Java code dialog [p. 321] .
13
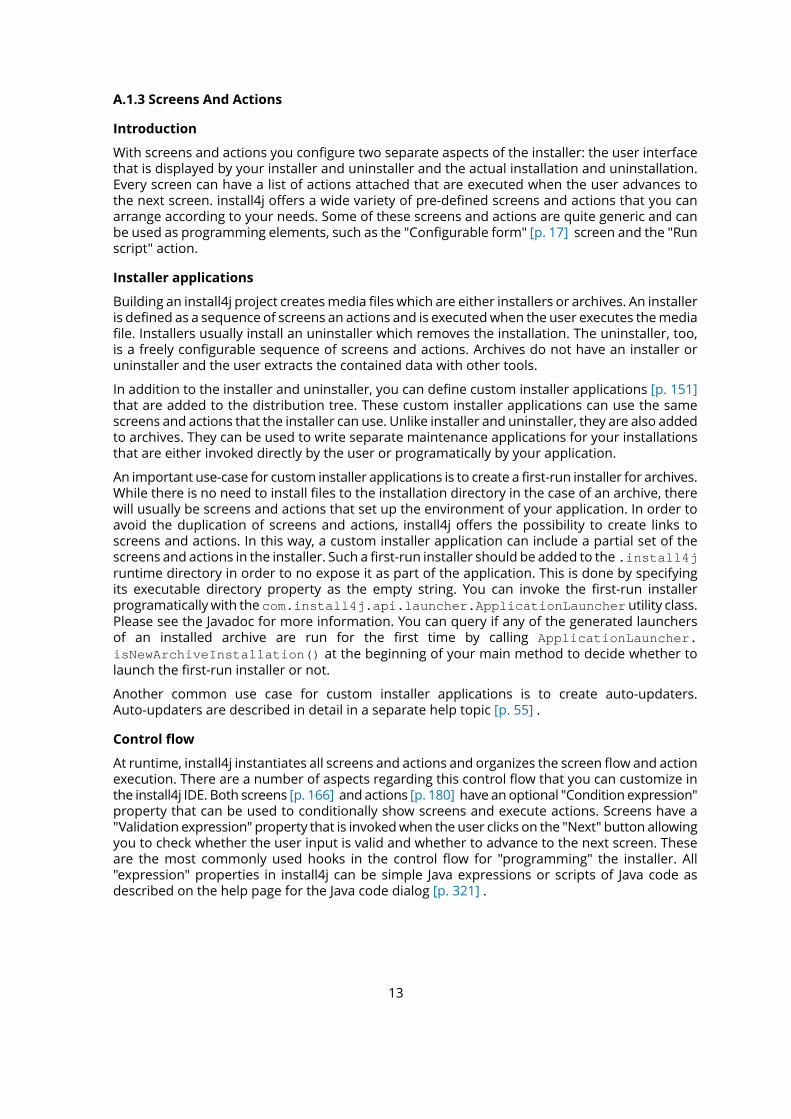
Common properties of actions
Common properties of screens
If you use a series of screens to query information from the user, the users expect to be able togo back to previous screens in order to review or change their input. This is fine as long as noactions are attached to the screen. When actions have been executed, the questions is whatshould happen if the user goes back to a screen with actions and clicks on "Next" again. Bydefault, install4j executes actions only once, but that may not be what you want, if they operateon the user input in a screen. Since install4j has no way of knowing what should happen in thiscase, it applies a "Safe back button" policy by default: if the previous screen had actions attached,the back button is not visible. You can change this policy for each screen, either making the backbutton always visible or always hidden. The "Can be executed multiple times" property of eachaction is relevant in the case where you you make the back button always visible for the nextscreen.
14
Another hook into the control flow is the ability to declare every screen as a "Finish" screen, i.e.the "Next" button will be replaced with a "Finish" button and the installer will quit after thatbutton is pressed. Consider to use a "banner" screen in that case since it alerts the user that aspecial screen has been reached.
Rollback behavior
At any time in the installation sequence the user can hit the "Cancel" button. The only exceptionin the standard screens is a customizable progress screen where the "Cancel" button has beendisabled. install4j is able to completely roll back any modification performed by its standardactions. However, the expectation of a user might not be that the installation is rolled back.Consider a series of post-installation screens that the user doesn't feel like filling out. Dependingon the installer, the user might feel that installation will work even if the installer is cancelled atthat point. A complete rollback would then irritate the user. That's why install4j has the conceptof a "rollback barrier". Any action or screen can be a rollback barrier whichmeans that any actionsbefore and including that action or screen will not be rolled back if the user cancels later on.
By default, only the "Installation screen" is a rollback barrier. This means that if the user cancelswhile the installation is running, everything is rolled back. If the user cancels on any of thefollowing screens, nothing that was performed on or before the installation screen is rolled back.With the "Rollback barrier" property of actions and screens you can make this behavior morefine-grained and customize it according to your own needs.
Error handling
Every action has two possible outcomes: failure or success. If an action succeeds the next actionis invoked. When the last action of a screen is reached, the next screen is displayed. What shouldhappen if an action doesn't succeed? This depends on how important the action is to yourinstallation. If your application will not be able to run without the successful execution of thisaction, the installer should fail and initiate a rollback. However, many actions are of peripheralimportance, such as the creation of a desktop link. Declaring that the installer has failed becausea desktop link could not be created and rolling back the entire installation would becounterproductive. That's why the failure of an action is ignored by install4j by default. If apossible failure of an action is critical, you can configure its "Failure strategy" to either ask theuser on whether to continue or to quit immediately.
Standard actions in install4j fail silently, i.e. the "Create a desktop link" action will not display anerrormessage if the link could not be created. For all available failure strategies, you can configurean error message that is displayed in the case of failure. The "Install files" action has its own,more granular failure handling mechanism that is automatically invoked after the installation ofeach file.
Standard and customizable screens
install4j offers a series of standard screens that are fully localized and serve a specific purpose.These standard screens have a preferred order, when you insert such a screen it will insert itselfautomatically in the correct position. This order is not mandated, you can re-order the screensin any way you like, however they may not yield the desired result anymore. If for example youplace the "Services" screen after the screen with the "Install service" actions (typically the"Installation" screen), the "Services" screen will not be able to modify the service installationsanymore and the default values are used.
The customizable screens don't have a fully defined purpose, their messages are configurableand empty by default. For example the "Display progress" screen is similar to the "Installation"screen, however the title and the subtitle are configurable. Customizable screens also do nothave any restriction with respect to how many times they can occur. While the "Installation"screen (and other screens) can occur only once for an installer, the "Display progress" screencould be used multiple times.
15

The "Welcome" and "Finish" screens have a special layout that is called "banner screen" in install4j.There are customizable banner screens to help you reproduce this layout if you require it in adifferent context. The most flexible of all customizable screens are the "configurable form"screens. They allow you to freely define the contents of a screen and are described in a separatehelp topic [p. 17] .
16
A.1.4 Form Screens
Introduction
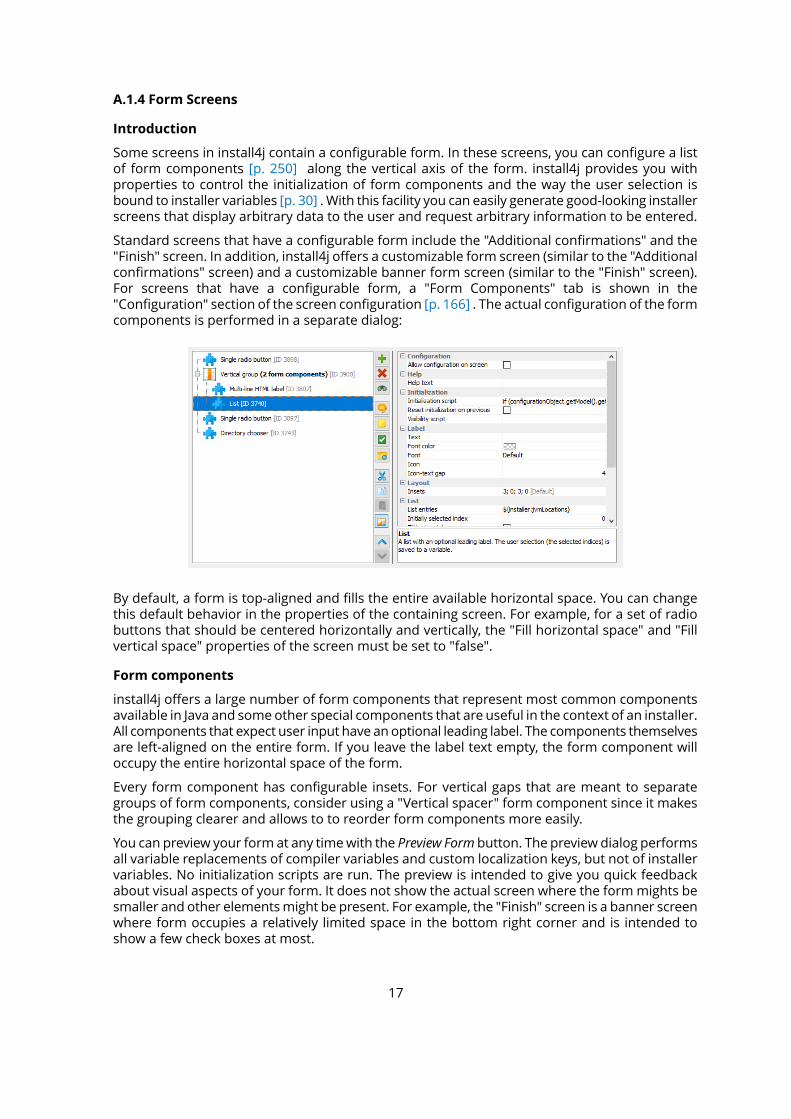
Some screens in install4j contain a configurable form. In these screens, you can configure a listof form components [p. 250] along the vertical axis of the form. install4j provides you withproperties to control the initialization of form components and the way the user selection isbound to installer variables [p. 30] . With this facility you can easily generate good-looking installerscreens that display arbitrary data to the user and request arbitrary information to be entered.
Standard screens that have a configurable form include the "Additional confirmations" and the"Finish" screen. In addition, install4j offers a customizable form screen (similar to the "Additionalconfirmations" screen) and a customizable banner form screen (similar to the "Finish" screen).For screens that have a configurable form, a "Form Components" tab is shown in the"Configuration" section of the screen configuration [p. 166] . The actual configuration of the formcomponents is performed in a separate dialog:
By default, a form is top-aligned and fills the entire available horizontal space. You can changethis default behavior in the properties of the containing screen. For example, for a set of radiobuttons that should be centered horizontally and vertically, the "Fill horizontal space" and "Fillvertical space" properties of the screen must be set to "false".
Form components
install4j offers a large number of form components that represent most common componentsavailable in Java and someother special components that are useful in the context of an installer.All components that expect user input have anoptional leading label. The components themselvesare left-aligned on the entire form. If you leave the label text empty, the form component willoccupy the entire horizontal space of the form.
Every form component has configurable insets. For vertical gaps that are meant to separategroups of form components, consider using a "Vertical spacer" form component since it makesthe grouping clearer and allows to to reorder form components more easily.
You can preview your form at any timewith the Preview Form button. The preview dialog performsall variable replacements of compiler variables and custom localization keys, but not of installervariables. No initialization scripts are run. The preview is intended to give you quick feedbackabout visual aspects of your form. It does not show the actual screen where the formmights besmaller and other elementsmight be present. For example, the "Finish" screen is a banner screenwhere form occupies a relatively limited space in the bottom right corner and is intended toshow a few check boxes at most.
17
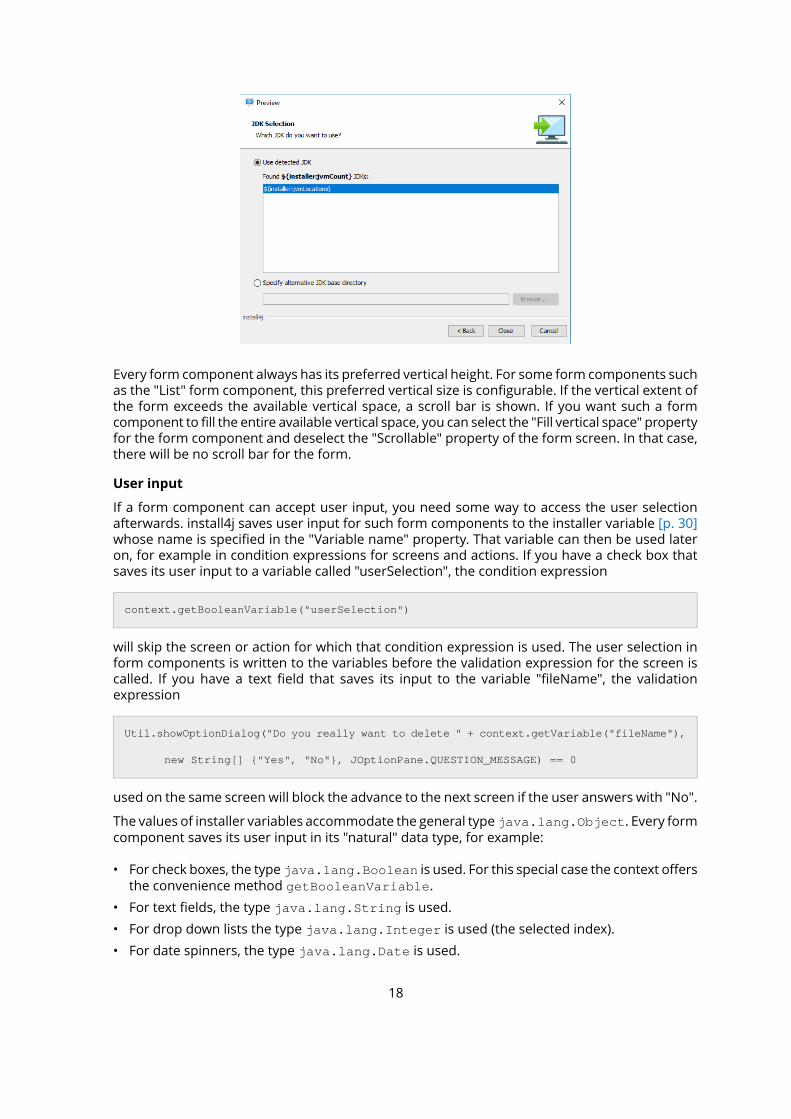
Every form component always has its preferred vertical height. For some form components suchas the "List" form component, this preferred vertical size is configurable. If the vertical extent ofthe form exceeds the available vertical space, a scroll bar is shown. If you want such a formcomponent to fill the entire available vertical space, you can select the "Fill vertical space" propertyfor the form component and deselect the "Scrollable" property of the form screen. In that case,there will be no scroll bar for the form.
User input
If a form component can accept user input, you need some way to access the user selectionafterwards. install4j saves user input for such form components to the installer variable [p. 30]whose name is specified in the "Variable name" property. That variable can then be used lateron, for example in condition expressions for screens and actions. If you have a check box thatsaves its user input to a variable called "userSelection", the condition expression
context.getBooleanVariable("userSelection")
will skip the screen or action for which that condition expression is used. The user selection inform components is written to the variables before the validation expression for the screen iscalled. If you have a text field that saves its input to the variable "fileName", the validationexpression
Util.showOptionDialog("Do you really want to delete " + context.getVariable("fileName"),
new String[] {"Yes", "No"}, JOptionPane.QUESTION_MESSAGE) == 0
used on the same screen will block the advance to the next screen if the user answers with "No".
The values of installer variables accommodate the general type java.lang.Object. Every formcomponent saves its user input in its "natural" data type, for example:
• For check boxes, the type java.lang.Boolean is used. For this special case the context offersthe convenience method getBooleanVariable.
• For text fields, the type java.lang.String is used.
• For drop down lists the type java.lang.Integer is used (the selected index).
• For date spinners, the type java.lang.Date is used.
18

The description of the value type for each form component that accepts user input is shown inthe registry dialog [p. 320] when you select the form component.
Initialization
For each form component, install4j offers several properties that allow you to customize its initialstate. However, there may be other advanced properties or a more complex logic is requiredformodifying the form component. For this purpose, the "Initialization script" property is provided.Form components can expose a well-known component in the initialization script that allowsyou to perform these modifications. This so-called "configuration object" is usually contained inthe form component itself. For example a "Check box" form component exposes aconfigurationObject parameter of type javax.swing.JCheckBox and a "Text field" formcomponent exposes a javax.swing.JTextField.
As with actions and screens [p. 13] in general, the possibility that the user moves back and forthin the screen sequence presents a dilemma to install4j. Any form components that accepts userinput has a configurable initial value and any form component can have an initialization script.This initialization is performed when the user enters the screen for the first time. Should thisinitialization be performed again when the user moves back and then enters the screen onceagain? Since install4j does not know, it initializes every form component only once by default.This policy can be changed with the "Reset initialization on previous" property for each formcomponent.
19
A.1.5 Layout Groups
Introduction
A layout group is an element in a form screen [p. 17] . It contains a number of form componentsand other layout groups. With layout groups you can achieve virtually any kind of visual layout.
There are two different kinds of layout groups: vertical and horizontal groups. A horizontal groupputs the contained elements side by side, while a vertical group organizes them from top tobottom. Essentially, the top-level of a form screen is a vertical layout group itself.
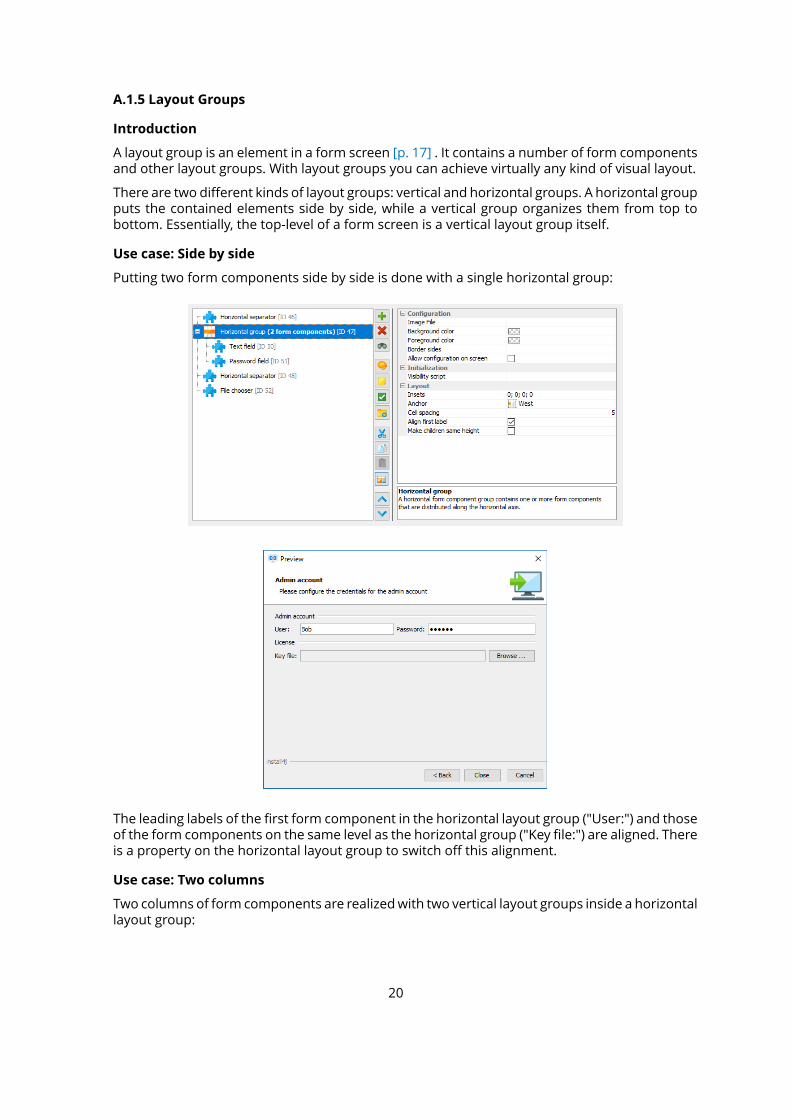
Use case: Side by side
Putting two form components side by side is done with a single horizontal group:
The leading labels of the first form component in the horizontal layout group ("User:") and thoseof the form components on the same level as the horizontal group ("Key file:") are aligned. Thereis a property on the horizontal layout group to switch off this alignment.
Use case: Two columns
Two columns of form components are realizedwith two vertical layout groups inside a horizontallayout group:
20
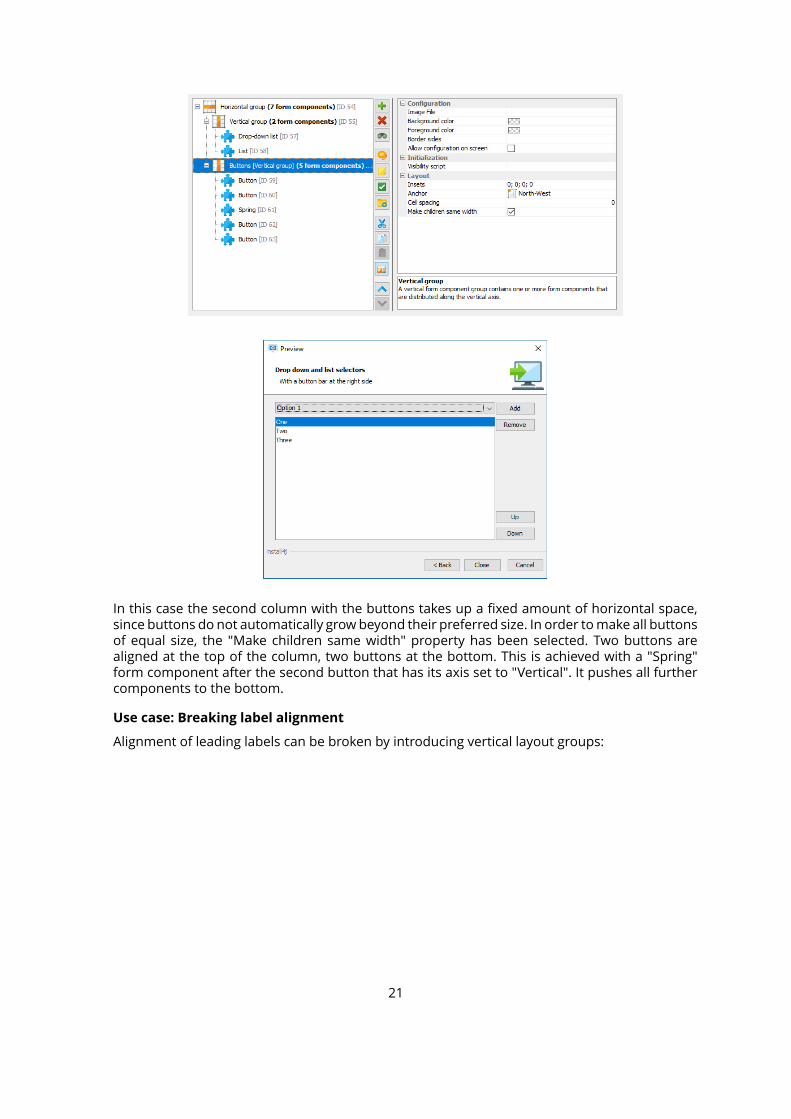
In this case the second column with the buttons takes up a fixed amount of horizontal space,since buttons do not automatically growbeyond their preferred size. In order tomake all buttonsof equal size, the "Make children same width" property has been selected. Two buttons arealigned at the top of the column, two buttons at the bottom. This is achieved with a "Spring"form component after the second button that has its axis set to "Vertical". It pushes all furthercomponents to the bottom.
Use case: Breaking label alignment
Alignment of leading labels can be broken by introducing vertical layout groups:
21

Here, the long leading label of the first form component does not enlarge the leading labels ofthe two text field form components. The latter are aligned only among themselves.
Use case: Center and right alignment
Single form components can be centered or right-aligned if you enclose them in a horizontallayout group and set the "Anchor" property on the layout group accordingly.
22

For the layout group with the radio button group, the anchor has been set to "Center", for thatwith the button the anchor has been set to "East". This only works with form components thatdo not grow horizontally. Some form components that do grow horizontally can be restricted toa fixed horizontal size, such as the text field by specifying a non-zero column count.
23
A.1.6 Styles
Introduction
Install4j has a flexible model for styling the UI of installer applications that allows you to arrangecontent and styling elements in arbitrary ways. While there is an API to do this programatically,you can configure form styles in the install4j IDE without any custom code. Form styles use thesame foundation as form components [p. 250] for screens. All default styles are created withform styles, so the details of the default styles can we tweaked very easily and new styles canbe developed by starting with the default styles.
Configuring styles
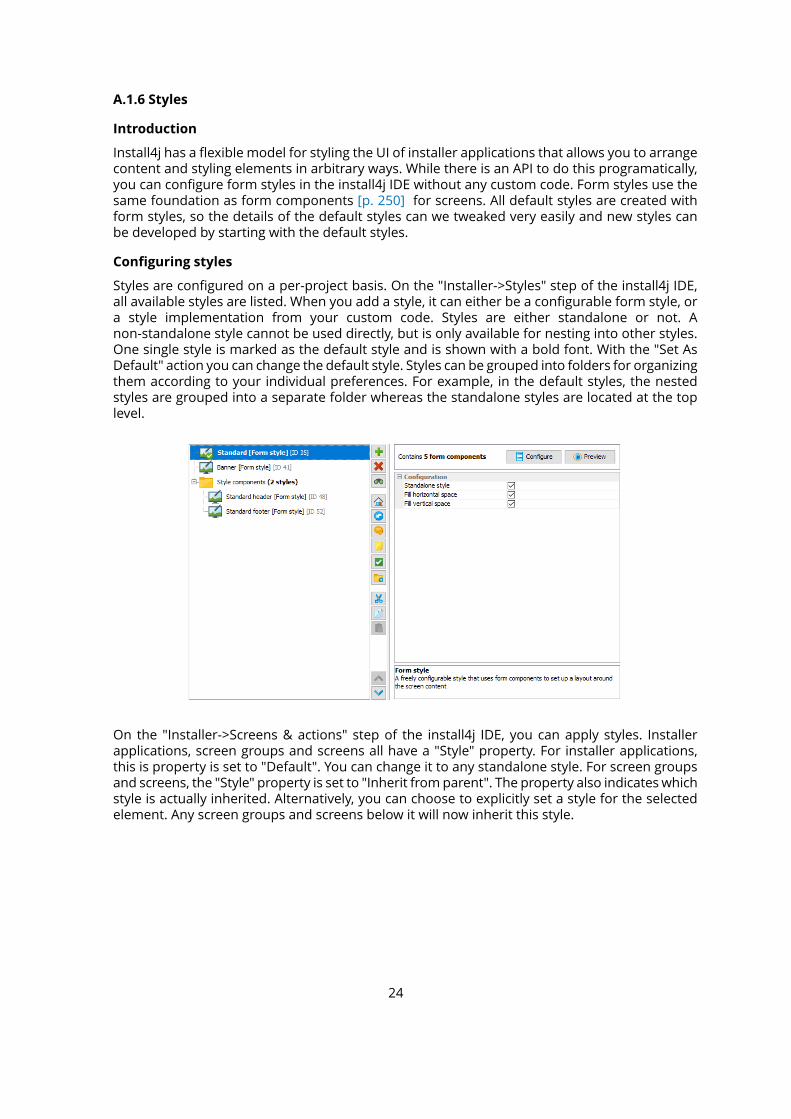
Styles are configured on a per-project basis. On the "Installer->Styles" step of the install4j IDE,all available styles are listed. When you add a style, it can either be a configurable form style, ora style implementation from your custom code. Styles are either standalone or not. Anon-standalone style cannot be used directly, but is only available for nesting into other styles.One single style is marked as the default style and is shown with a bold font. With the "Set AsDefault" action you can change the default style. Styles can be grouped into folders for organizingthem according to your individual preferences. For example, in the default styles, the nestedstyles are grouped into a separate folder whereas the standalone styles are located at the toplevel.
On the "Installer->Screens & actions" step of the install4j IDE, you can apply styles. Installerapplications, screen groups and screens all have a "Style" property. For installer applications,this is property is set to "Default". You can change it to any standalone style. For screen groupsand screens, the "Style" property is set to "Inherit fromparent". The property also indicates whichstyle is actually inherited. Alternatively, you can choose to explicitly set a style for the selectedelement. Any screen groups and screens below it will now inherit this style.
24
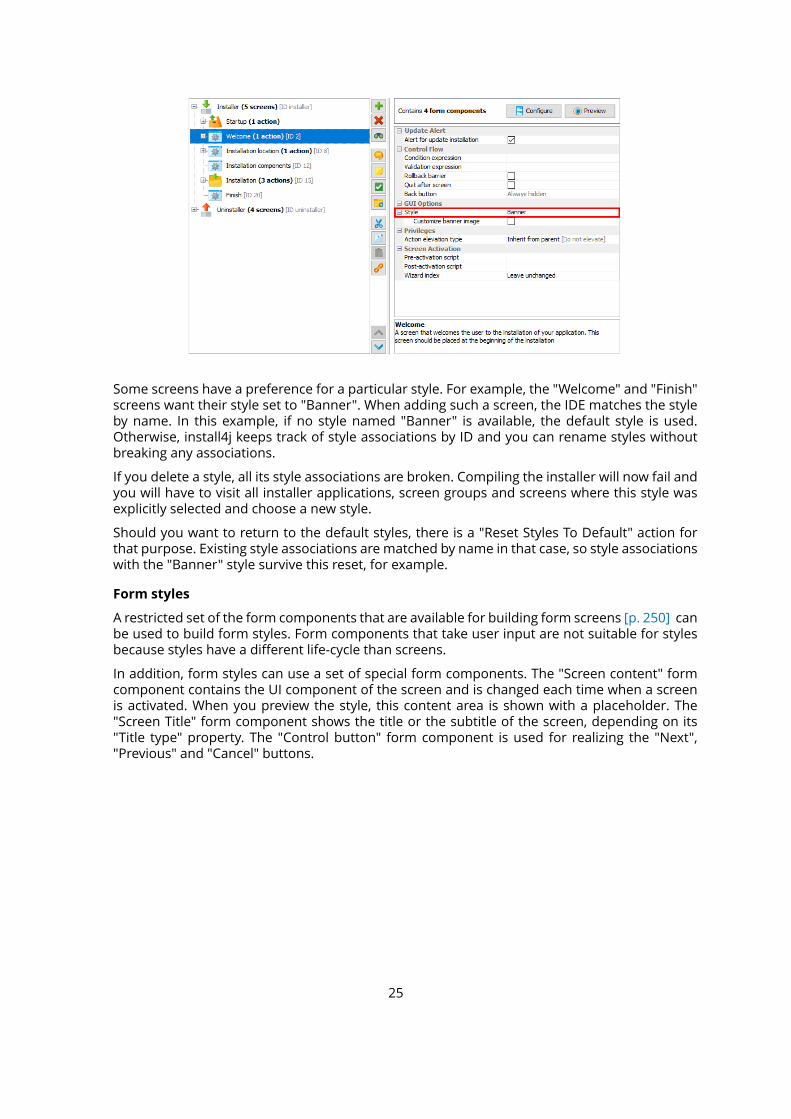
Some screens have a preference for a particular style. For example, the "Welcome" and "Finish"screens want their style set to "Banner". When adding such a screen, the IDE matches the styleby name. In this example, if no style named "Banner" is available, the default style is used.Otherwise, install4j keeps track of style associations by ID and you can rename styles withoutbreaking any associations.
If you delete a style, all its style associations are broken. Compiling the installer will now fail andyou will have to visit all installer applications, screen groups and screens where this style wasexplicitly selected and choose a new style.
Should you want to return to the default styles, there is a "Reset Styles To Default" action forthat purpose. Existing style associations are matched by name in that case, so style associationswith the "Banner" style survive this reset, for example.
Form styles
A restricted set of the form components that are available for building form screens [p. 250] canbe used to build form styles. Form components that take user input are not suitable for stylesbecause styles have a different life-cycle than screens.
In addition, form styles can use a set of special form components. The "Screen content" formcomponent contains the UI component of the screen and is changed each time when a screenis activated. When you preview the style, this content area is shown with a placeholder. The"Screen Title" form component shows the title or the subtitle of the screen, depending on its"Title type" property. The "Control button" form component is used for realizing the "Next","Previous" and "Cancel" buttons.
25
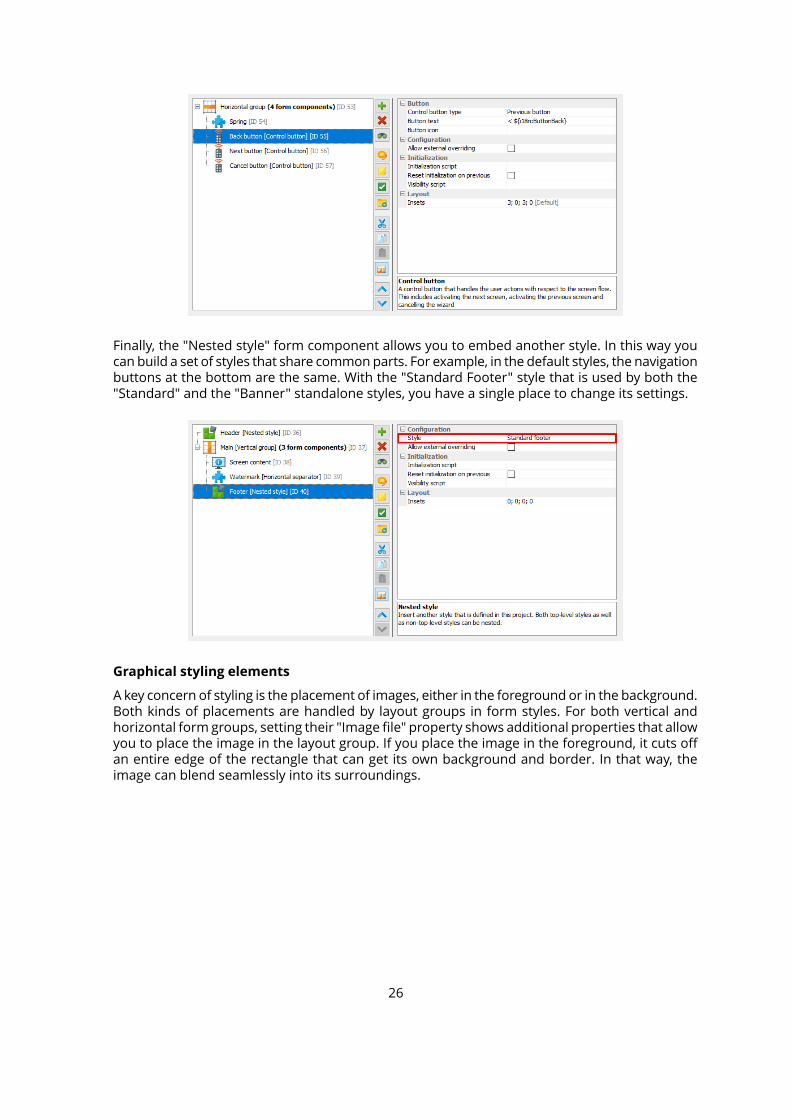
Finally, the "Nested style" form component allows you to embed another style. In this way youcan build a set of styles that share commonparts. For example, in the default styles, the navigationbuttons at the bottom are the same. With the "Standard Footer" style that is used by both the"Standard" and the "Banner" standalone styles, you have a single place to change its settings.
Graphical styling elements
A key concern of styling is the placement of images, either in the foreground or in the background.Both kinds of placements are handled by layout groups in form styles. For both vertical andhorizontal form groups, setting their "Image file" property shows additional properties that allowyou to place the image in the layout group. If you place the image in the foreground, it cuts offan entire edge of the rectangle that can get its own background and border. In that way, theimage can blend seamlessly into its surroundings.
26
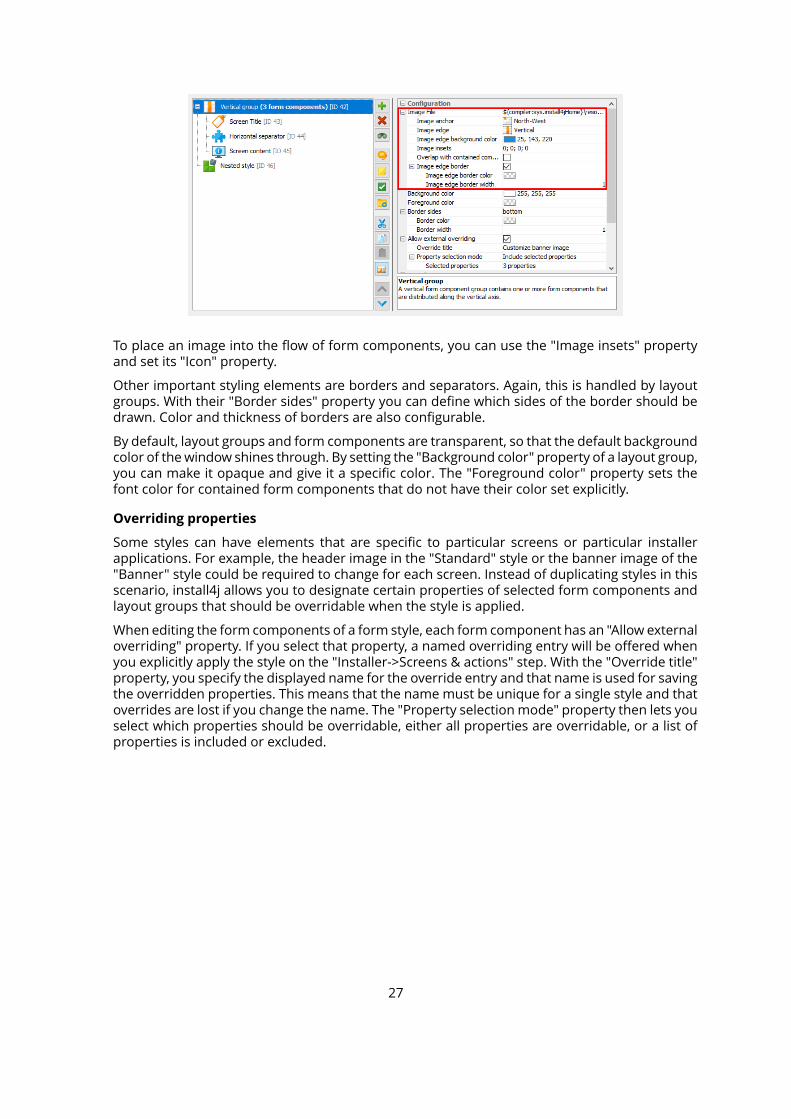
To place an image into the flow of form components, you can use the "Image insets" propertyand set its "Icon" property.
Other important styling elements are borders and separators. Again, this is handled by layoutgroups. With their "Border sides" property you can define which sides of the border should bedrawn. Color and thickness of borders are also configurable.
By default, layout groups and form components are transparent, so that the default backgroundcolor of thewindow shines through. By setting the "Background color" property of a layout group,you can make it opaque and give it a specific color. The "Foreground color" property sets thefont color for contained form components that do not have their color set explicitly.
Overriding properties
Some styles can have elements that are specific to particular screens or particular installerapplications. For example, the header image in the "Standard" style or the banner image of the"Banner" style could be required to change for each screen. Instead of duplicating styles in thisscenario, install4j allows you to designate certain properties of selected form components andlayout groups that should be overridable when the style is applied.
When editing the form components of a form style, each form component has an "Allow externaloverriding" property. If you select that property, a named overriding entry will be offered whenyou explicitly apply the style on the "Installer->Screens & actions" step. With the "Override title"property, you specify the displayed name for the override entry and that name is used for savingthe overridden properties. This means that the name must be unique for a single style and thatoverrides are lost if you change the name. The "Property selectionmode" property then lets youselect which properties should be overridable, either all properties are overridable, or a list ofproperties is included or excluded.
27
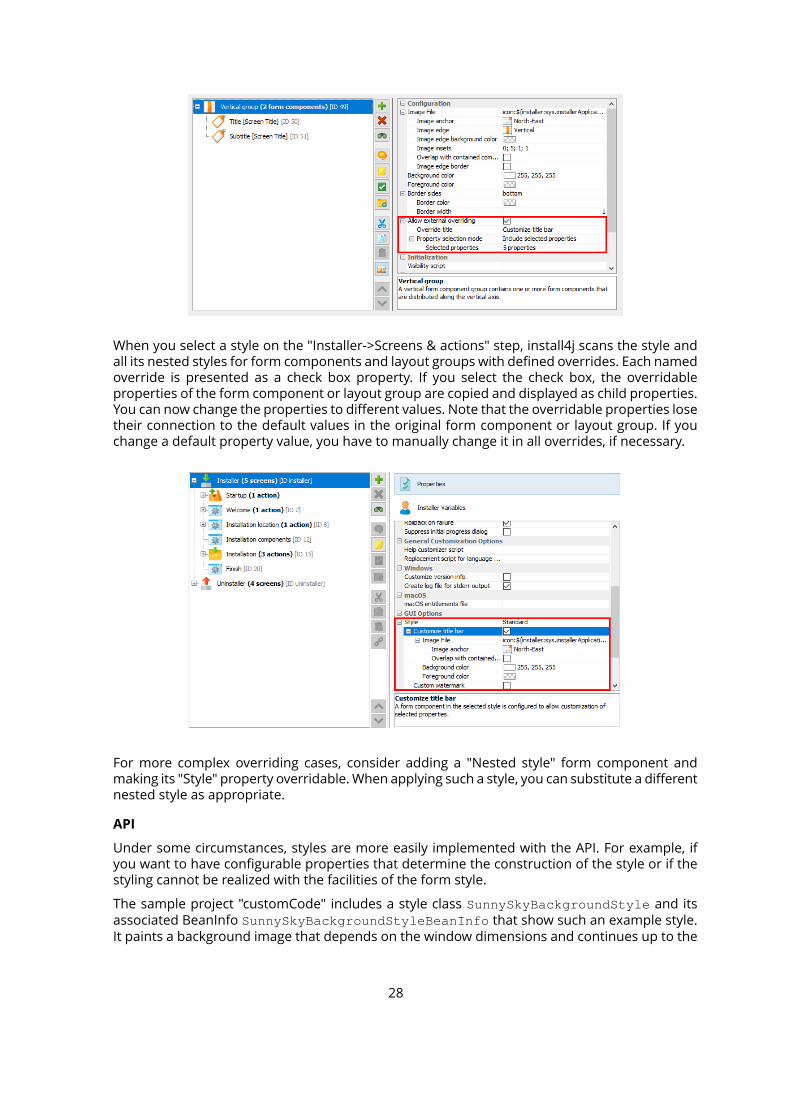
When you select a style on the "Installer->Screens & actions" step, install4j scans the style andall its nested styles for form components and layout groups with defined overrides. Each namedoverride is presented as a check box property. If you select the check box, the overridableproperties of the form component or layout group are copied and displayed as child properties.You can now change the properties to different values. Note that the overridable properties losetheir connection to the default values in the original form component or layout group. If youchange a default property value, you have to manually change it in all overrides, if necessary.
For more complex overriding cases, consider adding a "Nested style" form component andmaking its "Style" property overridable.When applying such a style, you can substitute a differentnested style as appropriate.
API
Under some circumstances, styles are more easily implemented with the API. For example, ifyou want to have configurable properties that determine the construction of the style or if thestyling cannot be realized with the facilities of the form style.
The sample project "customCode" includes a style class SunnySkyBackgroundStyle and itsassociated BeanInfo SunnySkyBackgroundStyleBeanInfo that show such an example style.It paints a background image that depends on the window dimensions and continues up to the
28
window border. In the "customCode" project, look for the "Configurable form" screen in in theinstaller and preview the form in order to see what it looks like.
That example also shows how to implement a style that wraps a user-selectable style. The mainstyle is still the standard style and the "Sunny sky background" style takes the function of adecorator. To make development of such wrappers easier, the API includes a convenience classcom.install4j.api.styles.WrapperStyle.
Merging styles from other projects
Instead of duplicating styles across projects, you can develop them in one project and mergethem into other projects. The merge projects functionality [p. 52] in install4j includes an optionto merge styles.
If styles are merged, the "Style" property of installer applications, screen groups and screensshows the merged styles as well, with their names prefixed with the project name that wasassigned in the merge settings.
If you link to screens or screen groups of merged projects, they will use their configured stylesfrom the merged project only if style merging is enabled. Otherwise, install4j tries to match astyle by name in the main project.
29
A.1.7 Variables
Introduction
With variables you can customize many aspects of install4j. They can be used in all text fieldsand text properties in the install4j IDE as well as from the install4j API [p. 84] . The general variablesyntax is
${prefix:variableName}
where prefix denotes the functionality scope of the variable and is one of
• compiler
Compiler variables are replaced by the install4j compiler when the project is built.
• installer
Installer variables are evaluated when the installer or uninstaller is running.
• launcher
Launcher variables are evaluated when a generated application launcher is started.
• i18n
Custom localization keys are evaluated at runtime anddependon the chosen installer language.
• (no prefix)
Variables with no prefix resolve to environment variables when used in the launcherconfiguration.
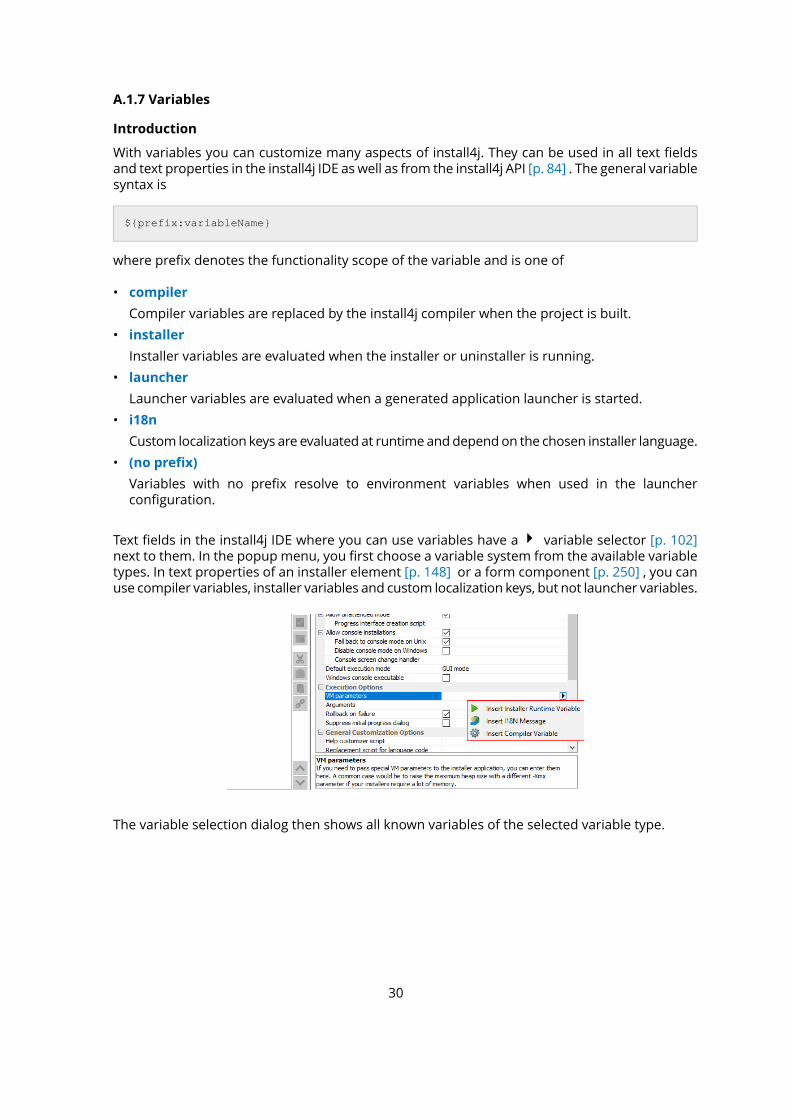
Text fields in the install4j IDE where you can use variables have a variable selector [p. 102]next to them. In the popup menu, you first choose a variable system from the available variabletypes. In text properties of an installer element [p. 148] or a form component [p. 250] , you canuse compiler variables, installer variables and custom localization keys, but not launcher variables.
The variable selection dialog then shows all known variables of the selected variable type.
30
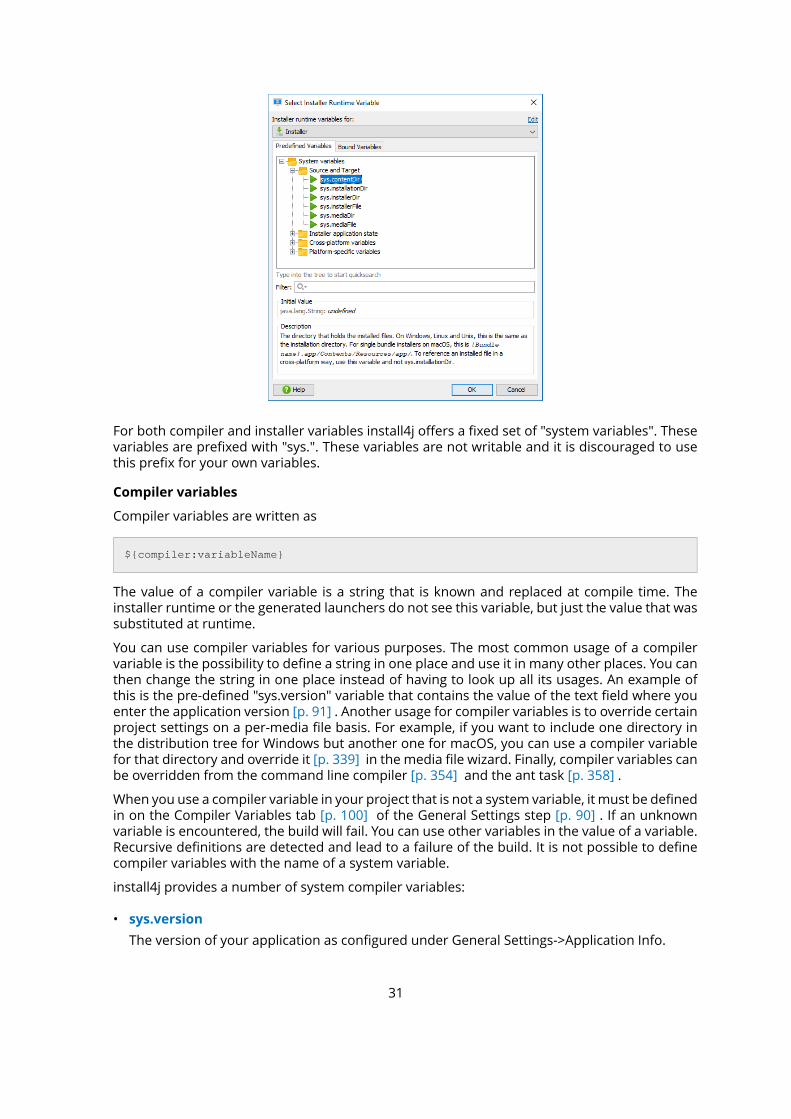
For both compiler and installer variables install4j offers a fixed set of "system variables". Thesevariables are prefixed with "sys.". These variables are not writable and it is discouraged to usethis prefix for your own variables.
Compiler variables
Compiler variables are written as
${compiler:variableName}
The value of a compiler variable is a string that is known and replaced at compile time. Theinstaller runtime or the generated launchers do not see this variable, but just the value that wassubstituted at runtime.
You can use compiler variables for various purposes. The most common usage of a compilervariable is the possibility to define a string in one place and use it in many other places. You canthen change the string in one place instead of having to look up all its usages. An example ofthis is the pre-defined "sys.version" variable that contains the value of the text field where youenter the application version [p. 91] . Another usage for compiler variables is to override certainproject settings on a per-media file basis. For example, if you want to include one directory inthe distribution tree for Windows but another one for macOS, you can use a compiler variablefor that directory and override it [p. 339] in the media file wizard. Finally, compiler variables canbe overridden from the command line compiler [p. 354] and the ant task [p. 358] .
When you use a compiler variable in your project that is not a system variable, it must be definedin on the Compiler Variables tab [p. 100] of the General Settings step [p. 90] . If an unknownvariable is encountered, the build will fail. You can use other variables in the value of a variable.Recursive definitions are detected and lead to a failure of the build. It is not possible to definecompiler variables with the name of a system variable.
install4j provides a number of system compiler variables:
• sys.version
The version of your application as configured under General Settings->Application Info.
31
• sys.shortName
The short name of your application as configured under General Settings->Application Info.
• sys.fullName
The full name of your application as configured under General Settings->Application Info.
• sys.publisher
The publisher of your application as configured under General Settings->Application Info.
• sys.publisherUrl
The publisher URL of your application as configured under General Settings->Application Info.
• sys.setName
The display name in the install4j IDE of the currently compiled media file as configured in theMedia section. If the default name of themedia file is not suitable, you can rename themediafile.
• sys.platform
The platformdescriptor of the currently compiledmedia file. One of "windows", "linux", "unix","macos". The value of this variable depends on your choice in the platform step of the mediafile wizard.
• sys.languageId
The 2-letter ISO 639 code (see https://www.loc.gov/standards/iso639-2/php/code_list.php )for the principal language of the installer. This variable can be overridden on the commandline or the ant task which is useful if you build different installers for different languages.
• sys.withJre
A variable that contains "_with_jre" if a JRE is statically bundledwith amedia file and the emptystring if not. This is useful if media files with and without JRE are built.
• sys.date
The current date in the format YYYYMMDD (e.g. "20090910").The value is set at the start of abuild and will not change during a single build.
• sys.time
The current time in the format HHMMSS (e.g. "153012") where HH is the hour in 24-hourformat, MM is the minute and SS is the second. The value is set at the start of a build and willnot change during a single build.
• sys.timestamp
The current time as the Unix epoch. This is a long value with the milliseconds since January1st, 1970 (UTC). The value is set at the start of a build and will not change during a single build.
• sys.javaMinVersion
The minimum Java version as configured under General Settings->Java Version
• sys.javaMaxVersion
The maximum Java version as configured under General Settings->Java Version
• sys.install4jHome
The installation directory of the install4j IDE.
• sys.applicationId
The application ID as configured under Installer->Update Options
32
• sys.updatesUrl
The URL where auto updaters can download the update descriptor file updates.xml asconfigured under Installer->Auto-Update Options. This variable is usually used in the "Updatedescriptor URL" property of a "Check for update" action.
• sys.fileSeparator
The platform-dependent separator for directories in a file path. OnWindows, this is a backslash("\"), on Unix a forward slash ("/"). Note that this is the value at compile-time, not at runtime.
• sys.pathlistSeparator
The platform-dependent separator for lists of directories. On Windows, this is a semicolon(";"), on Unix a colon (":"). Note that this is the value at compile-time, not at runtime.
You can access environment variables on the build machine with the syntax
${compiler:env.environmentVariableName}
where "environmentVariableName" is the name of an environment variable. This only works ifno compiler variablewith the samename is defined on the Compiler Variables tab. This is resolvedat build time, not at run time.
In order to debug problems with compiler variables, you can switch on the extra verboseoutput flag in the Build step [p. 347] . All variable replacementswill be printed to the build console.
Installer variables
Installer variables are written as
${installer:variableName}
The value of an installer variable is an arbitrary object that is not known at compile time. Installervariables are evaluated when requested in the installer or uninstaller. Installer variables can bepredefined in the install4j IDE like compiler variables, but this is not necessary. Undefined installervariables come into existence the first time they are defined at runtime. However, it is an errorto use an undefined variable. For example, if you use an installer variable in an action, you haveto make sure that the installer variable is defined before the action is executed.
Installer variables are used to wire together actions, screens and form components at runtime.The user input in screens is saved to variables, which can be used in the properties of certainactions. Furthermore, variables are routinely used in condition and validation expressions. Someexamples are given in the help topic on form screens [p. 17] . In expression/script properties,you retrieve variables by invoking
context.getVariable(String variableName)
Variable value can be set with the installer API by invoking
context.setVariable(String variableName, Object variableValue)
You can analyze the bindings of an installer variable on the "Installer Variables" tab of an installerapplication configuration. It will show you a list of bound variables together with all bindings. Inorder to document and categorize bound installer variables, you can pre-define them and set adescription for them, which will be displayed in the installer variable selector in the install4j IDE.
33
A common scenario is the need to calculate a variable value at runtime with some custom codeand use the result as the initial value of a component in a screen. To achieve this you can add a"Set a variable" action to the startup screen and set its "Variable name" property to some variablename. In contexts where a variable name is expected by install4j, you must not use the${installer:variableName} syntax but specify variableName only. The return value of the"Script" property is written to the variable. If, for example, the variable represents the initialdirectory that is displayed for a customizable "Directory selection" screen, you then set the "InitialDirectory" property of that screen to ${installer:variableName}. In this way you havewiredan action with a screen.
Another important use of installer variables is for the locations of custom installation roots [p.107] . In most cases a custom installation root contains an installer variable that is resolved atruntime. Often, one of the system installer variables that represent a "magic" folder can be used,such as the Windows system32 directory.
Installer variables can be passed to the installer or uninstaller from the command line prefixedwith -V (for example -VmyVar=test). Alternatively, you can specify a property file containinginstaller variables with -varfile (for example -varfile myfile.prop). The variables will be Stringobjects.
install4j provides a number of system installer variables:
• sys.installationDir [Source and Target]
The installation directory for the current installation. The value of this variable can change inthe installer as the user selects an installation directory in the "Installation directory" screenor the installation directory is set via context.setInstallationDirectory(File installationDirectory). Note that for single bundle installers on macOS, the installation directory is usually just /Applications , not a separate subdirectory.
• sys.contentDir [Source and Target]
The directory that holds the installed files. On Windows, Linux and Unix, this is the same asthe installation directory. For single bundle installers on macOS, this is [Bundle name].app/Contents/Resources/app/ . To reference an installed file in a cross-platform way, use thisvariable and not sys.installationDir.
• sys.mediaFile [Source and Target]
The path of your media file. Not available for uninstallers. On Windows and Unix this is thesame as sys.installerFile. On macOS, this is the path to the DMG file. If you want to referencethe installer file, use sys.installerFile instead.
• sys.mediaDir [Source and Target]
The path of the directory where your installer file is located. Not available for uninstallers. OnWindows and Unix this is the same as sys.installerDir. On macOS, this is the directory wherethe DMG file is located. If you want to reference files inside the DMG file, use sys.installerDirinstead.
• sys.installerFile [Source and Target]
The path of your installer file. Not available for uninstallers. On Windows and Unix this is thesame as sys.mediaFile. On macOS, this is the path to the installer inside the mounted DMG.If you want to reference the DMG file, use sys.mediaFile instead.
• sys.installerDir [Source and Target]
The path of the directory where your installer file is located. Not available for uninstallers. OnWindows and Unix this is the same as sys.mediaDir. On macOS, this is the path into themounted DMG. If you want to reference files in the same directory as the DMG file, use sys.mediaDir instead.
34
• sys.resourceDir [Installer application state]
The directory where the resource files are present that have been configured on theInstaller->Custom Code & Resources tab.
• sys.installationTypeId [Installer application state]
The ID of the selected installation type. This is only relevant if the "Installation Type" screenhas been added to the installer. The value is null as long as no installation type has beenselected.
• sys.version [Installer application state]
For installers, the version of your application as configured underGeneral Settings->ApplicationInfo. In that case, the variable yields the same value as the compiler variable of the samename. For custom installer applications, the installed version,whichmight not be the same asthe version for which the custom installer application was originally compiled.
• sys.logFile [Installer application state]
The full path to the currently used log file. This is a path in the TEMP directory. For installers,this changes after the "Install Files" action, when the log file ismoved to a path in the installationdirectory.
• sys.responseFile [Installer application state]
If a response file is supplied with a -varfile command line argument, the full path to theresponse file. If no response file is used, the variable value is null .
• sys.preferredJre [Installer application state]
The home directory of the JRE that will be used by the installed launchers. This variable willonly be set after the "Install files" action has run. It will be the same as System.getProperty("java.home") or the sys.javaHome installer variable unless a bundled JRE (shared or non-shared)has been installed. This variable is not available in the uninstaller or custom installerapplications, use the sys.javaHome directory there.
• sys.languageId [Installer application state]
The 2-letter ISO 639 code (see https://www.loc.gov/standards/iso639-2/php/code_list.php )for the actual language of the installer. For fixed-language installers, this is the same as thecompiler variable of the same name. For multi-language installers, the value is determined atruntime.
• sys.installerApplicationMode [Installer application state]
A string that reports the type of the installer application: "installer" for the installer, "uninstaller"for the uninstaller and "custom" for custom installer applications.
• sys.programGroupDisabled [Installer application state/Program group]
If the user has disabled program group creation on the "Standard program group" screen.This applies to both the Windows program group and the Linux/Unix launcher link directoryselection. If no "Standard program group" screen is present, the variable value will be null .
• sys.programGroupName [Installer application state/Program group]
The name of the program group that user has selected on the "Standard program group"screen. If no program group has been selected, the variable value will be null . Only set inWindows installers.
• sys.programGroupDir [Installer application state/Program group]
The directory that has been selected as the program group. This is the full path to the actuallocation of the program group, not just the name of the program group. If no program grouphas been selected, the variable value will be null . Only set in Windows installers.
35
• sys.programGroupAllUsers [Installer application state/Program group]
If the user has selected to create menu entries for all users on the "Standard program group"screen. If no "Standard program group" screen is present, the variable value will be null . Onlyset in Windows installers.
• sys.symlinkDir [Installer application state/Program group]
The name of the directory for launcher links that user has selected on the "Standard programgroup" screen. If no program group has been selected, the variable value will be null . Onlyset in Linux/Unix installers.
• sys.fileSeparator [Cross-platform variables]
The platform-dependent separator for directories in a file path. OnWindows, this is a backslash("\"), on Unix a forward slash ("/").
• sys.pathlistSeparator [Cross-platform variables]
The platform-dependent separator for lists of directories. On Windows, this is a semicolon(";"), on Unix a colon (":").
• sys.userHome [Cross-platform variables]
The user home directory, typically something like C:\Users\$USER on Windows or /home/$USER on Unix platforms.
• sys.userName [Cross-platform variables]
The user account name.
• sys.workingDir [Cross-platform variables]
The working directory. For the installer, this is the temporary directory that the installer wasextracted to.
• sys.tempDir [Cross-platform variables]
The temporary directory of the operating system. On all supported platforms, this is the valueof the TEMP environment variable.
• sys.javaHome [Cross-platform variables]
The Java home directory of the currently used JRE.
• sys.javaVersion [Cross-platform variables]
The Java version of the currently used JRE.
• sys.confirmedUpdateInstallation [Cross-platform variables]
If the user has confirmed an update installation on top of a previous installation. If a previousinstallation is detected, the "Welcome" screen asks the user whether to perform an updateinstallation or choose another installation directory. The result of that question is saved tothis variable. If the "Welcome screen is not shown, this variable is not set andContext#getBooleanVariable(...) returns false for this variable.
• sys.desktopDir [Cross-platform variables]
The directory used to physically store file objects on the desktop. On Windows, a typical pathis C:\Users\[user name]\Desktop . On macOS, this is the ~/Desktop directory and on Unix thefreedesktop.org setting for the XDG_DESKTOP_DIR directory is returned.
• sys.docsDir [Cross-platform variables]
The directory used to physically store a user's common repository of documents. OnWindows,a typical path is C:\Users\[user name]\Documents . OnmacOS, this is the ~/Documents directoryand on Unix the freedesktop.org setting for the XDG_DOCUMENTS_DIR directory is returned.
36
• sys.downloadsDir [Cross-platform variables]
The directory used to physically store a user's downloads. On Windows, a typical path is C:\Users\[user name]\Downloads . On macOS, this is the ~/Downloads directory and on Unixthe freedesktop.org setting for the XDG_DOWNLOAD_DIR directory is returned.
• sys.appdataDir [Platform-specific variables]
The directory that serves as a common repository for application-specific data. On Windows,a typical path is C:\Users\[user name]\AppData\Roaming . On macOS, this is the ~/Library/Application Support directory.
• sys.localAppdataDir [Platform-specific variables]
The user-specific directory that serves local applications to store computed data. OnWindows,a typical path is C:\Users\[user name]\AppData\Local . OnmacOS, this is the ~/Library/Cachesdirectory. On Unix, the value of the XDG_CACHE_HOME environment variable or if not defined~/.cache is returned.
• sys.windowsDir [Platform-specific variables]
The Windows installation directory, typically C:\Windows .
• sys.system32Dir [Platform-specific variables]
The system32 directory of your Windows installation, typically C:\Windows\system32 .
• sys.commonDir [Platform-specific variables]
The common files directory of your Windows installation, typically C:\Program Files\CommonFiles .
• sys.programDataDir [Platform-specific variables]
The directory where applications can save data that is not specific to particular users. A typicalpath is C:\ProgramData .
• sys.startMenuDir [Platform-specific variables]
The directory containing Start menu items. A typical path is C:\Users\[username]\AppData\Roaming\Microsoft\Windows\Start Menu .
• sys.programsDir [Platform-specific variables]
The directory that contains the user's program groups. The groups are themselves file systemdirectories. A typical path is C:\Users\[user name]\AppData\Roaming\Microsoft\Windows\StartMenu\Programs .
• sys.startupDir [Platform-specific variables]
The directory that corresponds to the user's Startup program group. The system starts theseprograms whenever any user logs onto Windows. A typical path is C:\Users\[username]\AppData\Roaming\Microsoft\Windows\Start Menu\Programs\Startup .
• sys.sendToDir [Platform-specific variables]
The directory that contains Send To menu items. A typical path is C:\Users\[username]\AppData\Roaming\Microsoft\Windows\SendTo .
• sys.templatesDir [Platform-specific variables]
The directory that serves as a common repository for document templates. A typical path isC:\Users\[user name]\AppData\Roaming\Microsoft\Windows\Templates .
• sys.favoritesDir [Platform-specific variables]
The directory that serves as a common repository for the user's favorite items. A typical pathis C:\Users\[user name]\Favorites .
37
• sys.programGroupDir [Platform-specific variables]
The directory of the programgroup thatwill be orwas created by the "Create standard programgroup" action. If this action is not present, the value will be null . The value of this variable canchange in the installer as the user selects a program group on the "Create program group"screen.
• sys.fontsDir [Platform-specific variables]
The folder that contains fonts. A typical path is C:\Windows\Fonts . On macOS, the value is /Library/Fonts .
• sys.programFilesDir [Platform-specific variables]
The directory where programs are installed, typically something like C:\Program Files . OnmacOS, the value is /Applications .
Launcher variables
Launcher variables are written as
${launcher:variableName}
The value of a launcher variable is a string that is not known at compile time. Launcher variablesare evaluated when a generated application launcher is started. Launcher variables can only beused in the VM parameters text field [p. 129] of the launcher wizard [p. 125] . No user-definedlauncher variables exist, the available system launcher variables are:
• sys.launcherDirectory
The directory in which your launcher has been installed at runtime.
• sys.jvmHome
The home directory of the JVM that your launcher is running with. This is useful to put JAR filesfrom the JRE into your boot classpath. The "home directory" is the directory that contains the"bin" directory of the JRE.
• sys.pathlistSeparator
The platform-dependent separator for lists of directories. On Windows, this is a semicolon(";"), on Unix a colon (":").
• sys.tempDir
The temporary directory for the current user.
I18N messages
I18N messages are written as
${i18n:keyName}
The value of an I18N message depends on the language that is selected for the installer. Youcan use this facility to localize messages in your installers if they support multiple languages [p.94] . You can supply key value pairs for internationalization in the custom localization file. Thevariable selection dialog for I18N messages shows all system messages as well as all messagesin the custom localization file for the principal language of your project.
All standard messages displayed by install4j can be referenced with this syntax as well. You canlocate the key name in one of the message_*.utf8 files in the $INSTALL4J_HOME/resource/
38
messages directory and use it anywhere in your project. The standard messages can beoverwritten by your custom localization files.
Using variables your own applications
Many times there is a need in the installed applications to access user input that was made inthe installer. The install4j API provides the helper class com.install4j.api.launcher.Variables to access the values of installer variables.
There are twoways that installer variables can be persisted in the installer: First, installer variablesare saved to the default response file .install4j/response.varfile that is created whenthe installer exits or if a "Create response file" action is executed. Only response file variablesare saved to that file. Please see the help topic on response files [p. 74] for more information.Second, selected installer variables can be saved to the Java preference store. The com.install4j.api.launcher.Variables helper class offers methods to load variables fromboth sources.
Saving to the Java preference store is interesting if you want to modify those variable values inyour applications and save back the modified values. The Java preference store is available ona per-user basis so that it is possible to modify settings even if the user does not have writepermissions for the installation directory. The com.install4j.api.launcher.Variableshelper class has methods for loading and saving the entire map of installer variables that waysaved by the installer. Also, it is possible to specify an arbitrary package to which the installervariables are saved, so that communication of settings between installers is made possible.
Lastly, it is useful to access compiler variables in your own applications. For example, the versionnumber configured in the install4j IDE can be accessed in your own application through the com.install4j.api.launcher.Variables helper class.
39
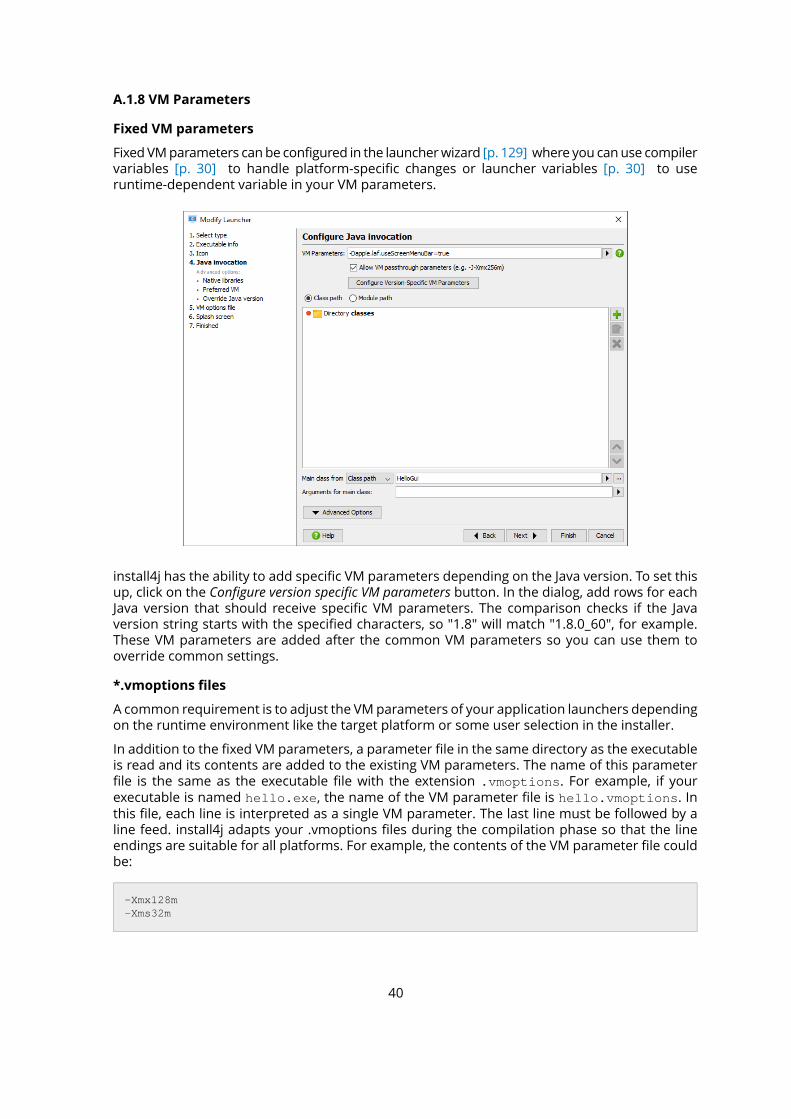
A.1.8 VM Parameters
Fixed VM parameters
FixedVMparameters canbe configured in the launcherwizard [p. 129] where you canuse compilervariables [p. 30] to handle platform-specific changes or launcher variables [p. 30] to useruntime-dependent variable in your VM parameters.
install4j has the ability to add specific VM parameters depending on the Java version. To set thisup, click on the Configure version specific VM parameters button. In the dialog, add rows for eachJava version that should receive specific VM parameters. The comparison checks if the Javaversion string starts with the specified characters, so "1.8" will match "1.8.0_60", for example.These VM parameters are added after the common VM parameters so you can use them tooverride common settings.
*.vmoptions files
A common requirement is to adjust the VMparameters of your application launchers dependingon the runtime environment like the target platform or some user selection in the installer.
In addition to the fixed VM parameters, a parameter file in the same directory as the executableis read and its contents are added to the existing VM parameters. The name of this parameterfile is the same as the executable file with the extension .vmoptions. For example, if yourexecutable is named hello.exe, the name of the VM parameter file is hello.vmoptions. Inthis file, each line is interpreted as a single VM parameter. The last line must be followed by aline feed. install4j adapts your .vmoptions files during the compilation phase so that the lineendings are suitable for all platforms. For example, the contents of the VM parameter file couldbe:
-Xmx128m-Xms32m
40
The .vmoptions files allow the installer as well as expert users to modify the VM parametersfor your application launchers.
It is possible to include other .vmoptions files from a .vmoptions file with the syntax
-include-options [path to other .vmoptions file]
For maximum cross-platform capability use just one include per .vmoptions file. Recursiveincludes are supported. You can also add this option to the fixed VM parameters of a launcher.In that way, you do not have to create .vmoptions files for all your launchers, but you can havea single .vmoptions file for all of them.
This allows you to to centralize the user-editable VM options for multiple launchers and to have.vmoptions files in a location that can be edited by the user if the installation directory is notwritable. You can use environment variables to find a suitable directory, for example
-include-options ${APPDATA}\My Application\my.vmoptions
on Windows and
-include-options ${HOME}/.myApp/my.vmoptions
on Unix. If you have to decide at runtime where the included .vmoptions file is located, use aninstaller variable:
-include-options ${installer:vmOptionsTargetDirectory}/my.vmoptions
and add a "Replace installer variables in a text file" action to replace it after you have set the thevmOptionsTargetDirectory installer variable to a suitable path with a "Set a variable" action.
In addition to the VM parameters you can also modify the classpath in the .vmoptions fileswith the following options:
• -classpath [classpath]
Replace the classpath of the generated launcher.
• -classpath/a [classpath]
Append to the classpath of the generated launcher.
• -classpath/p [classpath]
Prepend to the classpath of the generated launcher.
For GUI launchers on macOS, the VM options are stored in a file called Info.plist inside theapplication bundle. The "Add VMoptions" action described belowhandles these platform-specificdifferences. On macOS, .vmoptions files are only supported if Java 7+ is used, i.e. the Oracle JREoption has been selected in the media file wizard.
Environment variables
You can use environment variables in the VM parameters and the .vmoptions file with thesyntax ${variableName} where you replace variableName with the desired environmentvariable.
41
This environment variable syntax also works in the arguments text field and the classpathconfiguration.
"Add VM options" action
In order to handle VM parameter additions in the installer in a cross-platform fashion, install4jincludes an "Add VM options" action [p. 180] that adds VM parameters to the .vmoptions fileon Microsoft Windows and Unix and modifies the Info.plist file on macOS.
The Add VM options action creates a .vmoptions file if necessary or adds your options to the.vmoptions file if it already exists. However, a number of VM parameters can only occur onceso the action replaces the following parameters if they already exist:
• -Xmx
• -Xms
• -Xss
• -Xloggc
• -Xbootclasspath
• -verbose
• -ea / -enableassertions
• -da / -disableassertions
• -splash
as well as the install4j-specific classpath modification options (see above).
To set an -Xmx value that depends on the total memory of the target system, you can use a "Seta variable action" to calculate the numeric part of the -Xmx value using the utility methodSystemInfo.getPhysicalMemory() and use that variable in the "VM options" property of the"Add VMoptions" action. For example, in order to use 50%of the totalmemory for themaximumheap size, you do the following after the "Install files" action:
1. Add a "Set a variable" action with variable name "xmx" and expression
"-Xmx" + Math.round(SystemInfo.getPhysicalMemory() * 0.5 / 1024 / 1024) + "m"
2. Add a "Add VM options" action with VM options
"${installer:xmx}".
42
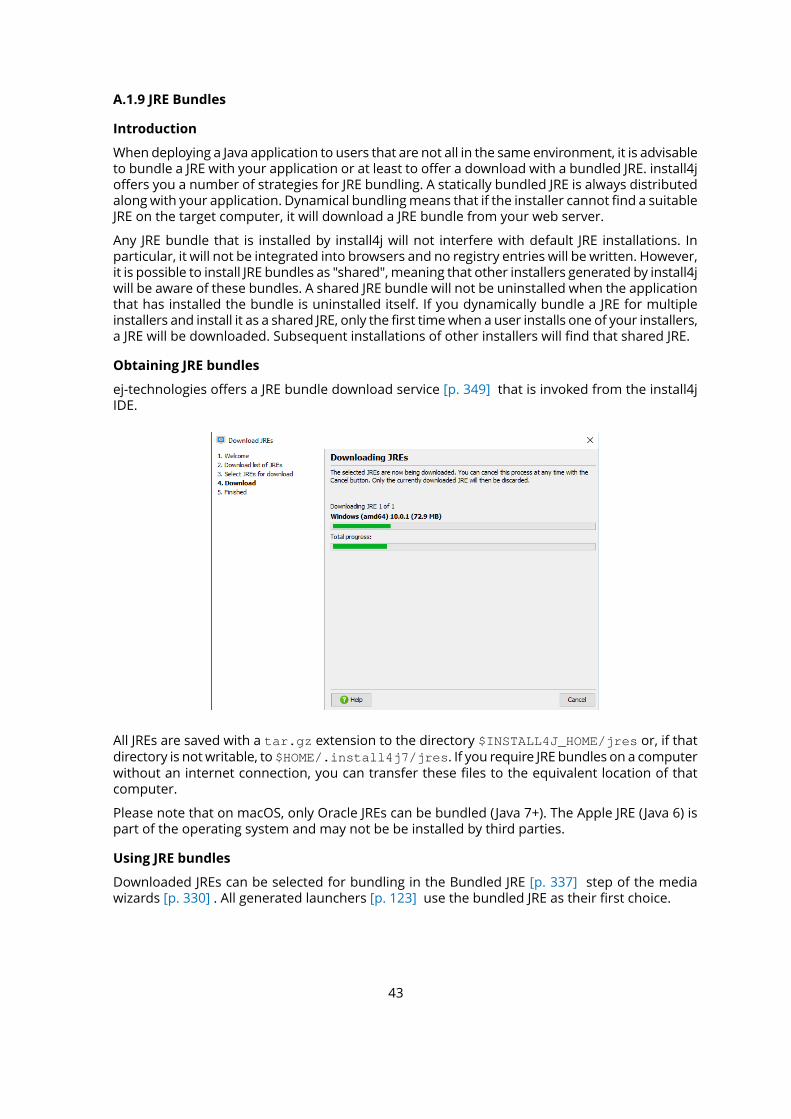
A.1.9 JRE Bundles
Introduction
Whendeploying a Java application to users that are not all in the same environment, it is advisableto bundle a JRE with your application or at least to offer a download with a bundled JRE. install4joffers you a number of strategies for JRE bundling. A statically bundled JRE is always distributedalongwith your application. Dynamical bundlingmeans that if the installer cannot find a suitableJRE on the target computer, it will download a JRE bundle from your web server.
Any JRE bundle that is installed by install4j will not interfere with default JRE installations. Inparticular, it will not be integrated into browsers and no registry entries will be written. However,it is possible to install JRE bundles as "shared",meaning that other installers generated by install4jwill be aware of these bundles. A shared JRE bundle will not be uninstalled when the applicationthat has installed the bundle is uninstalled itself. If you dynamically bundle a JRE for multipleinstallers and install it as a shared JRE, only the first timewhen a user installs one of your installers,a JRE will be downloaded. Subsequent installations of other installers will find that shared JRE.
Obtaining JRE bundles
ej-technologies offers a JRE bundle download service [p. 349] that is invoked from the install4jIDE.
All JREs are saved with a tar.gz extension to the directory $INSTALL4J_HOME/jres or, if thatdirectory is notwritable, to $HOME/.install4j7/jres. If you require JRE bundles on a computerwithout an internet connection, you can transfer these files to the equivalent location of thatcomputer.
Please note that on macOS, only Oracle JREs can be bundled (Java 7+). The Apple JRE (Java 6) ispart of the operating system and may not be be installed by third parties.
Using JRE bundles
Downloaded JREs can be selected for bundling in the Bundled JRE [p. 337] step of the mediawizards [p. 330] . All generated launchers [p. 123] use the bundled JRE as their first choice.
43
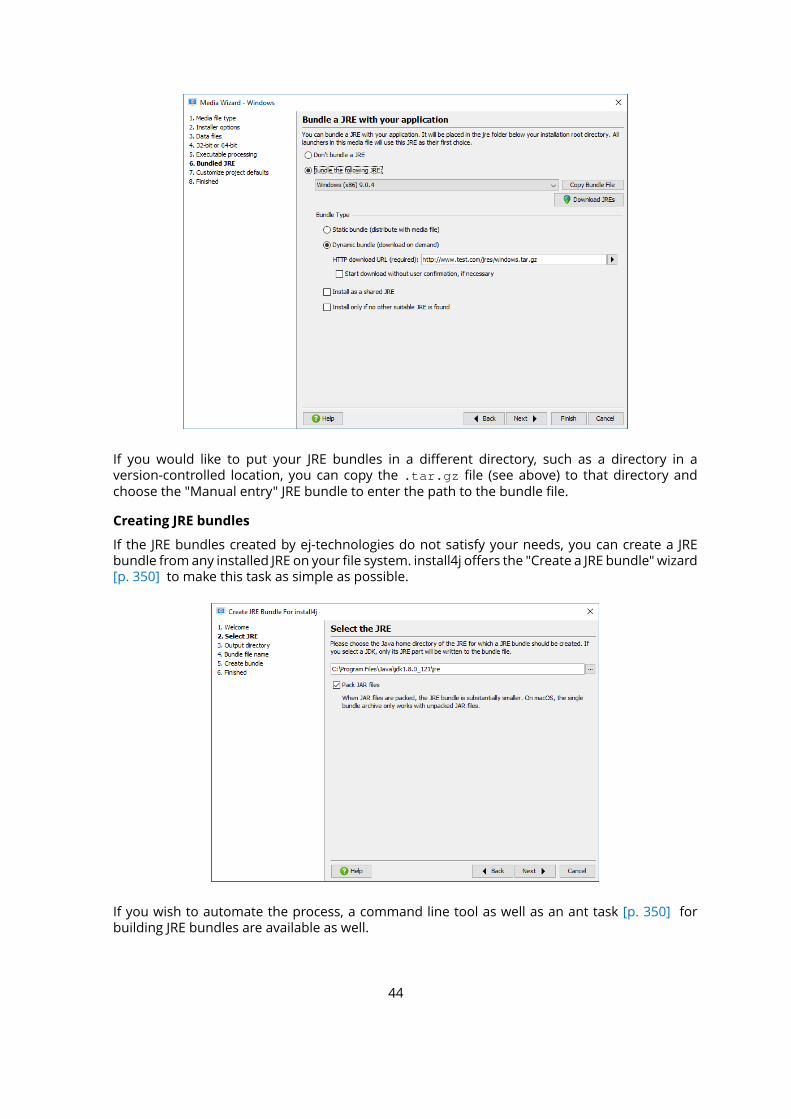
If you would like to put your JRE bundles in a different directory, such as a directory in aversion-controlled location, you can copy the .tar.gz file (see above) to that directory andchoose the "Manual entry" JRE bundle to enter the path to the bundle file.
Creating JRE bundles
If the JRE bundles created by ej-technologies do not satisfy your needs, you can create a JREbundle from any installed JRE on your file system. install4j offers the "Create a JRE bundle" wizard[p. 350] to make this task as simple as possible.
If you wish to automate the process, a command line tool as well as an ant task [p. 350] forbuilding JRE bundles are available as well.
44

Packaging your own JRE can be useful if you want to add standard extensions such as the JavaCommunications API to your JRE. The JRE bundle wizard only works for the platform you arerunning on. Thatmeans, to create a JRE bundle forWindows, you have to run install4j onWindows,to create a bundle for Linux, you have to run install4j on Linux.
In special cases you might want to create or modify a JRE bundle programmatically, i.e. withoutusing the install4j IDE or the command line tools. This can be done with the standard GNU toolstar and gzip. A JRE bundle for install4j is simply a file with the naming scheme:
[operating system]-[architecture]-[JRE version].tar.gz
For windows bundles, the operating system name must be "windows", for other platforms anyname can be used. The .tar.gz file directly contains the JRE, i.e. the bin and lib folders. Thesteps to create a bundle are outlined below:
cd jretar cvf minix-x86-1.5.0.tar *gzip minix-x86-1.5.0.tarcp minix-x86-1.5.0.tar.gz /usr/install4j/jres
First you change into the top-level directory of the JRE, then you tar all files and directories andgzip the tar archive. The last step copies the bundle into the directory $INSTALL4J_HOME/jres.You have to restart install4j for the JRE to be listed in the "Bundled JRE" step of the media filewizard.
If you choose to bundle your JRE this way on Microsoft Windows, you have to install the tar andgzip tool available at
• tar: http://gnuwin32.sourceforge.net/packages/gtar.htm (1)
• gzip: http://gnuwin32.sourceforge.net/packages/gzip.htm (2)
(1) http://gnuwin32.sourceforge.net/packages/gtar.htm(2) http://gnuwin32.sourceforge.net/packages/gzip.htm
45
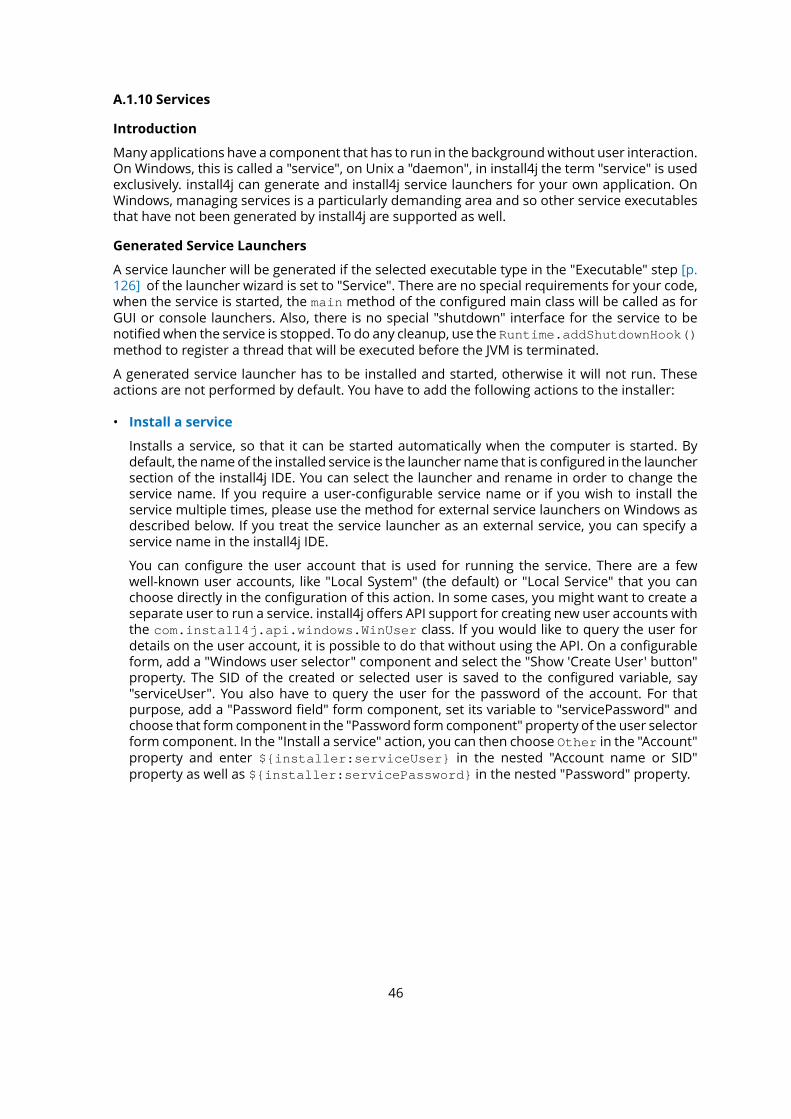
A.1.10 Services
Introduction
Many applications have a component that has to run in the backgroundwithout user interaction.On Windows, this is called a "service", on Unix a "daemon", in install4j the term "service" is usedexclusively. install4j can generate and install4j service launchers for your own application. OnWindows, managing services is a particularly demanding area and so other service executablesthat have not been generated by install4j are supported as well.
Generated Service Launchers
A service launcher will be generated if the selected executable type in the "Executable" step [p.126] of the launcher wizard is set to "Service". There are no special requirements for your code,when the service is started, the main method of the configured main class will be called as forGUI or console launchers. Also, there is no special "shutdown" interface for the service to benotifiedwhen the service is stopped. To do any cleanup, use the Runtime.addShutdownHook()method to register a thread that will be executed before the JVM is terminated.
A generated service launcher has to be installed and started, otherwise it will not run. Theseactions are not performed by default. You have to add the following actions to the installer:
• Install a service
Installs a service, so that it can be started automatically when the computer is started. Bydefault, the nameof the installed service is the launcher name that is configured in the launchersection of the install4j IDE. You can select the launcher and rename in order to change theservice name. If you require a user-configurable service name or if you wish to install theservice multiple times, please use the method for external service launchers on Windows asdescribed below. If you treat the service launcher as an external service, you can specify aservice name in the install4j IDE.
You can configure the user account that is used for running the service. There are a fewwell-known user accounts, like "Local System" (the default) or "Local Service" that you canchoose directly in the configuration of this action. In some cases, you might want to create aseparate user to run a service. install4j offers API support for creating new user accounts withthe com.install4j.api.windows.WinUser class. If you would like to query the user fordetails on the user account, it is possible to do that without using the API. On a configurableform, add a "Windows user selector" component and select the "Show 'Create User' button"property. The SID of the created or selected user is saved to the configured variable, say"serviceUser". You also have to query the user for the password of the account. For thatpurpose, add a "Password field" form component, set its variable to "servicePassword" andchoose that form component in the "Password form component" property of the user selectorform component. In the "Install a service" action, you can then choose Other in the "Account"property and enter ${installer:serviceUser} in the nested "Account name or SID"property as well as ${installer:servicePassword} in the nested "Password" property.
46
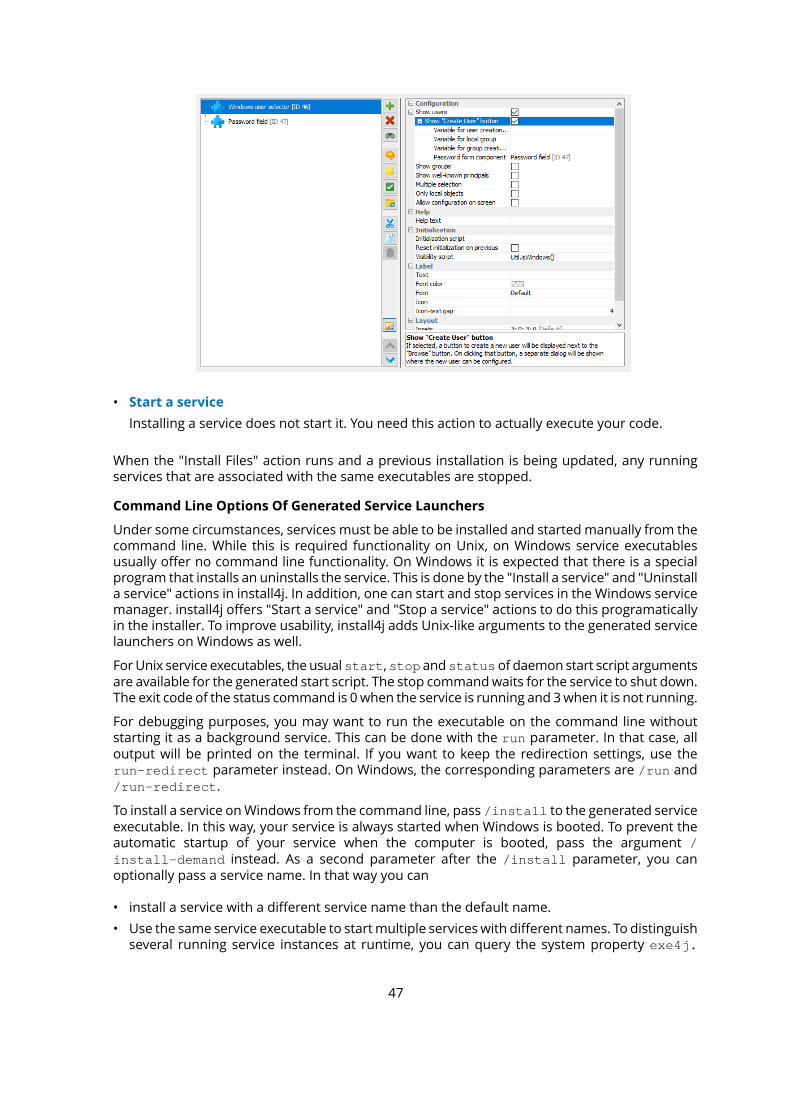
• Start a service
Installing a service does not start it. You need this action to actually execute your code.
When the "Install Files" action runs and a previous installation is being updated, any runningservices that are associated with the same executables are stopped.
Command Line Options Of Generated Service Launchers
Under some circumstances, services must be able to be installed and startedmanually from thecommand line. While this is required functionality on Unix, on Windows service executablesusually offer no command line functionality. On Windows it is expected that there is a specialprogram that installs an uninstalls the service. This is done by the "Install a service" and "Uninstalla service" actions in install4j. In addition, one can start and stop services in the Windows servicemanager. install4j offers "Start a service" and "Stop a service" actions to do this programaticallyin the installer. To improve usability, install4j adds Unix-like arguments to the generated servicelaunchers on Windows as well.
ForUnix service executables, the usualstart,stop andstatusof daemon start script argumentsare available for the generated start script. The stop commandwaits for the service to shut down.The exit code of the status command is 0when the service is running and 3when it is not running.
For debugging purposes, you may want to run the executable on the command line withoutstarting it as a background service. This can be done with the run parameter. In that case, alloutput will be printed on the terminal. If you want to keep the redirection settings, use therun-redirect parameter instead. On Windows, the corresponding parameters are /run and/run-redirect.
To install a service onWindows from the command line, pass /install to the generated serviceexecutable. In this way, your service is always started when Windows is booted. To prevent theautomatic startup of your service when the computer is booted, pass the argument /install-demand instead. As a second parameter after the /install parameter, you canoptionally pass a service name. In that way you can
• install a service with a different service name than the default name.
• Use the same service executable to startmultiple serviceswith different names. To distinguishseveral running service instances at runtime, you can query the system property exe4j.
47
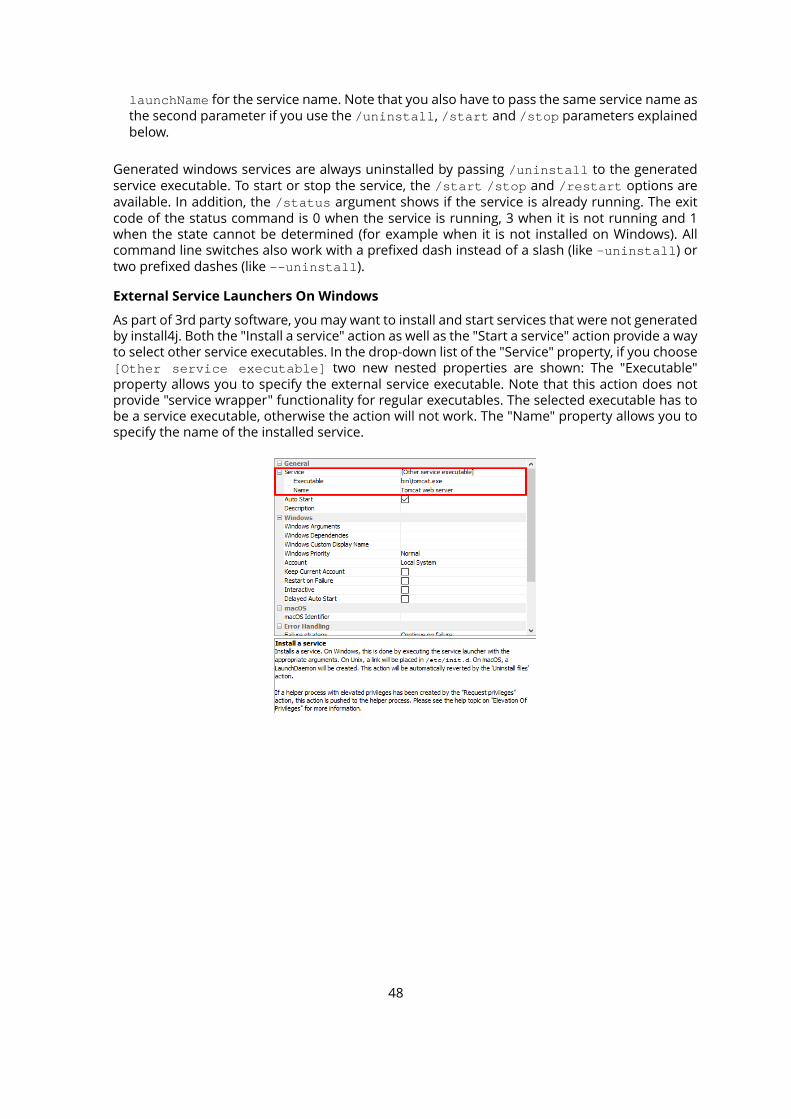
launchName for the service name. Note that you also have to pass the same service name asthe second parameter if you use the /uninstall, /start and /stop parameters explainedbelow.
Generated windows services are always uninstalled by passing /uninstall to the generatedservice executable. To start or stop the service, the /start /stop and /restart options areavailable. In addition, the /status argument shows if the service is already running. The exitcode of the status command is 0 when the service is running, 3 when it is not running and 1when the state cannot be determined (for example when it is not installed on Windows). Allcommand line switches also work with a prefixed dash instead of a slash (like -uninstall) ortwo prefixed dashes (like --uninstall).
External Service Launchers On Windows
As part of 3rd party software, youmay want to install and start services that were not generatedby install4j. Both the "Install a service" action as well as the "Start a service" action provide a wayto select other service executables. In the drop-down list of the "Service" property, if you choose[Other service executable] two new nested properties are shown: The "Executable"property allows you to specify the external service executable. Note that this action does notprovide "service wrapper" functionality for regular executables. The selected executable has tobe a service executable, otherwise the action will not work. The "Name" property allows you tospecify the name of the installed service.
48

A.1.11 Elevation Of Privileges
Introduction
Most operating systems have the concept of normal users and administrators. While regularapplications can run with limited privileges, installers often need full administrator privilegesbecause theymakemodifications to the system that are not granted to limited users. The requiredprivileges depend on two factors: The operating system and the type of operations that areperformed by the installer. The "Request privileges" action that is present in the "Startup"sequence of both installers and uninstallers by default takes care of elevating the privileges tothe required level and optionally terminating the installer with an error message if the requiredprivileged cannot be obtained. Due to the differences for the different operating systems, thisconfiguration is made separately for Windows, macOS and Unix.
For the installer and the uninstaller, the privileges should be the same. This is why by defaultthe uninstaller has a "Request installer privileges" action that will request the same privilegesthat were obtained in the installer. If you havemore complex requirements, you can havemultiple"Request privileges" actions with appropriate condition expressions, each with a link in theuninstaller.
Windows privileges
Since Windows Vista, "User Account Control" (UAC) (1) limits privileges for all users by default. Anapplication can request full privileges, with different effects for normal users and admin users:A normal user cannot be elevated to full privileges, so the user has to enter credentials for adifferent administrator account. A normal user is not likely to have these credentials, so by defaultthe "Request privileges" action does not try to obtain full privileges for normal users. An adminuser can be elevated. A UAC prompt will be shown in this case and the user simply has to agreein order to elevate privileges for the installer. Since it is not possible to write to the program filesdirectory without elevated privileges, this elevation is performed by default. With the "Try toobtain full privileges if admin user" and the "Try to obtain full privileges if normal user" propertiesin the "Windows" category, you can configure this behavior according to your own needs.
By default, the installer will fail if the requested privileges cannot be obtained. You can deselectthe "Show failure if requested privileges cannot be obtained" property in the Windows categoryto continue and let the user install into the user home directory or another writable directory.
(1) http://en.wikipedia.org/wiki/User_Account_Control
49
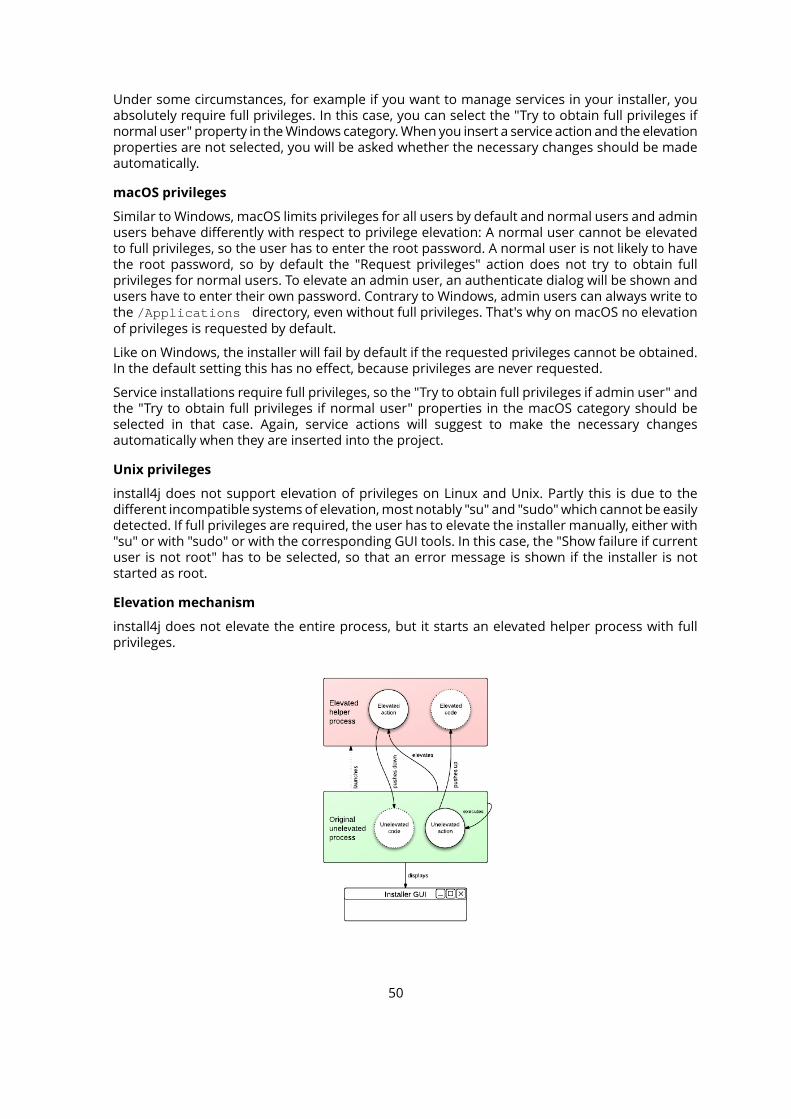
Under some circumstances, for example if you want to manage services in your installer, youabsolutely require full privileges. In this case, you can select the "Try to obtain full privileges ifnormal user" property in theWindows category.When you insert a service action and the elevationproperties are not selected, you will be asked whether the necessary changes should be madeautomatically.
macOS privileges
Similar to Windows, macOS limits privileges for all users by default and normal users and adminusers behave differently with respect to privilege elevation: A normal user cannot be elevatedto full privileges, so the user has to enter the root password. A normal user is not likely to havethe root password, so by default the "Request privileges" action does not try to obtain fullprivileges for normal users. To elevate an admin user, an authenticate dialog will be shown andusers have to enter their own password. Contrary to Windows, admin users can always write tothe /Applications directory, even without full privileges. That's why on macOS no elevationof privileges is requested by default.
Like on Windows, the installer will fail by default if the requested privileges cannot be obtained.In the default setting this has no effect, because privileges are never requested.
Service installations require full privileges, so the "Try to obtain full privileges if admin user" andthe "Try to obtain full privileges if normal user" properties in the macOS category should beselected in that case. Again, service actions will suggest to make the necessary changesautomatically when they are inserted into the project.
Unix privileges
install4j does not support elevation of privileges on Linux and Unix. Partly this is due to thedifferent incompatible systems of elevation,most notably "su" and "sudo"which cannot be easilydetected. If full privileges are required, the user has to elevate the installer manually, either with"su" or with "sudo" or with the corresponding GUI tools. In this case, the "Show failure if currentuser is not root" has to be selected, so that an error message is shown if the installer is notstarted as root.
Elevation mechanism
install4j does not elevate the entire process, but it starts an elevated helper process with fullprivileges.
50
All actions have an "Action elevation type" property that can be set to "Inherit from parent", "Donot elevate" and "Elevate to maximum available privileges". The root element in the elementhierarchy is always an installer application whose "Action elevation type" property is set to "Donot elevate by default".
Actionswhose "Action elevation type" property results to "Elevate tomaximumavailable privileges"will run in the helper process. They have full access to all installer variables as long as the contentsof the variables are serializable.
Actions can have a preferred elevation type that is set automatically when you add the action.Actions that need to be elevated include
• the "Install files" and "Uninstall files" actions
• service actions
• actions that add rights on Windows
• actions that write files
• the "Run executable or batch file" action
Actions that are explicitly not elevated by default include
• the "Show URL" action
• the "Show file" action
• the "Execute launcher" action
• actions that should run as the original user, such as registry actions
• actions that interact control the GUI of the installer application
Elevated actions can only interact with the GUI in a limited way. All methods in the com.install4j.api.Util class for displaying message dialogs or option dialogs are supported.You cannot call context.getWizardContext() or directly display a GUI using the Java Swing API.Also, calling methods in the com.api.install4j.context.Context that change screens isnot supported. Since an elevated action runs in a different process, you cannot access any staticstate in custom code. Installer variables are the onlymeans tomodify state fromelevated actions.
For your own scripts or custom code, the API offers a way to push a piece of code to the elevatedhelper process or to the original process if they exist. This is done by wrapping the code in acom.install4j.api.context.RemoteCallable and calling context.runElevated(...)for the elevated helper process and context.runUnelevated(...) for the original processwith the RemoteCallable. The RemoteCallable must be serializable, so its fields can betransferred to the other process. Its execute() method that contains the code returns aSerializable so you can return a result to the calling process. Several actions in install4j usethis mechanism, as explained in the next section.
51
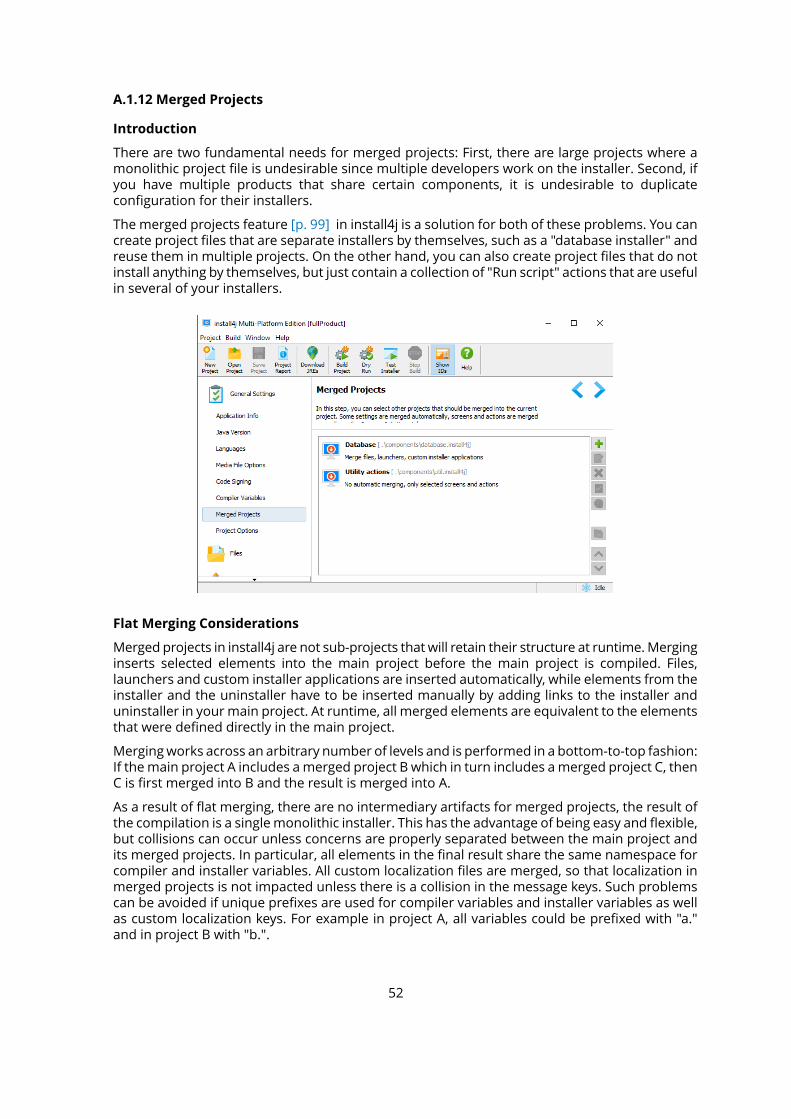
A.1.12 Merged Projects
Introduction
There are two fundamental needs for merged projects: First, there are large projects where amonolithic project file is undesirable since multiple developers work on the installer. Second, ifyou have multiple products that share certain components, it is undesirable to duplicateconfiguration for their installers.
The merged projects feature [p. 99] in install4j is a solution for both of these problems. You cancreate project files that are separate installers by themselves, such as a "database installer" andreuse them in multiple projects. On the other hand, you can also create project files that do notinstall anything by themselves, but just contain a collection of "Run script" actions that are usefulin several of your installers.
Flat Merging Considerations
Merged projects in install4j are not sub-projects that will retain their structure at runtime.Merginginserts selected elements into the main project before the main project is compiled. Files,launchers and custom installer applications are inserted automatically, while elements from theinstaller and the uninstaller have to be inserted manually by adding links to the installer anduninstaller in your main project. At runtime, all merged elements are equivalent to the elementsthat were defined directly in the main project.
Mergingworks across an arbitrary number of levels and is performed in a bottom-to-top fashion:If themain project A includes amerged project B which in turn includes amerged project C, thenC is first merged into B and the result is merged into A.
As a result of flat merging, there are no intermediary artifacts for merged projects, the result ofthe compilation is a singlemonolithic installer. This has the advantage of being easy and flexible,but collisions can occur unless concerns are properly separated between the main project andits merged projects. In particular, all elements in the final result share the same namespace forcompiler and installer variables. All custom localization files are merged, so that localization inmerged projects is not impacted unless there is a collision in the message keys. Such problemscan be avoided if unique prefixes are used for compiler variables and installer variables as wellas custom localization keys. For example in project A, all variables could be prefixed with "a."and in project B with "b.".
52

One area where such collisions are not possible is for IDs of any entity in a project, such aslaunchers, file sets, actions, screens or form components. When a project is merged, install4jprefixes all IDs with the application ID of that project. For example, if the application ID of amerged project is "1406-2150-6354-3051" and a launcher has the ID "2265", the ID is changedto "1406-2150-6354-3051:2265" aftermerging. This ensures that all IDs remain unique nomatterhow many projects are merged. Beans (screens, actions and form components) in the mergedproject are passed a special context that automatically prefixes all unqualified IDs with thisapplication ID. For example, if you have a script in your merged project that calls context.getLauncherById("2265") this will succeed, even though the ID is now actually"1406-2150-6354-3051:2265". If you want to access that same launcher configuration from ascript in the main project, you would have to call context.getLauncherById("1406-2150-6354-3051:2265").
Generally it is recommended to organizemerged projects so that they are relatively self-containedand only interact with their main project through common installer variables. In that way, themain project can continue to work if the merged project is removed and the merged project canwork as a standalone installer.
Display Of Merged Elements
Merged project files are only displayed on theMerged Projects tab [p. 99] . There is no hierarchicaldisplay of the elements of merged project files in the main project. Merging is only done atcompile time and the merged elements are added to the media file.
One exception is themerging of screens and actionswhich is not done automatically, but throughthe placement of links on the screens & actions tab [p. 148] .
Merging Of Files
If you have enabled file merging for a merged project, files are merged automatically accordingto the following rules: All files from the default file set of the merged project are merged intothe default file set of the main project. Roots are merged if the main project has roots with thesame name, otherwise they are discarded. Files in each other file set of the merged project areonly merged if the main project has a file set with the same name. To facilitate the set up of filesets in the main project, there is an action to synchronize file sets in merged projects.
If there are files with the same relative paths, the main project has the highest precedence andthe most deeply nested merged project has the lowest precedence. For merged projects on thesame level, a project with a lower position in the list has a higher precedence than a project witha higher position.
There is no merging of installation components. Installation components can only be defined inthe main project. However, with the appropriate definition of file sets in merged projects youcan easily contribute files to installation components in the main project. For example, if yourmerged project installs your database, and you want to ask the user whether to install thedatabase, define a file set named "database" in the merged project and add all files to that fileset. In your main project, you also add a file set named "database" (when adding the mergedproject, you will be asked whether to add that file set automatically). In your installationcomponent for the database, choose the file set "database". It will not contain any files in theIDE, but during compilation, the files from the merged project will be added to it.
Merging Of Launchers And Custom Installer Applications
Launchers and custom installer applications are merged automatically if you have enabledmerging for launchers and custom installer applications. It is not an error if there are collisionsof launchers or custom installer applications with the same relative paths and the rules ofprecedence are the same as for the merging of files. However, it is recommend not to hidelaunchers in this way since this can lead to unexpected problems at runtime.
53

Both launchers and custom installer applications can be attributed to a particular file set. In thatcase, they are only merged if the file set also exists in the main project. The attribution to aparticular installation component in the main project is done in this way, analogous to the wayit is done for files.
Merging Of Styles
If style merging is enabled, all styles from the main project are made available for installerapplications, screen groups and screens. This allows you to centrally manage a set of styles andre-use it in multiple projects.
See the help topic on styles [p. 24] for more information on how merged styles can be used inthe project.
54
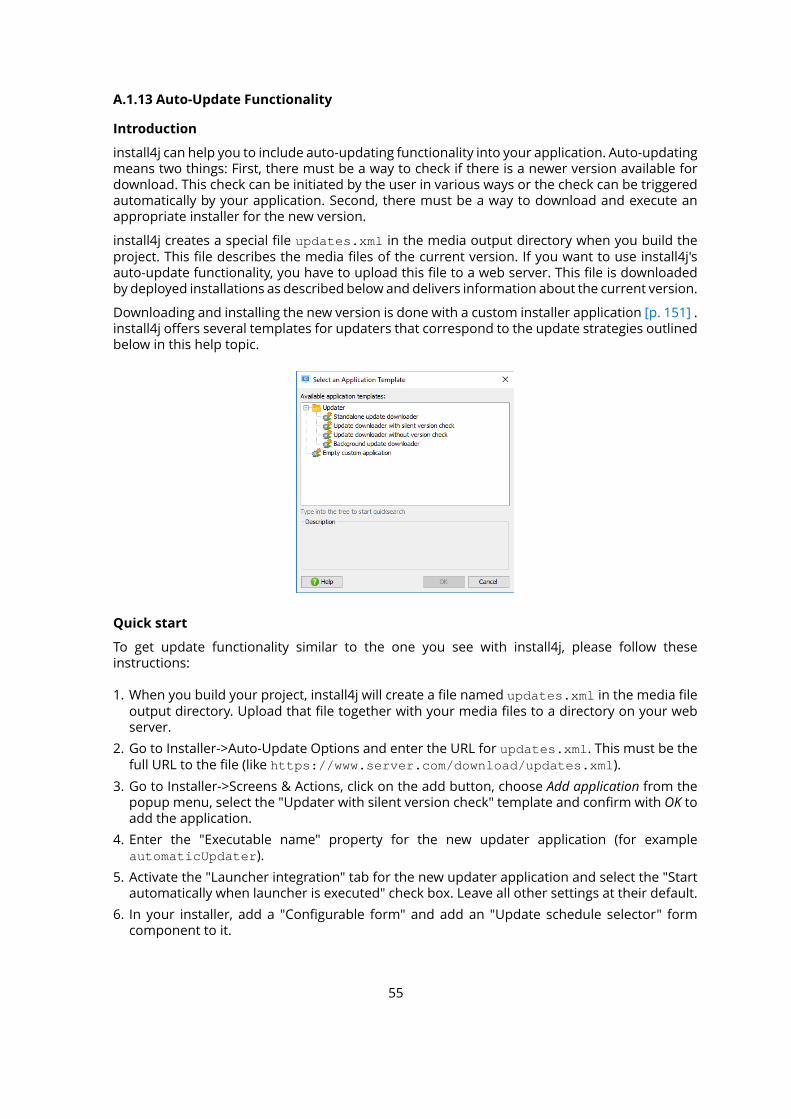
A.1.13 Auto-Update Functionality
Introduction
install4j can help you to include auto-updating functionality into your application. Auto-updatingmeans two things: First, there must be a way to check if there is a newer version available fordownload. This check can be initiated by the user in various ways or the check can be triggeredautomatically by your application. Second, there must be a way to download and execute anappropriate installer for the new version.
install4j creates a special file updates.xml in the media output directory when you build theproject. This file describes the media files of the current version. If you want to use install4j'sauto-update functionality, you have to upload this file to a web server. This file is downloadedby deployed installations as described below and delivers information about the current version.
Downloading and installing the new version is done with a custom installer application [p. 151] .install4j offers several templates for updaters that correspond to the update strategies outlinedbelow in this help topic.
Quick start
To get update functionality similar to the one you see with install4j, please follow theseinstructions:
1. When you build your project, install4j will create a file named updates.xml in the media fileoutput directory. Upload that file together with your media files to a directory on your webserver.
2. Go to Installer->Auto-Update Options and enter the URL for updates.xml. This must be thefull URL to the file (like https://www.server.com/download/updates.xml).
3. Go to Installer->Screens & Actions, click on the add button, choose Add application from thepopup menu, select the "Updater with silent version check" template and confirm with OK toadd the application.
4. Enter the "Executable name" property for the new updater application (for exampleautomaticUpdater).
5. Activate the "Launcher integration" tab for the new updater application and select the "Startautomatically when launcher is executed" check box. Leave all other settings at their default.
6. In your installer, add a "Configurable form" and add an "Update schedule selector" formcomponent to it.
55
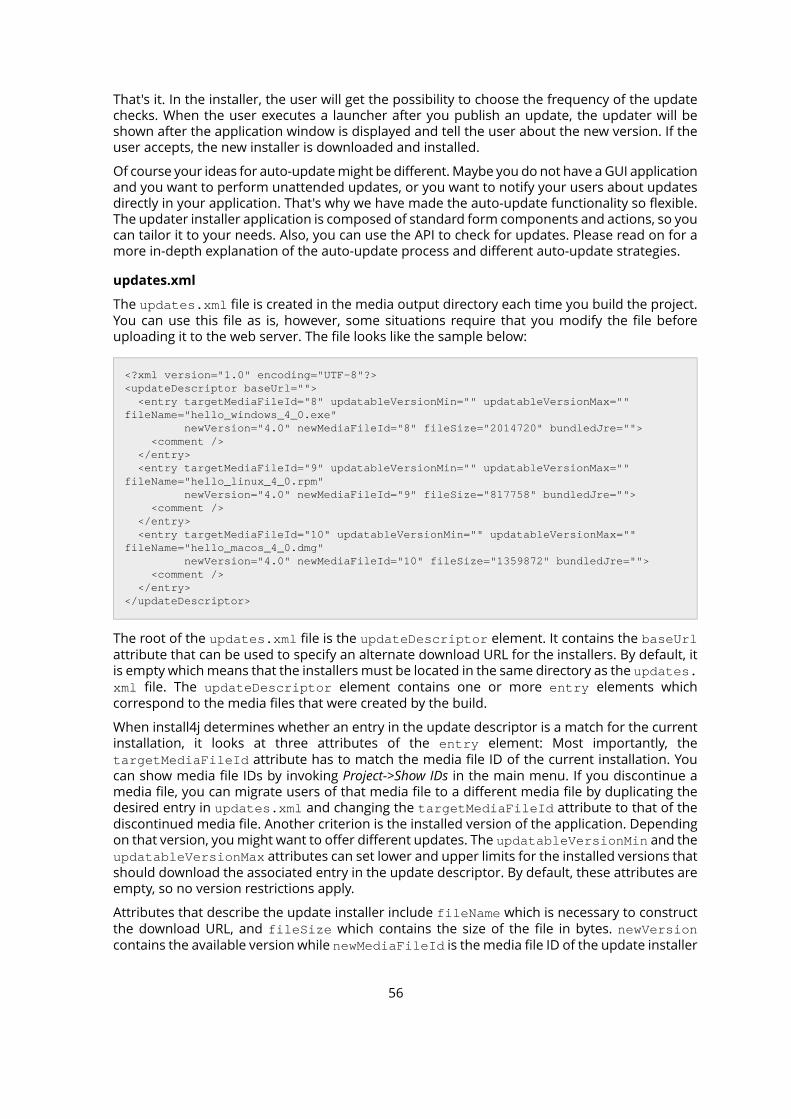
That's it. In the installer, the user will get the possibility to choose the frequency of the updatechecks. When the user executes a launcher after you publish an update, the updater will beshown after the application window is displayed and tell the user about the new version. If theuser accepts, the new installer is downloaded and installed.
Of course your ideas for auto-updatemight be different.Maybe you do not have aGUI applicationand you want to perform unattended updates, or you want to notify your users about updatesdirectly in your application. That's why we have made the auto-update functionality so flexible.The updater installer application is composed of standard form components and actions, so youcan tailor it to your needs. Also, you can use the API to check for updates. Please read on for amore in-depth explanation of the auto-update process and different auto-update strategies.
updates.xml
The updates.xml file is created in the media output directory each time you build the project.You can use this file as is, however, some situations require that you modify the file beforeuploading it to the web server. The file looks like the sample below:
<?xml version="1.0" encoding="UTF-8"?><updateDescriptor baseUrl=""> <entry targetMediaFileId="8" updatableVersionMin="" updatableVersionMax="" fileName="hello_windows_4_0.exe" newVersion="4.0" newMediaFileId="8" fileSize="2014720" bundledJre=""> <comment /> </entry> <entry targetMediaFileId="9" updatableVersionMin="" updatableVersionMax="" fileName="hello_linux_4_0.rpm" newVersion="4.0" newMediaFileId="9" fileSize="817758" bundledJre=""> <comment /> </entry> <entry targetMediaFileId="10" updatableVersionMin="" updatableVersionMax="" fileName="hello_macos_4_0.dmg" newVersion="4.0" newMediaFileId="10" fileSize="1359872" bundledJre=""> <comment /> </entry></updateDescriptor>
The root of the updates.xml file is the updateDescriptor element. It contains the baseUrlattribute that can be used to specify an alternate download URL for the installers. By default, itis empty whichmeans that the installers must be located in the same directory as the updates.xml file. The updateDescriptor element contains one or more entry elements whichcorrespond to the media files that were created by the build.
When install4j determines whether an entry in the update descriptor is a match for the currentinstallation, it looks at three attributes of the entry element: Most importantly, thetargetMediaFileId attribute has to match the media file ID of the current installation. Youcan show media file IDs by invoking Project->Show IDs in the main menu. If you discontinue amedia file, you can migrate users of that media file to a different media file by duplicating thedesired entry in updates.xml and changing the targetMediaFileId attribute to that of thediscontinued media file. Another criterion is the installed version of the application. Dependingon that version, youmight want to offer different updates. The updatableVersionMin and theupdatableVersionMax attributes can set lower and upper limits for the installed versions thatshould download the associated entry in the update descriptor. By default, these attributes areempty, so no version restrictions apply.
Attributes that describe the update installer include fileName which is necessary to constructthe download URL, and fileSize which contains the size of the file in bytes. newVersioncontains the available version while newMediaFileId is themedia file ID of the update installer
56
which is the same as targetMediaFileId unless you changed it yourself. Lastly, bundledJrecontains the original file name of the JRE bundle without the .tar.gz extension or the emptystring if no JRE is bundled in the installer. In addition to the above attributes, the nested commentelement can contain a description that should be displayed to the user. All of this informationcan be used for custom logic to select a suitable update installer or be displayed to the user inthe updater. In addition, you can add any number arbitrary attributes to the entry elementyourself.
The update descriptor
The install4j runtime API contains the com.install4j.api.update.UpdateChecker utilityclass that can download the updates.xml file and translate it to an instance of com.install4j.api.update.UpdateDescriptor. From there, you can get a suitable com.install4j.api.update.UpdateDescriptorEntry with a single method call. Please see the Javadoc for moredetailed information. The above API is primarily intended for use in your application. The install4jruntimeAPI contained inresource/i4jruntime.jar is always on the class path for a generatedlauncher.
In a custom installer application, youwould rather use a "Check for update" action that performsthe same actions as UpdateChecker and saves the downloaded UpdateDescriptor to aninstaller variable. All updater templates included with install4j execute the "Check for update"action at some point.
Instances ofUpdateDescriptorEntry expose all attributes of the correspondingentry elementin the updates.xml file. They also give access to additional attributes added to the entryelement so you can implement custom logic to find a suitable update. The most importantmethod of the UpdateDescriptorEntry class is the getUrl()method that constructs the fullURL from which the update installer can be downloaded. If no baseUrl has been specified onthe updateDescriptor root element, the URL starts with the parent directory from which theupdates.xml file has been downloaded.
Some information in the update descriptor, such as the file names, file sizes, the new media fileIDs and others are known to the compiler and are automatically filled in when the updates.xmlfile is created. Other information, such as the base URL, is information that can be customizedon the auto-update options [p. 317] tab. Other customizable information includes versionrequirements for the installed application, a localizable comment that can be displayed in theupdater and custom attributes that can be used for custom logic in updaters.
Strategy 1: Standalone updater
The easiest way to provide auto-update functionality to your users is to create a self-containedupdater application. This is done by adding an application on the screens & actions tab [p. 148]and choosing the "Standalone updater" application template. Such an auto-updater can byinvoked manually by the user, on Windows, it can also be added to the start menu. No changesin in your application code are required so far.
If you have aGUI application, you could provide integrationwith the updater by offering a "Checkfor update" menu item or similar that invokes the updater. One problem in this scenario is thatif the updater downloads and executes the update installer, your application will still be runningand the user will receive a corresponding warning message in the installer. The solution to thisproblem is to use the com.install4j.api.launcher.ApplicationLauncher class to launchthe updater. With this utility class you can launch the update installer by passing its ID as anargument. IDs can be shown on the screens & action tab by toggling the "Show IDs" tool barbutton. If you launch an installer application such as an updater that way, the "Shut down callinglauncher" action will be able to close your application. To react to the shutdown, for example,to invoke your own shutdown routine, you can pass a callback to the ApplicationLauncher.
57
launchApplication(...) call. After you were notified through the call back, your applicationwill be terminated with a call to System.exit().
To easily get the code snippet for invoking the updater, select the updater application on theScreens & Actions tab and click on the Start Integration Wizard button on the right.
Strategy 2: Updater with silent version check
In this scenario, you invoke the updater like in strategy 1, but rather than offering a "Check forupdate" menu item, you do so on a regular schedule. For example, you automatically check forupdates every week or each time the user starts the application. In that case, the standaloneupdater template is not suitable since you only want to give the user feedback if there is actuallya new version available. However, the standalone updater always starts with a "Welcome" screen,verbosely checks for updates and informs the user that no new version is available. Most likely,your users will be bothered if this is done automatically.
The "Updater with silent version check" application template is intended for this use case. Itchecks for an update in the startup sequence and terminates the updater if no new version isavailable. Thismeans that if there is no new version available, your users will not see that a checkhas taken place. Only if a new version is available will the updater display its window and informthe user of the possibility to download the update installer.
For such an automatic check you will likely want to invoke the updater in a blocking fashion. Ifyou callApplicationLauncher.launchApplication(...)with theblocking argument setto true, the method will not return until the update installer has exited. If the user decides torun the installer on the "Finish" screen, your application will terminate as explained in strategy1.
Strategy 3: Updater without version check
If you want to take the integration one step further and display the availability of a new versionin your application yourself, you can use the com.install4j.api.update.UpdateCheckerclass as explained under the "updates.xml" heading. In this way, you can create your own panelthat announces the new version and lets the user decide whether to download it or not. If theuser decides to download, the "Updater with silent version check" template is not suitable sinceit informs the user about the new version once more.
The "Updater without version check" application template is intended for this use case. Itimmediately starts downloading the new version and then proceeds to the "Finish" screenwherethe user can decide to start the downloaded installer. In the other two templates the user canchoose the directory where the downloaded installer should be saved. That screen is omittedin this template and the installer is downloaded to the user home directory by default. You canchange this default directory be passing the argument -DupdaterDownloadLocation=[directory] to the ApplicationLauncher.launchApplication(...) call. Again, theupdater will terminate your application if the user starts the installer as explained for strategy1.
Strategy 4: Background updater
A background updater has no UI, and automatically downloads an updater installer if available.It will not execute the downloaded update installer because that would disrupt the work of theuser. Instead, it executes a "Schedule update installation" action to register the downloadedupdated installer for later execution.
There are two options to execute an update installer that is scheduled for execution:
58
• Programmatic invocation
By callingcom.install4j.api.update.UpdateChecker.executeScheduledUpdate(...) you can execute the downloaded update installer programatically, usually after using com.install4j.api.update.UpdateChecker.isUpdateScheduled() to checkwhether sucha download has been completed. You can do that while the launcher is running or at startup.Notifying the user about this event or letting the user defer the installation is handled by yourown code. For GUI and server launchers, this is the only option.
The "HelloGui" class the in the "hello" sample contains a complete demonstration of how touse the API to check for updates programatically and use a background updater to downloadand install updates.
• Automatic invocation
For GUI launchers, you can edit the launcher, go to the "Executable info->Auto-updateintegration" step and select theExecute downloaded updater installers at startupcheck box. When the GUI installer is started and a downloaded update installer has beenscheduled for installation, the update installer will be executed.
Update schedule registry
A common requirement is to check for an update on a regular schedule. install4j comes with astandard implementation of an update schedule registry that frees you of the task to implementone yourself. This update schedule registry is fully integrated with the launcher integration thatstarts update downloaders when launchers are executed, but it is also available in the API.
The com.install4j.api.update.UpdateScheduleRegistry class is intended to be usedin your application. You configure an com.install4j.api.update.UpdateSchedule with acall to UpdateScheduleRegistry.setUpdateSchedule(...) and callUpdateScheduleRegistry.checkAndReset() each time your application is started. If youget a positive response, you can start a suitable updater as explained above. Please see theJavadoc for more information.
To facilitate the configuration of the update schedule in your installer, install4j offers a special"Update schedule selector" form component whose initial value is set to the current setting (ifany) and automatically updates the setting for the installed application when the user clicks"Next".
59
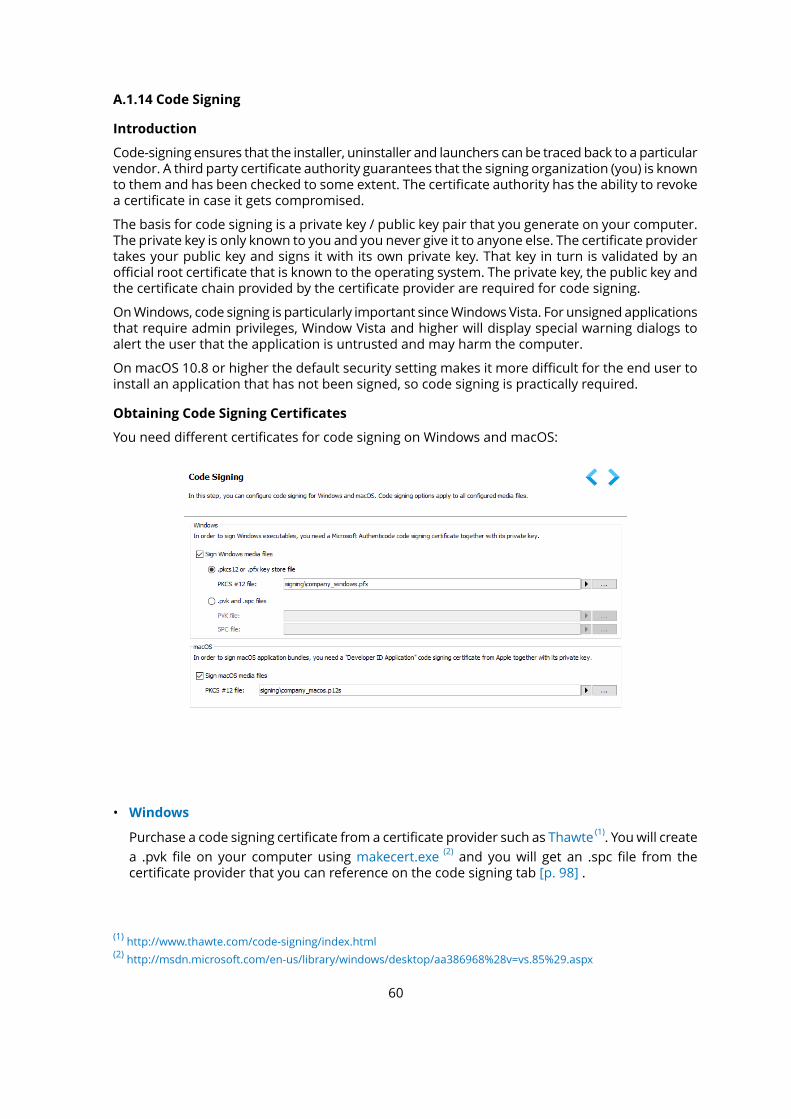
A.1.14 Code Signing
Introduction
Code-signing ensures that the installer, uninstaller and launchers can be traced back to a particularvendor. A third party certificate authority guarantees that the signing organization (you) is knownto them and has been checked to some extent. The certificate authority has the ability to revokea certificate in case it gets compromised.
The basis for code signing is a private key / public key pair that you generate on your computer.The private key is only known to you and you never give it to anyone else. The certificate providertakes your public key and signs it with its own private key. That key in turn is validated by anofficial root certificate that is known to the operating system. The private key, the public key andthe certificate chain provided by the certificate provider are required for code signing.
OnWindows, code signing is particularly important sinceWindows Vista. For unsigned applicationsthat require admin privileges, Window Vista and higher will display special warning dialogs toalert the user that the application is untrusted and may harm the computer.
On macOS 10.8 or higher the default security setting makes it more difficult for the end user toinstall an application that has not been signed, so code signing is practically required.
Obtaining Code Signing Certificates
You need different certificates for code signing on Windows and macOS:
• Windows
Purchase a code signing certificate from a certificate provider such as Thawte (1). Youwill create
a .pvk file on your computer using makecert.exe (2) and you will get an .spc file from thecertificate provider that you can reference on the code signing tab [p. 98] .
(1) http://www.thawte.com/code-signing/index.html(2) http://msdn.microsoft.com/en-us/library/windows/desktop/aa386968%28v=vs.85%29.aspx
60
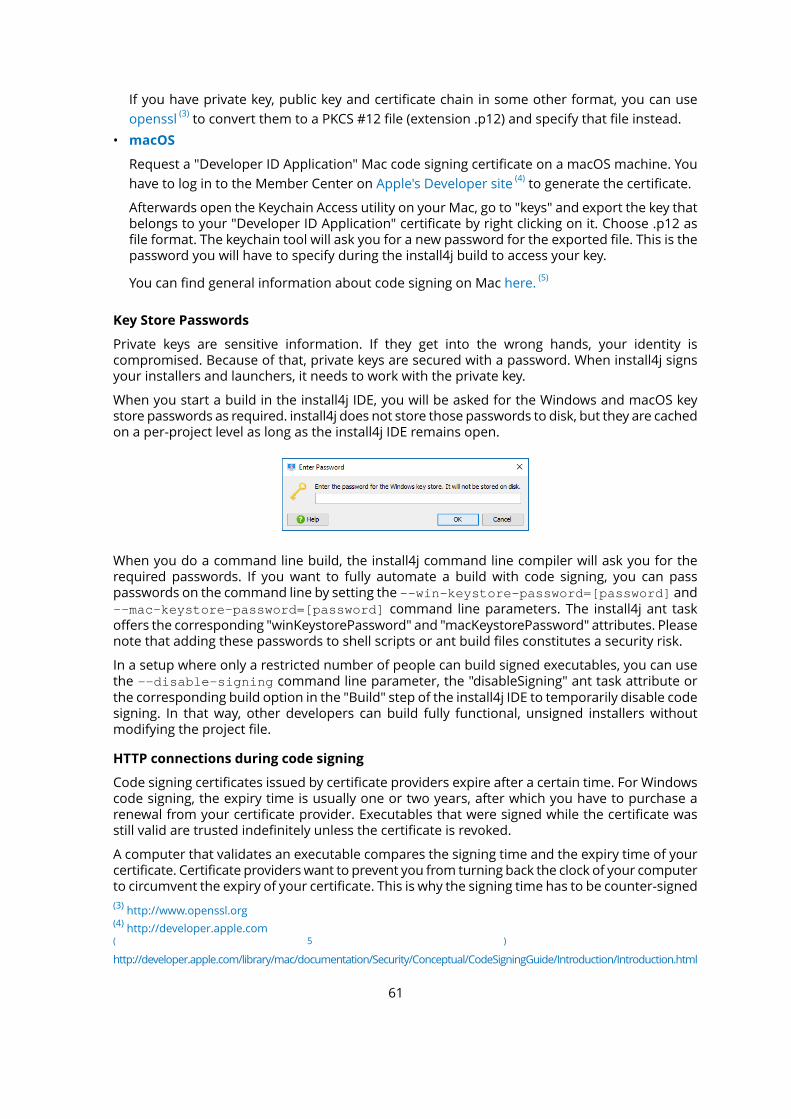
If you have private key, public key and certificate chain in some other format, you can use
openssl (3) to convert them to a PKCS #12 file (extension .p12) and specify that file instead.
• macOS
Request a "Developer ID Application" Mac code signing certificate on a macOS machine. You
have to log in to the Member Center on Apple's Developer site (4) to generate the certificate.
Afterwards open the Keychain Access utility on your Mac, go to "keys" and export the key thatbelongs to your "Developer ID Application" certificate by right clicking on it. Choose .p12 asfile format. The keychain tool will ask you for a new password for the exported file. This is thepassword you will have to specify during the install4j build to access your key.
You can find general information about code signing on Mac here. (5)
Key Store Passwords
Private keys are sensitive information. If they get into the wrong hands, your identity iscompromised. Because of that, private keys are secured with a password. When install4j signsyour installers and launchers, it needs to work with the private key.
When you start a build in the install4j IDE, you will be asked for the Windows and macOS keystore passwords as required. install4j does not store those passwords to disk, but they are cachedon a per-project level as long as the install4j IDE remains open.
When you do a command line build, the install4j command line compiler will ask you for therequired passwords. If you want to fully automate a build with code signing, you can passpasswords on the command line by setting the --win-keystore-password=[password] and--mac-keystore-password=[password] command line parameters. The install4j ant taskoffers the corresponding "winKeystorePassword" and "macKeystorePassword" attributes. Pleasenote that adding these passwords to shell scripts or ant build files constitutes a security risk.
In a setup where only a restricted number of people can build signed executables, you can usethe --disable-signing command line parameter, the "disableSigning" ant task attribute orthe corresponding build option in the "Build" step of the install4j IDE to temporarily disable codesigning. In that way, other developers can build fully functional, unsigned installers withoutmodifying the project file.
HTTP connections during code signing
Code signing certificates issued by certificate providers expire after a certain time. For Windowscode signing, the expiry time is usually one or two years, after which you have to purchase arenewal from your certificate provider. Executables that were signed while the certificate wasstill valid are trusted indefinitely unless the certificate is revoked.
A computer that validates an executable compares the signing time and the expiry time of yourcertificate. Certificate providerswant to prevent you from turning back the clock of your computerto circumvent the expiry of your certificate. This is why the signing time has to be counter-signed(3) http://www.openssl.org(4) http://developer.apple.com( 5 )
http://developer.apple.com/library/mac/documentation/Security/Conceptual/CodeSigningGuide/Introduction/Introduction.html
61
by a certificate provider. Certificate providers offer free web services that will confirm that asignature has been performed at a particular time. This counter-signature is not related to aparticular certificate - so one can use the web service of any certificate provider, regardless ofwhere the certificate came from. install4j uses the VeriSign time stamp service.
The consequence of this scheme is that you need an internet connection at build time in orderto get a trusted time-stamp counter signature. Many build servers are behind fire walls and youmight need to set up a proxy to get internet connectivity. install4j will try to auto-detect the proxyinformation. If that fails, the IDE will ask you for proxy information, but the command line buildswill not ask for user-input in order to avoid hanging builds due to temporary internet connectivityproblems.
For command line builds, you can pass the following VM parameters to the command linecompiler:
• -DproxySet=true
• -DproxyHost=[host name]
• -DproxyPort=1234
• -DproxyAuth=true
• -DproxyAuthUser=[user name]
• -DproxyAuthPassword=[password]
The authentication parameters are optional, only the first 3 parameters are required to set upa proxy.
If you pass these parameters to the command line compiler, you have to prefix them with "-J"(such as -J-DproxySet=true) to mark them as VM parameters. In the ant task [p. 358] , use nested"vmParameter" elements to pass the above parameters (without the "-J" prefix).
62
A.1.15 Styling Of DMGs On MacOS
Introduction
On macOS, software is usually delivered as a DMG. DMG stands for "Disk image" and containsa file system that can be mounted, rather than an archive that can be extracted. When the userdouble-clicks on a DMG file in the Finder, it is mounted to /Volumes/[volume name] and anew Finder window is opened for the mount point.
The Finder can by styled on a per-directory basis and the information about that styling is savedto a file named .DS_Store in every directory. This means that you can ship styling informationwith a DMG file. Styling includes setting a background image for the Finder window and thatimage file can be added to the DMG as well.
For single bundle GUI applications, a styled DMG generally includes a symbolic link to /Applications in the top-level folder of the DMG, so that user can drag the application bundleinto the default installation directory with minimum effort.
install4j allows you to add any number of files and symbolic links to the DMG. All macOS mediafile types have a step named "Additional files in DMG" as a sub-step of the "Installer options"step. Here, you can add the top-level .DS_Store files, a background image and the symlink to/Applications.
Step-By-Step Instructions
To create your .DS_Store file, please follow the steps below. You will need a Mac with macOS10.7+ and an installation of install4j on that machine.
1. Compile DMG
The first step is to compile your macOS media file from install4j - without any custom styling.This DMGwill be the template for which wewill define the style. You cannot use just any otherDMG, because eachmedia file has a unique ID.Whenusing background images, the.DS_Storefile must have been created for a DMG with the same ID, otherwise the image will not befound reliably.
When you recompile the media file in install4j, this ID remains the same, so you can add the.DS_Store file from a previously compiled DMG to the additional DMG files in the mediawizard.
2. Convert the read-only DMG to a writable DMG
The generated DMG is a read-only image. In order to make any modifications at all, we haveto convert the DMG to a writable format.
First, make sure that the DMG is not mounted. In a terminal, cd to the directory where theDMG was created and execute
hdiutil convert hello.dmg -format UDRW -o hello_rw.dmg
where "hello" has to be replaced by the actual name af your media file. Note that the lastargument has "_rw" appended at the end, because the output DMG must be different fromthe input DMG.
3. Enlarge the writable DMG
By default, a DMG generated by install4j is full. It is not possible to add any more files simplybecause the file system in it has no more available space. To enlarge the DMG, we firstdetermine its current size by executing
63
hdiutil resize hello_4_0_rw.dmg
The "cur" column of the output shows the number 512-byte sectors. To add about 10 MB, weadd 20000 to that number and execute
hdiutil resize -sectors [new number of sectors] hello_4_0_rw.dmg
To check the new size, run
hdiutil resize hello_4_0_rw.dmg
again.
4. Mount DMG
We now mount the read/write DMG by executing
hdiutil attach hello_4_0_rw.dmg
and note the mount point /Volumes/[volume name] that is given by the output of the abovecommand.
5. Copy background image to DMG
To add a background image, we first have to copy the image to the DMG. We do not want theimage file to show up in the finder, so we create a hidden directory in the DMG. To do that,we execute
cd /Volumes/[volume name]mkdir .background
To open this hidden directory in the Finder, we execute
cd .backgroundopen .
Now, we open another Finder window, locate our background image and copy it to the hiddendirectory that is visible in the original Finder window.
6. Select background image for DMG top-level folder
Since we need the Finder with the hidden directory in a minute, we leave it as it is, anddouble-click on the mounted volume on the desktop to open the default Finder window forthe DMG.We position the new Finder window side-by side with the Finder window that showsthe hidden directory.
To start changing styles, we invoke View->Show View Options. This will show a tool window withstyling controls. In the "Background" section, we choose "Picture" and notice the drop targetfor a picture file.
64
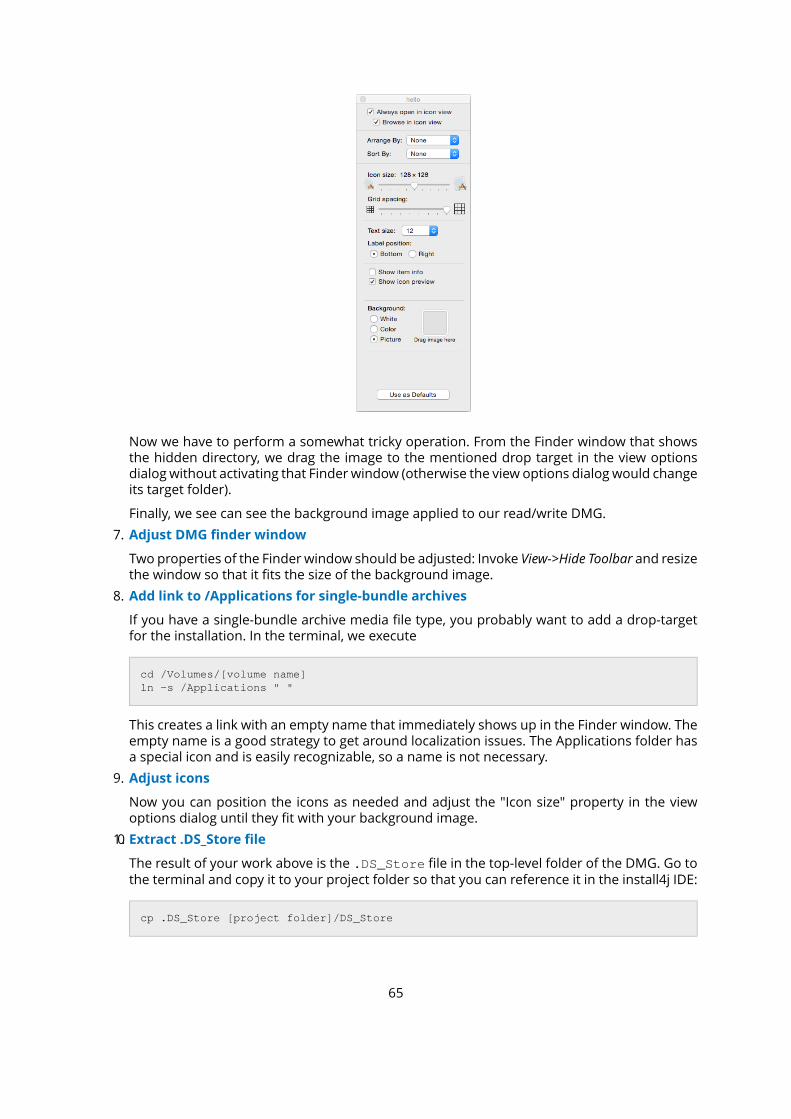
Now we have to perform a somewhat tricky operation. From the Finder window that showsthe hidden directory, we drag the image to the mentioned drop target in the view optionsdialog without activating that Finder window (otherwise the view options dialog would changeits target folder).
Finally, we see can see the background image applied to our read/write DMG.
7. Adjust DMG finder window
Two properties of the Finder window should be adjusted: Invoke View->Hide Toolbar and resizethe window so that it fits the size of the background image.
8. Add link to /Applications for single-bundle archives
If you have a single-bundle archive media file type, you probably want to add a drop-targetfor the installation. In the terminal, we execute
cd /Volumes/[volume name]ln -s /Applications " "
This creates a link with an empty name that immediately shows up in the Finder window. Theempty name is a good strategy to get around localization issues. The Applications folder hasa special icon and is easily recognizable, so a name is not necessary.
9. Adjust icons
Now you can position the icons as needed and adjust the "Icon size" property in the viewoptions dialog until they fit with your background image.
10. Extract .DS_Store file
The result of your work above is the .DS_Store file in the top-level folder of the DMG. Go tothe terminal and copy it to your project folder so that you can reference it in the install4j IDE:
cp .DS_Store [project folder]/DS_Store
65
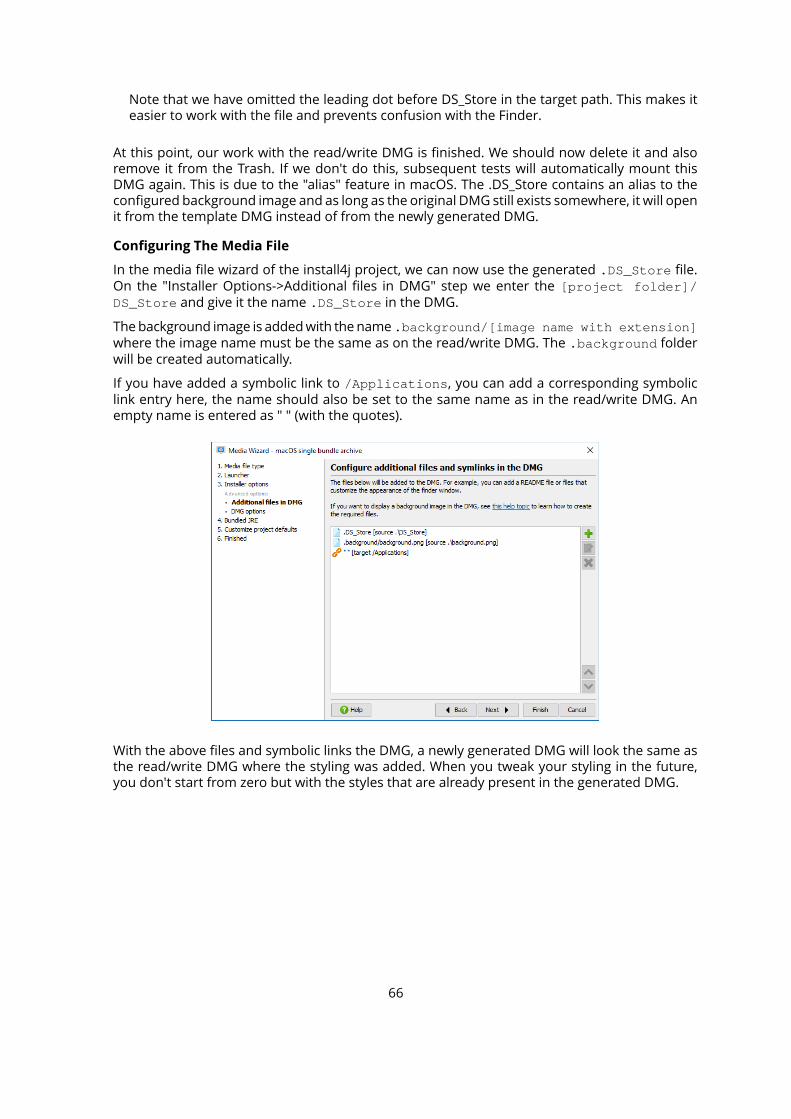
Note that we have omitted the leading dot before DS_Store in the target path. This makes iteasier to work with the file and prevents confusion with the Finder.
At this point, our work with the read/write DMG is finished. We should now delete it and alsoremove it from the Trash. If we don't do this, subsequent tests will automatically mount thisDMG again. This is due to the "alias" feature in macOS. The .DS_Store contains an alias to theconfigured background image and as long as the original DMG still exists somewhere, it will openit from the template DMG instead of from the newly generated DMG.
Configuring The Media File
In the media file wizard of the install4j project, we can now use the generated .DS_Store file.On the "Installer Options->Additional files in DMG" step we enter the [project folder]/DS_Store and give it the name .DS_Store in the DMG.
Thebackground image is addedwith thename.background/[image name with extension]where the image name must be the same as on the read/write DMG. The .background folderwill be created automatically.
If you have added a symbolic link to /Applications, you can add a corresponding symboliclink entry here, the name should also be set to the same name as in the read/write DMG. Anempty name is entered as " " (with the quotes).
With the above files and symbolic links the DMG, a newly generated DMG will look the same asthe read/write DMG where the styling was added. When you tweak your styling in the future,you don't start from zero but with the styles that are already present in the generated DMG.
66

A.2 Generated Installers
A.2.1 Installer Modes
Introduction
Installers generated by install4j can be run in three modes:
• GUI mode
The default mode for installer and uninstaller executables is to display a GUI installer oruninstaller.
• Console mode
If the installer is invoked with the -c argument, the interaction with the user is performed inthe terminal from which the installer was invoked. The same applies to the uninstaller.
• Unattended mode
If the installer is invoked with the -q argument, there is no interaction with the user, theinstallation is performed automatically with the default values. The same applies to theuninstaller.
The screen flow and the action sequence is executed in the same way for all three modes. Ifsome actions or screens should not be traversed for console or unattended installations, youcanuse themethodscontext.isConsole() andcontext.isUnattended() in their "Conditionexpression" properties.
Also see the command line options [p. 69] reference for installers.
GUI mode
In GUImode the keyboard shortcut CTRL-SHIFT-L shows the log file in the Explorer onWindows,in the Finder on macOS and in the file manager on Linux/Unix. This shortcut is not advertisedto the user, but you can communicate it to the user for debug purposes.
Console mode
Installers generated by install4j can perform console installations, unless this feature has beendisabled in the application configuration [p. 151] of the Installer step [p. 147] . In order to start aconsole installation, the installer has to be invoked with the -c argument.
All standard screens in install4j present their information on the console and allow the user toenter all information as in the GUI installer. Not all messages in the GUI installer are displayedto the console installer, for each screen the subtitle is displayed as the firstmessage. All standardscreens in install4j have a question as their subtitle, if you add customizable screens to the screensequence [p. 148] , you should phrase their subtitles as questions in order to create a consistentuser experience for the console installer.
Also, form screens [p. 250] are fully mapped to console installers, each form component isdisplayed on the console, form components that expect user input will allow the users tomodifyor enter values.
OnMicrosoftWindows the information of whether an executable is a GUI executable or a consoleexecutable has to be statically compiled into the executable. Installers are GUI executables,otherwise a console would be displayed when starting the installer from the explorer. This isalso the reason why the JRE supplies both the java.exe (console) and the javaw.exe (GUI) onWindows.
67
A GUI executable can attach to a console fromwhich it was started, though. GUI executables arestarted in the background by default, therefore you have to use the start command like this tostart it in the foreground and be able to enter information:
start /wait installer.exe -c
On older Windows versions a new console is opened.
If you develop new screens or form components, you have to override the method
boolean handleConsole(Console console) throws UserCanceledException
Displaying default data on the console and requesting user input ismade easy with the Consoleclass that is passed as a parameter.
Unattended mode
Installers generated by install4j can perform unattended installations, unless this feature hasbeen disabled on the application configuration [p. 151] of the Installer step [p. 147] . In order tostart an unattended installation, the installer has to be invokedwith the -q argument. The installerwill perform the installation as if the user had accepted all default settings.
There is no user interaction on the terminal. In all cases, where the installer would have askedthe user whether to overwrite an existing file, the installer will not overwrite it. You can changethis behavior by passing -overwrite as a parameter to the installer. In this case, the installerwill overwrite such files. For the standard case, it is recommended to fine-tune the overwritepolicy [p. 113] in the distribution tree instead, so that this situation never arises.
The installer will install the application to the default installation directory, unless you pass the-dir parameter to the installer. The parameter after -dir must be the desired installationdirectory. Example:
installer.exe -q -dir "d:\myapps\My Application"
For the unattended mode of an installer, response files [p. 74] are an important instrument topre-define user input.
On Windows, the output of the installer is not printed to the command line for unattendedinstallation. If you pass the -console parameter after the -q parameter, a console will beallocated the displays the output to the user. This is useful for debugging purposes.
If the installation was successful, the exit code of the installer will be 0, if no suitable JRE couldbe found it will be 83, for other types of failure it will be 1.
If you develop new screens or form components, you have to override the method
boolean handleUnattended()
in order to support unattended installations.
68
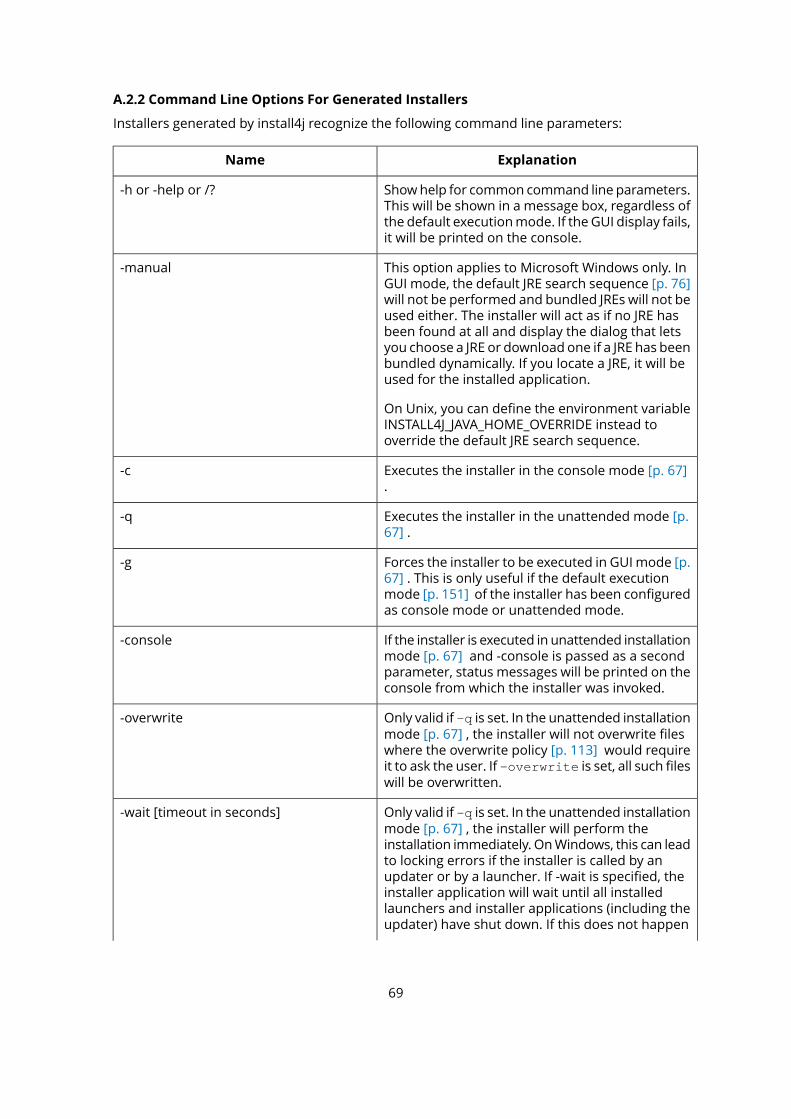
A.2.2 Command Line Options For Generated Installers
Installers generated by install4j recognize the following command line parameters:
ExplanationName
Showhelp for common command line parameters.This will be shown in a message box, regardless of
-h or -help or /?
the default executionmode. If theGUI display fails,it will be printed on the console.
This option applies to Microsoft Windows only. InGUI mode, the default JRE search sequence [p. 76]
-manual
will not be performed and bundled JREs will not beused either. The installer will act as if no JRE hasbeen found at all and display the dialog that letsyou choose a JRE or download one if a JRE has beenbundled dynamically. If you locate a JRE, it will beused for the installed application.
On Unix, you can define the environment variableINSTALL4J_JAVA_HOME_OVERRIDE instead tooverride the default JRE search sequence.
Executes the installer in the console mode [p. 67].
-c
Executes the installer in the unattended mode [p.67] .
-q
Forces the installer to be executed in GUI mode [p.67] . This is only useful if the default execution
-g
mode [p. 151] of the installer has been configuredas console mode or unattended mode.
If the installer is executed in unattended installationmode [p. 67] and -console is passed as a second
-console
parameter, status messages will be printed on theconsole from which the installer was invoked.
Only valid if -q is set. In the unattended installationmode [p. 67] , the installer will not overwrite files
-overwrite
where the overwrite policy [p. 113] would requireit to ask the user. If -overwrite is set, all such fileswill be overwritten.
Only valid if -q is set. In the unattended installationmode [p. 67] , the installer will perform the
-wait [timeout in seconds]
installation immediately. OnWindows, this can leadto locking errors if the installer is called by anupdater or by a launcher. If -wait is specified, theinstaller application will wait until all installedlaunchers and installer applications (including theupdater) have shut down. If this does not happen
69
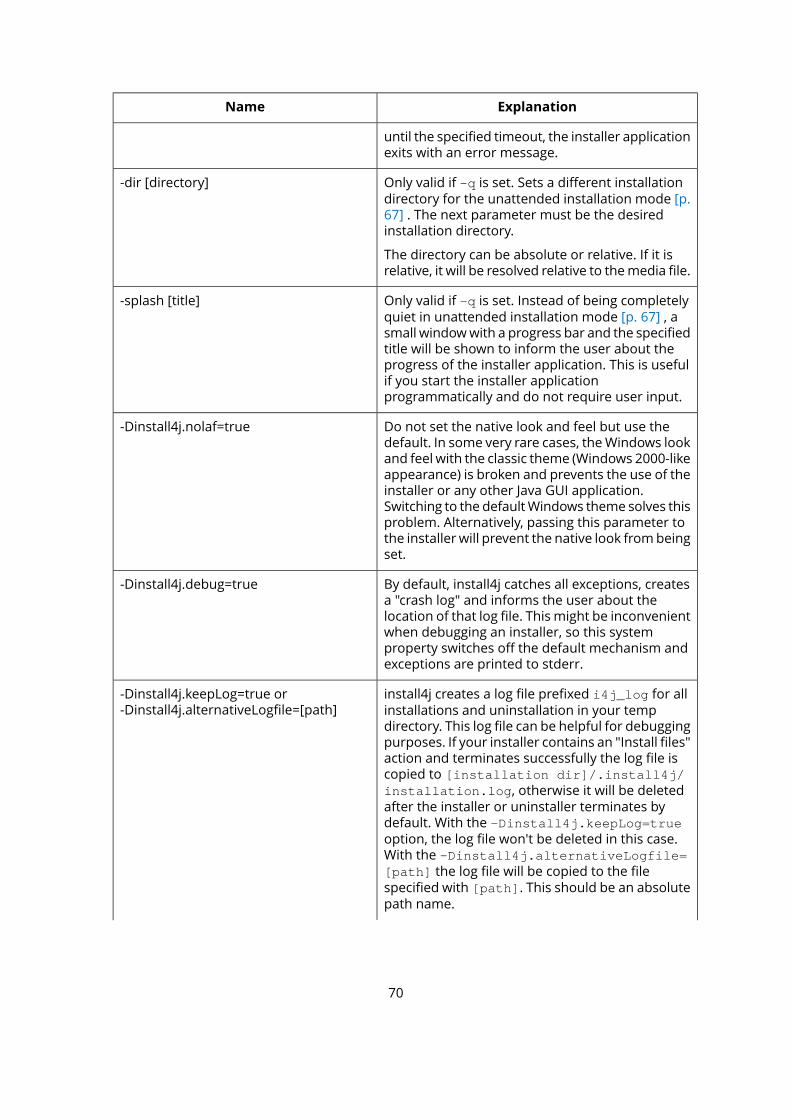
ExplanationName
until the specified timeout, the installer applicationexits with an error message.
Only valid if -q is set. Sets a different installationdirectory for the unattended installation mode [p.
-dir [directory]
67] . The next parameter must be the desiredinstallation directory.
The directory can be absolute or relative. If it isrelative, it will be resolved relative to themedia file.
Only valid if -q is set. Instead of being completelyquiet in unattended installation mode [p. 67] , a
-splash [title]
small windowwith a progress bar and the specifiedtitle will be shown to inform the user about theprogress of the installer application. This is usefulif you start the installer applicationprogrammatically and do not require user input.
Do not set the native look and feel but use thedefault. In some very rare cases, theWindows look
-Dinstall4j.nolaf=true
and feel with the classic theme (Windows 2000-likeappearance) is broken and prevents the use of theinstaller or any other Java GUI application.Switching to the defaultWindows theme solves thisproblem. Alternatively, passing this parameter tothe installer will prevent the native look frombeingset.
By default, install4j catches all exceptions, createsa "crash log" and informs the user about the
-Dinstall4j.debug=true
location of that log file. This might be inconvenientwhen debugging an installer, so this systemproperty switches off the default mechanism andexceptions are printed to stderr.
install4j creates a log file prefixed i4j_log for allinstallations and uninstallation in your temp
-Dinstall4j.keepLog=true or-Dinstall4j.alternativeLogfile=[path]
directory. This log file can be helpful for debuggingpurposes. If your installer contains an "Install files"action and terminates successfully the log file iscopied to [installation dir]/.install4j/installation.log, otherwise it will be deletedafter the installer or uninstaller terminates bydefault. With the -Dinstall4j.keepLog=trueoption, the log file won't be deleted in this case.With the -Dinstall4j.alternativeLogfile=[path] the log file will be copied to the filespecified with [path]. This should be an absolutepath name.
70
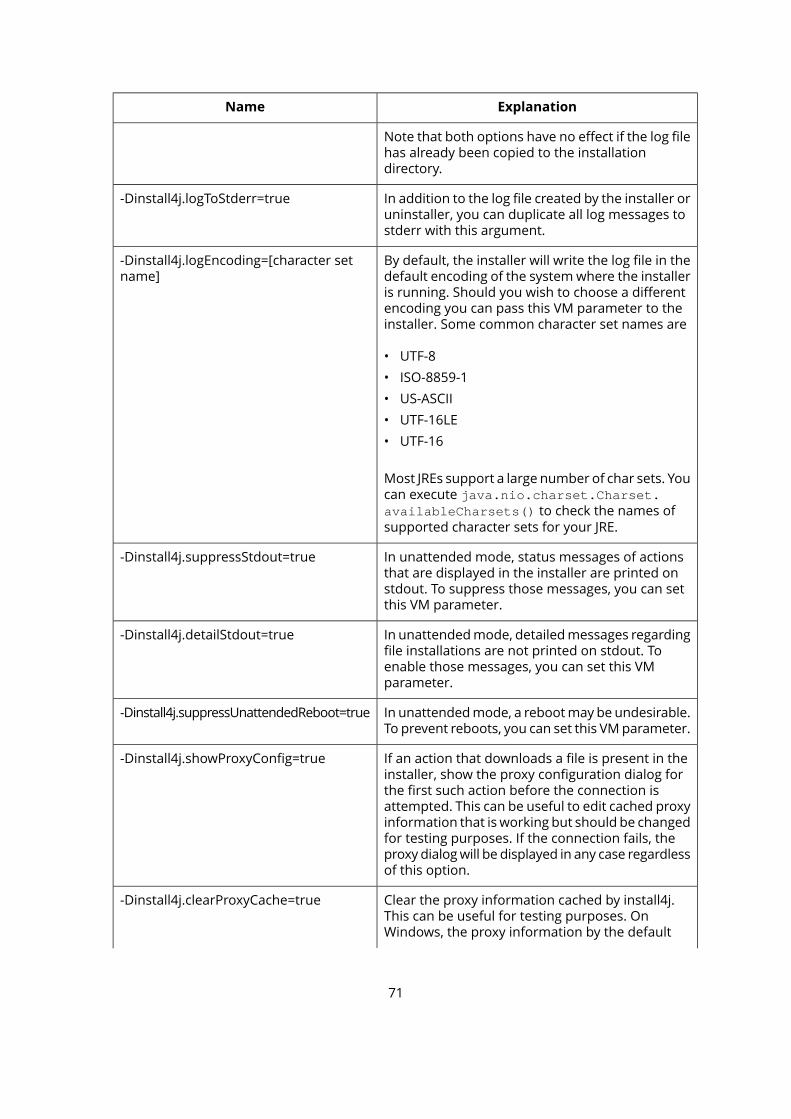
ExplanationName
Note that both options have no effect if the log filehas already been copied to the installationdirectory.
In addition to the log file created by the installer oruninstaller, you can duplicate all log messages tostderr with this argument.
-Dinstall4j.logToStderr=true
By default, the installer will write the log file in thedefault encoding of the systemwhere the installer
-Dinstall4j.logEncoding=[character setname]
is running. Should you wish to choose a differentencoding you can pass this VM parameter to theinstaller. Some common character set names are
• UTF-8
• ISO-8859-1
• US-ASCII
• UTF-16LE
• UTF-16
Most JREs support a large number of char sets. Youcan execute java.nio.charset.Charset.availableCharsets() to check the names ofsupported character sets for your JRE.
In unattended mode, status messages of actionsthat are displayed in the installer are printed on
-Dinstall4j.suppressStdout=true
stdout. To suppress those messages, you can setthis VM parameter.
In unattendedmode, detailedmessages regardingfile installations are not printed on stdout. To
-Dinstall4j.detailStdout=true
enable those messages, you can set this VMparameter.
In unattendedmode, a rebootmay be undesirable.To prevent reboots, you can set this VMparameter.
-Dinstall4j.suppressUnattendedReboot=true
If an action that downloads a file is present in theinstaller, show the proxy configuration dialog for
-Dinstall4j.showProxyConfig=true
the first such action before the connection isattempted. This can be useful to edit cached proxyinformation that is working but should be changedfor testing purposes. If the connection fails, theproxy dialogwill be displayed in any case regardlessof this option.
Clear the proxy information cached by install4j.This can be useful for testing purposes. On
-Dinstall4j.clearProxyCache=true
Windows, the proxy information by the default
71

ExplanationName
browser may be loaded again automatically afterthe cache is cleared.
Do not try to automatically detect proxyinformation from browser configurations.
-Dinstall4j.noProxyAutoDetect=true
Overrides the language selection for amulti-language installer. The language selection
-Dinstall4j.language=[ISO code]
dialog will not be displayed in this case, unless thespecified language is not included in the installer.
Debugging the installer application can be done bypassing -agentlib:jdwp=transport=
-Dinstall4j.helperDebugPort=[port]
dt_socket,server=y,suspend=n,address=[port] on the command line, on Windows thisargument has to be prefixedwith -J. However, thiswill not debug the elevated helper process that isstarted by the "Request privileges" action. Bysetting the install4j.helperDebugPort VMparameter, the same -agentlib parameter ispassed to the JVM of the helper process and youcan then attach to it with a debugger. If you debugboth the unelevated and the elevated JVM at thesame time, you have to assign different ports andstart two separate debugging sessions.
Forces the installer locale to be detected from theDisplay language setting set in Windows Region
-Dsun.locale.formatasdefault=false
and Language Control Panel. If this option isn'tspecified, the locale will be detected from theFormat setting.
You can set further arbitrary system propertieswith the standard command line parameter.
-DpropertyName=value
Specifies a VM parameter (e.g. -J-Xmx512m). Canbe cited more than once.
-J[VM parameter]
You can set arbitrary installer variables with the -Vparameter. The variable name should be used
-VvariableName=value
without prefix, so if you have a variable called${installer:variableName} in theGUI the parameterwould be -VvariableName=value. The variable willbe a String object.
Alternatively, you can specify a property filecontaining the variables you want to set. The
-varfile [fileName]
variable names should be usedwithout prefix, too,so if you have a variable called${installer:variableName} in the GUI the entrywould be variableName=value. The variables will
72

ExplanationName
be String objects. This option shares the samemechanism with response files [p. 74] .
On macOS, you can use the INSTALL4J_ARGUMENTS environment variable to pass argumentsto the installer.
On Unix, the environment variable INSTALL4J_TEMP determines the base directory forself-extraction. If the environment variable is not set, the parent directory of the installer mediafile is used.
73
A.2.3 Response Files
Introduction
With a response file you can change the default user selection in all screens. A response file isa text file with name value pairs that represent certain installer variables. All screens providedby install4j ensure that they write all user selections to appropriate installer variables and bindtheir user interface components to these variables. This includes form screens [p. 250] .
Installer variable values are of the general type java.lang.Object. In a response file, onlyvariables with values of certain types are included: The default type is java.lang.String. Inaddition the typesjava.lang.Boolean,java.lang.Integer,java.util.Date,java.lang.String[] and int[] are supported. In order to let the installer runtime know about thesenon-default types, the variable name in the response file is followed by a '$' sign and an encodingspecifier like 'Integer' or 'Boolean'.
Response file variables are variables that have been registered with context.registerResponseFileVariable(...) in the installer. All variables that are bound to formcomponents are automatically registered as response file variables. Also, system screens registerresponse file variables as needed to capture user input.
All installer variables live in the same name space. If you use an installer variablemore than oncefor different user inputs, the response file only captures the last user input and may lead toerroneous behavior when the installer is run with a response file. If you would like to optimizeyour installers for use with a response file, you have to make sure that the relevant variablenames are unique within your installer.
A response file can be used to
• Configure the installer for unattended execution mode
• Change the default settings in the GUI and console installer
• Get additional debugging information for an installation
When applying a response file to an installer, all variable definitions are translated into installervariables [p. 30] . The response file shares the samemechanism with the variable file offered bythe -varfile [p. 69] installer option. You can add the contents of a response file to a variable fileand vice versa.
Generating response files
There are two ways to generate a response file:
• A response file is generated automatically after an installation is finished. The generatedresponse file is found in the .install4j directory inside the installation directory and isnamed response.varfile. When you request debugging information from a user, youshould request this file in addition to the installer log file.
• install4j offers a "Create a response file" action [p. 180] that allows you to save the reponsefile to a different file in addition to the automatically generated response file. Here, you canalso specify variables that you would not like to be included in the reponse file. Together withan appropriate form component on the "Additional confimations" screen you can query theuser whether to create such a response file or not.
Applying response files
When an installer is executed, it checks whether a file with the same name and the extension.varfile can be found in the same directory and loads that file as the response file. For example,
74
if an installer is called hello_setup.exe on Windows, the response file next to it has to benamed hello_setup.varfile.
You can also specify a response file explicitly with the -varfile [p. 69] installer option.
Response files work with all three installer modes [p. 67] , GUI, console and unattended.
Response file variables
The variables that you see in the response file exist at runtime independently of the responsefile. You can use these installer variables to access or change user selections on system screens.For example, the "Create program group" screen on Windows binds the user selection for thecheck box that asks the user whether to create the program group for all users to the variablesys.programGroup.allUsers. To access the current user selection from somewhere else, youcan use the expression
context.getBooleanVariable("sys.programGroup.allUsers")
To change that selection, you can invoke
context.setVariable("sys.programGroup.allUsers", Boolean.FALSE)
75

A.2.4 How Installers Find A JRE
Installers generated by install4j are native and can start running without a JRE. However, theinstaller itself requires a JRE in order to perform its work and so the first action of the installeris to locate a JRE that is suitable for both the installer and your application. In this process itperforms the following steps:
• Look for a statically bundled JRE. If a statically bundled JRE is included with the installer, itwill unpack it and use it. First, this JRE is unpacked to a temporary directory, later it is copiedto a location that depends on whether the bundled JRE is configured as shared or not.
• Not shared
It is copied to the jre directory in the installation directory of your application. No otherinstaller generated by install4j will find this JRE. It will not be made publicly available (e.g.in the Windows registry).
• Shared
It is copied to the i4j_jres directory in a common folder which depends on the operatingsystem:
• C:\Program Files\Common Files on Microsoft Windows with an English locale.
• /opt if it exists, otherwise /usr/local on Unix.
If the above folder is not writable, the i4j_jres directory will be created in the use homedirectory and the shared JRE will only be shared for the current user.
Other installers generated by install4j will find this JRE. It will not bemade publicly available(e.g. in the Windows registry). For each Java version, only one such JRE can be installed.Shared JREs are never uninstalled.
Your application will also use the JRE selected by the installer.
• Look for a suitable JRE in the configured search sequence. The installer uses the samesearch sequence and Java version constraints as your launchers which are configured for theentire project [p. 92] . The most important search sequence element in this respect is the"Search Windows registry and standard locations" entry. On Microsoft Windows the registrycontains information on installed JREs, on Unix platforms there is a number of standardlocations which are checked, on macOS the location of installed JREs is always the same.
• If no JRE has been found, the installer notifies the user
and offers the following options:
• Download a dynamically bundled JRE
76

as configured in the Bundled JRE [p. 337] step of the media wizard [p. 330] .
• Manually locate a JRE
• Cancel the installation
You can force the installer to skip the first two steps and show this dialog immediately withthe -manual command line parameter [p. 69] .
77
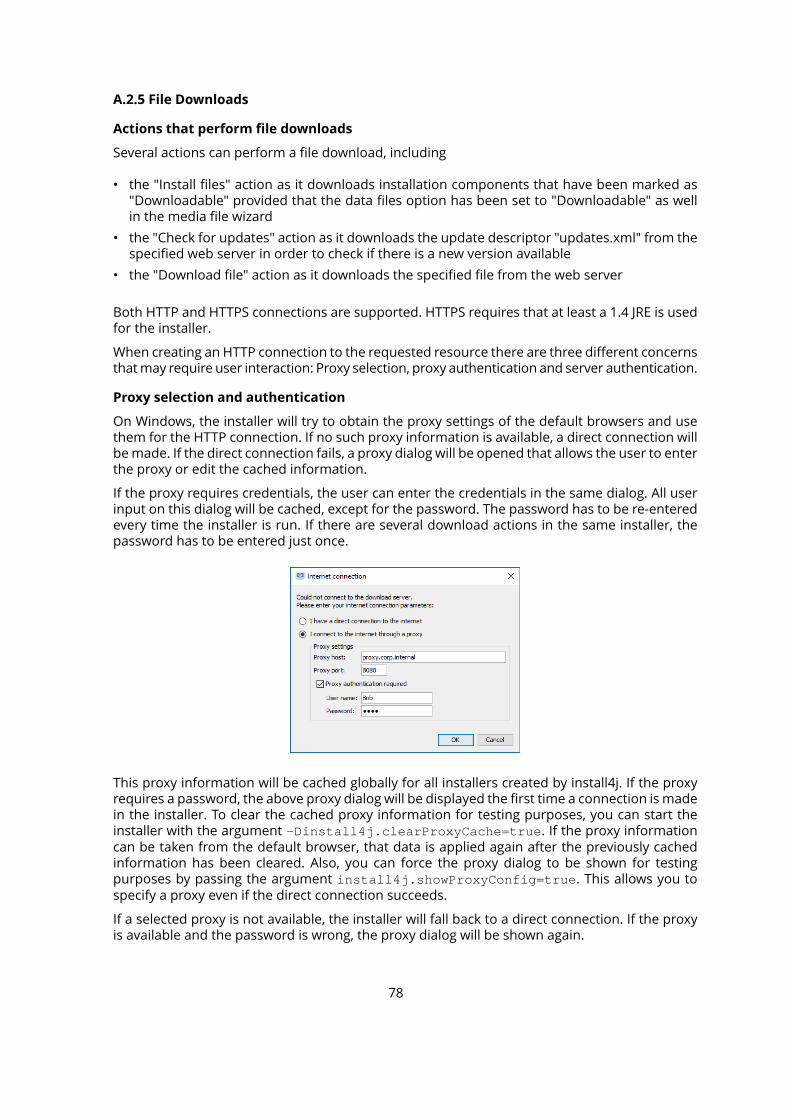
A.2.5 File Downloads
Actions that perform file downloads
Several actions can perform a file download, including
• the "Install files" action as it downloads installation components that have been marked as"Downloadable" provided that the data files option has been set to "Downloadable" as wellin the media file wizard
• the "Check for updates" action as it downloads the update descriptor "updates.xml" from thespecified web server in order to check if there is a new version available
• the "Download file" action as it downloads the specified file from the web server
Both HTTP and HTTPS connections are supported. HTTPS requires that at least a 1.4 JRE is usedfor the installer.
When creating an HTTP connection to the requested resource there are three different concernsthatmay require user interaction: Proxy selection, proxy authentication and server authentication.
Proxy selection and authentication
On Windows, the installer will try to obtain the proxy settings of the default browsers and usethem for the HTTP connection. If no such proxy information is available, a direct connection willbemade. If the direct connection fails, a proxy dialog will be opened that allows the user to enterthe proxy or edit the cached information.
If the proxy requires credentials, the user can enter the credentials in the same dialog. All userinput on this dialog will be cached, except for the password. The password has to be re-enteredevery time the installer is run. If there are several download actions in the same installer, thepassword has to be entered just once.
This proxy information will be cached globally for all installers created by install4j. If the proxyrequires a password, the above proxy dialog will be displayed the first time a connection is madein the installer. To clear the cached proxy information for testing purposes, you can start theinstaller with the argument -Dinstall4j.clearProxyCache=true. If the proxy informationcan be taken from the default browser, that data is applied again after the previously cachedinformation has been cleared. Also, you can force the proxy dialog to be shown for testingpurposes by passing the argument install4j.showProxyConfig=true. This allows you tospecify a proxy even if the direct connection succeeds.
If a selected proxy is not available, the installer will fall back to a direct connection. If the proxyis available and the password is wrong, the proxy dialog will be shown again.
78
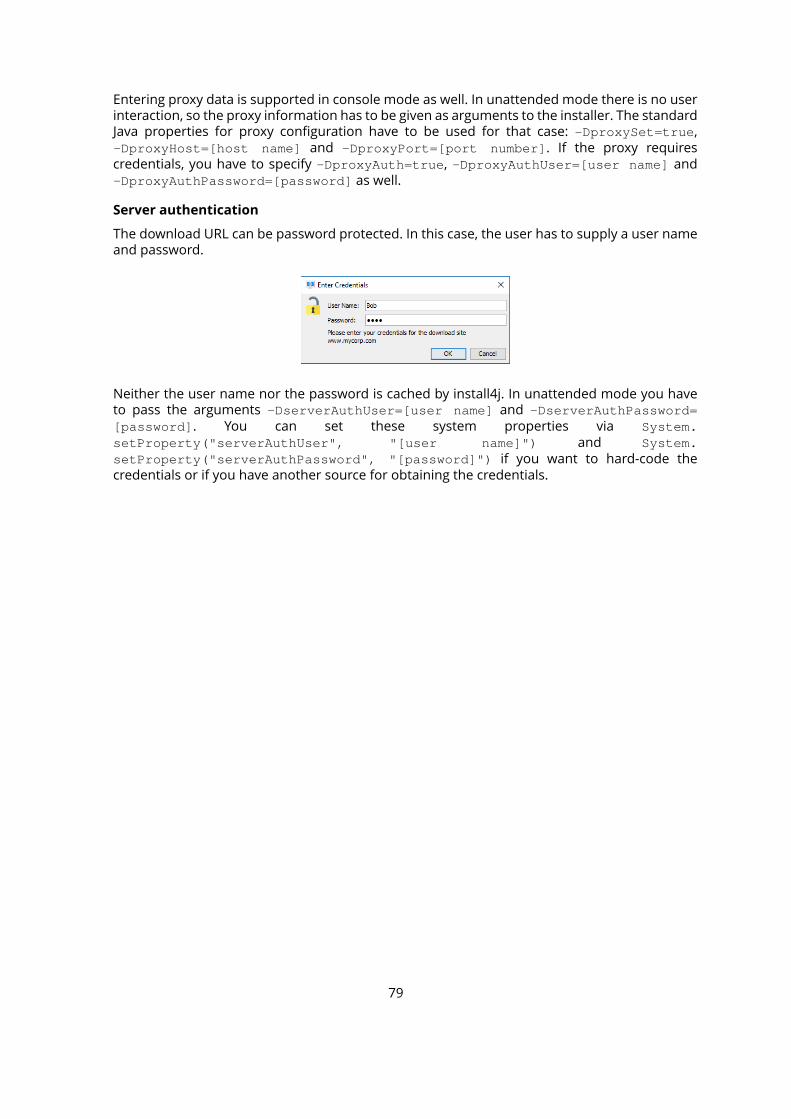
Entering proxy data is supported in console mode as well. In unattended mode there is no userinteraction, so the proxy information has to be given as arguments to the installer. The standardJava properties for proxy configuration have to be used for that case: -DproxySet=true,-DproxyHost=[host name] and -DproxyPort=[port number]. If the proxy requirescredentials, you have to specify -DproxyAuth=true, -DproxyAuthUser=[user name] and-DproxyAuthPassword=[password] as well.
Server authentication
The download URL can be password protected. In this case, the user has to supply a user nameand password.
Neither the user name nor the password is cached by install4j. In unattended mode you haveto pass the arguments -DserverAuthUser=[user name] and -DserverAuthPassword=[password]. You can set these system properties via System.setProperty("serverAuthUser", "[user name]") and System.setProperty("serverAuthPassword", "[password]") if you want to hard-code thecredentials or if you have another source for obtaining the credentials.
79
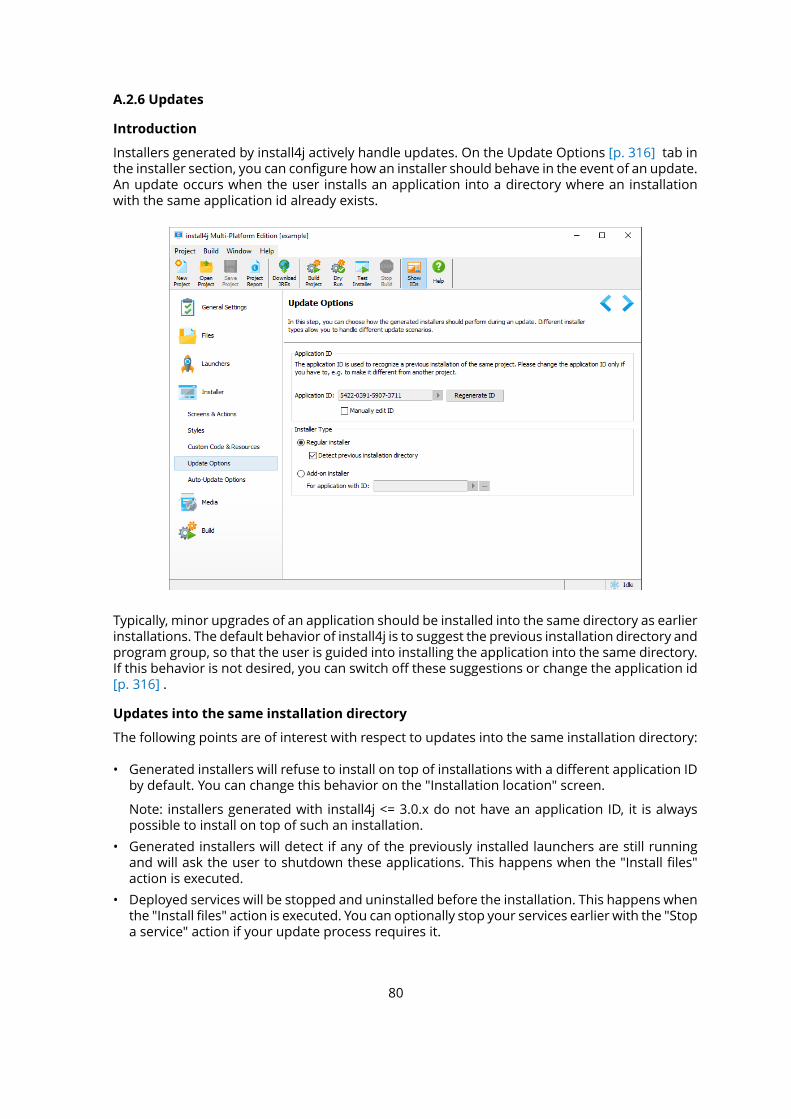
A.2.6 Updates
Introduction
Installers generated by install4j actively handle updates. On the Update Options [p. 316] tab inthe installer section, you can configure how an installer should behave in the event of an update.An update occurs when the user installs an application into a directory where an installationwith the same application id already exists.
Typically, minor upgrades of an application should be installed into the same directory as earlierinstallations. The default behavior of install4j is to suggest the previous installation directory andprogram group, so that the user is guided into installing the application into the same directory.If this behavior is not desired, you can switch off these suggestions or change the application id[p. 316] .
Updates into the same installation directory
The following points are of interest with respect to updates into the same installation directory:
• Generated installers will refuse to install on top of installations with a different application IDby default. You can change this behavior on the "Installation location" screen.
Note: installers generated with install4j <= 3.0.x do not have an application ID, it is alwayspossible to install on top of such an installation.
• Generated installers will detect if any of the previously installed launchers are still runningand will ask the user to shutdown these applications. This happens when the "Install files"action is executed.
• Deployed services will be stopped and uninstalled before the installation. This happens whenthe "Install files" action is executed. You can optionally stop your services earlier with the "Stopa service" action if your update process requires it.
80
• During an update, the installation databases will be merged, so that files, menu entries, fileassociations, etc. of old installations can still be uninstalled when the uninstaller is executed.
• After an update, only the (optional) uninstall actions of the newer installation will be executedwhen the uninstaller is executed. However, the auto-uninstall actions fromprevious installationswill be executed, too (for example the uninstallation of a service that is automatically registeredby an "Install service" action during installation).
If you would like to uninstall the previous installation before installing any new files, you can addthe "Uninstall previous installation" action before the "Install files" action. In this context, theuninstallation policies [p. 113] that exclude updates are of interest. With these uninstallationpolicies you can preserve certain files for updates, but uninstall them when the user manuallyinvokes the uninstaller. The uninstaller invoked by the "Uninstall previous installation" action isrunning in unattended mode. You can use context.isUninstallForUpgrade() to excludecertain actions for an update uninstaller.
Add-on installers
For distributing enhancements and patches, install4j offers the add-on installer type that can beconfigured on the Update Options [p. 316] tab in the installer section.
An add-on installer will only install on top of an installation of a specified application id. It doesnot have a separate uninstaller.
81
A.2.7 Error Handling
Debugging on Windows
On Windows, when an installer is executed it always generates a log file in the temp directorythat contains information about the JRE search sequence and canbeused for debuggingpurposes.The name of the log file starts with i4j_nlog_. If you have a problem with JRE detection or theinstaller startup, please send this log file along with your support request.
It is also possible to generate this log for the JRE detection of the generated Windows launchers.In order to switch on logging, please define the environment variable INSTALL4J_LOG=yes andlook for the newest text file whose name starts with i4j_nlog_ in the temp directory. This isdone silently, without notifying the user and is also suitable for situations where launchers arecalled automatically or repeatedly.
An easier way for a user to create a log file is to start the launcher with the /create-i4j-logargument. The launcher will notify the user where the log is created and will offer to open anexplorer window with the log file selected. After the message box, the launcher will continue tostart up.
Debugging on macOS
Similar to Windows, macOS launchers also support the INSTALL4J_LOG=yes environmentvariable definition for debug logging. Rather than writing a log file, they write to the system log.You can display the system log by starting the "Console" application which is located in /Applications/Utilities.
Setting the environment variable can be done by opening a terminal and executing
launchctl setenv INSTALL4J_LOG=yes
Then all newly started applications in the Finder will have this environment variable set. Thecurrent terminal will not have it set until you quit the Terminal application and start it again.
Rather than setting the environment variable for all install4j launchers, you can set it for aparticular invocation only. To do that, call the Contents/MacOS/JavaApplicationStub insidethe application bundle and prefix the call with the definition of the environment variable. For anapplication bundle "MyApp.app", the call looks like this:
INSTALL4J_LOG=yes MyApp.app/Contents/MacOS/JavaApplicationStub
In this case, the log output will also be written to the terminal. Using /usr/bin/open will notwork with this technique, since the latter gets the environment variables from the Finder.
Note that logging only works for GUI launchers and not for command line and service launcherswhich are implemented as Unix shell scripts. Also, launchers for the Apple JRE (Java 6) do notsupport logging. There is no command line argument that activates logging, like on Windows.
Error logs
If an exception is thrown in the installer, it prepares an error log and informs the user about itslocation
82
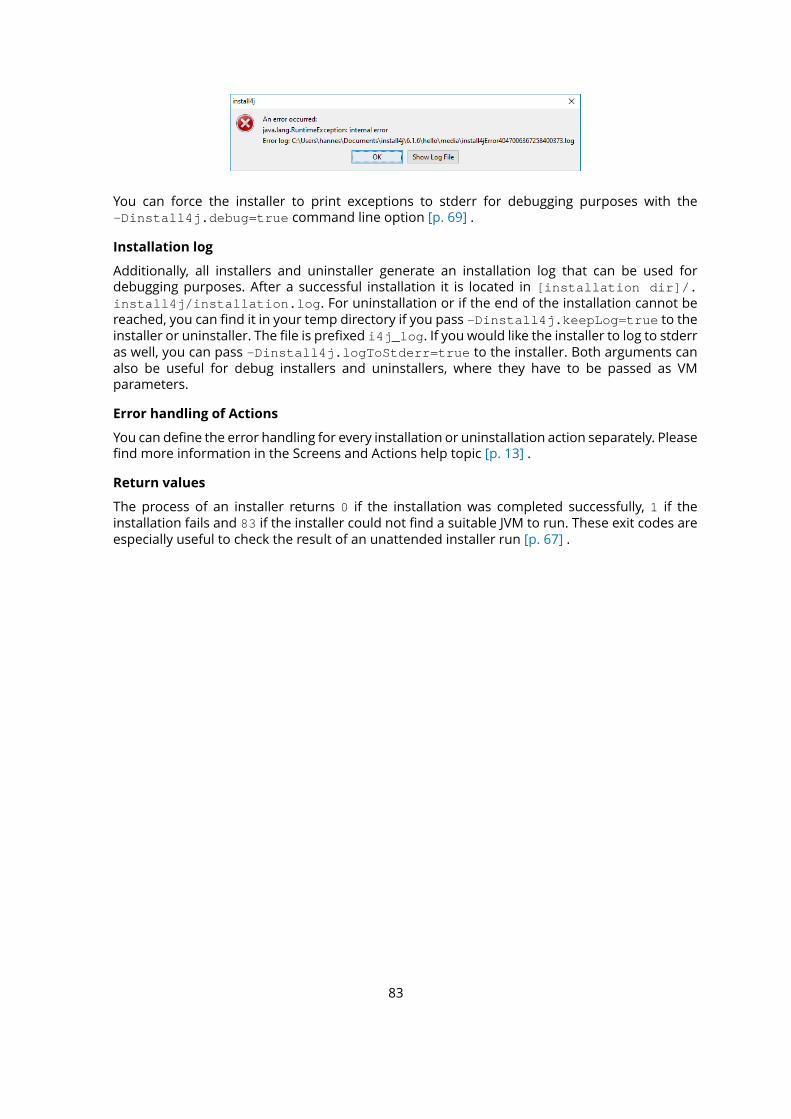
You can force the installer to print exceptions to stderr for debugging purposes with the-Dinstall4j.debug=true command line option [p. 69] .
Installation log
Additionally, all installers and uninstaller generate an installation log that can be used fordebugging purposes. After a successful installation it is located in [installation dir]/.install4j/installation.log. For uninstallation or if the end of the installation cannot bereached, you can find it in your temp directory if you pass -Dinstall4j.keepLog=true to theinstaller or uninstaller. The file is prefixed i4j_log. If you would like the installer to log to stderras well, you can pass -Dinstall4j.logToStderr=true to the installer. Both arguments canalso be useful for debug installers and uninstallers, where they have to be passed as VMparameters.
Error handling of Actions
You can define the error handling for every installation or uninstallation action separately. Pleasefind more information in the Screens and Actions help topic [p. 13] .
Return values
The process of an installer returns 0 if the installation was completed successfully, 1 if theinstallation fails and 83 if the installer could not find a suitable JVM to run. These exit codes areespecially useful to check the result of an unattended installer run [p. 67] .
83
A.3 Extending Install4j
A.3.1 Developing With The Install4j API
Introduction
There are two different circumstances where you might want to use the install4j API: Withinexpression/script properties [p. 321] in the configurationGUI and for the development of customelements in install4j. The development of custom elements in install4j is rarely necessary fortypical installers, most simple custom actions can be performed with a "Run script" action andmost custom forms can be realized with a "Customizable form" screen.
If you would not like to miss your IDE while writing more complex custom code, you can put asingle call to custom code into expression/script properties. The location of your custom codeclasses must be configured [p. 313] , so install4j will package it with the installer and put in intothe class path. In this way you can completely avoid the use of the interfaces required to extendinstall4j.
When you want to use install4j classes within your IDE, you can add $INSTALL4J_HOME/resource/i4jruntime.jar to your classpath (in your IDE). Do not distribute this jar file withyour application, install4j will handle this for you.
Expression/script properties
Using expression/script properties in install4j is required for wiring together screens and actions[p. 13] as well as for the conditional execution of screens and actions. The most importantelement in this respect is the context which is an instance of
• com.api.install4j.context.InstallerContext
in an installer
• com.api.install4j.context.UninstallerContext
in an uninstaller
The context allows you to query the environment and the configuration of the installer as wellas to perform some common tasks.
Please see the documentation of the com.install4j.api.context package for the completedocumentation of all methods in the context. Some common applications include:
• Setting the installation directory
By using context.setInstallationDirectory(File installationDirectory) in theinstaller context, you can change the default installation directory for the installer. Typically,this call is placed into a "Run script" action on the "Startup" screen.
• Getting and setting installer variables
The getVariable(String variableName) and setVariable(String variableName,Object value)methods allow you to query andmodify installer variables. Note that besidesthe "Run script" action, there is also a "Set a variable action" where you don't have to callsetVariable yourself.
• Conditionally executing screens or actions
Often, condition expressions for screens and actions check the values of variables. In addition,the context provides a number of boolean getters that you can use for conditionally executingscreens and actions depending on the installermode and environment. Thesemethods includeisConsole(), isUnattended() and others.
84
• Navigating between screens
Depending on the user selection on a screen, you might want to skip a number of screens.The goForward(...), goBack(...) and goBackInHistory(...) methods provide theeasiest way to achieve this.
Many other context methods are only useful if you develop custom elements for install4j.
Also have a look at thecom.install4j.api.Util classwhich offers a number of utilitymethodsthat are useful in expression/script properties.
Developing custom elements for install4j
For a general overview on how to start developing with the install4j API, how to set up your IDEand how to debug your custom elements, please see the API overview in the javadoc.
install4j provides three extension points:
• Actions [p. 180]
Please see the documentation of the com.install4j.api.actions package for the completedocumentation on how to develop actions.
• Screens [p. 166]
Please see the documentation of the com.install4j.api.screens package for the completedocumentation on how to develop screens.
• Form components [p. 250]
Please see the documentation of the com.install4j.api.formcomponents package for thecomplete documentation on how to develop form components.
All actions, screens and form components in install4j use this API themselves. To make yourcustom elements selectable in the install4j IDE, you first have to configure the custom codelocations [p. 313] . When you add an action, screen or form component, the first popup gives youthe choice onwhether to add a standard element or search for suitable elements in your customcode [p. 319] .
If you use your custom code in multiple projects, consider packaging an install4j extension [p.87] , which displays your custom elements alongside the standard elements that are providedby install4j and allows you to ship them easily to third parties.
Serialization
install4j serializes all instances of screens, actions and form components with the defaultserialization mechanism for JavaBeans that is present in Java since version 1.4 (the minimumJava version for installers).
To learn more about JavaBeans serialization, please visit
• https://docs.oracle.com/javase/8/docs/api/java/beans/XMLEncoder.html (1) for APIdocumentation on the long-term persistence mechanism for JavaBeans.
• http://www.oracle.com/technetwork/java/persistence4-140124.html/ (2) for information onhow to write your own persistence delegates. In your bean infos for screens, actions and formcomponents you can specify a list of additional persistence delegates for non-default types.
(1) https://docs.oracle.com/javase/8/docs/api/java/beans/XMLEncoder.html(2) http://www.oracle.com/technetwork/java/persistence4-140124.html
85

Compiler variables are replaced in the serialized representation of a bean. In this way, compilervariable replacement is automatically available for all properties of type java.lang.String.The values of installer variables and localization keys are determined at runtime, so you have tocall the utility methods in com.install4j.api.beans.AbstractBean before you use thevalues in the installer or uninstaller. For more information on variables, please see the separatehelp topic [p. 30] .
86
A.3.2 Extensions
Introduction
All standard actions [p. 180] , screens [p. 166] and form components [p. 250] in install4j use theinstaller API [p. 84] themselves. With this API you can create new elements that are displayedin the standard registries [p. 320] by packaging a JAR file with a few special manifest entries andputting that JAR file into the extensions directory of your install4j installation.
Configurability
An extension to install4j will likely need to be configurable by the user. install4j uses the JavaBean
specification (1) to control the user presentation of properties in the install4j IDE. Screens, actions,and form components correspond to beans in this context.
Optionally, you can add BeanInfo classes. In essence, a BeanInfo class next to the bean itselfdescribes which properties are editable and optionally gives details on how they should bepresented. Please see the documentation of the com.install4j.api.beaninfo package for thecomplete documentation on how to develop BeanInfo classes. Also, the $INSTALL4J_HOME/samples/customCode/src directory contains a sample action with the associated BeanInfoclass.
JAR manifest
In order to tell install4j which classes are screens, actions or form components, you have to usethe following manifest keys:
• Install-Action
for actions implementing com.install4j.api.actions.InstallAction
• Uninstall-Action
for actions implementing com.install4j.api.actions.UninstallAction
• Installer-Screen
for screens implementing com.install4j.api.screens.InstallerScreen
• Uninstaller-Screen
for screens implementing com.install4j.api.screens.UninstallerScreen
• Form-Component
for formcomponents implementingcom.install4j.api.formcomponents.FormComponent
• Style-Component
for formcomponents implementingcom.install4j.api.formcomponents.FormComponentthat should also be available in styles. Such form components should not take any user inputbecause they will have a different life-cycle in styles than in screens.
Please note that usually you do not implement these interfaces yourself, but rather extend oneof the abstract base classes.
A typical manifest with one action and one screen looks like this:
(1) http://www.oracle.com/technetwork/articles/javaee/spec-136004.html
87
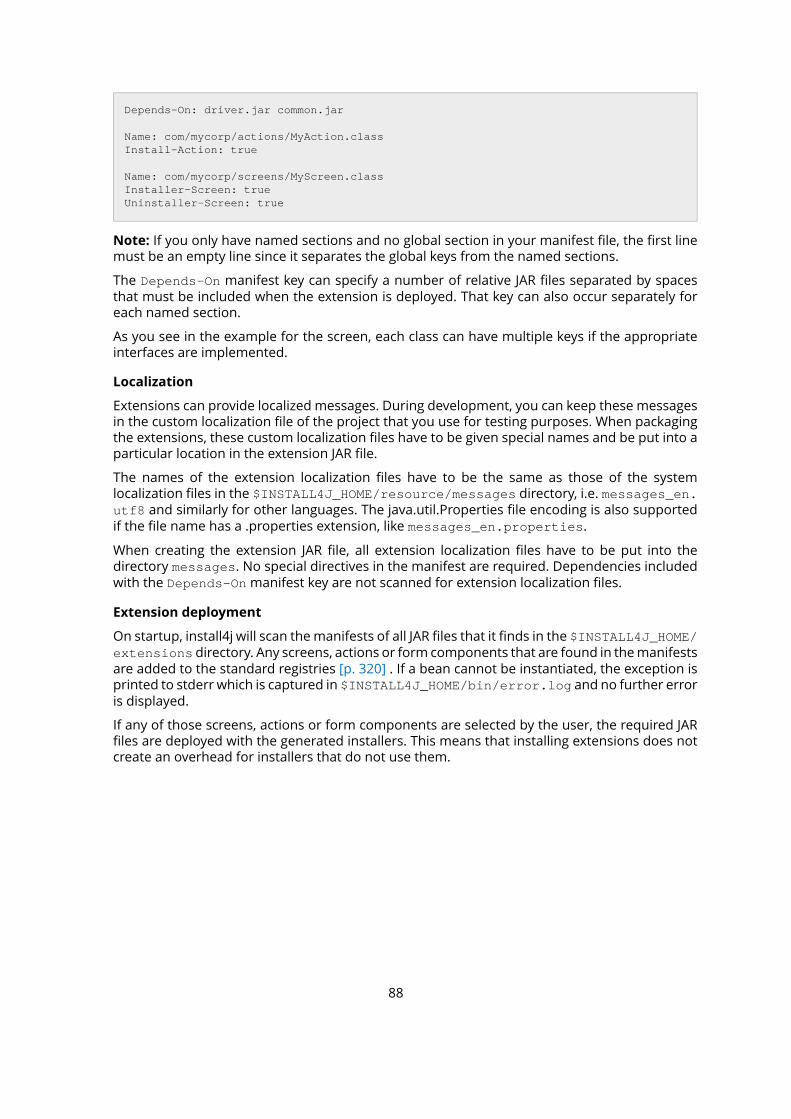
Depends-On: driver.jar common.jar
Name: com/mycorp/actions/MyAction.classInstall-Action: true
Name: com/mycorp/screens/MyScreen.classInstaller-Screen: trueUninstaller-Screen: true
Note: If you only have named sections and no global section in your manifest file, the first linemust be an empty line since it separates the global keys from the named sections.
The Depends-On manifest key can specify a number of relative JAR files separated by spacesthat must be included when the extension is deployed. That key can also occur separately foreach named section.
As you see in the example for the screen, each class can have multiple keys if the appropriateinterfaces are implemented.
Localization
Extensions can provide localized messages. During development, you can keep these messagesin the custom localization file of the project that you use for testing purposes. When packagingthe extensions, these custom localization files have to be given special names and be put into aparticular location in the extension JAR file.
The names of the extension localization files have to be the same as those of the systemlocalization files in the $INSTALL4J_HOME/resource/messages directory, i.e. messages_en.utf8 and similarly for other languages. The java.util.Properties file encoding is also supportedif the file name has a .properties extension, like messages_en.properties.
When creating the extension JAR file, all extension localization files have to be put into thedirectory messages. No special directives in the manifest are required. Dependencies includedwith the Depends-Onmanifest key are not scanned for extension localization files.
Extension deployment
On startup, install4j will scan themanifests of all JAR files that it finds in the $INSTALL4J_HOME/extensions directory. Any screens, actions or form components that are found in themanifestsare added to the standard registries [p. 320] . If a bean cannot be instantiated, the exception isprinted to stderr which is captured in $INSTALL4J_HOME/bin/error.log and no further erroris displayed.
If any of those screens, actions or form components are selected by the user, the required JARfiles are deployed with the generated installers. This means that installing extensions does notcreate an overhead for installers that do not use them.
88
B Reference
B.1 Steps For Configuring An Install4j Project
To learn more about install4j projects, please see the corresponding help topic [p. 9] or otherhelp topics about concepts in install4j [p. 9] .
install4j's main window is organized into 6 steps that are required to build a set of media files.The side bar on the left as well as the forward and back buttons in the top right corner let younavigate between these steps:
• Step 1: General Settings [p. 90]
(CTRL-1) In the General Settings step, you provide important information about yourapplication and the build preferences, such as the name of your application, the JRE searchsequence and the directory where the media files should be placed.
• Step 2: Files [p. 106]
(CTRL-2) In the Files step, you define your distribution tree, that means you collect filesfrom different places to be distributed in the generated media files. You can optionally defineinstallation components.
• Step 3: Launchers [p. 123]
(CTRL-3) In the Launchers step, you define the properties of the native launchers thatwill enable your users to start your application.
• Step 4: Installer [p. 147]
(CTRL-4) In the Installer step, you configure the installer screens and actions.
• Step 5: Media [p. 327]
(CTRL-5) In the Media step, you define the media files that will be created to distributeyour application to your end users.
• Step 6: Build [p. 347]
(CTRL-6) In the Build step, you start the actual generation of the media files.
89
B.2 Step 1: General Settings
B.2.1 Step 1: Enter General Project Settings
In the General Settings step, you provide important information about your application andspecify project-wide build settings.
There are several tabs in this section:
• Application Info [p. 91]
On this tab you enter information about your application, such as name and version.
• Java Version [p. 92]
On this tab define the version requirements for the JRE that your application launchers shoulduse as well as the detailed JRE search sequence.
• Languages [p. 94]
On this tab define the principal language as well as other languages supported by the installer.
• Media File Options [p. 96]
On this tab you enter general options regarding media file generation such as the outputdirectory for media files and compression settings.
• Code Signing [p. 98]
On this tab you configure code signing for Windows and macOS media files.
• Compiler Variables [p. 100]
On this tab you can define compiler variables for your project.
• Merged Projects [p. 99]
On this tab you can choose other projects that should be merged into the main project.
• Project Options [p. 101]
On this tab you you can adjust options regarding your install4j project.
90
B.2.2 General Settings - Application Info
On this tab of the General Settings step [p. 90] you enter general information about yourapplication.
Only options with bold labels have to be filled in. The available options are:
• Full name
(required) the long name used in situations where there is plenty of space for displaying aname.
• Short name
(required) the alternative short name for situationswhere there is limited space for displayinga name or where a name should be as short as possible. The short name is used to createsuggestions for installation directories in the Media step [p. 327] . It may not contain spaces.
• Version
(required) the version number of your application. This value can be overriden from thecommand line [p. 354] or the ant task [p. 358] .
• Publisher
the name of your company or your own name (e.g. used for the support information dialogin the Windows control panel)
• Publisher URL
theweb address of your company (e.g. used for the support information dialog in theWindowscontrol panel)
A build will not be possible until all required fields have been completed. If a required field ismissing when starting a build [p. 347] , this tab will be displayed with a warning message.
91

B.2.3 General Settings - Java Version
On this tab of the General Settings step [p. 90] you enter the version requirements and thesearch sequence for the JRE or JDK that apply to your installers [p. 147] and application launchers[p. 123] .
In the Java version section, you can constrain the version of the Java VM.
• Theminimum Java versionmust be specified. For example, enter a value of 1.8.
• Themaximum Java version can optionally be specified. For example, enter a value of 9.0.
The maximum Java version can be entered with less numeric detail than the minimum Javaversion to prevent the use of a higher major or minor release. For example, a minimum versionof 1.4.1 and a maximum version of 1.4 ensures that the highest available 1.4.x >= 1.4.1 JRE isused, but not a 1.5 JRE. Similarly, a minimum version of 1.4.1_03 and amaximum version of 1.4.1ensures that the highest available 1.4.1 >= 1.4.1_03 JRE is used, but not a 1.4.2 JRE.
By default, JREs with a beta version number or JREs from an early access release cycle will notbe used by the launcher. If youwould like to enable the use of these JREs, please check the optionallow JREs with a beta version number.
The JRE search sequence determines how install4j searches for a JRE on the target system. Newconfigurations get a pre-defined default search sequence. install4j has a special mechanismwhich allows you to bundle JREs with yourmedia files. If you choose a particular JRE for bundling[p. 337] in one of themedia file wizards [p. 330] , this JRE will always be used first and you do notneed to adjust the search sequence yourself.
If you have problems with JRE detection at runtime, please see the help topic on error handling[p. 82] for a description on how to get diagnostic information.
The following types of search sequence entries [p. 102] are available:
• Search registry
• Directory
• Environment variable
The control buttons on the right allow you to modify the contents of the search sequence list:
• Add search sequence entry (key INS)
Invokes the search sequence entry dialog [p. 102] . Upon closing the search sequence entrydialog with the OK button, a new search sequence entry will be appended to the bottom ofthe search sequence list.
• Remove search sequence entry (key DEL)
Removes the currently selected search sequence entry without further confirmation.
• Move search sequence entry up (key ALT-UP)
Moves the selected search sequence entry up one position in the class path list.
• Move search sequence entry down (key ALT-DOWN)
Moves the selected search sequence entry down one position in the class path list.
92
The design time JDK determines which JDK or JRE is used for the following purposes:
• Code compilation
install4j uses a bundled eclipse compiler, so it does not need this functionality from a JDK.However it needs a runtime library against which scripts entered in the installer configuration[p. 147] are compiled. The version of that JDK should correspond to theminimum Java versionfor the project configured above.
By default, the rt.jar runtime library of the JRE that is is used to run the install4j IDE is usedfor code compilation. If your minimum Java version is lower than the Java version used to runinstall4j, runtime errors can occur if you accidentally use newer classes and method.
• Context-sensitive Javadoc help
If you configure a separate design-time JDK or JRE, you can enter a Javadoc directory to getcontext-sensitive Javadoc help for the runtime library in the Java code editor [p. 321] . By default,context-sensitive Javadoc help is only available for the install4j API.
• Enhanced code completion functionality
If you configure a separate design-time JDK (and not a JRE), the Java code editor [p. 321] willshow completion proposals for methods in the runtime library with parameter names. Bydefault, parameter names for methods in the runtime library are not available.
The drop-down list next to the JDK option shows the name of all configured JDKs together withtheir Java versions. In order to configure a new design time JDK, select the JDK option, and clickon Configure JDKs. This shows the Configure JDKs dialog [p. 104] .
The list of available design time JDK is saved globally for your entire install4j installation and notfor the current project. The only information saved in your project is the name of the JDKconfiguration. In this way, you can bind a suitable JDK on another installation and on otherplatforms. If the JDK name saved in the project cannot be found in your install4j installation, thename will be displayed in red color with a "[not configured]" message attached. In that case,when clicking on Configure JDKs, you will be asked if you would like to configure this JDK.
A build will not be possible until all required fields have been completed. If a required field ismissing when starting a build [p. 347] , this tab will be displayed with a warning message.
93
B.2.4 General Settings - Languages
On this tab of the General Settings step [p. 90] you define the principal language as well asadditional languages supported by your installers [p. 147] .
The following options are available:
• Principal language
The principal language is the language that your installer defaults to if no other supportedlanguages match the locale at runtime.
• Custom localization file
A custom localization file is text file with key-message pairs in the format of
• a Java properties file
a Java properties file has ISO 8859-1 encoding, all other characters must be represented asUnicode escape sequences, like \u0823.
• a properties file with UTF-8 encoding
A properties file with UTF-8 encoding has the advantage that you do not have to use escapesequences. However it might not be supported by i18n tools.
A custom localization file can be used to
• override systemmessages
If any of the default messages in the installer is not appropriate for your use-case, you canchange it by looking up the corresponding keys in the appropriate $INSTALL4J_HOME/resource/messages/messages_*.utf8 file and define the same key in your customlocalization file to override that message.
• localize your installer
Anywhere in the install4j IDE where you can enter text that is used at runtime, you can usecustom localization keys [p. 30] , i.e. variables of the form ${i18n:myKey}. Those keys areread from your custom localization file and offered by the variable selection dialog [p. 102].
If required, you can use parameters for your messages by using the usual {n} syntax in thevalue and listing the parameters in function-like manner after the key name in the variableinstance. For example, if your key name is myKey and your message value is
Create {0} entries of type {1}
you can use a variable
${i18n:myKey("5", "foo")}
in order to fill the parameters, so that the actual message becomes
Create 5 entries of type foo
However, in the context of localizing an installer this is rarely necessary. Should you need toinclude a literal variable expression {n} in the message, you have to quote it like '{'n'}'.
94

• Additional languages
With install4j, you can build multi-language installers that offer the user a choice between anumber of languages. If you add languages to the additional languages table, the installerbecomes a multi-language installer, otherwise is is a fixed-language installer. When you adda new language, the language selection dialog [p. 102] is displayed. A new entry is then addedto the table and you can configure the custom localization file by double-clicking on theappropriate cell.
• Skip language selection dialog if auto-detected locale matches a supported language
This check box ensures that the language selection is only displayed if the installer cannotfind a match between a supported language (either principal or additional language) and theauto-detected locale at runtime. By default this option is not selected and the language selectiondialog is always displayed.
The principal language and the associated custom localization file can be overridden for eachmedia file [p. 339] . In this way you can build multiple fixed-language installers each with adifferent language.
95
B.2.5 General Settings - Media File Options
On this tab of the General Settings step [p. 90] you enter general options regarding media filegeneration.
Only options with bold labels have to be filled in. The available options are:
• Media file output directory
(required) the directory where the generated media files should be placed. If the project hasalready been saved, a relative directory will be interpreted as relative to the project file.
• Media file name pattern
(required) the default rule for naming your media files. This text field should contain systemcompiler variables [p. 30] in order to be unique for each media file. If two media file namesare equal, the build will fail. If the desired name for themedia file cannot be obtained throughthe use of variables, you can override the media file [p. 339] name in the media wizard.
• Convert dots to underscores
By default, dots ('.') will be converted to underscores ('_') when themedia file name is evaluated.If you would like to keep all dots in your media file name, please de-select this option.
• Compression level
The desired level of compression for your media files, chosen from a range of 1-9. "1" meansleast compressed and "9" means most compressed. Please note that extracting the mediafiles will take longer for higher compression levels.
• Use LZMA compression
LZMA compression (1) achieves much better results, but is considerably slower, especially forcompilation. LZMA compression is only used for installers and not for archives.
• Use Pack200 JAR compression
Pack200 compression (2) is a compression algorithm that's designed for JAR files and achievesexceptional results, especially for large JAR files. Since the Pack200 deflater is only includedsince JRE 1.5, this compression is only used if the minimum Java version requirement [p. 92]for your project is 1.5.
If you have signed JAR files or JAR files that create a digest, please apply the $JDK_HOME/bin/pack200 executable in your build process like
pack200 --repack my.jar
before signing the JAR files. Pack200 rearranges JAR files but the reordering is idempotent, sothis pack/unpack sequence creates a stable JAR file.
Pack200 compression can be quite slow, Pack200 decompression is relatively fast. Pack200compression is only used for installers and not for archives.
To avoid problems with external JAR files, you can check the "Exclude signed JARs or JARscreating digests" option. If you would like to exclude selected JAR files only, you can place anempty *.nopack file next to it. For example, if the jar file is named app.jar, then a file app.jar.nopack in the same directory will disable Pack200 compression for that file.
To pass options (3) to the packer, create a file *.packoptions next to the file and add oneoption per line. Currently, only -P and --pass-file are supported.
(1) http://en.wikipedia.org/wiki/LZMA(2) http://java.sun.com/j2se/1.5.0/docs/guide/deployment/deployment-guide/pack200.html(3) http://docs.oracle.com/javase/8/docs/technotes/tools/windows/pack200.html
96
• Shrink runtime
If selected, the runtime JAR file i4jruntime.jar that contains the support classes for theinstaller and the API will be shrunk, meaning that all unused classed will be removed. Usagesfrom custom code and classes in generated launchers are considered during the shrinkingprocess. If you have Java code in external launchers that uses the API, then shrinking mightlead to ClassNotFoundExceptions at runtime. In this case, please disable runtime shrinking.
Note that if you have configuredmerged projects [p. 99] , and one of the projects in the projecttree has disabled runtime shrinking, then runtime shrinking will be disabled for the mainproject as well.
• Create common data files where possible
If you use the "external" or "downloadable" data file settings in the Data Files [p. 335] step ofthe media wizard, you might want to generate common data files for different media files inorder to save disk space. If this option is selected, a directory common_files.dat will becreated in themedia output directory during the compilation that holds the data files that canbe used by all media files. This only works for installation components that have the samecontent for different media files.
• Create files with MD5 sums for checking the integrity of data files
If you want to verify the integrity of downloaded data files, this option enables the generationof MD5 checksum files next to the data files. The installer will try to download the MD5 filesfirst and check the downloaded data files against it.
A build will not be possible until all required fields have been completed. If a required field ismissing when starting a build [p. 347] , this tab will be displayed with a warning message.
97

B.2.6 General Settings - Code Signing
On this tab of the General Settings step [p. 90] you configure code signing for Windows andmacOS media files. Please read the help topic on code signing [p. 60] for detailed informationon how code signing works in install4j.
The code signing settings apply to all media files [p. 328] .
If you enable code signing for Windows media files, you either have to specify .pvk and .spc filesor a single .p12 (PKCS #12) file.
If you enable code signing for macOS, you have to specify a single .p12 (PKCS #12) file. You canexport the private key with Apple's keychain tool as PKCS #12 file. This will include your developercertificate. install4j will add the required certificate chain automatically.
A build will not be possible until all required fields have been completed. If a required field ismissing when starting a build [p. 347] , this tab will be displayed with a warning message.
98
B.2.7 General Settings - Merged Projects
On this tab of the General Settings step [p. 90] you can configure other projects that aremergedinto themain project. Please read the help topic onmerged projects [p. 52] formore information.
The control buttons on the right allow you to modify the merged projects:
• Add a merged project (key INS)
Invokes the merged projects edit dialog [p. 105] . If you have chosen to merge files and themerged project contains file sets that are not present in the current project, you will be askedwhether youwant to create themissing file sets (see below) after you close themerged projectsedit dialog with the OK button.
• Edit a merged project (key ENTER)
Invokes the merged projects edit dialog [p. 105] for the selected item, so that you changemerge settings.
• Remove a merged project (key DEL)
Removes the currently selected merged projects. If you have added links into the mergedprojects on the screens & actions tab [p. 148] , these links will be broken and the project willnot be able to compile until you remove those broken links.
• Enable or disable merged projects (keys ALT+Plus and ALT+Minus)
You can temporarily disable merged projects when developing your main project. If you haveadded links into the merged projects on the screens & actions tab [p. 148] , these links willsimply be omitted.
• Synchronize file sets
Inspects the selected file sets and suggests thatmissing file sets be added to themain project.This is also done when you add a merged project, but if file sets in merged projects changelater on, you might want to synchronize the file sets again. File sets are displayed in thedefinition of the distribution tree [p. 107] . This action only checks merged projects for whichyou have chosen to merge files.
• Move up (key ALT-UP)
Move down (key ALT-DOWN)
Changes the order in the list ofmerged projects. The order can be significant if several projectscontribute files with the same paths. Latermerged projects overwrite files from earliermergedprojects, so you have to move a merged project down in order to give it a higher priority. Themain project always has the highest priority.
99
B.2.8 General Settings - Compiler Variables
On this tab of the General Settings step [p. 90] you enter compiler variables for your project.
Defining compiler variables is optional and not required for a working project. For an explanationof compiler variables, please see the help topic on variables [p. 30] .
The control buttons on the right allow you to modify the contents of the compiler variables list:
• Add variable (key INS)
Adds a new variable. The variable namemust be unique andmust not be the nameof a systemvariable.
• Remove variable (key DEL)
Removes the currently selected variable.
• Move variable up (key ALT-UP)
Moves the selected variable up one position in the variables list.
• Move variable down (key ALT-DOWN)
Moves the selected variable down one position in the variables list.
In order to edit any column, please double-click on it.
100
B.2.9 General Settings - Project Options
On this tab of the General Settings step [p. 90] you can adjust options regarding your install4jproject.
The following options are available:
• Make all paths relative when saving the project file
If this option is checked, install4j will try to convert all absolute paths to relative paths whensaving the project file. Relative paths are always interpreted relative to the project file.
If you save your project under a different path, all relative paths will be adjusted accordingly.
Note: for cross platform usage of a single project file enabling this option is highlyrecommended, since file system roots are inherently incompatible across platforms.
• Create backup files when saving
If this option is checked, install4j will create a backup copy of existing project files by appending"~" to the file name.
• Auto save every 5 minutes
If this option is checked, install4j will save your project file every 5 minutes. Note that if theproject has never been saved before, no auto save operation will be attempted.
101
B.2.10 Dialogs
B.2.10.1 Search Sequence Entry Dialog
The search sequence entry dialog is shownwhen clicking on the add button in the Java Versiontab [p. 92] of the General settings step [p. 90] . Upon closing this dialog with the OK button, anew search sequence entry will be appended to the bottom of the search sequence list on thattab.
To define a search sequence entry, you select the entry type and fill out the Detail section ofthe dialogwhich is dependent on the selected entry type. The following entry types are available:
• Search registry
Search the Windows registry and well-known standard locations for installed JREs and JDKsby Sun Microsystems.
• Directory
Look in the specified directory. This is useful if you distribute your own JRE (not one providedby install4j) along with your application. In that case, be sure to supply a relative path. Notethat relative directories will be interpreted as relative to the installation root directory.
• Environment variable
Look for a JRE of JDK in a location that is defined by an environment variable like JAVA_HOMEor MYAPP_JAVA_HOME.
B.2.10.2 Language Selection Dialog
The variable selection dialog is displayed when you click on the Add Language button on theLanguages tab [p. 94]
Select one of the supported languages with a double-click or the OK button. You may also selectmore than a language at a time before pressing on the OK button. Next to each language theISO code is displayed that is required if you override the principal language from the commandline with the sys.languageId variable [p. 355] .
B.2.10.3 Variable Selection Dialogs
When you click on the variable selector which can be found next tomost text fields in install4j,you can choose variables from a number of variable systems [p. 30] . If there is more than onevariable system applicable for the text field, a popup menu will be displayed that lets you selectthe desired variable system first.
A dialog is then brought up that shows you all known variables of the selected type. The variablewill be inserted at the current cursor position, if you close the variable selection dialog with theOK button or of you double-click on a variable. In text fields, the appropriate variable syntax willbe used (like ${installer:myVariable}), in code editors, an appropriate API call will beinserted (like context.getVariable("myVariable").
Please see the help topic on variables [p. 30] more information on variables.
The following variable systems are available:
• Installer variables
Installer variables are only available for text properties of screens [p. 166] , actions [p. 180] andform components [p. 250] .
102
The variable selection dialog shows both predefined variables as well as all bound variables.Installer variables are shown for the currently edited installer application. The drop-down listat the top allows to you change the installer application.
The Edit link in the top right corner allows you to add pre-defined installer variables on thefly.
• Compiler variables
Compiler variables [p. 100] are available for all text fields. The Edit link in the top right cornerallows you to add compiler variables on the fly.
• I18N messages
I18Nmessages are available for text properties of screens [p. 166] , actions [p. 180] and formcomponents [p. 250] and selected other text fields in the install4j IDE.
The variable selector shows both system messages as well as custom localization keys fromthe file that has been defined for the principal language on the Languages tab [p. 94] .
The Edit link in the top right corner allows you to add custom localization keys on the fly.
• Launcher variables
Runtime variables are system variables that are evaluated at runtime of the launcher orinstaller. They are only shown in the variable selector next to the VM parameter text field inthe Java invocation step [p. 129] of the launcher wizard [p. 125] .
B.2.10.4 Variable Edit Dialogs
The variables edit dialogs are displayed when you click the Edit link in the variable selectiondialogs [p. 102] for compiler and installer variables. For installer variables this dialog can also beaccessed from the "Installer Variables" tab of the configuration of an installer application on theScreens & Actions [p. 148] tab.
The dialog contains the same controls as the Compiler Variables tab [p. 100] in the GeneralSettings step [p. 90] . Upon closing the dialog with the OK button, the contents of the tree in thevariable selection dialog will be updated.
Unlike compiler variables, installer variables do not have to be strings. In order to support variabletypes that are commonly used by form components, the installer variable edit dialog offersseveral value types:
• Undefined
If you just wish to document and categorize an installer variable, leave the type as "Undefined".The variable value will be set at runtime when the variable is first bound or assigned to.
• String
An instance of java.lang.String
• Integer
An instance of java.lang.Integer
• Long
An instance of java.lang.Long
• Boolean
An instance of java.lang.Boolean
103
• String array
An instance of java.lang.String[]. Enter the array entries surrounded by quotes andseparated by commas. Use the backslash to quote quotes and backslashes.
• Int array
An instance of int[]. Enter the array entries surrounded separated by commas.
B.2.10.5 Input Dialog
The input dialog allows you to enter a simple string value. Depending on the context, you canuse compiler variables [p. 30] in the value. To select a variable, you can click on the variableselector [p. 102] .
For entities that have a unique ID, you can specify your own custom ID. Setting a custom codeonly provides a benefit if you plan to reference an entity in a script. In scripts, you can then usethat verbose custom ID which is more readable than using the generated numeric ID. CustomIDs must not start with a number. The numeric internal ID is never discarded and continues towork. If you disable the custom ID at a later point, the ID will be reverted to the numeric ID.
Custom IDs are inserted into scripts instead of the numeric IDs by the ID selection dialog [p. 325]. All get...ById()methods in the API accept both the custom ID and the internal numeric ID.This means that you can set a custom ID without breaking anything in the project. However, ifyou use the custom IDs in scripts and change the custom ID or revert to the numeric ID, thosescripts will break.
B.2.10.6 Configure JDKs Dialog
The JDK configuration dialog is displayed when you click the Configure JDKs button on the Javaversion [p. 92] tab or in the Java editor settings dialog [p. 324] .
In this dialog, you can add one or more JDKs that will be available for the purposes outlined onthe Java version [p. 92] help page. The JDK configurations are not saved in the project, theyare saved globally for your install4j installation.
When you add a new JDK, you are asked for the home directory of the JDK that youwant to enter.Instead of a JDK, you can also select a JRE, in which case no parameter names will be availablein the code completion proposals of JDK methods. After you select the home directory, install4jwill check whether the directory contains a JDK or JRE and runs java -version to determinethe version of the selected JDK or JRE.
The table that shows the configured JDKs has several columns:
• Name
This is a symbolic name that describes the JDK, like "JDK 9.0" When you select a design timeJDK on the Java version [p. 92] tab or in the Java editor settings dialog [p. 324] , only this symbolicname will be saved in the project file. When users on other computers and other platformsconfigure a JDK with the same symbolic name in their install4j installation, it will be usedautomatically for code compilation and code completion.
When you add a JDK, the name "JDK [major version].[minor version]" will be suggested bydefault. If the selection is a JRE, "JRE [major version].[minor version]" will be suggested instead.The name of the JDK configuration must be unique.
• Java Home Directory
This is the Java home directory that you selected when you added the configuration. You canchange the Java homedirectory by editing this column. The Java version checkwill be performedagain and the version displayed in the "Java Version" column will be updated. The symbolicname of the configuration will not be changed.
104
• Javadoc Directory
In this column, you can enter the location of the Javadoc that should be associated with thisJDK configuration. The Javadoc directory can remain empty in which case no context-sensitiveJavadoc help will be available for classes from the runtime library.
• Java Version
This uneditable column shows the version of the selected JDK configuration.
When you delete the JDK configuration that is currently used by the project, the project will stillreference the same configured symbolic name for the JDK. It will then be shown in red color witha [not configured] message attached.
Changing the order of JDK configuration changes the order in the drop-down list on the Javaversion [p. 92] tab or in the Java editor settings dialog [p. 324] .
B.2.10.7 Merged Projects Edit Dialog
Themerged projects edit dialog is shownwhen adding or editing amerged project on theMergedProjects tab [p. 99] of the General settings step [p. 90] . Please read help topic onmerged projects[p. 52] for more information.
You can select a project file with the ... button. Relative path names are interpreted relative tothe main project file. The full name of the project as configured on the Application Info [p. 91]tab is extracted and displayed in the text field below. That name is displayed in the list of mergedprojects and it can be changed for documentation purposes. The name is not used at runtime.
In theMerge Settings section of the dialog, you can configure which entities should be mergedinto the main project:
• Files
If selected, all files [p. 107] from the default file set of the merged project will be merged intothe default file set of the main project. Files from other file sets in the merged project will bemerged to file sets with the same name in the main project.
• Launchers
If selected, all launchers [p. 123] in the merged project will be added to the main project.
• Custom installer applications
If selected, all custom installer applications [p. 148] in themerged project will be added to themain project.
All selections are transitive for nested merged projects. For example, if the merged projectcontains anothermerged project for whichmerging of files is enabled, those files are onlymergedif file merging is enabled in the main project.
Screens and actions are notmerged automatically. On the Screens &Actions tab [p. 148] you canmerge single elements from merged projects such as screen groups or action groups at anypoint.
105
B.3 Step 2: Files
B.3.1 Step 2: Configure Distributed Files
In the Files step, you define your distribution tree. This means that you collect files fromdifferent places to be distributed in the generated media files. In addition, you can optionallydefine installation components.
There are three tabs in this section:
• Define distribution tree [p. 107]
On the definition tab, you can add and edit the structural elements that make up thedistribution tree. You can create your own directory structure and "mount" directories fromyour hard disk or add single files in arbitrary directories.
• View results [p. 116]
On the results tab, you see the actual file tree as it will be collected and distributed by thegenerated media files [p. 327] . Go to this tab to check whether your actions on the definitiontab have actually produced the desired results.
• Installation components [p. 120]
On the components tab, you can optionally define parts of the distribution tree as installationcomponents to allow users to customize the installation of your application.
106
B.3.2 Defining The Distribution Tree
B.3.2.1 Files - Defining The Distribution Tree
The distribution tree shows your file selections and the distribution directory structure createdby you. The distribution tree is drag-and drop enabled.
To check whether your definition actually produces the desired results, please go to the ViewResults tab [p. 116] of the Files steps [p. 106] .
The top-level nodes in the distribution tree are called file sets. There is one "Default file set" thatcannot be deleted or renamed. The relative paths of all files that are added to a file set must beunique. Please see the help topic on file sets and installation components [p. 11] for moreinformation on how to use file sets.
Within a single file set, it causes an error if the installation paths for two files collide. For example,if you have added the contents of two different directories into the same folder in the distributiontree andboth directories contain a filefile.txt, building the project will fail with a correspondingerror message. In this case, you have to exclude the file in one of the directory entries. This isonly valid for files, sub-directory hierarchies on the other hand are merged and can overlapbetween multiple directory entries and explicitly added folders.
You can create new file sets with the New File Set action in the add menu on the right side.Each file set has its own "Installation directory" root. If you define custom roots that should bepresent in multiple file sets, you have to duplicate them.
When using the install4j API, you reference file sets with IDs. You can show IDs in the distributiontree by activating the Show IDs button on the lower right side of the distribution tree. Theautomatically generated numerical IDs are then shown in brackets. The selection will beremembered across restarts of install4j.
The child nodes of a file set are called installation roots. Their location is resolved when theinstaller runs. There are two types of roots:
• The default root of the distribution tree is labeled as "Installation directory" and has aspecial icon. This is the directory where your application will be installed on the target system.The directory is dependent on user actions at the time of installation. In regular installers auser can select an arbitrary directory where the application should be installed. For RPMmediafiles, a user can override the default directory with command line parameters. For archives,the files are simply extracted into a commmon top-level directory.
The installation directory will only be created if you execute an "Install files" action in theinstaller configuration [p. 148] . By default, the "Install files" action is placed on the "Installation"screen. If your installer should not create an installation directory, you can ignore this rootand remove the "Install files" action.
To learn more on the various installer modes, please see the corresponding help topic [p. 67].
• If your application needs to install files into directories outside themain installation directory,you can add custom roots to the distribution tree. This is done with the New Root actionin the add menu on the right side or in the context menu. The actual location of this rootis defined by its name and has to resolve to a valid directory at runtime. There are severalpossibilities for using custom roots. The name of a custom root can be
107
• a fixed absolute path known at compile-time
This works for custom environments where there's a fixed policy for certain locations. Forexample, if you have to install some files to D:\apps\myapp, you can enter that path asthe name for your custom root.
If you build installers for different platforms, that root is likely to be different for eachplatform. In that case, you can use a compiler variable [p. 100] for the name of the customroot and override its value for each media file [p. 339] .
• an installer variable that you resolve at runtime
If you would like to install files into the directory of an already installed application, suchas a plugin for your own application, you can use an installer variable that you resolve atruntime. Installer variables have an installer: prefix, such as ${installer:rootDir},and can be set in a variety of ways [p. 30] .
The most common case would be to add a "Directory selection" screen to the screensequence [p. 148] and set its variable name property to the variable that you've used as thename of the custom root. For the above example, that would be "rootDir" (without the${installer:...} variable syntax).
Alternatively, you could use a "Set a variable" action to determine the locationprogrammatically.
• a pre-defined installer variable
install4j offers several variables for "magic folders" that point to common directories, suchas ${installer:sys.userHome} which resolves to the user home directory or${installer:sys.system32Dir}which resolves to the system32directory onWindows.
If a custom installation root is not bound at runtime or if it points to an invalid directory, thecontained files will not be installed. There will be no error messages, if you require errorhandling, you can use a "Run a script" action before the "Install files" actionwith the appropriateerror message and failure strategy.
Note: For archive media file types [p. 328] , custom installation roots are not installed. If yourequire these custom roots for your installation, you cannot use archives.
An alternative way to redirect installed files to different directories is to use the "Directoryresolver" property of the "Install files" actions. Also, the "File filter" property of that action canbe used to conditionally install files. The use of these properties is only recommended if yourequire their full flexibility. Otherwise, using custom installation roots and installationcomponents [p. 120] is a better approach.
Beneath an installation root, you can add files or create folders:
• To create a folder, use the New folder action in the add menu on the right side or in thecontext menu. A folder named "New Folder" will be created below the selected directory. Ifno directory or installation root is selected, it will be created below the "Installation directory"root node. Right after its creation, the default name is editable and you can enter the intendedname of the folder. Confirm your entry with Enter. To configure further properties of thefolder, you can edit the folder node (see below) to show the folder property dialog [p. 122] .
• To add files, use the Add files and directories action in the add menu on the right side orin the context menu. The file wizard [p. 110] will be displayed.
In the distribution tree you can
108
• Move entries
Entries are moved by dragging themwith the mouse to the desired location. Both directories,file entries and directory content entries can be moved. To select a target directory inside aclosed directory while dragging, hover with the mouse over the closed directory and it willopen after a short delay. While dragging, the insertion bar shows you where the entry wouldbe dropped.
• Delete entries
Entries can be deleted by hitting the DEL key or using the corresponding tool bar button ormenu entry.
• Rename entries
Some types of entries can be renamed by using the Rename action on the right side of thetree or from the context menu. The name of the entry can then be edited in-place.
Renaming entries is possible for:
• File sets
• Roots
• Folders
• Edit the contents of entries
The contents of some types of entries can be edited by using the Edit action on the rightside of the tree or hitting the ENTER key while the entry is selected.
Editing entries is possible for:
• Folders
Editing a folder means opens the folder property dialog [p. 122] .
• Single file entries
Editing a single file entry will bring up the file wizard [p. 110] . Only the selected file will beshown in the "Select files" step, even if you initially selected multiple files with the wizard.If you add additional files in this step, they will be added below the selected file in thedistribution tree. If you delete the selected file in this step, it will also be deleted in thedistribution tree.
• Directory content and compiler variable entries
Editing a directory content entry or a compiler variable entry will bring up the file wizard[p. 110] .
Using compiler variables [p. 30] in the distribution tree allows you to make compile-timeconditional includes:
• if a directory node resolves to the empty string after variable replacement, the directory andany contained entries will not be included in the distribution.
• if the source directory of a "contents of directory" node resolves to the empty string aftervariable replacement, no files will be included through that entry.
• if the file name of a single file node resolves to the empty string after variable replacement,no file will be included.
109
For conditions that are evaluated at runtime or for adding platform dependent files, you shoulduse files sets [p. 11] instead.
B.3.2.2 File Wizard
The file wizard is displayed when you invoke the Add files and directories action in the addmenu on the right side of the file definition tree. To get more information about the distributiontree and related concepts, please see the overview [p. 107] .
In the first step of the file wizard you choose whether you want to add
• the contents of a directory and its subdirectories
Choose this wizard type if you want to recursively add the contents of a directory. You willhave the possibility of excluding certain files and subdirectories and exclude files based ontheir file suffix. If you would like to specify different settings for one or several files in theincluded directory, you have to exclude them and add them as single files in the appropriatedirectory.
The subsequent steps in the wizard for this selection are:
• Select directory [p. 112]
Choose the directory that should be distributed.
• Installation options [p. 113]
Select installation options like access rights as well as overwrite and uninstallation policies.
• Exclude files and directories [p. 115]
Select files or directories that should not be distributed.
• Exclude suffixes [p. 115]
Enter a list of file suffixes that should be ignored,
• a number of single files
Choose this wizard type if you collect a small number of files (possibly fromdifferent locations)into a single directory. Example: a number of support libraries from different directories areadded into the top level directory lib.
The subsequent steps in the wizard for this selection are:
• Select files [p. 112]
Choose the files that should be distributed.
• Installation options [p. 113]
Select installation options like access rights as well as overwrite and uninstallation policies.
• files that are passed with a compiler variable
Choose this wizard type if you collect lists of files in your build tool and want to use thatinformation to dynamically build the distribution tree.
The subsequent steps in the wizard for this selection are:
• Compiler variable [p. 112]
Choose the compiler variable that should be read.
110

• Installation options [p. 113]
Select installation options like access rights as well as overwrite and uninstallation policies.
111

B.3.2.3 Wizard Steps
B.3.2.3.1 File Wizard: Select Directory
In this step of the filewizard [p. 110] , you select the directorywhose contents should be recursivelyadded to the distribution tree. This step is only shown if you select "Directory" in the first step.
You can either enter the directory manually or use the chooser button ... to the right of the textfield to select a directory from your file system.
By default, the files that are contained in the selected directory are addeddirectory to the currentlyselected node in the distribution tree. Alternatively, you can suggest a subdirectory that shouldbe created below the currently selected node as a parent directory for the included files. Thismust be a simple directory name and not a path name with multiple components.
B.3.2.3.2 File Wizard: Select Files
In this step of the file wizard [p. 110] , you select the files that should be added to the distributiontree. This step is only shown if you select "Single files" in the first step.
To edit the list of files you can
• add a new entry by clicking on the right side of the window. If you choose "Browse for file"in the popupmenu, you can select one ormultiple files in a file chooser. If you choose "Manualentry", you can also use compiler variables.
• copy a file list from the system clipboard by clicking on the right side of the window. Thefile list must consist of
• a single file entry
• multiple file entries separated by the standard path separator (";" on Windows, ":" on Unix)or by line breaks.
Each file entry can be
• absolute
The file entry is added as it is.
• relative
On the first occurrence of a relative path, install4j brings up a directory chooser and asksfor the root directory against which relative paths should be interpreted. All subsequentrelative paths will be interpreted against this root directory.
Only unique file entries will be added to the list. If no new file entry could be found, acorresponding error message is displayed.
• remove an existing file entry by using the Remove action while the file is selected.
• change the position of an existing entry by using the Move Up and Move Down actions.
B.3.2.3.3 File Wizard: Compiler Variable
In this step of the file wizard [p. 110] , you specify the compiler variable whose value will be usedfor adding more files to the distribution tree. This step is only shown if you select "Compilervariable" in the first step.
The selected compiler variable must exist and will be read at compile time. Its value will be splitwith the configured path list separator. Note that the compiler variablemust be defined, otherwise
112
the build will fail and you have to specify the plain name of the compiler variable, without anysurrounding variable replacement syntax.
For each file that does not exist, a warning will be printed during the build.
For the separator, the compiler variable ${compiler:sys.pathlistSeparator} can be usedto separate path lists with ; onWindows and : on Unix. The separator is interpreted as a regularexpression, so you can use \n for separating files with new lines, for example.
B.3.2.3.4 File Wizard: Install Options
In this step of the file wizard [p. 110] , you select options regarding the installation of the selectedfiles and directories.
Except for the "Shared file" option, all configuration options have default settings that are definedon the File Options [p. 117] tab. To override the default settings, select the check boxes in frontof each configuration option.
The following install options are available:
• Shared file (Windows only)
Microsoft Windows has a concept of "shared files" where a usage counter is monitored foreach file or directory. When the usage counter reaches zero the installer will delete the file ordirectory. This is especially useful if you install DLLs into the system32 directory that are sharedby multiple applications.
• Overwrite policy
This setting determines what the installer will do if the file is already present. It does not applyfor archives (including RPM archives). The overwrite policy can be one of:
• Always ask, except for update
If the file is already present, the installer asks the user whether to overwrite it, regardlessof the file modification dates. However, files that have been proviously installed by install4jwill be overwritten.
• Always ask
If the file is already present, the installer asks the user whether to overwrite it, regardlessof the file modification dates and whether install4j has previously installed this file.
• If newer, otherwise ask
If the file is already present, the installer silently overwrites the file if the installed file isnewer, otherwise is asks the user.
• If newer
If the file is already present, the installer silently overwrites the file if the installed file isnewer, otherwise it does not install it.
• Always
The installer silently overwrites the file in all cases.
• never
The installer does not install the file.
• Uninstallation policy
This setting determines how the uninstaller decides whether an installed file should beuninstalled or not. The uninstallation policy can be one of:
113
If created
If the file or directory was created by the installer, it will be deleted.
•
• Always
The file or directory will always be deleted regardless of whether it was created by theinstaller. Please be careful when choosing this option, since deleting directories that werenot created by the installer can have severe unintended consequences.
• Never
The file or directory will not be deleted ny the uninstaller.
• If created, but not for update
If the file or directory was created by the installer, it will be deleted. However, if theuninstaller is running as part of the update (invoked by an "Uninstall previous installation"action), the file or directory will not be deleted.
• Always, but not for update
The file or directory will always be deleted regardless of whether it was created by theinstaller. However, if the uninstaller is running as part of the update (invoked by an "Uninstallprevious installation" action), the file or directory will not be deleted. Please be careful whenchoosing this option, since deleting directories that were not created by the installer canhave severe unintended consequences.
• Unix file and directory mode
On Unix-like platforms (including Linux and macOS), the file mode governs the access rightsto the installed files. The access mode is composed of three octal numbers (0-7) and eachnumber completely expresses the access rights for a particular group of users:
• First number
The first octal number contains the access rights for the owner of the file.
• Second number
The first octal number contains the access rights for the user group that the file is attachedto.
• Third number
The third octal number contains the access rights for all other users.
For a desired combination of access rights, the octal number is calculated by adding:
• 1
For the right to execute the file or to browse the directory. Only set this flag for directories,executables and shell scripts.
• 2
For the right to write to the file or directory.
• 4
For the right to read from the file or directory.
For example, read/write rights are calculated as 2 (for writing) + 4 (for reading) = 6, read-onlyrights are just 4, and the rights to read/execute a file are calculated as 1 (for executing) + 4(for reading) = 5.
114

The default access rights for files are 644, i.e. the owner can read and write the file and allothers can only read it. Since usually applications on Unix-like systems are installed by theadministrator (usually called root), this means that users will only be able to read files but notto write to them. For launchers, the installer sets access rights for files to 755, which isequivalent to 644 only that everyone can execute the launchers. If you have files that yourusers should be able to write to, you have to add these files to the distribution tree with adifferent access mode. For example, 666 would be appropriate in that case. You can reset thedefault mode with the Reset to default button.
The default access rights for directories are 755, i.e. the owner can read and write andbrowse the directory and all others can only read and browse it. Just as for files, this meansthat except for root, users will only be able to browse directories and read from them but theywill not be able to create files in them. If you have directories that your users should be ableto create files in, you have to add these directories to the distribution tree with a differentaccess mode. For example, 777 would be appropriate in that case. You can reset the defaultmode with the Reset to default button.
B.3.2.3.5 File Wizard: Excluded Files And Directories
In this step of the file wizard [p. 110] , you can select files and subdirectories that should beexcluded from distribution. This step is only shown if you select "Directory" in the first step.
The tree labeled "Excluded files and subdirectories" shows the tree of all files in the directoryselected in the previous step [p. 112] . Each file and subdirectory has a check box attached. If youselect that check box, the entry willnot be distributed. Selections of subdirectories are recursive.If you select a subdirectory, its contents are hidden from the tree since they will be excludedanyway.
B.3.2.3.6 File Wizard: Excluded Suffixes
In this step of the file wizard [p. 110] , you can enter file name suffixes that should be excludedfrom distribution. This step is only shown if you select "Directory" in the first step.
In addition to the explicit selections of excluded files and subdirectories in the previous step [p.115] , a list of file name suffixes separated by commas can be entered here to exclude them fromthe distribution. For example, entering *.java, *.java~will prevent files with these extensionsfrom being distributed.
The suffixes entered on this screen are combined with the global excludes that are defined inthe Files Options [p. 117] .
115

B.3.3 Files - Viewing The Results
On this tab you can check the results of your definition of the distribution tree [p. 107] .
The tree shows all files that will be distributed in the generated media files [p. 327] .
You cannot remove files from this tree or add them to it. If you would like to remove a file thathas been added with a directory entry, you have to use the excluded files and directories step[p. 115] or the excluded suffixes step [p. 115] in the files directory wizard. To exclude files anddirectories on a per-media set basis, please see the customize project defaults [p. 339] step inthe media file wizard [p. 330] .
On activating this tab, the file tree is re-read if the definition of the distribution tree [p. 107] haschanged since the last time the file tree was shown. This background process can take a shortwhile and is indicated by a "Please wait ..." entry in the result tree.
Should the contents of your hard disk have been modified in the meantime, you can use theRefresh button to re-read the displayed file tree.
116
B.3.4 Files - File Options
On this tab you can set global options that apply to all files and directories that are included bythe definition of the distribution tree [p. 107] .
In the Global excludes section, you can define patterns to exclude files and subdirectories fromdirectory entries in the definition of the distribution tree. If you do not want to distribute file ordirectories that have certain suffixes, please specify them in the text field as a comma separatedlist of wildcard entries.
For example, if you want to exclude files from the selected directory that end in .txt and .java,as well as .svn directories, please enter *.txt,*.java,.svn in the text field.
You can add further suffixes to this default for each entry in the definition of the distributiontree [p. 115]
In the Installation Options section, the following settings are available:
• Shared file (Windows only)
Microsoft Windows has a concept of "shared files" where a usage counter is monitored foreach file or directory. When the usage counter reaches zero the installer will delete the file ordirectory. This is especially useful if you install DLLs into the system32 directory that are sharedby multiple applications.
• Overwrite policy
This setting determines what the installer will do if the file is already present. It does not applyfor archives (including RPM archives). The overwrite policy can be one of:
• Always ask, except for update
If the file is already present, the installer asks the user whether to overwrite it, regardlessof the file modification dates. However, files that have been proviously installed by install4jwill be overwritten.
• Always ask
If the file is already present, the installer asks the user whether to overwrite it, regardlessof the file modification dates and whether install4j has previously installed this file.
• If newer, otherwise ask
If the file is already present, the installer silently overwrites the file if the installed file isnewer, otherwise is asks the user.
• If newer
If the file is already present, the installer silently overwrites the file if the installed file isnewer, otherwise it does not install it.
• Always
The installer silently overwrites the file in all cases.
• never
The installer does not install the file.
• Uninstallation policy
This setting determines how the uninstaller decides whether an installed file should beuninstalled or not. The uninstallation policy can be one of:
• If created
If the file or directory was created by the installer, it will be deleted.
117

• Always
The file or directory will always be deleted regardless of whether it was created by theinstaller. Please be careful when choosing this option, since deleting directories that werenot created by the installer can have severe unintended consequences.
• Never
The file or directory will not be deleted ny the uninstaller.
• If created, but not for update
If the file or directory was created by the installer, it will be deleted. However, if theuninstaller is running as part of the update (invoked by an "Uninstall previous installation"action), the file or directory will not be deleted.
• Always, but not for update
The file or directory will always be deleted regardless of whether it was created by theinstaller. However, if the uninstaller is running as part of the update (invoked by an "Uninstallprevious installation" action), the file or directory will not be deleted. Please be careful whenchoosing this option, since deleting directories that were not created by the installer canhave severe unintended consequences.
• Unix file and directory mode
On Unix-like platforms (including Linux and macOS), the file mode governs the access rightsto the installed files. The access mode is composed of three octal numbers (0-7) and eachnumber completely expresses the access rights for a particular group of users:
• First number
The first octal number contains the access rights for the owner of the file.
• Second number
The first octal number contains the access rights for the user group that the file is attachedto.
• Third number
The third octal number contains the access rights for all other users.
For a desired combination of access rights, the octal number is calculated by adding:
• 1
For the right to execute the file or to browse the directory. Only set this flag for directories,executables and shell scripts.
• 2
For the right to write to the file or directory.
• 4
For the right to read from the file or directory.
For example, read/write rights are calculated as 2 (for writing) + 4 (for reading) = 6, read-onlyrights are just 4, and the rights to read/execute a file are calculated as 1 (for executing) + 4(for reading) = 5.
The default access rights for files are 644, i.e. the owner can read and write the file and allothers can only read it. Since usually applications on Unix-like systems are installed by theadministrator (usually called root), this means that users will only be able to read files but notto write to them. For launchers, the installer sets access rights for files to 755, which is
118
equivalent to 644 only that everyone can execute the launchers. If you have files that yourusers should be able to write to, you have to add these files to the distribution tree with adifferent access mode. For example, 666 would be appropriate in that case. You can reset thedefault mode with the Reset to default button.
The default access rights for directories are 755, i.e. the owner can read and write andbrowse the directory and all others can only read and browse it. Just as for files, this meansthat except for root, users will only be able to browse directories and read from them but theywill not be able to create files in them. If you have directories that your users should be ableto create files in, you have to add these directories to the distribution tree with a differentaccess mode. For example, 777 would be appropriate in that case. You can reset the defaultmode with the Reset to default button.
These defaults can be customized for each entry in the definition of the distribution tree [p. 113]
In the Modification Times section, you can choose between two ways to set the modificationtimes of installed files:
• Keep original file modification times
The original modification times are kept for the installed files. This is the default mode.
• Use build timestamp
All installed files have the build time as the same modification time.
In the Build Options section, you can define the behavior if some files or directories in thedefinition of the distribution tree are missing while the project is being compiled. install4j canthen take one of the following actions:
• Ignore
Do not print any warnings and ignore. This setting is suitable if you intentionally add files ordirectories to your distribution tree that are no present for all builds. If the Enable extraverbose output option is selected on the Build step [p. 347] , the warning is still printed.
• Print a warning and continue
This is the default setting.
• Raise an error and abort
If missing files are not acceptable in your project, you should choose this option. If a missingfile is encountered, the build will fail with a corresponding error message.
119
B.3.5 Files - Defining Installation Components
On this tab you can optionally define installation components.
Installation components can be used to allow the user to customize the installation. GUI installerswill present a step that lists all available installation components in a tree with check boxes andlets the user choose which components to install. Console installers will also present a list ofinstallation components to the user for selection. If no installation components are defined, thatstep will be omitted and the entire distribution tree is installed.
On the left side you configure a tree of installation components and component folders.To every component folder you can add installation components and component folders as childnodes. The component tree is drag-and drop enabled.
In the component tree you can
• Move entries
Components or component folders aremoved by dragging themwith themouse to the desiredlocation. To select a target folder inside a closed component folder while dragging, hover withthemouse over the closed component folder and it will open after a short delay.While dragging,the insertion bar shows you where the entry would be dropped.
• Add installation components
With the Add Installation Component action, a new installation component is added to thecurrently selected component folder, or at the top-level if no component folder is selected.The name of the installation component can be edited in-place immediately.
• Add component folders
With the Add Component Folder action, a new component folder is added to the currentlyselected component folder, or at the top-level if no component folder is selected. The nameof the component folder can be edited in-place immediately.
• Delete entries
With the Delete action or the DEL key, you can remove the currently selected installationcomponent or component folder. All child nodes of component folders are removed as well.
• Rename entries
With the Rename action, you can rename an installation component or a component folder.
To internationalize the name of the component for different media files, please use customlocalization keys [p. 30] .
When using the install4j API, you reference installation components with IDs. You can show IDsin the component tree by activating the Show IDs button on the lower right side of thecomponent tree. The automatically generated numerical IDs are then shown in brackets. Theselection will be remembered across restarts of install4j.
This ID can be used in expressions, scripts and custom code when you want to check if theinstallation component has been selected for installation. A typical condition expression for anaction would be context.getInstallationComponentById("123").isSelected() if theID of the component is "123". In this way you can conditionally execute actions depending onwhether a component is selected or not.
The right pane displays the properties of the selected element in the component tree. The optionsare organized into several tabs. There are different configuration options, depending onwhetheryou've selected an installation component or a component folder:
120
• Installation component
Installation components have the following specific tabs:
• Files
To choose the contents of an installation component, you first have to decide whether thecomponent contains all files or just a selection of files or directories. For a selection of filesand directories, you then choose the desired contents in the tree. Installation componentsare not mutually exclusive and you can include the same files in multiple installationcomponents.
• Options
The available options are:
• Initially selected for installation
Whether the check box for the currently selected installation component is selected ornot.
• Mandatory component
Whether the currently selected component must be installed or not. If the componentis mandatory, the user cannot deselect it and the check box in the installer is grayed out.
• Downloadable component
Whether the currently selected component should be externalized for installers whosedata file type [p. 335] is set to "Downloadable". These components can then be placedon a web server and are downloaded on demand if the users selects them.
• Dependencies
If the currently selected installation component onlyworks if a number of other componentsare installed as well, you can select those components on the "Dependencies" tab. Whenthis installation component is selected, the dependencies become automatically selectedandmandatory.When this installation component is deselected again, the previous selectionstate of the dependencies is restored. The list of components in the "Dependencies" tabonly shows components that will not lead to circular dependencies.
• Component folder
Component folders have an "Options" tab where you can configure whether the componentfolder should be initially expanded or not.
Both installation components and component folders also have a Description tab. You canoptionally display a description below each component in the installer. Any component orcomponent folder with a description will have a toggle button with help icon on the right side.This toggle button controls whether the description is displayed below the element. You can alsouse the F1 key to toggle the visibility of the description. The Expand description automaticallycheck box allows you to show descriptions by default.
Note: Theuser canonly selectwhich installation components should be installed if the "Installationcomponents" screen or the "Installation type" screen is part of the screen sequence [p. 148] .
The "Installation type" screen offers a selection between sets of installation components, suchas "Full", "Standard" and "Custom", while the "Installation components" screen shows the treeof components that you define on this tabwith check boxes in front of each node. The "Installationcomponents" screen has a number of properties that let you customize the appearance of thedescriptions. If both are present, the "Installation components" screen will only be shown if theselected installation type was configured to be customizable.
121
B.3.6 Dialogs
B.3.6.1 Distribution Tree File Chooser Dialog
The distribution file chooser dialog shows files or directories in the distribution tree. This treedoes not necessarily correspond to a portion of the filesystem of your hard disk, since a virtualfolder hierarchy with arbitrarily mounted directories from your hard disk can be defined on theDefinition tab [p. 107] of the Files step [p. 106] .
The shown files or directories are a subset of the result tree [p. 116] in the Files step [p. 106] . Theactual filter depends on the particular context of your action and is displayed in the title bar ofthe dialog.
Should the contents of your hard disk have been modified in the meantime, you can use theRefresh button to re-read the displayed file tree.
B.3.6.2 Folder Properties Dialog
The folder properties dialog is displayed when you edit a folder in the distribution tree [p. 107] .
In the folder properties dialog you can set the access rights for the selected folder. On Unix-likeplatforms (including Linux and macOS), the file mode governs the access rights to the installeddirectories. The access mode is composed of three octal numbers (0-7) and each numbercompletely expresses the access rights for a particular group of users:
• First number
The first octal number contains the access rights for the owner of the file.
• Second number
The first octal number contains the access rights for the user group that the file is attachedto.
• Third number
The third octal number contains the access rights for all other users.
For a desired combination of access rights, the octal number is calculated by adding:
• 1
For the right to browse the directory.
• 2
For the right to write to the directory.
• 4
For the right to read from the directory.
The default access rights for directories are 755, i.e. the owner can read andwrite and browsethe directory and all others can only read and browse it. Since usually applications on Unix-likesystems are installed by the administrator (usually called root), this means that except for root,users will only be able to browse directories and read from them but they will not be able tocreate files in them. If you have directories that your users should be able to create files in, youhave to set a different access mode for them. For example, 777 would allow all users to create,read, write and delete files in the directory. You can reset the default mode with the Reset todefault button.
122
B.4 Step 3: Launchers
B.4.1 Step 3: Configure Launchers
Launchers are responsible for starting your application. There are two types of launchers:
• Generated launchers
install4j can generate native launchers that start your application. For example, on Windows,a .exe file will be created that among other things takes care of finding a suitable JRE, displayingappropriate error messages in case of need and then starts your application. Using launchersgenerated by install4j has numerous advantages as compared to using home-grown batchfiles and shell scripts.
Each launcher definition is compiled separately for each definedmedia set [p. 327] . Therefore,for the majority of all cases, a single launcher definition will be sufficient to start yourapplication. If, for example, your distribution contains two GUI applications and a commandline application, you have to define 3 launchers, regardless of how many media files [p. 327]you define.
When your application is started with a launcher generated by install4j, you can query thesystem property install4j.appDir to get the installation directory and and install4j.exeDir toget the directory where the launcher resides. Use System.getProperty("install4j.appDir") and System.getProperty("install4j.exeDir") to access these values.
• External launchers
If you already have an external launcher for your application, you can let install4j use thatlauncher instead of generating one. Since external launchers are most likely platformdependent, you will have to add external launchers for each platform that is targeted by yourmedia files [p. 327] . Make sure to exclude the irrelevant launchers [p. 339] in your media filedefinitions in this case.
To define a new launcher, you double-click on the new launcher entry in the list of definedlaunchers or choose Launcher->New launcher from install4j's main menu. The launcher wizard[p. 125] will then be displayed. Once you have completed all steps of the launcher wizard, a newlauncher entry will be displayed in the list of launchers. The icon of a launcher indicates if it is a
• GUI application launcher
• Console application launcher
• Service application launcher
• External launcher
In the list of launchers you you can
• Reorder launcher definitions
Launcher definitions are reordered by dragging them with the mouse to the desired location.While dragging, the insertion bar shows youwhere the launcher definition would be dropped.The order of launchers is not relevant for install4j, reordering is provided only for the purposeof letting you arrange the launcher definitions according to your personal preferences.
• Copy launcher definitions
Launcher definitions are copied by copy-dragging them (e.g. on Windows, press CTRL whiledragging) or using the Copy Launcher action while the source launcher is selected.
123

The name of the copied launcher definition will be prefixed with "Copy of". You can changethis default name by renaming the launcher definition (see below).
• Rename launcher definitions
Launcher definitions can be renamed by selecting Rename Launcher from the context menuor Launcher->Rename launcher from install4j's main menu.
An input dialog will be displayed where the current name can be edited. Please note that thename of the launcher is for your own information only and is not used in the distribution.
• Delete launcher definitions
Launcher definitions can be deleted by using the Delete Launcher action or by hitting theDEL key while the launcher definition is selected.
• Edit a launcher definition
Launcher definitions can be edited by using the Edit Launcher action or by hitting the ENTERkey while the launcher definition is selected.
The launcherwizard [p. 125] will be displayed for the selected launcher definition. Please notethat you can directly access any step in the wizard by clicking on it in the index.
124
B.4.2 Launcher Wizard
The launcher wizard is displayed when you add a new launcher or when you edit an exitinglauncher. To learn more information about the launchers, please see the overview [p. 123] .
In the first step of the launcher wizard you choose whether you want to create
• a generated launcher
The subsequent steps with the associated advanced options [p. 126] capture all informationrequired to start your Java application.
• an external launcher
The external launcher wizard queries the following data:
• Launcher executable
Enter the path to the executable in the distribution tree. You can select a file from thedistribution tree by clicking the ... chooser button.
• Menu integration
The menu integration options are the same as for the generated launcher [p. 139] .
125
B.4.3 Wizard Steps
B.4.3.1 Launcher Wizard: Configure Executable
In this step of the launcher wizard [p. 125] , you enter the properties of the executable that is tobe generated.
The following properties of the executable can be edited in the Executable section of this step:
• Executable type
Executables created by install4j can be either GUI applications, console applications or serviceapplications
• GUI application
There is no terminal window associated with a GUI application. If stdout and stderr are notredirected (see the redirection advanced step [p. 133] ), both streams are inaccessible forthe user. This corresponds to the behavior of javaw(.exe).
On Windows, if you launch the executable from a console window, a GUI application canneither write to or read from that console window. Sometimes it might be useful to use theconsole, for example for seeing debug output or for simulating a console mode with thesame executable. In this case you can select the Allow -console parameter check box. Ifthe user supplies the -console parameterwhen starting the launcher froma consolewindow,the launcher will try to acquire the console window and redirect stdout and stderr to it. Ifyou redirect stderr and stdout in the redirection settings [p. 133] , that output will not bewritten to the console.
If your GUI application uses SWT or QT Jambi instead of Swing, please select the usesSWT or QT check box below this radio button. This ismainly important for correct behavioron macOS where the application must be started differently in this case.
• Console application
A console application has an associated terminal window. If a console application is openedfrom the Windows explorer, a new terminal window is opened. If stdout and stderr are notredirected (see the redirection advanced step [p. 133] ), both streams are printed on theterminal window. This corresponds to the behavior of java(.exe).
• Service application
A service runs independently of logged-on users and can be run even if no user is loggedon. A service cannot rely on the presence of a console, nor can it openwindows. OnMicrosoftWindows, a service executable will be compiled by install4, on macOS a startup item willbe created and on Unix-like platforms a start/stop script will be generated.
When you develop a service please note the following requirement: The mainmethod willbe called when the service is started.
To handle the shutdown of your service, you can use the Runtime.addShutdownHook()method to register a thread that will be executed before the JVM is terminated.
For information on how services are installed or uninstalled, please see the help on helptopic on services [p. 46] .
• Executable name
Enter the desired name of the executable without any trailing .exe or .sh.
126
• File set
Choose the file set to which the launcher should be added. File sets are defined in thedistribution tree [p. 107] . If you do not use different file sets, "Default file set" will be the onlyoption which is activated by default.
• Directory
Enter the directory in the distribution tree where the executable should be generated. If youleave this field empty, the executable will be generated in the installation root directory. Youcan select a directory from the distribution tree by clicking the ... chooser button.
• Allow only a single running instance of the application
If you select this check box, the generated executable can only be started once. Subsequentuser invocations will bring the application to the front. In the StartupNotification classof the install4j launcher client API you can register a startup handler to receive the commandline parameters. In this way, you can handle file associations with a single application instance.This feature is only available on Microsoft Windows, on macOS, single bundle media filesalways behave this way.
• Fail if an exception in the main thread is thrown
Executables created by install4j can monitor whether the main method throws an exceptionand show an error dialog in that case. This provides a generic startup error notification facilityfor the developer that handles a range of errors that would otherwise not be notified correctly.For example, if an uncaught exception is thrown during application startup, a GUI applicationmight simply hang, leaving the user in the dark about the reasons for the malfunction. Withthe error message provided by the install4j executable, reasons for startup errors are foundmuch more easily.
• Working directory
For some applications (especially GUI applications) you might want to change the workingdirectory to a specific directory relative to the executable, for example to read config files thatare in a fixed location. To do so, please select the Change working directory to checkbox and enter a directory relative to the executable in the adjacent text field. To change thecurrent directory to the same directory where the executable is located, please enter a singledot.
127

B.4.3.2 Launcher Wizard: Define Launcher Icon
In this step of the launcher wizard [p. 125] , you define the icon for the generated launcher.
If you would like to associate a custom icon with your launcher, select the "add icon to launcher"check box.
• In the Cross platform section you can choose icon files in the PNG image format (extension*.png) in various sizes. It is recommend to add at least the formats 16x16, 32x32, 48x48 and128x128. On Microsoft Windows andmacOS, the generated executable will have an icon withthese images, on other platforms, these image files will be used for desktop integration. It isrecommended to use 32-bit images with an alpha channel, 8 bit-palette images will begenerated where required. Generated Windows icons contain traditional 256 color imagesand 32-bit imageswith an alpha channel. However, it is also possible to use 8 bit-palette imageswith a transparency color for the input image files.
• If you have an external icon file for Microsoft Windows, you can select the Use ICO fileoption in the Windows section and choose an icon file (extension *.ico) in the text field below.With the Generate from PNG files option, the icon will be generated as described in theCross platform section.
• If you have an external icon file formacOS, you can select the Use ICNS file in the macOSsection and choose a macOS icon file (extension *.icns) in the text field below. With theGenerate from PNG files option, the icon will be generated as described in the Crossplatform section. macOS icons can be generated on macOS with the Icon Composer
application located in /Developer/Applications. Other possibilities are the free IMG2ICNS(1) and png2icns (2) applications.
Note: If the project has already been saved, relative file paths will be interpreted as relative tothe project file.
(1) http://www.img2icnsapp.com(2) http://icns.sourceforge.net
128
B.4.3.3 Launcher Wizard: Configure Java Invocation
In this step of the launcher wizard [p. 125] , you enter the information required to start yourapplication.
The following properties of the Java invocation can be edited in the General section of this step:
• Main class
Enter the fully qualified main class of your application. Next to the text field is a ... chooserbutton that brings up a dialog with a list of all public main classes [p. 144] in the class path. Touse this facility, you have to set up your classpath first (see below).
• VM parameters
If there are any VM parameters you would like to specify for the invocation of your Javaapplication, you can enter them here (e.g. -Dmyapp.myproperty=true or -Xmx256m).
Note: You must quote parameters that contain spaces. Please quote the entire parameterlike"-Dapp.home=${launcher:sys.launcherDirectory}"andnot just the value. Incorrectquoting will lead to failure of the launcher.
Please read the help topic on VM parameters [p. 40] for more information on how install4jcan help you with adjusting the VM parameters at runtime.
• Arguments
If you need to specify arguments for your main class, you can enter them here. Argumentspassed to the executable will be appended to these arguments.
• Allow VM passthrough parameters
If you would like to allow the user to specify VM parameters with the syntax -J[VMparameter] (e.g. -J-Xmx512m), select the Allow VM passthrough parameters checkbox.
Note: This setting applies only to Windows launchers. On Unix platforms you can use theINSTALL4J_ADD_VM_PARAMS environment variables to add VM parameters to the launcher.On macOS, you can edit the Info.plist file to change the VM parameters.
In the Class path section of this step you can configure the class path and the error handlingfor missing class path entries. The class path list shows all class path entries that have beenadded so far. The following types of class path entries [p. 144] are available:
• Scan directory
• Directory
• Archive
• Environment variable
• Compiler variable
The symbol prepended to an entry indicates that an error with that entry will lead to a startupfailure with an error message displayed to the user.
The control buttons on the right allow you to modify the contents of the class path list:
• Add class path entry (key INS)
Invokes the class path entry dialog [p. 144] . Upon closing the class path entry dialog with theOK button, a new class path entry will be appended to the bottom of the class path list.
129
• Remove class path entry (key DEL)
Removes the currently selected class path entry.
• Move class path entry up (key ALT-UP)
Moves the selected class path entry up one position in the class path list.
• Move class path entry down (key ALT-DOWN)
Moves the selected class path entry down one position in the class path list.
To change the error handlingmode of a class path entry [p. 144] , select the class path entry andpress Toggle 'fail on error' right below the class path list or choose the corresponding menu itemfrom the context menu.
130
B.4.3.4 Launcher Wizard: VM Options File
In this step of the launcher wizard [p. 125] , you can configure a VM options file for the launcher.
For detailed information on VM options files, please see the help topic on VM parameters [p. 40].
If you select the Copy template file with explanations for user or the Generatewith the following contents options, a VM options file is placed next to the launcher withthe same file name and a .vmoptions extension. It contains one VM parameter per line forthe launcher.
It is also possible to add a VM options file directly to the distribution tree [p. 107] , in this case,please select the Do not generate a vmoptions file option, otherwise the file in thedistribution tree takes precedence over the generated file and a warning is printed.
VM options files are not supported for Java 6 on macOS. Any VM options that you specify onthis screen and that are not already contained in the fixed VM parameters configured in the Java
invocation [p. 129] will be merged into the Info.plist (1) file of the application bundle. To navigateto the Info.plist file inside the bundle, select the launcher bundle file choose in a finder windowon macOS, choose Action->Show Package Contents from the menu and open the Contentsdirectory. The Info.plist file is an XML file and can be edited by the user.
For Java 7 on macOS, VM options file are fully supported.
( 1 )
http://developer.apple.com/mac/library/documentation/MacOSX/Conceptual/BPRuntimeConfig/Articles/ConfigFiles.html
131

B.4.3.5 Launcher Wizard: Configure Splash Screen
In this step of the launcherwizard [p. 125] , you can configure a splash screen for your application.
If the "Show splash screen" check box is selected, the Java splash screen is shown with thespecified image file. If you decide to display a splash screen, you have to enter an image file. Thefile format can be PNG or GIF.
Please note that you cannot specify the -splash: VM parameter in the "Java Invocation" step[p. 129] , since this VMparameter is parsed by the default Java launchers (java.exe and javaw.exe) which are not used by install4j.
If you select the "Native splash screen on Windows" option, Windows launchers will use its ownimplementation of a splash screen that can be shown extremely quickly. The native splash screendoes not support translucent images. In that case, you cannot use the java.awt.SplashScreenAPI to modify the splash screen. However, the text lines [p. 129] on the splash screen work withthe native splash screen as well.
132
B.4.3.6 Advanced Options
B.4.3.6.1 Launcher Wizard: Configure Redirection
In this step of the launcher wizard [p. 125] , you can configure the redirection settings for stderrand stdout.
Note: this advanced option screen is reachable by selecting the "Executable" step [p. 126] andchoosing "Redirection" from the Advanced options popup menu or by clicking directly on theindex.
The following redirection settings can be edited:
• Redirection of stderr
To redirect stderr to a file, select the Redirect stderr check box and enter a file name inthe adjacent text field.
• Redirection of stdout
To redirect stdout to a file, select the Redirect stdout check box and enter a file name inthe adjacent text field.
File name are interpreted relative to the executable. Enter /dev/null if you want to suppressoutput completely for all platforms. You can choose whether the redirection file is overwritteneach time the launcher is started or if output should be appended to an existing redirection file.
Note that redirection files are created lazily. Thismeans that if nothing is written to the redirectedstream, the file file will not be created or overwritten.
133
B.4.3.6.2 Launcher Wizard: Configure Windows Version Info Resource
In this step of the launcher wizard [p. 125] , you can configure whether a version info resourceshould be generated for the Microsoft Windows executable and what values the version infofields should take. This step is only relevant for Microsoft Windows and is important if yourapplication wants to obtain the "Designed for Windows" logo.
Note: this advanced option screen is reachable by selecting the "Executable" step [p. 126] andchoosing "Windows version info" from the Advanced options popup menu or by clicking directlyon the index.
A version info resourcewill enable theWindows operating system to determinemeta informationabout your executable. This information is displayed in various locations. For example, whenopening the property dialog for the executable in the Windows explorer, a "Version" tab will bepresent in the property dialog if you have chosen to generate the version info resource.
The version info resource consists of several pieces of information. If you check Generateversion info resource, there are several fields whose values must be entered in the textfields on this step. Note that the "original file name", the "company name", the "product name"and the "product version" fields in the version info resource are filled in automatically by install4j.
• Product name
By default, the full name configured in the general settings is used by this value. If you wantto use another value, you can enter it here.
• File version
If you want to specify a version for the file which is a different from the product version, youcan do it here. If this field is left empty, the product version entered on the Application Infotab [p. 91] of the General Settings step [p. 90] will be used for the file version.
• Internal name
Choose a short internal name for identifying your application.
• File description
Enter a description of the application.
• Legal copyright
Enter a copyright statement for your application.
134
B.4.3.6.3 Launcher Wizard: Windows Manifest Options
In this step of the launcherwizard [p. 125] , you can configuremanifest options for yourWindowsexecutables. Themanifest of aWindows executable is a resource entry that can enable or disablecertain features provided by the operating system.
Note: this advanced option screen is reachable by selecting the "Executable" step [p. 126] andchoosing "Windows manifest options" from the Advanced options popup menu or by clickingdirectly on the index.
The execution level can be one of
• As invoker
This is the default setting. The executable will be executed with the rights of the current token.If the user is an Administrator, this will be a filtered token so the executable will not have alladministration rights.
• Highest available
This level will raise the rights of the executable to the maximum extend available for thecurrent user. This applies to Administrators that usually run with a filtered token. WindowsVista and higher will show a question to the user if he wants to elevate the rights of thisapplication. For a standard user this is the same as "As invoker".
• Require administrator
This is the same as "Highest available" when the user is an Administrator runningwith a filteredtoken. If the user is a standard user, Windows Vista and higher will ask for the credentials ofan Administrator account.
The user can set the Windows DPI setting to a value that is larger than 100%. This is particularlyrelevant for high-resolution screens.
If your application can deal with different DPI settings, you can tell install4j to add the manifestentry to the executable that enables DPI-awareness. If this option is not selected, the GUI willbe scaled up automatically and may look somewhat blurry.
135

B.4.3.6.4 Launcher Wizard: Unix Options
In this step of the launcher wizard [p. 125] , you can configure an optional settings for Unixlaunchers.
Note: this advanced option screen is reachable by selecting the "Executable" step [p. 126] andchoosing "Unix options" from the Advanced options popup menu or by clicking directly on theindex.
In the "Executable options" section, you can change the default Unix mode for launchers. Bydefault, the Unix mode is set to 755, allowing everyone to execute the launcher, but only theowner to delete it.
For RPM and DEB Linux archives, service executables are enabled and started automatically ifsystemd is present. You can deactivate this behavior in this section. In that case, only the link in/etc/init.d will be created and you can enable the service manually.
In the "Custom script fragment" section, you can configure an optional script that is executedbefore the Java invocation.
If you specify a Bourne shell custom script, the entered script fragment will be inserted into thelauncher script immediately before the Java invocation of your launcher takes place. This is ahook for experienced users to make custom changes in the environment.
You can select one of:
• No custom fragment
No custom script fragment will be inserted.
• Custom fragment from file
Specify a file from which the custom script will be read. If you enter a relative file, the file willbe interpreted relative to the project file.
• Direct entry
Enter your custom script fragment in the text area below.
136
B.4.3.6.5 Launcher Wizard: MacOS Options
There are two steps in the launcher wizard [p. 125] , where you can configure optional settingsfor macOS launchers.
Note: these advanced option screens are reachable by selecting the "Executable" step [p. 126]and choosing "macOS Info.plist file" or "macOS options" from the Advanced options popupmenuor by clicking directly on the index.
In the "Info.plist fragment" section, you can configure an optional XML fragment that is insertedinto the Info.plist file of the generated application bundle. This can be useful to customize thebehavior of your launcher in ways that are not directly supported by install4j.
You can select one of:
• No custom fragment
No custom XML fragment will be inserted.
• Custom fragment from file
Specify a file from which the custom XML fragment will be read. If you enter a relative file, thefile will be interpreted relative to the project file.
• Direct entry
Enter your custom XML fragment in the text area below.
You can specify a custom Mac bundle identifier for the launcher.The bundle identifier stringidentifies your application to the system. Explicit control over this string can can be useful if youneed to refer to the launcher from outside install4j. The identifier will be written to theCFBundleIdentifier key in in the Info.plist file. If this option is not set explicitly, install4j willgenerate a bundle identifier for you.
This string must be a uniform type identifier (UTI) that contains only alphanumeric (A-Z,a-z,0-9),hyphen (-), and period (.) characters.
If you have configured code signing [p. 98] for macOS media files, it may make sense to specify
an entitlements (1) file on the "macOS options" step.
Entitlements confer specific capabilities or security permissions to your app. If your media fileis a single bundle archive, you can publish it to the App Store only if the launcher and the bundledJRE are sandboxed. Without entitlements, the launcher will not be able to perform a lot ofoperations.
For installers, entitlements can be used to enable certain features on macOS, such as iCloudstorage or push notifications. If your application uses these features and you create an installer,you have to select the "Sign installed launchers" check box on the "Installer Options" [p. 332] stepof the media wizard.
By default, the generated application bundle for a GUI application uses the "Executable name"property from the Executable info [p. 126] step of the launcher wizard. If you choose compactnames as appropriate for Windows and Unix, you may not be happy with the appearance in theFinder on macOS.
Here, you can specify a different application bundle name that should be used for macOSmediafiles. macOS application bundle names are localizable. If you specify an i18n variable as theapplication bundle name, such as ${i18n:myLauncherName}, install4j will name the applicationbundle directory with the value for the principal language [p. 102] of your project. In addition, it
( 1 )
http://developer.apple.com/library/mac/#documentation/Miscellaneous/Reference/EntitlementKeyReference/Chapters/AboutEntitlements.html
137

will take the values for all additional configured languages and set up the appropriate localizationin the application bundle.
For example, if your prinicipal language is English and you have French as an additional language,the application bundle name on the disk will always be the English version, regardless of thelocale. On a French locale, the French name will be displayed to the user in the finder. In aterminal, the user would still see the English name for the application bundle.
Note that i18n messages can take parameters in java.text.MessageFormat style, so if youri18n message is My launcher for {0}, you can specify {i18n:myLauncherName(Myapplication} or even use compiler variables for the arguments, like in {i18n:myLauncherName(${compiler:sys.fullName})}.
This setting only has an effect if the launcher is a GUI launcher.
138
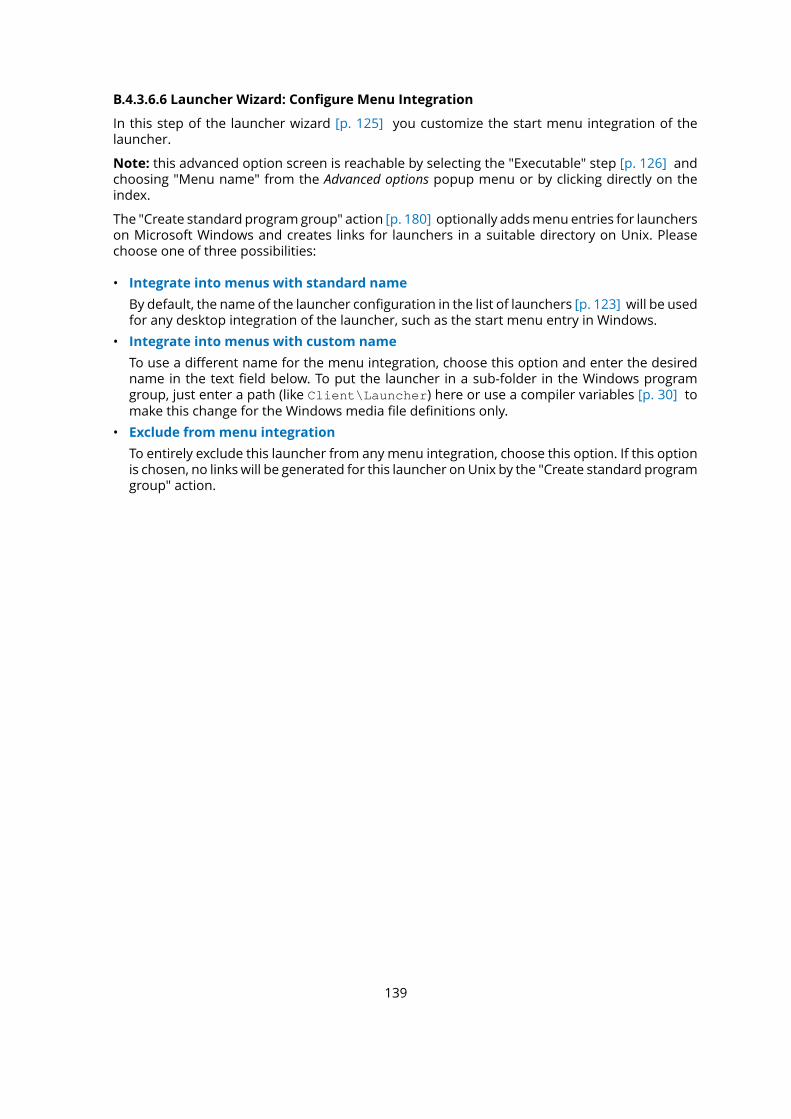
B.4.3.6.6 Launcher Wizard: Configure Menu Integration
In this step of the launcher wizard [p. 125] you customize the start menu integration of thelauncher.
Note: this advanced option screen is reachable by selecting the "Executable" step [p. 126] andchoosing "Menu name" from the Advanced options popup menu or by clicking directly on theindex.
The "Create standard programgroup" action [p. 180] optionally addsmenu entries for launcherson Microsoft Windows and creates links for launchers in a suitable directory on Unix. Pleasechoose one of three possibilities:
• Integrate into menus with standard name
By default, the name of the launcher configuration in the list of launchers [p. 123] will be usedfor any desktop integration of the launcher, such as the start menu entry in Windows.
• Integrate into menus with custom name
To use a different name for the menu integration, choose this option and enter the desiredname in the text field below. To put the launcher in a sub-folder in the Windows programgroup, just enter a path (like Client\Launcher) here or use a compiler variables [p. 30] tomake this change for the Windows media file definitions only.
• Exclude frommenu integration
To entirely exclude this launcher from anymenu integration, choose this option. If this optionis chosen, no links will be generated for this launcher onUnix by the "Create standard programgroup" action.
139
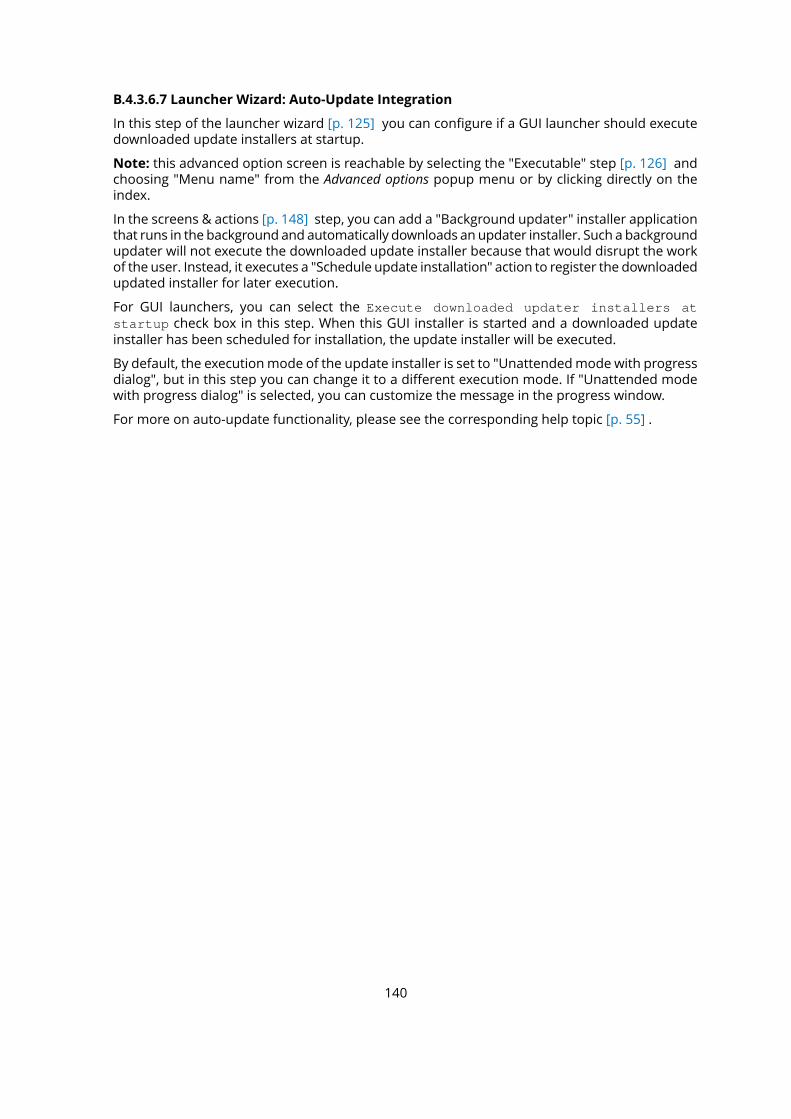
B.4.3.6.7 Launcher Wizard: Auto-Update Integration
In this step of the launcher wizard [p. 125] you can configure if a GUI launcher should executedownloaded update installers at startup.
Note: this advanced option screen is reachable by selecting the "Executable" step [p. 126] andchoosing "Menu name" from the Advanced options popup menu or by clicking directly on theindex.
In the screens & actions [p. 148] step, you can add a "Background updater" installer applicationthat runs in the background and automatically downloads an updater installer. Such a backgroundupdater will not execute the downloaded update installer because that would disrupt the workof the user. Instead, it executes a "Schedule update installation" action to register the downloadedupdated installer for later execution.
For GUI launchers, you can select the Execute downloaded updater installers atstartup check box in this step. When this GUI installer is started and a downloaded updateinstaller has been scheduled for installation, the update installer will be executed.
By default, the executionmode of the update installer is set to "Unattendedmode with progressdialog", but in this step you can change it to a different execution mode. If "Unattended modewith progress dialog" is selected, you can customize the message in the progress window.
For more on auto-update functionality, please see the corresponding help topic [p. 55] .
140
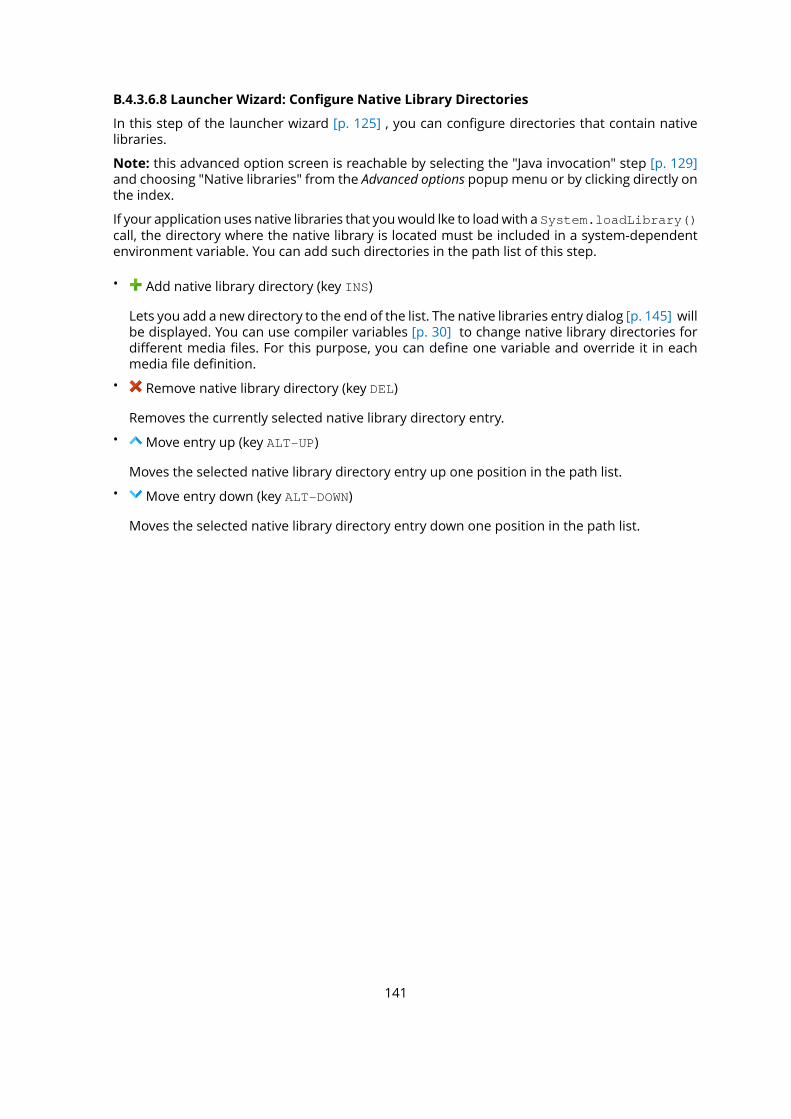
B.4.3.6.8 Launcher Wizard: Configure Native Library Directories
In this step of the launcher wizard [p. 125] , you can configure directories that contain nativelibraries.
Note: this advanced option screen is reachable by selecting the "Java invocation" step [p. 129]and choosing "Native libraries" from the Advanced options popupmenu or by clicking directly onthe index.
If your application uses native libraries that youwould lke to loadwith a System.loadLibrary()call, the directory where the native library is located must be included in a system-dependentenvironment variable. You can add such directories in the path list of this step.
• Add native library directory (key INS)
Lets you add a new directory to the end of the list. The native libraries entry dialog [p. 145] willbe displayed. You can use compiler variables [p. 30] to change native library directories fordifferent media files. For this purpose, you can define one variable and override it in eachmedia file definition.
• Remove native library directory (key DEL)
Removes the currently selected native library directory entry.
• Move entry up (key ALT-UP)
Moves the selected native library directory entry up one position in the path list.
• Move entry down (key ALT-DOWN)
Moves the selected native library directory entry down one position in the path list.
141
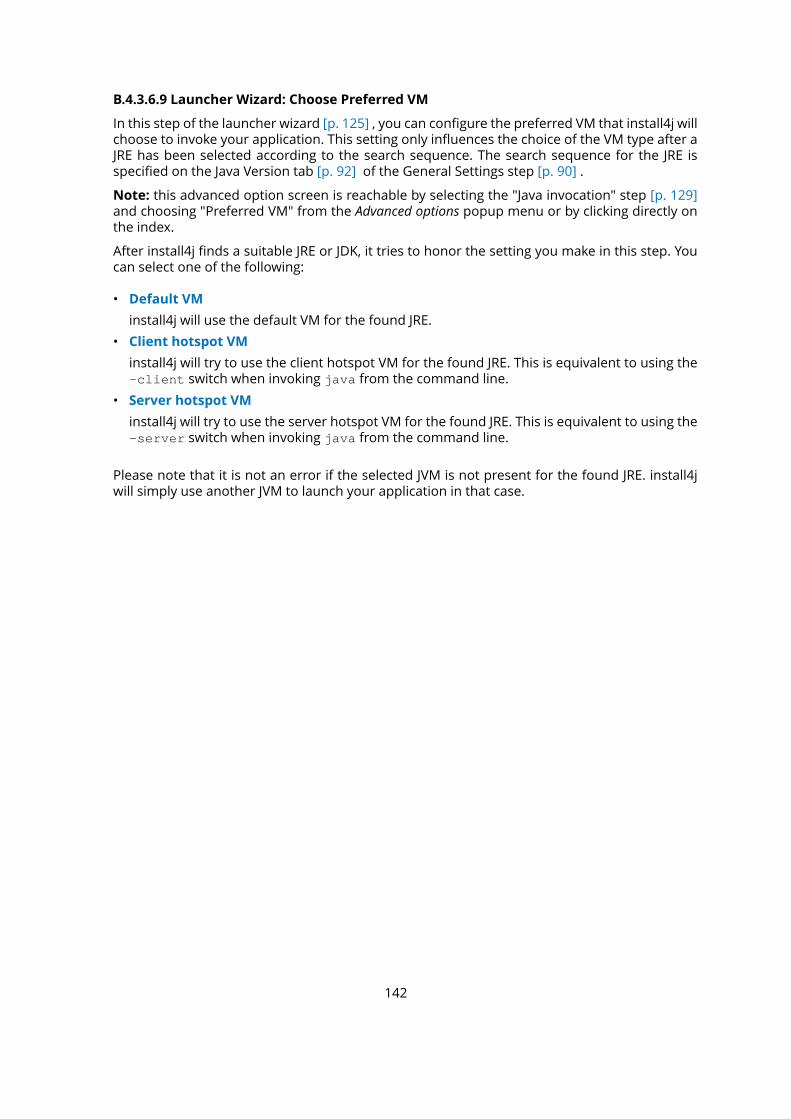
B.4.3.6.9 Launcher Wizard: Choose Preferred VM
In this step of the launcher wizard [p. 125] , you can configure the preferred VM that install4j willchoose to invoke your application. This setting only influences the choice of the VM type after aJRE has been selected according to the search sequence. The search sequence for the JRE isspecified on the Java Version tab [p. 92] of the General Settings step [p. 90] .
Note: this advanced option screen is reachable by selecting the "Java invocation" step [p. 129]and choosing "Preferred VM" from the Advanced options popup menu or by clicking directly onthe index.
After install4j finds a suitable JRE or JDK, it tries to honor the setting you make in this step. Youcan select one of the following:
• Default VM
install4j will use the default VM for the found JRE.
• Client hotspot VM
install4j will try to use the client hotspot VM for the found JRE. This is equivalent to using the-client switch when invoking java from the command line.
• Server hotspot VM
install4j will try to use the server hotspot VM for the found JRE. This is equivalent to using the-server switch when invoking java from the command line.
Please note that it is not an error if the selected JVM is not present for the found JRE. install4jwill simply use another JVM to launch your application in that case.
142

B.4.3.6.10 Launcher Wizard: Text Lines On Splash Screen
In this step of the launcher wizard [p. 125] , you can configure text lines on the splash screen.
Note: this advanced option screen is reachable by selecting the "Splash screen" step [p. 132] andchoosing "Text lines" from the Advanced options popupmenu or by clicking directly on the index.
If you would like to overlay lines of text for status and version information on the splash screen,you can select the check box at the top.
The Status line and Version line sections allow you to position the text lines on the splashscreen and configure their font. The status line is dynamically updatable with install4j's splashscreen client API while the text of the version linemay be overriddenwith a command line option[p. 355] of the install4j compiler.
You can configure the following properties of a text line
• Text
The (initial) text displayed in the text line.
• Position
The x and y-coordinates of the text line on the splash screen. The origin of the coordinatesystem is the top left corner of the splash screen window.
• Font
The font used for drawing the text line:
• Size
The size of the font in points.
• Bold
Whether the font weight should be bold or not.
• Color
The color of the font. By clicking on ..., a color chooser dialog is brought up.
In both text lines, you can use the %VERSION% variable to substitute the version entered on theApplication Info tab [p. 91] of the General Settings step [p. 90] .
To visually position the text lineswithmouse and keyboard on the actual splash screen image,please click on the Position text lines visually button. The visual positioning dialog [p. 145] will thenbe displayed. On exiting the dialog with the OK button, the X/Y coordinate text fields (see above)will be updated for both text lines.
143
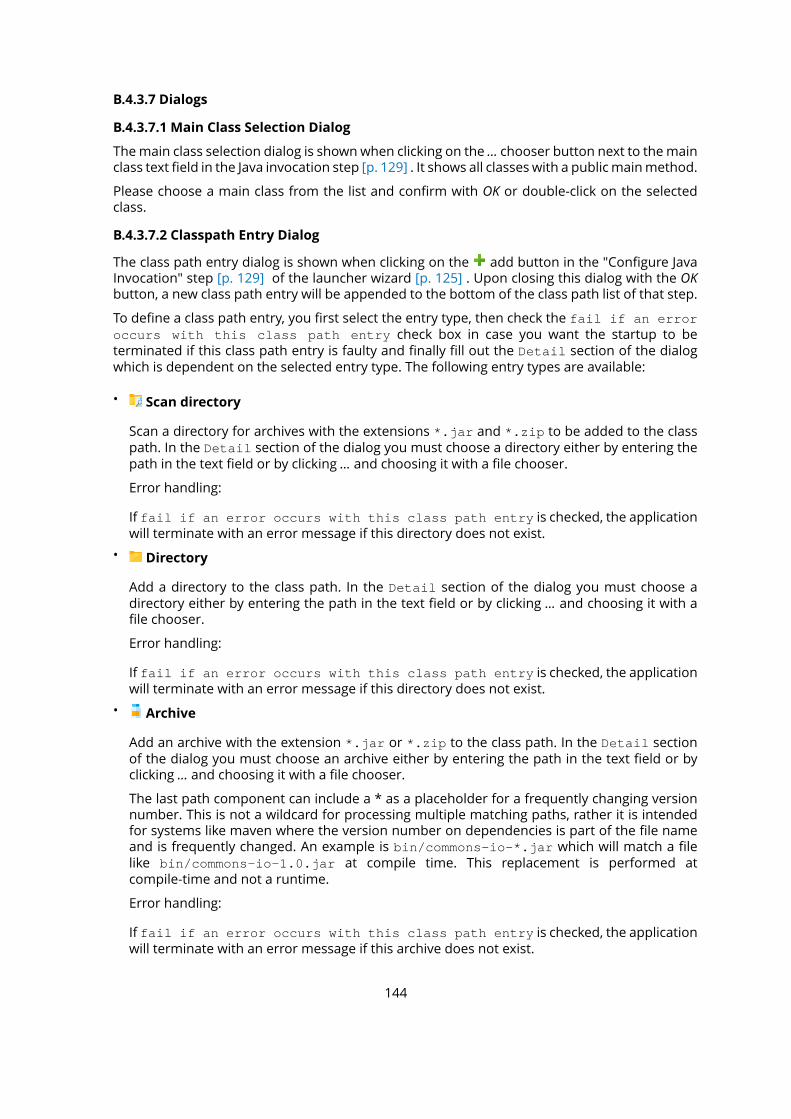
B.4.3.7 Dialogs
B.4.3.7.1 Main Class Selection Dialog
Themain class selection dialog is shownwhen clicking on the ... chooser button next to themainclass text field in the Java invocation step [p. 129] . It shows all classes with a publicmainmethod.
Please choose a main class from the list and confirm with OK or double-click on the selectedclass.
B.4.3.7.2 Classpath Entry Dialog
The class path entry dialog is shown when clicking on the add button in the "Configure JavaInvocation" step [p. 129] of the launcher wizard [p. 125] . Upon closing this dialog with the OKbutton, a new class path entry will be appended to the bottom of the class path list of that step.
To define a class path entry, you first select the entry type, then check the fail if an erroroccurs with this class path entry check box in case you want the startup to beterminated if this class path entry is faulty and finally fill out the Detail section of the dialogwhich is dependent on the selected entry type. The following entry types are available:
• Scan directory
Scan a directory for archives with the extensions *.jar and *.zip to be added to the classpath. In the Detail section of the dialog you must choose a directory either by entering thepath in the text field or by clicking ... and choosing it with a file chooser.
Error handling:
If fail if an error occurs with this class path entry is checked, the applicationwill terminate with an error message if this directory does not exist.
• Directory
Add a directory to the class path. In the Detail section of the dialog you must choose adirectory either by entering the path in the text field or by clicking ... and choosing it with afile chooser.
Error handling:
If fail if an error occurs with this class path entry is checked, the applicationwill terminate with an error message if this directory does not exist.
• Archive
Add an archive with the extension *.jar or *.zip to the class path. In the Detail sectionof the dialog you must choose an archive either by entering the path in the text field or byclicking ... and choosing it with a file chooser.
The last path component can include a * as a placeholder for a frequently changing versionnumber. This is not a wildcard for processing multiple matching paths, rather it is intendedfor systems like maven where the version number on dependencies is part of the file nameand is frequently changed. An example is bin/commons-io-*.jar which will match a filelike bin/commons-io-1.0.jar at compile time. This replacement is performed atcompile-time and not a runtime.
Error handling:
If fail if an error occurs with this class path entry is checked, the applicationwill terminate with an error message if this archive does not exist.
144
• Environment variable
Add the contents of an environment variable to the class path. In the Detail section of thedialog you must enter the name of an environment variable.
Error handling:
If fail if an error occurs with this class path entry is checked, the applicationwill terminate with an error message if this environment variable is not defined.
• Compiler variable
Reads the value of a compiler variable, splits it with the configured path separator and addsthat list of JAR files to the class path. Note that the compiler variablemust be defined, otherwisethe build will fail and you have to specify the plain name of the compiler variable, without anysurrounding variable replacement syntax.
For the separator, the compiler variable ${compiler:sys.pathlistSeparator} can beused to separate path lists with ; on Windows and : on Unix. The separator is interpreted asa regular expression, so you can use \n for separating files with new lines, for example.
The JAR files in the compiler variable must already be present in the distribution tree, theyare not added automatically. To change the directory where files should be resolved withinthe distribution tree, select the Relative path prefix check box and enter a relative path.The relative path can be empty in which case the JAR files must be located directly in theinstallation directory. If you pass a list of absolute files in the compiler variable, you mustselect the Relative path prefix check box, otherwise the build will fail.
Error handling:
If fail if an error occurs with this class path entry is checked, the applicationwill terminate with an error message if any of the archives that are referenced in the compilervariable are not found.
Except for the "Environment variable" and "Compiler variable" classpath types, you can useenvironment variables in the text field with the following syntax: ${VARIABLE_NAME}where youreplace VARIABLE_NAME with the desired environment variable.
Note that for path selections by means of a file chooser (... buttons), install4j will try to convertthe path to be relative to the distribution source directory.
B.4.3.7.3 Native Libraries Entry Dialog
The native libraries entry dialog is shownwhen clicking on the Add button in theNative libraries[p. 141] advanced options step below Java invocation step [p. 129] .
Please enter a directory that contains native libraries by entering the relative path to thedistribution tree root directly or choosing it with the ... chooser button next to the text field. Youcan use compiler variables [p. 30] to change native library directories for different media files.For this purpose, you can define one variable and override it in eachmedia file definition [p. 339].
B.4.3.7.4 Visual Positioning Of Text Lines
The visual positioning dialog is shown when clicking on the Position text lines visually button inthe "configure splash screen" step [p. 132] of the launcherwizard [p. 125] . Upon closing this dialogwith theOK button, the X/Y coordinate text fields will be updated for status and version text linesin that step.
145

The visual positioning dialog displays the selected image with overlaid status and text lineplaceholders that are surrounded on the left and bottom by lines. These lines flash for theselected text line. You can position the selected text line on the image by dragging it with themouse or using the cursor keys. Pressing CTRL with the cursor keys moves the text line in largersteps.
Please note that only the font color is reflected in the font of the text line placeholders. Fontweight, font size and font name are only used in the runtime version of the splash screen.
146
B.5 Step 4: Installer
B.5.1 Step 4: Configure The Installer
In the Installer step, you configure all aspects of your installer, most importantly the screensand actions representing the user input and the actual installation.The Installer step is divided into several tabs which are located at the bottom of install4j's mainwindow:
• Screens & actions [p. 148]
On this tab you configure the screens and actions in your installer and uninstaller as well ascustom installer applications.
• Custom Code & Resources [p. 313]
On this tab you configure the location of your custom code for additional libraries to be usedin scripts as well as your own implementations of actions, screens and form components.
• Update Options [p. 316]
On this tab you configure how your installers handle installations when an earlier version hasalready been installed.
• Auto-Update Options [p. 317]
On this tab you configure settings for the auto-update descriptor file updates.xml that isgenerated by a build.
147
B.5.2 Installer - Screens And Actions
For more information on screens and related concepts, please see the corresponding help topic[p. 13] .
The screens and actions tab shows a tree representation of the installer, the uninstaller andother installer applications, such as updaters. The nodes in the tree are of the following types:
• Applications [p. 151]
An application consist of a series of screens.
• Screens [p. 166]
A screens displays information to the user, optionally gathers user input andoptionally executesa series of actions when the user moves to the next screen.
• Actions [p. 180]
An action usually makes a modification to the installation.
The Add button shows a popup window where you can select whether to add
• an action [p. 180] , a screen [p. 166] or an application [p. 151] . Actions and screens are madeavailable by install4j or are contributed by an installed extension [p. 87] . A registry dialog [p.320] will be shown where you can select the desired screen or action. When adding anapplication, the application template dialog [p. 320] is displayed.
• an action or a screen that is contained in your custom code. New types of reusable actions orscreens can be developed with the install4j API [p. 84] . In your custom code configuration [p.313] you can specify code locations that are scanned for suitable classes. A class selector [p.319] will be shown where you can select the desired class.
• an action group or a screen group [p. 246] . The new group is initially empty. Note that you canalso create groups directly from a selection in the tree of installer elements (see below).
Installer elements can only be added to appropriate parent elements. If no appropriate parentelement is selected, install4j tries to find one bymoving in the ancestor hierarchy from the currentselection. If no appropriate parent element can be found, an error message is displayed.
• Applications
are added at the top level.
• Screens and screen groups
can be added to applications or screen groups.
• Actions and action groups
can be added to screens or action groups.
If you select a single installer element in the tree of installer elements, you can edit its propertieson the right side. Selecting multiple installer elements is possible on the same tree level, i.e. allselected elements have to be siblings in the tree.
When the configuration area is focused, you can transfer the focus back to the tree of installerelements with the keyboard by pressing ALT-F1.
148
The tree of installer elements provides the following actions in the toolbar on the right thatoperate on the current selection. You can also access these actions from the context menu oruse the associated keyboard shortcuts.
• Delete
All selected installer elements will be deleted after a confirmation dialog when invoking theDelete action. The deleted installer elements cannot be restored.
• Rename
After you add a installer element, the tree of installer elements shows it with its default name.This is often enough, however, if you have multiple instances of the same installer elementalongside, a custom name makes it easier to distinguish these instances. You can assign acustom name to each installer element with the Rename action. The default name is stilldisplayed in brackets after the custom name. To revert to the default, just enter an emptycustom name in the rename dialog.
• Comment
By default, installer elements have no comments associatedwith them. You can add commentsto selected installer elements with the Add Comments action. When a comment is added,the affected installer elements will receive a "Comments" tab. After adding a comment to asingle installer element, the comment area is focused automatically. Likewise, you can removecomments from one or more installer elements with the Remove Comments action.
In order to visit all comments, you can use the Show next comment and Show previous commentactions. These actionswill focus the comment area automatically andwrap around if no furthercomments can be found.
• Disable
In order to "comment out" installer elements, you can use the Disable action. Theconfiguration of the disabled installer elements will not be displayed, their entries in the treeof installer elements will be shown in gray and they will not be checked for errors when theproject is built.
• Copy and paste
install4j offers an inter-process clipboard for installer elements. You can Cut or Copyinstaller elements to the clipboard and Paste them in the same or a different instance ofinstall4j. Note that references to launchers or references to files in the distribution tree mightnot be valid after pasting to a different project.
Pasted installer elements are appended to the end of the same level that would be chosen ifyou added installer elements of that type. Sequence restrictions with respect to the alreadypresent installer elements may force a different order.
• Reorder
If your selection is a single contiguous interval, you canmove the entire block up or downin the list. The selection can only be moved on the same level with the reorder actions. Tomove the selection to a different parent, you can cut and paste it (see above).
• Group
You can create a screen group or an action group [p. 246] from the selected installer elementswith the Create Group action. The new groupwill be inserted in place of the selected installerelements.
149

You can dissolve a group with the Dissolve Group action. This action is only enabled if theselection consists of a single screen group or action group. The elements contained in thegroup will be inserted in place of the group. Nested groups will not be dissolved.
• Link
You can reuse screens and actions by linking to a single definition. This is particularly usefulif youdefine a installermaintenance application [p. 151] that should repeat parts of the installer,such as a number of forms that query the user for initial values to set up your application.Also, links are the only way to integrate screens and actions from the installer or uninstallermerged project [p. 99] into the main project.
In order to link to a screen, action, screen group or action group, you click on the add buttonand select Add Link Into from the popup menu. The first entry in that popup menu is always"This project" for links into the current project. If you have set up merged projects [p. 99] ,then you get an entry for eachmerged project. The configuration area of a linkwill only containa button that selects the original definition in the tree of installer elements. For mergedprojects, the merged project is opened in a new window, unless it is already open.
Another way to add a link into the same project is to select the installer element and invokethe Copy Link action. Then you navigate to the installer element where the link should beinserted and invoke the Paste Link action.
For links into the same project, install4j ensures that there are no broken links in the tree ofinstaller elements. When you delete an installer element, all links to it will be deleted as well.If that is the case, the deletion message will tell you how many links are about to be deleted.Links into merged projects may be broken, this condition is shown in in the configurationpane.
When using the install4j API, you reference installer elements with IDs. You can show IDs in thetree of installer elements by activating the Show IDs button on the lower right side of the treeof installer elements. The automatically generated numerical IDs are then shown in brackets.The selection will be remembered across restarts of install4j.
In order to adjust the information density in the tree of installer elements, you can change theicon size by choosing large or small icons in the Icon Size sub-menu in the context menu. Thedefault setting is to show large icons. The selectionwill be remembered across restarts of install4j.
150
B.5.3 Installer - Configuring Applications
Applications are configured on the screens & and actions tab [p. 148] .
The top-level nodes represent the different applications that can be configured for the project.There are 3 types of applications:
• Installer
The installer is the application that is executed when the media file is invoked by the user, forexample, when the user double-clicks on the installer executable in the Windows explorer.The installer cannot be deleted from the tree of installer elements.
• Uninstaller
The uninstaller is a special application for uninstalling an installation. It is used in variouscontexts:
• Directly invoked by the user
• Invoked from the Windows software registry
• Invoked by the "Uninstall previous installation" action
The uninstaller cannot be deleted from the tree of installer elements. If you do not wish togenerate an uninstaller, you can disable it [p. 148] .
• Custom installer application
You can add any number of custom installer applications that can be invoked after theinstallation. install4j comes with several templates for auto-updaters [p. 55] . Customapplications can also be used for writing maintenance applications for your installation.
You can add new custom installer application by clicking on the Add button on the rightside of the list and choosing Add Application from the popup. The application templatesdialog [p. 320] will be displayed and lets you choose a starting point for your custom installerapplication. Application templates are entirely made up of existing screens, actions and formcomponents. You can modify the selected application template after adding it.
Unlike the installer and uninstaller above, custom applications are also created for archivemedia files [p. 328] . Please see the help topic on screens and actions [p. 13] for moreinformation on how to create first-run installers for archives.
Custom installer applications with a non-empty "executable directory" property areautomatically added to the "Default file set". Unlike launchers, they cannot be assigned tospecific file sets. If your installation components do no include the root of the default file set,you have to select the custom installer applications explicitly in the installation componentconfiguration. If the custom installer application is added to the .install4j directory byleaving the executable directory empty, they will always be included.
Each installer application has a startup sequence of actions [p. 180] . Those actions are executedbefore the installer application presents a user interface. If any of these actions fails and has a"Quit on failure" failure strategy, the installer application will not be shown.
The configurable properties of the three types of applications are listed below:
Installer
151
The installer is the sequence of screens and actions that are executed when the userinvokes the media file.
Properties:
• Action elevation type [Privileges]
If any contained actions should run in the elevated helper process, if their "Actionelevation type" property is set to "Inherit from parent".An elevated helper process isavailable on Windows and macOS if the process has been started without adminprivileges and the "Request privileges" action has been configured to require fullprivileges.
• Style [GUI Options]
The default screen style for this installer application. Screens and screen groups canoverride this style.
• Customize title bar
A form component in the selected style is configured to allow customization of selectedproperties.
• Custom watermark
A form component in the selected style is configured to allow customization of selectedproperties.
• Customize banner image
A form component in the selected style is configured to allow customization of selectedproperties.
• macOS entitlements file [macOS]
If you have configured code signing for macOS, an entitlements file can unlock certainfeatures on macOS, such as iCloud storage or push notifications.
• Executable icon [Executable]
By default, a standard installer icon is used for the executable. To customize the icon,press the customizer button in the configuration pane.
• Allow unattended mode [Execution Modes]
If selected, the user can pass -q as an argument to run the installer applicationwithouta GUI. No user input is required, the installer applicationsworkswith the default values.Please see the corresponding help topic on installer modes for more information. Allstandard actions and standard screens support unattended installations. If your policyforbids unattended installations or if you include custom code that cannot handleunattended installations, you can disable them by deselecting this property.
• Progress interface creation script
If you would like to implement your own way of displaying progress information forunattended installations, you can do so by returning a custom implementation of com.install4j.api.context.UnattendedProgressInterface from this script. If you return null ,no progress information will be shown just as if this script had not been set. There isa default implementation com.install4j.api.context.DefaultUnattendedProgressInterfacethat does nothing for all its operations. You can derive from that class if you just needto implement a few particular methods in the progress interface. If you just need asimple dialog that shows progress information in unattended mode, please choosethe "Unattended mode with progress dialog" execution mode instead.
Note: This property is only visible if "Allow unattended mode" is selected.
152
• Allow console installations [Execution Modes]
If selected, the user can pass -c as an argument to run the installer application on theconsole. The installer asks for user input on the console in that mode. Please see thecorresponding help topic on installermodes formore information. All standard actionsand standard screens support console installations, form screens are also fullymappedto console installers. If your policy forbids console installations or if you include customcode that cannot handle console installations, you can disable them by deselectingthis property.
• Fall back to console mode on Unix
On Unix, users often operate in environments where no X11 server is available andno GUI can be displayed. The installer will fallback to console mode if console modeexecution is allowed and this option is selected. Otherwise an error message will bedisplayed that tells the user how to invoke the installer in console mode.
Note: This property is only visible if "Allow console installations" is selected.
• Disable console mode on Windows
Offer console mode only on non-Windows platforms.
Note: This property is only visible if "Allow console installations" is selected.
• Console screen change handler
By default, a screen in console mode does not show any particular separation. Youinsert your own custom display with this script. The title parameter gives you accessto the title of the screen. In console mode, screens display their subtitle only, so thetitle string will not be displayed again.
Note: This property is only visible if "Allow console installations" is selected.
• Default execution mode [Execution Modes]
The default execution mode for the installer application. By default, a GUI wizard willbe shown, but it is also possible to run in consolemode or unattendedmode by default.
• Title for progress dialog
The title for the progress dialog, for example "Updating installation".This title and theunattended mode with a progress window can also be set by passing -splash [title] asan argument from the command line.
Note: This property is only visible if "Default execution mode" is set to "Unattendedmode with progress dialog".
• Windows console executable [Execution Modes]
If selected, a console executable will be created on Windows. A non-hideable consolewill be shown when the installer is double-clicked in the explorer. This improves theuser experience for a console-only installer (default execution mode set to console)and allows execution through rsh .
• VM parameters [Execution Options]
If you need to pass special VM parameters to the installer application, you can enterthem here. A common case would be to raise the maximum heap size with a different-Xmx parameter if your installers require a lot of memory.
• Arguments [Execution Options]
If you need to pass fixed default arguments to the installer application, you can enterthem here. For example, if you want to display a splash screen in unattended modeby default, you can set the arguments to -splash "Installing ..." . Please note that
153
command line argumentswill be appended to this list, so it is not possible to "override"a fixed argument from the command line.
• Rollback on failure [Execution Options]
If selected, the installer application will try to restore the state before the last rollbackbarrier by rolling back all actions that were executed since the last barrier. Any screenor action can be selected as a rollback barrier with the property "Rollback barrier". Ifno rollback barrier was encountered, all executed actions will be rolled back.
• Suppress initial progress dialog [Execution Options]
If selected, the initial native progress dialog of the installer is not displayed.
• Window width [GUI Options]
The width of the window displayed by the installer application. The default value is500. If the "Size client area" property is selected, this does not include the size of thewindow frame border.
• Window height [GUI Options]
The height of the window displayed by the installer application. The default value is390.If the "Size client area" property is selected, this does not include the size of thewindow frame border.
• Size client area [GUI Options]
If selected, the supplied size for thewindowwill not be applied to the outer dimensionsof the window, but to the actually usable area inside the window. Unusually largewindow frame borders can occur due to user settings (accessibility, window themes,etc.) and may interfere with banner images or introduce unwanted scroll bars to formscreens.
• Resizable [GUI Options]
If selected, the window displayed by the installer application is resizable.
• Help customizer script [General Customization Options]
If the user starts the installer application with one of the arguments -h -help /? , helpregarding the available command line options will be displayed. If you have your owncommand line options you can customize this help with this script. The script receivesa List containing String arrays of length 2 with the options and explanations. You canaddoptions like this: options.add(newString[] {"/mySwitch", "ExplanationofmySwitch"}}. You can also delete default options in the list.Attention: The context parameter hasnot been initialized at that point. In order to get extra command line arguments in theinstaller, call context.getExtraCommandLineArguments() in any script.
• Replacement script for language code [General Customization Options]
With this script you can replace the language that the installer will runwith. Parameters:The parameter languageCode contains the 2-letter ISO 639 code of the auto-detectedlanguage. If auto-detection has not been enabled on the languages step of the generalsettings, the parameter will be null . Return value: If you return null , the languageselection dialog will be shown, if you return a language code, the language selectiondialog will not be shown and the returned language will be used. If the returnedlanguage code is a language that is not configured for this installer, the languageselection dialog will be shown.
• Customize version info [Windows]
If selected, you can customize the fields of the Windows version info in the nestedproperties. A windows version info is always generated for the executable with defaultvalues for product name and file version taken from the general settings.
154
• Product name
The product name field in the version resource. If empty, the full name from the generalsettings is used.
Note: This property is only visible if "Customize version info" is selected.
• File version
The file version field in the version resource. If empty, the version from the generalsettings is used. The file version must consist of 4 numbers separated by spaces,commas or dots.
Note: This property is only visible if "Customize version info" is selected.
• Internal name
The internal name field in the version resource. If empty, the short name from thegeneral settings is used.
Note: This property is only visible if "Customize version info" is selected.
• File description
The file description field in the version resource. If empty, the full name from thegeneral settings is used.
Note: This property is only visible if "Customize version info" is selected.
• Copyright
The copyright field in the version resource. If empty, the publisher name from thegeneral settings is used.
Note: This property is only visible if "Customize version info" is selected.
• Create log file for stderr output [Windows]
If selected, and output on stderr is detected, an file named error.log will be creatednext to the installer and all output to stderr will be redirected to that file.
Uninstaller
The uninstaller removes the installed application. If you do not wish to provide anuninstaller, you can disable it.
Properties:
• Action elevation type [Privileges]
If any contained actions should run in the elevated helper process, if their "Actionelevation type" property is set to "Inherit from parent".An elevated helper process isavailable on Windows and macOS if the process has been started without adminprivileges and the "Request privileges" action has been configured to require fullprivileges.
• Style [GUI Options]
The default screen style for this installer application. Screens and screen groups canoverride this style.
155
• Customize title bar
A form component in the selected style is configured to allow customization of selectedproperties.
• Custom watermark
A form component in the selected style is configured to allow customization of selectedproperties.
• Customize banner image
A form component in the selected style is configured to allow customization of selectedproperties.
• macOS entitlements file [macOS]
If you have configured code signing for macOS, an entitlements file can unlock certainfeatures on macOS, such as iCloud storage or push notifications.
• Executable icon [Executable]
By default, a standard installer icon is used for the executable. To customize the icon,press the customizer button in the configuration pane.
• Executable name [Executable]
The name of the executable for the uninstaller. Please enter a name without any pathcomponents and without a file extension.
• Executable directory [Executable]
The directory to which the executable of the uninstaller will be written. If empty, it willbe placed in the .install4j directory.
• Allow unattended mode [Execution Modes]
If selected, the user can pass -q as an argument to run the installer applicationwithouta GUI. No user input is required, the installer applicationsworkswith the default values.Please see the corresponding help topic on installer modes for more information. Allstandard actions and standard screens support unattended installations. If your policyforbids unattended installations or if you include custom code that cannot handleunattended installations, you can disable them by deselecting this property.
• Progress interface creation script
If you would like to implement your own way of displaying progress information forunattended installations, you can do so by returning a custom implementation of com.install4j.api.context.UnattendedProgressInterface from this script. If you return null ,no progress information will be shown just as if this script had not been set. There isa default implementation com.install4j.api.context.DefaultUnattendedProgressInterfacethat does nothing for all its operations. You can derive from that class if you just needto implement a few particular methods in the progress interface. If you just need asimple dialog that shows progress information in unattended mode, please choosethe "Unattended mode with progress dialog" execution mode instead.
Note: This property is only visible if "Allow unattended mode" is selected.
• Allow console installations [Execution Modes]
If selected, the user can pass -c as an argument to run the installer application on theconsole. The installer asks for user input on the console in that mode. Please see thecorresponding help topic on installermodes formore information. All standard actionsand standard screens support console installations, form screens are also fullymappedto console installers. If your policy forbids console installations or if you include custom
156
code that cannot handle console installations, you can disable them by deselectingthis property.
• Fall back to console mode on Unix
On Unix, users often operate in environments where no X11 server is available andno GUI can be displayed. The installer will fallback to console mode if console modeexecution is allowed and this option is selected. Otherwise an error message will bedisplayed that tells the user how to invoke the installer in console mode.
Note: This property is only visible if "Allow console installations" is selected.
• Disable console mode on Windows
Offer console mode only on non-Windows platforms.
Note: This property is only visible if "Allow console installations" is selected.
• Console screen change handler
By default, a screen in console mode does not show any particular separation. Youinsert your own custom display with this script. The title parameter gives you accessto the title of the screen. In console mode, screens display their subtitle only, so thetitle string will not be displayed again.
Note: This property is only visible if "Allow console installations" is selected.
• Default execution mode [Execution Modes]
The default execution mode for the installer application. By default, a GUI wizard willbe shown, but it is also possible to run in consolemode or unattendedmode by default.
• Title for progress dialog
The title for the progress dialog, for example "Updating installation".This title and theunattended mode with a progress window can also be set by passing -splash [title] asan argument from the command line.
Note: This property is only visible if "Default execution mode" is set to "Unattendedmode with progress dialog".
• Windows console executable [Execution Modes]
If selected, a console executable will be created on Windows. A non-hideable consolewill be shown when the installer is double-clicked in the explorer. This improves theuser experience for a console-only installer (default execution mode set to console)and allows execution through rsh .
• VM parameters [Execution Options]
If you need to pass special VM parameters to the installer application, you can enterthem here. A common case would be to raise the maximum heap size with a different-Xmx parameter if your installers require a lot of memory.
• Arguments [Execution Options]
If you need to pass fixed default arguments to the installer application, you can enterthem here. For example, if you want to display a splash screen in unattended modeby default, you can set the arguments to -splash "Installing ..." . Please note thatcommand line argumentswill be appended to this list, so it is not possible to "override"a fixed argument from the command line.
• Rollback on failure [Execution Options]
If selected, the installer application will try to restore the state before the last rollbackbarrier by rolling back all actions that were executed since the last barrier. Any screen
157
or action can be selected as a rollback barrier with the property "Rollback barrier". Ifno rollback barrier was encountered, all executed actions will be rolled back.
• Window width [GUI Options]
The width of the window displayed by the installer application. The default value is500. If the "Size client area" property is selected, this does not include the size of thewindow frame border.
• Window height [GUI Options]
The height of the window displayed by the installer application. The default value is390.If the "Size client area" property is selected, this does not include the size of thewindow frame border.
• Size client area [GUI Options]
If selected, the supplied size for thewindowwill not be applied to the outer dimensionsof the window, but to the actually usable area inside the window. Unusually largewindow frame borders can occur due to user settings (accessibility, window themes,etc.) and may interfere with banner images or introduce unwanted scroll bars to formscreens.
• Resizable [GUI Options]
If selected, the window displayed by the installer application is resizable.
• Help customizer script [General Customization Options]
If the user starts the installer application with one of the arguments -h -help /? , helpregarding the available command line options will be displayed. If you have your owncommand line options you can customize this help with this script. The script receivesa List containing String arrays of length 2 with the options and explanations. You canaddoptions like this: options.add(newString[] {"/mySwitch", "ExplanationofmySwitch"}}. You can also delete default options in the list.Attention: The context parameter hasnot been initialized at that point. In order to get extra command line arguments in theinstaller, call context.getExtraCommandLineArguments() in any script.
• Unix mode [Unix]
The executable mode for the uninstaller on Unix.
• Customize version info [Windows]
If selected, you can customize the fields of the Windows version info in the nestedproperties. A windows version info is always generated for the executable with defaultvalues for product name and file version taken from the general settings.
• Product name
The product name field in the version resource. If empty, the full name from the generalsettings is used.
Note: This property is only visible if "Customize version info" is selected.
• File version
The file version field in the version resource. If empty, the version from the generalsettings is used. The file version must consist of 4 numbers separated by spaces,commas or dots.
Note: This property is only visible if "Customize version info" is selected.
• Internal name
The internal name field in the version resource. If empty, the short name from thegeneral settings is used.
158
Note: This property is only visible if "Customize version info" is selected.
• File description
The file description field in the version resource. If empty, the full name from thegeneral settings is used.
Note: This property is only visible if "Customize version info" is selected.
• Copyright
The copyright field in the version resource. If empty, the publisher name from thegeneral settings is used.
Note: This property is only visible if "Customize version info" is selected.
• Use custom application bundle name [macOS]
If selected, a different application bundle name is used on macOS. Executable nameson macOS are localizable. Otherwise, the value of the "Executable name" property isused for the application bundle name.
• Custom application bundle name
The application bundle name to be used for macOS media files. Bundle names onmacOS are shown in the Finder and are localizable. For example, the executable namecould be set to ${i18n:myLauncherName(${compiler:sys.fullName})} wheremyLauncherName is an i18n message with value "Launcher for {0}".
Note: This property is only visible if "Use custom application bundle name" is selected.
Custom application
A custom installer application is installed by the installer. Users can start it manually orit can be executed programmatically from your own code via the API.
Properties:
• Action elevation type [Privileges]
If any contained actions should run in the elevated helper process, if their "Actionelevation type" property is set to "Inherit from parent".An elevated helper process isavailable on Windows and macOS if the process has been started without adminprivileges and the "Request privileges" action has been configured to require fullprivileges.
• Style [GUI Options]
The default screen style for this installer application. Screens and screen groups canoverride this style.
• Customize title bar
A form component in the selected style is configured to allow customization of selectedproperties.
• Custom watermark
A form component in the selected style is configured to allow customization of selectedproperties.
159
• Customize banner image
A form component in the selected style is configured to allow customization of selectedproperties.
• macOS entitlements file [macOS]
If you have configured code signing for macOS, an entitlements file can unlock certainfeatures on macOS, such as iCloud storage or push notifications.
• Executable icon [Executable]
By default, a standard installer icon is used for the executable. To customize the icon,press the customizer button in the configuration pane.
• File set [Executable]
Choose the file set to which the installer application is added. File sets can be definedon the Files->Define Distribution Tree step.
• Executable name [Executable]
The name of the executable for the custom application. Please enter a name withoutany path components and without a file extension.
• Executable directory [Executable]
The directory to which the executable of the custom application will be written. Ifempty, it will be placed in the .install4j directory.
• Allow unattended mode [Execution Modes]
If selected, the user can pass -q as an argument to run the installer applicationwithouta GUI. No user input is required, the installer applicationsworkswith the default values.Please see the corresponding help topic on installer modes for more information. Allstandard actions and standard screens support unattended installations. If your policyforbids unattended installations or if you include custom code that cannot handleunattended installations, you can disable them by deselecting this property.
• Progress interface creation script
If you would like to implement your own way of displaying progress information forunattended installations, you can do so by returning a custom implementation of com.install4j.api.context.UnattendedProgressInterface from this script. If you return null ,no progress information will be shown just as if this script had not been set. There isa default implementation com.install4j.api.context.DefaultUnattendedProgressInterfacethat does nothing for all its operations. You can derive from that class if you just needto implement a few particular methods in the progress interface. If you just need asimple dialog that shows progress information in unattended mode, please choosethe "Unattended mode with progress dialog" execution mode instead.
Note: This property is only visible if "Allow unattended mode" is selected.
• Allow console installations [Execution Modes]
If selected, the user can pass -c as an argument to run the installer application on theconsole. The installer asks for user input on the console in that mode. Please see thecorresponding help topic on installermodes formore information. All standard actionsand standard screens support console installations, form screens are also fullymappedto console installers. If your policy forbids console installations or if you include customcode that cannot handle console installations, you can disable them by deselectingthis property.
160
• Fall back to console mode on Unix
On Unix, users often operate in environments where no X11 server is available andno GUI can be displayed. The installer will fallback to console mode if console modeexecution is allowed and this option is selected. Otherwise an error message will bedisplayed that tells the user how to invoke the installer in console mode.
Note: This property is only visible if "Allow console installations" is selected.
• Disable console mode on Windows
Offer console mode only on non-Windows platforms.
Note: This property is only visible if "Allow console installations" is selected.
• Console screen change handler
By default, a screen in console mode does not show any particular separation. Youinsert your own custom display with this script. The title parameter gives you accessto the title of the screen. In console mode, screens display their subtitle only, so thetitle string will not be displayed again.
Note: This property is only visible if "Allow console installations" is selected.
• Default execution mode [Execution Modes]
The default execution mode for the installer application. By default, a GUI wizard willbe shown, but it is also possible to run in consolemode or unattendedmode by default.
• Title for progress dialog
The title for the progress dialog, for example "Updating installation".This title and theunattended mode with a progress window can also be set by passing -splash [title] asan argument from the command line.
Note: This property is only visible if "Default execution mode" is set to "Unattendedmode with progress dialog".
• Windows console executable [Execution Modes]
If selected, a console executable will be created on Windows. A non-hideable consolewill be shown when the installer is double-clicked in the explorer. This improves theuser experience for a console-only installer (default execution mode set to console)and allows execution through rsh .
• Change working directory [Execution Options]
If selected the working directory will be changed to the value in 'Working directory' atstartup.
• Working directory
The working directory to be used when 'Change working directory' is selected.
Note: This property is only visible if "Change working directory" is selected.
• Single instance [Execution Options]
If checked the applicationwill ensure at startup that there is only one instance runningper user account.
• VM parameters [Execution Options]
If you need to pass special VM parameters to the installer application, you can enterthem here. A common case would be to raise the maximum heap size with a different-Xmx parameter if your installers require a lot of memory.
161
• Arguments [Execution Options]
If you need to pass fixed default arguments to the installer application, you can enterthem here. For example, if you want to display a splash screen in unattended modeby default, you can set the arguments to -splash "Installing ..." . Please note thatcommand line argumentswill be appended to this list, so it is not possible to "override"a fixed argument from the command line.
• Rollback on failure [Execution Options]
If selected, the installer application will try to restore the state before the last rollbackbarrier by rolling back all actions that were executed since the last barrier. Any screenor action can be selected as a rollback barrier with the property "Rollback barrier". Ifno rollback barrier was encountered, all executed actions will be rolled back.
• Window title [GUI Options]
The title of the application window.
• Show message when user cancels [GUI Options]
If selected, a message will be shown when the user cancels the installer application byclicking on the "Cancel" button or closing the application frame.
• Cancel message
The message that is shown if the user cancels the installer application by clicking onthe "Cancel" button or closing the application frame. The options that are presentedto the user are "Cancel" or "Continue".
Note: This property is only visible if "Show message when user cancels" is selected.
• Window width [GUI Options]
The width of the window displayed by the installer application. The default value is500. If the "Size client area" property is selected, this does not include the size of thewindow frame border.
• Window height [GUI Options]
The height of the window displayed by the installer application. The default value is390.If the "Size client area" property is selected, this does not include the size of thewindow frame border.
• Size client area [GUI Options]
If selected, the supplied size for thewindowwill not be applied to the outer dimensionsof the window, but to the actually usable area inside the window. Unusually largewindow frame borders can occur due to user settings (accessibility, window themes,etc.) and may interfere with banner images or introduce unwanted scroll bars to formscreens.
• Resizable [GUI Options]
If selected, the window displayed by the installer application is resizable.
• Help customizer script [General Customization Options]
If the user starts the installer application with one of the arguments -h -help /? , helpregarding the available command line options will be displayed. If you have your owncommand line options you can customize this help with this script. The script receivesa List containing String arrays of length 2 with the options and explanations. You canaddoptions like this: options.add(newString[] {"/mySwitch", "ExplanationofmySwitch"}}. You can also delete default options in the list.Attention: The context parameter hasnot been initialized at that point. In order to get extra command line arguments in theinstaller, call context.getExtraCommandLineArguments() in any script.
162
• Unix mode [Unix]
The executable mode for the custom application on Unix.
• Execution level [Windows]
The execution level for this application. If you want to modify files in the installationdirection, you most likely need administrator rights. This is only relevant for WindowsVista and higher.
• Customize version info [Windows]
If selected, you can customize the fields of the Windows version info in the nestedproperties. A windows version info is always generated for the executable with defaultvalues for product name and file version taken from the general settings.
• Product name
The product name field in the version resource. If empty, the full name from the generalsettings is used.
Note: This property is only visible if "Customize version info" is selected.
• File version
The file version field in the version resource. If empty, the version from the generalsettings is used. The file version must consist of 4 numbers separated by spaces,commas or dots.
Note: This property is only visible if "Customize version info" is selected.
• Internal name
The internal name field in the version resource. If empty, the short name from thegeneral settings is used.
Note: This property is only visible if "Customize version info" is selected.
• File description
The file description field in the version resource. If empty, the full name from thegeneral settings is used.
Note: This property is only visible if "Customize version info" is selected.
• Copyright
The copyright field in the version resource. If empty, the publisher name from thegeneral settings is used.
Note: This property is only visible if "Customize version info" is selected.
• Use custom application bundle name [macOS]
If selected, a different application bundle name is used on macOS. Executable nameson macOS are localizable. Otherwise, the value of the "Executable name" property isused for the application bundle name.
• Custom application bundle name
The application bundle name to be used for macOS media files. Bundle names onmacOS are shown in the Finder and are localizable. For example, the executable namecould be set to ${i18n:myLauncherName(${compiler:sys.fullName})} wheremyLauncherName is an i18n message with value "Launcher for {0}".
Note: This property is only visible if "Use custom application bundle name" is selected.
163
The second tab in the configuration area for installer applications is the Installer variables tab.Here, you can check the bindings for all detected installer variables and pre-define installervariables. For more information, please see the help topic on variables [p. 30] and the help onthe variable selection dialog [p. 102] .
An additional feature with respect to the variable selection dialog is that you can navigate to abinding by selecting an element in the binding tree at the bottom and click on the Go To Selectionbutton.
Custom installer applications have a Launcher integrations tab in the configuration area thathelps you to start them when launchers are executed.
The first way to start an installer application is programmatically, by using the API contained in[install4j installation directory]/resource/i4jruntime.jar. To get the codesnippet for starting the selected installer application, click on the Start integration wizard button.The integration wizard will present a number of options that control the condition and possiblecall backs from the installer application. Note that you do not have to distribute i4jruntime.jar, since it is automatically available for installed applications.
The second way to start an installer application is automatically, by defining a launch scheduleand a launch mode. The launch schedule is one of
• Always
Every time you start the launcher, the installer application will be started as well.
• According to update schedule
install4j provides a built-in update schedule registry that can be configured by the user on aform screenwith an "Update schedule selector" form component. Also, you canprogramaticallymodify the update schedule through the class com.install4j.api.update.UpdateScheduleRegistry in the API. The selected installer application will be started onlyif the update schedule requires an update check.
• First run of any launcher in archive media file by the current user
For archive media files (such as a Windows ZIP file), no installer is available. To execute asequence of screens and actions when a launcher is started for the first time after the archivehas been extracted, use this launch schedule. It may be convenient to link to screen groupsin the installer in order to avoid duplicating configuration in your custom installer application.
In your launcher, you can check for this condition with com.install4j.api.launcher.ApplicationLauncher.isNewArchiveInstallation() in case youwant to performsomeactions outside of a custom installer application.
The launch mode is one of
• Blocking at start up
When the launcher is started, the selected installer application will be started first. When theinstaller application terminates, the launcher will then start up (unless a "Shut down callinglauncher" action has been executed).
• Non-blocking at start up
When the launcher is started, the selected installer application will be started immediately.The launcher continues to start up in parallel.
• When first window is shown
The selected installer application will be started when the first window is shown. This worksfor AWT, Swing and SWT applications. If you have a SWT application, the "Uses SWT" checkbox in the executable info [p. 126] step of the launcher wizard [p. 125] must be selected.
164

Just like with the API, the installer application can be started in the launcher process itself or ina new process. By default, the installer application is started in the same process. If the "Blockingat start up" or "Non-blocking at start up" launch modes are selected, the look and feel it set tothe system look and feel. For the "When first window is shown" launch mode, the look and feelis not changed, so your own look and feel will be used. When the installer application is executedin the same process, the "Shutdown calling launcher" action has a different effect: The wholeprocess will be terminated when the installer application exits.
By default, the selected installer application is started for all launchers in your project. If this isnot desired, you can restrict the integration to selected launchers. Note that if "All launchers" isselected and the project is merged into another project, the integration will be performed forall launchers in the main project as well.
165
B.5.4 Installer - Configuring Screens
Screens are configured on the screens & and actions tab [p. 148] .Please see the list of available screens [p. 169] that come with install4j.
A screen is a single step in an installer application. It displays information to the user orgathers user input.
If a screen has attached actions [p. 180] , there will be an expand control to the left of the screenicon that allows you to show the associated actions.
Common properties of screens are:
• Action elevation type [Privileges]
If any contained actions should run in the elevated helper process, if their "Action elevationtype" property is set to "Inherit fromparent".An elevated helper process is available onWindowsand macOS if the process has been started without admin privileges and the "Requestprivileges" action has been configured to require full privileges.
• Style [GUI Options]
The default screen style for this installer application. Screens and screen groups can overridethis style.
• Customize title bar
A form component in the selected style is configured to allow customization of selectedproperties.
• Custom watermark
A form component in the selected style is configured to allow customization of selectedproperties.
• Customize banner image
A form component in the selected style is configured to allow customization of selectedproperties.
• Condition expression [Control Flow]
This expression is evaluated to decide whether the screen is displayed. If the expression orscript returns false, the current screen will be skipped. This expression or script should nothave any side-effects, it will be called while another screen is still being displayed.
• Rollback barrier [Control Flow]
If the screen should be a rollback barrier. When a rollback barrier is completed, none of thepreceding actions will be rolled back. You can use this property to prevent an incompleterollback of complex changes or to protect actions from rollback when the user hits "Cancel"in the post-install phase.
• Exit code [Control Flow]
If the "Rollback barrier" property is selected, and a rollback terminates at this screen, thisproperty determines the exit code of the installer. By default, reaching a rollback barrier duringa rollback is considered a success, but you can signal a failure by specifying a non-zero exitcode here.
Note: This property is only visible if "Rollback barrier" is selected.
• Validation expression [Control Flow]
This expression or script is called when the user clicks the next button. If it returns false, thecurrent screen will be displayed again. You can use this to validate user input. Error messagesare not displayed automatically, you can use theUtil.showErrorMessage(String errorMessage)method in your script.
166
• Quit after screen [Control Flow]
If the screen should have a "Finish" button instead of a "Next" button. The installer or uninstallerwill quit after this screen. The "Cancel" button will not be visible if this option is checked.
• Back button [Control Flow]
Allowing the user to go back to previous screens can be problematic if the previous screenhas actions attached that cannot be executed multiple times. By default, every action is justexecuted once, all actions have a property to allow multiple execution. The default behavioris the "Safe back button", where the back button is hidden if the previous screen has actionsattached that cannot be executed multiple times.
• Wizard index [Screen Activation]
Every screen can set or change the current wizard index. The wizard index is an optional panelon the left side of the wizard that shows overall installation progress. You can leave the indexunchanged as it was set by a previous screen, change the step in the current wizard index,removed the currentwizard index ot configure a newwizard index. For conditional constructionof a wizard index, please use the com.install4j.api.context.WizardIndex class in the"Pre-activation" script.
• Step key
The key for the step in the wizard index that should be activated.
Note: This property is only visible if "Wizard index" is set to "Activate another step".
• Steps
The steps that are displayed by the wizard index. Each step has a key that you can use toswitch to that step later on by setting the wizard index property to "Activate another step"and specifying that key.
Note: This property is only visible if "Wizard index" is set to "Set a new wizard index".
• Initial key
The key of the step in the wizard index that should be initially selected. Leave empty to selectthe first step.
Note: This property is only visible if "Wizard index" is set to "Set a new wizard index".
• Partially defined
If selected, the list of wizard index steps will be partially defined. This means that a "..." entrywill be appended at the bottom.
Note: This property is only visible if "Wizard index" is set to "Set a new wizard index".
• Numbered
If selected, the steps in the wizard index are numbered.
Note: This property is only visible if "Wizard index" is set to "Set a new wizard index".
• Maximum width
The maximum width of the wizard index in pixels. The preferred with is determined by thelongest step name, the maximum width is an upper bound for the actual width.
Note: This property is only visible if "Wizard index" is set to "Set a new wizard index".
• Minimum width
The minimum width of the wizard index in pixels. The preferred with is determined by thelongest step name, the minimum width is a lower bound for the actual width.
Note: This property is only visible if "Wizard index" is set to "Set a new wizard index".
167
• Background color
The background color for the index panel. Set to "None" to restore the default color.
Note: This property is only visible if "Wizard index" is set to "Set a new wizard index".
• Foreground color
The foreground color for the index panel. Set to "None" to restore the default color.
Note: This property is only visible if "Wizard index" is set to "Set a new wizard index".
• Background image
The image file for the background of the wizard index panel. Leave empty if no backgroundimage is required.
Note: This property is only visible if "Wizard index" is set to "Set a new wizard index".
• Image anchor
The anchor for the background image. The default value is "North".
• Pre-activation script [Screen Activation]
This script is called each time just before the screen is displayed.
• Post-activation script [Screen Activation]
This script is called each time just after the screen has been displayed. It is not invoked inconsole or unattended mode.
Some screens only make sense when corresponding actions are used later on in the installer oruninstaller. For example, the "Services" screen will only be displayed at runtime if there are"Install a service" actions present on a subsequent screen. If such a dependency is not fulfilledafter adding a screen, a corresponding notification is displayed.
168
B.5.5 Installer - Available Screens
Empty form
An empty form to which form components can be added. By default, form componentsare layouted along the vertical axis, but you can use layout groups for greater flexibility.Form components with user input are bound to installer variables that can by referencedby other elements in the installer, for example by actions.
Applies to: Installer, Uninstaller
Properties:
• Screen can be reached [Control Flow]
Determines if the the screenwill be shownwhen the user reaches this screen by clickingthe "Next" or the "Back" button. If "Only with Next button" is selected, the screen isnot added to the screen history. If "Only with Back button" is selected, the screen isonly added to the screen history, but is not shown for the forward traversal.
• Fill horizontal space [Form]
If set, the form will fill the entire horizontal extent of the screen. Otherwise, it will beadded at the selected anchor and all form components will not be wider than theirpreferred widths.
• Horizontal anchor
If "Fill horizontal space" is not selected, the form can be placed at different locationsin the available space.
Note: This property is only visible if "Fill horizontal space" is selected.
• Fill vertical space [Form]
If set, the form will fill the entire vertical extent of the screen. Otherwise, it will be atthe selected anchor. Note that form components always have their preferred heightswhen the "Scrollable" property is selected. If "Fill vertical space" is selected, the formstarts at the top and any remaining space is empty.
• Vertical anchor
If "Fill vertical space" is not selected, the form can be placed at different locations inthe available space.
Note: This property is only visible if "Fill vertical space" is selected.
• Scrollable [Form]
If set, the form will be wrapped in a scroll pane. If not set, certain form componentswhich can grow in the vertical direction (like the text area form component) can claimremaining vertical space. Please note that those components have to be configuredaccordingly.
• Screen title [Messages]
The title of the screen, shown in a bold and larger font. Should be a concise subject.This question is also used by the console installer for presenting the screen.
• Screen subtitle [Messages]
The subtitle of the screen, shown below the title in a normal font. Should be a shortquestion. This question is also used by the console installer for presenting the screen.
169
Category: Form templates
Banner with header at the top
A form that has "Banner" as the default style and a configurable header label at the top.
Applies to: Installer, Uninstaller
Properties:
• Screen can be reached [Control Flow]
Determines if the the screenwill be shownwhen the user reaches this screen by clickingthe "Next" or the "Back" button. If "Only with Next button" is selected, the screen isnot added to the screen history. If "Only with Back button" is selected, the screen isonly added to the screen history, but is not shown for the forward traversal.
• Fill horizontal space [Form]
If set, the form will fill the entire horizontal extent of the screen. Otherwise, it will beadded at the selected anchor and all form components will not be wider than theirpreferred widths.
• Horizontal anchor
If "Fill horizontal space" is not selected, the form can be placed at different locationsin the available space.
Note: This property is only visible if "Fill horizontal space" is selected.
• Fill vertical space [Form]
If set, the form will fill the entire vertical extent of the screen. Otherwise, it will be atthe selected anchor. Note that form components always have their preferred heightswhen the "Scrollable" property is selected. If "Fill vertical space" is selected, the formstarts at the top and any remaining space is empty.
• Vertical anchor
If "Fill vertical space" is not selected, the form can be placed at different locations inthe available space.
Note: This property is only visible if "Fill vertical space" is selected.
• Scrollable [Form]
If set, the form will be wrapped in a scroll pane. If not set, certain form componentswhich can grow in the vertical direction (like the text area form component) can claimremaining vertical space. Please note that those components have to be configuredaccordingly.
• Screen title [Messages]
The title of the screen, shown in a bold and larger font. Should be a concise subject.This question is also used by the console installer for presenting the screen.
• Screen subtitle [Messages]
The subtitle of the screen, shown below the title in a normal font. Should be a shortquestion. This question is also used by the console installer for presenting the screen.
Directory selection
170
A form that asks the user to select a directory. All displayed messages are configurable.
Applies to: Installer, Uninstaller
Properties:
• Screen can be reached [Control Flow]
Determines if the the screenwill be shownwhen the user reaches this screen by clickingthe "Next" or the "Back" button. If "Only with Next button" is selected, the screen isnot added to the screen history. If "Only with Back button" is selected, the screen isonly added to the screen history, but is not shown for the forward traversal.
• Fill horizontal space [Form]
If set, the form will fill the entire horizontal extent of the screen. Otherwise, it will beadded at the selected anchor and all form components will not be wider than theirpreferred widths.
• Horizontal anchor
If "Fill horizontal space" is not selected, the form can be placed at different locationsin the available space.
Note: This property is only visible if "Fill horizontal space" is selected.
• Fill vertical space [Form]
If set, the form will fill the entire vertical extent of the screen. Otherwise, it will be atthe selected anchor. Note that form components always have their preferred heightswhen the "Scrollable" property is selected. If "Fill vertical space" is selected, the formstarts at the top and any remaining space is empty.
• Vertical anchor
If "Fill vertical space" is not selected, the form can be placed at different locations inthe available space.
Note: This property is only visible if "Fill vertical space" is selected.
• Scrollable [Form]
If set, the form will be wrapped in a scroll pane. If not set, certain form componentswhich can grow in the vertical direction (like the text area form component) can claimremaining vertical space. Please note that those components have to be configuredaccordingly.
• Screen title [Messages]
The title of the screen, shown in a bold and larger font. Should be a concise subject.This question is also used by the console installer for presenting the screen.
• Screen subtitle [Messages]
The subtitle of the screen, shown below the title in a normal font. Should be a shortquestion. This question is also used by the console installer for presenting the screen.
Display PDF file
A form that displays a PDF file in an embedded cross-platform PDF viewer.
Applies to: Installer, Uninstaller
171
Properties:
• Screen can be reached [Control Flow]
Determines if the the screenwill be shownwhen the user reaches this screen by clickingthe "Next" or the "Back" button. If "Only with Next button" is selected, the screen isnot added to the screen history. If "Only with Back button" is selected, the screen isonly added to the screen history, but is not shown for the forward traversal.
• Fill horizontal space [Form]
If set, the form will fill the entire horizontal extent of the screen. Otherwise, it will beadded at the selected anchor and all form components will not be wider than theirpreferred widths.
• Horizontal anchor
If "Fill horizontal space" is not selected, the form can be placed at different locationsin the available space.
Note: This property is only visible if "Fill horizontal space" is selected.
• Fill vertical space [Form]
If set, the form will fill the entire vertical extent of the screen. Otherwise, it will be atthe selected anchor. Note that form components always have their preferred heightswhen the "Scrollable" property is selected. If "Fill vertical space" is selected, the formstarts at the top and any remaining space is empty.
• Vertical anchor
If "Fill vertical space" is not selected, the form can be placed at different locations inthe available space.
Note: This property is only visible if "Fill vertical space" is selected.
• Scrollable [Form]
If set, the form will be wrapped in a scroll pane. If not set, certain form componentswhich can grow in the vertical direction (like the text area form component) can claimremaining vertical space. Please note that those components have to be configuredaccordingly.
• Screen title [Messages]
The title of the screen, shown in a bold and larger font. Should be a concise subject.This question is also used by the console installer for presenting the screen.
• Screen subtitle [Messages]
The subtitle of the screen, shown below the title in a normal font. Should be a shortquestion. This question is also used by the console installer for presenting the screen.
Display progress
A form that displays a progress bar with a status line capturing the progress informationof associated actions. The default post-activation script executes any associated actionsimmediately when the screen is activated. All displayed messages are configurable.
Applies to: Installer, Uninstaller
Properties:
172
• Screen can be reached [Control Flow]
Determines if the the screenwill be shownwhen the user reaches this screen by clickingthe "Next" or the "Back" button. If "Only with Next button" is selected, the screen isnot added to the screen history. If "Only with Back button" is selected, the screen isonly added to the screen history, but is not shown for the forward traversal.
• Fill horizontal space [Form]
If set, the form will fill the entire horizontal extent of the screen. Otherwise, it will beadded at the selected anchor and all form components will not be wider than theirpreferred widths.
• Horizontal anchor
If "Fill horizontal space" is not selected, the form can be placed at different locationsin the available space.
Note: This property is only visible if "Fill horizontal space" is selected.
• Fill vertical space [Form]
If set, the form will fill the entire vertical extent of the screen. Otherwise, it will be atthe selected anchor. Note that form components always have their preferred heightswhen the "Scrollable" property is selected. If "Fill vertical space" is selected, the formstarts at the top and any remaining space is empty.
• Vertical anchor
If "Fill vertical space" is not selected, the form can be placed at different locations inthe available space.
Note: This property is only visible if "Fill vertical space" is selected.
• Scrollable [Form]
If set, the form will be wrapped in a scroll pane. If not set, certain form componentswhich can grow in the vertical direction (like the text area form component) can claimremaining vertical space. Please note that those components have to be configuredaccordingly.
• Screen title [Messages]
The title of the screen, shown in a bold and larger font. Should be a concise subject.This question is also used by the console installer for presenting the screen.
• Screen subtitle [Messages]
The subtitle of the screen, shown below the title in a normal font. Should be a shortquestion. This question is also used by the console installer for presenting the screen.
Display text
A form that displays text to the user, either plain text or HTML. All displayed messagesare configurable.
Applies to: Installer, Uninstaller
Properties:
173
• Screen can be reached [Control Flow]
Determines if the the screenwill be shownwhen the user reaches this screen by clickingthe "Next" or the "Back" button. If "Only with Next button" is selected, the screen isnot added to the screen history. If "Only with Back button" is selected, the screen isonly added to the screen history, but is not shown for the forward traversal.
• Fill horizontal space [Form]
If set, the form will fill the entire horizontal extent of the screen. Otherwise, it will beadded at the selected anchor and all form components will not be wider than theirpreferred widths.
• Horizontal anchor
If "Fill horizontal space" is not selected, the form can be placed at different locationsin the available space.
Note: This property is only visible if "Fill horizontal space" is selected.
• Fill vertical space [Form]
If set, the form will fill the entire vertical extent of the screen. Otherwise, it will be atthe selected anchor. Note that form components always have their preferred heightswhen the "Scrollable" property is selected. If "Fill vertical space" is selected, the formstarts at the top and any remaining space is empty.
• Vertical anchor
If "Fill vertical space" is not selected, the form can be placed at different locations inthe available space.
Note: This property is only visible if "Fill vertical space" is selected.
• Scrollable [Form]
If set, the form will be wrapped in a scroll pane. If not set, certain form componentswhich can grow in the vertical direction (like the text area form component) can claimremaining vertical space. Please note that those components have to be configuredaccordingly.
• Screen title [Messages]
The title of the screen, shown in a bold and larger font. Should be a concise subject.This question is also used by the console installer for presenting the screen.
• Screen subtitle [Messages]
The subtitle of the screen, shown below the title in a normal font. Should be a shortquestion. This question is also used by the console installer for presenting the screen.
Program group selection
A screen that allows the user to select a program group on Microsoft Windows. Alldisplayed messages are configurable.
Applies to: Installer, Uninstaller
Properties:
174
• Screen can be reached [Control Flow]
Determines if the the screenwill be shownwhen the user reaches this screen by clickingthe "Next" or the "Back" button. If "Only with Next button" is selected, the screen isnot added to the screen history. If "Only with Back button" is selected, the screen isonly added to the screen history, but is not shown for the forward traversal.
• Fill horizontal space [Form]
If set, the form will fill the entire horizontal extent of the screen. Otherwise, it will beadded at the selected anchor and all form components will not be wider than theirpreferred widths.
• Horizontal anchor
If "Fill horizontal space" is not selected, the form can be placed at different locationsin the available space.
Note: This property is only visible if "Fill horizontal space" is selected.
• Fill vertical space [Form]
If set, the form will fill the entire vertical extent of the screen. Otherwise, it will be atthe selected anchor. Note that form components always have their preferred heightswhen the "Scrollable" property is selected. If "Fill vertical space" is selected, the formstarts at the top and any remaining space is empty.
• Vertical anchor
If "Fill vertical space" is not selected, the form can be placed at different locations inthe available space.
Note: This property is only visible if "Fill vertical space" is selected.
• Scrollable [Form]
If set, the form will be wrapped in a scroll pane. If not set, certain form componentswhich can grow in the vertical direction (like the text area form component) can claimremaining vertical space. Please note that those components have to be configuredaccordingly.
• Screen title [Messages]
The title of the screen, shown in a bold and larger font. Should be a concise subject.This question is also used by the console installer for presenting the screen.
• Screen subtitle [Messages]
The subtitle of the screen, shown below the title in a normal font. Should be a shortquestion. This question is also used by the console installer for presenting the screen.
Category: Standard screens
Welcome
A screen that welcomes the user to the installation of your application. This screen shouldbe placed at the beginning of the installation
Applies to: Installer
Display license agreement
175
A screen that displays a license agreement to the user, either plain text or HTML. Thelicense agreement must be accepted before the installation continues.
Applies to: Installer
Installation location
The screen that asks the userwhere to install the application. This determines the principalinstallation directory.
Applies to: Installer
Installation type
A screen that displays a list of installation types that correspond to configurablecomponent sets. The default types "Full","Standard" and "Customize" are provided bydefault. The "Installation components" screen may be hidden by this screen, dependingon the installation type selected by the user. This screenwill not be shown if no installationcomponents are defined.
Applies to: Installer
Properties:
• Installation types
Installation types are principally defined by a configurable set of components. The firstinstallation type is selected by default in the installer. Each installation type has thefollowing configurable properties: A name for the installation type. This name ispresented to the user An optional description of the installation type. This descriptionis displayed below the name and can be shown or hidden by the user If the descriptionis displayed by default or not If the installation type is customizable or not. If theuser-selected installation type is customizable, the "Installation components" screenwill be shown if present, otherwise that screen will be skipped. A set of installationcomponents. Installation components are configured in the install4j IDE on theFiles->Installation Components tab.You can choose between the options of installingall defined components, the default selected components as configured on theFiles->Installation Components tab, or directly select a number of installationcomponents in a check tree. By default, 3 universally usable installation types areadded whose names and descriptions are internationalized. You can change or deletethe default installation types as well as add new ones.
• Bold font [Description]
Use a bold font for the descriptions
• Italic font [Description]
Use an italic font for the descriptions
• Smaller font [Description]
Use a smaller font for the descriptions
Installation components
176
A screen that displays all installation components and asks the user which componentsshould be installed. This screen will not be shown if no installation components aredefined.
Applies to: Installer
Create program group
A screen that allows the user to select the default program group. Under Windows, thisscreen sets installer variables that influence "Create program group" and "Create startmenu entry" entry actions. Under Unix, the screen asks the user whether and wheresymbolic links to launchers should to be created. UndermacOS, the screen is not shown.
Applies to: Installer
Properties:
• User can disable creation [General]
If the user can disable all program group actions that rely on a default program group,such as the "Create standard program group action". If the user disables programgroup creation, the variable sys.programGroupDisabled will be set to Boolean.TRUE .
• Initially enabled
If the check box for enabling programgroupor launcher link creation should be selectedby default.
Note: This property is only visible if "User can disable creation" is selected.
• Create symlinks [Unix]
If symbolic links for all relevant launchers (those with "menu integration" enabled)should be created on UNIX. If this property is deselected, the variable sys.programGroupDisabled will be set to Boolean.TRUE in Linux/Unix installers.
• Directory for links
The default value for the directory in which links for all relevant launchers (those with"menu integration" enabled) will be created on UNIX. The user selection will be savedto the variable sys.symlinkDir .
Note: This property is only visible if "Create symlinks" is selected.
• Program group name [Windows]
The default value for the programgroupwhere entries for all relevant launchers (thosewith "menu integration" enabled) will be created. If the "Create program group" screenis present, the user can change this selection. If you leave this property empty, thelinks will be created at the top level. The user selection will be saved to the variablesys.programGroupName .
• User can change "all users" [Windows]
If the user can override the default value of the "Create for all users" property in the"Create standard programgroup" action. The user selectionwill be saved to the variablesys.programGroupAllUsers .
• Initially selected
If the "Create for all users" check box be selected by default.
Note: This property is only visible if "User can change "all users"" is selected.
177

• Show warning if program group exists [Windows]
If selected, a warning will be shown if the selected program group already exists.
File associations
A screen that displays a list of all subsequent file association actions and asks the userwhich associations should be made. This screen will not be shown if there are nocorresponding file association actions after this screen.
Applies to: Installer
Additional confirmations
A screen that displays a list of confirmations as check boxes whose results can be usedin condition expressions for actions.While other types of form components can be addedto this screen, only check boxes and other simple elements are consistent with thedisplayed text. For arbitrary forms, use the "Configurable form" screen instead.
Applies to: Installer, Uninstaller
Installation
The screen that displays displays the installation progress. Where possible, installationactions should be added to this screen.
Applies to: Installer
Properties:
• Cancel enabled
If the cancel button should be enabled.
Display information
A screen that displays text to the user, either plain text or HTML. In contrast to the "Displaytext" form template, all messages on this screen are pre-defined and localized.
Applies to: Installer, Uninstaller
Finish
A screen that tells the user that the installation is finished. This screen should be placedat the end of the installation.
Applies to: Installer
Uninstall Welcome
178
A screen that welcomes the user to the uninstallation of your application. This screenshould be placed at the beginning of the uninstallation.
Applies to: Uninstaller
Uninstallation
The screen that displays displays the uninstallationprogress.Where possible, uninstallationactions should be added to this screen.
Applies to: Uninstaller
Uninstallation failure
The screen that is displayed if the uninstallation was not completed successfully. Furtherinformation regarding the uninstallation problems is displayed to the user. This screenis not shown if the uninstallation was completed successfully or if it is placed before theuninstallation screen. The uninstaller will terminate after showing this screen in case offailure.
Applies to: Uninstaller
Properties:
• Show directories [General]
Also show initially created directories that could not be deleted. If unchecked, onlyundeleted files will be shown.
Uninstallation success
The screen that is displayed if the uninstallationwas completed successfully.
Applies to: Uninstaller
179
B.5.6 Installer - Configuring Actions
Actions are configured on the screens & and actions tab [p. 148] .
Please see the list of available actions [p. 182] that come with install4j.
An action performs a configurable unit of work of the installer application.
Actions are attached to screens [p. 166] or they are part of the startup sequence that allowsyou to perform actions before the installer or uninstaller is displayed. If any of these actions failsand has a "Quit on failure" failure strategy, the installer application will not be shown.
Common properties of actions are:
• Action elevation type [Privileges]
If the action should run in the elevated helper process.An elevated helper process is availableon Windows and macOS if the process has been started without admin privileges and the"Request privileges" action has been configured to require full privileges.
• Condition expression [Control Flow]
This expression is evaluated to decide whether the action is executed. If the expression orscript returns false, the current action will be skipped. This expression or script should nothave any side-effects, it will be called while another screen is still being displayed.
• Rollback barrier [Control Flow]
If the action should be a rollback barrier. When a rollback barrier is completed, none of thepreceding actions will be rolled back. You can use this property to prevent an incompleterollback of complex changes or to protect actions from rollback when the user hits "Cancel"in the post-install phase.
• Exit code [Control Flow]
If the "Rollback barrier" property is selected, and a rollback terminates at this action, thisproperty determines the exit code of the installer. By default, reaching a rollback barrier duringa rollback is considered a success, but you can signal a failure by specifying a non-zero exitcode here.
Note: This property is only visible if "Rollback barrier" is selected.
• Can be executed multiple times [Control Flow]
If the action can be executed multiple times. If unselected, the action will only be executedonce and do nothing for subsequent invocations of the containing screen. The default settingsfor screens ensure that a screen with actions that cannot be executed multiple times is onlyshown once. However, if the "Back button" property is changed of if you skip screensprogrammatically, a screen might be shown multiple times.
• Failure strategy [Error Handling]
If an action fails (i.e. returns false ), the installer or uninstaller can continue, quit, or ask theuser what to do. If you select something other than "Continue on failure", you should enteran error message in the "Error message" property unless the action displays the error itself.For "Return to the parent screen", no further actions will be executed and the previous screenwill be displayed again. If the action is contained in the "Startup" node, the first screen will beshown and in unattended mode the application will quit.
• Error message [Error Handling]
If the action fails, this errormessage is displayed to the user, otherwise the action fails silently.
Most often, actions are added to the "Installation" or "Uninstallation" screens. The advantage ofthose screens is that they have a progress and status bar that is utilized by actions. If a screendoes not expose a progress interface, the status and progress messages of attached actions are
180

lost. This is no problem for near-instantaneous actions such as setting an environment variable,but for time-consuming operations the user should be informed about progress, even if it is onlyan indeterminate progress bar. As an alternative to the "Installation" or "Uninstallation" screens,you can use "Display progress" screens to create additional installation phases.
Some actions have an "affinity" to a particular screen and will suggest to add themselves tothat screen, such as the actions in the "Final options" category which would like to go to the"Finish" screen. However, this is only a suggestion to guide you for the most common use case.
Some actions have an associated screen that allows the user to modify the behavior of theaction. For example, the "Install a service" action has a corresponding "Services" screen thatallows the user to decide whether the service should be installed and started on bootup. If sucha relationship exists, a corresponding notification is displayed after adding an action.
181

B.5.7 Installer - Available Actions
Category: Control
Change cancel button state
Changes the visibility and the enabled state of the cancel button. This action works inGUI mode as well as in unattended mode when the -splash option has been passed onthe command line and the simple unattended progress dialog with a cancel button isshown.
Applies to: Installation, Uninstallation
Properties:
• Button state
The new button state for the cancel button.
Run script
Runs a custom script. The script must return a boolean value. If it returns false, theinstallation will be canceled.
Applies to: Installation, Uninstallation
Properties:
• Script [General]
The script that will be executed. The script must return a boolean value. If it returnsfalse, the installation will be canceled.
• Optional Rollback Script [General]
The script that will be executed in case of a rollback. The return type is void.
Set a variable
Sets a variable by running a custom script. The script can return any java.lang.Object .
Applies to: Installation, Uninstallation
Properties:
• Script [General]
The script that will be executed. The script can return any java.lang.Object .
• Variable name [General]
The name of the variable that will be set. Enter the variable without the installer prefixand the dollar sign.
182
• Only if undefined [General]
The variable will only be set if it was previously undefined. This is useful for variablesthat your user can pass via -V or -varfile at the command line.
• Fail if value is null [General]
If selected, the action will fail if a null value is returned from the script.
• Register for response file [General]
If selected, the variablewill be saved to the response file .install4j/response.varfile thatis created automatically when the installer exits.This is equivalent to calling context.registerResponseFileVariable(variableName) in a script. If the variable is present in theresponse file, the "Load response file" action in the startup node of the uninstaller willmake this variable available in the uninstaller.
Set messages
Sets the messages in the progress interface.
Applies to: Installation, Uninstallation
Properties:
• Use status [General]
If the status message should be set.
• Status message
The status message.
Note: This property is only visible if "Use status" isselected.
• Use detail [General]
If the detail message should be set.
• Detail message
The detail message.
Note: This property is only visible if "Use detail" isselected.
Set the progress bar
Change the value of the progress bar or set it to indeterminate mode.
Applies to: Installation, Uninstallation
Properties:
183
• Type of change
Change the progress bar either to a percentage value, add progress, set it toindeterminate mode, start a timer, or return from indeterminate mode and show thelast percentage value.
• Percent value
The progress value from 0 to 100. This property is only used when a percentage valueis set or added.
Note: This property is only visible if "Type of change" is set to one of [Set percentagevalue, Add percentage value].
• Timer period
The time in milliseconds for one percent. This property is only used when the timer isstarted.
Note: This property is only visible if "Type of change" is set to "Start a timer".
• Timer maximum value
The maximum progress value to be set by the timer. This property is only used whenthe timer is started.
Note: This property is only visible if "Type of change" is set to "Start a timer".
Sleep
Sleep a specified number of milliseconds. This is useful to ensure that a progress screenis displayed for at least a certain period of time.
Applies to: Installation, Uninstallation
Properties:
• Sleep time
The sleep time in milliseconds.
Category: Desktop integration
Add a desktop link
Create a link on the desktop to an installed executable or file. This action will beautomatically reverted by the 'Uninstall files' action.
Applies to: Installation
Properties:
• Target file
The installed file or executable for which a link will be created on the desktop
184
• Name
The name of the desktop icon
• Arguments
Optional arguments to the executable for Windows and Unix.
• Icon file [Unix]
An optional image file (*.png) for the entry. If empty, no icon will be written to thedesktop file.
• Create for all users [Windows]
If the desktop link should be created for all users. If unselected, the link will be createdfor the current user only. If a "Create program group" screen is present, the "Createshortcuts for all users" check box will override this property.
• Icon file [Windows]
An optional different icon (*.ico) for the link on Windows.
• Tooltip description [Windows]
An optional description for Windows that will be displayed in the tooltip.
• Start in [Windows]
An optional working directory for the started executable.
• Run as administrator [Windows]
If the desktop link should be always run as administrator.
• Target is Single Bundle [macOS]
If selected and the media set is a single bundle installer, the desktop icon will point tothe bundle instead.
Add a startup executable on Windows and macOS
Add an installed executable to the startup folder on Windows or to the login items onmacOS so that it will be started automatically when the user logs in. This action will beautomatically reverted by the 'Uninstall files' action.
Applies to: Installation
Properties:
• Startup executable
The executable that should be started when the user logs in
• Entry name [Windows]
The name of the entry in the startup folder
• Create for all users [Windows]
If the startup item should be created for all users. If unselected, the link will be createdfor the current user only.
• Set the hide flag [macOS]
If the hide flag should be set for the login item.
185
Add an executable to the dock
Add an installed executable to the dock on macOS. This action will be automaticallyreverted by the 'Uninstall files' action.
Applies to: Installation
Properties:
• Executable
The executable that should be added to the dock.
Create a Windows URL link
Create a URL link on Windows. This is a special text file with a .url link that is supportedby the Windows desktop, start menu and explorer. To create links in the start menu, the"Create program group" action can be used as well. This action will be automaticallyreverted by the 'Uninstall files' action.
Applies to: Installation
Properties:
• URL
The URL that should be linked to. If no protocol is given, http:// is assumed.
• Target file
The path of the URL link, including the name of the link, but without the .url extension.To create a link on the desktop, prefix with ${installer:sys.desktopDir}
• Icon file
An optional icon file (*.ico) for the URL link. If empty, the default icon will be used.
• Use favicon
If the favicon file of the URL domain should be used. This only works if the icon hasbeen cached by Internet Explorer.
Create a file association
Create an association between a file extension and a launcher, so that the launcher isinvoked when the user double-clicks a file with the selected extension. On Windows, ifthe application has not yet been started, the arguments to the main method will containthe file name. Subsequent invocations and all invocations on macOS can be interceptedwith the com.install4j.api.launcher.StartupNotification class. Only effective on Windowsand macOS. This action will be automatically reverted by the 'Uninstall files' action.
Applies to: Installation
Properties:
186
• File extension [General]
The file extension for which the file association should be created. Must not includethe leading dot.
• Description [General]
A description that is presented to the user as the text next to the correspondingcheckbox in the "File associations" screen.
• Launcher [General]
The launcher that will be invoked when the file association is invoked by the user.
• Selected [General]
If the file association is selected in the "File associations" screen.
• Execute on Windows [Windows]
If the file association should be performed on Windows.
• Icon file for Windows [Windows]
An optional icon file (*.ico) for the file association onWindows. If empty, a default iconwill be used.
• Additional parameters [Windows]
Optional additional parameters that will be passed to the executable in front of thefile to be opened.
• Execute on macOS [macOS]
If the file association should be performed on macOS.
• Icon file for macOS [macOS]
An optional icon file (*.icns) for the file association on macOS. If empty, a default iconwill be used.
• Role [macOS]
The role the application can take for this file type.
• Restart Finder [macOS]
If true the Finder should be restarted at the end of the installation. This might benecessary for the icon (and sometimes the association itself) to be picked upimmediately. Note that users might find this restart disruptive. Additionally, if youlaunch an application at the end of the installation, it can be hidden by Finder windows.
Create program group
Create standard program group entries on Windows and freedesktop.org compatibleUNIX desktops. This action will be automatically reverted by the 'Uninstall files' action.
Applies to: Installation
Properties:
• Add default launcher links
If generated launchers are placed into the program group automatically with theirdefault menu integration properties. You can rename and move the default menuintegrations in the program group entries tree. If you delete them, the default menu
187
integration can be enabled again on the "Executable info->Menu integration" step ofthe launcher wizard.
• Program group entries
On Windows, the entries in the program group tree will be created in the start menuby the installer. The control buttons allow you to modify the contents of the list ofprogram group entries. You can add new sub-folders and new file links.In the editdialog, you have to fill in the display name of the program group entry.as wellas thetarget file for the of the program group link. This has to be a file or directory relativeto the distribution root directory. Please note that if you select a directory as the target,it will not "fly out" in the program group, but a separate explorer windowwill be openedif the user clicks on it. To display all files in a directory, please add all of themas separateprogram group entries. Optionally, you can specify an icon that is used for this programgroup entry. The icon file must point to an *.ico file. If the file name is relative, it isinterpreted as relative to the project file. If you do not specify an icon, the default iconis determined by the system.
• Create symlinks [Unix]
If symbolic links for all relevant launchers (those with "menu integration" enabled)should be created on UNIX.
• Directory for links
The directory in which links for all relevant launchers (those with "menu integration"enabled) will be created on UNIX.
Note: This property is only visible if "Create symlinks" is selected.
• Fail if symlinks are not created
If selected, the action will fail if the symlinks cannot be created. Usually this is due tomissing write permissions which is a common condition, so that the action does notfail by default.
Note: This property is only visible if "Create symlinks" is selected.
• Create menu entries [Unix]
If menu entries should be created on freedesktop.org (KDE, GNOME) systems.
• Application categories
The freedesktop.org (KDE, GNOME) application categories used to determine the bestplace in the applications menu. Multiple categories can be separated by semicolons.
Note: This property is only visible if "Create menu entries" is selected.
• Program group name [Windows]
The default value for the program group where the links will be created. If you leavethis property empty, the links will be created at the top level.
• Create for all users [Windows]
If the program group is created for all users or only for the current user. If the sys.programGroupAllUsers is set (typically by the "Create program group" screen), thevariable value will override this property.
• Add uninstaller [Windows]
If the uninstaller should be added to the programgroup. This has no effect forWindows8 and higher.
188
• Uninstaller menu name
The name in the program group that will be used for the uninstaller.
Note: This property is only visible if "Add uninstaller" is selected.
Create start menu entry
Create a single start menu entry on Windows and Unix. For creating multiple programgroup entries, please see the "Create program group" action. This action will beautomatically reverted by the 'Uninstall files' action.
Applies to: Installation
Properties:
• Entry name
The entry name in the start menu. On Windows, the name can contain sub-folderswith backslashes.
• Target file
The installed file or executable for which a start menu entry will be created
• Arguments
Optional arguments that should be passed to the executable when started with thisentry.
• Application categories [Unix]
The freedesktop.org (KDE, GNOME) application categories used to determine the bestplace in the applications menu. Multiple categories can be separated by semicolons.
• Icon file [Unix]
An optional image file (*.png) for the entry. If empty, no icon will be written to thedesktop file.
• Icon file [Windows]
An optional icon file (*.ico) for the entry. If empty, the default icon will be used.
• Create for all users [Windows]
If the program group is created for all users or only for the current user.
• Program group name [Windows]
The default value for the program group where the link will be created. If you leavethis property empty, the link will be created at the top level.
• Start in [Windows]
An optional working directory for the started executable.
• Run as administrator [Windows]
If the executable should be always run as administrator.
Register Add/Remove item
189
Register an Add/Remove item in the Windows software registry. This action will beautomatically reverted by the 'Uninstall files' action.
Applies to: Installation
Properties:
• Item name
The name of the item that is displayed in the Windows software registry.
• Icon source
The source of the icon in in Windows software registry. You can use the icon of theinstaller or specify a custom .ico file.
• Icon file
An optional icon file (*.ico).
Note: This property is only visible if "Icon source" is set to "Custom icon".
Category: File operations
Add Windows file rights
Adds access rights to files and directories on Windows. If a helper process with elevatedprivileges has been created by the "Request privileges" action, this action is pushed tothe helper process. Please see the help topic on "Elevation Of Privileges" for moreinformation.
Applies to: Installation, Uninstallation
Properties:
• Files and directories
The files and directories whose rights should be modified. In the edit dialog you canchoose files from the distribution tree or enter them manually. Files and directoriesthat are installer variableswith array values (e.g. String[], Object[] or File[]) are expandedas separate files and directories, this allows you to build a variable length list of filesand directories at runtime. The rights for a directory will be inherited by allsubdirectories and their contained files.
• Trustee [Rights]
The trustee for which the access right should be granted.
• SID or Account Name
The SID in String formor the account name forwhich the access right should be granted.
Note: This property is only visible if "Trustee" is set to "SID or Account Name".
• Read [Rights]
The right to read the object.
• Write [Rights]
The right to write to the object.
190
• Execute [Rights]
The right to execute the object.
• All [Rights]
All available rights.
Copy files and directories
Copy files and directories. This action will be automatically reverted by the 'Uninstall files'action.
Applies to: Installation, Uninstallation
Properties:
• Destination directory
The destination directory. If you have selected a single source file, this can also be afile rather than a directory. The destination directory will not be created, it must existbefore this action is executed, otherwise it will be treated as a destination file.
• Source files or directories
The files and directories to be copied. In the edit dialog you can choose files from thedistribution tree or enter themmanually. Files and directories that are installer variableswith array values (e.g. String[], Object[] or File[]) are expanded as separate files anddirectories, this allows you to build a variable length list of files and directories atruntime.
• File filter script
The file filter script is invoked for each file that is about to be processed by this action.The script is not invoked for directories. You can return true if the file should beprocessed or false if it should be excluded from processing.
• Directory filter script
The directory filter script is invoked for each directory that is about to be processedby this action. The script is not invoked for files. You can return true if the directoryshould be processed or false if it should be excluded from processing.
• Show progress
If selected, and a progress bar is available on the current screen, the action will showits progress in the progress bar.
• Show file names
If selected, the names of the files that are processed will be shown during theinstallation.
Note: This property is only visible if "Show progress" is selected.
• Resolve relative file in
A relative destination file can be resolved against the installation directory or againstthe root of the temporarily extracted archive.
• Resolve relative files in
Relative files can be resolved against the installation directory or against the root ofthe temporarily extracted archive.
191
• Overwrite mode
How to handle an existing destination file.
• Uninstall mode
The mode how the uninstaller should handle the files created with this action.
• Access mode [Unix]
The UNIX access mode for files.
• Directory access mode [Unix]
The UNIX access mode for directories.
• Shared file [Windows]
If created files should be registered as a shared files.
• Delay if necessary [Windows]
If selected and a destination file cannot be replaced, the operation will be scheduledfor the next reboot. The context method isRebootRequired() will return true in thiscase.
• Trigger reboot if required [Windows]
If selected and the operation is delayed until reboot, the user will be asked for a rebootautomatically at the end of installation.
Create a symbolic link
Creates a symbolic link. This action has no effect on Windows.
Applies to: Installation, Uninstallation
Properties:
• File
The file or directory that the symbolic link should point to.
• Link file
The link file that should be created. Relative files will be resolved relative to theinstallation directory.
• Remove on uninstall
If the link should be deleted by the 'Uninstall files' action in the uninstaller.
Delete files and directories
Deletes files and directory. Directories can be deleted recursively.
Applies to: Installation, Uninstallation
Properties:
192
• Files and directories
The files and directories to be deleted. In the edit dialog you can choose files from thedistribution tree or enter themmanually. Files and directories that are installer variableswith array values (e.g. String[], Object[] or File[]) are expanded as separate files anddirectories, this allows you to build a variable length list of files and directories atruntime.
• File filter script
The file filter script is invoked for each file that is about to be processed by this action.The script is not invoked for directories. You can return true if the file should beprocessed or false if it should be excluded from processing.
• Directory filter script
The directory filter script is invoked for each directory that is about to be processedby this action. The script is not invoked for files. You can return true if the directoryshould be processed or false if it should be excluded from processing.
• Recursive
If selected, the operation will be performed recursively on directories.
• Backup for rollback
If selected, a backup of the files to be deleted will be made and restored in case ofrollback.
Move files and directories
Moves files and directories. The newly created files are subject to removal by the 'Uninstallfiles' action.
Applies to: Installation, Uninstallation
Properties:
• Destination directory
The destination directory. If you have selected a single source file, this can also be afile rather than a directory. The destination directory will not be created, it must existbefore this action is executed, otherwise it will be treated as a destination file.
• Source files or directories
The files and directories to be moved. In the edit dialog you can choose files from thedistribution tree or enter themmanually. Files and directories that are installer variableswith array values (e.g. String[], Object[] or File[]) are expanded as separate files anddirectories, this allows you to build a variable length list of files and directories atruntime.
• File filter script
The file filter script is invoked for each file that is about to be processed by this action.The script is not invoked for directories. You can return true if the file should beprocessed or false if it should be excluded from processing.
193
• Directory filter script
The directory filter script is invoked for each directory that is about to be processedby this action. The script is not invoked for files. You can return true if the directoryshould be processed or false if it should be excluded from processing.
• Show progress
If selected, and a progress bar is available on the current screen, the action will showits progress in the progress bar.
• Show file names
If selected, the names of the files that are processed will be shown during theinstallation.
Note: This property is only visible if "Show progress" is selected.
• Resolve relative file in
A relative destination file can be resolved against the installation directory or againstthe root of the temporarily extracted archive.
• Resolve relative files in
Relative files can be resolved against the installation directory or against the root ofthe temporarily extracted archive.
• Overwrite mode
How to handle an existing destination file.
• Uninstall mode
The mode how the uninstaller should handle the files created with this action.
• Access mode [Unix]
The UNIX access mode for files.
• Directory access mode [Unix]
The UNIX access mode for directories.
• Shared file [Windows]
If created files should be registered as a shared files.
• Delay if necessary [Windows]
If selected and a destination file cannot be replaced, the operation will be scheduledfor the next reboot. The context method isRebootRequired() will return true in thiscase.
• Trigger reboot if required [Windows]
If selected and the operation is delayed until reboot, the user will be asked for a rebootautomatically at the end of installation.
Set the UNIX access mode of files and directories
Sets the UNIX access mode of files and directories. This action has no effect onWindows.
Applies to: Installation, Uninstallation
Properties:
194
• Files and directories
The files and directories that the access mode should be set for. In the edit dialog youcan choose files from the distribution tree or enter themmanually. Files and directoriesthat are installer variableswith array values (e.g. String[], Object[] or File[]) are expandedas separate files and directories, this allows you to build a variable length list of filesand directories at runtime.
• File filter script
The file filter script is invoked for each file that is about to be processed by this action.The script is not invoked for directories. You can return true if the file should beprocessed or false if it should be excluded from processing.
• Directory filter script
The directory filter script is invoked for each directory that is about to be processedby this action. The script is not invoked for files. You can return true if the directoryshould be processed or false if it should be excluded from processing.
• Recursive
If selected, the operation will be performed recursively on directories.
• Mode
The mode to be set. This can be an octal mode like 750 or a symbolic mode that canbe used with chmod , like u+x . For the permission flags in the symbolic mode, onlyrwxugo are supported.
• Perform on
The type of file this action should be performed on.
Set the modification time of files
Sets the modification time of files.
Applies to: Installation, Uninstallation
Properties:
• Files and directories
The files and directories that themodification time should be set for. In the edit dialogyou can choose files from the distribution tree or enter them manually. Files anddirectories that are installer variables with array values (e.g. String[], Object[] or File[])are expanded as separate files and directories, this allows you to build a variable lengthlist of files and directories at runtime.
• File filter script
The file filter script is invoked for each file that is about to be processed by this action.The script is not invoked for directories. You can return true if the file should beprocessed or false if it should be excluded from processing.
• Directory filter script
The directory filter script is invoked for each directory that is about to be processedby this action. The script is not invoked for files. You can return true if the directoryshould be processed or false if it should be excluded from processing.
195
• Recursive
If selected, the operation will be performed recursively on directories.
• Time
The new modification time.
Set the owner of files and directories
Sets the owner and optionally the group of files and directories. This action has no effecton Windows.
Applies to: Installation, Uninstallation
Properties:
• Files and directories
The files and directories that the owner should be set for. In the edit dialog you canchoose files from the distribution tree or enter them manually. Files and directoriesthat are installer variableswith array values (e.g. String[], Object[] or File[]) are expandedas separate files and directories, this allows you to build a variable length list of filesand directories at runtime.
• File filter script
The file filter script is invoked for each file that is about to be processed by this action.The script is not invoked for directories. You can return true if the file should beprocessed or false if it should be excluded from processing.
• Directory filter script
The directory filter script is invoked for each directory that is about to be processedby this action. The script is not invoked for files. You can return true if the directoryshould be processed or false if it should be excluded from processing.
• Recursive
If selected, the operation will be performed recursively on directories.
• Owner
The owner to be set. If you want to set the group, too, please add it with a colon(example: user:group ). To only change the group, prefix the group name with a colon(example: :group ).
Category: Final options
Execute launcher
Execute an installed launcher and return immediately. This action is intended to be placedon the "Finish" screen. A confirmation can be added automatically to the "Finish" screen.If the main installation process has been elevated by the "Request privileges" action, thisaction is pushed to the original process with limited rights. Please see the help topic on"Elevation Of Privileges" for more information.
196
Applies to: Installation
Properties:
• Launcher
The launcher that will be executed. Service launchers are not shown.
• Arguments
The arguments passed to the launcher. Please note that in the edit dialog, eachargument starts on a new line . Arguments that are installer variables with array values(e.g. String[], Object[] or File[]) are expanded as separate arguments, this allows youto build a variable length list of arguments at runtime.
Open PDF viewer
Displays a PDF file in a cross-platform PDF viewer. A separate windowwill be opened.
Applies to: Installation, Uninstallation
Properties:
• Dialog title
The title of the PDF viewer dialog.
• PDF file [PDF]
The PDF file that should be displayed.
Reboot computer
Reboot the computer onWindows andmacOS. This action will trigger a reboot that takesplace at the end of installation or uninstallation. By default, the user will be askedwhetherto reboot or not.
Applies to: Installation, Uninstallation
Properties:
• Ask user
Ask the user whether the reboot should be performed or not.
Show URL
Show a URL in the default browser. This action is intended to be placed on the "Finish"or the "Uninstallation success" screen. If the main installation process has been elevatedby the "Request privileges" action, this action is pushed to the original process with limitedrights. Please see the help topic on "Elevation Of Privileges" for more information.
Applies to: Installation, Uninstallation
197
Properties:
• URL
The URL that will be shown.
Show file
Show a file with the associated application. Usually, a text file or an HTML file isappropriate. This action is intended to be placed on the "Finish" screen. A confirmationcan be added automatically to the "Finish" screen. If the main installation process hasbeen elevated by the "Request privileges" action, this action is pushed to the originalprocess with limited rights. Please see the help topic on "ElevationOf Privileges" formoreinformation.
Applies to: Installation
Properties:
• File
The file that will be shown.
Category: HTTP and network
Download file
Download a URL and save it to a file
Applies to: Installation, Uninstallation
Properties:
• URL
The URL from which the file should be downloaded. The URL must start with http://or https:// . If you add a query string, it must already be URL encoded.
• Target file
The file to which the downloaded URL will be saved.
• Request headers
A list of name-value pairs that should be set as additional headers for the request.Request headers that are installer variables with array values (e.g. String[], Object[] orFile[]) are expanded as separate request headers, this allows you to build a variablelength list of request headers at runtime.
• Retry if interrupted
If selected, ask the user to retry if a successfully started download is interrupted.
• Check for md5sums
If selected, the action will try to download a file named md5sums from either thedirectory of the above URL or from the optional URL given below. If the download is
198
successful and the file contains an entry for the target file name, it will be checked. Ifthe MD5 checksums do not match and the "Silent failure" option is not selected, adialog will be shown that offers the possibility to retry the download.
• Optional md5sums URL
An optional URL for the md5ums file. If specified, only this URL will be used.
Note: This property is only visible if "Check for md5sums" is selected.
• Silent failure
If selected, the actionwill fail immediately if amismatch in theMD5 checksums occurs.Otherwise the user will be presented with a dialog box that explains the failure andoffers the possibility to retry the download.
Note: This property is only visible if "Check for md5sums" is selected.
• Show progress
If selected, and a progress bar is available on the current screen, the action will showits progress in the progress bar.
• Show file name
If selected, the name of the downloaded file and the target directory will be displayed.This setting has no effect if "Show progress" is not selected.
Note: This property is only visible if "Show progress" is selected.
• Delete downloaded file on exit
If selected, the downloaded filewill be deletedwhen the installer application terminates.
• Ask for proxy if necessary [Error Handling]
At first, the connection is attempted with the proxy information that is set for thedefault browser. If that fails, and this property is selected, a proxy dialog will be shownwhere the user can configure the proxy that should be used to connect to the webserver.
• Network failure script [Error Handling]
A script that is executed if theHTTP connection fails in such away, that the proxy dialogwould have to be shown. If you return ErrorHandlingMode.IGNORE , the regular proxyor failure handling will proceed, if you return ErrorHandlingMode.CANCEL , the actionwill fail immediately. If you can take corrective action in the script, you can returnErrorHandlingMode.RETRY to make the same HTTP request again. However, you haveto take special care not to enter an infinite loop. Typically, there should be user inputbefore you retry and the user should be given the option to cancel. The script is onlyexecuted for actual network failures, and not if the server or the proxy connectionrequire authentication.
• Accept all SSL certificates [Error Handling]
If the protocol of the URL starts with "https" and this property is selected, the SSLcertificatewill not be checked for validity. This is only recommended for testing purposeswhen working with self-signed certificates.
• Connect timeout [Error Handling]
The timeout for establishing the socket connection in milliseconds. A timeout of zerois interpreted as an infinite timeout.
199
• Read timeout [Error Handling]
The timeout for reading data from the socket connection in milliseconds. A timeoutof zero is interpreted as an infinite timeout.
• Show error message [Error Handling]
Show a default error message if the download fails.
HTTP request
Make an HTTP request to a specified URL. All common HTTP request methods aresupported for REST calls. For mime types starting with text or containing "charset"information, the response body can be saved to an installer variable. To download largefiles, use the "Download file" action instead. The action will succeed if a HTTP responsecode in the 2xx range is received, otherwise it will fail. You can save the response codeto a variable to inspect it in a later action.
Applies to: Installation, Uninstallation
Properties:
• Ask for proxy if necessary [Error Handling]
At first, the connection is attempted with the proxy information that is set for thedefault browser. If that fails, and this property is selected, a proxy dialog will be shownwhere the user can configure the proxy that should be used to connect to the webserver.
• Network failure script [Error Handling]
A script that is executed if theHTTP connection fails in such away, that the proxy dialogwould have to be shown. If you return ErrorHandlingMode.IGNORE , the regular proxyor failure handling will proceed, if you return ErrorHandlingMode.CANCEL , the actionwill fail immediately. If you can take corrective action in the script, you can returnErrorHandlingMode.RETRY to make the same HTTP request again. However, you haveto take special care not to enter an infinite loop. Typically, there should be user inputbefore you retry and the user should be given the option to cancel. The script is onlyexecuted for actual network failures, and not if the server or the proxy connectionrequire authentication.
• Accept all SSL certificates [Error Handling]
If the protocol of the URL starts with "https" and this property is selected, the SSLcertificatewill not be checked for validity. This is only recommended for testing purposeswhen working with self-signed certificates.
• Connect timeout [Error Handling]
The timeout for establishing the socket connection in milliseconds. A timeout of zerois interpreted as an infinite timeout.
• Read timeout [Error Handling]
The timeout for reading data from the socket connection in milliseconds. A timeoutof zero is interpreted as an infinite timeout.
200
• URL [Request]
The URL for the HTTP request. The URL must start with http:// or https:// . If you adda query string, itmust already beURL encoded. To post a query stringwithURL-encodedkey-value pairs, use the "Form data" property instead of adding the query string here.
• HTTP request method [Request]
The request method for the HTTP protocol can be one of GET, POST, HEAD, OPTIONS,PUT, DELETE, TRACE. For POST and PUT, the values entered in the "Formdata" propertyare transmitted in the HTTP message body with the mime type "application/x-www-form-urlencoded". For other requestmethods, the data is appended as a querystring to the URL.
• Custom request body
If selected, a custom request body is sent. For form data, use the "Form data" propertyinstead. If both form data and a custom request body are present, the form data isappended to the URL.
Note: This property is only visible if "HTTP request method" is set to one of [POST,PUT].
• Content type
The content type of the request body. For JSON, use application/json .
Note: This property is only visible if "Custom request body" is selected.
• Request body
The request body as a string.
Note: This property is only visible if "Custom request body" is selected.
• Form data [Request]
A list of key-value pairs that should be transmitted with this request. Depending onthe request method, they are either appended as a query string to the URL ortransmitted in theHTTPmessage body. Key-value pairs that are installer variables witharray values (e.g. String[], Object[] or File[]) are expanded as separate key-value pairs,this allows you to build a variable length list of key-value pairs at runtime.
• Request headers [Request]
A list of name-value pairs that should be set as additional headers for the request.Request headers that are installer variables with array values (e.g. String[], Object[] orFile[]) are expanded as separate request headers, this allows you to build a variablelength list of request headers at runtime.
• Perform rollback request [Request]
If selected, a request is performed in case of a rollback. You can configure the rollbackrequest with the child properties. All other properties, such as error handling areshared with the regular request.
• Rollback URL
The URL for the rollback request. The URL must start with http:// or https:// . If youadd a query string, it must already be URL encoded.
Note: This property is only visible if "Perform rollback request" is selected.
• Rollback HTTP request method
The request method for the HTTP protocol can be one of GET, POST, HEAD, OPTIONS,PUT, DELETE, TRACE. For POST and PUT, the values entered in the "Formdata" property
201
are transmitted in the HTTP message body with the mime type "application/x-www-form-urlencoded". For other requestmethods, the data is appended as a querystring to the URL.
Note: This property is only visible if "Perform rollback request" is selected.
• Custom request body
If selected, a custom request body is sent. For form data, use the "Form data" propertyinstead. If both form data and a custom request body are present, the form data isappended to the URL.
Note: This property is only visible if "Rollback HTTP request method" is set to one of[POST, PUT].
• Content type
The content type of the request body. For JSON, use application/json .
Note: This property is only visible if "Custom request body" is selected.
• Request body
The request body as a string.
Note: This property is only visible if "Custom request body" is selected.
• Rollback form data
A list of key-value pairs that should be transmitted with this request. Depending onthe request method, they are either appended as a query string to the URL ortransmitted in theHTTPmessage body. Key-value pairs that are installer variables witharray values (e.g. String[], Object[] or File[]) are expanded as separate key-value pairs,this allows you to build a variable length list of key-value pairs at runtime.
Note: This property is only visible if "Perform rollback request" is selected.
• Variable name for response body [Response]
Optionally, you can enter a variable name that will be set with the text of the responsebody as an instance of java.lang.String . The variable value will not be written to thelog file.Enter the variable without the installer prefix and the dollar sign. The variablewill not be set if themime type does not start with text/ or contain "charset" information.
• Variable name for response code [Response]
Optionally, you can enter a variable name that will be set with the response code asan instance of java.lang.Integer . Enter the variable without the installer prefix and thedollar sign.
• Variable name for response headers [Response]
Optionally, you can enter a variable name that will be set with the response headersas an instance of java.util.Map . The keys in the map are the header names, and thevalues are instances of java.util.List<String> with the header values. The variablevalue will not be written to the log file.Enter the variable without the installer prefixand the dollar sign.
Upload file
Upload a file to an HTTP server with a POST request.
Applies to: Installation, Uninstallation
202
Properties:
• File
The file that will be uploaded.
• URL
The URL to which the file should be uploaded. The URLmust start with http:// or https:// . If you add a query string, it must already be URL encoded.
• Request headers
A list of name-value pairs that should be set as additional headers for the request.Request headers that are installer variables with array values (e.g. String[], Object[] orFile[]) are expanded as separate request headers, this allows you to build a variablelength list of request headers at runtime.
• Retry if interrupted
If selected, ask the user to retry if a successfully started upload is interrupted.
• Show progress
If selected, and a progress bar is available on the current screen, the action will showits progress in the progress bar.
• Show file name
If selected, the name of the uploaded file and the target directory will be displayed.This setting has no effect if "Show progress" is not selected.
Note: This property is only visible if "Show progress" is selected.
• Ask for proxy if necessary [Error Handling]
At first, the connection is attempted with the proxy information that is set for thedefault browser. If that fails, and this property is selected, a proxy dialog will be shownwhere the user can configure the proxy that should be used to connect to the webserver.
• Network failure script [Error Handling]
A script that is executed if theHTTP connection fails in such away, that the proxy dialogwould have to be shown. If you return ErrorHandlingMode.IGNORE , the regular proxyor failure handling will proceed, if you return ErrorHandlingMode.CANCEL , the actionwill fail immediately. If you can take corrective action in the script, you can returnErrorHandlingMode.RETRY to make the same HTTP request again. However, you haveto take special care not to enter an infinite loop. Typically, there should be user inputbefore you retry and the user should be given the option to cancel. The script is onlyexecuted for actual network failures, and not if the server or the proxy connectionrequire authentication.
• Accept all SSL certificates [Error Handling]
If the protocol of the URL starts with "https" and this property is selected, the SSLcertificatewill not be checked for validity. This is only recommended for testing purposeswhen working with self-signed certificates.
• Connect timeout [Error Handling]
The timeout for establishing the socket connection in milliseconds. A timeout of zerois interpreted as an infinite timeout.
203
• Read timeout [Error Handling]
The timeout for reading data from the socket connection in milliseconds. A timeoutof zero is interpreted as an infinite timeout.
Wait for HTTP server
Wait until an HTTP or HTTPS port becomes available. This is useful if you start a server,for examplewith a "Start a service" action, and need towait until the server is operationalbefore proceeding with the installation.
Applies to: Installation, Uninstallation
Properties:
• URL
The URL that should be checked. The URLmust start with http:// or https:// . If you adda query string, it must already be URL encoded.
• Timeout
The timeout in seconds. After this timeout, the action will give up waiting for the HTTPport and fail. A timeout of 0 or a negative value means that the action will waitindefinitely for the HTTP port.
• Set indeterminate progress
If selected, the progress bar will be set to indeterminate mode while the action isrunning. Note that this only has an effect if a progress bar is available on the currentscreen.
• Accept all response codes
If selected, all response codes returned by the HTTP server will by accepted for theaction to succeed. Otherwise, the action will continue to wait for a 2xx response code.
• Variable name for response code
If set, the response code will be saved to this installer variable. The variable will onlybe set in case of success. If the action fails, it always fails due to the timeout and thereis no associated response code.
Wait for Socket
Wait until a socket can be connected to. This is useful if you start a non-HTTP server. ForHTTP and HTTPS, use the "Wait for HTTP server" action instead.
Applies to: Installation, Uninstallation
Properties:
• URL
The host on which the server socket should be checked. Can be a host name or an IPaddress.
204
• Port
The port on which the server socket should be checked.
• Timeout
The timeout in seconds. After this timeout, the action will give up waiting for the HTTPport and fail. A timeout of 0 or a negative value means that the action will waitindefinitely for the HTTP port.
• Set indeterminate progress
If selected, the progress bar will be set to indeterminate mode while the action isrunning. Note that this only has an effect if a progress bar is available on the currentscreen.
Category: JDBC
Check JDBC connection
Check if a connection can be made to the configured JDBC database. If no connectioncan be made, the action will fail. If the action is attached to a form screen that queries adatabase location, set its "Error message" property to an appropriate error message andthe "Failure strategy" property to "Return to the parent screen".
Applies to: Installation, Uninstallation
Properties:
• Use a custom SQL query
By default, the action executes "select 1 from dual" for Oracle databases and "select1" for other database. If you would like to use another statement, select this property.
• Custom SQL query
An SQL query that returns at least one row. If the statement fails or of it returns zerorows, the action will fail.
Note: This property is only visible if "Use a custom SQL query" is selected.
• JDBC Driver class name [Connection]
The class name of the JDBC driver. The JDBC driver JAR file must be added to the"Installer->Custom code & Resources" step.
• JDBC URL [Connection]
The JDBC URL that will be used to connect to the database. For example, to connectto a MySQL database named "test" and installed locally, the connection string is jdbc:mysql://localhost/test .
• User [Connection]
The user name for connecting to the database. Can be empty if no user name isrequired.
• Password [Connection]
The password for connecting to the database. Can be empty if no password is required.
205
• Additional JDBC properties [Connection]
Additional properties for configuring the JDBC driver. Property definitions that areinstaller variables with array values (e.g. String[], Object[] or File[]) are expanded asseparate property definitions, this allows you to build a variable length list of propertydefinitions at runtime.
• Variable name for error messages [Connection]
The name of the variable that will be set with the error messages that were loggedduring the execution of the action. There may bemultiple error messages in the orderof occurrence, each errormessage starts on a new line. If no error occurred, the variablewill be set to the empty string. Enter the variable without the installer prefix and thedollar sign.
Execute SQL query
Execute a single SQL query and store the result in an installer variable. If only the firstrow is taken, the row value is stored directly, otherwise the variablewill contain an instanceof java.util.List with the row values. If the query is for a single column, the row value isthe Java object representation of the return type, e.g. java.lang.String for VARCHAR orjava.lang.Long for INT .
Applies to: Installation, Uninstallation
Properties:
• JDBC Driver class name [Connection]
The class name of the JDBC driver. The JDBC driver JAR file must be added to the"Installer->Custom code & Resources" step.
• JDBC URL [Connection]
The JDBC URL that will be used to connect to the database. For example, to connectto a MySQL database named "test" and installed locally, the connection string is jdbc:mysql://localhost/test .
• User [Connection]
The user name for connecting to the database. Can be empty if no user name isrequired.
• Password [Connection]
The password for connecting to the database. Can be empty if no password is required.
• Additional JDBC properties [Connection]
Additional properties for configuring the JDBC driver. Property definitions that areinstaller variables with array values (e.g. String[], Object[] or File[]) are expanded asseparate property definitions, this allows you to build a variable length list of propertydefinitions at runtime.
• SQL query [SQL execution]
The SQL query. For example, select count(*) from customers will return a single rowwith a single column. To get the integer result directly in the installer variable, you alsohave to select the "Take first row only" property, otherwise a List<Object> withone element will be stored in the variable. For queries that return multiple rows, like
206
select first_name, last_name from customer , each row is stored as an instance ofList<Object> . If "Take first row only" is selected, the variable will contain that list,otherwise it will contain an instance of List<List<Object>> with the entiretable of the result set.
• Take first row only [SQL execution]
If selected, the result will at most consist of a single row. If the result has only onecolumn, the cell value will be stored directly in the installer variable, otherwise aList<Object> with all column values will be stored. Also, if no row is returned, theinstaller variable will be set to null . If not selected, the result will be a List<Object>for a single column and a List<List<Object>> for multiple columns.
• Fail if zero rows returned [SQL execution]
If selected, and zero rows are returned, the action will fail, and the installer variablewill not be changed.
• Variable name for result [SQL execution]
The name of the variable that will be set with the result of the query as explained inthe descriptions of the "SQL query" and the "Take first row only" properties. Enter thevariable without the installer prefix and the dollar sign, or leave empty if the errormessage should not be saved.
• Variable name for error messages [SQL execution]
The name of the variable that will be set with the error messages that were loggedduring the execution of the action. There may bemultiple error messages in the orderof occurrence, each errormessage starts on a new line. If no error occurred, the variablewill be set to the empty string. Enter the variable without the installer prefix and thedollar sign.
Execute SQL script
Execute a single SQL statement or a script of SQL statements.
Applies to: Installation, Uninstallation
Properties:
• JDBC Driver class name [Connection]
The class name of the JDBC driver. The JDBC driver JAR file must be added to the"Installer->Custom code & Resources" step.
• JDBC URL [Connection]
The JDBC URL that will be used to connect to the database. For example, to connectto a MySQL database named "test" and installed locally, the connection string is jdbc:mysql://localhost/test .
• User [Connection]
The user name for connecting to the database. Can be empty if no user name isrequired.
• Password [Connection]
The password for connecting to the database. Can be empty if no password is required.
207

• Additional JDBC properties [Connection]
Additional properties for configuring the JDBC driver. Property definitions that areinstaller variables with array values (e.g. String[], Object[] or File[]) are expanded asseparate property definitions, this allows you to build a variable length list of propertydefinitions at runtime.
• Script source [Script Execution]
You can either enter the SQL statements directly in the install4j IDE, or read a file thatcontains the SQL script. In both cases, installer variables will be replaced.
• SQL script
Either a single SQL statement or a sequence of statements separated by the configureddelimiter. Installer variables will be replaced before the execution. If no delimiter isfound, the entire input is treated as a single SQL statement.
Note: This property is only visible if "Script source" is set to "Direct entry".
• SQL script file
A file containing the SQL script, either a single SQL statement or a sequence ofstatements separated by the configured delimiter. Installer variables will be replacedbefore the execution.The file may also be gzipped (with the Unix gzip command lineutility), the action will then automatically decompress the file on the fly.
Note: This property is only visible if "Script source" is set to "Read from file".
• Encoding
The encoding of the file. If you leave this empty the system default will be used.Common encodings are UTF-8, UTF-16, ISO-8859-1.
Note: This property is only visible if "Script source" is set to "Read from file".
• Statement delimiter [Script Execution]
A regular expression that separates SQL statements. To match line breaks, enter \n .If the delimited contains characters that have a specialmeaning in regular expressions,you have to quote them, like in \. for a literal dot.
• Commit each statement [Script Execution]
If selected, each SQL statement will be committed separately. Otherwise, the entirescript will be committed at the end. If the script contains a single statement, the settinghas no effect.
• Ignore errors [Script Execution]
If selected, errors from single SQL statements will be ignored, and processing will notbe stopped. Otherwise, processing stops at the first error and a database rollback willbe performed unless "Commit each statement" is selected.
• Variable name for error messages [Script Execution]
The name of the variable that will be set with the error messages that were loggedduring the execution of the action. There may bemultiple error messages in the orderof occurrence, each errormessage starts on a new line. If no error occurred, the variablewill be set to the empty string. Enter the variable without the installer prefix and thedollar sign.
JDBC container action
208
This action allows you to configure connection properties just once and then execute alist of JDBC actions with the same connection.
Applies to: Installation, Uninstallation
Properties:
• JDBC actions
The JDBC actions that should be executed run with the same connection.
• JDBC Driver class name [Connection]
The class name of the JDBC driver. The JDBC driver JAR file must be added to the"Installer->Custom code & Resources" step.
• JDBC URL [Connection]
The JDBC URL that will be used to connect to the database. For example, to connectto a MySQL database named "test" and installed locally, the connection string is jdbc:mysql://localhost/test .
• User [Connection]
The user name for connecting to the database. Can be empty if no user name isrequired.
• Password [Connection]
The password for connecting to the database. Can be empty if no password is required.
• Additional JDBC properties [Connection]
Additional properties for configuring the JDBC driver. Property definitions that areinstaller variables with array values (e.g. String[], Object[] or File[]) are expanded asseparate property definitions, this allows you to build a variable length list of propertydefinitions at runtime.
Category: Java preference store
Delete a node or key in the Java preference store
Delete an entire package node or a key-value pair in the Java preference store.
Applies to: Installation, Uninstallation
Properties:
• Package name
The name of the package node in the preference store that should be deleted orcontains the key-value pair to be deleted. The action does not return an error if thispackage node does not exist. For your convenience, install4j replaces "." with "/" and"_" with "-" in package names tomake it possible to use the package syntax rather thanthe path syntax. If you do not want these characters to be replaced, you have to prefixthem with a backslash, like "\."
• Key
The key that should be deleted. If you leave this empty, the entire package node willbe deleted instead. The action does not return an error if this key does not exist.
209
• Preference root
If you want to delete the node or key-value pair for the current user, all users, or both.
• Only if empty
If a node should only be deleted when it contains no sub-nodes or keys.
Load installer variables from the Java preference store
Load installer variables from the Java preference store that have been previously savedby the "Save installer variables to the Java preference store" action.
Applies to: Installation, Uninstallation
Properties:
• Package name
The name of the package node in the preference store where the installer variablesshould be loaded from. By default, this is set to the application ID. For your convenience,install4j replaces "." with "/" and "_" with "-" in package names to make it possible touse the package syntax rather than the path syntax. If you do notwant these charactersto be replaced, you have to prefix them with a backslash, like "\."
• Preference root
If you want to load the installer variables for the current user, all users, or first readthe settings for all users and then override with the user-specific settings.
Read a key from the Java preference store
Read the value of a key from the Java preference store and save it to an installer variable.Only string values can be read.
Applies to: Installation, Uninstallation
Properties:
• Package name
The name of the package node in the preference store where the key is located. Foryour convenience, install4j replaces "." with "/" and "_" with "-" in package names tomake it possible to use the package syntax rather than the path syntax. If you do notwant these characters to be replaced, you have to prefix them with a backslash, like"\."
• Key
The key whose value should be read.
• Use a default value
If selected, a default value will be saved to the variable if the key cannot be found inthe preference store. Otherwise a missing key will result in the failure of the actionand the variable will not be set.
210
• Default value
The default value that will be used if the key cannot be found in the preference store.
Note: This property is only visible if "Use a default value" is selected.
• Preference root
If you want to read the value of the key for the current user, all users, or first read thesettings for all users and then override with the user-specific settings.
• Variable name
The nameof the variable that will be set with the string value. Enter the variablewithoutthe installer prefix and the dollar sign. If the key cannot be found in the preferencestore, the variable value will not be set.
Save installer variables to the Java preference store
Save installer variables to the Java preference store. This can be used to communicateinstaller variables to the uninstaller or to installers with different application IDs.
Applies to: Installation, Uninstallation
Properties:
• Package name
The name of the package node in the preference store where the installer variablesshould be set. By default, this is set to the application ID. For your convenience, install4jreplaces "." with "/" and "_" with "-" in package names to make it possible to use thepackage syntax rather than the path syntax. If you do not want these characters to bereplaced, you have to prefix them with a backslash, like "\."
• Preference root
If you want to save the installer variables for the current user only or for all users. Dueto access rights it can happen that the system preference registry is not writable, inthat case a fallback to the user specific registry can be tried.
• Installer variable names
A list of installer variable names. Just enter the names of the installer variables, notincluding the surrounding ${installer:...} syntax used for variable substitution in textfields. Variables with value null will be ignored. In the edit dialog, you have to enterone item per line. Entries that are installer variables with array values (e.g. String[],Object[] or File[]) are expanded as separate entries, this allows you to build a variablelength list of entries at runtime.
Set a key in the Java preference store
Set a key-value pair in the Java preference store. The package node is created if necessary.This is themost convenient way to communicate settings to related installers. Only stringvalues can be set.
Applies to: Installation, Uninstallation
211
Properties:
• Package name
The nameof the package node in the preference storewhere the key-value pair shouldbe set. For your convenience, install4j replaces "." with "/" and "_" with "-" in packagenames to make it possible to use the package syntax rather than the path syntax. Ifyou do not want these characters to be replaced, you have to prefix them with abackslash, like "\."
• Key
The key for which a value should be set.
• Value
The string value that should be set for the key.
• Preference root
If you want to set the key for the current user only or for all users. Due to access rightsit can happen that the system preference registry is not writable, in that case a fallbackto the user specific registry can be tried.
Category: Miscellaneous
Add VM options
Adds VM options for a launcher bymodifying or creating a .vmoptions file or by changingthe Info.plist file. This action will be automatically reverted by the 'Uninstall files' action.
Applies to: Installation
Properties:
• Launcher
The launcher that the VM options should be added for.
• VM options
The unquoted options that should be added. Note that system property definitionsmust be prefixed with -D just as on the command line, e.g. -Dkey=value. In the editdialog, you have to enter one item per line. VM options that are installer variables witharray values (e.g. String[], Object[] or File[]) are expanded as separate VM options, thisallows you to build a variable length list of VM options at runtime.
• Target file on macOS [macOS]
For application bundles on macOS, there are two locations for .vmoptions files. Onein the "Contents" directory inside the application bundle, and the other next to theapplication bundle. Both files are read by the launcher, but the contained file takesprecedence. If the launcher is signed, you should choose the location next to theapplication bundle, otherwise the signature will be broken. If the target is a containedcommand line executable, this property is ignored.
Check for running processes
212
Check for installed launchers and additional running processes onWindows andmacOS.
Applies to: Installation, Uninstallation
Properties:
• Include launchers
If selected, the operation will check for running launchers in the current installationdirectory.
• Additional executables
The additional executables that should be checked. In the edit dialog you can choosefiles from the distribution tree or enter them manually. Additional executables thatare installer variables with array values (e.g. String[], Object[] or File[]) are expandedas separate additional executables, this allows you to build a variable length list ofadditional executables at runtime. From relative files, only the file name is used forcomparison. This enables checking for executables with an unknown location. Toreference executables relative to your installation directory, please prefix them with${installer:sys.installationDir}/. This is an optional property.
• Close strategy
The strategy used when processes are running.
• Ignore button
Add an ignore button to the dialog. The action will return successfully if the user clicksthis button.
• Time out for close
The time out for the soft close strategy in milliseconds.
• Message
The message to be displayed at the top of the dialog.
Modify an environment variable on Windows
Sets, appends to, or prepends to an environment variable on Windows. This action canbe automatically reverted by the 'Uninstall files' action.
Applies to: Installation, Uninstallation
Properties:
• Modification type
Modification type
• Variable name
The name of the variable that should be modified.
• Value
The value to be set, appended or prepended.
• User specific
If the variable is user specific or system wide.
213
• Revert on uninstallation [Uninstallation]
Revert the change automatically on uninstallation if this action is used for an installer.
• Only if not modified
Revert the change only if the environment variable hss not beenmodified in themeantime. This is mainly useful for the 'set' modification type.
Note: This property is only visible if "Revert on uninstallation" is selected.
Modify classpath
Changes the classpath of a launcher by modifying or creating a .vmoptions file or bychanging the Info.plist file. This action will be automatically reverted by the 'Uninstall files'action.
Applies to: Installation
Properties:
• Launcher
The launcher that the classpath should be changed for.
• Classpath entries
The classpath entries. In the edit dialog, you have to enter one item per line. Entriesthat are installer variableswith array values (e.g. String[], Object[] or File[]) are expandedas separate entries, this allows you to build a variable length list of entries at runtime.
• Modification type
Modification type
• Target file on macOS [macOS]
For application bundles on macOS, there are two locations for .vmoptions files. Onein the "Contents" directory inside the application bundle, and the other next to theapplication bundle. Both files are read by the launcher, but the contained file takesprecedence. If the launcher is signed, you should choose the location next to theapplication bundle, otherwise the signature will be broken. If the target is a containedcommand line executable, this property is ignored.
Request privileges
Requests configurable administrator privileges. On Windows Vista and higher and onmacOS, the installer will be restarted with the requested privileges or a helper processwill be created that can perform certain actions in a privileged context. When you restartthe installer, you should not install files before this action. Please see the help topic on"Elevation Of Privileges" for a detailed discussion of this action.
Applies to: Installation, Uninstallation
Properties:
214
• Fall back to user specific installation directory [Error Handling]
If administrator privileges cannot be obtained change the installation directory to auser-specific default value.
• Show failure if current user is not root [Unix]
If set and the current user is not root a failure message will be shown and theinstallation will be canceled. This property overrides the "Failure strategy" property ofthe action. A separate property is necessary since the behavior can be configureddifferently for Windows, macOS and Unix.
• Try to obtain full privileges if admin user [Windows]
If set and the user is an admin user with limited privileges on Vista and higher, theaction will try to start a new process with full privileges.
• Try to obtain full privileges if normal user [Windows]
If set and the user is a non-admin user, the action will either try to start a new processwith full privileges on Vista and higher or fail on previous versions of Windows.
• Show failure if requested privileges cannot be obtained [Windows]
If set and the privileges required above could not be obtained a failure message willbe shown and the installation will be canceled. This property overrides the "Failurestrategy" property of the action. A separate property is necessary since the behaviorcan be configured differently for Windows, macOS and Unix.
• Try to obtain root privileges if admin user [macOS]
If set and the user is an admin user, the action will try to start a new process with rootprivileges. The user will have to enter his password.
• Try to obtain root privileges if normal user [macOS]
If set and the user is a non-admin user, the action will try to start a new process withroot privileges. The user will have to enter the password of an admin account.
• Show failure if requested privileges cannot be obtained [macOS]
If set and the privileges required above could not be obtained a failure message willbe shown and the installation will be canceled. This property overrides the "Failurestrategy" property of the action. A separate property is necessary since the behaviorcan be configured differently for Windows, macOS and Unix.
Require installer privileges
Require the same privileges as the ones that were obtained during the installation. OnWindows Vista and higher and on macOS, the uninstaller or custom installer applicationwill be restarted with the requested privileges if necessary. This action only has an effectif a "Load response file" action is executed previously. Please see the help topic on"Elevation Of Privileges" for a detailed discussion of this action.
Applies to: Installation, Uninstallation
Properties:
• Show failure if required privileges cannot be obtained [General]
If set and the privileges that were obtained in the installer could not be obtained bythis action, a failuremessagewill be shown and the installer applicationwill be canceled.
215
Run executable or batch file
Runs an executable or aWindows batch file. The action can optionally wait for terminationof the executable.
Applies to: Installation, Uninstallation
Properties:
• Executable
The file that should be executed. Please do not add arguments here, there is a separate"Arguments" property.
• Working directory
The working directory for the execution.
• Arguments
The arguments passed to the executable. Please note that in the edit dialog, eachargument starts on a new line . Arguments that are installer variables with array values(e.g. String[], Object[] or File[]) are expanded as separate arguments, this allows youto build a variable length list of arguments at runtime.
• Use rollback executable
If selected, an executable is invoked in the case of rollback. You can configure theexecutable with the child properties. All other properties, such as redirection andenvironment variables are shared with the regular executable.
• Rollback executable
The file that should be executed in the case of rollback. Please do not add argumentshere, there is a separate "Arguments" property.
Note: This property is only visible if "Use rollback executable" is selected.
• Rollback working directory
The working directory for the execution of the rollback executable.
Note: This property is only visible if "Use rollback executable" is selected.
• Rollback arguments
The arguments passed to the rollback executable. Please note that in the edit dialog,each argument starts on a new line . Arguments that are installer variables with arrayvalues (e.g. String[], Object[] or File[]) are expanded as separate arguments, this allowsyou to build a variable length list of arguments at runtime.
Note: This property is only visible if "Use rollback executable" is selected.
• Wait for termination
If the action should wait for termination of the process and check if the return valueis 0.
• Variable name for return code
If set, the return code will be saved to this installer variable. The type of the variablewill be java.lang.Integer . Under Windows, this variable will always be equal to 0 if the"Show console window" option below is selected.If a timeout has been set and theprocess is killed after the timeout, the return value will be -10000.
Note: This property is only visible if "Wait for termination" is selected.
216
• Timeout in seconds
If set to a value greater than 0, the executablewill be killed after that number of secondsif it does not return earlier.In that case, the return value will be -10000.
Note: This property is only visible if "Wait for termination" is selected.
• Wait for output streams
If selected, the action will wait until the output streams of the process are fully written.If the process has launched child processes, this can mean that the action will waituntil those child processes have terminated. If that is not desired, please deselect thisoption.
Note: This property is only visible if "Wait for termination" is selected.
• Log arguments
If the arguments should be written into the log file or not. Disabled by default due tosecurity reasons.
• Include parent environment variables [Environment Variables]
If selected, the environment variables of the parent process (the installer) will be set.Otherwise, only the environment variables in the "Specific environment variables" willbe set. This option is ignored on macOS.
• Specific environment variables [Environment Variables]
Specify additional ormodified environment variables that should be set for the executedprocess. Use previous values with the syntax ${PATH};additional .
• Redirect stdout [Redirection]
Redirection mode for stdout
• Installer variable name
An installer variable name towhich the stdout output of the executed process is saved.The contents of the variable will not be displayed in the log file.
Note: This property is only visible if "Redirect stdout" is set to "To installer variable".
• Redirection file
A file to which the stdout output of the executed process is saved. If you specify /dev/stdout , the output will be printed to the default stdout stream of the installerapplication. Relative paths are relative to the working directory of the installerapplication. In order to use a file in the installation directory, enter a path like ${installer:sys.installationDir}/log.txt .
Note: This property is only visible if "Redirect stdout" is set to "To file".
• Fail on error
If selected, the action fails if the redirection file cannot be written. Otherwise, errorsare silently ignored.
Note: This property is only visible if "Redirect stdout" is set to "To file".
• Redirect stderr [Redirection]
Redirection mode for stderr
• Installer variable name
An installer variable name to which the stderr output of the executed process is saved.The contents of the variable will not be displayed in the log file.
Note: This property is only visible if "Redirect stderr" is set to "To installer variable".
217
• Redirection file
A file to which the stderr output of the executed process is saved. If you specify /dev/stderr , the outputwill be printed to the default stderr streamof the installer application.Relative paths are relative to the working directory of the installer application. In orderto use a file in the installation directory, enter a path like ${installer:sys.installationDir}/log.txt .
Note: This property is only visible if "Redirect stderr" is set to "To file".
• Fail on error
If selected, the action fails if the redirection file cannot be written. Otherwise, errorsare silently ignored.
Note: This property is only visible if "Redirect stderr" is set to "To file".
• Redirect stdin [Redirection]
Redirection mode for stdin
• Input string
A string that should be fed to the input stream of the executed process.
Note: This property is only visible if "Redirect stdin" is set to "From string".
• Redirection file
A file which should be fed to the input stream of the executed process. If you specify/dev/stdin , the input from the default stdin stream of the installer application will beused. Relative paths are relative to the working directory of the installer application.In order to use a file in the installation directory, enter a path like ${installer:sys.installationDir}/log.txt .
Note: This property is only visible if "Redirect stdin" is set to "From file".
• Fail on error
If selected, the action fails if the redirection file cannot be written. Otherwise, errorsare silently ignored.
Note: This property is only visible if "Redirect stdin" is set to "From file".
• Show console window [Windows]
Show a console window with the console output of the executable. This makes onlysense if a command line executable is called.
• Keep console window
If selected, the console window will not be closed when the executable has finished.The user has to close the console window manually. This can be useful for debuggingpurposes. If the "Wait for termination" property is selected, the actionwill not terminateuntil the user has closed the console window.
Note: This property is only visible if "Show console window" is selected.
Category: Persistence of installer variables
Create a response file
218
Create a response file at an arbitrary location to save user input for subsequentinstallations. This file can be used with the -varfile command line option.
Applies to: Installation, Uninstallation
Properties:
• File
The response file that should be created. If it already exists, it will be overwritten.
• Variable selection mode
Determines which response file variables are written to the response file.
• Excluded variables
The variable that should be excluded from the response file. If empty all variables willbe used. In the edit dialog, you have to enter one itemper line. Entries that are installervariables with array values (e.g. String[], Object[] or File[]) are expanded as separateentries, this allows you to build a variable length list of entries at runtime.
Note: This property is only visible if "Variable selection mode" is set to "All exceptspecified response file variables".
• Included variables
The variable that should be included in the response file. If empty, no variables will beused. In the edit dialog, you have to enter one item per line. Entries that are installervariables with array values (e.g. String[], Object[] or File[]) are expanded as separateentries, this allows you to build a variable length list of entries at runtime.
Note: This property is only visible if "Variable selection mode" is set to "Only specifiedresponse file variables".
Load a response file
Load a response file that has previously been saved with the "Create a response file"action.
Applies to: Installation, Uninstallation
Properties:
• File
The response file that should be loaded. If empty, the action will try to load theautomatically created response file named response.varfile that has been saved by aprevious installer in the installation directory.
• Excluded variables
The variables in the response file that should be ignored. If empty, all variables will beloaded. In the edit dialog, you have to enter one item per line. Entries that are installervariables with array values (e.g. String[], Object[] or File[]) are expanded as separateentries, this allows you to build a variable length list of entries at runtime.
• Overwrite strategy
If "Overwrite existing" is selected, already defined installer variables will be overwrittenby variable definitions in the response file. With "Do not overwrite command line", you
219
can give priority to command line variable definitions of the form -Vname=value , butstill overwrite previous variable definitions for other variables.
• Register variables for response file
If selected, all variables in the response file will be registered as response file variables,except forvariables that are excluded or systemvariables (startingwith "sys."). Responsefile created by subsequent "Create a response file" actions and the automaticallycreated response file by the installer will contain these variables. Note that form screensregister bound variables for response files only when they are displayed, so if thisoption is deselected, the response file created by an update installationmay not containall variables from the original installation.
Modify a response file
Update all variables in an existing response file. The action does not delete variables inthe response file for which no installer variables are defined, but keeps them as they are.This action is useful for updating a response file from a custom installer application,where not all installer variables are available.
Applies to: Installation, Uninstallation
Properties:
• File
The response file that should be created. If it already exists, it will be overwritten.
• Variable selection mode
Determines which response file variables are written to the response file.
Note: This property is only visible if "Add response file variables" is selected.
• Excluded variables
The variable that should be excluded from the response file. If empty all variables willbe used. In the edit dialog, you have to enter one itemper line. Entries that are installervariables with array values (e.g. String[], Object[] or File[]) are expanded as separateentries, this allows you to build a variable length list of entries at runtime.
Note: This property is only visible if "Variable selection mode" is set to "All exceptspecified response file variables".
• Included variables
The variable that should be included in the response file. If empty, no variables will beused. In the edit dialog, you have to enter one item per line. Entries that are installervariables with array values (e.g. String[], Object[] or File[]) are expanded as separateentries, this allows you to build a variable length list of entries at runtime.
Note: This property is only visible if "Variable selection mode" is set to "Only specifiedresponse file variables".
• Add response file variables
If selected, the specified response file variables are added to the response file.Otherwise only the existing definitions in the response file are updated with theircurrent values.
220
Category: Properties files
Read a properties file
Read a properties file and save a java.util.Map object with the properties to an installervariable. If you use a "Write properties to file" action to write the variable back to disk,the comments on the existing property definitions will be preserved.
Applies to: Installation, Uninstallation
Properties:
• Properties file
The properties file that will be read.
• Encoding
Encoding for the properties file. If "java.util.Properties" is selected, the format of java.util.Properties will be emulated. For other encodings, the escaping for property valueswill be less aggressive.
• Character set name
The character set name as recognized by java.nio.Charset.forName(...) . Valuessupported by all JREs include "US-ASCII" "ISO-8859-1" and "UTF-16". SpecifyingISO-8859-1 is not the sameas selecting "java.util.Properties" for the "Encoding" property,because - except for comments - that format only writes characters from the US-ASCIIcharacter set and escapes more basic characters in property values.
Note: This property is only visible if "Encoding" is set to "Other".
• Variable name
The name of the variable that will be set with an instance of java.util.Map . Enter thevariable without the installer prefix and the dollar sign.
• Merge into existing variable
If the variable already contains a value of type java.util.Map , the properties will bemerged with the entries in that map. The actual map object after the action has runmay be different, since install4j supplies a special map that can retain comments onproperty definitions.
Remove keys from properties file
Remove selected keys from a properties file. The line separator of the properties file isconserved.
Applies to: Installation, Uninstallation
Properties:
• Properties file
The properties file that will modified.
221
• Encoding
Encoding for the properties file. If "java.util.Properties" is selected, the format of java.util.Properties will be emulated. For other encodings, the escaping for property valueswill be less aggressive.
• Character set name
The character set name as recognized by java.nio.Charset.forName(...) . Valuessupported by all JREs include "US-ASCII" "ISO-8859-1" and "UTF-16". SpecifyingISO-8859-1 is not the sameas selecting "java.util.Properties" for the "Encoding" property,because - except for comments - that format only writes characters from the US-ASCIIcharacter set and escapes more basic characters in property values.
Note: This property is only visible if "Encoding" is set to "Other".
• Remove keys
The names of the keys that should be removed. In the edit dialog, you have to enterone itemper line. Keys that are installer variableswith array values (e.g. String[], Object[]or File[]) are expanded as separate keys, this allows you to build a variable length listof keys at runtime.
Write properties to file
Write property definitions to a properties file. The properties can come from an installervariable with a java.util.Map object, another properties file or from direct entry. If the"Merge into existing file" property is selected, the new property definitions will be addedto the existing ones.
Applies to: Installation, Uninstallation
Properties:
• Properties file
The properties file that will be written or modified.
• Encoding
Encoding for the properties file. If "java.util.Properties" is selected, the format of java.util.Properties will be emulated. For other encodings, the escaping for property valueswill be less aggressive.
• Character set name
The character set name as recognized by java.nio.Charset.forName(...) . Valuessupported by all JREs include "US-ASCII" "ISO-8859-1" and "UTF-16". SpecifyingISO-8859-1 is not the sameas selecting "java.util.Properties" for the "Encoding" property,because - except for comments - that format only writes characters from the US-ASCIIcharacter set and escapes more basic characters in property values.
Note: This property is only visible if "Encoding" is set to "Other".
• Line separator
The line separator that should be used for writing the properties file.
222
• Merge into existing file
If selected, and the properties file already exists, the file will be read first and the newproperty definitions will be added to the existing ones.
• Update existing keys
If selected, the values of existing keys will be updated with the new values.
Note: This property is only visible if "Merge into existing file" is selected.
• Update existing comments
If selected, the comments of existing keys will be updated with the new comments.An existing comment will not be deleted if the new comment is empty.
Note: This property is only visible if "Merge into existing file" is selected.
• Source of property definitions
The source of the new property definitions that should be written to the propertiesfile.
• Property definitions
The new property definitions that should be written to the properties file. Commentlines starting with # and empty lines can be interspersedwith the property definitions.
Note: This property is only visible if "Source of property definitions" is set to "Directentry".
• Source properties file
The source file with the new property definitions that should be written to the targetproperties file. The encoding must be the same as that of the target properties file.
Note: This property is only visible if "Source of property definitions" is set to "Propertiesfile".
• Source variable name
The variable name with a java.util.Map object containing the new property definitionsthat should bewritten to the properties file. If themapwas read by a "Read a propertiesfile" action, the original comments will be used.
Note: This property is only visible if "Source of property definitions" is set to "Installervariable".
• Replace installer variables
If selected, installer variables written in the syntax ${installer:variableName} will bereplaced with their current values for all property values. If an installer variable doesnot exist, an error message will be inserted.
• Sort properties
This property determines where new properties should be inserted with respect toexisting properties. If the keys are sorted, then existing and new properties are sortedtogether.
Category: Services
Install a service
223
Installs a service. On Windows, this is done by executing the service launcher with theappropriate arguments. On Unix, a link will be placed in /etc/init.d . On macOS, aLaunchDaemonwill be created. This actionwill be automatically reverted by the 'Uninstallfiles' action. If a helper process with elevated privileges has been created by the "Requestprivileges" action, this action is pushed to the helper process. Please see the help topicon "Elevation Of Privileges" for more information.
Applies to: Installation
Properties:
• Service [General]
The service launcher that will be installed.
• Executable
The service executable.
• Name
The name of the service.
• Auto Start [General]
If the service should be started automatically at boot time.
• Description [General]
An optional description for the service.
• Account Name or SID
The account name or a SID in String form.
Note: This property is only visible if "Account" is set to "Other".
• Password
The password for the specified account.
Note: This property is only visible if "Account" is set to "Other".
• Windows Arguments [Windows]
Optional arguments passed to the main function of the service executable.
• Windows Dependencies [Windows]
Optional dependencies for Windows. Specify as a comma-separated list of the namesof the services that must be started before this service. You do not have to enter coreOS services these services will always be initialized before your service is launched.
• Windows Custom Display Name [Windows]
Optional display name for the service. If empty, the service name is used.
• Windows Priority [Windows]
The base priority class for the service. This only applies to services generated by install4j.
• Account [Windows]
The account the service should run under. Use Local System if you are not sure whatyou need.
• Keep Current Account [Windows]
If the service was already installed, use the currently specified account instead of thevalues above.
224
• Restart on Failure [Windows]
If the service should be automatically restarted if it doesn't exit with exit code 0 or ifit crashes.
• Interactive [Windows]
If the service can interact with the desktop. Not recommended for Windows Vista andhigher.
• Delayed Auto Start [Windows]
If checked and "Auto Start" is also selected the service will be started after all otherauto start services with an additional short delay.
• macOS Identifier [macOS]
The launch daemon identifier for macOS. Typically, this is something like com.mycorp.myService.
Start a service
Starts a service by executing the service launcher with the appropriate arguments. If ahelper process with elevated privileges has been created by the "Request privileges"action, this action is pushed to the helper process. Please see the help topic on "ElevationOf Privileges" for more information.
Applies to: Installation
Properties:
• Service [General]
The service launcher that will be started.
• Executable
The service executable.
• Name
The name of the service.
• For "Auto start installations" only [General]
If selected, the service will only be started when it is installed as an "Auto start" serviceon Windows and macOS. This is a property on the "Install a service" action.
Stop a service
Stops a service by executing the service launcher with the appropriate arguments. If ahelper process with elevated privileges has been created by the "Request privileges"action, this action is pushed to the helper process. Please see the help topic on "ElevationOf Privileges" for more information.
Applies to: Installation, Uninstallation
Properties:
225
• Service [General]
The service launcher that will be stopped.
• Executable
The service executable.
• Name
The name of the service.
Category: Text files
Fix line feeds
Changes the line feeds of text files to the platform specific type.
Applies to: Installation, Uninstallation
Properties:
• Text files
The text files that should be fixed. In the edit dialog you can choose files from thedistribution tree or enter them manually. Text files that are installer variables witharray values (e.g. String[], Object[] or File[]) are expanded as separate text files, thisallows you to build a variable length list of text files at runtime. You can add directoriesas well. In this case, all files in the selected directories that satisfy the "Suffixes" propertywill be fixed.
• Suffixes
The suffixes with a leading dot of the files to be fixed if the "File" property is a directory.If empty, all files will be used. In the edit dialog, you have to enter one item per line.Suffixes that are installer variables with array values (e.g. String[], Object[] or File[]) areexpanded as separate suffixes, this allows you to build a variable length list of suffixesat runtime.
• Recursive
If selected, the operation will be performed recursively on directories. If no selected,all files in directories will be fixed, but subdirectories will not be touched.
Modify text files
Modify installed text files by replacing a search value in the selected files. This action doesnot read the entire file into memory and can work on arbitrarily large text files.
Applies to: Installation, Uninstallation
Properties:
• Text files
The text files that should be modified. In the edit dialog you can choose files from thedistribution tree or enter them manually. Text files that are installer variables with
226
array values (e.g. String[], Object[] or File[]) are expanded as separate text files, thisallows you to build a variable length list of text files at runtime.
• Search value
The value that should be searched
• Replace value
The value that should be used instead
• Log replacement
If the replacement text should be written into the log file or not. If the modified filehas different security settings than the log file, youmight want to disable this propertyfor security reasons.
• Fail if no replacement occurred
If selected, the action will fail if no replacement was performed by the action. Notethat you have to set the error message property in order to display the error to theuser.
• Escape for property file
If set, the replaced values will be escaped for use in a Java property file.
• Encoding
The encoding of the file. If you leave this empty the system default will be used.Common encodings are UTF-8, UTF-16, ISO-8859-1.
Modify text files with regular expressions
Modify installed text files by applying a regular expression.
Applies to: Installation, Uninstallation
Properties:
• Text files
The text files that should be modified. In the edit dialog you can choose files from thedistribution tree or enter them manually. Text files that are installer variables witharray values (e.g. String[], Object[] or File[]) are expanded as separate text files, thisallows you to build a variable length list of text files at runtime.
• Match expression
The match expression, which is applied to the entire contents of the file. If you wishto use the characters ^ and $ for matching line start and line end, please prefix theexpressionwith (?m) . This switches onmulti-linemode. For case-insensitive expressions,prefix with (?i) .
• Replacement
The replacement.
• Replace all
If all occurrences should be replaced or only the first one.
227
• Quote variables
If values of installer variables in the match and replacement expressions should bequoted. This means that the characters of replaced installer variables will be treatedliterally instead of modifying the search or replace expressions with special characterssuch as \ or $.
• Log replacement
If the replacement text should be written into the log file or not. If the modified filehas different security settings than the log file, youmight want to disable this propertyfor security reasons.
• Fail if no replacement occurred
If selected, the action will fail if no replacement was performed by the action. Notethat you have to set the error message property in order to display the error to theuser.
• Escape for property file
If set, the replaced values will be escaped for use in a Java property file.
• Encoding
The encoding of the file. If you leave this empty the system default will be used.Common encodings are UTF-8, UTF-16, ISO-8859-1.
Read text from file
Read the content of a text file and save it to an installer variable. The variable value willbe of type String .
Applies to: Installation, Uninstallation
Properties:
• File
The file fromwhich the text should be read. If the file does not exist, the variable valuewill not be set.
• File encoding
The encoding of the text file. If empty, the native encoding of the operating systemwill be used.
• Variable name
The name of the variable whose value will be set to the text content of the file. If thefile cannot be found, the variable value will not be set.
Replace installer variables in text files
Modify installed text files by replacing all occurrences of installer variables of the form${installer:myVariable} with their current values. The action also replaces i18n variableslike ${i18n;myKey} and compiler variables like ${compiler:myCompilerVariable}
Applies to: Installation, Uninstallation
228
Properties:
• Text files
The text files that should be modified. In the edit dialog you can choose files from thedistribution tree or enter them manually. Text files that are installer variables witharray values (e.g. String[], Object[] or File[]) are expanded as separate text files, thisallows you to build a variable length list of text files at runtime.
• Ignore missing variables
If selected, all missing occurrences of variables will be left as they are. If unselected, amissing variable will be a fatal error leading to the termination of the installer.
• Fail if no replacement occurred
If selected, the action will fail if no replacement was performed by the action. Notethat you have to set the error message property in order to display the error to theuser.
• Escape for property file
If set, the replaced values will be escaped for use in a Java property file.
• Encoding
The encoding of the file. If you leave this empty the system default will be used.Common encodings are UTF-8, UTF-16, ISO-8859-1.
Write text to a file
Write text to a new file or append text to an existing file.
Applies to: Installation, Uninstallation
Properties:
• File
The file that the text should be appended to. If it doesn't exist it will be created.
• Text
The text that should be appended.
• Encoding
The encoding of the file. If you leave this empty the system default will be used.
• Escaped text
If selected, escape sequences like \n,\t or \u1234 in the text property will be replaced.
• Append
If selected, and the file exists, the text will be appended to the existing file. If the filedoes not exist, it will be created in any case.
• Log text
If the text should be written into the log file or not. If the written file has differentsecurity settings than the log file, you might want to disable this property for securityreasons.
229
Category: Update
Check for update
Load the update descriptor from the a URL and save it to the a variable. If successful, thevariable will contain an instance of com.install4j.api.UpdateDescriptor
Applies to: Installation, Uninstallation
Properties:
• Update descriptor URL
The URL from which the update descriptor for this project can be downloaded. Theupdate descriptor file is automatically created when compiling the project and can befound in the media output directory. The URL must start with http:// or https:// . If youadd a query string, it must already be URL encoded. For testing purposes, you can alsouse a file URL like file:/c:/test/updates.xml .
• Request headers
A list of name-value pairs that should be set as additional headers for the request.Request headers that are installer variables with array values (e.g. String[], Object[] orFile[]) are expanded as separate request headers, this allows you to build a variablelength list of request headers at runtime.
• Variable
The installer variable to which an instance of class com.install4j.api.UpdateDescriptorwill be saved if the action is successful.
• Ask for proxy if necessary [Error Handling]
At first, the connection is attempted with the proxy information that is set for thedefault browser. If that fails, and this property is selected, a proxy dialog will be shownwhere the user can configure the proxy that should be used to connect to the webserver.
• Network failure script [Error Handling]
A script that is executed if theHTTP connection fails in such away, that the proxy dialogwould have to be shown. If you return ErrorHandlingMode.IGNORE , the regular proxyor failure handling will proceed, if you return ErrorHandlingMode.CANCEL , the actionwill fail immediately. If you can take corrective action in the script, you can returnErrorHandlingMode.RETRY to make the same HTTP request again. However, you haveto take special care not to enter an infinite loop. Typically, there should be user inputbefore you retry and the user should be given the option to cancel. The script is onlyexecuted for actual network failures, and not if the server or the proxy connectionrequire authentication.
• Accept all SSL certificates [Error Handling]
If the protocol of the URL starts with "https" and this property is selected, the SSLcertificatewill not be checked for validity. This is only recommended for testing purposeswhen working with self-signed certificates.
• Connect timeout [Error Handling]
The timeout for establishing the socket connection in milliseconds. A timeout of zerois interpreted as an infinite timeout.
230
• Read timeout [Error Handling]
The timeout for reading data from the socket connection in milliseconds. A timeoutof zero is interpreted as an infinite timeout.
• Show error message [Error Handling]
Show a default error message if the download fails.
Schedule update installation
Schedule a downloaded media file to be started upon the next start of a launcherconfigured accordingly or by calling UpdateChecker.executeScheduledUpdate().
Applies to: Installation
Properties:
• Installer file
The downloaded installer or macOS single bundle archive.
• Version
The version of the new installer.
• Installer arguments
Optional additional arguments that should be passed to the installer.
• Maximum retries on error [Installation Error Handling]
The maximum number of the times the installer will be executed if an error occursduring installation. Retry is inhibited for one day after an error.
• Maximum retries on cancel [Installation Error Handling]
The maximum number of the times the installer will be executed if it was cancelled bythe user. Retry is inhibited for one day after cancellation.
Shut down calling launcher
Shut down the launcher that called this application if it was started with the com.install4j.api.launcher.ApplicationLauncher API.
Applies to: Installation, Uninstallation
Properties:
• Wait
If selected the action will wait for the calling launcher to exit.
• Timeout
The timeout in seconds this actionwill wait if the 'Wait' property is true. If set to 0 therewill be no timeout.
Category: Windows registry
231
Add access rights for a key in the Windows registry
Add access rights for a key in the Windows registry. If a helper process with elevatedprivileges has been created by the "Request privileges" action, this action is pushed tothe helper process. Please see the help topic on "Elevation Of Privileges" for moreinformation.
Applies to: Installation, Uninstallation
Properties:
• Registry root
The Windows registry root where the key is located.
• Key name
The name of the registry key without a leading backslash.
• Trustee [Rights]
The trustee for which the access right should be granted.
• SID or Account Name
The SID in String formor the account name forwhich the access right should be granted.
Note: This property is only visible if "Trustee" is set to "SID or Account Name".
• Read [Rights]
The right to read the object.
• Write [Rights]
The right to write to the object.
• Execute [Rights]
The right to execute the object.
• All [Rights]
All available rights.
Delete a key or value in the Windows registry
Delete a key or value in the Windows registry.
Applies to: Installation, Uninstallation
Properties:
• Registry root
The Windows registry root where the key or value should be deleted.
• Key name
The name of the registry key that should be deleted or contains the value to be deletedwithout a leading backslash.
232
• Value name
The name of the registry value that should be deleted. If you leave this empty, the keywill be deleted instead.
• Only if empty
If a key should only be deleted when it contains no sub-keys or values.
Read a value from the Windows registry
Read a value from the Windows registry and save it to an installer variable. The type ofthe value depends on the type in the registry, it will be an instance of one of the followingclasses: String, Integer, String[], byte[], WinRegistry.ExpandString .
Applies to: Installation, Uninstallation
Properties:
• Registry root
The Windows registry root where the key is located.
• Key name
The name of the registry key where the value is located without a leading backslash.
• Value name
The name of the registry value whose string content should be read.
• Use a default value
If selected, a default value will be saved to the variable if the key cannot be found inthe registry. Otherwise a missing registry value will result in the failure of the actionand the variable will not be set.
• Default value
The default value that will be used if the value cannot be found in the registry.
Note: This property is only visible if "Use a default value" is selected.
• Variable name
The name of the variable that will be set with the value. Enter the variable without theinstaller prefix and the dollar sign. If the value cannot be found in the registry, thevariable value will not be set.
Set a value in the Windows registry
Set a value in the Windows registry. This action can also create the appropriate key ifnecessary.
Applies to: Installation, Uninstallation
Properties:
233
• Registry root
The Windows registry root where the key should be created
• Key name
The name of the registry key that contains the value or that should be created withouta leading backslash.
• Value name
The name of the registry value.
• Value
The value that should be written into the registry.
• Create key
If set the key will be created if it doesn't exist.
Category: XML files
Apply an XSLT transform
Transform an installed file by applying an XSLT stylesheet.
Applies to: Installation, Uninstallation
Properties:
• Source file
The source for the transformation. This can be the same file as the destination.
• Destination file
The output of the transformation. This can be the same file as the source.
• Stylesheet
The XSLT stylesheet to apply.
• Download external entities [XML parser]
If selected, a DTD referenced with an HTTP system ID will be downloaded as thedocument is parsed. The success of the action requires a direct internet connectionin that case.
• Validate XML file [XML parser]
If selected, the XML parser will validate the document according to a associated DTDor XML schema. If the validation is unsuccessful, the action will fail.
Count nodes in XML file
Count the occurrences of an XPath expression in an XML file and save the result to aninstaller variable.
Applies to: Installation, Uninstallation
234

Properties:
• XML file
The XML file that should be read. It will not be validated, and no external entities willbe downloaded.
• XPath expression
The XPath expression whose occurrences should be counted. Example for countingattributes: /myRootNode/myChildNode/@myAttribute . Example for counting regularnodes: /myRootNode/myChildNode
• Variable name
The name of the variable that will be set to the result of the count as a java.lang.Integer. Enter the variable without the installer prefix and the dollar sign?. If the XPathexpression cannot be found, the variable value will be zero.
Insert XML fragment into XML files
Insert an XML fragment into the position defined by an XPath expression. The fragmentcan replace an existing element node, or it can be inserted as a child or a sibling.
Applies to: Installation, Uninstallation
Properties:
• XML files
The XML files that should be modified. In the edit dialog you can choose files from thedistribution tree or enter them manually. XML files that are installer variables witharray values (e.g. String[], Object[] or File[]) are expanded as separate XML files, thisallows you to build a variable length list of XML files at runtime.
• XPath expression
The XPath expression to the DOMnodes for which the insertion or replacement shouldbe performed. The result of the XPath expression should consist of one or moreelement nodes and not of attribute or text nodes. Example for selecting nodes byposition: /levelOne[2]/levelTwo[4] . Example for selecting nodes by attribute: /myRootNode/myChildNode[id='123'] . If no match can be found, the action will fail.
• XML fragment source
The XML fragment that is inserted can either be entered directly in a text editor or beread from a file.
• XML fragment text
The XML fragment that should be inserted. The fragment must not include an XMLdeclaration and can contain multiple top-level elements. Example: <insert>1</insert><insert>2</insert>
Note: This property is only visible if "XML fragment source" is set to "Direct entry".
• XML fragment file
The source file with the XML fragment that should be inserted. The file has to containa well-formed XML file. The root element is discarded and the XML fragment is formedfrom its immediate children.
235
Note: This property is only visible if "XML fragment source" is set to "Fragment file".
• Insert mode
For each result of the XPath expression, the selected action is performed. You canreplace the matched element, insert the fragment as a sibling or as a child. To insertas the n-th child, enter a positional XPath expression like /root/nested[3] , and choose"Insert before".
• Download external entities [XML parser]
If selected, a DTD referenced with an HTTP system ID will be downloaded as thedocument is parsed. The success of the action requires a direct internet connectionin that case.
• Validate XML file [XML parser]
If selected, the XML parser will validate the document according to a associated DTDor XML schema. If the validation is unsuccessful, the action will fail.
Read value from XML file
Read a string value from an XML file specified by an XPath expression and save the resultto an installer variable.
Applies to: Installation, Uninstallation
Properties:
• XML file
The XML file that should be read. It will not be validated, and no external entities willbe downloaded.
• XPath expression
The XPath expression to the DOM node whose string value should be read. Examplefor reading text fromanattribute: /myRootNode/myChildNode/@myAttribute . Examplefor reading text from an element: /myRootNode/myChildNode/text()
• Variable name for string value
The name of the variable that will be set with the string value of the matched node.Enter the variablewithout the installer prefix and the dollar sign. If the XPath expressioncannot be found, the variable value will not be set. If the XPath expression matches anode with a null node value, such as en element, the variable will be set to null .
• Variable name for node
The name of the variable that will be set with the node as an org.w3c.dom.Nodeinstance. Enter the variable without the installer prefix and the dollar sign. If the XPathexpression cannot be found, the variable value will not be set.
Remove nodes from XML files
Remove selected nodes from XML files by specifying an XPath expression.
Applies to: Installation, Uninstallation
236
Properties:
• XML files
The XML files that should be modified. In the edit dialog you can choose files from thedistribution tree or enter them manually. XML files that are installer variables witharray values (e.g. String[], Object[] or File[]) are expanded as separate XML files, thisallows you to build a variable length list of XML files at runtime.
• XPath expression
The XPath expression to the DOM nodes that should be removed. The result of theXPath expression can be or any node type. Example for selecting element nodes: /myRootNode/myChildNode[id='123'] . Example for selecting attribute nodes: //@removedAttribute . Example for selecting text nodes: //container/text() . If no matchcan be found, the action will fail.
• Download external entities [XML parser]
If selected, a DTD referenced with an HTTP system ID will be downloaded as thedocument is parsed. The success of the action requires a direct internet connectionin that case.
• Validate XML file [XML parser]
If selected, the XML parser will validate the document according to a associated DTDor XML schema. If the validation is unsuccessful, the action will fail.
Replace text in XML files
Modify installed XML files by selecting nodes with an XPath expression and applying aregular expression on the selected values.
Applies to: Installation, Uninstallation
Properties:
• XML files
The XML files that should be modified. In the edit dialog you can choose files from thedistribution tree or enter them manually. XML files that are installer variables witharray values (e.g. String[], Object[] or File[]) are expanded as separate XML files, thisallows you to build a variable length list of XML files at runtime.
• XPath expression
The XPath expression to selectedDOMnodes that have a value (this includes attributesand text). Example for replacing text in an attribute: /myRootNode/myChildNode/@myAttribute . Example for replacing text in an element: /myRootNode/myChildNode/text() . This will also work if myChildNode is an empty node. If you want to match linebreaks with the dot as well, prefix the regular expression with (?s) . If you want thecomparison to be case insensitive, prefix it with (?i) .
• Match expression
The match expression. This is a regular expression.
• Replacement
The replacement. The replacement string may contain references to subsequences,see the javadoc for java.util.regex.Matcher#appendReplacement for more details
237
• Replace all
If all occurrences should be replaced or only the first one.
• Quote variables
If values of installer variables in the match and replacement expressions should bequoted. This means that the characters of replaced installer variables will be treatedliterally instead of modifying the search or replace expressions with special characterssuch as \ or $.
• Log replacement
If the replacement text should be written into the log file or not. If the modified filehas different security settings than the log file, youmight want to disable this propertyfor security reasons.
• Download external entities [XML parser]
If selected, a DTD referenced with an HTTP system ID will be downloaded as thedocument is parsed. The success of the action requires a direct internet connectionin that case.
• Validate XML file [XML parser]
If selected, the XML parser will validate the document according to a associated DTDor XML schema. If the validation is unsuccessful, the action will fail.
Category: ZIP files and archives
Create a ZIP file
Create a ZIP file from the specified source files and directories.
Applies to: Installation, Uninstallation
Properties:
• ZIP file
The ZIP file that should be created.
• Source files or directories
The files and directories to be zipped. In the edit dialog you can choose files from thedistribution tree or enter themmanually. Files and directories that are installer variableswith array values (e.g. String[], Object[] or File[]) are expanded as separate files anddirectories, this allows you to build a variable length list of files and directories atruntime.
• File filter script
The file filter script is invoked for each file that is about to be processed by this action.The script is not invoked for directories. You can return true if the file should beprocessed or false if it should be excluded from processing.
• Directory filter script
The directory filter script is invoked for each directory that is about to be processedby this action. The script is not invoked for files. You can return true if the directoryshould be processed or false if it should be excluded from processing.
238
• Show progress
If selected, and a progress bar is available on the current screen, the action will showits progress in the progress bar.
• Show file names
If selected, the names of the files that are processed will be shown during theinstallation.
Note: This property is only visible if "Show progress" is selected.
• Resolve relative file in
A relative zip file can be resolved against the installation directory or against the rootof the temporarily extracted archive.
• Add top level directories
If selected, all directories that you have added to the source files, will be added underthe name of the directory. Otherwise, the contents of the directories will be addeddirectly to the root of ZIP file.
Extract a DMG file on macOS
Extracts the content of a DMG file to an arbitrary location on macOS.
Applies to: Installation, Uninstallation
Properties:
• DMG file
The DMG file that contains the content to be extracted.
• File filter script
The file filter script is invoked for each entry in the archive file that is about to beprocessed by this action. The script is invoked for both directories and files, which arepassed as relative files . You can return true if the file or directory should be processedor false if it should be excluded from processing. If you leave the script empty, all filesand directories are processed.
• Destination directory
The destination directory. Relative directory information in the zip file will be addedto this value. If the destination directory does not exist, it will be created.
• Show progress
If the action should show its progress with the progress bar and the detail message.
• Show file names
If selected, the names of the files that are processed will be shown during theinstallation.
Note: This property is only visible if "Show progress" is selected.
Extract a TAR file
239
Extracts the content of a tar or tar.gz file to an arbitrary location.
Applies to: Installation, Uninstallation
Properties:
• Tar file
The tar or tar.gz file that contains the content to be extracted.
• File filter script
The file filter script is invoked for each entry in the archive file that is about to beprocessed by this action. The script is invoked for both directories and files, which arepassed as relative files . You can return true if the file or directory should be processedor false if it should be excluded from processing. If you leave the script empty, all filesand directories are processed. Note that tar files have no hierarchical directorystructure, so it is not guaranteed that you are passed directory entries before entriesof contained files. This also means that by excluding a directory, you do notautomatically exclude its contents, you have to check and reject each contained file aswell.
• Destination directory
The destination directory. Relative directory information in the zip file will be addedto this value. If the destination directory does not exist, it will be created.
• Show progress
If the action should show its progress with the progress bar and the detail message.
• Show file names
If selected, the names of the files that are processed will be shown during theinstallation.
Note: This property is only visible if "Show progress" is selected.
Extract a ZIP file
Extracts the content of a ZIP file to an arbitrary location.
Applies to: Installation, Uninstallation
Properties:
• Zip file
The zip file that contains the content to be installed.
• File filter script
The file filter script is invoked for each entry in the ZIP file that is about to be processedby this action. The script is invoked for both directories and files, which are passed asrelative files . You can return true if the file or directory should be processed or falseif it should be excluded from processing. If you leave the script empty, all files anddirectories are processed. Note that ZIP files have no hierarchical directory structure,so it is not guaranteed that you are passed directory entries before entries of containedfiles. This also means that by excluding a directory, you do not automatically excludeits contents, you have to check and reject each contained file as well.
240
• Destination directory
The destination directory. Relative directory information in the zip file will be addedto this value. If the destination directory does not exist, it will be created.
• Show progress
If the action should show its progress with the progress bar and the detail message.
• Show file names
If selected, the names of the files that are processed will be shown during theinstallation.
Note: This property is only visible if "Show progress" is selected.
• File name encoding
The encoding for names of ZIP file entries. If you leave this property empty, UTF-8 willbe used. Only has an effect on Java 7+.
• Resolve relative file in
A relative destination directory can be resolved against the installation directory oragainst the root of the temporarily extracted archive.
• Resolve relative file in
A relative zip file can be resolved against the installation directory or against the rootof the temporarily extracted archive.
• File access mode [Unix]
The UNIX access mode of extracted files.
• Dir access mode [Unix]
The UNIX access mode of extracted directories.
Install content of a ZIP file
Installs the content of an external ZIP file to an arbitrary location. This action will beautomatically reverted by the 'Uninstall files' action.
Applies to: Installation
Properties:
• Zip file
The zip file that contains the content to be installed.
• File filter script
The file filter script is invoked for each entry in the ZIP file that is about to be processedby this action. The script is invoked for both directories and files, which are passed asrelative files . You can return true if the file or directory should be processed or falseif it should be excluded from processing. If you leave the script empty, all files anddirectories are processed. Note that ZIP files have no hierarchical directory structure,so it is not guaranteed that you are passed directory entries before entries of containedfiles. This also means that by excluding a directory, you do not automatically excludeits contents, you have to check and reject each contained file as well.
241
• Destination directory
The destination directory. Relative directory information in the zip file will be addedto this value. If the destination directory does not exist, it will be created.
• Show progress
If the action should show its progress with the progress bar and the detail message.
• Show file names
If selected, the names of the files that are processed will be shown during theinstallation.
Note: This property is only visible if "Show progress" is selected.
• File name encoding
The encoding for names of ZIP file entries. If you leave this property empty, UTF-8 willbe used. Only has an effect on Java 7+.
• Overwrite mode
How to handle an existing destination file.
• Uninstall mode
The mode how the uninstaller should handle files created with this action.
• File access mode [Unix]
The UNIX access mode of installed files.
• Dir access mode [Unix]
The UNIX access mode of installed directories.
• Shared file [Windows]
If the file should be registered as a shared file.
• Delay if necessary [Windows]
If selected and a destination file cannot be replaced, the operation will be scheduledfor the next reboot. The variable sys.rebootRequired will be set to Boolean.TRUE inthis case.
• Trigger reboot if required [Windows]
If selected and an operation is delayed until reboot, the user will be asked for a rebootautomatically at the end of installation.
Modify a ZIP file
Modify the contents of a ZIP file with a configurable list of actions.
Applies to: Installation, Uninstallation
Properties:
• Zip file
The zip file that should be modified.
• Modification actions
The actions that modify the contents of the ZIP file. All actions operate in the rootdirectory of the temporarily extracted ZIP file, except where configurable otherwise.
242
The "Copy files and directories" action can be used to copy files into or from the archive,the "Delete files and directories" action is used for removing files. All actions formodifying text files, XML files, property files and ZIP files are also supported.
• Show progress
If the action should show its progress with the progress bar and the detail message.
Download and install component
Download a specified downloadable component and install it. This action only works forinstallation components that have beenmarked as "downloadable" on the "Options" tabof the installation component configuration. Note: The "Install Files" action alreadydownloads and installs all selected downloadable installation components.This action isintended for scenarios where an installation component has to be downloaded after the"Install files" action has run. For example, you could use this in a custom installerapplication to install optional files.
Applies to: Installation
Properties:
• Installation component
The installation component to be downloaded. Only downloadable installationcomponents are displayed
• Show progress
If selected, and a progress bar is available on the current screen, the action will showits progress in the progress bar.
• Show file names
If selected, the names of the files that are installedwill be shown during the installation.
• File filter [Handlers]
Expression or script that is invoked for each file to decide whether to install the file ornot.
• Directory resolver [Handlers]
Expression or script that resolves the actual installation directory separately for eachinstalled file. Return null , if youwould like to choose the standard installation directoryfor a file.
• Delay if necessary [Windows]
If selected and a destination file cannot be replaced, the operation will be scheduledfor the next reboot. The context method isRebootRequired() will return true in thiscase.
• Trigger reboot if required [Windows]
If selected and an operation is delayed until reboot, the user will be asked for a rebootautomatically at the end of installation.
• Install in single bundle [macOS]
This option only applies to single bundle media types. If selected, files will be resolvedinside the bundle. In this case, the behavior is equivalent to the "Install files" action. If
243
unselected files will be resolved like specified in the distribution tree. A "Directoryresolver" script can be used to specify a useful installation location.
Execute previous uninstaller
Uninstalls the previous installation of this application in the selected installation directoryby executing the previous uninstaller.
Applies to: Installation
Properties:
• Installation directory
The installation directory for which the uninstaller should be run. Leave empty for thecurrent installation directory.
• Only if the same application ID is found
If selected, the actionwill only be performed if the application ID found in the installationdirectory is the same as that of the currently executed installer.
• Uninstall services
If selected, the uninstaller will auto-uninstall services. Deselect this option if you wantto retain previous service settings like the user account setting on Windows. Worksonly with uninstallers built with install4j 6.1+.
• Installer variables
Specify installer variables that should be passed to the uninstaller. Use the button onthe right side to open a dialog for easy entry or enter a list of definitions separated bysemicolons like var1=value1;var2=value2 . Use installer variables from the installerwith the usual syntax var1=${installer:otherVar} .
Install files
Install all files in the distribution tree that are contained in the selected installationcomponents.
Applies to: Installation
Properties:
• Validate application id
Check if another application is installed in the selected directory or if the applicationis not the correct target for an add-on installer. If you have an "installation location"screen, you don't have to select this option.
• Insufficient disk space warning
Show a warning message if there is not sufficient disk space for the installation on theselected target drive.
244
• Install runtime
Create the installation directory and install the install4j runtime. If your installer justmodifies some folders and does not need launchers, an uninstaller or custom installerapplications, you can deselect this option and use other installation roots in thedistribution tree to install files.
• Update bundled JRE
Update a bundled JRE if it already exists. If your application uses the JRE outside thegenerated launchers, an update of a bundled JREmight fail. In that case you can deselectthis property to keep the old JRE and skip the update.
• Save downloaded files
If this property is set and the action downloads files it will try to place them next tothe media file. In this case, the installer won't have to download the files again if it isinvoked another time.
• Show file names
If selected, the names of the files that are installedwill be shown during the installation.
• File filter [Handlers]
Expression or script that is invoked for each file to decide whether to install the file ornot.
• Directory resolver [Handlers]
Expression or script that resolves the actual installation directory separately for eachinstalled file. Return null , if youwould like to choose the standard installation directoryfor a file.
• Installation size calculator [Handlers]
Expression or script that calculates a custom installation size in bytes. The default sizein bytes is passed as a parameter.
• Delay if necessary [Windows]
If selected and a destination file cannot be replaced, the operation will be scheduledfor the next reboot. The context method isRebootRequired() will return true in thiscase.
• Trigger reboot if required [Windows]
If selected and an operation is delayed until reboot, the user will be asked for a rebootautomatically at the end of installation.
Uninstall files
Uninstall all installedfiles.
Applies to:Uninstallation
245
B.5.8 Installer - Screens And Actions Groups
Screen and action groups can be configured on the screens & and actions tab [p. 148] .
Actions and screens can be grouped in the tree of installer elements. Groups of the same typecan be nested, meaning that you can put a screen group into a screen group or an action groupinto an action group.
You can nest asmany levels of groups as youwish. Next to the label of the screen or action groupin the tree of installer elements, the number of all contained screens or actions is shown in boldfont. Elements in nested groups are counted as well.
Grouping offers the following:
• Organization
If you have many screens or actions, groups emphasize which elements belong together. Youcan add a common comment to the group.
• Common condition
Groups have a "Condition expression" property that allows you to skip the group with acommon condition instead of having to repeat the condition for each contained element.
• Single link target
If you want to reuse a set of adjacent screens or actions in a different part of your project,you can put them in a group and add a single link to that group instead of linking to eachelement separately.
• Looping
A group has a "Loop expression" property that allows you to execute the group repeatedlyuntil the loop expression returns false.
• Jump targets (screen groups only)
When you jump to a screen programmatically (with context.gotoScreen(...)), it is moremaintainable to jump to a group instead of to a single screen. You can think of the group astaking the function of a label in this case.
The configurable properties of screen and action groups are:
Screen group
A screen group contains multiple screens that can be disabled with a single conditionexpression on the group.
Properties:
• Action elevation type [Privileges]
If any contained actions should run in the elevated helper process, if their "Actionelevation type" property is set to "Inherit from parent".An elevated helper process isavailable on Windows and macOS if the process has been started without adminprivileges and the "Request privileges" action has been configured to require fullprivileges.
• Style [GUI Options]
The default screen style for this installer application. Screens and screen groups canoverride this style.
246
• Customize title bar
A form component in the selected style is configured to allow customization of selectedproperties.
• Custom watermark
A form component in the selected style is configured to allow customization of selectedproperties.
• Customize banner image
A form component in the selected style is configured to allow customization of selectedproperties.
• Condition expression [Control Flow]
This expression is evaluated just before the screen is displayed. If the expression orscript returns false , the entire screen group will be skipped.
• Loop [Control Flow]
If selected, the screen group will be looped. With the child properties you can set anexpression that terminates the loop and configure a loop index that is available insidethe loop. Note: If actions should be repeated in a loop, their "Can be executedmultipletimes" property has to be selected. If form components in a screen should bere-initialized on each loop, their "Reset initialization on previous" property has to beselected.
• Loop index start value
The start value for the loop index variable that is passed to the "Loop expression"
Note: This property is only visible if "Loop" is selected.
• Loop index step
The step for the loop index variable that is passed to the "Loop expression". At theend of each loop, this step is added to the loop index. It is added before the "Loopexpression" is evaluated. To decrement, specify a negative value.
Note: This property is only visible if "Loop" is selected.
• Loop expression
This expression is evaluated when the end of the screen group is reached. If it returnstrue , all screens will be repeated. If you leave the expression empty, no loop will beperformed.
Note: This property is only visible if "Loop" is selected.
• Loop index variable name
If you want to use the loop index in a screen that is contained in the group, you canoptionally save the value to an installer variable. Specify the variable name to whichthe value should be saved as a java.lang.Integer .
Note: This property is only visible if "Loop" is selected.
Action group
An action group contains multiple actions that can be disabled with a single conditionexpression on the group.
247

Properties:
• Action elevation type [Privileges]
If any contained actions should run in the elevated helper process, if their "Actionelevation type" property is set to "Inherit from parent".An elevated helper process isavailable on Windows and macOS if the process has been started without adminprivileges and the "Request privileges" action has been configured to require fullprivileges.
• Condition expression [Control Flow]
This expression is evaluated just before the action is executed. If the expression orscript returns false , the entire action group will be skipped.
• Loop [Control Flow]
If selected, the action group will be looped. With the child properties you can set anexpression that terminates the loop and configure a loop index that is available insidethe loop. Note: If actions should be repeated in a loop, their "Can be executedmultipletimes" property has to be selected. If form components in a screen should bere-initialized on each loop, their "Reset initialization on previous" property has to beselected.
• Loop index start value
The start value for the loop index variable that is passed to the "Loop expression"
Note: This property is only visible if "Loop" is selected.
• Loop index step
The step for the loop index variable that is passed to the "Loop expression". At theend of each loop, this step is added to the loop index. It is added before the "Loopexpression" is evaluated. To decrement, specify a negative value.
Note: This property is only visible if "Loop" is selected.
• Loop expression
This expression is evaluated when the end of the action group is reached. If it returnstrue , all actions will be repeated. If you leave the expression empty, no loop will beperformed.
Note: This property is only visible if "Loop" is selected.
• Loop index variable name
If you want to use the loop index in a action that is contained in the group, you canoptionally save the value to an installer variable. Specify the variable name to whichthe value should be saved as a java.lang.Integer .
Note: This property is only visible if "Loop" is selected.
• On error break group [Error Handling]
If selected, and one of the contained actions returns with an error, the control flowwill step out of the action group and continue with the next element after the group.This behavior only takes effect if the problematic action has its failure strategy set to"Continue on failure".
• Retry expression
If this expression is set and returns true , the action group is repeated. If the actiongroup is configured to loop, the loop index will not be incremented.
Note: This property is only visible if "On error break group" is selected.
248

• Failure strategy
The failure strategy that should be chosen if the action group fails. The "Errormessage"property will be used for the option dialog. If you also define a "Default errormessage",you will get two option dialogs, the first one from the action that causes the failure.
Note: This property is only visible if "On error break group" is selected.
• Error message
If the action group fails, this error message is displayed to the user, otherwise theaction group fails silently.
Note: This property is only visible if "On error break group" is selected.
• Default error message [Error Handling]
A default error message used by all actions that have no dedicated error message.
249
B.5.9 Installer - Configuring Form Components
For more information on form screens and related concepts, please see the corresponding helptopic [p. 17] .
Please see the list of available form components [p. 260] that come with install4j.
The Add button shows a popup window where you can select whether to add
• a form component. Form components are made available by install4j or are contributed byan installed extension [p. 87] . A registry dialog [p. 320] will be shown where you can selectthe desired form component.
• a form component that is contained in your custom code. New types of reusable formcomponents can be developedwith the install4j API [p. 84] . In your custom code configuration[p. 313] you can specify code locations that are scanned for suitable classes. A class selector[p. 319] will be shown where you can select the desired class.
• a layout group [p. 252] , either a vertical group or a horizontal group. The new layout group isinitially empty. Note that you can also create layout groups directly from a selection in thetree of installer elements (see below).
If you select a single form component in the list of form components, you can edit its propertieson the right side. Selecting multiple form components is possible on the same tree level, i.e. allselected elements have to be siblings in the tree.
When the configuration area is focused, you can transfer the focus back to the list of formcomponents with the keyboard by pressing ALT-F1.
The list of form components provides the following actions in the toolbar on the right that operateon the current selection. You can also access these actions from the context menu or use theassociated keyboard shortcuts.
• Delete
All selected form components will be deleted after a confirmation dialog when invoking theDelete action. The deleted form components cannot be restored.
• Rename
After you add a form component, the list of form components shows it with its default name.This is often enough, however, if you have multiple instances of the same form componentalongside, a custom name makes it easier to distinguish these instances. You can assign acustom name to each form component with the Rename action. The default name is stilldisplayed in brackets after the custom name. To revert to the default, just enter an emptycustom name in the rename dialog.
• Comment
Bydefault, form components have no comments associatedwith them. You can add commentsto selected form components with the Add Comments action. When a comment is added,the affected form components will receive a "Comments" tab. After adding a comment to asingle form component, the comment area is focused automatically. Likewise, you can removecomments from one or more form components with the Remove Comments action.
In order to visit all comments, you can use the Show next comment and Show previous commentactions. These actionswill focus the comment area automatically andwrap around if no furthercomments can be found.
250
• Disable
In order to "comment out" form components, you can use the Disable action. Theconfiguration of the disabled form components will not be displayed, their entries in the listof form components will be shown in gray and they will not be checked for errors when theproject is built.
• Copy and paste
install4j offers an inter-process clipboard for form components. You can Cut or Copyform components to the clipboard and Paste them in the same or a different instance ofinstall4j. Note that references to launchers or references to files in the distribution tree mightnot be valid after pasting to a different project.
Pasted form components are appended to the end of the list of form components.
• Reorder
If your selection is a single contiguous interval, you canmove the entire block up or downin the list. The selection can only be moved on the same level with the reorder actions. Tomove the selection to a different parent, you can cut and paste it (see above).
• Group
You can create a layout group [p. 252] from the selected form components with the CreateHorizontal Group and Create Vertical Group actions. The new group will be inserted in placeof the selected elements.
You can dissolve a group with the Dissolve Group action. This action is only enabled if theselection consists of a single layout group. The elements contained in the groupwill be insertedin place of the group. Nested groups will not be dissolved.
Common properties of form components are:
• Insets [Layout]
This insets around the form component. The format is top;left;bottom;right, use the drop-downbutton at the right side to show the insets editor.
• Initialization script [Initialization]
A script that initializes the form component. To configure the contained principal component,such as a JCheckBox, use the configurationObject parameter (if available). This script will runafter the internal initialization of the form component, just before the component appearson the screen. It will not be invoked in console mode.
• Reset initialization on previous [Initialization]
If set, the component will be initialized each time the user enters in the forward direction.Otherwise, the initialization will be performed only once. This setting affects both the internalinitialization as well as the initialization script.
• Visibility script [Initialization]
A script that determines whether the form component will be visible or not. This works forboth GUI and console modes. In GUI mode, the script will be invoked each time just beforethe form component is initialized.
You can preview a form screen with the Preview button which is also available on the propertypage of a screen. For screens that embed forms, the preview may not show the actual screen.However, the layout of the form itself will be the same at runtime.
251
B.5.10 Installer - Layout Groups
Layout groups can be configured on the form components [p. 250] configuration dialog.
For more information on layout groups, please see the corresponding help topic [p. 20] .
Form components can be grouped in horizontal and vertical layout groups.
You can nest as many levels of groups as you wish. Next to the label of the layout group in thetree of form components, the number of all contained form components is shown in bold font.Form components in nested groups are counted as well.
Grouping offers the following benefits:
• Custom layout
Instead of a simple sequence of form components on a form screen, you can use horizontallayout groups to put form components side-by-side. Nesting vertical and horizontal formcomponents allows you to achieve virtually any layout.
Sometimes, enclosing groups and sibling groups span a cell that cannot be entirely filled witha layout group. With the "Anchor" property you can determine where the layout should beplaced. By default, horizontal form components are anchored "West" and vertical formcomponents are anchored "North-West".
Layout groups have a configurable cell spacing. For vertical layout groups, this is the verticalgap between two form components (0 pixels by default), for horizontal layout groups this isthe horizontal gap between two adjacent form components (5 pixels by default)
For each layout group, you can specify insets that are inserted around the entire layout group.By default, the insets a zero in all directions.
By default, horizontal layout groups align a leading label of the first form component in thegroup with other form components from a direct vertical parent group. This is usuallyappropriate when horizontal groups are used to attach additional form components to theright side. If this alignment is not desired, you can use the "Align first label" property of ahorizontal layout group to switch off the alignment.
Vertical layout groups always break alignment of leading labels.Within a vertical group, leadinglabels are aligned, but between vertical groups, the width of leading labels is unrelated.
• Organization
If you have many form components on a screen, vertical groups emphasize which formcomponents belong together. You can add a common comment to the group.
• Common visibility script
Groups have a "Visibility script" property that allows you to hide the entire group with acommon condition instead of having to repeat the condition for each contained formcomponent.
• Single target for coupled form components
If a set of form components should be coupled to the selection state of a check box or a singleradio button, you can select the containing layout group as the target instead of selecting allcoupled form components separately.
The configurable properties of horizontal and vertical layout groups are:
Horizontal group
252
A horizontal form component group contains one or more form components that aredistributed along the horizontal axis.
Properties:
• Image File
An image that is shown on the edge or as a background. Apart from an image that isanchored to the center of the group, the image can optionally cut off an entire edgefrom the group. In that case it is possible to set a background color for the edge stripeso that the image can blend into the surroundings. Can be empty. To add ahigh-resolution image for retina displays, create a file with double the resolution andan additional @2x after the name (e.g. image.png and [email protected] ) next to theselected image. The install4j runtime JAR file i4jruntime.jar contains a number of imagefiles that you can reference here by prefixing the icon file name with "icon:". Forexample, icon:lock_open_32.png loads a 32x32 icon showing an open lock.
• Image anchor
The anchorwhere the imagewill be attached to in the layout group. If Center is chosen,the image is always displayed in the background.
• Image edge
For corner anchors, you have to select either the horizontal or the vertical edge thatwill optionally be filled with the image edge background color and that will be cut offrom the layout group if the image is not displayed in the background.
• Image edge background color
The background color that the image edge should be filledwith. If the image terminateswith the same color, the image will blend with the background and the entire edge willlook like a single visual element. Not available if the anchor is set to "Center"
• Image insets
The insets around the image. The format is top;left;bottom;right, use the drop-downbutton at the right side to show the insets editor.
• Overlap with contained components
If selected, the image will by used as a background image and form componentscontained in the layout group will overlap with the image. Otherwise, the image edgewill be cut off from the layout group and form components will not overlap with theimage. In that case, the insets of the layout group will be applied to the actual contentarea that excludes the image edge. Not available if the anchor is set to "Center"
• Image edge border
If selected, the image edge will be separated by a line border from the content area.Not available if the image overlaps the contained components.
• Image edge border color
The color of the image edge border. Leave empty to choose the default separator colorof the current look and feel.
Note: This property is only visible if "Image edge border" is selected.
• Image edge border width
The width of the image edge border in pixels.
Note: This property is only visible if "Image edge border" is selected.
253
• Background color
The background color of the layout group. Can be empty.
• Foreground color
The foreground color of the layout group. Can be empty. If set, all contained formcomponents will use this foreground color except those that have an explicitlyconfigured foreground color.
• Border sides
On which sides a line border should be painted around the form component, a list of"top", "right", "bottom" and "left", separated by semicolons. Use the drop-downbuttonto select the sides visually.
• Border color
The color of the drawn border sides. Leave empty to choose the default separatorcolor of the current look and feel.
• Border width
The width of the drawn border sides in pixels.
• Visibility script [Initialization]
A script that determines whether form components in the group (and all descendantcomponents in nested groups) will be visible or not. Thisworks for bothGUI and consolemodes. In GUI mode, the script will be invoked each time just before the formcomponents are initialized. Visibility scripts of nested form components can furtherhide single form components, but they cannot show them if a parent layout group isalready hidden.
• Insets [Layout]
The insets around the entire group. The format is top;left;bottom;right, use thedrop-down button at the right side to show the insets editor.
• Anchor [Layout]
The position in the available space where the group is anchored in the layout. This isonly relevant if the group takes less space than the cell that is created by thesurroundings.
• Cell spacing [Layout]
The cell spacing determines howmany pixels are inserted between single componentsin the layout group.
• Align first label [Layout]
If the horizontal group is directly added to a vertical group or to the top-level of a form,the leading label in the horizontal group is aligned with other leading labels in thevertical parent group. If this alignment is not desired, you can deselect this property.
• Make children same height [Layout]
If all contained elements should have the same height.
Vertical group
A vertical form component group contains one or more form components that aredistributed along the vertical axis.
254
Properties:
• Image File
An image that is shown on the edge or as a background. Apart from an image that isanchored to the center of the group, the image can optionally cut off an entire edgefrom the group. In that case it is possible to set a background color for the edge stripeso that the image can blend into the surroundings. Can be empty. To add ahigh-resolution image for retina displays, create a file with double the resolution andan additional @2x after the name (e.g. image.png and [email protected] ) next to theselected image. The install4j runtime JAR file i4jruntime.jar contains a number of imagefiles that you can reference here by prefixing the icon file name with "icon:". Forexample, icon:lock_open_32.png loads a 32x32 icon showing an open lock.
• Image anchor
The anchorwhere the imagewill be attached to in the layout group. If Center is chosen,the image is always displayed in the background.
• Image edge
For corner anchors, you have to select either the horizontal or the vertical edge thatwill optionally be filled with the image edge background color and that will be cut offrom the layout group if the image is not displayed in the background.
• Image edge background color
The background color that the image edge should be filledwith. If the image terminateswith the same color, the image will blend with the background and the entire edge willlook like a single visual element. Not available if the anchor is set to "Center"
• Image insets
The insets around the image. The format is top;left;bottom;right, use the drop-downbutton at the right side to show the insets editor.
• Overlap with contained components
If selected, the image will by used as a background image and form componentscontained in the layout group will overlap with the image. Otherwise, the image edgewill be cut off from the layout group and form components will not overlap with theimage. In that case, the insets of the layout group will be applied to the actual contentarea that excludes the image edge. Not available if the anchor is set to "Center"
• Image edge border
If selected, the image edge will be separated by a line border from the content area.Not available if the image overlaps the contained components.
• Image edge border color
The color of the image edge border. Leave empty to choose the default separator colorof the current look and feel.
Note: This property is only visible if "Image edge border" is selected.
• Image edge border width
The width of the image edge border in pixels.
Note: This property is only visible if "Image edge border" is selected.
• Background color
The background color of the layout group. Can be empty.
255
• Foreground color
The foreground color of the layout group. Can be empty. If set, all contained formcomponents will use this foreground color except those that have an explicitlyconfigured foreground color.
• Border sides
On which sides a line border should be painted around the form component, a list of"top", "right", "bottom" and "left", separated by semicolons. Use the drop-downbuttonto select the sides visually.
• Border color
The color of the drawn border sides. Leave empty to choose the default separatorcolor of the current look and feel.
• Border width
The width of the drawn border sides in pixels.
• Visibility script [Initialization]
A script that determines whether form components in the group (and all descendantcomponents in nested groups) will be visible or not. Thisworks for bothGUI and consolemodes. In GUI mode, the script will be invoked each time just before the formcomponents are initialized. Visibility scripts of nested form components can furtherhide single form components, but they cannot show them if a parent layout group isalready hidden.
• Insets [Layout]
The insets around the entire group. The format is top;left;bottom;right, use thedrop-down button at the right side to show the insets editor.
• Anchor [Layout]
The position in the available space where the group is anchored in the layout. This isonly relevant if the group takes less space than the cell that is created by thesurroundings.
• Cell spacing [Layout]
The cell spacing determines howmany pixels are inserted between single componentsin the layout group.
• Make children same width [Layout]
If all contained elements should have the same width.
In addition to the above layout groups, you can add tabbed panes to a form. A tabbed pane isadded by choosing Tabbed Panes->Add Tabbed Pane from the dropdown menu displayed by the
Add button. Below the tabbed pane, you have to add one or more single tabs by choosingTabbed Panes->Add Single Tab For Tabbed Pane. Each single tab can then contain arbitrary formcomponents or layout groups.
The configurable properties of tabbed panes and single tabs are:
Tabbed pane
A tabbed pane contains a number of single tabs, which in turn contain form components.
Properties:
256
• Visibility script [Initialization]
A script that determines whether form components in the group (and all descendantcomponents in nested groups) will be visible or not. Thisworks for bothGUI and consolemodes. In GUI mode, the script will be invoked each time just before the formcomponents are initialized. Visibility scripts of nested form components can furtherhide single form components, but they cannot show them if a parent layout group isalready hidden.
• Insets [Layout]
The insets around the entire group. The format is top;left;bottom;right, use thedrop-down button at the right side to show the insets editor.
• Anchor [Layout]
The position in the available space where the group is anchored in the layout. This isonly relevant if the group takes less space than the cell that is created by thesurroundings.
• Tab placement [Tabbed Pane]
The location where the tabs will be displayed.
• Tab layout policy [Tabbed Pane]
The layout policy for tabs determined what should be done if there is not enoughhorizontal space to display all tabs. The default policy "Wrap" creates multiple lines oftabs to accommodate all tabs, the policy "Scroll" shows a scroll button and keeps asingle line of tabs.
• Fill horizontal space [Tabbed Pane]
If set, the tabbed will fill all the available horizontal space regardless of its content,otherwise it will be as wide as required by the preferred size of the contained formcomponents.
• Fill extra vertical space [Tabbed Pane]
If set, the tabbed pane will expand to fill remaining vertical space. Extra vertical spaceis only available, if the form is not scrollable. Custom form screens have a "Scrollable"property, which must be set to false. If this property is not selected, the tabbed panewill be as high as required by the preferred size of the contained form components.
Single tab
A single tab can be added to a tabbed pane group. It can contain any kind of formcomponents
Properties:
• Image File
An image that is shown on the edge or as a background. Apart from an image that isanchored to the center of the group, the image can optionally cut off an entire edgefrom the group. In that case it is possible to set a background color for the edge stripeso that the image can blend into the surroundings. Can be empty. To add ahigh-resolution image for retina displays, create a file with double the resolution andan additional @2x after the name (e.g. image.png and [email protected] ) next to theselected image. The install4j runtime JAR file i4jruntime.jar contains a number of image
257

files that you can reference here by prefixing the icon file name with "icon:". Forexample, icon:lock_open_32.png loads a 32x32 icon showing an open lock.
• Image anchor
The anchorwhere the imagewill be attached to in the layout group. If Center is chosen,the image is always displayed in the background.
• Image edge
For corner anchors, you have to select either the horizontal or the vertical edge thatwill optionally be filled with the image edge background color and that will be cut offrom the layout group if the image is not displayed in the background.
• Image edge background color
The background color that the image edge should be filledwith. If the image terminateswith the same color, the image will blend with the background and the entire edge willlook like a single visual element. Not available if the anchor is set to "Center"
• Image insets
The insets around the image. The format is top;left;bottom;right, use the drop-downbutton at the right side to show the insets editor.
• Overlap with contained components
If selected, the image will by used as a background image and form componentscontained in the layout group will overlap with the image. Otherwise, the image edgewill be cut off from the layout group and form components will not overlap with theimage. In that case, the insets of the layout group will be applied to the actual contentarea that excludes the image edge. Not available if the anchor is set to "Center"
• Image edge border
If selected, the image edge will be separated by a line border from the content area.Not available if the image overlaps the contained components.
• Image edge border color
The color of the image edge border. Leave empty to choose the default separator colorof the current look and feel.
Note: This property is only visible if "Image edge border" is selected.
• Image edge border width
The width of the image edge border in pixels.
Note: This property is only visible if "Image edge border" is selected.
• Background color
The background color of the layout group. Can be empty.
• Foreground color
The foreground color of the layout group. Can be empty. If set, all contained formcomponents will use this foreground color except those that have an explicitlyconfigured foreground color.
• Border sides
On which sides a line border should be painted around the form component, a list of"top", "right", "bottom" and "left", separated by semicolons. Use the drop-downbuttonto select the sides visually.
258
• Border color
The color of the drawn border sides. Leave empty to choose the default separatorcolor of the current look and feel.
• Border width
The width of the drawn border sides in pixels.
• Visibility script [Initialization]
A script that determines whether form components in the group (and all descendantcomponents in nested groups) will be visible or not. Thisworks for bothGUI and consolemodes. In GUI mode, the script will be invoked each time just before the formcomponents are initialized. Visibility scripts of nested form components can furtherhide single form components, but they cannot show them if a parent layout group isalready hidden.
• Insets [Layout]
The insets around the entire group. The format is top;left;bottom;right, use thedrop-down button at the right side to show the insets editor.
• Anchor [Layout]
The position in the available space where the group is anchored in the layout. This isonly relevant if the group takes less space than the cell that is created by thesurroundings.
• Cell spacing [Layout]
The cell spacing determines howmany pixels are inserted between single componentsin the layout group.
• Tab title [Tab]
The title that is displayed on the tab. To configure a keyboard shortcut, prefix themnemonic character in the title with &, e.g."&User". The prefixed character will beunderlined and the platform-specific keyboard shortcut (e.g. ALT+[character] onWindows) will allow the user to quickly navigate to this tab with the keyboard.
• Tab icon [Tab]
An image file with an icon that is displayed on the tab. Can be empty. To add ahigh-resolution image for retina displays, create a file with double the resolution andan additional @2x after the name (e.g. image.png and [email protected] ) next to theselected image. The install4j runtime JAR file i4jruntime.jar contains a number of imagefiles that you can reference here by prefixing the icon file name with "icon:". Forexample, icon:lock_open_32.png loads a 32x32 icon showing an open lock.
• Tooltip text [Tab]
An optional tooltip text that is displayed when the user hovers with the mouse overthe tab.
• Activation script [Tab]
A script that is executed when the tab is activated.
259
B.5.11 Installer - Available Form Components
Category: Action components
Button
A standard button with an optional leading label. When the user clicks on the button, anaction script is executed.
Properties:
• Button text [Button]
The text that is displayed on the button. Can be empty if the button icon is set.
• Button icon [Button]
The icon displayed on the button. Can be empty if the button text is set. To add ahigh-resolution image for retina displays, create a file with double the resolution andan additional @2x after the name (e.g. image.png and [email protected] ) next to theselected image. The install4j runtime JAR file i4jruntime.jar contains a number of imagefiles that you can reference here by prefixing the icon file name with "icon:". Forexample, icon:lock_open_32.png loads a 32x32 icon showing an open lock.
• Action type [Button]
The type of the action that should be executed by the button is clicked. You can eitherchoose to configure a single script or an entire list of actions.
• Action script
The script that is executed when the button is clicked by the user. The return type isvoid .
Note: This property is only visible if "Action type" is set to "Script".
• Action list
A list of actions that is executed when the button is clicked by the user.
Note: This property is only visible if "Action type" is set to "Action list".
• Help text [Help]
If a text is entered into this property, a tooltip label with a help icon will be created onthe right side of the form component that will display the help text when the userhoverswith themouse above the icon. The text can be plain text or HTML. Formulti-linelabels, use HTML like this: <html>This is line one<br>This is line two</tt></html>.
• Text [Label]
The text of the label. Can be empty. To configure a keyboard shortcut, prefix themnemonic character in the label text with &, e.g."&User". The prefixed character willbe underlined and the platform-specific keyboard shortcut (e.g. ALT+[character] onWindows) will allow the user to quickly navigate to this form component with thekeyboard.
• Font color [Label]
The color of the label font. If empty, the default color will be used.
• Font [Label]
The font type of the label. For a derived form, you can optionally change size, and fontattributes, with a custom font you can also choose a different font face.
260
• Font specification
The font specification for the label.
Note: This property is only visible if "Font" is set to "Custom".
• Font style
The font style of the label.
Note: This property is only visible if "Font" is set to "Derived".
• Font size in percent
The font size of the label in percent relative to the default font.
Note: This property is only visible if "Font" is set to "Derived".
• Icon [Label]
An image file with an icon for the labellabel. Can be empty. To add a high-resolutionimage for retina displays, create a file with double the resolution and an additional@2x after the name (e.g. image.png and [email protected] ) next to the selected image.The install4j runtime JAR file i4jruntime.jar contains a number of image files that youcan reference here by prefixing the icon file name with "icon:". For example, icon:lock_open_32.png loads a 32x32 icon showing an open lock.
• Icon-text gap [Label]
The gap between the label icon and the label text in pixels.
• Request focus [User input]
If selected, the form component will request the focus after the form is activated. Ifyou have multiple form components in a single form that have this property selected,the result is undefined.
Hyperlink URL label
A label that displays a hyperlink. When the user clicks on the hyperlink, the appropriateaction is performed, depending on the protocol of the URL.
Properties:
• Hyperlink text
The text that is displayed on the hyperlink label.
• URL
The URL for the hyperlink. For example https://www.ej-technologies.com
• Help text [Help]
If a text is entered into this property, a tooltip label with a help icon will be created onthe right side of the form component that will display the help text when the userhoverswith themouse above the icon. The text can be plain text or HTML. Formulti-linelabels, use HTML like this: <html>This is line one<br>This is line two</tt></html>.
• Text [Label]
The text of the label. Can be empty.
261
• Font color [Label]
The color of the label font. If empty, the default color will be used.
• Font [Label]
The font type of the label. For a derived form, you can optionally change size, and fontattributes, with a custom font you can also choose a different font face.
• Font specification
The font specification for the label.
Note: This property is only visible if "Font" is set to "Custom".
• Font style
The font style of the label.
Note: This property is only visible if "Font" is set to "Derived".
• Font size in percent
The font size of the label in percent relative to the default font.
Note: This property is only visible if "Font" is set to "Derived".
• Icon [Label]
An image file with an icon for the labellabel. Can be empty. To add a high-resolutionimage for retina displays, create a file with double the resolution and an additional@2x after the name (e.g. image.png and [email protected] ) next to the selected image.The install4j runtime JAR file i4jruntime.jar contains a number of image files that youcan reference here by prefixing the icon file name with "icon:". For example, icon:lock_open_32.png loads a 32x32 icon showing an open lock.
• Icon-text gap [Label]
The gap between the label icon and the label text in pixels.
Hyperlink action label
A label that displays a hyperlink. When the user clicks on the hyperlink, an action scriptis executed
Properties:
• Hyperlink text
The text that is displayed on the hyperlink label.
• Action type
The type of the action that should be executed by the button is clicked. You can eitherchoose to configure a single script or an entire list of actions.
• Action script
The script that is executed when the button is clicked by the user. The return type isvoid .
Note: This property is only visible if "Action type" is set to "Script".
• Action list
A list of actions that is executed when the button is clicked by the user.
262
Note: This property is only visible if "Action type" is set to "Action list".
• Help text [Help]
If a text is entered into this property, a tooltip label with a help icon will be created onthe right side of the form component that will display the help text when the userhoverswith themouse above the icon. The text can be plain text or HTML. Formulti-linelabels, use HTML like this: <html>This is line one<br>This is line two</tt></html>.
• Text [Label]
The text of the label. Can be empty.
• Font color [Label]
The color of the label font. If empty, the default color will be used.
• Font [Label]
The font type of the label. For a derived form, you can optionally change size, and fontattributes, with a custom font you can also choose a different font face.
• Font specification
The font specification for the label.
Note: This property is only visible if "Font" is set to "Custom".
• Font style
The font style of the label.
Note: This property is only visible if "Font" is set to "Derived".
• Font size in percent
The font size of the label in percent relative to the default font.
Note: This property is only visible if "Font" is set to "Derived".
• Icon [Label]
An image file with an icon for the labellabel. Can be empty. To add a high-resolutionimage for retina displays, create a file with double the resolution and an additional@2x after the name (e.g. image.png and [email protected] ) next to the selected image.The install4j runtime JAR file i4jruntime.jar contains a number of image files that youcan reference here by prefixing the icon file name with "icon:". For example, icon:lock_open_32.png loads a 32x32 icon showing an open lock.
• Icon-text gap [Label]
The gap between the label icon and the label text in pixels.
Category: Labels and spacers
Horizontal separator
A horizontal separator with an optional label.
Properties:
• Text [Label]
The text of the label. Can be empty.
263
• Font color [Label]
The color of the label font. If empty, the default color will be used.
• Font [Label]
The font type of the label. For a derived form, you can optionally change size, and fontattributes, with a custom font you can also choose a different font face.
• Font specification
The font specification for the label.
Note: This property is only visible if "Font" is set to "Custom".
• Font style
The font style of the label.
Note: This property is only visible if "Font" is set to "Derived".
• Font size in percent
The font size of the label in percent relative to the default font.
Note: This property is only visible if "Font" is set to "Derived".
• Icon [Label]
An image file with an icon for the labellabel. Can be empty. To add a high-resolutionimage for retina displays, create a file with double the resolution and an additional@2x after the name (e.g. image.png and [email protected] ) next to the selected image.The install4j runtime JAR file i4jruntime.jar contains a number of image files that youcan reference here by prefixing the icon file name with "icon:". For example, icon:lock_open_32.png loads a 32x32 icon showing an open lock.
• Icon-text gap [Label]
The gap between the label icon and the label text in pixels.
• Use special title font [Label]
If selected, a special font and color are used for the separator label. The actual fontdepends on the look and feel. This setting overrides all other font settings for the label.
• Show enabled text [Label]
If selected, the title text is shown like for an enabled title, otherwise the title text isshown like for a disabled label.
Key value pair label
A pair of labels. The first ('key') label aligns with other leading labels on the form, thesecond ('value') label consumes the remaining horizontal space,
Properties:
• Help text [Help]
If a text is entered into this property, a tooltip label with a help icon will be created onthe right side of the form component that will display the help text when the userhoverswith themouse above the icon. The text can be plain text or HTML. Formulti-linelabels, use HTML like this: <html>This is line one<br>This is line two</tt></html>.
264
• Text [Key Label]
The text of the key label. Can be empty.
• Font color [Key Label]
The color of the key label font. If empty, the default color will be used.
• Font [Key Label]
The font type of the key label. For a derived form, you can optionally change size, andfont attributes, with a custom font you can also choose a different font face.
• Font specification
The font specification for the key label.
Note: This property is only visible if "Font" is set to "Custom".
• Font style
The font style of the key label.
Note: This property is only visible if "Font" is set to "Derived".
• Font size in percent
The font size of the key label in percent relative to the default font.
Note: This property is only visible if "Font" is set to "Derived".
• Icon [Key Label]
An image file with an icon for the key labellabel. Can be empty. To add a high-resolutionimage for retina displays, create a file with double the resolution and an additional@2x after the name (e.g. image.png and [email protected] ) next to the selected image.The install4j runtime JAR file i4jruntime.jar contains a number of image files that youcan reference here by prefixing the icon file name with "icon:". For example, icon:lock_open_32.png loads a 32x32 icon showing an open lock.
• Icon-text gap [Key Label]
The gap between the key label icon and the key label text in pixels.
• Text [Value Label]
The text of the value label. Can be empty.
• Font color [Value Label]
The color of the value label font. If empty, the default color will be used.
• Font [Value Label]
The font type of the value label. For a derived form, you can optionally change size,and font attributes, with a custom font you can also choose a different font face.
• Font specification
The font specification for the value label.
Note: This property is only visible if "Font" is set to "Custom".
• Font style
The font style of the value label.
Note: This property is only visible if "Font" is set to "Derived".
• Font size in percent
The font size of the value label in percent relative to the default font.
Note: This property is only visible if "Font" is set to "Derived".
265
• Icon [Value Label]
An image file with an icon for the value labellabel. Can be empty. To add ahigh-resolution image for retina displays, create a file with double the resolution andan additional @2x after the name (e.g. image.png and [email protected] ) next to theselected image. The install4j runtime JAR file i4jruntime.jar contains a number of imagefiles that you can reference here by prefixing the icon file name with "icon:". Forexample, icon:lock_open_32.png loads a 32x32 icon showing an open lock.
• Icon-text gap [Value Label]
The gap between the value label icon and the value label text in pixels.
Label
A single label. It is left-aligned with leading labels from other form components andextends beyond other leading labels.
Properties:
• Text [Label]
The text of the label. Can be empty.
• Font color [Label]
The color of the label font. If empty, the default color will be used.
• Font [Label]
The font type of the label. For a derived form, you can optionally change size, and fontattributes, with a custom font you can also choose a different font face.
• Font specification
The font specification for the label.
Note: This property is only visible if "Font" is set to "Custom".
• Font style
The font style of the label.
Note: This property is only visible if "Font" is set to "Derived".
• Font size in percent
The font size of the label in percent relative to the default font.
Note: This property is only visible if "Font" is set to "Derived".
• Icon [Label]
An image file with an icon for the labellabel. Can be empty. To add a high-resolutionimage for retina displays, create a file with double the resolution and an additional@2x after the name (e.g. image.png and [email protected] ) next to the selected image.The install4j runtime JAR file i4jruntime.jar contains a number of image files that youcan reference here by prefixing the icon file name with "icon:". For example, icon:lock_open_32.png loads a 32x32 icon showing an open lock.
• Icon-text gap [Label]
The gap between the label icon and the label text in pixels.
266
• Add empty leading label [Label]
If selected, the label will not be aligned at the very left, but it will start after the leadinglabels of other form components in the same vertical group.
Leading label
A form component that only has a leading label and no central component. This can alsobe used to create standalone help tooltips.
Properties:
• Help text [Help]
If a text is entered into this property, a tooltip label with a help icon will be created onthe right side of the form component that will display the help text when the userhoverswith themouse above the icon. The text can be plain text or HTML. Formulti-linelabels, use HTML like this: <html>This is line one<br>This is line two</tt></html>.
• Text [Label]
The text of the label. Can be empty.
• Font color [Label]
The color of the label font. If empty, the default color will be used.
• Font [Label]
The font type of the label. For a derived form, you can optionally change size, and fontattributes, with a custom font you can also choose a different font face.
• Font specification
The font specification for the label.
Note: This property is only visible if "Font" is set to "Custom".
• Font style
The font style of the label.
Note: This property is only visible if "Font" is set to "Derived".
• Font size in percent
The font size of the label in percent relative to the default font.
Note: This property is only visible if "Font" is set to "Derived".
• Icon [Label]
An image file with an icon for the labellabel. Can be empty. To add a high-resolutionimage for retina displays, create a file with double the resolution and an additional@2x after the name (e.g. image.png and [email protected] ) next to the selected image.The install4j runtime JAR file i4jruntime.jar contains a number of image files that youcan reference here by prefixing the icon file name with "icon:". For example, icon:lock_open_32.png loads a 32x32 icon showing an open lock.
• Icon-text gap [Label]
The gap between the label icon and the label text in pixels.
267
Multi-line HTML label
A multi-line label that wraps text as needed and displays simple HTML. In particular youcan include HTML links that open a browser.
Properties:
• HTML [Label]
The HTML for the label. The value should start with <html>, otherwise the plaintext will be displayed in the preview. You can include HTML links that open a browserwhen clicked by the user. URLs in <a href="..."> links should start with http:// ,https:// or file:// .
Multi-line label
A multi-line label that wraps text as needed.
Properties:
• Text [Label]
The text of the label.
• Hide if text is blank [Label]
If the text is blank, hide the form component when the form is activated. In that caseyou can also leave the "Text" property empty.
• Font color [Label]
The color of the label font. If empty, the default color will be used.
• Font [Label]
The font type of the label. For a derived form, you can optionally change size, and fontattributes, with a custom font you can also choose a different font face.
• Font specification
The font specification for the label.
Note: This property is only visible if "Font" is set to "Custom".
• Font style
The font style of the label.
Note: This property is only visible if "Font" is set to "Derived".
• Font size in percent
The font size of the label in percent relative to the default font.
Note: This property is only visible if "Font" is set to "Derived".
Spring
An invisible spring that can be used in horizontal and vertical layout groups to pushsubsequent components to the right or to the bottom
268
Properties:
• Axis
The direction alongwhich the springwill push subsequent components. In a horizontallayout group, use the "Horizontal" setting, in a vertical layout group, use the "Vertical"setting.
Vertical spacer
An invisible vertical spacer of configurable height.
Properties:
• Spacer height
The height of the spacer in pixels. The spacer itself isinvisible.
Category: Option selectors
Check box
A check boxwith an optional leading label. The user selection ( Boolean.TRUE or Boolean.FALSE ) is saved to a variable.
Properties:
• Text [Check box]
The text of the check box. Can be empty.
• Initially selected [Check box]
If set, the check box is initially selected
• Selection script [Check box]
The script that is executed when the selection state of the check box is changed by theuser. The return type is void .
• Coupled components
You can select other components on the same form screen which are enabled only ifthe check box is selected.
• Inverse coupling
If set, the coupling of other form components will be inverted with respect to theselection state of the check box.
• Help text [Help]
If a text is entered into this property, a tooltip label with a help icon will be created onthe right side of the form component that will display the help text when the userhoverswith themouse above the icon. The text can be plain text or HTML. Formulti-linelabels, use HTML like this: <html>This is line one<br>This is line two</tt></html>.
269
• Text [Label]
The text of the label. Can be empty. To configure a keyboard shortcut, prefix themnemonic character in the label text with &, e.g."&User". The prefixed character willbe underlined and the platform-specific keyboard shortcut (e.g. ALT+[character] onWindows) will allow the user to quickly navigate to this form component with thekeyboard.
• Font color [Label]
The color of the label font. If empty, the default color will be used.
• Font [Label]
The font type of the label. For a derived form, you can optionally change size, and fontattributes, with a custom font you can also choose a different font face.
• Font specification
The font specification for the label.
Note: This property is only visible if "Font" is set to "Custom".
• Font style
The font style of the label.
Note: This property is only visible if "Font" is set to "Derived".
• Font size in percent
The font size of the label in percent relative to the default font.
Note: This property is only visible if "Font" is set to "Derived".
• Icon [Label]
An image file with an icon for the labellabel. Can be empty. To add a high-resolutionimage for retina displays, create a file with double the resolution and an additional@2x after the name (e.g. image.png and [email protected] ) next to the selected image.The install4j runtime JAR file i4jruntime.jar contains a number of image files that youcan reference here by prefixing the icon file name with "icon:". For example, icon:lock_open_32.png loads a 32x32 icon showing an open lock.
• Icon-text gap [Label]
The gap between the label icon and the label text in pixels.
• Variable name [User input]
The name of the variable to which the user input is assigned. The variable value willbe one of Boolean.TRUE or Boolean.FALSE , depending on the user selection.The typeof the variable value is java.lang.Boolean
• Request focus [User input]
If selected, the form component will request the focus after the form is activated. Ifyou have multiple form components in a single form that have this property selected,the result is undefined.
Combo box
A combo box with an optional leading label. The user can enter arbitrary text into thecombo box. The user selection (the selected item as a string) is saved to a variable.
270
Properties:
• Combo box entries [Combo box]
The items in the combo box. In the edit dialog, you have to enter one item per line.Items that are installer variables with array values (e.g. String[], Object[] or File[]) areexpanded as separate items, this allows you to build a variable length list of items atruntime.
• Initially selected index [Combo box]
The zero-based index of the initially selected item in the combo box.If you would liketo compute this value at runtime, please set the bound variable to a java.lang.Integervalue before this screen is shown.
• Fill horizontal space [Combo box]
If set, the combo box will fill all the available horizontal space, otherwise it will be aswide as required for the widest item.
• Help text [Help]
If a text is entered into this property, a tooltip label with a help icon will be created onthe right side of the form component that will display the help text when the userhoverswith themouse above the icon. The text can be plain text or HTML. Formulti-linelabels, use HTML like this: <html>This is line one<br>This is line two</tt></html>.
• Text [Label]
The text of the label. Can be empty. To configure a keyboard shortcut, prefix themnemonic character in the label text with &, e.g."&User". The prefixed character willbe underlined and the platform-specific keyboard shortcut (e.g. ALT+[character] onWindows) will allow the user to quickly navigate to this form component with thekeyboard.
• Font color [Label]
The color of the label font. If empty, the default color will be used.
• Font [Label]
The font type of the label. For a derived form, you can optionally change size, and fontattributes, with a custom font you can also choose a different font face.
• Font specification
The font specification for the label.
Note: This property is only visible if "Font" is set to "Custom".
• Font style
The font style of the label.
Note: This property is only visible if "Font" is set to "Derived".
• Font size in percent
The font size of the label in percent relative to the default font.
Note: This property is only visible if "Font" is set to "Derived".
• Icon [Label]
An image file with an icon for the labellabel. Can be empty. To add a high-resolutionimage for retina displays, create a file with double the resolution and an additional@2x after the name (e.g. image.png and [email protected] ) next to the selected image.
271

The install4j runtime JAR file i4jruntime.jar contains a number of image files that youcan reference here by prefixing the icon file name with "icon:". For example, icon:lock_open_32.png loads a 32x32 icon showing an open lock.
• Icon-text gap [Label]
The gap between the label icon and the label text in pixels.
• Variable name [User input]
The name of the variable to which the user input is assigned. The variable value willbe the selected item text.The type of the variable value is java.lang.String
• Selection change script [User input]
A script that is executed when the selection is changed by the user. This script is onlyrequired for advanced customizations of the form screen. The return type is void .
• Input validation expression [User input]
An expression or script that validates the user input when the combo box loses thefocus. If the expression returns false, the focus remains in the combo box. In that caseyou should display an error message.
• Request focus [User input]
If selected, the form component will request the focus after the form is activated. Ifyou have multiple form components in a single form that have this property selected,the result is undefined.
Drop-down list
A drop-down list with an optional leading label. The user selection (the selected index asa java.lang.Integer ) is saved to a variable.
Properties:
• Drop-down list entries [Drop-down list]
The items in the drop-down list. In the edit dialog, you have to enter one item per line.Items that are installer variables with array values (e.g. String[], Object[] or File[]) areexpanded as separate items, this allows you to build a variable length list of items atruntime.
• Initially selected index [Drop-down list]
The zero-based index of the initially selected item in the drop-down list.If you wouldlike to compute this value at runtime, please set the bound variable to a java.lang.Integer value before this screen is shown.
• Fill horizontal space [Drop-down list]
If set, the drop-down list will fill all the available horizontal space, otherwise it will beas wide as required for the widest item.
• Help text [Help]
If a text is entered into this property, a tooltip label with a help icon will be created onthe right side of the form component that will display the help text when the userhoverswith themouse above the icon. The text can be plain text or HTML. Formulti-linelabels, use HTML like this: <html>This is line one<br>This is line two</tt></html>.
272
• Text [Label]
The text of the label. Can be empty. To configure a keyboard shortcut, prefix themnemonic character in the label text with &, e.g."&User". The prefixed character willbe underlined and the platform-specific keyboard shortcut (e.g. ALT+[character] onWindows) will allow the user to quickly navigate to this form component with thekeyboard.
• Font color [Label]
The color of the label font. If empty, the default color will be used.
• Font [Label]
The font type of the label. For a derived form, you can optionally change size, and fontattributes, with a custom font you can also choose a different font face.
• Font specification
The font specification for the label.
Note: This property is only visible if "Font" is set to "Custom".
• Font style
The font style of the label.
Note: This property is only visible if "Font" is set to "Derived".
• Font size in percent
The font size of the label in percent relative to the default font.
Note: This property is only visible if "Font" is set to "Derived".
• Icon [Label]
An image file with an icon for the labellabel. Can be empty. To add a high-resolutionimage for retina displays, create a file with double the resolution and an additional@2x after the name (e.g. image.png and [email protected] ) next to the selected image.The install4j runtime JAR file i4jruntime.jar contains a number of image files that youcan reference here by prefixing the icon file name with "icon:". For example, icon:lock_open_32.png loads a 32x32 icon showing an open lock.
• Icon-text gap [Label]
The gap between the label icon and the label text in pixels.
• Variable name [User input]
The name of the variable to which the user input is assigned. The variable value willbe the index of the selected item.The type of the variable value is java.lang.Integer
• Selection change script [User input]
A script that is executed when the selection is changed by the user. This script is onlyrequired for advanced customizations of the form screen. The return type is void .
• Request focus [User input]
If selected, the form component will request the focus after the form is activated. Ifyou have multiple form components in a single form that have this property selected,the result is undefined.
List
273
A list with an optional leading label. The user selection (the selected indices) is saved toa variable.
Properties:
• Help text [Help]
If a text is entered into this property, a tooltip label with a help icon will be created onthe right side of the form component that will display the help text when the userhoverswith themouse above the icon. The text can be plain text or HTML. Formulti-linelabels, use HTML like this: <html>This is line one<br>This is line two</tt></html>.
• Text [Label]
The text of the label. Can be empty. To configure a keyboard shortcut, prefix themnemonic character in the label text with &, e.g."&User". The prefixed character willbe underlined and the platform-specific keyboard shortcut (e.g. ALT+[character] onWindows) will allow the user to quickly navigate to this form component with thekeyboard.
• Font color [Label]
The color of the label font. If empty, the default color will be used.
• Font [Label]
The font type of the label. For a derived form, you can optionally change size, and fontattributes, with a custom font you can also choose a different font face.
• Font specification
The font specification for the label.
Note: This property is only visible if "Font" is set to "Custom".
• Font style
The font style of the label.
Note: This property is only visible if "Font" is set to "Derived".
• Font size in percent
The font size of the label in percent relative to the default font.
Note: This property is only visible if "Font" is set to "Derived".
• Icon [Label]
An image file with an icon for the labellabel. Can be empty. To add a high-resolutionimage for retina displays, create a file with double the resolution and an additional@2x after the name (e.g. image.png and [email protected] ) next to the selected image.The install4j runtime JAR file i4jruntime.jar contains a number of image files that youcan reference here by prefixing the icon file name with "icon:". For example, icon:lock_open_32.png loads a 32x32 icon showing an open lock.
• Icon-text gap [Label]
The gap between the label icon and the label text in pixels.
• List entries [List]
The items in the list. In the edit dialog, you have to enter one item per line. Items thatare installer variables with array values (e.g. String[], Object[] or File[]) are expandedas separate items, this allows you to build a variable length list of items at runtime.
274
• Initially selected index [List]
The zero-based index of the initially selected item in the list.If youwould like to computethis value at runtime, please set the bound variable to a java.lang.Integer value beforethis screen is shown.
• Fill horizontal space [List]
If set, the list will fill all the available horizontal space, otherwise it will be as wide asrequired for the widest item.
• Visible rows [List]
If the list is scrollable, this property determines the height of the list.
• Fill extra vertical space [List]
If set, the form component will expand to fill remaining vertical space. Extra verticalspace is only available, if the form is not scrollable. Custom form screens have a"Scrollable" property, which must be set to false.
• Scrollable [List]
If set, the list will be wrapped in a scroll pane.
• Multi-selection [List]
If set, the user can select multiple entries at the same time.
• Variable name [User input]
The name of the variable to which the user input is assigned. If multiple items can beselected, the variable value will be an int[] array with the selected indices, otherwisethe variable value will be the index of the selected item as a java.lang.Integer
• Selection change script [User input]
A script that is executed when the selection is changed by the user. This script is onlyrequired for advanced customizations of the form screen. The return type is void .
• Request focus [User input]
If selected, the form component will request the focus after the form is activated. Ifyou have multiple form components in a single form that have this property selected,the result is undefined.
Radio button group
A number of radio buttons in a common button group with an optional leading label.The user selection (the selected index as a java.lang.Integer ) is saved to a variable.
Properties:
• Help text [Help]
If a text is entered into this property, a tooltip label with a help icon will be created onthe right side of the form component that will display the help text when the userhoverswith themouse above the icon. The text can be plain text or HTML. Formulti-linelabels, use HTML like this: <html>This is line one<br>This is line two</tt></html>.
• Text [Label]
The text of the label. Can be empty.
275
• Font color [Label]
The color of the label font. If empty, the default color will be used.
• Font [Label]
The font type of the label. For a derived form, you can optionally change size, and fontattributes, with a custom font you can also choose a different font face.
• Font specification
The font specification for the label.
Note: This property is only visible if "Font" is set to "Custom".
• Font style
The font style of the label.
Note: This property is only visible if "Font" is set to "Derived".
• Font size in percent
The font size of the label in percent relative to the default font.
Note: This property is only visible if "Font" is set to "Derived".
• Icon [Label]
An image file with an icon for the labellabel. Can be empty. To add a high-resolutionimage for retina displays, create a file with double the resolution and an additional@2x after the name (e.g. image.png and [email protected] ) next to the selected image.The install4j runtime JAR file i4jruntime.jar contains a number of image files that youcan reference here by prefixing the icon file name with "icon:". For example, icon:lock_open_32.png loads a 32x32 icon showing an open lock.
• Icon-text gap [Label]
The gap between the label icon and the label text in pixels.
• Radio button labels [Radio buttons]
The labels of all the radio buttons. In the edit dialog, you have to enter one item perline. Labels that are installer variables with array values (e.g. String[], Object[] or File[])are expanded as separate labels, this allows you to build a variable length list of labelsat runtime.
• Initially selected index [Radio buttons]
The zero-based index of the initially selected radio button. If youwould like to computethis value at runtime, please set the bound variable to a java.lang.Integer value beforethis screen is shown.
• Axis [Radio buttons]
The direction along which the radio buttons will be laid out.
• Selection script [Radio buttons]
The script that is executed when a radio button is selected by the user. The return typeis void .
• Variable name [User input]
The name of the variable to which the user input is assigned. The variable value willbe the index of the selected radio button.The type of the variable value is java.lang.Integer
276
Single radio button
A single radio button with an optional leading label. If selected, a specified string is savedto a variable. If you place multiple instances of this form component on a form screenand give them the same variable name, they will form a radio button group.
Properties:
• Coupled components
You can select other components on the same form screen which are enabled only ifthe radio button is selected.
• Inverse coupling
If set, the coupling of other form components will be inverted with respect to theselection state of the radio button.
• Help text [Help]
If a text is entered into this property, a tooltip label with a help icon will be created onthe right side of the form component that will display the help text when the userhoverswith themouse above the icon. The text can be plain text or HTML. Formulti-linelabels, use HTML like this: <html>This is line one<br>This is line two</tt></html>.
• Text [Label]
The text of the label. Can be empty. To configure a keyboard shortcut, prefix themnemonic character in the label text with &, e.g."&User". The prefixed character willbe underlined and the platform-specific keyboard shortcut (e.g. ALT+[character] onWindows) will allow the user to quickly navigate to this form component with thekeyboard.
• Font color [Label]
The color of the label font. If empty, the default color will be used.
• Font [Label]
The font type of the label. For a derived form, you can optionally change size, and fontattributes, with a custom font you can also choose a different font face.
• Font specification
The font specification for the label.
Note: This property is only visible if "Font" is set to "Custom".
• Font style
The font style of the label.
Note: This property is only visible if "Font" is set to "Derived".
• Font size in percent
The font size of the label in percent relative to the default font.
Note: This property is only visible if "Font" is set to "Derived".
• Icon [Label]
An image file with an icon for the labellabel. Can be empty. To add a high-resolutionimage for retina displays, create a file with double the resolution and an additional@2x after the name (e.g. image.png and [email protected] ) next to the selected image.The install4j runtime JAR file i4jruntime.jar contains a number of image files that you
277
can reference here by prefixing the icon file name with "icon:". For example, icon:lock_open_32.png loads a 32x32 icon showing an open lock.
• Icon-text gap [Label]
The gap between the label icon and the label text in pixels.
• Radio button label [Radio button]
The text of the radio button.
• Initially selected [Radio button]
If selected, the radio button will be initially selected.
• Selection script [Radio button]
The script that is executed when the radio button is selected by the user. The returntype is void .
• Variable name [User input]
The name of the variable to which the user input is assigned. The variable value willbe the string defined in the "Variable value" property.The type of the variable value isjava.lang.String
• Variable value [User input]
The value that should be written to the variable if this radio button is selected.
• Request focus [User input]
If selected, the form component will request the focus after the form is activated. Ifyou have multiple form components in a single form that have this property selected,the result is undefined.
Category: Sliders and spinners
Slider
A slider with an optional leading label. The user input (a java.lang.Integer ) is saved to avariable.
Properties:
• Help text [Help]
If a text is entered into this property, a tooltip label with a help icon will be created onthe right side of the form component that will display the help text when the userhoverswith themouse above the icon. The text can be plain text or HTML. Formulti-linelabels, use HTML like this: <html>This is line one<br>This is line two</tt></html>.
• Text [Label]
The text of the label. Can be empty. To configure a keyboard shortcut, prefix themnemonic character in the label text with &, e.g."&User". The prefixed character willbe underlined and the platform-specific keyboard shortcut (e.g. ALT+[character] onWindows) will allow the user to quickly navigate to this form component with thekeyboard.
278
• Font color [Label]
The color of the label font. If empty, the default color will be used.
• Font [Label]
The font type of the label. For a derived form, you can optionally change size, and fontattributes, with a custom font you can also choose a different font face.
• Font specification
The font specification for the label.
Note: This property is only visible if "Font" is set to "Custom".
• Font style
The font style of the label.
Note: This property is only visible if "Font" is set to "Derived".
• Font size in percent
The font size of the label in percent relative to the default font.
Note: This property is only visible if "Font" is set to "Derived".
• Icon [Label]
An image file with an icon for the labellabel. Can be empty. To add a high-resolutionimage for retina displays, create a file with double the resolution and an additional@2x after the name (e.g. image.png and [email protected] ) next to the selected image.The install4j runtime JAR file i4jruntime.jar contains a number of image files that youcan reference here by prefixing the icon file name with "icon:". For example, icon:lock_open_32.png loads a 32x32 icon showing an open lock.
• Icon-text gap [Label]
The gap between the label icon and the label text in pixels.
• Minimum value [Slider]
The minimum value on the left side of the slider.
• Maximum value [Slider]
The maximum value on the right side of the slider.
• Initial value [Slider]
The initial value of the slider.
• Major tick spacing [Slider]
The spacing between major ticks expressed as a value.
• Minor tick spacing [Slider]
The spacing between minor ticks expressed as a value.
• Snap to ticks [Slider]
If set, the user selection is snapped to the closest tick value.
• Variable name [User input]
The name of the variable to which the user input is assigned. The type of the variablevalue is java.lang.Integer
279

• Request focus [User input]
If selected, the form component will request the focus after the form is activated. Ifyou have multiple form components in a single form that have this property selected,the result is undefined.
Spinner of dates
A spinner with date and time valueswith an optional leading label. The user input is savedto a variable.
Properties:
• Help text [Help]
If a text is entered into this property, a tooltip label with a help icon will be created onthe right side of the form component that will display the help text when the userhoverswith themouse above the icon. The text can be plain text or HTML. Formulti-linelabels, use HTML like this: <html>This is line one<br>This is line two</tt></html>.
• Text [Label]
The text of the label. Can be empty. To configure a keyboard shortcut, prefix themnemonic character in the label text with &, e.g."&User". The prefixed character willbe underlined and the platform-specific keyboard shortcut (e.g. ALT+[character] onWindows) will allow the user to quickly navigate to this form component with thekeyboard.
• Font color [Label]
The color of the label font. If empty, the default color will be used.
• Font [Label]
The font type of the label. For a derived form, you can optionally change size, and fontattributes, with a custom font you can also choose a different font face.
• Font specification
The font specification for the label.
Note: This property is only visible if "Font" is set to "Custom".
• Font style
The font style of the label.
Note: This property is only visible if "Font" is set to "Derived".
• Font size in percent
The font size of the label in percent relative to the default font.
Note: This property is only visible if "Font" is set to "Derived".
• Icon [Label]
An image file with an icon for the labellabel. Can be empty. To add a high-resolutionimage for retina displays, create a file with double the resolution and an additional@2x after the name (e.g. image.png and [email protected] ) next to the selected image.The install4j runtime JAR file i4jruntime.jar contains a number of image files that you
280
can reference here by prefixing the icon file name with "icon:". For example, icon:lock_open_32.png loads a 32x32 icon showing an open lock.
• Icon-text gap [Label]
The gap between the label icon and the label text in pixels.
• Date format pattern [Spinner]
A pattern to format dates for display and input as described in the javadoc of java.text.SimpleDateFormat . An example is yyyy.MM.dd 'at' HH:mm:ss z . If empty, alocale-dependent default pattern with date and time components will be used.
• Initial value [Spinner]
The initial value of the spinner.
• Variable name [User input]
The name of the variable to which the user input is assigned. The type of the variablevalue is java.util.Date
• Request focus [User input]
If selected, the form component will request the focus after the form is activated. Ifyou have multiple form components in a single form that have this property selected,the result is undefined.
Spinner of enumerated values
A spinner with enumerated values with an optional leading label. The user input is savedto a variable.
Properties:
• Help text [Help]
If a text is entered into this property, a tooltip label with a help icon will be created onthe right side of the form component that will display the help text when the userhoverswith themouse above the icon. The text can be plain text or HTML. Formulti-linelabels, use HTML like this: <html>This is line one<br>This is line two</tt></html>.
• Text [Label]
The text of the label. Can be empty. To configure a keyboard shortcut, prefix themnemonic character in the label text with &, e.g."&User". The prefixed character willbe underlined and the platform-specific keyboard shortcut (e.g. ALT+[character] onWindows) will allow the user to quickly navigate to this form component with thekeyboard.
• Font color [Label]
The color of the label font. If empty, the default color will be used.
• Font [Label]
The font type of the label. For a derived form, you can optionally change size, and fontattributes, with a custom font you can also choose a different font face.
• Font specification
The font specification for the label.
281
Note: This property is only visible if "Font" is set to "Custom".
• Font style
The font style of the label.
Note: This property is only visible if "Font" is set to "Derived".
• Font size in percent
The font size of the label in percent relative to the default font.
Note: This property is only visible if "Font" is set to "Derived".
• Icon [Label]
An image file with an icon for the labellabel. Can be empty. To add a high-resolutionimage for retina displays, create a file with double the resolution and an additional@2x after the name (e.g. image.png and [email protected] ) next to the selected image.The install4j runtime JAR file i4jruntime.jar contains a number of image files that youcan reference here by prefixing the icon file name with "icon:". For example, icon:lock_open_32.png loads a 32x32 icon showing an open lock.
• Icon-text gap [Label]
The gap between the label icon and the label text in pixels.
• List entries [Spinner]
The items in the spinner. In the edit dialog, you have to enter one item per line. Listitems that are installer variables with array values (e.g. String[], Object[] or File[]) areexpanded as separate list items, this allows you to build a variable length list of listitems at runtime.
• Initially selected index [Spinner]
The zero-based index of the initially selected item in the spinner.
• Variable name [User input]
The name of the variable to which the user input is assigned. The type of the variablevalue is java.lang.String
• Request focus [User input]
If selected, the form component will request the focus after the form is activated. Ifyou have multiple form components in a single form that have this property selected,the result is undefined.
Spinner of integer values
A spinner with integer values with an optional leading label. The user input is saved to avariable.
Properties:
• Help text [Help]
If a text is entered into this property, a tooltip label with a help icon will be created onthe right side of the form component that will display the help text when the userhoverswith themouse above the icon. The text can be plain text or HTML. Formulti-linelabels, use HTML like this: <html>This is line one<br>This is line two</tt></html>.
282
• Text [Label]
The text of the label. Can be empty. To configure a keyboard shortcut, prefix themnemonic character in the label text with &, e.g."&User". The prefixed character willbe underlined and the platform-specific keyboard shortcut (e.g. ALT+[character] onWindows) will allow the user to quickly navigate to this form component with thekeyboard.
• Font color [Label]
The color of the label font. If empty, the default color will be used.
• Font [Label]
The font type of the label. For a derived form, you can optionally change size, and fontattributes, with a custom font you can also choose a different font face.
• Font specification
The font specification for the label.
Note: This property is only visible if "Font" is set to "Custom".
• Font style
The font style of the label.
Note: This property is only visible if "Font" is set to "Derived".
• Font size in percent
The font size of the label in percent relative to the default font.
Note: This property is only visible if "Font" is set to "Derived".
• Icon [Label]
An image file with an icon for the labellabel. Can be empty. To add a high-resolutionimage for retina displays, create a file with double the resolution and an additional@2x after the name (e.g. image.png and [email protected] ) next to the selected image.The install4j runtime JAR file i4jruntime.jar contains a number of image files that youcan reference here by prefixing the icon file name with "icon:". For example, icon:lock_open_32.png loads a 32x32 icon showing an open lock.
• Icon-text gap [Label]
The gap between the label icon and the label text in pixels.
• Minimum value [Spinner]
The minimum value on the left side of the spinner.
• Maximum value [Spinner]
The maximum value on the right side of the spinner.
• Initial value [Spinner]
The initial value of the spinner.
• Step size [Spinner]
The step size for the spinner.
• Variable name [User input]
The name of the variable to which the user input is assigned. The type of the variablevalue is java.lang.Integer
283

• Request focus [User input]
If selected, the form component will request the focus after the form is activated. Ifyou have multiple form components in a single form that have this property selected,the result is undefined.
Category: Special selectors and displays
Directory chooser
Adirectory chooserwith an optional leading label. The user selection is saved to a variable.
Properties:
• Manual entry allowed [Chooser Dialog]
If selected, the user can enter the directory manually in the text field. Otherwise, thetext field is disabled.
• Initial directory [Directory Chooser]
The initially selected directory. The variable value takes precedence, so this value willonly be used if the variable value is undefined. Can be empty.
• Initial browser directory [Directory Chooser]
The initial directory that is shown in the browser if no directory is selected. If empty,the browser will start in the user home directory. If a directory is entered in the textfield, the browser will use that path instead.
• Border title [Directory Chooser]
The description of the kind of directory that the user should select, in a few words, e.g. "ABC directory". This will be shown in a titled border around the text field.
• Standard directory [Directory Chooser]
A directory name that should be appended to the user selection in the directorybrowser. Should be empty if an existing directory has to be selected.
• Next screen on enter [Directory Chooser]
If selected and the user hits the enter key while the text field is focused, the next screenis activated.
• Help text [Help]
If a text is entered into this property, a tooltip label with a help icon will be created onthe right side of the form component that will display the help text when the userhoverswith themouse above the icon. The text can be plain text or HTML. Formulti-linelabels, use HTML like this: <html>This is line one<br>This is line two</tt></html>.
• Text [Label]
The text of the label. Can be empty. To configure a keyboard shortcut, prefix themnemonic character in the label text with &, e.g."&User". The prefixed character willbe underlined and the platform-specific keyboard shortcut (e.g. ALT+[character] onWindows) will allow the user to quickly navigate to this form component with thekeyboard.
284
• Font color [Label]
The color of the label font. If empty, the default color will be used.
• Font [Label]
The font type of the label. For a derived form, you can optionally change size, and fontattributes, with a custom font you can also choose a different font face.
• Font specification
The font specification for the label.
Note: This property is only visible if "Font" is set to "Custom".
• Font style
The font style of the label.
Note: This property is only visible if "Font" is set to "Derived".
• Font size in percent
The font size of the label in percent relative to the default font.
Note: This property is only visible if "Font" is set to "Derived".
• Icon [Label]
An image file with an icon for the labellabel. Can be empty. To add a high-resolutionimage for retina displays, create a file with double the resolution and an additional@2x after the name (e.g. image.png and [email protected] ) next to the selected image.The install4j runtime JAR file i4jruntime.jar contains a number of image files that youcan reference here by prefixing the icon file name with "icon:". For example, icon:lock_open_32.png loads a 32x32 icon showing an open lock.
• Icon-text gap [Label]
The gap between the label icon and the label text in pixels.
• Allow spaces in directory name [Unix]
If selected, spaces are valid characters in the installation directory name for Unix/Linuxinstallers, otherwise an error message is displayed if the user chooses a directory withspaces in it. Some JREs do not work on Unix if installed to a path that contains spaces,so spaces are disallowed by default.
• Variable name [User input]
The name of the variable to which the user input is assigned. The type of the variablevalue is java.lang.String
• Validation script [User input]
The script that is executed when the directory is selected with the chooser button andwhen the user clicks on the Next button of the screen. If the script returns true , theselection is accepted, if it returns false , the selection is discarded.
• Standard validation [User input]
If selected, the standard validation for well-formed directory nameswill be performed.This validation is performed before the validation script and will canonicalize thedirectory name before passing it to the validation script.
• Allow empty input [User input]
If selected, the user can leave the directory empty or clear the initial directory (ifmanualentry is allowed) and there will be no validation error.
285
• Only accept writable directories [User input]
If selected, non-writable directories will be rejected.
• Request focus [User input]
If selected, the form component will request the focus after the form is activated. Ifyou have multiple form components in a single form that have this property selected,the result is undefined.
File associations selector
A form component that displays a list of all subsequent file association actions and asksthe user which associations should bemade. This form component will be empty if thereare no corresponding file association actions after this screen.
Properties:
• Show selection buttons
If selected, the screenwill showbuttons for selecting anddeselecting all file associations.
• Position of selection buttons
The selection buttons can be added at the top or at the bottomof the form component.
Note: This property is only visible if "Show selection buttons" is selected.
• Fill extra vertical space
If set, the form component will expand to fill remaining vertical space. Extra verticalspace is only available, if the form is not scrollable. Custom form screens have a"Scrollable" property, which must be set to false.
File chooser
A file chooser with an optional leading label. The user selection is saved to a variable.
Properties:
• Manual entry allowed [Chooser Dialog]
If selected, the user can enter the file manually in the text field. Otherwise, the textfield is disabled.
• Initial file [File Chooser]
The initially selected file. The variable value takes precedence, so this value will onlybe used if the variable value is undefined. Can be empty.
• Initial browser directory [File Chooser]
The initial directory that is shown in the browser if no file is selected. If empty, thebrowser will start in the user home directory. If a file is entered in the text field, thebrowser will use that path instead.
• Use file filter [File Chooser]
If a file filter should be used. Configure the file filter in the nested properties once youenable this option.
286
• File filter name
The name of the file filter which is displayed to the user in the drop-down filter list ofthe file chooser.
Note: This property is only visible if "Use file filter" is selected.
• Filtered file extension
The list of the filtered file extension. A file extension may be written as *.xml , .xml orxml , all three notations are equivalent. In the edit dialog, you have to enter one itemper line. File extensions that are installer variables with array values (e.g. String[],Object[] or File[]) are expanded as separate file extensions, this allows you to build avariable length list of file extensions at runtime.
Note: This property is only visible if "Use file filter" is selected.
• Help text [Help]
If a text is entered into this property, a tooltip label with a help icon will be created onthe right side of the form component that will display the help text when the userhoverswith themouse above the icon. The text can be plain text or HTML. Formulti-linelabels, use HTML like this: <html>This is line one<br>This is line two</tt></html>.
• Text [Label]
The text of the label. Can be empty. To configure a keyboard shortcut, prefix themnemonic character in the label text with &, e.g."&User". The prefixed character willbe underlined and the platform-specific keyboard shortcut (e.g. ALT+[character] onWindows) will allow the user to quickly navigate to this form component with thekeyboard.
• Font color [Label]
The color of the label font. If empty, the default color will be used.
• Font [Label]
The font type of the label. For a derived form, you can optionally change size, and fontattributes, with a custom font you can also choose a different font face.
• Font specification
The font specification for the label.
Note: This property is only visible if "Font" is set to "Custom".
• Font style
The font style of the label.
Note: This property is only visible if "Font" is set to "Derived".
• Font size in percent
The font size of the label in percent relative to the default font.
Note: This property is only visible if "Font" is set to "Derived".
• Icon [Label]
An image file with an icon for the labellabel. Can be empty. To add a high-resolutionimage for retina displays, create a file with double the resolution and an additional@2x after the name (e.g. image.png and [email protected] ) next to the selected image.The install4j runtime JAR file i4jruntime.jar contains a number of image files that youcan reference here by prefixing the icon file name with "icon:". For example, icon:lock_open_32.png loads a 32x32 icon showing an open lock.
287
• Icon-text gap [Label]
The gap between the label icon and the label text in pixels.
• Variable name [User input]
The name of the variable to which the user input is assigned. The type of the variablevalue is java.lang.String
• Validation script [User input]
The script that is executed when the file is selected with the chooser button and whenthe user clicks on the Next button of the screen. If the script returns true , the selectionis accepted, if it returns false , the selection is discarded.
• Request focus [User input]
If selected, the form component will request the focus after the form is activated. Ifyou have multiple form components in a single form that have this property selected,the result is undefined.
HTML display
A scroll panel that displays HTML text. TheHTML is easily localizable since the file selectionallows you to enter separate files for all supported languages.
Properties:
• Text source [HTML display]
The source fromwhich the text is loaded. Formulti-language installers, the "File" sourceis recommended since it is more easily localizable than the direct entry.
• Variable name [HTML display]
Optionally, you can save the actually displayed text to a variable. Enter the variablename without the installer prefix and the dollar sign. This is useful if you displaylocalized text and want to save the actually displayed text with a "Write text to a file"action later on.
• Text file
The file from which the text is loaded.
Note: This property is only visible if "Text source" is set to "File".
• Text
The text that is displayed in the screen, either plain text or HTML. For HTML, the valueshould start with <html> , otherwise the plain text will be displayed. The text isdisplayed in a scrollable text area.
Note: This property is only visible if "Text source" is set to "Direct".
• Height [HTML display]
The height of the HTML display in pixels.
• Fill extra vertical space [HTML display]
If set, the form component will expand to fill remaining vertical space. Extra verticalspace is only available, if the form is not scrollable. Custom form screens have a"Scrollable" property, which must be set to false.
288
• Help text [Help]
If a text is entered into this property, a tooltip label with a help icon will be created onthe right side of the form component that will display the help text when the userhoverswith themouse above the icon. The text can be plain text or HTML. Formulti-linelabels, use HTML like this: <html>This is line one<br>This is line two</tt></html>.
• Text [Label]
The text of the label. Can be empty.
• Font color [Label]
The color of the label font. If empty, the default color will be used.
• Font [Label]
The font type of the label. For a derived form, you can optionally change size, and fontattributes, with a custom font you can also choose a different font face.
• Font specification
The font specification for the label.
Note: This property is only visible if "Font" is set to "Custom".
• Font style
The font style of the label.
Note: This property is only visible if "Font" is set to "Derived".
• Font size in percent
The font size of the label in percent relative to the default font.
Note: This property is only visible if "Font" is set to "Derived".
• Icon [Label]
An image file with an icon for the labellabel. Can be empty. To add a high-resolutionimage for retina displays, create a file with double the resolution and an additional@2x after the name (e.g. image.png and [email protected] ) next to the selected image.The install4j runtime JAR file i4jruntime.jar contains a number of image files that youcan reference here by prefixing the icon file name with "icon:". For example, icon:lock_open_32.png loads a 32x32 icon showing an open lock.
• Icon-text gap [Label]
The gap between the label icon and the label text in pixels.
Installation components selector
A form component that displays all installation components and asks the user whichcomponents should be installed.
Properties:
• Selection change script [Component Selector]
A script that is invoked each time the selection state of a component is changed. If acomponent has dependencies that are changed aswell, or if entire folders are toggled,this script will be called repeatedly, once for each installation component whose
289
selection state is changed. If the dependency parameter is false , this tells you that thecorresponding installation component belongs to the node that the user has actuallytoggled. If a folder is toggled, dependency will be true for all installation components.
• Fill extra vertical space [Component Selector]
If set, the form component will expand to fill remaining vertical space. Extra verticalspace is only available, if the form is not scrollable. Custom form screens have a"Scrollable" property, which must be set to false.
• Bold font [Description]
Use a bold font for the descriptions
• Italic font [Description]
Use an italic font for the descriptions
• Smaller font [Description]
Use a smaller font for the descriptions
Installation directory chooser
An installation directory chooser with an optional display of required and free space. Theuser selection is set as the installation directory.
Properties:
• Suggest application directory [Application ID]
When the user chooses a directory, always append the default application directoryconfigured in the media file wizard. You should only switch this off if you substitute adifferent installation directory in the screen validation.
• Existing directory warning [Application ID]
Ask the user whether to install the application in the selected directory if it alreadyexists and the installation is not an update.
• Validate application id [Application ID]
Check if another application is installed in the selected directory or if the applicationis not the correct target for an add-on installer.
• Check if directory is writable [Application ID]
Check if the directory is writable with the currently available privileges and show awarningmessage if it is not. If you deselect this option, and the directory is not writable,you should execute a "Request privileges" action before installing files to the installationdirectory.
• Manual entry allowed [Chooser Dialog]
If selected, the user can enter the installation directory manually in the text field.Otherwise, the text field is disabled.
• Insufficient disk space warning [Disk Space]
Show a warning message if there is not sufficient disk space for the installation on theselected target drive.
290
• Show required disk space [Disk Space]
Show the disk space that is required for the installation. You should switch this off ifyour installation includes other data sources.
• Show free disk space [Disk Space]
Show the disk space that is available on the selected drive or partition. This setting isonly effective for Windows, macOS and Linux.
• Help text [Help]
If a text is entered into this property, a tooltip label with a help icon will be created onthe right side of the form component that will display the help text when the userhoverswith themouse above the icon. The text can be plain text or HTML. Formulti-linelabels, use HTML like this: <html>This is line one<br>This is line two</tt></html>.
• Text [Label]
The text of the label. Can be empty. To configure a keyboard shortcut, prefix themnemonic character in the label text with &, e.g."&User". The prefixed character willbe underlined and the platform-specific keyboard shortcut (e.g. ALT+[character] onWindows) will allow the user to quickly navigate to this form component with thekeyboard.
• Font color [Label]
The color of the label font. If empty, the default color will be used.
• Font [Label]
The font type of the label. For a derived form, you can optionally change size, and fontattributes, with a custom font you can also choose a different font face.
• Font specification
The font specification for the label.
Note: This property is only visible if "Font" is set to "Custom".
• Font style
The font style of the label.
Note: This property is only visible if "Font" is set to "Derived".
• Font size in percent
The font size of the label in percent relative to the default font.
Note: This property is only visible if "Font" is set to "Derived".
• Icon [Label]
An image file with an icon for the labellabel. Can be empty. To add a high-resolutionimage for retina displays, create a file with double the resolution and an additional@2x after the name (e.g. image.png and [email protected] ) next to the selected image.The install4j runtime JAR file i4jruntime.jar contains a number of image files that youcan reference here by prefixing the icon file name with "icon:". For example, icon:lock_open_32.png loads a 32x32 icon showing an open lock.
• Icon-text gap [Label]
The gap between the label icon and the label text in pixels.
291

• Allow spaces in directory name [Unix]
If selected, spaces are valid characters in the installation directory name for Unix/Linuxinstallers, otherwise an error message is displayed if the user chooses a directory withspaces in it. Some JREs do not work on Unix if installed to a path that contains spaces,so spaces are disallowed by default.
• Validation script [User input]
The script that is executed when the installation directory is selected with the chooserbutton and when the user clicks on the Next button of the screen. If the script returnstrue , the selection is accepted, if it returns false , the selection is discarded.
• Standard validation [User input]
If selected, the standard validation for well-formed directory nameswill be performed.This validation is performed before the validation script and will canonicalize thedirectory name before passing it to the validation script.
• Request focus [User input]
If selected, the form component will request the focus after the form is activated. Ifyou have multiple form components in a single form that have this property selected,the result is undefined.
License agreement
A form component that displays a license agreement to the user, either plain text orHTML. The license agreement must be accepted before the next screen can be shown.
Properties:
• Help text [Help]
If a text is entered into this property, a tooltip label with a help icon will be created onthe right side of the form component that will display the help text when the userhoverswith themouse above the icon. The text can be plain text or HTML. Formulti-linelabels, use HTML like this: <html>This is line one<br>This is line two</tt></html>.
• Text [Label]
The text of the label. Can be empty.
• Font color [Label]
The color of the label font. If empty, the default color will be used.
• Font [Label]
The font type of the label. For a derived form, you can optionally change size, and fontattributes, with a custom font you can also choose a different font face.
• Font specification
The font specification for the label.
Note: This property is only visible if "Font" is set to "Custom".
• Font style
The font style of the label.
Note: This property is only visible if "Font" is set to "Derived".
292
• Font size in percent
The font size of the label in percent relative to the default font.
Note: This property is only visible if "Font" is set to "Derived".
• Icon [Label]
An image file with an icon for the labellabel. Can be empty. To add a high-resolutionimage for retina displays, create a file with double the resolution and an additional@2x after the name (e.g. image.png and [email protected] ) next to the selected image.The install4j runtime JAR file i4jruntime.jar contains a number of image files that youcan reference here by prefixing the icon file name with "icon:". For example, icon:lock_open_32.png loads a 32x32 icon showing an open lock.
• Icon-text gap [Label]
The gap between the label icon and the label text in pixels.
• Text source [License agreement]
The source from which the license is loaded. For multi-language installers, the "File"source is recommended since it is more easily localizable than the direct entry.
• Variable name [License agreement]
Optionally, you can save the actually displayed text to a variable. Enter the variablename without the installer prefix and the dollar sign. This is useful if you displaylocalized text and want to save the actually displayed text with a "Write text to a file"action later on.
• License file
The file from which the license is loaded.
Note: This property is only visible if "Text source" is set to "File".
• License
The license that is displayed in the screen, either plain text or HTML. For HTML, thevalue should start with <html> , otherwise the plain text will be displayed. Thetext is displayed in a scrollable text area.
Note: This property is only visible if "Text source" is set to "Direct".
• Height [License agreement]
The height of the HTML display in pixels.
• Fill extra vertical space [License agreement]
If set, the form component will expand to fill remaining vertical space. Extra verticalspace is only available, if the form is not scrollable. Custom form screens have a"Scrollable" property, which must be set to false.
• Initially accepted [License agreement]
If selected, the "Accept" radio button is initially selected.
• User must scroll to bottom [License agreement]
If selected, the user can only accept the license if the text area with the license texthas been previously scrolled to the bottom. Has no effect if the "Initially selected"property is selected.
• Radio buttons axis [License agreement]
The axis alongwhich the radio buttons for accepting the license agreement are layouted.
293
PDF display
Displays a PDF file in an embedded cross-platformPDF viewer.
Properties:
• PDF file [PDF]
The PDF file that should be displayed.
Program group selector
A form component that allows the user to select a program group onMicrosoftWindows.
Properties:
• Variable name for selection [Program Group Selector]
The name of the variable to which the selected program group is saved when the useradvances to the next screen.
• Initial program group [Program Group Selector]
The initially selected program group. Can be empty if no program group should beinitially selected.
• Program groups for all users [Program Group Selector]
If selected, the program groups for all users are shown, otherwise the program groupsfor the current user are shown.
• Show warning if program group exists [Program Group Selector]
If selected, a warning will be shown if the selected program group already exists.
• Fill extra vertical space [Program Group Selector]
If set, the form component will expand to fill remaining vertical space. Extra verticalspace is only available, if the form is not scrollable. Custom form screens have a"Scrollable" property, which must be set to false.
Progress display
An progress display that can show the progress of the actions attached to the containingscreen.
Properties:
• Hide initially
If selected, the progress bar is hidden when the form is shown. When the actionsattached to the screen are executed, the progress bar is made visible.
• Status line visible
If selected, the status line is visible.
294
• Initial status message
The initial status message displayed by the progress screen. You can change thismessage with "Set messages" actions or by invoking Context.getProgressInterface().setStatusMessage("...") .
Note: This property is only visible if "Status line visible" is selected.
• Detail line visible
If selected, the detail line is visible.
• Initial detail message
The initial detail message displayed by the progress screen. You can change thismessage with "Set messages" actions or by invoking Context.getProgressInterface().setDetailMessage("...") .
Note: This property is only visible if "Detail line visible" is selected.
Update alert
Apair of radio buttons offering the user a choicewhether to update an existing installationor not. If the existing installation should be updated, the installer variable sys.confirmedUpdateInstallation is set to true . Several standard screens use that installervariable in their default condition expression.
Properties:
• Alert for update installation
If selected, the form component will check if a previous installation can be found bycalling context.isUpdateInstallation() . In this case, the user will be presented with thechoice to update the existing installation or select a new installation directory. If theupdate is selected, the installer variable sys.confirmedUpdateInstallation will be setto Boolean.TRUE . The default condition expressions on the "Installation location"screen and the "Create program group" screen are set so that the screen is skippedin that case. Note that this only works if "Detect previous installation directory" isselected on the "Installer->Update Options" tab.
• Selection script [User input]
Invoked when the user changes the selection or when the screen is activated and thisform component is visible.
Update schedule selector
Drop-down box that lets the user select an update schedule for your application. Youcan use the com.install4j.api.update.UpdateScheduleRegistry class in your application tocheck if you should launch an updater. Please see the Javadoc for more information.Please note that simply adding this form component does not automatically launch anupdater at regular intervals.
Properties:
295
• Initial update schedule
The initially selected update schedule. If the user has already installed the applicationbefore, the currently active selection by the user will be selected and this value will beignored.
• Help text [Help]
If a text is entered into this property, a tooltip label with a help icon will be created onthe right side of the form component that will display the help text when the userhoverswith themouse above the icon. The text can be plain text or HTML. Formulti-linelabels, use HTML like this: <html>This is line one<br>This is line two</tt></html>.
• Text [Label]
The text of the label. Can be empty. To configure a keyboard shortcut, prefix themnemonic character in the label text with &, e.g."&User". The prefixed character willbe underlined and the platform-specific keyboard shortcut (e.g. ALT+[character] onWindows) will allow the user to quickly navigate to this form component with thekeyboard.
• Font color [Label]
The color of the label font. If empty, the default color will be used.
• Font [Label]
The font type of the label. For a derived form, you can optionally change size, and fontattributes, with a custom font you can also choose a different font face.
• Font specification
The font specification for the label.
Note: This property is only visible if "Font" is set to "Custom".
• Font style
The font style of the label.
Note: This property is only visible if "Font" is set to "Derived".
• Font size in percent
The font size of the label in percent relative to the default font.
Note: This property is only visible if "Font" is set to "Derived".
• Icon [Label]
An image file with an icon for the labellabel. Can be empty. To add a high-resolutionimage for retina displays, create a file with double the resolution and an additional@2x after the name (e.g. image.png and [email protected] ) next to the selected image.The install4j runtime JAR file i4jruntime.jar contains a number of image files that youcan reference here by prefixing the icon file name with "icon:". For example, icon:lock_open_32.png loads a 32x32 icon showing an open lock.
• Icon-text gap [Label]
The gap between the label icon and the label text in pixels.
• Request focus [User input]
If selected, the form component will request the focus after the form is activated. Ifyou have multiple form components in a single form that have this property selected,the result is undefined.
296
Windows user selector
A component for selecting Windows users or groups in the native Windows user dialog.Optionally, you can display a button to create a new user. The selection is saved as a SIDto a string variable. If multiple selection is enabled, the result is a string array of SIDs.This component does not do anything in console mode, since it requires the nativeWindows dialog for selecting users and groups.
Properties:
• Show users
Show users in the native user selection dialog.
• Show groups
Show users in the native user selection dialog.
• Show well-known principals
Show well-known principals like "SYSTEM" or "SERVICE" in the native user selectiondialog.
• Multiple selection
If selected, multiple users or groups can be selected. The variable type is a string arrayof SIDs in that case, otherwise it is a stringwith the single selected SID.Multiple selectioncannot be combined with the "Create User" option.
• Only local objects
If selected, only local users and groups will be displayed.
• Show "Create User" button
If selected, a button to create a new user will be displayed next to the "Browse" button.On clicking that button, a separate dialog will be shown where the new user can beconfigured.
Note: This property is only visible if "Show users" is selected.
• Variable for user creation flag
The name of the variable which will be set to Boolean.TRUE if the selected user hasbeen created by the user. If the selected user has not been created, the variable valuewill be set to Boolean.FALSE . This is useful if you would like to determine if theuninstaller should delete the user. Users can be deleted with the install4j API. Thisvariable name can be empty, in which case the creation status will not be saved.
Note: This property is only visible if "Show "Create User" button" is selected.
• Variable for local group
The name of the variable which will be set to the local group used for a newly createduser. This variable name can be empty, in which case the created local group namewill not be saved.
Note: This property is only visible if "Show "Create User" button" is selected.
• Variable for group creation flag
The name of the variable which will be set to Boolean.TRUE if a group for the selecteduser has been created by the user. If the selected user has not been created or if anexisting group was used, the variable value will be set to Boolean.FALSE . This is usefulif you would like to determine if the uninstaller should delete the local group. Groups
297
can be deleted with the install4j API. This variable name can be empty, in which casethe creation status will not be saved.
Note: This property is only visible if "Show "Create User" button" is selected.
• Password form component
A text field or password field form component that should be updated with thepassword that was chosen for the created user.If not selected, no such update will beperformed.
Note: This property is only visible if "Show "Create User" button" is selected.
• Help text [Help]
If a text is entered into this property, a tooltip label with a help icon will be created onthe right side of the form component that will display the help text when the userhoverswith themouse above the icon. The text can be plain text or HTML. Formulti-linelabels, use HTML like this: <html>This is line one<br>This is line two</tt></html>.
• Text [Label]
The text of the label. Can be empty.
• Font color [Label]
The color of the label font. If empty, the default color will be used.
• Font [Label]
The font type of the label. For a derived form, you can optionally change size, and fontattributes, with a custom font you can also choose a different font face.
• Font specification
The font specification for the label.
Note: This property is only visible if "Font" is set to "Custom".
• Font style
The font style of the label.
Note: This property is only visible if "Font" is set to "Derived".
• Font size in percent
The font size of the label in percent relative to the default font.
Note: This property is only visible if "Font" is set to "Derived".
• Icon [Label]
An image file with an icon for the labellabel. Can be empty. To add a high-resolutionimage for retina displays, create a file with double the resolution and an additional@2x after the name (e.g. image.png and [email protected] ) next to the selected image.The install4j runtime JAR file i4jruntime.jar contains a number of image files that youcan reference here by prefixing the icon file name with "icon:". For example, icon:lock_open_32.png loads a 32x32 icon showing an open lock.
• Icon-text gap [Label]
The gap between the label icon and the label text in pixels.
• Variable name [User input]
The name of the variable to which the user input is assigned. The variable value willbe a string with the selected SID , or, if multiple selection is enabled, a string array ofSIDs.
298

Category: Text fields
Password field
A password text field with an optional leading label. The user input is displayed with '*'characters. The user input is saved to a variable.
Properties:
• Help text [Help]
If a text is entered into this property, a tooltip label with a help icon will be created onthe right side of the form component that will display the help text when the userhoverswith themouse above the icon. The text can be plain text or HTML. Formulti-linelabels, use HTML like this: <html>This is line one<br>This is line two</tt></html>.
• Text [Label]
The text of the label. Can be empty. To configure a keyboard shortcut, prefix themnemonic character in the label text with &, e.g."&User". The prefixed character willbe underlined and the platform-specific keyboard shortcut (e.g. ALT+[character] onWindows) will allow the user to quickly navigate to this form component with thekeyboard.
• Font color [Label]
The color of the label font. If empty, the default color will be used.
• Font [Label]
The font type of the label. For a derived form, you can optionally change size, and fontattributes, with a custom font you can also choose a different font face.
• Font specification
The font specification for the label.
Note: This property is only visible if "Font" is set to "Custom".
• Font style
The font style of the label.
Note: This property is only visible if "Font" is set to "Derived".
• Font size in percent
The font size of the label in percent relative to the default font.
Note: This property is only visible if "Font" is set to "Derived".
• Icon [Label]
An image file with an icon for the labellabel. Can be empty. To add a high-resolutionimage for retina displays, create a file with double the resolution and an additional@2x after the name (e.g. image.png and [email protected] ) next to the selected image.The install4j runtime JAR file i4jruntime.jar contains a number of image files that youcan reference here by prefixing the icon file name with "icon:". For example, icon:lock_open_32.png loads a 32x32 icon showing an open lock.
• Icon-text gap [Label]
The gap between the label icon and the label text in pixels.
299
• Initial text [Password field]
The initial text in the text field. The variable value takes precedence, so this value willonly be used if the variable value is undefined. Can be empty.
• Prevent empty user input [Password field]
If selected, empty user input is not accepted and a default error message is shown inthat case. This is a quick validation option so that you do not have to validate userinput in the validation script of the form screen, as it would be necessary for morecomplex validations.
• Font [Password field]
The font type of the text field. For a derived form, you can optionally change size, andfont attributes, with a custom font you can also choose a different font face.
• Font specification
The font specification for the text field.
Note: This property is only visible if "Font" is set to "Custom".
• Font style
The font style of the text field.
Note: This property is only visible if "Font" is set to "Derived".
• Font size in percent
The font size of the text field in percent relative to the default font.
Note: This property is only visible if "Font" is set to "Derived".
• Text field columns [Password field]
The width of the text field, expressed as a multiple of the width of the character 'm'.If zero, the text field will fill the entire horizontal space.
• Write encoded value to response file [Password field]
Write an encoded value of the entered password to the response file. Note that theencoding only prevents casual observation of the password. Do not enable if yourequire strict security for the password.
• Show icon to toggle password visibility [Password field]
If selected, an icon will be shown inside the text field to toggle the visibility of thepassword.
• Variable name [User input]
The name of the variable to which the user input is assigned. The type of the variablevalue is java.lang.String
• Key validation expression [User input]
An expression or script that validates each key that is pressed in this component bythe user. The text parameter does not contain> the modifications of this key event.
• Key listener script [User input]
A script that is executed each time that a key is pressed in this component by the user.The text parameter already contains the modification of this key event.
• Input validation expression [User input]
An expression or script that validates the user input when the password field losesthe focus. If the expression returns false, the focus remains in the password field. Inthat case you should display an error message.
300
• Enter goes to next screen [User input]
If selected, hitting the ENTER key while the text field is focused, will go to the nextscreen, just as if the user had clicked on the "Next" button.
• Request focus [User input]
If selected, the form component will request the focus after the form is activated. Ifyou have multiple form components in a single form that have this property selected,the result is undefined.
Text area
A text area with an optional leading label. The user input is saved to a variable.
Properties:
• Help text [Help]
If a text is entered into this property, a tooltip label with a help icon will be created onthe right side of the form component that will display the help text when the userhoverswith themouse above the icon. The text can be plain text or HTML. Formulti-linelabels, use HTML like this: <html>This is line one<br>This is line two</tt></html>.
• Text [Label]
The text of the label. Can be empty. To configure a keyboard shortcut, prefix themnemonic character in the label text with &, e.g."&User". The prefixed character willbe underlined and the platform-specific keyboard shortcut (e.g. ALT+[character] onWindows) will allow the user to quickly navigate to this form component with thekeyboard.
• Font color [Label]
The color of the label font. If empty, the default color will be used.
• Font [Label]
The font type of the label. For a derived form, you can optionally change size, and fontattributes, with a custom font you can also choose a different font face.
• Font specification
The font specification for the label.
Note: This property is only visible if "Font" is set to "Custom".
• Font style
The font style of the label.
Note: This property is only visible if "Font" is set to "Derived".
• Font size in percent
The font size of the label in percent relative to the default font.
Note: This property is only visible if "Font" is set to "Derived".
• Icon [Label]
An image file with an icon for the labellabel. Can be empty. To add a high-resolutionimage for retina displays, create a file with double the resolution and an additional
301
@2x after the name (e.g. image.png and [email protected] ) next to the selected image.The install4j runtime JAR file i4jruntime.jar contains a number of image files that youcan reference here by prefixing the icon file name with "icon:". For example, icon:lock_open_32.png loads a 32x32 icon showing an open lock.
• Icon-text gap [Label]
The gap between the label icon and the label text in pixels.
• Initial text [Text area]
The initial text in the text field. The variable value takes precedence, so this value willonly be used if the variable value is undefined. Can be empty.
• Prevent empty user input [Text area]
If selected, empty user input is not accepted and a default error message is shown inthat case. This is a quick validation option so that you do not have to validate userinput in the validation script of the form screen, as it would be necessary for morecomplex validations.
• Font [Text area]
The font type of the text field. For a derived form, you can optionally change size, andfont attributes, with a custom font you can also choose a different font face.
• Font specification
The font specification for the text field.
Note: This property is only visible if "Font" is set to "Custom".
• Font style
The font style of the text field.
Note: This property is only visible if "Font" is set to "Derived".
• Font size in percent
The font size of the text field in percent relative to the default font.
Note: This property is only visible if "Font" is set to "Derived".
• Text area columns [Text area]
The width of the text area, expressed as a multiple of the width of the character 'm'.If zero, the text area will fill the entire horizontal space.
• Text area rows [Text area]
The height of the text area, expressed as a multiple of line heights. Must be greaterthan zero.
• Fill extra vertical space [Text area]
If set, the form component will expand to fill remaining vertical space. Extra verticalspace is only available, if the form is not scrollable. Custom form screens have a"Scrollable" property, which must be set to false.
• Wrap lines [Text area]
If selected, lines will wrap at the end of the text area. Otherwise a horizontal scroll barwill be show when needed.
• Wrap entire words [Text area]
This property is only relevant when lines are wrapped. If set, lines will wrap on wordboundaries if possible.
302

• Use label font [Text area]
If selected, the default label font is used and other font settings are ignored.
• Variable name [User input]
The name of the variable to which the user input is assigned. The type of the variablevalue is java.lang.String
• Key validation expression [User input]
An expression or script that validates each key that is pressed in this component bythe user. The text parameter does not contain> the modifications of this key event.
• Key listener script [User input]
A script that is executed each time that a key is pressed in this component by the user.The text parameter already contains the modification of this key event.
• Input validation expression [User input]
An expression or script that validates the user inputwhen the text area loses the focus.If the expression returns false, the focus remains in the text area. In that case youshould display an error message.
• Request focus [User input]
If selected, the form component will request the focus after the form is activated. Ifyou have multiple form components in a single form that have this property selected,the result is undefined.
Text field
A text field with an optional leading label. The user input is saved to a variable.
Properties:
• Help text [Help]
If a text is entered into this property, a tooltip label with a help icon will be created onthe right side of the form component that will display the help text when the userhoverswith themouse above the icon. The text can be plain text or HTML. Formulti-linelabels, use HTML like this: <html>This is line one<br>This is line two</tt></html>.
• Text [Label]
The text of the label. Can be empty. To configure a keyboard shortcut, prefix themnemonic character in the label text with &, e.g."&User". The prefixed character willbe underlined and the platform-specific keyboard shortcut (e.g. ALT+[character] onWindows) will allow the user to quickly navigate to this form component with thekeyboard.
• Font color [Label]
The color of the label font. If empty, the default color will be used.
• Font [Label]
The font type of the label. For a derived form, you can optionally change size, and fontattributes, with a custom font you can also choose a different font face.
303
• Font specification
The font specification for the label.
Note: This property is only visible if "Font" is set to "Custom".
• Font style
The font style of the label.
Note: This property is only visible if "Font" is set to "Derived".
• Font size in percent
The font size of the label in percent relative to the default font.
Note: This property is only visible if "Font" is set to "Derived".
• Icon [Label]
An image file with an icon for the labellabel. Can be empty. To add a high-resolutionimage for retina displays, create a file with double the resolution and an additional@2x after the name (e.g. image.png and [email protected] ) next to the selected image.The install4j runtime JAR file i4jruntime.jar contains a number of image files that youcan reference here by prefixing the icon file name with "icon:". For example, icon:lock_open_32.png loads a 32x32 icon showing an open lock.
• Icon-text gap [Label]
The gap between the label icon and the label text in pixels.
• Initial text [Text field]
The initial text in the text field. The variable value takes precedence, so this value willonly be used if the variable value is undefined. Can be empty.
• Prevent empty user input [Text field]
If selected, empty user input is not accepted and a default error message is shown inthat case. This is a quick validation option so that you do not have to validate userinput in the validation script of the form screen, as it would be necessary for morecomplex validations.
• Font [Text field]
The font type of the text field. For a derived form, you can optionally change size, andfont attributes, with a custom font you can also choose a different font face.
• Font specification
The font specification for the text field.
Note: This property is only visible if "Font" is set to "Custom".
• Font style
The font style of the text field.
Note: This property is only visible if "Font" is set to "Derived".
• Font size in percent
The font size of the text field in percent relative to the default font.
Note: This property is only visible if "Font" is set to "Derived".
• Text field columns [Text field]
The width of the text field, expressed as a multiple of the width of the character 'm'.If zero, the text field will fill the entire horizontal space.
304
• Variable name [User input]
The name of the variable to which the user input is assigned. The type of the variablevalue is java.lang.String
• Key validation expression [User input]
An expression or script that validates each key that is pressed in this component bythe user. The text parameter does not contain> the modifications of this key event.
• Key listener script [User input]
A script that is executed each time that a key is pressed in this component by the user.The text parameter already contains the modification of this key event.
• Input validation expression [User input]
An expression or script that validates the user input when the text field loses the focus.If the expression returns false, the focus remains in the text field. In that case youshould display an error message.
• Enter goes to next screen [User input]
If selected, hitting the ENTER key while the text field is focused, will go to the nextscreen, just as if the user had clicked on the "Next" button.
• Request focus [User input]
If selected, the form component will request the focus after the form is activated. Ifyou have multiple form components in a single form that have this property selected,the result is undefined.
Text field with date format
A text field with an optional leading label and a date format. The user input (a java.util.Date ) is saved to a variable.
Properties:
• Date format [Format]
The date format specifies the components of the date that should be editable, i.e. date,time or date and time.
• Date display style [Format]
The date display style specifies the verbosity of the date component.
• Time display style [Format]
The time display style specifies the verbosity of the time component.
• Initial value [Format]
The initial date in the text field.
• Help text [Help]
If a text is entered into this property, a tooltip label with a help icon will be created onthe right side of the form component that will display the help text when the userhoverswith themouse above the icon. The text can be plain text or HTML. Formulti-linelabels, use HTML like this: <html>This is line one<br>This is line two</tt></html>.
305
• Text [Label]
The text of the label. Can be empty. To configure a keyboard shortcut, prefix themnemonic character in the label text with &, e.g."&User". The prefixed character willbe underlined and the platform-specific keyboard shortcut (e.g. ALT+[character] onWindows) will allow the user to quickly navigate to this form component with thekeyboard.
• Font color [Label]
The color of the label font. If empty, the default color will be used.
• Font [Label]
The font type of the label. For a derived form, you can optionally change size, and fontattributes, with a custom font you can also choose a different font face.
• Font specification
The font specification for the label.
Note: This property is only visible if "Font" is set to "Custom".
• Font style
The font style of the label.
Note: This property is only visible if "Font" is set to "Derived".
• Font size in percent
The font size of the label in percent relative to the default font.
Note: This property is only visible if "Font" is set to "Derived".
• Icon [Label]
An image file with an icon for the labellabel. Can be empty. To add a high-resolutionimage for retina displays, create a file with double the resolution and an additional@2x after the name (e.g. image.png and [email protected] ) next to the selected image.The install4j runtime JAR file i4jruntime.jar contains a number of image files that youcan reference here by prefixing the icon file name with "icon:". For example, icon:lock_open_32.png loads a 32x32 icon showing an open lock.
• Icon-text gap [Label]
The gap between the label icon and the label text in pixels.
• Font [Text field]
The font type of the text field. For a derived form, you can optionally change size, andfont attributes, with a custom font you can also choose a different font face.
• Font specification
The font specification for the text field.
Note: This property is only visible if "Font" is set to "Custom".
• Font style
The font style of the text field.
Note: This property is only visible if "Font" is set to "Derived".
• Font size in percent
The font size of the text field in percent relative to the default font.
Note: This property is only visible if "Font" is set to "Derived".
306
• Text field columns [Text field]
The width of the text field, expressed as a multiple of the width of the character 'm'.If zero, the text field will fill the entire horizontal space.
• Variable name [User input]
The name of the variable to which the user input is assigned. The type of the variablevalue is java.util.Date
• Key validation expression [User input]
An expression or script that validates each key that is pressed in this component bythe user. The text parameter does not contain> the modifications of this key event.
• Key listener script [User input]
A script that is executed each time that a key is pressed in this component by the user.The text parameter already contains the modification of this key event.
• Input validation expression [User input]
An expression or script that validates the user input when the text field loses the focus.If the expression returns false, the focus remains in the text field. In that case youshould display an error message.
• Enter goes to next screen [User input]
If selected, hitting the ENTER key while the text field is focused, will go to the nextscreen, just as if the user had clicked on the "Next" button.
• Request focus [User input]
If selected, the form component will request the focus after the form is activated. Ifyou have multiple form components in a single form that have this property selected,the result is undefined.
Text field with format mask
A text field with an optional leading label and an arbitrary format mask. The user inputis saved to a variable. The default mask is that of an SSN. For more information, pleasesee the javadoc of javax.swing.text.MaskFormatter .
Properties:
• Input mask [Format]
The input mask as defined be the javadoc of javax.swing.text.MaskFormatter .
• Placeholder character [Format]
The character that is displayed for empty characters of the input mask that still haveto be filled out by the user.
• Valid characters [Format]
If not empty, this string defines the characters that are valid for user input.
• Invalid characters [Format]
If not empty, this string defines the characters that are invalid for user input.
• Allow invalid input [Format]
If set, invalid input will be allowed during editing.When the text field loses focus, invalidinput will not be accepted, so the final value is guaranteed to be valid in any case.
307

• Return literal characters [Format]
If set, the value that is saved to the variable contains literal characters defined in theinput mask.
• Help text [Help]
If a text is entered into this property, a tooltip label with a help icon will be created onthe right side of the form component that will display the help text when the userhoverswith themouse above the icon. The text can be plain text or HTML. Formulti-linelabels, use HTML like this: <html>This is line one<br>This is line two</tt></html>.
• Text [Label]
The text of the label. Can be empty. To configure a keyboard shortcut, prefix themnemonic character in the label text with &, e.g."&User". The prefixed character willbe underlined and the platform-specific keyboard shortcut (e.g. ALT+[character] onWindows) will allow the user to quickly navigate to this form component with thekeyboard.
• Font color [Label]
The color of the label font. If empty, the default color will be used.
• Font [Label]
The font type of the label. For a derived form, you can optionally change size, and fontattributes, with a custom font you can also choose a different font face.
• Font specification
The font specification for the label.
Note: This property is only visible if "Font" is set to "Custom".
• Font style
The font style of the label.
Note: This property is only visible if "Font" is set to "Derived".
• Font size in percent
The font size of the label in percent relative to the default font.
Note: This property is only visible if "Font" is set to "Derived".
• Icon [Label]
An image file with an icon for the labellabel. Can be empty. To add a high-resolutionimage for retina displays, create a file with double the resolution and an additional@2x after the name (e.g. image.png and [email protected] ) next to the selected image.The install4j runtime JAR file i4jruntime.jar contains a number of image files that youcan reference here by prefixing the icon file name with "icon:". For example, icon:lock_open_32.png loads a 32x32 icon showing an open lock.
• Icon-text gap [Label]
The gap between the label icon and the label text in pixels.
• Initial text [Text field]
The initial text in the text field. The variable value takes precedence, so this value willonly be used if the variable value is undefined. Can be empty.
308
• Prevent empty user input [Text field]
If selected, empty user input is not accepted and a default error message is shown inthat case. This is a quick validation option so that you do not have to validate userinput in the validation script of the form screen, as it would be necessary for morecomplex validations.
• Font [Text field]
The font type of the text field. For a derived form, you can optionally change size, andfont attributes, with a custom font you can also choose a different font face.
• Font specification
The font specification for the text field.
Note: This property is only visible if "Font" is set to "Custom".
• Font style
The font style of the text field.
Note: This property is only visible if "Font" is set to "Derived".
• Font size in percent
The font size of the text field in percent relative to the default font.
Note: This property is only visible if "Font" is set to "Derived".
• Text field columns [Text field]
The width of the text field, expressed as a multiple of the width of the character 'm'.If zero, the text field will fill the entire horizontal space.
• Variable name [User input]
The name of the variable to which the user input is assigned. The type of the variablevalue is java.lang.String
• Key validation expression [User input]
An expression or script that validates each key that is pressed in this component bythe user. The text parameter does not contain> the modifications of this key event.
• Key listener script [User input]
A script that is executed each time that a key is pressed in this component by the user.The text parameter already contains the modification of this key event.
• Input validation expression [User input]
An expression or script that validates the user input when the text field loses the focus.If the expression returns false, the focus remains in the text field. In that case youshould display an error message.
• Enter goes to next screen [User input]
If selected, hitting the ENTER key while the text field is focused, will go to the nextscreen, just as if the user had clicked on the "Next" button.
• Request focus [User input]
If selected, the form component will request the focus after the form is activated. Ifyou have multiple form components in a single form that have this property selected,the result is undefined.
Text field with integer format
309

A text field with an optional leading label and an integer format. The user input is savedto a variable with type java.lang.Long .
Properties:
• Minimum number of digits [Format]
The minimum number of digits that are acceptable for user input.
• Maximum number of digits [Format]
The maximum number of digits that are acceptable for user input. If zero, there is nolimit.
• Use grouping separator [Format]
If set, a locale-dependent grouping separator is displayed.
• Allow invalid input [Format]
If set, invalid input will be allowed during editing.When the text field loses focus, invalidinput will not be accepted, so the final value is guaranteed to be valid in any case.
• Help text [Help]
If a text is entered into this property, a tooltip label with a help icon will be created onthe right side of the form component that will display the help text when the userhoverswith themouse above the icon. The text can be plain text or HTML. Formulti-linelabels, use HTML like this: <html>This is line one<br>This is line two</tt></html>.
• Text [Label]
The text of the label. Can be empty. To configure a keyboard shortcut, prefix themnemonic character in the label text with &, e.g."&User". The prefixed character willbe underlined and the platform-specific keyboard shortcut (e.g. ALT+[character] onWindows) will allow the user to quickly navigate to this form component with thekeyboard.
• Font color [Label]
The color of the label font. If empty, the default color will be used.
• Font [Label]
The font type of the label. For a derived form, you can optionally change size, and fontattributes, with a custom font you can also choose a different font face.
• Font specification
The font specification for the label.
Note: This property is only visible if "Font" is set to "Custom".
• Font style
The font style of the label.
Note: This property is only visible if "Font" is set to "Derived".
• Font size in percent
The font size of the label in percent relative to the default font.
Note: This property is only visible if "Font" is set to "Derived".
• Icon [Label]
An image file with an icon for the labellabel. Can be empty. To add a high-resolutionimage for retina displays, create a file with double the resolution and an additional
310
@2x after the name (e.g. image.png and [email protected] ) next to the selected image.The install4j runtime JAR file i4jruntime.jar contains a number of image files that youcan reference here by prefixing the icon file name with "icon:". For example, icon:lock_open_32.png loads a 32x32 icon showing an open lock.
• Icon-text gap [Label]
The gap between the label icon and the label text in pixels.
• Initial text [Text field]
The initial text in the text field. The variable value takes precedence, so this value willonly be used if the variable value is undefined. Can be empty.
• Prevent empty user input [Text field]
If selected, empty user input is not accepted and a default error message is shown inthat case. This is a quick validation option so that you do not have to validate userinput in the validation script of the form screen, as it would be necessary for morecomplex validations.
• Font [Text field]
The font type of the text field. For a derived form, you can optionally change size, andfont attributes, with a custom font you can also choose a different font face.
• Font specification
The font specification for the text field.
Note: This property is only visible if "Font" is set to "Custom".
• Font style
The font style of the text field.
Note: This property is only visible if "Font" is set to "Derived".
• Font size in percent
The font size of the text field in percent relative to the default font.
Note: This property is only visible if "Font" is set to "Derived".
• Text field columns [Text field]
The width of the text field, expressed as a multiple of the width of the character 'm'.If zero, the text field will fill the entire horizontal space.
• Variable name [User input]
The name of the variable to which the user input is assigned. The type of the variablevalue is java.lang.Long
• Key validation expression [User input]
An expression or script that validates each key that is pressed in this component bythe user. The text parameter does not contain> the modifications of this key event.
• Key listener script [User input]
A script that is executed each time that a key is pressed in this component by the user.The text parameter already contains the modification of this key event.
• Input validation expression [User input]
An expression or script that validates the user input when the text field loses the focus.If the expression returns false, the focus remains in the text field. In that case youshould display an error message.
311
• Enter goes to next screen [User input]
If selected, hitting the ENTER key while the text field is focused, will go to the nextscreen, just as if the user had clicked on the "Next" button.
• Request focus [User input]
If selected, the form component will request the focus after the form is activated. Ifyou have multiple form components in a single form that have this property selected,the result is undefined.
Console handler
Allows you to interact with the user in a console installer. All standard form componentsexpose appropriate behavior in console mode, however, there are situations where youneed to fine-tune your console installer with additional messages or questions. In GUIor unattended mode, this form component does not have any effect.
Properties:
• Console script
The script that is executed in consolemode. The "console" parameter gives you accessto the console and many helper methods. The return type is boolean and indicateswhether the installer should be cancelled or not.
312
B.5.12 Installer - Custom Code & Resources
Custom code is used for
• specifying additional libraries that can be used in scripts and expressions [p. 321] of screens[p. 166] , actions [p. 180] and form components [p. 250] .
• developing new types of actions, screens or form components with the install4j API. Pleasesee the help topic on using the API [p. 84] for more information.
Before you start to develop a new action, please have a look at the available actions [p. 182]and screens [p. 169] . If it's just a few lines of code, you can use the "Run script" action to enterthemdirectly into install4j. If youwould like to collect user input, most use cases can be solvedwith a "Configurable form" screen.
An alternative way of adding your beans to the install4j is packaging them as an extension [p.87] . In that case, you can select them directly from the standard registry dialogs instead ofhaving to go through the "Search in custom code" menu entries when adding beans to theinstaller.
• including resource files into the installer. Resource files are arbitrary files like DLLs, externalexecutables or text files that have to be available before the "Install files" action has run.Whileall class files are packed into a single user.jar file, archives and resource file are extractedto the user subdirectory in the working directory of the installer. You can access a resourcefile with the following expression:
new File("user", "[file name]")
For example, if you have added a native library jni.dll to your custom code, you can loadit in a "Run script" action by calling
System.load(new File("user", "jni.dll").getPath());
In the Custom code section you can specify the location of your custom code. The following customcode location types [p. 319] are available:
• Class or resource files
• Directories
• Archives
All classes used by your custom code have to be included in these locations (except for Javaruntime classes and install4j framework classes).The control buttons allow you to modify the contents of the list of custom code locations, the
Add button displays the custom code entry dialog [p. 319] .
After you have chosen your custom code locations, you will be able to select your own screens,actions and form components.
Files that are present in both the custom code aswell as the distribution treewillnot be packagedtwice. You can add files that are also in the distribution tree freely to your custom code, theywill not increase the size of your installer. The compiler checks the source path of included filesto determine if they are already present in the installer.
313

B.5.13 Installer - Styles
For more information on styles, please see the corresponding help topic [p. 24] .
The Add button shows a popup window where you can select whether to add
• a configurable style. Styles can be constructed with a restricted set of the form components[p. 250] for screens that do not take user input and some special form components that arerelevant in a styling context.
• a style that is contained in your custom code. New types of reusable styles can be developedwith the install4j API [p. 84] . In your custom code configuration [p. 313] you can specify codelocations that are scanned for suitable classes. A class selector [p. 319] will be shown whereyou can select the desired class.
• a group for organizing styles, so you have a better overview of which styles belong together.
If you select a single style in the list of styles, you can edit its properties on the right side. Selectingmultiple styles is possible on the same tree level, i.e. all selected elements have to be siblings inthe tree.
When the configuration area is focused, you can transfer the focus back to the list of styles withthe keyboard by pressing ALT-F1.
The list of styles provides the following actions in the toolbar on the right that operate on thecurrent selection. You can also access these actions from the contextmenu or use the associatedkeyboard shortcuts.
• Delete
All selected styles will be deleted after a confirmation dialogwhen invoking the Delete action.The deleted styles cannot be restored.
• Rename
After you add a style, the list of styles shows it with its default name. This is often enough,however, if you have multiple instances of the same style alongside, a custom name makesit easier to distinguish these instances. You can assign a custom name to each style with the
Rename action. The default name is still displayed in brackets after the custom name. Torevert to the default, just enter an empty custom name in the rename dialog.
• Comment
By default, styles have no comments associatedwith them. You can add comments to selectedstyles with the Add Comments action. When a comment is added, the affected styles willreceive a "Comments" tab. After adding a comment to a single style, the comment area isfocused automatically. Likewise, you can remove comments from one or more styles with theRemove Comments action.
In order to visit all comments, you can use the Show next comment and Show previous commentactions. These actionswill focus the comment area automatically andwrap around if no furthercomments can be found.
• Disable
In order to "comment out" styles, you can use the Disable action. The configuration of thedisabled styles will not be displayed, their entries in the list of styles will be shown in gray andthey will not be checked for errors when the project is built.
314
• Copy and paste
install4j offers an inter-process clipboard for styles. You can Cut or Copy styles to theclipboard and Paste them in the sameor a different instance of install4j. Note that referencesto launchers or references to files in the distribution tree might not be valid after pasting toa different project.
Pasted styles are appended to the end of the list of styles.
• Reorder
If your selection is a single contiguous interval, you canmove the entire block up or downin the list. The selection can only be moved on the same level with the reorder actions. Tomove the selection to a different parent, you can cut and paste it (see above).
• Group
You can create a group [p. 252] from the selected styles with the Create group from selectionaction. The new group will be inserted in place of the selected elements.
You can dissolve a group with the Dissolve Group action. This action is only enabled if theselection consists of a single layout group. The elements contained in the groupwill be insertedin place of the group. Nested groups will not be dissolved.
Form styles have the following properties:
• Standalone style
If selected, the style can be selected for installer applications, screen groups and screens. Ifa style is not standalone, it can only be used in other styles.
• Fill horizontal space
If selected, all available horizontal space is filled by this style. This setting is also used when itis nested in another style by a "Nested style" form component.
• Horizontal anchor
If "Fill horizontal space" is not selected, the style can be placed at different locations in theavailable space.
Note: This property is only visible if "Fill horizontal space" is selected.
• Fill vertical space
If selected, all available vertical space is filled by this style. This setting is also used when it isnested in another style by a "Nested style" form component.
• Vertical anchor
If "Fill vertical space" is not selected, the style can be placed at different locations in the availablespace.
Note: This property is only visible if "Fill vertical space" is selected.
You can preview a style with the Preview button which is also available on the property pageof a style.
315
B.5.14 Installer - Update Options
Please see the help topic on updates [p. 80] for a general discussion on how generated installershandle installations when an earlier version has already been installed.
Every install4j project has an application ID. When you create a new project, the application IDis calculated. The ID is displayed on this tab. If you have to change the ID, you can use theRegenerate ID button. You can also change the ID manually if the manually edit ID check boxis checked. You should only change the ID if you want to change the identity if your project. Theapplication ID ensures that later versions of your application will be able to find and recognizeearlier installations.
install4j offers two types of installers:
• Regular installer
This generates standalone installer. The following options related to updates are available forregular installers:
• Detect previous installation directory
If a previous installation can be detected on the computer, the installer will suggest thedirectory of that previous installation. In that case, the "Welcome" screen will ask the userif the previous installation should be updated. This question can be suppressed in theconfiguration of the "Welcome" screen.
• Add-on installer
This generates an installer that can only be installed on top of an installation of a certaininstallation. An add-on installer doesn't have a separate uninstaller. This is useful to distributepatches and enhancements.
If the add-on installer type is selected, you have to enter an application ID for the baseapplication in the text field below.With the ... chooser button, you can select an install4j projectfile from your file system, and extract its application ID.
316
B.5.15 Installer - Auto Update Options
Please see the help topic on auto-updates [p. 55] for a general discussion on how to implementauto-update functionality in your project.
All settings on this tab are returned at runtime by instances of UpdateDescriptorEntry objectsthat are returnedby theUpdateDescriptorobject. There are twodifferent scenarios forworkingwith these objects:
• In updater installer applications
If you have added an updater installer application on the screens & actions tab [p. 148] , theupdater uses a "Check for update" action to download updates.xml, instantiate anUpdateDescriptor object and save it to the installer variable named "updateDescriptor". A"Set a variable" action is used to save the appropriate UpdateDescriptorEntry object to teinstaller variable named "updateDescriptorEntry"
You can use the above installer variables directly in your updater application.
• From the API
If youwant to check updates fromyour own code, you can call com.install4j.api.update.UpdateChecker.getUpdateDescriptor(...) to obtain an instanceofUpdateDescriptor.
The URL for updates.xml setting sets the contents of the sys.updatesUrl compiler variable.When you insert an updater on the screens& actions tab [p. 148] , it contains a "Check for updates"action, thatwill have its "Update descriptorURL" property set to${compiler:sys.updatesUrl}.If there are any "Check for updates" actions in your project that use this compiler variable, youhave to define it in this text field. Note that this must be the full URL to which you will uploadthe update descriptor file updates.xml, for example https://www.server.com/donwload/updates.xml. You do not have to name the file updates.xml on the server, it can have anyname.
The base URL setting controls how the download URL of a new installer is constructed by anauto-updater. By default, new installers have to be located in the same directory as the updates.xml update descriptor file. If they should be downloaded from another source, activate the baseURL setting and specify the baseURL. TheURL should start with http:// or https:// and pointto a directory where the installers are located, not to a particular installer.
The configured value is returned by UpdateDescriptor#getBaseUrl(). It is not possible toset different base URLs for different media files by using a compiler variable.
The minimum and maximum updatable versions control if updater applications of alreadyinstalled applications should recognize the current version as a possible update. For example,if the installed version is 1.0 and a minimum updatable version of 2.0 is specified, the returnvalue of UpdateDescriptor#getPossibleUpdateEntry() will be null and the updaterapplication will not detect a new version.
The configured values are returnedbyUpdateDescriptorEntry#getUpdatableVersionMin()and UpdateDescriptorEntry#getUpdatableVersionMax(). They can be overridden foreach media file in the "Customize project defaults->Auto-update options" step of the media filewizard.
The files with comments setting allows you to embed an comment in text or HTML format inthe update descriptor. You can configure a file for each language [p. 94] that is supported bythe installer. If you configure a comment file for at least the principal language, a hyperlink thatshows the comment in the appropriate language will be added to the "New version available"screen in updaters that perform a version check.
317

The comment in the user-selected language is returned byUpdateDescriptorEntry#getComment(). Comment files can be overridden for each mediafile in the "Customize project defaults->Auto-update options" step of the media file wizard.
The files with comments must be encoded in UTF-8.
Additional attributes can be used for custom logic in updaters. Attributes are simple key-valuepairs.
T h e c o n f i g u r e d a t t r i b u t e s a r e r e t u r n e d b yUpdateDescriptorEntry#getAdditionalAttribute(...). They canbeoverridden for eachmedia file in the "Customize project defaults->Auto-update options" step of themedia file wizard.
318

B.5.16 Dialogs
B.5.16.1 Custom Code & Resources Entry Dialog
The custom code entry dialog is shown when clicking on the add button in the Custom Code& Resources tab [p. 313] .The following entry types are available:
• Class or resource files
For simple actions, screens or form components that do not depend on other classes, it iseasiest to insert their class files directly, especially if you build your installer extensions togetherwith your application. Anonymous inner classes will be included automatically. If you select aresource file, e.g. an image, it will be added to the top-level directory of the custom JAR fileand will be available via Class.getResourceAsStream().
• Directories
With this type of entry you can add an entire directory. Please make sure to select a classpathroot directory, otherwise your classes cannot be loaded.
• Scan Directories
With this type of entry you can add all JAR and ZIP files in a selected directory.
• Archives
With this type of entry you can add a JAR file. JAR files can optionally ne mapped to installedJAR files, so that they are not duplicated if they are used by both custom code and launchers.Please see the help on the Custom Code & Resources tab [p. 313] for more information.
Use the ... chooser button to select files and directories from your file system. A relative pathwill be interpreted relative to the project file.
B.5.16.2 Class Selector Dialog
The custom class selection dialog is shownwhen you add an action [p. 180] , a screen [p. 166] ora form component [p. 250] from your custom code.
The custom class selector shows all classes that implement the appropriate interface, dependingon the context:
• com.install4j.api.actions.InstallAction for actions in the installation mode.
• com.install4j.api.actions.UninstallAction for actions in the uninstallation mode.
• com.install4j.api.screens.InstallerScreen for screens in the installation mode.
• com.install4j.api.screens.UninstallerScreen for screens in theuninstallationmode.
• com.install4j.api.formcomponents.FormComponent for form components.
Note that you usually do not implement these interface directly but rather extend one of theabstract classes in the respective packages.
Please see the API description for a detailed explanation of these base classes.
319
B.5.16.3 Registry Dialog
The registry dialog is displayed when you add a standard action [p. 180] , screen [p. 166] or formcomponent [p. 250] . It shows all built-in elements aswell as any elements contributed by installedextensions [p. 87] .
The registry dialog is quick-search enabled, you can start typing your query when the tree isfocused. The search term will be displayed in a yellow dialog at the top of the tree. If no matchis found, the search term is displayed in red. If a match is found, the search term is displayed inblack and the match is made visible. The matched portion is drawn inverted with a greenbackground.
To navigate between matches, you can use the arrow keys or F3 and SHIFT-F3.
You can use wildcards in your search term, for example: Font*Handle.
B.5.16.4 Application Templates Dialog
The application templates dialog is displayedwhen you add an application [p. 151] on the screens& actions [p. 321] tab.
Available application templates are grouped into categories. If you select the top-level Emptycustom application, a new applicationwill be added that initially does not contain any screensand actions.
install4j comes with several updater templates. Please see the help topic on auto-updatefunctionality [p. 55] for more help on creating updaters.
The application templates dialog is quick-search enabled, you can start typing your querywhenthe tree is focused. The search term will be displayed in a yellow dialog at the top of the tree. Ifno match is found, the search term is displayed in red. If a match is found, the search term isdisplayed in black and the match is made visible. The matched portion is drawn inverted with agreen background.
To navigate between matches, you can use the arrow keys or F3 and SHIFT-F3.
You can use wildcards in your search term, for example: Font*Handle.
B.5.16.5 Link Selection Dialog
The link selection dialog is displayed by choosing Add Link Into from the popup menu that isshown when clicking on the Add button in the Screens & Actions tab [p. 148] .
The dialog shows a tree of installer elements either of the current project or of the selectedmerged project. After you close the dialog with the OK button, a link to the selected element isadded at the current position in the tree of installer elements.
In order to avoid placing to many links, it is recommend to create a screen group or an actiongroup to collect several screens and actions. A single link to that screen or action group is lessfragile than multiple links to the single elements.
B.5.16.6 String Edit Dialog
The string edit dialog is shown from the action [p. 180] , screen [p. 166] or form component [p.250] editors when you click on the ... for a
• a "multi-line string" property. Multi-line strings cannot be edited inline in the property sheet.
• a "list of strings" property.While the inline editor in the property sheet accepts items separatedby semicolons (';'), this dialog separates item by line breaks. When you wish to enter a newitem, you have to put it on a new line.
320
All key bindings in the editor are configurable. Choose Settings->Key Map to display the Key mapeditor [p. 325] .
The editing functionality in the Editmenu includes:
• Undo/Redo
• Copy/Cut/Paste
The "Paste with dialog" action shows previous selections.
• Rectangular selections
• Extended selection and deletion
This included actions like "Select word" and "Delete line".
• Join lines
• Duplicate lines
• Indent/Unindent selection
• Toggle case
By choosing Edit->Insert Variable from the menu, you can add a compiler variable or customlocalization key at the current cursor position. It will be added with the text field variable syntax,like ${i18n:myKey} for a custom localization key or ${compiler:myVariable} for a compiler variable.
The search functionality in the Searchmenu includes:
• Find
Find simple or regular expressions in the selected or the entire text with options of casesensitivity and word matching. With "Find next occurrence" and "Find previous occurrence"you can quickly move among the search results.
• Replace
Same as "Find" with an option to replace the found items.
• Quick search
Search text by typing directly in the editor and highlighting the search results as you type.
B.5.16.7 Java Code Editor
The Java code editor is shown from the screens & actions [p. 148] tab or the form component [p.250] editor when you click on the ... for a Java code property.
Please see the help on the string editor dialog [p. 320] for common editing functionality.
The box above the edit area show the available parameters for the Java code property as wellas the return type. If parameters or return type are classes (and not primitive types), they willbe shown as hyperlinks. Clicking on such a hyperlink opens the Javadoc in the external browser.If you would not like the default browser to be opened, you can configure your own browser inthe preferences dialog [p. 353] .
To get more information on classes from the com.install4j.* packages, please chooseHelp->Show Javadoc Overview from the menu and read the help topic for the install4j API [p. 84]. In addition, the Java code editor offers a code gallery [p. 325] that contains useful snippets thatshow you how to get started with using the install4j API. The code gallery is invoked from thetool bar or by choosing Code->Insert from Code gallery from the menu.
A number of packages can be used without using fully-qualified class names. Those packagesare:
321
• java.util.*
• java.io.*
• javax.swing.*
• com.install4j.api.*
• com.install4j.api.beans.*
• com.install4j.api.context.*
• com.install4j.api.events.*
• com.install4j.api.screens.*
• com.install4j.api.actions.*
• com.install4j.api.formcomponents.*
• com.install4j.api.update.*
• com.install4j.api.windows.*
• com.install4j.api.unix.*
You can put a number of import statements as the first lines in the text area in order to avoidusing fully qualified class names.
Java code properties can be
• expressions
An expression doesn't have a trailing semicolon and evaluates to the required return type.
Example: !context.isUnattended() && !context.isConsole()
The above example would work as the condition expression of an action and skip the actionfor unattended or console installations.
• scripts
A script consists of a series of Java statements with a return statement of the required returntype as the last statement.
Example: if (!context.getBooleanVariable("enterDetails")) context.goForward(2, true, true); return true;
The above example would work as the validation expression of a screen and skip two screensforward (checking the conditions of the target screen as well as executing the actions of thecurrent screen) if the variable with name "enterDetails" is not set to "true".
install4j detects automatically whether you have entered an expression or a script.
The primary interface to interact with the installer or uninstaller is the context which is alwaysamong the available parameters. The context provides information about the current installationand gives access to variables, screens, actions and other elements of the installation oruninstallation. The parameter is of type
• com.install4j.api.context.InstallerContext for screens andactions in the installationmode
• com.install4j.api.context.UninstallerContext for screens and actions in theuninstallation mode
• com.install4j.api.context.Context for form components.
322
Apart from the context, the action, screen or form component to which the Java code propertybelongs is among the available parameters. If you know the actual class, you can cast to it andmodify the object as needed.
The Java editor offers the following code assistance powered by the eclipse platform:
• Code completion
Pressing CTRL-Space brings up a popup with code completion proposals. Also, typing a dot(".") shows this popup after a delay if no other character is typed.While the popup is displayed,you can continue to type or delete characters with Backspace and the popupwill be updatedaccordingly. "Camel-hump completion" is supported, i.e. typing NPE and hitting CTRL-Spacewill propose NullPointerException among other classes. If you accept a class that is notautomatically imported, the fully qualified name will be inserted.
The completion popup can suggest:
• variables and default parameters. Default parameters are displayed in bold font.
• packages (when typing an import statement)
• classes
• fields (when the context is a class)
• methods (when the context is a class or the parameter list of a method)
You can configure code completion behavior in the Java editor settings [p. 324] .
• Problem analysis
The code that you enter is analyzed on the fly and checked for errors and warning conditions.Errors are shown as red underlines in the editor and red stripes in the right gutter. Warnings(such as an unused variable declaration) are shown as a yellow backgrounds in the editor andyellow stripes in the right gutter. Hovering the mouse over an error or warning in the editoras well as hovering the mouse over a stripe in the gutter area displays the error or warningmessage.
The status indicator at the top of the right gutter is
• green
if there are no warnings or errors in the code.
• yellow
if there are warnings but no errors in the code.
• red
if there are errors in the code. In this case the code will not compile and the installer cannotbe generated.
You can configure the threshold for problem analysis in the Java editor settings [p. 324] .
• Context-sensitive Javadoc
Pressing SHIFT-F1 opens the browser at the Javadoc page that describes the element at thecursor position. If no corresponding Javadoc can be found, a warning message is displayed.Javadoc for the Java runtime library can only be displayed if a design time JDK is configuredand a valid Javadoc location is specified in the design time JDK configuration [p. 104] .
You can set the design time JDK in the Java editor settings [p. 324]
323
All key bindings in the Java code editor are configurable. Choose Settings->Key Map to display theKey map editor [p. 325] .
Screens, actions and form components are wired together with installer variables, please seethe help topic on screens and actions [p. 13] for more information. Setting and getting installervariables is done through the context parameter with the context.getVariable(StringvariableName) and context.setVariable(String variableName, Object value)methods. The conveniencemethodcontext.getBooleanVariable(String variableName)makes it easier to check conditions. Any object can be used as the value for a variable. To useinstaller variables in text properties of actions, screens and form components, write them as${installer:myVariableName}.
If the gutter icon in the top right corner of the dialog is green, your script is going to compileunless you have disabled error analysis in the Java editor settings [p. 324] . In some situations,you might want to try the actual compilation. Choosing Code->Test Compile from the menu willcompile the script and display any errors in a separate dialog. Saving your script with the OKbuttonwill not test the syntactic correctness of the script. When your install4j project is compiled,the script will also be compiled and errors will be reported.
B.5.16.8 Java Editor Settings
The Java editor settings dialog is shown when you select Settings->Java Editor Settings from themenu in the Java code editor dialog [p. 321] .
In the code completion popup settings section, you can configure the following options:
• Auto-popup code completion after dot
If selected, each time you type a dot (".") in the Java code editor, the code completion popupwill be displayed after a certain delay unless you type another character in the meantime.
• Delay
The "Auto-popup code completion after dot" feature above uses a configurable delay. Bydefault, the delay is set to 1000 ms.
• Popup height
The height of the completion popup in number of entries is configurable.
In the display code problems section, you can configure the threshold for which code problemsare shown in the editor.
• None
No code problems are displayed at all.
• Errors only
Only problems that prevent code compilation are displayed. Errors show as red underlinesin the editor and red stripes in the right gutter.
• Errors and warnings
In addition to errors, warnings are displayed.Warnings cover all kinds of suspicious conditionsthat could be sources of bugs such as an unused local variable. Warnings are displayed asyellow backgrounds in the editor and yellow stripes in the right gutter.
In the Javadoc Settings section, there is an option to use the online documentation for theinstall4j API instead of the bundled HTML files. SinceWindows 7, it is not possible to use anchorswhen showing URLs anymore, so JavaScript redirection files are used to navigate to anchors inthe Javadoc documentation. When Internet Explorer is used, two warnings are displayed each
324
time you invoke a show Javadoc action. By using the online documentation, these warnings areeliminated.
The design time JDK section mirrors the design time JDK configuration on the Java version [p.92] tab of the general settings [p. 90] .
B.5.16.9 Code Gallery
The code gallery dialog is displayed by choosing Code->Insert from Code Gallery from the menuin the Java code editor dialog [p. 321] .
Available code snippets are grouped into categories. They show how to use the install4j API incommon use cases. The script is shown in a preview on the right side. You can either copy aportion of the script with CTRL-C or click OK to insert the entire script at the current cursorposition.
Please note that not all code snippets might be directly usable in the script that you are editing.
Some java script properties have special code snippets that are only shown for this property.If such code snippets exist, they are displayed in a category with the name of the java scriptproperty in bold font.
The code gallery dialog is quick-search enabled, you can start typing your query when the treeis focused. The search term will be displayed in a yellow dialog at the top of the tree. If no matchis found, the search term is displayed in red. If a match is found, the search term is displayed inblack and the match is made visible. The matched portion is drawn inverted with a greenbackground.
To navigate between matches, you can use the arrow keys or F3 and SHIFT-F3.
You can use wildcards in your search term, for example: Font*Handle.
B.5.16.10 Key Map Editor
The key map editor is displayed by choosing Settings->Key map from the menu in the Java codeeditor dialog [p. 321] or the string edit dialog [p. 320] .
The active key map controls all key bindings in the editor. By default, the [Default] key map isactive. The default key map cannot be edited directly. To customize key bindings, you first haveto copy the default keymap. Except for the default keymap, the name of a keymap can be editedby double-clicking on it.
When assigning new keystrokes or removing existing key strokes froma copiedmap, the changesto the base key map will be shown as "overridden" in the list of bindings.
The key map editor also features search functionality for locating bindings as well a conflictresolution mechanism.
Key bindings are saved in the file $HOME/.install4j7/editor_keymap.xml. This file onlyexists if the default keymaphas been copied.Whenmigrating an install4j installation to a differentcomputer, you can copy this file.
B.5.16.11 ID Selection Dialog
The ID selection dialog is displayed by choosing Edit->Insert ID of a configuration component fromthe menu in the Java code editor dialog [p. 321] .
Available configuration components are grouped into categories such as file sets or installationcomponents. IDs are required for certain finder methods in the context object. For example, inthe following code
context.getFileSetById("756").setSelected(false);
325
the ID "756" is not be readily available in the script. With the ID selector, you type
context.getFileSetById(
and then open the ID selector. You open the "File sets" node, and select the desired file set.Whenthe dialog is closed with the OK button, the ID will be inserted into the edited script surroundedby quotes.
The ID selection dialog is quick-search enabled, you can start typing your query when the treeis focused. The search term will be displayed in a yellow dialog at the top of the tree. If no matchis found, the search term is displayed in red. If a match is found, the search term is displayed inblack and the match is made visible. The matched portion is drawn inverted with a greenbackground.
To navigate between matches, you can use the arrow keys or F3 and SHIFT-F3.
You can use wildcards in your search term, for example: Font*Handle.
B.5.16.12 Integration Wizard For Custom Installer Applications
The integration wizard for custom installer applications is displayed when you click the StartIntegrationWizards button at the top of the configuration pane for any custom installer applicationon the screens & actions tab [p. 148] .
With this wizard, you can create a code snippet that you can paste into the Java code of yourown application in order to call the selected custom installer application.
This has several advantages with respect to simply using Runtime.exec():
• It works as expected on all supported platforms, including macOS
• It uses the ID of the application and not the path, so the code snippet still works when yourename the executable in your project
• It allows the \"Shut down calling launcher\" action to close your application
• It provides a callback to react to a shutdown of your application or an exit of the custominstaller application
326
B.6 Step 5: Media
B.6.1 Step 5: Configure Media
Media files are the final output of install4j: single installer files that are used to distribute yourapplication to your users. The creation of a media file has platform dependent options, so foreach platform, you have to define a media file. It also makes sense to define several media filesfor one platform in case you wish to distribute different subsets of your distribution tree, or ifyou distribute your application with and without a bundled JRE.
To define a new media file, you double-click on the new media file entry in the list of definedmedia files or choose Media->New media file from install4j's main menu. The first step of themedia wizard will then be displayed. The subsequent steps [p. 330] depend on your choice ofthe media file type [p. 328] in this first step.
Once you have completed all steps of the media wizard and clicked OK in the final step, a newmedia file entry will be displayed in the list of media files.
In the list of media files, you can
• Reorder media file definitions
Media file definitions are reordered by dragging themwith themouse to the desired location.While dragging, the insertion bar shows youwhere themedia file definitionwould be dropped.The order of media files determines the order in which the media files are generated.Reordering ismainly provided for the purpose of letting you arrange themedia file definitionsaccording to your personal preferences.
• Copy media file definitions
Media file definitions can be copied by copy-dragging a media file definition or using thecorresponding tool bar button or menu entry. The name of the copied media file definitionwill be prefixed with "Copy of".
• Rename media file definitions
Media file definitions can be renamed by using the corresponding tool bar button or menuentry. An input dialog will be displayed where the current name can be edited. Please notethat except for the %SETNAME% variable used in the media file options [p. 96] , the name ofthe media file is not used in the distribution but is for your own information only.
• Delete media files definitions
Media file definitions can be deleted by hitting the DEL key or using the corresponding toolbar button or menu entry.
• Edit a media file definition
Media file definitions can be edited by hitting the ENTER key or using the corresponding toolbar button or menu entry.
The appropriate media wizard [p. 327] will be displayed for the selected media file definition.Note that you can directly access any step in the wizard by clicking on it in the index.
Eachmedia file definitions has an IDwhich can be used to select certainmedia files when buildingthe project from the command line [p. 355] . To show all IDs, choose Project->Show IDs from themain menu. The IDs will then be shown in square brackets next to the names of the media filedefinitions.
327
B.6.2 Available Media File Types
There are two fundamentally different types of media files:
• Installers
The media file is an executable that invokes the installer. Optionally, the installer can beexecuted as an unattended installer or as a console installer. Please see the correspondinghelp topic [p. 67] for more information.
• Windows media file
a media file for Windows is a native setup executable that installs your application withan installer wizard.
The installer can download a JRE if no suitable JRE is found on the target system.
• macOS single bundle media file
a single bundle media file for macOS is a DMG file that contains an installer wizard thatis started by double clicking on it. Thewizard installs your application as a single applicationbundle. If you wish to support multiple GUI launchers, please choose the "macOS foldermedia wizard" (see below). Command line launchers and service launchers are containedin the application bundle.
The default JRE (which is always present on macOS) is used during the installation phase.
If you would like to create a separate directory next to the generated application bundlethat contains user files, you cannot add it directory to the "Installation directory" root ofthe distribution tree, since all files under that node will end up in the application bundle.The solution to this problem is to use the single bundle installer and to add anotherinstallation root to the distribution directory, that root should be set to
${installer:sys.installationDir}/My Application Documents
if you want to call the additional folder "My Application Documents". That folder will becreated next to the installed application bundle.
• macOS folder media file
a foldermedia file formacOS is a DMG file that contains an installer wizard that is startedby double clicking on it. The wizard installs your application as a folder that contains theentire distribution tree andmultiple application bundles for each included launcher.
The default JRE (which is always present on macOS) is used during the installation phase.
• Unix/Linux GUI installer media file
a Unix/Linux GUI installer media file is an executable shell script that extracts an installerand installs your application with an installer wizard.
The installer can download a JRE if no suitable JRE is found on the target system.
• Archives
The media file is an archive that the user can extract to an arbitrary location. No screens areshown and no actions are executed. If you define additional installation roots, the files in themare not installed. No components can be downloaded.
Archives are intended as a fallback or as additional packages such as documentation bundles.If your installer heavily relies on actions, screens and additional installation roots, you shouldnot use archives to distribute your application. The main advantages of archives such as the
328
ability to install them at the command line is also available from installers by using theirunattended or console installation modes [p. 67] .
• Windows archive media file
an archive media file for Windows is a ZIP-file that contains your application.
Note: Thismedia file typedoes not have aGUI installer. If youwish to create aGUI installerfor Windows, please choose the "Windows media wizard" (see above).
• macOS single bundle archive media file
a single bundle media file for macOS is a DMG or .tgz archive that contains a singlebundle for your application. If you wish to support multiple GUI launchers, please choosethe "macOS folder archivemedia wizard" (see below). Command line launchers and servicelaunchers are contained in the application bundle.
Note: Thismedia file typedoes not have aGUI installer. If youwish to create aGUI installerfor macOS, please choose the "macOS single bundle media wizard" (see above).
• macOS folder archive media file
a foldermedia file formacOS is aDMGor .tgz archive that contains the entire distributiontree andmultiple application bundles for each included launcher.
Note: Thismedia file typedoes not have aGUI installer. If youwish to create aGUI installerfor macOS, please choose the "macOS folder media wizard" (see above).
• Linux RPMmedia file
an RPM archive for Linux can be installed and uninstalled with the rpm command onLinux distributions that use the Redhat packagemanagement. There are also a large numberof graphical package management tools that Linux users can use to install an RPM archive.
Note: Thismedia file typedoes not have aGUI installer. If youwish to create aGUI installerfor Linux, please choose the "Unix/Linux GUI installer media wizard" (see below).
• Linux Deb media file
an Deb archive for Linux can be installed and uninstalled with the dpkg command onLinux distributions that use theDebian packagemanagement. There are also a large numberof graphical package management tools that Linux users can use to install a Deb archive.
Note: Thismedia file typedoes not have aGUI installer. If youwish to create aGUI installerfor Linux, please choose the "Unix/Linux GUI installer media wizard" (see below).
• Unix/Linux archive media file
a Unix/Linux archive media file is a gzipped TAR archive that contains your application.
Note: Thismedia file typedoes not have aGUI installer. If youwish to create aGUI installerfor Unix or Linux, please choose the "Unix/Linux GUI installer media wizard" (see above).
Note: GUI launchers on macOS only start a single instance of your application. Subsequentlaunches will not start additional JVMs. You can use the com.install4j.api.launcher.StartupNotification from the install4j API to be informed about those invocations.
329
B.6.3 Media File Wizards
The media file wizard is displayed when you add a new media file or when you edit an exitingmedia file. To learnmore information about the variousmedia file types, please see the overview[p. 328] .
The media file wizards show a number of steps which depend on the media file type. Commonsteps are:
• Platform [p. 331]
Choose the media file type.
• Installer options [p. 332]
Define options for the installer.
• Data files [p. 335]
Specify where the installer data should be placed. Not displayed for archives.
• Bundled JRE [p. 337]
Decide if and how a JRE should be bundled with the installer. Not displayed for macOS mediafile types.
• Customize project defaults [p. 339]
A number of project settings can be customized on a per-media file basis.
In addition, there are a number of steps that depend on the media file type:
• 32-bit or 64-bit [p. 341]
For Windows media files only.
• Executable processing [p. 342]
For Windows media files only.
• Launcher [p. 343]
For macOS single bundle media files only.
• 64 bit settings [p. 344]
For macOS media files only.
• Additional files in DMG [p. 345]
For macOS media files only.
• DMG options [p. 346]
For macOS media files only.
330

B.6.4 Wizard Steps
B.6.4.1 Media File Wizard: Platform
In this step of the media file wizard [p. 330] you select the media file type [p. 328] . If you arecreating a new media file definition, the subsequent steps are undefined at this point.
If you are editing an existing media file definition, changing the media file type away from fromthe current selection will change the wizard into a different one and data that has been enteredin the subsequent steps will be lost after a warning message has been confirmed.
331
B.6.4.2 Media File Wizard: Installer Options
In this step of themedia file wizard [p. 330] you define options for the installer,most importantlythe default installation directory.
This step is different for installers and archives:
• Installers:
• Installation directory
Enter a simple directory name (without backslashes). The standard location for applicationswill we prepended to this directory name. In other words: do not enter C:\ProgramFiles\MyApplication but only MyApplication The installer will find out the correctequivalent for C:\Program Files, /opt or similar standard locations at runtime. Bydefault, install4j will suggest the short name you have entered in the general applicationoptions [p. 91] . It is also possible to enter a composite relative directory like MyCorp\MyApplication.
Note that this value will be overridden if an installer with the same application ID has beenpreviously installed and "Detect previous installation directory" is selected on the updateoptions tab [p. 316] of the installer section.
• Use custom installation base directory
If you do not want to install your application to the standard application directory, you canenter a custombase directory here. This is useful for internal deploymentswith non-standarddirectory policies. The installation directory entered above will be appended to the custombase directory. For example, if the application should be installed in D:\apps\MyApplication, check the custom installation base option, enter D:\apps in thetext field below it and enter MyApplication in the installation directory text field above.
On Unix, if you want to suggest a directory below the user home directory, you can use ~as the custom installation base directory.
• Archives:
With the installation directory you determine the top level directory for the archive. All fileswill be contained in the top level directory. Enter a simple name without slashes, such asmyapp. By default, install4j will suggest the short name you have entered in the generalapplication options [p. 91] .
For macOS single bundle archives, it is not possible to set an installation directory since allfiles in a single bundle are in contained in a single directory whose name is determined bythe name of the main launcher. The user can move the entire bundle somewhere else bydragging the displayed icon.
For macOS bundle archives, you can configure whether the media file should be a DMG or a.tar.gz file. For GUI applications, DMG is preferred. For command line applications or for folderbundles, you may want to select the .tar.gz file.
For Windows installer media files, this step includes an option Verify integrity ofinstaller file that allows you to disable the built-in integrity verification. You might have todo that if you use EXE-wrapper software for licensing purposes or similar tools that modify theinstaller executable.
For macOS installer media files, this step has an option Sign installed launchers. Bydefault, only the installer is signed onmacOS. If you have configured entitlements for code signingin the "Executable info->macOS options" step [p. 137] of the launcherwizard, these entitlementswill only be used for your launchers if the above option is selected.
332
Note that it is not possible to modify the Info.plist file at runtime if you select this option.
For Linux Deb media files, this step includes the following options:
• Register files with overwrite policy "Never" as config files
If selected, all files that have an overwrite policy "Never" from their configuration in thedistribution tree [p. 113] are marked as config files. When updating the package through thepackage manager, those files will not be changed and they are kept when the package isremoved.
• Use bzip2 compression method
If selected, the bzip2 compression method will be used. It is slower, but more efficient thanthe standard gzip compression method.
• Archive description
Enter an optional description that will be displayed by package managers.
• Dependencies
Enter optional dependencies that will have to be present in the package management for theinstallation to succeed. Enter a comma separated list of packages.
• Maintainer email
Optionally enter the email of the maintainer that will be displayed by package managers.
For Linux RPMmedia files, this step includes the following options:
• Register files with overwrite policy "Never" as config files
If selected, all files that have an overwrite policy "Never" from their configuration in thedistribution tree [p. 113] are marked as config files. When updating the package through thepackage manager, those files will not be changed and they are kept when the package isremoved.
• Operating system
By default, the operating system of the RPM is set to "linux", here you can change it tosomething else.
• Architecture
By default, the architecture system of the RPM is set to "i386", here you can change it tosomething else.
For Unix/Linux GUI installer media files, this step has a Installer custom script sub-step.
If you specify a Bourne shell custom script, the entered script fragment will be inserted into thelauncher script immediately before the Java invocation of your installer takes place. This is ahook for experienced users to make custom changes in the environment.
You can select one of:
• No custom fragment
No custom script fragment will be inserted.
• Custom fragment from file
Specify a file from which the custom script will be read. If you enter a relative file, the file willbe interpreted relative to the project file.
• Direct entry
Enter your custom script fragment in the text area below.
333
For Linux RPMand Linux Debmedia files, this step has sub-steps where you can define scriptsto run before and after installation or uninstallation by the rpm executable. The available hooksare:
• Pre-install script
• Post-install script
• Pre-uninstall script
• Post-uninstall script
Please see http://www.rpm.org (1) for more information.
You can select one of:
• No custom fragment
No custom script fragment will be inserted.
• Custom fragment from file
Specify a file from which the custom script will be read. If you enter a relative file, the file willbe interpreted relative to the project file.
• Direct entry
Enter your custom script fragment in the text area below.
(1) http://www.rpm.org
334
B.6.4.3 Media File Wizard: Data Files
In this step of themedia file wizard [p. 330] you definewhere the installer data should be placed.
Typically, installers are single files that contain all data that they install on the user's request.There are three common use cases where this is not the case:
• CD/DVD installers with large data files
If your application relies on large amounts of data, it is often distributed on a CD or DVD. Inthat case, you typically ship a number of external data files that you do not wish to packageinside the installer. The installer should start up quickly and the data files should not beextracted from the installer in order to save time. The user might decide to install only certaincomponents, so some data files might not be needed at all. If they are included in the installerexecutable, all this data would have to be read from disk.
• Installers with large optional components
Some applications have large optional components that are not relevant for the typical user.To reduce download size for the majority, the optional component should be downloadableon demand.
• Net installers
Some application are highly modular, so it is not feasible to build a set of installers for typicaluse cases. A net installer lets the user select the desired components and downloads themon demand. The download size of the net installer is small since no parts of the applicationare contained in the installer itself.
To accommodate the above use cases, install4j offers three different ways to handle the installerdata files:
• Included in media file
All data files are included in the installer so you can ship it as a single download.
• External
This mode covers the "CD/DVD installers with large data files" use case.
All data files are placed in a directory next to your installer that has the name of your installerwith the extension .dat. For example, if your media file name is hello_4_0 (resulting in aWindows installer executable hello_4_0.exe), the directory containing the external datafiles is named hello_4_0.dat. You have to ship this directory in the same relative locationon your CD or DVD.
The number of data files depends the definition of your installation components. The datafiles are generated in such a way that
• the files for an installation component are contained in one or more data files
• there are no files in those data files that do not belong to this installation component
If components do not overlap, there's a one-to-one correspondence between data files andinstallation components.
• Downloadable
This mode covers the "Installers with large optional components" and "Net installers" usecases. It can only be used if you define installation components [p. 120] .
Data files are generated just like for the "External"mode, but only for installation componentsthat have beenmarked as downloadable in the installation component definition [p. 120] .
335

If no installation components are marked as "downloadable", this mode will behave like the"Included in media file" mode. For a "net installer", all installation components are"downloadable".
For this mode, you have to enter a HTTP download URL, so the installer knows from whereit should download the data files at runtime if the user requests downloadable components.The URL must begin with http:// or https:// and point to a directory where you place the datafiles. For example, if the data filehello_windows_4_0.000 is downloadable and the downloadURL is https://www.test.com/components, the data file must be uploaded to the webserver, so that the installer can download the data file from the URL https://www.test.com/components/hello_windows_4_0.000.
Any data files that you leave in the data file directory next to the installer will not bedownloaded. This means that if you test your installer directory from the location where itwas generated, the installer finds all data files in the data file directory and does not try todownload them.
336
B.6.4.4 Media File Wizard: Bundled JRE
In this step of the media file wizard [p. 330] you define if an how a JRE should be bundled withthe installer.
If you choose to bundle a JRE by selecting the "bundle the following JRE" radio button, youhave to choose a JRE from the drop down list below it. If you select "manual entry" in the dropdown list, a text field will appear where you can enter a file name with compiler variables. If youenter a relative file name, it will first be checked whether that file exists relative to the install4jproject file. If not, it will be searched in $INSTALL4J_HOME/jresand {user home directory}/.install4j7/jres. The existence of this bundle file will be checked only at compile time, notby the wizard.
You can download additional JREswith the JRE downloadwizard [p. 349] . Click JRE downloadwizardto download the JREs you need. The drop down list will be updated after the download hasfinished.
If you wish to bundle a JRE that is not available from ej-technologies' download server or thathas custommodifications (like an installation of the javax.comm API), please see the JRE bundlecreation wizard [p. 350] on how to create your own JRE bundle.
Further options and runtime behavior are different for installers and archives:
• Installers:
The Bundle type section allows you to choose between the two JRE bundlingmodes offeredby install4j:
• Static bundle
The selected JRE will be distributed in your media file. install4j will automatically adjustthe JRE search sequence [p. 92] of all generated launchers and include the bundled JRE asthe first choice.
A statically bundled JRE will always be distributed inside the installation root directory [p.106] , on Windows and Linux/Unix in the directory jre and on macOS in [contentdirectory]/.install4j/jre.bundle. The content directory is available from the installerruntime variable sys.contentDir. and resolves to the installation directory for foldermedia file types and Contents/Resources/app for archive media file types. The actuallocation of the JRE installation directory is available from the installer runtime variable sys.preferredJre after the "Install files" action has run.
When you update your application and include a static JRE bundle again, the old JRE bundlewill be deleted prior to installation, so that any files left over from the old JRE cannot interferewith the new JRE.
• Dynamic bundle
Adynamic bundle isdownloadedondemand. If the user already has a suitable JRE installed,that JRE will be used. If there is no such JRE available on the target machine, the installerwill download the dynamically bundled JRE from the URL that you specify in the text fieldsbelow.
To enable the downloadondemand, you have to locate the corresponding.tar.gzbundlearchive in the jres subdirectory of your install4j installation and place it on a server so thatthe HTTP download URL will point to the bundle archive. The URL has to be of the formhttps://www.myserver.com/somewhere/windows-x86-1.8.0_121.tar.gz.
If the installer determines that there is no suitable JRE present, it will ask the user whetherthe JRE should be downloaded. If the Start download without user confirmation,
337
if necessary check box has been selected, that confirmation is skipped and the downloadstarts immediately.
• On Windows, a progress bar with download speed and estimated duration will bedisplayed during the download.
• OnUnix-like systems, the progresswill be shown in the terminal. Adding an FTP downloadURL will increase the chance that the download will work on Unix-like systems behindrestrictive firewalls.
If the download fails or is aborted by the user, the download URL will be displayed togetherwith instructions on where to place the downloaded bundle archive.
You can override the default JRE search in a Microsoft Windows installer executable bypassing the argument -manual to the installer executable. The installer will then reportthat no JRE could be found and offer you to locate one in your file system. If you have setup a dynamic JRE bundle, it will also offer you to download one. This is a good way to testif your download URL is correct.
The check box install as a shared JRE determines whether the bundled JRE should beprivate for the application or whether other applications distributed with install4j can sharethis JRE. The following scenarios are covered by this approach:
• If you distribute several applications with dynamically bundled JREs, installing as a sharedJRE is advisable, since the user will have to wait for the download only once.
• If you have a main application and several add-on applications, it makes sense to staticallybundle the JRE with the main application and install it as a shared JRE, so the add-onapplications can be distributed without JRE.
Note: installers generated by install4j will never install a JRE on the system path ormakeWindows registry changes. The term "shared installation" only applies to applicationsdistributed with install4j. Other applications will not be able to use such a JRE.
• Archives:
install4j will automatically adjust the JRE search sequence [p. 92] of all generated launchersand include the bundled JRE as the first choice. The JREwill always be distributed in the directoryjre right below the installation root directory [p. 106] .
338
B.6.4.5 Media File Wizard: Customize Project Defaults
In this step of the media file wizard [p. 330] you can customize a number of project settings ona per-media file basis. Customizable settings are displayed in sub-steps that can be selectedwiththe Choose customization category button or by clicking into the index on the left side.
The customization categories are:
• Compiler variables
Compiler variables [p. 30] that are defined on the Compiler Variables tab [p. 100] can beoverridden on a per-media file basis. For example, this would be useful to adjust the nativelibrary directories [p. 141] in a launcher definition.The variable table shows 4 columns:
• Override marker
If you have overridden a variable by editing the value column, the first column will displaya marker to indicate that that variable has been overridden. In that case, the reset buttoncolumn will display a button to restore the original value.
• Variable name
Shows the name of the variable.
• Variable value
Shows the value of the variable. This column is editable. To override the variable, double-clickon the desired cell in this column and edit the value. The override marker column and thereset button column will then show that the variable has been overridden.
• Reset button
If a variable has been overridden, this column shows a Reset button that allows you torestore the original value as defined on the Compiler Variables tab [p. 100] .
Overriding compiler variables on a per-media file basis is also possible from the commandline [p. 354] and from the ant task [p. 358] .
• Media file name
The file name pattern defined in the Media File Options tab [p. 96] determines the actualname of the media file. If you want to override that pattern, you can enter an individual namehere. To enter an individual name, select the custom name radio button and enter a file namein the text field below it.
• Principal language
By default, the language used by an installer is governed by the setting on the Languages [p.94] tab. If you would like to generate installers with fixed languages, you leave those settingsat their default values and override the principal language and custom localization file here.
You can change the principal language for all media files or on a per-media file basis from thecommand line [p. 354] or from the ant task [p. 358] by defining the variable LANGUAGE_IDwith
the 2-letter ISO codeof thedesired language (seehttps://www.w3.org/WAI/ER/IG/ert/iso639.htm(1)).
• Exclude components
Here, you can select components that should not be distributed by selecting their attachedcheck boxes. This is useful if you have installation components that do not work with specificmedia files, such as a Windows-only extension, for example.
(1) https://www.w3.org/WAI/ER/IG/ert/iso639.htm
339
• Include downloadable components
Sometimes, you want to create media files where installation components are included, thathave been marked as downloadable [p. 120] for the entire project. This screens list alldownloadable installation components as a flat list. All selected components are included inthis media file. For example, this is useful if you want to offer a net installer and a full offlineinstaller where some components should remain downloaded. For the media file of the fulloffline installer, you can mark all required components as included on this step.
• Exclude files
This step is useful to tailor your distribution to platform-specific needs. The distribution treeis shown in expanded form and shows all files. This is unlike the distribution tree in the Filesstep [p. 106] which shows the definition of the distribution tree.
Each file and subdirectory has a check box attached. If you select that check box, the entrywill not be distributed. Selections of subdirectories are recursive. If you select a subdirectory,its contents are hidden from the tree since they will be excluded anyway.
• Exclude launchers
This step is complementary to the "Exclude files" screen where launchers are not shown. Eachlauncher has a check box attached. If you select that check box, the launcher will not begenerated.
• Exclude installer elements
If you some installer applications, screens or actions should not be included with this mediafile, you can exclude those elements by selecting their attached check boxes in the tree ofinstaller elements. Note that for more complex cases you can also skip screens by entering acondition property for screens [p. 166] and actions [p. 180] .
https://www.ej-technologies.com/download/install4j/changelog.html For archives, only custominstaller applications are shown, since installer and uninstaller are not present for archives.
• Auto-update options
In this step you can override project-level settings [p. 317] for the creation of the updatedescriptor file updates.xml. If you add a files with comments, they will either override thefiles in the project-level configuration, or - if there is no project-level comment - set a commentfor this media file only. The files with comments must be encoded in UTF-8. If you defineattributes, they will override attributes with the same name in the project-level configurationor add new attributes for this media file only. Minimum and maximum updatable versionscan also be overridden.
If you discontinue certainmedia files, youwill probably still want to add entries into the updatedescriptor file updates.xml, so that auto-updaters of installed applications that were installedby a discontinued media file can still download a new version. In that case, you can enter theIDs of the discontinued media files. For each ID, an update descriptor entry that mirrors thatof the current media file will be added to the update descriptor. Auto-updaters fromdiscontinued media files will then be redirected to download the current media file.
340

B.6.4.6 Media File Wizard: 32-bit Or 64-bit (Windows Only)
This step of the media file wizard [p. 330] is specific to Windows media file types.
On Windows, a native executable can be either a 32-bit or a 64-bit executable. If you need a64-bit JRE for your application you can choose to generate 64-bit installers and launchers for amedia file.
Note that it is not possible to create launchers that work with both 64-bit and 32-bit JREs. Sincethe launcher starts the JVM with the JNI interface by loading the JVM DLL, the architecture hasto be the same. If you target both 32-bit and 64-bit JREs and operating systems, you have togenerate different media files for them.
On a 64-bit Windows, there are separate system directories for 32-bit and 64-bit applications. Ifyou enable the 64-bit executable mode in this step, those system directories will be appropriatefor 64-bit applications, e.g. c:\Program Files instead of c:\Program Files (x86).
341

B.6.4.7 Media File Wizard: Executable Processing
In this step of the media file wizard [p. 330] you can optionally configure an external commandthat is run for each generated executable.
The install4j compiler can invoke a post-processor for each executable that is generated. Thisincludes
• generated launchers
• the installer
• the uninstaller
In the post processor text field you can use the $EXECUTABLE variable to reference the executablethat is currently being post-processed. The working directory of the executed process is thedirectory your config is located in so you can use relative file names for key or certificate files. Ifthe signing command cannot replace the executable directly, but rather needs a separate outputfile, use the $OUTFILE variable. It will receive a temporary output file name that will be movedback to the processed executable by install4j after the post processor has completed.
Prior to install4j 5.1, this facility was use for code signing, which is now implemented directly ininstall4j and can be configured on the code signing tab [p. 98] of the general settings section.
342

B.6.4.8 Media File Wizard: Launcher (macOS Single Bundle Only)
This step of themedia file wizard [p. 330] is specific to single bundlemedia file types for macOS.
A macOS single bundle media file supports a single launcher only. Please choose a launcherfrom the drop-down list of defined launchers. Only GUI launchers are shown.
Note: external launchers are not supported for single bundles and are not shown in the list oflaunchers.
343

B.6.4.9 Media File Wizard: 64-bit Settings (macOS Only)
This step of the media file wizard [p. 330] is specific to macOS media file types.
Since macOS 10.6 (Snow Leopard), the default JRE is a 64-bit JRE. Prior to 10.6, 32-bit JREs werethe default. If your application loads native 32-bit libraries, it will not be able to run with a 64-bitJRE. In that case, you have to deselect the "Allow 64-bit JREs" option in order to force the launcherto select a 32-bit JRE.
344
B.6.4.10 Media File Wizard: Additional Files In DMG (macOS Only)
This step of the media file wizard [p. 330] is specific to macOS media file types.
By default, the disk image created by install4j contains
• the installer for the installer media file types
• the application bundle of the selected GUI launcher for single bundle archives
• the distribution tree for folder archives
To add more files to the DMG, specify them on this screen. There are two types of files that canbe created:
• Regular files
You select the file from your local file system and specify the name under which is should bewritten to the DMG. The name can be a composite path, like .background/image.png. Inthis example the screen .backgroundwill be created and since it starts with a dot, it is hiddenin the Finder.
• Symbolic links
You enter the target of the symbolic link (like /Applications) and the name of the link.Quotes around the name are stripped, so you can specify an empty name as a single spacein quotes (" "). An empty name is appropriate for a link to the /Applications directory.
You can use this feature for adding a README.txt file to the DMG or for adding files that will beused for styling the Finderwindow that is shownwhen theDMG ismounted. Formore informationabout DMG styling, read the corresponding help topic [p. 63] .
345
B.6.4.11 Media File Wizard: DMG Options (macOS Only)
This step of the media file wizard [p. 330] is specific to macOS media file types.
For installers media file types, you can configure the following properties:
• Volume name
When the user double-clicks on the DMG in the Finder, it is mounted and displayed in a newwindow. Other Finder windows will show the volume name of the DMG in their side bars anda link to the mounted DMG will be shown on the desktop. This name should be shorter thanthe installer name, so by default it is set to the short name of the project.
• Installer name
The name of the installer in the DMG is what the user sees when the DMG is mounted. Notethat this is not the file name of the DMG, that name is is defined by the general media filesettings [p. 96] and possibly by the overriddenmedia file name [p. 339] for the currentmediafile.
Since the installer is an application bundle, the name of the installer is localizable, just like thenames of launchers [p. 137] and installer applications. To use the localization feature, specifyan i18n variable for the installer file name. The actual file name is evaluated in the context ofthe principal language, and for each additional language a localized version is written to thecorresponding localization files in the installer application bundle. If the locale of the usermatches one of the additional languages, that name will be displayed in the Finder instead ofthe real file name.
• Compression
While DMGs for archive media file types are compressed by default, most files that are partof the installer are already compressed and the benefit of an additional compression of theentire DMG is small. On the flip-side, a compressed DMG takes longer to open. That is whyDMGs for installer media file types are not compressed by default. If you add largeuncompressed files on the custom code and resources step [p. 313] , youmay want to enablecompression.
For archivemedia file types, the "Installer name" and "Compression" settings are not available.
346
B.7 Step 6: Build
B.7.1 Step 6: Build The Project
In the Build step, all defined media files [p. 327] are generated. There are three different buildmodes:
• Regular build
Build the media files and place them in the media file output directory [p. 96] .
• Dry run
Build the media files in the temporary directory only. This mode allows you to check whetheryour configuration is ok while not making any changes to your file system.
• Test installer
This build mode is intended for testing changes that you make in the installer configuration[p. 148] , such as adding, removing or modifying screens, actions and form components.
The action looks for the firstmedia file in themedia step [p. 327] that can be run on the currentplatform and has an installer media file type [p. 328] . The media file must be already built,otherwise the action will terminate with an error message.
All scripts are recompiled and the installer configuration files are regenerated. The installedfiles are taken from the full build of the media file. If you change the definition of thedistribution tree [p. 107] and expect to see these changes in the installer, you have to rebuildthe media file with a regular build.
At the end, the installer is started, so you can try out your changes immediately. With respectto a full build, the compilation time is reduced substantially to a couple of seconds, while afull build can take several minutes, depending on the amount of files that are included andthe selected type of compression.
When a build or a test build is started, important status messages are displayed in the text arealabeled build output. A progress bar appears in the status bar of install4j's main menu whichindicates what percentage of the total build has been completed so far. The build process isasynchronous, so you can change to other steps while it is running. The status bar will informyou when the build process has finished.
With the Build selection section you can choose which media files should actually be built.This can be useful for testing purposes, or if you have defined media files that should not bebuilt by default.
With the standard setting, all media files will be built. If you select the radio button buildselected, only the media files that are selected in the adjacent list will be built.
These settings are persistent and are saved in your project file, however, when you build fromthe command line, your build selection will be ignored unless you specify a special parameter.Please see the help on the command line compiler options [p. 355] for further details.
Also, have a look at the available build options [p. 347] .
B.7.2 Build Options
The following options are available for the build process [p. 347] :
347
• Enable extra verbose output
If this option is checked, muchmore information than usual will be printed in the build outputtext area. This can be useful for getting more information about the reason of a build failure.
• Do not delete temporary directory
If this option is checked, the temporary directory where install4j creates the project is notdeleted after completion or failure. This can be useful for trouble shooting.
• Disable LZMA and Pack200 compression
If this option is checked and either LZMA or Pack200 compression have been enabled for thisproject on themedia file options tab [p. 96] , these compressionswill be disabled for the build.This is useful during testing, since without LZMA and Pack200 compression, the build willcomplete much faster.
• Disable code signing
If this option is checked and code signing is configured on the code signing [p. 98] , codesigning will be disabled for the build. This is useful during testing to avoid entry of key storepasswords.
• Create additional debug installer
If this option is checked, directories with debug installers will be created in the media fileoutput directory that allow you to execute the installer as well as the uninstaller with a plainJava invocation from the command line as well as from your IDE. Please see the APIdocumentation [p. 84] for more information.
348

B.8 JRE Download Wizard
The JRE download wizard lets you download JREs from ej-technologies' servers for easy bundlingwith your applications. Formore information on JRE bundles and on how they are used by install4j,please see the corresponding help topic [p. 43] .
The JRE download wizard is started by
• clicking on the toolbar button of the main window.
• clicking on JRE download wizard in the Bundled JRE [p. 337] step of the media file wizard [p.330] .
The JRE downloadwizard leads you step by step through the process of connecting to the server,choosing the desired JREs and downloading them to your local disk.
The "Connection" step allows you to configure a proxy, with an optional proxy authentication.Note that the password will not be saved in the install4j configuration, you will have to reenterit each time you run the JRE download wizard.
If the download fails or if you have no internet connectivity, go to
https://download.ej-technologies.com/bundles/list (1) to download the bundles and save themto the directory %USERPROFILE%\.install4j7\jres on Windows or $HOME/.install4j7/jres on Linux, Unix and macOS. After restarting the install4j IDE, the bundles will be availableon the "Bundled JRE" step of the media wizard.
ej-technologies offers JREs for a number of common platforms. TheWindows JREs whose namesend with _us_only do not include support for non-English locales.If you wish to bundle a JRE that is not available from ej-technologies' download server or thathas custommodifications (like an installation of the javax.comm API), please see the JRE bundlecreation wizard [p. 350] on how to create your own JRE bundle.
(1) https://download.ej-technologies.com/bundles/list
349
B.9 JRE Bundle Wizard
With the JRE bundle wizard you can create JRE bundles for install4j from any JRE installation onyour disk. For more information on JRE bundles and on how they are used by install4j, pleasesee the corresponding help topic [p. 43] .
Please check first, if one of the JREs provided by ej-technologies' JRE download server [p. 349] fitsyour needs.
Note that JRE bundles can only be created on the platform where they are intended to run. Forexample, it is not possible to create a Linux JRE bundle on Windows. You have to install install4jon a Linux machine and run the JRE bundle creation process there.
The JRE bundle wizard is started by choosing Project->Create a JRE Bundle from install4j's mainmenu. The JRE bundle wizard leads you step by step through the process of choosing the desiredJRE and creating an install4j bundle from it:
• Select JRE
In the "Select JRE" step of thewizard you select the Java home directory of the JRE. It is possibleto select a JDK, however, after a confirmation dialog the bundle will be created from theincluded JRE.
• Output directory
By default, the JRE bundle file is saved to the jres directory in your install4j installationdirectory. If that directory is not writable, the .install4j7/jres directory in your homedirectory is used. Bundles in the default directory will be suggested by the IDE.
You can also save your bundle to any other directory and use theManual entry option in theBundled JRE step [p. 337] of the media wizard to select the bundle file.
• Bundle file name
The file name of the bundle is auto-generated and is used by the install4j IDE to suggestsuitable JRE bundles in theBundled JRE step [p. 337] of the media wizard. You can customizethe following components of the file name:
• Java version
Enter the version of the JRE. This is useful if you would like to use a version without patchlevel information, such as 9.0.
• Custom ID
This should be short identifier that will be presented in the IDE in order to differentiatemultiple bundles with the same architecture and Java version.
The version and the custom ID are used to construct the name of the bundle file. The formatof the name is important for the IDE to recognize the file as a bundle and determine its scope.
To automate the JRE bundle creation, you can use the command line utility createbundle[.exe] in the bin directory of your install4j installation. The bundle creation tool is invoked asfollows:
createbundle [OPTIONS] [JRE home directory]
The available options are:
350
• -h or --help
Displays a quick help for all available options.
• -o or --output
The directory where the bundle file will be created. If you do not specify this option, the defaultbundle directory of install4j will be used.
• -v or --version
The version string for the JRE. If you do not specify this option, the JRE will be queried for theversion, for example "9.0.3". If you want to use a shorter version number like "9.0", you canuse this option.
• -i or --id
The custom ID of the JRE as described above. If you do not specify this option, it will be set tothe empty string. This is only required if you havemultiple bundles with the same architectureand Java version. This id becomes part of the name of the bundle file.
• -u or --unpacked
If this flag is specified, the JAR files are not packed with the Pack200 algorithm. This makesthe JRE bundles substantially larger. Unpacked JRE bundles are required for single bundlearchives on macOS, where signature requirements prevent any modifications in the installedapplication bundle.
Creating a JRE bundle from your ant script (read about ant at ant.apache.org (1)) is easy. Just usethe createbundle task that is provided in $INSTALL4J_HOME/bin/ant.jar and set thejavahome parameter to the JRE that you want to create a bundle for.
To make the createbundle task available to ant, you must first insert a taskdef element thattells ant where to find the task definition. Here is an example of using the task in an ant buildfile:
<taskdef name="createbundle" classname="com.install4j.CreateBundleTask" classpath="C:\Program Files\install4j\bin\ant.jar"/>
<target name="media"> <createbundle javahome="c:\Program Files\Java\jre6"/></target>
The taskdef definitionmust occur only once per ant-build file and can appear anywhere on thetop level below the project element.
Note: it is not possible to copy the ant.jar archive to the lib folder of your ant distribution.You have to reference a full installation of install4j in the task definition.
The createbundle task supports the following parameters:
RequiredDescriptionAttribute
YesThe home directory of the JRE that should bebundled
javahome
Corresponds tothe --output
The output directoryoutputDirectory
command line
(1) http://ant.apache.org
351

RequiredDescriptionAttribute
optiondescribedabove.
NoCorresponds to the --version command lineoption described above.
version
NoCorresponds to the --id command line optiondescribed above.
id
NoCorresponds to the --unpacked command lineoption described above.
unpacked
Example:
<createbundle javahome="/usr/lib/jvm/jre-9.0.4/jre" output="/home/build/projects/myproject/jrebundles" version="9.0" id="j3d"/>
352
B.10 Preferences Dialog
The preferences dialog is displayed by clicking Project->Preferences in install4j's main menu.
The preferences dialog has two panels:
• Appearance
Here, you can select a look and feel for the install4j IDE. This does not affect generated installers,they always use the native look and feel. The newly selected look and feel will be used wheninstall4j is started the next time.
• Miscellaneous
In the Startup section of this tab you can specify that install4j should load the last editedproject at startup. If this option is not selected, install4j starts with a blank screen. If you specifya project file at the command line, that project will be loaded in any case.
In the Browser section section of this tab, the browser start command for your preferredbrowser can be adjusted. Use $URL as a variable for the URL to be displayed. This setting isimportant for generating project reports [p. 9] . If you leave the text box empty, install4j willuse the system defaults on Windows and macOS and try to invoke netscape on Linux andSolaris.
353
B.11 Command Line Compiler
B.11.1 Command Line Compiler
install4j's command line compiler install4jc[.exe] can be found in the bin directory of yourinstall4j installation. It operates on project files with extension .install4j that have beenproduced with the install4j IDE. (install4j[.exe]). The install4j command line compiler isinvoked as follows:
install4jc [OPTIONS] [config file]
The available options are described here [p. 355] . A quick help for all options is printed to theterminal when invoking
install4jc --help
In order to facilitate usage of install4jc with automated build processes, the destination directory[p. 96] for the media files and the application version [p. 91] can be overridden with commandline options [p. 355] . Furthermore you can achieve internationalization and powerfulcustomizations with compiler variables [p. 30] . As a last resort, since the file format of install4j'sconfig files is xml-based, you can achieve arbitrary customizations by replacing tokens (see theant integration help page [p. 358] for an example) or by applying XSLT stylesheets to the configfile.
354
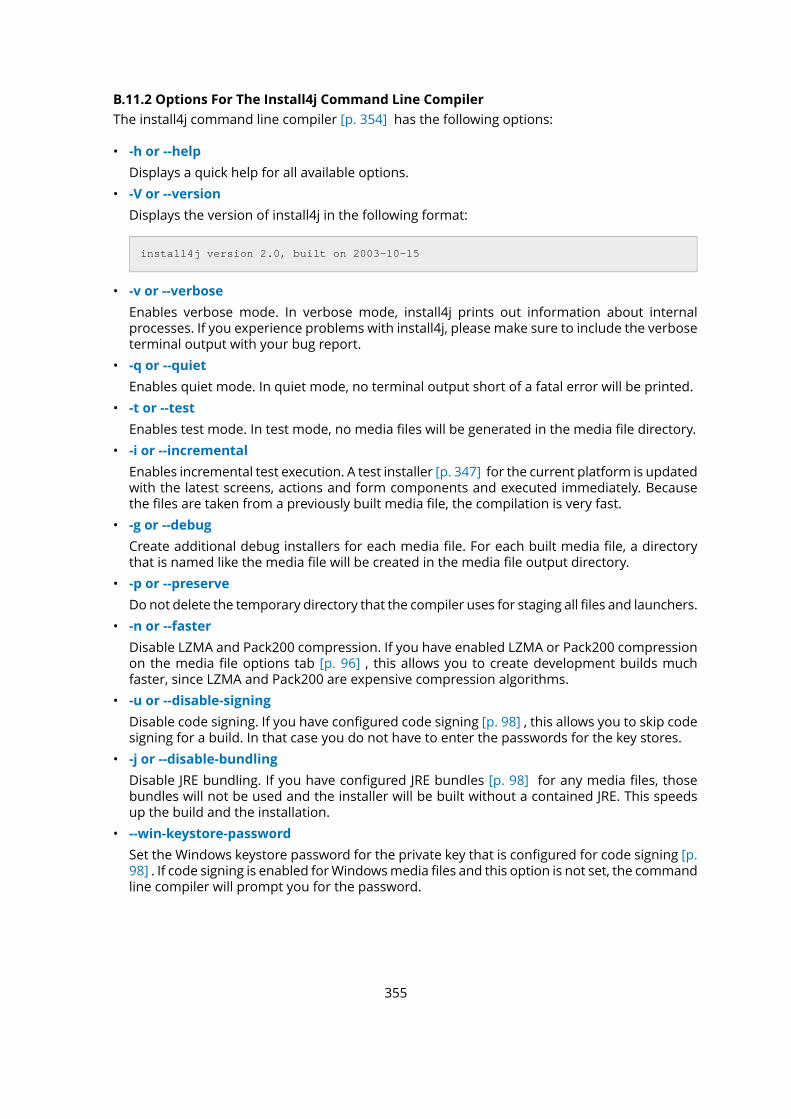
B.11.2 Options For The Install4j Command Line Compiler
The install4j command line compiler [p. 354] has the following options:
• -h or --help
Displays a quick help for all available options.
• -V or --version
Displays the version of install4j in the following format:
install4j version 2.0, built on 2003-10-15
• -v or --verbose
Enables verbose mode. In verbose mode, install4j prints out information about internalprocesses. If you experience problems with install4j, please make sure to include the verboseterminal output with your bug report.
• -q or --quiet
Enables quiet mode. In quiet mode, no terminal output short of a fatal error will be printed.
• -t or --test
Enables test mode. In test mode, no media files will be generated in the media file directory.
• -i or --incremental
Enables incremental test execution. A test installer [p. 347] for the current platform is updatedwith the latest screens, actions and form components and executed immediately. Becausethe files are taken from a previously built media file, the compilation is very fast.
• -g or --debug
Create additional debug installers for each media file. For each built media file, a directorythat is named like the media file will be created in the media file output directory.
• -p or --preserve
Donot delete the temporary directory that the compiler uses for staging all files and launchers.
• -n or --faster
Disable LZMA and Pack200 compression. If you have enabled LZMA or Pack200 compressionon the media file options tab [p. 96] , this allows you to create development builds muchfaster, since LZMA and Pack200 are expensive compression algorithms.
• -u or --disable-signing
Disable code signing. If you have configured code signing [p. 98] , this allows you to skip codesigning for a build. In that case you do not have to enter the passwords for the key stores.
• -j or --disable-bundling
Disable JRE bundling. If you have configured JRE bundles [p. 98] for any media files, thosebundles will not be used and the installer will be built without a contained JRE. This speedsup the build and the installation.
• --win-keystore-password
Set the Windows keystore password for the private key that is configured for code signing [p.98] . If code signing is enabled forWindowsmedia files and this option is not set, the commandline compiler will prompt you for the password.
355
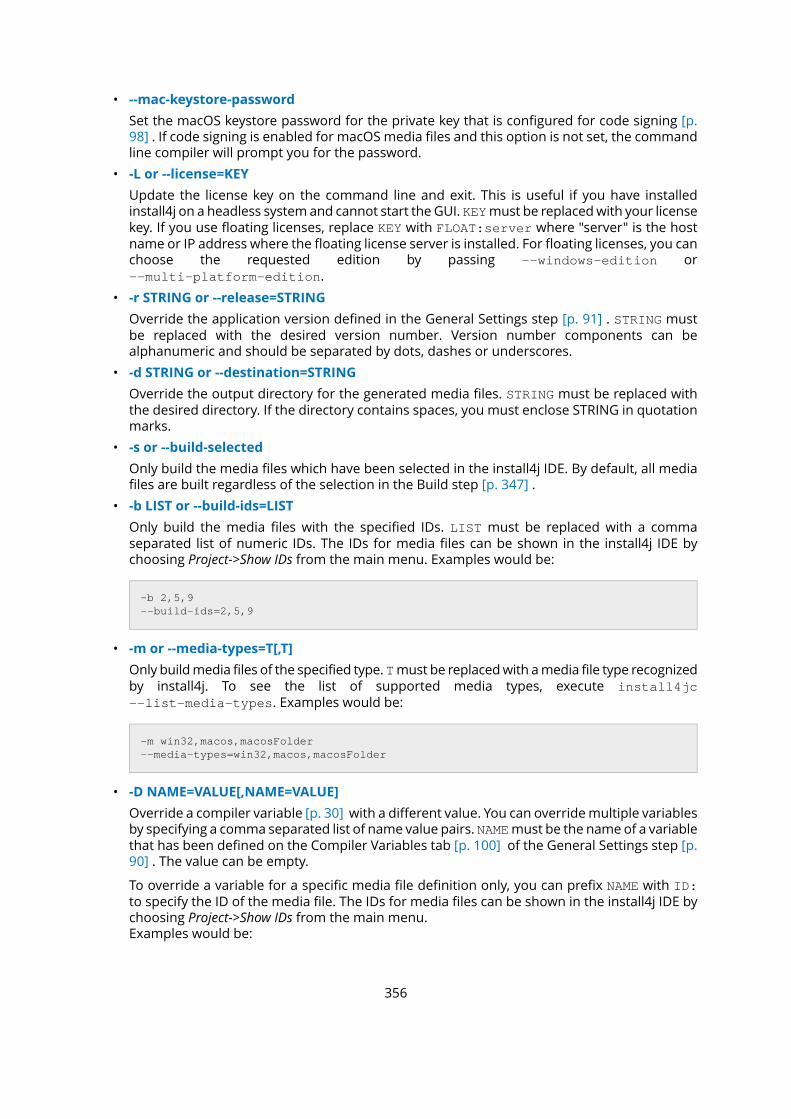
• --mac-keystore-password
Set the macOS keystore password for the private key that is configured for code signing [p.98] . If code signing is enabled for macOS media files and this option is not set, the commandline compiler will prompt you for the password.
• -L or --license=KEY
Update the license key on the command line and exit. This is useful if you have installedinstall4j on a headless systemand cannot start the GUI. KEYmust be replacedwith your licensekey. If you use floating licenses, replace KEY with FLOAT:server where "server" is the hostname or IP address where the floating license server is installed. For floating licenses, you canchoose the requested edition by passing --windows-edition or--multi-platform-edition.
• -r STRING or --release=STRING
Override the application version defined in the General Settings step [p. 91] . STRING mustbe replaced with the desired version number. Version number components can bealphanumeric and should be separated by dots, dashes or underscores.
• -d STRING or --destination=STRING
Override the output directory for the generated media files. STRING must be replaced withthe desired directory. If the directory contains spaces, you must enclose STRING in quotationmarks.
• -s or --build-selected
Only build the media files which have been selected in the install4j IDE. By default, all mediafiles are built regardless of the selection in the Build step [p. 347] .
• -b LIST or --build-ids=LIST
Only build the media files with the specified IDs. LIST must be replaced with a commaseparated list of numeric IDs. The IDs for media files can be shown in the install4j IDE bychoosing Project->Show IDs from the main menu. Examples would be:
-b 2,5,9--build-ids=2,5,9
• -m or --media-types=T[,T]
Only buildmedia files of the specified type. Tmust be replacedwith amedia file type recognizedby install4j. To see the list of supported media types, execute install4jc--list-media-types. Examples would be:
-m win32,macos,macosFolder--media-types=win32,macos,macosFolder
• -D NAME=VALUE[,NAME=VALUE]
Override a compiler variable [p. 30] with a different value. You can overridemultiple variablesby specifying a comma separated list of name value pairs. NAMEmust be the name of a variablethat has been defined on the Compiler Variables tab [p. 100] of the General Settings step [p.90] . The value can be empty.
To override a variable for a specific media file definition only, you can prefix NAME with ID:to specify the ID of the media file. The IDs for media files can be shown in the install4j IDE bychoosing Project->Show IDs from the main menu.Examples would be:
356
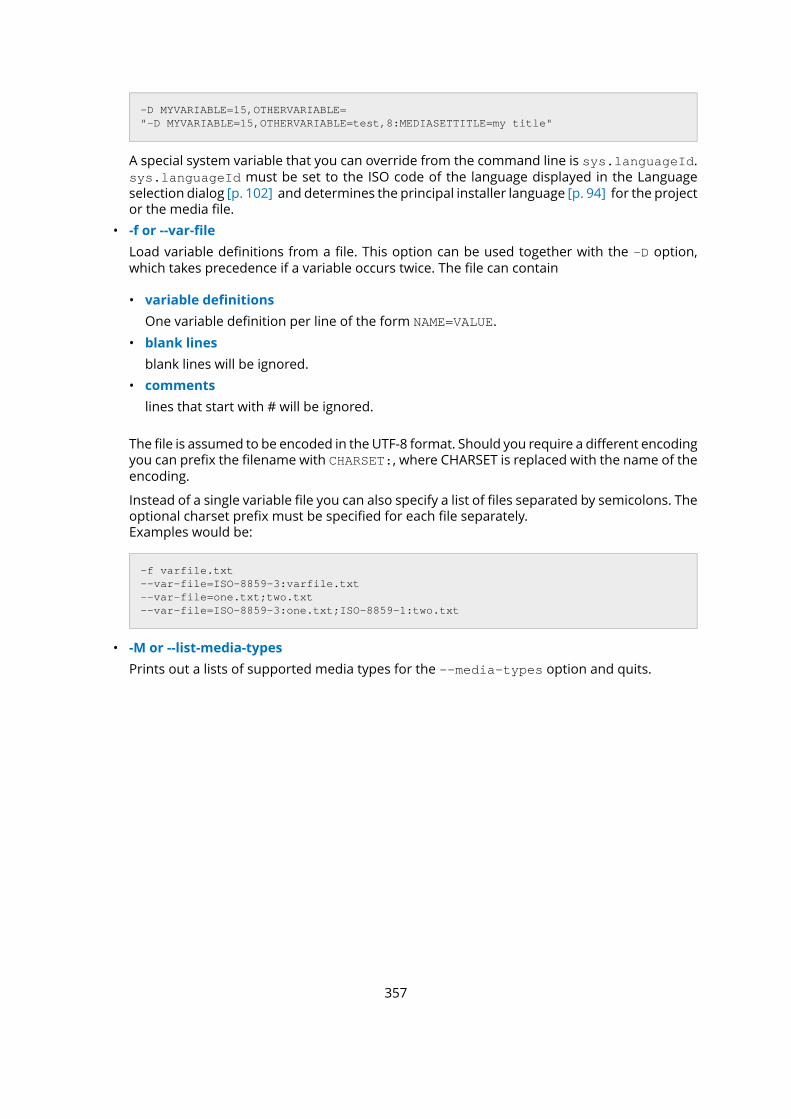
-D MYVARIABLE=15,OTHERVARIABLE="-D MYVARIABLE=15,OTHERVARIABLE=test,8:MEDIASETTITLE=my title"
A special system variable that you can override from the command line is sys.languageId.sys.languageId must be set to the ISO code of the language displayed in the Languageselection dialog [p. 102] and determines the principal installer language [p. 94] for the projector the media file.
• -f or --var-file
Load variable definitions from a file. This option can be used together with the -D option,which takes precedence if a variable occurs twice. The file can contain
• variable definitions
One variable definition per line of the form NAME=VALUE.
• blank lines
blank lines will be ignored.
• comments
lines that start with # will be ignored.
The file is assumed to be encoded in the UTF-8 format. Should you require a different encodingyou can prefix the filename with CHARSET:, where CHARSET is replaced with the name of theencoding.
Instead of a single variable file you can also specify a list of files separated by semicolons. Theoptional charset prefix must be specified for each file separately.Examples would be:
-f varfile.txt--var-file=ISO-8859-3:varfile.txt--var-file=one.txt;two.txt--var-file=ISO-8859-3:one.txt;ISO-8859-1:two.txt
• -M or --list-media-types
Prints out a lists of supported media types for the --media-types option and quits.
357
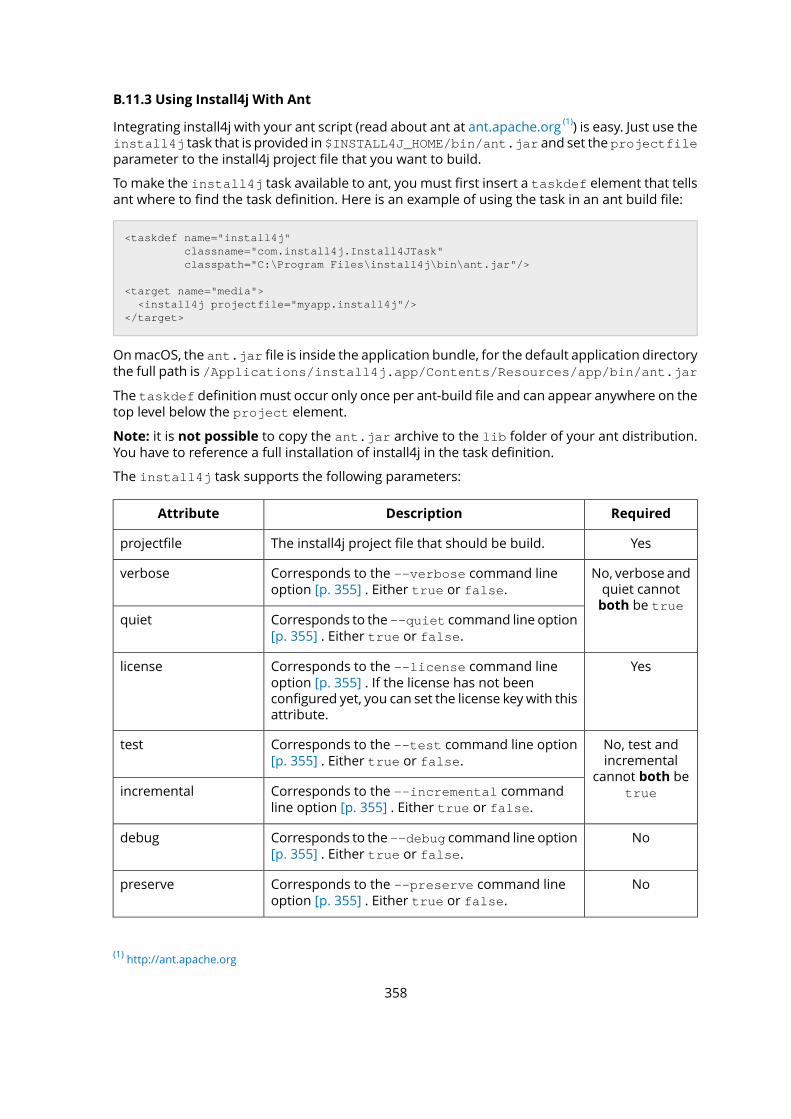
B.11.3 Using Install4j With Ant
Integrating install4j with your ant script (read about ant at ant.apache.org (1)) is easy. Just use theinstall4j task that is provided in $INSTALL4J_HOME/bin/ant.jar and set the projectfileparameter to the install4j project file that you want to build.
To make the install4j task available to ant, you must first insert a taskdef element that tellsant where to find the task definition. Here is an example of using the task in an ant build file:
<taskdef name="install4j" classname="com.install4j.Install4JTask" classpath="C:\Program Files\install4j\bin\ant.jar"/>
<target name="media"> <install4j projectfile="myapp.install4j"/></target>
OnmacOS, the ant.jar file is inside the application bundle, for the default application directorythe full path is /Applications/install4j.app/Contents/Resources/app/bin/ant.jar
The taskdef definitionmust occur only once per ant-build file and can appear anywhere on thetop level below the project element.
Note: it is not possible to copy the ant.jar archive to the lib folder of your ant distribution.You have to reference a full installation of install4j in the task definition.
The install4j task supports the following parameters:
RequiredDescriptionAttribute
YesThe install4j project file that should be build.projectfile
No, verbose andquiet cannotboth be true
Corresponds to the --verbose command lineoption [p. 355] . Either true or false.
verbose
Corresponds to the --quiet command line option[p. 355] . Either true or false.
quiet
YesCorresponds to the --license command lineoption [p. 355] . If the license has not been
license
configured yet, you can set the license key with thisattribute.
No, test andincremental
Corresponds to the --test command line option[p. 355] . Either true or false.
test
cannot both betrueCorresponds to the --incremental command
line option [p. 355] . Either true or false.incremental
NoCorresponds to the --debug command line option[p. 355] . Either true or false.
debug
NoCorresponds to the --preserve command lineoption [p. 355] . Either true or false.
preserve
(1) http://ant.apache.org
358
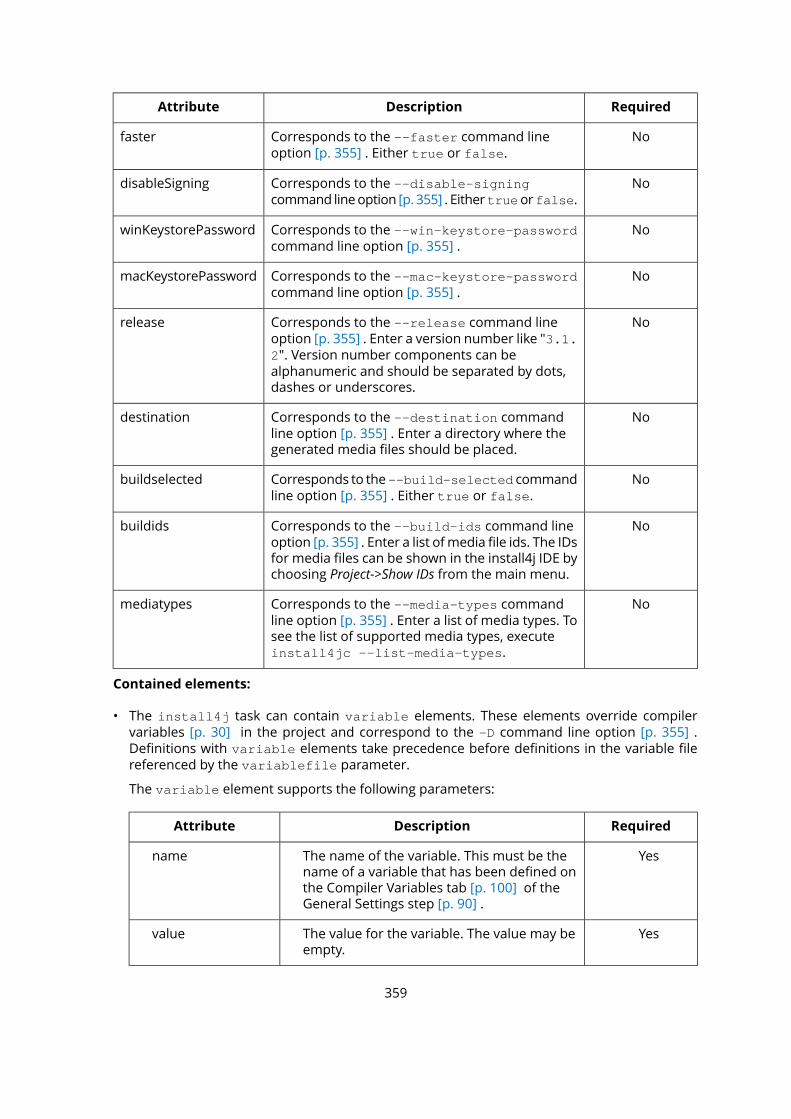
RequiredDescriptionAttribute
NoCorresponds to the --faster command lineoption [p. 355] . Either true or false.
faster
NoCorresponds to the --disable-signingcommand lineoption [p. 355] . Eithertrueorfalse.
disableSigning
NoCorresponds to the --win-keystore-passwordcommand line option [p. 355] .
winKeystorePassword
NoCorresponds to the --mac-keystore-passwordcommand line option [p. 355] .
macKeystorePassword
NoCorresponds to the --release command lineoption [p. 355] . Enter a version number like "3.1.
release
2". Version number components can bealphanumeric and should be separated by dots,dashes or underscores.
NoCorresponds to the --destination commandline option [p. 355] . Enter a directory where thegenerated media files should be placed.
destination
NoCorresponds to the--build-selected commandline option [p. 355] . Either true or false.
buildselected
NoCorresponds to the --build-ids command lineoption [p. 355] . Enter a list ofmedia file ids. The IDs
buildids
for media files can be shown in the install4j IDE bychoosing Project->Show IDs from the main menu.
NoCorresponds to the --media-types commandline option [p. 355] . Enter a list of media types. To
mediatypes
see the list of supported media types, executeinstall4jc --list-media-types.
Contained elements:
• The install4j task can contain variable elements. These elements override compilervariables [p. 30] in the project and correspond to the -D command line option [p. 355] .Definitions with variable elements take precedence before definitions in the variable filereferenced by the variablefile parameter.
The variable element supports the following parameters:
RequiredDescriptionAttribute
YesThe name of the variable. This must be thename of a variable that has been defined on
name
the Compiler Variables tab [p. 100] of theGeneral Settings step [p. 90] .
YesThe value for the variable. The value may beempty.
value
359
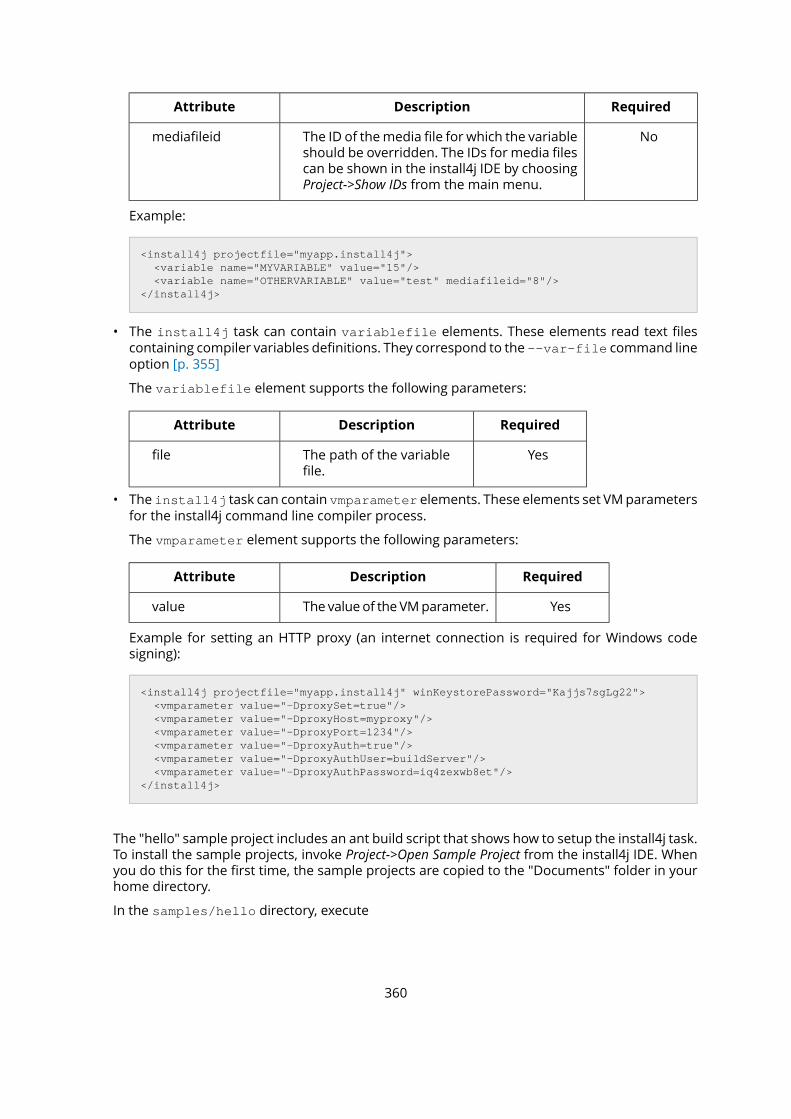
RequiredDescriptionAttribute
NoThe ID of themedia file for which the variableshould be overridden. The IDs for media files
mediafileid
can be shown in the install4j IDE by choosingProject->Show IDs from the main menu.
Example:
<install4j projectfile="myapp.install4j"> <variable name="MYVARIABLE" value="15"/> <variable name="OTHERVARIABLE" value="test" mediafileid="8"/></install4j>
• The install4j task can contain variablefile elements. These elements read text filescontaining compiler variables definitions. They correspond to the --var-file command lineoption [p. 355]
The variablefile element supports the following parameters:
RequiredDescriptionAttribute
YesThe path of the variablefile.
file
• The install4j task can contain vmparameter elements. These elements set VMparametersfor the install4j command line compiler process.
The vmparameter element supports the following parameters:
RequiredDescriptionAttribute
YesThe value of the VMparameter.value
Example for setting an HTTP proxy (an internet connection is required for Windows codesigning):
<install4j projectfile="myapp.install4j" winKeystorePassword="Kajjs7sgLg22"> <vmparameter value="-DproxySet=true"/> <vmparameter value="-DproxyHost=myproxy"/> <vmparameter value="-DproxyPort=1234"/> <vmparameter value="-DproxyAuth=true"/> <vmparameter value="-DproxyAuthUser=buildServer"/> <vmparameter value="-DproxyAuthPassword=iq4zexwb8et"/></install4j>
The "hello" sample project includes an ant build script that shows how to setup the install4j task.To install the sample projects, invoke Project->Open Sample Project from the install4j IDE. Whenyou do this for the first time, the sample projects are copied to the "Documents" folder in yourhome directory.
In the samples/hello directory, execute
360

ant media
to start the build. If you have not defined install4jHomeDir in build.xml, the build will fail witha corresponding error message.
361
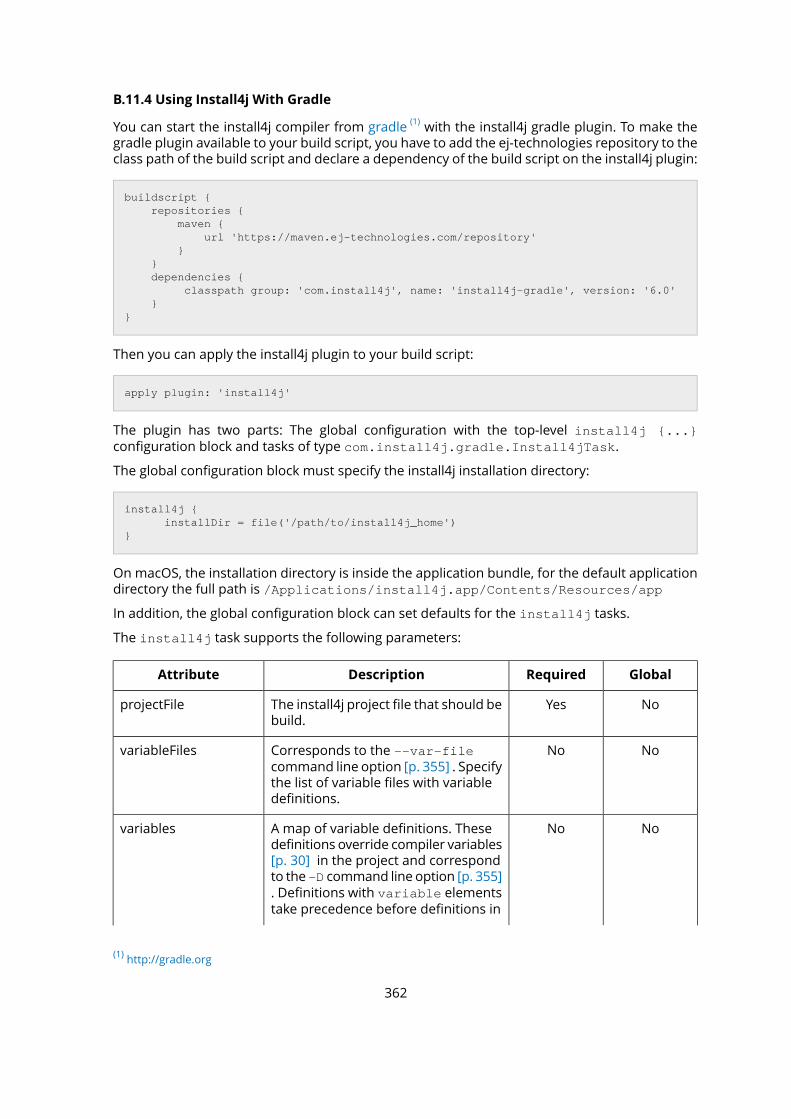
B.11.4 Using Install4j With Gradle
You can start the install4j compiler from gradle (1) with the install4j gradle plugin. To make thegradle plugin available to your build script, you have to add the ej-technologies repository to theclass path of the build script and declare a dependency of the build script on the install4j plugin:
buildscript { repositories { maven { url 'https://maven.ej-technologies.com/repository' } } dependencies { classpath group: 'com.install4j', name: 'install4j-gradle', version: '6.0' }}
Then you can apply the install4j plugin to your build script:
apply plugin: 'install4j'
The plugin has two parts: The global configuration with the top-level install4j {...}configuration block and tasks of type com.install4j.gradle.Install4jTask.
The global configuration block must specify the install4j installation directory:
install4j { installDir = file('/path/to/install4j_home')}
On macOS, the installation directory is inside the application bundle, for the default applicationdirectory the full path is /Applications/install4j.app/Contents/Resources/app
In addition, the global configuration block can set defaults for the install4j tasks.
The install4j task supports the following parameters:
GlobalRequiredDescriptionAttribute
NoYesThe install4j project file that should bebuild.
projectFile
NoNoCorresponds to the --var-filecommand line option [p. 355] . Specify
variableFiles
the list of variable files with variabledefinitions.
NoNoA map of variable definitions. Thesedefinitions override compiler variables
variables
[p. 30] in the project and correspondto the-D command line option [p. 355]. Definitions with variable elementstake precedence before definitions in
(1) http://gradle.org
362
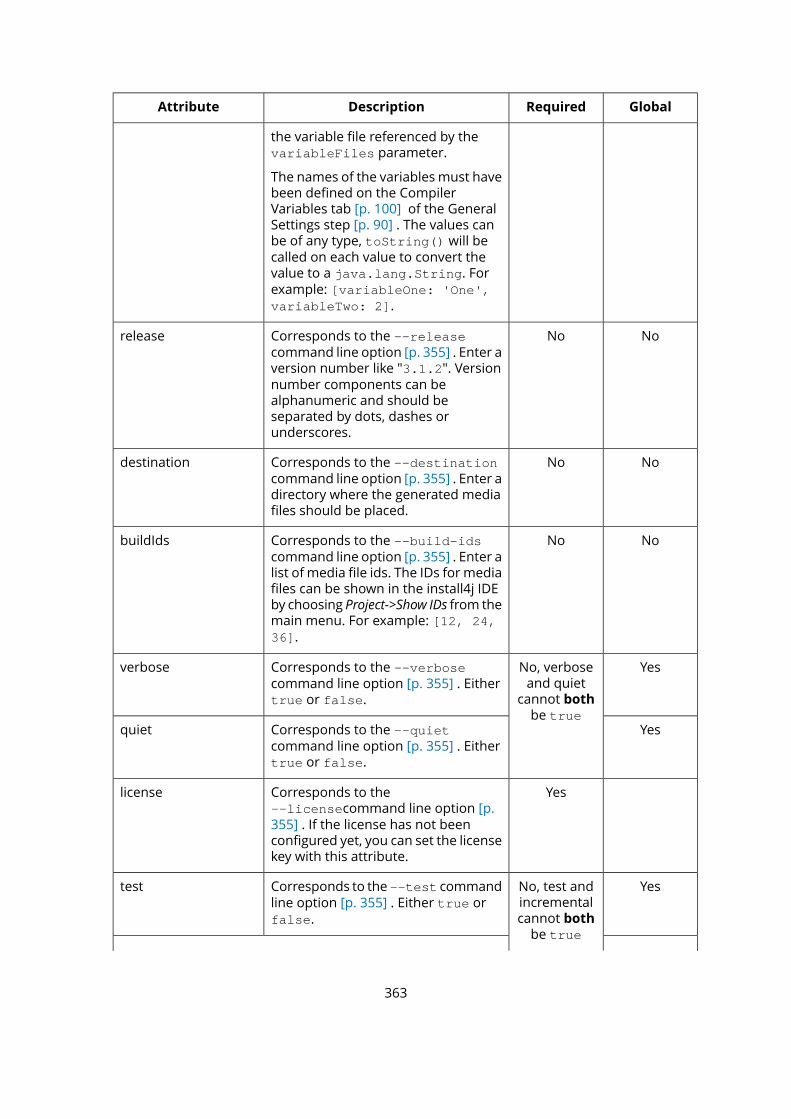
GlobalRequiredDescriptionAttribute
the variable file referenced by thevariableFiles parameter.
The names of the variablesmust havebeen defined on the CompilerVariables tab [p. 100] of the GeneralSettings step [p. 90] . The values canbe of any type, toString() will becalled on each value to convert thevalue to a java.lang.String. Forexample: [variableOne: 'One',variableTwo: 2].
NoNoCorresponds to the --releasecommand line option [p. 355] . Enter a
release
version number like "3.1.2". Versionnumber components can bealphanumeric and should beseparated by dots, dashes orunderscores.
NoNoCorresponds to the --destinationcommand line option [p. 355] . Enter a
destination
directory where the generated mediafiles should be placed.
NoNoCorresponds to the --build-idscommand line option [p. 355] . Enter a
buildIds
list of media file ids. The IDs for mediafiles can be shown in the install4j IDEby choosing Project->Show IDs from themain menu. For example: [12, 24,36].
YesNo, verboseand quiet
Corresponds to the --verbosecommand line option [p. 355] . Eithertrue or false.
verbose
cannot bothbe true
YesCorresponds to the --quietcommand line option [p. 355] . Eithertrue or false.
quiet
YesCorresponds to the--licensecommand line option [p.
license
355] . If the license has not beenconfigured yet, you can set the licensekey with this attribute.
YesNo, test andincremental
Corresponds to the--test commandline option [p. 355] . Either true orfalse.
test
cannot bothbe true
363
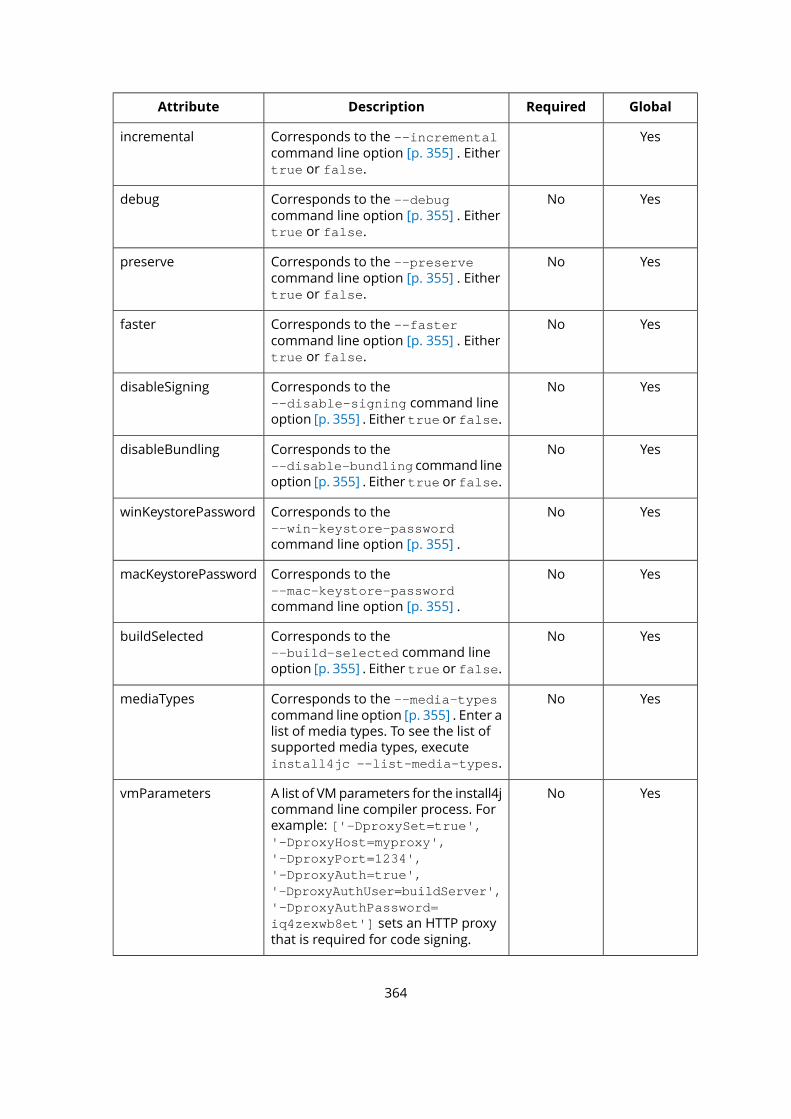
GlobalRequiredDescriptionAttribute
YesCorresponds to the --incrementalcommand line option [p. 355] . Eithertrue or false.
incremental
YesNoCorresponds to the --debugcommand line option [p. 355] . Eithertrue or false.
debug
YesNoCorresponds to the --preservecommand line option [p. 355] . Eithertrue or false.
preserve
YesNoCorresponds to the --fastercommand line option [p. 355] . Eithertrue or false.
faster
YesNoCorresponds to the--disable-signing command lineoption [p. 355] . Either true or false.
disableSigning
YesNoCorresponds to the--disable-bundling command lineoption [p. 355] . Either true or false.
disableBundling
YesNoCorresponds to the--win-keystore-passwordcommand line option [p. 355] .
winKeystorePassword
YesNoCorresponds to the--mac-keystore-passwordcommand line option [p. 355] .
macKeystorePassword
YesNoCorresponds to the--build-selected command lineoption [p. 355] . Either true or false.
buildSelected
YesNoCorresponds to the --media-typescommand line option [p. 355] . Enter a
mediaTypes
list of media types. To see the list ofsupported media types, executeinstall4jc --list-media-types.
YesNoA list of VMparameters for the install4jcommand line compiler process. For
vmParameters
example: ['-DproxySet=true','-DproxyHost=myproxy','-DproxyPort=1234','-DproxyAuth=true','-DproxyAuthUser=buildServer','-DproxyAuthPassword=iq4zexwb8et'] sets an HTTP proxythat is required for code signing.
364
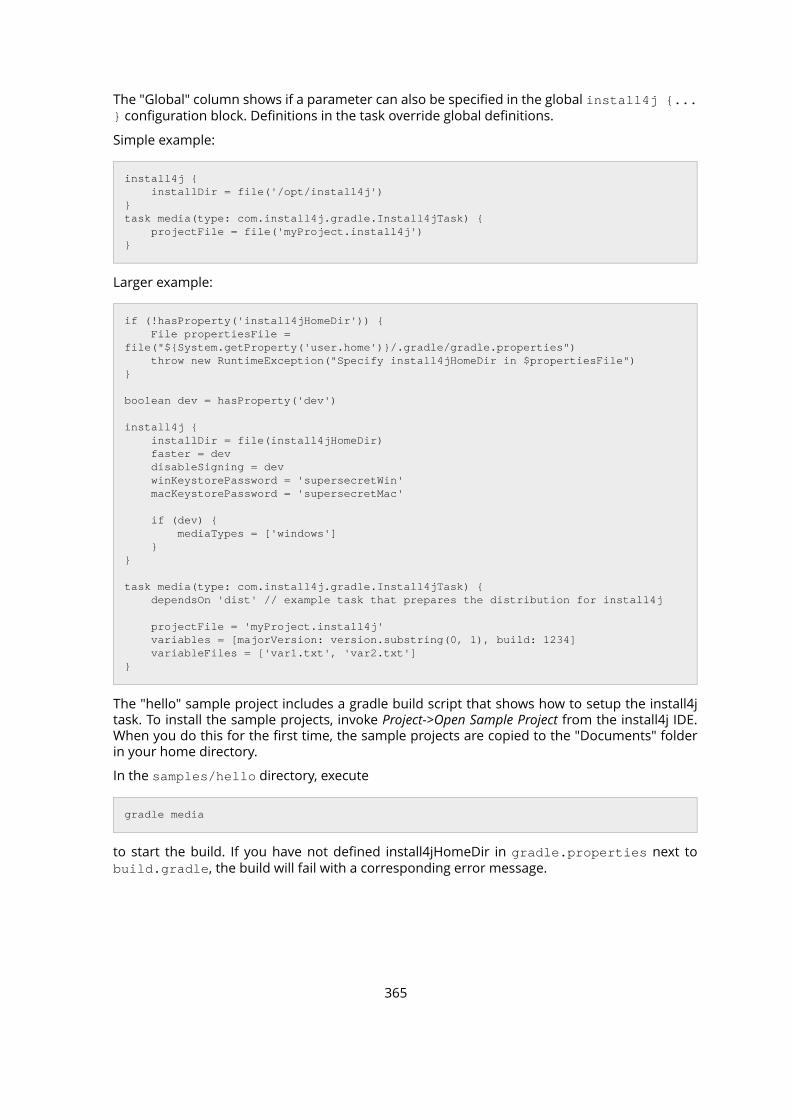
The "Global" column shows if a parameter can also be specified in the global install4j {...} configuration block. Definitions in the task override global definitions.
Simple example:
install4j { installDir = file('/opt/install4j')}task media(type: com.install4j.gradle.Install4jTask) { projectFile = file('myProject.install4j')}
Larger example:
if (!hasProperty('install4jHomeDir')) { File propertiesFile = file("${System.getProperty('user.home')}/.gradle/gradle.properties") throw new RuntimeException("Specify install4jHomeDir in $propertiesFile")}
boolean dev = hasProperty('dev')
install4j { installDir = file(install4jHomeDir) faster = dev disableSigning = dev winKeystorePassword = 'supersecretWin' macKeystorePassword = 'supersecretMac'
if (dev) { mediaTypes = ['windows'] }}
task media(type: com.install4j.gradle.Install4jTask) { dependsOn 'dist' // example task that prepares the distribution for install4j
projectFile = 'myProject.install4j' variables = [majorVersion: version.substring(0, 1), build: 1234] variableFiles = ['var1.txt', 'var2.txt']}
The "hello" sample project includes a gradle build script that shows how to setup the install4jtask. To install the sample projects, invoke Project->Open Sample Project from the install4j IDE.When you do this for the first time, the sample projects are copied to the "Documents" folderin your home directory.
In the samples/hello directory, execute
gradle media
to start the build. If you have not defined install4jHomeDir in gradle.properties next tobuild.gradle, the build will fail with a corresponding error message.
365

B.11.5 Using Install4j With Maven
You can start the install4j compiler from maven (1) with the install4j maven plugin. The maven
plugin is developed by Sonatype (2). Please see the external project site (3) for more information.
The source code is available on github (4).
(1) http://maven.org(2) http://sonatype.com(3) http://sonatype.github.io/install4j-support/install4j-maven-plugin/index.html(4) http://github.com/sonatype/install4j-support
366

B.11.6 Using Relative Resource Paths
If you would like to use relative paths for splash screen images, icon files, directories and otherexternal resources, (e.g. for automated build processes in distributed environments) you canchoose "make all paths relative when saving project file" on the Project Optionstab [p. 101] of the General Settings step [p. 90] .
Note: relative paths are always interpreted relative to the location of the project file.
367
B.12 Launcher API
B.12.1 Controlling The Splash Screen From Your Application
If you have enabled a splash screen [p. 132] for a launcher, you will want to hide it once theapplication startup is finished. The splashwill be hidden automatically as soon as your applicationopens the first window.
However, you might want to hide the splash screen programmatically or update the contents ofthe status text line on the splash screen during the startup phase to provide more extensivefeedback to your users.
With the install4j launcher client API you can
• Hide the splash screen programatically
Invoke the staticmethodcom.install4j.api.launcher.SplashScreen.hide() as soonas you wish to hide the splash screen.
• Update the status text line
Invoke the static method com.install4j.api.launcher.SplashScreen.writeMessage(String message) to change the text in the status line.
install4j's launcher client API is automatically available to an application deployed with install4j.For compiling your application, youneed to addi4jruntime.jar to the classpath.i4jruntime.jar can be found in the resource directory of your install4j installation.
B.12.2 Receiving Startup Events In Single Instance Mode
If you have enabled the single instance mode [p. 126] for your executable, the application canonly be started once. For a GUI application, the existing application window is brought to frontwhen a user executes the launcher another time.
However, you might want to receive notifications about multiple startups together with thecommand line parameters. If you have associated you executable with a file extension, you willlikely want to handlemultiple invocations in the same instance of your application. Alternatively,you might want to perform some action when another startup occurs.
With the install4j launcher client API you canwrite a class that implements the com.install4j.api.launcher.StartupNotification.Listener interface and register it with com.install4j.api.launcher.StartupNotification.registerStartupListener(ListenerstartupListener). Your implementation of startupPerformed(String parameters) ofthe Listener interface will then be notified if another startup occurs.
install4j's launcher client API is automatically available to an application deployed with install4j.For compiling your application, youneed to addi4jruntime.jar to the classpath.i4jruntime.jar can be found in the resource directory of your install4j installation.
368


![HJPWFEÑ HFOOBJP m4DVPMB EJ UFOFP EJ SDIJUFUUVSB Fsaad.unicam.it/sites/saad.unicam.it/files/notizie... · hjpwfeÑ hfoobjp m4dvpmb ej "ufofp ej "sdijufuuvsb f %ftjho ] 4fef "oovo[jbub](https://img.pdfslide.net/doc/110x75/5f74d214f69aff0a5d2116ba/hjpwfe-hfoobjp-m4dvpmb-ej-ufofp-ej-sdijufuuvsb-fsaad-hjpwfe-hfoobjp-m4dvpmb.jpg)