Embed Size (px)
Citation preview

Installation & Operation User Manual – SMG Connect for Android
1 | P a g e
Installation & Operation User Manual
(SMG Connect for Android)

Installation & Operation User Manual – SMG Connect for Android
2 | P a g e
Table of Contents
1. Introduction ................................................................................................................................................ 4
2. Requirement ............................................................................................................................................... 4
3. Installation Steps to install application on mobile .................................................................................... 4
Installation using android phone ...................................................................................................................... 4
4. Mobile Registration .................................................................................................................................... 5
Steps for mobile registration ............................................................................................................................ 5
Welcome Screen: .......................................................................................................................................... 5
First time permission screens: ...................................................................................................................... 5
First time registration process: ..................................................................................................................... 6
Mobile Registration: ..................................................................................................................................... 6
5. Login ............................................................................................................................................................ 9
6. Steps to Change Pin .................................................................................................................................. 11
7. Configure App ........................................................................................................................................... 12
8. My Apps .................................................................................................................................................... 13
9. STARS ........................................................................................................................................................ 18
9.1 Pending Request List ................................................................................................................................. 18
9.2 Request Details ......................................................................................................................................... 19
9.3 Foreign Exchange Details .......................................................................................................................... 20
10. RAS ............................................................................................................................................................ 21
10.1 Pending Request List ............................................................................................................................... 21
10.2 Request Details ....................................................................................................................................... 22
10.3 Item Details ............................................................................................................................................. 23
11. EASY .......................................................................................................................................................... 24
11.1 Pending Request List ............................................................................................................................... 24
11.2 Request Details ....................................................................................................................................... 25
12. GRSS-SMR ................................................................................................................................................. 26
12.1 Pending Request List ............................................................................................................................... 26
12.2 Request Details ....................................................................................................................................... 27
13. SMG-DOCS ................................................................................................................................................ 29
13.1 Available SMG Documents List ............................................................................................................... 29
14. EASY-HU .................................................................................................................................................... 32
14.1 Pending Request List ............................................................................................................................... 32
14.2 Request Details ....................................................................................................................................... 33
15. BPO ............................................................................................................................................................... 34
15.1 Pending Request List ............................................................................................................................... 34
15.2 Request Details ....................................................................................................................................... 35
16. Search Page .................................................................................................................................................. 37
17. Viewing Attachments ................................................................................................................................... 38

Installation & Operation User Manual – SMG Connect for Android
3 | P a g e
18. Take Action on Request (Approve, Return or Reject) ................................................................................. 38
Option 1: ..................................................................................................................................................... 38
Option 2: ..................................................................................................................................................... 38
After Action Process:................................................................................................................................... 39
19. Session Timeout ........................................................................................................................................... 39
20. Generic Troubleshooting ............................................................................................................................. 39
21. Note: ............................................................................................................................................................. 40

Installation & Operation User Manual – SMG Connect for Android
4 | P a g e
1. Introduction SMG Connect application is specially designed for Android platform. It allows you to access various enterprise application(s) to view information & perform certain actions. This document serves as the installation and operation user manual for SMG Connect application on android Phone.
2. Requirement An android phone Office Suite (to see attachment) (Not mandatory but recommended)
3. Installation Steps to install application on mobile
Installation using android phone
Open browser on your phone. Visit link https://appStore.mindeservices.com On appStore page, User can tap on Download to download the SMG Connect app. User can also tap on SMG Connect to open detail page and on detail page, user can tap on download icon to
download and then install SMG Connect app (SMGConnectApp.apk) (Refer to Fig-1)
Fig- 1

Installation & Operation User Manual – SMG Connect for Android
5 | P a g e
4. Mobile Registration
Steps for mobile registration
Press on the SMG Connect icon to open the application for the first time in your Phone. Welcome splash screen guides you to the Mobile Registration screen. (Refer to Fig-2, 3 & 4)
Welcome Screen:
Fig- 2
First time permission screens:
Fig- 3
Note: The permission screens will appear only in Android version 6.0 and above.

Installation & Operation User Manual – SMG Connect for Android
6 | P a g e
First time registration process:
Fig- 4
Mobile Registration:
After first time setup process, “Register Mobile” page will appear. Input all the items to register the mobile. (Refer to Fig- 5)
(1) Tap on “<” button to close registration process.
(2) If you face any difficulty, tap “Helpdesk Mail” button, it will create a mail to Helpdesk ([email protected]) with screen snapshot. You can send it to helpdesk. Please don’t change subject line of the mail.
(3) Input Network Domain Name.
(4) Input Windows User Name.
(5) Input Windows Password.
(6) Input Pin – minimum 4 digits and maximum 8 digits are allowed.
(7) Re-input Pin to confirm.
(8) Check box to show password & Pin.
(9) Tap on “Register this Mobile” button to register the mobile.
(10) Tap on “Clear” button to clear all input boxes.

Installation & Operation User Manual – SMG Connect for Android
7 | P a g e
On tap on “Register this Mobile” button, If any device is already registered with same user then option popup will be appeared where
(1) Tap on “Remove All & Add New” option to unregistered all previous registered devices with this user and register this as a new user.
(2) Tap on “Device Details” option to open a new screen which shows the details of all previous registered devices.
(3) Tap on “Continue” option to register this device successfully.
Note: This popup will also show the count of registered devices as 1 Android and 2 iOS.
On tap on “Device Details” option of previous popup screen, a new screen will be appeared where
(1) Name of Device Type like iOS or Android. (2) Version of OS. (3) UUID or unique identifier of device. (4) Date of registration. (5) Tap on “Continue” button to register this
device successfully. (6) Tap on “Remove” button to unregistered
selected devices. (7) Pull down list of records to refresh the
page.

Installation & Operation User Manual – SMG Connect for Android
8 | P a g e
Fig- 5
One user can register total 4 devices having any operating system. After input all the items tap on “Register this Mobile” button to register. If successful then it will move to next page “Login”.

Installation & Operation User Manual – SMG Connect for Android
9 | P a g e
5. Login
If registration process is successful or previously done then “Login” page will appear. To login to SMGConnect input all items. (Refer to Fig- 6)
(1) Tap on “Bar” icon button to open/close setting panel.
(2) Domain and windows user name appears here.
(3) Input registered PIN and tap on “Login” button to login. Note: If “Save PIN” option is selected then confirmation message window will appear. Tap “Yes” to save the PIN. Tap “No” to login without saving PIN.
(4) Check “Save PIN” option to save PIN. Check “Show Pin” to show pin. To remove the saved PIN data, uncheck the “Save PIN” checkbox and press “Login”.
(5) Tap on “Login” button to login.
(6) Tap on “Offline” button to access data in offline mode.
(7) SMG mantra and greeting will be displayed here. We can share greeting when tap on greeting.
(8) Tap on “Change User” on setting panel if you want to allow other user to use same device. It will open “Register Mobile” page refer Fig-4 above.
(9) Tap on “Change Pin” on setting panel to change the PIN (refer Fig-6 above).
(10) Tap on “App Info” on setting panel to see the Application Information i.e. revision history of the SMGConnect App.

Installation & Operation User Manual – SMG Connect for Android
10 | P a g e
Note: 1. An input box will be appeared whenever your windows password will be changed and after input correct windows password, you will be able to login in SMGConnect. 2. When user input incorrect PIN then following messages will appear: a- Authentication failed. Please re-input PIN.(First Attempt) b- Authentication failed. One more wrong PIN input will unregister this device. (Second Attempt) c- Wrong PIN! This device is unregistered. Please re-register yourself with change user action. (Third Attempt) d- Please register yourself with change user action. (Fourth Attempt)
Fig- 6

Installation & Operation User Manual – SMG Connect for Android
11 | P a g e
6. Steps to Change Pin To change the Pin, tap on “Change Pin” (Refer Fig-7) .This will open below screen, enter your updated Pin and tap on “Change Pin”. (Refer to Fig-7)
(1) Network Domain Name will be displayed automatically.
(2) Windows User Name will be displayed automatically.
(3) Input Windows Password.
(4) Input Pin - minimum of 4 digits and maximum 8 digits are allowed.
(5) Re-input Pin to confirm.
(6) Select “Show Password and PIN” to see Password and PIN.
(7) Tap on “Update Pin” button to save new pin. Pin will be changed for all registered devices.
(8) Tap on “Clear” button to clear above input items.
Fig- 7

Installation & Operation User Manual – SMG Connect for Android
12 | P a g e
7. Configure App For the users who are using SMGConnect first time, “My Apps” screen will appear with one icon: “Configure App(s)” For other users “My Apps” will appear with registered apps. (Refer to Fig 8)
Fig- 8
If you need to register an app, tap on “Configure App(s)” icon on “My Apps” page and follows below steps. (Refer Fig- 9)
(1) “Not Registered” button shows the services which are not registered. “Registered” button shows the services which are registered.
(2) All services display here. Tap on any icon to “Register App”/ “Unregister App” app. If you are a valid user of the app, then only you will be able to register for it. E.g. if you want to register STARS then you should be a valid user of STARS app.
Fig- 9
To register an app, tap on the app when “Not Registered” apps are displayed. To unregister an app, tap on the app when “Registered” apps are displayed.

Installation & Operation User Manual – SMG Connect for Android
13 | P a g e
8. My Apps For the users who are using SMGConnect first time, “My Apps” screen will appear with one icon: “Configure App(s)”. For other users “My Apps” will appear with registered apps (Refer to Fig 10).
Fig– 10
(1) Tap on “Setting” icon button to open/close setting panel.
(2) This bar shows user name and last login details
of that user.
(3) Application name with icon. To check information about a particular app, user needs to tap on app icon.
(4) Tap on “Configure App(s)” icon to register or unregister apps. If you are a valid user of the app, then only you will be able to register for it. E.g. if you want to register STARS then you should be a valid user of STARS app.
(5) Tap on “User Profile” icon to update the user profile.
Fig- 11

Installation & Operation User Manual – SMG Connect for Android
14 | P a g e
To change setting, click on setting icon on top bar to open/close setting panel. (Refer to Fig 12)
Fig– 12
(1) Tap on “Setting” icon button to open/close setting panel.
(2) Tap on “User Profile” to update user details.
(3) Tap on “Notification Settings” change the notification setting.
(4) Tap on “Configure App(s)” icon to register or unregister apps. If you are a valid user of the app, then only you will be able to register for it. E.g. if you want to register STARS then you should be a valid user of STARS app.
(5) Tap on “Rate App” on setting panel to open Rate App page.
(6) Tap on “Log Out” on setting panel to move to login page.
Fig- 13

Installation & Operation User Manual – SMG Connect for Android
15 | P a g e
Now click on, “User Profile”” to update the user profile. (Refer to Fig 14)
Fig– 14
On clicking, “User Profile,” User Profile screen will appear. (Refer to Fig 15)
Fig- 15
User can edit the setting and press save to update.

Installation & Operation User Manual – SMG Connect for Android
16 | P a g e
To change notification, click on “Notification Setting.” (Refer to Fig 16)
Fig– 16
On clicking, “Notification Setting,” notification setting screen will appear. (Refer to Fig 17)
(1) Tap on “Daily” to change daily notification.
(2) Tap on “Weekly” to change weekly notification.
(3) Tap on “Never” to never receive notification
(4) Tap on “Save” to save the changes.
(5) Tap on “Cancel” to cancel the changes.

Installation & Operation User Manual – SMG Connect for Android
17 | P a g e
Fig- 17

Installation & Operation User Manual – SMG Connect for Android
18 | P a g e
9. STARS
9.1 Pending Request List
Tapping on STARS app icon displays Pending Request(s) List for STARS. (Refer Fig- 18)
(1) Check box to check / uncheck all pending request(s).
(2) This bar shows pending request(s) count and last data retrieval time.
(3) Each block denotes one pending request. Left side strip denotes domestic / international travel request. Note: Use single tap on checkbox to select /
unselect request and tap on to open detail page.
(4) Action bar contains action buttons. Approve – To approve selected request(s). Reject – To reject selected request(s). Return – To return selected request(s). More - To show Logout, Search and Close button. Logout – To logout from app and go back to “Login” page. Search - To Search last approved requests. Go to “Search” page. Close – To close popup menu of (More).
(5) Pull down the list of request to refresh page.

Installation & Operation User Manual – SMG Connect for Android
19 | P a g e
When you tap on … button then “Logout”, “Search” and “Close” button will appear as shown in left side image.
(1) Name of the Site (2) Total travel days (3) Name of person made request (In case of
Group Request no individual name will appear)
(4) Destination (Start – End) with departure date and “…” Which indicating intermediate journey (i.e. Itinerary).
(5) Return (Start – End) with return date (6) Reason of travel (7) Requested amount for travel
Fig- 18
9.2 Request Details
Fig- 19
(1) Request ID has four parts. Blank or GR – Group Request / Company Name / Dom – Domestic or INT – International / Running number
(2) Name of person made request (In case of Group Travel no individual name will appear. Tapping on Show List will display Item 13.)

Installation & Operation User Manual – SMG Connect for Android
20 | P a g e
(3) Itinerary i.e. Intermediate journey with departure date
(4) Total travel days
(5) Currency & amount requested for travel and tap on to display the “Foreign Exchange Details” screen
(6) Bill to whom
(7) Reason of travel
(8) Approver chain with current approver in Red color.
(9) List of attached document(s). Attachments (0) means there is no file attached with the request.
(10) Comments of last approver(s)
(11) List of travelers in case of group request.
9.3 Foreign Exchange Details
(1) Request ID has four parts. Blank or GR – Group Request / Company Name / Dom – Domestic or INT – International / Running number
(2) Total Amount for Travel Allowance is shown in multiple currencies.
(3) Total Amount for Daily Charges is shown in multiple currencies.
(4) Contingency Amount is shown in multiple currencies.
(5) Any Other Expenditure is shown in multiple currencies.
(6) Currency Breakup Amount is shown in multiple currencies.
Fig- 20

Installation & Operation User Manual – SMG Connect for Android
21 | P a g e
10. RAS
10.1 Pending Request List
Tapping on RAS app icon displays Pending Request(s) List for RAS. (Refer Fig- 21)
(1) Check box to check / uncheck all pending request(s).
(2) This bar shows pending request(s) count and last data retrieval time.
(3) Each block denotes one pending request. The left side strip denotes “Capex”, “Over-budgeted/Un-budgeted”, “Revex”,“Customer Funded”, “Tooling Capex (Customer recovery above 110%)”and “Tooling Capex (Customer recovery up to 110%)” Note: Use single tap on checkbox to select /
unselect request and tap on to open detail page.
(4) Action bar contains action buttons. Approve – To approve selected request(s). Reject – To reject selected request(s). Return – To return selected request(s). … - To show Logout, Search and Close button. Logout – To logout from app and go back to “Login” page. Search - To Search last approved requests. Go to “Search” page. Close – To close popup menu of (…).
(5) Pull down to refresh the page.

Installation & Operation User Manual – SMG Connect for Android
22 | P a g e
When you tap on … button then “Logout”, “Search” and “Close” button will appear as shown in left side image.
(1) Name of the company (2) Name of person made request (3) Type of the request (4) Title of request (5) Requisition Number of the request (6) Date on which request is made (7) Currency & amount for the request
Fig- 21
10.2 Request Details
Fig- 22
(1) Requisition Number of the request
(2) Name of the company
(3) Name of person made request (with Date of request creation)
(4) Type of the request Sub Category of the request
(5) Project

Installation & Operation User Manual – SMG Connect for Android
23 | P a g e
(6) Supplier
(7) Title
(8) Justification
(9) Currency & Original amount
(10) Currency & Negotiated amount
(11) No. of Items and tap on to display the “Item Details”
(12) Comments of last approver
(13) Approver chain with current approver in Red color.
(14) Comments by other approvers
(15) List of attached document(s). Attachments (0) means there is no file attached with the request.
10.3 Item Details
Fig- 23
(1) Item Description
(2) Quantity
(3) Item Value
(4) Budget
(5) Budget Spend (Spend Percentage)
(6) Variance
Note: Left side strip denotes Over Budgeted/Unbudgeted and Budgeted

Installation & Operation User Manual – SMG Connect for Android
24 | P a g e
11. EASY
11.1 Pending Request List
Tapping on EASY app icon displays Pending Request(s) List for EASY. (Refer Fig- 24)
(1) Check box to check / uncheck all pending request(s).
(2) This bar shows pending request(s) count and last data retrieval time.
(3) Each block denotes one pending request. Note: Use single tap on checkbox to select /
unselect request and tap on to open detail page.
(4) Action bar contains action buttons. Approve – To approve selected request(s). Reject – To reject selected request(s). Return – To return selected request(s). … - To show Logout, Search and Close button. Logout – To logout from app and go back to “Login” page. Search - To Search last approved requests. Go to “Search” page. Close – To close popup menu of (…).
(5) Pull down to refresh the page.
When you tap on … button then “Logout”, “Search” and “Close” button will appear as shown in left side image.

Installation & Operation User Manual – SMG Connect for Android
25 | P a g e
(1) Name of the company (2) Name of person made request (3) Type of the request (4) Description of request (5) Requisition Number of the request (6) Date on which request is made (7) Currency & amount for the request
Fig- 24
11.2 Request Details
Fig- 25
(1) Requisition Number of the request
(2) Name of the company
(3) Name of person made request (with Date of request creation)
(4) Type of the request
(5) Segment Owner
(6) Cost Center
(7) Requested Value
(8) Last Approved Value
(9) Justification
(10) Description
(11) Approver chain with current approver in Red color.
(12) Comments of last approver.
(13) List of attached document(s). Attachments (0) means there is no file attached with the request.

Installation & Operation User Manual – SMG Connect for Android
26 | P a g e
12. GRSS-SMR
12.1 Pending Request List
Tapping on GRSS-SMR app icon displays Pending Request(s) List for GRSS. (Refer Fig- 26)
(1) Check box to check / uncheck all pending request(s).
(2) This bar shows pending request(s) count and last data retrieval time.
(3) Each block denotes one pending request. Note: Use single tap on checkbox to select /
unselect request and tap on to open detail page.
(4) Action bar contains action buttons. Approve – To approve selected request(s). Reject – To reject selected request(s). Return – To return selected request(s). … - To show Logout, Search and Close button. Logout – To logout from app and go back to “Login” page. Search - To Search last approved requests. Go to “Search” page. Close – To close popup menu of (…).
(5) Pull down to refresh page.

Installation & Operation User Manual – SMG Connect for Android
27 | P a g e
When you tap on … button then “Logout”, “Search” and “Close” button will appear as shown in left side image.
(1) Name of the company (2) Name of person made request (3) Type of the request (4) Description of request (5) Requisition Number of the request (6) Date on which request is made
Fig- 26
12.2 Request Details
Fig- 27
(1) Requisition Number of the request
(2) Name of the company
(3) Name of person made request (with Date of request creation)
(4) Type of the request

Installation & Operation User Manual – SMG Connect for Android
28 | P a g e
(5) Justification
(6) Description
(7) Remarks
(8) Approver chain with current approver in Red color.
(9) Comments of last approver.
(10) List of attached document(s). Attachments (0) means there is no file attached with the request.

Installation & Operation User Manual – SMG Connect for Android
29 | P a g e
13. SMG-DOCS
13.1 Available SMG Documents List
Tapping on SMG-DOCS app icon displays SMG documents List. (Refer Fig- 28)
Online Mode
(1) Tap on “<” icon to go to My Apps page.
(2) This displays available directory (i.e. Folder) on SMGConnect Server and when tap on this directory it displays contents inside this directory.
(3) This displays available file on SMGConnect Server.
(4) Tap on “Prev Dir” button to display previous directory.
(5) Tap on “Logout” button to go to Login page.
(6) Pull down list of files to refresh the page.

Installation & Operation User Manual – SMG Connect for Android
30 | P a g e
When you tap on files then option pop up will be opened where file will be downloaded and displayed when tap on “Open” button and file will be downloaded only when tap on “Download” button.
Offline Mode
When tap on “Offline” button on login page, My Apps page will be opened in Offline Mode.
(1) Tap on any files to open and swipe left to delete files.

Installation & Operation User Manual – SMG Connect for Android
31 | P a g e
(2) Swipe Left or Right to get Delete file or Folder.
(3) Tap on “Login” button to go to Login
Page.
Fig- 28

Installation & Operation User Manual – SMG Connect for Android
32 | P a g e
14. EASY-HU
14.1 Pending Request List
Tapping on EASY-HU app icon displays Pending Request(s) List for EASY-HU. (Refer to Fig 29)
(1) Check box to check / uncheck all pending request(s).
(2) This bar shows pending request(s) count and last data retrieval time.
(3) Each block denotes one pending request. Note: Use single tap on checkbox to select /
unselect request and tap on to open detail page.
(4) Action bar contains action buttons. Approve – To approve selected request(s). Reject – To reject selected request(s). Return – To return selected request(s). … - To show Logout, Search and Close button. Logout – To logout from app and go back to “Login” page. Search - To Search last approved requests. Go to “Search” page. Close – To close popup menu of (…).
(5) Pull down to refresh the page.
When you tap on … button then “Logout”, “Search” and “Close” button will appear as shown in left side image.

Installation & Operation User Manual – SMG Connect for Android
33 | P a g e
(1) Name of the company (2) Name of person made request (3) Type of the request (4) Description of request (5) Requisition Number of the request (6) Date on which request is made (7) Currency & amount for the request
Fig- 29
14.2 Request Details
Fig- 30
(1) Requisition Number of the request
(2) Name of the company
(3) Name of person made request (with Date of request creation)
(4) Type of the request
(5) Segment Owner
(6) Cost Center
(7) Requested Value
(8) Last Approved Value
(9) Justification
(10) Description
(11) Approver chain with current approver in Red color.
(12) Comments of last approver.
(13) List of attached document(s). Attachments (0) means there is no file attached with the request.

Installation & Operation User Manual – SMG Connect for Android
34 | P a g e
15. BPO
15.1 Pending Request List
Tapping on BPO app icon displays Pending Request(s) List for BPO. (Refer to Fig 31)
(1) The bar with heading “Pending,” shows pending request(s) count and last data retrieval time.
(2) Each block denotes one pending request. Note: Use single tap on checkbox to select
/ unselect request and tap on to open detail page.
(3) Action bar at the bottom contains action buttons. Approve – To approve selected request(s). Reject – To reject selected request(s). Return – To return selected request(s). … - To show Logout, Search and Close button. Logout – To logout from app and go back to “Login” page. Search - To Search last approved requests. Go to “Search” page. Close – To close popup menu of (…).
When you tap on … button then “Logout”, “Search” and “Close” button will appear as shown in left side image.
Installation & Operation User Manual – SMG Connect for Android
35 | P a g e
(1) File Name (2) No. of Attachments (3) Date of request creation (4) Party (vendor/supplier) name
with Party(vendor/supplier)code.
(5) Doc. Date (6) Amount
Fig- 31
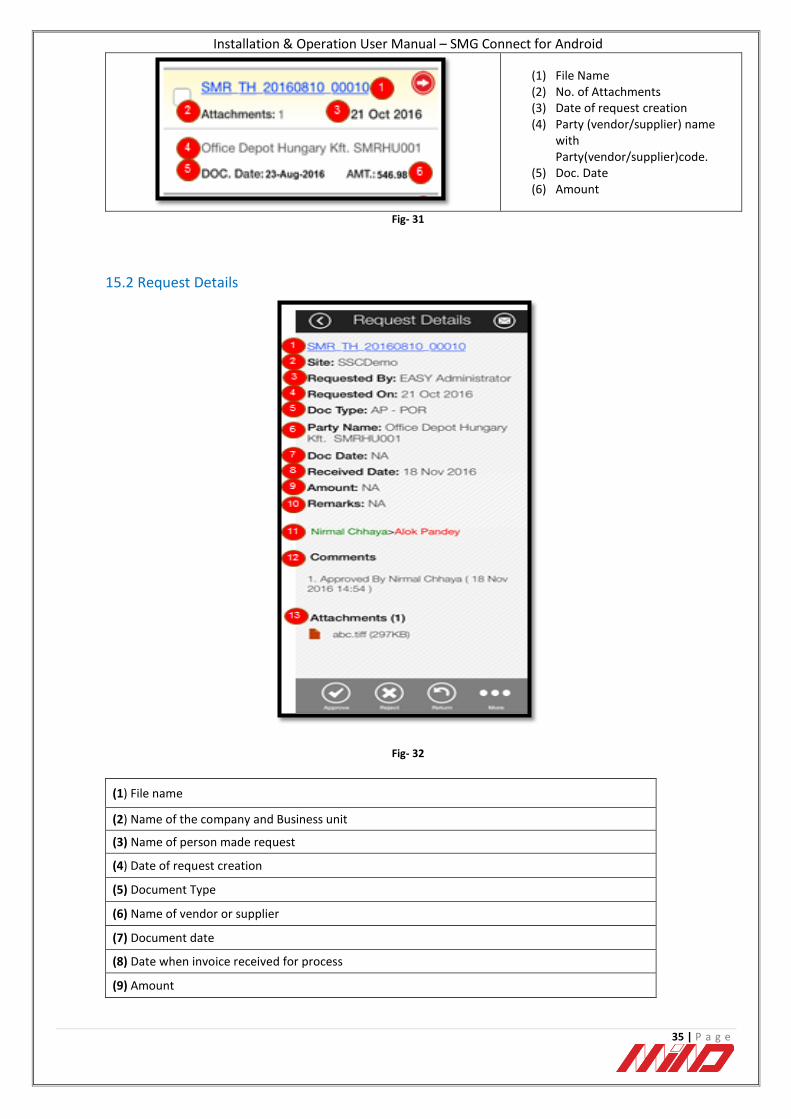
15.2 Request Details
Fig- 32
(1) File name
(2) Name of the company and Business unit
(3) Name of person made request
(4) Date of request creation
(5) Document Type
(6) Name of vendor or supplier
(7) Document date
(8) Date when invoice received for process
(9) Amount

Installation & Operation User Manual – SMG Connect for Android
36 | P a g e
(10) Remarks made by originator
(11) Name of next approver if any
(12) Comments of last approver.
(13) List of attached document(s). Attachments (0) means there is no file attached with the request.

Installation & Operation User Manual – SMG Connect for Android
37 | P a g e
16. Search Page
To search last processed requests on “Pending Request List” page. Tap on “Search” in menu of “…” on “Pending Request List” page.
(1) Click on “Processed by me” to check request under you for approval. (2) Click on “My request” to check the status of requests raised by you. (3) Enter number of requests that you want to search. Note that request number can only be between 0-99. (4) Select status to search according to status of particular status like all, approved, rejected, pending and returned. (5) Enter Requisition number to search a particular request. (6) Tap on Search to display the search data.
Note: After tap on “Search” button, last processed request will be appeared on next page where Green Background Color used for Approved and Light Red Background Color used for Rejected request.
Fig- 34

Installation & Operation User Manual – SMG Connect for Android
38 | P a g e
17. Viewing Attachments
To view the attachments scroll down on “Request Details” page. Attachment file name(s) along with size
are displayed as hyperlink. Tap on any attachment file name to download the file. (Refer below figure)
(1) Tap on the filename to download and view the file. However you must have appropriate plugin / suite to view file on your phone.
Fig- 35
18. Take Action on Request (Approve, Return or Reject)
There are two options to take action on any pending request.
Option 1:
If you are on “Pending Request List” page. In order to approve, return or reject a request you need to select it by checking the checkbox against it. You can select multiple request to perform single action. You can select all request by checking the checkbox given on black bar.
Option 2:
If you are on “Request Details” page then tap on related action button to approve, return or reject the request.

Installation & Operation User Manual – SMG Connect for Android
39 | P a g e
After Action Process:
After taking any action corresponding request will be displayed with different icon and shifted to the
bottom of the list. (Refer below figure) For Approved Requests: Green Background Color For Rejected Requests: Light Red Background Color For Returned Requests: Yellow Background Color For Already Processed Requests: Gray Background Color
Fig- 36
19. Session Timeout
Application establishes connection with server when you login to SMGConnect. If there is no activity for a certain time then server will terminate the session. If session expires then application will show related message and ask you to login again. Please login again in SMGConnect to start access.
20. Generic Troubleshooting
Server/Network not responding on startup
On application startup, in case server is unable to respond due to any reason, then such type of error will be displayed for the user to change either the server settings (connection url) or just logout for a later re-login.
Server/Network not responding on an application query
In case server is unable to respond due to any reason, then such type of error will be displayed for the user either to the request again (ok) or just logout for a later re-login.

Installation & Operation User Manual – SMG Connect for Android
40 | P a g e
Orientation
SMG Connect application will realign itself on Vertical/horizontal change of device orientation.
21. Note:
Maximum 4 devices can be registered by one user. If any other user want to use your device, then “Change User” option need to be used.