Embed Size (px)
Citation preview
Copyright 2018 PerkinElmer Health Sciences, Inc. All rights reserved.PN CLS150182 Rev A
Living Image® Version 4.7 SoftwareInstallation and Licensing Guide
Contents
Chapter 1 Before You Begin. . . . . . . . . . . . . . . . . . . . . . . . . . . . . . . . . . . . . . . . 1Requirements . . . . . . . . . . . . . . . . . . . . . . . . . . . . . . . . . . . . . . . . . . . . . . . . . . . . . 1Contact Information . . . . . . . . . . . . . . . . . . . . . . . . . . . . . . . . . . . . . . . . . . . . . . . . 2
Chapter 2 Installing Living Image® Software On a PC. . . . . . . . . . . . . . . . . . . . . 3Installing the Software . . . . . . . . . . . . . . . . . . . . . . . . . . . . . . . . . . . . . . . . . . . . . . 3Troubleshooting Installation . . . . . . . . . . . . . . . . . . . . . . . . . . . . . . . . . . . . . . . . . 8
Chapter 3 Installing Living Image® Software On a Macintosh . . . . . . . . . . . . . . . 9
Chapter 4 Activating a License . . . . . . . . . . . . . . . . . . . . . . . . . . . . . . . . . . . . 14Activating a License Online . . . . . . . . . . . . . . . . . . . . . . . . . . . . . . . . . . . . . . . . . 14
Specifying Proxy Settings . . . . . . . . . . . . . . . . . . . . . . . . . . . . . . . . . . . . . . . 15Manually Activating a License . . . . . . . . . . . . . . . . . . . . . . . . . . . . . . . . . . . . . . . 16
Editing a License File . . . . . . . . . . . . . . . . . . . . . . . . . . . . . . . . . . . . . . . . . . . . . . . .18Checking Current Licensing . . . . . . . . . . . . . . . . . . . . . . . . . . . . . . . . . . . . . . . . . . . . . .19Returning a License . . . . . . . . . . . . . . . . . . . . . . . . . . . . . . . . . . . . . . . . . . . . . . . 19Troubleshooting . . . . . . . . . . . . . . . . . . . . . . . . . . . . . . . . . . . . . . . . . . . . . . . . . . . . . . .20
Changing the User Account Control Settings . . . . . . . . . . . . . . . . . . . . . . . . 20Starting Living Image Software as Administrator . . . . . . . . . . . . . . . . . . . . . . . . .22
1 Before You Begin
RequirementsContact Information on page 2
1.1 RequirementsHardware & Software Requirements
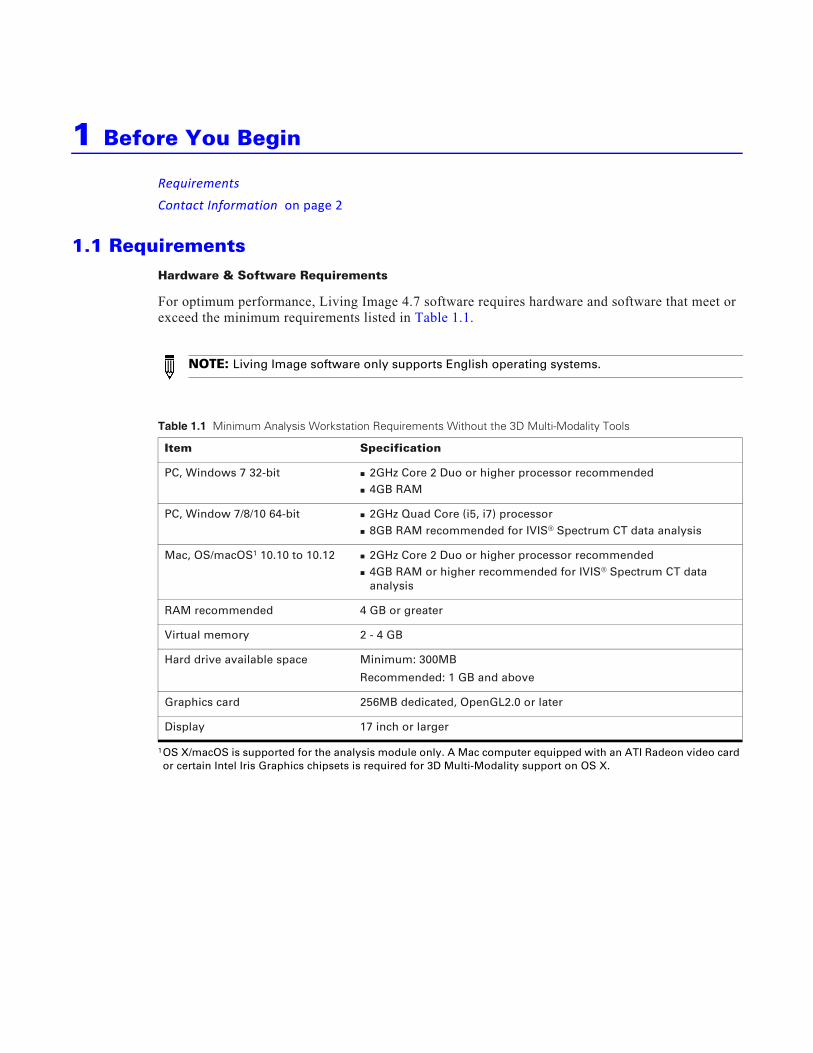
For optimum performance, Living Image 4.7 software requires hardware and software that meet or exceed the minimum requirements listed in Table 1.1.
NOTE: Living Image software only supports English operating systems.
Table 1.1 Minimum Analysis Workstation Requirements Without the 3D Multi-Modality Tools
Item Specification
PC, Windows 7 32-bit 2GHz Core 2 Duo or higher processor recommended 4GB RAM
PC, Window 7/8/10 64-bit 2GHz Quad Core (i5, i7) processor 8GB RAM recommended for IVIS® Spectrum CT data analysis
Mac, OS/macOS1 10.10 to 10.12
1OS X/macOS is supported for the analysis module only. A Mac computer equipped with an ATI Radeon video card or certain Intel Iris Graphics chipsets is required for 3D Multi-Modality support on OS X.
2GHz Core 2 Duo or higher processor recommended 4GB RAM or higher recommended for IVIS® Spectrum CT data
analysis
RAM recommended 4 GB or greater
Virtual memory 2 - 4 GB
Hard drive available space Minimum: 300MB
Recommended: 1 GB and above
Graphics card 256MB dedicated, OpenGL2.0 or later
Display 17 inch or larger
Living Image® 4.7 Installation and Licensing Guide Chapter 1 | Before You Begin 2
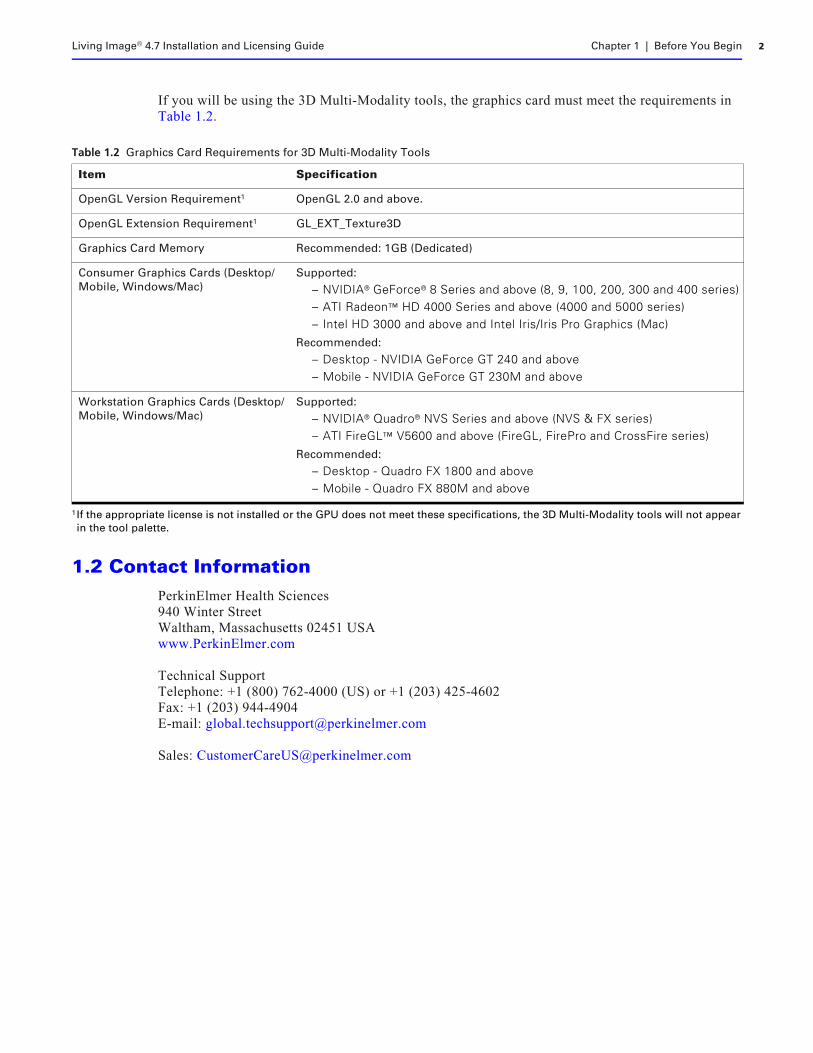
If you will be using the 3D Multi-Modality tools, the graphics card must meet the requirements in Table 1.2.
1.2 Contact InformationPerkinElmer Health Sciences940 Winter StreetWaltham, Massachusetts 02451 USAwww.PerkinElmer.com
Technical Support Telephone: +1 (800) 762-4000 (US) or +1 (203) 425-4602Fax: +1 (203) 944-4904E-mail: [email protected]
Sales: [email protected]
Table 1.2 Graphics Card Requirements for 3D Multi-Modality Tools
Item Specification
OpenGL Version Requirement1
1If the appropriate license is not installed or the GPU does not meet these specifications, the 3D Multi-Modality tools will not appear in the tool palette.
OpenGL 2.0 and above.
OpenGL Extension Requirement1 GL_EXT_Texture3D
Graphics Card Memory Recommended: 1GB (Dedicated)
Consumer Graphics Cards (Desktop/Mobile, Windows/Mac)
Supported:
– NVIDIA® GeForce® 8 Series and above (8, 9, 100, 200, 300 and 400 series)– ATI Radeon™ HD 4000 Series and above (4000 and 5000 series)– Intel HD 3000 and above and Intel Iris/Iris Pro Graphics (Mac)
Recommended:
– Desktop - NVIDIA GeForce GT 240 and above– Mobile - NVIDIA GeForce GT 230M and above
Workstation Graphics Cards (Desktop/Mobile, Windows/Mac)
Supported:
– NVIDIA® Quadro® NVS Series and above (NVS & FX series)– ATI FireGL™ V5600 and above (FireGL, FirePro and CrossFire series)
Recommended:
– Desktop - Quadro FX 1800 and above– Mobile - Quadro FX 880M and above
2 Installing Living Image® Software On a PC
Installing the SoftwareTroubleshooting Installation on page 8
2.1 Installing the Software
Living Image software will be installed at the following locations:
The 32-bit application will work on a 32-bit or 64-bit operating system; however, the 64-bit application is recommended for a 64-bit operating system. Only the 32-bit application can be installed on a 32-bit operating system.
NOTE: Living Image 4.7 software can only be installed on a Windows 7.1 with SP1 (32-bit or 64-bit), Windows 8.1, or Window 10 OS. Administrative privileges are required to install andconfigure Living Image 4.7 software on Windows operating systems.
Application Location
32-bit application on Windows 7.1 32-bit OS C:\Program Files\Caliper Life Sciences\Living Image
32-bit Application on Windows 7.1 64-bit OS C:\Program Files (x86)\Caliper Life Sciences\Living Image
64-bit Application on Windows 7.1 64-bit OS C:\Program Files\Caliper Life Sciences\Living Image
32-bit Application on Windows 8.1 64-bit OS C:\Program Files (x86)\Caliper Life Sciences\Living Image
64-bit Application on Windows 8.1 64-bit OS C:\Program Files\Caliper Life Sciences\Living Image
64-bit Application on Windows 10 64-bit OS C:\Program Files\Caliper Life Sciences\Living Image
Living Image® 4.7 Installation and Licensing Guide Chapter 2 | Installing Living Image® Software On a PC 4
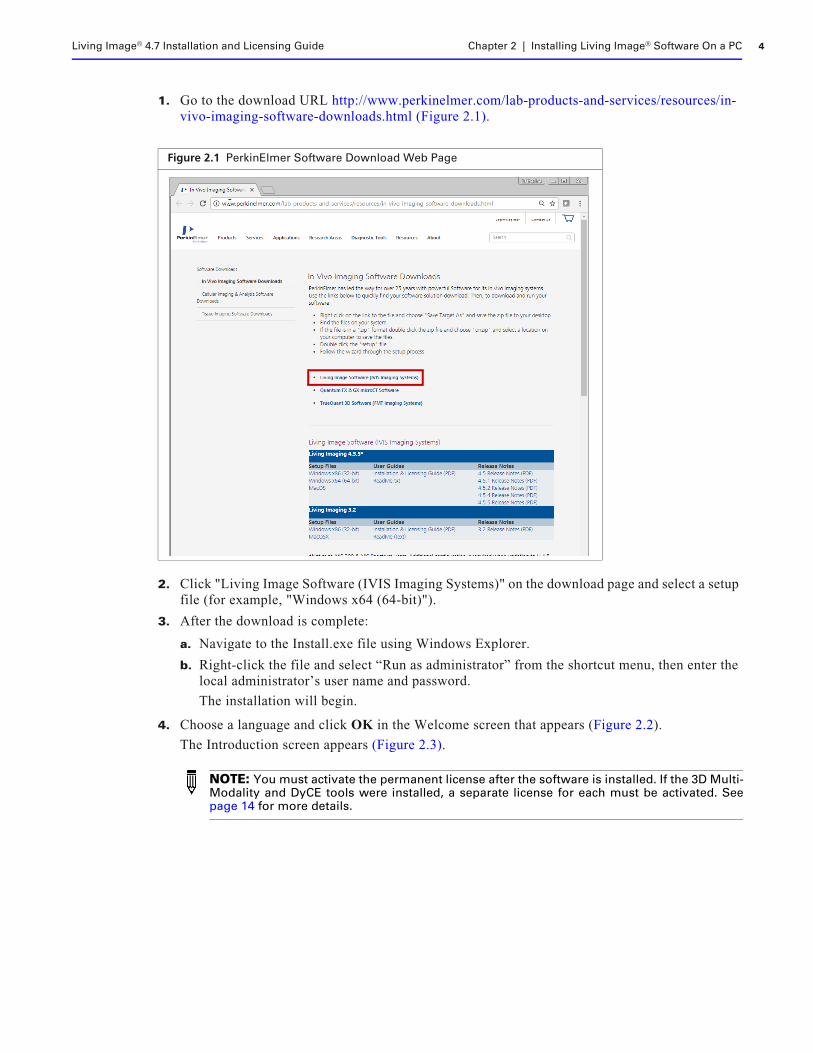
1. Go to the download URL http://www.perkinelmer.com/lab-products-and-services/resources/in-vivo-imaging-software-downloads.html (Figure 2.1).
2. Click "Living Image Software (IVIS Imaging Systems)" on the download page and select a setup file (for example, "Windows x64 (64-bit)").
3. After the download is complete:
a. Navigate to the Install.exe file using Windows Explorer.
b. Right-click the file and select “Run as administrator” from the shortcut menu, then enter the local administrator’s user name and password.
The installation will begin.
4. Choose a language and click OK in the Welcome screen that appears (Figure 2.2).
The Introduction screen appears (Figure 2.3).
Figure 2.1 PerkinElmer Software Download Web Page
NOTE: You must activate the permanent license after the software is installed. If the 3D Multi-Modality and DyCE tools were installed, a separate license for each must be activated. Seepage 14 for more details.
Living Image® 4.7 Installation and Licensing Guide Chapter 2 | Installing Living Image® Software On a PC 5
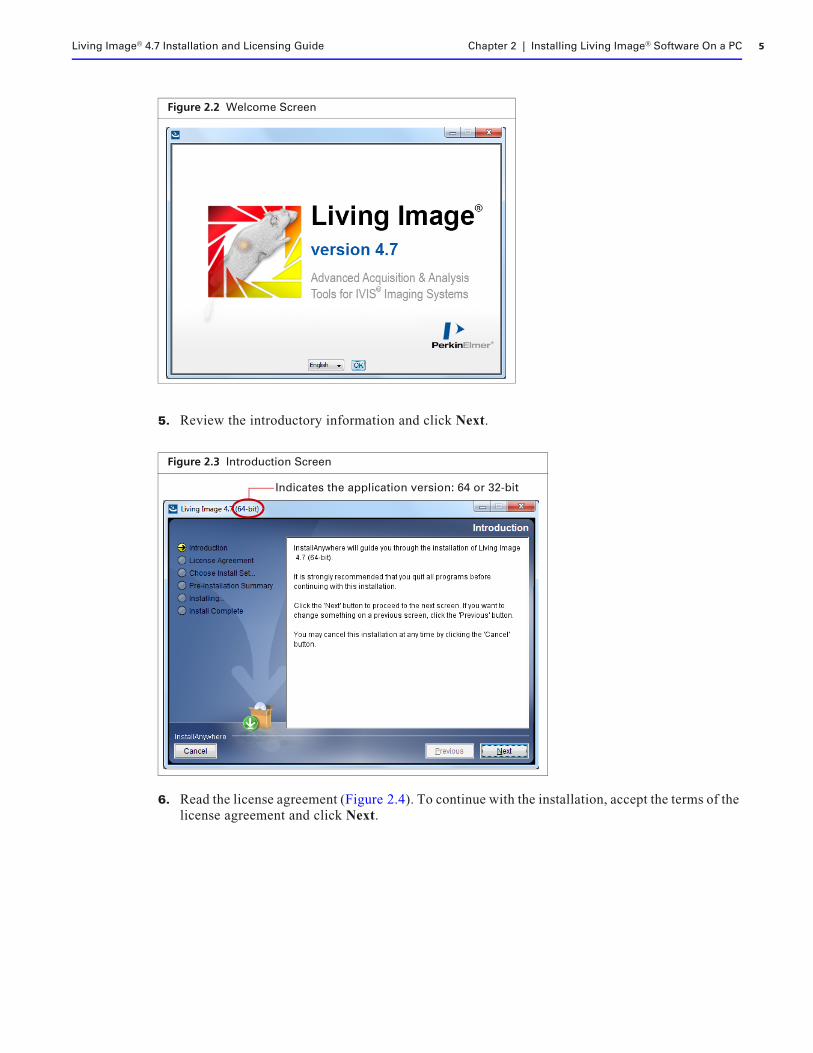
5. Review the introductory information and click Next.
6. Read the license agreement (Figure 2.4). To continue with the installation, accept the terms of the license agreement and click Next.
Figure 2.2 Welcome Screen
Figure 2.3 Introduction Screen
Indicates the application version: 64 or 32-bit
Living Image® 4.7 Installation and Licensing Guide Chapter 2 | Installing Living Image® Software On a PC 6
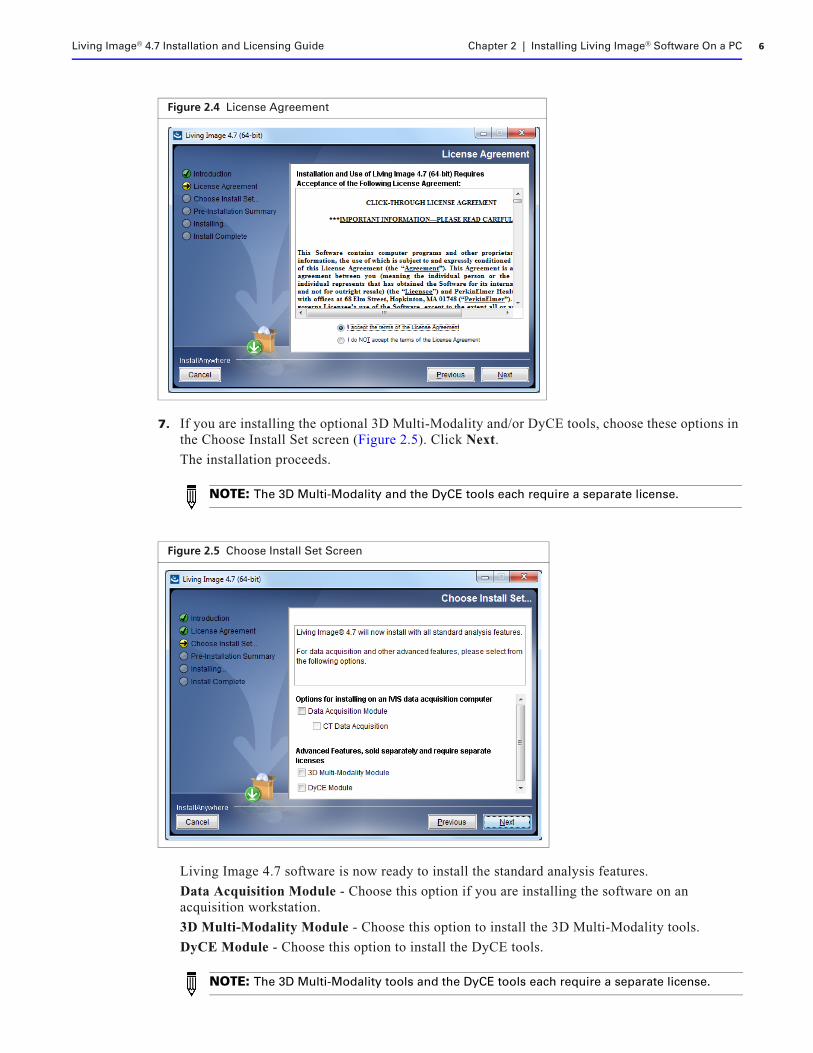
7. If you are installing the optional 3D Multi-Modality and/or DyCE tools, choose these options in the Choose Install Set screen (Figure 2.5). Click Next.
The installation proceeds.
Living Image 4.7 software is now ready to install the standard analysis features.
Data Acquisition Module - Choose this option if you are installing the software on an acquisition workstation.
3D Multi-Modality Module - Choose this option to install the 3D Multi-Modality tools.
DyCE Module - Choose this option to install the DyCE tools.
Figure 2.4 License Agreement
NOTE: The 3D Multi-Modality and the DyCE tools each require a separate license.
Figure 2.5 Choose Install Set Screen
NOTE: The 3D Multi-Modality tools and the DyCE tools each require a separate license.
Living Image® 4.7 Installation and Licensing Guide Chapter 2 | Installing Living Image® Software On a PC 7
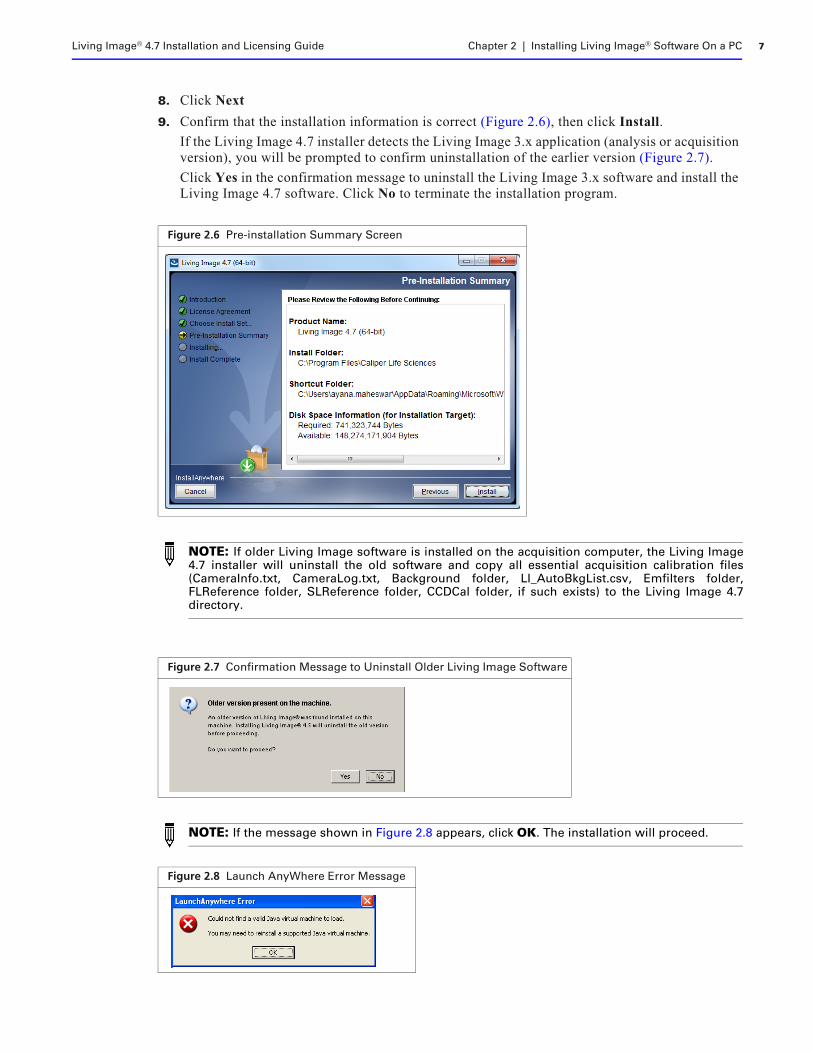
8. Click Next
9. Confirm that the installation information is correct (Figure 2.6), then click Install.
If the Living Image 4.7 installer detects the Living Image 3.x application (analysis or acquisition version), you will be prompted to confirm uninstallation of the earlier version (Figure 2.7).
Click Yes in the confirmation message to uninstall the Living Image 3.x software and install the Living Image 4.7 software. Click No to terminate the installation program.
Figure 2.6 Pre-installation Summary Screen
NOTE: If older Living Image software is installed on the acquisition computer, the Living Image4.7 installer will uninstall the old software and copy all essential acquisition calibration files(CameraInfo.txt, CameraLog.txt, Background folder, LI_AutoBkgList.csv, Emfilters folder,FLReference folder, SLReference folder, CCDCal folder, if such exists) to the Living Image 4.7directory.
Figure 2.7 Confirmation Message to Uninstall Older Living Image Software
NOTE: If the message shown in Figure 2.8 appears, click OK. The installation will proceed.
Figure 2.8 Launch AnyWhere Error Message
Living Image® 4.7 Installation and Licensing Guide Chapter 2 | Installing Living Image® Software On a PC 8
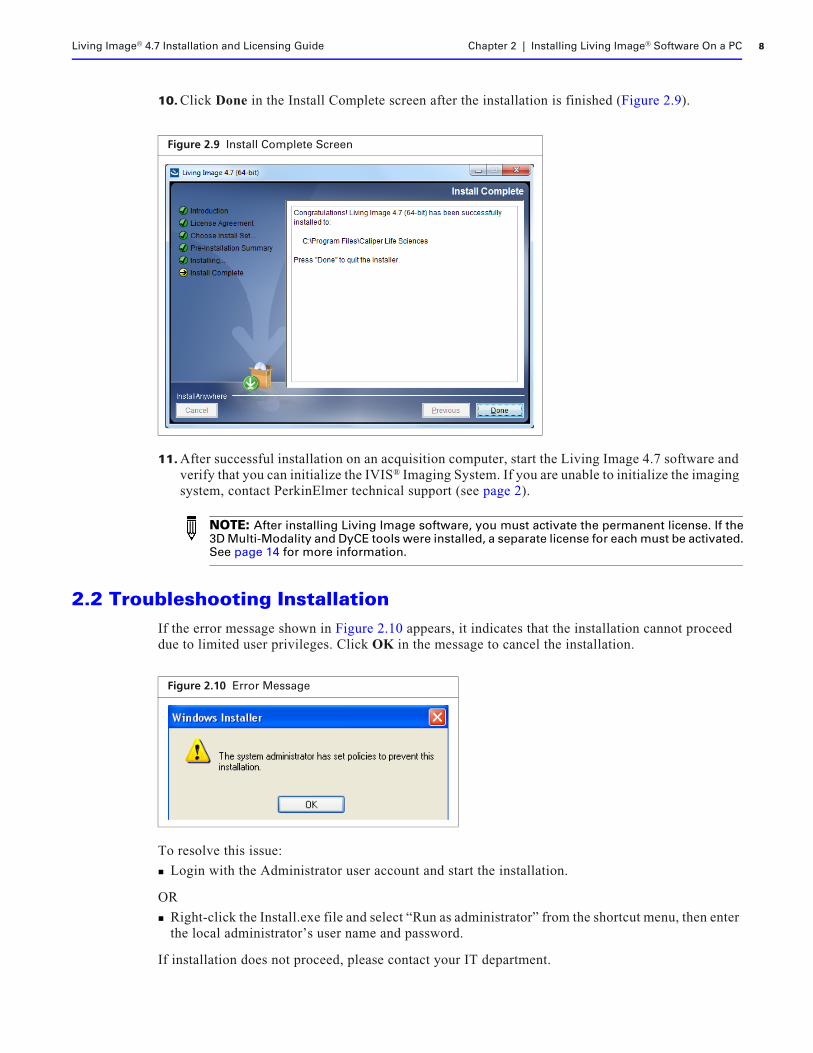
10. Click Done in the Install Complete screen after the installation is finished (Figure 2.9).
11. After successful installation on an acquisition computer, start the Living Image 4.7 software and verify that you can initialize the IVIS® Imaging System. If you are unable to initialize the imaging system, contact PerkinElmer technical support (see page 2).
2.2 Troubleshooting InstallationIf the error message shown in Figure 2.10 appears, it indicates that the installation cannot proceed due to limited user privileges. Click OK in the message to cancel the installation.
To resolve this issue:
Login with the Administrator user account and start the installation.
OR
Right-click the Install.exe file and select “Run as administrator” from the shortcut menu, then enter the local administrator’s user name and password.
If installation does not proceed, please contact your IT department.
Figure 2.9 Install Complete Screen
NOTE: After installing Living Image software, you must activate the permanent license. If the3D Multi-Modality and DyCE tools were installed, a separate license for each must be activated.See page 14 for more information.
Figure 2.10 Error Message
3 Installing Living Image® Software On a Macintosh
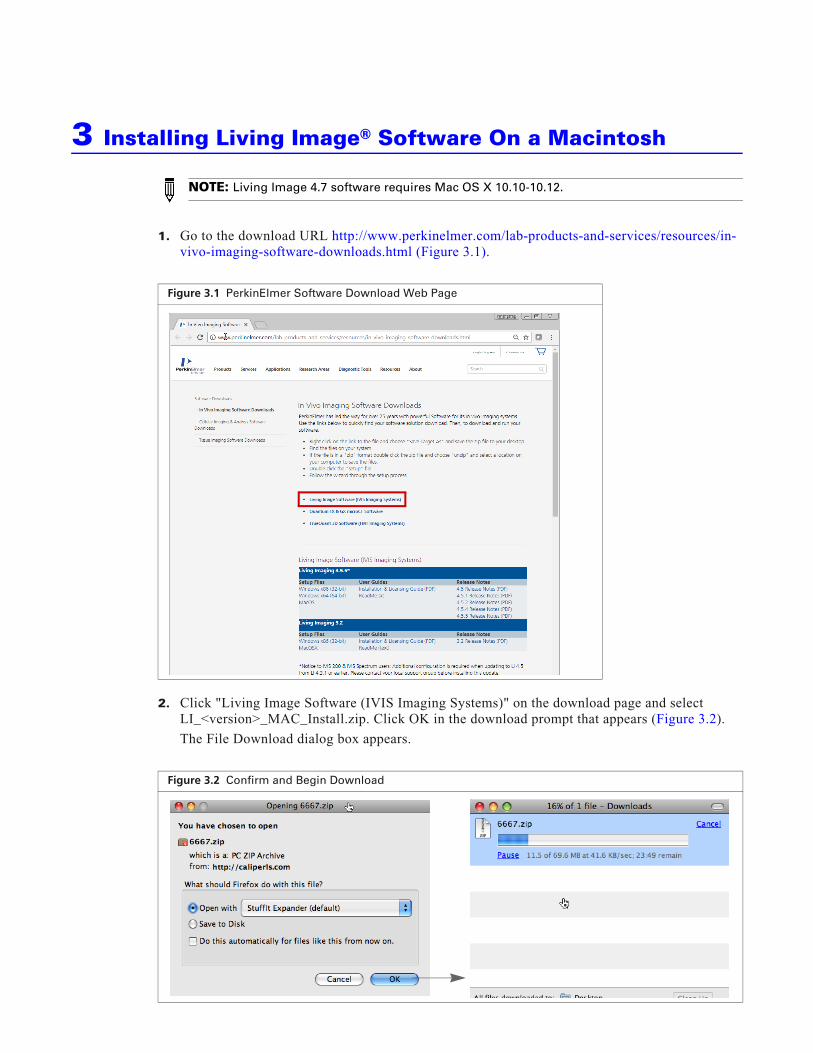
1. Go to the download URL http://www.perkinelmer.com/lab-products-and-services/resources/in-vivo-imaging-software-downloads.html (Figure 3.1).
2. Click "Living Image Software (IVIS Imaging Systems)" on the download page and select LI_<version>_MAC_Install.zip. Click OK in the download prompt that appears (Figure 3.2).
The File Download dialog box appears.
NOTE: Living Image 4.7 software requires Mac OS X 10.10-10.12.
Figure 3.1 PerkinElmer Software Download Web Page
Figure 3.2 Confirm and Begin Download
Living Image® 4.7 Installation and Licensing Guide Chapter 3 | Installing Living Image® Software On a Macintosh 10
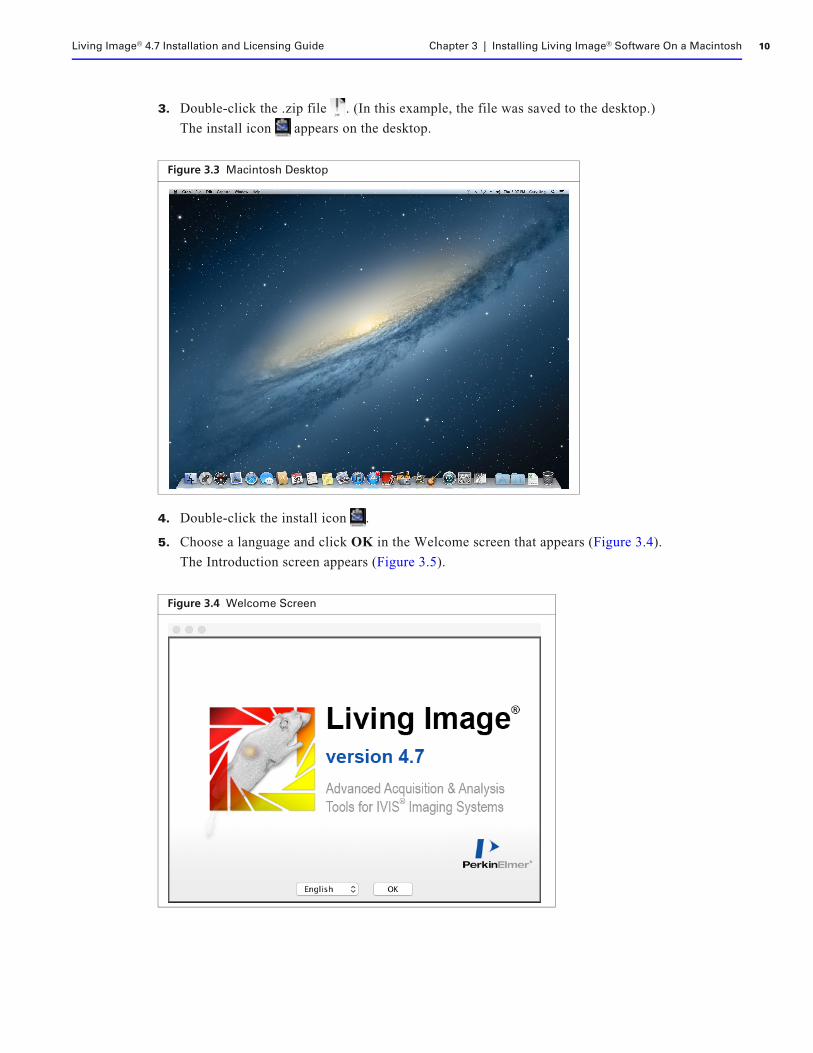
3. Double-click the .zip file . (In this example, the file was saved to the desktop.)
The install icon appears on the desktop.
4. Double-click the install icon .
5. Choose a language and click OK in the Welcome screen that appears (Figure 3.4).
The Introduction screen appears (Figure 3.5).
Figure 3.3 Macintosh Desktop
Figure 3.4 Welcome Screen
Living Image® 4.7 Installation and Licensing Guide Chapter 3 | Installing Living Image® Software On a Macintosh 11
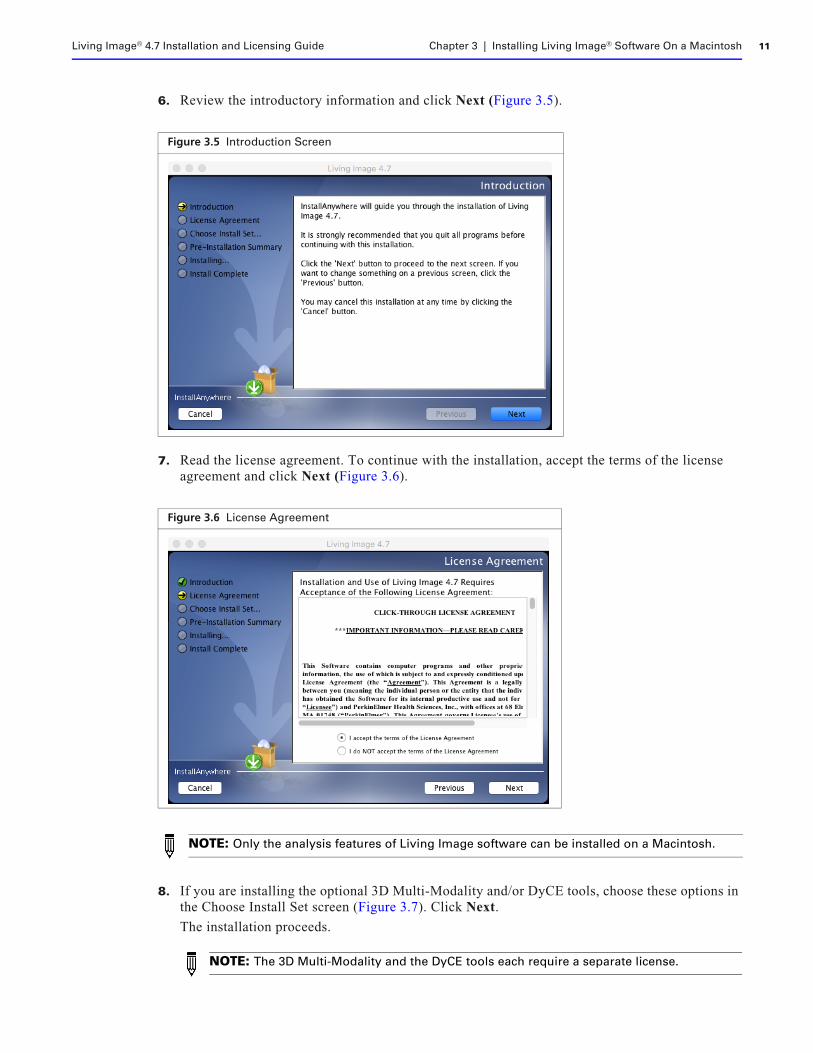
6. Review the introductory information and click Next (Figure 3.5).
7. Read the license agreement. To continue with the installation, accept the terms of the license agreement and click Next (Figure 3.6).
8. If you are installing the optional 3D Multi-Modality and/or DyCE tools, choose these options in the Choose Install Set screen (Figure 3.7). Click Next.
The installation proceeds.
Figure 3.5 Introduction Screen
Figure 3.6 License Agreement
NOTE: Only the analysis features of Living Image software can be installed on a Macintosh.
NOTE: The 3D Multi-Modality and the DyCE tools each require a separate license.

Living Image® 4.7 Installation and Licensing Guide Chapter 3 | Installing Living Image® Software On a Macintosh 12
9. Confirm that the installation information is correct the Pre-Installation Summary screen (Figure 3.8), then click Install.
The installation proceeds.
Figure 3.7 Choose Install Set Screen
Figure 3.8 Pre-installation Summary Screen
Living Image® 4.7 Installation and Licensing Guide Chapter 3 | Installing Living Image® Software On a Macintosh 13
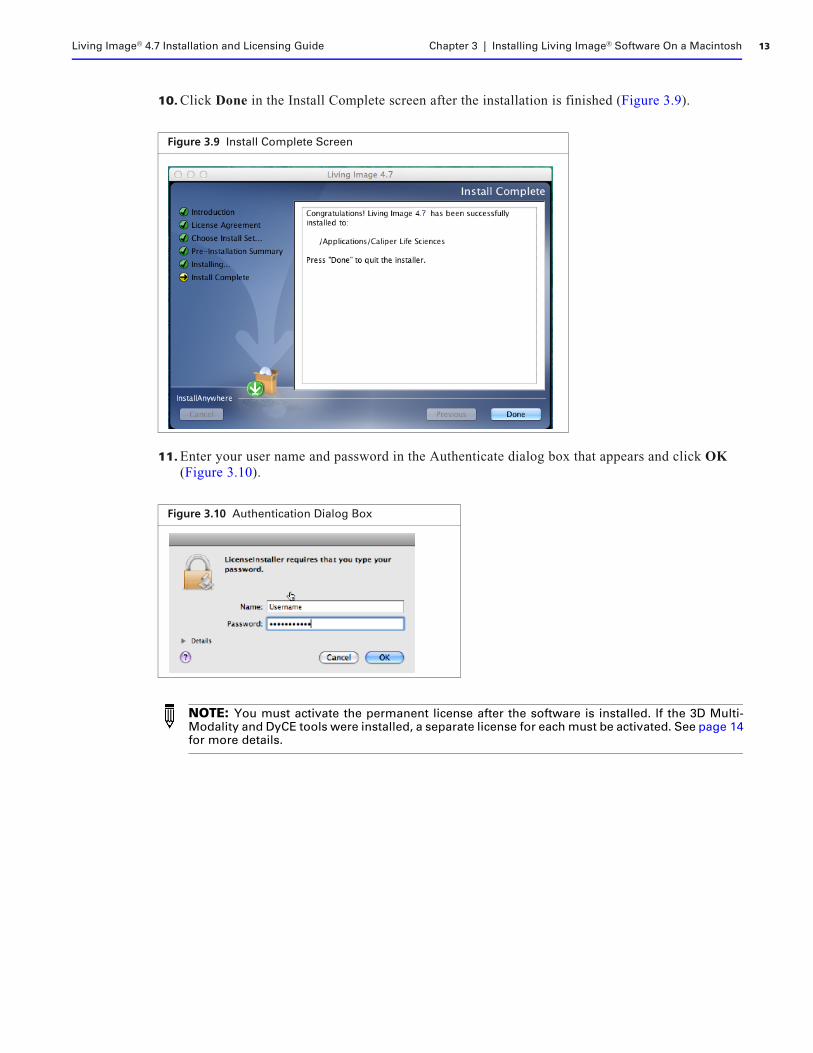
10. Click Done in the Install Complete screen after the installation is finished (Figure 3.9).
11. Enter your user name and password in the Authenticate dialog box that appears and click OK (Figure 3.10).
Figure 3.9 Install Complete Screen
Figure 3.10 Authentication Dialog Box
NOTE: You must activate the permanent license after the software is installed. If the 3D Multi-Modality and DyCE tools were installed, a separate license for each must be activated. See page 14for more details.
4 Activating a License
Activating a License OnlineManually Activating a License on page 16Checking Current Licensing on page 19Returning a License on page 19Troubleshooting on page 20
Living Image® software is licensed to individual workstations. The software provided with an IVIS® Imaging System includes a five seat license that permits installation of the software for data analysis on up to five workstations. After the software is installed, you have 30 days to activate the permanent license.
The 3D Multi-Modality Tools plug-in and the DyCE plug-in each require a separate license.
There are two ways to activate a license:
Internet activation - Activates the license online
Manual activation - For workstations not on a network
.
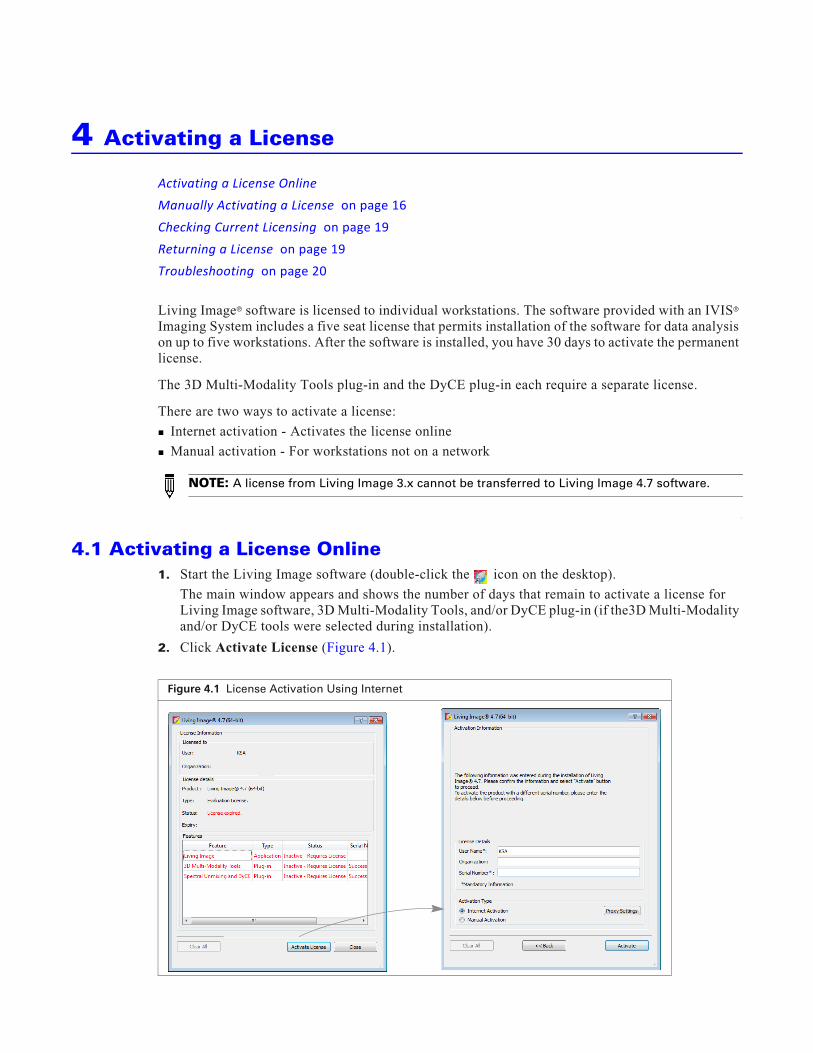
4.1 Activating a License Online1. Start the Living Image software (double-click the icon on the desktop).
The main window appears and shows the number of days that remain to activate a license for Living Image software, 3D Multi-Modality Tools, and/or DyCE plug-in (if the3D Multi-Modality and/or DyCE tools were selected during installation).
2. Click Activate License (Figure 4.1).
NOTE: A license from Living Image 3.x cannot be transferred to Living Image 4.7 software.
Figure 4.1 License Activation Using Internet
Living Image® 4.7 Installation and Licensing Guide Chapter 4 | Activating a License 15
3. In the dialog box that appears (Figure 4.1):
a. Enter the license serial number for the software application (Living Image, 3D Multi-Modality Tools, or DyCE Tools).
b. Choose the Internet Activation option and click Activate.
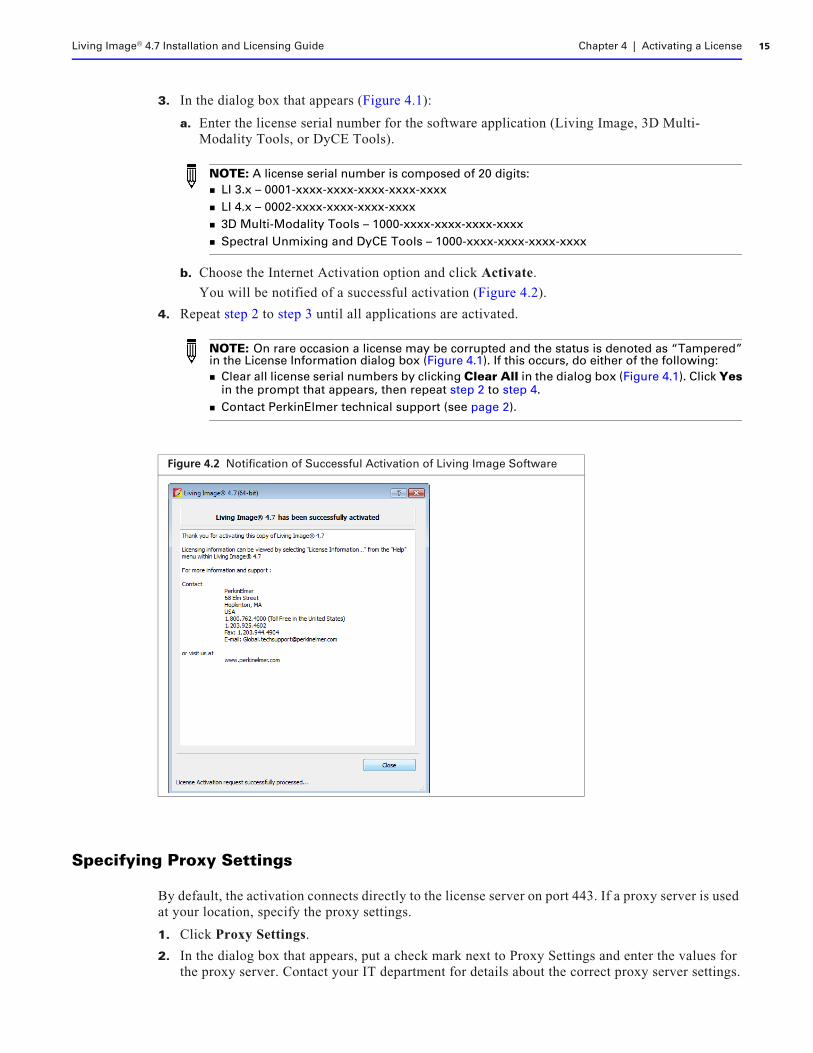
You will be notified of a successful activation (Figure 4.2).
4. Repeat step 2 to step 3 until all applications are activated.
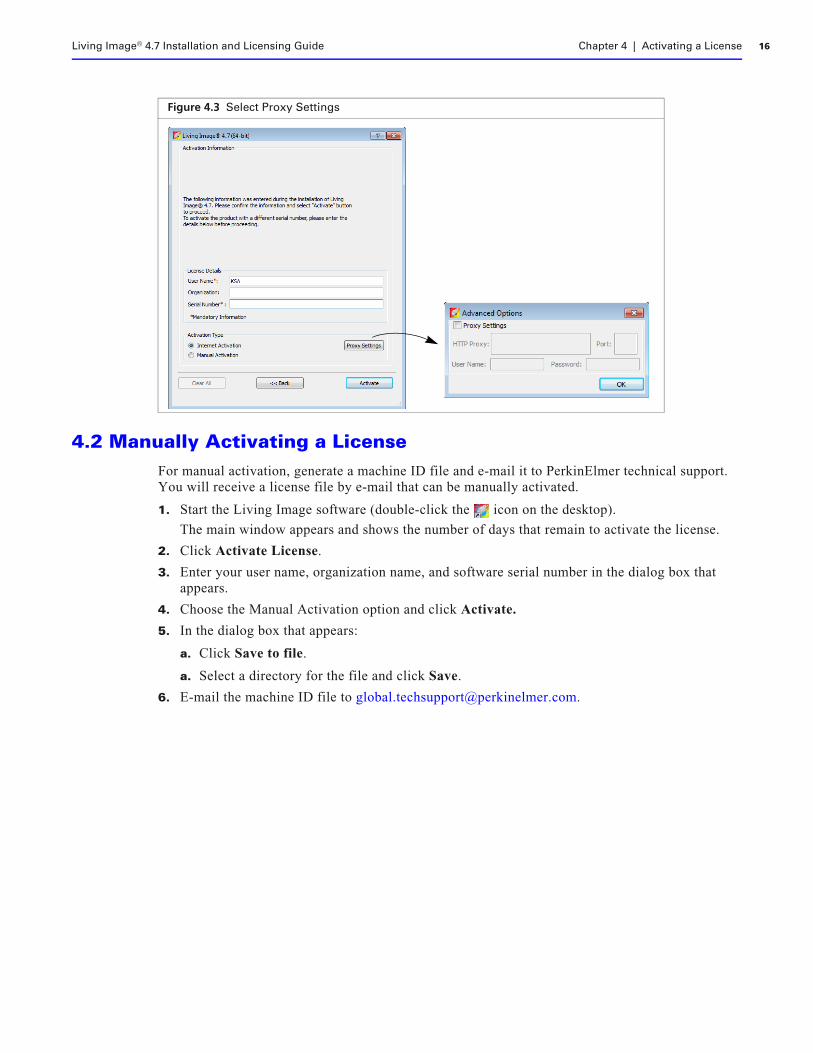
Specifying Proxy Settings
By default, the activation connects directly to the license server on port 443. If a proxy server is used at your location, specify the proxy settings.
1. Click Proxy Settings.
2. In the dialog box that appears, put a check mark next to Proxy Settings and enter the values for the proxy server. Contact your IT department for details about the correct proxy server settings.
NOTE: A license serial number is composed of 20 digits: LI 3.x – 0001-xxxx-xxxx-xxxx-xxxx-xxxx LI 4.x – 0002-xxxx-xxxx-xxxx-xxxx 3D Multi-Modality Tools – 1000-xxxx-xxxx-xxxx-xxxx Spectral Unmixing and DyCE Tools – 1000-xxxx-xxxx-xxxx-xxxx
NOTE: On rare occasion a license may be corrupted and the status is denoted as “Tampered”in the License Information dialog box (Figure 4.1). If this occurs, do either of the following: Clear all license serial numbers by clicking Clear All in the dialog box (Figure 4.1). Click Yes
in the prompt that appears, then repeat step 2 to step 4. Contact PerkinElmer technical support (see page 2).
Figure 4.2 Notification of Successful Activation of Living Image Software
Living Image® 4.7 Installation and Licensing Guide Chapter 4 | Activating a License 16
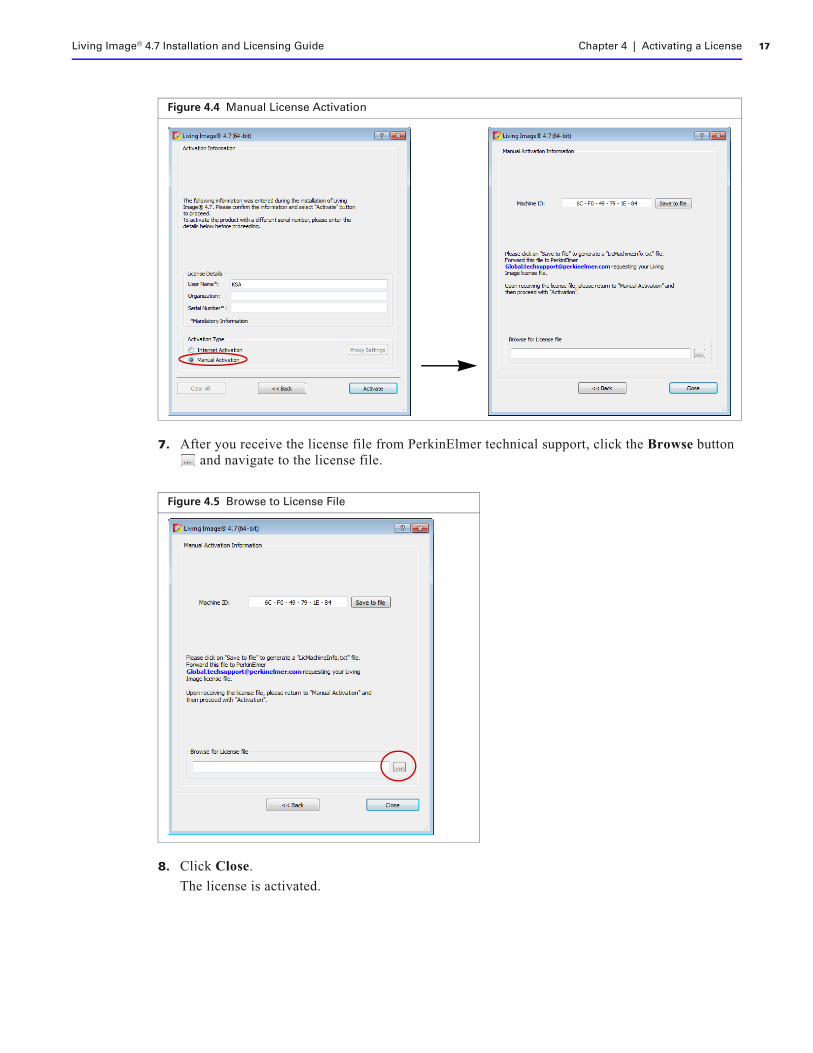
4.2 Manually Activating a LicenseFor manual activation, generate a machine ID file and e-mail it to PerkinElmer technical support. You will receive a license file by e-mail that can be manually activated.
1. Start the Living Image software (double-click the icon on the desktop).
The main window appears and shows the number of days that remain to activate the license.
2. Click Activate License.
3. Enter your user name, organization name, and software serial number in the dialog box that appears.
4. Choose the Manual Activation option and click Activate.
5. In the dialog box that appears:
a. Click Save to file.
a. Select a directory for the file and click Save.
6. E-mail the machine ID file to [email protected].
Figure 4.3 Select Proxy Settings
Living Image® 4.7 Installation and Licensing Guide Chapter 4 | Activating a License 17
7. After you receive the license file from PerkinElmer technical support, click the Browse button and navigate to the license file.
8. Click Close.
The license is activated.
Figure 4.4 Manual License Activation
Figure 4.5 Browse to License File
Living Image® 4.7 Installation and Licensing Guide Chapter 4 | Activating a License 18
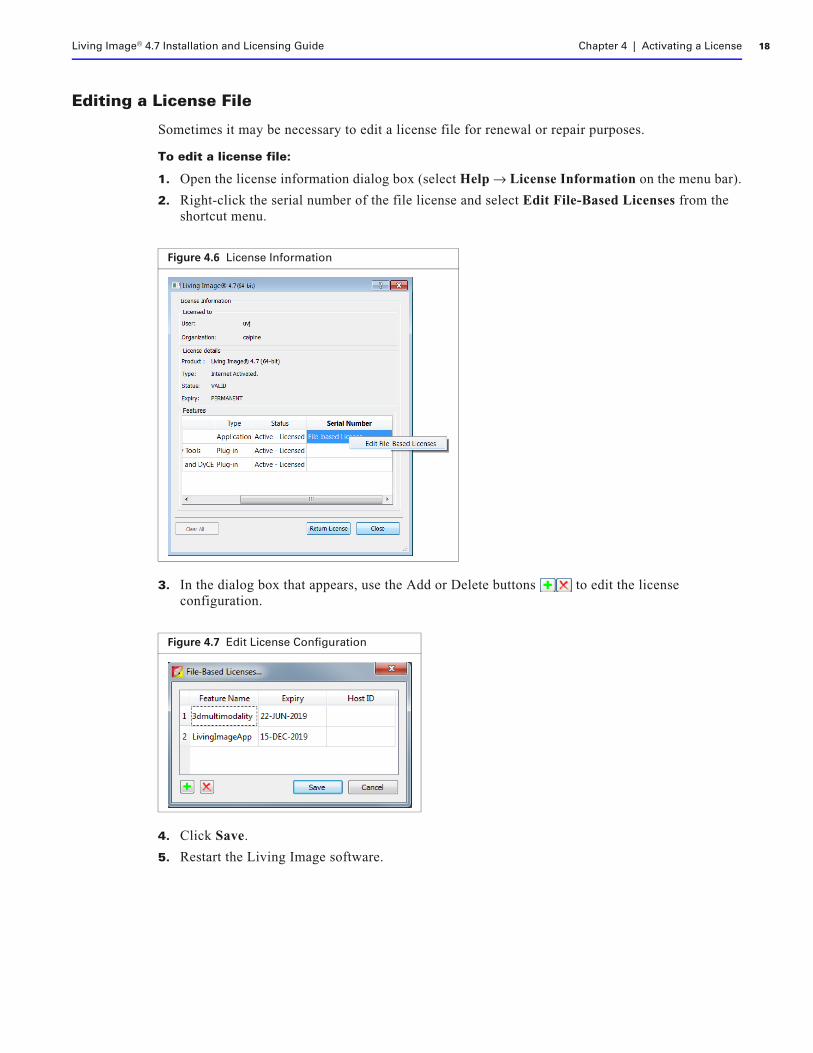
Editing a License File
Sometimes it may be necessary to edit a license file for renewal or repair purposes.
To edit a license file:
1. Open the license information dialog box (select Help → License Information on the menu bar).
2. Right-click the serial number of the file license and select Edit File-Based Licenses from the shortcut menu.
3. In the dialog box that appears, use the Add or Delete buttons to edit the license configuration.
4. Click Save.
5. Restart the Living Image software.
Figure 4.6 License Information
Figure 4.7 Edit License Configuration
Living Image® 4.7 Installation and Licensing Guide Chapter 4 | Activating a License 19
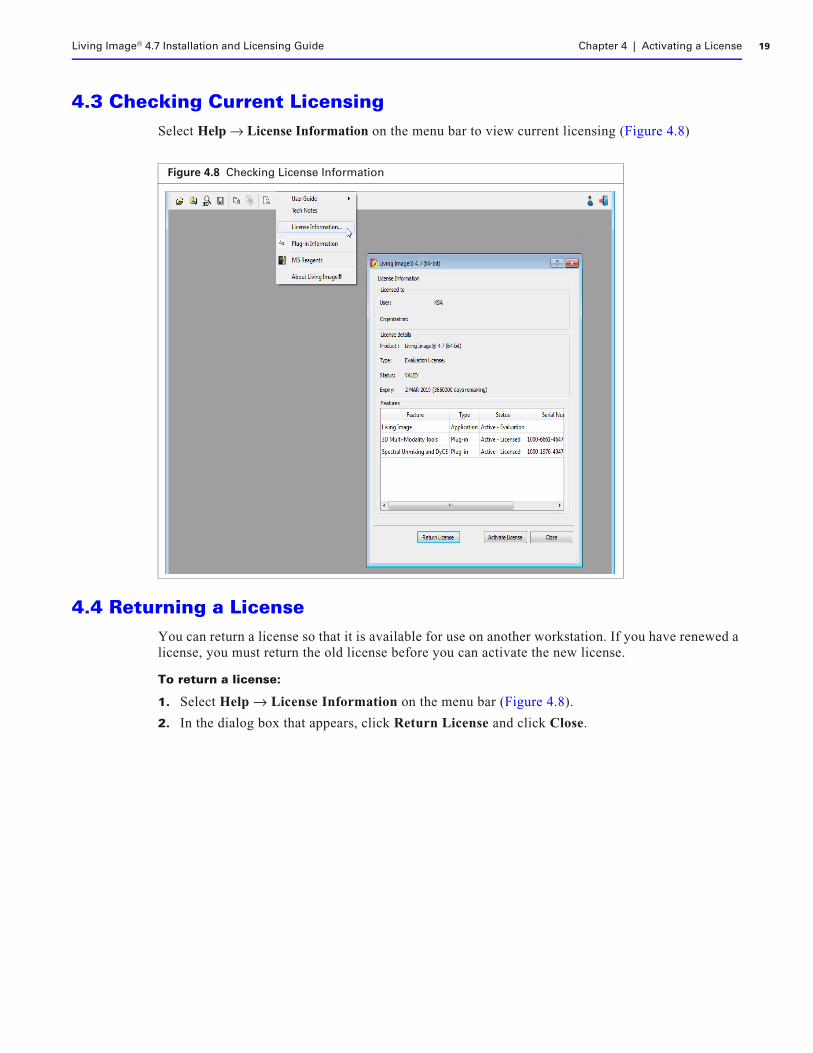
4.3 Checking Current LicensingSelect Help → License Information on the menu bar to view current licensing (Figure 4.8)
4.4 Returning a LicenseYou can return a license so that it is available for use on another workstation. If you have renewed a license, you must return the old license before you can activate the new license.
To return a license:
1. Select Help → License Information on the menu bar (Figure 4.8).
2. In the dialog box that appears, click Return License and click Close.
Figure 4.8 Checking License Information
Living Image® 4.7 Installation and Licensing Guide Chapter 4 | Activating a License 20
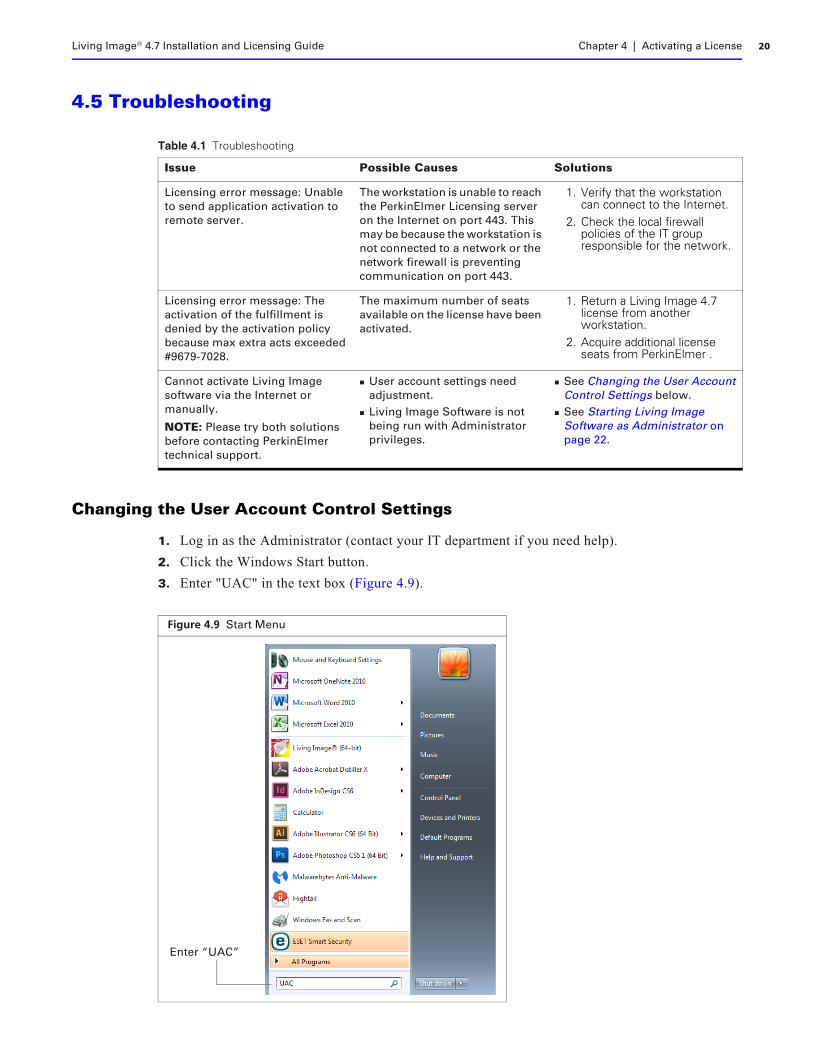
4.5 Troubleshooting
Changing the User Account Control Settings
1. Log in as the Administrator (contact your IT department if you need help).
2. Click the Windows Start button.
3. Enter "UAC" in the text box (Figure 4.9).
Table 4.1 Troubleshooting
Issue Possible Causes Solutions
Licensing error message: Unable to send application activation to remote server.
The workstation is unable to reach the PerkinElmer Licensing server on the Internet on port 443. This may be because the workstation is not connected to a network or the network firewall is preventing communication on port 443.
1. Verify that the workstation can connect to the Internet.
2. Check the local firewall policies of the IT group responsible for the network.
Licensing error message: The activation of the fulfillment is denied by the activation policy because max extra acts exceeded #9679-7028.
The maximum number of seats available on the license have been activated.
1. Return a Living Image 4.7 license from another workstation.
2. Acquire additional license seats from PerkinElmer .
Cannot activate Living Image software via the Internet or manually.
NOTE: Please try both solutions before contacting PerkinElmer technical support.
User account settings need adjustment.
Living Image Software is not being run with Administrator privileges.
See Changing the User Account Control Settings below.
See Starting Living Image Software as Administrator on page 22.
Figure 4.9 Start Menu
Enter “UAC”
Living Image® 4.7 Installation and Licensing Guide Chapter 4 | Activating a License 21
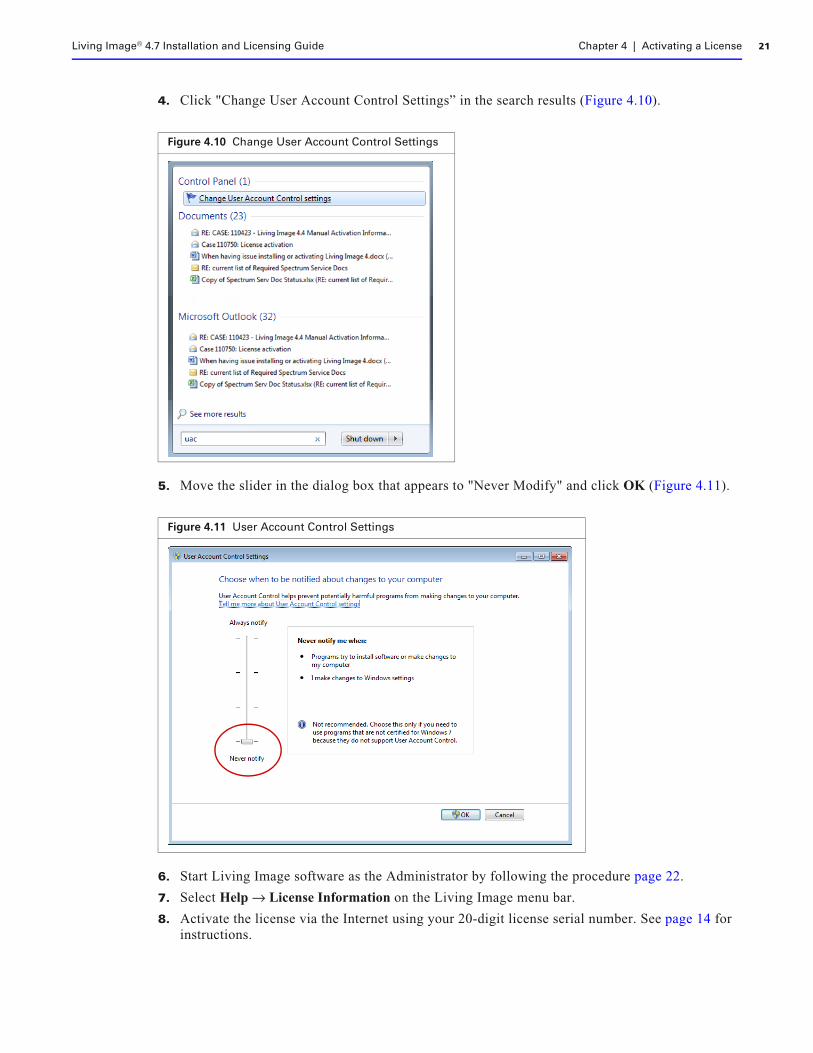
4. Click "Change User Account Control Settings” in the search results (Figure 4.10).
5. Move the slider in the dialog box that appears to "Never Modify" and click OK (Figure 4.11).
6. Start Living Image software as the Administrator by following the procedure page 22.
7. Select Help → License Information on the Living Image menu bar.
8. Activate the license via the Internet using your 20-digit license serial number. See page 14 for instructions.
Figure 4.10 Change User Account Control Settings
Figure 4.11 User Account Control Settings
Living Image® 4.7 Installation and Licensing Guide Chapter 4 | Activating a License 22
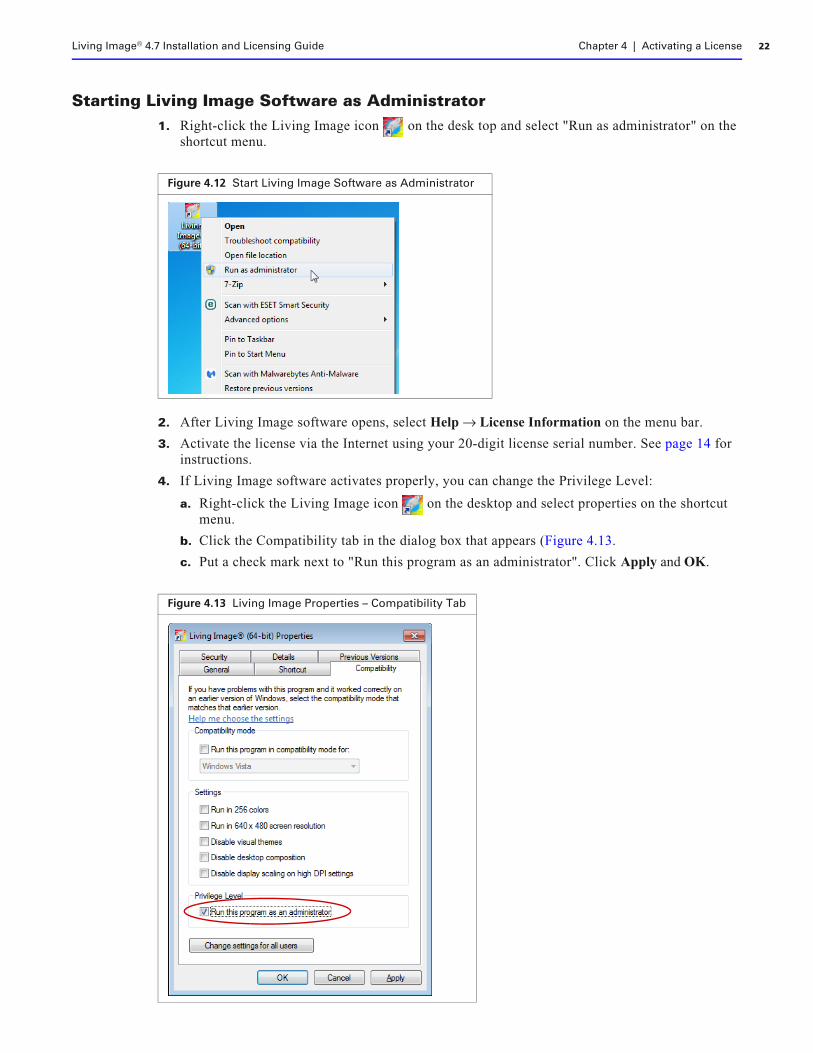
Starting Living Image Software as Administrator1. Right-click the Living Image icon on the desk top and select "Run as administrator" on the
shortcut menu.
2. After Living Image software opens, select Help → License Information on the menu bar.
3. Activate the license via the Internet using your 20-digit license serial number. See page 14 for instructions.
4. If Living Image software activates properly, you can change the Privilege Level:
a. Right-click the Living Image icon on the desktop and select properties on the shortcut menu.
b. Click the Compatibility tab in the dialog box that appears (Figure 4.13.
c. Put a check mark next to "Run this program as an administrator". Click Apply and OK.
Figure 4.12 Start Living Image Software as Administrator
Figure 4.13 Living Image Properties – Compatibility Tab