Embed Size (px)
Citation preview

Installation and Operating
Instructions
For
ABSOLYTE® GP Batteries100G, 2-Cell Module
UL Recognized Component
SECTION 92.70 2017-04
®
A Division of Exide Technologies


INDEXPage
SECTION 1 1.0 General Information ............................................................................................................. 1
SECTION 2 2.0 Safety Precautions ............................................................................................................... 1 2.1 Sulfuric Acid Electrolyte Burns ............................................................................................ 1 2.2 Explosive Gases .................................................................................................................. 1 2.3 Electrical Shock and Burns .................................................................................................. 1 2.3.1 Static Discharge Precautions for Batteries .......................................................................... 1 2.4 Safety Alert .......................................................................................................................... 2 2.5 Important Message .............................................................................................................. 2
SECTION 3 3.0 Receipt of Shipment ............................................................................................................ 2 3.1 Concealed Damage ............................................................................................................. 2
SECTION 4 4.0 Storage Prior to Installation ................................................................................................. 2 4.1 Storage Location ................................................................................................................. 2 4.2 Storage Interval .................................................................................................................... 2
SECTION 5 5.0 Installation Considerations .................................................................................................. 2 5.1 Space Considerations ......................................................................................................... 2 5.2 Battery Location and Ambient Temperature Requirements ................................................ 2 5.3 Temperature Variations ........................................................................................................ 4 5.4 Ventilation ............................................................................................................................ 4 5.5 Floor Loading ....................................................................................................................... 4 5.6 Floor Anchoring ................................................................................................................... 4 5.7 Connecting Cables: Battery System to Operating Equipment ............................................ 4 5.7.1 Paralleling ............................................................................................................................ 4 5.8 Stacking Limitations ............................................................................................................ 4 5.9 Terminal Plates .................................................................................................................... 4 5.10 Grounding ............................................................................................................................ 4
SECTION 6 6.0 Unpacking and Handling ..................................................................................................... 5 6.1 General ................................................................................................................................ 5 6.2 Accessories ......................................................................................................................... 5 6.3 Recommended Installation Equipment and Supplies .......................................................... 5 6.4 Unpacking ............................................................................................................................ 5 6.5 Handling ............................................................................................................................... 5
SECTION 7 7.0 System Arrangements ......................................................................................................... 6 7.1 Module Arrangements ......................................................................................................... 6 7.2 Dummy Cells within a Module ............................................................................................. 7
SECTION 8 8.0 System Assembly ................................................................................................................ 7 8.1 Horizontal - Single Stack ..................................................................................................... 7 8.1.1 Single Stack Assembly ........................................................................................................ 7 8.2 Multiple Stack Assembly ..................................................................................................... 9

SECTION 9 9.0 Connections ......................................................................................................................... 9 9.1 Post Preparation .................................................................................................................. 9 9.2 Connections - System Terminals ......................................................................................... 9 9.3 Connections - INTER-Module .............................................................................................. 9 9.4 Connections - INTER-Stack ................................................................................................ 9 9.5 Connections - Torquing ....................................................................................................... 9 9.6 Connections - Check ........................................................................................................... 9 9.7 Connection Resistance ........................................................................................................ 9 9.8 Cell Numerals ....................................................................................................................... 10 9.9 Warning Label ...................................................................................................................... 10 9.10 Battery Nameplate ............................................................................................................... 10
SECTION 10 10.0 Protective Module Covers ................................................................................................... 10 10.1 Module Cover Installation .................................................................................................... 10
SECTION 11 11.0 Initial Charge ........................................................................................................................ 10 11.1 Constant Voltage Method .................................................................................................... 10
SECTION 12 12.0 Operation ............................................................................................................................. 12 12.0.1 Cycle Method of Operation ................................................................................................. 12 12.1 Floating Charge Method ...................................................................................................... 12 12.2 Float Charge - Float Voltages .............................................................................................. 12 12.3 Voltmeter Calibration ........................................................................................................... 12 12.4 Recharge .............................................................................................................................. 12 12.5 Determining State-of-Charge .............................................................................................. 12 12.6 Effects of Float Voltage ........................................................................................................ 13 12.7 Float Current and Thermal Management ............................................................................. 13 12.8 AC Ripple ............................................................................................................................. 13 12.9 Ohmic Measurements .......................................................................................................... 13
SECTION 13 13.0 Equalizing Charge ................................................................................................................ 13 13.1 Equalizing Frequency ........................................................................................................... 14 13.2 Equalizing Charge Method .................................................................................................. 14
SECTION 14 14.0 Pilot Cell ............................................................................................................................... 14
SECTION 15 15.0 Records ............................................................................................................................... 14 SECTION 16 16.0 Tap Connections .................................................................................................................. 15
SECTION 17 17.0 Temporary Non-Use ............................................................................................................ 15
SECTION 18 18.0 Unit Cleaning ....................................................................................................................... 15
SECTION 19 19.0 Connections ......................................................................................................................... 15
SECTION 20 20.0 Capacity Testing .................................................................................................................. 15

LIST OF ILLUSTRATIONS
Page
3 Fig. 1A-B Typical Systems - Top View
5 Fig. 2 Packed Modules
5 Fig. 3 Unpacking Modules
6 Fig. 4 Handling - Lifting Strap Placement
6 Fig. 5A-B-C-D Typical Horizontal Stack Arrangements - Front Views
7 Fig. 6 I-Beam Layout
7 Fig. 7 Module Lifting Points
7 Fig. 8 Module Tip-over
8 Fig. 9 Module/I-Beam Assembly
8 Fig. 10 Hardware Installation for I-Beam
8 Fig. 11 Placement/Alignment of 2nd Module
8 Fig. 12 Hardware Installation for Module
8 Fig. 13 Completed Single Stack
11 Fig. 14 Installation of Module Cover
16 Fig. 15 Battery Maintenance Report
APPENDICES
17 A Temperature Corrected Float Voltages 18 B Maximum Storage Interval Between Freshening Charges Versus
Average Storage Temperature
19 C Bonding and Grounding of Battery Rack

- 1 -
SECTION 1
1.0 General Information
The Absolyte GP battery is of the valve-regulated lead-acid (VRLA) design and so can operate with lower maintenance (e.g. no maintenance water additions) in comparison to conventional flooded lead-acid batteries. The Absolyte GP VRLA design is also inherently safer than conventional flooded lead-acid batteries. Under normal operating conditions and use, the Absolyte GP battery minimizes hydrogen gas release, and virtually eliminates acid misting and acid leakage. However, there is the possibility that under abnormal operating conditions (e.g. over-charge), or as a result of damage, misuse and/or abuse, potentially hazardous conditions (hydrogen gassing, acid misting and leakage) may occur. Thus, GNB recommends that Section 2.0 of these instructions entitled “SAFETY PRECAUTIONS” be reviewed thoroughly prior to commissioning, and strictly followed when working with Absolyte GP batteries.
SECTION 2
2.0 Safety Precautions
2.1 Sulfuric Acid Electrolyte Burns“Warning: Risk of fire, explosion or burns. Do not disas-semble, heat above 50°C or incinerate.” Batteries contain dilute (1.310 nominal specific gravity) sulfuric acid electrolyte
which can cause burns and other serious injury. In the event of contact with electrolyte, flush immediately and thoroughly with water. Secure medical attention immediately.
When working with batteries, wear rubber apron and rubber gloves. Wear safety goggles or other eye protection. These will help prevent injury if contact is made with the acid.
2.2 Explosive Gases
Hydrogen gas formation is an inherent feature of all lead acid batteries. Absolyte GP VRLA batteries, however, significantly
reduce hydrogen formation. Tests have shown that 99% or more of generated gases are recombined within the cell under normal operating conditions. Under abnormal operating conditions (e.g. charger malfunction), the safety valve may open and release these gases through the vent. The gases can explode and cause blindness and other serious injury.
Keep sparks, flames, and smoking materials away from the battery area and the explosive gases.
All installation tools should be adequately insulated to minimize the possibility of shorting across connections.Never lay tools or other metallic objects on modules as shorting, explosions and personal injury may result.
2.3 Electrical Shock and Burns
Multi-cell systems attain high voltages, therefore, extreme caution must be exercised during installation of a battery system to prevent serious electrical burns or shock.
Interrupt the AC and DC circuits before working on batteries or charging equipment.
Assure that personnel understand the risk of working with batteries, and are prepared and equipped to take the nec-essary safety precautions. These installation and operating
instructions should be understood and followed. Assure that you have the necessary equipment for the work, including insulated tools, rubber gloves, rubber aprons, safety goggles and face protection.
2.3.1 Static Discharge Precautions for Batteries
When maintaining the batteries, care must be taken to pre-vent build-up of static charge. This danger is particularly significant when the worker is electrically isolated, i.e. working on a rubber mat or an epoxy painted floor or wearing rubber shoes.
Prior to making contact with the cell, discharge static elec-tricity by touching a grounded surface.
DANGER
ELECTRICAL SHOCK
AND BURNS
DANGER SULFURIC ACID ELECTROLYTE
BURNS
CAUTION!
Before proceeding with the unpacking, han-dling, installation and operation of this VRLA storage battery, the following general infor-mation should be reviewed together with the recommended safety precautions.
!
CAUTION!
If the foregoing precautions are not fully under-stood, clarification should be obtained from your nearest GNB representative. Local conditions may introduce situations not covered by GNB Safety Precautions. If so, contact the nearest GNB repre-sentative for guidance with your particular safety problem; also refer to applicable federal, state and local regulations as well as industry standards.
!
DANGEREXPLOSIVE GASES
- 2 -
Wearing a ground strap while working on a connected bat-tery string is not recommended.
2.4 Safety Alert
2.5 Important Message
SECTION 3
3.0 Receipt of Shipment
Immediately upon delivery, examine for possible damage caused in transit. Damaged packing material or staining from leaking electrolyte could indicate rough handling. Make a descriptive notation on the delivery receipt before signing. Look for evidence of top loading or dents in the steel mod-ules. If cell or unit damage is found, request an inspection by the carrier and file a damage claim.
3.1 Concealed Damage
Within 10 days of receipt, examine all cells for concealed damage. If damage is noted, immediately request an inspec-tion by the carrier and file a concealed damage claim. Pay particular attention to packing material exhibiting damage or electrolyte staining. Delay in notifying carrier may result in loss of right to reimbursement for damages.
SECTION 4
4.0 Storage Prior to Installation
4.1 Storage Location
If the battery is not to be installed at the time of receipt, it is recommended that it be stored indoors in a cool [77°F (25°C) or less], clean, dry location. Do not stack pallets or cell termi-nal damage may occur.
4.2 Storage Interval
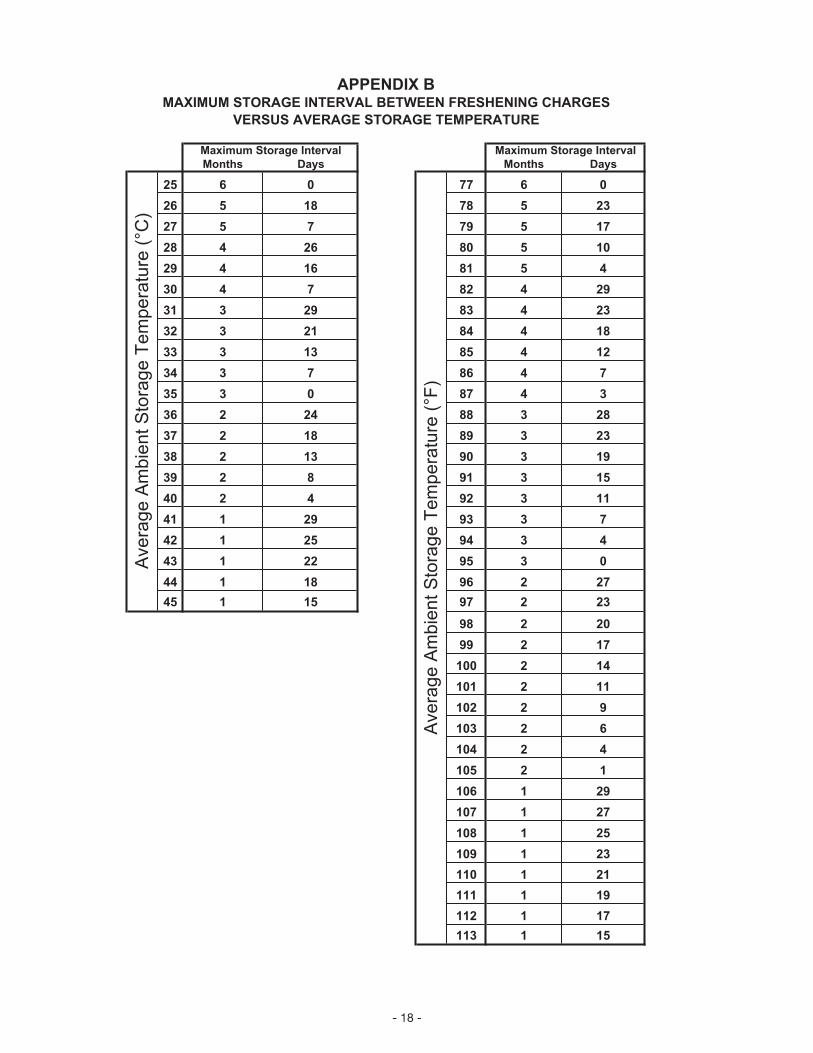
The storage interval from the date of battery shipment to the date of installation and initial charge should not exceed six (6) months. If extended storage is necessary, the battery should be charged at regular intervals until installation can be completed and float charging can be initiated. When in extended storage, it is advised to mark the battery pallets with the date of shipment and the date of every charge. If the battery is stored at 77°F (25°C) or below, the battery should be given a freshening charge (perform per Section 11 Initial Charge) within 6 months of the date of shipment and receive a freshening charge (perform per Section 11 Initial Charge) at 6 month intervals thereafter. Storage at elevated temperatures will result in accelerated rates of self
discharge. For every 18°F (10°C) temperature increase above 77°F (25°C), the time interval for the initial freshening charge and subsequent freshening charges should be halved. Thus, if a battery is stored at 95°F (35°C), the maximum storage interval between charges would be 3 months (reference Appendix B). Storage beyond these periods without proper charge can result in excessive sulphation of plates and positive grid corrosion which is detrimental to battery performance and life. Failure to charge accordingly may void the battery’s warranty. Initial and freshening charge data should be saved and included with the battery historical records; (see Section 15 - Records).
SECTION 55.0 Installation Considerations
Prior to starting installation of the Absolyte Battery System, a review of this section is strongly recommended.
5.1 Space Considerations
It is important to know certain restrictions for the area where the battery is to be located. First, a designated aisle space should be provided to permit initial installation as well as for service or surveillance. After installation, any additional equipment installed after the battery should not compromise access to the battery system.
A minimum aisle space of 36 inches from modules / 33 inch-es from covers should be available adjacent to the battery system. See Figure 1 for typical space allocations required. Following the spacing requirements will aid in maintenance of the battery and help maintain air flow to battery surfaces to enhance heat dissipation.
NOTE: When planning system space requirements, allow at least 6 inches past system total length wherever a terminal plate assembly is to be located. (See Figure 1A)
Figure 1 A-B are typical. For total length, width and height dimensions of connected systems, consult layout/wiring dia-gram for the particular system.
5.2 Battery Location & Ambient Temperature Requirements
It is recommended that the battery unit be installed in a clean, cool, dry location. Floors should be level. Absolyte batteries can be installed in proximity to electronic equip-ment.
A location having an ambient temperature of 75°F (24°C) to 77°F (25°C) will result in optimum battery life and per-formance. Temperatures below 77°F (25°C) reduce battery charge efficiency and discharge performance. Temperatures above 77°F (25°C) will result in a reduction in battery life (see table A, page 4)
The symbol on the left indicates an impor-
tant message. If not followed, damage to and/or impaired performance of the battery may result.
Any modifications, alterations or additions to an Absolyte system, without the expressed written consent of GNB Engineering, may void any warranties and/or seismic qualifications. Contact your GNB representative for additional information.
The safety alert symbol on the left appears throughout this manual. Where the symbol appears, obey the safety message to avoid personal injury.
!
!

- 3 -
FIGURE 1A - HORIZONTAL END TO END
4” between stacksside mount
terminal plate
FIGURE 1B - HORIZONTAL BACK TO BACK
FIGURE 1 - TYPICAL SYSTEMS (TOP VIEW)
- 4 -
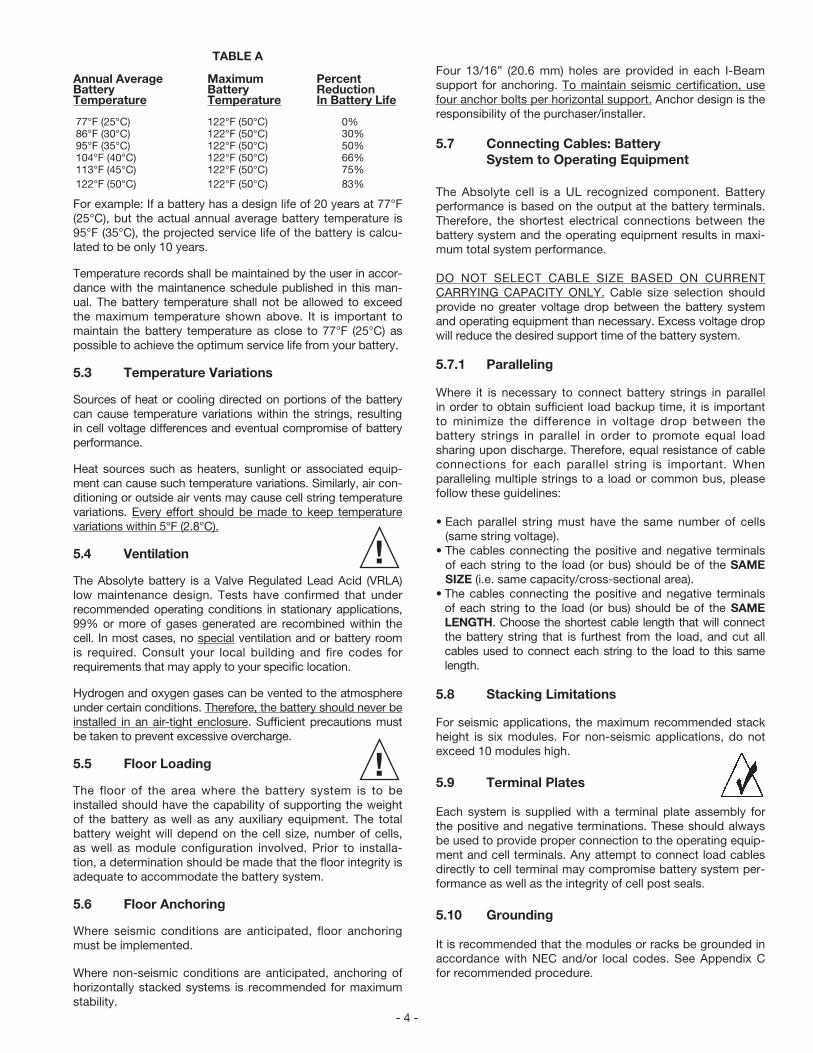
TABLE A
Annual Average Maximum PercentBattery Battery ReductionTemperature Temperature In Battery Life
77°F (25°C) 122°F (50°C) 0% 86°F (30°C) 122°F (50°C) 30% 95°F (35°C) 122°F (50°C) 50% 104°F (40°C) 122°F (50°C) 66% 113°F (45°C) 122°F (50°C) 75% 122°F (50°C) 122°F (50°C) 83%
For example: If a battery has a design life of 20 years at 77°F (25°C), but the actual annual average battery temperature is 95°F (35°C), the projected service life of the battery is calcu-lated to be only 10 years.
Temperature records shall be maintained by the user in accor-dance with the maintanence schedule published in this man-ual. The battery temperature shall not be allowed to exceed the maximum temperature shown above. It is important to maintain the battery temperature as close to 77°F (25°C) as possible to achieve the optimum service life from your battery.
5.3 Temperature Variations
Sources of heat or cooling directed on portions of the battery can cause temperature variations within the strings, resulting in cell voltage differences and eventual compromise of battery performance.
Heat sources such as heaters, sunlight or associated equip-ment can cause such temperature variations. Similarly, air con-ditioning or outside air vents may cause cell string temperature variations. Every effort should be made to keep temperature variations within 5°F (2.8°C).
5.4 Ventilation
The Absolyte battery is a Valve Regulated Lead Acid (VRLA) low maintenance design. Tests have confirmed that under recommended operating conditions in stationary applications, 99% or more of gases generated are recombined within the cell. In most cases, no special ventilation and or battery room is required. Consult your local building and fire codes for requirements that may apply to your specific location.
Hydrogen and oxygen gases can be vented to the atmosphere under certain conditions. Therefore, the battery should never be installed in an air-tight enclosure. Sufficient precautions must be taken to prevent excessive overcharge.
5.5 Floor Loading
The floor of the area where the battery system is to be installed should have the capability of supporting the weight of the battery as well as any auxiliary equipment. The total battery weight will depend on the cell size, number of cells, as well as module configuration involved. Prior to installa-tion, a determination should be made that the floor integrity is adequate to accommodate the battery system.
5.6 Floor Anchoring
Where seismic conditions are anticipated, floor anchoring must be implemented.
Where non-seismic conditions are anticipated, anchoring of horizontally stacked systems is recommended for maximum stability.
Four 13/16” (20.6 mm) holes are provided in each I-Beam support for anchoring. To maintain seismic certification, use four anchor bolts per horizontal support. Anchor design is the responsibility of the purchaser/installer.
5.7 Connecting Cables: Battery System to Operating Equipment
The Absolyte cell is a UL recognized component. Battery performance is based on the output at the battery terminals. Therefore, the shortest electrical connections between the battery system and the operating equipment results in maxi-mum total system performance.
DO NOT SELECT CABLE SIZE BASED ON CURRENT CARRYING CAPACITY ONLY. Cable size selection should provide no greater voltage drop between the battery system and operating equipment than necessary. Excess voltage drop will reduce the desired support time of the battery system.
5.7.1 Paralleling
Where it is necessary to connect battery strings in parallel in order to obtain sufficient load backup time, it is important to minimize the difference in voltage drop between the battery strings in parallel in order to promote equal load sharing upon discharge. Therefore, equal resistance of cable connections for each parallel string is important. When paralleling multiple strings to a load or common bus, please follow these guidelines:
• Each parallel string must have the same number of cells (same string voltage).
• The cables connecting the positive and negative terminals of each string to the load (or bus) should be of the SAME SIZE (i.e. same capacity/cross-sectional area).
• The cables connecting the positive and negative terminals of each string to the load (or bus) should be of the SAME LENGTH. Choose the shortest cable length that will connect the battery string that is furthest from the load, and cut all cables used to connect each string to the load to this same length.
5.8 Stacking Limitations
For seismic applications, the maximum recommended stack height is six modules. For non-seismic applications, do not exceed 10 modules high.
5.9 Terminal Plates
Each system is supplied with a terminal plate assembly for the positive and negative terminations. These should always be used to provide proper connection to the operating equip-ment and cell terminals. Any attempt to connect load cables directly to cell terminal may compromise battery system per-formance as well as the integrity of cell post seals.
5.10 Grounding
It is recommended that the modules or racks be grounded in accordance with NEC and/or local codes. See Appendix C for recommended procedure.
!
!

- 5 -
SECTION 6
6.0 Unpacking and Handling
PACKED MODULESFigure 2
6.1 General
Do not remove shipping materials if a storage period is planned, unless charging is required per Section 4.2.
The battery modules are generally packed in groups. Lag bolts retain the modules to the shipping pallet together with a protective hood banded in place. Modules are also bolted together at the top adjacent channels. See Figure 2.
6.2 Accessories
Accessories are packed separately and will include the following: (Note: Some items may not be provided depending on battery configuration).
• Layout/wiring diagram • Installation and operating instructions • Lifting straps and lifting shackles • Protective covers and hardware • Terminal plate assembly kits and covers • Horizontal supports (i.e. I-beams) • Lead-Tin Plated copper intercell connectors • Assembly hardware • NO-OX-ID® “A”* grease • Battery warning label • Battery nameplate • Cell numerals with polarity indicators • Shims (leveling) • Drift pins
*Registered Trademark of Sanchem Inc.
NOTE: Check battery components against supplied drawings to assure completeness. Do not proceed with installation until all accessory parts are available.
6.3 Recommended Installation Equipment and Supplies
• Fork lift or portable boom crane • Chalk line • Line Cord • Torpedo level (Plastic) • Plywood straight edge 1/2” x 4” x 48” • Torque wrenches • Ratchet wrench with 10, 13, 15, 17, 19,
and 24 mm sockets • Box wrenches of 10, 13, 15, 17, 19 and 24 mm sizes • Vinyl electrical tape • Paper wipers • 3M Scotch Brite® scour-pads™† • Hammer drill (floor anchoring)
† Trademark of 3M
6.4 Unpacking
Carefully remove the protective shipping hood. See Figure 3. Remove the lag bolts holding modules to shipping pallet. Also remove hardware bolting upper channels of modules together.
Note: Placement of modules on shipping pallet has no rela-tionship to final installation.
UNPACKING MODULESFigure 3
6.5 Handling
The design of the modular tray permits handling by a fork lift, portable crane or by a hoist sling (see Figure 4). Whichever method is used, make sure equipment can safely handle the module weight.
Always use the two lifting straps and four lifting shackles for lifting and placement of modules.
!

- 6 -
NOTE: 1) Straps must be criss-crossed. 2) Lifting shackle orientation and proper channel hole use must be observed. 3) See Figure 13 for handling modules in horizontal orientation. 4) Never lift more than one module with straps and hooks.
HANDLING - LIFTING STRAP PLACEMENTFigure 4
SECTION 7
7.0 System Arrangements
7.1 Module Arrangements
Absolyte batteries are recommended for installation in a horizontal orientation only. Figure 5 shows typical arrangements and is not intended to represent all configurations possible.
CAUTION!If a fork lift or portable crane is used to handle modules in a horizontal position, a piece of insulating material such as heavy cardboard, rubber insulating mats or plywood should be used between handling equipment and cell posts to prevent shorting.
HORIZONTAL SINGLE STACK Figure 5A
HORIZONTAL MULTIPLE STACKS END TO END Figure 5B
1
1
2
2
3
3
4
4
A A
B B
C C
D D
DRAWN
CHECK
DESIGN
DATE
DATE
DATE
THIRD ANGLE PROJECTION CAD REFERENCE
DIMENSIONS IN [ ] ARE MILLIMETERS
MATERIAL:
PROCESS:
REMOVE ALL BURRS AND BREAK SHARP EDGES SCALE: 1:1 SUPERCEDES: SHEET 1 OF 2
REVDRAWING NO.CAGE CODESIZE
TITLE
3950 SUSSEX AVENUEAURORA, IL 60504-7932USA
fig6A-6D replacement88219BCREATED WITH INV
P. MATTALIANO
P. MATTALIANO
3/23/2017
A Division of Exide Technologies
UNLESS OTHERWISE SPECIFIEDDIMENSIONS ARE IN INCHES
TOLERANCES ARE:
DO NOT SCALE DRAWING
DECIMALS [MM] FRACTIONAL ANGLE.X±.1
.XX±.01.XXX±.005
X±30.X±0,2
0.XX±0,10
±1/32 ±0.5INDUSTRIAL POWER
THE USE OF INFORMATION CONTAINED HEREIN IS RESTRICTED FOR THE BENEFIT OF GNB ONLY. UNAUTHORIZED USE OR DISCLOSURE, COPYING OR OTHERWISE REPRODUCING (IN ANY MANNER) ANY PORTION OF THIS DRAWING WITHOUT PRIOR WRITTEN PERMISSION OF AN AUTHORIZED OFFICIAL OF GNB, IS PROHIBITED.
1
1
2
2
3
3
4
4
A A
B B
C C
D D
SCALE: 1:1 SUPERCEDES: SHEET 2 OF 2
REVDRAWING NO.CAGE CODESIZE
3950 SUSSEX AVENUEAURORA, IL 60504-7932USA
fig6A-6D replacement88219B
A Division of Exide TechnologiesINDUSTRIAL POWER
THE USE OF INFORMATION CONTAINED HEREIN IS RESTRICTED FOR THE BENEFIT OF GNB ONLY. UNAUTHORIZED USE OR DISCLOSURE, COPYING OR OTHERWISE REPRODUCING (IN ANY MANNER) ANY PORTION OF THIS DRAWING WITHOUT PRIOR WRITTEN PERMISSION OF AN AUTHORIZED OFFICIAL OF GNB, IS PROHIBITED.
HORIZONTAL SINGLE STACK BACK TO BACKFigure 5C

- 7 -
7.2 Dummy Cells within a Module
Where application voltage requires, a dummy cell can replace a live cell in a module. For example, a 46 volt, two-cell per module system may consist of eleven full modules and one module containing one live cell and a dummy cell.
SECTION 8
8.0 System Assembly
8.1 Horizontal Single Stack
Consult layout/wiring diagram for total number and type of module assemblies in system. There can be varying combinations of cell arrangements within the module.
Compare required module assemblies called for on layout/wiring diagram with modules in shipment for completeness before continuing further.
8.1.1 Single Stack Assembly
A. Locate the I-Beam supports and M16 hardware kit. Lay out the I-beams according to figure 6 in the desired stack location making sure that wall and obstruction clearances are observed.
B. To remove a module from the pallet, insert a shackle through each end of the two lifting straps. Next, install the four shackles into the four holes in the tray stiffeners (see Figure 7) so each strap crosses front to back and left to right. Lift the module and stage it near the I-Beams. Remove the lifting straps and shackles.
Module lifting points Figure 7
C. To tip the module to the horizontal position, install one strap through the shackles in the rear or what is desired to be the top C-channel of the horizontal module (see Figure 8).
D. Center strap in lifting hook and raise hook until the module tilts off of the vertical.
E. While pushing on the top rear of the module, carefully lower the hoist and module into the horizontal position.
Module Tip-OverFigure 8
F. Re-install all four shackles into the C-channel holes and cross each strap from front to back. Raise the horizontal module and position it onto the I-Beams (see Figure 9) using the drift pins to facilitate hole alignment. Install the hardware per Figure 10 and torque to 203 Newton-meters (150 foot-pounds).
1
1
2
2
3
3
4
4
A A
B B
C C
D D
SCALE: 1:1 SUPERCEDES: SHEET 2 OF 2
REVDRAWING NO.CAGE CODESIZE
3950 SUSSEX AVENUEAURORA, IL 60504-7932USA
fig6A-6D replacement88219B
A Division of Exide TechnologiesINDUSTRIAL POWER
THE USE OF INFORMATION CONTAINED HEREIN IS RESTRICTED FOR THE BENEFIT OF GNB ONLY. UNAUTHORIZED USE OR DISCLOSURE, COPYING OR OTHERWISE REPRODUCING (IN ANY MANNER) ANY PORTION OF THIS DRAWING WITHOUT PRIOR WRITTEN PERMISSION OF AN AUTHORIZED OFFICIAL OF GNB, IS PROHIBITED.
HORIZONTAL MULTIPLE STACKSBACK TO BACK AND END TO END
TYPICAL HORIZONTAL STACK ARRANGEMENTSFigure 5D
I-Beam LayoutFigure 6
MODULETYPE A (in.) A (mm)
2-100G21 18.79 477.32-100G25 21.79 553.52-100G29 24.79 629.72-100G31 26.29 667.82-100G33 27.79 705.9
MODULETYPE A (in.) A (mm)
2-100G21 18.79 477.32-100G25 21.79 553.52-100G29 24.79 629.72-100G31 26.29 667.82-100G33 27.79 705.9

- 8 -
DRAWN
CHECK
DESIGN
DATE
DATE
DATE
THIRD ANGLE PROJECTION CAD REFERENCE
DIMENSIONS IN [ ] ARE MILLIMETERS
MATERIAL:
REMOVE ALL BURRS AND BREAK SHARP EDGES SHEET 1 OF 1
3950 SUSSEX AVENUEAURORA, IL 60504-7932USA
I&O Manual images-188219ACREATED WITH INV
P. MATTALIANO
P. MATTALIANO
2/22/2017
A Division of Exide Technologies
UNLESS OTHERWISE SPECIFIEDDIMENSIONS ARE IN INCHES
TOLERANCES ARE:DECIMALS [MM] FRACTIONAL ANGLE
.X±.1.XX±.01
.XXX±.005
X±30.X±0,2
0.XX±0,10
±1/32 ±0.5INDUSTRIAL POWER
THE USE OF INFORMATION CONTAINED HEREIN IS RESTRICTED FOR THE BENEFIT OF GNB ONLY. UNAUTHORIZED USE OR DISCLOSURE, COPYING OR OTHERWISE REPRODUCING (IN ANY MANNER) ANY PORTION OF THIS DRAWING WITHOUT PRIOR WRITTEN PERMISSION OF AN AUTHORIZED OFFICIAL OF GNB, IS PROHIBITED.
TITLE
SIZE CAGE CODE DRAWING NO. REV.
SCALE: 1:1 DWG. SUPERCEDES:
DO NOT SCALE DRAWING
M16 X 50 BOLT
M16 NUT
M16 EXTERNAL TOOTHLOCKWASHER
Module/I-Beam Assembly after Tip-OverFigure 9
Hardware Installation for I-Beam/Module AssemblyFigure 10
G. When the module/I-Beam assembly is in the desired location, mark the floor through the I-Beam holes and use both straps and all four shackles to remove the assembly. Install floor anchors and reposition module/I-Beam assembly over the anchors. Before installing nuts and washers onto the anchor studs, check that the module is level in both axes. Level using provided shims if necessary. Torque anchor hardware to manufacturer’s recommended value. The use of four M12 anchors per I-Beam is required to maintain seismic certification.
Note: The use of leveling shims is required when assembling any Absolyte system in order to meet seismic requirements. Failure to use the shims to level each module and to fill spaces between tray channels during stack assembly will result in the assembly not meeting seismic certification criteria.
H. Using Steps B through F and the provided wiring diagram, position the next module on top of the first so the channels of each mate with one another. Use the drift pins to align channel holes as shown in figure 11. Make sure channel ends and sides of the upper and lower modules are flush. Install hardware in open holes finger tight. Remove lifting straps. Use leveling shims to fill gaps between trays.
SHEET 2 OF 2
3950 SUSSEX AVENUEAURORA, IL 60504-7932USA
I&O Manual images-188219AA Division of Exide TechnologiesINDUSTRIAL POWER
THE USE OF INFORMATION CONTAINED HEREIN IS RESTRICTED FOR THE BENEFIT OF GNB ONLY. UNAUTHORIZED USE OR DISCLOSURE, COPYING OR OTHERWISE REPRODUCING (IN ANY MANNER) ANY PORTION OF THIS DRAWING WITHOUT PRIOR WRITTEN PERMISSION OF AN AUTHORIZED OFFICIAL OF GNB, IS PROHIBITED.
SIZE CAGE CODE DRAWING NO. REV.
SCALE: 1:1 DWG. SUPERCEDES:
M16 X 50 BOLT
M16 NUT
M16 EXTERNAL TOOTHLOCKWASHER
Placement and Alignment of 2nd moduleFigure 11
Hardware Installation SequenceFigure 12
I. At this time, check to see that the first two modules are plumb front to back and side to side using wooden or plastic level together with plywood straight edge. This is to insure proper alignment for inter-cell connectors. Torque hardware to 203 Newton-meters (150 foot-pounds).
J. Proceed with the stacking of the remaining modules, checking after each module placement that the stack is plumb in both axes before torqueing hardware. Check the wiring diagram to assure correct module placement and for post polarity orientation.
Completed Single StackFigure 13

- 9 -
8.2 Multiple Stack Assembly
It is recommended that all of the base module/I-Beam assemblies be placed into position first. A chalk line floor mark is useful in assuring the stacks are placed in a straight line. This applies to stacks positioned end-to-end, back-to-back or both.
When all of the base module/I-Beam assemblies have been set in place, continue stacking subsequent modules. Procedures for the assembly of multiple stacks are the same as outlined in Section 8.1.1. Consult the wiring diagram to assure proper post polarity orientation. Each module should be placed on each stack in sequence so that the top modules of each stack are the last installed.
SECTION 9
9.0 Connections
9.1 Post Preparation
Using either a brass bristle suede shoe brush or 3M Scotch Brite scouring pad, brighten the flat copper terminal surfaces to ensure lowest resistance connections.
Apply a thin film of NO-OX-ID “A” grease (supplied with battery) to all terminal mating surfaces. This will preclude oxidation after connections are completed.
9.2 Connections - System Terminals
Each system is supplied with a terminal plate assembly for the positive and negative terminations. These should always be used to provide proper connection to the operating equipment and cell terminals. Any attempt to connect load cables directly to cell terminals may compromise battery system performance as well as the integrity of cell post seals.
For terminal plate assembly, refer to the drawing supplied with the terminal plate kit. It is recommended that all components be assembled in place with hardware torqued to 11.3 Newton-meters (100 in-lbs). Retorque value is also 11.3 Newton-meters (100 in-lbs).
Refer to Sections 9.1 and 9.3 for electrical contact surface preparation of terminal plate components.
Do not make connections to operating system at this time.
9.3 Connections
Consult layout/wiring diagram for correct quantity of lead-tin plated copper connectors required at each connection. Follow procedure in Section 9.1 and brighten lead-tin plated surfaces coming in contact with copper posts. Apply a film of NO-OX-ID “A” grease to these areas. NOTE: Apply a minimum amount of grease to cover the surface. As a rule: “If you can see it, it’s too much”. Where laminated connectors are required across any single connection, brighten both sides of connectors vertically along the entire length. Grease these areas as well. It is recommended when installing connectors that the upper bolts be installed first to reduced risk of accidental shorting.
WASHERS SHOULD BE INSTALLED WITH THE CURVED EDGE TOWARD THE CONNECTORS.
BOLT WASHER CONNECTOR POST
9.4 Connections - INTER-Stack
Multiple stacks end to end are interconnected with cables. See supplied wiring diagram for details.
9.5 Connections - Torquing
When all inter-cell connections have been installed, tighten all M6 connection hardware to 11.3 Newton-meters (100 in-lbs) Use insulated tools. All connections should be rechecked after the initial charge, due to heating during charge.
9.6 Connection - Check
Again, visually check to see that all module terminals are connected positive (+) to negative (-) throughout the battery.
Also measure the total voltage from terminal plate to terminal plate. This should be approximately equal to 2.15 volts times the number of cells in the system, e.g., a 12 cell system would read: 12 x 2.15v = 25.8 volts.
9.7 Connection Resistance
Electrical integrity of connections can be objectively established by measuring the resistance of each connection. These resistances are typically in the microhm range. Meters are available which determine connection resistance in microhms. Be sure that the probes are touching only the posts to ensure that the contact resistance of connector to post is included in the reading.
Resistance measurements or microhm measurements should be taken at the time of installation and annually thereafter. Initial measurements at installation become the bench mark values and should be recorded for future monitoring of electrical integrity.
It is important that the bench mark value for all similar connections be no greater than 10% over the average. If any connection resistance exceeds the average by more than 10%, the connection should be remade so that an acceptable bench mark value is established.
Bench mark values for connection resistances should also
!

- 10 -
be established for terminal plates, where used, as well as cable connections. Bench mark values should preferably be established upon installation.
All bench mark values should be recorded. Annually, all connection resistances should be re-measured. Any connection which has a resistance value 20% above its benchmark value should be corrected.
9.8 Cell Numerals
A set of pressure sensitive cell numerals and system polarity labels are supplied and should be applied at this time.
Cell numerals should be applied to the top of the module and as close to the cell being identified as possible. Suggest application to cell restraint bars or to module channels. Designate the positive terminal cell as #1 with succeeding cells in series in ascending order.
The system polarity labels should be applied next to the positive and negative terminals.
9.9 Warning Label
Apply pressure sensitive warning and GHS labels provided on a prominently visible module side or end (The module cover is recommended).
9.10 Battery Nameplate
For future reference and warranty protection, apply pressure sensitive nameplate on a prominently visible module. Fill in date of installation and the specified capacity and rate.
Make sure surfaces are free of dirt and grease by wiping with clean, dry wipers to ensure proper label adhesion.
For protective module cover installation, see Section 10.
SECTION 10
10.0 Protective Module Covers
Each module is provided with a transparent protective cover to help prevent accidental contact with live module electrical connections, and to provide easy visual access to the system.
When all system assembly has been completed, as well as initial testing including initial charge and cell float voltage readings, all covers should be installed. Covers should remain in place at all times during normal operation of the battery system.
10.1 Module Cover Installation
Refer to Figure 14 for installation of the transparent Module Covers. Install standoff legs and standoff keys first, as shown.
The cover is then installed by grasping it so that the GNB logo is upright. Locate holes at the bottom of cover to the bottom standoff legs and slide in place. Locate the holes at top of cover and install to top standoff legs.
SECTION 11
11.0 Initial Charge
Batteries lose some charge during shipment as well as dur-ing the period prior to installation. A battery should be given its initial charge at installation. Battery positive (+) terminal should be connected to charger positive (+) terminal and battery negative (-) terminal to charger negative (-) terminal.
Failure to perform the freshening charge within the limits stated in Section 4 as well as failure to perform the initial charge upon installation of the battery will affect the per-formance and life of the battery and may void the warranty.
11.1 Constant Voltage Method
Constant voltage is the only charging method allowed. Most modern chargers are of the constant voltage type.
Determine the maximum voltage that may be applied to the system equipment. This voltage, divided by the number of cells connected in series, will establish the maximum volts per cell (VPC) that is available.
Table B (page 12) lists recommended voltages and charge times for the initial charge. Select the highest voltage the system allows to perform the initial charge in the shortest time period.
NOTE: Time periods listed in Table B are for 77°F. For other temperatures a compensation factor of .003 V/°F (.0055 V/°C) per cell is recommended. The minimum voltage is 2.20 VPC, temperature correction does not apply below this voltage.
TEMPERATURE CORRECTION
V corrected = V25°C - (( T actual-25°C) x ( .0055V/°C)) or V corrected = V77°F - ((T actual-77°F) x (.003V/°F))See Appendix A for standard values.
STEP 1
A. Set constant voltage charger to maximum setting without exceeding 2.35 VPC. Example: For a target charge of 2.35 VPC on a 24-cell system, you would set the charger voltage to 56.4 volts. Depending on the battery’s state of charge, the charger may go into current limit at the beginning and decline slowly once the target charge voltage is reached.
B. Record time and current at regular intervals – every hour
as a minimum.
C. Continue charging the battery until there is no further drop in charge current over 3 consecutive hours. This could take days if the battery has been in storage for a long time.
D. When the current has stabilized, proceed to step 2.
STEP 2
A. Continue the charge for the time listed in Table B
!
!

- 11 -
1
1
2
2
3
3
4
4
A A
B B
C C
D D
SCALE: 1:1 SUPERCEDES: SHEET 2 OF 2
REVDRAWING NO.CAGE CODESIZE
3950 SUSSEX AVENUEAURORA, IL 60504-7932USA
I&O manual cover install88219B
A Division of Exide TechnologiesINDUSTRIAL POWER
THE USE OF INFORMATION CONTAINED HEREIN IS RESTRICTED FOR THE BENEFIT OF GNB ONLY. UNAUTHORIZED USE OR DISCLOSURE, COPYING OR OTHERWISE REPRODUCING (IN ANY MANNER) ANY PORTION OF THIS DRAWING WITHOUT PRIOR WRITTEN PERMISSION OF AN AUTHORIZED OFFICIAL OF GNB, IS PROHIBITED.
CLOSEOUT (TOP MODULE ONLY)
COVER PANEL
KEY
STANDOFFLEG
TO ASSEMBLE THE ABSOLYTE GP MODULE COVER, THE FOLLOWING ARE NEEDED: ITEM QUANTITY COVER PANEL 1 STANDOFF LEG 4 KEY 4 CLOSEOUT 1 1. PLACE THE KEY INTO THE FRONT SET OF HOLES IN THE STIFFENER BRACKET.2. WHILE HOLDING THE KEY IN PLACE, SCREW THE STANDOFF LEG ONTO THE KEY. DO NOT OVERTIGHTEN.3. PLACE THE CLOSEOUT ONTO THE COVER PANEL OF THE TOP MODULE. CLOSEOUT MAY REQUIRE TRIMMING FOR TOP TERMINATION PLATES.4. HANG THE COVER PANELS ONTO THE STANDOFF LEGS.
Figure 14
INSTALLATION GUIDE FOR ABSOLYTE GP MODULE COVER

- 12 -
depending on the charger voltage setting. The time is IN ADDITION to the time spent charging in Step 1. Example, charge for 12 hours if the charger voltage is set to 2.35 VPC.
TABLE B
INITIAL CHARGE (77°F) CELL VOLTS TIME-HRS (Minimum) 2.30 24 2.35 12
B. Record cell voltages hourly during the last 3 hours of the charge time. If, after the charge time has completed, but the lowest cell voltage has continued to rise, you may extend the charge, monitoring cell voltages hourly, until the lowest cell voltage ceases to rise.
C. Proceed to Step 3.
STEP 3
The initial charge is complete. Charger voltage can now be reduced to float voltage setting per Section 12.2. For a target float charge of 2.25 VPC on a 12-cell system, you would set the charger voltage to 27.00 volts.
SECTION 12
12.0 Operation
12.0.1 Cycle Method of Operation
In cycle operation, the degree of discharge will vary for dif-ferent applications. Therefore, the frequency of recharging and the amount of charge necessary will vary. The amount of charge necessary depends on the number of ampere hours discharged. Generally, Absolyte GP cells require approximately 105-110% of the ampere-hours removed to be returned to achieve a full state of charge.
The upper voltage settings recommended, given that the maxium charge current is 5% of the nominal C100 Amp-hour rating and ambient temperatures of 25°C (77°F), are as fol-lows:
2.28 ± 0.02 VPC @ 0-2% DOD2.33 ± 0.02 VPC @ 3-5% DOD2.38 ± 0.02 VPC @ >5% DOD
Due to the variety of applications and charging equipment (particularly in Photovoltaic systems) it is recommended that you contact a GNB representative when determining proper recharge profiles.
12.1 Floating Charge Method
In this type of operation, the battery is connected in parallel with a constant voltage charger and the critical load circuits. The charger should be capable of maintaining the required constant voltage at battery terminals and also supply a nor-mal connected load where applicable. This sustains the bat-tery in a fully charged condition and also makes it available to assume the emergency power requirements in the event of an AC power interruption or charger failure.
12.2 Float Charge - Float Voltages Following are the float voltage ranges recommended for the Absolyte Battery System. Select any “volts per cell” (VPC) value within the range listed that will result in the series string having an average volts per cell equal to that value.
RECOMMENDED FLOAT RANGE (@77°F)2.23 to 2.27 VPC
NOTE: Recommended float voltages are for 77°F. For other temperatures a compensation factor of .003 V/°F (.0055 V/°C) per cell is recommended. The minimum voltage is 2.20 VPC, temperature correction does not apply below this voltage. The maximum voltage is 2.35 VPC, temperature correction does not apply above this voltage.
TEMPERATURE CORRECTION
V corrected = V25°C - (( T actual-25°C) x ( .0055V/°C)) or V corrected = V77°F - ((T actual-77°F) x (.003V/°F))
See Appendix A for standard values.
Modern constant voltage output charging equipment is recom-mended for the floating charger method of operation of GNB Absolyte batteries. This type of charger, properly adjusted to the recommended float voltages and following recommended surveil-lance procedures, will assist in obtaining consistent serviceability and optimum life.
After the battery has been given its initial charge (refer to Section 11), the charger should be adjusted to provide the recommended float voltages at the battery terminals.
Do not use float voltages higher or lower than those recom-mended. Reduced capacity or battery life will result.
Check and record battery terminal voltage on a regular basis. Monthly checks are recommended. See Section 15.0, Records, second bullet. If battery float voltage is above or below the correct value, adjust charger to provide proper voltage as measured at the battery terminals.
12.3 Voltmeter Calibration
Panel and portable voltmeters used to indicate battery float voltages should be accurate at the operating voltage value. The same holds true for portable meters used to read indi-vidual cell voltages. These meters should be checked against a standard every six months and calibrated when necessary.
12.4 Recharge
All batteries should be recharged as soon as possible follow-ing a discharge with constant voltage chargers. However, to recharge in the shortest period of time, raise the charger out-put voltage to the highest value which the connected system will permit. Do not exceed the voltages and times listed in Table C, Section 13.2.
12.5 Determining State-of-Charge
If the normal connected load is constant (no emergency load connected), the following method can be used to determine the approximate state-of-charge of the battery. The state-of-charge can be identified to some degree by the amount of

- 13 -
charging current going to the battery. When initially placed on charge or recharge following a discharge, the charging current, read at the charger ammeter, will be a combination of the load current plus the current necessary to charge the battery. The current to the battery will start to decrease and will finally stabilize when the battery becomes fully charged. If the current level remains constant for three consecutive hours, then this reflects a state-of-charge of approximately 95 to 98%. For most requirements, the battery is ready for use.
If the normal connected load is variable (i.e. telecommunica-tions), the following method may be used to check the state-of-charge of the battery. Measure the voltage across a pilot cell (See Section 14.0 for definition of pilot cell). If the voltage is stable for 24 consecutive hours, the battery reflects a state of charge of approximately 95%.
12.6 Effects of Float Voltage
Float voltage has a direct effect on the service life of your battery and can be the cause of thermal instability.
A float voltage above the recommended values reduces ser-vice life. The chart below shows the effects of float voltage (temperature corrected) on battery life.
Temperature corrected 77°F (25°C) Percent Float voltage per cell Reduction Minimum Maximum in Battery Life 2.23 2.27 0% 2.28 2.32 50% 2.33 2.37 75%
Voltage records must be maintained by the user in accor-dance with the maintanence schedule published in this man-ual. To obtain the optimum service life from the battery, it is important to make sure the battery’s float voltage is within the recommended range.
12.7 Float Current and Thermal Management
Increased float current can portend a condition known as thermal runaway, where the battery produces more heat than it can dissipate. VRLA batteries are more prone to thermal runaway because the recombination reaction that occurs at the negative plate, and reduces water loss, also produces heat. High room temperature, improper applications, improper voltage settings, and incorrect installation practices can increase the chances of thermal runaway.
As with good record-keeping practices, monitoring float current can prevent a minor excursion from becoming a major issue.
12.8 AC Ripple
AC ripple is noise or leftover AC waveform riding on the DC charge current to the battery that the rectifier did not remove. It is usually more pronounced in UPS than telecom systems. Proper maintenance of the UPS capacitors will reduce the amount of ripple going into the battery.
Establishment of absolute limits for AC ripple has always been problematic because the degree of damage it causes depends on the wave shape, peak-to-peak magnitude and frequency. Accurate characterization of AC ripple requires an oscilloscope and even then, only represents a picture of
the ripple at that moment in time.
Whatever its exact characteristics, AC ripple is always harmful to batteries. Depending on its particular properties, ripple can result in overcharge, undercharge and micro-cycling that can prematurely age the battery. The most common and damaging result of AC ripple is battery heating which can lead to thermal runaway. AC ripple will decrease battery life and should be reduced as much as possible.
12.9 Ohmic Measurements
Impedance, resistance and conductance testing is collectively known in the industry as ohmic measurements. Each measurement is derived using a manufacturer-specific and proprietary algorithm and / or frequency. This means that one type of measurement cannot be converted or related easily to another.“Reference” ohmic values are of dubious value because so many factors can affect the way the readings are made and displayed by the devices. Connector configuration and AC ripple as well as differences between readings of temperature and probe placement will prevent the ohmic devices from generating consistent and meaningful data. The meters work better with monoblocs and small capacity VRLA products and less well with large (>800-Ah) VRLA and flooded battery designs. Users should be particularly skeptical of data taken on series-parallel VRLA battery configurations as the feedback signal to the device may follow unforeseen paths that can overwhelm it.
It is best for users to establish their own baseline values for their battery as specifically configured. Do not rely on reference values.
If users wish to enhance normal maintenance and record-keeping with ohmic measurements, GNB recommends the trending of this data over time. Use a first set of readings taken 6 months after initial charge and installation as the baseline data. Subsequent measurements should be taken using the same device over the life of the battery. Because cell positioning within the string (connector configuration to a particular cell) can affect the reading, always compare each cell at baseline to itself in the new data. Standalone ohmic data is not sufficient to justify warranty cell replacement.
Responsible ohmic device manufacturers acknowledge that there is no direct relationship between percent ohmic change from baseline and battery capacity. A change from baseline of 25% or less is in the normal noise or variability range. Changes between 25% and 50% may call for additional scrutiny of the system. An IEEE compliant discharge test is usually warranted on systems exhibiting more than a 50% change from baseline. Consult an GNB representative for specific questions about ohmic data.
SECTION 13
13.0 Equalizing Charge
Under normal operating conditions an equalizing charge is not required. An equalizing charge is a special charge given a battery when non-uniformity in voltage has developed between cells. It is given to restore all cells to a fully charged condition. Use a charging voltage higher than the normal float voltage and for a specified number of hours, as deter-mined by the voltage used.

- 14 -
Non-uniformity of cells may result from low float voltage due to improper adjustment of the charger or a panel voltme-ter which reads an incorrect (higher) output voltage. Also, variations in cell temperatures greater than 5°F (2.78°C) in the series string at a given time, due to environmental conditions or module arrangement, can cause low cells.
13.1 Equalizing Frequency
An equalizing charge should be given when the following conditions exist:
A. The float voltage of any cell (as per Section 14.0) is less than 2.18 VPC.
B. A recharge of the battery is required in a minimum time period following an emergency discharge.
C. Individual cell(s) float is more than +/- 0.05 volts from average.
D. Accurate periodic records (See Section 15) of individual cell voltages show an increase in spread since the previ-
ous semi-annual readings.
An annual equalize charge is recommended to help ensure uniform cell performance.
13.2 Equalizing Charge Method
Constant voltage charging is the method for giving an equal-izing charge. Determine the maximum voltage that may be applied to the system equipment. This voltage, divided by the number of cells connected in series, will establish the maximum volts per cell that may be used to perform the equalizing charge in the shortest period of time (not to exceed 2.35 VPC applicable at 77°F, 25°C). Refer to Table C for voltages and recommended time periods.
NOTE: Charge volts listed in Table C are for 77°F. For other temperatures a compensation factor of .003 V/°F (.0055 V/°C) per cell is recommended. The minimum voltage is 2.20 VPC. The maximum voltage is 2.35 VPC. Temperature correction does not apply outside of this range.
V corrected = V25°C - ((T actual-25°C) x (.0055 V/°C))orV corrected = V77°F - ((T actual-77°F) x (.003 V/°F))
See Appendix A for standard values.
STEP 1
A. Set constant voltage charger to maximum setting without exceeding 2.35 VPC.
Example: For a target charge of 2.35 VPC on a 24-cell system, you would set the charger voltage to 56.4 volts.
B. Record time and current at regular intervals – every hour as a minimum.
C. Continue charging the battery until there is no further drop in charge current over 3 consecutive hours.
D. When the current has stabilized, proceed to step 2.
STEP 2
A. Continue the charge for the time listed in Table C depending on the charger voltage setting. The time is IN ADDITION to the time spent charging in Step 1.
Example, charge for 12 hours if the charger voltage is set to 2.35 VPC.
TABLE C
EQUALIZE CHARGE (77°F)
CELL VOLTS TIME (HOURS) 2.30 24 2.35 12
B. Record cell voltages hourly during the last 3 hours of the charge time. If, after the charge time has completed, but the lowest cell voltage has continued to rise, you may extend the charge, monitoring cell voltages hourly, until the lowest cell voltage ceases to rise.
C. Proceed to Step 3.
STEP 3
The Equalize charge is now complete. Charger voltage can now be reduced to float voltage setting per Section 12.2. For a target float charge of 2.25 VPC on a 24-cell system, you would set the charger voltage to 54 volts.
SECTION 14
14.0 Pilot Cell
A pilot cell is selected in the series string to reflect the general condition of cells in the battery. The cell selected should be the lowest cell voltage in the series string following the initial charge. See Section 11.0 - Initial Charge. Reading and record-ing pilot cell voltage monthly serves as an indicator of battery condition between scheduled overall individual cell readings.
SECTION 15
15.0 Records
The following information must be recorded at installation, and annually for every year of operation after installation. These records must be maintained throughout the life of the battery and made available for review by GNB representatives for capacity or life related warranty claims. Failure to collect and store these maintenance data will void the warranty. Please review the warranty statement specific to the battery application for any additional requirements.
• Individual cell voltages
• Overall string voltage
• Ambient temperature immediately surrounding battery
• Battery temperature at several places throughout the string. Recommend 1 reading per battery stack. More data points are recommended for larger batteries and to check for temperature gradients. Readings on the tray, cell cover or negative terminal are good places to measure battery temperature. Take readings away from HVAC sources.

- 15 -
• Float current measured at stack to stack connections (optional)
• Ohmic measurements (optional). Baseline ohmic readings of individual cells should be taken 6 months from the date of initial charge.
• Retorque connectors as part of annual maintenance.
ONCE PER YEAR READINGS ARE THE ABSOLUTE MINIMUM REQUIRED TO PROTECT WARRANTY. More frequent readings are recommended, especially for critical sites. Good record-keeping will prevent minor issues from escalating into more serious problems over time. See Figure 25 for sample record-keeping form.
SECTION 16
16.0 Tap Connections
Tap connections should not be used on a battery. This can cause overcharging of the unused cells and undercharging of those cells supplying the load, thus reducing battery life.
SECTION 17
17.0 Temporary Non-Use
An installed battery that is expected to stand idle longer than the maximum storage interval (see Sec. 4.2), should be treated as stated below. The maximum storage interval is 6 months if stored at 77°F.
Give the battery an equalizing charge as per Section 13. Following the equalizing charge, open connections at the battery terminals to remove charger and load from the bat-tery.
Repeat the above after every 6 months (77°F) or at the required storage interval. See Section 4.2 for adjustments to storage intervals when the storage temperature exceeds 77°F.
To return the battery to normal service, re-connect the bat-tery to the charger and the load, give an equalizing charge and return the battery to float operation.
SECTION 18
18.0 Unit Cleaning
Periodically clean cell covers with a dry 2” paintbrush to remove accumulated dust. If any cell parts appear to be damp with electrolyte or show signs of corrosion, contact your local GNB representative.
SECTION 19
19.0 Connections
Battery terminals and intercell connections should be cor-rosion free and tight for trouble-free operation. Periodically these connections should be inspected.
CAUTION!
DO NOT WORK ON CONNECTIONS WITH BATTERY CONNECTED TO CHARGER OR LOAD.
!
If corrosion is present, disconnect the connector from the terminal.
Gently clean the affected area using a suede brush or Scotch Brite scouring pad. Apply a thin coating of NO-OX-ID “A” grease to the cleaned contact surfaces, reinstall connectors and retorque connections to 11.3 Newton-meters (100 inch pounds).
ALL TERMINAL AND INTERCELL CONNECTIONS SHOULD BE RETORQUED AT LEAST ONCE EVERY YEAR TO 11.3 NEWTON-METERS (100 INCH POUNDS).
NOTE: Design and/or specifications subject to change without notice. If questions arise, contact your local sales representative for clarification.
SECTION 20
20.0 Capacity Testing
When a capacity discharge test is desired, it is recommend-ed that it be performed in accordance with IEEE-1188*, latest revision.
An equalizing charge, as described in Section 13.2, must be completed within 7 days prior to the capacity test. The bat-teries must be returned to float charging immediately after the equalize charge completes. Allow the batteries to float at least 72 hours prior to capacity discharge.
After the capacity discharge has completed, the batteries can be recharged in the shortest amount of time by following the equalize charge procedure described in Section 13.2.
*IEEE-1188: Recommended Practice for Maintenance, Testing, and Replacement of Valve-Regulated Lead-Acid (VRLA) Batteries for Stationary Applications.
CAUTION!
Do not clean plastic parts with solvents, detergents, oils, mineral spirit or spray type cleaners as these may cause crazing or cracking of the plastic materials.

- 16 -
AB
SO
LY
TE
BA
TT
ER
Y M
AIN
TE
NA
NC
E R
EP
OR
T
PA
GE
1 O
F
No.
of C
ELL
S:
CH
AR
GE
R V
OLT
AG
E:
CH
AR
GE
R C
UR
RE
NT
:
pme
Tp
meT
pme
Tp
meT
AD
DIT
ION
AL
CO
MM
EN
TS
:
Ohm
icC
/ R
/ I
Ohm
icC
/ R
/ I
Cel
lC
onn.
No.
Vol
tsR
esis
t.O
hmic
C /
R /
IO
hmic
C /
R /
IC
ell
Con
n.N
o.V
olts
Res
ist.
Cel
lC
onn.
No.
Vol
tsR
esis
t.
29 3012
009
0611
989
5911
888
8511
787
5711
668
6511
585
5511
448
4511
383
5311
228
2511
181
5111
008
0510
979
4910
887
8410
777
4710
667
6410
575
4510
447
4410
373
4310
227
2410
171
4110
007
0499
6939
9886
8397
6737
9666
6395
6535
9446
4393
363332
9262
9161
Con
n.R
esis
t.
23 24 25 26 27 2819 20 21 2215 16 17 1811 12 13 147 8 9 10
31
5 6Cel
l
DA
TE
:
INS
TA
LL D
AT
E:
BA
TT
ER
Y L
OC
AT
ION
/ N
UM
BE
R:
SY
ST
EM
VO
LTA
GE
:T
EM
PE
RA
TU
RE
:
AD
DR
ES
S:
CO
MP
AN
Y:
TY
PE
:M
AN
UF
. DA
TE
:
SE
RIA
L N
UM
BE
R:
No.
Vol
ts
41 2 3
Figure 15
A D
ivis
ion
of E
xide
Tec
hnol
ogie
s
A D
ivis
ion
of E
xide
Tec
hnol
ogie
s
A D
ivis
ion
of E
xide
Tec
hnol
ogie
s
Cel
l N
o.Vo
ltsC
onn.
R
esis
t.O
hmic
C
/ R
/ I
Tem
pC
ell
No.
Volts
Con
n.
Res
ist.
Ohm
ic
C /
R /
ITe
mp
Cel
l N
o.Vo
ltsC
onn.
R
esis
t.O
hmic
C
/ R
/ I
Tem
pC
ell
No.
Volts
Con
n.
Res
ist.
Ohm
ic
C /
R /
ITe
mp
11
11
22
22
33
33
44
44
55
55
66
66
77
77
88
88
99
99
1010
1010
1111
1111
1212
1212
1313
1313
1414
1414
1515
1515
1616
1616
1717
1717
1818
1818
1919
1919
2020
2020
2121
2121
2222
2222
2323
2323
2424
2424

- 17 -
72.262.252.242.232.272.262.252.242.232.23 2.35 55 2.30 2.31 2.32 2.33 2.344 2.35 2.35 56 2.29 2.30 2.31 2.32 2.335 2.34 2.35 57 2.29 2.30 2.31 2.32 2.336 2.34 2.35 58 2.29 2.30 2.31 2.32 2.337 2.33 2.34 9553.2 2.28 2.29 2.30 2.31 2.328 2.33 2.34 0653.2 2.28 2.29 2.30 2.31 2.329 2.32 2.33 2.34 2.35 61 2.28 2.29 2.30 2.31 2.32
10 2.32 2.33 2.34 2.35 62 2.28 2.29 2.30 2.31 2.3211 2.31 2.32 2.33 2.34 2.35 63 2.27 2.28 2.29 2.30 2.3112 2.31 2.32 2.33 2.34 2.35 64 2.27 2.28 2.29 2.30 2.3113 2.30 2.31 2.32 2.33 2.34 65 2.27 2.28 2.29 2.30 2.3114 2.30 2.31 2.32 2.33 2.34 66 2.26 2.27 2.28 2.29 2.3015 2.29 2.30 2.31 2.32 2.33 67 2.26 2.27 2.28 2.29 2.3016 2.28 2.29 2.30 2.31 2.32 68 2.26 2.27 2.28 2.29 2.3017 2.28 2.29 2.30 2.31 2.32 69 2.25 2.26 2.27 2.28 2.2918 2.27 2.28 2.29 2.30 2.31 70 2.25 2.26 2.27 2.28 2.2919 2.27 2.28 2.29 2.30 2.31 71 2.25 2.26 2.27 2.28 2.2920 2.26 2.27 2.28 2.29 2.30 72 2.25 2.26 2.27 2.28 2.2921 2.26 2.27 2.28 2.29 2.30 73 2.24 2.25 2.26 2.27 2.2822 2.25 2.26 2.27 2.28 2.29 74 2.24 2.25 2.26 2.27 2.2823 2.25 2.26 2.27 2.28 2.29 75 2.24 2.25 2.26 2.27 2.2824 2.24 2.25 2.26 2.27 2.28 76 2.23 2.24 2.25 2.26 2.2725 2.23 2.24 2.25 2.26 2.27 77 2.23 2.24 2.25 2.26 2.2726 2.23 2.24 2.25 2.26 2.27 78 2.23 2.24 2.25 2.26 2.2727 2.22 2.23 2.24 2.25 2.26 79 2.22 2.23 2.24 2.25 2.2628 2.22 2.23 2.24 2.25 2.26 80 2.22 2.23 2.24 2.25 2.2629 2.21 2.22 2.23 2.24 2.25 81 2.22 2.23 2.24 2.25 2.2630 2.21 2.22 2.23 2.24 2.25 82 2.22 2.23 2.24 2.25 2.2631 2.20 2.21 2.22 2.23 2.24 83 2.21 2.22 2.23 2.24 2.2532 2.20 2.21 2.22 2.23 2.24 84 2.21 2.22 2.23 2.24 2.2533 2.20 2.21 2.22 2.23 85 2.21 2.22 2.23 2.24 2.2534 2.20 2.21 2.22 2.23 86 2.20 2.21 2.22 2.23 2.24
02.253 2.21 2.22 87 2.20 2.21 2.22 2.23 2.2402.263 2.20 2.21 88 2.21 2.22 2.23 2.24
37 2.20 2.21 89 2.20 2.21 2.22 2.2338 2.20 90 2.20 2.21 2.22 2.2339 2.20 12.219 2.22 2.23
12.229 2.22 2.2302.239 2.21 2.2202.249 2.21 2.22
95 2.21 2.22
Expressed in Volts per CellTemperature Corrected Float Voltages
APPENDIX A
Bat
tery
Tem
pera
ture
(°F
)
Float Voltage at 25°C
Bat
tery
Tem
pera
ture
(°C
)
Float Voltage at 77°F
- 18 -

- 19 -
APPENDIX C
BONDING & GROUNDING OF BATTERY RACK
INTRODUCTION1. To insure personnel safety, and equipment protection, operation, and reliability, the battery rack should be connected to the
Common Bonding Network (CBN).
2. Electrical continuity between components is provided through the use of serrated hardware.
CONNECTING TO THE CBN1. The recommended location for attaching the frame ground is the back “C” channel on the upper module of the stack (see Figure 4).
2. Using a grinder, etc., remove the paint from around the holes, apply a thin film of NO-OX-ID “A” grease to the bare metal and attach the frame ground conductor/lug.
NOTE: Hardware and ground conductor/lug supplied by installer. Holes are sized for 1/4" self-tapping screws spaced 5/8" apart.
Figure 4: Recommended Frame Ground Location


A Division of Exide TechnologiesSECTION 92.70 2017-04
GNB Industrial PowerUSA – Tel: 888.898.4462 Canada – Tel: 800.268.2698
www.gnb.com
GNB Industrial Power – The Industry Leader.
A Division of Exide Technologies
®
®
SECTION 93.10 2013-06
GNB Industrial PowerUSA – Tel: 888.898.4462 Canada – Tel: 800.268.2698
www.gnb.com
GNB Industrial Power, a division of Exide Technologies, is aglobal leader in network power applications includingcommunication/data networks, UPS systems for computersand control systems, electrical power generation anddistribution systems, as well as a wide range of otherindustrial standby power applications. With a strongmanufacturing base in both North America and Europe and atruly global reach (operations in more than 80 countries) insales and service, GNB Industrial Power is best positioned tosatisfy your back up power needs locally as well as all over theworld.
Based on over 100 years of technological innovation the NetworkPower group leads the industry with the most recognized globalbrands such as ABSOLYTE®, GNB® FLOODED CLASSIC®,MARATHON®, RELAY GEL®, SONNENSCHEIN®, andSPRINTER®. They have come to symbolize quality, reliability,performance and excellence in all the markets served.
GNB Industrial Power takes pride in its commitment to a betterenvironment. Its Total Battery Management program, anintegrated approach to manufacturing, distributing and recyclingof lead acid batteries, has been developed to ensure a safe andresponsible life cycle for all of its products.
GNB Industrial Power –The Industry Leader.