Embed Size (px)
Citation preview

www.pyramidtechnologies.com
MODEL 3700 ELECTRONIC PAYROLL TIME RECORDER
ENGLISH ESPAÑOL
FRANÇAIS DEUTSCH
IMPORTANT! READ THESE INSTRUCTIONS BEFORE
INSTALLING AND USING THIS PRODUCT Keep these instructions for future reference.
INSTALLATION AND OPERATION
INSTRUCTIONS

SET-UP INSTRUCTIONS
STEP 1 – UNPACKING 1. Remove the Model 3700 from its box and place it on a firm surface. 2. Plug unit into an outlet. 3. Locate key packaged with the unit. Unlock and remove the top cover of the unit.
Locate the programming buttons which are labeled SELECT, UP, and DOWN. STEP 2 – PROGRAMMING THE MODEL 3700 Programming the Model 3700 is extremely easy and can be done in 3 easy steps. NOTE: The display will flash Jan 1 12:01AM when power is lost for more than 30 days, simply reset the time by the following steps. 1. To change or set a feature, press the SELECT button until the desired feature is
displayed. 2. Use the UP or DOWN button to change the feature. 3. After the displayed feature is changed, press the SELECT button to change
other features and to return to the main display. STEP 3 – READY TO GO Reinstall the top cover, lock the unit and you are ready to use your new Model 3700.
FEATURE TABLE
LANG=ENGLISH – Use the UP or DOWN key to select the desired language to print and program the Model 3700. Select English, Spanish, French or German. DATE FMT=YYMMDD – Use the UP or DOWN key to select the desired date format that will be printed and displayed. There are three selections: YYMMDD (Year, Month, Day), MMDDYY (Month, Day, Year) or DDMMYY (Day, Month, Year). SET YEAR – Use the UP or DOWN key to set the desired year. SET MONTH – Use the UP or DOWN key to set the desired month. SET DAY – Use the UP or DOWN key to set the desired day of month. DAYLIGHT SAV=USA – Allows the Model 3700 to automatically adjust to daylight saving time. There are 4 options you can select with the UP or DOWN key:
1. USA-Automatically adjusts time to United States daylight saving time. 2. EURO-Automatically adjusts time to European daylight saving
time.(Begins last Sunday in March and ends on the last Sunday in October)
1

3. OTHER-Allows you to select a custom start and end Sunday for automatic daylight saving time changes. After SELECTING OTHER, use the UP or DOWN key to select the desired Sunday (only Sundays are allowed) you wish to START daylight saving time, press SELECT and again use the UP or DOWN key to select the desired Sunday to END daylight saving time. Note: The time will automatically change at 2 a.m. on the selected Sundays. Press SELECT and the TIME STD=LINE option will appear. Press SELECT again to advance to the next option. (Note: The TIME STD=LINE option should only be changed for areas where there is frequency variation in the power lines, however, this does not occur in the USA. If you are operating this unit in an area that has problems with power line frequency resulting in the unit losing or gaining time or you are running the unit off a generator/inverter, use the UP or DOWN key to change the TIME STD to CRYSTAL which will cause the unit to keep time using an internal device.)
4. OFF- Unit will not adjust time for daylight saving time. DSPLY FMT=AM/PM – Selects how the time will be displayed on the front of the unit. Using the UP or DOWN keys, select one of the following options:
1. AM/PM - Standard time (1-12 hours).
2. MIL - Military time (0-24 hours). PRINT FMT=AM/PM – Selects how time will be printed on the time card. Using the UP or DOWN keys, select one of the following options:
1. AM/PM - Standard time (3:30 PM) 2. MIL- Military time (3:30 PM = 15:30) 3. ATAAP-Military time with minutes expressed in hundredths of hour (3:30
PM = 15.50) 4. 24H.1 – Time expressed with minutes in tenths of an hour.
PRINT DIR=RIGHT – Use the UP or DOWN key to select printing on the right side of the time card or the left side (almost all time cards in the USA are right sided). FMT=DATE TIME – Use the UP or DOWN key to select which of the following formats you want printed on time card:
1. DATE TIME – Prints current date and time.
2. DATE YR TIME – Prints current date, year, and time (small font). 3. DATE YR APPD – Prints current date, year, and APPD (approved)
message. 4. DATE YR FAXD – Prints current date, year, and FAXD (faxed) message. 5. DATE YR FILE – Prints current date, year, and FILE (filed) message. 6. DATE YR IN – Prints current date, year, and IN message. 7. DATE YR OUT – Prints current date, year, and OUT message. 8. DATE YR PAID – Prints current date, year, and PAID message.
2

9. DATE YR RCVD – Prints current date, year, and RCVD (received) message.
10. DATE YR SENT – Prints current date, year, and SENT message. 11. DATE YR ORIG – Prints current date, year, and ORIG (original)
message. 12. DATE YR VOID – Prints current date, year, and VOID message. 13. DATE YR USED – Prints current date, year, and USED message. 14. DATE YR CPLD – Prints current date, year, and CPLD (completed)
message.
SET HOUR – Sets the current hour of day by using the UP or DOWN key. SET MINUTES – Sets the current minute of day by using the UP or DOWN key.
Note: To bypass any feature, simply press the SELECT button until the desired feature is displayed. Need Help? Contact Pyramid Technical
Service toll free at 1-888-479-7264.
CHANGING THE PRINT RIBBON 1. Unplug the clock and remove the cover using the key provided. 2. Turn the clock on its side so the ribbon is on top. 3. Manually move the ribbon cartridge holder to the left towards the display. 4. Gently push the hold tab away from the ribbon cartridge and remove the ribbon
cartridge. 5. Snap the new ribbon cartridge into the holder while turning the ribbon advance
knob. Make sure the ribbon and the clear plastic protector slide completely over the print head.
6. Replace and lock the cover. Test the unit for proper installation by punching several times on a time card.
3
Hold Down
Tab
Ribbon Advance
Knob
Print Head
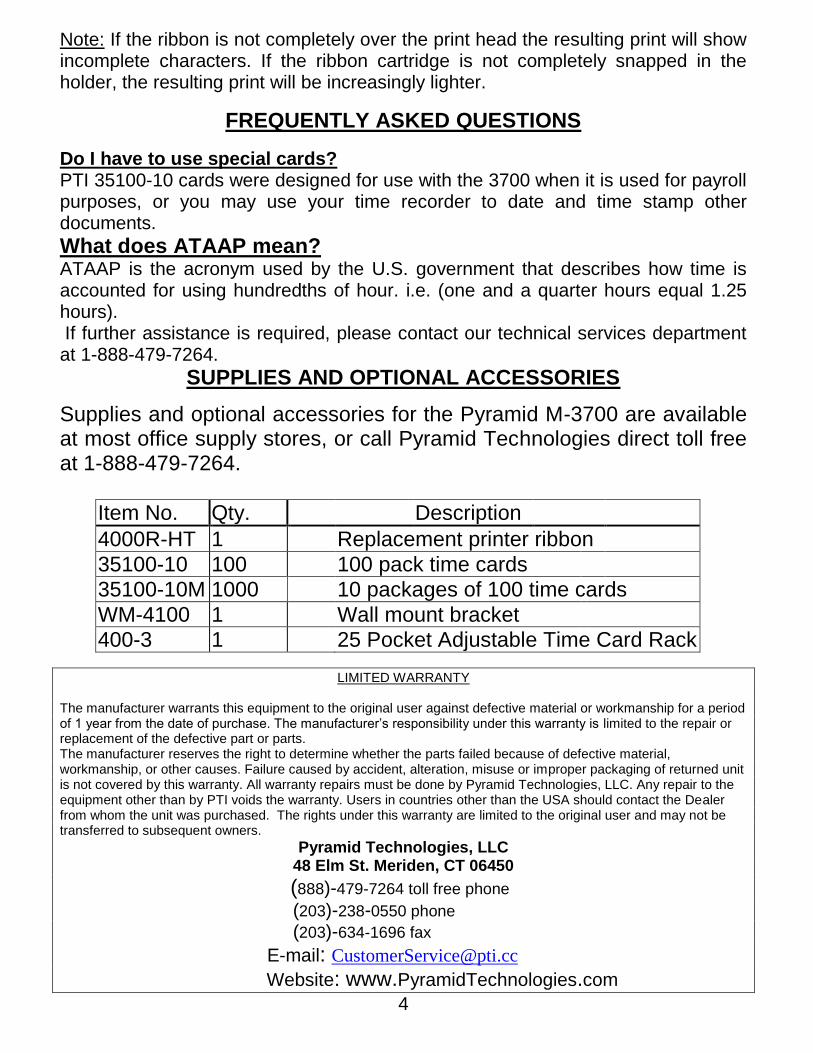
Note: If the ribbon is not completely over the print head the resulting print will show incomplete characters. If the ribbon cartridge is not completely snapped in the holder, the resulting print will be increasingly lighter.
FREQUENTLY ASKED QUESTIONS
Do I have to use special cards? PTI 35100-10 cards were designed for use with the 3700 when it is used for payroll purposes, or you may use your time recorder to date and time stamp other documents.
What does ATAAP mean? ATAAP is the acronym used by the U.S. government that describes how time is accounted for using hundredths of hour. i.e. (one and a quarter hours equal 1.25 hours). If further assistance is required, please contact our technical services department at 1-888-479-7264.
SUPPLIES AND OPTIONAL ACCESSORIES
Supplies and optional accessories for the Pyramid M-3700 are available at most office supply stores, or call Pyramid Technologies direct toll free at 1-888-479-7264.
Item No. Qty. Description
4000R-HT 1 Replacement printer ribbon
35100-10 100 100 pack time cards
35100-10M 1000 10 packages of 100 time cards
WM-4100 1 Wall mount bracket
400-3 1 25 Pocket Adjustable Time Card Rack
LIMITED WARRANTY The manufacturer warrants this equipment to the original user against defective material or workmanship for a period of 1 year from the date of purchase. The manufacturer’s responsibility under this warranty is limited to the repair or replacement of the defective part or parts. The manufacturer reserves the right to determine whether the parts failed because of defective material, workmanship, or other causes. Failure caused by accident, alteration, misuse or improper packaging of returned unit is not covered by this warranty. All warranty repairs must be done by Pyramid Technologies, LLC. Any repair to the equipment other than by PTI voids the warranty. Users in countries other than the USA should contact the Dealer from whom the unit was purchased. The rights under this warranty are limited to the original user and may not be transferred to subsequent owners.
Pyramid Technologies, LLC 48 Elm St. Meriden, CT 06450
(888)-479-7264 toll free phone
(203)-238-0550 phone (203)-634-1696 fax E-mail: [email protected]
Website: www.PyramidTechnologies.com
4

EXTENDED WARRANTY
All extended warranties are good for the new period purchased, per the terms noted on page 4. In addition, with the purchase of an extended warranty, Pyramid also offers next day service-at no charge-for any terminals/clocks that are to be replaced per the terms of the warranty. Also included with the extended warranty program is unlimited toll free technical support for the period of the extended warranty. See enclosed order form to purchase extended warranty protection.
Specifications Operating Conditions Temperature 0C to 50C, (3F to 122F) Humidity 10 to 95% RH, non condensing Power Failure Battery Back-up of data and time for 30 days Battery life (Designed to last more than10 years) Calendar Automatic Leap Year and daylight saving time, Year up to 2099 Clock Accuracy Less than 30 seconds/year Weight 7.9 lbs (3.6 kg) Dimensions 8" wide x8.25" high x 7" deep 203.2mm wide x 209.6mm high x 177.8 mm deep Certifications UL and CUL Mounting Desktop Or Wall Mountable.
5
PYRAMID TECHNOLOGIES
REGISTRADORA ELECTRONICA DE TIEMPO
DE PAGO. MODELO 3700
¡ATENCION!
LEA ATENTAMENTE LAS INSTRUCCIONES ANTES DE LA INSTALACION Y USO DE ESTE PRODUCTO.
Conserve las instrucciones para futuras consultas.
INSTRUCCIONES DE INSTALACION
PRIMER PASO – DESEMPAQUETAR 1. Remueva el Modelo 3700 de su caja y sitúelo en una superficie firme y plana.
2. Conecte la unidad a una toma de corriente eléctrica.
3. Localíze la llave que acompaña el equipo, desencaje y separe la cubierta o tapa superior
de la unidad, visualize los botones de programación SELECT, UP, y DOWN.
SEGUNDO PASO – PROGRAMACION DEL MODELO 3700 La programación del Modelo 3700 es extremadamente sencilla y puede concluirse en tres pasos sencillos. NOTA: El visualizador volverá a mostrar Jan 1 12:01AM cuando se encuentra desconectada de la corriente por más de 30 días. Simplemente vuelva a introducir la hora siguiendo estos pasos.
1. Para cambiar o seleccionar una determinada función, debe presionar el botón SELECT
hasta que aparezca visualizada la opción deseada.
2. Utilize los botónes UP y DOWN para cambiar de función.
3. Después de cambiar una determinada característica que aparezca visualizada, presione el
botón SELECT para cambiar otras y para volver al menú principal.
TERCER PASO – LISTO PARA EMPEZAR
Coloque la cubierta o tapa superior, cierre y asegure la unidad y usted esta listo para utilizar
su nuevo Modelo 3700.
1
INSTRUCCIONES DE INSTALACION
Y USO

TABLA DE CONTENIDOS
IDIOM=ENGLISH – Utilize las teclas UP y DOWN para seleccionar el idioma deseado
para la impresión y programación del Modelo 3700. Seleccione Inglés, Español, Francés o
Alemán, según su preferencia.
DATE FMT=USA – Utilize las teclas UP y DOWN para seleccionar el formato de fecha
que desee sea mostrado e impreso. Existen dos posibilidades: USA (Mes, Día, Año) o
EURO (Europa: Día, Mes, Año).
SELECCIONAR AÑO – Utilize las teclas UP y DOWN para seleccionar el año deseado.
SELECCIONAR MES – Utilize las teclas UP y DOWN para seleccionar el mes deseado.
SELECCIONAR DIA – Utilize las teclas UP y DOWN para seleccionar el día del mes
deseado.
DAYLIGHT SAV=USA – Esta opción permite al Modelo 3700 ajustarse automáticamente
según el sistema de cambio de hora para aprovechamiento de luz solar. Existen 4 opciones
que pueden ser seleccionadas mediante las teclas UP y DOWN:
1. USA-Ajusta la hora automáticamente al sistema de cambio de hora
estadounidense.
2. EURO- Ajusta la hora automáticamente al sistema de cambio de hora europea
(empezando el último domingo de marzo y acabando en el último domingo de
octubre).
3. OTROS- Le permite seleccionar los domingos determinados en los que se inicia y
finaliza el sistema de cambio de hora de ahorro energético. Después de
seleccionar OTHER, utilize las teclas UP y DOWN para elegir el domingo (sólo
se permite esta operación para los domingos) en el que desea comenzar el sistema
de cambio de hora, nuevamente presione SELECT y las teclas UP y DOWN para
elegir el domingo en el que se desea poner fin al sistema de cambio de hora para
el ahorro de energía. NOTA: La hora cambiará automáticamente a las 2 a.m. de
los domingos seleccionados. Presione de nuevo SELECT para continuar con la
siguiente opción. (NOTA: la opción TIME STD=LINE debera cambiarse
únicamente en aquellos lugares donde es frecuente el cambio de intensidad en la
corriente eléctrica, aunque esto no ocurre en los EE.UU. Si usted esta operando
esta unidad en un lugar que presenta problemas con la corriente eléctrica, como
consecuencia de caídas de la frecuencia, o usted está empleando está unidad con
un generador/inversor de corriente, utilize las teclas UP y DOWN para cambiar la
función TIME STD a CRYSTAL, lo que permitirá que la unidad conserve la hora
exacta utilizando un dispositivo interno independiente).
4. OFF- Mediante esta opción la unidad no ajustará la hora al cambio del sistema de
ahorro energético.
2
VISUALIZAR FMT=AM/PM Selecciona el modo en el que se visualizará la hora en la
parte frontal de la unidad. Utilizando las teclas UP y DOWN, seleccione una de las
siguientes opciones:
1. AM/PM - Hora establecida o fija (1-12 horas).
2. MIL - Hora militar (0-24 horas)
IMPRIMIR FMT=AM/PM Selecciona el modo en el que se imprimirá la hora en las
fichas de tiempo. Ulizando las teclas UP y DOWN, seleccione una de las siguientes
opciones:
1. AM/PM - Hora establecida o fija (3:30 PM).
2. MIL - Hora militar (3:30 PM = 15:30)
3. ATAAP - Hora militar con los minutos expresados en centenas de hora (3:30 PM =
15.50)
4. 24H.1 – Hora con minutos expesado en decimos de hora.
IMPRIMIR DIR=RIGHT Utilize las teclas UP y DOWN para seleccionar el lugar de
impresión de la tarjeta, izquierda o derecha (Casi todas las tarjetas de tiempo en los USA
estan hechas para ser imprimidas en el lado derecho).
IMPRIMIR FMT=DATE TIME Utilize las teclas UP y DOWN para seleccionar cual de
los siguientes formatos de impresión prefiere que aparezcan en la ficha de tiempo:
1. FECHA HORA Imprime la fecha y hora corrientes.
2. FECHA AÑO HORA Imprime la fecha, año (dos dígitos) y hora corrientes (en
un pequeño formato).
3. FECHA AÑO APPD Imprime la fecha, año (dos dígitos) y un mensaje de
aprobación (APPD).
4. FECHA AÑO FAXD Imprime la fecha, año (dos dígitos) y un mensaje enviado
por fax (faxed).
5. FECHA AÑO FILE Imprime la fecha, año (dos dígitos) y un mensaje
clasificado (filed).
6. FECHA AÑO IN Imprime la fecha, año (dos dígitos) y el mensaje de entrada
(in).
7. FECHA AÑO OUT Imprime la fecha, año (dos dígitos) y el mensaje de salida
(out).
8. FECHA AÑO PAID Imprime la fecha, año (dos dígitos) y el mensaje pagado.
9. FECHA AÑO RCVD Imprime la fecha, año (dos dígitos) y el mensaje recibido.
10. FECHA AÑO SENT Imprime la fecha, año (dos dígitos) y el mensaje enviado
11. FECHA AÑO ORIG Imprime la fecha, año (dos dígitos) y el mensaje original.
12. FECHA AÑO VOID Imprime la fecha, año (dos dígitos) y el mensaje invalido
o nulo.
13. FECHA AÑO USED – Imprime la fecha, año (dos dígitos) y el mensaje usado .
14. FECHA AÑO CPLD Imprime la fecha, año (dos dígitos) y el mensaje
completo.
SELECCIONAR HORA – Utilize las teclas UP y DOWN para seleccionar la hora exacta
del día.
3

SELECCIONAR MINUTOS – Utilize las teclas UP y DOWN para seleccionar el minuto
exacto.
Nota: Para saltar cualquier característica, simplemente presione el botón SELECT
hasta que se visualize la opción deseada. ¿Necesita ayuda? Contácte el Servicio
Técnico de Pyramid en el número gratuito 1-888-479-7264.
CAMBIO DE LA CINTA DE IMPRESIÓN
1. Desconecte el reloj y separe la cubierta superior de la unidad con la llave suministrada. 2. Dele vuelta al reloj de forma que la cinta quede situada en la parte superior. 3. Mueva manualmente la rosca del cartucho de impresión a la izquierda, en dirección al visualizador. 4. Empúje suavemente la pestaña de enganche del cartucho de impresión, y remueva el cartucho de impresión. 5. Encaje a presión el nuevo cartucho de impresión y haga avanzar la cinta dándole vueltas a la manecilla de arrastre. Asegúrese de que la cinta y el plástico transparente protector se deslízan sin dificultad sobre la cabeza impresora. 6. colóque nuevamente la cubierta superior y encájela en su posición.correcta. Pruebe que la unidad esté correctamente instalada perforando varias veces una fícha o tarjeta de tiempo.
Nota: Si la cinta no cubre completamente la cabeza impresora, la impresión resultante mostrará caractéres incompletos. Si el cartucho de la cinta no queda completamente encajado en su correspondiente ubicación, la impresión resultará anormalmente clara.
4
Manecilla de
arrastre de la cinta
Presione la pestaña de enganche
Cabeza impresora

PREGUNTAS FRECUENTES
¿Debo utilizar fichas especiales? Las fichas PTI 35100-10 han sido diseñadas para su utilización con el modelo 3700 cuando este es utilizado con fines de pago, pero también puede utilizar su impresor de fecha y hora para grabar cualquier otro tipo de documentos. ¿Qué significa ATAAP? ATAAP es la abreviatura utilizada por el gobierno de los EE.UU. para definir el sistema de decimal de medición del tiempo que utiliza las centenas de hora (ej. Una hora y cuarto corresponde a 1.25 horas). Si requiere ayuda adicional por favor pongase en contacto con nuestro departamento de servicios técnico en 1-888-479-7264
REPUESTOS Y ACCESORIOS OPCIONALES
Piezas de repuesto y accesorios adicionales para la Pyramid M-3700 pueden encontrarse en la mayoría de las tiendas de repuestos, o llamando al número de teléfono gratuito de Pyramid Technologies 1-888-479-7264.
Nº Serie. Cantidad Descripción
4000R-HT 1 Cinta impresora de repuesto
35100-10 100 Paquete de 100 fichas de tiempo
35100-10M 1000 10 paquetes de 100 fichas de tiempo
WM-4100 1 Enganches para ajustar a la pared
400-3 1 Fichero ajustable de 25 bolsillos para fichas de tiempo.
GARANTIA LIMITADA
El fabricante ofrece al usuario original de este equipo una garantía de un año desde la fecha de compra contra defectos de fabricación o del material empleado. La responsabilidad del fabricante, bajo esta garantía, queda
limitada a la reparación o sustitución de la pieza o piezas defectuosas. El fabricante se reserva el derecho de decidir cuando las piezas muestran daños debidos a defectos de fabricación, del material o a otras razones. Los daños ocasionados por accidente, manipulación indebida, empleo incorrecto o embalaje inapropiado en la devolución de la unidad quedan explícitamente excluidos de esta garantía. Todas las
reparaciones cubiertas por esta garantía deben ser realizadas por Pyramid Technologies, LLC. Cualquier otra reparación hecha a este equipo al margen de PTI anula automáticamente esta garantía. Los usuarios de otros paises que no sean los EE.UU. deben contactar a el vendedor que les suministró este equipo. Los derechos
cubiertos por esta garantía quedan limitados al usuario original que compró la unidad, y son intransferibles a otros propietarios posteriores.
Pyramid Technologies, LLC 48 Elm St. Meriden, CT 06450
(203)-238-0550 teléfono (203)-634-1696 fax
E-mail: [email protected] Website: WWW. PyramidTechnologies.com
5
PYRAMID TECHNOLOGIES
ENREGISTREUSE ELECTRONIQUE DE TEMPS
DE PAIE. MODELE 3700.
IMPORTANT!
LISEZ ATTENTIVEMENT CES INSTRUCTIONS AVANT D’INSTALLER ET
D’UTILISER CE PRODUIT.
Gardez ces instructions pour pouvoir les consulter ultérieurement.
INSTRUCTIONS D’INSTALLATION
PREMIERE ETAPE – SORTIR L’APPAREIL DE SON EMBALLAGE. 1. Enlevez le Modèle 3700 de sa boîte et placez-le sur une surface plane. 2. Connectez l’unité à une prise de courant. 3. Repérez la clé qui va avec l’unité. Dégagez et mettez de côté le couvercle de
l’unité. Repérez les boutons programmateurs SELECT, UP et DOWN. DEUXIEME ETAPE – PROGRAMMER LE MODELE 3700 La programmation du Modèle 3700 est extrêmement simple et peut être réalisée en trois étapes faciles. REMARQUE: l’écran marquera Jan 1 12:01A.M si l’appareil n’est pas connecté pendant plus de 30 jours; remettez alors très facilement l’appareil à l’heure en suivant les étapes suivantes. 1. Pour changer ou mettre en place une fonction, appuyez sur le bouton SELECT
jusqu’à ce que la fonction desirée apparaisse sur l’écran. 2. Utilisez les boutons UP et DOWN pour changer de fonction. 3. Une fois que vous avez changé une certaine fonction visualisée sur l’écran,
appuyez sur le bouton SELECT pour changer d’autres fonctions et pour revenir au menu principal.
1
INSTRUCTIONS D’INSTALLATION ET MODE
D’EMPLOI.

TROISIEME ETAPE – PRET A FONCTIONNER Remettez en place le couvercle, fermez l’unité et vous voilà prêt à utiliser votre nouveau Modèle 3700. INVENTAIRE DES FONCTIONS LANG=ENGLISH – Utilisez les touches UP et DOWN pour sélectionner la langue dans laquelle vous voulez imprimer et programmer le Modèle 3700. Sélectionnez Anglais, Espagnol, Français ou Allemand, selon votre préférence. DATE FMT=USA – Utilisez les touches UP et DOWN pour sélectionner la façon dont la date apparaîtra sur l’écran et sera imprimée. Il existe deux possibilités: USA (Mois, Jour, Année) ou EURO (Europe : Jour, Mois, Année). SELECTIONNER L’ANNEE – Utilisez les touches UP et DOWN pour sélectionner l’année desirée. SELECTIONNER LE MOIS – Utilisez les touches UP et DOWN pour sélectionner le mois desiré. SELECTIONNER LE JOUR – Utilisez les touches UP et DOWN pour sélectionner le jour desiré. DAYLIGHT SAV=USA – Cette option permet au Modèle 3700 de s’adapter automatiquement au système de changement de l’heure normale á l’heure avancée et vice versa. Il y a 4 possibilités que vous pouvez sélectionner à l’aide des touches UP et DOWN : 1. USA- Réglage automatique de l’heure au système de changement d’heure
américain. 2. EURO- Réglage automatique de l’heure au changement d’heure européen (qui
commence le dernier dimanche du mois de mars et prend fin le dernier dimanche du mois d’octobre).
3. OTHER- Cette option vous permet de sélectionner le dimanche où débute et celui où finit le système de changement horaire. Après avoir sélectionné OTHER, utilisez les touches UP et DOWN pour sélectionner le dimanche (vous ne pouvez sélectionner que le dimanche comme jour de la semaine) où vous désirez faire commencer l ‘heure avancée, puis appuyez sur SELECT et utilisez une fois de plus les touches UP et DOWN pour sélectionner le dimanche où vous désirez revenir á l’heure normale. REMARQUE : l’heure changera automatiquement à 2 : 00 heures du matin des dimanches sélectionnés. Appuyez sur SELECT et l’option TIME STD=LINE option apparaîtra. Appuyez sur SELECT encore une fois pour passer à l’option suivante. (REMARQUE : l’option TIME STD-LINE ne devra être changée que dans les endroits où il y a fréquemment des changements d’intensité du courant électrique ; toutefois, cela n’a jamais lieu aux Etats-Unis. Si vous faîtes marcher cette unité dans un endroit qui a des problèmes avec le courant électrique liés aux chutes de fréquence,
2
ou si vous faîtes opérer cette unité sans générateur/inverseur de courant, utilisez les touches UP et DOWN pour passer de la fonction TIME STD à CRYSTAL, ce qui permettra à l’unité de garder l’heure exacte à l’aide d’une horloge interne indépendante).
4. OFF. Choisissez cette option si vous souhaitez ne pas vous adapter au systeme de l’heure avancée. DSPLY FMT=AM/PM – Sert à sélectionner la façon dont l’heure apparaîtra sur le devant de l’unité. A l’aide des touches UP et DOWN, sélectionnez une des options suivantes : 1. AM/PM – Heure standard (1 – 12 heures) 2. MIL – Heure militaire (0 – 24 heures) PRINT FMT – AM/PM – Sert à sélectionner la façon dont l’heure apparaîtra sur la carte. A l’aide des touches UP et DOWN, sélectionnez une des options suivantes : 1. AM/PM – Heure standard (3 :30 PM) 2. MIL – Heure militaire (3 :30 PM = 15 :30) 3. ATAAP – Heure militaire avec les minutes exprimées en centièmes d’heure (3 :30 PM = 15 :50) 4. 24H.1 - Heure avec les minutes exprimées en dixièmes d'heure.
PRINT DIR=RIGHT – Utilisez les touches UP et DOWN pour choisir d’imprimer soit sur le côté droit de la carte, soit sur le côté gauche de la carte (presque toutes les cartes sont imprimées sur le côté droit aux Etats-Unis). FMT=DATE TIME – Utilisez les touches UP et DOWN pour sélectionner le type de format, parmi les suivants, que vous desirez voir imprimé sur la carte : 1. DATE HEURE – Imprime la date et l’heure en cours. 2. DATE ANNEE HEURE – Imprime la date, l’année, et l’heure (en petit
format). 3. DATE ANNEE APPD – Imprime la date, l’année, et un message
d’approbation (APPD). 4. DATE ANNEE FAXD – Imprime la date, l’année, et un message envoyé par
fax (FAXD). 5. DATE ANNEE FILE – Imprime la date, l’année, et un message classé
(FILE). 6. DATE ANNEE IN – Imprime la date, l’année, et un message arrivé (IN). 7. DATE ANNEE OUT – Imprime la date, l’année, et un message parti (OUT). 8. DATE ANNEE PAID – Imprime la date, l’année et un message payé (PAID). 9. DATE ANNEE RCVD – Imprime la date, l’année, et un message reçu
(RCVD). 10. DATE ANNEE SENT – Imprime la date, l’année, et un message
envoyé (SENT). 11. DATE ANNEE ORIG – Imprime la date, l’année, et un message original
(ORIG). 3

12. DATE ANNEE VOID –Imprime la date, l’année, et un message annulé (VOID).
13. DATE ANNEE USED – Imprime l’année, la date, et un message utilisé (USED).
14. DATE ANNEE CPLD – Imprime la date, l’année, et un message d’opération accomplie (CPLD).
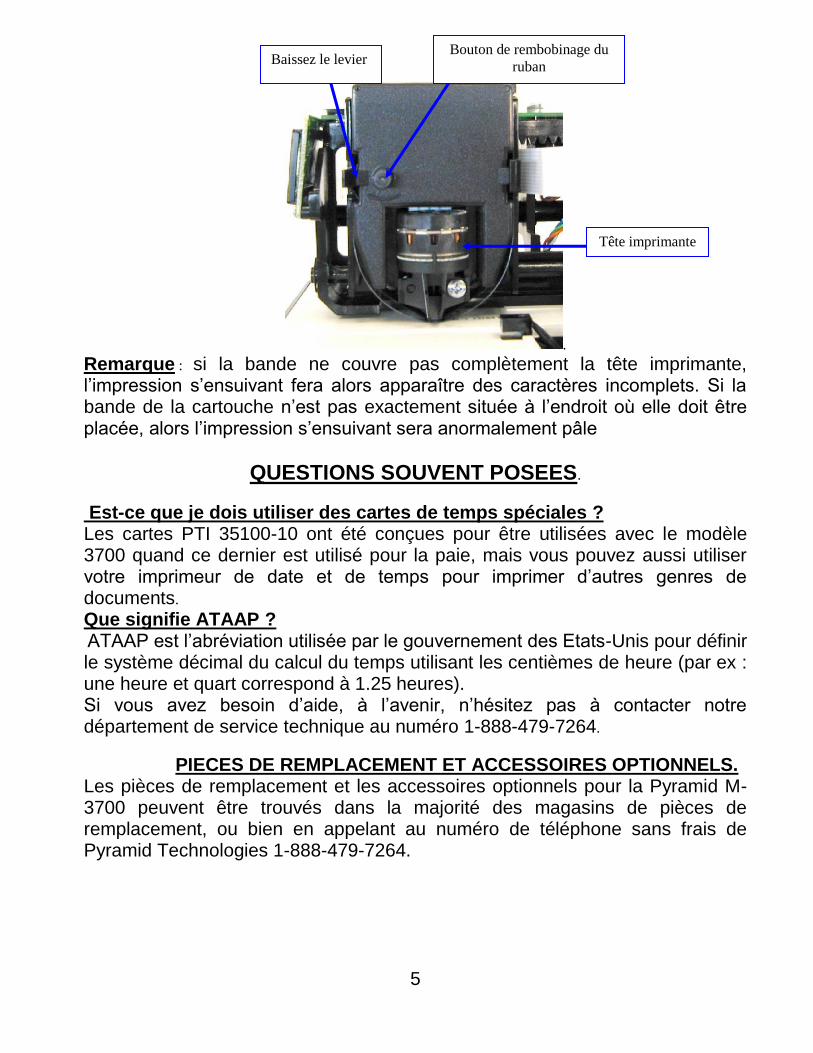
SELECTIONNER L’HEURE – Utilisez les touches UP et DOWN pour sélectionner l’heure exacte. SELECTIONNER LES MINUTES – Utilisez les touches UP et DOWN pour sélectionner la minute exacte. Remarque : pour passer n’importe quelle fonction, appuyez simplement sur la bouton SELECT jusqu’à ce que la fonction desirée apparaisse sur l’écran. Vous avez besoin d’aide ? Contactez le Service Technique de Pyramid au numéro sans frais 1-888-479-7264. CHANGEMENT DE LA CARTOUCHE D’IMPRESSION. 1. Débranchez l’horloge et séparez la partie supérieure de l’unité à l’aide de la
clé fournie. 2. Faîtes tourner l’horloge sur elle-même de sorte que le ruban soit situé sur la
partie supérieure. 3. Bougez manuellement le petit support de la cartouche d’impression vers la
gauche, en direction de l’écran. 4. Poussez très délicatement le levier de la cartouche d’impression, et retirez la
cartouche d’impression. 5. Poussez à fond la nouvelle cartouche d’impression et faîtes avancer le ruban
à l’aide du bouton de rembobinage. Assurez-vous que le ruban le plastique protecteur transparent glissent sans difficulté sur la tête imprimante.
6. Remettez le couvercle à sa place. Vérifiez que l’unité est correctement installée en perforant plusieurs fois une carte de temps.
4
.
Remarque : si la bande ne couvre pas complètement la tête imprimante, l’impression s’ensuivant fera alors apparaître des caractères incomplets. Si la bande de la cartouche n’est pas exactement située à l’endroit où elle doit être placée, alors l’impression s’ensuivant sera anormalement pâle
QUESTIONS SOUVENT POSEES.
Est-ce que je dois utiliser des cartes de temps spéciales ? Les cartes PTI 35100-10 ont été conçues pour être utilisées avec le modèle 3700 quand ce dernier est utilisé pour la paie, mais vous pouvez aussi utiliser votre imprimeur de date et de temps pour imprimer d’autres genres de documents.
Que signifie ATAAP ? ATAAP est l’abréviation utilisée par le gouvernement des Etats-Unis pour définir le système décimal du calcul du temps utilisant les centièmes de heure (par ex : une heure et quart correspond à 1.25 heures). Si vous avez besoin d’aide, à l’avenir, n’hésitez pas à contacter notre département de service technique au numéro 1-888-479-7264.
PIECES DE REMPLACEMENT ET ACCESSOIRES OPTIONNELS. Les pièces de remplacement et les accessoires optionnels pour la Pyramid M-3700 peuvent être trouvés dans la majorité des magasins de pièces de remplacement, ou bien en appelant au numéro de téléphone sans frais de Pyramid Technologies 1-888-479-7264.
5
Baissez le levier Bouton de rembobinage du
ruban
Tête imprimante
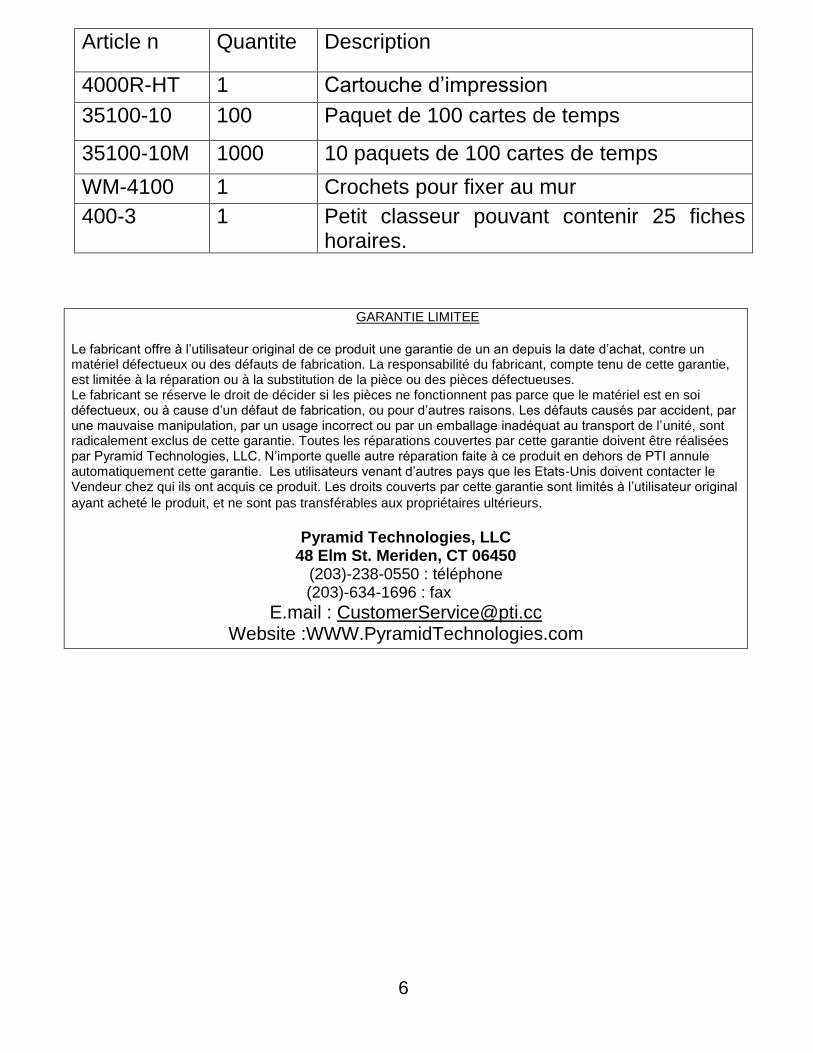
Article n Quantite Description
4000R-HT 1 Cartouche d’impression
35100-10 100 Paquet de 100 cartes de temps
35100-10M 1000 10 paquets de 100 cartes de temps
WM-4100 1 Crochets pour fixer au mur
400-3 1 Petit classeur pouvant contenir 25 fiches horaires.
GARANTIE LIMITEE
Le fabricant offre à l’utilisateur original de ce produit une garantie de un an depuis la date d’achat, contre un matériel défectueux ou des défauts de fabrication. La responsabilité du fabricant, compte tenu de cette garantie, est limitée à la réparation ou à la substitution de la pièce ou des pièces défectueuses. Le fabricant se réserve le droit de décider si les pièces ne fonctionnent pas parce que le matériel est en soi défectueux, ou à cause d’un défaut de fabrication, ou pour d’autres raisons. Les défauts causés par accident, par une mauvaise manipulation, par un usage incorrect ou par un emballage inadéquat au transport de l’unité, sont radicalement exclus de cette garantie. Toutes les réparations couvertes par cette garantie doivent être réalisées par Pyramid Technologies, LLC. N’importe quelle autre réparation faite à ce produit en dehors de PTI annule automatiquement cette garantie. Les utilisateurs venant d’autres pays que les Etats-Unis doivent contacter le Vendeur chez qui ils ont acquis ce produit. Les droits couverts par cette garantie sont limités à l’utilisateur original
ayant acheté le produit, et ne sont pas transférables aux propriétaires ultérieurs.
Pyramid Technologies, LLC 48 Elm St. Meriden, CT 06450
(203)-238-0550 : téléphone (203)-634-1696 : fax
E.mail : [email protected] Website :WWW.PyramidTechnologies.com
6
PYRAMID TECHNOLOGIES
MODELL 3700
ELEKTRONISCHE STECHUHR INSTRUCTIONS
WICHTIG!
LESEN SIE DIESE ANLEITUNG BEVOR SIE DIESES GERÄT INSTALLIEREN UND IN BETRIEB NEHMEN
Bewahren sie diese Gebrauchsanweisung für spätere Fragen auf. Grundeinstellungen
SCHRITT 1 - AUSPACKEN
1. Packen Sie das Modell 3700 sorgfältig aus und stellen es auf einer stabile Oberfläche auf.
2. Schließen Sie das Gerät an das Stromnetz an. 3. Öffnen und entfernen Sie die obere Abdeckung mit dem beigefügten
Schlüssel. Suchen Sie die mit SELECT, UP und DOWN gekennzeichneten Programmiertasten.
SCHRITT 2 – PROGRAMMIERUNG DES MODELLS 3700 Das Modell 3700 ist besonders leicht in 3 einfachen Schritten zu programmieren. Bitte beachten Sie: Sollte das Gerät länger als 30 Tage ohne Strom sein, wird die Anzeige „Jan 1 12:01AM“ blinken. Um die Anzeige wieder herzustellen, befolgen Sie bitte den nachstehenden Anweisungen.
1. Um eine Einstellung vorzunehmen oder zu ändern, drücken Sie die SELECT-Taste bis die gewünschte Einstellung angezeigt wird.
2. Ändern Sie die betreffende Einstellung mit der UP- oder DOWN-taste.
3. . Sobald die angezeigte Einstellung erscheint, drücken Sie die SELECT-Taste, um weitere Einstellungen zu ändern bzw. um zum Hauptmenü zurückzukehren.
SCHRITT 3 – DAs GERÄT IST EINSATZBEREIT Befestigen und verschließen Sie die obere Abdeckung. Das Modell 3700 ist jetzt einsatzbereit.
1
INSTALLATIONS- UND
GEBRAUCHSANWEISUNG
EINSTELLUNGEN LANG=ENGLISH (Sprache=Englisch) - Wählen Sie mit der UP- oder DOWN-taste die Sprache aus, in der das Modell 3700 programmiert werden und drucken soll. Sie können Englisch, Spanisch, Französisch oder Deutsch wählen. DATE FMT=USA (Datumsformat=USA) - Wählen Sie mit der UP- oder DOWN-Taste das Datumsformat für die Anzeige und den Ausdruck aus: USA (Monat, Tag, Jahr) oder EURO (Tag, Monat, Jahr). SET YEAR (Jahr Einstellung) – Stellen Sie mit der UP- oder DOWN-taste das gewünschte Jahr ein. SET MONTH (Monat Einstellung) – Stellen Sie mit der UP- oder DOWN-taste den gewünschten Monat ein. SET DAY (Tag Einstellung) –Stellen Sie mit dem UP- oder DOWN-Knopf den gewünschten Tag ein. DAYLIGHT SAV=USA(Sommerzeit=USA) – Das Modell stellt automatisch auf Sommer-/Winterzeit um. Sie können mit der UP- oder DOWN-Taste aus 4 Optionen wählen:
1. USA – Stellt automatisch auf die amerikanische Sommer-/Winterzeit um. 2. EURO – Stellt automatisch auf die europäische Sommer-/Winterzeit um. (Die
Sommerzeit beginnt am letzten Sonntag im März und endet am letzten Sonntag im Oktober.)
3. OTHER (andere) – Ermöglicht Ihnen einen beliebigen Sonntag für die automatische Zeitumstellung zu wählen. Wenn Sie OTHER gewählt haben, stellen Sie mit der UP- oder DOWN-Taste den gewünschten Sonntag (es können nur Sonntage gewählt werden) ein, an dem die Sommerzeit beginnen soll. Anschliessend drücken Sie dann SELECT und wieder UP- oder DOWN, um den Sonntag einzustellen, an dem die Sommerzeit ENDEN soll. (Bitte beachten Sie: Die Zeit wird automatisch um 2 Uhr morgens an den gewählten Sonntagen umgestellt.) Drücken Sie SELECT, womit die TIME STD=LINE - Option erscheint. Drücken Sie SELECT nochmals, um zur nächsten Option zu gelangen. (Bitte beachten Sie: Die TIME STD=LINE - Option sollte nur in Gebieten geändert werden, in denen Frequenz-schwankungen in der Stromversorgung auftreten. Wenn Sie das Gerät in einem solchen Gebiet nutzen, oder wenn Sie das Gerät mit einem Generator betreiben, kann es vorkommen, daß die im Gerät eingestellte Zeit langsamer oder schneller abläuft. In diesem Fall ändern Sie diese Einstellung in TIME STD=CRYSTAL. Das Gerät kann dann die eingestellte Zeit mit einem internen Zeitgeber konstant halten.)
4. OFF – Das Gerät stellt nicht automatisch auf Sommer-/Winterzeit um.
2
DSPLY FMT=AM/PM (Anzeige Format=AM/PM) – Ändert das Format der Zeitanzeige auf der Vorderseite des Gerätes. Wählen Sie mit der UP- oder DOWN-Taste eine der folgenden Optionen:
1. AM/PM – Amerikanisches Zeitformat (0-12 Uhr) 2. MIL (military time) – Europäisches Zeitformat (0-24 Uhr)
FMT=AM/PM (Format=AM/PM) – Legt fest, welches Zeitformat auf die Stempelkarte gedruckt werden soll. Wählen Sie mit der UP- oder DOWN-Taste eine der folgenden Optionen: 1. AM/PM – Amerikanisches Zeitformat (3:30 PM) 2. MIL (military time) – Europäisches Zeitformat (3:30 PM = 15:30) 3. ATAAP – Dezimales Zeitformat; Minuten werden als Hundertstel einer Stunde
dargestellt (15:30=15,50)
4. 24H.1 - Uhrzeit: die Minuten werden in 1/10 Stunden angegeben
PRINT DIR=RIGHT (Druckrichtung) – Legen Sie mit der UP- oder DOWN-Taste fest, ob die Zeit auf der rechten oder linken Seite der Stempelkarte gedruckt werden soll. FMT=DATE TIME (Format=Datum Zeit) – Legen Sie mit der UP- oder DOWN-Taste fest, welche der folgenden Informationen Sie auf die Stempelkarte gedruckt haben möchten: 1. DATE TIME – Druckt aktuelles Datum und Uhrzeit. 2. DATE YR TIME – Druckt aktuelles Datum, Jahr und Uhrzeit (kleingedruckt). 3. DATE YR APPD – Druckt aktuelles Datum, Jahr und APPD- (GENEHMIGT) 4. DATE YR FAXD – Druckt aktuelles Datum, Jahr und FAXD- (GEFAXT) 5. DATE YR FILE – Druckt aktuelles Datum, Jahr und FILE- (ABGELEGT) 6. DATE YR IN – Druckt aktuelles Datum, Jahr und IN (EIN) 7. DATE YR OUT – Druckt aktuelles Datum, Jahr und OUT (AUS) 8. DATE YR PAID – Druckt aktuelles Datum, Jahr und PAID- (BEZAHLT) 9. DATE YR RCVD – Druckt aktuelles Datum, Jahr und RCVD- (ERHALTEN) 10. DATE YR SENT – Druckt aktuelles Datum, Jahr und SENT (GESENDET) 11. DATE YR ORIG – Druckt aktuelles Datum, Jahr und ORIG- (ORIGINAL) 12. DATE YR VOID – Druckt aktuelles Datum, Jahr und VOID- (UNGÜLTIG) 13. DATE YR USED – Druckt aktuelles Datum, Jahr und USED- (BENUTZT) 14. DATE YR CPLD – Druckt aktuelles Datum, Jahr und CPLD-
(ABGESCHLOSSEN) SET HOUR (Stunde Einstellung) – Stellen Sie mit der UP- oder DOWN-Taste die gegenwärtige Stunde ein. SET MINUTES (Minuten Einstellung) – Stellen Sie mit der UP- oder DOWN-Taste die gegenwärtige Minute ein. Bitte beachten Sie: Einstellungen können übersprungen werden, indem Sie die SELECT-Taste so oft drücken, bis die gewünschte Einstellung erscheint. Wenn Sie Hilfe brauchen, wenden Sie sich an Pyramid Technical Service oder an Ihren Lieferanten. 3

WECHSELN DES FARBBANDES
1. Nehmen Sie das Gerät vom Stromnetz ab und entfernen Sie die obere
Abdeckung mit dem beigepackten Schlüssel. 2. Drehen Sie das Gerät auf die Seite, so daß das Farbband nach oben zeigt. 3. Schieben Sie den Farbbandhalter nach links in Richtung Anzeige. 4. Schieben Sie den Riegel mit Sorgfalt von der Farbbandkassette weg und
entfernen diese. 5. Legen Sie die neue Kassette in den Halter ein (so daß sie einrastet) und
drehen Sie dabei den Bandtransportknopf. Stellen Sie sicher, daß sich das Farbband und der durchsichtige Plastikschutz komplett über dem Druckkopf befinden.
6. Befestigen und verschließen Sie die obere Abdeckung. Prüfen Sie das Gerät auf einwandfreie Installation, indem Sie eine Stempelkarte einige Male stempeln.
. Bitte beachten Sie: Wenn sich das Farbband nicht völlig über dem Druckkopf befindet, so wird der Ausdruck “abgeschnittene” Buchstaben aufweisen. Falls die Farbbandkassette nicht völlig im Halter eingerastet ist, werden die Ausdrucke zunehmend blasser.
HÄUFIG GESTELLTE FRAGEN Muß ich spezielle Karten benutzen? PTI 35100- 10 Karten wurden für die Nutzung des Modells für Arbeitszeitabrechnungen entworfen. Sie können aber auch andere Dokumente mit dem Gerät bestempeln.
4
Riegel nach unten
schieben
Farbband
Transportknopf
Druckkopf
Was heißt ATAAP? ATAAP ist ein von der US-Regierung verwendetes Kürzel, das die Zeitrechnung in Stunden und Hundertstel-Stunden beschreibt (d.h. Ein ein viertel Stunden sind 1.25 Stunden). Falls Sie weitere Auskünfte benötigen, wenden Sie sich bitte an unseren technischen Service unter der Nummer 001-203-238-0550 oder an Ihren Lieferanten.
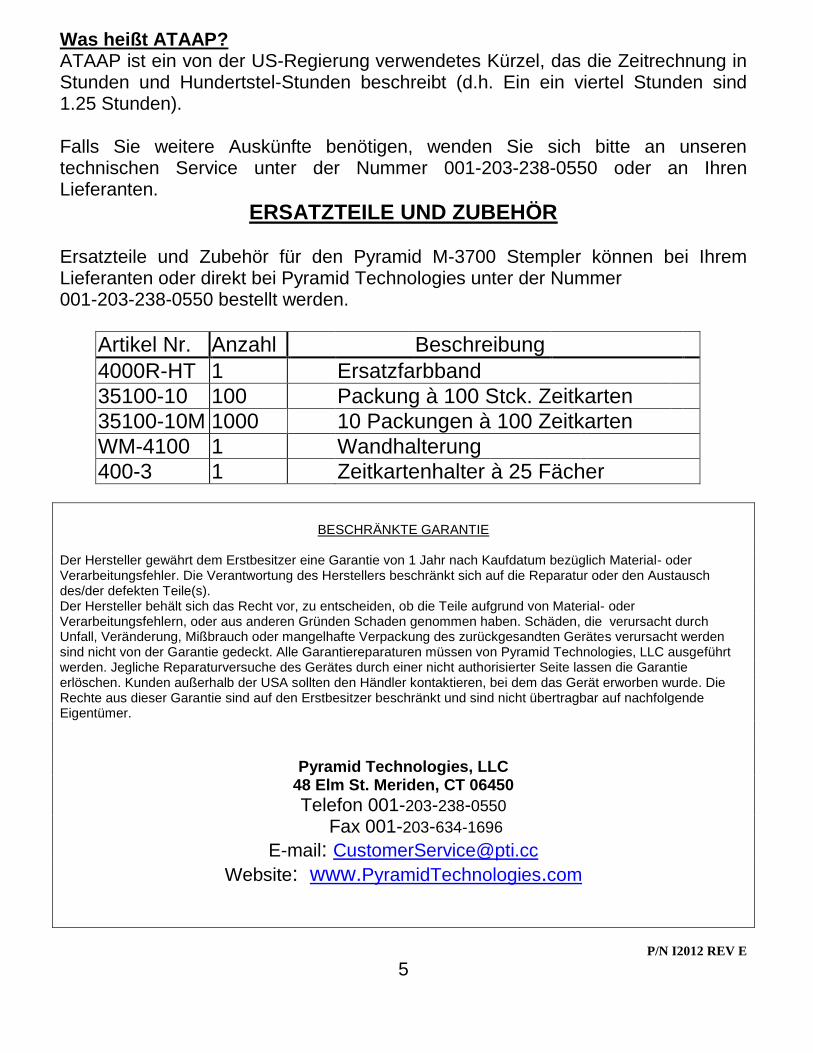
ERSATZTEILE UND ZUBEHÖR Ersatzteile und Zubehör für den Pyramid M-3700 Stempler können bei Ihrem Lieferanten oder direkt bei Pyramid Technologies unter der Nummer 001-203-238-0550 bestellt werden.
Artikel Nr. Anzahl Beschreibung
4000R-HT 1 Ersatzfarbband
35100-10 100 Packung à 100 Stck. Zeitkarten
35100-10M 1000 10 Packungen à 100 Zeitkarten
WM-4100 1 Wandhalterung
400-3 1 Zeitkartenhalter à 25 Fächer
BESCHRÄNKTE GARANTIE
Der Hersteller gewährt dem Erstbesitzer eine Garantie von 1 Jahr nach Kaufdatum bezüglich Material- oder Verarbeitungsfehler. Die Verantwortung des Herstellers beschränkt sich auf die Reparatur oder den Austausch des/der defekten Teile(s). Der Hersteller behält sich das Recht vor, zu entscheiden, ob die Teile aufgrund von Material- oder Verarbeitungsfehlern, oder aus anderen Gründen Schaden genommen haben. Schäden, die verursacht durch Unfall, Veränderung, Mißbrauch oder mangelhafte Verpackung des zurückgesandten Gerätes verursacht werden sind nicht von der Garantie gedeckt. Alle Garantiereparaturen müssen von Pyramid Technologies, LLC ausgeführt werden. Jegliche Reparaturversuche des Gerätes durch einer nicht authorisierter Seite lassen die Garantie erlöschen. Kunden außerhalb der USA sollten den Händler kontaktieren, bei dem das Gerät erworben wurde. Die Rechte aus dieser Garantie sind auf den Erstbesitzer beschränkt und sind nicht übertragbar auf nachfolgende Eigentümer.
Pyramid Technologies, LLC 48 Elm St. Meriden, CT 06450
Telefon 001-203-238-0550 Fax 001-203-634-1696
E-mail: [email protected] Website: www.PyramidTechnologies.com
P/N I2012 REV E
5


![2019 Christmas Cards - EASE Products...三] I 2019 Christmas Cards Greeting, Mini Cards & Post Cards CONTENTS GREETING CARDS 03 Basic Christmas Cards 05 Import & Turnowsky Christmas](https://img.pdfslide.net/doc/110x75/5f07a85f7e708231d41e157a/2019-christmas-cards-ease-products-i-2019-christmas-cards-greeting-mini.jpg)