Embed Size (px)
Citation preview
Installation and Owner’s Manual
For models DE / EV 0041 - 3.6 cubic foot, AC / DC electric refrigerators.For models DE / EV 0061 - 7.0 cubic foot, AC / DC electric refrigerators.
NORCOLD, Inc.P.O. Box 4248Sidney, OH 45365-4248
Part No. 626669A (5-04)
English
French
Special Requirements for Marine Installations:
These refrigerators are internally wired so that the AC and DC circuits are isolated from each other. If thepositive (+12/24 volts) input is grounded (by cuts in the wire insulation, incorrectly insulated components, etc.) avoltage potential can be caused throughout the boat, which causes corrosion to form on any metal parts that areexposed to water.
This condition can be avoided by wiring the boat so that the AC and DC grounds are common and so the wiringis protected per NNMA CERTIFICATION HANDBOOK (1987). Inspect all wiring to make sure that the insulationis not damaged and use plastic wire clamps.
One reference for more information on corrosion is:
BOAT AND YACHT CORROSION CONTROLby Yacht Corrosion Consultants, Inc.2368 Eastman Ave. #6Ventura, CA 93003
Norcold Customer Support Dept.Telephone: 800-543-1219
Fax: 937-497-3183Web Site: www.norcold.com
Installation and Owner’s Manual 2
Table of Contents
Owner’s Manual ........................................................................ 2
Dual Electric Warranty Policy .............................................. 2Dual Electric Warranty Information ..................................... 3Dual Electric Warranty Questions ....................................... 3Safety Awareness ................................................................ 4Safety Instructions ............................................................... 4About Your Refrigerator ....................................................... 4
Storage volume ............................................................ 4Food compartment ...................................................... 4Freezer compartment ................................................... 4Door latch for travel and storage ................................. 5Interior light .................................................................. 5
Operation ............................................................................. 5Controls ........................................................................ 5DC Operation Guidelines ............................................ 5
Refrigerator Care Checklist ................................................ 5Defrosting ..................................................................... 5Cleaning ....................................................................... 6Door Sealing ................................................................ 6
Troubleshooting .................................................................. 6If refrigerator does not cool correctly in either AC or DC mode ........................................................... 7Overheating shut-off device (models DE0041T and DE0061T) ............................................................... 7
Refrigerator Maintenance Checklist ................................... 7Wiring Pictorial .................................................................... 8Replacement Parts ............................................................. 8
Installation Manual .................................................................... 8
Safety Awareness ................................................................ 8Safety Instructions ............................................................... 8Assemble the Enclosure .................................................... 9Ventilation Requirements ................................................... 9Installation Options ............................................................. 9
Install the decorative door panel(s) ............................. 9Reverse the door swing (DE / EV0041 models) ......... 9Reverse the door swing (DE / EV0061 models) ....... 10
Connect the Drain Tube .................................................... 12Install the Refrigerator ....................................................... 12Connect the Electrical Components ................................. 13
Electrical current necessary ...................................... 13Connect the 120 / 220 volts AC supply ...................... 13Connect the 12 / 24 volts DC supply ......................... 13
NORCOLD - Dual Electric Two Year LimitedWarranty Policy
Owner’s Manual
Norcold, Inc. warrants that when properly installed and placedunder normal service and use its refrigeration equipment is freefrom defects in material and workmanship for two yearscommencing from the original date of purchase of the newequipment.
Limitations of Warranty
1. This Warranty is the only warranty for a Norcold AC/DCrefrigerator. This Warranty does not extend to glassware,electric light bulbs, and replaceable fuses.
2. This warranty does not apply to parts and assemblies thathave been subjected to misuse, improper installation,abnormal service, transit damage, recharging of coolingsystem, accident, fire, improper repair, tampering or abuse.
3. Irrespective of the nature of the warranty protection offered orclaimed, the period of warranty shall in no case extendbeyond two years commencing from the original date ofpurchase of the new equipment.
LIMITATION OF REMEDY
1. THE RESPONSIBILITY OF NORCOLD UNDER THIS OR ANYWARRANTY IS LIMITED TO THE REPAIR OR REPLACEMENT(AT NORCOLD’S OPTION) OF THE DEFECTIVE PART ORASSEMBLY.
2. IN NO EVENT AND UNDER NO CIRCUMSTANCES SHALLNORCOLD BE RESPONSIBLE UNDER THIS LIMITED WAR-RANTY FOR ANY OTHER CHARGE WHATSOEVER, INCLUDINGBUT NOT LIMITED TO CHARGES OR CLAIMS FOR LABOR,LOST BUSINESS, LOST TIME, LOST PROFITS, LOSS OF USE,OR ANY KIND OF INCIDENTAL OR CONSEQUENTIAL DAM-AGES, HOWEVER DENOMINATED OR DESCRIBED. THEREMEDY UNDER THIS WARRANTY IS LIMITED TO REPAIR ORREPLACEMENT.
3. SOME STATES DO NOT ALLOW THE EXCLUSION ORLIMITATION OF INCIDENTAL OR CONSEQUENTIAL DAMAGES,SO THE ABOVE EXCLUSION MAY NOT APPLY TO YOU.
DISCLAIMER OF OTHER WARRANTIES
THIS WARRANTY IS EXPRESSLY IN LIEU OF ALL OTHERWARRANTIES EITHER EXPRESSED OR IMPLIED. ALL OTHERWARRANTIES, EXPRESSED OR IMPLIED, INCLUDING ANYWARRANTY OF MERCHANTABILITY OR FITNESS FOR A PAR-TICULAR PURPOSE, ARE HEREBY DISCLAIMED AND EX-CLUDED.
Legal Rights
This warranty gives you specific legal rights, and you may haveother legal rights which vary from state to state.

Installation and Owner’s Manual 3
Dual Electric Warranty Information
Your refrigerator is made to provide the ultimate in coolingsatisfaction and will serve you reliably in the years to come.Norcold refrigerators are the only RV refrigerators made in theUnited States and offer a standard limited two-year warranty.
To activate your two-year limited warranty, complete and mail thewarranty registration supplied.
Help us to help you.
Write the model number and serial number below for futurereference. These numbers are on the serial plate in therefrigerator. The serial plate is located in the fresh foodcompartment on the top right hand side. Use these numberswhen receiving service or in any correspondence concerningyour refrigerator.
Model number ___________ Serial number ___________
If a problem occurs with your refrigerator, contact any of theservice centers throughout the United States and Canada. Tofind an authorized Norcold Service Center near you, pleasetelephone the Norcold Customer Support Dept. at 800-543-1219 (option-1) or visit our web site at www.norcold.com.
Norcold is committed to providing products that are in harmonywith the environment. Your Norcold refrigerator meets allenvironmental safety standards.
This warranty is the only warranty for your Norcold refrigerator.There are no other express warranties. The only uses for thisproduct are described in this manual. Part or model specifica-tions are subject to change without notice.
What does this warranty cover?This warranty covers labor and freight (ground service only)and costs incurred in removing and reinstalling the refrigera-tor when necessary to replace a defective part and any partsreplaced under warranty (including cooling units).
What is not covered by this warranty?- Travel expenses for bringing the refrigerator to an autho-
rized Norcold Service Center for warranty coverage.- Additional costs caused by the inability to bring the
refrigerator to an authorized Norcold Service Center.- Defects which are caused by transit damage, misuse,
neglect, or accident.- Manufacturing defects found at the time of purchase, parts
replaced under warranty, and associated labor, which theoriginal consumer-purchaser does not communicate toNorcold within 30 days.
- Labor, performed without need for parts replacements,which the original consumer-purchaser does not commu-nicate to Norcold within 30 days.
- Defects in glassware, electric light bulbs, or replacementfuses.
- Defects caused by improper installation, maintenance, oradjustment.
- Normal maintenance of this refrigerator as described in thismanual.
- Defects caused by the improper use of parts or parts notmanufactured or supplied by Norcold for repairs or replace-ments to the refrigerator.
Norcold will not be liable for any incidental or consequentialloss or damage, due directly or indirectly to the use of thisproduct. Some states do not allow the exclusion or limitationof incidental or consequential damages, so the above maynot apply to you.
How long does this warranty last?This warranty is effective for a period of two years from date ofpurchase.
What will Norcold do?Norcold will provide free service and replacement of defectiveparts, at no charge, at all authorized Norcold Service Centers.Norcold has the option of replacing the defective parts or theentire refrigerator. If the refrigerator is replaced, Norcold isnot responsible for replacing dealer installed options.
How do you get service?Bring the refrigerator to any authorized Norcold Service Centerand show proof that the defective item is within warrantycoverage.If you are unable to bring the refrigerator to an authorizedNorcold Service Center:
- Send a written notice of the defect to Norcold.- Norcold will promptly advise you how to obtain warranty
service.
What rights do you have?This warranty gives you specific legal rights. You may alsohave other rights which vary from state to state.
Dual Electric Warranty Questions
Installation and Owner’s Manual 4
WARNING:
- The storage of flammable materials behind or aroundthe refrigerator creates a fire hazard. Do not use thearea behind the refrigerator to store anything, espe-cially flammable materials (gasoline, cleaningsupplies, etc.)
- Do not remove the round ground prong from therefrigerator AC power cord. Do not use a two prongadapter or extension cord on the AC power cord.
- A circuit overload can result in an electrical fire if thewires and/or fuses are not the correct size. Use onlythe wire and fuse sizes as written in the “InstallationManual”.
- Incorrect installation, adjustment, change to, ormaintenance of this refrigerator can cause personalinjury, property damage, or both. Have service andmaintenance work done by your dealer or by anauthorized Norcold Service Center.
- Disconnect both the AC and DC power sources beforedoing any maintenance work on the refrigerator. Allservice work on this refrigerator must be done by aqualified service technician.
- Do not bypass or change the refrigerator’s electricalcomponents or features.
- When you discard an appliance, remove all doors toprevent accidental entrapment and suffocation.
Safety Instructions
Read this manual carefully and understand the contents beforeyou use the refrigerator.
Be aware of possible safety hazards when you see the safetyalert symbol on the refrigerator and in this manual. A signalword follows the safety alert symbol and identifies the danger ofthe hazard. Carefully read the descriptions of these signalwords to fully know their meanings. They are for your safety.
WARNING: This signal word means a hazard, which ifignored, can cause dangerous personal injury, death, ormuch property damage.
CAUTION: This signal word means a hazard, which ifignored, can cause small personal injury or muchproperty damage.
Safety Awareness - Do not spray liquids near electrical outlets, connec-tions, or the refrigerator components. Many liquids areelectrically conductive and can cause a shock hazard,electrical shorts, and in some cases fire.
CAUTION:
- The rear of the refrigerator has sharp edges andcorners. To prevent cuts or abrasions when workingon the refrigerator, be careful and wear cut resistantgloves.
About Your Refrigerator
Storage Volume:
This refrigerator is made to store fresh and frozen foods and formaking ice.
Total capacity DE / EV0041 3.6 cubic feet
Total capacity DE / EV0061 7.0 cubic feet
Food compartment:
Start up the refrigerator and let it cool for eight hours beforeloading with food. If the refrigerator does not start to cool downafter about two hours, contact your dealer or an authorizedNorcold Service Center.
For the best cooling performance:
- Let air move freely inside the entire food compartment.
- Do not cover the shelves with plastic, paper, etc.
To decrease the amount of ice that collects on the freezerplates:
- Cover all liquids and moist foods.
- Let all hot foods cool before putting them in the refrigerator.
- Do not open the door any longer than necessary.
Freezer compartment:
The freezer compartment is made to keep pre-frozen foodfrozen and not to quick freeze food. Keep pre-frozen foods in thefreezer compartment.
NOTE: When making ice, put the ice cube tray directly on thefreezer surface. Do not put other items on the ice cubetray while the water is freezing. The water freezesmore rapidly if the power switch / thermostat is at thecoldest temperature setting.
Installation and Owner’s Manual 5
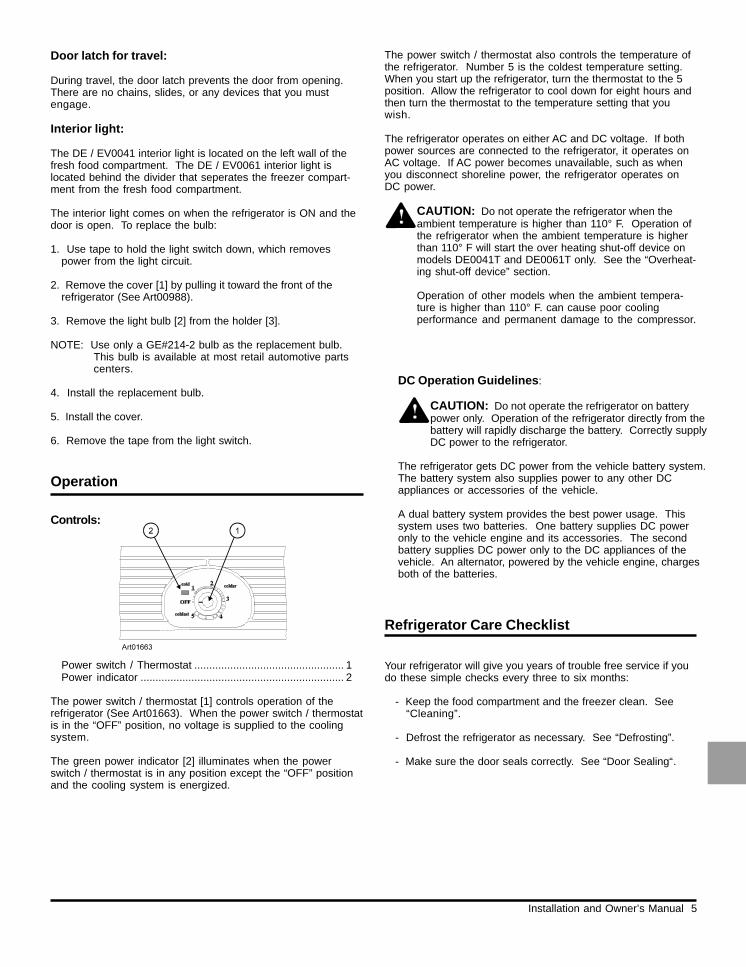
Controls:
Power switch / Thermostat .................................................. 1Power indicator .................................................................... 2
The power switch / thermostat [1] controls operation of therefrigerator (See Art01663). When the power switch / thermostatis in the “OFF” position, no voltage is supplied to the coolingsystem.
The green power indicator [2] illuminates when the powerswitch / thermostat is in any position except the “OFF” positionand the cooling system is energized.
Door latch for travel:
During travel, the door latch prevents the door from opening.There are no chains, slides, or any devices that you mustengage.
Interior light:
The DE / EV0041 interior light is located on the left wall of thefresh food compartment. The DE / EV0061 interior light islocated behind the divider that seperates the freezer compart-ment from the fresh food compartment.
The interior light comes on when the refrigerator is ON and thedoor is open. To replace the bulb:
1. Use tape to hold the light switch down, which removespower from the light circuit.
2. Remove the cover [1] by pulling it toward the front of therefrigerator (See Art00988).
3. Remove the light bulb [2] from the holder [3].
NOTE: Use only a GE#214-2 bulb as the replacement bulb.This bulb is available at most retail automotive partscenters.
4. Install the replacement bulb.
5. Install the cover.
6. Remove the tape from the light switch.
Operation
DC Operation Guidelines:
CAUTION: Do not operate the refrigerator on batterypower only. Operation of the refrigerator directly from thebattery will rapidly discharge the battery. Correctly supplyDC power to the refrigerator.
The refrigerator gets DC power from the vehicle battery system.The battery system also supplies power to any other DCappliances or accessories of the vehicle.
A dual battery system provides the best power usage. Thissystem uses two batteries. One battery supplies DC poweronly to the vehicle engine and its accessories. The secondbattery supplies DC power only to the DC appliances of thevehicle. An alternator, powered by the vehicle engine, chargesboth of the batteries.
Refrigerator Care Checklist
Your refrigerator will give you years of trouble free service if youdo these simple checks every three to six months:
- Keep the food compartment and the freezer clean. See“Cleaning”.
- Defrost the refrigerator as necessary. See “Defrosting”.
- Make sure the door seals correctly. See “Door Sealing“.
The power switch / thermostat also controls the temperature ofthe refrigerator. Number 5 is the coldest temperature setting.When you start up the refrigerator, turn the thermostat to the 5position. Allow the refrigerator to cool down for eight hours andthen turn the thermostat to the temperature setting that youwish.
The refrigerator operates on either AC and DC voltage. If bothpower sources are connected to the refrigerator, it operates onAC voltage. If AC power becomes unavailable, such as whenyou disconnect shoreline power, the refrigerator operates onDC power.
CAUTION: Do not operate the refrigerator when theambient temperature is higher than 110° F. Operation ofthe refrigerator when the ambient temperature is higherthan 110° F will start the over heating shut-off device onmodels DE0041T and DE0061T only. See the “Overheat-ing shut-off device” section.
Operation of other models when the ambient tempera-ture is higher than 110° F. can cause poor coolingperformance and permanent damage to the compressor.

Installation and Owner’s Manual 6
- Be aware of any cooling changes that are not because ofweather, loading, or thermostat changes. If changes occur,contact your dealer or an authorized Norcold ServiceCenter.
- Make sure the air flow in the lower intake vent, through therefrigerator condenser and coils and out the upper exhaustvent is not blocked or decreased.
- Make sure the area behind the refrigerator is clear. Do notuse the area behind the refrigerator for storage of anything,especially combustible materials, especially gasoline andother flammable vapors and liquids.
Defrosting:
The freezer plates of the refrigerator operate at below freezingtemperature and will naturally form frost from humidity, which isalways present in the air. The humidity inside the refrigeratorincreases:
- with higher outside temperature and humidity.
- with the storage of non-sealed fresh foods or warm foods.
- with the amount of time that the door(s) are open.
- with any air leakage into the refrigerator.
It is normal for frost to collect inside the refrigerator. Excessfrost decreases the cooling performance of the refrigerator.Defrost the refrigerator as necessary:
- Remove all food from the refrigerator.
- Turn the refrigerator OFF.
NOTE: Defrosting the refrigerator makes excess water insidethe refrigerator, which falls onto the drip tray andflows to the outside of the refrigerator through thedrain tube.
- Put dry towels (etc.) inside the refrigerator to help removethe excess water.
CAUTION: High temperatures can cause the insidesurfaces of the refrigerator to warp or melt. Do not usepans of HOT water, a hair dryer, or any other hightemperature devices to defrost the refrigerator. Do notuse any hard or sharp objects to remove frost. Damageto the interior of the refrigerator can occur.
- To increase the speed of defrosting, put pans of WARMwater in the refrigerator.
- Remove the wet towels (etc.) and dry the interior.
- Start up the refrigerator.
- Allow the refrigerator to cool down.
- Return all food to the refrigerator.
Cleaning:
A good time to clean the refrigerator is just after you defrost it.
Clean the inside of the refrigerator as often as necessary toavoid food odors:
- Remove all food from the refrigerator.
NOTE: Do not use abrasive cleaners, chemicals, orscouring pads because they can damage theinterior of the refrigerator.
- Wash the interior with a mild cleaner or a solution of liquiddish detergent and warm water.
- Rinse with a solution of baking soda and clean water.
- Dry with a clean cloth.
- Put all food back into the refrigerator.
To remove and clean the drip tray:
- Make sure that the drip tray is empty of water.
- Pull the drain tube plug out from the inside of the drip trayand out of the drain hose.
- Pull the drip tray down to remove from the slots in therefrigerator cabinet.
- Clean the drip tray.
- Put the drain tube plug down into the drip tray and push thedrip tray back into the original position.
- Push the drain hose back onto the drain tube plug.
Door sealing:
If the door does not seal correctly, excess frost will collect insidethe refrigerator. Make sure the door seals correctly:
- Close the door on a piece of paper that is about the size ofa dollar bill (See Art00980).
- Gently pull the paper.
- You should feel a slight drag between the gasket andthe cabinet.
- Do this on all four sides of the door.
- If you do not feel a slight drag on thepaper, the door is not sealing correctly.
- Have your dealer or an authorized Norcold ServiceCenter correct the seal of the door

Installation and Owner’s Manual 7
Refrigerator Maintenance Checklist
Read and understand the following maintenance sections ofthis manual.
NOTE: Norcold is not responsible for installation, adjustment,alteration, service, or maintenance performed byanyone other than a qualified RV dealer or anauthorized Norcold Service Center.
Have a qualified RV dealer or an authorized Norcold ServiceCenter do these annual safety and maintenance checks:
- Make sure the AC and DC voltages are correct (See the“Electrical current necessary” section).
- The wire connections must be clean, tight and free ofcorrosion. If any of these items are not correct:
- A voltage drop to the refrigerator will occur.
- The voltage drop will decrease the cooling perfor-mance of the refrigerator.
CAUTION: Disconnect the positive (+) DC power supplywire from the battery before you do a “fast charge” of thebattery. Failure to disconnect the positive (+) powersupply wire from the battery during a “fast charge” cancause damage to the refrigerator or other 12 volt DCappliances.
- Make sure the area at the rear of the refrigerator is free ofanything, especially combustible materials, gasoline, andother flammable vapors and liquids.
Troubleshooting
If the refrigerator does not cool correctly in either ACor DC mode:
- Make sure the power switch / thermostat is not in the OFFposition.
- Make sure the power switch / thermostat is at the tempera-ture setting that you wish.
- Make sure that the power source(s) to the refrigerator isserviceable.
- Make sure that the fuse or circuit breaker is intact (See“Overcurrent protection system”)
- Make sure that the refrigerator is correctly installed and thatthe built in vents are not blocked.
- Make sure that the ambient temperature is not unusuallyhigh (more than 110° F. / 43° C.) (See “Overheating shut-offdevice operation”).
- Make sure that the door is closed.
- If the weather is hot, make sure that the door is sealingcorrectly.
- Make sure that the air circulation inside the refrigerator isnot decreased by foods or by shelves that are covered withplastic, paper, etc.
- Make sure that hot foods were not placed in the fresh foodcompartment of the refrigerator.
- Make sure that the freezer is defrosted.
After you make these checks, if the refrigerator does notoperate, contact your dealer or an authorized Norcold ServiceCenter.
Over heating shut-off device operation(models DE0041T and DE0061T):
Operating the refrigerator in high ambient temperatures can overheat the cooling unit and cause premature failure of the compres-sor (See the label inside the refrigerator).
To protect the cooling unit from over heating, the refrigerator willautomatically shut-off when the vehicle air temperature is higherthan 110° F. If shut off occurs, an audible alarm tone (an intermit-tent beeping) operates from the refrigerator.
To stop the audible alarm tone and restart the refrigerator, turn thethermostat counterclockwise to the “OFF” position and then clock-wise to the desired thermostat position.
The refrigerator will not restart until the air temperature is lowerthan 110° F.
Over current protection system:
Your refrigerator has an over current protection system in theelectronic circuit to prevent damage to the inverter which mayoccur due to a reverse polarity connection.
If the refrigerator does not operate and the green power lightdoes not come on, check the fuse, which is located in-line withthe DC connector, and the polarity of the DC power supply. If therefrigerator still does not operate, another problem can exist inthe inverter. Have an authorized Norcold Service Center checkthe refrigerator.

Installation and Owner’s Manual 8
Safety Instructions
Safety Awareness
Read this manual carefully and understand the contents beforeyou install the refrigerator.
Be aware of possible safety hazards when you see the safetyalert symbol on the refrigerator and in this manual. A signalword follows the safety alert symbol and identifies the danger ofthe hazard. Carefully read the descriptions of these signalwords to fully know their meanings. They are for your safety.
WARNING: This signal word means a hazard, which ifignored, can cause dangerous personal injury, death, ormuch property damage.
CAUTION: This signal word means a hazard, which ifignored, can cause small personal injury or muchproperty damage.
WARNING:
- For installations which need an electric outlet that isenergized by an external power source, the refrigeratormust be electrically grounded as written in local codes orthe National Electrical code, NFPA 70.
- Incorrect installation, adjustment, alteration, or mainte-nance of this refrigerator can cause personal injury,property damage, or both.
- Obey the instructions in the “Ventilation Requirements”section of this manual.
- Do not bypass or change the refrigerator’s electricalcomponents or features.
- Protect all wiring from physical damage, vibration, andexcessive heat.
- Do not spray liquids near electrical outlets, connections,or the refrigerator components. Many liquids areelectrically conductive and can cause a shock hazard,electrical shorts, and in some cases fire.
CAUTION:
- The front and rear of the refrigerator has sharp edges andcorners. To prevent cuts or abrasions when working onthe refrigerator, use caution and wear cut resistantgloves.
Installation Manual
Replacement Parts
You may purchase replacement parts through your dealer or anauthorized Norcold Service Center.
Wiring Pictorial
The parts of the wiring pictorial are (See Art01730):
1 ....................................................................... Power supply2 ...............................................................................DC input3 ............................................................................... AC input4 ...................................................Power switch / thermostat5 ...............................................................Evaporator sensor6 ........................................................................ Compressor7 .......................................................................... DC 24V fan8 .......................................................................... Interior light9 ..................................................................... Door switch(s)10 ............................... Divider heater (DE / EV0061 models)

Installation and Owner’s Manual 9
Assemble the Enclosure
- Make sure that the enclosure is the correct size:
- For DE / EV 0041 models - 30 7/8 inches high x 23 1/4inches wide x 23 1/2 inches deep.
- For DE / EV 0061 models - 52 7/8 inches high x 23 1/4inches wide x 23 3/4 inches deep.
- Make sure the floor is solid and level.
- The floor must be metal or a wood panel and extendthe full width and depth of the enclosure.
- The floor must be able to support the weight of therefrigerator and its contents.
- Make sure there are no adjacent heat sources such as afurnace vent, etc.
Ventilation Requirements
This refrigerator is made for a built-in installation. Correctventilation is necessary for the correct operation of therefrigerator and to increase the life of the refrigerator coolingsystem.
Ventilation allows the natural air flow that is necessary for goodrefrigeration. Cooler air comes in through a lower intake vent,goes around the refrigerator coils where it removes the excessheat from the refrigerator components, and goes out through anupper exhaust vent. If this air flow is blocked or decreased, therefrigerator will not cool correctly. Do not install the vents intocompletely enclosed areas such as closets or cabinets.
CAUTION: The refrigerator has built in vents at the topand at the bottom. Make sure that the flow of air throughthese vents is not blocked in any way. Blockage of airthrough these vents can cause:
- shortened life of the refrigerator cooling unit.
- poor cooling performance of the refrigerator.
- continuous operation of the refrigerator.
- fast battery discharge.
- void of the refrigerator warranty.
Installation Options
Install the decorative door panel(s):
- Make a decorative door panel [4] (See Art01664).
NOTE: The decorative panels must be 3/16 inch or less inthickness and must be within ± 1/32 inch of thefollowing dimensions:
- For DE / EV0041 models, the door panel must be 1713/16 inches wide x 23 5/8 inches tall.
- If the door panel has a raised panel, the size of theraised part of the panel must be less than 17 7/16inches wide x 23 5/16 inches tall.
- For DE / EV0061 models, the lower door panel mustbe 17 13/16 inches wide x 27 1/4 inches tall.
- If the door panel has a raised panel, the size of theraised part of the panel must be less than 17 7/16inches wide x 26 15/16 inches tall.
- For DE / EV0061 models, the upper door panel mustbe 17 13/16 inches wide x 16 1/2 inches tall.
- If the door panel has a raised panel, the size of theraised part of the panel must be less than 17 7/16inches wide 16 3/16 inches tall.
- Pull the panel retainer [3] off the hinge side of the door [6].
- Push the decorative door panel into the slots [5] of the door.
- Push the panel retainer in the original position on the door.
Reverse the door swing (DE / EV0041 models):
This refrigerator has door hinges that allow you to change thedirection that the door opens by moving the hinges to theopposite corner.
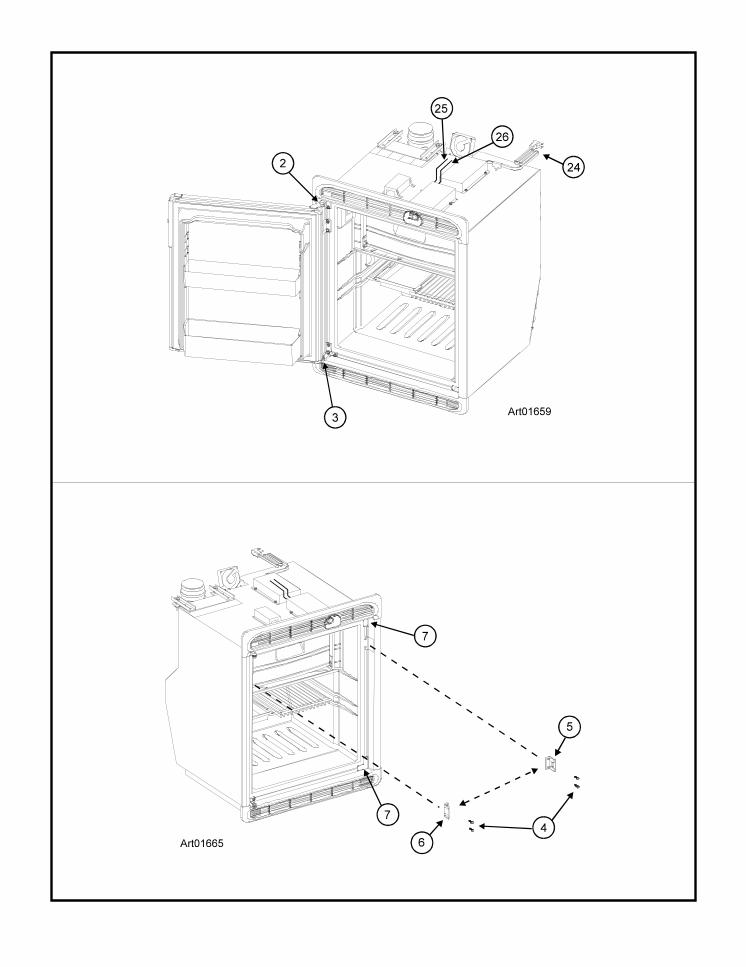
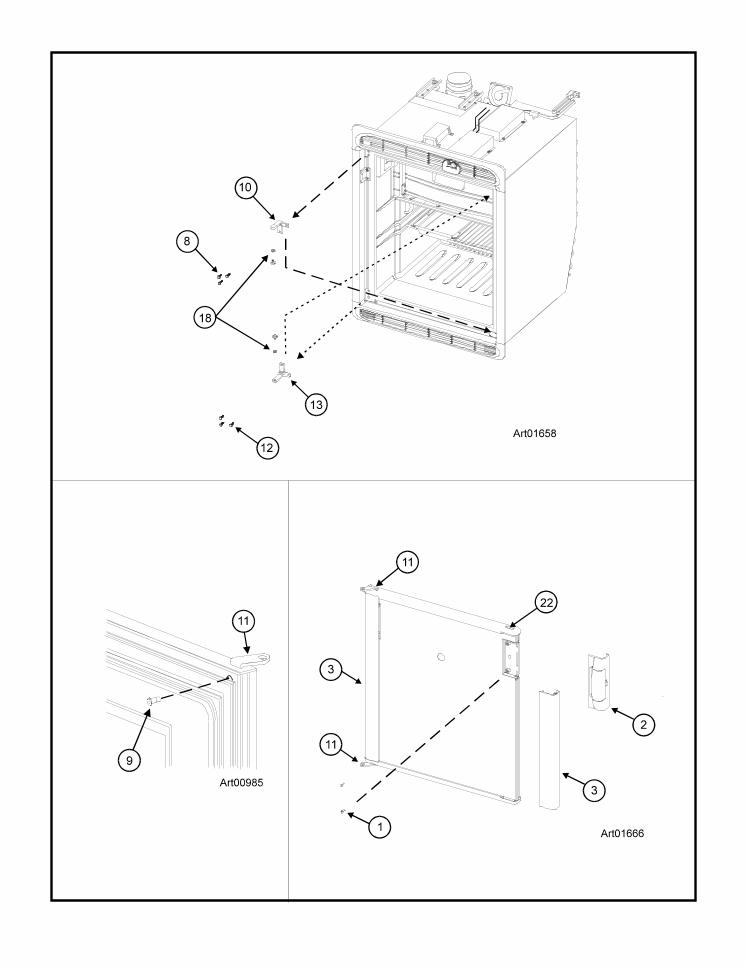
1. Remove the door (See Art01658 and Art01659):
- Turn out and save the upper hinge pin [2].
- Open the door a small amount and pull the top of the dooraway from the upper hinge of the refrigerator.
- Turn out and save the lower hinge pin.
Installation and Owner’s Manual 10
- Remove the screw [9] from the door hinges [11].
- Remove the upper door hinge.
- Reverse the hinge and put on the opposite side of the dooras the lower door hinge.
- Remove the lower door hinge.
- Reverse the hinge and put on the opposite side of the dooras the upper door hinge.
- Attach each of these hinges with the screws that wereremoved from the other side.
NOTE: You may need to pierce a hole in the door gasketallow the screw to engage to door hinge.
- Put the plastic cap in the hole that is opposite the upperhinge.
5. Install the door:
NOTE: Make sure that the plastic bushings [18] remain in thedoor hinges.
- Put the door down onto the lower hinge pin.
- Align the holes in the upper hinge and the hinge bushingand hold in this position.
- Screw the upper hinge pin down into the upper hinge andinto the door.
- Align the door so the space between the door and thecabinet is equal all around the door.
- Hold the door in this position and tighten all of the hingescrews.
Reverse the door swing (DE / EV0061 models):
The refrigerator has door hinges that allow you to change thedirection that the doors open by moving the hinges to theopposite corner.
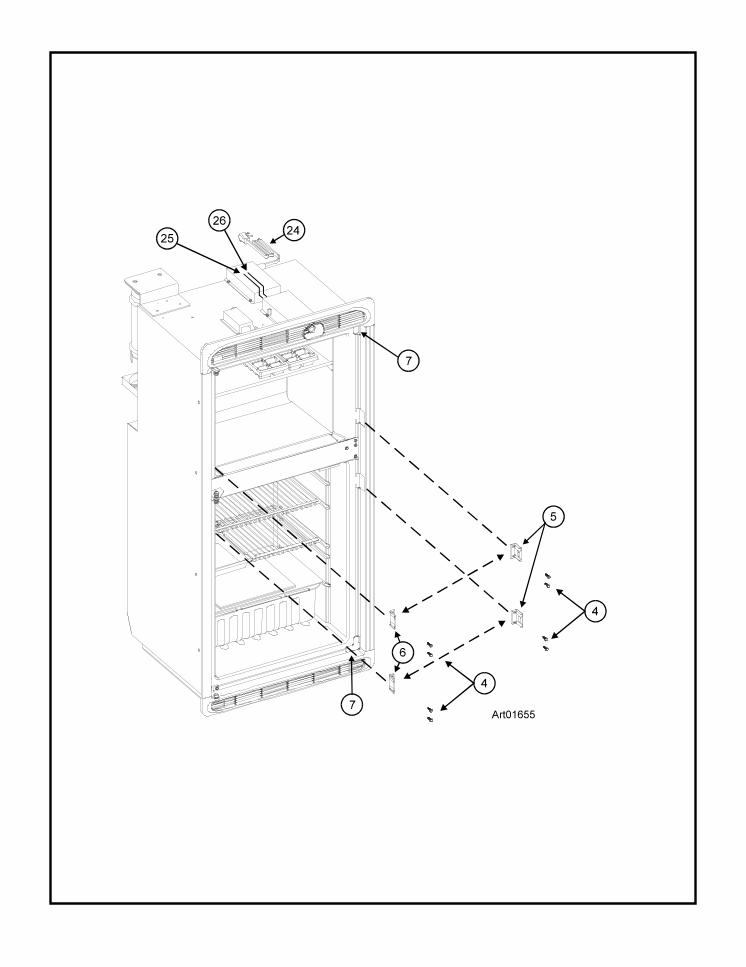
1. Remove the doors (See Art01657).
- Turn out and save the upper hinge pin [14].
- Turn out and save the center hinge pin caps [15].
- Open the upper door a small amount and pull the top of theupper door away from the upper hinge of the refrigerator.
- Lift the upper door off of the center hinge pin [16].
- Lift the door off of the lower hinge pin [3].
NOTE: Make sure that the plastic bushings [18] remain in thedoor hinges.
2. Change the position of the strike plate and the strike platecover (See Art01665):
- Remove the screws [4] that attach the strike plate (withhole) [5] and the strike plate cover (without hole) [6].
- Reverse the strike plate and the strike plate cover and puteach one on the other side of the refrigerator cabinet.
- Attach the strike plate and strike plate cover with the screws.
3. Change the position of the cabinet hinges (See Art01658 andArt01659):
- Remove the screws [8] from the upper cabinet hinge [10].
- Reverse this hinge and put on the other side of the refrig-erator as the lower cabinet hinge.
- Attach the cabinet hinge with the screws.
- Do not fully tighten the screws at this time.
- Turn the lower hinge pin [3] down into this hinge.
- Remove the screws [12] from the lower cabinet hinge [13].
- Put this hinge on the other side of the refrigerator as theupper cabinet hinge.
- Attach the cabinet hinge with the screws.
- Do not fully tighten the screws at this time.
4. Change the position of the door hinges and handle (SeeArt00985 and Art01666):
- Remove and save the screws [1] that attach the door handle[2] to the refrigerator door.
- Remove the door handle.
- Pull the panel retainers off the door.
- Reverse the panel retainers and push onto opposite side ofthe door.
- Reverse the door handle and put on the other side of thedoor.
- Attach the door handle with the screws.
- Remove and save the plastic cap [ 22] that is opposite theupper hinge of the door.

Installation and Owner’s Manual 11
- Turn out and save the lower hinge pin [17].
- Open the lower door a small amount and pull the bottom ofthe lower door away from the lower hinge of the refrigerator.
- Pull the lower door down off of the center hinge pin.
NOTE: Make sure that the plastic bushings [18] remain in thedoor hinges.
2. Change the position of the cabinet hinges (See Art01657):
- Remove the screws from the upper cabinet hinge [19].
- Put this hinge on the other side of the refrigerator cabinet asthe lower cabinet hinge.
- Attach the hinge with the screws.
- Do not fully tighten the screws at this time.
- Remove the screws from the lower cabinet hinge [20].
- Put this hinge on the other side of the refrigerator cabinet asthe upper cabinet hinge.
- Attach the hinge with the screws.
- Do not fully tighten the screws at this time.
- Remove the three screws from the center cabinet hinge[21].
- Remove the center cabinet hinge.
- Turn the screws back into the original holes and tighten thescrews.
- Remove the three screws on the opposite side of therefrigerator cabinet.
- Reverse the center cabinet hinge and put it on the oppositeside of the refrigerator cabinet.
- Attach the hinge with the screws.
- Do not fully tighten the screws at this time.
- Turn the center hinge pin [16] out of bottom of the centercabinet hinge.
- Reverse the center hinge pin and turn it down into the top ofthe center cabinet hinge.
3. Change the position of the strike plate and the strike platecover for both doors (See Art01655):
- Remove the screws that attach the strike plates (with hole)[5] and the strike plate covers (without hole) [6].
- Reverse the strike plates and the strike plate covers andput each one on the other side of the refrigerator cabinet.
- Attach the strike plates and strike plate covers with thescrews.
4. Change the position of the door hinges and handle of bothdoors (See Art00985 and Art01666):
- Remove and save the screws [1] that attach the door handle[2] to each door.
- Remove the door handle from each door.
- Pull the panel retainers off each door.
- Reverse the panel retainers [3] and push onto oppositeside of each door.
- Reverse the door handle and put on the other side of eachdoor.
- Attach each door handle with the screws.
- Remove and save the plastic cap [ 22] that is opposite theupper hinge of each door.
- Remove the screw [9] from each door hinge [11].
- Remove each upper door hinge.
- Reverse the hinge and put on the opposite side of eachdoor as the lower door hinge.
- Remove each lower door hinge.
- Reverse the hinge and put on the opposite side of eachdoor as the upper door hinge.
- Attach the hinges with the screws that were removed fromthe other side of each door.
NOTE: You may need to pierce a hole in the door gasketallow the screw to engage to door hinge.
- Put the plastic cap in the hole that is opposite the upperhinge of each door.
5. Install the lower door:
- Make sure a hinge bushing is in the top of the upper doorhinge.
- Push the upper door hinge up onto the center hinge pin.

Installation and Owner’s Manual 12
Install the Refrigerator
1. Fasten the refrigerator into the enclosure (See Art01668):
- Push the refrigerator fully into the enclosure opening.
NOTE: DE/EV0041 models have four mounting screws andDE/EV0061 models have six mounting screws.
- Put the mounting screws [4] through the mounting flange [5]on both sides of the refrigerator.
- Make sure the mounting screws are through upperhole [6] of each pair of holes in the mounting flanges.
CAUTION: If the mounting screws are notthrough the upper hole of each pair of holes in themounting flanges, the side trim pieces will not fitcorrectly.
2. Install the side trim pieces (See Art01669 and Art01670):
- Open the door(s).
- Push the top only of each side trim piece [7] onto the metalframe [8] of the refrigerator.
- While holding the top only of each side trim piece onto themetal frame, push each side trim piece up and under thetop grill [9].
- Align the hinges, the strike plate cover, and the strike platewith the openings in the side trim pieces and push theremainder of each side trim piece onto the metal frame ofthe refrigerator.
- The side trim should engage the metal frame and theinner tabs [10] with a “snap” sound.
3. Put the hinge hole covers onto the refrigerator cabinetopposite the hinges and over the empty hinge holes (SeeArt01655 and Art01665).
4. Install the bottom grill (See Art01660):
- Align the mounting clips [1] of the bottom grill [2] with theopenings [3] in the bottom rail of the refrigerator cabinet.
CAUTION: Carefully push both ends of thebottom grill equally to engage the mounting clipsin the bottom rail at the same time. If the mountingclips engage the bottom rail one at a time,damage to the bottom grill can result.
- Push the bottom grill toward the lower frame until themounting clips “snap” into the bottom rail.
- Allow the door to close and put the bottom of the lower doorhinge onto the lower cabinet hinge of the refrigerator.
- Make sure a hinge bushing is in the bottom of the lowerdoor hinge.
- Align the holes in lower door hinge and the lower cabinethinge.
- Turn the lower hinge pin down into the lower cabinet hinge.
6. Install the upper door:
- Make sure a hinge bushing is in the bottom of the lowerdoor hinge.
- Put the lower door hinge down onto the center hinge pin.
- Allow the door to close and put the top of the upper doorhinge under the upper cabinet hinge of the refrigerator.
- Make sure a hinge bushing is in the top of the upper doorhinge.
- Align the holes in upper door hinge and the upper cabinethinge.
- Turn the upper hinge pin up into the upper cabinet hinge.
- Turn a center hinge pin cap back onto each end of thecenter hinge pin.
7. Align the doors and tighten all of the screws.
Connect the Drain Tube
CAUTION:
If you do not remove the orange cable tie from the draintube, the result will be water inside the refrigerator.
If you do not connect the drain tube to another tube, theresult will be water at the rear of the refrigerator.
1. Remove and discard the orange cable tie that seals thedrain tube at the rear of the refrigerator.
2. Attach the drain tube to another tube which allows the defrostwater of the refrigerator to correctly drain to a sump or to anarea outside the vehicle.
Installation and Owner’s Manual 13
Connect the Electrical Components
Electrical current necessary:
AC Operation DE0041and DE0061 models120 volts AC voltage(108 volts min. - 132 volts max.)59 hertz min. - 61 hertz max.
AC Operation EV0041and EV0061 models220 volts AC voltage(205 volts min. - 253 volts max.)49 hertz min. - 51 hertz max.
DC Operation DE / EV0041 and DE/ EV0061 models12 volts DC voltage(10.2 volts min. - 15.4 volts max.)
24 volts DC voltage(21.2 volts min. - 30.5 volts max.)
This refrigerator operates on both AC and DC electricalsources. Operation out of these limits may damage therefrigerator’s electrical circuit parts and will void the warranty.
Connect the 120 / 220 volts AC supply:
WARNING: Connect the AC power cord only to agrounded three-prong receptacle. Do not remove theround ground prong from the power cord. Do not use atwo-prong adapter or an extension cord. Operation of therefrigerator without correct ground can cause dangerouselectrical shock or death if you are touching the metalparts of the refrigerator.
Put the AC power cord [24] (See Art01655 and Art01659) into agrounded three-prong receptacle:
- Make sure the AC power to the receptacle goes through afuse or a circuit breaker which will protect the vehicle whenan outside power source is used.
- If the AC power to the receptacle is supplied by an on-boardgenerator, make sure that both the voltage and the fre-quency are within the specified limits (See the “Electricalcurrent necessary” section).
Connect the 12/24 volts DC supply:
To reduce the risk of electrical interference from other DCappliances and induction from voltage spikes:
- The refrigerator must have an independent 12/24 volt DCsupply.
- Route the DC power supply wires including the fusesdirectly from the battery to the refrigerator.
- Twist the DC power supply wires from the battery to therefrigerator.
CAUTION: Do not use a converter or a battery charger tosupply the DC power to the refrigerator. These devicesdo not supply filtered DC power. When using a converteror a battery charger, make sure a battery is in-linebetween them and the refrigerator.
As the distance from the vehicle battery to the refrigeratorincreases, the correct AWG wire size also increases. If the wiresize is too small for the distance, a voltage drop occurs. Thevoltage drop decreases the cooling performance of the refrig-erator.
1. Find the minimum wire size to use:
WARNING: Use only the recommended wire size.
- Measure the distance from the vehicle battery to therefrigerator:
- If the distance is 0 - 12 feet, use #14 AWG min. wiresize.
- If the distance is 12-20 feet, use #12 AWG min. wiresize.
- If the distance is over 20 feet, use #10 AWG min. wiresize.
2. To protect the DC power supply wiring, install a 15 amp fuseor circuit breaker in the positive (+) DC power supply wire asclose to the battery as possible.
- There is a 10 amp automotive fuse in the DC circuit at therefrigerator junction box.
3. Connect the DC power supply wires (See Art01655 andArt01659):
CAUTION: If the DC power supply leads are attachedincorrectly, damage to the refrigerator power supply willoccur.
- Connect the positive (+) DC power supply lead to the redwire [25] of the refrigerator.
- Connect the negative (-) DC power supply lead to the blackwire [26] of the refrigerator.
- Make sure that:
- Each DC power supply lead is attached to the correctpolarity wire of the refrigerator power supply.
- The chassis or the vehicle frame is not used as one ofthe conductors.

Installation and Owner’s Manual 14
- The DC power supply wires including the fuses arerouted directly from the battery to the refrigerator.
- The wire connections must be clean, tight and free ofcorrosion. If any of these items are not correct:
- A voltage drop to the refrigerator will occur.
- The voltage drop will decrease the coolingperformance of the refrigerator.
CAUTION: Disconnect the positive (+) DC power supplywire from the battery before you do a “fast charge” of thebattery. Failure to disconnect the positive (+) powersupply wire from the battery during a “fast charge” cancause damage to the refrigerator or other DC appliances.