Embed Size (px)
Citation preview

1
MATTERHORN® Tile
Installation Guide
MATTERHORN®
METAL ROOFING TO LAST A LIFETIME

2
Watch detailed installation videos online at
http://www.matterhornmetalroofing.com/tile-installation/
Or follow this QR Code:
Matterhorn® Tile Installation Videos

3
System Components Placement ...................................................................................4
Fasteners.......................................................................................................................5
Tools and Accessories ...................................................................................................6
General Installation Guidelines......................................................................................7
Screw and Fastening Specifications..............................................................................9
Eave Edge/Drip Edge ..................................................................................................10
Bird Stop or Bird Guard ...............................................................................................11
Inner Gable ..................................................................................................................12
Outer Gable .................................................................................................................13
Hip and Ridge ..............................................................................................................14
Locating Inner Gable or C-Closure ..............................................................................15
Valley ...........................................................................................................................16
Sidewall .......................................................................................................................17
Stucco Sidewall Detail .................................................................................................18
Endwall ........................................................................................................................19
Transition .....................................................................................................................20
Panel to Panel Installation ...........................................................................................21
Panel Layout and Installation ......................................................................................22
Tile Rooftop Snow Retention Options .........................................................................23
Snow Guard Installation Using Fasteners ...................................................................24
Plastic Snow Guards ...................................................................................................25
Steel Snow Guards......................................................................................................26
Snow Guards ...............................................................................................................27
Snow Guard Placement on Panel ...............................................................................29
Order/Estimating Sheet ...............................................................................................30
Table of Contents

4
B. 1.5 EL T-Style Drip Edge
C. Hip/Ridge Cap
D. 2” C-Closure Vented - Black
E. Ridge Cap End Closure
F. Inner Gable - Black*
G. Outer Gable
H. Side Wall Flashing
I. Endwall Trim
J. 2” Valley Closure - Black
K. Valley Closure Cap
L. 019x24” WL W-Valley
P. Trim Coil
N. Bird Stop 36” L
N. .019 GAL Bird Guard - 36” L
O. Weep Trim
*Inner gable can also be used as a non-vented c-closure in endwall applications.
M. Wind StopP. Junior Clear Poly Snow Guard
See the end of this guide for larger pictures, descriptions and SKUs of each accessory listed below.
System Components Placement
This page only refers to the area that components are placed for the Matterhorn® Metal Roofing System. Refer to the bid sheet at the end of the manual for actual components sizes and detailed information.
FG
IM
P
N
P
C QL
O
J
H
EA
B
D
K

5
Fasteners
2”. Mill finish, 100 screws per square of job. #10 Zinc coated panhead screw square drive. QTY 1,000/box (bulk packed)
MRS2M__________________Boxes
#10 - 12x2” Roofing Screws
#10-16 1-1/4”. Painted hexhead screw, used anywhere an exposed fastener is needed. QTY 1,000/ctn (10 bags of 100) Standard colors
MRS1.25_________________Boxes
#10 - 16x1-1/4” Roof Screw (Painted)
#10 - 12x1 1/4” Roofing Screw
1.25”. Mill finish, 100 screws per square of job. #10 Zinc coated panhead screw square drive. (Refer to screw length and use in installation instructions)QTY 1,000/Box (bulk packed)
MRS1.25__________________Boxes
#10-16 x 2” Stainless Hex Head Screw
Use two screws per each SNO-GEMJR, comes with a neoprene washer.QTY 250/Box
SGSCREW_________________Boxes
All screws used while installing Matterhorn® Standing Seam must be of a recommended screw type. Screws must be long enough to penetrate the roof deck. Refer to diagram on page 9.
6
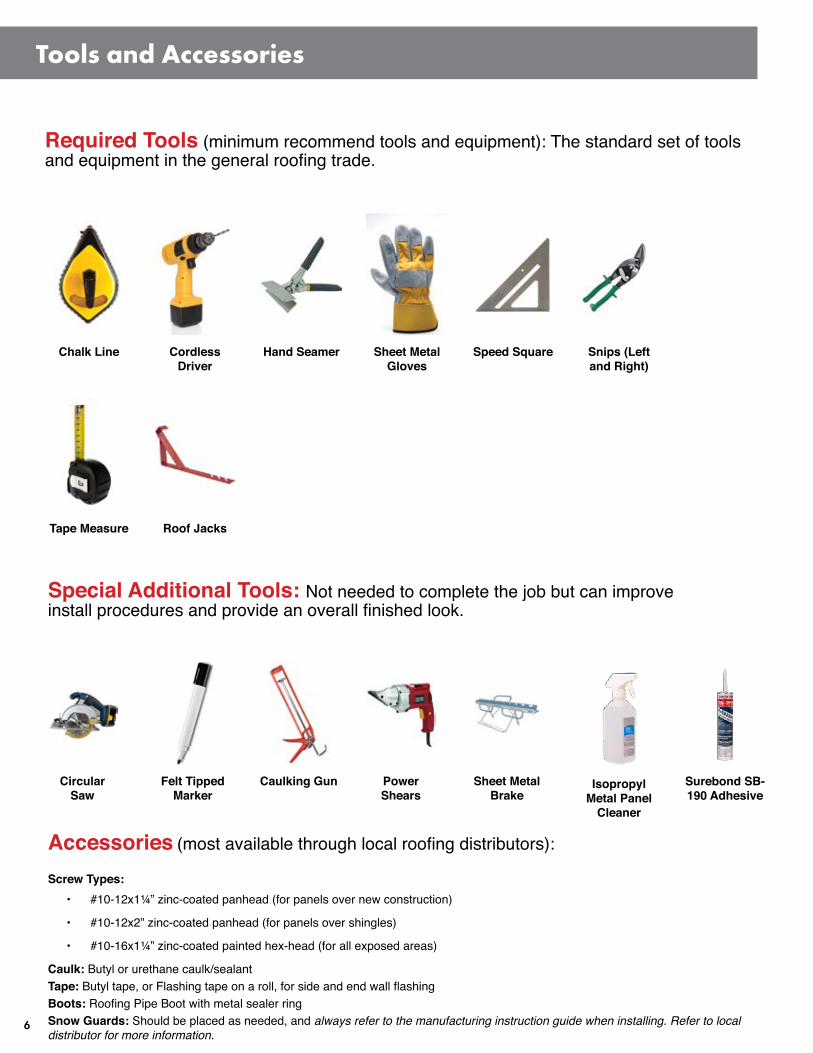
Required Tools (minimum recommend tools and equipment): The standard set of tools and equipment in the general roofing trade.
Special Additional Tools: Not needed to complete the job but can improve install procedures and provide an overall finished look.
Accessories (most available through local roofing distributors):
Screw Types:• #10-12x1¼” zinc-coated panhead (for panels over new construction)
• #10-12x2” zinc-coated panhead (for panels over shingles)
• #10-16x1¼” zinc-coated painted hex-head (for all exposed areas)
Caulk: Butyl or urethane caulk/sealant Tape: Butyl tape, or Flashing tape on a roll, for side and end wall flashing Boots: Roofing Pipe Boot with metal sealer ringSnow Guards: Should be placed as needed, and always refer to the manufacturing instruction guide when installing. Refer to local distributor for more information.
Snips (Left and Right)
Cordless Driver
Chalk Line Sheet Metal Gloves
Hand Seamer Speed Square
Tape Measure Roof Jacks
Circular Saw
Felt Tipped Marker
Caulking Gun Power Shears
Sheet Metal Brake
CUT SHEET
Dimensions
Height: 2 1/2” - Width: 3 1/2” - Length: 3 1/2”
Colors/FinishesAvailable in Any Standard or Custom Pre-finished Color.
MaterialsManufactured in Any Metal Form, including Pre-finished Aluminum or Steel In Kynar 500 Finish, Stainless Steel & Galvalume.
OverviewFormed after the Sno Gem® Original Polycarbonate, this prismatic design is available in any standard or custom pre-finished color and can be manufactured in any metal form, including: pre-finished aluminum or steel in Kynar 500 finish, stainless steel and galvalume. Diagonal installation creates a 5” barrier for more coverage per unit on wider panels. The Original Metal™ snow guard is installed using tube adhesive or a mechanical fastening application.
ApplicationsFor Metal Roof Systems.
Recommended AccessoriesDepending on the application, the following accessories are available to ensure proper installation.
For Metal Roof Systems
Original Metal™ Snow Guard
SB-190 Adhesive Installation Option Shown
Isopropyl Alcohol Panel Cleaner
SurebondSB-190 Adhesive
*Seller assumes no responsibility for the warranty. Check your roof manufacturer’s warranty information before installation.
Isopropyl Metal Panel
Cleaner
CUT SHEET
Dimensions
Height: 2 1/2” - Width: 3 1/2” - Length: 3 1/2”
Colors/FinishesAvailable in Any Standard or Custom Pre-finished Color.
MaterialsManufactured in Any Metal Form, including Pre-finished Aluminum or Steel In Kynar 500 Finish, Stainless Steel & Galvalume.
OverviewFormed after the Sno Gem® Original Polycarbonate, this prismatic design is available in any standard or custom pre-finished color and can be manufactured in any metal form, including: pre-finished aluminum or steel in Kynar 500 finish, stainless steel and galvalume. Diagonal installation creates a 5” barrier for more coverage per unit on wider panels. The Original Metal™ snow guard is installed using tube adhesive or a mechanical fastening application.
ApplicationsFor Metal Roof Systems.
Recommended AccessoriesDepending on the application, the following accessories are available to ensure proper installation.
For Metal Roof Systems
Original Metal™ Snow Guard
SB-190 Adhesive Installation Option Shown
Isopropyl Alcohol Panel Cleaner
SurebondSB-190 Adhesive
*Seller assumes no responsibility for the warranty. Check your roof manufacturer’s warranty information before installation.Surebond SB-190 Adhesive
Tools and Accessories

7
General Installation Guidelines• Installing Matterhorn® Metal Roofing on top of existing
shingles is acceptable per local building requirements.
• Matterhorn Metal Roofing must be installed on a solid roof deck. Synthetic underlayment and high-temperature ice and water shield must be installed prior to the installation of the metal roofing products—refer to local building code.
• Prior to installing the underlayment, clear the roof deck of any debris or protrusions that could puncture the protective membrane. Installing roof panels on uneven surfaces may cause distortion or deflection on the metal surface. Surface wave in the material is not cause for rejection of the product.
• Inner Gable, Valley, Valley Closure, T-Style Drip Edge, Vented C-Closure, Bird Guard and Bird Stop must be installed before the panels. Sidewall Flashing, Outer Gable, Hip/Ridge Cap, Transition Flashing and Ridge Cap End Closure may also be installed before the panels.
• When cutting panels to length, always remove material so that the factory pre-formed bend remains intact to allow for proper locking to adjacent panel below.
• Always install Matterhorn® Tile panels from bottom to top, then right to left; beginning with the bottom right corner of the roof deck. Always fill one column in completely before moving to the next one.
• Be sure each panel is fully engaged to the panel below before fastening it to the deck. This may be done by using the heel of your hand.
Storage and Handling: Storage: Metal building products should be stored in a dry well ventilated space. Never cover materials with non-breathing or plastic tarps. This may cause condensation which will deteriorate the protective coating of the materials. General Handling: Carry the roofing panels on edge instead of laying flat. Be sure to wear gloves.
Foot Traffic: Wear clean, soft sole, non-marking shoes when walking on installed roofing panels. Only step in areas where the panel is in contact with the roof deck.
Safety GuidelinesFollow all governmental safety procedures, including, but not limited to, all OSHA guidelines. Always wear safety gloves, safety glasses and fall protection gear when installing Matterhorn® Metal Roofing.
Mechanically Attached Roofing Underlayment:The manufactures underlayment must include this listed technical information.
• Fully synthetic underlayment designed for use under metal roofing.
• Meet or exceeds the physical requirements of ASTM D226 & D4869
• Installed per manufacturers installation instructions.
Self-adhered Waterproofing Underlayment:Matterhorn metal roofing requirements for a self-adhered roofing underlayment. Waterproofing underlayment must resist the higher roof temperatures produced under metal roofing. Underlayment’s not designed for higher temperature applications can prematurely deteriorate, crack or not seal properly. Must include listed technical data from underlayment manufacturer.
• Withstand temperatures up to 250°F.
• Meet or exceed ASTM D1970
• Installed per manufacturers installation instructions.
VentilationProper ventilation must be achieved to avoid moisture and heat buildup in the attic space, or between the layers of the building envelope. Consult local building code for NFA (Net Free Area) rating requirements.
• Intake vs. exhaust: To achieve maximum airflow through the attic, the amount of intake at the eave must be less than or equal to the exhaust at the ridge.
• Soffit vents are found on the underside of the eave overhang. This is the primary source for the intake of air to the attic.
• Ridge vents are located at the peak of the roof and are the primary exhaust outlet for accumulated hot, moist air.
Upon completion of the installation, inspect the roof surface for metal shavings or other loose material. Remove by wiping softly with a cloth, being careful not to scratch the painted surface. Remove dirt with a damp rag, using detergent if necessary.
MaintenanceRemove any and all debris that may accumulate on the roof during its lifespan to keep it moisture free. Tighten any loose fasteners or trim pieces as access allows. Do not attempt to repair or replace any parts of the Matterhorn roof system without consulting a certified applicator. Repainting the roof should not be necessary through the duration of the warranty.
General Installation Guidelines
8
General Installation Guidelines
WarrantyVisit qualityedge.com/warranties/ to register your warranty. This is required to “trigger” any coverage. See the warranty document for details. Alternatively, you can register your warranty by mailing the warranty card.
Class A Fire RatingPlease visit matterhornmetalroofing.com/code-compliance/ for the most up-to-date information.
FasteningFasten all roofing panels to the roof using only the required screw type: a Quality Edge supplied screw or equivalent.
#10 zinc coated pan head screw with a minimum head diameter of 0.45”. Screw length must be long enough to fully penetrate through the roofing deck. Ensure each panel is fully engaged into the corresponding panel.
See Screw and Fastening Specifications on pg. 8.See panel Layout and Installation on pg. 20.

9
!!
MRS2
MRS1.25
1.250±.050
2.000±.050 Screw Must Penetrate Thru Decking#10 Zinc Coated Panhead Screw
Standard five screw installation using pre-punched holes:
#10 Zinc Coated Panhead Screw
Screw and Fastening Specifications

10
1. Fasten drip edge to the roof deck every 12” with panhead screws.
2. Ensure that drip edge is installed securely, the drip edge is designed to hold down the bottom of the first row of panels.
3. When installing, ensure that drip edge is straight and square to the roof plane and does not follow any wave in the fascia. This may require a chalk line.
4. Matterhorn drip edge is designed to be installed on up to a 12/12 pitch without modification. On steeper roof pitches, drip edge can be bent in a siding brake for easier installation. By bending forward the leg of the drip edge it will fit tight on a steep slope roof.
5. Bird Stop (foam) or Bird Guard (steel) should be installed between the drip edge and the underside of the panel at the eave edge only.
T-Style Drip Edge
T-Style Drip Edge
Tile Panel
Underlayment
Underlayment
#10 Zinc Coated Panhead Screw
#10 Zinc Coated Panhead Screw
Step 1
Step 2
Fastener for first row of metal shingle
Runs over drip edge
Bottom hem of panel
Eave/Drip Edge

11
Bird Stop (Foam) or Bird Guard (Steel) should be installed between the drip edge and the underside of the panel at the eave edge only.
T-Style Drip Edge
T-Style Drip Edge
Bird Stop
Bird GuardTile Panel
Tile Panel
#10 Zinc Coated Panhead Screw
Bird Guard (Steel)
Bird Stop (Foam)
Underlayment
Underlayment
Bird Stop or Bird Guard
#10 Zinc Coated Panhead Screw
#10 Zinc Coated Panhead Screw

12
Inner Gable 1. Install the inner gable up the rake edges using panhead screws every 12”. The opening of the inner gable
should face toward the roof deck. The back side should align with the outside edge of the roof deck.
2. Overlap inner gable trim as per the sequence below. Overlap by at least 6”.
3. In high wind areas check your local code requirements for approved installation techniques.
#10 Zinc Coated Panhead Screw
Inner Gable
Underlayment
When overlapping, apply sealant under overlap. Be sure to screw every 12” between the divereter and the water lock.
Cut bottom of inner gable so outside weeping channel will protrude past drip edge ¼”.
Cut out top leg of inner gable trim to allow for tight, waterproof overlapping.
Refit the overlapping water locks together with a hand seamer.
Install inner gable as a whole piece. When adding a second inner gable trim, open up the water lock and cut out the top section to allow for tight, overlapping, waterproof fit.
Inner Gable

13
1. Install the outer gable over the inner gable. This may require opening the hem slightly.
2. Make sure the outer gable fits parallel with the inner gable and the lap joint is staggered with the inner gable lap joint.
3. Outer gable should be hemmed to inner gable and fastened with a #10 painted hex head screw.
Note: For high-wind areas additional fasteners may be needed into the fascia. Consult local codes to determine if your area is a high wind area.
Underlayment
Underlayment
Tile Panel
Tile Panel
#10 Zinc Coated Panhead Screw
#10 Zinc Coated Panhead Screw
Roof Sheathing
Roof Sheathing
#10 Painted Hex Head Screw
#10 Painted Hex Head Screw
#10 Painted Hex Head Screw
Outer Gable
Inner Gable
Inner Gable
Ridge Cap
Option 1: Using outer gable
Option 2: Using ridge caps on the rake
Outer Gable

14
Hip and Ridge Detail(s): Hip and ridge capping can be installed before the roof panels to prevent walking on the finished roof. For vented ridges, the vented C-Closure is fastened to the deck every 12” with panhead screws. For unvented hips or ridges the inner gable is installed with panhead screw every 12”. Be sure the inner gable or vented c-closure are properly spaced to engage the hem of the hip/ridge cap. When overlapping the cap sections, be sure to maintain the correct spacing end to end by nesting the ridge cap together. A shorter flange on the ridge cap can be achieved by moving the closures closer together.
For a 130 MPH wind rating, fasten cap to the tile through the closure with color matched screws at every barrel top.
Hip or Non Vented Ridge
Vented Ridge
Hip and Ridge Cap
Hip and Ridge Cap
Wind Stop
#10 Painted Hex Head Screw
#10 Painted Hex Head Screws
#10 Painted Hex Head Screws
#10 Painted Hex Head Screw
Vented C-Closure
Inner Gable
Roof Sheathing
Roof Sheathing
Underlayment
Hip and Ridge
Underlayment

15
Vented C-Closure or Inner Gable
Use the Ridge Cap as your guide
Roof Sheathing
UnderlaymentUnderlayment
To set the spacing of the hip or ridge, Use the ridge cap as your guide.1. Slide a Ridge Cap over the inner gable or Vented C-Closure at one end before screwing it to the hip or ridge.
2. Set the assembly on the hip or ridge and position the end with the cap where needed.
3. Screw down the Inner Gable or Vented C-Closure at the end with the Ridge Cap.
4. Slide the Ridge Cap down the Inner Gable or Vented C-Closure to the other end.
5. Position that end with the cap where needed and screw down.
6. Carry on these steps along the hip or ridge.
Step 1 Step 2
Step 3
Slide the Ridge Cap down the Inner Gable or Vented C-Closure to the other end.
Screw down the inner gable or Vented C-Closure at the end with the ridge cap.
Locating Inner Gable or C-Closure
#10 Painted Hex Head Screws

16
Valley Detail #1: Closed Valley (3 Pieces)1. Fully line the valley of the roof with self adhering underlayment.
2. Install the opposing pieces of valley closure back to back. Fasten every two feet within one inch of the water lock with pan head screws.
3. Slide the valley cap up the valley starting at the eave. Make sure the cap stays hemmed to the valley closure. Additional sections may be added for long roof valleys. For a 130 MPH wind rating, fasten every 12” through the valley cap into the barrel top.
VALLEY DETAIL
Tile
W-Valley
Valley Cap
Ice and Water Shield
Valley Closure
#10 Zinc Coated Panhead Screw
#10 Painted Hex Head Screw#10 Painted Hex Head Screw
Valley Detail #2: Open Valley1. Install valley closure over hang the drip edge on the inside corner, 6” out of the lowest point.
2. Cut the bottom hem of the first panel at the bottom of the valley closure. This will allow water to flow out of the valley at the bottom and not back flow.
3. Cut the roof panels at the angle of the valley, fitting it as close to the inside of the valley closure as possible. Extra fasteners may be needed to secure the panels in the valley. Be sure not to fasten within 6” of the bottom.
4. When joining valley sections, apply sealant and install valley closure to be water tight. Apply sealant neatly and completely along all sides of the valley trim.
5. Both sides of the valley closure need to be water tight.
6. On a gable protrusion, when installing panels into valley, take frequent measurements to ensure that the first course above the valley peak will be aligned horizontally. At the bottom of all trim pieces, allow for weeping of water. Panels will need to be notched out to allow water to escape.
Valley
#10 Zinc Coated Panhead Screw
Ice and Water Shield

17
Sidewall Detail:1. Cut roof panel of the last row to the remaining width needed to meet the sidewall.
2. Install inner gable before the last panel, fastening every 12” just inside the water lock.
3. Install the panel with the cut edge against the inner gable. Fasten the top of the inner gable into the panel at the high spots with pan head screws.
4. Install the sidewall flashing over both the panel and the inner gable, hooking the sidewall flash hem on to the edge of the inner gable.
5. Fasten the sidewall flashing into the sidewall or fit behind the siding to secure.
6. When installing along a chimney, be sure the sidewall flashing is sealed to the brick or a reglet is cut into the mortar joints. For a 130 MPH wind rating, fasten through the sidewall flashing into the tile panel every 12”.
#10 Zinc Coated Panhead Screw
Siding
Underlayment
Roof Sheathing
Flashing Tape
J-Channel
Flashing Tape
Sidewall Flashing
Inner Gable
Sidewall

18
Flashing Tape
Sidewall Flashing
#10 Painted Hex Head Screw
Bend a 3/8 leg out to make a butyl cop
Butyl
Butyl
Stucco Wall
Inner Gable for Sidewall
Underlayment
Roof Sheathing
Stucco Sidewall Detail
Using Inner Gable and Sidewall Flashing
#10 Zinc Coated Panhead Screw
#10 Zinc Coated Panhead Screw

19
Endwall Detail with Inner Gable:1. Fasten the inner gable to the roof deck with panhead screws every 12”.
2. Fasten the endwall flashing into the endwall with the hem hooked into the inner gable.
3. Lap endwall flashing behind the siding or seal to the endwall as needed.
4. When installing up to a chimney, be sure counter/endwall flashing is sealed to the brick. For a 130 MPH wind rating, fasten through the inner gable into the tile panel every 12”.
#10 Painted Hex Head Screw
#10 Zinc Coated Panhead Screw
#10 Zinc Coated Panhead Screw
Wind Stop
Flashing Tape
Flashing Tape
Siding
J-Channel
Sidewall Flashing
Inner Gable
UnderlaymentRoof SheathingWall Sheathing
Endwall

20
Transition Detail:1. Install inner gable, sealing the bottom to the roof deck at the roof angle change.
2. Install the transition flashing with the lower hem hooked into the inner gable.
3. Install the upper roof section first over the transition flashing along the bottom edge, filling the voids with Bird Stop (foam) or Bird Guard (steel).
4. Then install the lower roof section under the transition flashing, fitting the panels all the way up into the inner gable. For a 130 MPH wind rating, fasten through the inner gable into the tile panel every 12”.
Transition
Inner GableWind Stop
UnderlaymentRoof Sheathing
FlashingTape
#10 Zinc CoatedPanhead Screws
#10 Zinc CoatedPanhead Screw
#10 PaintedHex Head Screw
Roof Sheathing
End Wall Trim
Bird Guard (Steel)

21
Row 1Row 2 Row 1Row 2
Panel to Panel Installation
1. Prior to installing the panels over the underlayment, clear the roof deck of any debris that could puncture the underlayment.
2. Always install tile panels from bottom to top, then right to left; beginning with the bottom right corner of the roof deck. Always fill one column in completely before moving to the next one.
3. To fully engage the panel to the previous row, start the panel down and to the right, engage the mating hook and flange, after the flange is started press the panel to the left and up to fully engage. Take care not to over engage the panel in the mating pocket.
4. Be sure each panel is fully engaged to the panel below and to the right before fastening it to the deck.
Panel to Panel Installation

22
Row 1Row 2Row 3
Panel Layout & Installation
Panel Layout & Installation

23
There are a lot of options for snow guards in the market. What will follow in this installation guide is one possible solution using Sno Gem® snow guards. Sno Gem has recommended two options of snow guards per profile for Matterhorn metal roofing. The clear plastic snow guards depicted in this installation guide can be acquired from Quality Edge and all the steel or color coordinated snow guards can be acquired direct from Sno Gem.
Snow stops are most often installed on eave edges over areas of concern like walk ways, parking areas, gutters, garage entrances, shrubberies and entryways. Some less common locations to mount snow guards are pipe vent penetrations, above mechanical units or anything that added weight or falling snow could damage. If you have no experience or are questioning your judgment on the placement of snow guards it is recommended that you work with Sno Gem on placement locations. The drawings, placement on the panel and mounting methods in this guide are derived from the recommendations of Sno Gem.
Below are frequently asked questions about snow guards provided by Sno Gem®
Why is rooftop snow retention important? Snow often accumulates on a sloped roof. When temperatures go above freezing, the snow accumulation melts. Without snow guards, the result can be dangerous as the built up snow and ice slides and falls to the ground, and that extraordinarily heavy amount of snow could fall onto a person. The weight of the snow can also easily damage the building as well as the adjoining landscape. Sno Gem Snow Guards reduce the dangers associated with rooftop snow.
How do snow guards work? Once snow is on a roof, heat generated through the roof or from rising exterior temperature melts the snow. The melting process often creates a thin layer of water between the snow and the roof. The water forms a slippery path that the snow and ice follow down, often in one large chunk. Properly placed and attached, Sno Gem snow guards will reduce the potential for cascading snow. Instead of falling off in an avalanche, the snow and ice often drops off in small amounts or melts completely. Also, Sno Gem Snow Guards can help to more evenly distribute the weight of snow and ice on a roof.
What Rooftop pattern will my snow guard placement follow? The correct choice and snow guard placement of the Sno Gems is critical. When you are planning your installation, Sno Gem representatives will work with you to design the most efficient system.
What type of SNO GEM snow guards do I need? In the case of Matterhorn metal roofing Sno Gem has determined the right snow guards for slate, shake, tile and standing seam. Slate and shake profiles can use the Junior Polycarbonate or steel Half Carat with tab. Tile can use the Junior Polycarbonate or the Original metal with tab. The standing seam can use the Junior Polycarbonate or the 2” iClad clamp to seam bar/fence snow retention system.
Can Sno Gem guards match the color of my roof? Sno Gem Snow Guards can be manufactured in standard metal roof colors. We also offer an unlimited amount of custom colors to meet architectural requirements.
Plastic: Tile Snow GuardsUsing 2 Stainless Fasteners, 2” Wide Junior Polycarbonate Snow Guard. The clear Jr snow guard can be ordered from Quality Edge or you can buy direct from Sno Gem, Their part number is (SNO-GEM JR RAW NO 3M Tape).
Steel Option Direct from Snow Gem: Tile Snow GuardOriginal Metal snow guard, 1” mounting tab and three thru holes for mounting. The Sno Gem part number for ordering the Matterhorn style snow guard is (OM w/Tab-QE).
To order steel snow guards or get help with snow guard placement, direct all questions to:Sno Gem, Inc.4800 Metalmaster WayMcHenry, IL 60050Hours: Mon. – Fri. 7:00 A.M. – 5:30 P.M. (CST)E-mail: [email protected]: 888-SNO-GEMS (766-4367)Phone: 815-477-4367Fax: 815-455-4367
Tile Rooftop Snow Retention Options

24
Installation Instructions are provided by Sno Gem, Inc.
Introduction:The following installation instructions are provided solely to assist installers. Sno Gem, Inc. recommends that these products be installed by a qualified roofing contractor who will have the knowledge and ability to properly install the product. It is also strongly recommended that adhesive installation be limited to smooth panels to ensure maximum bonding. Sno Gem, Inc. does not take any responsibility for acts, errors or omissions of the installer and cannot be held responsible for product installation. Check with local building code officials for requirements in your area.
Installation Products:Sno Gem, Inc. recommends and offers the following products in order to provide the most effective installation of the Sno Gem® products. Sno Gem, Inc. cannot be liable for the effectiveness of any products used by the installer which have not been purchased directly from Sno Gem®.• Isopropyl Metal Panel Cleaner• Stainless Fasteners with Neoprene Gasket Washers• SB-190 Tube Adhesive SealantThese recommendations are based on test believed to be reliable. Please note that installation using an adhesive product should be performed in accordance with the adhesive manufacturer’s published instructions. Sno Gem, Inc. does not warrant against adhesive failure and the purchaser must rely on the adhesive manufacturer’s applicable warranty, if any.
Installation Instructions:
1. Measure and mark the distance from the eave where the Sno Gem® snow guard is to be installed. Using isopropyl metal panel cleaner, thoroughly clean that area. Before proceeding, make sure the panel is completely dry and free from dirt.
2. Spread and adequate amount of SB-190 Adhesive Sealant evenly across the entire bottom of the snow guard base with a notched adhesive spreader tool ensuring there are no voids, which will cause air pockets if not spread properly.
3. Place the snow guard in position on the roof panel surface, applying firm, even pressure perpendicular to the roof surface to best ensure there are no air pockets.
4. Install each fastener along with a neoprene gasket washer using the pre tapped pilot holes on the snow guard’s base as a guide.
5. Apply a continuous bead of SB-190 sealant around the entire perimeter (all 4 sides) sides of the snow guard base and over all screw heads. Smooth the sealant around the edge of the snow guard to create a clean and water tight seal. Failure to perform this step could result in water infiltration between the snow guard and the roof panel and a weakening of the adhesive bond. The sealant application will require regular and ongoing maintenance to remain effective.
6. SB-190 requires a 28 day period at 50 degrees (F) or higher to fully cure and for the best results in adhesion (90% strength is achieved at 12-14 days at 50 degrees (F) or above).
7. 6. Repeat steps 1-5 for each snow guard. Be sure to follow the Architect’s and/or Engineer’s required spacing and/or layout, including their adjustments for field conditions, if any (a recommended layout is furnished by Sno Gem, Inc. only upon written request).
Warranty:Sno Gem, Inc. does not provide any warranty on the installation of the products. Sno Gem, Inc. will not be responsible of misapplication of the product, incorrect materials or defects that were obvious at the time of installation. Any warranty claim shall be limited to Sno Gem’s cost of material on the product determined to have a manufacturer’s defect and in no event will Sno Gem, Inc. be liable for any damage, schedule delays or additional labor.
Snow Guard Installation Using Fasteners

25
2” Wide Junior Polycarbonate™ Snow Guard Snow Retention System
2 Stainless Fasteners with Neoprene Gasket Washersat the Top Only
Fastener Option 1
Apply Sealant Around the Entire Perimeter (All 4 Sides)
Junior Polycarbonate™
SB-190 Adhesive SealantAcross the Entire Bottom
Clean Areas with Isopropyl Metal Panel Cleaner
SB-190 Adhesive over the heads of screws
Plastic Snow GuardsCan be ordered from Quality Edge or direct from Sno Gem
26
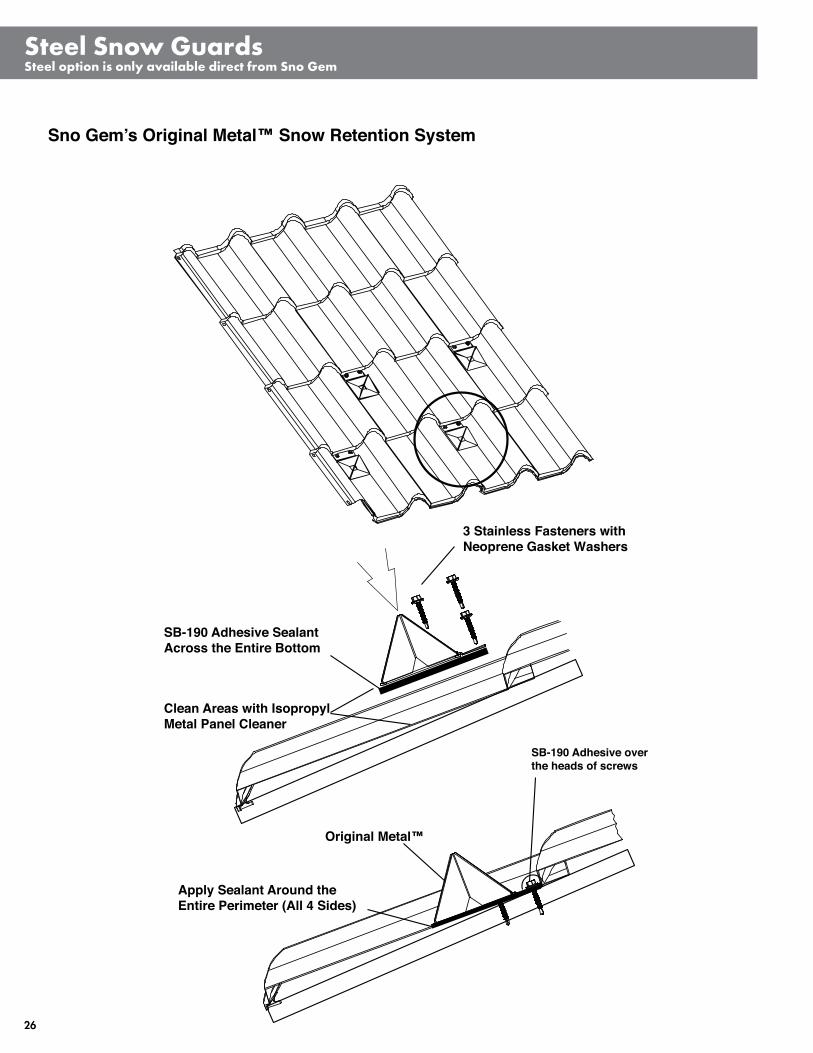
Sno Gem’s Original Metal™ Snow Retention System
Steel Snow GuardsSteel option is only available direct from Sno Gem
3 Stainless Fasteners with Neoprene Gasket Washers
Original Metal™
Apply Sealant Around the Entire Perimeter (All 4 Sides)
SB-190 Adhesive SealantAcross the Entire Bottom
Clean Areas with Isopropyl Metal Panel Cleaner
SB-190 Adhesive over the heads of screws

27
Snow Guards
NO!NO!
GOOD!
Snow Guard Placement by Lower Roof Edge
Snow Guard Placement on Large Roofs / Extreme Pitch Roofs
Never install beyond the load bearing wall
Never install the snow guards over the roof edge overhang, the weight of the snow can damage the roof or wall.
If a 2nd group/run of snow guards is determined to be needed. Space the 2nd group/run of snow guard up the roof 6 to 8 feet from the last snow guard in the first group/run.
6ft to 8ft

28
Snow Guards Shielding Roof Penetrations
On large or extreme pitch roofs, if roof penetrations like vent pipes, skylights or the alike are present in the lower section, it is a good practice to install snow guards above them.
Vent Pipe
Approximately 1 ft. to the Left and Right
1 ft. 1 ft.
Snow Guards

29
Snow Guard Must be Mountedup to the Tile Step, This is WhereThere is Little to no Gap Under The Panel
Little to no Gap
Tile Step
Tile Installation Pattern2 Rows, Around 18” on CenterOver All Eave Edges
NO!
NO!
Snow Guard Placement on Panel

30
Tile Order/Estimating SheetMATTERHORN®
METAL ROOFING
qualityedge.com matterhornmetalroofing.com Page 1 of 3
All quantities to complete installation need to be verified by contractor and/or Installer. Quality Edge will only honor ordered amounts.
STEP ONE:Select your color:
STEP TWO:List quantities need in the spaces below:
r Terracotta 105 (TCOT)r Jade 101 (JAD)
r Weathered Clay 112 (WLCLA)r Weathered Canyon 110 (WLCAN)
r Weathered Sequoia 113 (WLSEQ)
r Brick Blend 103 (BRK)
r Tuscan Stone 102 (TSC)
r Weathered Sage 111 (WLSAG)
4-Course Tile Panel A
Tile panel is 4 course tall, panel is 20 5/8” by 48”. Coverage is 48 sq./ft/box. Exposed area: 18.17” x 47.20”.
8 pcs/ctn. 16 pcs equals 1 square, 100 sq. ft.
2048STP_________________Boxes
2-Course Tile Panel A
Tile panel is 2 course tall, Panel is 20 5/8” by 24”. Coverage is 24 sq./ft. Exposed area: 18.17” x 23.64”.
8 pcs/ctn. 32 pcs equals 1 square, 100 sq. ft.
2024STP_________________Boxes
1.5 EL T-Style Drip Edge B
Used at eaves to match tile roofing. 10 ft. long, 1.5” tall.
10 pcs/ctn.
1.5TDST10________________Boxes
Hip/Ridge Cap C
Used for hip, ridge and rake/ gable edge. For vented ridge use Vented C-Closure. For non-vented ridge, gable and rake use inner gable.
10 pcs/ctn.
RCST4___________________Boxes
2” C-Closure Vented - Black D
Used at vented ridge 10’ long, 2” tall.
4 pcs/ctn.
2CCVST10BLK____________Boxes
Ridge Cap End Closure E
Used to close of end of cap for ridge/hip/rake/gable as needed.
10 pcs/ctn.
1RCECST_________________Boxes
Outside Gable G
Installed over inner gable, on gable/rake edges. 6” tall, 10’ long.
10 pcs/ctn.
6OGST10_________________Boxes
Side Wall Flashing H
Installed over inner gable, on side wall and endwall. 6” tall, 10’ long.
10 pcs/ctn.
6SWFST10________________Boxes
Endwall Trim I
Installed over inner gable, at end and side walls. 6” on roof 4” up the wall, 10’ long.
10 pcs/ctn.
6EWST10_________________Boxes
Inner Gable - Black F
2” tall 10 ft. long. Installed under outer gable/rake edges, side wall, end wall, non-vented ridge and hips.
4 pcs/ctn.
2IGST10BLK_______________Boxes

31Page 2 of 3qualityedge.com matterhornmetalroofing.com
019x24” WL W-Valley L
Option B (Open Valley)
Installed in valley on roof deck. One-piece valley option, see install instructions. 24” wide, 10’ long.
Sold by piece, 50 pcs/crate
24WVST_________________Pieces
Used to make custom parts and flashing on site. 24” wide, 25’.
1 roll/ctn.
T25G_____________________Boxes
24”x 25’ Trim Coil P 2”. Mill finish, 100 screws per square of job. #10 Zinc coated panhead screw square drive.
QTY 1,000/box (bulk packed)
MRS2M__________________Boxes
#10 - 12x2” Roofing Screws
#10-16 1-1/4”. Painted hexhead screw, used anywhere an exposed fastener is needed.
QTY 1,000/ctn (10 bags of 100) Standard colors
MRS1.25_________________Boxes
#10 - 16x1-1/4” Roof Screw (Painted)
Installed inside the vented c-closure and inner gable at the ridge, end wall and roof transitions. Designed to keep water from blowing behind the panel or into vents.
56” long, 25 pcs/box
WINDSTOP_______________Boxes
Windstop M
#10 - 12x1 1/4” Roofing Screw
1.25”. Mill finish, 100 screws per square of job. #10 Zinc coated panhead screw square drive. (Refer to screw length and use in installation instructions)
QTY 1,000/Box (bulk packed)
MRS1.25__________________Boxes
#10-16 x 2” Stainless Hex Head Screw
Use two screws per each SNO-GEMJR, comes with a neoprene washer.
QTY 250/Box
SGSCREW_________________Boxes
Installed under tile at eave to close off barrel opening. 3’ long, 2” tall.
24 pcs/ctn
BIRDSTOP_______________Boxes
Bird Stop 36” L N
CI-7 Foam Material
Installed under tile at eave to close off barrel opening. 3’ long.
48 pcs/ctn
BIRDGUARD_____________Boxes
.019 GAL Bird Guard - 36” L N
Steel Material2” Valley Closure - Black J
Option A Valley (Hidden)
Installed in valley, two pieces needed per 10’. (Plus one piece of valley closure) 2” tall, 11” wide, 10’ long.
4 pcs/ctn.
2VCST10BLK______________Boxes
Valley Closure Cap K
Option A Valley (Hidden)
Installed over valley closure. 3.25” wide, 10’ long.
10 pcs/ctn.
3VCCST10________________Boxes
Used in areas that require drainage. 3” wide, 10’ long.
14 pcs/ctn
3WTSE10BLK_____________Boxes
Weep Trim O

32 Page 3 of 3
01/4
/16
qualityedge.com matterhornmetalroofing.com
F
G
IM
P
N
P
C QL
O
J
H
EA
B
D
CUT SHEET
Dimensions
Height: 2 1/2” - Width: 3 1/2” - Length: 3 1/2”
Colors/FinishesAvailable in Any Standard or Custom Pre-finished Color.
MaterialsManufactured in Any Metal Form, including Pre-finished Aluminum or Steel In Kynar 500 Finish, Stainless Steel & Galvalume.
OverviewFormed after the Sno Gem® Original Polycarbonate, this prismatic design is available in any standard or custom pre-finished color and can be manufactured in any metal form, including: pre-finished aluminum or steel in Kynar 500 finish, stainless steel and galvalume. Diagonal installation creates a 5” barrier for more coverage per unit on wider panels. The Original Metal™ snow guard is installed using tube adhesive or a mechanical fastening application.
ApplicationsFor Metal Roof Systems.
Recommended AccessoriesDepending on the application, the following accessories are available to ensure proper installation.
For Metal Roof Systems
Original Metal™ Snow Guard
SB-190 Adhesive Installation Option Shown
Isopropyl Alcohol Panel Cleaner
SurebondSB-190 Adhesive
*Seller assumes no responsibility for the warranty. Check your roof manufacturer’s warranty information before installation.
Surebond SB-190 Adhesive
One tube is needed for every 18-20 SNOW-GEMJR.
10.3 oz.
SNO-GEMSB190________________Ea
Touch Up Paint Brush
Standard colors only.
1 oz.
BRUSH_______________________Ea
Isopropyl Metal Panel Cleaner
One bottle is needed for every 100 SNO-GEMJR.
16 oz.
SNO-GEMCLEANER______________Ea
CUT SHEET
Dimensions
Height: 2 1/2” - Width: 3 1/2” - Length: 3 1/2”
Colors/FinishesAvailable in Any Standard or Custom Pre-finished Color.
MaterialsManufactured in Any Metal Form, including Pre-finished Aluminum or Steel In Kynar 500 Finish, Stainless Steel & Galvalume.
OverviewFormed after the Sno Gem® Original Polycarbonate, this prismatic design is available in any standard or custom pre-finished color and can be manufactured in any metal form, including: pre-finished aluminum or steel in Kynar 500 finish, stainless steel and galvalume. Diagonal installation creates a 5” barrier for more coverage per unit on wider panels. The Original Metal™ snow guard is installed using tube adhesive or a mechanical fastening application.
ApplicationsFor Metal Roof Systems.
Recommended AccessoriesDepending on the application, the following accessories are available to ensure proper installation.
For Metal Roof Systems
Original Metal™ Snow Guard
SB-190 Adhesive Installation Option Shown
Isopropyl Alcohol Panel Cleaner
SurebondSB-190 Adhesive
*Seller assumes no responsibility for the warranty. Check your roof manufacturer’s warranty information before installation.
2” x 6.25”, used for Shake, Slate and Tile only. Steel snow guards are available direct from Sno Gem only.
200 pcs/ctn
SNO-GEMJR_____________Boxes
Junior Clear Poly Snow Guard P
K

matterhornmetalroofing.comqualityedge.com
02/2
3/20
16
MATTERHORN®
METAL ROOFING TO LAST A LIFETIME
For installation assistance call 888.784.0878
Watch detailed installation videos online at
matterhornmetalroofing.com/tile-installation
Or follow this QR Code:
Page 3 of 3
01/4
/16
qualityedge.com matterhornmetalroofing.com
F
G
IM
P
N
P
C QL
O
J
H
EA
B
D
CUT SHEET
Dimensions
Height: 2 1/2” - Width: 3 1/2” - Length: 3 1/2”
Colors/FinishesAvailable in Any Standard or Custom Pre-finished Color.
MaterialsManufactured in Any Metal Form, including Pre-finished Aluminum or Steel In Kynar 500 Finish, Stainless Steel & Galvalume.
OverviewFormed after the Sno Gem® Original Polycarbonate, this prismatic design is available in any standard or custom pre-finished color and can be manufactured in any metal form, including: pre-finished aluminum or steel in Kynar 500 finish, stainless steel and galvalume. Diagonal installation creates a 5” barrier for more coverage per unit on wider panels. The Original Metal™ snow guard is installed using tube adhesive or a mechanical fastening application.
ApplicationsFor Metal Roof Systems.
Recommended AccessoriesDepending on the application, the following accessories are available to ensure proper installation.
For Metal Roof Systems
Original Metal™ Snow Guard
SB-190 Adhesive Installation Option Shown
Isopropyl Alcohol Panel Cleaner
SurebondSB-190 Adhesive
*Seller assumes no responsibility for the warranty. Check your roof manufacturer’s warranty information before installation.
Surebond SB-190 Adhesive
One tube is needed for every 18-20 SNOW-GEMJR.
10.3 oz.
SNO-GEMSB190________________Ea
Touch Up Paint Brush
Standard colors only.
1 oz.
BRUSH_______________________Ea
Isopropyl Metal Panel Cleaner
One bottle is needed for every 100 SNO-GEMJR.
16 oz.
SNO-GEMCLEANER______________Ea
CUT SHEET
Dimensions
Height: 2 1/2” - Width: 3 1/2” - Length: 3 1/2”
Colors/FinishesAvailable in Any Standard or Custom Pre-finished Color.
MaterialsManufactured in Any Metal Form, including Pre-finished Aluminum or Steel In Kynar 500 Finish, Stainless Steel & Galvalume.
OverviewFormed after the Sno Gem® Original Polycarbonate, this prismatic design is available in any standard or custom pre-finished color and can be manufactured in any metal form, including: pre-finished aluminum or steel in Kynar 500 finish, stainless steel and galvalume. Diagonal installation creates a 5” barrier for more coverage per unit on wider panels. The Original Metal™ snow guard is installed using tube adhesive or a mechanical fastening application.
ApplicationsFor Metal Roof Systems.
Recommended AccessoriesDepending on the application, the following accessories are available to ensure proper installation.
For Metal Roof Systems
Original Metal™ Snow Guard
SB-190 Adhesive Installation Option Shown
Isopropyl Alcohol Panel Cleaner
SurebondSB-190 Adhesive
*Seller assumes no responsibility for the warranty. Check your roof manufacturer’s warranty information before installation.
2” x 6.25”, used for Shake, Slate and Tile only. Steel snow guards are available direct from Sno Gem only.
200 pcs/ctn
SNO-GEMJR_____________Boxes
Junior Clear Poly Snow Guard P
K