Embed Size (px)
Citation preview
Copyright 2006 i-Math Pte Ltd Contact [email protected]
Quanser WinCon Installation Guide Prerequisites: 1) MATLAB R14 (SP1/SP2) installed in PC’s root folder (* C:\ not C:\Program Files\ ) 2) Microsoft Visual C++ or Microsoft Visual Studio installed in PC 3) MATLAB to Microsoft C++ / Visual Studio Real-Time workshop Compiler link set up (Please check with MATLAB vendor) Quanser WinCon installation can only start when the above steps have been completed. Quanser WinCon installation consists of installing
1. RTX 2. WinCon server 3. WinCon client 4. WinCon control
Please follow the steps closely. Installing RTX
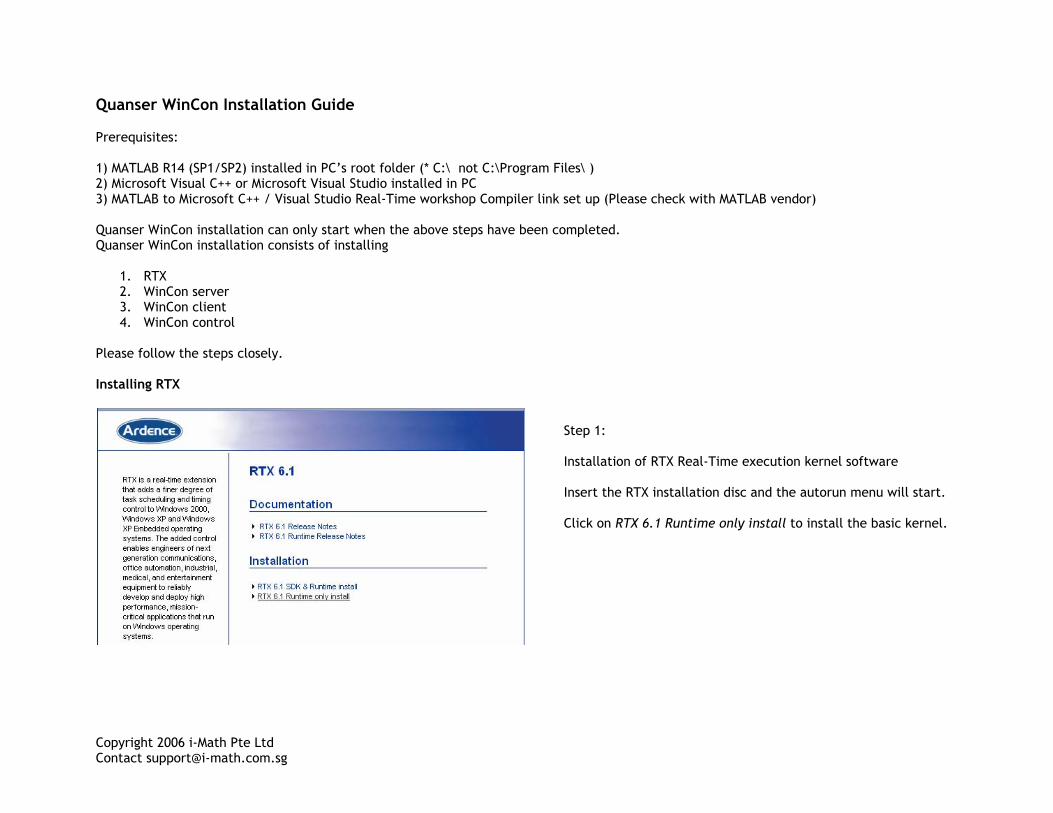
Step 1: Installation of RTX Real-Time execution kernel software Insert the RTX installation disc and the autorun menu will start. Click on RTX 6.1 Runtime only install to install the basic kernel.
Copyright 2006 i-Math Pte Ltd Contact [email protected]
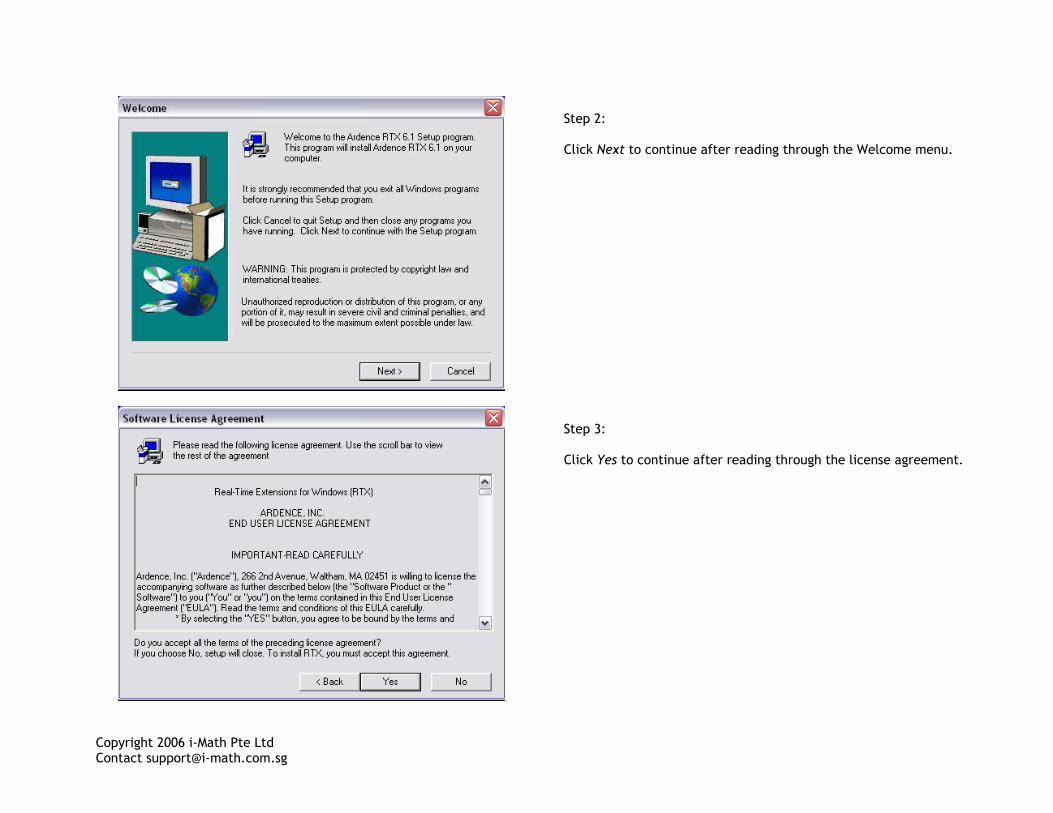
Step 2: Click Next to continue after reading through the Welcome menu.
Step 3: Click Yes to continue after reading through the license agreement.
Copyright 2006 i-Math Pte Ltd Contact [email protected]
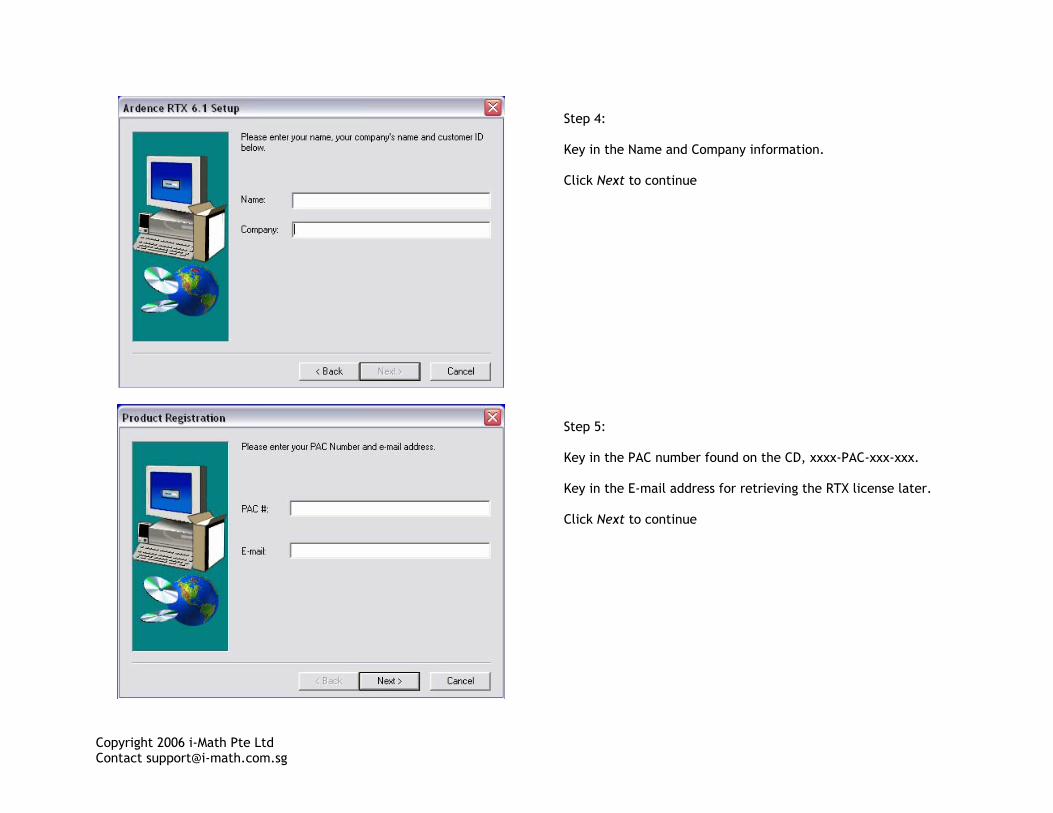
Step 4: Key in the Name and Company information. Click Next to continue
Step 5: Key in the PAC number found on the CD, xxxx-PAC-xxx-xxx. Key in the E-mail address for retrieving the RTX license later. Click Next to continue
Copyright 2006 i-Math Pte Ltd Contact [email protected]
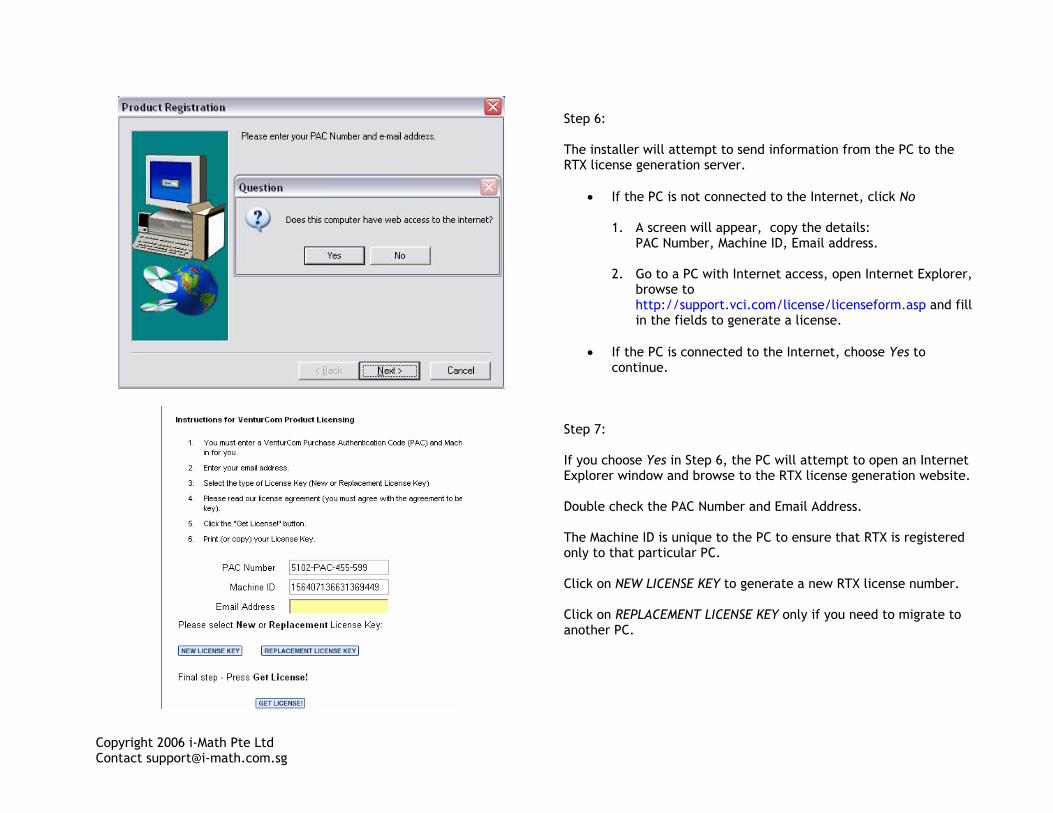
Step 6: The installer will attempt to send information from the PC to the RTX license generation server.
• If the PC is not connected to the Internet, click No
1. A screen will appear, copy the details: PAC Number, Machine ID, Email address.
2. Go to a PC with Internet access, open Internet Explorer,
browse to http://support.vci.com/license/licenseform.asp and fill in the fields to generate a license.
• If the PC is connected to the Internet, choose Yes to
continue.
Step 7: If you choose Yes in Step 6, the PC will attempt to open an Internet Explorer window and browse to the RTX license generation website. Double check the PAC Number and Email Address. The Machine ID is unique to the PC to ensure that RTX is registered only to that particular PC. Click on NEW LICENSE KEY to generate a new RTX license number. Click on REPLACEMENT LICENSE KEY only if you need to migrate to another PC.
Copyright 2006 i-Math Pte Ltd Contact [email protected]
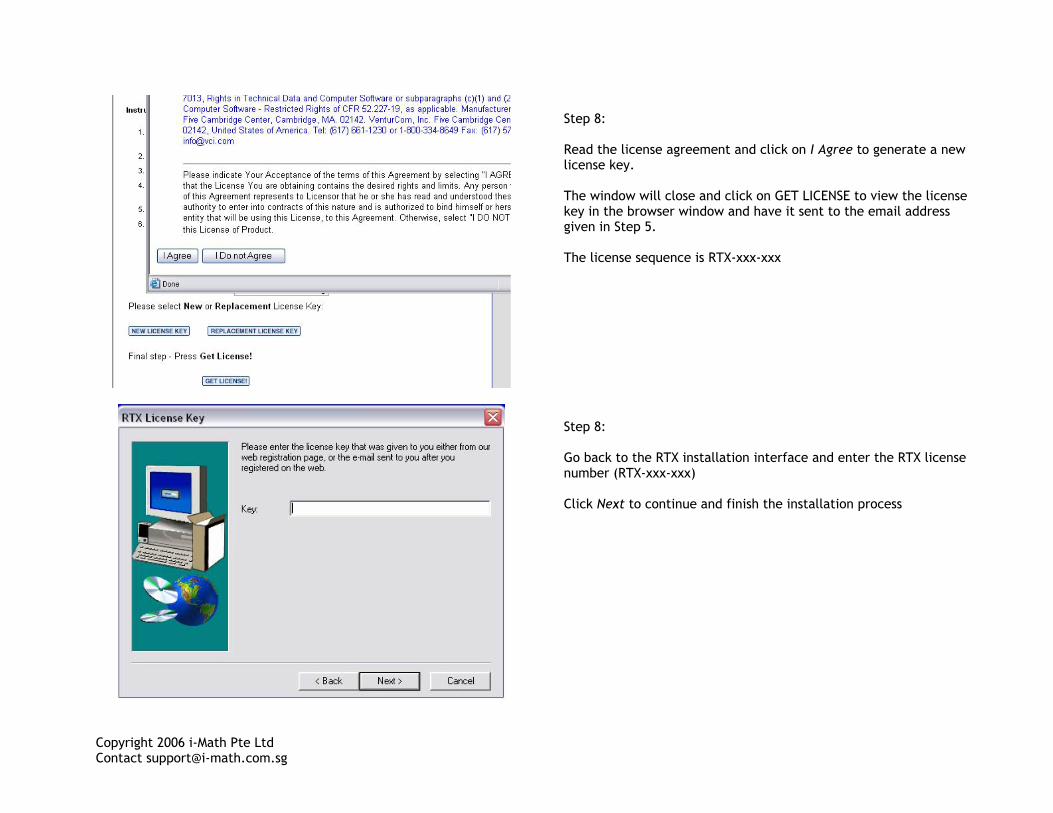
Step 8: Read the license agreement and click on I Agree to generate a new license key. The window will close and click on GET LICENSE to view the license key in the browser window and have it sent to the email address given in Step 5. The license sequence is RTX-xxx-xxx
Step 8: Go back to the RTX installation interface and enter the RTX license number (RTX-xxx-xxx) Click Next to continue and finish the installation process
Copyright 2006 i-Math Pte Ltd Contact [email protected]
Configuring RTX
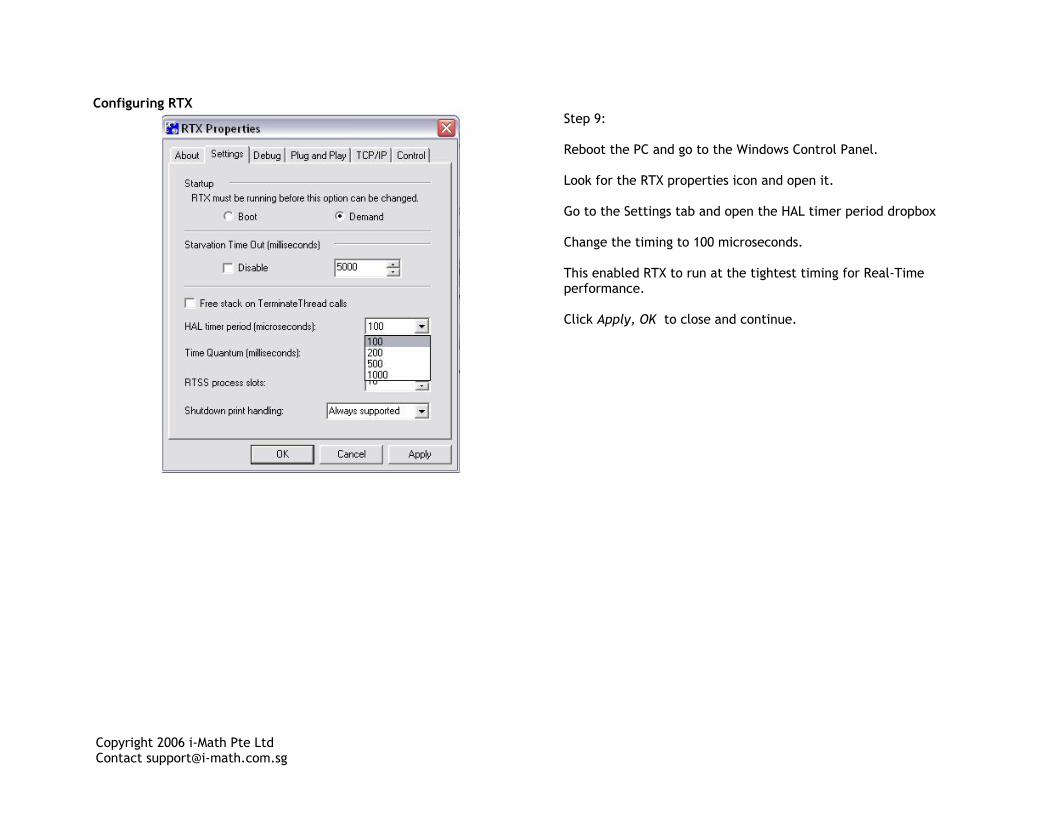
Step 9: Reboot the PC and go to the Windows Control Panel. Look for the RTX properties icon and open it. Go to the Settings tab and open the HAL timer period dropbox Change the timing to 100 microseconds. This enabled RTX to run at the tightest timing for Real-Time performance. Click Apply, OK to close and continue.
Copyright 2006 i-Math Pte Ltd Contact [email protected]
Installing WinCon Server
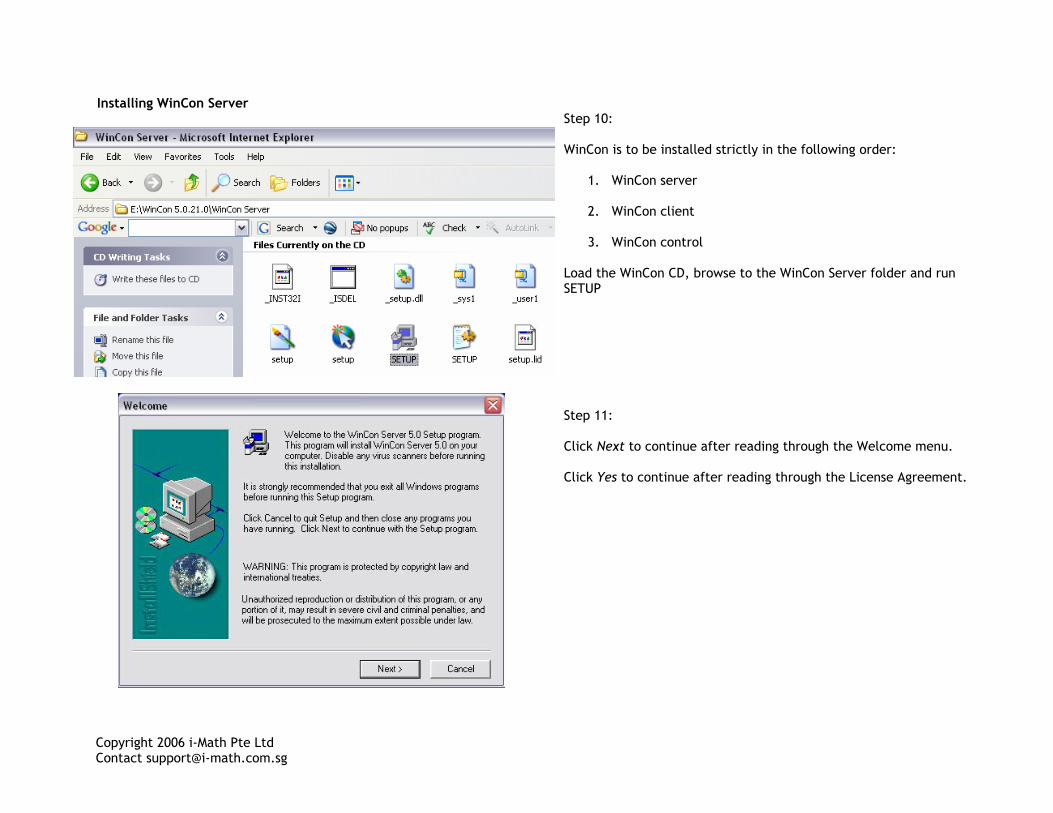
Step 10: WinCon is to be installed strictly in the following order:
1. WinCon server
2. WinCon client
3. WinCon control Load the WinCon CD, browse to the WinCon Server folder and run SETUP
Step 11: Click Next to continue after reading through the Welcome menu. Click Yes to continue after reading through the License Agreement.
Copyright 2006 i-Math Pte Ltd Contact [email protected]
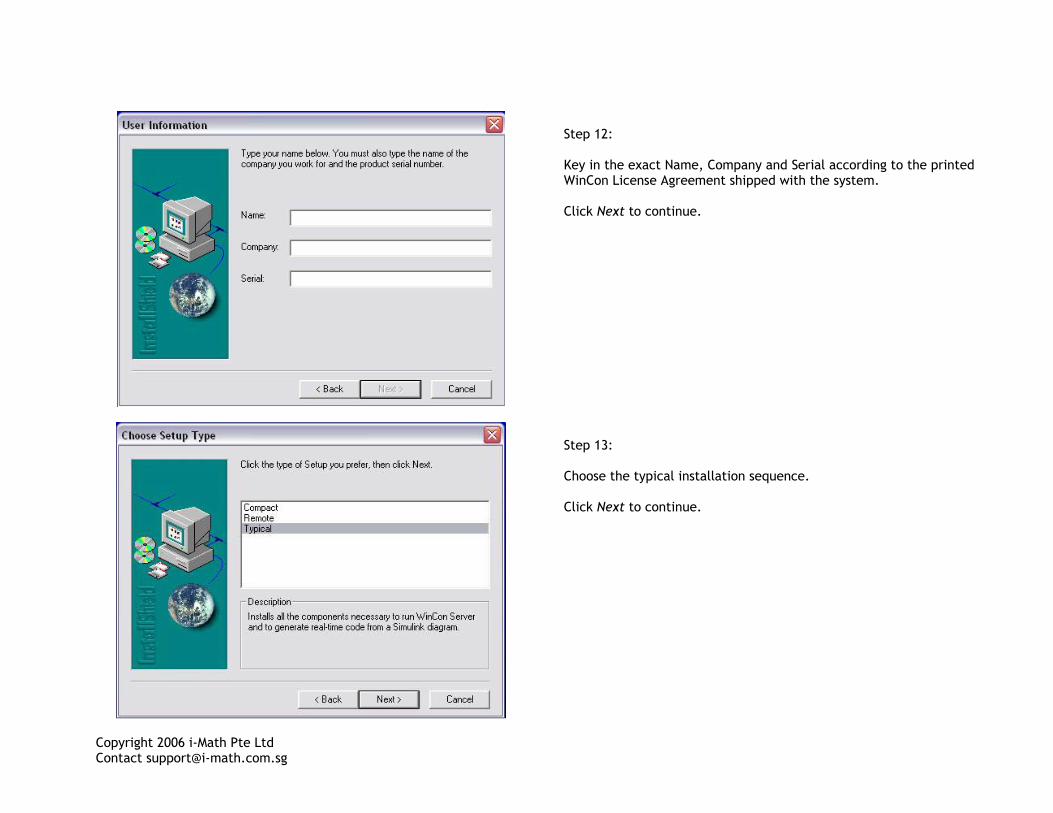
Step 12: Key in the exact Name, Company and Serial according to the printed WinCon License Agreement shipped with the system. Click Next to continue.
Step 13: Choose the typical installation sequence. Click Next to continue.
Copyright 2006 i-Math Pte Ltd Contact [email protected]
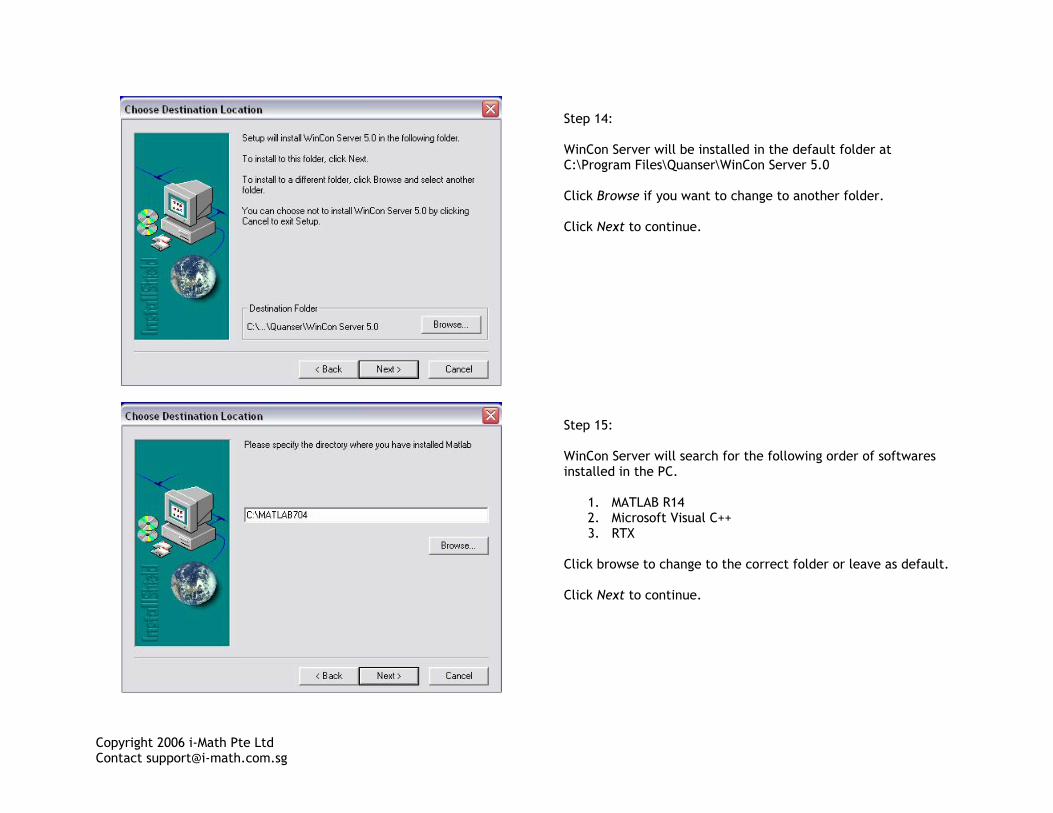
Step 14: WinCon Server will be installed in the default folder at C:\Program Files\Quanser\WinCon Server 5.0 Click Browse if you want to change to another folder. Click Next to continue.
Step 15: WinCon Server will search for the following order of softwares installed in the PC.
1. MATLAB R14 2. Microsoft Visual C++ 3. RTX
Click browse to change to the correct folder or leave as default. Click Next to continue.
Copyright 2006 i-Math Pte Ltd Contact [email protected]
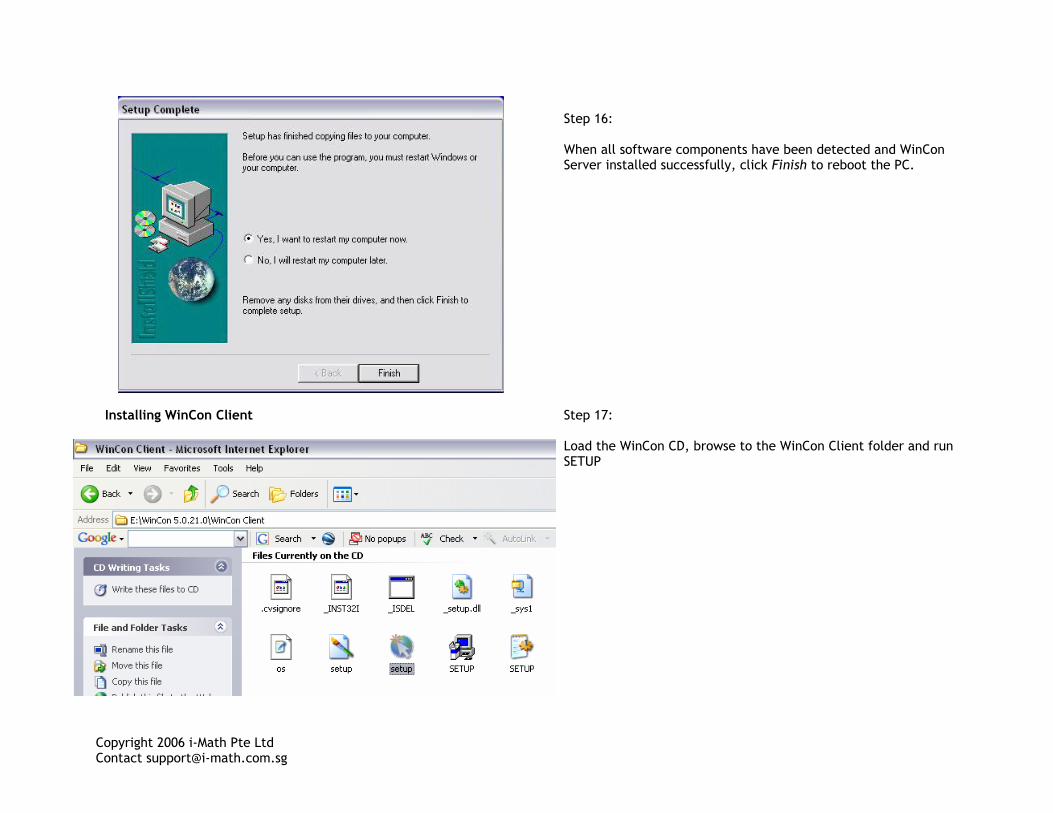
Step 16: When all software components have been detected and WinCon Server installed successfully, click Finish to reboot the PC.
Installing WinCon Client
Step 17: Load the WinCon CD, browse to the WinCon Client folder and run SETUP

Copyright 2006 i-Math Pte Ltd Contact [email protected]
Step 18: Click Next to continue after reading through the Welcome menu. Click Yes to continue after reading through the License Agreement.
Step 19: Key in the exact Name, Company and Serial according to the printed WinCon License Agreement shipped with the system. Click Next to continue.
Copyright 2006 i-Math Pte Ltd Contact [email protected]
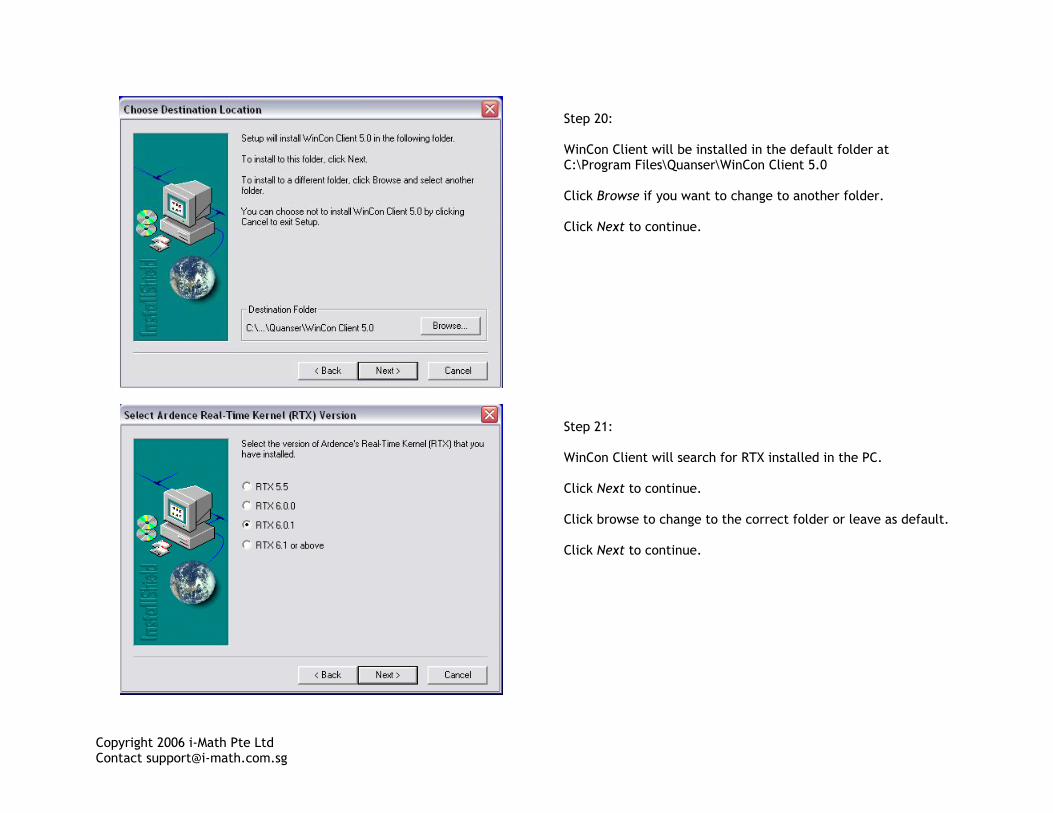
Step 20: WinCon Client will be installed in the default folder at C:\Program Files\Quanser\WinCon Client 5.0 Click Browse if you want to change to another folder. Click Next to continue.
Step 21: WinCon Client will search for RTX installed in the PC. Click Next to continue. Click browse to change to the correct folder or leave as default. Click Next to continue.
Copyright 2006 i-Math Pte Ltd Contact [email protected]
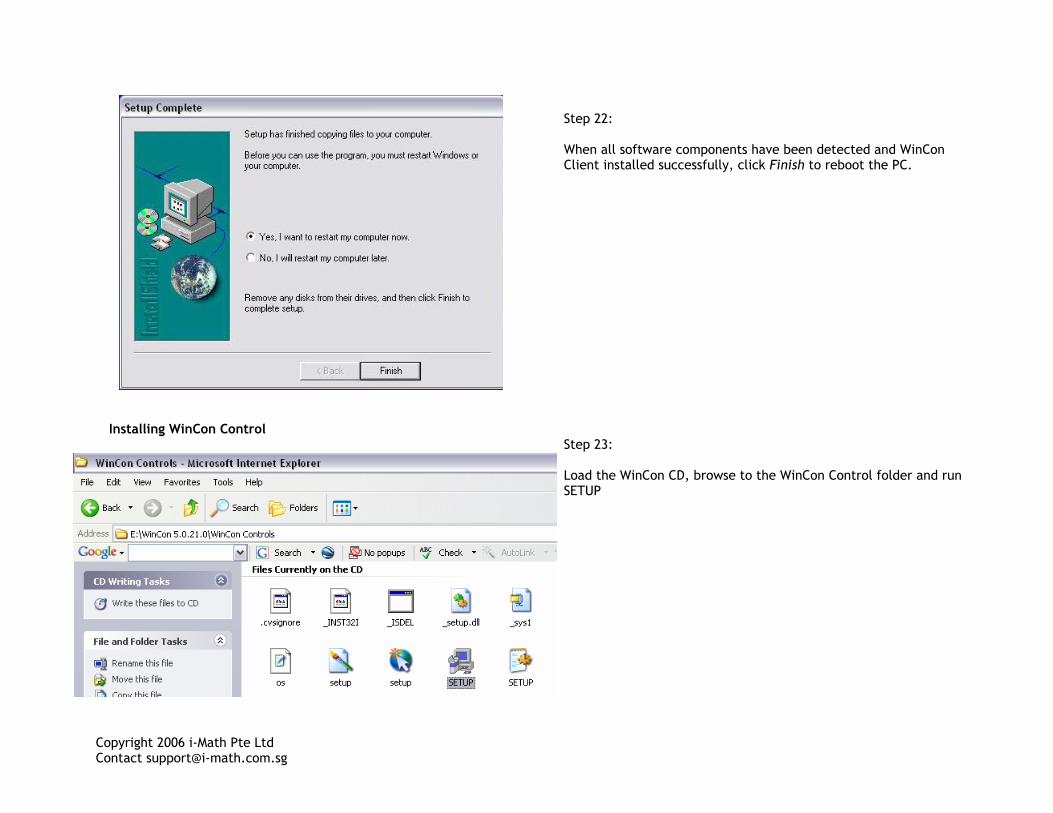
Step 22: When all software components have been detected and WinCon Client installed successfully, click Finish to reboot the PC.
Installing WinCon Control
Step 23: Load the WinCon CD, browse to the WinCon Control folder and run SETUP
Copyright 2006 i-Math Pte Ltd Contact [email protected]
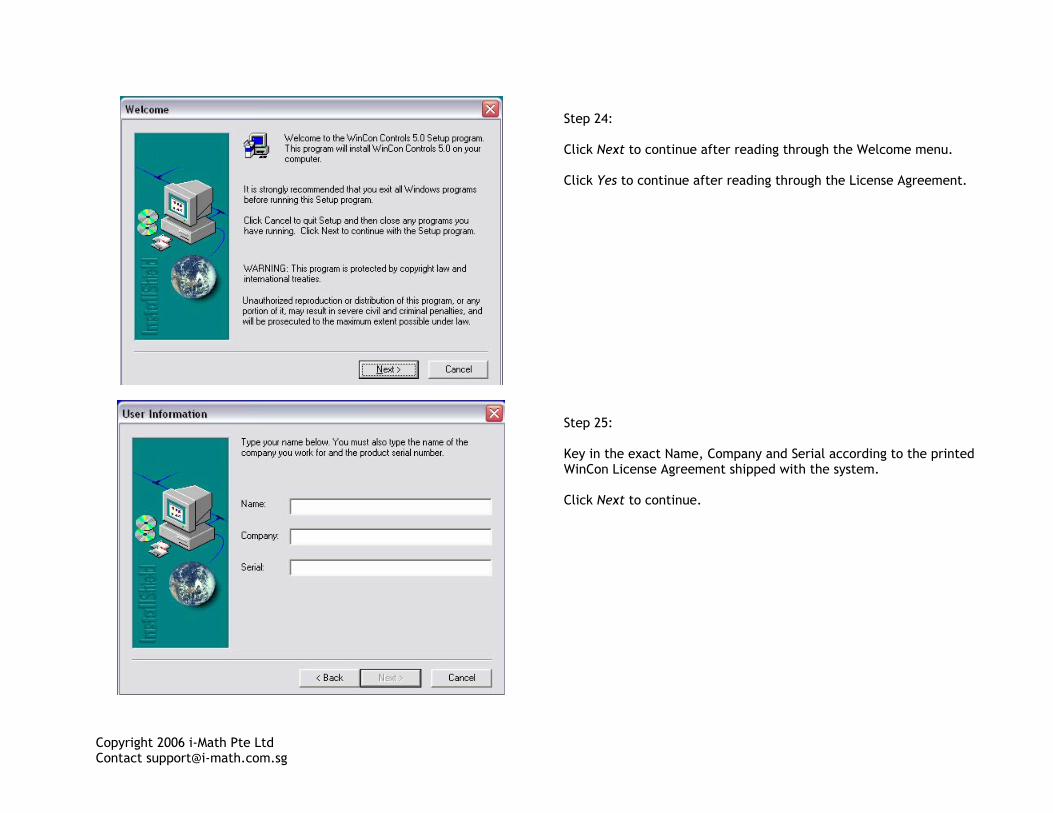
Step 24: Click Next to continue after reading through the Welcome menu. Click Yes to continue after reading through the License Agreement.
Step 25: Key in the exact Name, Company and Serial according to the printed WinCon License Agreement shipped with the system. Click Next to continue.
Copyright 2006 i-Math Pte Ltd Contact [email protected]
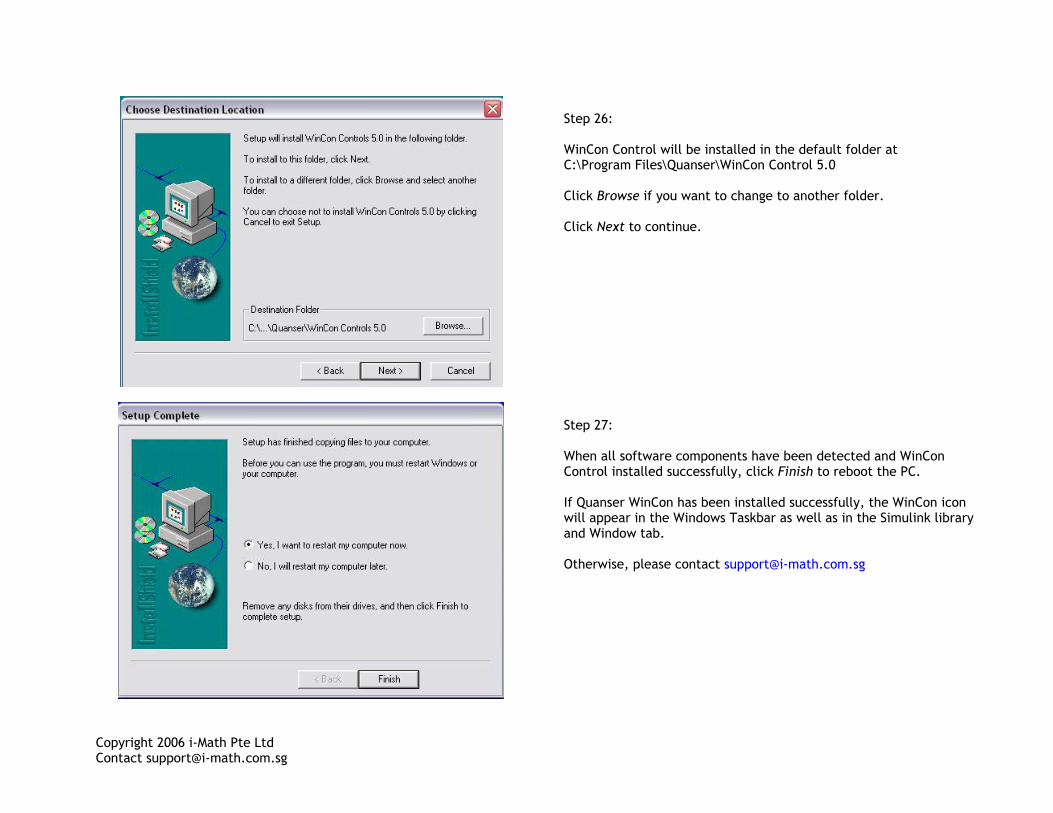
Step 26: WinCon Control will be installed in the default folder at C:\Program Files\Quanser\WinCon Control 5.0 Click Browse if you want to change to another folder. Click Next to continue.
Step 27: When all software components have been detected and WinCon Control installed successfully, click Finish to reboot the PC. If Quanser WinCon has been installed successfully, the WinCon icon will appear in the Windows Taskbar as well as in the Simulink library and Window tab. Otherwise, please contact [email protected]