Embed Size (px)
Citation preview
1-3
/4"
(44 m
m)
1-3
/4"
(44 m
m)
Edge of the door
Borde de la puerta
Bord de la porte
62846 / 018-13/32"
© 2015 Spectrum Brands, Inc.
2-3/8" (60 mm)
2-3/8" (60 mm)
2-3/8" (60 mm)
2-3/4" (70 mm)
2-3/4" (70 mm)
2-3/4" (70 mm)
5-1
/2"
(14
0 m
m)
8-1
3/3
2 (214
mm
)
Backset
Distancia al centro
Écartement
Backset
Distancia al centro
Écartement
Backset
Distancia al centro
Écartement
Centerline
Linea central
Ligne médiane
Drilling Template
Plantilla de perforación
Gabarit de perçage
Face of the door
Frente de la puerta
Face de la porte
Fold
Doble
Plier
Fold
Doble
Plier
Fold
Doble
Plier
1-3
/4"
(44 m
m)
1-3
/4"
(44 m
m)
Edge of the door
Borde de la puerta
Bord de la porte
62846 / 018-13/32"
© 2015 Spectrum Brands, Inc.
2-3/8" (60 mm)
2-3/8" (60 mm)
2-3/8" (60 mm)
2-3/4" (70 mm)
2-3/4" (70 mm)
2-3/4" (70 mm)
5-1
/2"
(14
0 m
m)
8-1
3/3
2 (214
mm
)
Backset
Distancia al centro
Écartement
Backset
Distancia al centro
Écartement
Backset
Distancia al centro
Écartement
Centerline
Linea central
Ligne médiane
Drilling Template
Plantilla de perforación
Gabarit de perçage
Face of the door
Frente de la puerta
Face de la porte
Fold
Doble
Plier
Fold
Doble
Plier
Fold
Doble
Plier
H
E
G
F
Parts in the boxPiezas en la caja
HandlesetConjunto
de manija
Additional tools (if needed)Herramientas adicionales
(si es necesario)
Latches and strikesPestillos y placas
DeadboltCerrojo
Required toolsHerramientas necesarias
LeversManijas
A B
C Dwood blockbloque de madera
KeysLlaves
K
J
J2
L
T
Z
P
R
W
VU
S
07535
220410359623286
SmartKey tool(SmartKey locks only)Herramienta
SmartKey
(cerraduras
SmartKey
solamente)
M
Screws and included toolsTornillos y herramientas incluidas
Allen wrenchLlave Allen
SmartKey tool(SmartKey locks only)Herramienta
SmartKey
(cerraduras
SmartKey
solamente)
oro
Installation Guide
Guía de instalación
1-800-327-5625www.kwikset.com
1/4
Fold supplied template along fold line
and place on the exterior side of your
door so that the holes in the template
are aligned with the holes in your door.
Doble la plantilla suministrada a lo largo de la línea de pliegue y coloquela sobre el borde exterior de su puerta de manera que los orificios en la plantilla queden alineados con los orificios de su puerta.
2-3/8" (60 mm) or • o
2-3/4" (70 mm)
1-3/4"*44 mm*
5-1/2"140 mm
or
o
2-1/8"
54 mm
2-1/8"
54 mm
1-1/2"
38 mm
1"
25 mm
exteriorexterior
exteriorexterior
Note: Additional door preparation may be required for doors with 1-1/2" (38 mm) holes. Consult the drilling instructions at kwikset.com/doorprep.
Nota: Preparacion adicional para la puerta puede ser
necesaria para puertas con orificios de 1-1/2” (38 mm).
Consulte las instrucciones para la perforación de la
puerta estan disponibles en kwikset.com/doorprep.
Rotate the front of the latch to extend it.
Gire la parte delantera
del pestillo para
extenderlo.
centeredcentrado
not centeredno centrado
Hold the top latch in front of the
door hole, with the latch face
flush against the door edge.
Sostenga el pestillo superior en frente del orificio de la puerta, con la cara del pestillo al ras con el borde de la puerta.
If the D-shaped hole is centered
in the door hole, no adjustment
is required. Proceed to step 6.
If the D-shaped hole is NOT
centered, adjust latch. See
“Latch Adjustment” (step 5C).
Si el orificio en forma de “D” está centrado con el orificio de la puerta, no se requiere ajustarlo. Vaya al paso 6.
Si el orificio en forma de “D” NO está centrado, ajustar el pestillo. Consulte “Ajuste del pestillo” (el paso 5C).
Latch Adjustment (only if needed)
Ajuste del pestillo (si es necesario)
A
B
C
latch facela cara del
pestillo
A
A
B
A
Wood door
Puerta de maderaMetal door
Puerta metálica
Through door A través
de la puerta
1” (25 mm)deepprofundidad
exteriorexterior
exteriorexterior
9/64"
4 mm
1/4"
6 mm
66500-001 Rev 01687
A
180°
D-shaped holeOrificio en forma “D”
If you already have the bottom
hole drilled in your door, confirm
that it aligns with the bottom
hole in the template. If it does not
align, drill a new hole in step 3.
If the bottom hole is not drilled, use
the template to mark the location
of the hole on your door. Make sure
it is aligned with the other holes in
the door. Drill a new hole in step 3.
Si la puerta ya viene con el orificio inferior perforado, confirme que se encuentre alineado con el orificio en la plantilla. Si no se encuentran alineados, perfore un nuevo orificio en el paso 3.
Si el orificio inferior no está perforado, utilice la plantilla para marcar la ubicación de este último en su puerta. Asegúrese de que el orificio está alineado con los otros orificios en la puerta. Perfore un nuevo orificio en el paso 3.
If drilling a new door, use
the supplied template and
the complete door drilling
instructions available at
kwikset.com/doorprep.
Si va a perforar una puerta nueva, utilice la plantilla suministrada y las instrucciones para la perforación de la puerta estan disponibles en kwikset.com/doorprep. 1"
25 mm
*Call Kwikset to order a thick door handleset and service kit for 2-1/4" (57 mm) thick doors.
*Llame a Kwikset para pedir
un conjunto de manija para
puertas gruesas y el kit
de servicio para puertas
gruesas con un espesor
de entre 57 mm (2-1/4”).
Prepare door and check dimensions
Prepare la puerta y revise las dimensiones1 Drill new bottom hole (if needed)
Perfore un nuevo oricio inferior (si es necesario)3
Extend the top latch bolt
Extienda el perno del pestillo superior4
Confirm bottom hole location
Confirme la ubicación del orificio inferior2
Adjust top latch length (if needed)
Ajuste la longitud del pestillo superior (si es necesario)5
H
E
G
F
Parts in the boxPiezas en la caja
HandlesetConjunto
de manija
Additional tools (if needed)Herramientas adicionales
(si es necesario)
Latches and strikesPestillos y placas
DeadboltCerrojo
Required toolsHerramientas necesarias
LeversManijas
A B
C Dwood blockbloque de madera
KeysLlaves
K
J
J2
L
T
Z
P
R
W
VU
S
07535
220410359623286
SmartKey tool(SmartKey locks only)Herramienta
SmartKey
(cerraduras
SmartKey
solamente)
M
Screws and included toolsTornillos y herramientas incluidas
Allen wrenchLlave Allen
SmartKey tool(SmartKey locks only)Herramienta
SmartKey
(cerraduras
SmartKey
solamente)
2/4
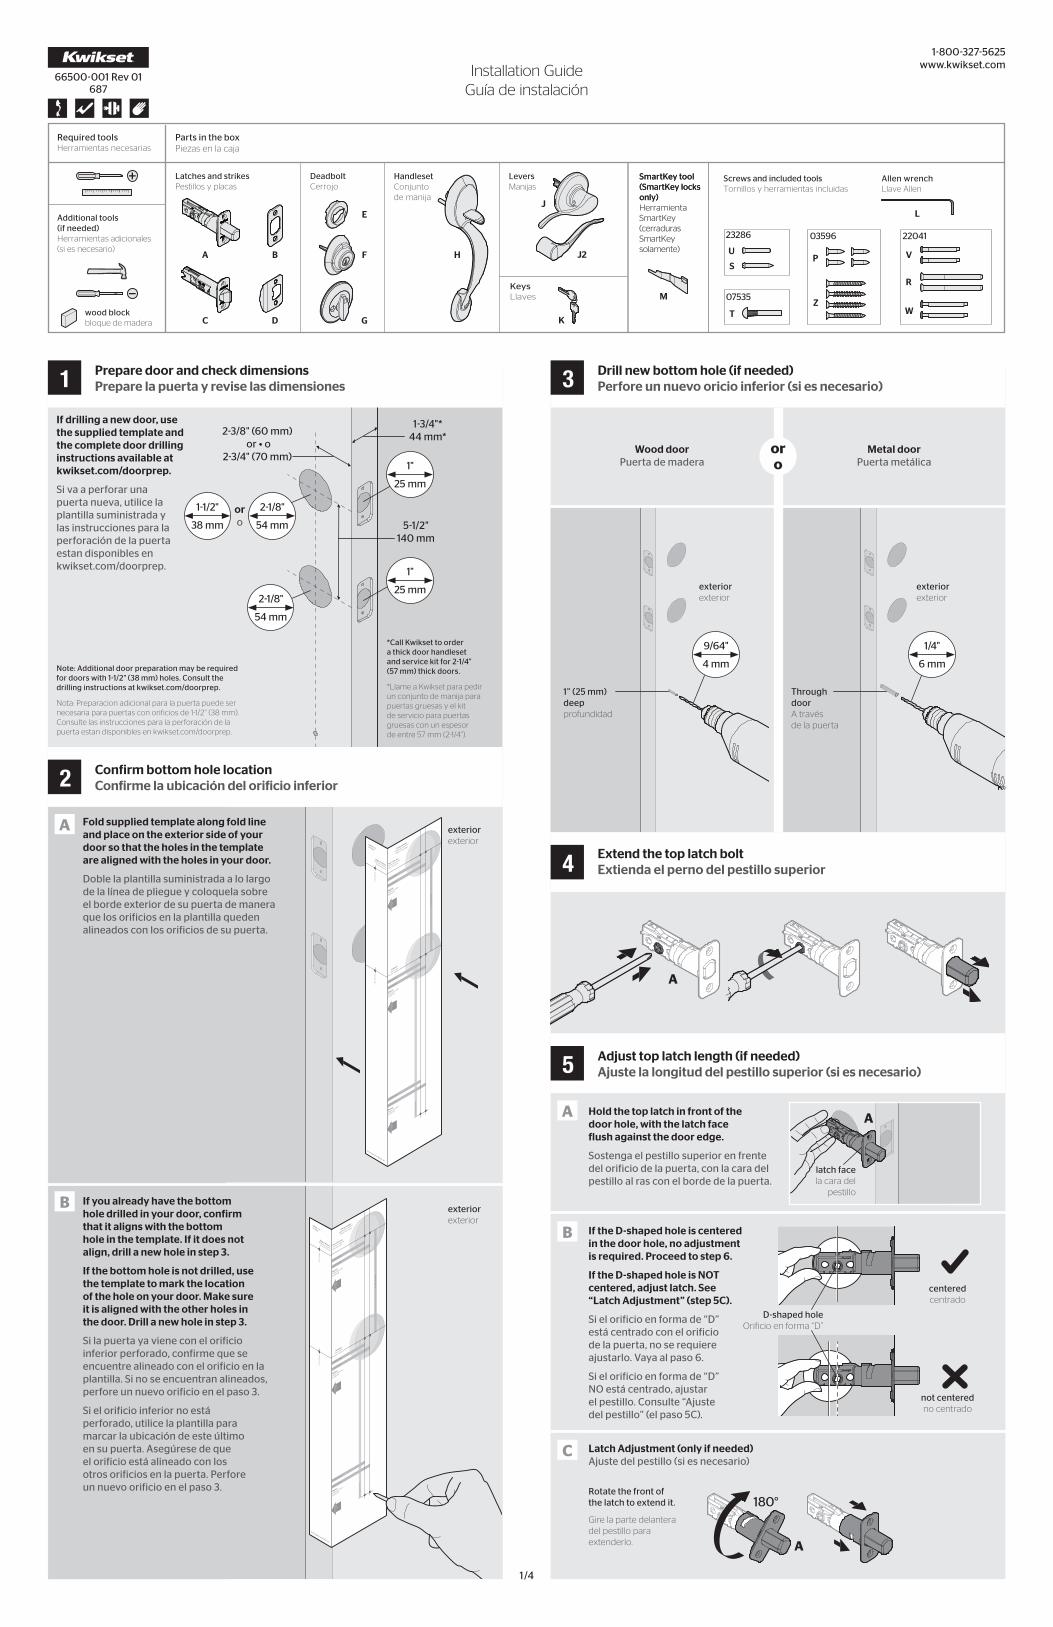
semi-circular holeorificio de medio circulo
2-1/8"
54 mm
1-1/2"
38 mm
P1 (2x)
Secure with
screws.
Fije el pestillo con los tornillos.
Insert bottom latch
into bottom hole.
Inserte el pestillo en el orificio inferior.
The slant of bolt faces in direction that door closes.
La inclinación del
perno del pestillo
queda en la dirección
que cierra la puerta.
door framemarco de
la puerta
P (2x)
C
P
A
B
“UP” is on top“UP” está en la
parte superior
P (2x)
P
B Secure latch with screws.
Fije el pestillo con los tornillos.
A
A
If the semi-circular hole is centered
in the door hole, no adjustment is
required. Proceed to step 8.
If the semi-circular hole is NOT
centered, adjust latch. See “Latch
Adjustment” (step 7C).
Si el orificio de medio círculo está centrado con el orificio de la puerta, no se requiere ajustarlo. Vaya al paso 8.
Si el orificio de medio círculo NO está centrado, ajuste el pestillo. Consulte “Ajuste del pestillo” (el paso 7C). not centered
no centrado
centeredcentrado
exteriorexterior
A
B
Install top latch in top hole.
Instale el pestillo superior en el orificio superior.
interiorinterior
B
R (2x)*
R*
G
F*
E
E
E
The orientation of “E” will depend on the diameter of the hole in the door. Flip as required.
La orientación de
“E” dependerá del
diámetro del
orificio en la puerta.
Gire según se indica.
A Hold the BOTTOM latch in front of
the door hole, with the latch face
flush against the door edge.
Sostenga el pestillo inferior en frente del orificio de la puerta, con la cara del pestillo al ras con el borde de la puerta.
C
Grasp the pin on both sides of the latch and move it to the longer setting.
Mantenga el pasador
en ambos lados del
pestillo, y muevalo a la
configuración más largo.
pinpasadorC
Latch Adjustment (only if needed)
Ajuste del pestillo (si es necesario)C
actual sizetamaño real
03596
P
Z
22041
W
V
R
actual sizetamaño real
actual sizetamaño real
03596
P
Z
Note: Part numbers are printed on screw bags.
Nota: Los números
de parte están
impresos en
las bolsas de
los tornillos.
Install the top latch
Instale el pestillo superior6
Install the bottom latch
Instale el pestillo inferior
Adjust bottom latch length (if needed)
Ajuste la longitud del pestillo inferior (si es necesario)
Install deadbolt
Instale el cerrojo
7
8
9
Insert the torque blade of the deadbolt through the D-shaped hole in the top latch.
Inserte la paleta
de torsión del
cerrojo a través
del orificio en forma
de D en el pestillo
superior.
* Additional installation steps are required for this component when installing a service kit for 2-1/4" (57 mm) thick doors. See thick door kit instructions.
* Se requieren pasos adicionales de instalación para este
componente cuando se instala un kit de servicio para puertas
gruesas con un espesor de entre 57 mm (2-1/4"). Consulte las
instrucciones para el kit de servicio para puertas gruesas.
* If installing the thick door service kit, use the screws provided in the kit.
* Si va a instalar el
kit de servicio de
puertas gruesas,
utilice los tornillos
suministrados en el kit.
Install deadbolt interior.Instale el cerrojo interior.
3/4
oro
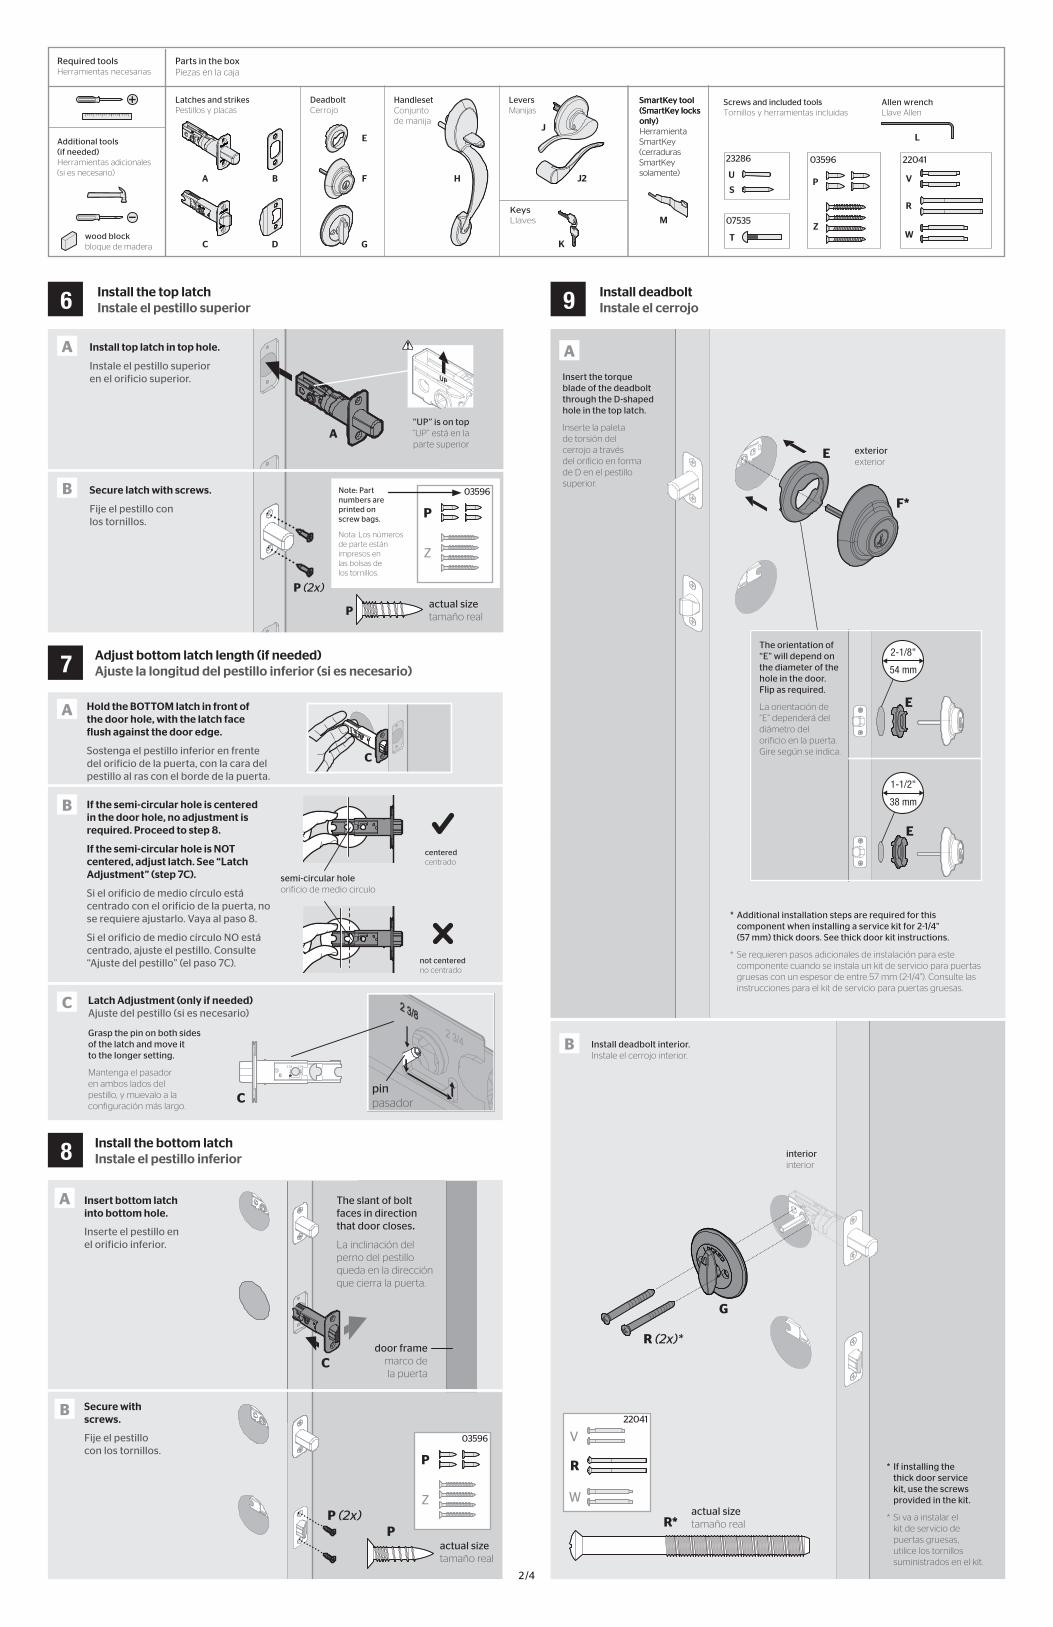
Wood door
Puerta de madera
exterior
exterior
spindle
husillo
door edge
borde de la puerta
Metal door
Puerta metálica
If hole is drilled all the way through wood door, use “T” and “U”.
Si el orificio se encuentra
perforado en su totalidad
a través de la puerta de
madera, utilice “T” y “U”.
S
U*
U*
T
T
If hole is drilled only partway through the door, use “S”.
Si el orificio solo está
parcialmente perforado
en la puerta, utilice “S”.
Press latch bolt to insert the spindle.
Presione el perno
para insertar
el husillo.
B
A
If adjustment is required, pull and rotate the spindle.
Si se requiere un ajuste,
jale y gire el husillo.
180°
H*
Hold the handleset on
the exterior side of the
door and make sure
the round edge of
the spindle faces
the door edge.
Mantenga el conjunto de manija en el lado exterior de la puerta. Asegúrese que el borde redondo del husillo este hacia el borde la puerta.
Insert the spindle into
the semi-circular hole
in the bottom latch.
Inserte el husillo en el orificio de medio circulo en el pestillo inferior.
Install handleset
Instale el conjunto de manija10 Secure handleset
Fije el conjunto de manija11
U
S
23286
T
07535
actual sizetamaño real
S
U*
T
* If installing the thick door service kit, use the screws provided in the kit.
* Si va a instalar el
kit de servicio de
puertas gruesas,
utilice los tornillos
suministrados
en el kit.
Install lever
Instale la palanca
22041
W
V
R
V*
* If installing the thick door service kit, use the screws provided in the kit.
* Si va a instalar el kit
de servicio de puertas
gruesas, utilice los tornillos
suministrados en el kit.
actual sizetamaño real
D
E
L
Push up on lever base while tightening screws to keep latch horizontal and centered.
Empuje hacia arriba la base de palanca
mientras ajusta los tornillos para mantener
el pestillo en forma horizontal y centrada.
V (2x)*
J / J2
clockwisesentido horario
Tighten the pre-installed set screw.
Ajuste el tornillo de
fijación preinstalado.
C
B Install lever base.Instale la base de palanca interior.
Loosen the pre-installed set screw to remove lever. Do not remove set screw.
Afloje el tornillo de fijación
preinstalado para remover
la palanca. No retire el
tornillo de fijación. counter-clockwisesentido antihorario
L
JA
Find your lever style in the chart and use the lever that will install in the correct orientation.
Encuentre su estilo de
palanca en la tabla y utilice
la palanca que instalará en
la orientación correcta.
Align round edges.Alinee los bordes redondos.
correctcorrecto
incorrectincorrecto
12* A special order thick door handleset must be used in conjunction with the thick door service kit.
* Un conjunto de manija para
puertas gruesas de pedido
especial debe ser utilizado
conjuntamente con el kit de
servicio de puertas gruesas.
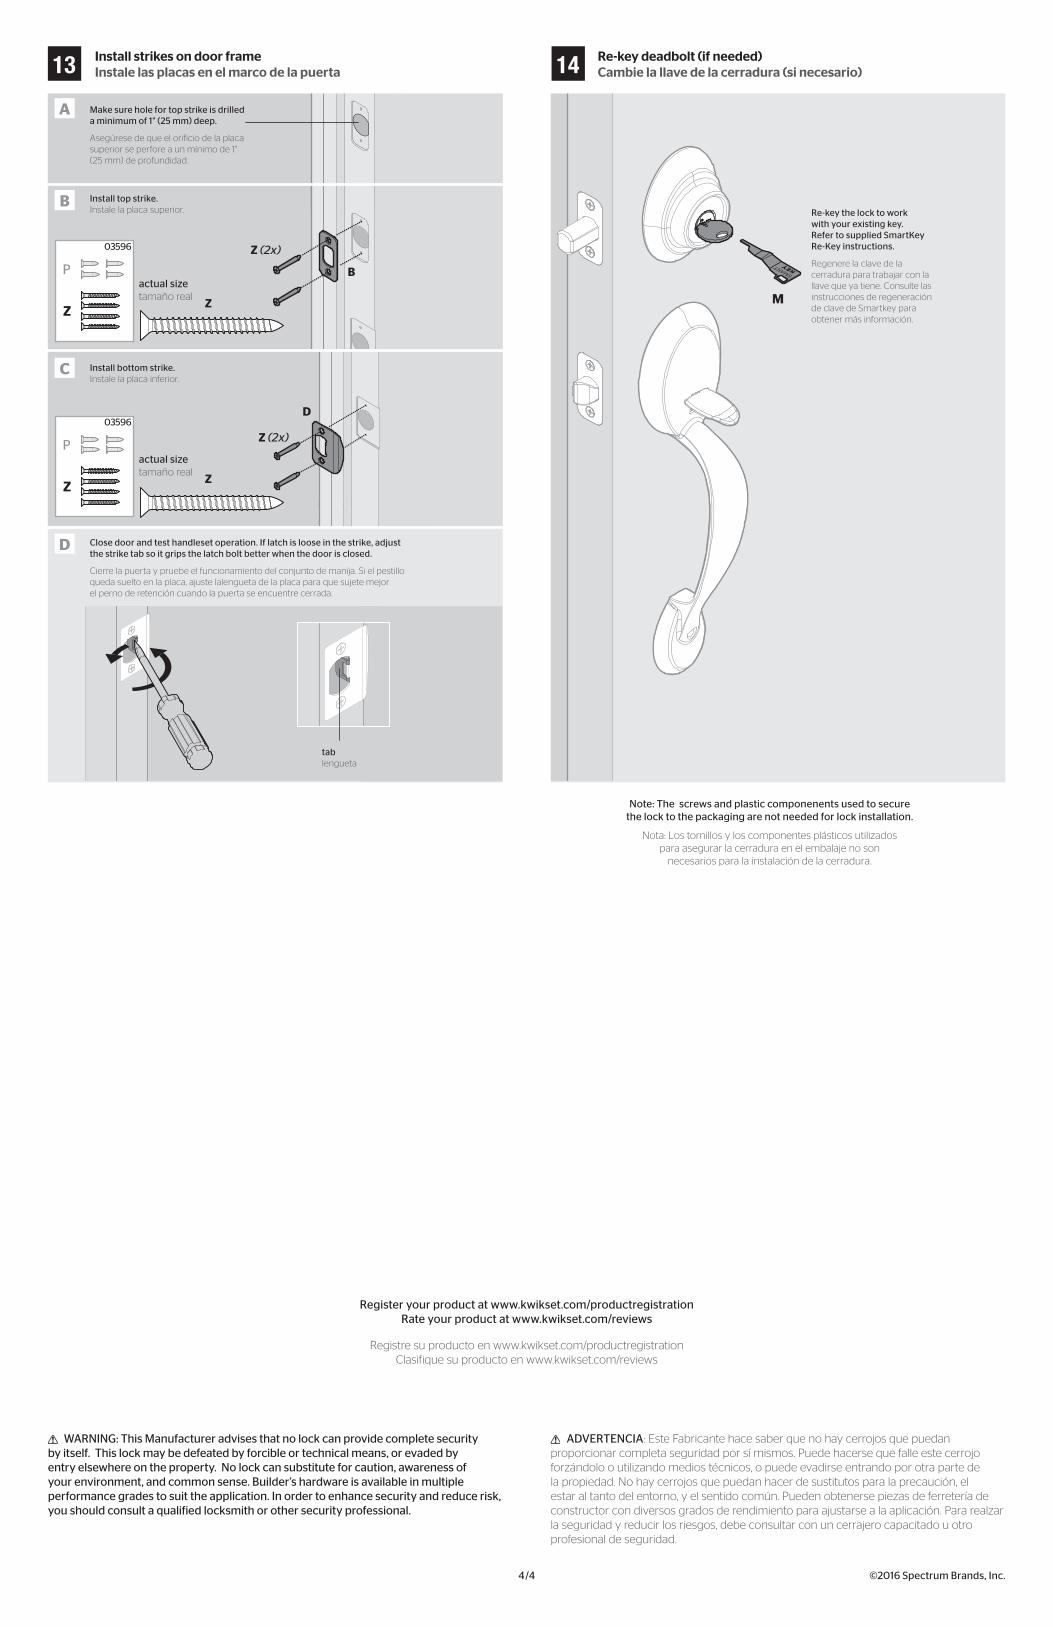
Close door and test handleset operation. If latch is loose in the strike, adjust the strike tab so it grips the latch bolt better when the door is closed.
Cierre la puerta y pruebe el funcionamiento del conjunto de manija. Si el pestillo
queda suelto en la placa, ajuste lalengueta de la placa para que sujete mejor
el perno de retención cuando la puerta se encuentre cerrada.
tablengueta
D
Install top strike.Instale la placa superior.
B
Install bottom strike.Instale la placa inferior.
C
Z (2x)
Z (2x)
Z
Z
B
D
Make sure hole for top strike is drilled a minimum of 1" (25 mm) deep.
Asegúrese de que el orificio de la placa
superior se perfore a un mínimo de 1"
(25 mm) de profundidad.
A
03596
P
Z
03596
P
Z
actual sizetamaño real
actual sizetamaño real
Install strikes on door frame
Instale las placas en el marco de la puerta
M
Re-key the lock to work with your existing key. Refer to supplied SmartKey Re-Key instructions.
Regenere la clave de la
cerradura para trabajar con la
llave que ya tiene. Consulte las
instrucciones de regeneración
de clave de Smartkey para
obtener más información.
Re-key deadbolt (if needed)
Cambie la llave de la cerradura (si necesario)13
Note: The screws and plastic componenents used to secure the lock to the packaging are not needed for lock installation.
Nota: Los tornillos y los componentes plásticos utilizados
para asegurar la cerradura en el embalaje no son
necesarios para la instalación de la cerradura.
WARNING: This Manufacturer advises that no lock can provide complete security by itself. This lock may be defeated by forcible or technical means, or evaded by entry elsewhere on the property. No lock can substitute for caution, awareness of your environment, and common sense. Builder’s hardware is available in multiple performance grades to suit the application. In order to enhance security and reduce risk, you should consult a qualified locksmith or other security professional.
ADVERTENCIA: Este Fabricante hace saber que no hay cerrojos que puedan
proporcionar completa seguridad por sí mismos. Puede hacerse que falle este cerrojo
forzándolo o utilizando medios técnicos, o puede evadirse entrando por otra parte de
la propiedad. No hay cerrojos que puedan hacer de sustitutos para la precaución, el
estar al tanto del entorno, y el sentido común. Pueden obtenerse piezas de ferretería de
constructor con diversos grados de rendimiento para ajustarse a la aplicación. Para realzar
la seguridad y reducir los riesgos, debe consultar con un cerrajero capacitado u otro
profesional de seguridad.
Register your product at www.kwikset.com/productregistrationRate your product at www.kwikset.com/reviews
Registre su producto en www.kwikset.com/productregistration
Clasifique su producto en www.kwikset.com/reviews
14
©2016 Spectrum Brands, Inc.4/4