Embed Size (px)
Citation preview

Installation Guide Commercial Software
Catalog Content

2020spaces.com | 1
Contents
Contents .......................................................................................................................................... 1
Preface ............................................................................................................................................. 3
Audience .............................................................................................................. 3
About this guide .................................................................................................. 3
Additional Resources ........................................................................................... 4
Typographic Conventions Used in this Guide ...................................................... 4
About the Screenshots in this Guide ................................................................... 4
Installing from Installation Disc versus Network Deployment ........................................................ 5
Best Practices for Network Deployment ............................................................. 5
The Installation Menu ..................................................................................................................... 6
Installing 2020 Commercial Software.............................................................................................. 7
Before You Install................................................................................................. 7
Review System Requirements ................................................................................................... 7
Install AutoCAD (for 2020 Cap) .................................................................................................. 7
Connect Hardware Key(s) .......................................................................................................... 7
Installing Software from the Installation Disc ..................................................... 8
Deploying Software Installation over a Network ..............................................13
Installing 2020 Commercial Software from a Network (Client Install) ..............15
Installing Manufacturer Catalogs ................................................................................................... 16
Installing Manufacturer Catalogs from the Installation Discs ...........................16
Deploying Manufacturer Catalog Installation over a Network .........................22
Installing Manufacturer Catalogs from a Network (Client Install) .....................29

2020spaces.com | 2
Access Catalogs from the Server ............................................................................................. 31
Install Catalogs on This Computer ........................................................................................... 33
Update, Modify or Remove Catalogs ............................................................................................ 38
Installing Express Updates .................................................................................40
Standard Express Update ........................................................................................................ 41
Modified Update ..................................................................................................................... 43
Creating an Alternate Manufacturer .................................................................48
Remove Catalogs ...............................................................................................51
Check for Software and Catalog Updates....................................................................................... 52
Check for Updates .............................................................................................52
Restore hidden updates .....................................................................................53
Frequently Asked Questions .......................................................................................................... 54

2020spaces.com | 3
Preface
Welcome to 2020 Commercial Software, the intelligent way to design, price and sell office
designs. This software suite contains four main programs: 2020 Worksheet, 2020 Visual
Impression, 2020 Cap and 2020 Giza.
With 2020 Commercial Software, you acquire a state-of-the-art, intuitive, catalog-driven
software environment that guides you through the entire process of selling office furniture.
Audience This guide is aimed at new and experienced users of 2020 Commercial Software. The guide
assumes that you are familiar with basic Windows concepts and techniques and that you have
some experience in interior design.
About this guide This guide is divided into seven sections that cover the following topics:
Installing 2020 Commercial Software
o Software installation on a local drive
Network Deployment (Software)
o Copy installation on network drive to install software from a network drive
Installing Manufacturer Catalogs
o Install catalogs in 2020 Commercial Software applications to a local hard drive
Network Deployment (Manufacturer Catalogs)
o Deploy manufacturer catalog installation to a network drive to install catalogs from a network drive
Update, Modify or Remove Catalogs Installed
o Add or remove catalogs installed, or update catalogs to a newer version
Check for Software and Catalog Updates
o Update software and catalogs with the latest software updates, catalog updates, security patches, software improvements, and important messages
Frequently Asked Questions
o Answers to questions frequently asked by users who install 2020 Commercial software and catalogs

2020spaces.com | 4
Additional Resources
Please consult the following resources to discover the full potential of the software suite:
Online Help: You can access online help from each of the 2020 Commercial Software programs.
The help contains full reference information on all aspects of software functionality, including a
list of handy menu and command shortcuts that you can use to optimize your time.
2020 Website: Visit our website at www.2020spaces.com to find out about seminars,
conferences or training—web-based or on site—to increase your proficiency with the product.
Typographic Conventions Used in this Guide The following typographic conventions are used in this guide:
Example Description
Save Bold type identifies interface elements such as menus, dialogs, commands,
icons, etc
Help, About 2020 Bold elements separated by a comma identify a menu sequence (this
example is equivalent to “click on the Help menu, then click About 2020”)
TAB SMALL CAPS identify keyboard keys
CTRL+S SMALL CAPS joined by a plus sign identify keyboard keys that you must press
simultaneously
140 Monospace type identifies text that you must type exactly as shown: values,
file names, sizes, etc
Notes
About the Screenshots in this Guide The screenshots in this guide are taken in Windows XP and could differ slightly from screens
you might see when installing 2020 Commercial Software on a different Windows version.

2020spaces.com | 5
Installing from Installation Disc versus Network Deployment
With both the 2020 Commercial Software and the 2020 Commercial Catalogs, you have the
option to install from the installation discs directly to a local computer or to copy the installation
files and required data to a network so that users can install from the network location without
the discs. Note that the network deployment method does not automatically install software or
catalogs, but rather copies the necessary files to a network location to make them more
accessible to users.
Best Practices for Network Deployment It is best not to network deploy the software and catalogs into the same folder. Keep
separate folders such as X:\2020 Data for the catalogs and X:\2020 Software for the software
If you have clients who access the catalogs directly from the server folder, you will need to ensure that these users completely close all 2020 Commercial Software applications when you are updating the catalogs on the network. If they are using the program and accessing the content, it locks those files as they are in use and those catalog files will not be able to be overwritten to get updated.
Clients should close all 2020 applications when installing any catalog or software updates.
It is not required to network deploy the software in order to network deploy catalogs. Some choose to network deploy catalog content only.
Laptop users or clients who may regularly disconnect from the network should install the content to the local hard drive. When setting up the network deployment, choose the client install method of "Ask User" or “Install Catalogs on User's Computer".
The "Ask User" installation choice does require more space on the server as it must account for both client installation types. A full network deployment of content with all available content and textures uses considerable hard drive space so verify you have adequate storage when selecting your network location.

2020spaces.com | 6
The Installation Menu
When you run either the 2020 Commercial Software or the 2020 Commercial Catalog
installation, you will see an installation menu, shown in the figure below:
The choices in the installation menu are described as follows:
Install Use to Install any commercial software product on your local hard
drive.
Network Deployment Use to copy the installation files to a network drive. Users will be able
to install the software products from that network location without
using the installation DVD. Go to the Network Deployment – Software
section to continue.
This option makes the installation available from your network; it
does not actually install any software.
What’s New Use to access data or product updates, reports, and announcements.
When done browsing through the What’s New window, click the Close
icon in the upper right corner to return to the menu.
Exit Use to cancel the installation or close the window.
2020spaces.com | 7
Installing 2020 Commercial Software
This section guides you through the installation of 2020 Commercial Software, which includes
these programs: 2020 Worksheet, 2020 Cap, 2020 Giza and 2020 Visual Impression.
Before You Install Before you install 2020 Commercial Software, make sure to follow these prerequisites:
Review System Requirements
View system requirements for 2020 Commercial Software products at www.2020spaces.com.
Install AutoCAD (for 2020 Cap)
Before installing 2020 Cap, install AutoCAD and launch it at least once.
Connect Hardware Key(s)
2020 Commercial Software comes with one or more hardware keys. Connect the key(s) to your
USB port(s) before installing the software. 2020 hardware keys are not supported on docking
stations. For more information, go to http://www.safenet-inc.com.

2020spaces.com | 8
Installing Software from the Installation Disc To install the 2020 Commercial Software on a local hard drive from the installation disc, do the
following:
At any point in the installation, you can click the Cancel button to cancel the
installation. When it is possible to return to the previous screen to change your
selections, you can click on the Back button.
1. Close all applications, including those in the System Tray (next to the clock
on the Windows taskbar).
2. Insert the 2020 Commercial Software DVD-ROM in the appropriate drive. An installation
menu appears:
If the installation menu does not appear within a few seconds, click Start, Run from the
Windows taskbar. In the Run dialog, type the letter corresponding to your DVD-ROM
drive followed by \autorun.exe and click OK.
3. Click Install from the installation menu. A welcome screen appears to notify you that it is scanning your environment and preparing the InstallShield Wizard.

2020spaces.com | 9
4. Click Next.
5. In the License Agreement window, read the contents of the screen and click I accept the terms in the license agreement, then click Next.
The Next button remains disabled until you accept the agreement.
Scroll or use the PAGE DOWN key to view the remainder of the license agreement.
2020spaces.com | 10
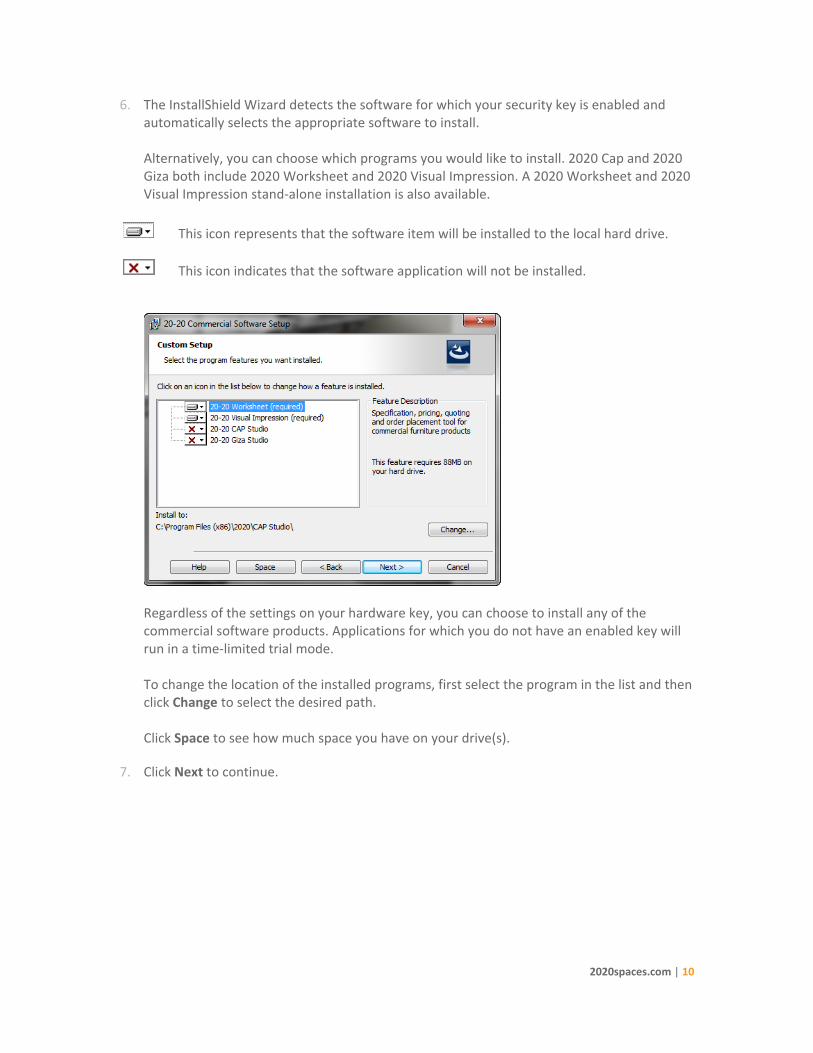
6. The InstallShield Wizard detects the software for which your security key is enabled and automatically selects the appropriate software to install. Alternatively, you can choose which programs you would like to install. 2020 Cap and 2020 Giza both include 2020 Worksheet and 2020 Visual Impression. A 2020 Worksheet and 2020 Visual Impression stand-alone installation is also available.
Regardless of the settings on your hardware key, you can choose to install any of the commercial software products. Applications for which you do not have an enabled key will run in a time-limited trial mode. To change the location of the installed programs, first select the program in the list and then click Change to select the desired path. Click Space to see how much space you have on your drive(s).
7. Click Next to continue.
This icon represents that the software item will be installed to the local hard drive.
This icon indicates that the software application will not be installed.

2020spaces.com | 11
8. Click Install to begin the installation. The time required to install depends on your selection(s) and the speed of your computer.
A status bar provides a visual indication of installation completion as the various software components are installed. Other install dialogs or messages may appear depending on components needed.

2020spaces.com | 12
9. In the Setup Completed window, click Finish.
The installed programs will be available from the Start menu and via desktop shortcuts.
Because the 2020 Commercial Software installation only includes sample catalog
content, you must use the separate set of data DVDs to install manufacturer-specific
content for all commercial products.

2020spaces.com | 13
Deploying Software Installation over a Network This process copies installation files for the 2020 Commercial Software products on a network
drive so that users can install from a network drive without using the installation DVD. This
installation does not install any of the commercial software for use; it simply makes it all
available for installation from your network.
At any point during installation, you can click the Cancel button to cancel the
installation. When it is possible to return to the previous screen to change your
selections, you can click on the Back button.
To copy the installation files to a network location, do the following:
1. Close all applications, including those in the System Tray (next to the clock
on the Windows taskbar).
2. Insert the 2020 Commercial Software DVD-ROM in the appropriate drive. An installation
menu appears:
If the installation menu does not appear within a few seconds, click Start, Run from the
Windows taskbar. In the Run dialog, type the letter corresponding to your DVD-ROM
drive followed by \autorun.exe and click OK.

2020spaces.com | 14
3. Click Install from the installation menu. A welcome screen appears to notify you that it is scanning your environment and preparing the InstallShield Wizard.
4. Click Next.
5. In the License Agreement window, read the contents of the screen and click I accept the terms in the license agreement, then click Next.
6. In the Choose Destination Location window, click Change.
7. In the Choose Folder window, choose the network location to copy the network software. It is recommended to call the folder “2020 Software”.
8. Click OK. You will return to the Choose Destination Location window.
The Next button remains disabled until you accept the agreement.
Scroll or use the PAGE DOWN key to view the remainder of the license agreement.

2020spaces.com | 15
9. Click Next to start copying the files. A status bar provides a visual indication of installation completion as the various software components are copied.
10. In the InstallShield Wizard Completion window, click Finish.
11. In the Installation menu, click Exit.
Installing 2020 Commercial Software from a Network (Client Install) 1. Browse to the network folder where the installation programs were copied.
2. Double-click on the Setup.exe file.
3. Follow the steps in Installing Software from the Installation Disc beginning with Step 3.

2020spaces.com | 16
Installing Manufacturer Catalogs
Installing manufacturer catalogs gives you the manufacturer-specific content you need to use in
all 2020 Commercial Software products. If you do not install any manufacturer catalogs, you will
only see sample catalog content in your 2020 software products.
Installing Manufacturer Catalogs from the Installation Discs To install manufacturer catalogs to a local computer using the installation discs, do the
following:
At any point during the installation, you can click the Cancel button to cancel the
installation. When it is possible to return to the previous screen to change your
selections, you can click on the Back button.
1. Close all applications, including those in the System Tray (next to the clock
on the Windows taskbar).
2. Insert the first 2020 Commercial Catalog DVD-ROM in the appropriate drive. An installation menu appears:
3. Click Install. Before catalogs are installed, certain files must exist on your computer. If they are not present, a screen will appear indicating what is required. Click Install. The setup program will go through some preparatory steps. Simply wait for it to finish.

2020spaces.com | 17
Windows may require a restart after the prerequisite files are installed. The setup will resume automatically once the computer restarts.
4. Read the contents of the Welcome screen. Scroll or use the PAGE DOWN key to view the remainder of the license agreement. Click Accept.
5. In the Select Applications window, check the 2020 Commercial Software for which you would like to install manufacturer catalogs. The installation process detects any 2020 software installed on your computer and automatically checks the appropriate applications.

2020spaces.com | 18
6. Click Customize Locations to change the installation location.
In the Customize Locations dialog, click under the application name to change the folder where catalogs will be installed. Navigate to the desired location, then click OK
7. Back in the Select Applications window, click Next to continue.
In the Select Catalog window, click on the Standard Selection tab and place a check by each manufacturer that you would like to install. All of the catalogs for a manufacturer will be installed for all the applications you have selected. The required disk space for the selected manufacturer is displayed to the right of the manufacturer name.
If you would like to customize your selections, click the Advanced Selection tab. For example, here you can specify to install manufacturer catalogs for only certain 2020 applications. For example, to install all manufacturers’ catalogs for a specific application, click on the checkbox above the application logo, as shown in this figure:

2020spaces.com | 19
For example, to install a specific manufacturer catalogs for an application, click on the checkbox under the application logo.
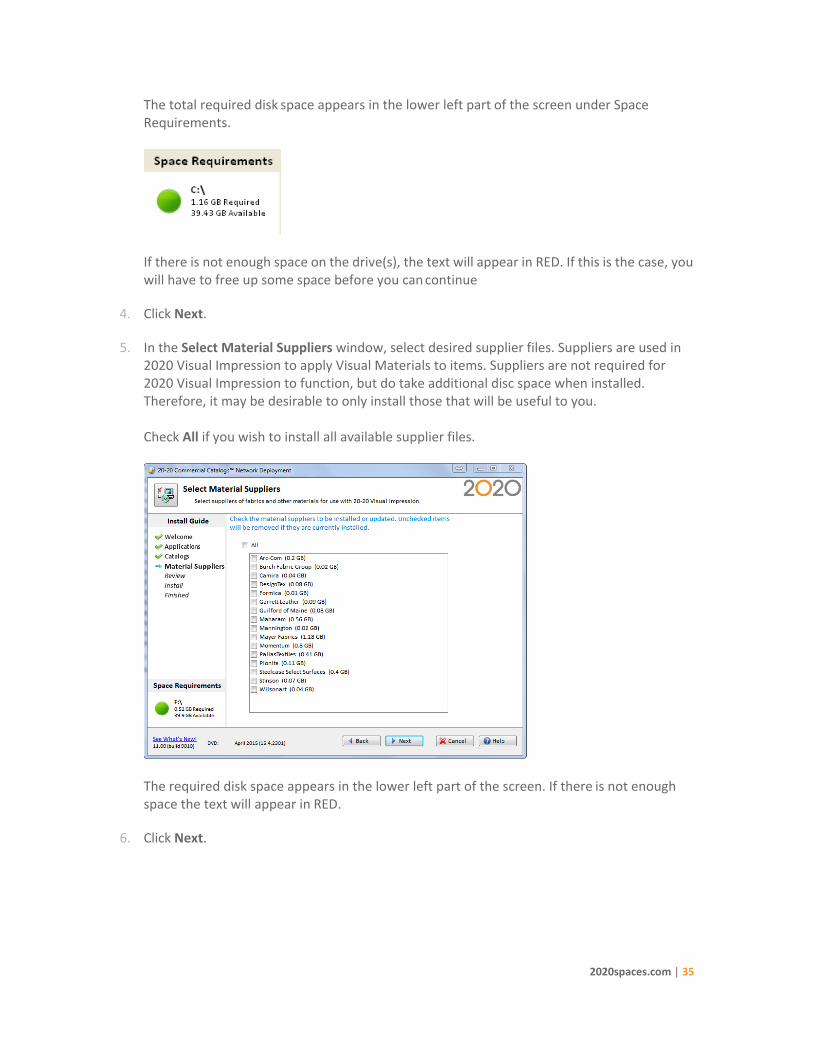
The total required disk space appears in the lower left part of the screen under Space Requirements.
If there is not enough space on the drive(s), the text will appear in RED.
8. Click Next.
9. In the Select Material Suppliers window, select desired supplier files. Suppliers are used in 2020 Visual Impression to apply Visual Materials to items. Suppliers are not required for 2020 Visual Impression to function, but do take additional disc space when installed. Therefore, it may be desirable to only install those that will be useful to you. Check All if you wish to install all available supplier files.
The required disk space appears in the lower left part of the screen. If there is not enough space for the installation, the text will appear in RED.
10. Click Next.

2020spaces.com | 20
11. Review the disk space requirements for the installation. If there is not enough space on any of your drives, click Back to change your selections.
12. Click Begin or Next. During installation, you will see the progress of the current operation and the overall installation.
If you are asked to insert another disc, insert the appropriate one. The installation automatically detects the disc and continues with the installation. The time required to install catalogs depends on your selections and the speed of your computer. If you click Cancel, all operations performed will be undone. However, any software installed as pre-requisites will not be removed if the overall setup is canceled.

2020spaces.com | 21
13. The Installation Complete window will appear to indicate success! Choose Check for Updates If you want the 2020 Commercial Software application to automatically check for catalog updates in the future.
If you select Check for updates, the Software Manager appears right away to check if updates are available on the internet. Follow the instructions, then click Finish. The Software Manager checks if catalog fixes are available via the internet and downloads them to your system. For more information about the Software Manager, see Check for Software and Catalog Updates.
14. Click Finish.
15. Click Exit to close the installation menu.

2020spaces.com | 22
Deploying Manufacturer Catalog Installation over a Network This process copies the 2020 catalog installation files and manufacturer catalogs to a network
drive. Users can then install catalogs from that network location to their computer or access the
catalogs directly from the network location.
To copy to a network location, do the following:
At any point during the installation, you can click the Cancel button to cancel the
installation. When it is possible to return to the previous screen to change your
selections, you can click on the Back button.
1. Close all applications, including those in the System Tray (next to the clock
on the Windows taskbar).
2. Insert the first 2020 Commercial Catalog DVD-ROM in the appropriate drive. An installation menu appears:
3. Click Network Deployment.
4. Before catalogs are installed, certain files must exist on your computer. If they are not present, a screen will appear indicating what is required. Click Install. The setup program will go through some preparatory steps. Simply wait for it to finish.
Windows may require a restart after the prerequisite files are installed. The setup will resume automatically once the computer restarts.

2020spaces.com | 23
5. Click to choose a network location where the server deployment should be stored.
The three options for client installation are available for selection in this screen.
Ask User: Asks the user at the time of client install to choose to install to a local hard drive or to access the files on the server.
Access Catalogs on the Server: Requires users to access catalog files on the server.
Install Catalogs on User’s Computer: Requires users to install files locally (to the hard drive of the user’s computer).
The checkbox below the three choices determines if a user can install web downloads and
updates. As noted, this only applies if the catalogs are installed locally. For maximum
flexibility, select Ask User and check the box to allow web downloads and updates.
If you are updating or modifying a network deployment from the same computer used in
the previous month, the location will default to the path used the previous month. If you are
updating or modifying a network deployment from a computer not used previously, this field
will be empty.

2020spaces.com | 24
6. Click Next to continue. In the Select Catalogs window, select the manufacturer catalog(s) for 2020 Cap and 2020 Worksheet. In the Standard Selection tab, check the manufacturer name. All the catalogs of that manufacturer will be installed for both 2020 Cap and 2020 Worksheet.
The required disk space for the selected manufacturer is displayed to the right of the manufacturer name. Click on the Advanced Selection tab to customize your selections. Note that 2020 Worksheet catalogs are required for 2020 Cap. For example, if you wish to install all manufacturers for 2020 Worksheet only, click on the checkbox above the application logo.
For example, if you wish to install a specific manufacturer for 2020 Worksheet only, click on the checkbox under the appropriate application logo.

2020spaces.com | 25
7. The total required disk space appears in the lower left part of the screen under Space Requirements.
If there is not enough space on the drive(s), the text will appear in RED. If this is the case, you will have to free up some space before you can continue.
8. Click Next.
9. In the Select Material Suppliers window, select desired supplier files. Suppliers are used in 2020 Visual Impression to apply Visual Materials to items. Suppliers are not required for 2020 Visual Impression to function, but do take additional disc space when installed. Therefore, it may be desirable to only install those that will be useful to you. Check All if you wish to install all available supplier files.
The required disk space appears in the lower left part of the screen. If there is not enough space the text will appear in RED.
10. Click Next.

2020spaces.com | 26
11. Review the disk space requirements for the installation.
If there is not enough space on a specific drive, click Back to change selections or free up space on the drive.
12. Click Begin or Next. During the installation, you will see the progress of the current operation and the overall installation.
If you are asked to insert another disk, insert the appropriate one. The installation automatically detects the disk and continues with the installation. The time required to copy catalogs depends on your selections and the speed of your computer.
If you click Cancel, all operations performed will be undone. However, any software
installed as pre-requisites will not be removed if the overall setup is canceled.\
13. Review the disk space requirements for the installation.
If there is not enough space, click Back to change selections or free up space on the drive.

2020spaces.com | 27
14. Click Begin. During the installation, you will see the progress of the current operation and the overall installation.
If you are asked to insert another disc, insert the appropriate one. The installation automatically detects the disc and continues with the installation. The time required to copy catalogs depends on your selections and the speed of your computer.
15. Congratulations! You have successfully deployed the 2020 Cap installation program and data to a network location.
The path users can use to access the catalogs is shown in this screen.
16. Click Finish.

2020spaces.com | 28
17. Click Exit to close the installation menu.
Each user must now go to the network location, go into the Clientsetup folder, then run
setup.exe. From this program they will choose whether to install the catalogs on their
computer or access catalogs from the network location. See Installing Manufacturer Catalogs
from a Network (Client Install).

2020spaces.com | 29
Installing Manufacturer Catalogs from a Network (Client Install) 1. Browse to the network folder where the manufacturer catalog installation programs were
installed.
2. Open the ClientSetup folder, then double-click on Setup.exe. Before catalogs are installed, certain files must exist on your computer. If they are not present, a screen will appear indicating what is required. Click Install. The setup program will go through some preparatory steps. Simply wait for it to finish.
Windows may require a restart after the prerequisite files are installed. The setup will resume automatically once the computer restarts.
3. Read the contents of the Welcome screen. Scroll or use the PAGE DOWN key to view the remainder of the license agreement.
4. Click Accept.

2020spaces.com | 30
5. In the Select Catalog Location window, choose from where you want to access catalogs:
Access Catalogs on the Server: When you select Access Catalogs on the Server, you will not be able to select which manufacturers to install. You will have access to all the manufacturer catalogs and material suppliers selected when the install was deployed to the network. If you wish to hide certain catalogs, you can do so after the installation by going into 2020 Cap or 2020 Worksheet, selecting the Tools menu, Preferences, then Content. Install Catalogs on this Computer: Manufacturer catalog content is installed on your computer. Recommended for laptops that are not always connected to the network.
6. Click Next. Click to continue instructions for Access Catalogs on the Server or Install Catalogs on this Computer.

2020spaces.com | 31
Access Catalogs from the Server
1. Review the disk space requirements for the installation.
If there is not enough space on a specific drive, click Back to change selections or free up space on the drive.
2. Click Begin. During the installation, you will see the progress of the current operation and the overall installation.
The time required to install catalogs depends on your selections and the speed of your computer.

2020spaces.com | 32
3. Congratulations! You have successfully installed 2020 Commercial catalogs.
4. Click Finish.
In the future, when you restart your computer, 2020 Cap will check if an updated
version of 2020 Commercial Catalogs is available on your network. If updates exist, you
will see the following message window:

2020spaces.com | 33
Install Catalogs on This Computer
1. Check the 2020 Commercial software for which you want to install catalogs.
The installation detects any 2020 software that is installed on your computer and automatically checks the appropriate applications. Click Customize Locations to change the folder where catalogs will be installed.
In the Customize Locations window, click under the application name to change the folder where catalogs will be installed. Navigate to the desired location then click OK.
2. Click Next.

2020spaces.com | 34
3. In the Select Catalogs window you will select the manufacturer catalog(s) for Cap and Worksheet. Note that the manufacturers displayed are only those that were selected to be installed to the server. In the Standard Selection tab, check the manufacturer name. All the catalogs of that manufacturer will be installed for both 2020 Cap and 2020 Worksheet.
The required disk space for the selected manufacturer is displayed to the right of the manufacturer name. Click the Advanced Selection tab to customize your selections. Note that 2020 Worksheet catalogs are required for 2020 Cap. For example, if you wish to install all manufacturer catalogs for 2020 Worksheet only, click above the logo for the 2020 Worksheet application:
For example, if you wish to install a specific manufacturer catalog for 2020 Worksheet only, click on the checkbox under the appropriate application logo
2020spaces.com | 35
The total required disk space appears in the lower left part of the screen under Space Requirements.
If there is not enough space on the drive(s), the text will appear in RED. If this is the case, you will have to free up some space before you can continue
4. Click Next.
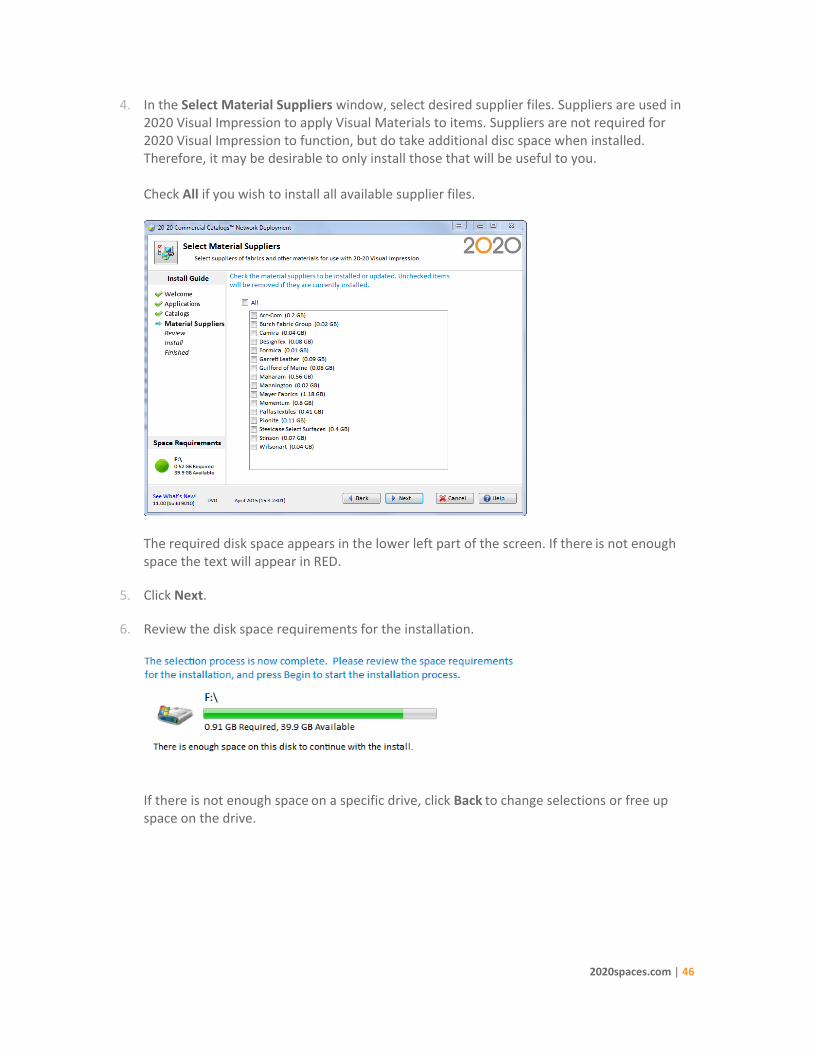
5. In the Select Material Suppliers window, select desired supplier files. Suppliers are used in 2020 Visual Impression to apply Visual Materials to items. Suppliers are not required for 2020 Visual Impression to function, but do take additional disc space when installed. Therefore, it may be desirable to only install those that will be useful to you. Check All if you wish to install all available supplier files.
The required disk space appears in the lower left part of the screen. If there is not enough space the text will appear in RED.
6. Click Next.

2020spaces.com | 36
7. Review the disk space requirements for the installation.
If there is not enough space on a specific drive, click Back to change selections or free up space on the drive.
8. Click Begin or Next. During the installation, you will see the progress of the current operation and the overall installation.
If you are asked to insert another disc, insert the appropriate one. The installation automatically detects the disc and continues with the installation. The time required to install catalogs depends on your selections and the speed of your computer.
If you click Cancel, all operations performed will be undone. However, if the setup
cleaned up 2020 Cap and 2020 Worksheet catalogs, these will not be returned; you will
need to re-install the content from the previous disk set. Also, any software installed as
pre-requisites will not be removed if the overall setup is canceled.

2020spaces.com | 37
9. Congratulations! You have successfully installed content to the local hard drive.
Choose Check for updates if you want the 2020 Commercial Software application to
automatically check for catalog updates in the future. (if this was enabled during the server
deployment).
10. Click Finish. If you chose Check for updates, the Software Manager appears to verify if updates are available on the internet. Follow the instructions then click Finish when done. The Software Manager checks if security patches are available via the Internet and downloads them to your system. For more information about the Software Manager, see Check for Software and Catalog Updates. Note that this is not the same as updating your 2020 catalogs to a newer version (see note below).
In the future, when you restart your computer, Cap Updates will check if an updated
version of 20- 20 Catalogs is available on your network. If updates exist, you will see this
message box.

2020spaces.com | 38
Update, Modify or Remove Catalogs
Once you have installed the 2020 Commercial Catalogs, you may want to add or remove
catalogs, or update catalogs to a newer version.
To maintain catalogs that are already installed, do the following:
1. Launch the Catalog Maintenance tools. Depending on the type of installation you have, you will find these tools in the following places:
Local Installation: Insert Disc 1 and select Install. Or, from your Windows taskbar, click Start, All Programs, 2020 Technologies, Catalog Maintenance.
Network Deployment: Insert Disc 1 and select Network Deployment.
Client Install: Go into the network location where the catalog installation was deployed, open the Clientsetup folder, then run setup.exe.
Note that the screens displayed and options available on each screen vary, depending on which
type of install you are maintaining.
2. In the Welcome screen, select Express Update, Remove, Alternate Manufacturer or run Diagnostics:
Express Update: Update the installed catalogs with a newer version. If the installed manufacturer has added catalogs, they will be included in your installation. Click for more instructions >>

2020spaces.com | 39
Remove: Delete all of the installed catalogs on your system. Click for more instructions >> Alternate Manufacturer: Choose to copy older versions of catalogs before updating to a newer version. This will allow you to use older catalogs side-by-side with updated catalogs. Click for more instructions >> Diagnostics: Repair and troubleshoot problems with the catalog installation. Select this only when directed by a 2020 Commercial Support representative.

2020spaces.com | 40
Installing Express Updates The Express Update option installs newer versions of catalogs already in your system. If the
installed manufacturer has added catalogs, they will be included in your installation.
There are 2 options for Express Updates:
Standard Express Update: Use when you wish to quickly update catalogs with the monthly release of 2020 Commercial Catalogs.
Modified Update: Use when you wish to remove catalogs or add catalogs that you did not select at the time of the initial installation. At the same time, the installation will update the catalogs in your system with the release as provided on the monthly disc set. Note: The program detects whether the catalogs installed on your system are of the same month. If they are, you will NOT see this option.

2020spaces.com | 41
Standard Express Update
Use when you wish to quickly update catalogs with the monthly release of 2020 Commercial
Catalogs. Do not check Modify to run the Express Update.
If you do not check Modify, perform the following steps:
1. In the Welcome screen, select Express Update.:
2. Click Next.
3. Review the disk space requirements for the installation
If there is not enough space on a specific drive, click Back to change selections or free up space on the drive.
4. Click Begin. During installation, you will see the progress of the current operation and the overall

2020spaces.com | 42
installation.
If you are asked to insert another disc, insert the appropriate one. The installation automatically detects the disc and continues with the installation. The time required to install catalogs depends on your selections and the speed of your computer.
5. Congratulations! You have successfully installed 2020 Commercial catalogs.
6. Choose Check for updates if you want the 2020 Commercial Software application to
automatically check for catalog updates in the future.
If you selected Check for updates, the Software Manager appears to verify if updates are
available on the internet. Follow the instructions, then click Finish when done. The Software
Manager checks if catalog fixes are available via the Internet and downloads them to your
system. For more information about the Software Manager, see Check for Software and
Catalog Updates.

2020spaces.com | 43
Modified Update
Use when you wish to remove catalogs or add catalogs that you did not select at the time of the
initial installation. At the same time, the installation will update the catalogs in your system with
the release as provided on the monthly disc set. If the manufacturer has added catalogs, they
will be included in this installation process.
Note: The program detects whether the catalogs installed on your system are of the same
month. If they are, you will NOT see this option.
1. In the Welcome window, check Modify which manufacturers’ catalogs are installed. When you do this, the Express Update option changes to Update, as shown in the following figure:
Note: The program detects if the catalogs you have installed on your system are of the same month. If they are, Modify will be an option by itself and you will not see the Update option, as shown in the figure below:
2. Click Next to continue with the installation.

2020spaces.com | 44
If you are modifying a desktop install, check the 2020 Commercial Software applications for
which you want to install catalogs as shown in the following figure. Note that 2020 Worksheet
catalogs are required for all 2020 Commercial Software applications.
In the Customize Locations dialog, click under the application name to change the folder
where catalogs will be installed. Navigate to the desired location then click OK.
If you are modifying a network deployment or client install, then in the Select Catalogs window,
click on the Standard Selection tab and check the manufacturer name you wish to alter. All
catalogs for the selected manufacturer will be installed for both 2020 Cap and 2020 Worksheet.
The required disk space for the selected manufacturer is displayed to the right of the
manufacturer name.
If you wish to customize your selections, click the Advanced Selection tab. Note that 2020

2020spaces.com | 45
Worksheet catalogs are required for 2020 Cap.
For example, if you wish to install all manufacturer catalogs for 2020 Worksheet only, click on
the checkbox above the application logo.
For example, if you wish to install one specific manufacturer’s catalog for 2020 Worksheet only,
click on the checkbox under the application logo.
The total required disk space appears in the lower left part of the screen under Space
Requirements.
If there is not enough space on the drive(s), the text will appear in RED. In this case, you will need
to free up some space before you can continue.
3. Click Next to continue with the installation.
2020spaces.com | 46
4. In the Select Material Suppliers window, select desired supplier files. Suppliers are used in 2020 Visual Impression to apply Visual Materials to items. Suppliers are not required for 2020 Visual Impression to function, but do take additional disc space when installed. Therefore, it may be desirable to only install those that will be useful to you. Check All if you wish to install all available supplier files.
The required disk space appears in the lower left part of the screen. If there is not enough space the text will appear in RED.
5. Click Next.
6. Review the disk space requirements for the installation.
If there is not enough space on a specific drive, click Back to change selections or free up space on the drive.

2020spaces.com | 47
7. Click Begin or Next. During the installation, you will see the progress of the current operation and the overall installation.
If you are asked to insert another disc, insert the appropriate one. The installation automatically detects the disc and continues with the installation. The time required to install catalogs depends on your selections and the speed of your computer.

2020spaces.com | 48
Creating an Alternate Manufacturer By creating an alternate manufacturer before doing an update, you will be able to use older
catalogs side-by-side with updated catalogs.
1. Click the Alternate Manufacturer button on the lower left portion of the Welcome screen.
2. Click Next.

2020spaces.com | 49
3. In the Select a Manufacturer window, you will see a list of manufacturers, the current version installed, and the version on the disc.
If you wish to change the disc from which you want to install, insert the disc then click Find DVD, or click Browse to install from a different drive.
4. Select the manufacturer and click Next.
5. In the Describe Alternate Manufacturer Window, type in a three-character Alternate
Manufacturer code and enter a description for the Alternate Manufacturer. Note that the
system automatically enters defaults in these fields. By default, an Alternate Manufacturer
code is entered for you.

2020spaces.com | 50
6. Click Begin. During the Alternate Manufacturer creation, you will see the progress of the current operation and the overall installation.
Note: If you click Cancel, all operations performed will be undone.
7. Click Finish.
You can now use this Alternate Manufacturer in 2020 Worksheet.
When you insert a product from an Alternate Manufacturer catalog, the MFG column will show
the original manufacturer code and the Alt MFG column will show the Alternate Manufacturer
code you just created.

2020spaces.com | 51
Remove Catalogs This option deletes all of the catalogs on your system installed by the setup from a monthly disk
set or from web downloads. If you want to delete only certain catalogs, see Modified Update.
1. Select Remove on the Welcome window.
2. Click Next.
3. In the Review window, click Remove to proceed. Note that ALL catalogs will be removed. During catalog removal you will see the progress of the current operation and the overall uninstall.
4. When removal has been completed, an Uninstall Complete window appears. Click Finish.

2020spaces.com | 52
Check for Software and Catalog Updates
When you install 2020 Giza, 2020 Cap and/or 2020 Worksheet from the 2020 Commercial
Software DVD, Software Manager is also automatically installed. Software Manager keeps your
programs up-to-date with the latest software updates, catalog updates, security patches,
software improvements, and important messages.
When an update is available, you can view the updates for your system, view update
descriptions and download and install updates.
Check for Updates To check for updates, do the following:
1. Select Check for Updates from the Help menu in 2020 Cap, 2020 Giza, or 2020 Worksheet OR click on Start, (All) Programs, 2020 Technologies, Check for Software Updates.
2. In the Software Manager window, click Next.
3. Select 2020 Commercial Software or 2020 Commercial Catalogs from the Select by Product dropdown list.
2020spaces.com | 53
4. Check the update to install and click Install. The Update Service will download and install the update on your system. You can also choose to download the update and install it later.
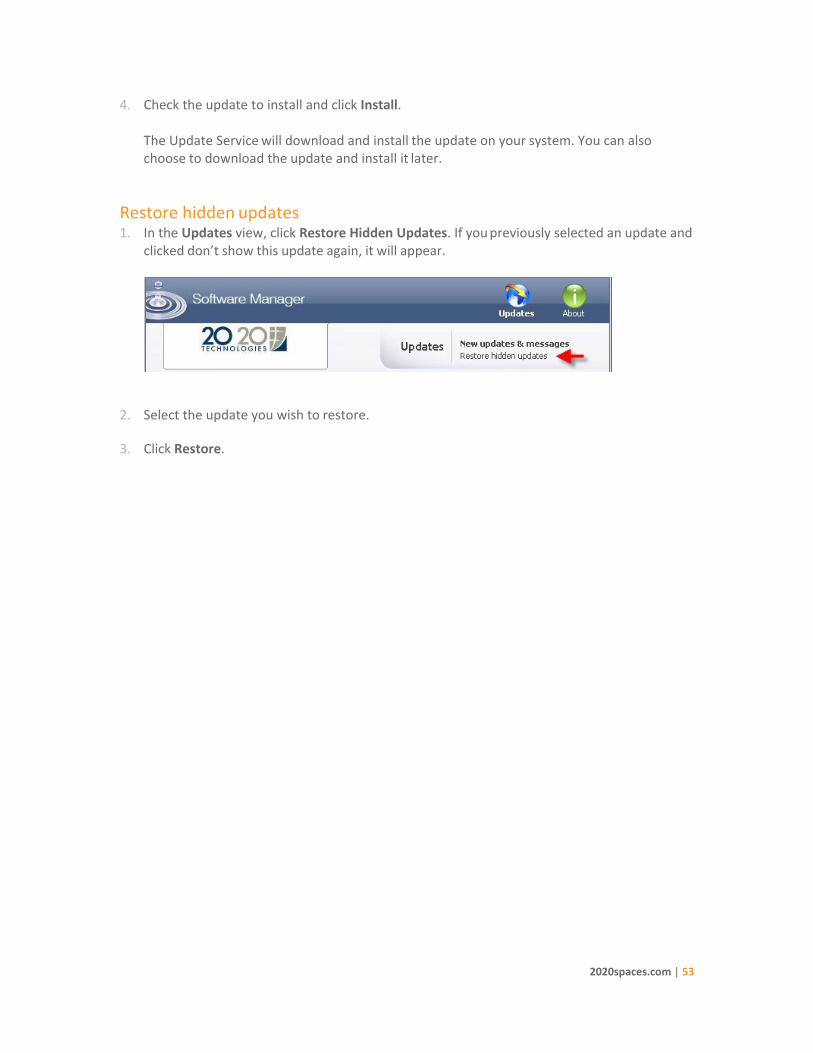
Restore hidden updates 1. In the Updates view, click Restore Hidden Updates. If you previously selected an update and
clicked don’t show this update again, it will appear.
2. Select the update you wish to restore.
3. Click Restore.

2020spaces.com | 54
Frequently Asked Questions
Here are answers to questions frequently asked by users who install 2020 Commercial software
and catalogs:
What do I need to do after aborting a catalog installation?
When you abort an installation, the setup undoes all performed operations. However, any
software installed as pre-requisites will not be removed if the overall setup is canceled.
What is the difference between getting catalog updates from the Internet (via Software
Manager) and updates from the DVD set?
Every month, 2020 sends you a DVD set which contains new catalog versions. You need to install
this version to update your catalogs.
However, sometimes after sending the monthly DVD set we discover issues in some catalogs
which need to be corrected. The Software Manager checks if patches are available via the
Internet and downloads them to your system.

2020spaces.com | 55
Published by:
2020 Technologies Inc.
400 Armand-Frappier Blvd. Laval (Quebec) Canada H7V 4B4
© 20-20 Technologies Inc. All rights reserved
The name 20-20 Technologies and all associated trade names used by 20-20 Technologies Inc. are registered, pending
or common law trademarks of 2020 Technologies Inc. and/or of its subsidiaries. Any reference to other brands and
products appearing herein are trademarks of their respective holder(s).
20-20 Technologies Inc. reserves the right to alter specifications and other product information without prior
notice.The information contained herein is subject to the terms and conditions of the License Agreement included
with the media.