Embed Size (px)
Citation preview
INSTALLATION GUIDEPX2 – FORD RANGER/MAZDA BT50INTERCOOLER KIT
ENGINEERING THE UNFAIR ADVANTAGE
P/N PWI53860 – INTERCOOLER | P/N PWA62593 – PIPE KIT
Contents CONDITIONAL MANUFACTURERS WARRANTY ................................................................................................. 2
Warranty voids ....................................................................................................................................................................... 2 Warranty does not cover ..................................................................................................................................................... 2
LIMIT OF LIABILITY STATEMENT ....................................................................................................................... 2
SAFETY PRECAUTIONS ..................................................................................................................................... 3
IMPORTANT INFORMATION FOR FITTING ........................................................................................................ 4
RADIATORS: ..................................................................................................................................................................................... 4 INTERCOOLERS: ................................................................................................................................................................................ 4 OIL COOLERS: ................................................................................................................................................................................... 4 LIQUID TO AIR BARREL INTERCOOLER KITS: ....................................................................................................................................... 4
PACKING LIST ................................................................................................................................................... 5
EQUIPMENT AND SUPPLIES REQUIRED FOR FITMENT ...................................................................................... 6
ASSEMBLY....................................................................................................................................................... 11
Assembly Section 1 – Intercooler ..................................................................................................................................... 11 Assembly Section 2 – Modifications ................................................................................................................................ 12 Assembly Section 3 – Reinstallation of OEM components ......................................................................................... 13 Assembly Section 4 – Piping kit ........................................................................................................................................ 15
INSTALLATION INSTRUCTIONS FORD RANGER MKII - AUGUST 2016 2
CONDITIONAL MANUFACTURERS WARRANTY
PWR Custom Aluminium Radiators, Intercoolers and Oil Coolers along with cores only for these units are warranted to the original purchaser to be free of fault for materials and workmanship for a period of 1 year from the date of purchase and only when used under normal operating conditions. Claims for internal damage to engine or other related components of user’s vehicle are not covered by this warranty. The PWR product user is responsible for the monitoring of engine temperature operations and for having the appropriate detection devices in place to warn the user of overheating and other engine related malfunctions. At time of installation an approved coolant must be added to the cooling system. (see important information – Radiator point 3) Responsibility for any damage, injury or loss attributed to any fault in material or workmanship in the above listed products shall be limited by replacing the unit on return of the defective product.
Warranty voids
If the product is repaired or welded by another party other than PWR Performance Products. * If any defect is attributable to an accident, abuse or negligence. * Where the product is used for an application for other then it was intended. * If any parts or accessories are fitted which adversely affect the product
Warranty does not cover
Charge relating to removal and replacement to vehicle. *Internal or external corrosion. * Any consequential damage. * Freight cost incurred to send the item back to PWR
LIMIT OF LIABILITY STATEMENT
The information contained in this publication was accurate and in effect at the time the publication was approved for printing and is subject to change without notice or liability. PWR Performance Products reserves the right to revise the information presented herein or to discontinue the production of parts described at any time.

INSTALLATION INSTRUCTIONS FORD RANGER MKII - AUGUST 2016 3
SAFETY PRECAUTIONS
STOP CAREFULLY READ THE IMPORTANT SAFETY PRECAUTIONS and WARNINGS BEFORE PROCEEDING WITH THE INSTALLATION!
Appropriate disassembly, assembly methods and procedures are essential to ensure the personal safety of the individual performing the kit installation. Improper installation due to the failure to correctly follow these instructions could cause personal injury or death. Read each step of the installation manual carefully before starting the installation.
• Always wear safety glasses for eye protection.
• Place the ignition switch in the OFF position.
• Always apply the parking brake when working on the vehicle.
• Block the front and rear tyre surfaces to prevent unexpected vehicle movement. • Operate the engine only in well-ventilated areas to avoid exposure to carbon monoxide.
• Do not smoke or use flammable items near or around the fuel system.
• Use chemicals and cleaners only in well ventilated areas.
• Batteries can produce explosive hydrogen gas which can cause personal injury. Do not allow flames, sparks or flammable sources to come near the battery.
• Keep hands and any other objects away from the radiator fan blades. • Keep yourself and your clothing away from moving parts when the engine is running.
• Do not wear loose clothing or jewellery that can be caught in rotating or moving parts.
INSTALLATION INSTRUCTIONS FORD RANGER MKII - AUGUST 2016 4
IMPORTANT INFORMATION FOR FITTING Please read the following before fitting our PWR Performance Product.
WARNING: Failure to follow this procedure will void your warranty. • Do not use this product in any other motor vehicle for which it is not designed. • Do not use any other mounting location / method other than described in this instruction. • It is advisable to seek assistance of another person when installing this product. • Do not repair or modify this product and / or its mounting bracket in any way - repair or modification may
affect proper operation of the vehicle or cause destruction of property. • Ensure all torque settings are followed. • Be sure to clean and remove any loose debris before removing pipe work as debris entering the engine
could be detrimental to the engine and or components
Radiators:
• Before removing the old radiator check the existing coolant for stray current. This is done by connecting a voltmeter between the coolant and the battery ground. The meter should have a range of at least 12 volts (assuming the vehicle have a 12 volt charging system) and a sensitivity of at least one-tenth of a volt. By connecting one test lead to battery ground and placing the other lead into the coolant (DO NOT TOUCH THE METAL CORE OR FILLER NECK) any voltage indicates current passing through the coolant- ELECTROLYSIS.
• If no current found flush cooling system with distilled water to remove the existing coolant/inhibitors. When the entire system has been flushed including the over flow bottles, you can fit the new radiator. DO NOT MIX COOLANTS
• Select a coolant that is recommended by the manufactured or by PWR. Product must meet the current AS2108 or manufactures engine coolant/inhibitor standard and refill system. Bring engine up to temperature and let cool. Re-Check the coolant level and top up if necessary. USE ONLY DISTILLED WATER.
• IMPORTANT- again recheck step 1 for any stray current. • PLEASE be careful when fitting and make sure all mounting points are tight (to manufacturers
specifications) and there is sufficient clearance so no rubbing occurs. • PLEASE ensure that all hose clamps are done up. • Correct cap must be used for each individual system.
Intercoolers:
• PLEASE be careful when fitting and make sure all mounting points are tight (to manufacturers specifications) and there is sufficient clearance so no rubbing occurs.
• PLEASE ensure that all hose clamps are done up.
Oil Coolers:
• PLEASE be careful when fitting and make sure all mounting points are tight (to manufacturers specifications) and there is sufficient clearance so no rubbing occurs.
• PLEASE ensure that all hose clamps are done up. • Do not run over 80 psi rating.
Liquid to Air Barrel Intercooler kits:
• Select a coolant that is recommended by the manufactured or by PWR. Product must meet the current AS2108 engine coolant/inhibitor standard and refill system. Cycle the fluids through the system to remove air locks. Re-Check the coolant level and top up if necessary. USE ONLY DISTILLED WATER
• PLEASE be careful when fitting and make sure all mounting points are tight (to manufacturers specifications) and that there is sufficient clearance so no rubbing occurs.
• PLEASE ensure that all hose clamps are done up. • Pump must be fitted in accordance to fitting instructions supplied and by a qualified auto electrician.
INSTALLATION INSTRUCTIONS FORD RANGER MKII - AUGUST 2016 5
APPLICATION
Before commencing the procedures outlined please read the guide and verify all parts are present and not damaged. If anything is missing or damaged, please notify PWR Performance Products on 07 5547 1600.
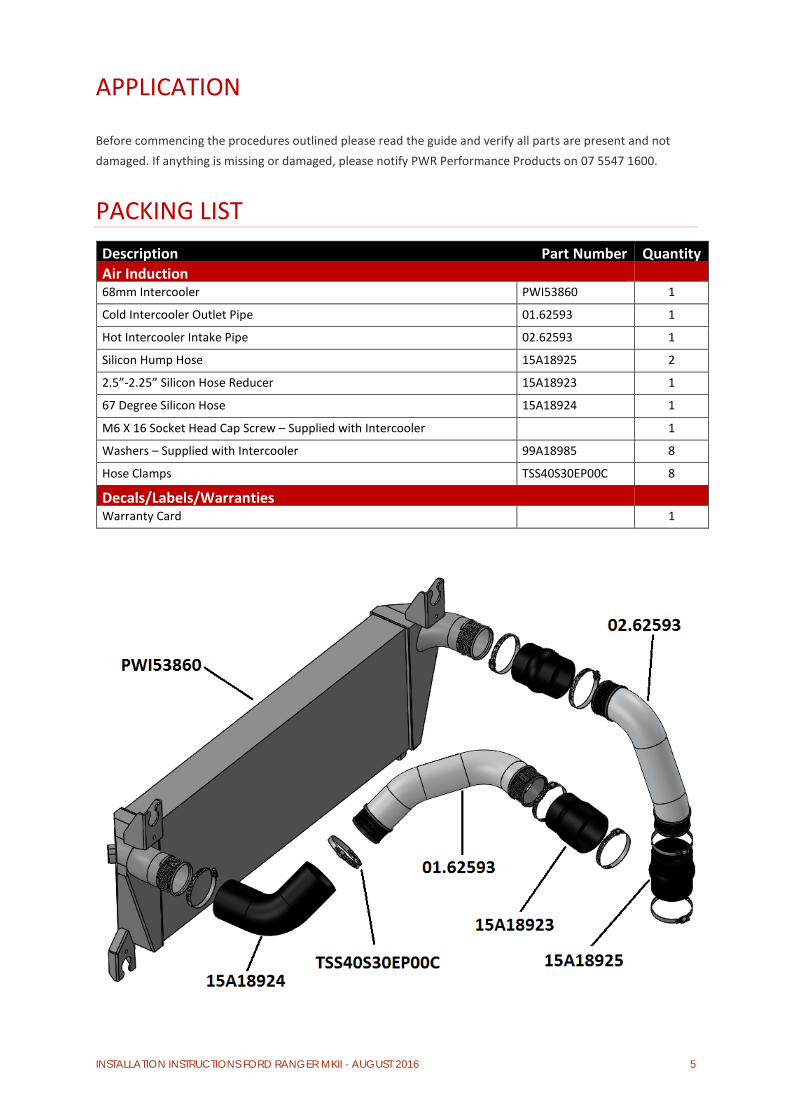
PACKING LIST Description Part Number Quantity Air Induction 68mm Intercooler PWI53860 1
Cold Intercooler Outlet Pipe 01.62593 1
Hot Intercooler Intake Pipe 02.62593 1
Silicon Hump Hose 15A18925 2
2.5”-2.25” Silicon Hose Reducer 15A18923 1
67 Degree Silicon Hose 15A18924 1
M6 X 16 Socket Head Cap Screw – Supplied with Intercooler 1
Washers – Supplied with Intercooler 99A18985 8
Hose Clamps TSS40S30EP00C 8
Decals/Labels/Warranties Warranty Card 1
INSTALLATION INSTRUCTIONS FORD RANGER MKII - AUGUST 2016 6
EQUIPMENT AND SUPPLIES REQUIRED FOR FITMENT
• Fender Cover (2)
• 1/4" and 3/8" drive ratchets with extensions
• 3/8" drive torque wrench (7-35 ft-lb range)
• Metric socket sets (short and deep recommended)
• Metric wrench sets
• Metric allen key set
• T-25 TORX bit screwdrivers or sockets
• Short Phillip’s-head and Flat head screwdriver
• Trim pad tool /flat blade screw driver (for pushpin removal)
• Assembly lubricant (White Lithium Grease or Petroleum Jelly)
• Sharp serrated knife, Wood saw or grinding disk (to cut plastic)
• Medium strength thread locker – Loctite® 242 (blue) or equivalent
• Writing equipment (marker pen)
• Rubbing alcohol (e.g. Methylated spirits)
• Rags
• Zip lock / resealable bags (to store and label removed nuts / bolts clips etc.)
INSTALLATION INSTRUCTIONS FORD RANGER MKII - AUGUST 2016 7
DISASSEMBLY
The following section will guide you through the disassembly of the OEM parts on your vehicle. Special care should be taken to label parts and avoid damaging items as removed since many items will be reused.
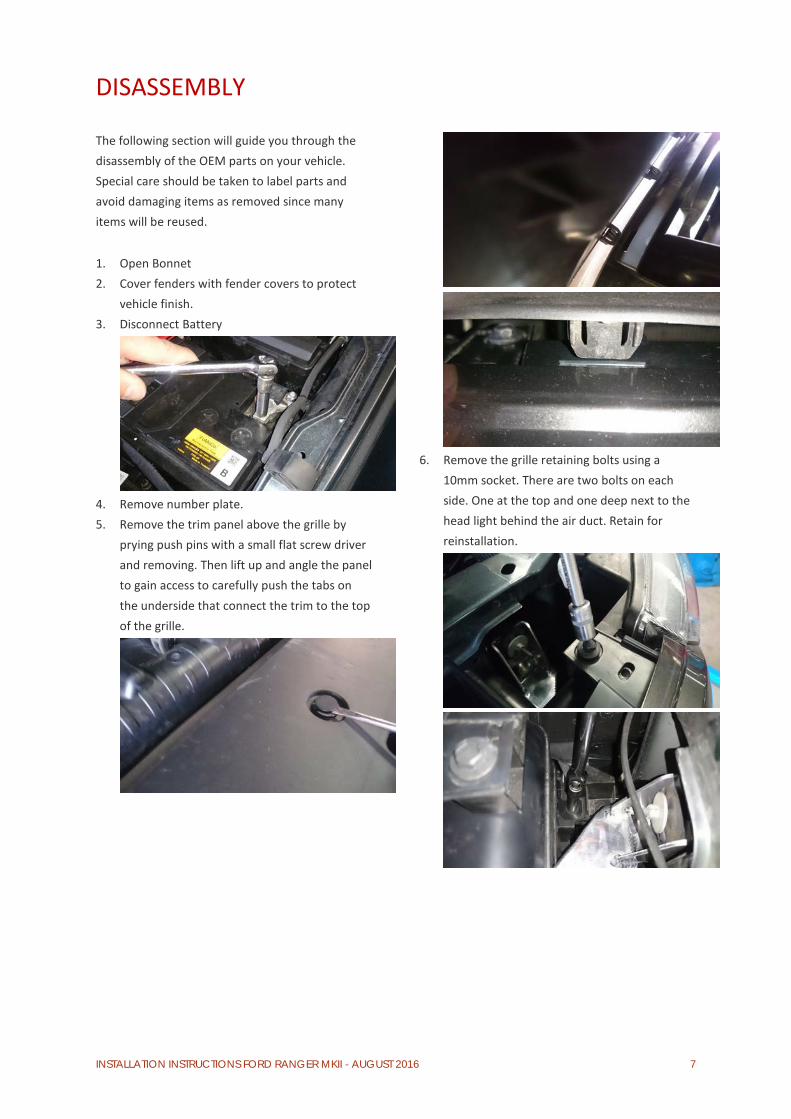
1. Open Bonnet 2. Cover fenders with fender covers to protect
vehicle finish. 3. Disconnect Battery
4. Remove number plate. 5. Remove the trim panel above the grille by
prying push pins with a small flat screw driver and removing. Then lift up and angle the panel to gain access to carefully push the tabs on the underside that connect the trim to the top of the grille.
6. Remove the grille retaining bolts using a
10mm socket. There are two bolts on each side. One at the top and one deep next to the head light behind the air duct. Retain for reinstallation.
INSTALLATION INSTRUCTIONS FORD RANGER MKII - AUGUST 2016 8
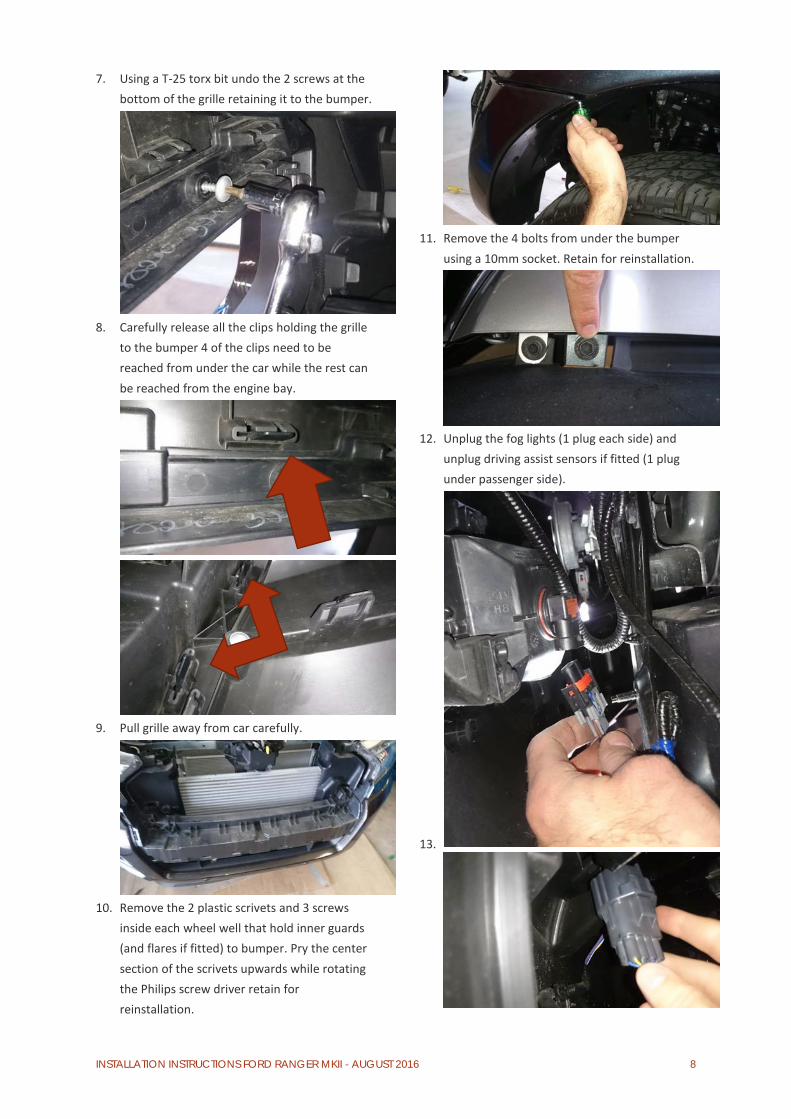
7. Using a T-25 torx bit undo the 2 screws at the bottom of the grille retaining it to the bumper.
8. Carefully release all the clips holding the grille
to the bumper 4 of the clips need to be reached from under the car while the rest can be reached from the engine bay.
9. Pull grille away from car carefully.
10. Remove the 2 plastic scrivets and 3 screws
inside each wheel well that hold inner guards (and flares if fitted) to bumper. Pry the center section of the scrivets upwards while rotating the Philips screw driver retain for reinstallation.
11. Remove the 4 bolts from under the bumper
using a 10mm socket. Retain for reinstallation.
12. Unplug the fog lights (1 plug each side) and
unplug driving assist sensors if fitted (1 plug under passenger side).
13.
INSTALLATION INSTRUCTIONS FORD RANGER MKII - AUGUST 2016 9
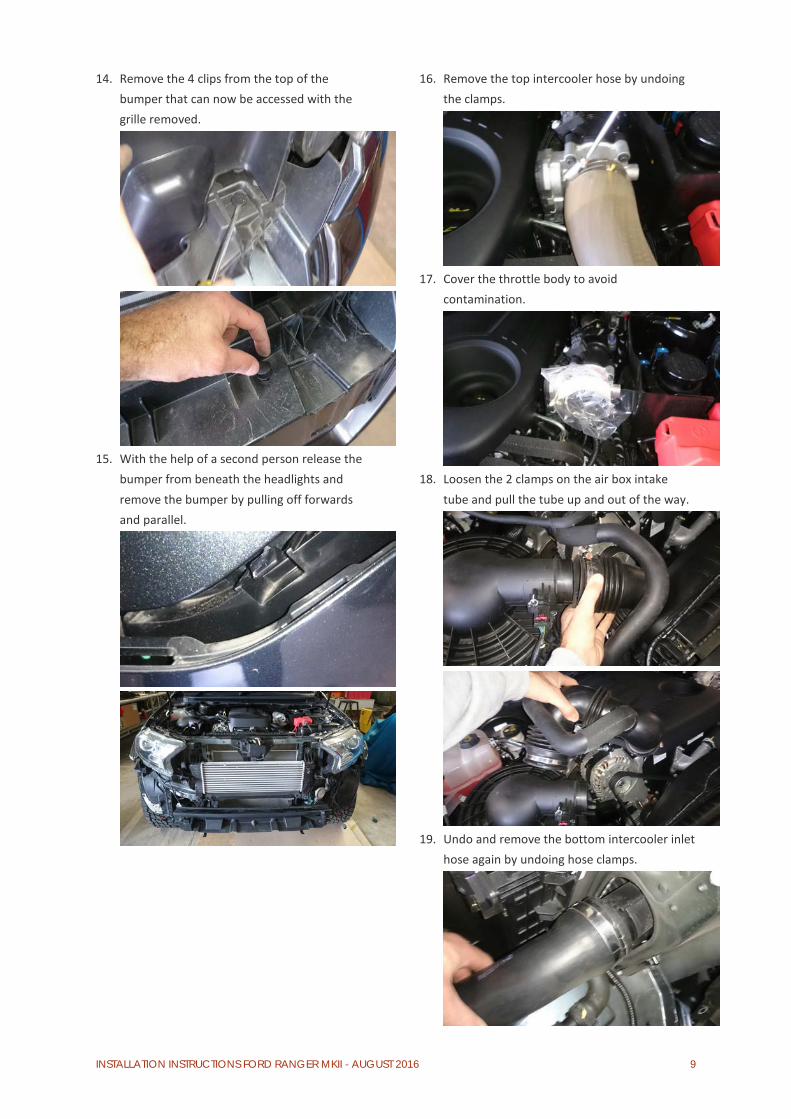
14. Remove the 4 clips from the top of the bumper that can now be accessed with the grille removed.
15. With the help of a second person release the
bumper from beneath the headlights and remove the bumper by pulling off forwards and parallel.
16. Remove the top intercooler hose by undoing the clamps.
17. Cover the throttle body to avoid
contamination.
18. Loosen the 2 clamps on the air box intake
tube and pull the tube up and out of the way.
19. Undo and remove the bottom intercooler inlet
hose again by undoing hose clamps.
INSTALLATION INSTRUCTIONS FORD RANGER MKII - AUGUST 2016 10
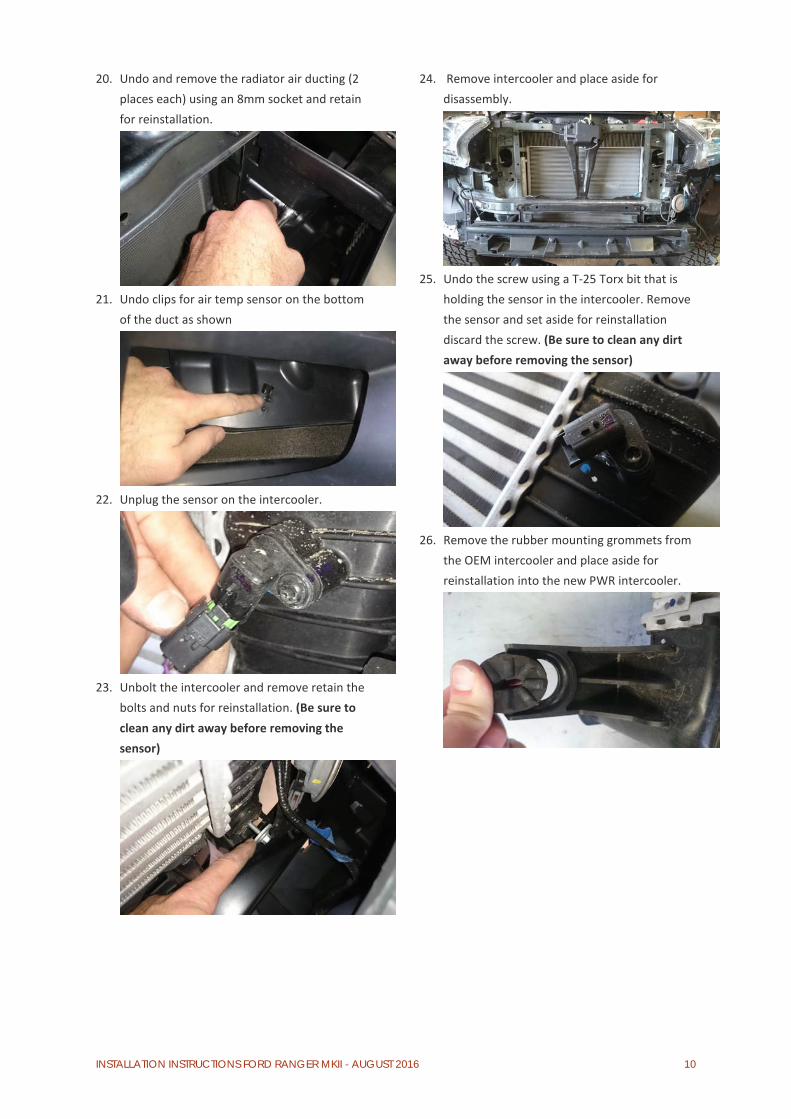
20. Undo and remove the radiator air ducting (2 places each) using an 8mm socket and retain for reinstallation.
21. Undo clips for air temp sensor on the bottom
of the duct as shown
22. Unplug the sensor on the intercooler.
23. Unbolt the intercooler and remove retain the
bolts and nuts for reinstallation. (Be sure to clean any dirt away before removing the sensor)
24. Remove intercooler and place aside for disassembly.
25. Undo the screw using a T-25 Torx bit that is
holding the sensor in the intercooler. Remove the sensor and set aside for reinstallation discard the screw. (Be sure to clean any dirt away before removing the sensor)
26. Remove the rubber mounting grommets from
the OEM intercooler and place aside for reinstallation into the new PWR intercooler.
INSTALLATION INSTRUCTIONS FORD RANGER MKII - AUGUST 2016 11
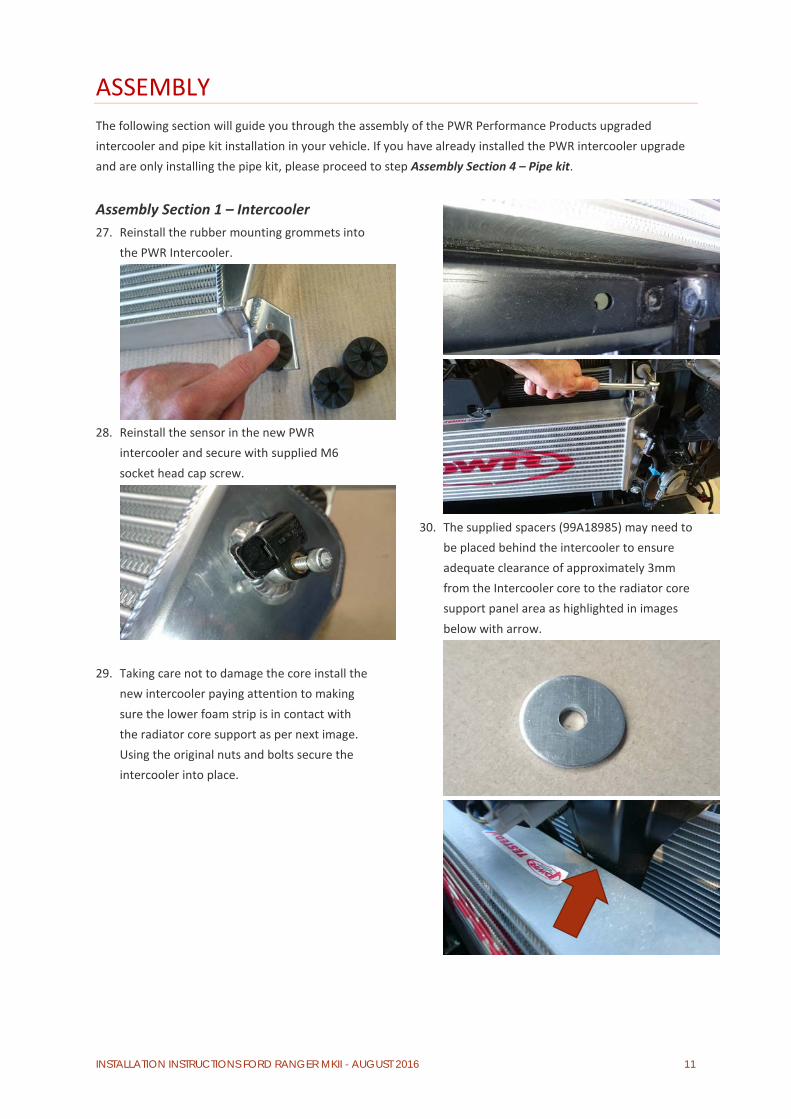
ASSEMBLY The following section will guide you through the assembly of the PWR Performance Products upgraded intercooler and pipe kit installation in your vehicle. If you have already installed the PWR intercooler upgrade and are only installing the pipe kit, please proceed to step Assembly Section 4 – Pipe kit.
Assembly Section 1 – Intercooler 27. Reinstall the rubber mounting grommets into
the PWR Intercooler.
28. Reinstall the sensor in the new PWR
intercooler and secure with supplied M6 socket head cap screw.
29. Taking care not to damage the core install the new intercooler paying attention to making sure the lower foam strip is in contact with the radiator core support as per next image. Using the original nuts and bolts secure the intercooler into place.
30. The supplied spacers (99A18985) may need to
be placed behind the intercooler to ensure adequate clearance of approximately 3mm from the Intercooler core to the radiator core support panel area as highlighted in images below with arrow.
INSTALLATION INSTRUCTIONS FORD RANGER MKII - AUGUST 2016 12
Assembly Section 2 – Modifications
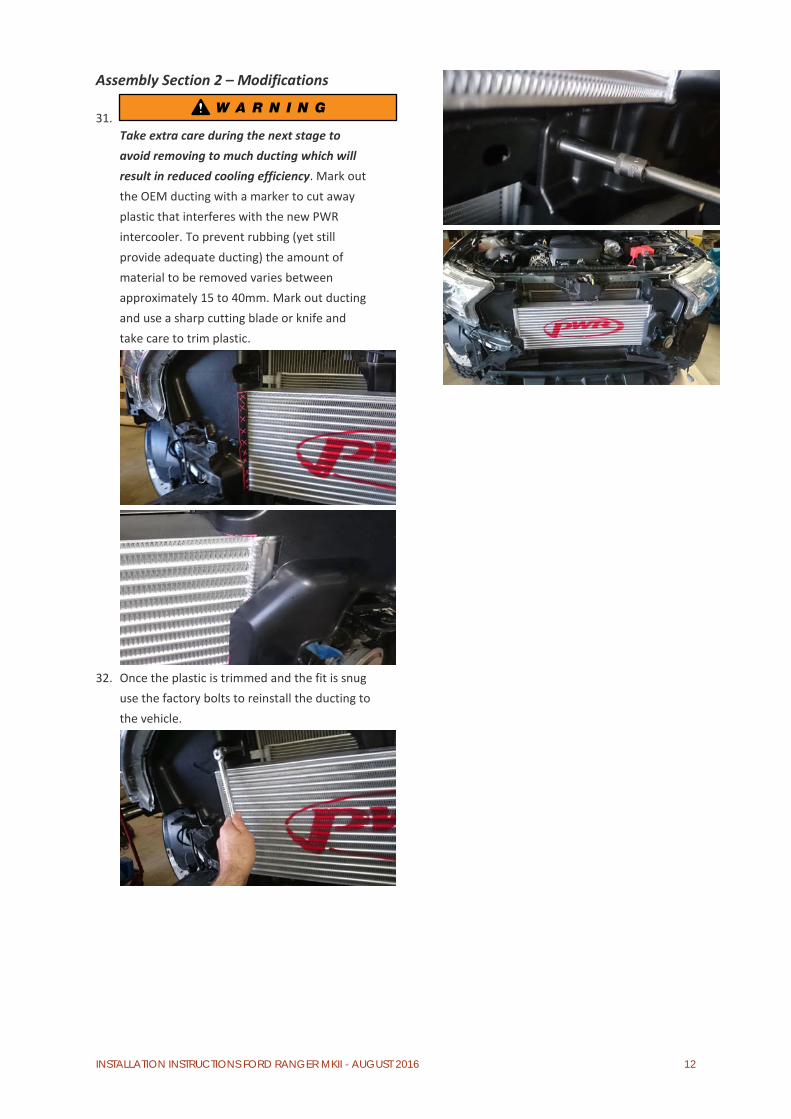
31. Take extra care during the next stage to avoid removing to much ducting which will result in reduced cooling efficiency. Mark out the OEM ducting with a marker to cut away plastic that interferes with the new PWR intercooler. To prevent rubbing (yet still provide adequate ducting) the amount of material to be removed varies between approximately 15 to 40mm. Mark out ducting and use a sharp cutting blade or knife and take care to trim plastic.
32. Once the plastic is trimmed and the fit is snug
use the factory bolts to reinstall the ducting to the vehicle.

INSTALLATION INSTRUCTIONS FORD RANGER MKII - AUGUST 2016 13
Assembly Section 3 – Reinstallation of OEM components 33. Attach the sensor to the bottom of the
passenger side air ducting.
34. Reinstall the front bumper being sure to clip in
under the head lights firmly.
35. Reinstall the 2 pushpins in the top of the
bumper.
36. Reconnect the 2 fog lights and the driving assist sensors if fitted.
37. Secure the bottom of the bumper with the 4
original bolts that were removed using a 10mm socket.
38. Reinstall flares (if fitted) and secure the
bumper the original clips and screws.
39. Confirm all screws and clips are in place prior
to moving onto the grille reinstallation. 40. Reinstall the grille by connecting all clips firmly
before moving onto the screws.
INSTALLATION INSTRUCTIONS FORD RANGER MKII - AUGUST 2016 14
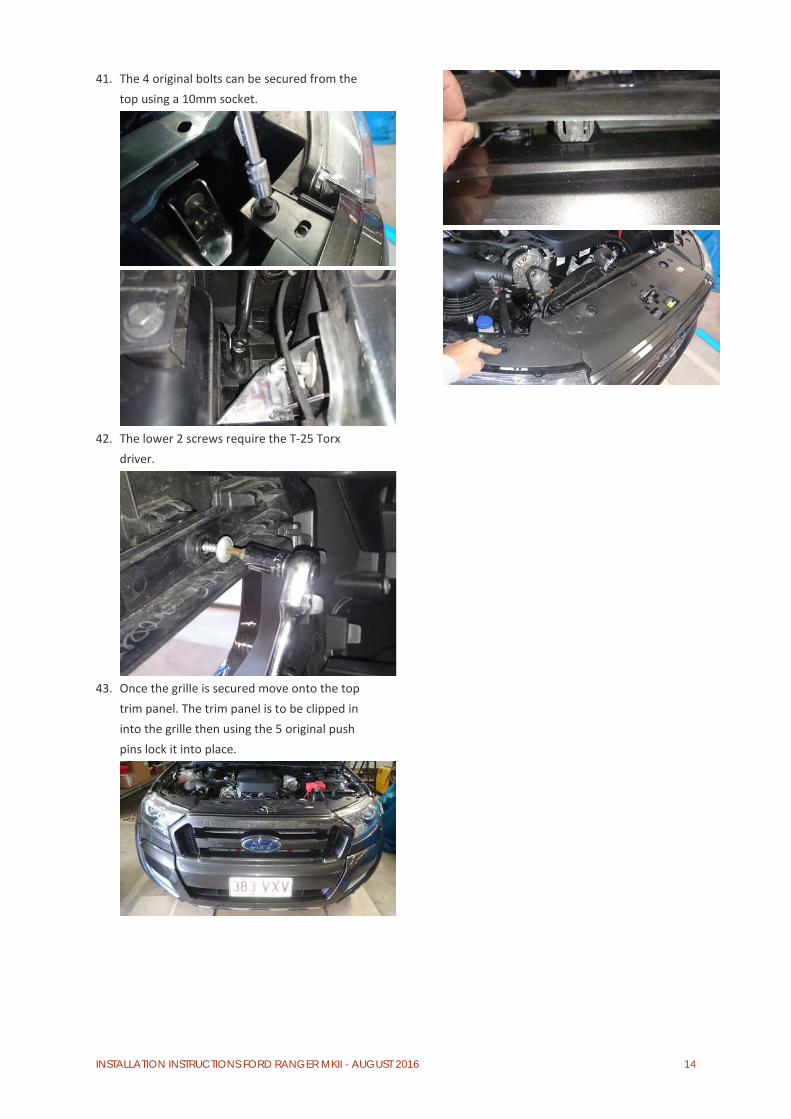
41. The 4 original bolts can be secured from the top using a 10mm socket.
42. The lower 2 screws require the T-25 Torx
driver.
43. Once the grille is secured move onto the top
trim panel. The trim panel is to be clipped in into the grille then using the 5 original push pins lock it into place.
INSTALLATION INSTRUCTIONS FORD RANGER MKII - AUGUST 2016 15
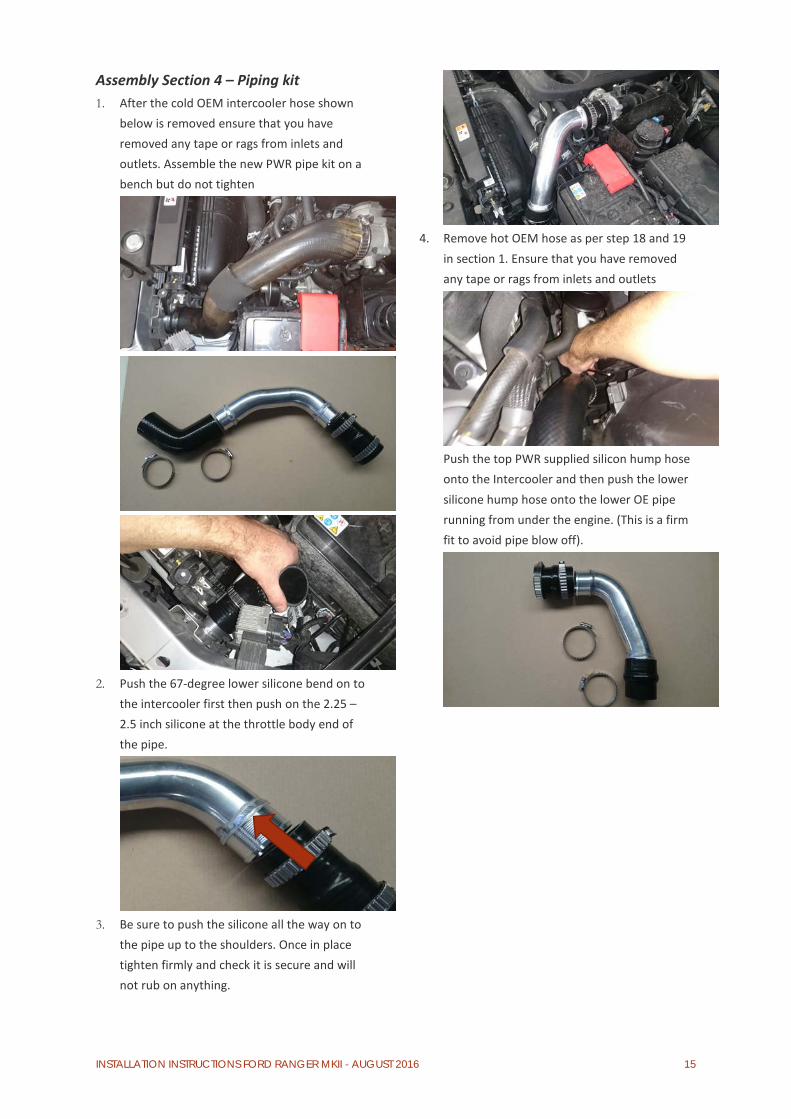
Assembly Section 4 – Piping kit 1. After the cold OEM intercooler hose shown
below is removed ensure that you have removed any tape or rags from inlets and outlets. Assemble the new PWR pipe kit on a bench but do not tighten
2. Push the 67-degree lower silicone bend on to
the intercooler first then push on the 2.25 – 2.5 inch silicone at the throttle body end of the pipe.
3. Be sure to push the silicone all the way on to
the pipe up to the shoulders. Once in place tighten firmly and check it is secure and will not rub on anything.
4. Remove hot OEM hose as per step 18 and 19
in section 1. Ensure that you have removed any tape or rags from inlets and outlets
Push the top PWR supplied silicon hump hose onto the Intercooler and then push the lower silicone hump hose onto the lower OE pipe running from under the engine. (This is a firm fit to avoid pipe blow off).
INSTALLATION INSTRUCTIONS FORD RANGER MKII - AUGUST 2016 16
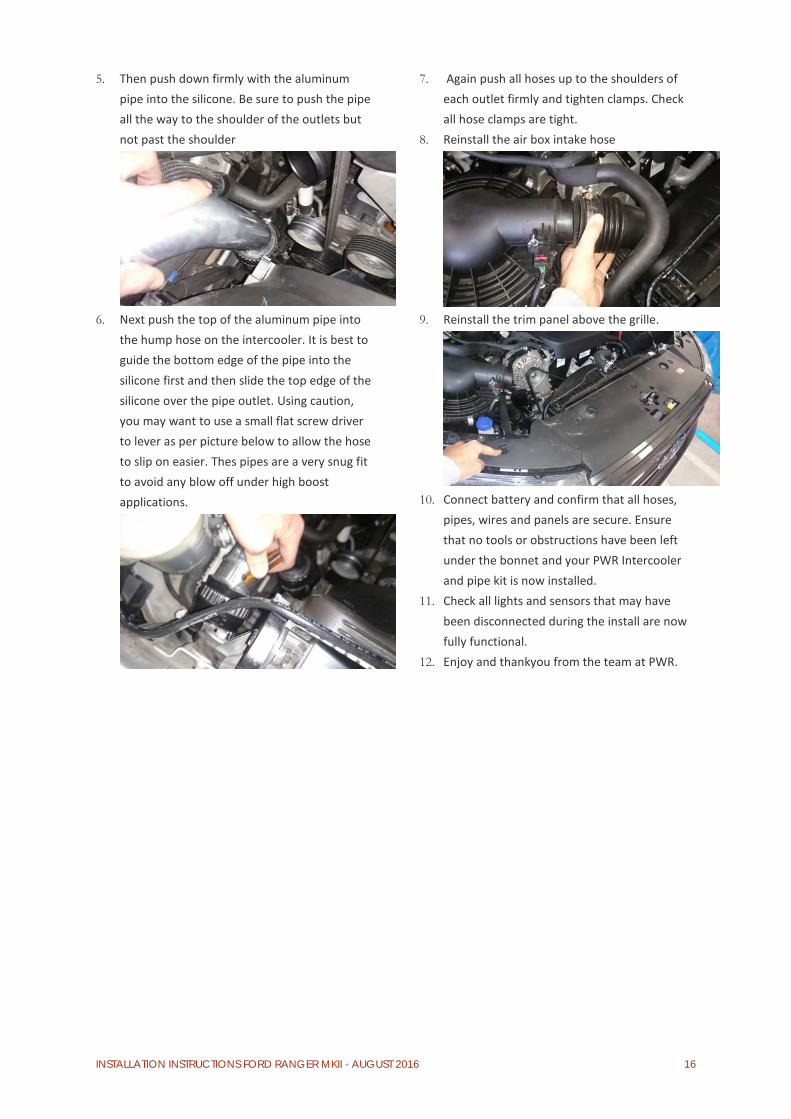
5. Then push down firmly with the aluminum pipe into the silicone. Be sure to push the pipe all the way to the shoulder of the outlets but not past the shoulder
6. Next push the top of the aluminum pipe into
the hump hose on the intercooler. It is best to guide the bottom edge of the pipe into the silicone first and then slide the top edge of the silicone over the pipe outlet. Using caution, you may want to use a small flat screw driver to lever as per picture below to allow the hose to slip on easier. Thes pipes are a very snug fit to avoid any blow off under high boost applications.
7. Again push all hoses up to the shoulders of each outlet firmly and tighten clamps. Check all hose clamps are tight.
8. Reinstall the air box intake hose
9. Reinstall the trim panel above the grille.
10. Connect battery and confirm that all hoses,
pipes, wires and panels are secure. Ensure that no tools or obstructions have been left under the bonnet and your PWR Intercooler and pipe kit is now installed.
11. Check all lights and sensors that may have been disconnected during the install are now fully functional.
12. Enjoy and thankyou from the team at PWR.