Embed Size (px)
Citation preview
Installation Guide for
Symantec Endpoint
Protection and Symantec
Network Access Control
Installation Guide for Symantec Endpoint Protectionand Symantec Network Access Control
The software described in this book is furnished under a license agreement and may be used
only in accordance with the terms of the agreement.
Documentation version 11.00.00.00.00
Legal Notice
Copyright © 2007 Symantec Corporation. All rights reserved.
Symantec, the Symantec Logo, LiveUpdate, Sygate, Symantec AntiVirus, Bloodhound,
Confidence Online, Digital Immune System, and Norton are trademarks or registered
trademarks of Symantec Corporation or its affiliates in the U.S. and other countries. Other
names may be trademarks of their respective owners.
The product described in this document is distributed under licenses restricting its use,
copying, distribution, and decompilation/reverse engineering. No part of this document
may be reproduced in any form by any means without prior written authorization of
Symantec Corporation and its licensors, if any.
THE DOCUMENTATION IS PROVIDED "AS IS" AND ALL EXPRESS OR IMPLIED CONDITIONS,
REPRESENTATIONS AND WARRANTIES, INCLUDING ANY IMPLIED WARRANTY OF
MERCHANTABILITY, FITNESS FOR A PARTICULAR PURPOSE OR NON-INFRINGEMENT,
ARE DISCLAIMED, EXCEPT TO THE EXTENT THAT SUCH DISCLAIMERS ARE HELD TO
BE LEGALLY INVALID. SYMANTEC CORPORATION SHALL NOT BE LIABLE FOR INCIDENTAL
OR CONSEQUENTIAL DAMAGES IN CONNECTION WITH THE FURNISHING,
PERFORMANCE, OR USE OF THIS DOCUMENTATION. THE INFORMATION CONTAINED
IN THIS DOCUMENTATION IS SUBJECT TO CHANGE WITHOUT NOTICE.
The Licensed Software and Documentation are deemed to be commercial computer software
as defined in FAR 12.212 and subject to restricted rights as defined in FAR Section 52.227-19
"Commercial Computer Software - Restricted Rights" and DFARS 227.7202, "Rights in
Commercial Computer Software or Commercial Computer Software Documentation", as
applicable, and any successor regulations. Any use, modification, reproduction release,
performance, display or disclosure of the Licensed Software and Documentation by the U.S.
Government shall be solely in accordance with the terms of this Agreement.
Symantec Corporation
20330 Stevens Creek Blvd.
Cupertino, CA 95014
http://www.symantec.com
Technical Support
Symantec Technical Support maintains support centers globally. Technical
Support’s primary role is to respond to specific queries about product feature and
function. The Technical Support group also authors content for our online
Knowledge Base. The Technical Support group works collaboratively with the
other functional areas within Symantec to answer your questions in a timely
fashion. For example, the Technical Support group works with Product Engineering
and Symantec Security Response to provide alerting services and virus definition
updates.
Symantec’s maintenance offerings include the following:
■ A range of support options that give you the flexibility to select the right
amount of service for any size organization
■ A telephone and web-based support that provides rapid response and
up-to-the-minute information
■ Upgrade assurance that delivers automatic software upgrade protection
■ Global support that is available 24 hours a day, 7 days a week
■ Advanced features, including Account Management Services
For information about Symantec’s Maintenance Programs, you can visit our Web
site at the following URL:
www.symantec.com/techsupp/
Contacting Technical Support
Customers with a current maintenance agreement may access Technical Support
information at the following URL:
www.symantec.com/techsupp/
Before contacting Technical Support, make sure you have satisfied the system
requirements that are listed in your product documentation. Also, you should be
at the computer on which the problem occurred, in case it is necessary to recreate
the problem.
When you contact Technical Support, please have the following information
available:
■ Product release level
■ Hardware information
■ Available memory, disk space, and NIC information
■ Operating system
■ Version and patch level
■ Network topology
■ Router, gateway, and IP address information
■ Problem description:
■ Error messages and log files
■ Troubleshooting that was performed before contacting Symantec
■ Recent software configuration changes and network changes
Licensing and registration
If your Symantec product requires registration or a license key, access our technical
support Web page at the following URL:
www.symantec.com/techsupp/
Customer service
Customer service information is available at the following URL:
www.symantec.com/techsupp/
Customer Service is available to assist with the following types of issues:
■ Questions regarding product licensing or serialization
■ Product registration updates such as address or name changes
■ General product information (features, language availability, local dealers)
■ Latest information about product updates and upgrades
■ Information about upgrade assurance and maintenance contracts
■ Information about the Symantec Buying Programs
■ Advice about Symantec's technical support options
■ Nontechnical presales questions
■ Issues that are related to CD-ROMs or manuals
Maintenance agreement resources
If you want to contact Symantec regarding an existing maintenance agreement,
please contact the maintenance agreement administration team for your region
as follows:
■ Asia-Pacific and Japan: [email protected]
■ Europe, Middle-East, and Africa: [email protected]
■ North America and Latin America: [email protected]
Additional Enterprise services
Symantec offers a comprehensive set of services that allow you to maximize your
investment in Symantec products and to develop your knowledge, expertise, and
global insight, which enable you to manage your business risks proactively.
Enterprise services that are available include the following:
These solutions provide early warning of cyber
attacks, comprehensive threat analysis, and
countermeasures to prevent attacks before they occur.
Symantec Early Warning Solutions
These services remove the burden of managing and
monitoring security devices and events, ensuring
rapid response to real threats.
Managed Security Services
Symantec Consulting Services provide on-site
technical expertise from Symantec and its trusted
partners. Symantec Consulting Services offer a variety
of prepackaged and customizable options that include
assessment, design, implementation, monitoring and
management capabilities, each focused on establishing
and maintaining the integrity and availability of your
IT resources.
Consulting Services
Educational Services provide a full array of technical
training, security education, security certification,
and awareness communication programs.
Educational Services
To access more information about Enterprise services, please visit our Web site
at the following URL:
www.symantec.com
Select your country or language from the site index.

Technical Support
Chapter 1 Introducing your Symantec Products
About your Symantec products ... . . . . . . . . . . . . . . . . . . . . . . . . . . . . . . . . . . . . . . . . . . . . . . . . . . . . 13
About Symantec Endpoint Protection .... . . . . . . . . . . . . . . . . . . . . . . . . . . . . . . . . . . . . . 13
About Symantec Network Access Control ... . . . . . . . . . . . . . . . . . . . . . . . . . . . . . . . . . 16
About Symantec Endpoint Protection Manager ... . . . . . . . . . . . . . . . . . . . . . . . . 17
Components that work with Symantec Endpoint Protection
Manager ... . . . . . . . . . . . . . . . . . . . . . . . . . . . . . . . . . . . . . . . . . . . . . . . . . . . . . . . . . . . . . . . . . . . . . . . . . . . . 17
How Symantec Endpoint Protection Manager works .... . . . . . . . . . . . . . . . . . . . . . . . 19
Managed and unmanaged environments ... . . . . . . . . . . . . . . . . . . . . . . . . . . . . . . . . . . 19
About groups .... . . . . . . . . . . . . . . . . . . . . . . . . . . . . . . . . . . . . . . . . . . . . . . . . . . . . . . . . . . . . . . . . . . . . . 19
How clients and servers interact ... . . . . . . . . . . . . . . . . . . . . . . . . . . . . . . . . . . . . . . . . . . . . . 19
What you can do with Symantec Endpoint Protection Manager ... . . . . . . . . . . 20
Where to get more information .... . . . . . . . . . . . . . . . . . . . . . . . . . . . . . . . . . . . . . . . . . . . . . . . . . . . 21
Chapter 2 Installing for the first time
Before you install .. . . . . . . . . . . . . . . . . . . . . . . . . . . . . . . . . . . . . . . . . . . . . . . . . . . . . . . . . . . . . . . . . . . . . . . . 23
Installing and configuring Symantec Endpoint Protection
Manager ... . . . . . . . . . . . . . . . . . . . . . . . . . . . . . . . . . . . . . . . . . . . . . . . . . . . . . . . . . . . . . . . . . . . . . . . . . . . . 25
Configuring and deploying client software .... . . . . . . . . . . . . . . . . . . . . . . . . . . . . . . . . . . . . 26
Logging on to and locating your group in the console ... . . . . . . . . . . . . . . . . . . . . . . . 28
Logging on to the management console ... . . . . . . . . . . . . . . . . . . . . . . . . . . . . . . . . . . . 28
About locating your group in the console ... . . . . . . . . . . . . . . . . . . . . . . . . . . . . . . . . . 28
Configuring LiveUpdate for site updates ... . . . . . . . . . . . . . . . . . . . . . . . . . . . . . . . . . . . . . . . . 29
Configuring LiveUpdate for client updates ... . . . . . . . . . . . . . . . . . . . . . . . . . . . . . . . . . . . . . 30
Configuring a LiveUpdate Settings policy ... . . . . . . . . . . . . . . . . . . . . . . . . . . . . . . . . . 31
Configuring a LiveUpdate Content policy ... . . . . . . . . . . . . . . . . . . . . . . . . . . . . . . . . . 31
Configuring and testing Symantec Endpoint Protection .... . . . . . . . . . . . . . . . . . . . 32
Configuring a default Antivirus and Antispyware policy ... . . . . . . . . . . . . . 32
Testing antivirus capabilities ... . . . . . . . . . . . . . . . . . . . . . . . . . . . . . . . . . . . . . . . . . . . . . . . . . 34
Configuring and testing Symantec Network Access Control ... . . . . . . . . . . . . . . . 38
Creating a Host Integrity policy ... . . . . . . . . . . . . . . . . . . . . . . . . . . . . . . . . . . . . . . . . . . . . . . 38
Testing a Host Integrity policy ... . . . . . . . . . . . . . . . . . . . . . . . . . . . . . . . . . . . . . . . . . . . . . . . 39
Contents

Chapter 3 Planning the production installation
About planning the installation and network architecture ... . . . . . . . . . . . . . . . . . 41
Network and system requirements ... . . . . . . . . . . . . . . . . . . . . . . . . . . . . . . . . . . . . . . . . . . . . . . . . 46
About setting administrative rights to target computers ... . . . . . . . . . . . . . 46
About configuring user rights with Active Directory .... . . . . . . . . . . . . . . . . . 46
System installation requirements ... . . . . . . . . . . . . . . . . . . . . . . . . . . . . . . . . . . . . . . . . . . . 46
About VMWare support ... . . . . . . . . . . . . . . . . . . . . . . . . . . . . . . . . . . . . . . . . . . . . . . . . . . . . . . . . 55
About Desktop firewalls and communications ports ... . . . . . . . . . . . . . . . . . . . . . . . . . 56
Disabling and modifying Windows firewalls ... . . . . . . . . . . . . . . . . . . . . . . . . . . . . . . . . . . . 58
About Windows and Symantec firewalls ... . . . . . . . . . . . . . . . . . . . . . . . . . . . . . . . . . . 58
Disabling Internet Connection Firewall .. . . . . . . . . . . . . . . . . . . . . . . . . . . . . . . . . . . . . . 58
Disabling Windows XP Firewall .. . . . . . . . . . . . . . . . . . . . . . . . . . . . . . . . . . . . . . . . . . . . . . . . 59
Modifying Windows Vista Firewall .. . . . . . . . . . . . . . . . . . . . . . . . . . . . . . . . . . . . . . . . . . . . 60
Preparing computers for remote deployment that run Windows
XP/Vista ... . . . . . . . . . . . . . . . . . . . . . . . . . . . . . . . . . . . . . . . . . . . . . . . . . . . . . . . . . . . . . . . . . . . . . . . . . . . . 60
Preparing the computers that run Windows XP in
workgroups .... . . . . . . . . . . . . . . . . . . . . . . . . . . . . . . . . . . . . . . . . . . . . . . . . . . . . . . . . . . . . . . . . . 61
Preparing the computers that run Windows Vista ... . . . . . . . . . . . . . . . . . . . . . . 61
Prepare your computers for installation .... . . . . . . . . . . . . . . . . . . . . . . . . . . . . . . . . . . . . . . . . 62
Remove virus threats and security risks ... . . . . . . . . . . . . . . . . . . . . . . . . . . . . . . . . . . . 63
Evaluate third-party client software .... . . . . . . . . . . . . . . . . . . . . . . . . . . . . . . . . . . . . . . . 63
Install client software in stages ... . . . . . . . . . . . . . . . . . . . . . . . . . . . . . . . . . . . . . . . . . . . . . . 63
Required computer restarts ... . . . . . . . . . . . . . . . . . . . . . . . . . . . . . . . . . . . . . . . . . . . . . . . . . . . . . . . . . 63
Chapter 4 Installing Symantec Endpoint Protection Manager
Before you install .. . . . . . . . . . . . . . . . . . . . . . . . . . . . . . . . . . . . . . . . . . . . . . . . . . . . . . . . . . . . . . . . . . . . . . . 65
Installing Symantec Endpoint Protection Manager with an embedded
database ... . . . . . . . . . . . . . . . . . . . . . . . . . . . . . . . . . . . . . . . . . . . . . . . . . . . . . . . . . . . . . . . . . . . . . . . . . . . . 66
About embedded database installation settings ... . . . . . . . . . . . . . . . . . . . . . . . . . 66
Installing Symantec Endpoint Protection Manager with the
embedded database ... . . . . . . . . . . . . . . . . . . . . . . . . . . . . . . . . . . . . . . . . . . . . . . . . . . . . . . . 67
Installing Symantec Endpoint Protection Manager with a Microsoft
SQL database .... . . . . . . . . . . . . . . . . . . . . . . . . . . . . . . . . . . . . . . . . . . . . . . . . . . . . . . . . . . . . . . . . . . . . . 70
Preparing Microsoft SQL Server 2000/2005 for database
creation .... . . . . . . . . . . . . . . . . . . . . . . . . . . . . . . . . . . . . . . . . . . . . . . . . . . . . . . . . . . . . . . . . . . . . . . 70
About Microsoft SQL Server database installation settings ... . . . . . . . . . . 75
Installing Symantec Endpoint Protection Manager with a
Microsoft SQL database .... . . . . . . . . . . . . . . . . . . . . . . . . . . . . . . . . . . . . . . . . . . . . . . . . . 78
Installing additional Symantec Endpoint Protection Manager
Consoles ... . . . . . . . . . . . . . . . . . . . . . . . . . . . . . . . . . . . . . . . . . . . . . . . . . . . . . . . . . . . . . . . . . . . . . . . . . . . . 81
Installing and configuring Symantec Endpoint Protection Manager
for failover or load balancing .... . . . . . . . . . . . . . . . . . . . . . . . . . . . . . . . . . . . . . . . . . . . . . . . . 82
Contents8
Installing Symantec Endpoint Protection Manager for failover
or load balancing .... . . . . . . . . . . . . . . . . . . . . . . . . . . . . . . . . . . . . . . . . . . . . . . . . . . . . . . . . . 82
Configuring failover and load balancing .... . . . . . . . . . . . . . . . . . . . . . . . . . . . . . . . . . 83
Installing and configuring Symantec Endpoint Protection Manager
for replication .... . . . . . . . . . . . . . . . . . . . . . . . . . . . . . . . . . . . . . . . . . . . . . . . . . . . . . . . . . . . . . . . . . . . . 87
Installing Symantec Endpoint Protection Manager for
replication .... . . . . . . . . . . . . . . . . . . . . . . . . . . . . . . . . . . . . . . . . . . . . . . . . . . . . . . . . . . . . . . . . . . 87
Configuring Symantec Endpoint Protection Manager for
replication .... . . . . . . . . . . . . . . . . . . . . . . . . . . . . . . . . . . . . . . . . . . . . . . . . . . . . . . . . . . . . . . . . . . 88
Adjusting the Symantec Endpoint Protection Manager heap size ... . . . . . . . . 89
Upgrading from the embedded database to Microsoft SQL Server ... . . . . . . . 90
Backing up the keystore and server.xml files ... . . . . . . . . . . . . . . . . . . . . . . . . . . . . . 91
Backing up the embedded database .... . . . . . . . . . . . . . . . . . . . . . . . . . . . . . . . . . . . . . . . . 91
Installing an instance of Microsoft SQL Server 2000 or 2005 .... . . . . . . 92
Uninstalling the Symantec Endpoint Protection Manager with
an embedded database .... . . . . . . . . . . . . . . . . . . . . . . . . . . . . . . . . . . . . . . . . . . . . . . . . . . 92
Reinstalling the Symantec Endpoint Protection Manager with a
Microsoft SQL database .... . . . . . . . . . . . . . . . . . . . . . . . . . . . . . . . . . . . . . . . . . . . . . . . . . 93
Restoring the original Java keystore file ... . . . . . . . . . . . . . . . . . . . . . . . . . . . . . . . . . . . 93
Reconfiguring the Symantec Endpoint Protection Manager ... . . . . . . . . . 94
Uninstalling Symantec Endpoint Protection Manager ... . . . . . . . . . . . . . . . . . . . . . . 95
Chapter 5 Installing Symantec client software
About Symantec client installation software .... . . . . . . . . . . . . . . . . . . . . . . . . . . . . . . . . . . 97
About Symantec Endpoint Protection .... . . . . . . . . . . . . . . . . . . . . . . . . . . . . . . . . . . . . . 98
About Symantec Network Access Control software .... . . . . . . . . . . . . . . . . . . . . 99
About Windows Installer software version 3.1 ... . . . . . . . . . . . . . . . . . . . . . . . . . . . 99
About groups and clients ... . . . . . . . . . . . . . . . . . . . . . . . . . . . . . . . . . . . . . . . . . . . . . . . . . . . . . . 99
About installing unmanaged client software .... . . . . . . . . . . . . . . . . . . . . . . . . . . . . . . . . 100
Creating client installation packages ... . . . . . . . . . . . . . . . . . . . . . . . . . . . . . . . . . . . . . . . . . . . 100
About deploying client software from a mapped drive ... . . . . . . . . . . . . . . . . . . . . . 101
Deploying client software with the Push Deployment Wizard .... . . . . . . . . . . 102
Deploying client software with Find Unmanaged Computers ... . . . . . . . . . . . . 103
Importing computer lists ... . . . . . . . . . . . . . . . . . . . . . . . . . . . . . . . . . . . . . . . . . . . . . . . . . . . . . . . . . . 104
Creating a text file of computers to install .. . . . . . . . . . . . . . . . . . . . . . . . . . . . . . . . 105
Importing a text file of computers that you want to install .. . . . . . . . . . . 105
About installing and deploying software with Altiris ... . . . . . . . . . . . . . . . . . . . . . . 106
Third-party installation options .... . . . . . . . . . . . . . . . . . . . . . . . . . . . . . . . . . . . . . . . . . . . . . . . . 106
About installing clients using third-party products ... . . . . . . . . . . . . . . . . . . 106
About customizing installations by using .msi options .... . . . . . . . . . . . . . 107
About installing clients with Microsoft SMS 2003 .... . . . . . . . . . . . . . . . . . . . 107
Installing clients with Active Directory Group Policy Object ... . . . . . . . 108
9Contents
Uninstalling client software with Active Directory Group Policy
Object ... . . . . . . . . . . . . . . . . . . . . . . . . . . . . . . . . . . . . . . . . . . . . . . . . . . . . . . . . . . . . . . . . . . . . . . . . 115
About uninstalling client software .... . . . . . . . . . . . . . . . . . . . . . . . . . . . . . . . . . . . . . . . . . . . . . 115
Chapter 6 Installing Quarantine and LiveUpdate servers
Before you install .. . . . . . . . . . . . . . . . . . . . . . . . . . . . . . . . . . . . . . . . . . . . . . . . . . . . . . . . . . . . . . . . . . . . . . . 117
Installing and configuring the Central Quarantine .... . . . . . . . . . . . . . . . . . . . . . . . . 117
Installing the Quarantine Console ... . . . . . . . . . . . . . . . . . . . . . . . . . . . . . . . . . . . . . . . . 118
Installing the Quarantine Server ... . . . . . . . . . . . . . . . . . . . . . . . . . . . . . . . . . . . . . . . . . . 119
Attaching a management server to the Central Quarantine .... . . . . . . 121
Configuring groups to use the Central Quarantine .... . . . . . . . . . . . . . . . . . . . 121
About using a Symantec LiveUpdate server ... . . . . . . . . . . . . . . . . . . . . . . . . . . . . . . . . . . 122
Installing and configuring a LiveUpdate server ... . . . . . . . . . . . . . . . . . . . . . . . . . . . . . 125
Uninstalling Symantec Endpoint Security management
components ... . . . . . . . . . . . . . . . . . . . . . . . . . . . . . . . . . . . . . . . . . . . . . . . . . . . . . . . . . . . . . . . . . . . . . . 126
Chapter 7 Migrating Symantec AntiVirus and Symantec ClientSecurity
Migration overview and sequence .... . . . . . . . . . . . . . . . . . . . . . . . . . . . . . . . . . . . . . . . . . . . . . . 128
Supported and unsupported migration paths .... . . . . . . . . . . . . . . . . . . . . . . . . . . . . . . . 129
Migrations that are supported .... . . . . . . . . . . . . . . . . . . . . . . . . . . . . . . . . . . . . . . . . . . . . . 130
Migrations that are blocked .... . . . . . . . . . . . . . . . . . . . . . . . . . . . . . . . . . . . . . . . . . . . . . . . . 130
Migrations that are not supported .... . . . . . . . . . . . . . . . . . . . . . . . . . . . . . . . . . . . . . . . 130
About migrating Central Quarantine .... . . . . . . . . . . . . . . . . . . . . . . . . . . . . . . . . . . . . 131
Preparing legacy installations for migration .... . . . . . . . . . . . . . . . . . . . . . . . . . . . . . . . . 131
Preparing all legacy installations .... . . . . . . . . . . . . . . . . . . . . . . . . . . . . . . . . . . . . . . . . . 131
Preparing Symantec 10.x/3.x legacy installations .... . . . . . . . . . . . . . . . . . . . 134
About migrating and not preserving server and client groups and
settings ... . . . . . . . . . . . . . . . . . . . . . . . . . . . . . . . . . . . . . . . . . . . . . . . . . . . . . . . . . . . . . . . . . . . . . . . . . . . 135
About migrating groups and settings ... . . . . . . . . . . . . . . . . . . . . . . . . . . . . . . . . . . . . . . . . . . . 136
About settings that are not migrated .... . . . . . . . . . . . . . . . . . . . . . . . . . . . . . . . . . . . . . . . . . . 139
About packages and deployment ... . . . . . . . . . . . . . . . . . . . . . . . . . . . . . . . . . . . . . . . . . . . . . . . . 139
About the client installation packages that are generated during
migration .... . . . . . . . . . . . . . . . . . . . . . . . . . . . . . . . . . . . . . . . . . . . . . . . . . . . . . . . . . . . . . . . . . . 140
Exporting and formatting a list of client computer names to
migrate ... . . . . . . . . . . . . . . . . . . . . . . . . . . . . . . . . . . . . . . . . . . . . . . . . . . . . . . . . . . . . . . . . . . . . . . 141
Communications ports to open .... . . . . . . . . . . . . . . . . . . . . . . . . . . . . . . . . . . . . . . . . . . . . 142
About preparing client computers for migration .... . . . . . . . . . . . . . . . . . . . . . 143
Installing Symantec Endpoint Protection Manager ... . . . . . . . . . . . . . . . . . . . . . . . . . 144
Migrating server and client group settings ... . . . . . . . . . . . . . . . . . . . . . . . . . . . . . . . . . . . . 145
Verify migration and update your migrated policies ... . . . . . . . . . . . . . . . . . . . . . . . 146
Migrating unmanaged Clients ... . . . . . . . . . . . . . . . . . . . . . . . . . . . . . . . . . . . . . . . . . . . . . . . . . . . . 147
Contents10
About migrating unmanaged clients with CD files ... . . . . . . . . . . . . . . . . . . . . 147
Migrating unmanaged clients with exported packages ... . . . . . . . . . . . . . . 148
What has changed for legacy administrators ... . . . . . . . . . . . . . . . . . . . . . . . . . . . . . . . . . 149
Chapter 8 Migrating legacy Symantec Sygate software
About migrating to Symantec Endpoint Protection 11.x ... . . . . . . . . . . . . . . . . . . 153
About migrating Symantec Sygate server and management
software .... . . . . . . . . . . . . . . . . . . . . . . . . . . . . . . . . . . . . . . . . . . . . . . . . . . . . . . . . . . . . . . . . . . . . 154
About migrating legacy Symantec Sygate client software .... . . . . . . . . . 155
About migrating to Symantec Network Access Control 11.x ... . . . . . . . . . . . . . 157
About migrating legacy Symantec Sygate server software .... . . . . . . . . . 157
About migrating legacy Symantec Sygate client software .... . . . . . . . . . 157
About Enforcer upgrades ... . . . . . . . . . . . . . . . . . . . . . . . . . . . . . . . . . . . . . . . . . . . . . . . . . . . . . . . . . . 158
Server migration scenarios ... . . . . . . . . . . . . . . . . . . . . . . . . . . . . . . . . . . . . . . . . . . . . . . . . . . . . . . . . 158
Migrating an installation instance that uses one management
server ... . . . . . . . . . . . . . . . . . . . . . . . . . . . . . . . . . . . . . . . . . . . . . . . . . . . . . . . . . . . . . . . . . . . . . . . . 158
Migrating an installation instance that uses one Microsoft SQL
database and multiple management servers ... . . . . . . . . . . . . . . . . . . . . . 159
Migrating an installation instance that uses multiple embedded
databases and management servers ... . . . . . . . . . . . . . . . . . . . . . . . . . . . . . . . . 160
Migrating an installation instance that uses multiple SQL
database and management servers ... . . . . . . . . . . . . . . . . . . . . . . . . . . . . . . . . . . 160
Management server migration procedures ... . . . . . . . . . . . . . . . . . . . . . . . . . . . . . . . . . . . . 161
Migrating a management server ... . . . . . . . . . . . . . . . . . . . . . . . . . . . . . . . . . . . . . . . . . . . 162
Stopping the servers before load balancing and failover
migration .... . . . . . . . . . . . . . . . . . . . . . . . . . . . . . . . . . . . . . . . . . . . . . . . . . . . . . . . . . . . . . . . . . . 163
Disabling replication before migration .... . . . . . . . . . . . . . . . . . . . . . . . . . . . . . . . . . . 163
Enabling replication after migration .... . . . . . . . . . . . . . . . . . . . . . . . . . . . . . . . . . . . . 164
Console user interface and functionality changes post migration .... . . . . . 164
Migrating remote management consoles ... . . . . . . . . . . . . . . . . . . . . . . . . . . . . . . . . . . . . . . 165
About configuring migrated and new policies ... . . . . . . . . . . . . . . . . . . . . . . . . . . . . . . . . 166
About removing the client password protections from group
settings ... . . . . . . . . . . . . . . . . . . . . . . . . . . . . . . . . . . . . . . . . . . . . . . . . . . . . . . . . . . . . . . . . . . . . . . . . . . . 166
Migrating legacy Symantec Sygate client software .... . . . . . . . . . . . . . . . . . . . . . . . . 167
Chapter 9 Upgrading to new Symantec products
About upgrading to new Symantec products ... . . . . . . . . . . . . . . . . . . . . . . . . . . . . . . . . . 169
Upgrading Symantec Endpoint Protection Manager ... . . . . . . . . . . . . . . . . . . . . . . . 169
Backing up the database ... . . . . . . . . . . . . . . . . . . . . . . . . . . . . . . . . . . . . . . . . . . . . . . . . . . . . . 170
Disabling replication .... . . . . . . . . . . . . . . . . . . . . . . . . . . . . . . . . . . . . . . . . . . . . . . . . . . . . . . . . . 170
Stopping the Symantec Endpoint Protection Manager
service ... . . . . . . . . . . . . . . . . . . . . . . . . . . . . . . . . . . . . . . . . . . . . . . . . . . . . . . . . . . . . . . . . . . . . . . . 171
11Contents
Upgrading Symantec Endpoint Protection Manager ... . . . . . . . . . . . . . . . . . 171
Enabling replication after migration .... . . . . . . . . . . . . . . . . . . . . . . . . . . . . . . . . . . . . 172
About upgrading Symantec Endpoint Protection clients with Symantec
Network Access Control ... . . . . . . . . . . . . . . . . . . . . . . . . . . . . . . . . . . . . . . . . . . . . . . . . . . . . . . 173
About upgrading Symantec Network Access Control clients with
Symantec Endpoint Protection .... . . . . . . . . . . . . . . . . . . . . . . . . . . . . . . . . . . . . . . . . . . . . 173
Appendix A Symantec Endpoint Protection installation featuresand properties
About installation features and properties ... . . . . . . . . . . . . . . . . . . . . . . . . . . . . . . . . . . . . 175
About configuring Setaid.ini ... . . . . . . . . . . . . . . . . . . . . . . . . . . . . . . . . . . . . . . . . . . . . . . . . 176
About configuring MSI command strings ... . . . . . . . . . . . . . . . . . . . . . . . . . . . . . . . 177
Client installation features and properties ... . . . . . . . . . . . . . . . . . . . . . . . . . . . . . . . . . . . . 177
Symantec Endpoint Protection client features ... . . . . . . . . . . . . . . . . . . . . . . . . . 178
Symantec Endpoint Protection client installation properties ... . . . . . . 179
Windows Installer parameters ... . . . . . . . . . . . . . . . . . . . . . . . . . . . . . . . . . . . . . . . . . . . . . . . . . . . . 180
Windows Security Center properties ... . . . . . . . . . . . . . . . . . . . . . . . . . . . . . . . . . . . . . . . . . . . . 182
About using the log file to check for errors ... . . . . . . . . . . . . . . . . . . . . . . . . . . . . . . . . . . . 183
Identifying the point of failure of an installation .... . . . . . . . . . . . . . . . . . . . . . . . . . . 184
Command-line examples ... . . . . . . . . . . . . . . . . . . . . . . . . . . . . . . . . . . . . . . . . . . . . . . . . . . . . . . . . . . 184
Appendix B Updating Symantec client software
About updates and patches ... . . . . . . . . . . . . . . . . . . . . . . . . . . . . . . . . . . . . . . . . . . . . . . . . . . . . . . . . 187
Updating Symantec client software .... . . . . . . . . . . . . . . . . . . . . . . . . . . . . . . . . . . . . . . . . . . . . 188
Appendix C Disaster recovery
How to prepare for disaster recovery .... . . . . . . . . . . . . . . . . . . . . . . . . . . . . . . . . . . . . . . . . . . 191
About the disaster recovery process ... . . . . . . . . . . . . . . . . . . . . . . . . . . . . . . . . . . . . . . . . . . . . 193
Restoring the Symantec Endpoint Protection Manager ... . . . . . . . . . . . . . . . . . . . 194
About identifying the new or rebuilt computer ... . . . . . . . . . . . . . . . . . . . . . . . . 194
Reinstalling the Symantec Endpoint Protection Manager ... . . . . . . . . . . 194
Restoring the server certificate ... . . . . . . . . . . . . . . . . . . . . . . . . . . . . . . . . . . . . . . . . . . . . . . . . . . 195
Restoring client communications .... . . . . . . . . . . . . . . . . . . . . . . . . . . . . . . . . . . . . . . . . . . . . . . . 196
Restoring client communications with a database backup .... . . . . . . . . . 196
Restoring client communications without a database backup .... . . . . 197
Index
Contents12
Introducing your Symantec
Products
This chapter includes the following topics:
■ About your Symantec products
■ Components that work with Symantec Endpoint Protection Manager
■ How Symantec Endpoint Protection Manager works
■ What you can do with Symantec Endpoint Protection Manager
■ Where to get more information
About your Symantec productsYou Symantec products may include Symantec Endpoint Protection and Symantec
Network Access Control. Both products include Symantec Endpoint Protection
Manager, which provides the infrastructure to install and manage Symantec
Endpoint Protection and Symantec Network Access Control. Symantec Endpoint
Protection and Symantec Network Access Control are two different endpoint
protection technologies that work together. This book covers both endpoint
protection technologies, which are purchased separately.
About Symantec Endpoint Protection
Symantec Endpoint Protection protects endpoint computing devices from virus,
threats, and risks, and provides three layers of protection to your endpoint
computing devices. The layers are network threat protection, proactive threat
protection, and antivirus and antispyware protection.
1Chapter
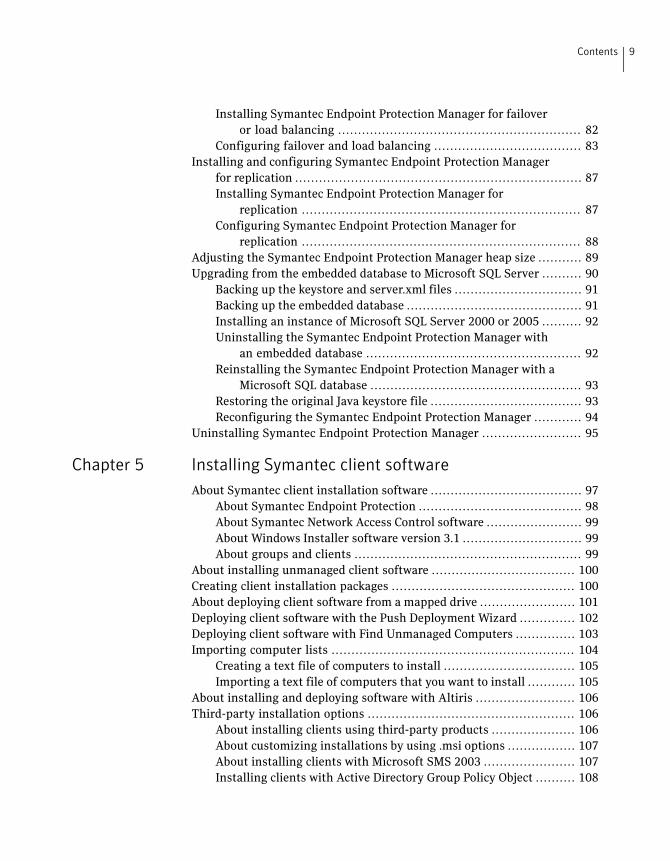
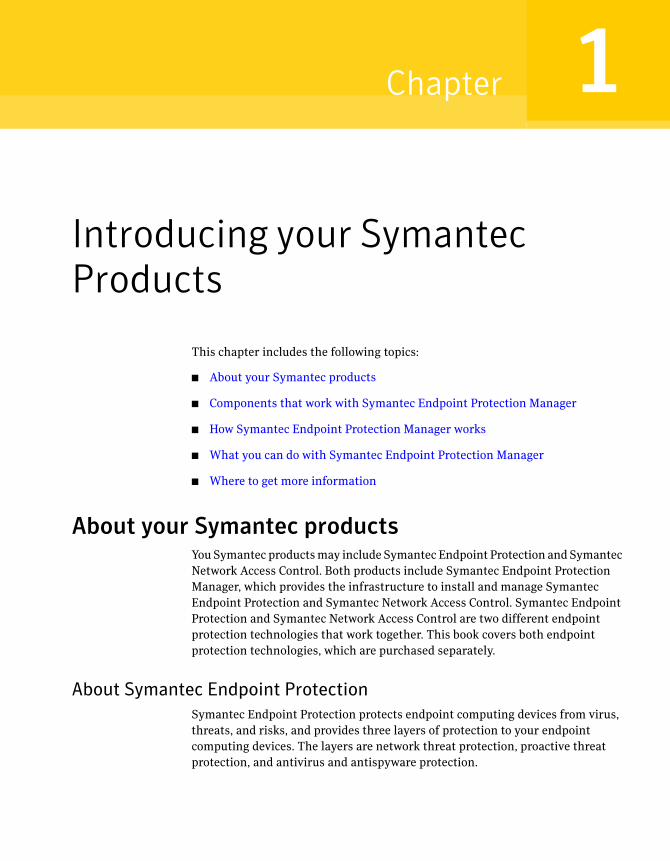
Figure 1-1 Protection layers
Network Threat Protection
Proactive Threat Protection
Antivirus and AntispywareProtection
Network threat protection blocks threats from accessing your computer by using
rules and signatures. Proactive threat protection identifies and mitigates the
threats that are based on the threat's behavior. Antivirus and antispyware
protection identifies and mitigates the threats that try to or have gained access
to your computers with signatures that Symantec creates.
About Network Threat Protection
Network Threat Protection consists of firewall and intrusion prevention software
to protect your endpoint computing devices. The firewall supports the rules that
are written for both specific ports and specific applications, and uses stateful
inspection of all network traffic. Therefore, for all network traffic that is
client-initiated, you only have to create an outbound rule to support that traffic.
The return traffic that responds to the outbound traffic is automatically permitted
by stateful inspection.
The firewall provides full support for TCP, UDP, ICMP, and all IP protocols such
as ICMP and RSVP. The firewall also supports Ethernet protocols such as Token
Ring, and can block protocol drivers such as VMWare and WinPcap. The firewall
can automatically recognize legitimate DNS, DHCP, and WINS traffic, so you can
check a checkbox to permit this traffic without writing rules.
Note: Symantec assumes that you construct your firewall rulebase such that all
traffic that is not permitted is denied. The firewall does not support IPv6.
The intrusion prevention engine supports checking for port scans and
denial-of-service attacks, and protects against buffer overflow attacks. This engine
also supports the automatic blocking of malicious traffic from infected computers.
Introducing your Symantec ProductsAbout your Symantec products
14
The intrusion detection engine supports deep packet inspection, regular
expressions, and lets you create custom signatures with a format that is similar
to SNORT.
About Proactive Threat Protection
Proactive Threat Protection includes behavior-based security that identifies online
threats such as worms, viruses, Trojan horses, and keystroke loggers. Proactive
threat protection identifies these threats by their actions and characteristics, not
with traditional security signatures. Proactive Threat Protection analyzes the
threat's behavior against hundreds of detection modules to determine whether
the active processes are safe or malicious. This technology can immediately detect
and mitigate the unknown threats by their behavior without traditional signatures
or patches.
On supported 32-bit operating systems, Proactive Threat Protection also lets you
control read, write, and execute access to hardware devices, files, and registry
keys. If necessary, you can refine the control to specific, supported operating
systems. You can also block peripheral devices by class ID such as USB, Bluetooth,
infrared, FireWire, serial, parallel, SCSI, and PCMCIA.
About Antivirus and Antispyware Threat Protection
Antivirus and Antispyware Threat Protection prevents infections on computers
by scanning the boot sector, memory, and files for viruses, spyware, and security
risks. Antivirus and antispyware threat protection uses the virus and the security
risk signatures that are found in virus definitions files. This protection also
protects your computers by blocking security risks before they install if this action
would not leave the computer in an unstable state.
Antivirus and Antispyware Threat Protection includes Auto-Protect, which detects
viruses and security risks when they try to access memory or install themselves.
Auto-Protect also scans for security risks such as adware and spyware. When it
finds security risks, it quarantines the infected files, or removes and repairs the
side effects of the security risks. You can also disable scanning for security risks
in Auto-Protect. Auto-Protect can repair complicated risks, such as sheathed user
mode risks (rootkits), and persistent security risks that are difficult to remove or
that reinstall themselves.
Antivirus and Antispyware Threat Protection also includes Auto-Protect scanning
for Internet email programs by monitoring all POP3 and SMTP traffic. You can
configure antivirus and antispyware threat protection to scan incoming messages
for threats and security risks, as well as outgoing messages for known heuristics.
Scanning outgoing email helps to prevent the spread of threats such as worms
that can use email clients to replicate across a network.
15Introducing your Symantec ProductsAbout your Symantec products
Note: Auto-Protect for Web-based Internet email programs is blocked from
installation on server-based operating systems. For example, you cannot install
this feature on Windows 2003 Server.
About Symantec Network Access Control
Symantec Network Access Control protects networks from unauthorized,
misconfigured, and infected endpoint computing devices. For example, Symantec
Network Access Control can deny network access to the client computers that do
not run specific versions of software and signatures. If client computers do not
comply, Symantec Network Access Control can quarantine and remediate the
computers. For example, if client computers have antivirus definitions that are
more than a week old, Symantec Network Access Control can quarantine the
computers. Symantec Network Access Control can update the computers with the
latest antivirus definitions (remediation), and then permit the computers to access
the network.
Symantec Network Access Control lets you control this protection with Host
Integrity policies. You create Host Integrity policies with Symantec Endpoint
Protection Manager Console, and then apply the policies to groups of client
computers. If you install Symantec Network Access Control client software only,
you can require that client computers run antivirus, antispyware, and firewall
software. You can also require that they run the latest operating system service
packs and patches, and create custom application requirements. If client computers
do not comply, you can run commands on those client computers to try and update
those computers.
If you integrate Symantec Network Access Control with Symantec Endpoint
Protection, you can apply a firewall policy to the clients that do not comply with
Host Integrity policies. This policy can restrict the ports that the clients can use
for network access, and can limit the IP addresses that the clients can access. For
example, you can restrict non-compliant computer communications to only the
computers that contain the software and updates that are required. This
integration is called self-enforcement.
If you integrate Symantec Network Access Control with Symantec Enforcer, an
optional hardware device, you can further restrict non-compliant computers from
gaining access to your network. You can restrict non-compliant computers to
specific network segments for remediation, and you can completely prohibit access
to non-compliant computers. For example, with Symantec Gateway Enforcer, you
can control external computer access to your network through VPNs. With
Symantec DHCP and LAN Enforcers, you can control internal computer access to
your network by assigning the non-routable IP addresses to non-compliant
Introducing your Symantec ProductsAbout your Symantec products
16
computers. You can also assign non-compliant computers to quarantined LAN
segments.
About Symantec Endpoint Protection Manager
Symantec Endpoint Protection Manager consists of two Web-based applications.
One Web-based application requires Microsoft Internet Information Services,
which must exist before you install Symantec Endpoint Protection Manager. The
other Web-based application runs on Apache Tomcat, which is installed
automatically. Symantec Endpoint Protection Manager includes an embedded
SQL server and database, and the Symantec Endpoint Protection Manager Console.
You can install the embedded SQL server and database automatically, or you can
install a database in an instance of Microsoft SQL Server 2000/2005.
If the network that supports your business is small and located in one geographic
location, you need to install only one Symantec Endpoint Protection Manager. If
your network is geographically dispersed, you may need to install additional
Symantec Endpoint Protection Managers for load balancing and bandwidth
distribution purposes. If your network is very large, you can install additional
Symantec Endpoint Protection Managers with additional databases and configure
them to share data with replication. To provide additional redundancy, you can
install additional Symantec Endpoint Protection Managers for failover support.
Components that work with Symantec EndpointProtection Manager
Table 1-1 describes the components that comprise and work with Symantec
Endpoint Protection Manager.
17Introducing your Symantec ProductsComponents that work with Symantec Endpoint Protection Manager

Table 1-1 Components that comprise and work with Symantec Endpoint
Protection Manager
DescriptionComponent
Lets you perform management operations such as the
following:
■ Installing client protection on workstations and
network servers.
■ Updating definitions, signatures, and product
updates.
■ Managing network servers and the workstations
that run Symantec Endpoint Protection and
Symantec Network Access Control client software.
■ Collecting and organizing events, including virus
and security-risk alerts, scans, definitions updates,
endpoint compliance events, and intrusion attempts.
Also lets you create and print detailed reports, and
set up alerting
Symantec Endpoint Protection
Manager Console
Communicates with the endpoint clients, and are
configured with the Symantec Endpoint Protection
Manager Console.
Symantec Endpoint Protection
Manager
Provides antivirus, firewall, proactive threat protection,
and intrusion prevention for networked and
non-networked computers.
Symantec Endpoint Protection
Provides network compliance protection for networked
computers.
Symantec Network Access
Control
Provides the ability to pull definitions, signatures, and
product updates from a Symantec LiveUpdate server
and distribute the updates to client computers.
LiveUpdate Server
Works as part of the Digital Immune System to provide
automated responses to heuristically detected, new, or
unrecognized viruses and does the following:
■ Receives the unrepaired infected items from
Symantec Endpoint Protection clients.
■ Forwards suspicious files to Symantec Security
Response.
Central Quarantine
Introducing your Symantec ProductsComponents that work with Symantec Endpoint Protection Manager
18

How Symantec Endpoint Protection Manager worksYou must understand the following Symantec networking concepts to administer
Symantec Endpoint Protection Manager:
■ Managed and unmanaged environments
■ About groups
■ How clients and servers interact
Managed and unmanaged environments
Clients can be installed as either managed or unmanaged. The managed network
takes full advantage of Symantec Endpoint Protection Manager's networking
capabilities. Each client and server on your network can be monitored, configured,
and updated from a single computer that runs Symantec Endpoint Protection
Manager. You can also install and upgrade Symantec Endpoint Protection and
Symantec Network Access Control clients from the Symantec Endpoint Protection
Manager Console.
In an unmanaged network, you must administer each computer individually, or
pass this responsibility to the primary user of the computer. The responsibilities
include updating virus and security risk definitions, configuring antivirus and
firewall settings, and periodically upgrading or migrating client software. This
approach should be taken for the smaller networks that have limited or no
information technology resources.
Note: If you want to let users change client settings, Symantec recommends as a
best practice to install the clients in a managed environment.
About groups
In a managed network, you can organize clients computers into groups. Groups
let you group together the clients that require similar access levels and
configuration settings. You can optionally specify different location settings in a
group. So that if a client accesses the network from different locations, you can
apply different policies. You can create, view, and configure groups from the
Symantec Endpoint Protection Manager Console.
How clients and servers interact
In a managed network, Symantec Endpoint Protection Manager manages every
client. Symantec Endpoint Protection Manager provides its clients with content
19Introducing your Symantec ProductsHow Symantec Endpoint Protection Manager works
definitions updates and configuration information, and keeps track of these
settings. The managed clients, in turn, keep track of Symantec Endpoint Protection
Manager. The managed clients check in with Symantec Endpoint Protection
Manager to determine if new policy information or definitions are available.
What you can do with Symantec Endpoint ProtectionManager
Symantec Endpoint Protection Manager lets you do the following:
■ Establish and enforce security policies.
■ Protect against viruses, blended threats, and security risks such as adware
and spyware.
■ Manage the deployment, configuration, updating, and reporting of antivirus
protection from an integrated management console.
■ Prevent users from accessing hardware devices on their computers, such as
USB drives.
■ Manage the deployment, configuration, updating, and reporting of antivirus
and firewall protection and intrusion prevention from an integrated
management console.
■ Manage the clients based on their location.
■ Quickly respond to virus outbreaks by identifying out-of-date clients and
deploy updated virus definitions.
■ Create and maintain the reports that detail the important events that occur
in your network.
■ Provide a high level of protection and an integrated response to security threats
for all users who connect to your network. This protection includes
telecommuters with the connections that are always on and mobile users with
intermittent connections to your network.
■ Obtain a consolidated view of multiple security components across all of the
workstations on your network.
■ Perform a customizable, integrated installation of all of the security
components and set policies simultaneously.
■ View histories and log data.
Introducing your Symantec ProductsWhat you can do with Symantec Endpoint Protection Manager
20
Where to get more informationSources of information include the following:
■ AdministrationGuide for SymantecEndpointProtectionandSymantecNetwork
Access Control
■ Client User Guide for Symantec Endpoint Protection and Symantec Network
Access Control
■ LiveUpdate Administration Guide (Symantec Endpoint Protection only)
■ Symantec Central Quarantine Administration Guide (Symantec Endpoint
Protection only)
■ Online Help that contains all of the content that is in the guides and more
The primary documentation is available in the Documentation folder on the
installation CDs. Some individual component folders contain component-specific
documentation. Updates to the documentation are available from the Symantec
Technical Support and Platinum Support Web sites.
Table 1-2 lists the additional information that is available from the Symantec
Web sites.
Table 1-2 Symantec Web sites
Web addressTypes of information
http://www.symantec.com/techsupp/enterprise/Public Knowledge Base
Releases and updates
Manuals and documentation
updates
Contact options
http://securityresponse.symantec.comVirus and other threat
information and updates
http://enterprisesecurity.symantec.comProduct news and updates
https://www-secure.symantec.com/platinum/Platinum Support Web access
21Introducing your Symantec ProductsWhere to get more information

Introducing your Symantec ProductsWhere to get more information
22
Installing for the first time
This chapter includes the following topics:
■ Before you install
■ Installing and configuring Symantec Endpoint Protection Manager
■ Configuring and deploying client software
■ Logging on to and locating your group in the console
■ Configuring LiveUpdate for site updates
■ Configuring LiveUpdate for client updates
■ Configuring and testing Symantec Endpoint Protection
■ Configuring and testing Symantec Network Access Control
Before you installIf this installation is a first-time installation, you should install, configure, and
test Symantec Endpoint Protection or Symantec Network Access Control software
in a test environment.
Note: Small businesses that do not have test environment resources should install
and test the client software on a few production clients.
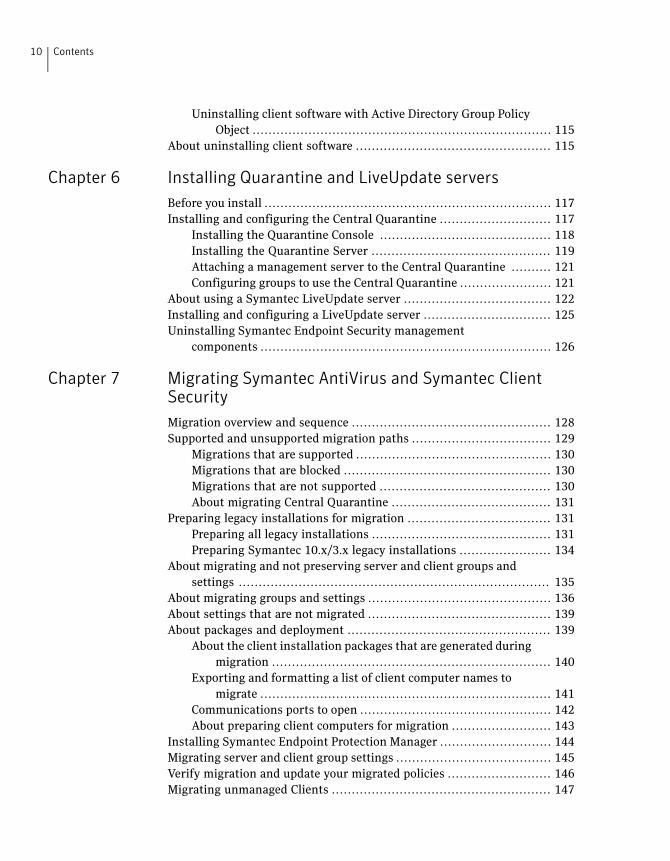
Figure 2-1 shows one way to configure a test environment.
2Chapter
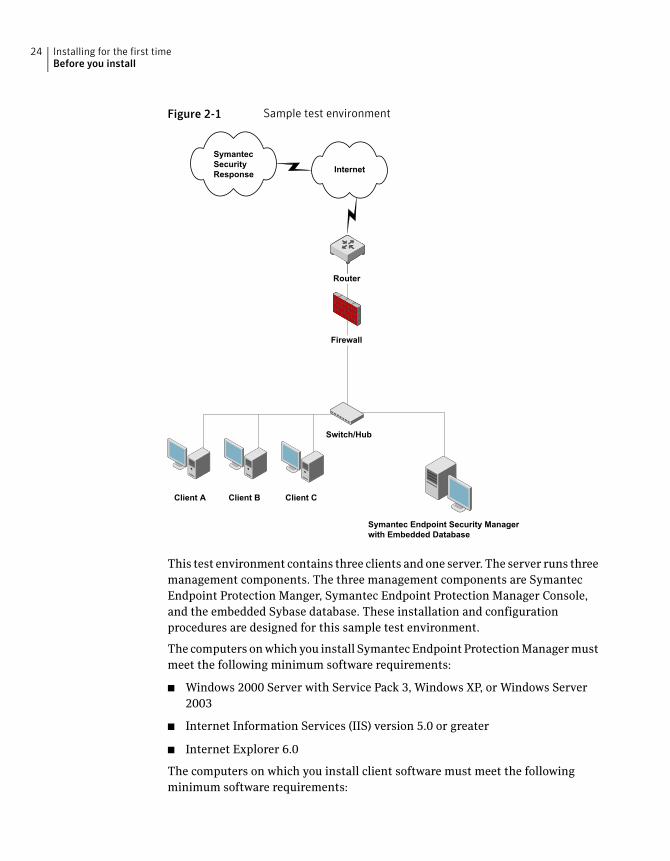
Figure 2-1 Sample test environment
Router
Firewall
Symantec Endpoint Security Managerwith Embedded Database
Client A Client B Client C
Internet
SymantecSecurityResponse
Switch/Hub
This test environment contains three clients and one server. The server runs three
management components. The three management components are Symantec
Endpoint Protection Manger, Symantec Endpoint Protection Manager Console,
and the embedded Sybase database. These installation and configuration
procedures are designed for this sample test environment.
The computers on which you install Symantec Endpoint Protection Manager must
meet the following minimum software requirements:
■ Windows 2000 Server with Service Pack 3, Windows XP, or Windows Server
2003
■ Internet Information Services (IIS) version 5.0 or greater
■ Internet Explorer 6.0
The computers on which you install client software must meet the following
minimum software requirements:
Installing for the first timeBefore you install
24
■ Windows 2000 Professional with Service Pack 3, Windows XP, or Windows
Server 2003
■ Internet Explorer 6.0 or greater
Installing and configuring Symantec EndpointProtection Manager
Installing management software for the first time is divided into two parts. The
first part installs Symantec Endpoint Protection Manager. The second part installs
and configures the Symantec Endpoint Protection Manager database. In the first,
you can accept all defaults. In the second part, you must add at least one custom
value, which is a password.
Note: Management software does not include Symantec Endpoint Protection or
any other client software that is managed.
To install Symantec Endpoint Protection Manager
1 Insert the installation CD and start the installation.
2 In the installation panel, do one of the following:
■ If you install Symantec Endpoint Protection, click Install Symantec
Endpoint Protection.
■ If you install Symantec Network Access Control, click Install Symantec
NetworkAccess Control.
3 In the next installation panel, click Install Symantec Endpoint Protection
Manager.
4 In the Welcome panel, click Next.
5 In the License Agreement panel, check I accept the terms in the license
agreement, and then click Next.
6 In the Destination Folder panel, accept or change the installation directory.
7 Do one of the following:
■ To configure the Symantec Endpoint Protection Manger IIS Web as the
only Web server on this computer, check Create a customWeb site, and
then clickNext.
■ To let the Symantec Endpoint Protection Manager IIS Web server run
with other Web servers on this computer, check Use thedefaultWeb site,
and then clickNext.
25Installing for the first timeInstalling and configuring Symantec Endpoint Protection Manager
8 In the Ready to Install panel, click Install.
9 When the installation finishes and the Install Wizard Complete panel appears,
click Finish.
Wait for the Management Server Configuration Wizard panel to appear, which
can take up to 15 additional seconds.
To configure Symantec Endpoint Protection Manager
1 In the Management Server Configuration Wizard panel, click Next.
2 In the Site Type panel, check Installmy first Site, and then click Next.
3 In the Server Information panel, accept or change the default values for the
following boxes, and then click Next:
■ Server Name
■ Server Port
■ Server Data Folder
4 In the Site Name panel, in the Site name box, enter your site name, and then
click Next.
5 In the Encryption Password panel, type a value in both boxes, and then click
Next.
Document this password when you install Symantec Endpoint Protection in
your production environment. You need it for disaster recovery purposes,
and for adding optional Enforcer hardware.
6 In the Database Server Choice panel, check EmbeddedDatabase, and then
click Next.
7 In the Set User panel, in the Password boxes, type a password to use with
Admin to log on to the console, and then click Next.
When the installation finishes, you have the option of deploying client
software with the Installation and Migration Wizard. If you do not deploy
client software at this time, refer to the Client Installation chapter for details
on how to install client software. Logon to the console with the user name
and password that you entered here.
Configuring and deploying client softwareThe Installation and Migration Wizard lets you configure a client software package.
The Push Deployment Wizard then optionally appears to let you deploy the client
software package. If you do not select to use the Push Deployment Wizard, you
can start it manually by using ClientRemote.exe from the \tomcat\bin directory.
Installing for the first timeConfiguring and deploying client software
26
Note:This procedure assumes that you deploy client software to 32-bit computers
and not to 64-bit computers. This procedure also has you select a directory in
which to place installation files. You may want to create this directory before you
start this procedure. Also, you need to authenticate with administrative credentials
to the Windows Domain or Workgroup that contain the computers.
Deploying client software to computers that run firewalls, and that run Windows
XP/Vista, have special requirements. Firewalls must permit remote deployment
over TCP port 139 and the computers that are in workgroups and that run Windows
XP must disable simple file sharing. Windows Vista has additional requirements.
See “Disabling and modifying Windows firewalls” on page 58.
See “Preparing computers for remote deployment that run Windows XP/Vista”
on page 60.
To configure client software
1 In the Management Server Configuration Wizard Finished panel, check Yes,
and then click Finish.
2 In the Welcome to the Migration and Deployment Wizard panel, click Next.
3 In the What would you like to do panel, check Deploy the client, and then
click Next.
4 In the next unnamed panel, check Specify the nameof a newgroup that you
wish to deploy clients to, type a group name in the box, and then click Next.
5 In the next panel, uncheck any client software that you do not want to install,
and then click Next.
6 In the next panel, check the options that you want for packages, files, and
user interaction.
7 Click Browse, locate and select a directory in which to place the installation
files, and then click Open.
8 Click Next.
9 In the next unnamed panel, check Yes, and then click Finish.
Do not check Launch Administrator Console. It can take up to 5 minutes to
create and export the installation package for your group before the Push
Deployment Wizard appears.
27Installing for the first timeConfiguring and deploying client software
To deploy the client software with the Push Deployment Wizard
1 In the Push Deployment Wizard panel, under Available Computers, expand
the trees and select the computers on which to install the client software,
and then click Add.
2 In the Remote Client Authentication dialog box, type a user name and
password that can authenticate to the Windows Domain or Workgroup that
contains the computers, and then click OK.
3 When you have selected all of the computers and they appear in the right
pane, click Finish.
4 When installation completes, click Done.
Logging on to and locating your group in the consoleYour first activity is to log on to the console and locate your group.
Logging on to the management console
The management console lets you manage clients.
To log on to the management console
1 ClickStart>Programs>SymantecEndpointProtectionManager>Symantec
Endpoint ProtectionManager Console.
2 In the Symantec Endpoint Protection Manager logon prompt, in the User
Name box, type admin.
3 In the Password box, type the admin password that you created during
installation, and then click Log on.
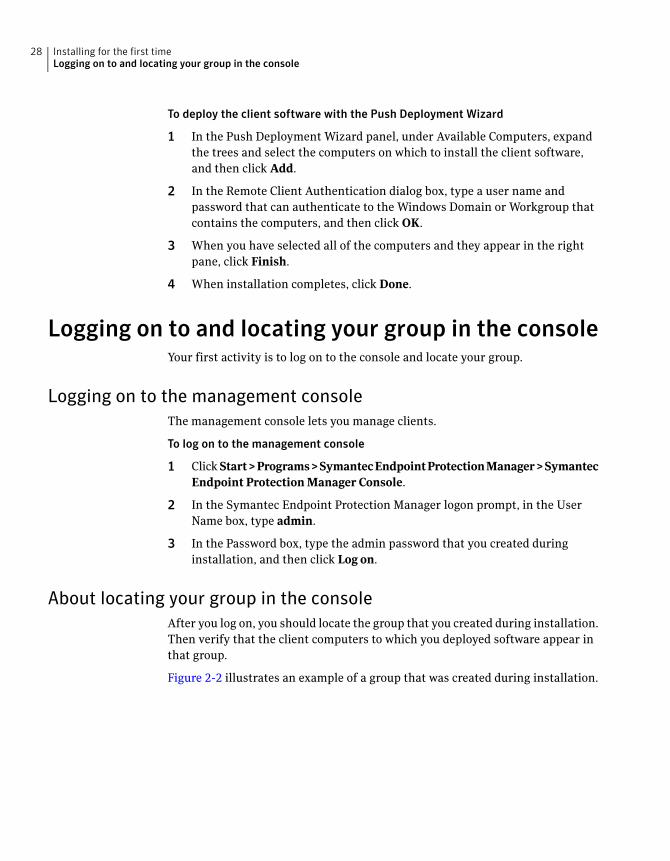
About locating your group in the console
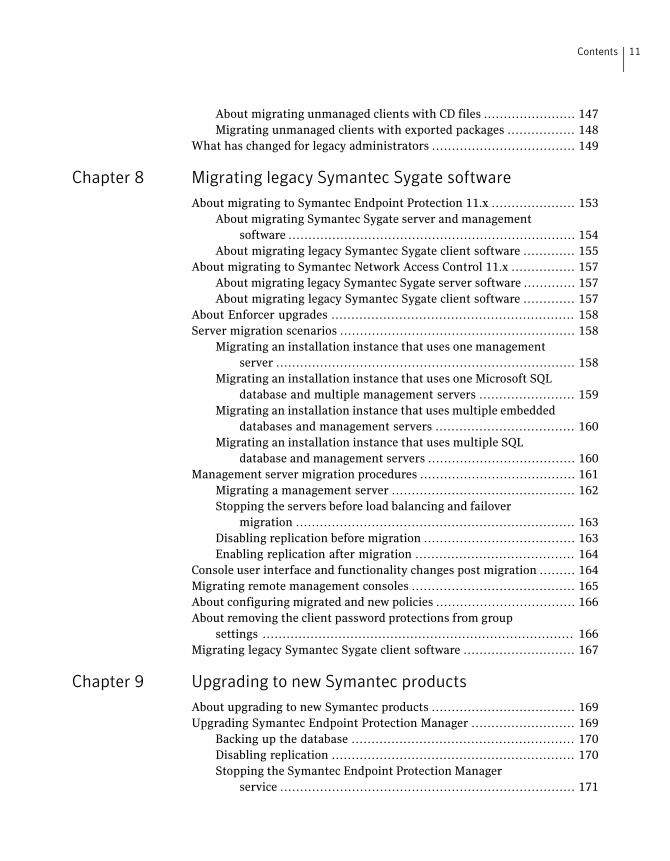
After you log on, you should locate the group that you created during installation.
Then verify that the client computers to which you deployed software appear in
that group.
Figure 2-2 illustrates an example of a group that was created during installation.
Installing for the first timeLogging on to and locating your group in the console
28

Figure 2-2 Group
Configuring LiveUpdate for site updatesYou should configure the frequency that the Symantec Endpoint Protection
Manager checks for and downloads new updates to the site. You also configure
client updates with LiveUpdate Content policies, so be sure to download all types
that you want clients to receive.
Symantec Endpoint Protection Manager for Symantec Network Access Control
only supports product updates.
To configure LiveUpdate for the site
1 In the console left pane, click Admin.
2 In the lower-left pane, click Servers.
29Installing for the first timeConfiguring LiveUpdate for site updates
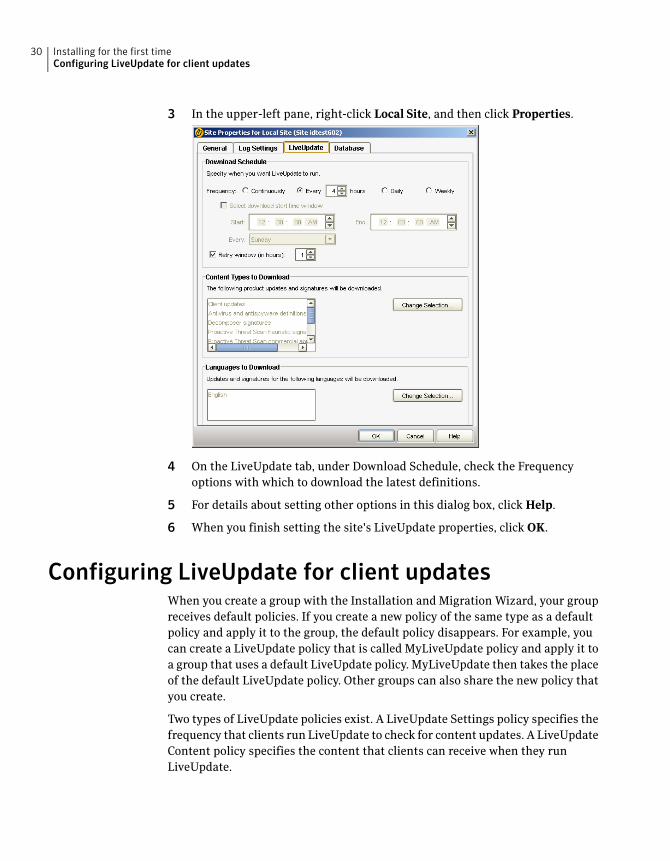
3 In the upper-left pane, right-click Local Site, and then click Properties.
4 On the LiveUpdate tab, under Download Schedule, check the Frequency
options with which to download the latest definitions.
5 For details about setting other options in this dialog box, click Help.
6 When you finish setting the site's LiveUpdate properties, click OK.
Configuring LiveUpdate for client updatesWhen you create a group with the Installation and Migration Wizard, your group
receives default policies. If you create a new policy of the same type as a default
policy and apply it to the group, the default policy disappears. For example, you
can create a LiveUpdate policy that is called MyLiveUpdate policy and apply it to
a group that uses a default LiveUpdate policy. MyLiveUpdate then takes the place
of the default LiveUpdate policy. Other groups can also share the new policy that
you create.
Two types of LiveUpdate policies exist. A LiveUpdate Settings policy specifies the
frequency that clients run LiveUpdate to check for content updates. A LiveUpdate
Content policy specifies the content that clients can receive when they run
LiveUpdate.
Installing for the first timeConfiguring LiveUpdate for client updates
30
Configuring a LiveUpdate Settings policy
When you create a group with the Installation and Migration Wizard, your group
receives default policies. You can either create a new policy and replace the default
policy, or edit the default policy. A best practice is to create a new policy and
modify the default policy.
To configure a LiveUpdate settings policy
1 On the console, clickPolicies.
2 In the View Policies pane, click LiveUpdate.
3 In the lower-left Tasks pane, click Add a LiveUpdate Setting Policy.
4 In the Overview pane, in the Policy name box, type a name for the policy.
5 Under LiveUpdate policy, click Schedule.
6 In the Schedule pane, accept or change the scheduling options.
7 Under LiveUpdate policy, click Advanced Settings.
8 Decide whether to keep or change the default settings.
9 For details about the settings, click Help.
Generally, you do not want users to modify update settings. However, you
may want to let them manually launch a LiveUpdate session if you do not
support hundreds or thousands of clients.
10 When you have configured your policy, click OK.
11 In the Assign Policy dialog box, Click Yes.
12 In the Assign LiveUpdate Policy dialog box, check the groups and locations
to which to apply the policy, and then click Assign.
If you cannot select a nested group, that group inherits policies from its parent
group, as set on the Clients Policies tab.
13 In the Apply LiveUpdate Policy dialog box, click OK, and complete the
application.
Configuring a LiveUpdate Content policy
By default, all clients in a group receive the latest versions of all content updates.
If a group is configured to get updates from a management server, the clients
receive only the updates that the server downloads. If the LiveUpdate content
policy is configured to allow all updates, but the management server is not
configured to download all updates, the clients receive only what the server
downloads. What the server downloads is configurable from the Admin pane.
31Installing for the first timeConfiguring LiveUpdate for client updates
Note: LiveUpdate Content policies are not available for Symantec Network Access
Control clients.
To configure a LiveUpdate Content policy
1 On the console, clickPolicies.
2 In the View Policies pane, click LiveUpdate.
3 In the LiveUpdate Policies pane, click the LiveUpdate Content tab.
4 In the lower-left Tasks pane, click Add a LiveUpdate Content Policy.
5 In the Overview pane, in the Policy name box, type a name for the policy.
6 If you configure Symantec Endpoint Protection, in the LiveUpdate Content
pane, click SecurityDefinitions.
7 In the Security Definitions pane, check the updates to download and install,
and uncheck the updates to disallow.
8 In the LiveUpdate Content Policy window, click OK.
9 In the Assign Policy dialog box, click Yes.
10 In the Assign LiveUpdate Content Policy dialog box, check one or more groups
to which to apply this policy, and then click Assign.
If you cannot select a nested group, that group inherits policies from its parent
group, as set on the Clients Policies tab.
11 In the Apply LiveUpdate Policy dialog box, click OK, and complete the
application.
Configuring and testing Symantec EndpointProtection
After you configure and install a LiveUpdate policy, you should create and apply
an Antivirus and Antispyware protection policy.
Note:This section assumes that you purchased Symantec Network Access Control
and installed it.
Configuring a default Antivirus and Antispyware policy
Next, you should configure an Antivirus and Antispyware policy for your group.
This procedure has you edit the default policy that is currently only applied to
the group. You can, however, create a new policy and apply it to your group.
Installing for the first timeConfiguring and testing Symantec Endpoint Protection
32
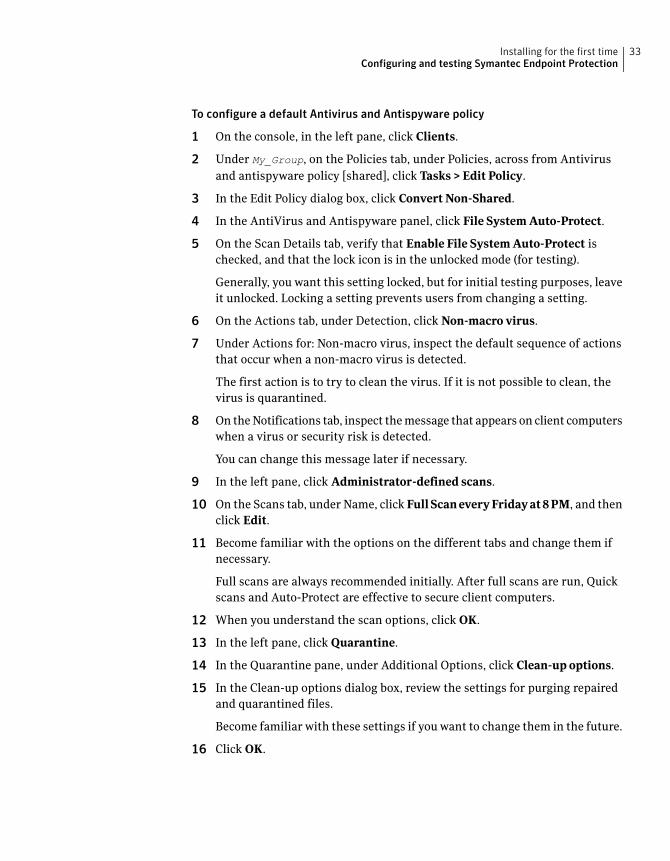
To configure a default Antivirus and Antispyware policy
1 On the console, in the left pane, click Clients.
2 Under My_Group, on the Policies tab, under Policies, across from Antivirus
and antispyware policy [shared], click Tasks > Edit Policy.
3 In the Edit Policy dialog box, click Convert Non-Shared.
4 In the AntiVirus and Antispyware panel, click File SystemAuto-Protect.
5 On the Scan Details tab, verify that Enable File SystemAuto-Protect is
checked, and that the lock icon is in the unlocked mode (for testing).
Generally, you want this setting locked, but for initial testing purposes, leave
it unlocked. Locking a setting prevents users from changing a setting.
6 On the Actions tab, under Detection, click Non-macro virus.
7 Under Actions for: Non-macro virus, inspect the default sequence of actions
that occur when a non-macro virus is detected.
The first action is to try to clean the virus. If it is not possible to clean, the
virus is quarantined.
8 On the Notifications tab, inspect the message that appears on client computers
when a virus or security risk is detected.
You can change this message later if necessary.
9 In the left pane, click Administrator-defined scans.
10 On the Scans tab, under Name, click FullScaneveryFridayat8PM, and then
click Edit.
11 Become familiar with the options on the different tabs and change them if
necessary.
Full scans are always recommended initially. After full scans are run, Quick
scans and Auto-Protect are effective to secure client computers.
12 When you understand the scan options, click OK.
13 In the left pane, click Quarantine.
14 In the Quarantine pane, under Additional Options, click Clean-up options.
15 In the Clean-up options dialog box, review the settings for purging repaired
and quarantined files.
Become familiar with these settings if you want to change them in the future.
16 Click OK.
33Installing for the first timeConfiguring and testing Symantec Endpoint Protection
Testing antivirus capabilities
You should experiment with antivirus detection in a controlled test environment
to become familiar with alerts and log entries. Before you test antivirus detection,
download the latest antivirus test file Eicar.com onto transportable media such
as a memory stick. You can download Eicar.com at the following URL:
http:// www.eicar.org
Testing Auto-Protect
Auto-Protect is the Symantec real-time process that inspects every file that
executes or is user-accessed to see if it is a virus or security risk. Auto-Protect
determines whether files are viruses or security risks by using the definitions that
you download from Symantec. You can see how Auto-Protect works by using a
benign virus called Eicar. Several versions are available from at the following
URL:
http://www.eicar.org.
To test Auto-Protect
1 On a client computer, in the lower-right corner, right-click the Symantec
Endpoint Protection shield, and click DisableAuto-Protect.
2 If you have not downloaded eicar.com, go to http://www.eicar.org, and then
locate and download eicar.com to the client computer.
3 In the lower-right corner, right-click the Symantec Endpoint Protection shield,
and click EnableAuto-Protect.
4 Double-click eicar.com.
5 Read and become familiar with the details in the message prompt(s).
Installing for the first timeConfiguring and testing Symantec Endpoint Protection
34

Managing the detected threat
After Symantec Endpoint Protection detects and isolates eicar.com, it sends the
information to Symantec Endpoint Protection Manager. You can then see that
the activity that occurred from the Home page in Symantec Endpoint Protection
Manager Console. This task is a primary task that you perform in a production
environment. When clients detect real threats, you first display details about the
threat. You then decide if Auto-Protect mitigated the threat and then clear the
status.
35Installing for the first timeConfiguring and testing Symantec Endpoint Protection
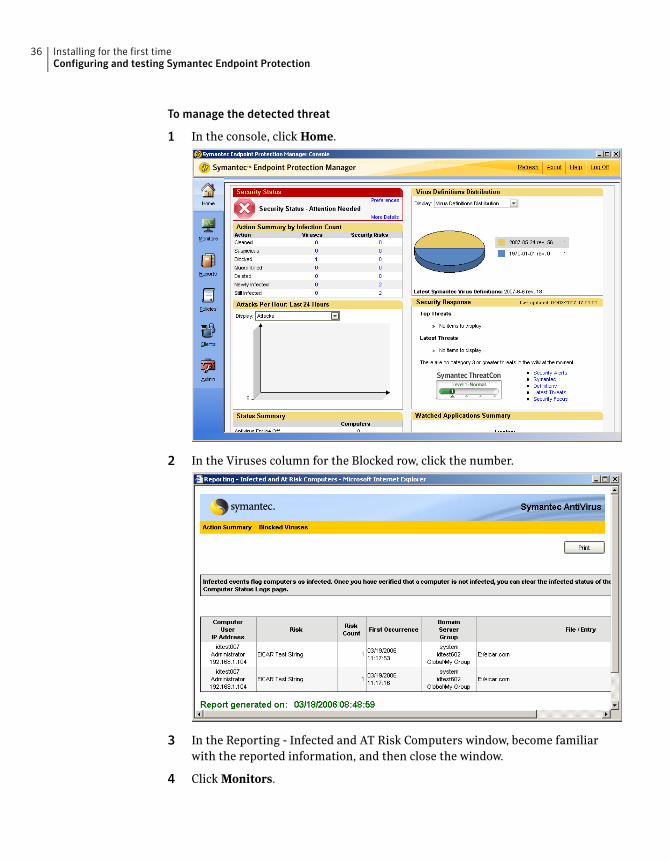
To manage the detected threat
1 In the console, click Home.
2 In the Viruses column for the Blocked row, click the number.
3 In the Reporting - Infected and AT Risk Computers window, become familiar
with the reported information, and then close the window.
4 Click Monitors.
Installing for the first timeConfiguring and testing Symantec Endpoint Protection
36
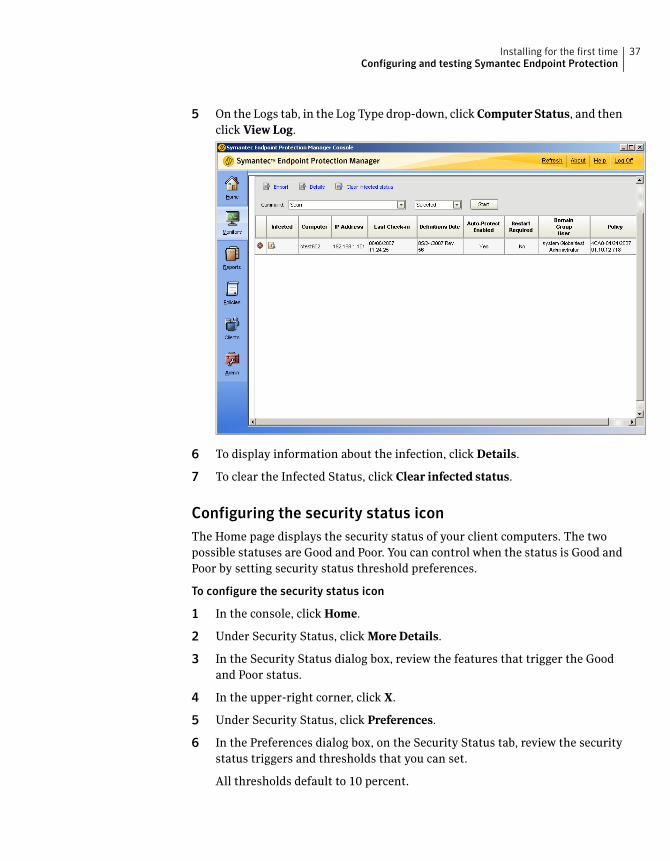
5 On the Logs tab, in the Log Type drop-down, clickComputerStatus, and then
click View Log.
6 To display information about the infection, click Details.
7 To clear the Infected Status, click Clear infected status.
Configuring the security status icon
The Home page displays the security status of your client computers. The two
possible statuses are Good and Poor. You can control when the status is Good and
Poor by setting security status threshold preferences.
To configure the security status icon
1 In the console, click Home.
2 Under Security Status, click MoreDetails.
3 In the Security Status dialog box, review the features that trigger the Good
and Poor status.
4 In the upper-right corner, click X.
5 Under Security Status, click Preferences.
6 In the Preferences dialog box, on the Security Status tab, review the security
status triggers and thresholds that you can set.
All thresholds default to 10 percent.
37Installing for the first timeConfiguring and testing Symantec Endpoint Protection
7 For security status details, click Help.
To trigger the Poor status, disable Auto-Protect on one of your test clients.
8 Click OK.
9 To review the security status of your managed clients at any time, on the
Home page, click the status icon.
Configuring and testing Symantec Network AccessControl
Symantec Network Access Control supports two policies only: LiveUpdate and
Host Integrity. The Host Integrity policy, however, provides the core functionality
of Symantec Network Access Control.
Note: This section assumes that you purchased and installed Symantec Network
Access Control.
Creating a Host Integrity policy
The Host integrity policy is the foundation of Symantec Network Access Control.
The policy that you create for this test is for demonstration purposes only. The
policy detects the existence of an operating system, and when detected generates
a FAIL event. Normally, you would generate FAIL events for other reasons.
Note: If you purchased and installed Symantec Network Access Control and
Symantec Endpoint Protection, you can create a firewall policy for the client
computers that fail Host Integrity. If you run Symantec Enforcer with Symantec
Network Access Control, you can isolate the clients that fail Host Integrity to
specific network segments. This isolation prevents client authentication and
domain access.
To create a Host Integrity policy
1 In the console, click Policies.
2 Under View Policies, click and select Host Integrity.
3 In the right pane, if a Host Integrity policy is highlighted in yellow, click the
white space below the policies to deselect the policy.
4 Under Tasks, click Add aHost Integrity Policy.
5 In the Overview pane, in the Policy Name box, type a name for the policy.
Installing for the first timeConfiguring and testing Symantec Network Access Control
38
6 Click Requirements.
7 In the Requirements pane, check Always doHost Integrity checking, and
then click Add.
8 In the New Requirement dialog box, in the Type drop-down menu, click
CustomRequirement, and then click OK.
9 In the Custom Requirement window, in the Name box, type a name for the
Custom Requirement.
10 Under Customized Requirement Script, right-click InsertStatementsBelow,
and then click Add> IF .. THEN.
11 In the right pane, in the Select a condition drop-down menu, click Utility:
Operating System is.
12 Under Check Windows version, check one or more operating systems that
your client computers run.
13 Under Customized Requirement Script, right-clickTHEN//Insertstatements
here, and then click Add> Function >Utility: Showmessage dialog.
14 In the Caption of the message box, type a name to appear in the message title.
15 In the Test of the message box, type the text that you want the message to
display.
16 To display information about the settings for the icons and the buttons that
you can integrate with the message, click Help.
17 In the left pane, under Customized Requirement Script, click PASS.
18 In the right pane, under As the result of the requirement return, check Fail,
and then click OK.
19 In the Host Integrity window, click OK.
20 In the Assign Policy prompt, click Yes.
21 In the Host Integrity Policy dialog box, check the group or groups to which
to apply the policy and that contain your test client computers, and then click
Assign.
22 In the Assign Host Integrity Policy prompt, click Yes.
Testing a Host Integrity policy
You can test a Host Integrity policy from the Symantec Endpoint Protection
Manager Console.
Note: You can also run Host Integrity checks from the client.
39Installing for the first timeConfiguring and testing Symantec Network Access Control

To test a Host Integrity policy
1 In the console, click Clients.
2 In the right pane, click the Clients tab.
3 In the left pane, under View, click and highlight the group that contains the
client computers to which you applied the Host Integrity policy.
4 Under Tasks, click RunCommand onGroup >Update.
5 Log on to a client computer that runs Symantec Network Access Control and
note the message box that appears.
Because the rule triggered the fail test, the message box appears. After testing,
disable or delete the test policy.
Installing for the first timeConfiguring and testing Symantec Network Access Control
40
Planning the production
installation
This chapter includes the following topics:
■ About planning the installation and network architecture
■ Network and system requirements
■ About Desktop firewalls and communications ports
■ Disabling and modifying Windows firewalls
■ Preparing computers for remote deployment that run Windows XP/Vista
■ Prepare your computers for installation
■ Required computer restarts
About planning the installation and networkarchitecture
The first decision to make when you plan a production installation is to select the
database to use. You can select to use an embedded database that is installable
from the installation CD. You can also select to use an instance of Microsoft SQL
Server 2000/2005. You must purchase and install Microsoft SQL Server before
you install the Symantec Endpoint Protection Manager. The embedded Sybase
database is the easiest to install and configure and supports up to 1,000 clients.
Performance begins to degrade as you add additional clients.
Figure 3-1 illustrates the simplest example of this configuration.
3Chapter
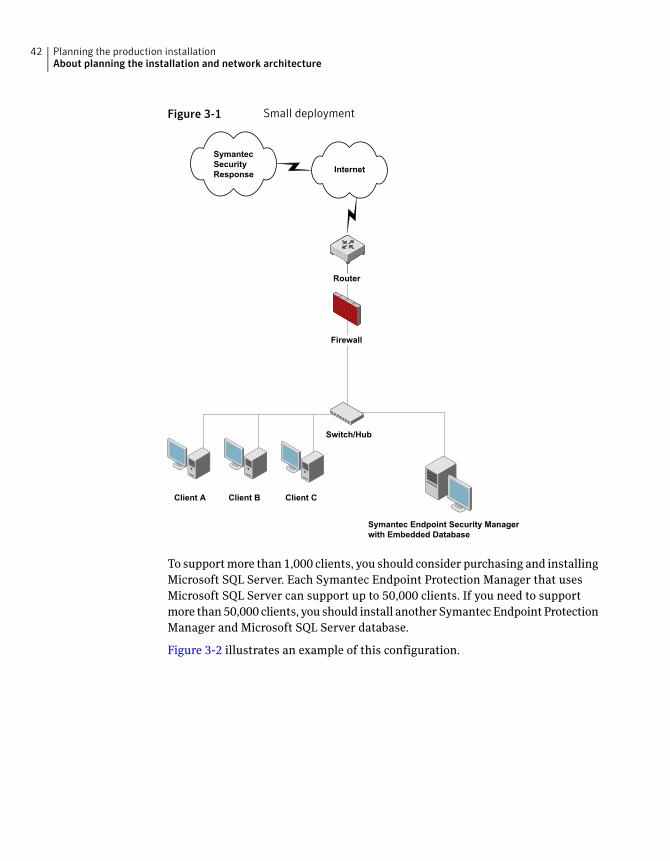
Figure 3-1 Small deployment
Router
Firewall
Symantec Endpoint Security Managerwith Embedded Database
Client A Client B Client C
Internet
SymantecSecurityResponse
Switch/Hub
To support more than 1,000 clients, you should consider purchasing and installing
Microsoft SQL Server. Each Symantec Endpoint Protection Manager that uses
Microsoft SQL Server can support up to 50,000 clients. If you need to support
more than 50,000 clients, you should install another Symantec Endpoint Protection
Manager and Microsoft SQL Server database.
Figure 3-2 illustrates an example of this configuration.
Planning the production installationAbout planning the installation and network architecture
42
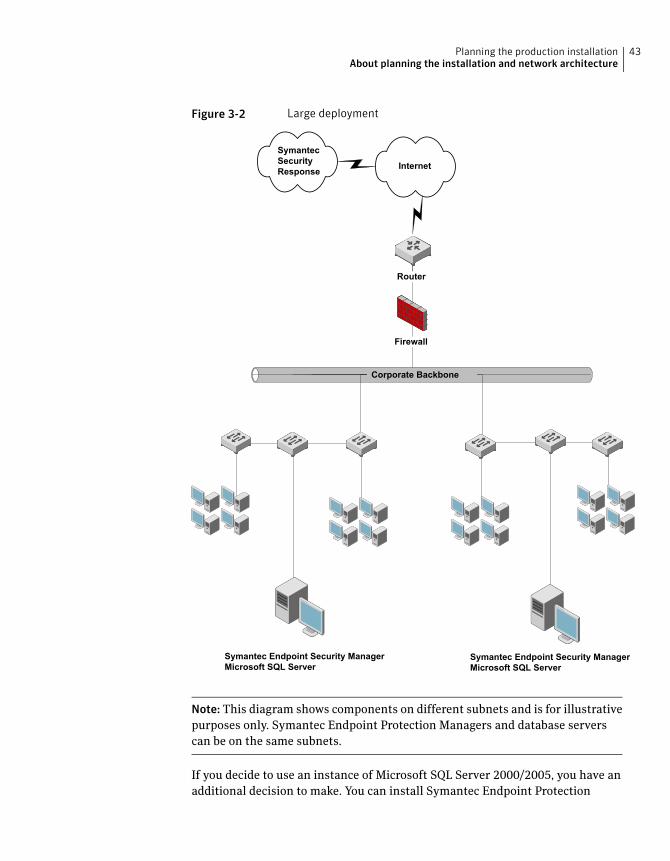
Figure 3-2 Large deployment
Router
Firewall
Corporate Backbone
Symantec Endpoint Security ManagerMicrosoft SQL Server
Symantec Endpoint Security ManagerMicrosoft SQL Server
Internet
SymantecSecurityResponse
Note: This diagram shows components on different subnets and is for illustrative
purposes only. Symantec Endpoint Protection Managers and database servers
can be on the same subnets.
If you decide to use an instance of Microsoft SQL Server 2000/2005, you have an
additional decision to make. You can install Symantec Endpoint Protection
43Planning the production installationAbout planning the installation and network architecture
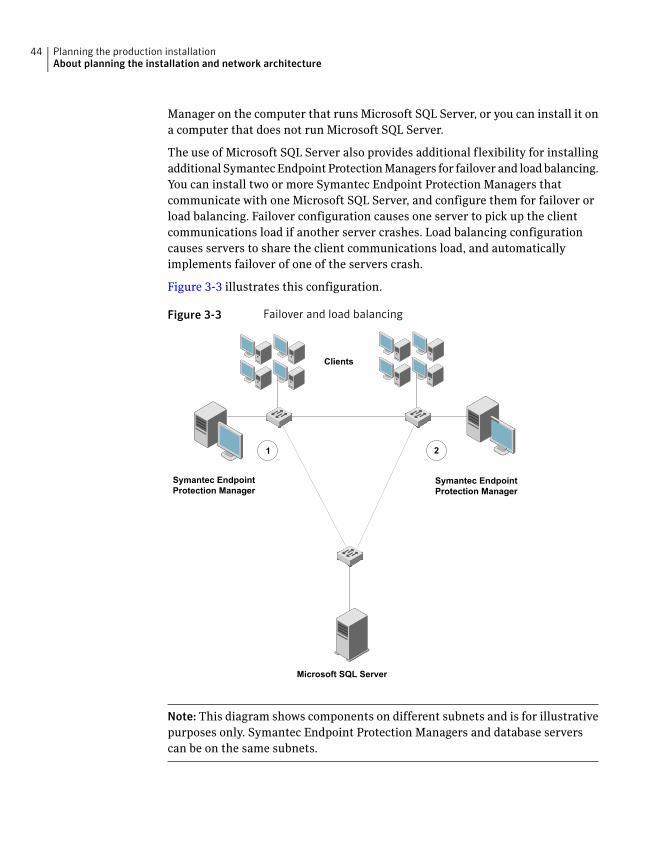
Manager on the computer that runs Microsoft SQL Server, or you can install it on
a computer that does not run Microsoft SQL Server.
The use of Microsoft SQL Server also provides additional flexibility for installing
additional Symantec Endpoint Protection Managers for failover and load balancing.
You can install two or more Symantec Endpoint Protection Managers that
communicate with one Microsoft SQL Server, and configure them for failover or
load balancing. Failover configuration causes one server to pick up the client
communications load if another server crashes. Load balancing configuration
causes servers to share the client communications load, and automatically
implements failover of one of the servers crash.
Figure 3-3 illustrates this configuration.
Figure 3-3 Failover and load balancing
Microsoft SQL Server
Symantec EndpointProtection Manager
Clients
Symantec EndpointProtection Manager
1 2
Note: This diagram shows components on different subnets and is for illustrative
purposes only. Symantec Endpoint Protection Managers and database servers
can be on the same subnets.
Planning the production installationAbout planning the installation and network architecture
44
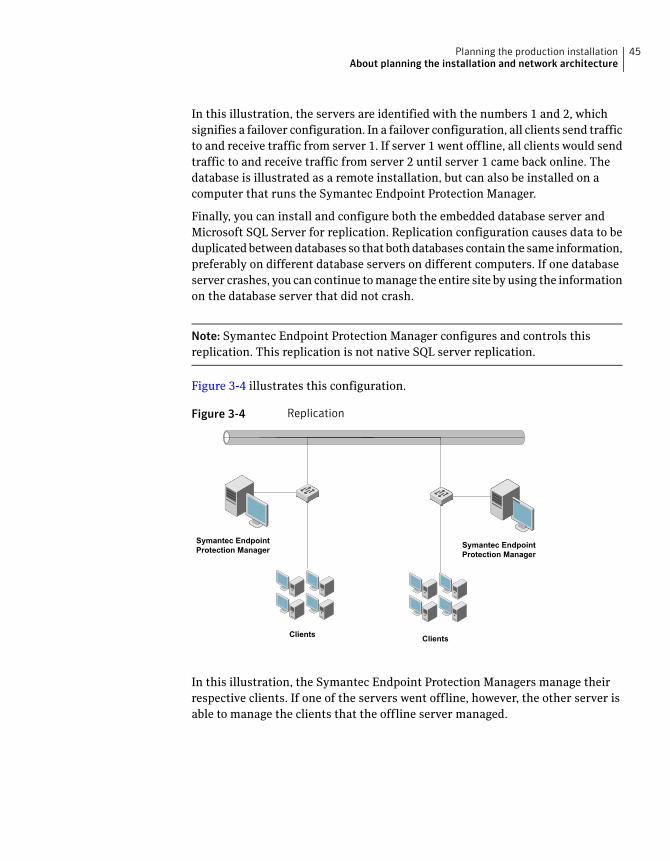
In this illustration, the servers are identified with the numbers 1 and 2, which
signifies a failover configuration. In a failover configuration, all clients send traffic
to and receive traffic from server 1. If server 1 went offline, all clients would send
traffic to and receive traffic from server 2 until server 1 came back online. The
database is illustrated as a remote installation, but can also be installed on a
computer that runs the Symantec Endpoint Protection Manager.
Finally, you can install and configure both the embedded database server and
Microsoft SQL Server for replication. Replication configuration causes data to be
duplicated between databases so that both databases contain the same information,
preferably on different database servers on different computers. If one database
server crashes, you can continue to manage the entire site by using the information
on the database server that did not crash.
Note: Symantec Endpoint Protection Manager configures and controls this
replication. This replication is not native SQL server replication.
Figure 3-4 illustrates this configuration.
Figure 3-4 Replication
Symantec EndpointProtection Manager Symantec Endpoint
Protection Manager
ClientsClients
In this illustration, the Symantec Endpoint Protection Managers manage their
respective clients. If one of the servers went offline, however, the other server is
able to manage the clients that the offline server managed.
45Planning the production installationAbout planning the installation and network architecture
Network and system requirementsBefore you install Symantec software in your network, you should understand
how certain network and system variables affect the ability to deploy the servers
and clients.
You should consider the following concepts and requirements as you plan your
installation:
■ About setting administrative rights to target computers
■ About configuring user rights with Active Directory
■ System installation requirements
■ About VMWare support
About setting administrative rights to target computers
To install Symantec client software, you must have administrator rights to the
computer or to the Windows domain, and log on as administrator. The Symantec
software installation program launches a second installation program on the
computer to create and start services, and to modify the registry.
If you do not want to provide users with administrative rights to their own
computers, use the Push Deployment Wizard to remotely install Symantec clients.
To run the Push Deployment Wizard, you must have local administrative rights
to the computers to which you install the program.
Note: This client installation package upgrades the MSI to version 3.1, which
requires administrative rights. If all of your computers are upgraded to MSI 3.1,
your users only require elevated privileges to install Symantec client software.
About configuring user rights with Active Directory
If you use Active Directory to manage computers, you can create a Group Policy
that provides the necessary user rights to install Symantec software.
For more information on using Active Directory, see the Active Directory
documentation.
System installation requirements
Symantec software requires specific protocols, operating systems and service
packs, software, and hardware. All computers to which you install Symantec
Planning the production installationNetwork and system requirements
46
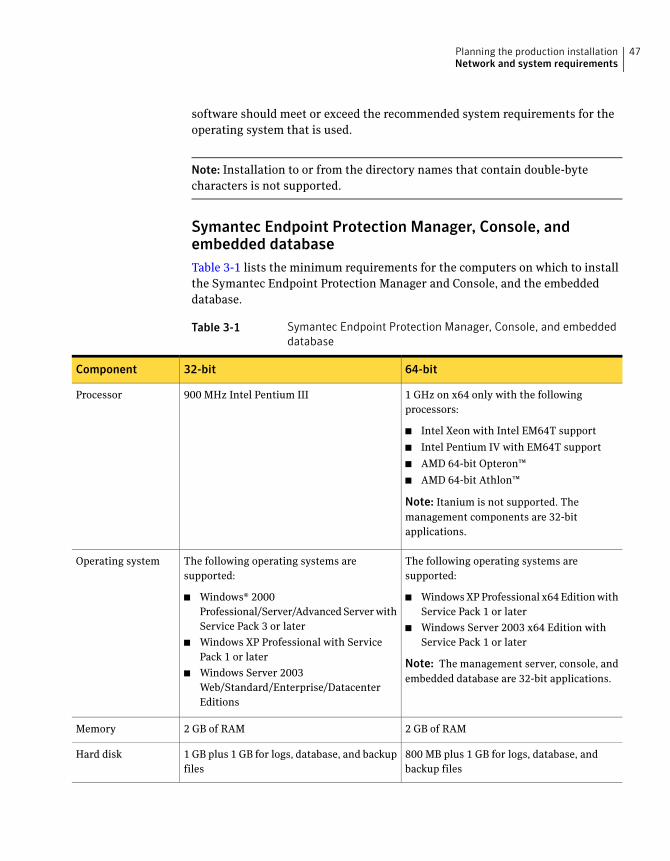
software should meet or exceed the recommended system requirements for the
operating system that is used.
Note: Installation to or from the directory names that contain double-byte
characters is not supported.
Symantec Endpoint Protection Manager, Console, andembedded database
Table 3-1 lists the minimum requirements for the computers on which to install
the Symantec Endpoint Protection Manager and Console, and the embedded
database.
Table 3-1 Symantec Endpoint Protection Manager, Console, and embedded
database
64-bit32-bitComponent
1 GHz on x64 only with the following
processors:
■ Intel Xeon with Intel EM64T support
■ Intel Pentium IV with EM64T support
■ AMD 64-bit Opteron™
■ AMD 64-bit Athlon™
Note: Itanium is not supported. The
management components are 32-bit
applications.
900 MHz Intel Pentium IIIProcessor
The following operating systems are
supported:
■ Windows XP Professional x64 Edition with
Service Pack 1 or later
■ Windows Server 2003 x64 Edition with
Service Pack 1 or later
Note: The management server, console, and
embedded database are 32-bit applications.
The following operating systems are
supported:
■ Windows® 2000
Professional/Server/Advanced Server with
Service Pack 3 or later
■ Windows XP Professional with Service
Pack 1 or later
■ Windows Server 2003
Web/Standard/Enterprise/Datacenter
Editions
Operating system
2 GB of RAM2 GB of RAMMemory
800 MB plus 1 GB for logs, database, and
backup files
1 GB plus 1 GB for logs, database, and backup
files
Hard disk
47Planning the production installationNetwork and system requirements
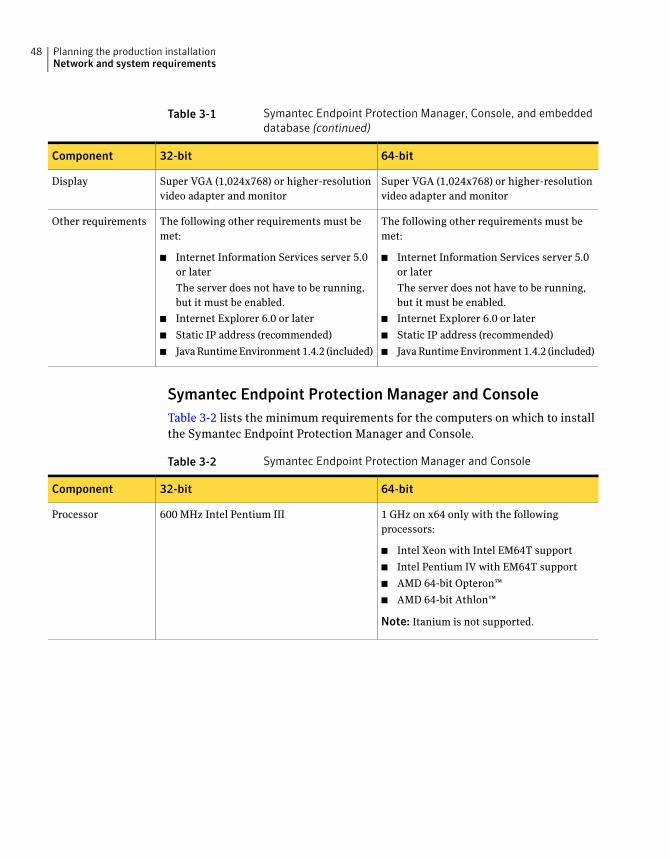
Table 3-1 Symantec Endpoint Protection Manager, Console, and embedded
database (continued)
64-bit32-bitComponent
Super VGA (1,024x768) or higher-resolution
video adapter and monitor
Super VGA (1,024x768) or higher-resolution
video adapter and monitor
Display
The following other requirements must be
met:
■ Internet Information Services server 5.0
or later
The server does not have to be running,
but it must be enabled.
■ Internet Explorer 6.0 or later
■ Static IP address (recommended)
■ Java Runtime Environment 1.4.2 (included)
The following other requirements must be
met:
■ Internet Information Services server 5.0
or later
The server does not have to be running,
but it must be enabled.
■ Internet Explorer 6.0 or later
■ Static IP address (recommended)
■ Java Runtime Environment 1.4.2 (included)
Other requirements
Symantec Endpoint Protection Manager and Console
Table 3-2 lists the minimum requirements for the computers on which to install
the Symantec Endpoint Protection Manager and Console.
Table 3-2 Symantec Endpoint Protection Manager and Console
64-bit32-bitComponent
1 GHz on x64 only with the following
processors:
■ Intel Xeon with Intel EM64T support
■ Intel Pentium IV with EM64T support
■ AMD 64-bit Opteron™
■ AMD 64-bit Athlon™
Note: Itanium is not supported.
600 MHz Intel Pentium IIIProcessor
Planning the production installationNetwork and system requirements
48
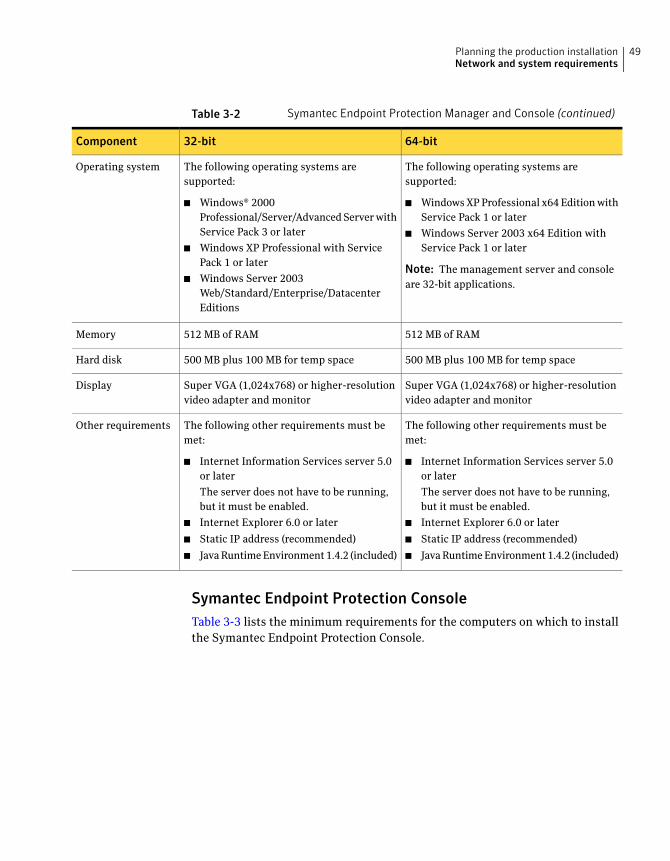
Table 3-2 Symantec Endpoint Protection Manager and Console (continued)
64-bit32-bitComponent
The following operating systems are
supported:
■ Windows XP Professional x64 Edition with
Service Pack 1 or later
■ Windows Server 2003 x64 Edition with
Service Pack 1 or later
Note: The management server and console
are 32-bit applications.
The following operating systems are
supported:
■ Windows® 2000
Professional/Server/Advanced Server with
Service Pack 3 or later
■ Windows XP Professional with Service
Pack 1 or later
■ Windows Server 2003
Web/Standard/Enterprise/Datacenter
Editions
Operating system
512 MB of RAM512 MB of RAMMemory
500 MB plus 100 MB for temp space500 MB plus 100 MB for temp spaceHard disk
Super VGA (1,024x768) or higher-resolution
video adapter and monitor
Super VGA (1,024x768) or higher-resolution
video adapter and monitor
Display
The following other requirements must be
met:
■ Internet Information Services server 5.0
or later
The server does not have to be running,
but it must be enabled.
■ Internet Explorer 6.0 or later
■ Static IP address (recommended)
■ Java Runtime Environment 1.4.2 (included)
The following other requirements must be
met:
■ Internet Information Services server 5.0
or later
The server does not have to be running,
but it must be enabled.
■ Internet Explorer 6.0 or later
■ Static IP address (recommended)
■ Java Runtime Environment 1.4.2 (included)
Other requirements
Symantec Endpoint Protection Console
Table 3-3 lists the minimum requirements for the computers on which to install
the Symantec Endpoint Protection Console.
49Planning the production installationNetwork and system requirements
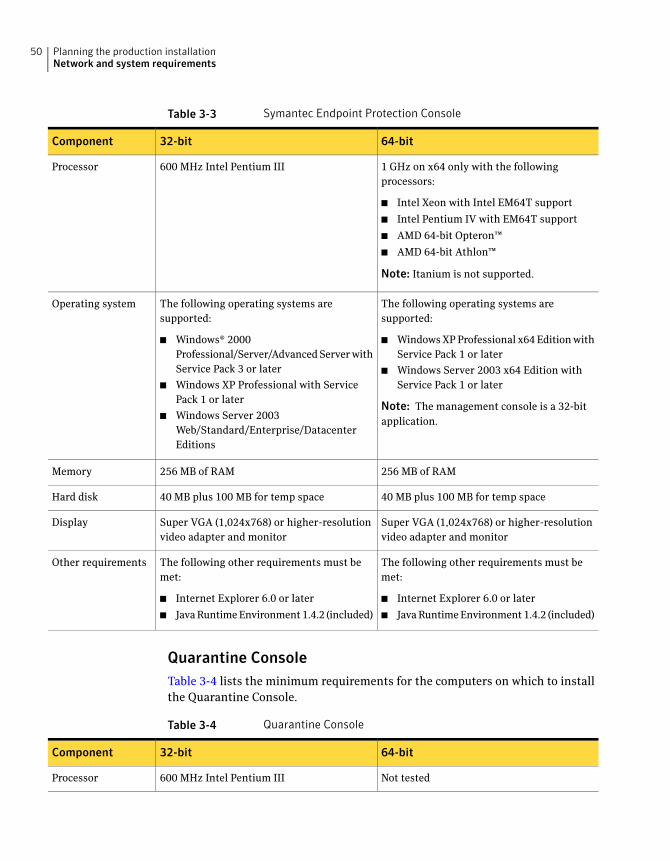
Table 3-3 Symantec Endpoint Protection Console
64-bit32-bitComponent
1 GHz on x64 only with the following
processors:
■ Intel Xeon with Intel EM64T support
■ Intel Pentium IV with EM64T support
■ AMD 64-bit Opteron™
■ AMD 64-bit Athlon™
Note: Itanium is not supported.
600 MHz Intel Pentium IIIProcessor
The following operating systems are
supported:
■ Windows XP Professional x64 Edition with
Service Pack 1 or later
■ Windows Server 2003 x64 Edition with
Service Pack 1 or later
Note: The management console is a 32-bit
application.
The following operating systems are
supported:
■ Windows® 2000
Professional/Server/Advanced Server with
Service Pack 3 or later
■ Windows XP Professional with Service
Pack 1 or later
■ Windows Server 2003
Web/Standard/Enterprise/Datacenter
Editions
Operating system
256 MB of RAM256 MB of RAMMemory
40 MB plus 100 MB for temp space40 MB plus 100 MB for temp spaceHard disk
Super VGA (1,024x768) or higher-resolution
video adapter and monitor
Super VGA (1,024x768) or higher-resolution
video adapter and monitor
Display
The following other requirements must be
met:
■ Internet Explorer 6.0 or later
■ Java Runtime Environment 1.4.2 (included)
The following other requirements must be
met:
■ Internet Explorer 6.0 or later
■ Java Runtime Environment 1.4.2 (included)
Other requirements
Quarantine Console
Table 3-4 lists the minimum requirements for the computers on which to install
the Quarantine Console.
Table 3-4 Quarantine Console
64-bit32-bitComponent
Not tested600 MHz Intel Pentium IIIProcessor
Planning the production installationNetwork and system requirements
50
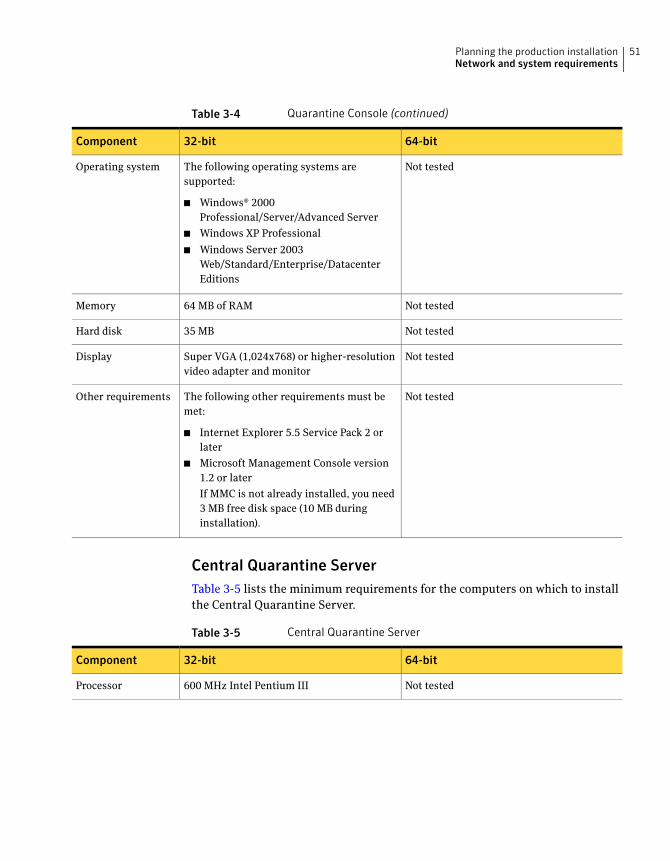
Table 3-4 Quarantine Console (continued)
64-bit32-bitComponent
Not testedThe following operating systems are
supported:
■ Windows® 2000
Professional/Server/Advanced Server
■ Windows XP Professional
■ Windows Server 2003
Web/Standard/Enterprise/Datacenter
Editions
Operating system
Not tested64 MB of RAMMemory
Not tested35 MBHard disk
Not testedSuper VGA (1,024x768) or higher-resolution
video adapter and monitor
Display
Not testedThe following other requirements must be
met:
■ Internet Explorer 5.5 Service Pack 2 or
later
■ Microsoft Management Console version
1.2 or later
If MMC is not already installed, you need
3 MB free disk space (10 MB during
installation).
Other requirements
Central Quarantine Server
Table 3-5 lists the minimum requirements for the computers on which to install
the Central Quarantine Server.
Table 3-5 Central Quarantine Server
64-bit32-bitComponent
Not tested600 MHz Intel Pentium IIIProcessor
51Planning the production installationNetwork and system requirements
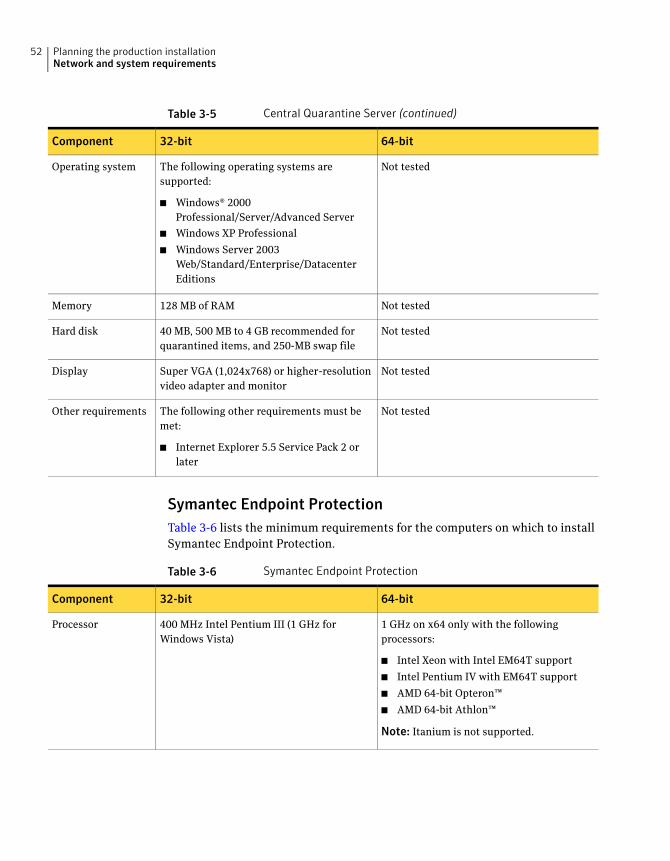
Table 3-5 Central Quarantine Server (continued)
64-bit32-bitComponent
Not testedThe following operating systems are
supported:
■ Windows® 2000
Professional/Server/Advanced Server
■ Windows XP Professional
■ Windows Server 2003
Web/Standard/Enterprise/Datacenter
Editions
Operating system
Not tested128 MB of RAMMemory
Not tested40 MB, 500 MB to 4 GB recommended for
quarantined items, and 250-MB swap file
Hard disk
Not testedSuper VGA (1,024x768) or higher-resolution
video adapter and monitor
Display
Not testedThe following other requirements must be
met:
■ Internet Explorer 5.5 Service Pack 2 or
later
Other requirements
Symantec Endpoint Protection
Table 3-6 lists the minimum requirements for the computers on which to install
Symantec Endpoint Protection.
Table 3-6 Symantec Endpoint Protection
64-bit32-bitComponent
1 GHz on x64 only with the following
processors:
■ Intel Xeon with Intel EM64T support
■ Intel Pentium IV with EM64T support
■ AMD 64-bit Opteron™
■ AMD 64-bit Athlon™
Note: Itanium is not supported.
400 MHz Intel Pentium III (1 GHz for
Windows Vista)
Processor
Planning the production installationNetwork and system requirements
52
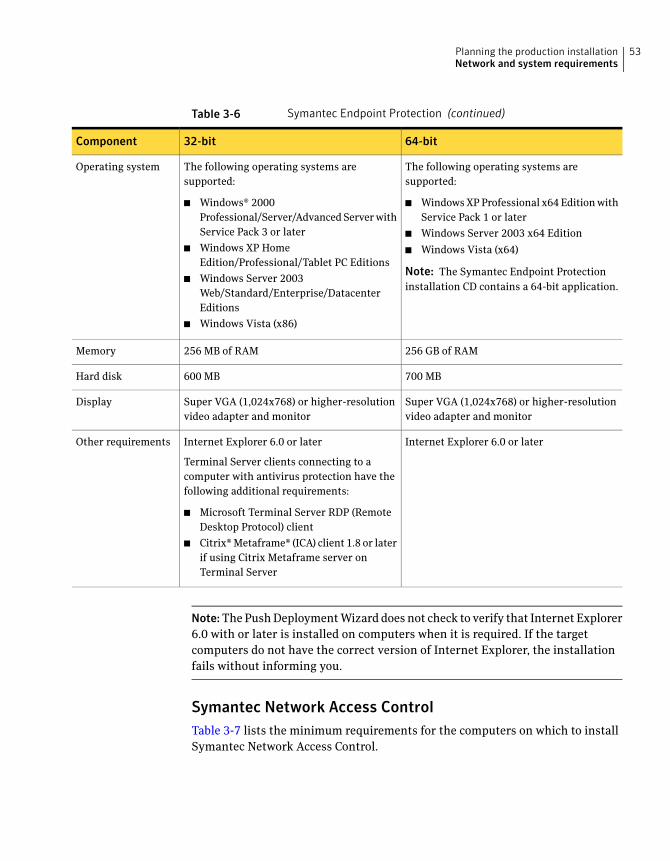
Table 3-6 Symantec Endpoint Protection (continued)
64-bit32-bitComponent
The following operating systems are
supported:
■ Windows XP Professional x64 Edition with
Service Pack 1 or later
■ Windows Server 2003 x64 Edition
■ Windows Vista (x64)
Note: The Symantec Endpoint Protection
installation CD contains a 64-bit application.
The following operating systems are
supported:
■ Windows® 2000
Professional/Server/Advanced Server with
Service Pack 3 or later
■ Windows XP Home
Edition/Professional/Tablet PC Editions
■ Windows Server 2003
Web/Standard/Enterprise/Datacenter
Editions
■ Windows Vista (x86)
Operating system
256 GB of RAM256 MB of RAMMemory
700 MB600 MBHard disk
Super VGA (1,024x768) or higher-resolution
video adapter and monitor
Super VGA (1,024x768) or higher-resolution
video adapter and monitor
Display
Internet Explorer 6.0 or laterInternet Explorer 6.0 or later
Terminal Server clients connecting to a
computer with antivirus protection have the
following additional requirements:
■ Microsoft Terminal Server RDP (Remote
Desktop Protocol) client
■ Citrix® Metaframe® (ICA) client 1.8 or later
if using Citrix Metaframe server on
Terminal Server
Other requirements
Note:The Push Deployment Wizard does not check to verify that Internet Explorer
6.0 with or later is installed on computers when it is required. If the target
computers do not have the correct version of Internet Explorer, the installation
fails without informing you.
Symantec Network Access Control
Table 3-7 lists the minimum requirements for the computers on which to install
Symantec Network Access Control.
53Planning the production installationNetwork and system requirements
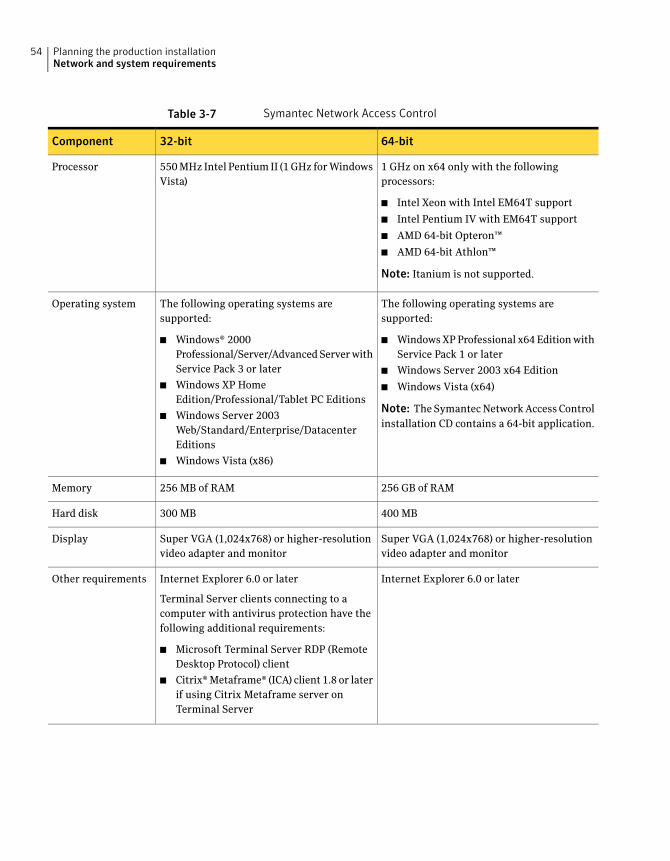
Table 3-7 Symantec Network Access Control
64-bit32-bitComponent
1 GHz on x64 only with the following
processors:
■ Intel Xeon with Intel EM64T support
■ Intel Pentium IV with EM64T support
■ AMD 64-bit Opteron™
■ AMD 64-bit Athlon™
Note: Itanium is not supported.
550 MHz Intel Pentium II (1 GHz for Windows
Vista)
Processor
The following operating systems are
supported:
■ Windows XP Professional x64 Edition with
Service Pack 1 or later
■ Windows Server 2003 x64 Edition
■ Windows Vista (x64)
Note: The Symantec Network Access Control
installation CD contains a 64-bit application.
The following operating systems are
supported:
■ Windows® 2000
Professional/Server/Advanced Server with
Service Pack 3 or later
■ Windows XP Home
Edition/Professional/Tablet PC Editions
■ Windows Server 2003
Web/Standard/Enterprise/Datacenter
Editions
■ Windows Vista (x86)
Operating system
256 GB of RAM256 MB of RAMMemory
400 MB300 MBHard disk
Super VGA (1,024x768) or higher-resolution
video adapter and monitor
Super VGA (1,024x768) or higher-resolution
video adapter and monitor
Display
Internet Explorer 6.0 or laterInternet Explorer 6.0 or later
Terminal Server clients connecting to a
computer with antivirus protection have the
following additional requirements:
■ Microsoft Terminal Server RDP (Remote
Desktop Protocol) client
■ Citrix® Metaframe® (ICA) client 1.8 or later
if using Citrix Metaframe server on
Terminal Server
Other requirements
Planning the production installationNetwork and system requirements
54
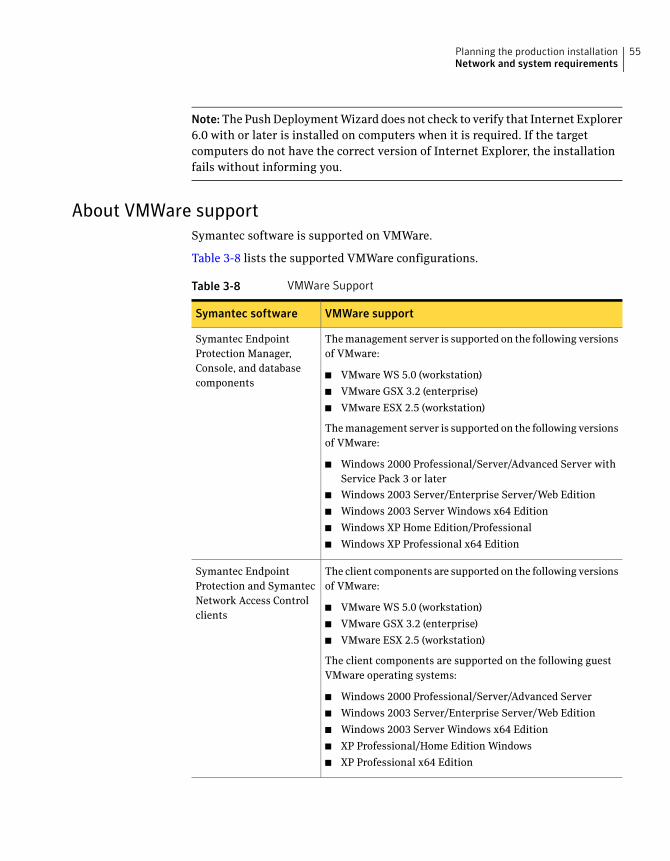
Note:The Push Deployment Wizard does not check to verify that Internet Explorer
6.0 with or later is installed on computers when it is required. If the target
computers do not have the correct version of Internet Explorer, the installation
fails without informing you.
About VMWare support
Symantec software is supported on VMWare.
Table 3-8 lists the supported VMWare configurations.
Table 3-8 VMWare Support
VMWare supportSymantec software
The management server is supported on the following versions
of VMware:
■ VMware WS 5.0 (workstation)
■ VMware GSX 3.2 (enterprise)
■ VMware ESX 2.5 (workstation)
The management server is supported on the following versions
of VMware:
■ Windows 2000 Professional/Server/Advanced Server with
Service Pack 3 or later
■ Windows 2003 Server/Enterprise Server/Web Edition
■ Windows 2003 Server Windows x64 Edition
■ Windows XP Home Edition/Professional
■ Windows XP Professional x64 Edition
Symantec Endpoint
Protection Manager,
Console, and database
components
The client components are supported on the following versions
of VMware:
■ VMware WS 5.0 (workstation)
■ VMware GSX 3.2 (enterprise)
■ VMware ESX 2.5 (workstation)
The client components are supported on the following guest
VMware operating systems:
■ Windows 2000 Professional/Server/Advanced Server
■ Windows 2003 Server/Enterprise Server/Web Edition
■ Windows 2003 Server Windows x64 Edition
■ XP Professional/Home Edition Windows
■ XP Professional x64 Edition
Symantec Endpoint
Protection and Symantec
Network Access Control
clients
55Planning the production installationNetwork and system requirements

About Desktop firewalls and communications portsIf your servers and clients run firewall software, you must open certain ports so
that communication between the management servers and clients is possible.
Alternatively, you can permit the application Rtvscan.exe on all computers to
send and receive traffic through your firewalls. Also, remote server and client
installation tools require that TCP port 139 be opened.
Note: Management servers and clients use the default ephemeral port range for
TCP (1024 to 65535) for network communications. The ephemeral port range that
is used, however, rarely exceeds 5000, and is configurable for most operating
systems. Most firewalls use stateful inspection when filtering TCP traffic, so
incoming TCP responses are automatically allowed and routed back to the original
requester. Therefore you do not have to open the ephemeral TCP ports when you
configure your firewall software.
Table 3-9 lists the network protocols and ports that management servers and
clients require for communicating and network installations.
Table 3-9 Ports for client and server installation and communication
Protocol and portComponentFunction
TCP 139 on managers and
clients
UDP 137 and 138 on managers
and clients
TCP ephemeral ports on
servers and clients
Symantec Endpoint Protection
Managers and clients
Push Deployment
Wizard deployment
TCP 139 on managers
TCP ephemeral ports on clients
Symantec Endpoint Protection
Managers and clients
Network Audit
TCP 2967 on all devices
Note: This port is the default,
which can be changed.
Symantec Endpoint Protection
Managers and Group Update
Providers
Group Update Providers and
clients
Group Update Provider
communication
TCP 80 on managers
TCP ephemeral ports on clients
Note: Port 80 can also be
changed to TCP 443 (HTTPS).
Symantec Endpoint Protection
Managers and clients
General
communication
Planning the production installationAbout Desktop firewalls and communications ports
56
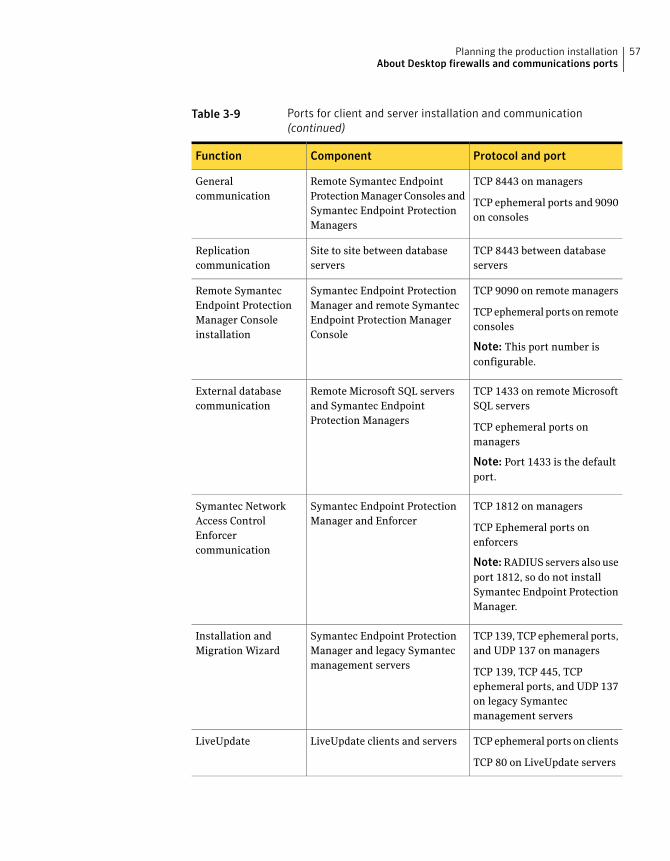
Table 3-9 Ports for client and server installation and communication
(continued)
Protocol and portComponentFunction
TCP 8443 on managers
TCP ephemeral ports and 9090
on consoles
Remote Symantec Endpoint
Protection Manager Consoles and
Symantec Endpoint Protection
Managers
General
communication
TCP 8443 between database
servers
Site to site between database
servers
Replication
communication
TCP 9090 on remote managers
TCP ephemeral ports on remote
consoles
Note: This port number is
configurable.
Symantec Endpoint Protection
Manager and remote Symantec
Endpoint Protection Manager
Console
Remote Symantec
Endpoint Protection
Manager Console
installation
TCP 1433 on remote Microsoft
SQL servers
TCP ephemeral ports on
managers
Note: Port 1433 is the default
port.
Remote Microsoft SQL servers
and Symantec Endpoint
Protection Managers
External database
communication
TCP 1812 on managers
TCP Ephemeral ports on
enforcers
Note:RADIUS servers also use
port 1812, so do not install
Symantec Endpoint Protection
Manager.
Symantec Endpoint Protection
Manager and Enforcer
Symantec Network
Access Control
Enforcer
communication
TCP 139, TCP ephemeral ports,
and UDP 137 on managers
TCP 139, TCP 445, TCP
ephemeral ports, and UDP 137
on legacy Symantec
management servers
Symantec Endpoint Protection
Manager and legacy Symantec
management servers
Installation and
Migration Wizard
TCP ephemeral ports on clients
TCP 80 on LiveUpdate servers
LiveUpdate clients and serversLiveUpdate
57Planning the production installationAbout Desktop firewalls and communications ports
Disabling and modifying Windows firewallsWindows XP\2003 Server\Vista contain firewalls that may prevent certain types
of Symantec product communications. If these firewalls are enabled, you might
not be able to install client software remotely with remote installation and
deployment tools. If there are computers in your network that are running these
operating systems, you need to configure the firewalls to allow for these
communications.
To use the Windows XP firewalls, you need to configure them to support
communications by opening ports or by specifying trusted programs. You can
enable communications by permitting Rtvscan.exe on all computers.
If you want to install client software remotely, you must permit servers to send
traffic from TCP ports 1024-5000 to TCP port 139 on clients. Stateful inspection
permits the return traffic automatically. You must also permit clients to receive
traffic from server TCP ports 1024-5000 on TCP port 139. And you must permit
clients to send traffic from TCP port 139 to TCP ports 1024-5000 on servers.
Legacy communications also require that UDP port 2967 be open on all computers.
About Windows and Symantec firewalls
If you install the Symantec firewall feature of Network Threat Protection, the
installer automatically disables Windows firewalls that are enabled. If you do not
install the Symantec firewall feature, the installer does not disable Windows
firewalls that are enabled.
The firewall that runs on Windows Vista supports both IPv4 and IPv6. The
Symantec firewall supports IPv4 only. The default Symantec firewall rulebase,
however, contains a rule that blocks all IPv6 traffic.
Warning:Do not delete the rule that blocks IPv6 or change its filtering action from
deny to permit.
This rule is created for the Ethernet protocol. When you display the services for
a rule, and then add a service, you get access to the Ethernet protocol. You can
then select the IPv6 protocol type for the Ethernet protocol.
Disabling Internet Connection Firewall
Windows XP with Service Pack 1 includes a firewall that is called Internet
Connection Firewall. This firewall can interfere with remote installation, and
communications between servers and clients. If any of your servers or clients run
Planning the production installationDisabling and modifying Windows firewalls
58
Windows XP, you can disable the Windows XP firewall on them before you install
client software.
Note: You are not required to disable the firewall. If you are familiar with and
comfortable with creating and configuring rules, you open ports to permit
deployment.
See Table 3-9 on page 56.
To disable Internet Connection Firewall
1 On the Windows XP taskbar, click Start > Control Panel.
2 In the Control Panel window, double-click Network Connections.
3 In the Network Connections window, right-click the active connection, and
then click Properties.
4 On the Advanced tab, under Internet Connection Firewall, uncheck Protect
mycomputerandnetworkbylimitingorpreventingaccesstothiscomputer
from the Internet.
5 Click OK.
Disabling Windows XP Firewall
Windows XP with Service Pack 2 and Windows 2003 Server include a firewall that
is called Windows Firewall. This firewall can interfere with remote installation,
and communications between management servers and clients. If any of your
servers or clients run Windows XP with Service Pack 2 or Windows Server 2003,
you can disable the firewall on them before you install client software.
Note: You are not required to disable the firewall. If you are familiar with and
comfortable with creating and configuring rules, you open ports to permit
deployment.
See Table 3-9 on page 56.
To disable Windows Firewall
1 On the Windows XP taskbar, click Start > Control Panel.
2 In the Control Panel window, double-click Network Connections.
3 In the Network Connections window, right-click the active connection, and
then click Properties.
4 On the Advanced tab, under Windows Firewall, click Settings.
59Planning the production installationDisabling and modifying Windows firewalls
5 In the Windows Firewall window, on the General tab, check Off (not
recommended).
6 Click OK.
Modifying Windows Vista Firewall
Windows Vista contains a firewall that is enabled by default. If the firewall is
enabled, you might not be able to install client software remotely from Symantec
Endpoint Protection Manager Console and other remote installation tools. You
must configure Windows Firewall to allow components to communicate with each
other. You should configure Windows Firewall before you install client software.
You can also temporarily disable Windows Firewall on your clients before deploying
client software.
To configure Windows Firewall to allow you to install client software on Windows
Vista, you must enable file and printer sharing.
Note: Client installation also automatically modifies Windows Firewall during
installation on Window Vista to allow specific processes access to your network
and the Internet. You are not required to make any further modifications.
To Enable file and printer sharing
1 On the Windows Vista taskbar, click Start > Settings > Control Panel >
Windows Firewall.
2 In the Windows Firewall dialog box, clickAllowaProgramthroughWindows
Firewall.
3 In the Windows Firewall Settings dialog box, on the Exceptions tab, check
File and Printer Sharing, and then click OK.
Preparing computers for remote deployment that runWindows XP/Vista
Over time, Microsoft has increased the default security posture of their operating
systems. For example, Windows Vista is more secure after default installation
than Windows XP, and Windows XP is more secure after default installation than
Windows 2000.
Planning the production installationPreparing computers for remote deployment that run Windows XP/Vista
60
Preparing the computers that run Windows XP in workgroups
By default, Windows XP client computers that are installed in workgroups do not
accept remote client deployment. To permit remote deployment to these
computers, you need to disable simple file sharing.
Note: This procedure is not required for the computers that are part of a Windows
domain.
To prepare the computers that run Windows XP
1 Right-click My Computer, and then click Open.
2 In the My Computer panel, click Tools > FolderOptions.
3 On the View tab, under Advanced Settings, at the end of the list, uncheckUse
simple file sharing (recommended), and then click OK.
Preparing the computers that run Windows Vista
Windows Vista provides a highly customizable user interface. The procedures in
this section are based on the Windows Classic user interface that you can set for
Windows Vista.
The Windows Vista feature User Access Control (UAC) blocks local administrative
accounts from remotely accessing remote administrative shares such as C$ and
Admin$. To use the Push Deployment Wizard Tool in this scenario, you should
use a Domain Administrative account if the target client computer is part of an
Active Directory domain. Remote client installation also requires elevated
privileges to install.
To enable remote client software deployment on the computers that run Windows
Vista, then you must do the following on each client computer:
■ Disable the File Sharing Wizard.
■ Enable network discovery by using the Network and Sharing center.
■ Enable the built-in Administrator account and assign it a password.
■ Verify that your account has elevated privileges.
To disable the file-sharing wizard
1 Display the drives on your computer.
2 In the Computer window, click Tools > FolderOptions.
3 On the View tab, under Advanced Settings, uncheck Use SharingWizard
(Recommended), and then click OK.
61Planning the production installationPreparing computers for remote deployment that run Windows XP/Vista
To enable network discovery
1 Display the computers in your network.
2 In the Network window, click Network and Sharing Center.
3 Under Sharing and Discovery, click NetworkDiscovery.
4 Click Turn onNetworkDiscovery, and then click Apply.
To enable the Administrator account
1 Click Start > Settings > Control Panel >Administrative Tools > Computer
Management.
2 In the Computer Management window, click and expand Local Users and
Groups.
3 Click Users.
4 In the right pane, right-click Administrator, and then click Set Password.
5 In the Warning prompt, click Proceed.
6 In the Set Password for Administrator dialog box, type the same password
in the password boxes, and then click OK.
7 In the right pane, right-click Administrator, and then click Properties.
8 Uncheck Account is disabled, and then click OK.
To verify that you have elevated privileges
1 Click Start >Run.
2 Type \\<targetmachine name>\C$.
If you can access and display the C$ remote administrative share, then your
privileges are elevated. If you cannot access and display this share, you must
authenticate with an account that has the required privileges.
Prepare your computers for installationBefore you install client software on your computers, you should first determine
the state of these computers. Client installation is more efficient and effective if
you evaluate the following conditions before you begin the installation process:
■ Remove virus threats and security risks
■ Evaluate third-party client software
■ Install client software in stages
Planning the production installationPrepare your computers for installation
62
Remove virus threats and security risks
Try to avoid installing or upgrading clients on the computers that are infected
with virus threats or other security risks. Some threats can directly interfere with
the installation or operation of the client software. For the computers that do not
have an antivirus scanner installed, you can perform a virus check from Symantec
Security Response. If virus check finds a virus, it directs you to manual removal
instructions in the virus encyclopedia if they are available. You can find virus
check at the Symantec Security Response Web site at the following URL:
http://securityresponse.symantec.com
Evaluate third-party client software
As you prepare to install client software in your network, you must determine if
third-party security software is installed on your computers. Third-party security
software includes other antivirus or anti-adware and spyware software. These
programs can affect the performance and effectiveness of the client software.
Symantec does not recommended to run two antivirus programs on one computer.
Likewise, it may be problematic to run two anti-adware or spyware programs, and
two firewall programs. This recommendation is important if both programs provide
real-time protection. Both programs can create a resource conflict and can drain
the computer's resources as the programs try to scan and repair the same files.
Install client software in stages
You can install or migrate clients across your network in logical stages. Particularly
in a large-scale environment, you should first deploy client software in a test
environment. The test environment can be an independent network of computers
that is modeled after your production environment. Or, the test network can
comprise a small group of computers from your actual production network.
Required computer restartsThe following installations or migrations require computer restarts:
■ All client computers that do not run MSI 3.1. Client installations upgrade MSI
to 3.1 if 3.1 does not run on client computers, and this upgrade requires a
restart.
■ Symantec Endpoint Protection client installation that installs Network Threat
Protection and the firewall.
■ Symantec Sygate Enterprise Protection server migrations.
63Planning the production installationRequired computer restarts

Planning the production installationRequired computer restarts
64
Installing Symantec
Endpoint Protection
Manager
This chapter includes the following topics:
■ Before you install
■ Installing Symantec Endpoint Protection Manager with an embedded database
■ Installing Symantec Endpoint Protection Manager with a Microsoft SQL
database
■ Installing additional Symantec Endpoint Protection Manager Consoles
■ Installing and configuring Symantec Endpoint Protection Manager for failover
or load balancing
■ Installing and configuring Symantec Endpoint Protection Manager for
replication
■ Adjusting the Symantec Endpoint Protection Manager heap size
■ Upgrading from the embedded database to Microsoft SQL Server
■ Uninstalling Symantec Endpoint Protection Manager
Before you installBefore you install a Symantec Endpoint Protection Manager and a database, you
must decide which type of database to create. You can create an embedded SQL
database, or you can create a Microsoft SQL database. The embedded SQL database
4Chapter
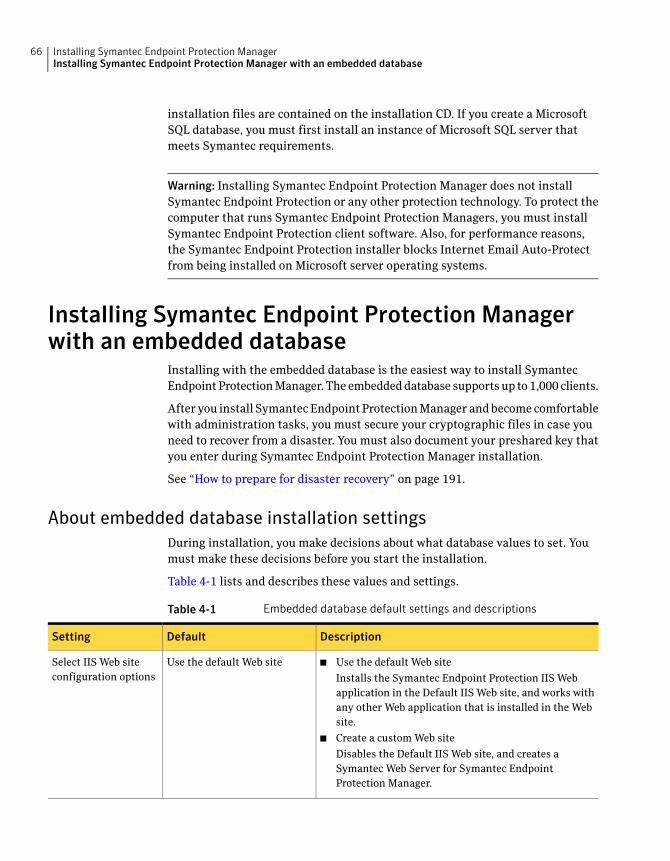
installation files are contained on the installation CD. If you create a Microsoft
SQL database, you must first install an instance of Microsoft SQL server that
meets Symantec requirements.
Warning: Installing Symantec Endpoint Protection Manager does not install
Symantec Endpoint Protection or any other protection technology. To protect the
computer that runs Symantec Endpoint Protection Managers, you must install
Symantec Endpoint Protection client software. Also, for performance reasons,
the Symantec Endpoint Protection installer blocks Internet Email Auto-Protect
from being installed on Microsoft server operating systems.
Installing Symantec Endpoint Protection Managerwith an embedded database
Installing with the embedded database is the easiest way to install Symantec
Endpoint Protection Manager. The embedded database supports up to 1,000 clients.
After you install Symantec Endpoint Protection Manager and become comfortable
with administration tasks, you must secure your cryptographic files in case you
need to recover from a disaster. You must also document your preshared key that
you enter during Symantec Endpoint Protection Manager installation.
See “How to prepare for disaster recovery” on page 191.
About embedded database installation settings
During installation, you make decisions about what database values to set. You
must make these decisions before you start the installation.
Table 4-1 lists and describes these values and settings.
Table 4-1 Embedded database default settings and descriptions
DescriptionDefaultSetting
■ Use the default Web site
Installs the Symantec Endpoint Protection IIS Web
application in the Default IIS Web site, and works with
any other Web application that is installed in the Web
site.
■ Create a custom Web site
Disables the Default IIS Web site, and creates a
Symantec Web Server for Symantec Endpoint
Protection Manager.
Use the default Web siteSelect IIS Web site
configuration options
Installing Symantec Endpoint Protection ManagerInstalling Symantec Endpoint Protection Manager with an embedded database
66
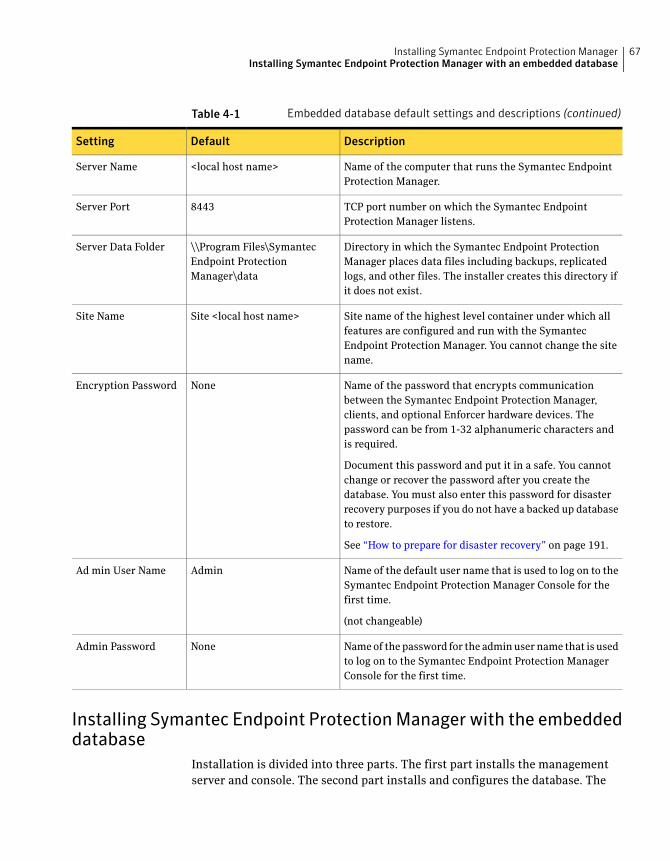
Table 4-1 Embedded database default settings and descriptions (continued)
DescriptionDefaultSetting
Name of the computer that runs the Symantec Endpoint
Protection Manager.
<local host name>Server Name
TCP port number on which the Symantec Endpoint
Protection Manager listens.
8443Server Port
Directory in which the Symantec Endpoint Protection
Manager places data files including backups, replicated
logs, and other files. The installer creates this directory if
it does not exist.
\\Program Files\Symantec
Endpoint Protection
Manager\data
Server Data Folder
Site name of the highest level container under which all
features are configured and run with the Symantec
Endpoint Protection Manager. You cannot change the site
name.
Site <local host name>Site Name
Name of the password that encrypts communication
between the Symantec Endpoint Protection Manager,
clients, and optional Enforcer hardware devices. The
password can be from 1-32 alphanumeric characters and
is required.
Document this password and put it in a safe. You cannot
change or recover the password after you create the
database. You must also enter this password for disaster
recovery purposes if you do not have a backed up database
to restore.
See “How to prepare for disaster recovery” on page 191.
NoneEncryption Password
Name of the default user name that is used to log on to the
Symantec Endpoint Protection Manager Console for the
first time.
(not changeable)
AdminAd min User Name
Name of the password for the admin user name that is used
to log on to the Symantec Endpoint Protection Manager
Console for the first time.
NoneAdmin Password
Installing Symantec Endpoint ProtectionManager with the embeddeddatabase
Installation is divided into three parts. The first part installs the management
server and console. The second part installs and configures the database. The
67Installing Symantec Endpoint Protection ManagerInstalling Symantec Endpoint Protection Manager with an embedded database
third part involves client software deployment to multiple computers, and is
optional.
In the first part, you can accept all of the defaults. In the second part, you add at
least one custom value, which is a password. In the third part, you select the clients
on which to deploy client software.
To install Symantec Endpoint Protection Manager with the embedded database
1 Insert the installation CD, and start the installation.
2 In the Welcome panel, do one of the following:
■ If you are installing Symantec Endpoint Protection, click Symantec
Endpoint Protection.
■ If you are installing Symantec Network Access Control, click Symantec
NetworkAccess Control.
3 In the next panel, click Install Symantec Endpoint ProtectionManager.
4 Click through the panels, until the Destination Folder panel appears.
5 In the Destination Folder panel, accept or change the default installation
directory.
6 Do one of the following:
■ To configure the Symantec Endpoint Protection Manger IIS Web as the
only Web server on this computer, check Create a customWeb site, and
then clickNext.
■ To let the Symantec Endpoint Protection Manager IIS Web server run
with other Web on this computer, check Use the defaultWeb site, and
then clickNext.
7 Click through the panels, until the installation begins.
8 When the installation finishes and the Installation Wizard Complete panel
appears, click Finish
Note: The Server Configuration Wizard panel can take up to 15 seconds to
appear. If you are prompted to restart the computer, restart the computer,
log on, and the Server Configuration Wizard panel appears automatically for
you to continue.
9 In the Management Server Configuration Wizard panel, check Installmy
first site, and then click Next.
10 In the Server Information panel, accept or change the default values for the
following boxes, and then click Next:
Installing Symantec Endpoint Protection ManagerInstalling Symantec Endpoint Protection Manager with an embedded database
68
■ Server Name
■ Server Port
■ Server Data Folder
11 In the Site Name panel, in the Site name box, accept or change the default
name, and then click Next.
12 In the Encryption Password panel, in the Encryption Password boxes, type a
password, and then click Next.
Document this password and put it in a safe. You cannot change or recover
the password after you create the database. You must also enter this password
for disaster recovery purposes if you do not have a backed up database to
restore.
13 In the Database Server Choice panel, check EmbeddedDatabase, and then
click Next.
14 In the Set User Name panel, type the same password in the following boxes,
and then click Next.
■ Password
■ Confirm Password
Use the user name and password that you set here to log on to the console
for the first time.
15 In the Configuration Completed dialog box, do one of the following:
■ To deploy client software with the Migration and Deployment Wizard,
click Yes.
■ To log on to the Symantec Endpoint Protection Manager Console first,
and then deploy client software, click No.
Refer to the Client Installation chapter for details on how to deploy client
software.
After you install Symantec Endpoint Protection Manager and become
comfortable with administration tasks, you should secure your cryptographic
files in case you need to recover from a disaster. You should also document
your preshared key that you enter during Symantec Endpoint Protection
Manager installation.
See “How to prepare for disaster recovery” on page 191.
69Installing Symantec Endpoint Protection ManagerInstalling Symantec Endpoint Protection Manager with an embedded database
Installing Symantec Endpoint Protection Managerwith a Microsoft SQL database
You can install the Symantec Endpoint Protection Manager on the same computer
that runs Microsoft SQL Server 2000/2005, and then create a database on the
local SQL server. You can also install the Symantec Endpoint Protection Manager
on a computer that does not run Microsoft SQL Server 2000/2005, and then create
a database on the remote SQL server. In both cases, you must properly install and
configure Microsoft SQL Server components on all computers.
Note: Microsoft SQL Server 2000 is supported on English-language Windows
operating systems only.
Preparing Microsoft SQL Server 2000/2005 for database creation
Before you create the database, Symantec recommends that you install a new
instance of SQL Server that conforms to Symantec installation and configuration
requirements. You can install a database in an older, existing instance, but the
instance must be configured properly or your database installation fails. For
example, if the authentication configuration is not set to Mixed Mode, your
installation fails or does not function properly. If you select a case-sensitive SQL
collation your installation fails.
Warning: Symantec Endpoint Protection Manager authenticates to Microsoft SQL
Server with a clear text database owner user name and password. If you install
to and communicate with a remote Microsoft SQL Server, any computer in the
communications path can potentially capture this user name and password with
a packet capture utility. To maximize the security posture of remote Microsoft
SQL Server communications, collocate both servers in a secure subnet.
A secure subnet isolates network communications between servers to that subnet
only. A secure subnet is typically located behind a network device that performs
network address translation (NAT). Many of the modern inexpensive routers that
perform DHCP address assignments also perform NAT. A secure subnet is also
physically secure so that only authorized personnel have physical access to the
network devices on that subnet.
Installing Symantec Endpoint Protection ManagerInstalling Symantec Endpoint Protection Manager with a Microsoft SQL database
70
Microsoft SQL Server 2000 installation and configurationrequirements
The installation and configuration requirements affect all Microsoft SQL Server
2000 installations, both local and remote. To create a database on a remote SQL
server, you must also install the SQL Server Client Components on the server that
runs or will run the Symantec Endpoint Protection Manager.
Microsoft SQL Server 2000 installation requirements
When you install the instance of Microsoft SQL Server 2000, select the following
non-default features:
■ Do not accept the default instance name. Use SEPM or some other name.
By default, a database named Sem5 is created in this instance when you install
the Symantec Endpoint Protection Manager. The default instance is supported,
which is unnamed, but can lead to confusion if you install multiple instances
on one computer.
■ Set authentication configuration to Mixed Mode (Windows authentication and
SQL Server authentication).
■ Set the sa password when you set Mixed Mode authentication. You type this
password when you install the Symantec Endpoint Protection Manager.
Note: When you install the instance of Microsoft SQL Server, do not select a
case-sensitive SQL collation. The database does not support case-sensitivity.
Microsoft SQL Server 2000 configuration requirements
After you install the instance of Microsoft SQL Server 2000, you must do the
following:
■ Apply SQL Server Service Pack 4, and select to authenticate using SQL server
credentials.
■ In Enterprise Manager, register the instance, right-click the instance, and edit
the registration properties to use SQL server authentication.
■ After editing, when prompted, disconnect from the server.
■ Right-click the instance and connect to the server.
■ Use the SQL Server Network Utility to verify that TCP/IP is an enabled protocol.
If the protocol is not enabled, enable the protocol.
■ Verify that SQL Server Agent is running, and start it if it is not running.
71Installing Symantec Endpoint Protection ManagerInstalling Symantec Endpoint Protection Manager with a Microsoft SQL database
Installing and configuring Microsoft SQL Server 2000 client components
You install and configure Microsoft SQL Server 2000 Client Components on the
computer that runs or will run the Symantec Endpoint Protection Manager.
To install Microsoft SQL Server 2000 client components
1 Start the Microsoft SQL Server 2000 installation CD and begin the installation
process.
2 In the Installation Definition window, click Client Tools Only.
3 Complete the installation.
To configure Microsoft SQL Server 2000 client components
1 Click Start > Programs >Microsoft SQL Server > ClientNetworkUtility.
2 In the SQL Server Client Network Utility dialog box, on the General tab, verify
that TCP/IP is an enabled protocol. If it is not an enabled protocol, enable the
protocol.
3 Right-click TCP/IP, and then click Properties.
4 In the TCP/IP dialog box, in the Default Port box, type the port number that
matches the port that is used by the Microsoft SQL Server 2000 instance.
The default port is typically 1433. You specify this port number when you
create the database.
5 ClickOK, and then exit the SQL Server Client Network Utility.
Microsoft SQL Server 2005 installation and configurationrequirements
The installation and configuration requirements affect all Microsoft SQL Server
2005 installations, both local and remote. If you create a database on a remote
SQL server, you must also install the SQL Server Client Components on the server
that runs or will run the Symantec Endpoint Protection Manager.
Microsoft SQL Server 2005 installation requirements
When you install the instance of Microsoft SQL Server 20005 select the following
non-default features:
■ Do not accept the default instance name. Use SEPM or some other name.
By default, a database named Sem5 is created in this instance when you install
the Symantec Endpoint Protection Manager. The default instance is supported,
which is unnamed, but can lead to confusion if you install multiple instances
on one computer.
Installing Symantec Endpoint Protection ManagerInstalling Symantec Endpoint Protection Manager with a Microsoft SQL database
72
■ Set authentication configuration to Mixed Mode (Windows authentication and
SQL Server authentication).
■ Set the sa password when you set Mixed Mode authentication. You type this
password when you install the Symantec Endpoint Protection Manager.
■ When you configure Service Accounts, select to start the SQL Server Browser
at the end of setup.
Note: When you install the instance of Microsoft SQL Server, do not select a
case-sensitive SQL collation. The reporting database does not support
case-sensitivity.
Microsoft SQL Server 2005 configuration requirements
After you install the instance of Microsoft SQL Server 2005, apply SQL Server
2005 Service Pack 2, and select to authenticate using SQL server credentials. Then,
use the SQL Server Configuration Manager to do the following:
■ Display the protocols for the SQL Server 2005 Network Configuration.
■ Display the protocol properties for TCP/IP and enable TCP/IP.
■ Display the IP addresses for TCP/IP and enable the IP1 and IP2 addresses.
■ Set the TCP/IP port numbers for IP1, IP2, and PALL.
The Symantec Endpoint Protection Manager database does not support dynamic
ports. As a result, set TCP Dynamic Ports to blank, and specify a TCP Port
number. The default is typically 1433. You specify this port number when you
create the database.
■ Stop and restart the SQL server.
If you did not select to start the SQL Browser during installation, your remote
installation fails. If you did not make this selection during installation, use the
SQL Server Surface Area Configuration utility to do the following:
■ Display the Surface Area Configuration for Services and Connections
information.
■ Enable the SQL Server Browser service.
If this service is not enabled, client computers cannot communicate with the
server.
■ Verify that Local and Remote Connections are enabled by using TCP/IP only.
Named Pipes are not required.
73Installing Symantec Endpoint Protection ManagerInstalling Symantec Endpoint Protection Manager with a Microsoft SQL database

Installing and configuring Microsoft SQL Server 2005 client components
You install Microsoft SQL Server 2005 client components on the computer that
runs or will run the Symantec Endpoint Protection Manager.
Note: You must install the client components on a computer that runs Windows
Server 2003. The client component installation requires MDAC 2.8 Service Pack
1 or higher, Windows Installer 3.1, and Internet Explorer 6.0 Service Pack 1 or
higher.
To install Microsoft SQL Server 2005 client components
1 Start the Microsoft SQL Server 2005 installation CD and begin the installation
process.
2 In the Start window, click Server components, tools, BooksOnline, and
samples.
3 Continue the installation until you are prompted to select the components
to install.
4 In the Components to Install dialog box, click Advanced.
5 In the left pane, click and expand Client Components.
6 Click Client Components, and then select Will be installed on local hard
drive.
7 Click Client Component featuresConnectivityComponents andManagement
Tools, and then select Will be installed on local hard drive.
8 Complete the installation.
To configure Microsoft SQL Server 2005 client components
1 Click Start > Programs >Microsoft SQL Server 2005 > Configuration Tools
> SQL Server ConfigurationManager.
2 Under SQL Native Client Configuration, click Client Protocols, right-click
TCP/IP, and then click Properties.
3 In the Default Port box, type the port number that matches the port that is
used by the Microsoft SQL Server 2005 instance.
The default port is typically 1433. You specify this port number when you
create the database.
4 Click Apply >OK.
Installing Symantec Endpoint Protection ManagerInstalling Symantec Endpoint Protection Manager with a Microsoft SQL database
74
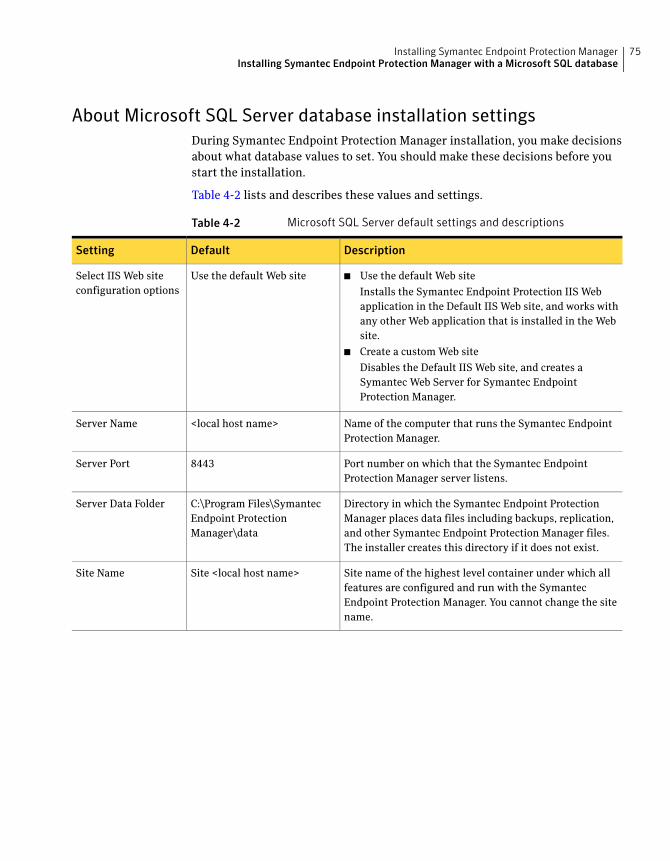
About Microsoft SQL Server database installation settings
During Symantec Endpoint Protection Manager installation, you make decisions
about what database values to set. You should make these decisions before you
start the installation.
Table 4-2 lists and describes these values and settings.
Table 4-2 Microsoft SQL Server default settings and descriptions
DescriptionDefaultSetting
■ Use the default Web site
Installs the Symantec Endpoint Protection IIS Web
application in the Default IIS Web site, and works with
any other Web application that is installed in the Web
site.
■ Create a custom Web site
Disables the Default IIS Web site, and creates a
Symantec Web Server for Symantec Endpoint
Protection Manager.
Use the default Web siteSelect IIS Web site
configuration options
Name of the computer that runs the Symantec Endpoint
Protection Manager.
<local host name>Server Name
Port number on which that the Symantec Endpoint
Protection Manager server listens.
8443Server Port
Directory in which the Symantec Endpoint Protection
Manager places data files including backups, replication,
and other Symantec Endpoint Protection Manager files.
The installer creates this directory if it does not exist.
C:\Program Files\Symantec
Endpoint Protection
Manager\data
Server Data Folder
Site name of the highest level container under which all
features are configured and run with the Symantec
Endpoint Protection Manager. You cannot change the site
name.
Site <local host name>Site Name
75Installing Symantec Endpoint Protection ManagerInstalling Symantec Endpoint Protection Manager with a Microsoft SQL database
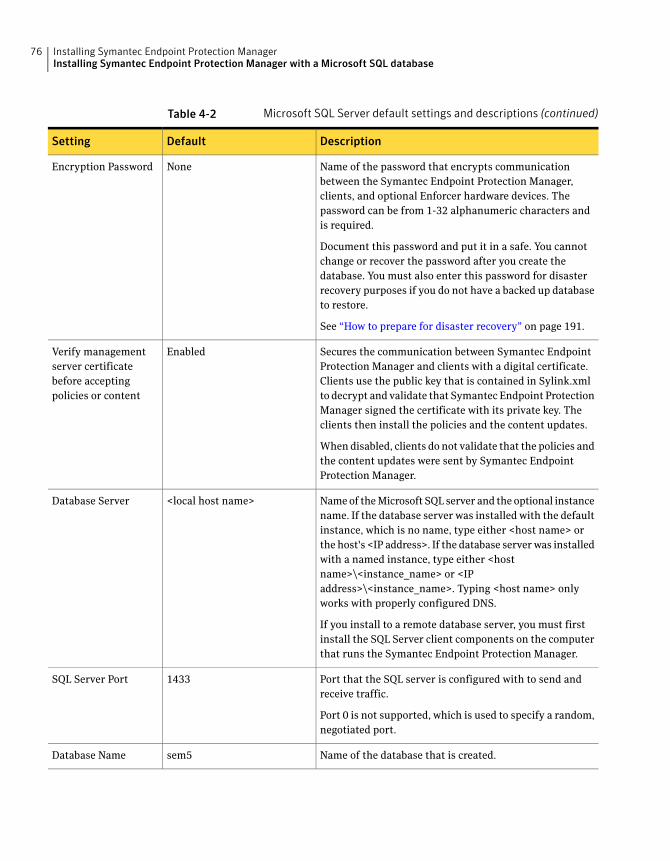
Table 4-2 Microsoft SQL Server default settings and descriptions (continued)
DescriptionDefaultSetting
Name of the password that encrypts communication
between the Symantec Endpoint Protection Manager,
clients, and optional Enforcer hardware devices. The
password can be from 1-32 alphanumeric characters and
is required.
Document this password and put it in a safe. You cannot
change or recover the password after you create the
database. You must also enter this password for disaster
recovery purposes if you do not have a backed up database
to restore.
See “How to prepare for disaster recovery” on page 191.
NoneEncryption Password
Secures the communication between Symantec Endpoint
Protection Manager and clients with a digital certificate.
Clients use the public key that is contained in Sylink.xml
to decrypt and validate that Symantec Endpoint Protection
Manager signed the certificate with its private key. The
clients then install the policies and the content updates.
When disabled, clients do not validate that the policies and
the content updates were sent by Symantec Endpoint
Protection Manager.
EnabledVerify management
server certificate
before accepting
policies or content
Name of the Microsoft SQL server and the optional instance
name. If the database server was installed with the default
instance, which is no name, type either <host name> or
the host's <IP address>. If the database server was installed
with a named instance, type either <host
name>\<instance_name> or <IP
address>\<instance_name>. Typing <host name> only
works with properly configured DNS.
If you install to a remote database server, you must first
install the SQL Server client components on the computer
that runs the Symantec Endpoint Protection Manager.
<local host name>Database Server
Port that the SQL server is configured with to send and
receive traffic.
Port 0 is not supported, which is used to specify a random,
negotiated port.
1433SQL Server Port
Name of the database that is created.sem5Database Name
Installing Symantec Endpoint Protection ManagerInstalling Symantec Endpoint Protection Manager with a Microsoft SQL database
76
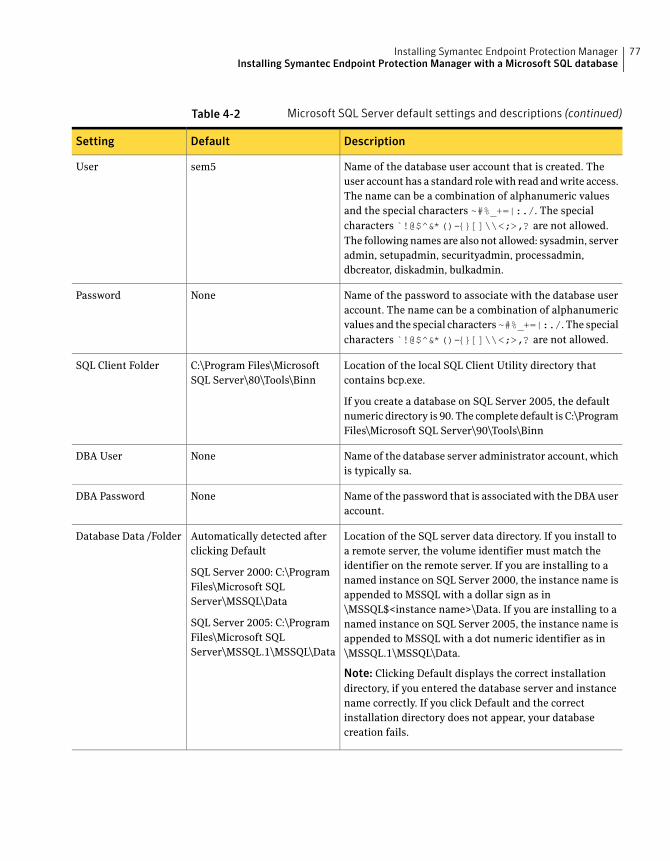
Table 4-2 Microsoft SQL Server default settings and descriptions (continued)
DescriptionDefaultSetting
Name of the database user account that is created. The
user account has a standard role with read and write access.
The name can be a combination of alphanumeric values
and the special characters ~#%_+=|:./. The special
characters `!@$^&*()-{}[]\\<;>,? are not allowed.
The following names are also not allowed: sysadmin, server
admin, setupadmin, securityadmin, processadmin,
dbcreator, diskadmin, bulkadmin.
sem5User
Name of the password to associate with the database user
account. The name can be a combination of alphanumeric
values and the special characters~#%_+=|:./. The special
characters `!@$^&*()-{}[]\\<;>,? are not allowed.
NonePassword
Location of the local SQL Client Utility directory that
contains bcp.exe.
If you create a database on SQL Server 2005, the default
numeric directory is 90. The complete default is C:\Program
Files\Microsoft SQL Server\90\Tools\Binn
C:\Program Files\Microsoft
SQL Server\80\Tools\Binn
SQL Client Folder
Name of the database server administrator account, which
is typically sa.
NoneDBA User
Name of the password that is associated with the DBA user
account.
NoneDBA Password
Location of the SQL server data directory. If you install to
a remote server, the volume identifier must match the
identifier on the remote server. If you are installing to a
named instance on SQL Server 2000, the instance name is
appended to MSSQL with a dollar sign as in
\MSSQL$<instance name>\Data. If you are installing to a
named instance on SQL Server 2005, the instance name is
appended to MSSQL with a dot numeric identifier as in
\MSSQL.1\MSSQL\Data.
Note: Clicking Default displays the correct installation
directory, if you entered the database server and instance
name correctly. If you click Default and the correct
installation directory does not appear, your database
creation fails.
Automatically detected after
clicking Default
SQL Server 2000: C:\Program
Files\Microsoft SQL
Server\MSSQL\Data
SQL Server 2005: C:\Program
Files\Microsoft SQL
Server\MSSQL.1\MSSQL\Data
Database Data /Folder
77Installing Symantec Endpoint Protection ManagerInstalling Symantec Endpoint Protection Manager with a Microsoft SQL database
Table 4-2 Microsoft SQL Server default settings and descriptions (continued)
DescriptionDefaultSetting
Name of the default user name that is used to log on to the
Symantec Endpoint Protection Manager Console for the
first time.
(not changeable)
AdminAdmin User Name
Name of the password to use with the Admin user name
that is used to log on to the Symantec Endpoint Protection
Manager Console for the first time.
NoneAdmin Password
Installing Symantec Endpoint Protection Manager with a MicrosoftSQL database
After you install and configure the SQL server client components, you can install
the Symantec Endpoint Protection Manager.
Note: If you create a new database, SQL Server automatically manages your
database with the simple recovery model and enables Auto Shrink.
To install the Symantec Endpoint Protection Manager
1 Insert the installation CD, and start the installation.
2 In the Welcome panel, do one of the following:
■ In you are installing Symantec Endpoint Protection, click Symantec
Endpoint Protection.
■ If you are installing Symantec Network Access Control, click Symantec
NetworkAccess Control.
3 In the next panel, click Install Symantec Endpoint ProtectionManager.
4 Click through the panels, until the Destination Folder panel appears.
5 In the Destination Folder panel, accept or change the default installation
directory.
6 Do one of the following:
■ To configure the Symantec Endpoint Protection Manger IIS Web as the
only Web server on this computer, check Create a customWeb site, and
then clickNext.
Installing Symantec Endpoint Protection ManagerInstalling Symantec Endpoint Protection Manager with a Microsoft SQL database
78
■ To let the Symantec Endpoint Protection Manager IIS Web server run
with other Web on this computer, check Use the defaultWeb site, and
then clickNext.
7 Click through the panels, until the installation begins.
8 When the installation finishes and the Installation Wizard Complete panel
appears, click Finish
Note: The Server Configuration Wizard panel can take up to 15 seconds to
appear. If you are prompted to restart the computer, restart the computer.
When you log on, the Server Configuration Wizard panel appears
automatically.
To create a SQL database
1 In the Management Server Configuration Wizard panel, check Installmy
first site, and then click Next.
2 In the Server Information panel, accept or change the default values for the
following boxes, and then click Next:
■ Server Name
■ Server Port
■ Server Data Folder
3 In the Site Information panel, in the Site name box, accept or change the
default name, and then click Next.
4 In the Encryption Password panel, in the Encryption Password boxes, type a
password, and then click Next.
Document this password and put it in a safe. You cannot change or recover
the password after you create the database. You must also enter this password
for disaster recovery purposes if you do not have a backed up database to
restore.
5 In the Secure Communications panel, do one of the following:
■ To secure communications with digital certificates, click Yes, and then
click Next.
■ To not secure communications with digital certificates, clickNo, and then
click Next.
6 In the Database Server Choice panel, check Microsoft SQL Server, and then
click Next.
79Installing Symantec Endpoint Protection ManagerInstalling Symantec Endpoint Protection Manager with a Microsoft SQL database
7 In the Define New Database panel, do one of the following:
■ If the database does not exist, check Create a newdatabase
(recommended).
■ If the database does exist, check Use an existing database.
An existing database must define file groups PRIMARY, FG_CONTENT,
FG_LOGINFO, FG_RPTINFO, and FG_INDEX. The user account for database
access must have privileges db_ddladmin, db_datareader, and db_datawriter.
If these requirements are not met, your installation fails. A best practice is
to define a new database.
8 Click Next.
9 In the Microsoft SQL Server Information panel, type your values for the
following boxes, and then click Next:
■ Database Server
If you created a new instance, the format is
<servername_or_IPaddress>\<instance_name>.
■ SQL Port Number
■ Database Name
■ User
■ Password
■ SQL Client folder
■ DBA user
■ DBA password
■ Database Data folder
10 In the Warning dialog prompt, read and understand the warning information
about clear text communications, and then click OK.
11 In the Set Console Password panel, type the same password in the following
boxes, and then click Next.
■ Password
■ Confirm Password
12 In the Configuration Completed panel, do one of the following:
■ To deploy client software with the Migration and Deployment Wizard,
click Yes.
■ To log on to the Symantec Endpoint Protection Manager Console first,
and then deploy client software, click No.
Installing Symantec Endpoint Protection ManagerInstalling Symantec Endpoint Protection Manager with a Microsoft SQL database
80
Refer to the Client Installation chapter for details on how to deploy client
software.
After you install Symantec Endpoint Protection Manager and become
comfortable with administration tasks, you should secure your cryptographic
files in case you need to recover from a disaster. You should also document
your preshared key that you enter during Symantec Endpoint Protection
Manager installation.
See “How to prepare for disaster recovery” on page 191.
Installing additional Symantec Endpoint ProtectionManager Consoles
You can install additional management consoles on remote computers and log on
to and manage Symantec Endpoint Protection Manager. The consoles require Java
runtime software, so if your computer does not run the correct version of Java
runtime, it installs automatically. You may have to adjust your Internet Explorer
settings for ActiveX and Java to permit installation.
Note: If you export client installation packages from a remote management console,
the packages are created on the computer from which you run the remote
management console. Also, when you install servers for failover or load balancing,
you install the management consoles on those computers.
To install additional management consoles
1 On the computer on which to install the management console, start a Web
browser.
2 In the URL box, type one of the following identifiers for the computer that
runs the Symantec Endpoint Protection Manager:
■ http://<computer_name>:9090
■ http://<computer_IP_address>:9090
9090 is the default port, which you can change in the \tomcat\conf\server.xml
file.
3 In the Symantec Policy Management Console window, clickHere to download
and install JRE 1.5.
4 In the License Agreement dialog box, click I accept the terms in the license
agreement, and then click Next.
5 In the Completed dialog box, click Finish.
81Installing Symantec Endpoint Protection ManagerInstalling additional Symantec Endpoint Protection Manager Consoles
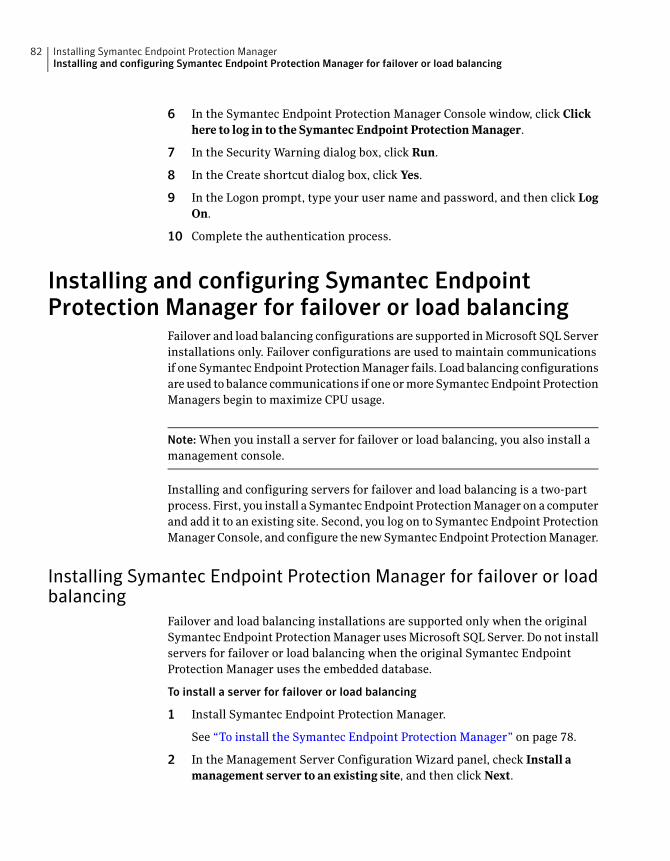
6 In the Symantec Endpoint Protection Manager Console window, click Click
here to log in to the Symantec Endpoint ProtectionManager.
7 In the Security Warning dialog box, click Run.
8 In the Create shortcut dialog box, click Yes.
9 In the Logon prompt, type your user name and password, and then click Log
On.
10 Complete the authentication process.
Installing and configuring Symantec EndpointProtection Manager for failover or load balancing
Failover and load balancing configurations are supported in Microsoft SQL Server
installations only. Failover configurations are used to maintain communications
if one Symantec Endpoint Protection Manager fails. Load balancing configurations
are used to balance communications if one or more Symantec Endpoint Protection
Managers begin to maximize CPU usage.
Note: When you install a server for failover or load balancing, you also install a
management console.
Installing and configuring servers for failover and load balancing is a two-part
process. First, you install a Symantec Endpoint Protection Manager on a computer
and add it to an existing site. Second, you log on to Symantec Endpoint Protection
Manager Console, and configure the new Symantec Endpoint Protection Manager.
Installing Symantec Endpoint Protection Manager for failover or loadbalancing
Failover and load balancing installations are supported only when the original
Symantec Endpoint Protection Manager uses Microsoft SQL Server. Do not install
servers for failover or load balancing when the original Symantec Endpoint
Protection Manager uses the embedded database.
To install a server for failover or load balancing
1 Install Symantec Endpoint Protection Manager.
See “To install the Symantec Endpoint Protection Manager” on page 78.
2 In the Management Server Configuration Wizard panel, check Install a
management server to an existing site, and then click Next.
Installing Symantec Endpoint Protection ManagerInstalling and configuring Symantec Endpoint Protection Manager for failover or load balancing
82
3 In the Server Information panel, accept or change the default values for the
following boxes, and then click Next:
■ Server Name
■ Server Port
■ Server Data Folder
4 In the Microsoft SQL Server Information dialog box, enter the remote server
values for the following boxes:
■ Database Server<\instance_name>
■ SQL Port Number
■ Database Name
■ User
■ Password
■ SQL Client Path (on the local computer)
If this box is not automatically populated with the correct path, you have
incorrectly or not installed Microsoft SQL Client Utility.
5 In Warning prompt, read and understand the text message, and then click
OK.
6 In Management Server Completed panel, click Finish.
Configuring failover and load balancing
By default, a management server that is installed for failover and load balancing
is configured for load balancing where both servers share the same priority. If
you want to change the default after installation, you need to configure it with
the Symantec Endpoint Protection Manager Console.
83Installing Symantec Endpoint Protection ManagerInstalling and configuring Symantec Endpoint Protection Manager for failover or load balancing
To configure failover and load balancing
1 In the Symantec Endpoint Protection Manager Console, click Policies.
2 In the View Policies pane, to the right of Policy Components, click the up
arrow so that it becomes a down arrow,
Click on and highlight Management Server Lists.
3 In the lower-left What would you like to do pane, click Add aManagement
Server List.
Installing Symantec Endpoint Protection ManagerInstalling and configuring Symantec Endpoint Protection Manager for failover or load balancing
84
4 In the Shared Management Server Lists dialog box, under Policy Manager
Servers, click Add>NewPriority three times.
5 Under Management Servers, click on and highlight Priority 1.
6 Click Add>NewServer.
7 In the Host Address dialog box, in the Server Address box, type the fully
qualified domain name or IP address of a Symantec Endpoint Protection
Manager.
If you type an IP address, be sure that it is static, and that all clients can
resolve the IP address.
8 Click OK.
9 Do one of the following:
■ To configure load balancing with the other server, click on and highlight
Priority 1.
■ To configure failover with the other server, click on and highlightPriority
2.
10 Click Add>NewServer.
11 In the Host Address dialog box, in the Server Address box, type the fully
qualified domain name or IP address of a Symantec Endpoint Protection
Manager.
If you type an IP address, be sure that it is static, and that it can be resolved
by all clients.
85Installing Symantec Endpoint Protection ManagerInstalling and configuring Symantec Endpoint Protection Manager for failover or load balancing
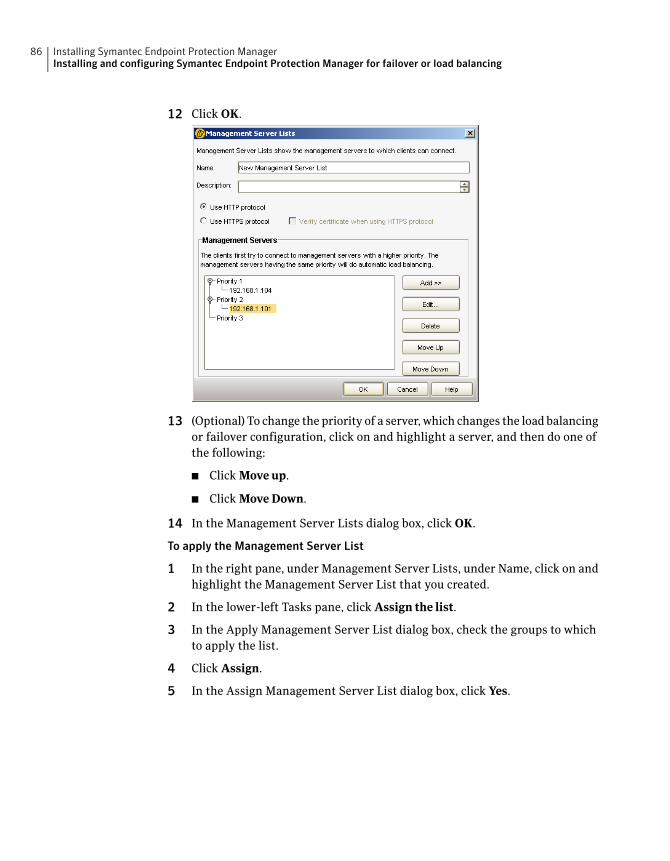
12 Click OK.
13 (Optional) To change the priority of a server, which changes the load balancing
or failover configuration, click on and highlight a server, and then do one of
the following:
■ Click Move up.
■ Click MoveDown.
14 In the Management Server Lists dialog box, click OK.
To apply the Management Server List
1 In the right pane, under Management Server Lists, under Name, click on and
highlight the Management Server List that you created.
2 In the lower-left Tasks pane, click Assign the list.
3 In the Apply Management Server List dialog box, check the groups to which
to apply the list.
4 Click Assign.
5 In the Assign Management Server List dialog box, click Yes.
Installing Symantec Endpoint Protection ManagerInstalling and configuring Symantec Endpoint Protection Manager for failover or load balancing
86
Installing and configuring Symantec EndpointProtection Manager for replication
Replication configurations are supported with both embedded and Microsoft SQL
Server databases. Replication configurations are used for redundancy. All data
from one database is replicated (duplicated) on another database. If one database
fails, you can still manage and control all clients because the other database
contains the client information.
Installing and configuring servers for replication is a two-part process. In an
existing installation site, you first install a new Symantec Endpoint Protection
Manager and database for replication with an existing manager. Second, you log
on to the Symantec Endpoint Protection Manager, and select and schedule the
items to replicate.
When you select the items to replicate, you can choose logs and packages. Packages
also include the updates to virus definitions, client components, and client
software. The size of packages and updates can grow to several gigabytes of
information if you download updates in multiple languages. Consider the amount
of data you replicate when you select these options, along with the bandwidth
consumption. One client package is generally 180 MB in size when compressed.
Installing Symantec Endpoint Protection Manager for replication
You can install servers for replication with both the embedded and Microsoft SQL
Server databases. If you want to install a Microsoft SQL Server database for
replication, you must first install Microsoft SQL Server.
See “Installing Symantec Endpoint Protection Manager with a Microsoft SQL
database” on page 70.
Note: Do not install a new server with a shared secret. New servers that are
installed with shared secrets do not communicate with each other.
To install servers for replication
1 Install Symantec Endpoint Protection Manager.
See “To install the Symantec Endpoint Protection Manager” on page 78.
2 In the Management Server Configuration Wizard panel, check Install an
additional site, and then click Next.
3 In the Server Information panel, accept or change the default values for the
following boxes, and then click Next:
87Installing Symantec Endpoint Protection ManagerInstalling and configuring Symantec Endpoint Protection Manager for replication
■ Server Name
■ Server Port
■ Server Data Folder
4 In the Site Information panel, accept or change the name in the Site Name
box, and then click Next.
5 In the Replication Information panel, type values in the following boxes:
■ Replication Server Name
The name or IP address of the remote Symantec Endpoint Protection
Manager.
■ Replication Server Port
The default is 8443.
■ Administrator Name
The name that is used to log on to the console.
■ Password
The password that is used to log on to the console.
6 Click Next.
7 In the Certificate Warning dialog box, click Yes.
8 In the Database Server Choice panel, do one of the following, and then click
Next.
■ Check Embedded database, and complete the installation.
■ Check Microsoft SQL Server, and complete the installation.
See “To create a SQL database” on page 79.
Configuring Symantec Endpoint Protection Manager for replication
You use the Symantec Endpoint Protection Manager Console to configure servers
for replication. The administrator logon credentials are the credentials that are
used at the first site that you specified for replication.
To configure servers for replication
1 On the computer that you installed the server, click Start > Programs >
Symantec Endpoint ProtectionManager.
2 In the Logon dialog box, in the User Name box, type the administrator ID that
is used to log on to the Symantec Endpoint Protection Manager that uses the
initial database.
Installing Symantec Endpoint Protection ManagerInstalling and configuring Symantec Endpoint Protection Manager for replication
88
3 In Password box, type the password that is associated with the administrator
ID, and then click Log on.
4 In the console, in the left pane, click Admin > Servers.
5 In the left tree, expand Local Site, expand Replication Partner, right-click
Site <remote_host>, and then click Properties.
6 In the Replication Partner Properties dialog box, set the options that you
want for logs, packages, and replication frequency, and then click OK.
Refer to context-sensitive Help and the Administration Guide for Symantec
Endpoint Protection and Symantec Network Access Control for details about
these settings.
7 Right-click Site <remote_host>, and then click ReplicateNow.
Adjusting theSymantec Endpoint ProtectionManagerheap size
The default heap size for Symantec Endpoint Protection Manager is 256 MB. If
the Symantec Endpoint Protection Manager Console is slow or unresponsive, a
larger heap size may increase responsiveness. You can increase the default size
with two registry key values. The two registry key values are -Xms256m and
-Xmx256m. -Xms256m sets the minimum heap size. -Xmx256m sets the maximum
heap size. -Xms256m is the value that is specified for the key JVM Option Number
0. -Xmx256m is the value that is specified for the key JVM Option Number 1.
Symantec Endpoint Protection Manager requires the same values for both keys.
To adjust the Symantec Endpoint Protection Manager heap size
1 Click Start >Run.
2 In the Run dialog box, type regedit, and then press Enter.
3 Locate the following registry key:
HKLM\SYSTEM\CurrentControlSet\Services\semsrv\Parameters\
4 Locate the following keys:
■ JVM Option Number 0
■ JVM Option Number 1
5 Adjust the key values upward, and match the key values.
For example, to create a 1 GB static heap, set JVM Option Number 0 to
-Xms1024m, and set JVM Option Number 1 to -Xmx1024m.
89Installing Symantec Endpoint Protection ManagerAdjusting the Symantec Endpoint Protection Manager heap size
6 Exit Regedit, and then click Start>Settings>ControlPanel>Administrative
Tools.
7 In the Services dialog box, right-click Symantec Endpoint Protection
Manager, and then click Restart.
Upgrading from the embedded database toMicrosoftSQL Server
If you use the embedded database and find that it is insufficient, you can upgrade
the database server to either Windows SQL Server 2000 or 2005. The following
bullets summarize the process and procedures that you must follow:
■ Back up the Java keystore certificate file and the server.xml file and move or
copy the files from the \Symantec\Symantec Endpoint Protection Manager\
directory.
■ Back up the embedded database and move or copy the backup from the
\Symantec\Symantec Endpoint Protection Manager\ directory.
■ Install an instance of Microsoft SQL Server 2000 or 2005.
■ Uninstall the Symantec Endpoint Protection Manager and embedded database
by using the Change uninstallation option.
Warning: You must uninstall the Symantec Endpoint Protection Manager
Manger with the Change uninstallation option or your upgrade will fail. This
option lets you uninstall the embedded database. The Remove option does not
let you uninstall the embedded database.
■ Reinstall the Symantec Endpoint Protection Manager with a Microsoft SQL
Server database
You must reinstall the Symantec Endpoint Protection Manager on the same
computer, or on a computer with the original IP address and host name.
■ Restore the Java keystore certificate
■ Restore the embedded database to the Microsoft SQL Server database
■ Reconfigure the Symantec Endpoint Protection Manager to recognize Microsoft
SQL Server
The upgrade process is very similar to the disaster recovery process because you
must uninstall your existing Symantec Endpoint Protection Manager. Therefore,
you must prepare for disaster recovery to successfully perform the upgrade, and
create a well-formed disaster recovery file.
Installing Symantec Endpoint Protection ManagerUpgrading from the embedded database to Microsoft SQL Server
90
See “How to prepare for disaster recovery” on page 191.
Best Practice BeforeUpgrading: Perform these upgrade procedures on test
computers before you perform these upgrade procedures on production computers.
Warning: Do not attempt this upgrade without creating or be in possession of a
well-formed disaster recovery file. Do not attempt this upgrade before moving
your backed up keystore, server.xml file, and database out of the
\Symantec\Symantec Endpoint Protection Protection Manager\ directory. These
files are deleted during the uninstall process.
Backing up the keystore and server.xml files
If you have not prepared for disaster recovery, you must copy or move these files.
The uninstallation process deletes these files from their original location.
See “How to prepare for disaster recovery” on page 191.
To backup the keystore and server.xml files
◆ Move or copy all files in the following directory to a directory that is not
beneath \Symantec\Symantec Endpoint Protection Manager\
\Symantec\Symantec Endpoint Protection Manager\Server Private Key
Backup\
The files are named keystore_<date>.jks and server_<date>.xml
Backing up the embedded database
You will restore this database to Microsoft SQL Server.
To back up the embedded database
1 On the computer that runs the embedded database, click Start > Programs
>SymantecEndpointProtectionManager>DatabaseBackupandRestore.
2 In the Database Back up and Restore dialog box, click Back up.
This backup may take a few minutes. The backup files are .zip files that are
located in \\Program Files\Symantec\Symantec Endpoint Protection
Manager\data\backup\.
3 Click Exit.
4 Move or copy the backup file to a directory that is not beneath
\Symantec\Symantec Endpoint Protection Manager.
If you do not perform this step, your upgrade will fail because you will
uninstall the backup file.
91Installing Symantec Endpoint Protection ManagerUpgrading from the embedded database to Microsoft SQL Server
Installing an instance of Microsoft SQL Server 2000 or 2005
You must Install Microsoft SQL Server 2000 or 2005 with SQL server authentication
and know what port your server uses for network communications. You must
enter this port number when you reinstall the Symantec Endpoint Protection
Manager with a Microsoft SQL Server database.
To install an instance of Microsoft SQL Server 2000 or 2005
◆ Install and configure a Microsoft SQL Server instance on the computer that
runs the Symantec Endpoint Protection Manager and the embedded database,
or on a different computer.
See “Microsoft SQL Server 2000 installation and configuration requirements”
on page 71.
See “Microsoft SQL Server 2005 installation and configuration requirements”
on page 72.
See “To create a SQL database” on page 79.
Uninstalling the Symantec Endpoint Protection Manager with anembedded database
The most important thing to remember in this procedure is to use the Change
feature and not the Remove feature. The Remove feature does not let you uninstall
the embedded database. If you do not uninstall the embedded database, your
upgrade will fail.
Touninstall theSymantec Endpoint ProtectionManagerwith anembeddeddatabase
1 Click Start > Settings > Control Panel >Add orRemove Programs.
2 In the Add or Remove Programs dialog box, click Symantec Endpoint
ProtectionManager > Change.
3 In the Welcome panel, click Next.
4 In the Program Maintenance panel, check Remove, and then click Next.
5 In the Remove panel, checkRemovethedatabaseduringuninstall, and then
click Next.
6 In the Remove the Program panel, click Remove.
If an error message appears about file access, restart the computer, and repeat
this procedure without logging on to the Symantec Endpoint Protection
Manager Console.
Installing Symantec Endpoint Protection ManagerUpgrading from the embedded database to Microsoft SQL Server
92
Reinstalling the Symantec Endpoint Protection Manager with aMicrosoft SQL database
You need the original encryption password to reinstall the Symantec Endpoint
Protection Manager with a Microsoft SQL database. This password should be in
your well-formed disaster recovery file. If it is not, you must find someone who
knows the password.
To reinstall the Symantec Endpoint Protection Manager with a Microsoft SQL
database
1 Open your well-formed disaster recovery file.
See “How to prepare for disaster recovery” on page 191.
2 Insert the installation CD, and begin the installation for Symantec Endpoint
Protection Manager with a Microsoft SQL Server database.
See “Installing Symantec Endpoint Protection Manager with a Microsoft SQL
database” on page 78.
3 When the Welcome to the Management Server Configuration Wizard panel
appears, check Installmy first site, and then click Next.
4 Continue the installation and enter the same values that you used for the
embedded database. For example, enter the same server name and port that
was used for the embedded database installation. Enter the same encryption
password that was used for the embedded database installation, and so forth.
These values are required to correctly regenerate the sylink.xml file.
5 When the installation completes, and the Management Server Configuration
Wizard Completed panel appears, check No, and then click Finish.
6 Log on to the Symantec Endpoint Protection Manager Console.
Restoring the original Java keystore file
The keystore file contains the public certificate that is used to secure
communications. You need the original private key password to restore this file.
This password is in your well-formed disaster recovery file if one was created
during the original installation. The password is also in the
server_<timestamp>.xml file.
See “How to prepare for disaster recovery” on page 191.
To restore the original Java keystore file
1 Log on to the Console, and then click Admin.
2 In the Admin pane, under Tasks, click Servers.
93Installing Symantec Endpoint Protection ManagerUpgrading from the embedded database to Microsoft SQL Server
3 Under View Servers, expand Local Site, and then click the computer name
that identifies the local site.
4 Under Tasks, click Manage Server Certificate.
5 In the Welcome panel, click Next.
6 In the Manage Server Certificate panel, check Update theServerCertificate,
and then click Next.
7 Under Select the type of certificate to import, check JKS keystore, and then
click Next.
If you have implemented one of the other certificate types, select that type.
8 In the JKS Keystore panel, click Browse, locate and select your backed up
keystore_<timestamp>.jks keystore file, and then click OK.
9 Open your disaster recovery text file, and then select and copy the keystore
password.
10 Activate the JKS Keystore dialog box, and then paste the keystore password
into the Keystore and Key boxes.
The only supported paste mechanism is Ctrl + V.
11 Click Next.
If you get an error message that says you have an invalid keystore file, you
probably entered invalid passwords. Retry the password copy and paste. This
error message is misleading.
12 In the Complete panel, click Finish.
13 Log off the Console.
Reconfiguring the Symantec Endpoint Protection Manager
The final procedure is to reconfigure the Symantec Endpoint Protection Manager.
To reconfigure the Symantec Endpoint Protection Manager
1 Click Start > Settings > Control Panel >Administrative Tools > Services.
2 In the Services window, in the right pane, right-click Symantec Endpoint
ProtectionManager, and then click Stop.
3 ClickStart>Programs>SymantecEndpointProtectionManager>Database
BackUp andRestore
4 In the Database Back Up and Restore dialog box, clickRestore.
5 In the prompt, click Yes.
Installing Symantec Endpoint Protection ManagerUpgrading from the embedded database to Microsoft SQL Server
94
6 In the Select Backup file dialog box, browse to and select the database to
restore, and then click OK..
7 After the database is restored, click Exit.
8 Click Start > Programs > Symantec Endpoint ProtectionManager >
Management Server ConfigurationWizard.
9 In the Welcome panel, click Reconfigure themanagement server , and then
click Next.
10 Complete the reconfiguration.
Be sure that your input values match the values that you entered when you
installed the Symantec Endpoint Protection Manager. For example, if you
created a named instance, be sure to append the instance name to the host
name as in <host_name>\<instance_name>.
11 Log on to the Symantec Endpoint Protection Manager, and then clickClients.
12 Right-click your groups, and then click RunCommand onGroup >Update
Content.
If the clients do not respond after about one half hour, restart the clients.
Uninstalling Symantec Endpoint ProtectionManagerWhen you uninstall Symantec Endpoint Protection Managers, all Symantec
components are uninstalled except exported client installation packages. However,
you have the option to not uninstall the embedded database and Microsoft SQL
Server database and backup files. For all installations, the database backup files
are located on the computer that runs the Symantec Endpoint Protection Manager.
Use the standard Windows Add or Remove Programs feature to uninstall Symantec
Endpoint Protection Manager. Also, select Change to have the option to uninstall
the database. If you select Remove, the database is not uninstalled.
Note: You must manually delete all directories that contain exported client
installation packages, including those directories that were created with the
Installation and Migration Wizard. You must also manually delete all backup files
and directories, including those backup files and directories that contain private
keys, certificates, and database files.
95Installing Symantec Endpoint Protection ManagerUninstalling Symantec Endpoint Protection Manager

Installing Symantec Endpoint Protection ManagerUninstalling Symantec Endpoint Protection Manager
96
Installing Symantec client
software
This chapter includes the following topics:
■ About Symantec client installation software
■ About installing unmanaged client software
■ Creating client installation packages
■ About deploying client software from a mapped drive
■ Deploying client software with the Push Deployment Wizard
■ Deploying client software with Find Unmanaged Computers
■ Importing computer lists
■ About installing and deploying software with Altiris
■ Third-party installation options
■ About uninstalling client software
About Symantec client installation softwareTwo products of Symantec client installation software are available. One product
is Symantec Endpoint Protection. The other product is Symantec Network Access
Control.
5Chapter
Note: Symantec Endpoint Protection installations require at least 700 MB of hard
disk space during the installation process. If this amount is not available, the
installation fails.
About Symantec Endpoint Protection
Symantec Endpoint Protection contains many components that you can select to
install or not install. When you install Symantec Endpoint Protection, you have
the following options as to what components to install:
■ Core Files
This option is required for all installations.
■ Antivirus and Antispyware
This option installs core antivirus and antispyware software, and lets you
select these additional components:
■ AntiVirus Email Tools
Note: For performance reasons, the Symantec Endpoint Protection installer
blocks Internet Email Auto-Protect from installation on supported Microsoft
Server operating systems. For example, you cannot install Internet Email
Auto-Protect on a computer that runs Windows Server 2003.
■ Proactive Threat Protection
This option does not install core software, but lets you select these components:
■ Proactive Threat Scan
■ Application Control and Device Control
■ Network Threat Protection
This option does not install core software, but lets you select these components:
■ Firewall and Intrusion Prevention
Installing Symantec client softwareAbout Symantec client installation software
98
Note: Symantec Endpoint Protection also installs Symantec Network Access
Control software, but Symantec Network Access Control is not enabled. When
you update the Symantec Endpoint Protection Manager Console for Symantec
Network Access Control, the client Symantec Network Access Control feature
automatically appears in the client user interface. Therefore, if you install
Symantec Endpoint Protection and purchase Symantec Network Access Control
at a later date, you do not need to install Symantec Network Access Control client
software. If your client computers run Symantec Network Access Control, and if
you purchased Symantec Endpoint Protection software at a later date, you over
install Symantec Endpoint Protection software. You do not need to first uninstall
Symantec Network Access Control.
About Symantec Network Access Control software
Symantec Network Access Control software does not contain the components
that you can select to install or not install. If your client computers run Symantec
Endpoint Protection and if you purchased Symantec Network Access Control
software at a later date, you do not need to install Symantec Network Access
Control software. After you update Symantec Endpoint Protection Manager for
Symantec Network Access Control, the Symantec Network Access Control feature
on clients appears automatically.
About Windows Installer software version 3.1
All client software installations require that all client computers run Windows
Installer (MSI) version 3.1. If 3.1 is not running on client computers, the Symantec
client installation software installs it automatically.
Note: If you run msiexec in a command prompt on a computer that runs MSI 3.1,
the version that is displayed is 3.01.4000.x.
About groups and clients
Groups can contain both 32-bit clients and 64-bit clients. However, you must
deploy both 32-bit packages and 64-bit packages to separately to the clients. The
32-bit clients ignore the 64-bit installation packages, and the 64-bit clients ignore
the 32-bit installation packages.
If your environment has a mix of Symantec Endpoint Protection clients and
Symantec Network Access Control clients, it is a best practice to group these
clients separately. For example, a best practice is to not place Symantec Endpoint
Protection clients in a group that also contains Symantec Network Access Control
99Installing Symantec client softwareAbout Symantec client installation software
clients. Also, if you install the Symantec Endpoint Protection Manager for
Symantec Network Access Control, the Symantec Endpoint Protection clients
automatically support Symantec Network Access Control.
When you create client installation packages with the Symantec Endpoint
Protection Manager Console, you can specify a group to contain the clients. If you
reinstall a client software package on clients, and if the package specifies a
different group, the clients still appear in their original group. The clients do not
appear in the new group. You can only move clients to new groups with the
Symantec Endpoint Protection Manager Console.
About installing unmanaged client softwareIf you do not want to manage client software, you can install unmanaged software.
However, the installation of unmanaged Symantec Network Access Control client
software is not recommended. To install unmanaged client software, install the
software by using the CD Start menu. On the Symantec Endpoint Protection CD,
the unmanaged installation files appear in the SEP directory. On the Symantec
Network Control Access CD, the unmanaged installation files appear in the SNAC
directory.
Optionally, you can export unmanaged client installation packages from the
Symantec Endpoint Protection Manager Console. After you export the unmanaged
packages, do not assign the packages to groups for auto-upgrade. If you assign
the packages to groups, the clients in the group will appear in the console after
software installation. However, you cannot manage these clients.
You can also deploy unmanaged software by using the ClientRemote.exe that is
located in the TOOLS\PUSHDEPLOYMENTWIZARD directory on the installation
CD. During deployment, you select the files in either the SEP or the SNAC
directories on the installation CD.
Creating client installation packagesYou can create two types of client installation packages. One type is 32-bit and
the other type is 64-bit. You can also create two 32-bit packages and 64-bit
packages. One type is the default installation package that is created when you
install the Symantec Endpoint Protection Manager. If you install this package,
clients appear in the Temporary group, and receive the default policies. The other
type is an installation package that is customized for a group, which is typically
not the Temporary group. This installation package may contain customized
group polices and settings.
Installing Symantec client softwareAbout installing unmanaged client software
100
You can create client installation packages for groups at any time. If you have
customized policies for a group that are stable and do not change regularly, you
can create a client installation package for that group. You do not, however, have
to re-install client installation packages to existing client computers in a group
to change a policy. As you make changes to policies in a group, these changes are
automatically propagated to the installed clients in that group.
Note: The Administration Guide for Symantec Endpoint Protection and Symantec
Network Access Control contains complete information about client installation
packages.
To create client installation packages
1 In the Symantec Policy Management Console, click Admin.
2 In the Tasks pane, click Install Packages.
3 In the right pane, under Package Name, select the package to export.
4 In the lower-left pane, under Tasks, click Export the Package.
5 In the Export Package dialog box, click Browse.
6 In the Save dialog box, browse to and select the directory to contain the
exported package, and then click Save.
7 In the Export Package dialog box, set the other options according to your
installation goals.
For details about the other options in this dialog box, click Help.
8 Click OK.
About deploying client software fromamapped driveAfter you export a client installation package to a directory, you can share that
directory, and then have users map the directory from client computers. The users
can then install the client software from the mapped drive.
Note: During Symantec Endpoint Protection client software installation, the
mapped drive becomes temporarily disconnected. This activity is known and
expected. This activity does not occur when you install Symantec Network Access
Control client software.
101Installing Symantec client softwareAbout deploying client software from a mapped drive
Deploying client software with the Push DeploymentWizard
The Push Deployment Wizard either appears automatically when you use the
deployment wizard, or you can start it manually. Either way, you should have an
idea of what client software package you want to deploy and in what folder the
package exists. You have to locate it during deployment.
Note: This procedure describes how to manually start the Push Deployment
Wizard. You can also start this utility at the end of using the Installation and
Migration Wizard.
To deploy client software with the Push Deployment Wizard
1 Display the contents of the \Symantec\Symantec Endpoint Protection
Manager\tomcat\bin directory, and then double-click ClientRemote.exe.
2 In the Push Deployment Wizard panel, clickNext.
3 In the Select Install Source Location panel, under Deployment Type, check
Client Install if it is not checked., and then click Browse.
4 In the Open dialog box, locate and select the directory that contains the
installation files, and then click Open.
5 In the Select Install Source Location panel, click Next.
6 In the Select Computers panel, in the left pane under Available Computers,
expand the trees and select the computers on which to install the client
software, and then click Add.
As an alternative, you can import a workgroup or domain of computers, and
also a text file list of computers.
See “Importing computer lists” on page 104.
7 In the Remote Client Authentication dialog box, type a User name and
password that can authenticate to the Windows Domain or Workgroup that
contains the computers, and then click OK.
8 When you have selected all of the computers and they appear in the right
pane, click Finish.
Installing Symantec client softwareDeploying client software with the Push Deployment Wizard
102
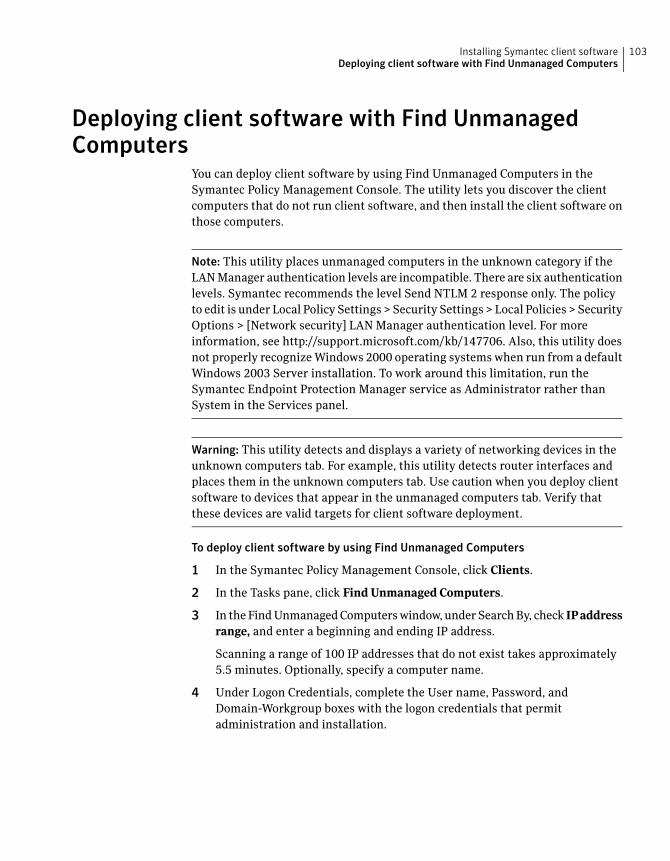
Deploying client software with Find UnmanagedComputers
You can deploy client software by using Find Unmanaged Computers in the
Symantec Policy Management Console. The utility lets you discover the client
computers that do not run client software, and then install the client software on
those computers.
Note: This utility places unmanaged computers in the unknown category if the
LAN Manager authentication levels are incompatible. There are six authentication
levels. Symantec recommends the level Send NTLM 2 response only. The policy
to edit is under Local Policy Settings > Security Settings > Local Policies > Security
Options > [Network security] LAN Manager authentication level. For more
information, see http://support.microsoft.com/kb/147706. Also, this utility does
not properly recognize Windows 2000 operating systems when run from a default
Windows 2003 Server installation. To work around this limitation, run the
Symantec Endpoint Protection Manager service as Administrator rather than
System in the Services panel.
Warning: This utility detects and displays a variety of networking devices in the
unknown computers tab. For example, this utility detects router interfaces and
places them in the unknown computers tab. Use caution when you deploy client
software to devices that appear in the unmanaged computers tab. Verify that
these devices are valid targets for client software deployment.
To deploy client software by using Find Unmanaged Computers
1 In the Symantec Policy Management Console, click Clients.
2 In the Tasks pane, click FindUnmanaged Computers.
3 In the Find Unmanaged Computers window, under Search By, check IPaddress
range, and enter a beginning and ending IP address.
Scanning a range of 100 IP addresses that do not exist takes approximately
5.5 minutes. Optionally, specify a computer name.
4 Under Logon Credentials, complete the User name, Password, and
Domain-Workgroup boxes with the logon credentials that permit
administration and installation.
103Installing Symantec client softwareDeploying client software with Find Unmanaged Computers
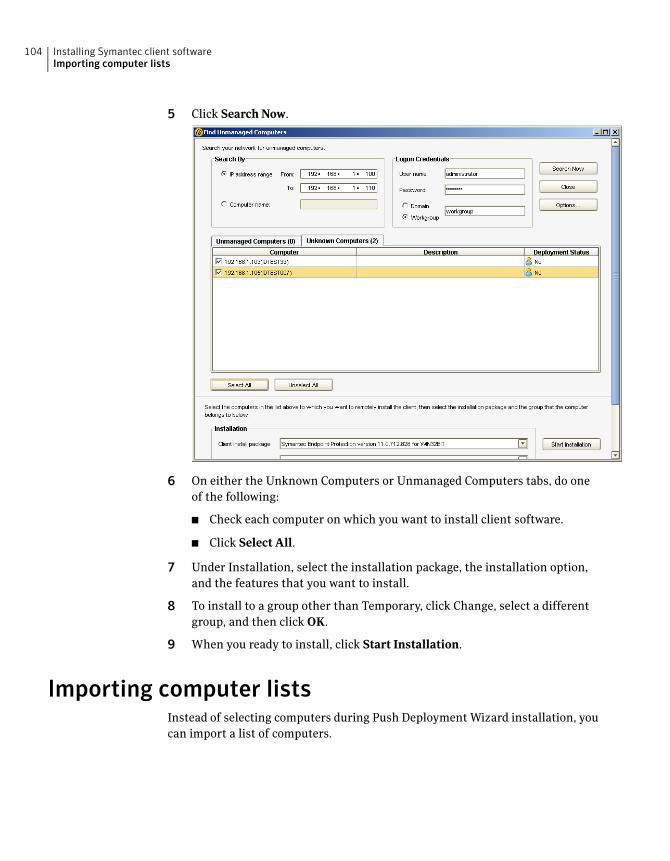
5 Click SearchNow.
6 On either the Unknown Computers or Unmanaged Computers tabs, do one
of the following:
■ Check each computer on which you want to install client software.
■ Click Select All.
7 Under Installation, select the installation package, the installation option,
and the features that you want to install.
8 To install to a group other than Temporary, click Change, select a different
group, and then click OK.
9 When you ready to install, click Start Installation.
Importing computer listsInstead of selecting computers during Push Deployment Wizard installation, you
can import a list of computers.
Installing Symantec client softwareImporting computer lists
104
Creating a text file of computers to install
You can create a text file of computer IP addresses, import this text file during
Push Deployment Wizard deployment, and then deploy the client software to the
specified computers. You can also create the text file by exporting a list of
computers that you type one by one to a text file before you begin client
deployment.
Note: Creating a text file of IP addresses is not recommended for the computers
that receive DHCP-assigned IP addresses.
To create a text file with IP addresses to import
1 In a text editor such as Notepad, create a new text file.
2 Type the IP address of each computer that you want to import on a separate
line.
For example:
192.168.1.1
192.168.1.2
192.168.1.3
You can comment out the IP addresses that you do not want to import with
a semicolon (;) or colon (:). For example, if you included addresses in your list
for the computers that are on a subnet that you know is down, you can
comment them out to eliminate errors.
3 Save the file to a directory.
Importing a text file of computers that you want to install
You import the text file during Push Deployment Wizard installation.
To import a text file of computers that you want to install
1 In the Select Computers panel, click Select.
2 In the Client Details dialog box, click Import.
105Installing Symantec client softwareImporting computer lists
3 Locate and double-click the text file that contains the IP addresses to import.
During the authentication process, you may need to provide a user name and
password for the computers that require authentication. The installation
program also checks for error conditions. You are prompted to view this
information on an individual computer basis or to write the information to
a log file for later viewing.
4 Finish the installation.
About installing and deploying software with AltirisYou can install and deploy Symantec client software by using software from Altiris,
now part of Symantec. Altiris provides a free, Integrated Component for Symantec
Endpoint Protection that provides default installation capabilities, integrated
client management, and high-level reporting.
Altiris software enables information technology organizations to manage, secure,
and service heterogeneous IT assets. It also supports software delivery, patch
management, provisioning, and many other management capabilities. Altiris
software helps IT align services to drive business objectives, deliver audit-ready
security, automate tasks, and reduce the cost and complexity of management.
For information about the Integrated Component for Symantec Endpoint
Protection, see https://kb.altiris.com/article.asp?article=35819&p=1.
For information about Altiris, see http://www.altiris.com.
To download the Integration Component for Symantec Endpoint Protection or
other Altiris solutions, see http://www.altiris.com/Download.aspx.
Third-party installation optionsSymantec client software supports third-party installation options that you can
use to deploy client software. This support, however, requires advanced knowledge
of Windows or third-party management tools. Larger-scale networks are more
likely to benefit by using these advanced options to install Symantec client
software.
About installing clients using third-party products
You can install Symantec clients by using a variety of third-party products,
including Microsoft Active Directory, Tivoli, Microsoft Systems Management
Server (SMS), and Novell ZENworks. The only tested and supported third-party
products are Novell ZENworks, Microsoft Active Directory, and Microsoft SMS.
Installing Symantec client softwareAbout installing and deploying software with Altiris
106
About customizing installations by using .msi options
The Symantec client software installation packages are Windows Installer (.msi)
files that are fully configurable and deployable by using the standard Windows
Installer options. You can use the environment management tools that support
.msi deployment, such as Active Directory or Tivoli, to install clients on your
network.
See “About configuring MSI command strings” on page 177.
About installing clients with Microsoft SMS 2003
System administrators can use Microsoft Systems Management Server (SMS) to
install Symantec client software. We assume that system administrators who use
SMS have previously installed software with SMS. As a result, we assume that
you do not need detailed information about installing Symantec client software
with SMS.
Symantec client installation software requires that Microsoft Installer 3.1 be
running on client computers before the installation. This software is automatically
installed if it is not on client computers, but only when you deploy with a single
executable setup.exe. This software is not automatically installed if you deploy
with the MSI file. Computers that run Windows Server 2003 with Service Pack 2,
and Windows Vista include Microsoft Installer 3.1 or greater. If necessary, first
deploy WindowsInstaller-x86.exe that is contained in the SEP and the SNAC
installation directories on the installation CD. Upgrading to MSI 3.1 also requires
a computer restart.
To create and distribute Symantec client software with SMS 2003, you typically
complete the following tasks:
■ Create a software installation package with Symantec Endpoint Protection
Manager Console that contains the software and policies to install on your
client computers. Additionally, this software installation package must contain
a file named Sylink.xml, which identifies the server that manages the clients.
■ Create a source directory and copy Symantec client installation files into that
source directory. For example, you would create a source directory that contains
the installation files for Symantec client software.
■ Create a package, name the package, and identify the source directory as part
of the package.
■ Configure the Program dialog box for the package to specify the executable
that starts the installation process, and possibly specify the MSI with
parameters.
■ Distribute the software to specific Collections with Advertising.
107Installing Symantec client softwareThird-party installation options
Note: (This note applies to SMS version 2.0 and earlier.) If you deploy files with
SMS, you might need to disable the Show Status Icon On The Toolbar For All
System Activity feature on the clients in the Advertised Programs Monitor. In
some situations, Setup.exe might need to update a shared file that is in use by the
Advertised Programs Monitor. If the file is in use, the installation fails.
Warning: Do not install a package that is created with installation files that are
copied from the installation CD or other media without including Sylink.xml. You
must include a Sylink.xml file that gets created after installing and using Symantec
Endpoint Protection Manager Console. At a minimum, this file identifies the
management server to which the clients will report. If you do not include this file
and install a package that was created with installation files only, you will install
unmanaged clients. As a result, you could potentially install 1,000 or more
unmanaged clients with default settings, if you manage a large enterprise.
For more information on using SMS, see your Microsoft Systems Management
Server documentation.
Installing clients with Active Directory Group Policy Object
You can install Symantec client software by using a Windows 2000/2003 Active
Directory Group Policy Object. The easiest way to implement group policy is with
Microsoft's Group Policy Management Console with Service Pack 1 or later. This
software is freely available from Microsoft's Web site, and runs on Windows Server
2003. The procedures for installing client software with Active Directory Group
Policy Object assume that you have installed this software and use Windows 2003
Active Directory.
To install Symantec client software by using Active Directory Group Policy Object,
you must do the following:
■ Create the administrative install image
■ Copy Sylink.xml to the installation files
■ Stage the administrative install image
■ Create a GPO software distribution
■ Create a Windows Installer 3.1 startup script
■ Add computers to the organizational unit
Installing Symantec client softwareThird-party installation options
108
Before you install
The installation software requires that client computers contain and can run
Windows Installer 3.1 or higher. By default, client computers meet this requirement
if they run Windows XP with Service Pack 2 and higher, Windows 2003 Server
with Service Pack 1 and higher, and Windows Vista. If client computers do not
meet this requirement, all other installation methods automatically install
Windows Installer 3.1 by bootstrapping it from the installation files.
For security reasons, Windows Group Policy Object does not permit bootstrapping
to the executable file WindowsInstaller*.exe from the installation files. Therefore,
before you install Symantec client software, you must run this file on the
computers that do not contain and run Windows Installer 3.1. You can run this
file with a computer startup script. Before you decide to use GPO as an installation
method, you must develop an approach to update the client computers that do
not contain and run Windows Installer 3.1.
The Symantec client installation uses standard Windows Installer .msi files. As
a result, you can customize the client installation with .msi properties and the
features as documented in Appendix A.
Finally, confirm that your DNS server is set up correctly. The correct setup is very
important because Active Directory relies heavily on your DNS server for computer
communication. To test the setup, ping the Windows Active Directory computer,
and then ping in the opposite direction. Use the fully qualified domain name; the
use of the computer name alone does not call for a new DNS lookup. Use the
following format:
ping computername.fullyqualifieddomainname.com
You should also test GPO installation with a small number of computers before
the production deployment. If DNS is not configured properly, GPO installations
can take an hour or more.
Creating the administrative installation image
Group Policy Object installations that use Windows Installer 3.0 and lower require
administrative images of the client installation files. This image is not a
requirement for 3.1 and higher installations and is optional. If you do not create
the administrative image, you must still copy the contents of the SEP folder on
the CD to your computer.
To create the administrative installation image
1 Copy the contents of SEP folder on the CD to your computer.
2 From a command prompt, navigate to the SEP folder and type msiexec /a
"Symantec AntiVirus.msi"
109Installing Symantec client softwareThird-party installation options
3 In the Welcome panel, click Next.
4 In the Network Location panel, enter the location where you want to create
the administrative install image, and then click Install.
5 Click Finish.
The administrative install image is created in the location that you specified.
Copying Sylink.xml to the installation files
When you install a Symantec Endpoint Protection Manager, the installation creates
a file named Sylink.xml. Symantec clients read the contents of this file to know
which Symantec Endpoint Protection Manager manages the client. If you do not
copy this file to the installation files before you install the client software, you
will create unmanaged clients. If you have not created at least one new group with
the management console, the Sylink.xml file causes the clients to appear in the
Temporary group.
Note: This information does not apply to packages that are exported with the
Symantec Endpoint Protection Manager Console. These packages contain
sylink.xml.
To copy Sylink.xml to the installation files
1 If you have not done so, install a Symantec Endpoint Protection Manager.
2 Locate a Sylink.xml file in one of the outbox folders.
By default, these folders are located at \\Program Files\Symantec\Symantec
Endpoint Protection Manager\data\outbox\agent\<uid>\. You may have to
open and read the Sylink.xml files in the different <uid> files with a text
editor to find the desired file.
3 If necessary, copy Sylink.xml to removable media.
4 Copy Sylink.xml by using one of the following:
■ If you created an administrative installation file image, overwrite the
Sylink.xml file in folder \\<install_directory>\Program Files\Symantec
Endpoint Protection Manager\.
■ If you did not create an administrative installation file image, copy the
contents of the SEP folder on the CD to a destination folder on your
computer. Then, copy the Sylink.xml file into that destination folder.
Installing Symantec client softwareThird-party installation options
110
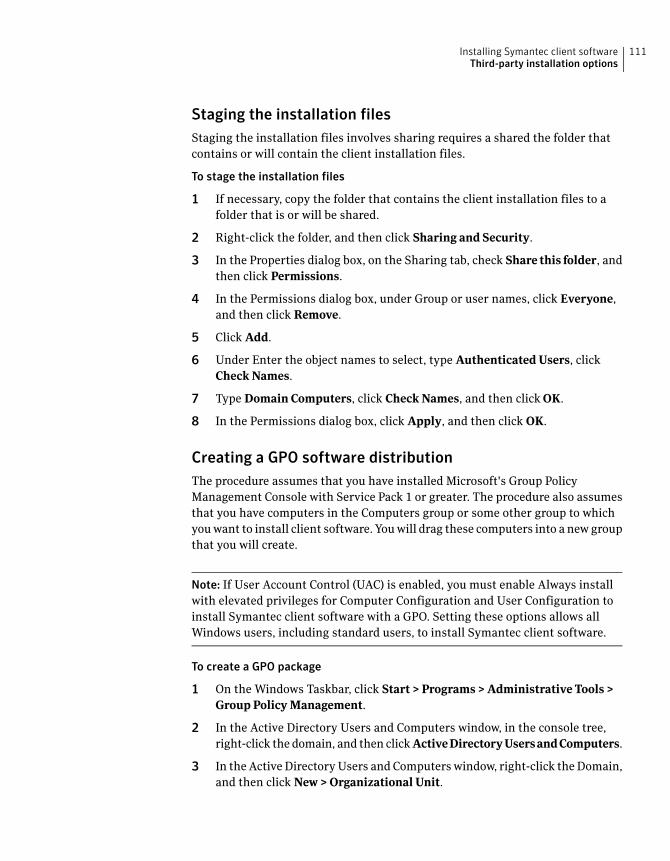
Staging the installation files
Staging the installation files involves sharing requires a shared the folder that
contains or will contain the client installation files.
To stage the installation files
1 If necessary, copy the folder that contains the client installation files to a
folder that is or will be shared.
2 Right-click the folder, and then click Sharing and Security.
3 In the Properties dialog box, on the Sharing tab, check Share this folder, and
then click Permissions.
4 In the Permissions dialog box, under Group or user names, click Everyone,
and then click Remove.
5 Click Add.
6 Under Enter the object names to select, type AuthenticatedUsers, click
CheckNames.
7 Type Domain Computers, click CheckNames, and then clickOK.
8 In the Permissions dialog box, click Apply, and then click OK.
Creating a GPO software distribution
The procedure assumes that you have installed Microsoft's Group Policy
Management Console with Service Pack 1 or greater. The procedure also assumes
that you have computers in the Computers group or some other group to which
you want to install client software. You will drag these computers into a new group
that you will create.
Note: If User Account Control (UAC) is enabled, you must enable Always install
with elevated privileges for Computer Configuration and User Configuration to
install Symantec client software with a GPO. Setting these options allows all
Windows users, including standard users, to install Symantec client software.
To create a GPO package
1 On the Windows Taskbar, click Start > Programs >Administrative Tools >
GroupPolicyManagement.
2 In the Active Directory Users and Computers window, in the console tree,
right-click the domain, and then clickActiveDirectoryUsersandComputers.
3 In the Active Directory Users and Computers window, right-click the Domain,
and then click New>Organizational Unit.
111Installing Symantec client softwareThird-party installation options
4 In the New Object dialog box, in the Name box, type a name for your
organizational unit, and then click OK.
5 In the Active Directory Users and Computers window, click File > Exit.
6 In the Group Policy Management window, in the console tree, right-click the
organizational unit that you created, and then click Create and Link aGPO
Here.
You may need to refresh the domain to see your new organizational unit.
7 In the New GPO dialog box, in the Name box, type a name for your GPO, and
then click OK.
8 In the right pane, right-click that GPO that you created, and then click Edit.
9 In the Group Policy Object Editor window, in the left pane, under the Computer
Configuration, expand Software Settings.
10 Right-click Software installation, and then click New>Package.
11 In the Open dialog box, type the Universal Naming Convention (UNC) path
that points to and contains the MSI package.
Use the format as shown in the following example:
\\<server name>\<SharedDir>\Symantec AntiVirus.msi
12 Click Open.
13 In the Deploy Software dialog box, click Assigned, and then click OK.
The package appears in the right pane of the Group Policy Object Editor
window if you select Software Installation.
To configure templates for the package
1 In the Group Policy Object Editor window, in the console tree, display and
enable the following settings:
Always install with elevated
privileges
Windows Installer
>
Windows
Components >
Administrative
Templates >
Computer
Configuration >
Always wait for the network at
computer startup and logon >
Logon >System >Administrative
Templates >
Computer
Configuration >
Software Installation policy
processing
Group Policy >System >Administrative
Templates >
Computer
Configuration >
Always Install with elevated
privileges
Windows Installer
>
Windows
Components >
Administrative
Templates >
User Configuration >
2 Close the Group Policy Object Editor window.
Installing Symantec client softwareThird-party installation options
112
3 In the Group Policy Management window, in the left pane, right-click the
GPO that you edited, and then click Enforced.
4 In the right pane, under Security Filtering, click Add.
5 In the dialog box, under Enter the object name to select, type Domain
Computers, and then click OK.
Creating a Windows Installer 3.1 Startup script
You must install Windows Installer 3.1 on the computers that contain and run
earlier versions of Windows Installer. You can display Windows Installer versions
by running msiexec /? in a command prompt. For security reasons, the GPO
installation package that you created and that runs the .msi installation files
cannot also install Windows Installer 3.1, a prerequisite. How you install Windows
Installer 3.1 on computers is up to you.
Note:Restricted users cannot run Windows Installer 3.1, and restricted users with
elevated privileges cannot run Windows Installer 3.1. Restricted users are set
with the local security policy.
One way to install Windows Installer 3.1 is with a GPO computer startup script.
Startup scripts execute before the GPO .msi installation files when computers
restart. If you use this approach, be aware that the startup script executes and
reinstalls Windows Installer every time the computer is restarted. If you install
it in silent mode , however, users experience a slight delay before they see the
logon screen. Symantec client software is only installed once with a GPO.
To install Windows Installer 3.1
1 In the Group Policy Management Window, in the console tree, expand your
organizational unit, right-click your package, and then click Edit.
2 In the Group Policy Object Editor window, in the console tree, expand
Computer Configuration >Windows Settings, and then click Scripts
(Startup/Shutdown).
3 In the right pane, double-click Startup.
4 In the Startup Properties dialog box, click ShowFiles.
5 In a new window, display the contents of your GPO installation file folder,
and then copy WindowsInstaller-893803-x86.exe from that window and folder
to the Startup window and folder.
6 Redisplay the Startup Properties dialog box, and then click Add.
7 In the Add a Script dialog box, click Browse.
113Installing Symantec client softwareThird-party installation options
8 In the Browse dialog box, select the Windows Installer executable file, and
then click Open.
9 In the Add a Script dialog box, in the Script Parameters box, type /quiet
/norestart, and then click OK.
10 In the Startup Properties dialog box, click OK.
11 Exit the Group Policy Object Manager window.
Adding computers to the organizational unit and installationsoftware
You are now ready to add computers to the organization unit. When the computers
restart, the client software installation process begins. When users log on to the
computers, the client software installation process completes. The group policy
update, however, is not instantaneous, so it may take time for this policy to
propagate. The procedure, however, contains the commands that you can run on
the client computers to update the policy on demand.
To add computers to the organizational unit and install software
1 On the Windows Taskbar, click Start > Programs >Administrative Tools >
ActiveDirectoryUsers and Computers.
2 In the Active Directory Users and Computers window, in the console tree,
locate one or more computers to add to the organizational unit that you
created for GPO installation.
Computers first appear in the Computers organizational unit.
3 Drag-and-drop the computers into the organization unit that you created for
the installation.
4 Close the Active Directory Users and Computers window.
5 To quickly apply the changes to the client computers (for testing), display a
command prompt on the client computers.
6 Type one of the following commands, and then press Enter.
■ On the computers that run Windows 2000, type secedit /refreshpolicy
machine_policy.
■ On the computers that run Windows XP and later, type gpupdate.
7 Click OK.
When the client computer starts, the client software package is installed
before the logon.
Installing Symantec client softwareThird-party installation options
114
Uninstalling client software with Active Directory Group Policy Object
You can also uninstall the client software that you installed with Active Directory.
To uninstall client software with Active Directory Group Policy Object
1 On the Windows Taskbar, click Start > Programs >Administrative Tools >
GroupPolicyManagement.
2 In the Group Policy Management window, in the console tree, expand the
domain, expand Computer Configuration, expand Software Settings, right-click
Software Installation, and then click Properties.
3 On the Advanced tab, check Uninstall this applicationwhen it falls out of
the scope ofmanagement, and then click OK.
4 In the right pane, right-click the software package, and then click Remove.
5 In the Remove Software dialog box, check Immediatelyuninstallthesoftware
fromusers and computers, and then click OK.
6 Close the Group Policy Object Editor window, and then close the Group Policy
Management window.
The software uninstalls when the client computers are restarted.
About uninstalling client softwareYou can uninstall client software with the Windows Add and Remove utility. If
you uninstall Symantec Endpoint Protection client software that currently runs
a policy that blocks hardware devices, the devices are still blocked after you
uninstall software. To unblock the devices, use Admin Tools > Computer
Management > Device Manager.
115Installing Symantec client softwareAbout uninstalling client software

Installing Symantec client softwareAbout uninstalling client software
116
Installing Quarantine and
LiveUpdate servers
This chapter includes the following topics:
■ Before you install
■ Installing and configuring the Central Quarantine
■ About using a Symantec LiveUpdate server
■ Installing and configuring a LiveUpdate server
■ Uninstalling Symantec Endpoint Security management components
Before you installSymantec Endpoint Protection and Symantec Network Access Control come with
the optional administration components that you can use to assist in administering
clients and servers. Symantec Endpoint Protection includes both Central
Quarantine and LiveUpdate management servers. Symantec Network Access
Control includes a LiveUpdate management server only. A LiveUpdate management
is especially useful in large networks that contain multiple Symantec products
that run LiveUpdate.
Note: In small-scale networks, these components are not necessary.
Installing and configuring the Central QuarantineThe Quarantine Server receives virus and security risk submissions from Symantec
Endpoint Protection clients and forwards these submissions to Symantec. The
6Chapter
Quarantine Console lets you manage the Quarantine Server and these submissions.
If you determine that your network requires a central location for all quarantined
files, you can install the Central Quarantine.
The Central Quarantine is composed of the Quarantine Server and the Quarantine
Console. The Quarantine Console and the Quarantine Server can be installed on
the same or different supported Windows computers.
Note: If you install the Quarantine Server or Quarantine Console from the
individual installation folders on the CD, run Setup.exe rather than run the .msi
file. Using Setup.exe ensures that all of the files that Windows Installer requires
are installed on the destination computer before the .msi installation package
runs.
For complete information, see the Symantec Central Quarantine Administration
Guide on the installation CD.
Installation of the Central Quarantine requires the following tasks in the following
order:
■ Installing the Quarantine Console
■ Installing the Quarantine Server
■ Attaching a management server to the Central Quarantine
■ Configuring groups to use the Central Quarantine
Note: Install the Quarantine Console first and then install the Quarantine Server.
If you do not follow this order, the AMS is not properly configured. If you do not
follow this order and want to properly configure AMS, associate AMS with the
Quarantine Server with the Alerting Properties. Then restart the Quarantine
Server.
Installing the Quarantine Console
The Quarantine Console lets you manage submissions to the Quarantine Server.
Installing Quarantine and LiveUpdate serversInstalling and configuring the Central Quarantine
118
To install the Quarantine Console
1 On the computer on which the Symantec Endpoint Protection Manager
Console is installed, insert the installation CD into the CD-ROM drive.
If your computer is not set automatically to run a CD, you must manually run
Setup.exe.
2 In the main panel, click Install OtherAdministrator Tools > Install Central
Quarantine Console.
3 Follow the on-screen instructions to complete the installation.
Installing the Quarantine Server
The Quarantine Server receives virus submissions. The Quarantine Server requires
a restart after installation.
To install the Quarantine Server
1 On the computer on which you want to install the Quarantine Server, insert
the installation CD into the CD-ROM drive.
If your computer is not set automatically to run a CD, you must manually run
Setup.exe.
2 In the main panel, click Install OtherAdministrator Tools > Install Central
Quarantine Server.
3 In the Welcome panel, click Next.
4 In the License Agreement panel, click I accept the terms in the license
agreement, and then click Next.
5 In the Destination Folder panel, do one of the following:
■ To accept the default destination folder, click Next.
■ Click Change, locate and select a destination folder, click OK, and then
click Next.
6 In the Setup Type panel, select the following:
■ Internet based (Recommended), and then click Next.
E-mail based is no longer supported.
7 In the Maximum Disk Space panel, type the amount of disk space to make
available on the server for Central Quarantine submissions from clients, and
then click Next.
119Installing Quarantine and LiveUpdate serversInstalling and configuring the Central Quarantine
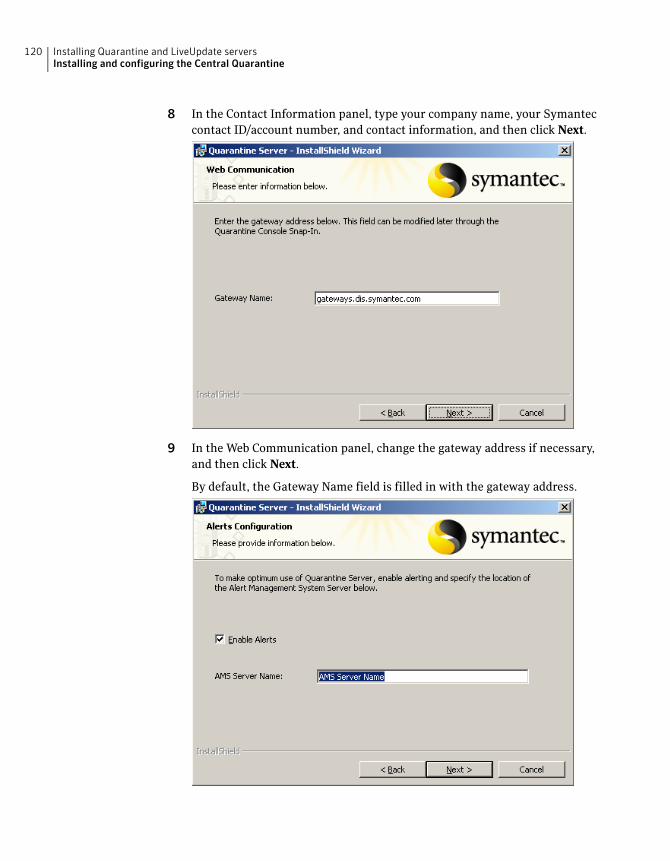
8 In the Contact Information panel, type your company name, your Symantec
contact ID/account number, and contact information, and then click Next.
9 In the Web Communication panel, change the gateway address if necessary,
and then click Next.
By default, the Gateway Name field is filled in with the gateway address.
Installing Quarantine and LiveUpdate serversInstalling and configuring the Central Quarantine
120
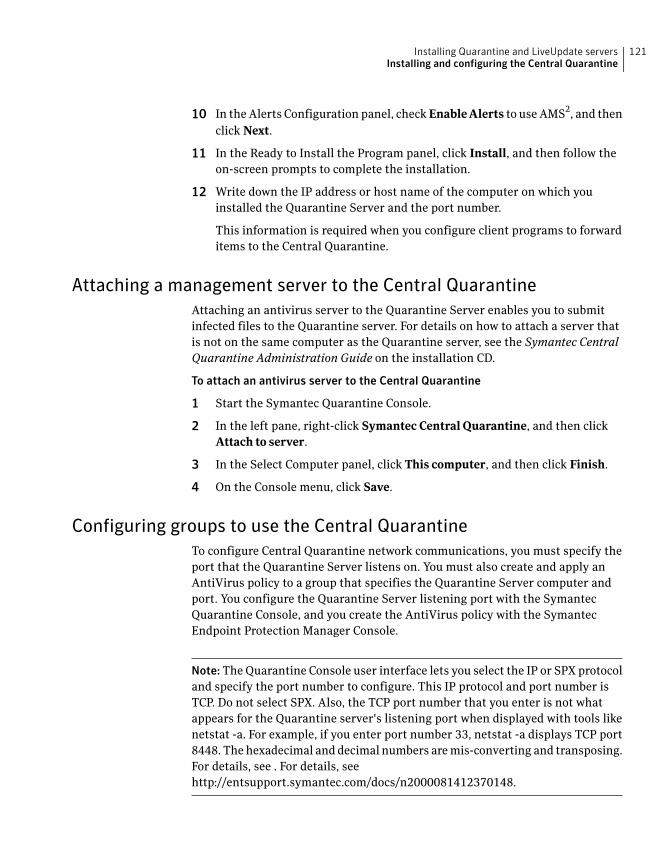
10 In the Alerts Configuration panel, checkEnableAlerts to use AMS2, and then
click Next.
11 In the Ready to Install the Program panel, click Install, and then follow the
on-screen prompts to complete the installation.
12 Write down the IP address or host name of the computer on which you
installed the Quarantine Server and the port number.
This information is required when you configure client programs to forward
items to the Central Quarantine.
Attaching a management server to the Central Quarantine
Attaching an antivirus server to the Quarantine Server enables you to submit
infected files to the Quarantine server. For details on how to attach a server that
is not on the same computer as the Quarantine server, see the Symantec Central
Quarantine Administration Guide on the installation CD.
To attach an antivirus server to the Central Quarantine
1 Start the Symantec Quarantine Console.
2 In the left pane, right-click Symantec Central Quarantine, and then click
Attach to server.
3 In the Select Computer panel, click This computer, and then click Finish.
4 On the Console menu, click Save.
Configuring groups to use the Central Quarantine
To configure Central Quarantine network communications, you must specify the
port that the Quarantine Server listens on. You must also create and apply an
AntiVirus policy to a group that specifies the Quarantine Server computer and
port. You configure the Quarantine Server listening port with the Symantec
Quarantine Console, and you create the AntiVirus policy with the Symantec
Endpoint Protection Manager Console.
Note:The Quarantine Console user interface lets you select the IP or SPX protocol
and specify the port number to configure. This IP protocol and port number is
TCP. Do not select SPX. Also, the TCP port number that you enter is not what
appears for the Quarantine server's listening port when displayed with tools like
netstat -a. For example, if you enter port number 33, netstat -a displays TCP port
8448. The hexadecimal and decimal numbers are mis-converting and transposing.
For details, see . For details, see
http://entsupport.symantec.com/docs/n2000081412370148.
121Installing Quarantine and LiveUpdate serversInstalling and configuring the Central Quarantine
To configure the Quarantine Server
1 In the Symantec Central Quarantine console, in the left pane, in the Console
Root tree, right-click Symantec Central Quarantine, and then click
Properties.
2 On the General tab, under Protocols, check Listen on IP.
SPX is no longer supported.
3 In the Listen on IP Port box, type the port number on which to listen for client
submissions.
This port number is TCP/IP. Do not enter an IANA well-known port number
without doing research to see if it is used in your network. For example, do
not enter port number 21 because it is reserved for FTP communications.
4 Click OK.
To configure an AntiVirus policy
1 In the Symantec Endpoint Protection Manager Console, click Policies.
2 In the View Policies pane, click AntiVirus.
3 In the lower-left What would you like to do pane, click Add anAntiVirus
Policy.
You can also edit an existing policy.
4 In the AntiVirus Policy window, in the left pane, click Submissions.
5 Under Quarantined Items, check Allow client computers to automatically
submit quarantined items to aQuarantine Server.
6 In the Server name box, type the fully-qualified domain name or IP address
of the Quarantine Server.
7 In the Port number box, accept or change the default port number.
8 In the Retry, accept or change the retry interval when client to Quarantine
Server communications fail.
9 In the Protocol drop-down list, very that IP is selected only.
10 Click OK.
11 Apply the policy to one or more groups.
About using a Symantec LiveUpdate serverLiveUpdate is the utility that updates client computers with antivirus definitions,
intrusion detection signatures, product patches, and so on. In unmanaged
environments, LiveUpdate on client computers is typically configured to connect
Installing Quarantine and LiveUpdate serversAbout using a Symantec LiveUpdate server
122
directly to Symantec LiveUpdate servers. In managed environments of a small to
medium networks, LiveUpdate on client computers is typically configured to
connect to a Symantec Endpoint Protection Manager.
In large, managed networks, bandwidth conservation issues through Internet
gateways can be very important. When these issues are important, you can install
and configure one or more LiveUpdate servers to download updates. Then you
can distribute the updates to management servers or directly to clients.
Figure 6-1 illustrates the three network architectures that support LiveUpdate
servers.
123Installing Quarantine and LiveUpdate serversAbout using a Symantec LiveUpdate server
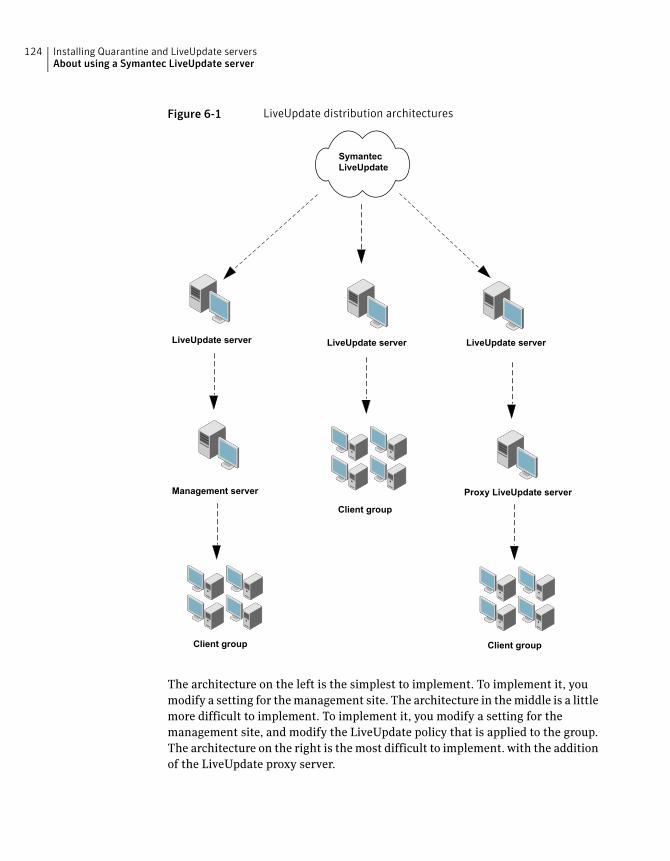
Figure 6-1 LiveUpdate distribution architectures
LiveUpdate server
Management server
LiveUpdate server
Client group
Client group
Client group
LiveUpdate server
Proxy LiveUpdate server
SymantecLiveUpdate
The architecture on the left is the simplest to implement. To implement it, you
modify a setting for the management site. The architecture in the middle is a little
more difficult to implement. To implement it, you modify a setting for the
management site, and modify the LiveUpdate policy that is applied to the group.
The architecture on the right is the most difficult to implement. with the addition
of the LiveUpdate proxy server.
Installing Quarantine and LiveUpdate serversAbout using a Symantec LiveUpdate server
124
Note:This installation guide does not describe how to configure Symantec Endpoint
Protection sites or policies to implement these LiveUpdate architectures. This
installation guide describes how to install the LiveUpdate Administration Utility
and Server only. To fully implement these LiveUpdate architectures, refer to your
Symantec Endpoint ProtectionAdministrationGuide . Locate and read the chapter
about updating content and components.
Installing and configuring a LiveUpdate serverThe LiveUpdate server is installed when you install the LiveUpdate Administration
Utility. After you install the LiveUpdate server, you configure it to download
updates with the LiveUpdate Administration Utility. Depending on your
architecture, you configure your Management site or clients to get updates from
your LiveUpdate server. For details, see the Symantec Endpoint Protection
Administration Guide .
For complete information about how to use the LiveUpdate Administration Utility,
see the LiveUpdate Administration Guide on the installation CD.
To install the LiveUpdate server
1 Insert installation CD into the CD-ROM drive.
2 In the main panel, click Install OtherAdministrator Tools > Install
LiveUpdateAdministrator.
3 Follow the on-screen instructions to complete the installation.
To configure the LiveUpdate server to download updates
1 On the Windows taskbar, click Start >All Programs > LiveUpdate
AdministrationUtility > LiveUpdateAdministrationUtility.
2 In the LiveUpdate Administration Utility window, in the left pane, click
RetrieveUpdates.
3 In the LiveUpdate Administration Utility window, under Languages of
Updates, select the language for downloaded packages.
125Installing Quarantine and LiveUpdate serversInstalling and configuring a LiveUpdate server
4 Under Symantec Product Line, check the Symantec product lines for which
you want to receive packages.
By clicking Details, you can select individual product components to update,
but you risk missing other available updates. For example, new virus
definitions files for Symantec Endpoint Protection might require an engine
update that is also available for download.
Because all installed Symantec products that use LiveUpdate now point to
your intranet server, it is safer to download full product lines rather than
individual products.
5 Under Download Directory, type or select the download directory on your
LiveUpdate server.
This location is where the update packages and virus definitions files are
stored when they are downloaded from Symantec. (Files are downloaded to
a temporary directory that is created with the LiveUpdate Administration
Utility. When the file is downloaded, it is moved to the specified Download
Directory.) The Download Directory can be any directory on your server.
UninstallingSymantecEndpointSecuritymanagementcomponents
You can uninstall all of the Symantec Endpoint Security management components
using Add/Remove Programs in the Control Panel on the local computer.
Installing Quarantine and LiveUpdate serversUninstalling Symantec Endpoint Security management components
126
Migrating Symantec
AntiVirus and Symantec
Client Security
This chapter includes the following topics:
■ Migration overview and sequence
■ Supported and unsupported migration paths
■ Preparing legacy installations for migration
■ About migrating and not preserving server and client groups and settings
■ About migrating groups and settings
■ About settings that are not migrated
■ About packages and deployment
■ Installing Symantec Endpoint Protection Manager
■ Migrating server and client group settings
■ Verify migration and update your migrated policies
■ Migrating unmanaged Clients
■ What has changed for legacy administrators
7Chapter
Migration overview and sequenceRead and understand all information in this chapter before migrating legacy
Symantec AntiVirus and Symantec Client Security clients and servers. Also, test
all procedures in this chapter in a test environment before migrating legacy
Symantec AntiVirus and Symantec Client Security clients and servers.
Follow this sequence to create your test environment and test migration:
■ Create a test environment of at least three computers. If possible, create a test
environment that resembles your management infrastructure. If you have
multiple management servers, install multiple management servers. For
example, if you have multiple server groups, create multiple server groups.
■ Install a supported legacy version of the Symantec System Center, a primary
management server, and a managed client on different test computers.
■ Uninstall the Reporting Server if you installed it.
■ Use the Symantec System Center to configure settings for the management
server and client that prepares them for migration.
■ Install and logon to Symantec Endpoint Protection Manager on a computer in
your test environment.
Next, decide if you want to migrate your groups and settings from the Symantec
System Center to Symantec Endpoint Protection Manager. If you do not want to
migrate your groups and settings, you can create new groups, policies, and
installation packages with Symantec Endpoint Protection Manager. You then
migrate your legacy clients, legacy servers, uninstall the Symantec System Center,
and migrate the legacy client or server that protects that computer.
If you want to migrate your groups and settings, you must understand how your
groups and settings get migrated and deployed to legacy clients and servers.
Specifically, you need to understand the following:
■ Read and understand your options for migrating group settings from the
Symantec System Center to policies in the Symantec Endpoint Protection
Manager Console.
■ Read and understand how client installation packages are created, where they
are located, and how they affect client computers after migration.
■ If you do not deploy client installation packages with third-party tools such
as SMS, read about and understand your options for using the Push Deployment
Wizard to deploy client installation packages.
■ In particular, consider whether or not to export a list of client computers to a
text file from the Symantec System Center for each management server, and
then import this file to the Push Deployment Wizard for deployment.
Migrating Symantec AntiVirus and Symantec Client SecurityMigration overview and sequence
128
■ Use the Installation and Migration Wizard to perform the migration in this
test environment and create your client installation packages.
■ Decide which installation packages to deploy for migration.
After you create your installation packages and decide which ones to deploy to
legacy clients and management servers, a best practice is to deploy the packages
and verify package deployment in the following sequence:
■ Deploy a client installation package to one or more clients and verify that the
clients appear in the correct groups in the Symantec Endpoint Protection
Manager Console.
■ Verify that the LiveUpdate, and Antivirus and antispyware policy settings for
the client were properly migrated.
■ Deploy a client installation package to one or more legacy management servers
and verify that the servers appear in the correct groups in the Symantec
Endpoint Protection Manager Console.
■ Verify that the LiveUpdate, and Antivirus and antispyware policy settings for
the server were properly migrated.
■ Uninstall the Symantec System Center.
■ Install a client installation package on the computer that ran the Symantec
System Center.
Finally, if you modified the settings in the Symantec System Center as
recommended for migration, locate these settings in the LiveUpdate, and Antivirus
and antispyware policies. Then change them back to their original settings. For
example, one recommendation was to disable scheduled scans, which you should
reenable in the Antivirus and antispyware policies for each group. When you are
comfortable and confident with migration in your test environment, you are ready
to begin the migration of your production network.
Supported and unsupported migration pathsUnderstand which migrations are supported, blocked, and unsupported. If you
have the legacy software that blocks migration, you must uninstall this software.
If you have the legacy software that is not supported for migration, decide whether
or not to uninstall it. For example, if you run Symantec AntiVirus on Netware
computers, you most likely want to keep your legacy software running on those
computers.
129Migrating Symantec AntiVirus and Symantec Client SecuritySupported and unsupported migration paths
Migrations that are supported
The client installation routines check for the existence of the following software
and migrates the software if it is detected:
■ Symantec AntiVirus client and server 9.x and later
■ Symantec Client Security client and server 2.x and later
Migrations that are blocked
The client installation routines check for the existence of the following software
and blocks migration if the software is detected:
■ Symantec AntiVirus client and server 8.x and earlier
■ Symantec Client Security client and server 1.x
■ Symantec Client Firewall 5.0
■ Symantec System Center, all versions
■ Symantec Reporting Server 10.x
■ Confidence Online Heavy by Whole Security, all versions
■ Norton AntiVirus and Norton Internet Security, all versions
You must uninstall this software first and then install Symantec Endpoint
Protection clients.
Migrations that are not supported
The following software is not migrated, and can co-exist on the same computer
as Symantec Endpoint Protection client software:
■ Symantec Client Firewall Administrator, all versions
■ LiveUpdate Server
To install the latest version of LiveUpdate Server, first uninstall the legacy
version.
■ Netware computers that run any version of Symantec AntiVirus
Netware operating systems are not supported with this version. Continue to
protect these computers with legacy versions.
■ Symantec AntiVirus and Symantec Client Security client and server that runs
on Itanium hardware
Itanium hardware is not supported with this version. Continue to protect these
computers with legacy versions.
Migrating Symantec AntiVirus and Symantec Client SecuritySupported and unsupported migration paths
130
About migrating Central Quarantine
To migrate Central Quarantine Console and Server, you must uninstall and then
reinstall both components.
Preparing legacy installations for migrationWith the Symantec System Center, you must change settings for clients and
servers to simplify the migration process. For example, if a client runs an antivirus
scan during migration, migration is blocked until the scan finishes, and the
migration may fail. Also, you need to disable the uninstall password feature for
client software if it is enabled. If you do not, users are prompted to enter the
password in interactive mode.
Note: If you migrate groups and settings from the Symantec System Center, your
migrated LiveUpdate, and Antivirus and antispyware policies that get created for
these groups contain these modifications. You may want to revert these settings.
For example, you may want to reenable scheduled scans. Also, you do not need to
disable the uninstall password if it is enabled. The migration ignores the password.
Preparing all legacy installations
These procedures apply to all legacy software installations that are supported for
migration.
Note: If you use client groups, and if those groups do not inherit settings, prepare
these groups the same way that you prepare server groups and management
servers.
Disabling scheduled scans
If a scan is scheduled to run and is running while the client migration occurs,
migration may fail. A best practice is to disable scheduled scans during migration
and then reenable after migration.
To disable scheduled scans
1 In the Symantec System Center, do one of the following:
■ Right-click a management server.
■ Right-click a client group.
2 Click All Tasks > SymantecAntiVirus > Scheduled Scans.
131Migrating Symantec AntiVirus and Symantec Client SecurityPreparing legacy installations for migration

3 In the Scheduled Scans dialog box, on the Server Scans tab, uncheck all
scheduled scans.
4 On the Client Scans tab, uncheck all scheduled scans, and then click OK.
5 Repeat this procedure for all primary management servers, secondary
management servers, and all client groups.
Configuring Central Quarantine and quarantined files
Quarantine server no longer supports updates to client computers with the latest
definitions. Therefore, you do not want it to update client computers with the
latest definitions during a migration. Also, quarantined file migration is not
necessary.
To configure Central Quarantine and quarantine items
1 In the Symantec System Center, right-click a server group.
2 Click All Tasks > SymantecAntiVirus >QuarantineOptions.
3 In the Quarantine Options dialog box, click PurgeOptions.
4 In the Purge Options dialog box, set all time values to 1 day, and set all
directory size limit values to 1 MB, and check all check boxes.
5 Click OK.
6 In the Quarantine Options dialog box, uncheck Enable Quarantine or Scan
andDeliver.
7 Under When new virus definitions arrive, check Donothing, and then click
OK.
8 Repeat this procedure for all server groups if you have more than one.
Deleting histories
All histories are now stored in a database. History file deletion speeds the migration
process.
To delete histories
1 In the Symantec System Center, right-click a server group.
2 Click All Tasks > SymantecAntiVirus > ConfigureHistory.
3 In the History Options dialog box, change the Delete after values to 1 day.
4 Click OK.
5 Repeat this procedure for all server groups if you have more than one.
Migrating Symantec AntiVirus and Symantec Client SecurityPreparing legacy installations for migration
132
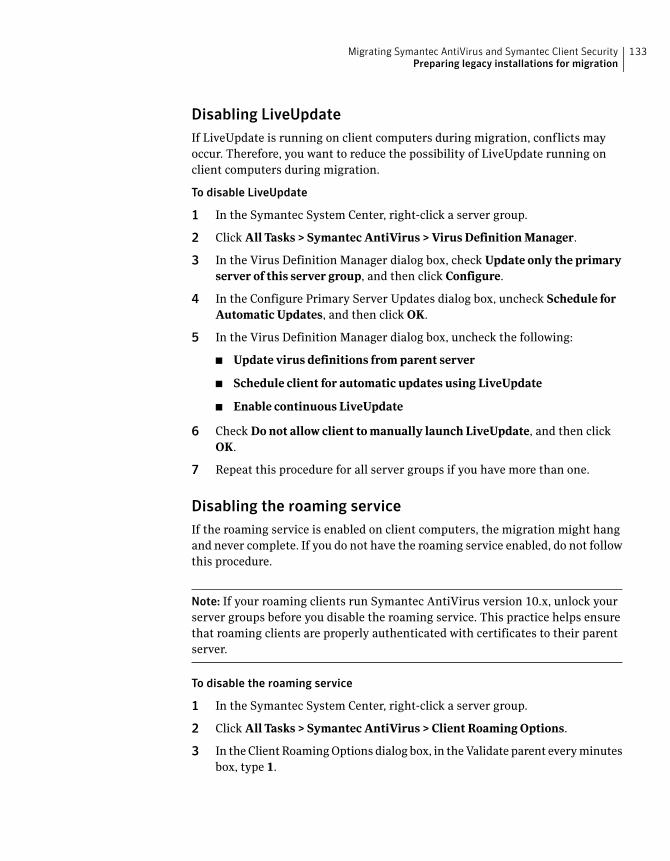
Disabling LiveUpdate
If LiveUpdate is running on client computers during migration, conflicts may
occur. Therefore, you want to reduce the possibility of LiveUpdate running on
client computers during migration.
To disable LiveUpdate
1 In the Symantec System Center, right-click a server group.
2 Click All Tasks > SymantecAntiVirus >VirusDefinitionManager.
3 In the Virus Definition Manager dialog box, check Update only the primary
server of this server group, and then click Configure.
4 In the Configure Primary Server Updates dialog box, uncheck Schedule for
Automatic Updates, and then click OK.
5 In the Virus Definition Manager dialog box, uncheck the following:
■ Update virus definitions fromparent server
■ Schedule client for automatic updates using LiveUpdate
■ Enable continuous LiveUpdate
6 Check Donot allow client tomanually launch LiveUpdate, and then click
OK.
7 Repeat this procedure for all server groups if you have more than one.
Disabling the roaming service
If the roaming service is enabled on client computers, the migration might hang
and never complete. If you do not have the roaming service enabled, do not follow
this procedure.
Note: If your roaming clients run Symantec AntiVirus version 10.x, unlock your
server groups before you disable the roaming service. This practice helps ensure
that roaming clients are properly authenticated with certificates to their parent
server.
To disable the roaming service
1 In the Symantec System Center, right-click a server group.
2 Click All Tasks > SymantecAntiVirus > Client RoamingOptions.
3 In the Client Roaming Options dialog box, in the Validate parent every minutes
box, type 1.
133Migrating Symantec AntiVirus and Symantec Client SecurityPreparing legacy installations for migration
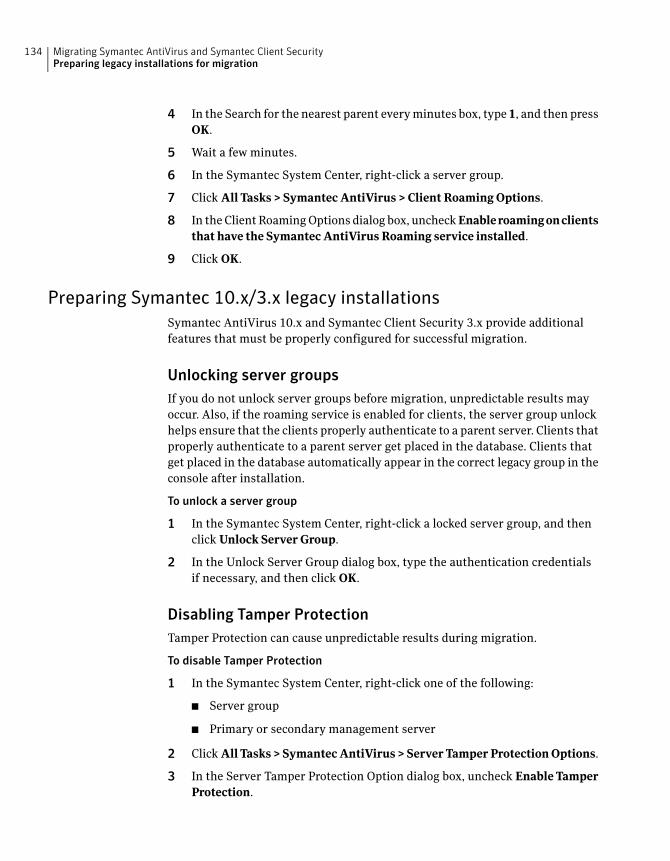
4 In the Search for the nearest parent every minutes box, type 1, and then press
OK.
5 Wait a few minutes.
6 In the Symantec System Center, right-click a server group.
7 Click All Tasks > SymantecAntiVirus > Client RoamingOptions.
8 In the Client Roaming Options dialog box, uncheckEnableroamingonclients
that have the SymantecAntiVirus Roaming service installed.
9 Click OK.
Preparing Symantec 10.x/3.x legacy installations
Symantec AntiVirus 10.x and Symantec Client Security 3.x provide additional
features that must be properly configured for successful migration.
Unlocking server groups
If you do not unlock server groups before migration, unpredictable results may
occur. Also, if the roaming service is enabled for clients, the server group unlock
helps ensure that the clients properly authenticate to a parent server. Clients that
properly authenticate to a parent server get placed in the database. Clients that
get placed in the database automatically appear in the correct legacy group in the
console after installation.
To unlock a server group
1 In the Symantec System Center, right-click a locked server group, and then
click Unlock ServerGroup.
2 In the Unlock Server Group dialog box, type the authentication credentials
if necessary, and then click OK.
Disabling Tamper Protection
Tamper Protection can cause unpredictable results during migration.
To disable Tamper Protection
1 In the Symantec System Center, right-click one of the following:
■ Server group
■ Primary or secondary management server
2 Click All Tasks > SymantecAntiVirus > Server TamperProtectionOptions.
3 In the Server Tamper Protection Option dialog box, uncheck Enable Tamper
Protection.
Migrating Symantec AntiVirus and Symantec Client SecurityPreparing legacy installations for migration
134
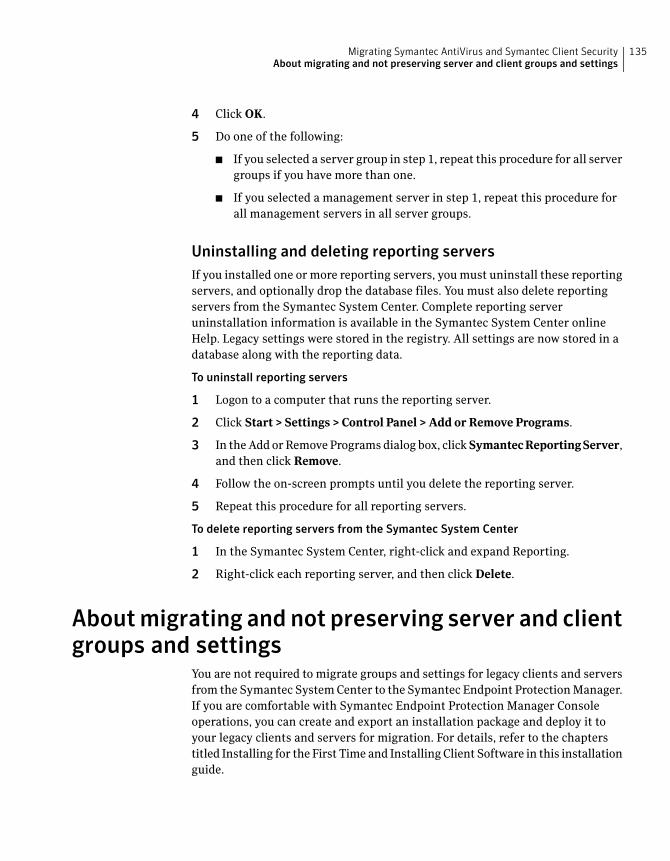
4 Click OK.
5 Do one of the following:
■ If you selected a server group in step 1, repeat this procedure for all server
groups if you have more than one.
■ If you selected a management server in step 1, repeat this procedure for
all management servers in all server groups.
Uninstalling and deleting reporting servers
If you installed one or more reporting servers, you must uninstall these reporting
servers, and optionally drop the database files. You must also delete reporting
servers from the Symantec System Center. Complete reporting server
uninstallation information is available in the Symantec System Center online
Help. Legacy settings were stored in the registry. All settings are now stored in a
database along with the reporting data.
To uninstall reporting servers
1 Logon to a computer that runs the reporting server.
2 Click Start > Settings > Control Panel >Add orRemove Programs.
3 In the Add or Remove Programs dialog box, clickSymantecReportingServer,
and then click Remove.
4 Follow the on-screen prompts until you delete the reporting server.
5 Repeat this procedure for all reporting servers.
To delete reporting servers from the Symantec System Center
1 In the Symantec System Center, right-click and expand Reporting.
2 Right-click each reporting server, and then click Delete.
Aboutmigrating and not preserving server and clientgroups and settings
You are not required to migrate groups and settings for legacy clients and servers
from the Symantec System Center to the Symantec Endpoint Protection Manager.
If you are comfortable with Symantec Endpoint Protection Manager Console
operations, you can create and export an installation package and deploy it to
your legacy clients and servers for migration. For details, refer to the chapters
titled Installing for the First Time and Installing Client Software in this installation
guide.
135Migrating Symantec AntiVirus and Symantec Client SecurityAbout migrating and not preserving server and client groups and settings

Note: A best practice is to create one or more groups and associated policies for
your legacy clients and migrate them first. You can then create one or more groups
and associated policies for your legacy servers and then migrate them to clients.
Finally, uninstall the Symantec System Center, and migrate the legacy management
server or client that protected the computer that ran the Symantec System Center.
About migrating groups and settingsTo migrate server and client groups and settings from the Symantec System
Center to the Symantec Endpoint Protection Manager, you must read about and
understand how this process works. For example, your existing settings in the
Symantec System Center may or may not be inherited from server groups. And
you have to choose whether or not to preserve this inheritance.
Legacy primary and secondary management servers have settings that apply only
to those servers and not to the clients that they manage. The reason is that these
servers may need to be protected differently than how the clients that they manage
are protected. For example, these servers may provide other services that may
need to have certain files types excluded from scans. With the Symantec System
Center, you can specify that all servers inherit their settings from those specified
for the server group. Or, you can specify custom settings for each server.
After you migrate settings for management servers, these settings appear in
LiveUpdate, and Antivirus and antispyware policies. These policies are applied
to the groups that will contain the management servers after you migrate them
to a Symantec Endpoint Protection client. During migration you decide whether
these settings are inherited from the server group, or are specified for each server.
Legacy client settings can also be inherited from the server group or inherited
from a management server. After you migrate settings for clients, these settings
appear in LiveUpdate, and Antivirus and antispyware policies. During migration
you decide whether these setting are inherited from the server group or from the
management server.
Figure 7-1 illustrates a before-and-after scenario when both management servers
and clients inherit settings from server groups.
Migrating Symantec AntiVirus and Symantec Client SecurityAbout migrating groups and settings
136
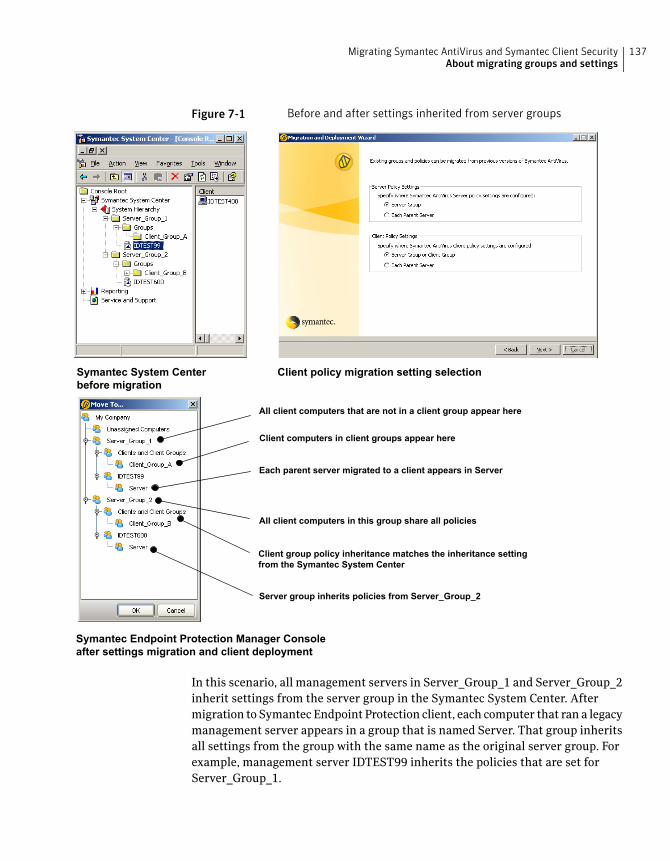
Figure 7-1 Before and after settings inherited from server groups
Symantec System Centerbefore migration
Client policy migration setting selection
Symantec Endpoint Protection Manager Consoleafter settings migration and client deployment
All client computers that are not in a client group appear here
Each parent server migrated to a client appears in Server
Client computers in client groups appear here
Server group inherits policies from Server_Group_2
Client group policy inheritance matches the inheritance settingfrom the Symantec System Center
All client computers in this group share all policies
In this scenario, all management servers in Server_Group_1 and Server_Group_2
inherit settings from the server group in the Symantec System Center. After
migration to Symantec Endpoint Protection client, each computer that ran a legacy
management server appears in a group that is named Server. That group inherits
all settings from the group with the same name as the original server group. For
example, management server IDTEST99 inherits the policies that are set for
Server_Group_1.
137Migrating Symantec AntiVirus and Symantec Client SecurityAbout migrating groups and settings
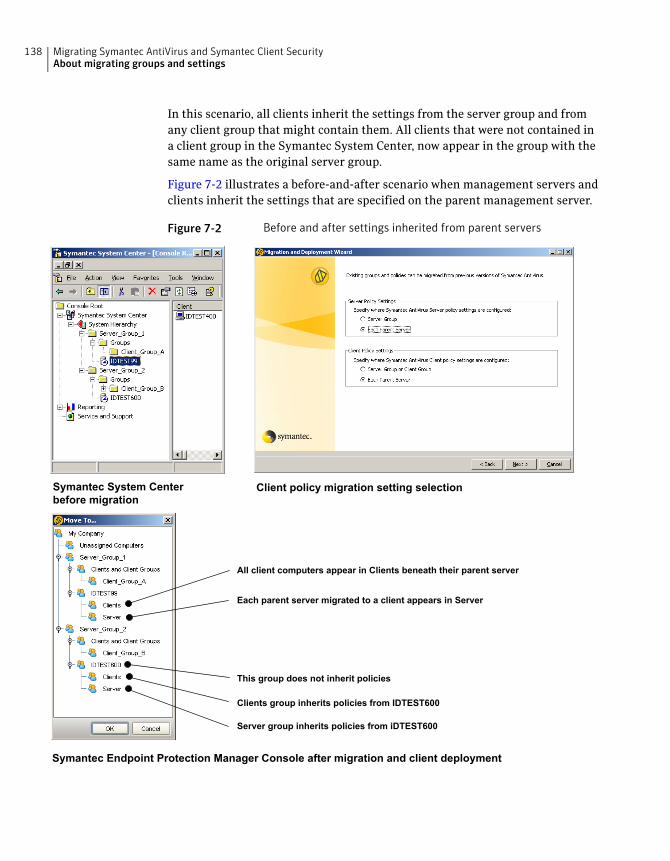
In this scenario, all clients inherit the settings from the server group and from
any client group that might contain them. All clients that were not contained in
a client group in the Symantec System Center, now appear in the group with the
same name as the original server group.
Figure 7-2 illustrates a before-and-after scenario when management servers and
clients inherit the settings that are specified on the parent management server.
Figure 7-2 Before and after settings inherited from parent servers
Symantec System Centerbefore migration
Client policy migration setting selection
Symantec Endpoint Protection Manager Console after migration and client deployment
All client computers appear in Clients beneath their parent server
Each parent server migrated to a client appears in Server
Server group inherits policies from iDTEST600
Clients group inherits policies from IDTEST600
This group does not inherit policies
Migrating Symantec AntiVirus and Symantec Client SecurityAbout migrating groups and settings
138
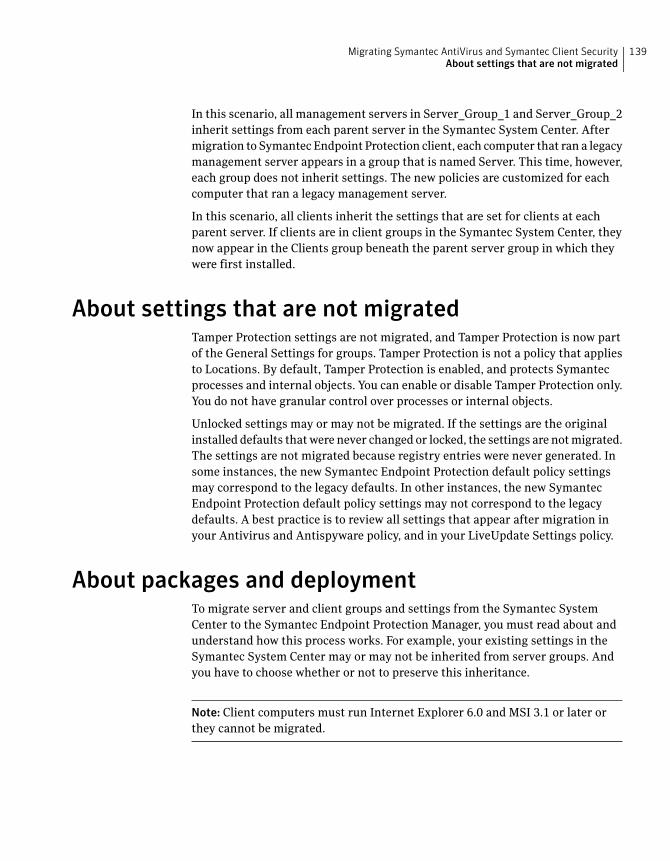
In this scenario, all management servers in Server_Group_1 and Server_Group_2
inherit settings from each parent server in the Symantec System Center. After
migration to Symantec Endpoint Protection client, each computer that ran a legacy
management server appears in a group that is named Server. This time, however,
each group does not inherit settings. The new policies are customized for each
computer that ran a legacy management server.
In this scenario, all clients inherit the settings that are set for clients at each
parent server. If clients are in client groups in the Symantec System Center, they
now appear in the Clients group beneath the parent server group in which they
were first installed.
About settings that are not migratedTamper Protection settings are not migrated, and Tamper Protection is now part
of the General Settings for groups. Tamper Protection is not a policy that applies
to Locations. By default, Tamper Protection is enabled, and protects Symantec
processes and internal objects. You can enable or disable Tamper Protection only.
You do not have granular control over processes or internal objects.
Unlocked settings may or may not be migrated. If the settings are the original
installed defaults that were never changed or locked, the settings are not migrated.
The settings are not migrated because registry entries were never generated. In
some instances, the new Symantec Endpoint Protection default policy settings
may correspond to the legacy defaults. In other instances, the new Symantec
Endpoint Protection default policy settings may not correspond to the legacy
defaults. A best practice is to review all settings that appear after migration in
your Antivirus and Antispyware policy, and in your LiveUpdate Settings policy.
About packages and deploymentTo migrate server and client groups and settings from the Symantec System
Center to the Symantec Endpoint Protection Manager, you must read about and
understand how this process works. For example, your existing settings in the
Symantec System Center may or may not be inherited from server groups. And
you have to choose whether or not to preserve this inheritance.
Note: Client computers must run Internet Explorer 6.0 and MSI 3.1 or later or
they cannot be migrated.
139Migrating Symantec AntiVirus and Symantec Client SecurityAbout settings that are not migrated
About the client installation packages that are generated duringmigration
To perform the migration, you run the Installation and Migration Wizard. When
you run the Installation and Migration Wizard, you choose the management
servers and clients for which to create client installation packages.
Note: Management servers migrate to clients.
After you install these client installation packages on your legacy clients, your
migrated clients automatically appear in the appropriate group in the Symantec
Endpoint Protection Manager Console.
During migration, installation packages are automatically generated for several
combinations of client components. For example, an installation package is
generated for all Symantec Endpoint Protection features. An installation package
is generated for Antivirus and Antispyware protection only, and so forth. These
packages are created in a directory that you specify during migration.
In this directory, you will find five directories that contain different installation
packages with the following names:
■ All Client Features_xx-bit
■ Antivirus Features Only_xx-bit
■ Network Threat Protection Features Only_xx-bit
■ Antivirus and Proactive Threat Protection Features Only_xx-bit
■ Network Threat Protection and Device Protection Features Only_xx-bit
For 32-bit installation packages, these packages take 300 MB of disk space, and
all packages are always generated automatically. For 64-bit installation packages,
these packages take more than 300 MB of disk space.
When you use the Installation and Migration Wizard, you choose whether or not
to migrate all management servers and clients that appear in the Symantec System
Center. Your other choice is to select individual management servers.
If you decide to migrate specific management servers, you should create separate
package-creation directories for each management server or combination of
management servers. Then, you can deploy these packages to the respective legacy
clients for migration, and the clients automatically appear in the correct group
in the Symantec Endpoint Protection Manager Console.
Migrating Symantec AntiVirus and Symantec Client SecurityAbout packages and deployment
140
Note: When you migrate groups and settings, the Installation and Migration
Wizard stores the legacy management server and client IDs in a table in the
Symantec Endpoint Protection Manager database. When you migrate legacy
management servers and clients to Symantec Endpoint Protection, the newly
migrated clients send their legacy IDs to the Symantec Endpoint Protection
Manager. When the manager receives the legacy IDs, it places the newly migrated
clients in the correct migrated group.
Exporting and formatting a list of client computer names to migrate
The recommended Symantec-supplied client package deployment tool is the Push
Deployment Wizard. You can start this tool by double-clicking \Symantec Endpoint
Protection\tomcat\bin\ClientRemote.exe. You can also choose to start the Push
Deployment Wizard when you use the Installation and Migration Wizard.
Note:You can use the technique that is described here whether or not you migrate
settings from the Symantec System Center. This technique is useful to create lists
of all of your legacy clients and servers and to import lists into the Push
Deployment Wizard for deployment.
The Push Deployment Wizard automatically detects Windows computers that are
powered on. The wizard then lets you select the computers and deploy a selectable
installation package to the detected computers. You can select each computer one
at a time, or you can select the workgroup or domain of computers.
Your other option is to create a text file that contains the names or IP addresses
of your legacy clients. Then import that file into the Push Deployment Wizard
for package deployment. You can then manually start the Push Deployment Wizard
and deploy packages to clients in stages.
A best practice is to export a list of clients for each management server to a text
file. Then open it in a spreadsheet and delete all columns except the column that
contains the computer name or IP address. You can then save it back to a text file
that you can import to the Push Deployment Wizard. This approach lets you
deploy to clients by management server, staging your migration.
The downside to this approach is that the Push Deployment Wizard waits about
20 seconds for each computer in the list that is not powered on. The upside to this
approach is that you can inspect the log file to see which computers were not
powered on. Thus you have a record of which computers are not yet migrated. A
best practice in DHCP-enabled environments is to use computer names rather
than IP addresses, because the IP addresses may change.
141Migrating Symantec AntiVirus and Symantec Client SecurityAbout packages and deployment
Note: The following procedure provides details about how to use Microsoft Office
Excel. You are not required to use Excel. You can use any spreadsheet software
that imports text files.
To export and format a list of client computer names to migrate
1 In the Symantec System Center, right-click one of the following, and then
click Export List:
■ Primary or secondary management server
■ Client group
2 In the Export List dialog box, in the File name box, type a name of a text file.
3 In the Save as type drop-down list, select Text (TabDelimited) (*.txt), and
then click Save.
4 In Microsoft Office Excel, click File >Open.
5 In the Open dialog box, in the Files of type drop-down list, click All Files.
6 Locate and select your text file, and then click Open.
7 In the Text Import Wizard Step 1 of 3 dialog box, check Delimited, and then
click Next.
8 In the Text Import Wizard Step 2 of 3 dialog box, under Delimiter, check Tab,
and then click Next.
9 In the Text Import Wizard Step 3 of 3 dialog box, click Finish.
10 Start Notepad and create a new text file.
11 In Excel, highlight and copy the computer names that appear in the column
that is titled Client.
12 In Notepad, paste the computer names, and verify that the last line is a
computer name and not blank.
13 Save the file as a text file.
Communications ports to open
When you migrate server and client group settings, network communications
occur between the Symantec System Center and Symantec Endpoint Protection
Manager. If these components run on different computers, and if these computers
run firewalls, you need to open communications ports.
Table 7-1 lists the ports to open for settings migration.
Migrating Symantec AntiVirus and Symantec Client SecurityAbout packages and deployment
142
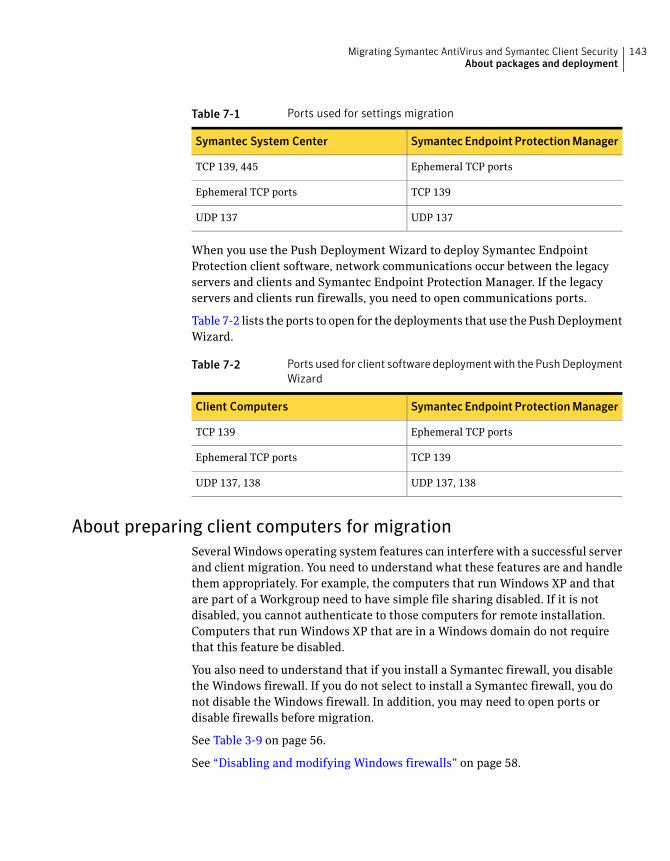
Table 7-1 Ports used for settings migration
Symantec Endpoint ProtectionManagerSymantec System Center
Ephemeral TCP portsTCP 139, 445
TCP 139Ephemeral TCP ports
UDP 137UDP 137
When you use the Push Deployment Wizard to deploy Symantec Endpoint
Protection client software, network communications occur between the legacy
servers and clients and Symantec Endpoint Protection Manager. If the legacy
servers and clients run firewalls, you need to open communications ports.
Table 7-2 lists the ports to open for the deployments that use the Push Deployment
Wizard.
Table 7-2 Ports used for client software deploymentwith the PushDeployment
Wizard
Symantec Endpoint ProtectionManagerClient Computers
Ephemeral TCP portsTCP 139
TCP 139Ephemeral TCP ports
UDP 137, 138UDP 137, 138
About preparing client computers for migration
Several Windows operating system features can interfere with a successful server
and client migration. You need to understand what these features are and handle
them appropriately. For example, the computers that run Windows XP and that
are part of a Workgroup need to have simple file sharing disabled. If it is not
disabled, you cannot authenticate to those computers for remote installation.
Computers that run Windows XP that are in a Windows domain do not require
that this feature be disabled.
You also need to understand that if you install a Symantec firewall, you disable
the Windows firewall. If you do not select to install a Symantec firewall, you do
not disable the Windows firewall. In addition, you may need to open ports or
disable firewalls before migration.
See Table 3-9 on page 56.
See “Disabling and modifying Windows firewalls” on page 58.
143Migrating Symantec AntiVirus and Symantec Client SecurityAbout packages and deployment
See “Preparing computers for remote deployment that run Windows XP/Vista”
on page 60.
See “Prepare your computers for installation” on page 62.
Installing Symantec Endpoint Protection ManagerThis procedure assumes that you have not installed Symantec Endpoint Protection
Manager in your production environment. If you have installed Symantec Endpoint
Protection Manager in your production environment, proceed to read about
migrating server and client groups.
You can install Symantec Endpoint Protection Manager on the same computer
that runs the Symantec System Center, but it is not a requirement. Also, if you
manage a large number of legacy Symantec clients, a best practice is not to install
Symantec Endpoint Protection Manager on the same computer that runs the
Symantec System Center. Finally, if you have legacy Netware or Itanium
computers, you need to continue to manage and protect those computers with
legacy software.
Note: Installing Symantec Endpoint Protection Manager does not migrate the
Symantec System Center.
To install Symantec Endpoint Protection Manager
1 At the computer on which to install the Symantec Endpoint Protection
Manager, insert and start the installation CD.
2 Click Install Symantec Endpoint Protection > Install Symantec Endpoint
ProtectionManager, and follow and complete the installation prompts until
the Install Wizard Completed panel appears.
3 Install Symantec Endpoint Protection Manager and configure it to use one
of the following databases:
■ Embedded database
See “Installing Symantec Endpoint Protection Manager with an embedded
database” on page 66.
■ Microsoft SQL database
See “Installing Symantec Endpoint Protection Manager with a Microsoft
SQL database” on page 70.
4 When installation and database installation is complete, in the Configuration
Completed panel, do one of the following:.
Migrating Symantec AntiVirus and Symantec Client SecurityInstalling Symantec Endpoint Protection Manager
144
■ CheckYes and then click Finish to migrate your server and client groups
from the Symantec System Center to the Symantec Endpoint Protection
Manager. Then create client installation packages for those groups.
■ Check No and then click Finish to manually start the Installation and
Migration Wizard at a later time, or to create new groups with Symantec
Endpoint Protection Manager Console.
You may also want to perform the migration after you log on and verify
that the Symantec Endpoint Protection Manager and Console are fully
operational.
Note: You can also migrate one server group at a time if you have multiple
groups.
Migrating server and client group settingsAfter you install Symantec Endpoint Protection Manager, you can migrate your
management server and client groups. You are not required to migrate all server
and client groups at the same time. Also, you can migrate management servers
and the clients that report to them one at a time.
Note: All computers that do not run MSI 3.1 are migrated to MSI 3.1 first, before
client software is installed. Computers that are not restarted after client software
is installed are protected with antivirus and antispyware features, but not with
firewall features. To implement the firewall features, client computers must be
restarted.
To migrate server and client group settings
1 Do one the following:
■ If you launched the Installation and Migration Wizard at the end of
installing Symantec Endpoint Protection Manager, skip to Step 2.
■ If you did not launch the Installation and Migration Wizard at the end of
installing Symantec Endpoint Protection Manager, clickStart>Programs
>SymantecEndpoint ProtectionManager > Installation andMigration
Wizard.
2 In the Welcome to the Migration and Deployment Wizard panel, click Next.
3 In the What would you like to do panel, clickMigratefromaPreviousversion
of SymantecAntiVirus.
145Migrating Symantec AntiVirus and Symantec Client SecurityMigrating server and client group settings
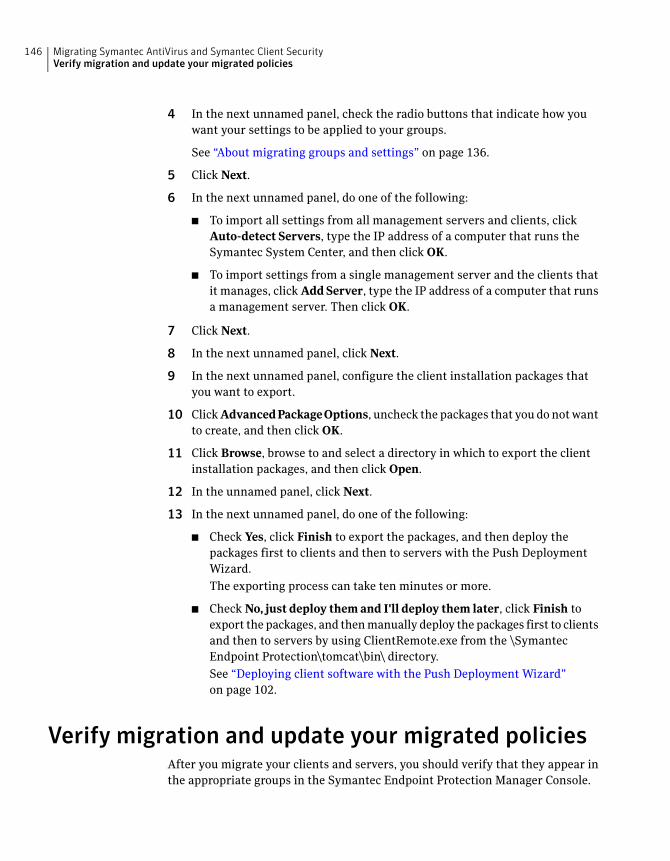
4 In the next unnamed panel, check the radio buttons that indicate how you
want your settings to be applied to your groups.
See “About migrating groups and settings” on page 136.
5 Click Next.
6 In the next unnamed panel, do one of the following:
■ To import all settings from all management servers and clients, click
Auto-detect Servers, type the IP address of a computer that runs the
Symantec System Center, and then click OK.
■ To import settings from a single management server and the clients that
it manages, click AddServer, type the IP address of a computer that runs
a management server. Then click OK.
7 Click Next.
8 In the next unnamed panel, click Next.
9 In the next unnamed panel, configure the client installation packages that
you want to export.
10 ClickAdvancedPackageOptions, uncheck the packages that you do not want
to create, and then click OK.
11 Click Browse, browse to and select a directory in which to export the client
installation packages, and then click Open.
12 In the unnamed panel, click Next.
13 In the next unnamed panel, do one of the following:
■ Check Yes, click Finish to export the packages, and then deploy the
packages first to clients and then to servers with the Push Deployment
Wizard.
The exporting process can take ten minutes or more.
■ Check No, just deploy themand I'll deploy them later, click Finish to
export the packages, and then manually deploy the packages first to clients
and then to servers by using ClientRemote.exe from the \Symantec
Endpoint Protection\tomcat\bin\ directory.
See “Deploying client software with the Push Deployment Wizard”
on page 102.
Verify migration and update your migrated policiesAfter you migrate your clients and servers, you should verify that they appear in
the appropriate groups in the Symantec Endpoint Protection Manager Console.
Migrating Symantec AntiVirus and Symantec Client SecurityVerify migration and update your migrated policies
146
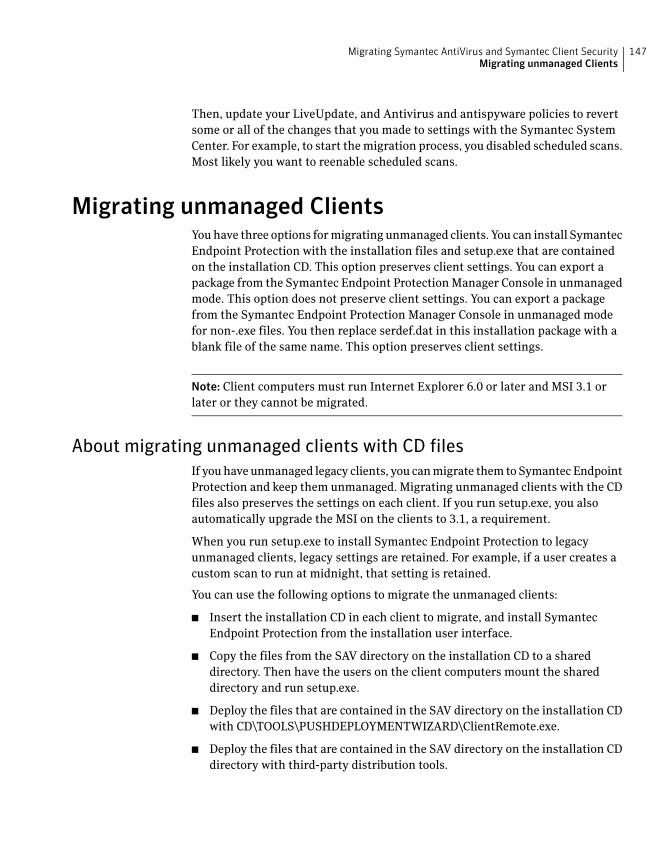
Then, update your LiveUpdate, and Antivirus and antispyware policies to revert
some or all of the changes that you made to settings with the Symantec System
Center. For example, to start the migration process, you disabled scheduled scans.
Most likely you want to reenable scheduled scans.
Migrating unmanaged ClientsYou have three options for migrating unmanaged clients. You can install Symantec
Endpoint Protection with the installation files and setup.exe that are contained
on the installation CD. This option preserves client settings. You can export a
package from the Symantec Endpoint Protection Manager Console in unmanaged
mode. This option does not preserve client settings. You can export a package
from the Symantec Endpoint Protection Manager Console in unmanaged mode
for non-.exe files. You then replace serdef.dat in this installation package with a
blank file of the same name. This option preserves client settings.
Note: Client computers must run Internet Explorer 6.0 or later and MSI 3.1 or
later or they cannot be migrated.
About migrating unmanaged clients with CD files
If you have unmanaged legacy clients, you can migrate them to Symantec Endpoint
Protection and keep them unmanaged. Migrating unmanaged clients with the CD
files also preserves the settings on each client. If you run setup.exe, you also
automatically upgrade the MSI on the clients to 3.1, a requirement.
When you run setup.exe to install Symantec Endpoint Protection to legacy
unmanaged clients, legacy settings are retained. For example, if a user creates a
custom scan to run at midnight, that setting is retained.
You can use the following options to migrate the unmanaged clients:
■ Insert the installation CD in each client to migrate, and install Symantec
Endpoint Protection from the installation user interface.
■ Copy the files from the SAV directory on the installation CD to a shared
directory. Then have the users on the client computers mount the shared
directory and run setup.exe.
■ Deploy the files that are contained in the SAV directory on the installation CD
with CD\TOOLS\PUSHDEPLOYMENTWIZARD\ClientRemote.exe.
■ Deploy the files that are contained in the SAV directory on the installation CD
directory with third-party distribution tools.
147Migrating Symantec AntiVirus and Symantec Client SecurityMigrating unmanaged Clients
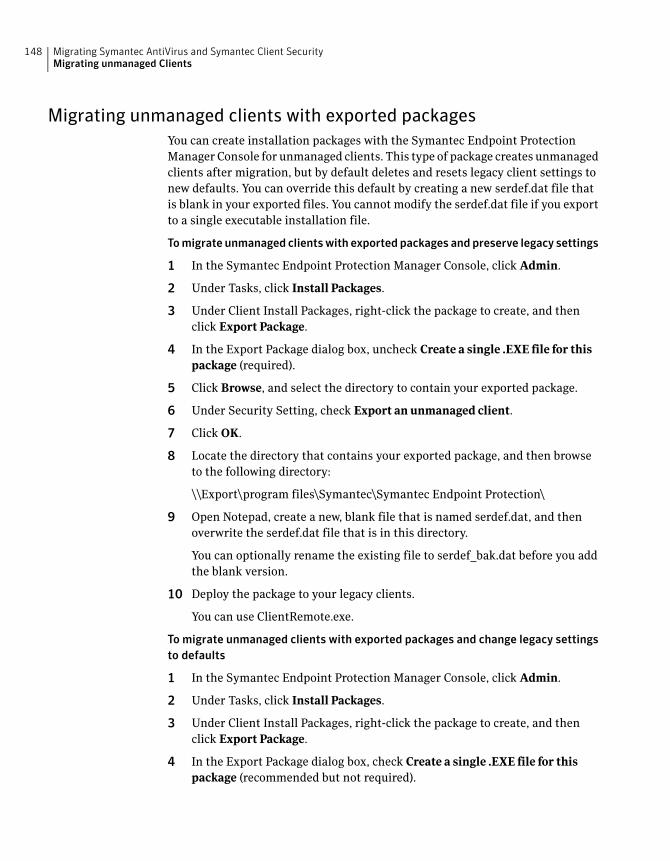
Migrating unmanaged clients with exported packages
You can create installation packages with the Symantec Endpoint Protection
Manager Console for unmanaged clients. This type of package creates unmanaged
clients after migration, but by default deletes and resets legacy client settings to
new defaults. You can override this default by creating a new serdef.dat file that
is blank in your exported files. You cannot modify the serdef.dat file if you export
to a single executable installation file.
Tomigrate unmanaged clientswith exported packages and preserve legacy settings
1 In the Symantec Endpoint Protection Manager Console, click Admin.
2 Under Tasks, click Install Packages.
3 Under Client Install Packages, right-click the package to create, and then
click Export Package.
4 In the Export Package dialog box, uncheck Create a single .EXE file for this
package (required).
5 Click Browse, and select the directory to contain your exported package.
6 Under Security Setting, check Export an unmanaged client.
7 Click OK.
8 Locate the directory that contains your exported package, and then browse
to the following directory:
\\Export\program files\Symantec\Symantec Endpoint Protection\
9 Open Notepad, create a new, blank file that is named serdef.dat, and then
overwrite the serdef.dat file that is in this directory.
You can optionally rename the existing file to serdef_bak.dat before you add
the blank version.
10 Deploy the package to your legacy clients.
You can use ClientRemote.exe.
To migrate unmanaged clients with exported packages and change legacy settings
to defaults
1 In the Symantec Endpoint Protection Manager Console, click Admin.
2 Under Tasks, click Install Packages.
3 Under Client Install Packages, right-click the package to create, and then
click Export Package.
4 In the Export Package dialog box, check Create a single .EXE file for this
package (recommended but not required).
Migrating Symantec AntiVirus and Symantec Client SecurityMigrating unmanaged Clients
148
5 Click Browse, and select the directory to contain your exported package.
6 Under Security Setting, check Export an unmanaged client.
7 Click OK.
8 Deploy the package to your legacy clients.
You can use ClientRemote.exe.
What has changed for legacy administratorsTable 7-3 describes what's changed for legacy administrators.
Table 7-3 New features
DescriptionFeature
Symantec Endpoint Protection Manager does not include Symantec Endpoint
Protection. To protect Symantec Endpoint Protection Managers, you must install
Symantec Endpoint Protection client software on the server.
Legacy Symantec AntiVirus and Symantec Client Security servers included
Symantec AntiVirus protection.
Server software does not provide
Symantec AntiVirus protection
The client user interface has been redesigned.Client software user interface is
redesigned
The Symantec System Center has been deprecated. The new management console
is called the Symantec Endpoint Protection Manager console.
Management console is
redesigned
Legacy management servers can be installed as secondary servers that reports
to a primary management server for a server group.
Secondary management servers
are no longer used
Symantec Endpoint Protection clients can be configured to provide signature
and content updates to clients in a group. When clients are configured this way,
they are called Group Update Providers. Group Update Providers do not have to
be in the group or groups that they update.
Group Update Providers
Legacy Symantec System Center operations revolved around server groups. Each
group had a primary server, and clients were ultimately managed by that primary
server.
Symantec Endpoint Protection uses the concept of a site, and multiple sites can
be part of an installation instance. When you install additional sites in an
installation instance, you do so by not specifying a secret key during installation.
Every time you specify a secret key when you install a site, you create a new
installation instance. Computers in different installation instances do not
communicate with each other.
Server groups can be thought of
as sites
149Migrating Symantec AntiVirus and Symantec Client SecurityWhat has changed for legacy administrators
Table 7-3 New features (continued)
DescriptionFeature
Legacy operations supported location awareness for firewall operations only.
Symantec Endpoint Protection expands location awareness support to the group
level. Each group can be divided into multiple locations, and when a client is in
that location, policies can be applied to that location.
Location awareness is expanded
Legacy Symantec System Center operations let you apply a series of settings to
groups of computers by using dialog boxes.
Settings are now controlled with the policies that can be applied down to the
location level. For example, two policies that affect LiveUpdate settings. One
policy specifies how often LiveUpdate runs and controls user interaction. The
other policy specifies the content that is allowed to be installed on client
computers with LiveUpdate.
Policies now control most client
settings
Legacy Symantec AntiVirus communications were governed by the presence of
a Grc.dat file on client computers, which is deprecated. A file named Sylink.xml
has replaced Grc.dat, and appears in the client installation directory. To replace
Sylink.xml, execute smc -stop, replace Sylink.xml, and then execute smc -start.
You can also use smc -import Sylink.xml.
Grc.dat is no longer used
Some legacy Symantec System Center settings are still applied at the group level.
For example, setting the client uninstall password applied to all computers in a
group. Also, the new LiveUpdate Content policy applies to the group.
Some settings are still set on
groups
Legacy Netware management servers are no longer supported. Do not migrate
legacy netware management servers, but continue to manage them with legacy
software.
Netware is no longer supported
Domains let you create additional global groups if you want to use additional
global groups. This feature is advanced and should be used only if necessary. The
System domain is the default domain.
Domains are now available for
use
Legacy products named Symantec Client Security included Symantec AntiVirus
and Symantec Client Firewall. Symantec Endpoint Protection now includes a
new, improved firewall and user interface.
Symantec Endpoint Protection
now includes firewall support
Migrating Symantec AntiVirus and Symantec Client SecurityWhat has changed for legacy administrators
150
Table 7-3 New features (continued)
DescriptionFeature
If you want to disable certain hardware devices on client computers, you can now
configure policies to block user access to a list of hardware devices. These devices
include items like USB ports and floppy disk drives, and modems.
These devices also include items for which you should exercise caution. For
example, you can disable network interface cards (NIC), which disable client
computers from network communications, even with the Symantec Endpoint
Protection Manager Console. The only way to recover from this scenario is to
uninstall Symantec Endpoint Protection, and then reenable the NIC with Windows
Device Manager.
Device blocking is now available
The Symantec Client Firewall Administrator was the tool that was used to create
Symantec Client Firewall policies. The new Symantec Endpoint Protection
Manager Console now integrates this functionality by default.
Symantec Client Firewall
Administrator is no longer used
If you have a large network and need the ability to conserve bandwidth
consumption, you can configure additional management servers in a load-balanced
configuration. If you have a large network and need the ability to configure
redundancy, you can configure additional management servers in a failover
configuration.
Failover and load balancing can
be implemented for management
servers
If you have a large network and need replication, you can configure sites in an
installation instance to replicate data.
Note: When you install a site for replication, you do not specify a secret key. All
sites that are installed with a secret key do not communicate with each other.
Replication can be implemented
between sites
Legacy product included an Alert Management Server that supported alerting.
The new Symantec Endpoint Protection Manager now includes this functionality
by default.
Alert Management Server is no
longer used
Legacy products stored information in the registry. Symantec Endpoint Protection
Manager now stores all information about client computers in a SQL database
(the embedded database or a Microsoft SQL database).
Client information is now stored
in a database
LiveUpdate now supports downloading and installation of a wide variety of
content including definitions, signatures, white lists to prevent false positives,
engines, and product updates.
Enhanced LiveUpdate features
151Migrating Symantec AntiVirus and Symantec Client SecurityWhat has changed for legacy administrators

Migrating Symantec AntiVirus and Symantec Client SecurityWhat has changed for legacy administrators
152
Migrating legacy Symantec
Sygate software
This chapter includes the following topics:
■ About migrating to Symantec Endpoint Protection 11.x
■ About migrating to Symantec Network Access Control 11.x
■ About Enforcer upgrades
■ Server migration scenarios
■ Management server migration procedures
■ Console user interface and functionality changes post migration
■ Migrating remote management consoles
■ About configuring migrated and new policies
■ About removing the client password protections from group settings
■ Migrating legacy Symantec Sygate client software
About migrating to Symantec Endpoint Protection11.x
You can migrate Symantec Sygate Enterprise Protection 5.1 and greater and
Symantec Network Access Control 5.1 and greater to Symantec Endpoint Protection
11.x. No other legacy Sygate software is supported for this migration. To migrate
older legacy Sygate software versions, first migrate them to Symantec Sygate
Enterprise Protection 5.1.
8Chapter
About migrating Symantec Sygate server and management software
The migration goal is to install Symantec Endpoint Protection Manager and
Symantec Endpoint Protection Management Console for Symantec Endpoint
Protection 11.x. The legacy server and management software that you can migrate
consists of the following two products:
■ Symantec Sygate Enterprise Protection 5.1 management server, console, and
database
The server components are called Symantec Policy Manager and Symantec
Policy Management Console.
■ Symantec Network Access Control 5.1 management server, console, and
database
The server components are also called Symantec Policy Manager and Symantec
Policy Management Console.
The legacy product Symantec Sygate Enterprise Protection 5.1 includes all of the
functionality that the legacy product Symantec Network Access Control 5.1
provides. The functionality subset that Symantec Network Access Control provides
is Host Integrity policies and Enforcer capabilities.
Note: Time stamp values in Host Integrity policies to not properly migrate. After
migration, inspect all Host Integrity settings that are configured for time values
and change them if necessary.
Symantec Endpoint Protection 11.0 is similar to Symantec Sygate Enterprise
Protection 5.1 with one exception. The exception is that Symantec Endpoint
Protection does not include Host Integrity or Enforcer capabilities. Therefore, if
you migrate Symantec Sygate Enterprise Protection 5.1 servers that provide Host
Integrity or Enforcer capabilities, you must also purchase and install the Symantec
Endpoint Protection Manager for Symantec Network Access Control 11.0 on those
migrated servers to regain access to that functionality.
Note: Server migration migrates all existing policies and settings that are
configured for the servers and site.
Supported server migration paths
The following software is supported for migration to Symantec Endpoint Protection
Manager and Management Console for Symantec Endpoint Protection:
■ Symantec Policy Manager and Management Console 5.1
Migrating legacy Symantec Sygate softwareAbout migrating to Symantec Endpoint Protection 11.x
154
To gain access to the Host Integrity and Enforcer features, you must also install
Symantec Endpoint Protection Manager for Symantec Network Access Control
11.0.
■ Symantec Network Access Control Manager and Console 5.1
You can migrate this software to Symantec Endpoint Protection 11.0. However,
to gain access to the legacy Host Integrity and Enforcer features, you must
also install the Symantec Endpoint Protection Manager for Symantec Network
Access Control 11.0.
Unsupported server migration paths
Symantec Endpoint Protection Manager for Symantec Endpoint Protection
migration is blocked when any of the following software is detected:
■ Sygate Policy Manager 5.0
■ Sygate Management Server 3.x and 4.x
■ Whole Security Management Server, all versions
Before you can install Symantec Endpoint Protection Manager for Symantec
Endpoint Protection, you must uninstall this software.
Note: If you try to migrate Symantec Endpoint Protection Manager 5.1, and if any
of the unsupported software is detected, the migration is also blocked.
About migrating legacy Symantec Sygate client software
The migration goal is to install Symantec Endpoint Protection 11.x. The legacy
agent software that you can migrate consists of the following two products:
■ Symantec Protection Agent 5.1
■ Symantec Enforcement Agent 5.1
Symantec Protection Agent includes all of the functionality that Symantec
Enforcement Agent provides. The functionality subset that Symantec Enforcement
Agent provides includes Host Integrity only.
To migrate the client computers that run Symantec Protection Agent or Symantec
Enforcement Agent, install Symantec Endpoint Protection 11.0 on those computers
and migration is complete.
Like the Sygate Protection Agent, Symantec Endpoint Protection 11.0 client
software includes all functionality that the Symantec Protection Agent and
Symantec Enforcement Agent provide and more. So if you have Sygate Protection
Agents that provide Host Integrity, you do not need to also install Symantec
155Migrating legacy Symantec Sygate softwareAbout migrating to Symantec Endpoint Protection 11.x
Network Access Control 11.0 on those clients. You do, however, need to install
the Symantec Endpoint Protection Manager for Symantec Network Access Control
11.0 on the management servers to regain access to that client functionality.
Note: Agent migration migrates all existing settings that are configured for the
clients as long as you export the client installation package for your existing
groups. And then perform automatic upgrade for those groups.
Supported client migration paths
The following software is supported for migration to Symantec Endpoint
Protection:
■ Symantec Protection Agent 5.1
■ Symantec Protection Agent 5.1 with Symantec AntiVirus 9.x and greater
■ Symantec Protection Agent 5.1 with Symantec Client Security 2.x and greater
■ Symantec Enforcement Agent 5.1
■ Symantec Enforcement Agent 5.1 with Symantec AntiVirus 9.x and greater
■ Symantec Enforcement Agent 5.1 with Symantec Client Security 2.x and greater
Unsupported client migration paths
Symantec Endpoint Protection 11.0 client migration is blocked when any of the
following software is detected:
■ Sygate Protection Agent 5.0
■ Sygate Enforcement Agent 5.0
■ Sygate Security Agent 3.x and 4.x
■ Whole Security Confidence Online Enterprise Edition all versions.
■ Symantec Protection Agent 5.1 and Symantec AntiVirus 7.x and 8.x
■ Symantec Protection Agent 5.1 and Symantec Client Security 1.x
■ Symantec Enforcement Agent 5.1 and Symantec AntiVirus 7.x and 8.x
■ Symantec Enforcement Agent 5.1 and Symantec Client Security 1.x
Migrating legacy Symantec Sygate softwareAbout migrating to Symantec Endpoint Protection 11.x
156
Aboutmigrating toSymantecNetworkAccessControl11.x
You can migrate Symantec Network Access Control 5.1 to Symantec Network
Access Control 11.x. No other legacy Sygate software is supported for this
migration. To migrate other versions, first migrate them to Symantec Sygate
Enterprise Protection 5.1.
About migrating legacy Symantec Sygate server software
Symantec Network Access Control Manager and Management Console 5.1 is the
only software that is supported for migration to Symantec Endpoint Protection
Manager and Management Console for Symantec Network Access Control 11.x.
Symantec Endpoint Protection Manager for Symantec Network Access Control
migration is blocked when any of the following software is detected:
■ Sygate Policy Manager 5.0
■ Sygate Management Server 3.x and 4.x
■ Whole Security Management Server, all versions
About migrating legacy Symantec Sygate client software
Symantec Enforcement Agent 5.1 is the only software that is supported for
migration to Symantec Network Access Control 11.0.
Note: Agent migration migrates all existing settings that are configured for the
clients as long as you export the client installation package for your existing
groups. hen perform automatic upgrade for those groups.
Symantec Network Access Control 11.0 client migration is blocked when any of
the following software is detected:
■ Sygate Enforcement Agent 5.0
■ Sygate Protection Agent 5.0 and greater
■ Sygate Security Agent 3.x and 4.x
■ Whole Security Confidence Online Enterprise Edition all versions
■ Symantec Enforcement Agent 5.1 and Symantec AntiVirus all versions
■ Symantec Enforcement Agent 5.1 and Symantec Client Security all versions
157Migrating legacy Symantec Sygate softwareAbout migrating to Symantec Network Access Control 11.x
About Enforcer upgradesSymantec Endpoint Protection Manager supports Symantec Gateway, DHCP, and
LAN Enforcers that run on version 6100 hardware appliances only. These
appliances support software versions 5.1, 5.1.5, and 11.x. Symantec Endpoint
Protection Manager supports software versions 5.1.5 and 11.x only. Symantec
Endpoint Protection Manager does not support software version 5.1. Earlier
versions of Symantec Enforcer that were provided as software only are also not
supported.
If your 6100 Enforcer appliance is running software version 5.1, you must upgrade
the software image to version 5.1.5 or 11.x. Symantec recommends that you flash
the legacy software image to version 11.x to use the latest version. All Enforcer
settings are stored in Symantec Endpoint Protection Server, so Enforcer settings
are migrated during server migration.
Server migration scenariosMigrating legacy Symantec Sygate Enterprise Protection software is as complex
as your network architecture. If you have one legacy management server that
manages clients, install the latest Management components on the computer that
runs Symantec Policy Manager 5.1 management components. You are finished.
If additional legacy servers run replication, disable replication before migration,
and then reenable it after migration.
If additional legacy servers run failover or load balancing, disable the Symantec
Policy Manager service on those computers. Then, migrate the servers one by
one. Begin with the server that you first installed with the license file and
pre-shared secret. After the servers are migrated, they automatically manage
legacy clients. Then, use the AutoUpgrade feature to migrate the client computers
to the latest version, which is the easiest way to migrate the clients.
Note: The server scenarios support both Symantec Endpoint Protection and
Symantec Network Access Control migrations.
Migrating an installation instance that uses one management server
Migrating an installation instance that uses one management server is
straightforward because you only migrate one site. You install Symantec Endpoint
Protection Manager on the computer that runs Symantec Sygate Enterprise
Protection. Then proceed to update your client software. The database is also
migrated. It does not matter if the database is maintained by the embedded
Migrating legacy Symantec Sygate softwareAbout Enforcer upgrades
158
database server or by a local Microsoft SQL Server or a remote Microsoft SQL
Server.
To migrate a site that uses one Management server
◆ Migrate your management server.
See “Migrating a management server” on page 162.
Migrating an installation instance that uses oneMicrosoft SQLdatabaseand multiple management servers
Migrating an installation instance that uses one database and multiple
management servers has the following three implications:
■ The management servers are configured for load balancing or failover.
■ The database runs on Microsoft SQL server because failover and load balancing
is supported on Microsoft SQL Server only.
■ Replication is not performed because there is only one database.
All installation instances have a site in which you first installed the management
server. Only one of these management servers was installed with a license and a
pre-shared secret. You should migrate this management server first. You then
migrate the other management servers that were installed for load balancing and
failover.
To migrate an installation instance that uses one Microsoft SQL database and
multiple Management servers
1 On all management servers that were not installed with the license and
pre-shared secret, disable the Symantec Policy Manager service with Windows
Administrative Tools.
See “Stopping the servers before load balancing and failover migration”
on page 163.
2 Authenticate to and log on to the computer that contains the Symantec Policy
Manager that was installed with the license and pre-shared secret.
Do not log on to the Symantec Policy Manager.
3 Migrate the management server.
See “Migrating a management server” on page 162.
4 Migrate all additional management servers one by one.
159Migrating legacy Symantec Sygate softwareServer migration scenarios
Migrating an installation instance that uses multiple embeddeddatabases and management servers
Migrating an installation instance that uses multiple embedded database and
management servers has the following two implications:
■ No failover or load balancing is performed because the embedded database
does not support failover or load balanced servers.
■ The Management servers are configured for replication only, because you
cannot install multiple embedded database servers without installing them as
replicating servers.
All sites have a computer on which you first installed the management server.
Only one of these management servers was installed with a license and a
pre-shared secret. You must migrate this management server first. You then
migrate the other management servers that were installed for replication.
To migrate an installation instance that uses multiple embedded databases and
management servers
1 On all management servers, disable replication.
See “Disabling replication before migration” on page 163.
2 Authenticate to and logon to the computer that contains the Symantec Policy
Manager that was installed with the license and pre-shared secret.
Do not logon to the Symantec Policy Manager.
3 Migrate the management server.
See “Migrating a management server” on page 162.
4 Migrate all additional management servers one by one.
5 After you migrate the servers, enable replication on each server.
See “Enabling replication after migration” on page 164.
Migrating an installation instance that uses multiple SQL databaseand management servers
Migrating a site that uses multiple SQL database and management servers has
the following two implications:
■ Replication is configured because it uses multiple Microsoft SQL 2000
databases.
■ The management servers may be configured for load balancing or failover.
Migrating legacy Symantec Sygate softwareServer migration scenarios
160
All sites have a computer on which you first installed the management server.
Only one of these management servers was installed with a license and a
pre-shared secret. You should migrate this management server first. You then
migrate the other management servers that were installed for replication, failover,
and load balancing.
Note: It is possible to have an embedded database that replicates with Microsoft
SQL database. The embedded database, however, does not support failover and
load balanced servers.
To migrate an installation instance that uses multiple SQL database and
management servers
1 On all management servers that perform replication to a database, disable
replication.
See “Disabling replication before migration” on page 163.
2 On all management servers that perform load balancing and failover for that
database, and that were not installed with the license and pre-shared secret,
disable the Symantec Policy Manager service with Windows Administrative
Tools.
See “Stopping the servers before load balancing and failover migration”
on page 163.
3 Authenticate to and logon to the computer that contains the Symantec Policy
Manager that was installed with the license and pre-shared secret, but do not
logon to the Symantec Policy Manager.
4 Migrate the management server.
See “Migrating a management server” on page 162.
5 Migrate all additional management servers that perform failover and load
balancing one by one.
6 Repeat the previous steps until you have migrated all sites.
7 Reenable replication one site at a time until all sites replicate again.
See “Enabling replication after migration” on page 164.
Management server migration proceduresUse these procedures to migrate management servers and consoles, and the
management databases that are based on the scenarios that fit your environments
161Migrating legacy Symantec Sygate softwareManagement server migration procedures
and sites. The order in which you follow these procedures depends on your
migration scenario.
See “Server migration scenarios” on page 158.
Migrating a management server
You must migrate all management servers before migrating clients. If you migrate
management servers in an environment that supports load balancing, failover,
or replication, you must prepare and migrate management servers in a very
specific order.
See “Server migration scenarios” on page 158.
Warning: Identify and follow your migration scenario or your migration will fail.
If you migrate Symantec Sygate Enterprise Protection servers that have
implemented Host Integrity policies or Enforcer protection, install the Symantec
Endpoint Protection Manager for Symantec Endpoint Protection first. Then, repeat
the procedure and install Symantec Endpoint Protection Manager for Symantec
Network Access Control to gain access to the Host Integrity and Enforcer
functionality.
To migrate a management server
1 Insert one of the following installation CDs in server to migrate, and start
the installation:
■ Symantec Endpoint Protection
■ Symantec Network Access Control
2 Do one of the following:
■ In the Symantec AntiVirus panel, click Install Symantec Endpoint
Protection, and then click Symantec Endpoint ProtectionManager.
■ In the Symantec Network Access Control panel, click Install Symantec
NetworkAccess Control, and then click Symantec Endpoint Protection
Manager.
3 In the Welcome panel, click Next.
4 Click through the installation prompts until installation begins.
Initial file installation takes a few minutes.
5 In the Install Wizard Completed panel, click Finish.
6 In the Welcome to the Management Server Upgrade Wizard panel, clickNext.
Migrating legacy Symantec Sygate softwareManagement server migration procedures
162
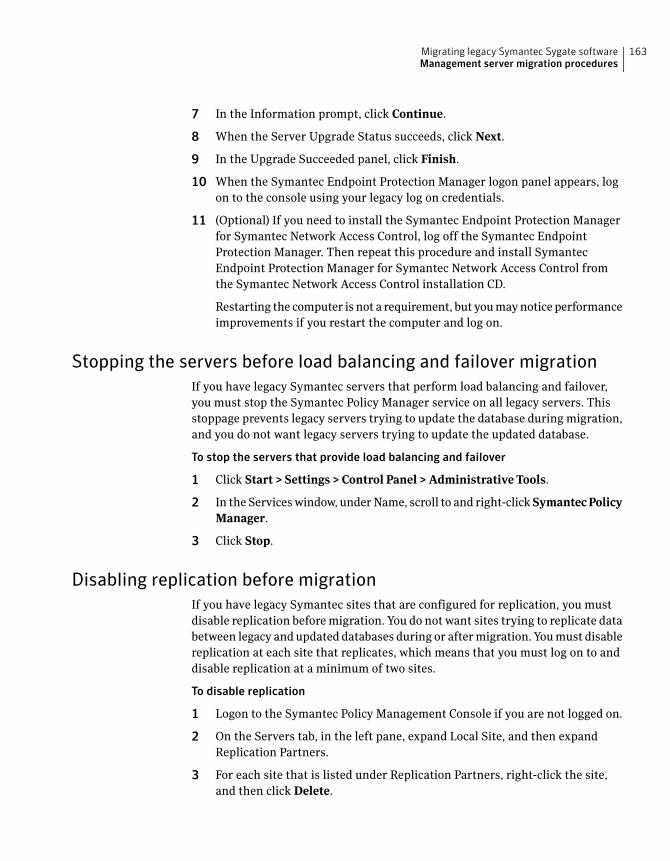
7 In the Information prompt, click Continue.
8 When the Server Upgrade Status succeeds, click Next.
9 In the Upgrade Succeeded panel, click Finish.
10 When the Symantec Endpoint Protection Manager logon panel appears, log
on to the console using your legacy log on credentials.
11 (Optional) If you need to install the Symantec Endpoint Protection Manager
for Symantec Network Access Control, log off the Symantec Endpoint
Protection Manager. Then repeat this procedure and install Symantec
Endpoint Protection Manager for Symantec Network Access Control from
the Symantec Network Access Control installation CD.
Restarting the computer is not a requirement, but you may notice performance
improvements if you restart the computer and log on.
Stopping the servers before load balancing and failover migration
If you have legacy Symantec servers that perform load balancing and failover,
you must stop the Symantec Policy Manager service on all legacy servers. This
stoppage prevents legacy servers trying to update the database during migration,
and you do not want legacy servers trying to update the updated database.
To stop the servers that provide load balancing and failover
1 Click Start > Settings > Control Panel >Administrative Tools.
2 In the Services window, under Name, scroll to and right-clickSymantecPolicy
Manager.
3 Click Stop.
Disabling replication before migration
If you have legacy Symantec sites that are configured for replication, you must
disable replication before migration. You do not want sites trying to replicate data
between legacy and updated databases during or after migration. You must disable
replication at each site that replicates, which means that you must log on to and
disable replication at a minimum of two sites.
To disable replication
1 Logon to the Symantec Policy Management Console if you are not logged on.
2 On the Servers tab, in the left pane, expand Local Site, and then expand
Replication Partners.
3 For each site that is listed under Replication Partners, right-click the site,
and then click Delete.
163Migrating legacy Symantec Sygate softwareManagement server migration procedures
4 In the Delete Partner prompt, click Yes.
5 Logoff the console, and repeat this procedure at all sites that replicate data.
Enabling replication after migration
After you migrate all servers that used replication, failover, and load balancing,
you need to reenable replication. After migration, you add a replication partner
to enable replication. You only need to add replication partners on the computer
on which you first installed the management server. Replication partners
automatically appear on the other management servers.
To enable replication after migration
1 Logon to the Symantec Policy Management Console if you are not logged on.
2 On the Servers tab, in the left pane, expand Local Site, and then expand
Replication Partners.
3 For each site that is listed under Replication Partners, right-click the site,
and then click AddPartner.
4 In the Add Replication Partner panel, click Next.
5 In the Remote Site Information panel, enter the identifying information about
the replication partner, enter the authentication information, and then click
Next.
6 In the Schedule Replication panel, set the schedule for when replication occurs
automatically, and then click Next.
7 In the Replication of Log Files and Client Packages panel, check the items to
replicate, and then click Next.
Replicating packages generally involves large amounts of traffic and storage
requirements.
8 In the Completing the Add Replication Partner Wizard panel, click Finish.
9 Repeat this procedure for all management servers that replicate data with
this management server.
Console user interface and functionality changes postmigration
The following user interfaces changes appear post migration:
■ The Start Program menu for Symantec Policy Manager is changed to Symantec
Endpoint Protection Manager Console.
Migrating legacy Symantec Sygate softwareConsole user interface and functionality changes post migration
164
■ The installation directory and service name retain the legacy name of Symantec
Policy Manager and are not renamed.
■ Legacy OS Protection Policies appear as Hardware Device Protection policies.
■ Several new policy types are available for LiveUpdate, AntiVirus and
AntiSpyware, and so forth. You cannot use the new policies until you migrate
your clients.
■ Legacy client installation packages are removed from the database so that
they do not appear in the migrated console. However, these packages still
remain in your legacy package directory. You should export your new client
installation packages to a different directory.
■ Report Scheduler is now available from the Reports tab instead of the legacy
Server Site Properties dialog box.
■ License Management has been deprecated and is no longer required.
■ Package management is now available from the Servers pane instead of the
legacy Client Manager pane.
■ Policy Library components such as Management Server Lists and Network
Services are now available on the Policies pane, under the lists of Policies, and
identified as Policy Components.
■ The Servers and Administrators tab functionality have been consolidated into
the Admin pane.
■ The server migration purges all client installation packages from the database.
These packages are no longer supported, and package removal does not affect
the connected clients. This purge only prevents new deployments of the legacy
client packages.
Migrating remote management consolesYou migrate legacy remote management consoles by installing the latest remote
management consoles on the computers that run the legacy consoles. The legacy
Symantec Policy Manager icons and Program start menu are not migrated. When
you click the icon or menu item, however, they display the new Symantec Endpoint
Protection Manager logon prompt.
Legacy remote management consoles downloaded and installed Sun Java 1.4
runtime. This new version of the remote management console downloads and
installs Sun Java 1.5 to the remote computer. If you do not need Sun Java 1.4
runtime for any other applications, you can remove it with the Windows
Add/Remove program utility.
165Migrating legacy Symantec Sygate softwareMigrating remote management consoles
To migrate remote management consoles
1 On the computer on which to install the management console, start a Web
browser.
2 In the URL box, type one of the following identifiers for the computer that
runs the policy manager:
■ http://computer_name:9090
■ http://computer_IP_address:9090
9090 is the default port, which can be changed in the \tomcat\conf\server.xml
file.
3 In the Symantec Policy Management Console window, clickHere to download
and install JRE 1.5.
4 Respond to and follow the prompts and logon to the Symantec Endpoint
Protection Manager Console.
About configuring migrated and new policiesThe Symantec Endpoint Protection Manager Console lets you manage legacy
clients. If you migrated to Symantec Endpoint Protection, the console also contains
migrated Firewall and Intrusion Prevention policies that contain your legacy
settings. In addition, new policies are also available. As a result, you should become
familiar with the new policies that affect your groups before you migrate legacy
clients.
For example, if you decide to add Antivirus and Antispyware protection to your
clients during migration, become familiar with the Antivirus and Antispyware
policy settings. Also, LiveUpdate Settings and LiveUpdate Content policies affect
both Symantec Endpoint Protection and Symantec Network Access Control. As a
result, you should become very familiar with these policies and how they affect
your groups and locations before client migration.
About removing the client password protections fromgroup settings
Group settings are migrated and include the group client password protection
settings. If you have group settings that enable one or more passwords, such as
for uninstallation, client migration fails for certain MR releases. As a best practice,
disable these passwords in your migrated groups with the Symantec Endpoint
Protection Manager Console before you migrate legacy client software. The
Migrating legacy Symantec Sygate softwareAbout configuring migrated and new policies
166
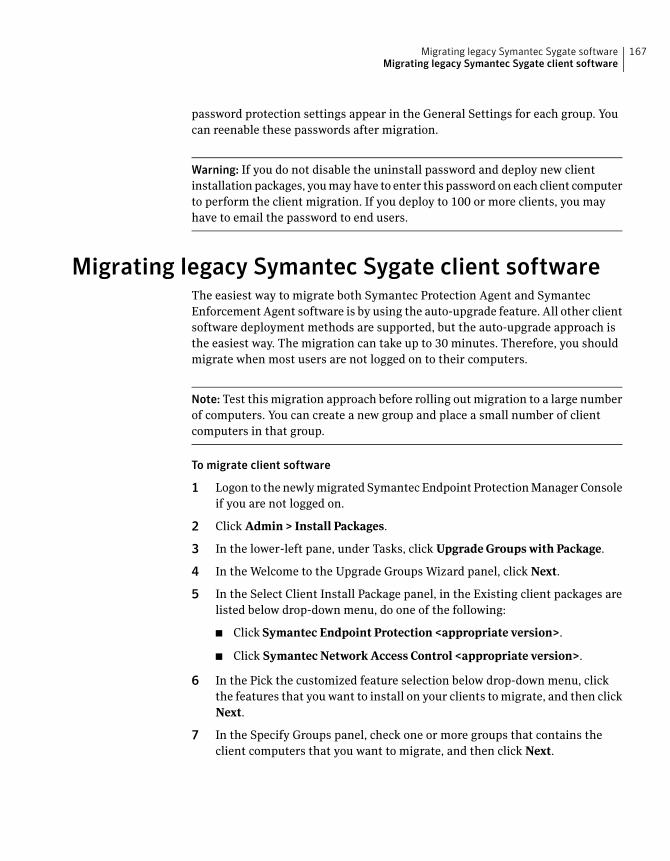
password protection settings appear in the General Settings for each group. You
can reenable these passwords after migration.
Warning: If you do not disable the uninstall password and deploy new client
installation packages, you may have to enter this password on each client computer
to perform the client migration. If you deploy to 100 or more clients, you may
have to email the password to end users.
Migrating legacy Symantec Sygate client softwareThe easiest way to migrate both Symantec Protection Agent and Symantec
Enforcement Agent software is by using the auto-upgrade feature. All other client
software deployment methods are supported, but the auto-upgrade approach is
the easiest way. The migration can take up to 30 minutes. Therefore, you should
migrate when most users are not logged on to their computers.
Note: Test this migration approach before rolling out migration to a large number
of computers. You can create a new group and place a small number of client
computers in that group.
To migrate client software
1 Logon to the newly migrated Symantec Endpoint Protection Manager Console
if you are not logged on.
2 Click Admin > Install Packages.
3 In the lower-left pane, under Tasks, click UpgradeGroupswith Package.
4 In the Welcome to the Upgrade Groups Wizard panel, click Next.
5 In the Select Client Install Package panel, in the Existing client packages are
listed below drop-down menu, do one of the following:
■ Click Symantec Endpoint Protection <appropriate version>.
■ Click SymantecNetworkAccess Control <appropriate version>.
6 In the Pick the customized feature selection below drop-down menu, click
the features that you want to install on your clients to migrate, and then click
Next.
7 In the Specify Groups panel, check one or more groups that contains the
client computers that you want to migrate, and then click Next.
167Migrating legacy Symantec Sygate softwareMigrating legacy Symantec Sygate client software
8 In the Package Upgrade Settings panel, check Download client from the
management server.
Note: You can optionally stage and select a package on a Web server.
9 Click Upgrade Settings.
10 In the Add Client Install Package dialog box, on the General and Notification,
specify a schedule for when to migrate the client computers, and specify a
message to display to users during the migration.
11 For details about settings on these tabs, click Help.
12 Click OK.
13 In the Install Client Install Package dialog box, click Next.
14 In the Completing the Client Upgrade Wizard panel, click Finish.
Migrating legacy Symantec Sygate softwareMigrating legacy Symantec Sygate client software
168
Upgrading tonewSymantec
products
This chapter includes the following topics:
■ About upgrading to new Symantec products
■ Upgrading Symantec Endpoint Protection Manager
■ About upgrading Symantec Endpoint Protection clients with Symantec Network
Access Control
■ About upgrading Symantec Network Access Control clients with Symantec
Endpoint Protection
About upgrading to new Symantec productsSymantec Endpoint Protection Manager supports management and deployment
of the following Symantec products:
■ Symantec Endpoint Protection
■ Symantec Network Access Control
You can upgrade Symantec Endpoint Protection with Symantec Network Access
Control and you can upgrade Symantec Network Access Control with Symantec
Endpoint Protection.
Upgrading Symantec Endpoint Protection ManagerTo upgrade Symantec Endpoint Protection Manager for Symantec Endpoint
Protection, you install Symantec Endpoint Protection Manager for Symantec
9Chapter
Network Access Control on the same computers that run Symantec Endpoint
Protection Manager for Symantec Endpoint Protection.
To upgrade Symantec Endpoint Protection Manger for Symantec Network Access
Control, you install Symantec Endpoint Protection Manager for Symantec Endpoint
Protection on the same computers that run Symantec Endpoint Protection Manager
for Symantec Network Access Control.
Warning:You must stop the Symantec Endpoint Protection Manager service before
upgrading your existing installation of Symantec Endpoint Protection Manager.
If you do not, you will corrupt your existing installation of Symantec Endpoint
Protection Manager.
Backing up the database
Before you upgrade, you should back up the database.
To back up the database
1 ClickStart>Programs>SymantecEndpointProtectionManager>Symantec
Database Tools.
2 In the Symantec Management Toolkit dialog box, click BackupDatabase.
3 When the Message prompt appears, click OK.
4 In the Symantec Management Toolkit dialog box, click Exit.
Disabling replication
If your site uses replication, you must disable replication before upgrading
Symantec Endpoint Protection Manager. You must disable replication at each site
that replicates.
To disable replication
1 Logon to the Symantec Endpoint Protection Manager Console.
2 On the Servers tab, in the left pane, expand Local Site, and then expand
Replication Partners.
3 For each site that is listed under Replication Partners, right-click the site,
and then click Delete.
4 In the Delete Partner prompt, click Yes.
5 Logoff the console, and repeat this procedure at all sites that replicate data.
Upgrading to new Symantec productsUpgrading Symantec Endpoint Protection Manager
170

Stopping the Symantec Endpoint Protection Manager service
Before you upgrade, you must manually stop the Symantec Endpoint Protection
Manager service on every management server in your site. After you upgrade, the
service is started automatically.
Warning:You must stop the Symantec Endpoint Protection Manager service before
you perform this procedure or you will corrupt your existing installation of
Symantec Endpoint Protection Manager.
To stop the Symantec Endpoint Protection service
1 Click Start > Settings > Control Panel >Administrative Tools.
2 In the Services window, under Name, scroll to and right-click Symantec
Endpoint ProtectionManager.
3 Click Stop.
4 Close the Services window.
Warning: Close the Services window or your upgrade may fail.
5 Repeat this procedure for all Symantec Endpoint Protection Managers.
Upgrading Symantec Endpoint Protection Manager
You must upgrade all Symantec Endpoint Protection Managers on which you
stopped the Symantec Endpoint Protection service.
To upgrade Symantec Endpoint Protection Manager
1 Insert one of the following installation CDs in server to upgrade, and start
the installation:
■ Symantec Endpoint Protection
■ Symantec Network Access Control
2 Do one of the following:
■ In the Symantec Endpoint Protection panel, click Install Symantec
Endpoint Protection, and then click Symantec Endpoint Protection
Manager.
■ In the Symantec Network Access Control panel, click Install Symantec
NetworkAccess Control, and then click Symantec Endpoint Protection
Manager.
171Upgrading to new Symantec productsUpgrading Symantec Endpoint Protection Manager
3 In the Upgrade Wizard Welcome panel, click Next.
4 In the Information panel, click Continue.
5 When the Upgrade completes, click Next.
6 In the Upgrade Succeeded panel, click Finish.
Enabling replication after migration
After you migrate all servers that used replication including the servers that were
configured for failover and load balancing, you need to reenable replication. After
migration, you add a replication partner to enable replication. You only need to
add replication partners on the computer on which you first installed the
management server. Replication partners automatically appear on the other
management servers.
To enable replication after migration
1 Logon to the Symantec Policy Management Console if you are not logged on.
2 On the Servers tab, in the left pane, expand Local Site, and then expand
Replication Partners.
3 For each site that is listed under Replication Partners, right-click the site,
and then click AddPartner.
4 In the Add Replication Partner panel, click Next.
5 In the Remote Site Information panel, enter the identifying information about
the replication partner, enter the authentication information, and then click
Next.
6 In the Schedule Replication panel, set the schedule for when replication occurs
automatically, and then click Next.
7 In the Replication of Log Files and Client Packages panel, check the items to
replicate, and then click Next.
Replicating packages generally involves large amounts of traffic and storage
requirements.
8 In the Completing the Add Replication Partner Wizard panel, click Finish.
9 Repeat this procedure for all computers that replicate data with this computer.
Upgrading to new Symantec productsUpgrading Symantec Endpoint Protection Manager
172
About upgrading Symantec Endpoint Protectionclients with Symantec Network Access Control
Symantec Endpoint Protection clients include Symantec Network Access Control
and do not need to be upgraded. After you upgrade Symantec Endpoint Protection
Manager for Symantec Network Access Control, you can apply host integrity
policies to your existing clients.
About upgrading Symantec Network Access Controlclients with Symantec Endpoint Protection
You upgrade Symantec Network Access Control clients by installing Symantec
Endpoint Protection on those clients. The installation automatically detects
Symantec Network Access Control client, removes it, and then installs Symantec
Endpoint Protection client software. You can deploy the client software by using
any of the supported client deployment methods.
173Upgrading to new Symantec productsAbout upgrading Symantec Endpoint Protection clients with Symantec Network Access Control

Upgrading to new Symantec productsAbout upgrading Symantec Network Access Control clients with Symantec Endpoint Protection
174
Symantec Endpoint
Protection installation
features and properties
This appendix includes the following topics:
■ About installation features and properties
■ Client installation features and properties
■ Windows Installer parameters
■ Windows Security Center properties
■ About using the log file to check for errors
■ Identifying the point of failure of an installation
■ Command-line examples
About installation features and propertiesInstallation features and properties are the strings that appear in text files and
command lines. Text files and command lines are processed during all client
software installations for Symantec Endpoint Protection. Installation features
control what components get installed, and installation properties control what
subcomponents are enabled or disabled after installation. Installation features
and properties are available for Symantec Endpoint Protection client software
only, and are also available for the Windows operating system. Installation features
and properties are not available for Symantec Network Access Control client
software, or for Symantec Endpoint Protection Manager installations.
AAppendix
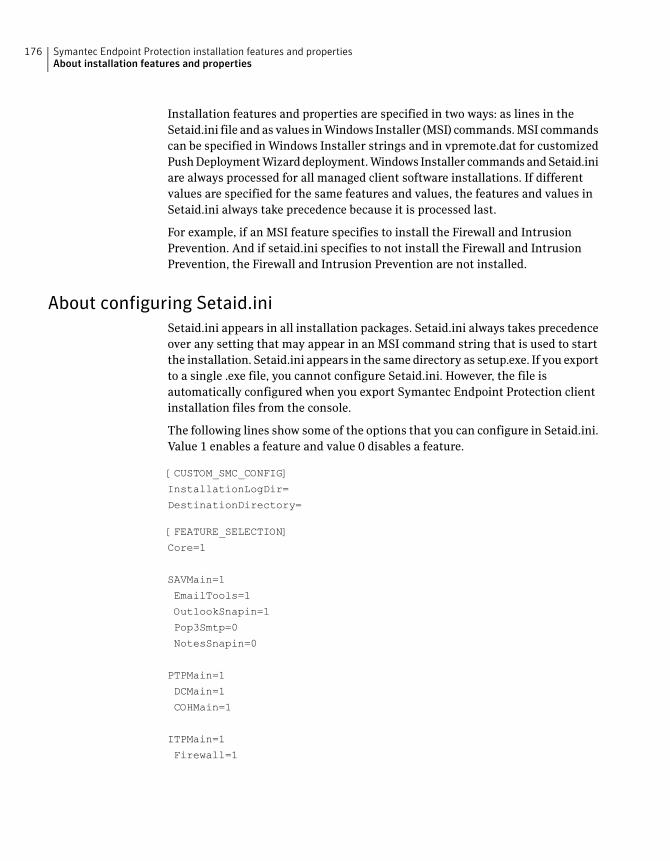
Installation features and properties are specified in two ways: as lines in the
Setaid.ini file and as values in Windows Installer (MSI) commands. MSI commands
can be specified in Windows Installer strings and in vpremote.dat for customized
Push Deployment Wizard deployment. Windows Installer commands and Setaid.ini
are always processed for all managed client software installations. If different
values are specified for the same features and values, the features and values in
Setaid.ini always take precedence because it is processed last.
For example, if an MSI feature specifies to install the Firewall and Intrusion
Prevention. And if setaid.ini specifies to not install the Firewall and Intrusion
Prevention, the Firewall and Intrusion Prevention are not installed.
About configuring Setaid.ini
Setaid.ini appears in all installation packages. Setaid.ini always takes precedence
over any setting that may appear in an MSI command string that is used to start
the installation. Setaid.ini appears in the same directory as setup.exe. If you export
to a single .exe file, you cannot configure Setaid.ini. However, the file is
automatically configured when you export Symantec Endpoint Protection client
installation files from the console.
The following lines show some of the options that you can configure in Setaid.ini.
Value 1 enables a feature and value 0 disables a feature.
[CUSTOM_SMC_CONFIG]
InstallationLogDir=
DestinationDirectory=
[FEATURE_SELECTION]
Core=1
SAVMain=1
EmailTools=1
OutlookSnapin=1
Pop3Smtp=0
NotesSnapin=0
PTPMain=1
DCMain=1
COHMain=1
ITPMain=1
Firewall=1
Symantec Endpoint Protection installation features and propertiesAbout installation features and properties
176
Note: The features are indented to show hierarchy. The features are not indented
inside the Setaid.ini file. Feature names in Setaid.ini are case sensitive.
See “Client installation features and properties” on page 177.
Feature values that are set to 1 installs the features. Feature values that are set
to 0 does not install the features. You must specify and install the parent features
to successfully install the client features as shown in the feature tree.
See Figure A-1 on page 178.
The only time that Setaid.ini is not processed is when you install the client software
with the files in the SAV installation CD directory. You can install these files with
third-party distribution tools like SMS.
You should also be aware of the following additional setaid.ini settings that map
to MSI properties for Symantec Endpoint Protection client installation:
■ DestinationDirectory maps to INSTALLDIR
■ KeepPreviousSetting maps to MIGRATESETTINGS
■ AddProgramIntoStartMenu maps to ADDSTARTMENUICON
About configuring MSI command strings
Symantec Endpoint Protection installation software uses Windows Installer (MSI)
3.1 packages for installation and deployment. If you use the command line to
install or deploy an installation package, you can customize the installation with
the standard Windows Installer parameters and the Symantec-specific features
and properties.
To use this Windows Installer, elevated privileges are required. If you try the
installation without elevated privileges, the installation may fail without notice.
For the most up-to-date list of Symantec installation commands and parameters,
see the Symantec Knowledge Base.
Note:The Microsoft Installer advertise function is unsupported. Setaid.ini-specified
features and properties take precedence over MSI-specified features and properties.
Feature and property names in MSI commands are case sensitive.
Client installation features and propertiesClient installation features and properties affect Symantec Endpoint Protection
client installations.
177Symantec Endpoint Protection installation features and propertiesClient installation features and properties
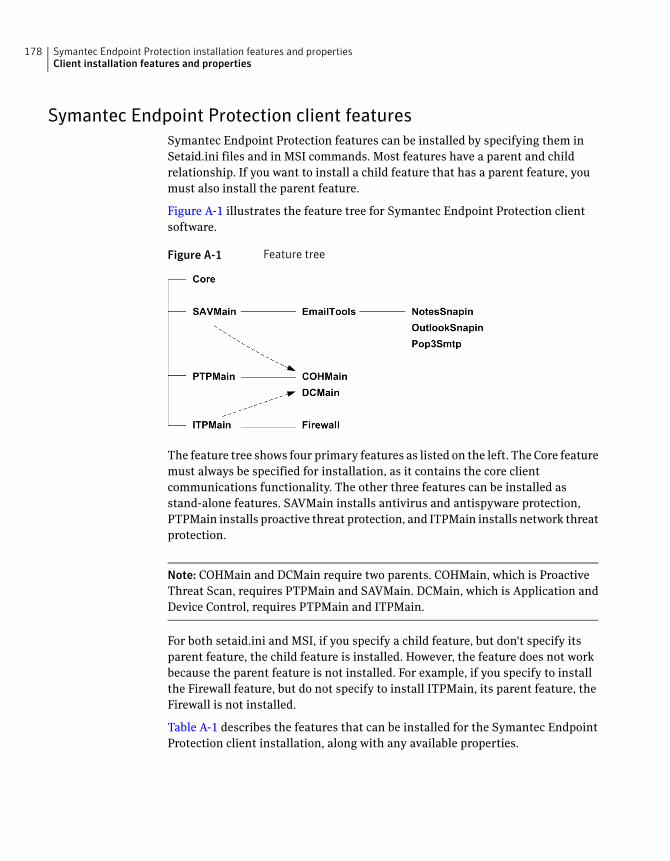
Symantec Endpoint Protection client features
Symantec Endpoint Protection features can be installed by specifying them in
Setaid.ini files and in MSI commands. Most features have a parent and child
relationship. If you want to install a child feature that has a parent feature, you
must also install the parent feature.
Figure A-1 illustrates the feature tree for Symantec Endpoint Protection client
software.
Figure A-1 Feature tree
The feature tree shows four primary features as listed on the left. The Core feature
must always be specified for installation, as it contains the core client
communications functionality. The other three features can be installed as
stand-alone features. SAVMain installs antivirus and antispyware protection,
PTPMain installs proactive threat protection, and ITPMain installs network threat
protection.
Note: COHMain and DCMain require two parents. COHMain, which is Proactive
Threat Scan, requires PTPMain and SAVMain. DCMain, which is Application and
Device Control, requires PTPMain and ITPMain.
For both setaid.ini and MSI, if you specify a child feature, but don't specify its
parent feature, the child feature is installed. However, the feature does not work
because the parent feature is not installed. For example, if you specify to install
the Firewall feature, but do not specify to install ITPMain, its parent feature, the
Firewall is not installed.
Table A-1 describes the features that can be installed for the Symantec Endpoint
Protection client installation, along with any available properties.
Symantec Endpoint Protection installation features and propertiesClient installation features and properties
178
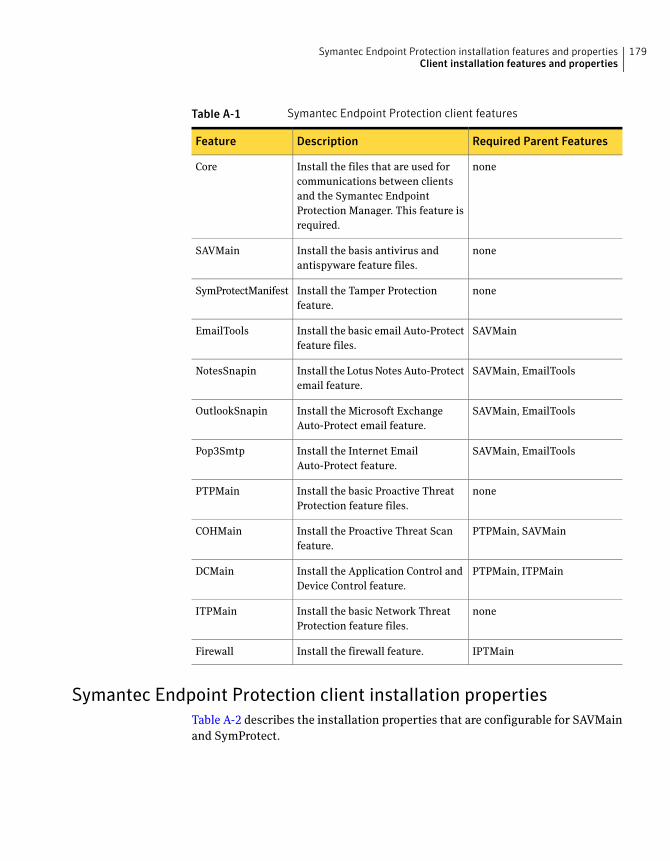
Table A-1 Symantec Endpoint Protection client features
Required Parent FeaturesDescriptionFeature
noneInstall the files that are used for
communications between clients
and the Symantec Endpoint
Protection Manager. This feature is
required.
Core
noneInstall the basis antivirus and
antispyware feature files.
SAVMain
noneInstall the Tamper Protection
feature.
SymProtectManifest
SAVMainInstall the basic email Auto-Protect
feature files.
EmailTools
SAVMain, EmailToolsInstall the Lotus Notes Auto-Protect
email feature.
NotesSnapin
SAVMain, EmailToolsInstall the Microsoft Exchange
Auto-Protect email feature.
OutlookSnapin
SAVMain, EmailToolsInstall the Internet Email
Auto-Protect feature.
Pop3Smtp
noneInstall the basic Proactive Threat
Protection feature files.
PTPMain
PTPMain, SAVMainInstall the Proactive Threat Scan
feature.
COHMain
PTPMain, ITPMainInstall the Application Control and
Device Control feature.
DCMain
noneInstall the basic Network Threat
Protection feature files.
ITPMain
IPTMainInstall the firewall feature.Firewall
Symantec Endpoint Protection client installation properties
Table A-2 describes the installation properties that are configurable for SAVMain
and SymProtect.
179Symantec Endpoint Protection installation features and propertiesClient installation features and properties
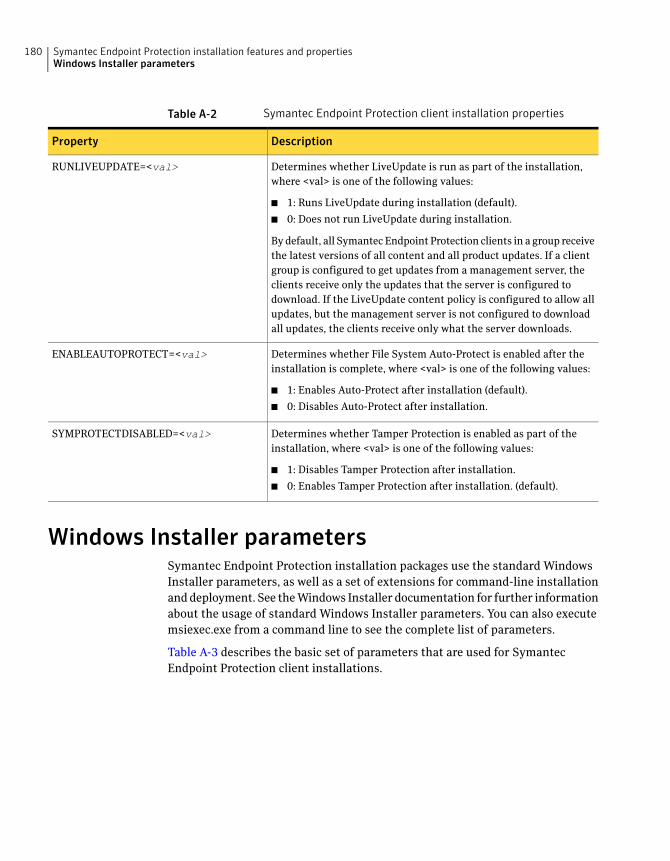
Table A-2 Symantec Endpoint Protection client installation properties
DescriptionProperty
Determines whether LiveUpdate is run as part of the installation,
where <val> is one of the following values:
■ 1: Runs LiveUpdate during installation (default).
■ 0: Does not run LiveUpdate during installation.
By default, all Symantec Endpoint Protection clients in a group receive
the latest versions of all content and all product updates. If a client
group is configured to get updates from a management server, the
clients receive only the updates that the server is configured to
download. If the LiveUpdate content policy is configured to allow all
updates, but the management server is not configured to download
all updates, the clients receive only what the server downloads.
RUNLIVEUPDATE=<val>
Determines whether File System Auto-Protect is enabled after the
installation is complete, where <val> is one of the following values:
■ 1: Enables Auto-Protect after installation (default).
■ 0: Disables Auto-Protect after installation.
ENABLEAUTOPROTECT=<val>
Determines whether Tamper Protection is enabled as part of the
installation, where <val> is one of the following values:
■ 1: Disables Tamper Protection after installation.
■ 0: Enables Tamper Protection after installation. (default).
SYMPROTECTDISABLED=<val>
Windows Installer parametersSymantec Endpoint Protection installation packages use the standard Windows
Installer parameters, as well as a set of extensions for command-line installation
and deployment. See the Windows Installer documentation for further information
about the usage of standard Windows Installer parameters. You can also execute
msiexec.exe from a command line to see the complete list of parameters.
Table A-3 describes the basic set of parameters that are used for Symantec
Endpoint Protection client installations.
Symantec Endpoint Protection installation features and propertiesWindows Installer parameters
180
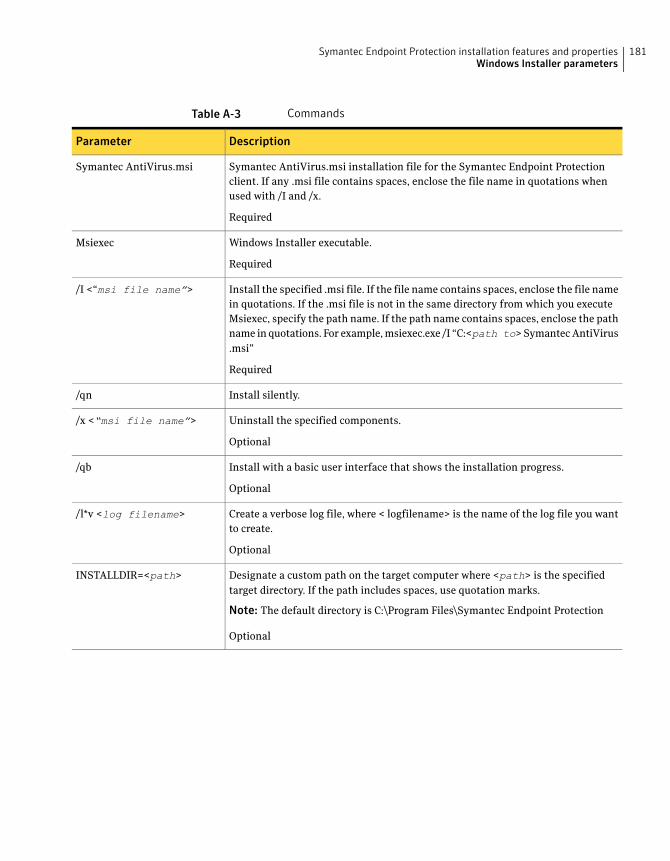
Table A-3 Commands
DescriptionParameter
Symantec AntiVirus.msi installation file for the Symantec Endpoint Protection
client. If any .msi file contains spaces, enclose the file name in quotations when
used with /I and /x.
Required
Symantec AntiVirus.msi
Windows Installer executable.
Required
Msiexec
Install the specified .msi file. If the file name contains spaces, enclose the file name
in quotations. If the .msi file is not in the same directory from which you execute
Msiexec, specify the path name. If the path name contains spaces, enclose the path
name in quotations. For example, msiexec.exe /I “C:<path to> Symantec AntiVirus
.msi”
Required
/I <“msi file name”>
Install silently./qn
Uninstall the specified components.
Optional
/x <“msi file name”>
Install with a basic user interface that shows the installation progress.
Optional
/qb
Create a verbose log file, where < logfilename> is the name of the log file you want
to create.
Optional
/l*v <log filename>
Designate a custom path on the target computer where <path> is the specified
target directory. If the path includes spaces, use quotation marks.
Note: The default directory is C:\Program Files\Symantec Endpoint Protection
Optional
INSTALLDIR=<path>
181Symantec Endpoint Protection installation features and propertiesWindows Installer parameters
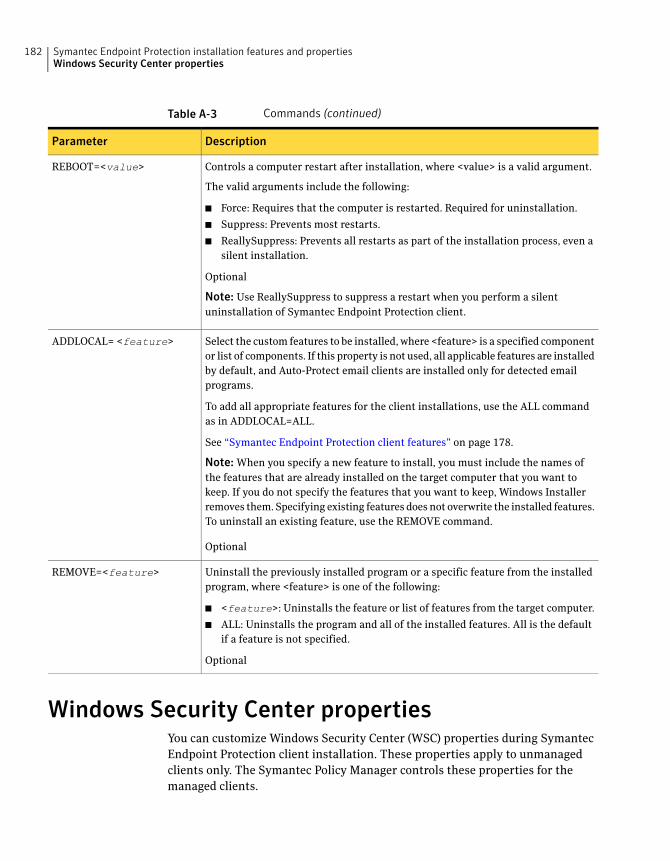
Table A-3 Commands (continued)
DescriptionParameter
Controls a computer restart after installation, where <value> is a valid argument.
The valid arguments include the following:
■ Force: Requires that the computer is restarted. Required for uninstallation.
■ Suppress: Prevents most restarts.
■ ReallySuppress: Prevents all restarts as part of the installation process, even a
silent installation.
Optional
Note: Use ReallySuppress to suppress a restart when you perform a silent
uninstallation of Symantec Endpoint Protection client.
REBOOT=<value>
Select the custom features to be installed, where <feature> is a specified component
or list of components. If this property is not used, all applicable features are installed
by default, and Auto-Protect email clients are installed only for detected email
programs.
To add all appropriate features for the client installations, use the ALL command
as in ADDLOCAL=ALL.
See “Symantec Endpoint Protection client features” on page 178.
Note: When you specify a new feature to install, you must include the names of
the features that are already installed on the target computer that you want to
keep. If you do not specify the features that you want to keep, Windows Installer
removes them. Specifying existing features does not overwrite the installed features.
To uninstall an existing feature, use the REMOVE command.
Optional
ADDLOCAL= <feature>
Uninstall the previously installed program or a specific feature from the installed
program, where <feature> is one of the following:
■ <feature>: Uninstalls the feature or list of features from the target computer.
■ ALL: Uninstalls the program and all of the installed features. All is the default
if a feature is not specified.
Optional
REMOVE=<feature>
Windows Security Center propertiesYou can customize Windows Security Center (WSC) properties during Symantec
Endpoint Protection client installation. These properties apply to unmanaged
clients only. The Symantec Policy Manager controls these properties for the
managed clients.
Symantec Endpoint Protection installation features and propertiesWindows Security Center properties
182
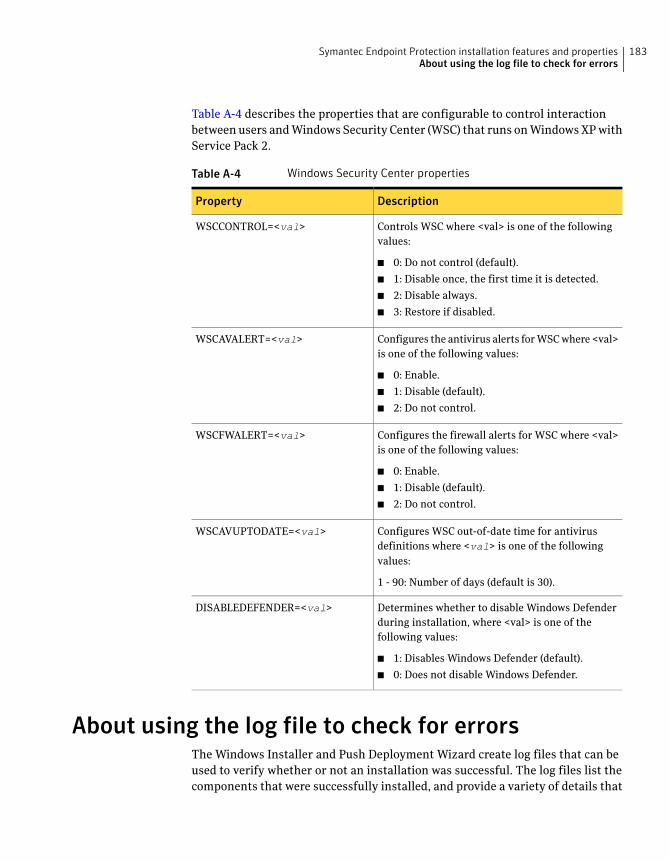
Table A-4 describes the properties that are configurable to control interaction
between users and Windows Security Center (WSC) that runs on Windows XP with
Service Pack 2.
Table A-4 Windows Security Center properties
DescriptionProperty
Controls WSC where <val> is one of the following
values:
■ 0: Do not control (default).
■ 1: Disable once, the first time it is detected.
■ 2: Disable always.
■ 3: Restore if disabled.
WSCCONTROL=<val>
Configures the antivirus alerts for WSC where <val>
is one of the following values:
■ 0: Enable.
■ 1: Disable (default).
■ 2: Do not control.
WSCAVALERT=<val>
Configures the firewall alerts for WSC where <val>
is one of the following values:
■ 0: Enable.
■ 1: Disable (default).
■ 2: Do not control.
WSCFWALERT=<val>
Configures WSC out-of-date time for antivirus
definitions where <val> is one of the following
values:
1 - 90: Number of days (default is 30).
WSCAVUPTODATE=<val>
Determines whether to disable Windows Defender
during installation, where <val> is one of the
following values:
■ 1: Disables Windows Defender (default).
■ 0: Does not disable Windows Defender.
DISABLEDEFENDER=<val>
About using the log file to check for errorsThe Windows Installer and Push Deployment Wizard create log files that can be
used to verify whether or not an installation was successful. The log files list the
components that were successfully installed, and provide a variety of details that
183Symantec Endpoint Protection installation features and propertiesAbout using the log file to check for errors
are related to the installation package. The log files can be used as an effective
tool to troubleshoot a failed installation.
If the installation is successful, the log files include a success entry near the end.
If the installation is not successful, an entry indicates that the installation failed.
Typically, look for Value 3 to find failures. You specify the log file and location
with the parameter named /l*v <log filename>. The log file (vpremote.log) that
is created when you use the Push Deployment Wizard is located in the
\\Windows\temp directory.
Note: Each time the installation package is executed, the log file is overwritten.
Appending logs to an existing log file is not supported.
Identifying the point of failure of an installationYou can use the log file to help identify the component or the action that caused
an installation to fail. If you cannot determine the reason for the failed installation,
you should retain the log file. Provide the file to Symantec Technical Support if
it is requested.
To identify the point of failure of an installation
1 In a text editor, open the log file that the installation generated.
2 Search for the following:
Value 3
The action that occurred before the line that contains this entry is most likely
the action that caused the failure. The lines that appear after this entry are
the installation components that have been rolled back because the installation
was unsuccessful.
Command-line examplesTable A-5 include common command-line examples.
Symantec Endpoint Protection installation features and propertiesIdentifying the point of failure of an installation
184
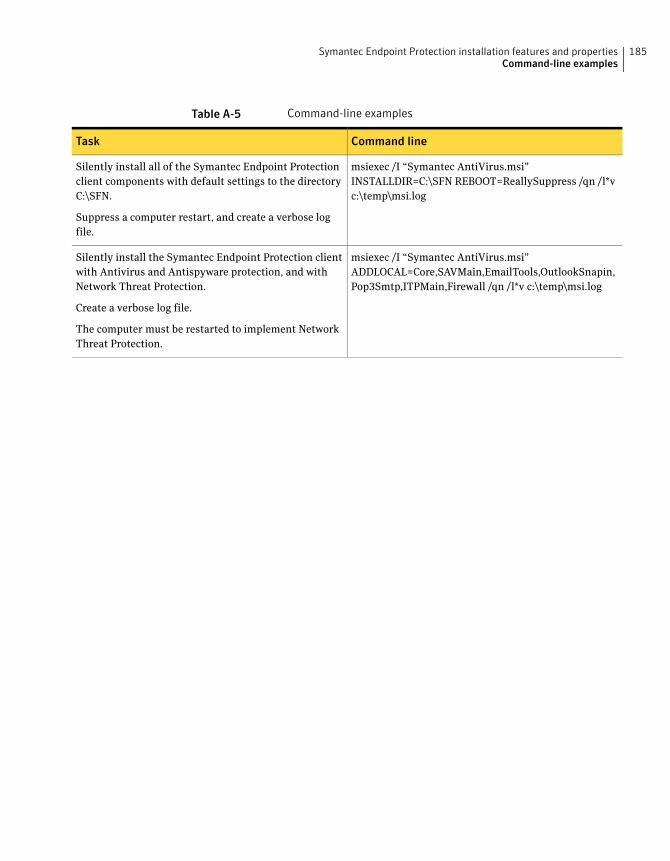
Table A-5 Command-line examples
Command lineTask
msiexec /I “Symantec AntiVirus.msi”
INSTALLDIR=C:\SFN REBOOT=ReallySuppress /qn /l*v
c:\temp\msi.log
Silently install all of the Symantec Endpoint Protection
client components with default settings to the directory
C:\SFN.
Suppress a computer restart, and create a verbose log
file.
msiexec /I “Symantec AntiVirus.msi”
ADDLOCAL=Core,SAVMain,EmailTools,OutlookSnapin,
Pop3Smtp,ITPMain,Firewall /qn /l*v c:\temp\msi.log
Silently install the Symantec Endpoint Protection client
with Antivirus and Antispyware protection, and with
Network Threat Protection.
Create a verbose log file.
The computer must be restarted to implement Network
Threat Protection.
185Symantec Endpoint Protection installation features and propertiesCommand-line examples

Symantec Endpoint Protection installation features and propertiesCommand-line examples
186
Updating Symantec client
software
This appendix includes the following topics:
■ About updates and patches
■ Updating Symantec client software
About updates and patchesTo understand upgrades and patches, you need to understand two Windows
Installer terms, MSI and MSP. These terms are not acronyms. MSI is both a file
type and extension. MSI is also a common term that is used to describe a complete
installation package that is installed with Windows Installer. MSP is a both a file
type and extension, and is a common term used to describe a patch to an MSI
installation package. The MSP cannot be applied unless the base MSI that the
patch is based on is either available to or installed on a client computer.
Periodically, Symantec creates maintenance releases for Symantec client software.
Each maintenance release is available in two forms, MSI and MSP. The MSI form
includes the complete installation package of files. The MSP form includes only
the installation files that are necessary to upgrade to the new maintenance release.
The MSP form assumes that the current maintenance release is installed on the
client computer, and can be patched to the latest version.
When clients receive product updates from Symantec or internal LiveUpdate
servers, they receive and process MSP files. When clients receive product updates
from a Symantec Endpoint Protection Manager, they receive and process a third
form of update that is called a microdef. Symantec Endpoint Protection Manager
receives and processes MSP files from a LiveUpdate server, and then reconstructs
and stores the MSI files. It then generates the difference between the original and
BAppendix
changed MSI files, which is called a microdef, and then updates the clients with
microdefs.
Updating Symantec client softwareYou can update Symantec client product software automatically with a permit
product updates with a LiveUpdate Settings policy. When product updates are
permitted, product microdefs or patches are installed on clients when users click
LiveUpdate or when a scheduled LiveUpdate session runs. When product updates
are denied, client software is not updated, even if another Symantec product runs
LiveUpate on the client computer. When product updates are denied, client
software can only be manually updated with the Symantec Endpoint Protection
Manager Console.
When the Symantec Endpoint Protection Manager downloads and processes
patches, it creates a microdef, which automatically appears as a new package. The
new package appears in the Client Install Packages pane. You can then select the
package, and update groups and locations manually with the Upgrade Groups
with Package feature.
Note: If the LiveUpdate Settings policy specifies that clients download updates
from a Symantec Endpoint Protection Manager or Group Update Provider, the
updates are in the form of microdefs. If the LiveUpdate Settings policy specifies
that clients download updates from a LiveUpdate server, the updates are in the
form of MSP (patch) files.
To update Symantec client software
1 In the Symantec Endpoint Protection Manager Console, click Policies.
2 Under View Policies, click on and highlight LiveUpdate.
3 In the lower-left pane, under Tasks, click Edit the Policy.
4 In the right pane, on the LiveUpdate Settings tab, click on and highlight a
LiveUpdate policy.
5 In the lower-left pane, under Tasks, click Edit the Policy.
6 Under LiveUpdate policy, click Advanced Settings.
7 In the Advanced Settings pane, under Download product updates using
LiveUpdate, do one of the following:
■ To automatically update client software, checkDownloadproductupdates
using LiveUpdate.
Updating Symantec client softwareUpdating Symantec client software
188

■ To manually update client software with the Upgrade Groups with Package
feature with the Symantec Endpoint Protection Manager Console, uncheck
Download product updates using LiveUpdate.
8 Click OK, and then apply the policy to a group or a location in a group.
189Updating Symantec client softwareUpdating Symantec client software

Updating Symantec client softwareUpdating Symantec client software
190
Disaster recovery
This appendix includes the following topics:
■ How to prepare for disaster recovery
■ About the disaster recovery process
■ Restoring the Symantec Endpoint Protection Manager
■ Restoring the server certificate
■ Restoring client communications
How to prepare for disaster recoveryTo perform disaster recovery, you must prepare for disaster recovery. You prepare
for disaster recovery by collecting files and information during and after Symantec
Endpoint Protection Manager installation. For example, you need to must
document your preshared key during the installation, and you must locate and
move your keystore file to a secure location.
Table C-1 lists and describes the high-level tasks that you must follow to prepare
for disaster recovery.
Table C-1 Tasks to perform to prepare for disaster recovery
Additional informationTask
The database backup directory is located in \\Program
Files\Symantec\ Symantec Endpoint Protection
Manager\data\backup. The backup file is named
<date>_<timestamp>.zip.
Back up your database on a regular basis, preferably
weekly, and store the backups off site.
CAppendix
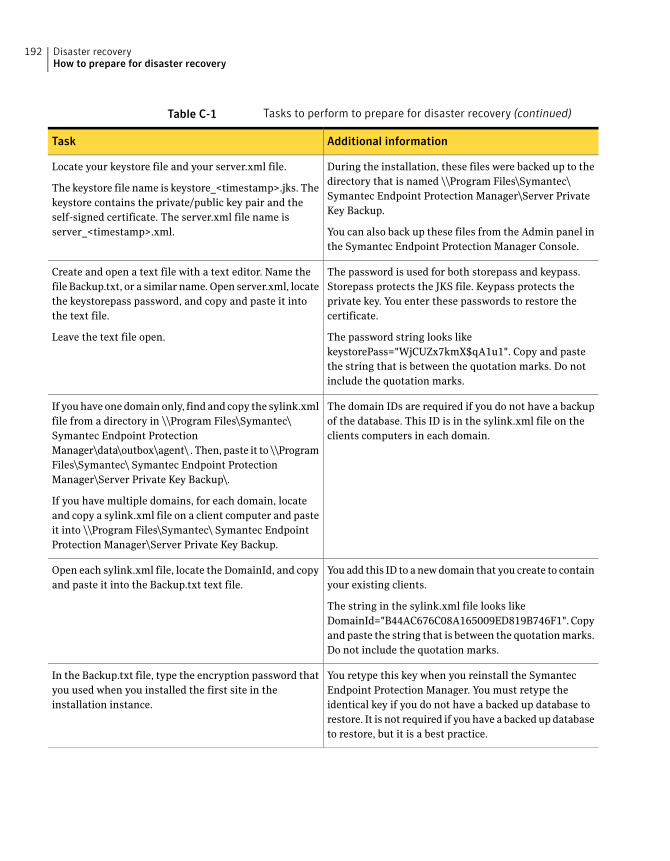
Table C-1 Tasks to perform to prepare for disaster recovery (continued)
Additional informationTask
During the installation, these files were backed up to the
directory that is named \\Program Files\Symantec\
Symantec Endpoint Protection Manager\Server Private
Key Backup.
You can also back up these files from the Admin panel in
the Symantec Endpoint Protection Manager Console.
Locate your keystore file and your server.xml file.
The keystore file name is keystore_<timestamp>.jks. The
keystore contains the private/public key pair and the
self-signed certificate. The server.xml file name is
server_<timestamp>.xml.
The password is used for both storepass and keypass.
Storepass protects the JKS file. Keypass protects the
private key. You enter these passwords to restore the
certificate.
The password string looks like
keystorePass="WjCUZx7kmX$qA1u1". Copy and paste
the string that is between the quotation marks. Do not
include the quotation marks.
Create and open a text file with a text editor. Name the
file Backup.txt, or a similar name. Open server.xml, locate
the keystorepass password, and copy and paste it into
the text file.
Leave the text file open.
The domain IDs are required if you do not have a backup
of the database. This ID is in the sylink.xml file on the
clients computers in each domain.
If you have one domain only, find and copy the sylink.xml
file from a directory in \\Program Files\Symantec\
Symantec Endpoint Protection
Manager\data\outbox\agent\ . Then, paste it to \\Program
Files\Symantec\ Symantec Endpoint Protection
Manager\Server Private Key Backup\.
If you have multiple domains, for each domain, locate
and copy a sylink.xml file on a client computer and paste
it into \\Program Files\Symantec\ Symantec Endpoint
Protection Manager\Server Private Key Backup.
You add this ID to a new domain that you create to contain
your existing clients.
The string in the sylink.xml file looks like
DomainId="B44AC676C08A165009ED819B746F1". Copy
and paste the string that is between the quotation marks.
Do not include the quotation marks.
Open each sylink.xml file, locate the DomainId, and copy
and paste it into the Backup.txt text file.
You retype this key when you reinstall the Symantec
Endpoint Protection Manager. You must retype the
identical key if you do not have a backed up database to
restore. It is not required if you have a backed up database
to restore, but it is a best practice.
In the Backup.txt file, type the encryption password that
you used when you installed the first site in the
installation instance.
Disaster recoveryHow to prepare for disaster recovery
192
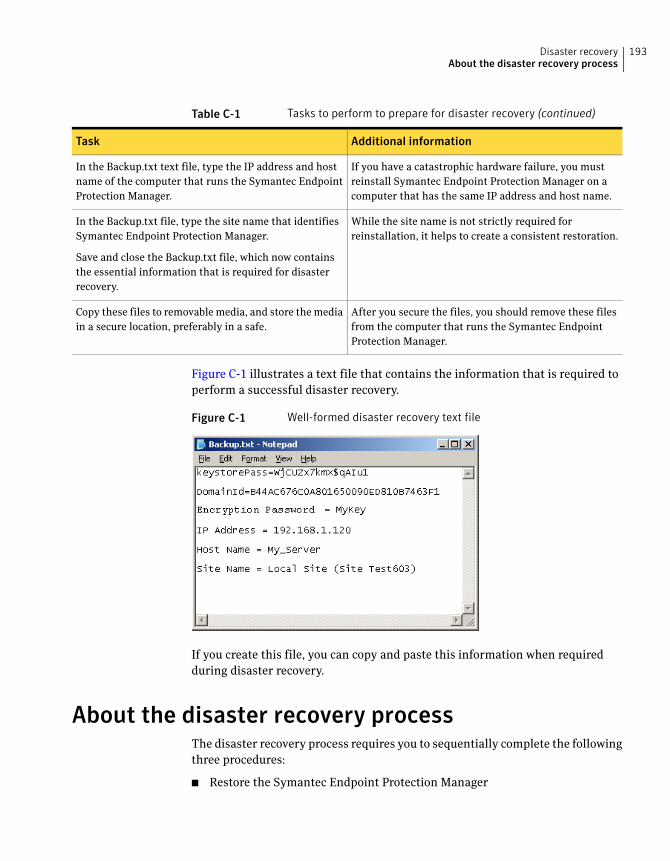
Table C-1 Tasks to perform to prepare for disaster recovery (continued)
Additional informationTask
If you have a catastrophic hardware failure, you must
reinstall Symantec Endpoint Protection Manager on a
computer that has the same IP address and host name.
In the Backup.txt text file, type the IP address and host
name of the computer that runs the Symantec Endpoint
Protection Manager.
While the site name is not strictly required for
reinstallation, it helps to create a consistent restoration.
In the Backup.txt file, type the site name that identifies
Symantec Endpoint Protection Manager.
Save and close the Backup.txt file, which now contains
the essential information that is required for disaster
recovery.
After you secure the files, you should remove these files
from the computer that runs the Symantec Endpoint
Protection Manager.
Copy these files to removable media, and store the media
in a secure location, preferably in a safe.
Figure C-1 illustrates a text file that contains the information that is required to
perform a successful disaster recovery.
Figure C-1 Well-formed disaster recovery text file
If you create this file, you can copy and paste this information when required
during disaster recovery.
About the disaster recovery processThe disaster recovery process requires you to sequentially complete the following
three procedures:
■ Restore the Symantec Endpoint Protection Manager
193Disaster recoveryAbout the disaster recovery process
■ Restore the server certificate
■ Restore client communications
How you restore client communications depends on whether or not you have
access to a database backup.
Restoring theSymantecEndpoint ProtectionManagerIf you have a disaster, recover the files that were secured after initial installation.
Then open the Backup.txt file that contains the passwords, domain IDs, and so
forth.
About identifying the new or rebuilt computer
If you had a catastrophic hardware failure, you may need to rebuild the computer.
If you rebuild the computer, you must assign it the original IP address and host
name. This information should be in the Backup.txt file.
Reinstalling the Symantec Endpoint Protection Manager
The key task to perform when you reinstall the Symantec Endpoint Protection
Manager is to type the preshared key name that you used when you installed the
Symantec Endpoint Protection Manager that failed.
To reinstall the Symantec Endpoint Protection Manager
1 Insert the installation CD, and start installing the Symantec Endpoint
Protection Manager.
2 In the Welcome panel, check Installmy first site, and then click Next.
3 Continue with the installation until prompted for the preshared key.
4 In the Site Information panel, in the Encryption Password boxes, type the
password name that is in the text file.
If you are restoring without a backed up database, your restoration will fail
if you do not type the password correctly.
5 Click Next.
6 When you are prompted, recreate the same type of database, and continue
the installation until the Management Server Installation Wizard -
Configuration Completed panel appears.
7 In the Configuration Completed panel, under Do you want to run the Migration
and Deployment wizard now?, check No, and then click Finish.
Disaster recoveryRestoring the Symantec Endpoint Protection Manager
194
Restoring the server certificateThe server certificate is a Java keystore that contains the public certificate and
the private-public key pairs. You must enter the password that is contained in the
Backup.txt file. This password is also in the original server_<timestamp>.xml file.
To restore the server certificate
1 Log on to the Console, and then click Admin.
2 In the Admin pane, under Tasks, click Servers.
3 Under View Servers, expand Local Site, and then click the computer name
that identifies the local site.
4 Under Tasks, click Manage Server Certificate.
5 In the Welcome panel, click Next.
6 In the Manage Server Certificate panel, check Update theServerCertificate,
and then click Next.
7 Under Select the type of certificate to import, check JKS keystore, and then
click Next.
If you have implemented one of the other certificate types, select that type.
8 In the JKS Keystore panel, click Browse, locate and select your backed up
keystore_<timestamp>.jks keystore file, and then click OK.
9 Open your disaster recovery text file, and then select and copy the keystore
password.
10 Activate the JKS Keystore dialog box, and then paste the keystore password
into the Keystore and Key boxes.
The only supported paste mechanism is Ctrl + V.
11 Click Next.
If you get an error message that says you have an invalid keystore file, you
probably entered invalid passwords. Retry the password copy and paste. This
error message is misleading.
12 In the Complete panel, click Finish.
13 Log off the Console.
14 Click Start > Settings > Control Panel >Administrative Tools > Services.
195Disaster recoveryRestoring the server certificate
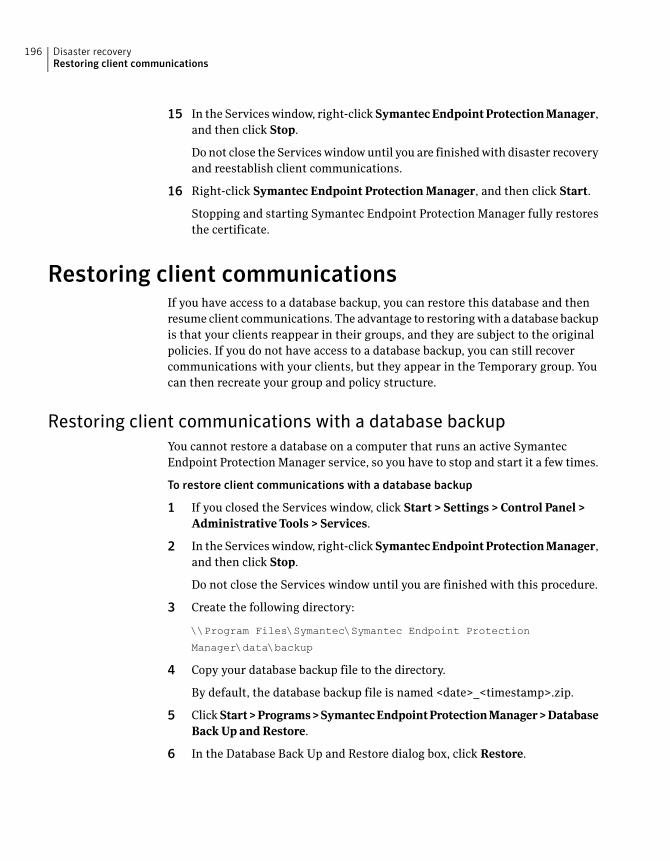
15 In the Services window, right-click SymantecEndpointProtectionManager,
and then click Stop.
Do not close the Services window until you are finished with disaster recovery
and reestablish client communications.
16 Right-click Symantec Endpoint ProtectionManager, and then click Start.
Stopping and starting Symantec Endpoint Protection Manager fully restores
the certificate.
Restoring client communicationsIf you have access to a database backup, you can restore this database and then
resume client communications. The advantage to restoring with a database backup
is that your clients reappear in their groups, and they are subject to the original
policies. If you do not have access to a database backup, you can still recover
communications with your clients, but they appear in the Temporary group. You
can then recreate your group and policy structure.
Restoring client communications with a database backup
You cannot restore a database on a computer that runs an active Symantec
Endpoint Protection Manager service, so you have to stop and start it a few times.
To restore client communications with a database backup
1 If you closed the Services window, click Start > Settings > Control Panel >
Administrative Tools > Services.
2 In the Services window, right-click SymantecEndpointProtectionManager,
and then click Stop.
Do not close the Services window until you are finished with this procedure.
3 Create the following directory:
\\Program Files\Symantec\Symantec Endpoint Protection
Manager\data\backup
4 Copy your database backup file to the directory.
By default, the database backup file is named <date>_<timestamp>.zip.
5 ClickStart>Programs>SymantecEndpointProtectionManager>Database
BackUp andRestore.
6 In the Database Back Up and Restore dialog box, click Restore.
Disaster recoveryRestoring client communications
196
7 In the Restore Site dialog box, select the backup file that you copied to the
backup directory, and then click OK.
The database restoration time varies and depends on the size of your database.
8 When the Message prompt appears, click OK.
9 Click Exit.
10 Click Start > Programs > Symantec Endpoint ProtectionManager >
Management Server ConfigurationWizard.
11 In the Welcome panel, checkReconfigure theManagementServer, and then
click Next.
12 In the Server Information panel, modify input values if necessary to match
previous inputs, and then click Next.
13 In the Database Server Choice panel, check the database type to match the
previous type, and then click Next.
14 In the Database Information panel, modify and insert input values to match
previous inputs, and then click Next.
The configuration takes a few minutes.
15 In the Configuration Completed dialog box, click Finish.
16 Log on to the Symantec Endpoint Protection Manager Console.
17 Right-click your groups, and then click RunCommand onGroup >Update
Content.
If the clients do not respond after about one half hour, restart the clients.
Restoring client communications without a database backup
For each domain that you use, you must create a new domain and re-insert the
same domain ID into the database. These domain IDs are in the disaster recovery
text file if someone typed them in this file. The default domain is the System
domain.
A best practice is to create a domain name that is identical to the previous domain
name. To recreate the System (default) domain, append some value such as _2
(System_2). After restoring domains, you can then delete the old system domain,
and then rename the new domain back to System.
To restore client communications without a database backup
1 Log on to the Symantec Endpoint Protection Manager Console.
2 In the console, click Admin.
3 In the System Administrator pane, click Domains.
197Disaster recoveryRestoring client communications
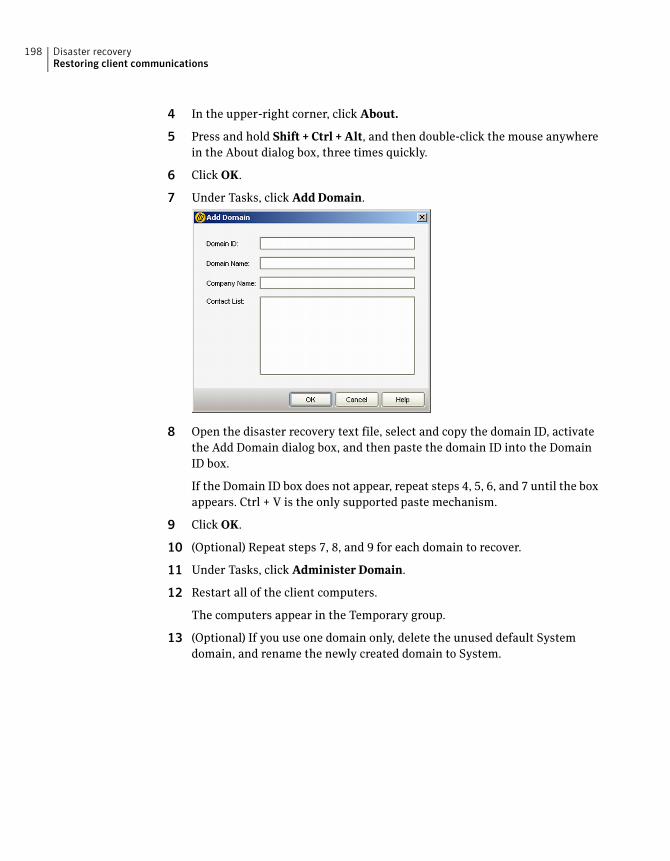
4 In the upper-right corner, click About.
5 Press and hold Shift + Ctrl +Alt, and then double-click the mouse anywhere
in the About dialog box, three times quickly.
6 Click OK.
7 Under Tasks, click AddDomain.
8 Open the disaster recovery text file, select and copy the domain ID, activate
the Add Domain dialog box, and then paste the domain ID into the Domain
ID box.
If the Domain ID box does not appear, repeat steps 4, 5, 6, and 7 until the box
appears. Ctrl + V is the only supported paste mechanism.
9 Click OK.
10 (Optional) Repeat steps 7, 8, and 9 for each domain to recover.
11 Under Tasks, click Administer Domain.
12 Restart all of the client computers.
The computers appear in the Temporary group.
13 (Optional) If you use one domain only, delete the unused default System
domain, and rename the newly created domain to System.
Disaster recoveryRestoring client communications
198
Symbols17, 72
.MSI
installing using command-line parameters 177
Aabout
Antivirus and Antispyware Threat Protection 15
Auto-Protect 15
client installation packages generated during
migration 140
configuring setaid.ini 176
failover 17
groups 19
groups and clients 100
intrusion prevention 15
load balancing 17
microdefs 188
migrating legacy Symantec Sygate client
software 155
MSI and MSP files 188
Proactive Threat Protection 15
replication 17
stateful inspection 14
Symantec client software installation 97
Symantec Endpoint Protection 13, 98
Symantec Endpoint Protection Manager 17
Symantec Network Access Control 16, 99
Windows Installer 3.1 99
Active Directory and user rights 46
administrative rights to install
46
Antivirus and Antispyware Threat Protection 15
antivirus detection testing 34
AntiVirus policy configuration 32
Auto-Protect
about 15
email scanning 15
testing 34
CCentral Quarantine
attaching a management server 121
configuring servers and clients to use 121
installing 117
client installation
configuring and deploying for the first time 26
preparing the computers that run Windows
Vista 61
preparing the computers that run Windows
XP 61
client installation packages
creating 100
deploying from a mapped drive 101
deploying with the Push Deployment
Wizard 102
generated during migration 140
client software
installation 46
updates with MSI and MSP 187
communication and required ports 56
computer restarts 63
Ddatabase
installing embedded 67
installing Microsoft SQL 70
deployment
client packages from a mapped drive 101
client packages with the Push Deployment
Wizard 102
with Find Unmanaged Computers 103
disaster recovery
about the process 193
preparing for 191
restoring client communications 196
restoring the server certificate 195
restoring the Symantec Endpoint Protection
Manager 194
domain ID
discovering 192
Index

domain ID (continued)
replacing 197
Eembedded database
installation settings 66
installing 67
supports up to 1,000 clients 41
Enforcer upgrades 158
Ffailover 17
failover and load balancing
configuring 83
installing 82
network architecture 44
Find Unmanaged Computers client deployment
tool 103
first time installation 23
Ggroups 19
groups and clients 100
Hhardware devices and blocking 15
heap adjustments for the Symantec Endpoint
Protection Manager 89
host integrity policies 16
host integrity policy
creating 38
testing 39
Iinstallation
about communications ports 56
about desktop firewalls 56
about embedded database settings 66
about Microsoft SQL Server database settings 75
administrative rights 46
Central Quarantine 117
client through Active Directory 108
failover and load balancing 82
first time 23
how to create a text file with IP addresses to
import 105
installation (continued)
installing Symantec Endpoint Protection
Manager for the first time 25
LiveUpdate Administration Utility 125
MSI command-line examples 184
MSI Windows Security Center properties 182
network and system requirements 46
preparing for 62
preparing the computers that run Windows
Vista 61
preparing the computers that run Windows
XP 61
removing viruses and security risks before 63
replication 87
requirements 46
server with an embedded database 66
stages 63
Symantec Endpoint Protection Console only 81
test network 24
testing 24
through Active Directory Group Policy
Object 108
unmanaged client software options 100
using MSI commands 177
using third-party products 106
with a Microsoft SQL database 70, 78
installation and configuration requirements
Microsoft SQL Server 2000 71
Microsoft SQL Server 2005 72
Internet Connection Firewall 59
intrusion prevention 15
IP addresses and creating a text file for
installation 105
Kkeystore 192
LLiveUpdate
about using a server 123
configuring a LiveUpdate Content policy 31
configuring for client updates 30
configuring for site updates 29
configuring the two policy types 30
network architectures that support 123
LiveUpdate Administration Utility and installing 125
load balancing 17
Index200

Mmanaged environments and client and server
interaction 20
microdefs
about 188
processing 188
Microsoft Active Directory
about using for client deployment 106
configuring templates 112
creating the administrative installation
image 109
installing client software with Group Policy
Object 108
Microsoft SMS
about using for client deployment 106
rolling out Package Definition Files 107
Microsoft SQL Server
database installation settings 75
upgrading to 90
Microsoft SQL Server 2000
client configuration requirements 72
installation and configuration requirements 71
installing and configuring client components 72
server and client configuration requirements 71
Microsoft SQL Server 2005
installation and configuration requirements 72
installing and configuring client components 74
server and client configuration requirements 72
migration
about groups and settings 128
about migrating Symantec groups and
settings 136
about not preserving Symantec server and client
groups and settings 135
about Symantec AntiVirus and Symantec Client
Security 128
before and after inherited settings 136
Central Quarantine 131
Enforcers 158
exporting a list of legacy client computer names
to migrate 141
legacy Symantec Sygate client software 155,
167
legacy Symantec Sygate software 153
migrating Symantec server and client
groups 145
of unmanaged clients 147
package deployment sequence 129
ports to open on client computers 142
migration (continued)
preparing legacy Symantec product
installations 131
preparing Symantec 10.x/3.x legacy
installations 134
preparing Symantec client computers for 143
remote Symantec Sygate management
consoles 165
supported and unsupported paths 129
supported Symantec Sygate paths 154
Symantec Network Access Control 5.1 157
Symantec Sygate management server
procedures 162
Symantec Sygate scenarios 158
unmanaged clients with exported packages 148
unsupported Symantec Sygate paths 155
using CD files 147
migrations that are blocked 130
MSI
command-line examples 184
features and properties 175
processing precedence with setaid.ini 176
updating client software with 187
MSP
updating client software with 187
when used to update client software 188
Nnetwork and system requirements 46
network architecture
failover and load balancing 44
large deployment example 42
planning for deployment 41
replication 45
Network Threat Protection 14
Novell ZENworks 106
Pports
communication requirements 56
installation requirements 56
Proactive Threat Protection 15
Push Deployment Wizard
deploying client software with 102
importing computer lists 104
ports used by 143
using for Symantec product migration 141
201Index
Rremote installation and TCP port 139 56
replication 17
configuring 88
installing 87
Ssecurity status icon configuration 37
serdef.dat 147–148
server certificate restoration 195
setaid.ini
configuring 176
processing precedence with MSI features and
properties 176
stateful inspection 14
Sylink.xml 192
integrating with Group Policy Object client
installations 110
sylink.xml
regenerating 93
Symantec Endpoint Protection clients
MSI features 178
MSI properties 179
Symantec Endpoint Protection Manager
adjusting the heap size 89
components that work with 17
configuring for the first time 26
how it works 19
installing for the first time 25
Web servers used by 17
what you can do with 20
Symantec Endpoint Protection Manager Console
locating your groups 28
logging on to for the first time 28
Symantec Enforcement Agent 5.1 migration 157
Symantec Enforcer 17
Symantec Network Access Control 16
configuring and testing 38
host integrity policies 16
Symantec Network Access Control 5.1 migration 157
Symantec System Center
preparing settings for 10.x/3.x product
migrations 134
preparing settings for all legacy product
migrations 131
system requirements
about 46
for Central Quarantine Server 51
for Quarantine Console 50
system requirements (continued)
for Symantec Endpoint Protection 52
for Symantec Endpoint Protection Console 49
for Symantec Endpoint Protection Manager and
Console 48
for Symantec Endpoint Protection Manager,
Console, and embedded database 47
for Symantec Network Access Control 53
for VMWare 55
Tthird-party deployment tools 106
Tivoli 106
troubleshooting
ports to open for legacy Symantec
migrations 142
remote deployment on Windows XP and Vista 60
Symantec Endpoint Protection Manager Console
is slow or unresponsive 89
User Account Control on Vista and GPO 111
using installation log files 184
Windows Vista deployments 61
Windows XP in workgroups deployments 61
with Find Unmanaged Computers 103
Uuninstallation
client software 115
client software with Active Directory GPO 115
how to uninstall the database 95
management components 126
Symantec Endpoint Protection Manager 95
unmanaged clients
installing 100
migrating Symantec 147
migrating Symantec with exported packages 148
unmanaged environments 19
upgrade to Microsoft SQL Server 90
upgrades
upgrading from Symantec Endpoint Protection
to Symantec Network Access Control 169
upgrading from Symantec Network Access
Control to Symantec Endpoint Protection 169
User Account Control and preparing the computers
that run Windows Vista 61
VVMWare 55
Index202

WWeb servers used by Symantec Endpoint Protection
Manager 17
Windows firewalls
and Symantec firewalls 58
using 58
Windows Installer
commands 177
creating a startup script 113
features and properties 175
parameters 180
Windows Installer 3.1 requirements 99
Windows Vista Firewall 60
Windows Vista preparation 61
Windows XP Firewall 59
203Index