Embed Size (px)
Citation preview
INSTALLATION INSTRUCTIONS FOR NORAM GB2-1010 GEAR BOX
1) INTRODUCTION: Thank you for purchasing a Noram 2:1 reduction gearbox. The following pages will inform you on how to properly install and maintain your gearbox. Please note that Noram offers several different models of 2:1 gearboxes to allow for flexibility with engine manufacturers, engine sizes and crankshaft configurations. Please make sure the gearbox is sized properly for and has the correct engine mounting (kit if applicable). Please contact Noram Sales at 414-267-4000 with any questions or concerns regarding your 2:1 reduction gearbox.
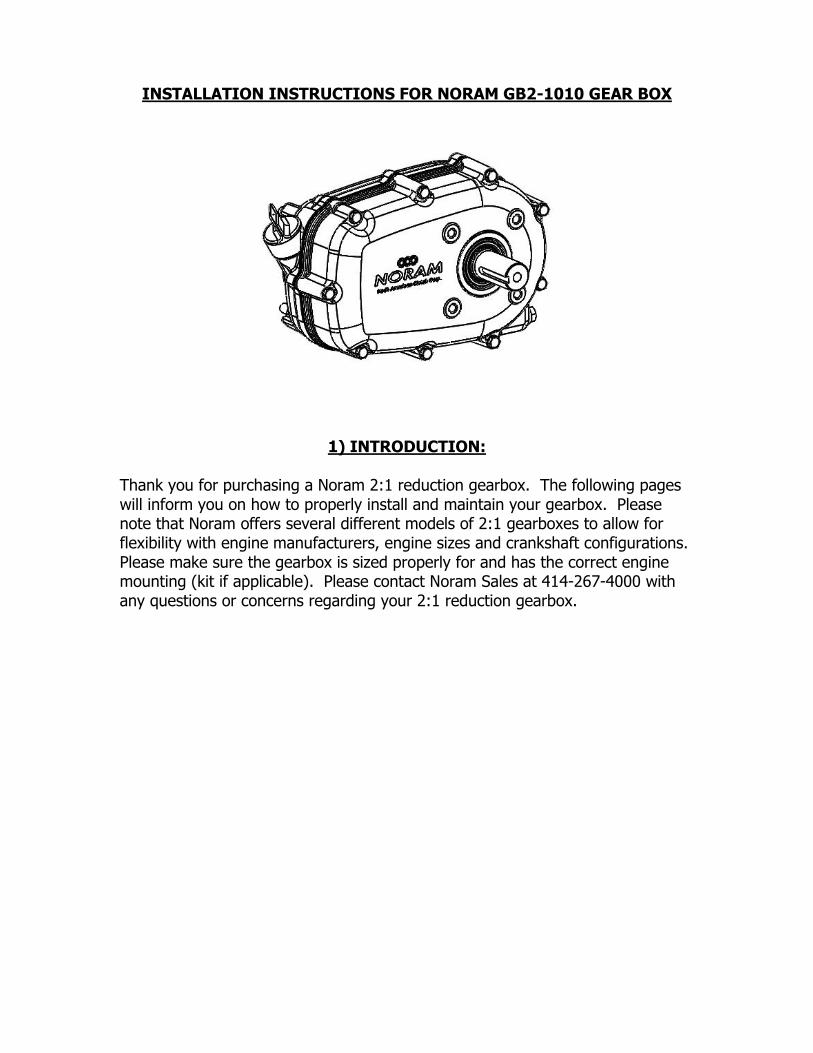
2) PART LIST
Each gearbox contains the following items. Some items may differ based on the size of the engine used, size of the crankshaft, or engine manufacturer.
BOTTOM HOUSING FRONT HOUSING BOTTOM GASKET
CRANKSPACER KEY BOLT AND WASHER(S) ALIGNMENT PINS
CLUTCH/CHAIN/PTO SHAFT ASSEMBLY HOUSING GASKET CRANKSHAFT BOLT AND WASHER
(2) ¼” x 2” (7) ¼” x 2.25” DIPSTICK M6x1.0 SCREWS M6x1.0 SCREWS
Note - Bolts are used to fasten bottom housing to the engine as well as mounting the clutch
to the engine crankshaft. The number and size of bolts and washers are dependant on the engine make and model.
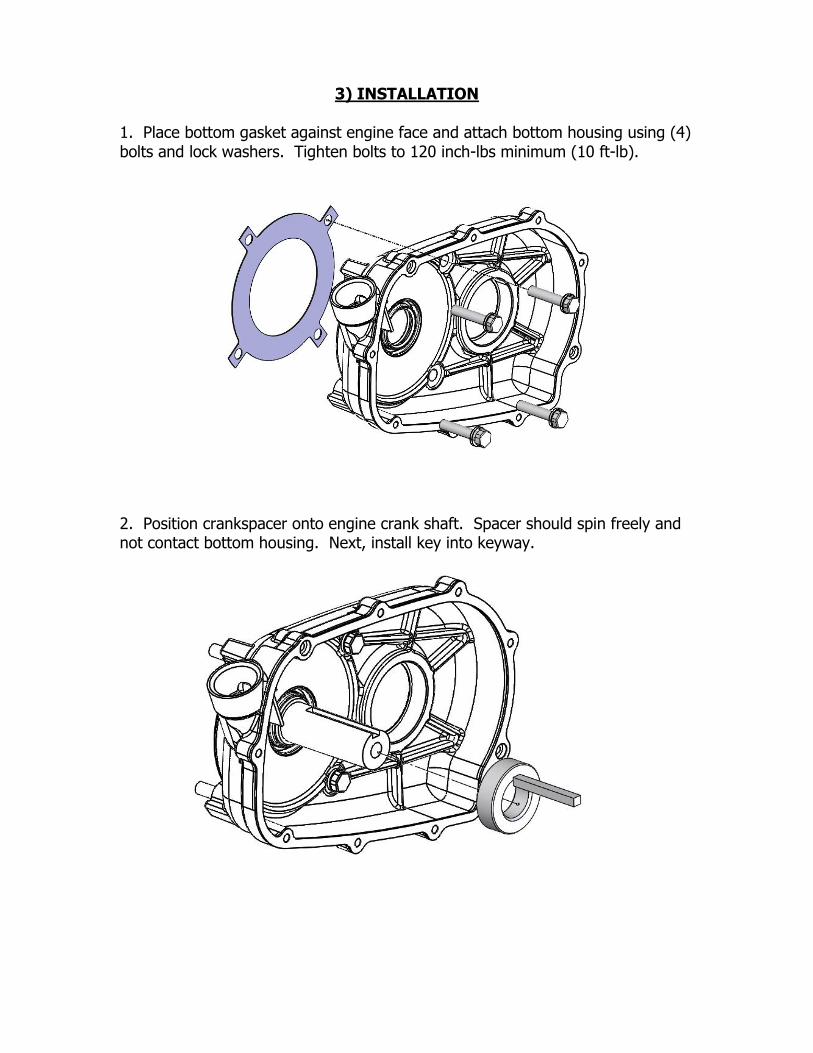
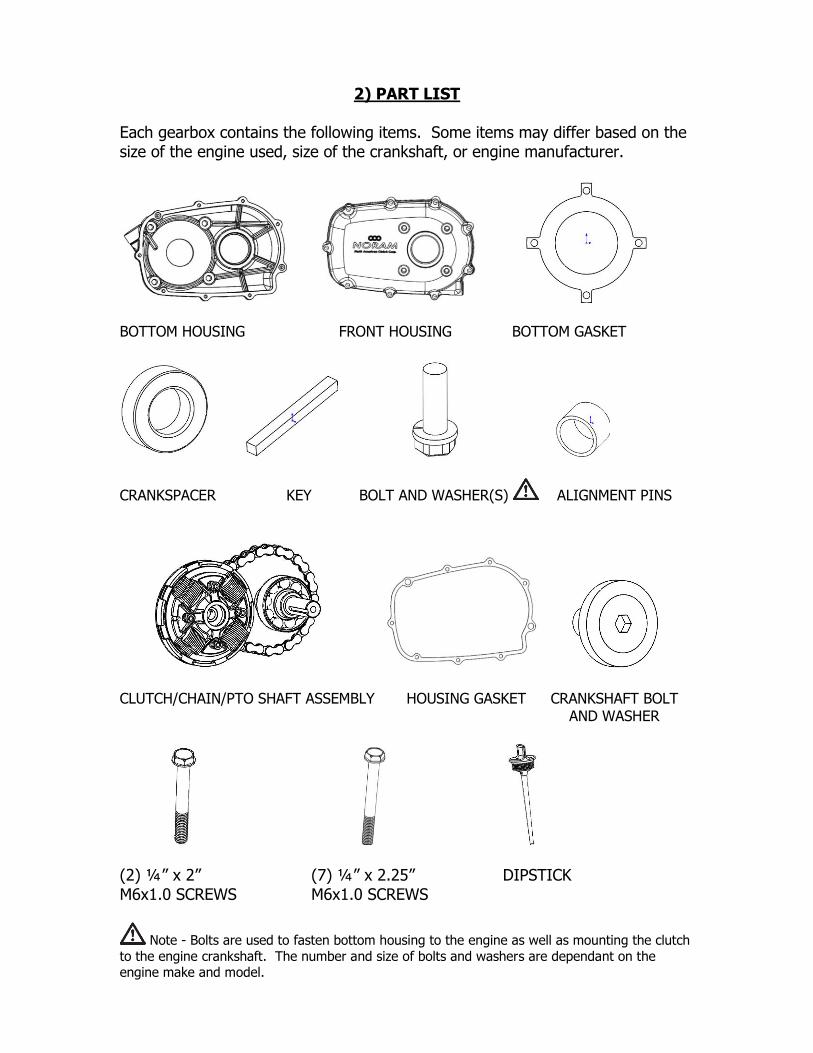
3) INSTALLATION
1. Place bottom gasket against engine face and attach bottom housing using (4) bolts and lock washers. Tighten bolts to 120 inch-lbs minimum (10 ft-lb).
2. Position crankspacer onto engine crank shaft. Spacer should spin freely and not contact bottom housing. Next, install key into keyway.
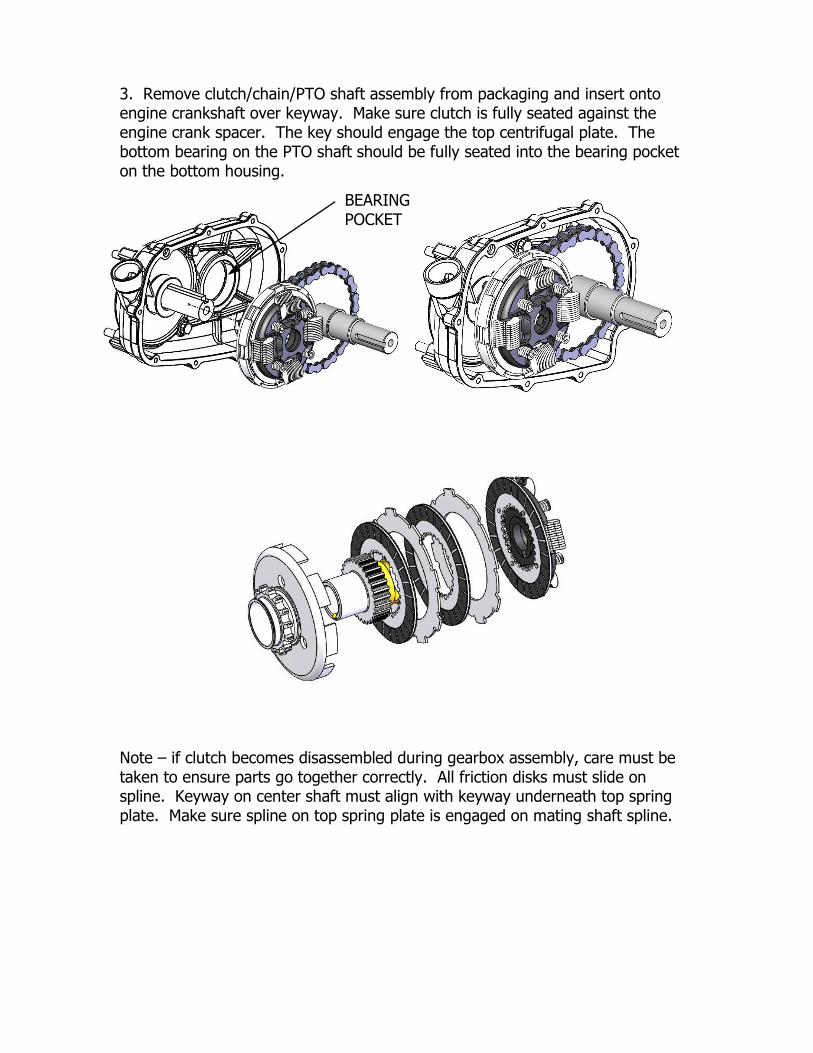
3. Remove clutch/chain/PTO shaft assembly from packaging and insert onto engine crankshaft over keyway. Make sure clutch is fully seated against the engine crank spacer. The key should engage the top centrifugal plate. The bottom bearing on the PTO shaft should be fully seated into the bearing pocket on the bottom housing.
Note – if clutch becomes disassembled during gearbox assembly, care must be taken to ensure parts go together correctly. All friction disks must slide on spline. Keyway on center shaft must align with keyway underneath top spring plate. Make sure spline on top spring plate is engaged on mating shaft spline.
BEARING POCKET
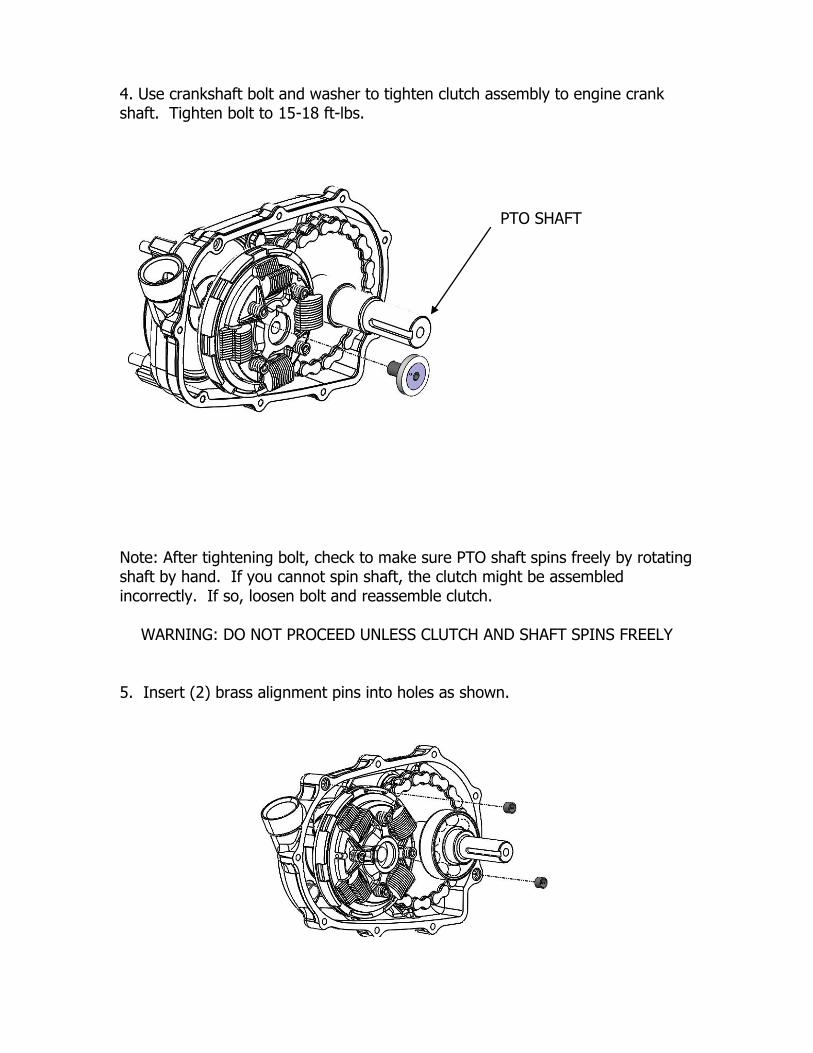
4. Use crankshaft bolt and washer to tighten clutch assembly to engine crank shaft. Tighten bolt to 15-18 ft-lbs.
Note: After tightening bolt, check to make sure PTO shaft spins freely by rotating shaft by hand. If you cannot spin shaft, the clutch might be assembled incorrectly. If so, loosen bolt and reassemble clutch.
WARNING: DO NOT PROCEED UNLESS CLUTCH AND SHAFT SPINS FREELY 5. Insert (2) brass alignment pins into holes as shown.
PTO SHAFT
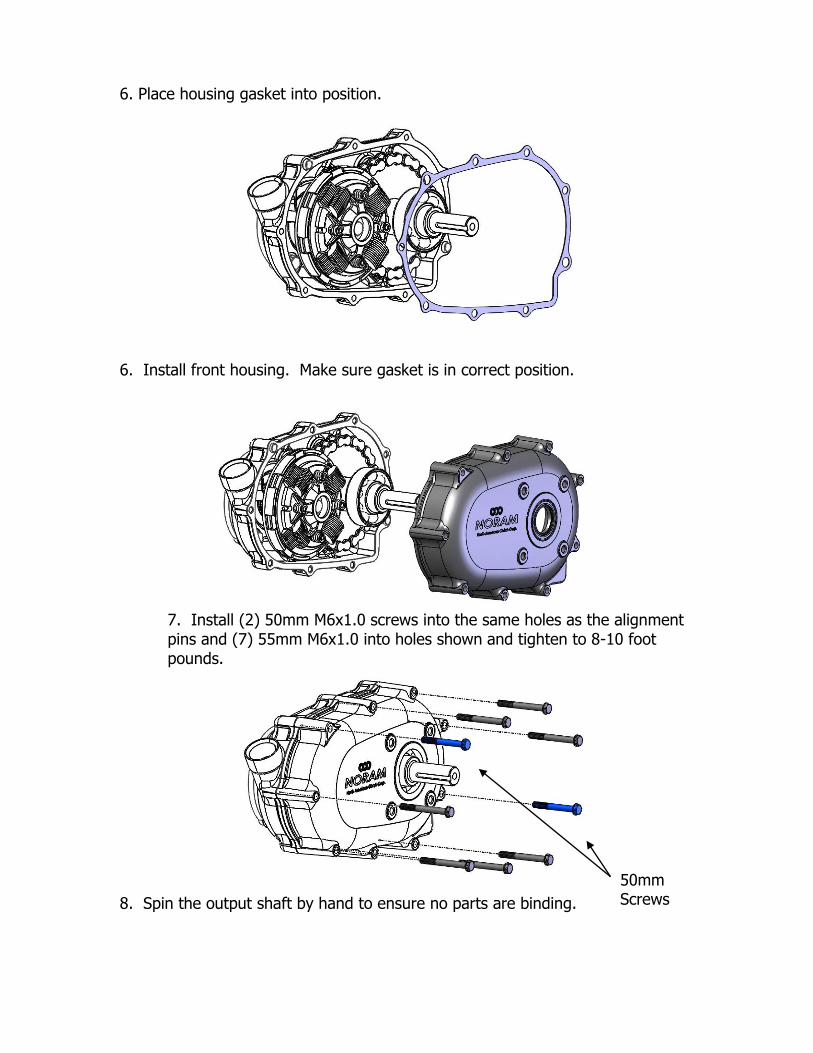
6. Place housing gasket into position.
6. Install front housing. Make sure gasket is in correct position.
7. Install (2) 50mm M6x1.0 screws into the same holes as the alignment pins and (7) 55mm M6x1.0 into holes shown and tighten to 8-10 foot pounds.
8. Spin the output shaft by hand to ensure no parts are binding.
50mm Screws
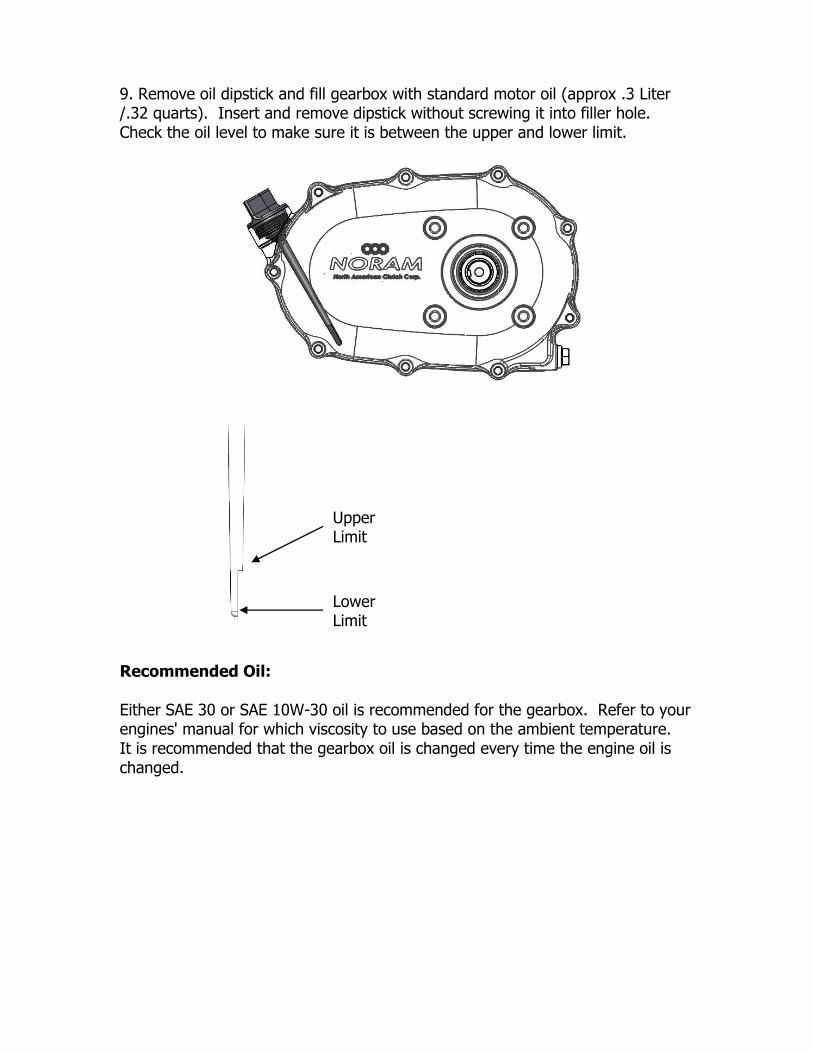
9. Remove oil dipstick and fill gearbox with standard motor oil (approx .3 Liter /.32 quarts). Insert and remove dipstick without screwing it into filler hole. Check the oil level to make sure it is between the upper and lower limit.
Recommended Oil: Either SAE 30 or SAE 10W-30 oil is recommended for the gearbox. Refer to your engines' manual for which viscosity to use based on the ambient temperature. It is recommended that the gearbox oil is changed every time the engine oil is changed.
Upper Limit
Lower Limit