Embed Size (px)
Citation preview
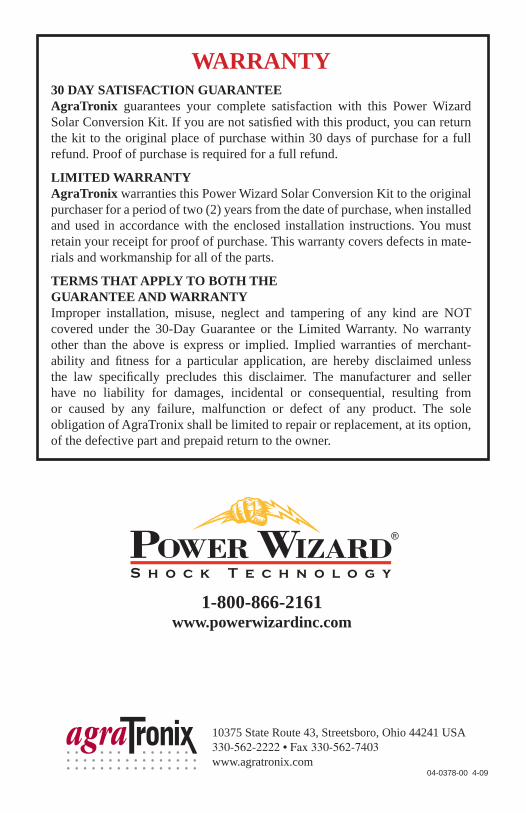
WARRANTY30 DAY SATISFACTION GUARANTEEAgraTronix guarantees your complete satisfaction with this Power WizardSolar Conversion Kit. If you are not satisfied with this product, you can return the kit to the original place of purchase within 30 days of purchase for a full refund. Proof of purchase is required for a full refund.
LIMITED WARRANTYAgraTronix warranties this Power Wizard Solar Conversion Kit to the original purchaser for a period of two (2) years from the date of purchase, when installed and used in accordance with the enclosed installation instructions. You must retain your receipt for proof of purchase. This warranty covers defects in mate-rials and workmanship for all of the parts.
TERMS THAT APPLY TO BOTH THEGUARANTEE AND WARRANTYImproper installation, misuse, neglect and tampering of any kind are NOT covered under the 30-Day Guarantee or the Limited Warranty. No warranty other than the above is express or implied. Implied warranties of merchant-ability and fitness for a particular application, are hereby disclaimed unless the law specifically precludes this disclaimer. The manufacturer and seller have no liability for damages, incidental or consequential, resulting from or caused by any failure, malfunction or defect of any product. The sole obligation of AgraTronix shall be limited to repair or replacement, at its option, of the defective part and prepaid return to the owner.
1-800-866-2161www.powerwizardinc.com
10375 State Route 43, Streetsboro, Ohio 44241 USA330-562-2222 • Fax 330-562-7403www.agratronix.com
04-0378-00 4-09
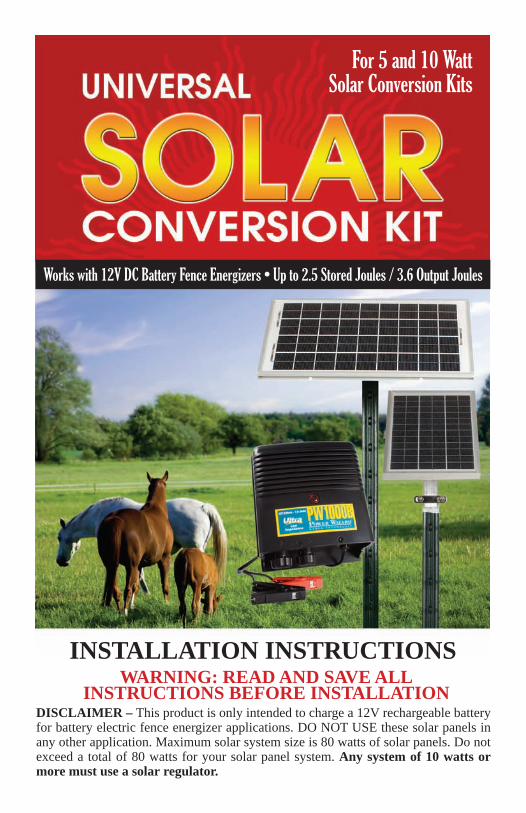
WARNING: READ AND SAVE ALLINSTRUCTIONS BEFORE INSTALLATION
DISCLAIMER – This product is only intended to charge a 12V rechargeable battery for battery electric fence energizer applications. DO NOT USE these solar panels in any other application. Maximum solar system size is 80 watts of solar panels. Do not exceed a total of 80 watts for your solar panel system. Any system of 10 watts or more must use a solar regulator.
INSTALLATION INSTRUCTIONS
Works with 12V DC Battery Fence Energizers • Up to 2.5 Stored Joules / 3.6 Output Joules
For 5 and 10 WattSolar Conversion Kits
22
March through OctoberZone 4PanelWatts
Needed
Zone 3PanelWatts
Needed
Zone 2PanelWatts
Needed
Zone 1PanelWatts
Needed
OutputJoules
StoredJoules
0.1 to 0.5 0.06 to 0.3 5W 5W 5W 5W
15W* 10W* 10W* 10W*
25W* 15W* 15W* 10W*
30W* 20W* 15W* 15W*
35W* 25W* 20W* 15W*
35W* 25W* 20W* 20W*
0.4 to 0.7
0.8 to 1.2
1.3 to 1.7
1.8 to 2.1
2.2 to 2.5
0.6 to 0.9
1.0 to 1.6
1.7 to 2.4
2.5 to 3.2
3.3 to 3.6
*Solar panel systems totaling 10 watts or more MUST have one solar regulator
OR
Table 3. Table of Contents
Page
Warnings ......................................................................................................................1
Introduction ..................................................................................................................1
Parts Included in Kit ................................................................................................ 2-3
Assembly and Installation Tips ....................................................................................5
DO’s and DON’Ts ......................................................................................................14
Troubleshooting ................................................................................................... 14-16
Care, Maintenance and Storage .................................................................................16
Determining Solar Panel Total Watts Needed ..............................................................2
Table 1. March through August ............................................................................4
Table 2. April through September .........................................................................5
Table 3. March through October ...........................................................................6
Table 4. All Year ...................................................................................................7
PLEASE READ THIS MANUAL BEFORE INSTALLATION.It will only take about 10 minutes to read it from cover to cover
and may save you hours of time.
20
Use the Charts Below for Your Season,Location and Energizer
Reading the below tables in order, use the FIRST TABLE that includes all of the months you want to use your solar panels.
May through AugustZone 4PanelWatts
Needed
Zone 3PanelWatts
Needed
Zone 2PanelWatts
Needed
Zone 1PanelWatts
Needed
OutputJoules
StoredJoules
0.1 to 0.5 0.06 to 0.3 5W 5W 5W 5W
10W* 10W* 10W* 5W
15W* 15W* 10W* 10W*
20W* 15W* 15W* 15W*
25W* 20W* 15W* 15W*
25W* 20W* 20W* 15W*
0.4 to 0.7
0.8 to 1.2
1.3 to 1.7
1.8 to 2.1
2.2 to 2.5
0.6 to 0.9
1.0 to 1.6
1.7 to 2.4
2.5 to 3.2
3.3 to 3.6
*Solar panel systems of 10 watts or more MUST have one solar regulator
OR
Table 1.
1
Warnings• Alterations – Do not alter the solar panels, mounting brackets, regulator or the
cable harnesses and do not connect them in any manner other than recommended in this manual.
• Maximum Panels – Do not connect more than a total of 80 watts (80W) of solar panels.
• Animals – Ensure that animals contained within your fence cannot come in contact with any part of your solar panel kit (wires, solar panels, battery clamps, energizer or your battery).
• Battery Charger – Do not simultaneously connect a battery charger and solar panel to your battery.
• You must use our solar regulator on any system with a total of 10 watts or more of solar panels.
IntroductionEach year, more and more people use battery electric fence energizers, especially for electric fences that are located away from utility power. The main inconvenience of battery energizers is the need to swap out the battery. Power Wizard has now devised a way for battery electric fence energizer owners to convert their unit into a solar fence energizer.
Changing a battery every month is not only inconvenient, but is also tedious. Now you can take advantage of the sun’s “free energy” to keep your 12 volt battery charged. This will eliminate the need to change your battery every month or so. We are the first company to offer a creative way to convert any 12 volt battery energizer into a solar energizer (when using a rechargeable 12 volt battery). Believe us when we say, “You will be glad you bought this product!”
NOTE: More than likely your battery energizer manufacturer recommends a deep cycle-type rechargeable battery since they work best in electric fence energizer ap-plications. Use the type of rechargeable 12 volt battery that your energizer manufac-turer recommends.
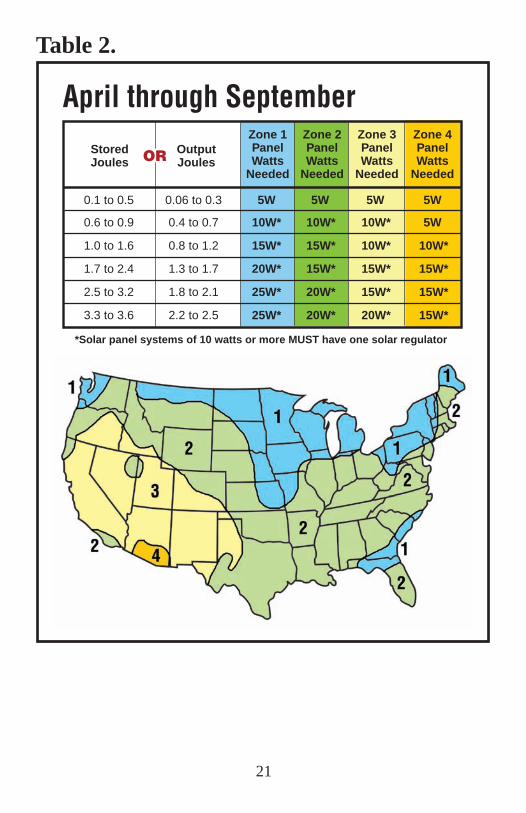
April through SeptemberZone 4PanelWatts
Needed
Zone 3PanelWatts
Needed
Zone 2PanelWatts
Needed
Zone 1PanelWatts
Needed
OutputJoules
StoredJoules
0.1 to 0.5 0.06 to 0.3 5W 5W 5W 5W
10W* 10W* 10W* 5W
15W* 15W* 10W* 10W*
20W* 15W* 15W* 15W*
25W* 20W* 15W* 15W*
25W* 20W* 20W* 15W*
0.4 to 0.7
0.8 to 1.2
1.3 to 1.7
1.8 to 2.1
2.2 to 2.5
0.6 to 0.9
1.0 to 1.6
1.7 to 2.4
2.5 to 3.2
3.3 to 3.6
*Solar panel systems of 10 watts or more MUST have one solar regulator
OR
2
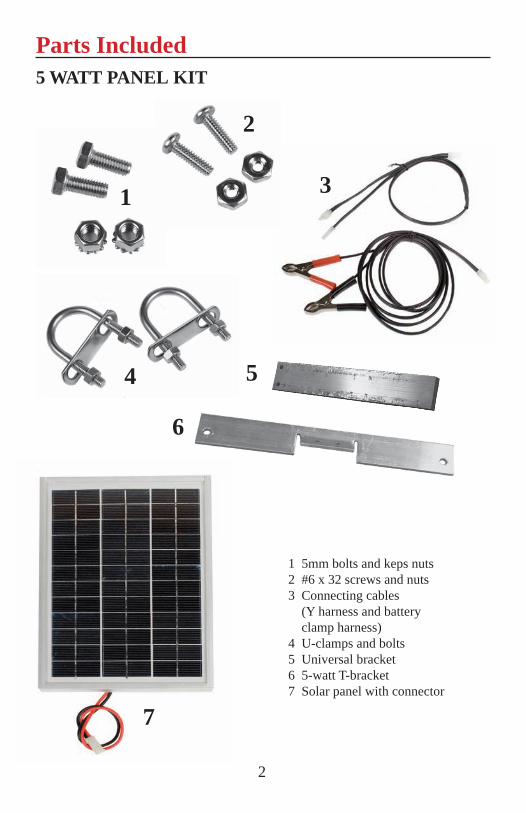
Parts Included5 WATT PANEL KIT
1
2
3
4 5
6
7
1 5mm bolts and keps nuts2 #6 x 32 screws and nuts3 Connecting cables (Y harness and battery clamp harness)4 U-clamps and bolts5 Universal bracket6 5-watt T-bracket7 Solar panel with connector
19
STEP
3 Use the table, zone and energizer type to determine panel watts needed. In this example, use 10 watts of panels.
Zone 4PanelWatts
Needed
Zone 3PanelWatts
Needed
Zone 1PanelWatts
Needed
OutputJoules
StoredJoules
0.1 to 0.5 0.06 to 0.3 5W 5W 5W 5W
10W* 10W* 10W* 5W
15W* 15W* 10W* 10W*
20W* 15W* 15W* 15W*
25W* 20W* 15W* 15W*
25W* 20W* 20W* 15W*
0.4 to 0.70.8 to 1.2
1.3 to 1.7
1.8 to 2.1
2.2 to 2.5
0.6 to 0.9
1 to 1.6
1.7 to 2.4
2.5 to 3.2
3.3 to 3.6
*Solar panel systems of 10 watts or more MUSThave one solar regulator
May through AugustZone 2PanelWatts
Needed
OR
Any combination of 5 and 10 watt panels may be used to equal your total panel watts needed.
18
STEP
2 Use the map under May through August to determine the zone you are in. In this example, Ohio is in Zone 2.
3
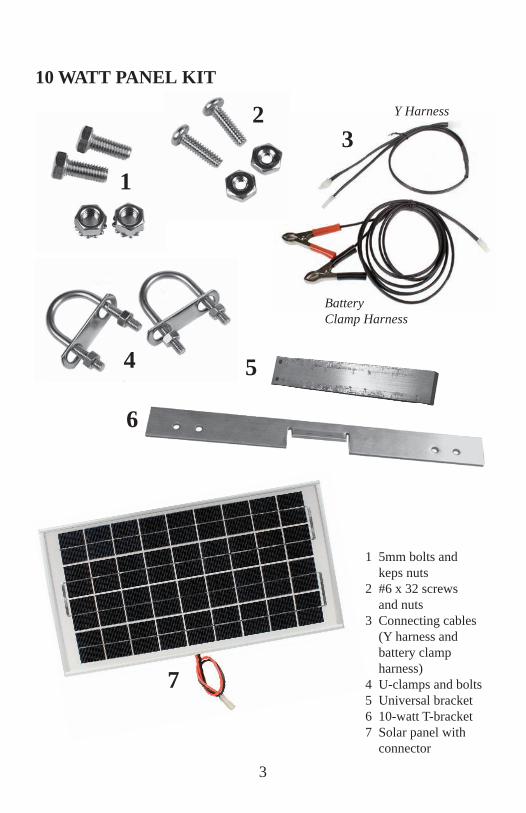
10 WATT PANEL KIT
3
4 5
6
7
1 5mm bolts and keps nuts2 #6 x 32 screws and nuts3 Connecting cables (Y harness and battery clamp harness)4 U-clamps and bolts5 Universal bracket6 10-watt T-bracket7 Solar panel with connector
1
2 Y Harness
BatteryClamp Harness
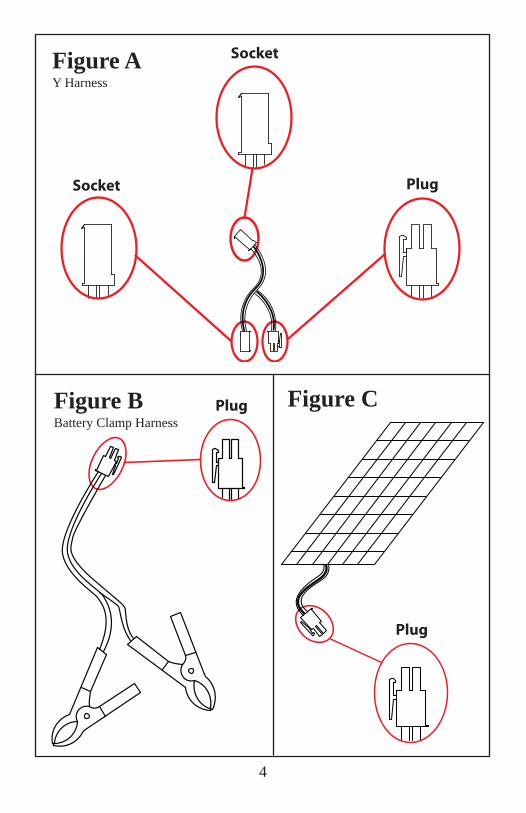
Figure AY Harness
4
Figure BBattery Clamp Harness
Figure C
Socket
Socket Plug
Plug
Plug
17
Determining the Solar Panel Total Watts Needed
Example:You live in Ohio, have a 12V battery energizer with 0.5 output joules and want to use your solar panels from May through August (or any months between May and August).
STEP
1Use the months to select your table. In thisexample, use the May through August table.
Zone 4PanelWatts
Needed
Zone 3PanelWatts
Needed
Zone 2PanelWatts
Needed
Zone 1PanelWatts
Needed
OutputJoules
StoredJoules
0.1 to 0.5 0.06 to 0.3 5W 5W 5W 5W
10W* 10W* 10W* 5W
15W* 15W* 10W* 10W*
20W* 15W* 15W* 15W*
25W* 20W* 15W* 15W*
25W* 20W* 20W* 15W*
0.4 to 0.7
0.8 to 1.2
1.3 to 1.7
1.8 to 2.1
2.2 to 2.5
0.6 to 0.9
1.0 to 1.6
1.7 to 2.4
2.5 to 3.2
3.3 to 3.6
*Solar panel systems of 10 watts or more MUSThave one solar regulator
May through August
OR
16
• Check for proper polarity on the solar regulator to battery clamps to the battery. The red clamp goes to the positive (+) battery terminal and the black clamp goes to the negative (–) terminal.
• If your 12V battery is fully discharged, then neither regulator LED will light since the battery voltage is too low to run the solar regulator. Use a 12V automotive bat-tery charger to charge your battery. The solar regulator gets its operating energy directly from the battery.
Care, Maintenance, and Storage• For maximum efficiency, clean the solar panel glass once a year with water and
paper towels or any other glass cleaning product. Do not use abrasive cleansers to clean the solar panel glass. Scratches in the glass will negatively affect the solar panel performance.
• Store your solar panels if you do not use them for a month or more.
• Keep the solar regulator off the ground. Strap it to the battery if needed.
5
General Assembly and Installation Tips
NOTE: For more specific details on the assembly of the 5 watt solar kit, please see page 7. For more specific details on the assembly of the 10 watt solar kit, please see page 9.
Fully Charged BatteryEnsure your 12V rechargeable battery is fully charged. Use a 12V automotive battery charger for this purpose. Even new batteries can be slightly discharged.
Select Site LocationFind a sunny location that is free from the shade of nearby buildings, trees, and other objects that cast shadows. Ensure the panel faces due south to maximize the amount of daily sunlight your panels will collect throughout the day.
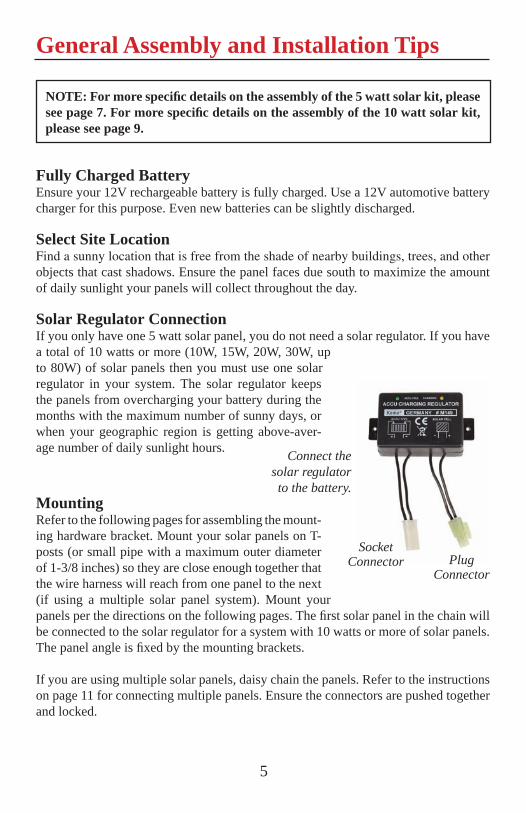
Solar Regulator ConnectionIf you only have one 5 watt solar panel, you do not need a solar regulator. If you have a total of 10 watts or more (10W, 15W, 20W, 30W, up to 80W) of solar panels then you must use one solar regulator in your system. The solar regulator keeps the panels from overcharging your battery during the months with the maximum number of sunny days, or when your geographic region is getting above-aver-age number of daily sunlight hours.
Connect the solar regulator to the battery.
MountingRefer to the following pages for assembling the mount-ing hardware bracket. Mount your solar panels on T-posts (or small pipe with a maximum outer diameter of 1-3/8 inches) so they are close enough together that the wire harness will reach from one panel to the next (if using a multiple solar panel system). Mount your panels per the directions on the following pages. The first solar panel in the chain will be connected to the solar regulator for a system with 10 watts or more of solar panels. The panel angle is fixed by the mounting brackets.
If you are using multiple solar panels, daisy chain the panels. Refer to the instructions on page 11 for connecting multiple panels. Ensure the connectors are pushed together and locked.
PlugConnector
SocketConnector
6
Testing Your Solar PanelsIf you have several solar panels in your system and one solar regulator, here is how you ensure each panel works. Test each individual panel, using only one solar panel connected to the regulator, by following the instructions below.
Connect one solar panel to the regulator. Connect the solar regulator to the battery and ensure the regulator’s “Charging” LED (amber color light) or “Accu-Full” (green bat-tery full light) comes on when the solar panel is in the sunlight (this even works on a mostly cloudy sky). If an LED comes on, then the solar panel is working. Disconnect the panel and set it aside. Test your next solar panel the exact same way. If neither LED comes on, then you may have a bad connection.
Ensure all connectors are locked and ensure the battery clamp polarity (+ (positive) to the red clamp and – (negative) to the black) is correct. If connections are good, then the battery is not charged, the solar regulator is bad, or the solar panel is bad. If another solar panel works with the solar regulator, then the solar regulator and battery are OK. When performing this test, never have more than one panel connected to the solar regulator at a time. This will allow verification that each solar panel is working.
This test allows you to verify each individual panel before connecting the entire sys-tem. You may have to cup your hands around the solar regulator to reduce ambient light to see the lights well. If your battery is full, then the “Charging” LED may only light for a few seconds after it is connected, and then the “Accu-Full” (accumulator/battery full) green LED will light. On a fully charged battery, you will often see the “Accu-Full” and “Charging” LEDs alternate being lit for 5-10 seconds at a time. Only one LED will be on at any given time. This is a safe condition and only means that the battery is full.
15
• Charge your battery – ensure that your rechargeable battery is fully charged before connecting it to the system. The quickest way to fully charge your battery is to use a 12V automotive battery charger. An alternate way is to connect your solar panel system to your battery but leave the battery energizer disconnected. Depending on the number of panels and battery amp hour rating, this may take 6 or more days of pure sunlight. The 12V automotive battery charger is the quickest way to ensure your battery is fully charged.
• Extra panels – you may need an extra 5 watt or 10 watt solar panel. Selecting the correct solar panel size is difficult due to the month-to-month and year-to-year variation in average hours of daily solar radiation in your geographic region. One year you may get an extra 2 hours of daily sunlight over a given month, and the next year 2 hours less per day. Thus, if your battery normally lasts 1 month without solar panels, but with the solar panel system connected it only lasts 5 months, then you may need to add another panel or two to your system. You can add either a 5 watt or 10 watt panel and see how much longer the battery lasts. If saving money is critical, then add panels in increments of 5 watts. If buying a 10 watt panel is an option for your budget, then the best thing to do is to add an extra 10 watt panel to your system (for systems greater than 30 watts). Remember to use a 12V automotive battery charger and recharge your battery prior to connecting an extra solar panel to your system.
• Battery condition – if your battery has ever been fully discharged one or more times, then it may have permanent damage due to sulfation of the terminals inside of the battery. There is no easy way to identify this condition other than your battery won’t hold a charge. Try using an automotive battery charger to fully recharge your bat-tery. If your automotive battery charger has a “battery conditioning” mode then use that to recondition the battery before charging it.
Problem:Both solar regulator LEDs (lights) are off (not lit).
Possible solutions:NOTE: When the LEDs toggle, both will be off for 1-2 seconds. • With the solar regulator connected between the solar panels and battery, cup your
hand so the front of the regulator case is shaded, and look closely to see if one of the LEDs is lit. One LED light should always be on when the sun is shining (if the battery is not depleted). If not, then ensure all cable connectors are locked, and the battery connections are correct. The green and amber LEDs are difficult to see in the ambient light.
• At night time, the solar regulator LEDs will not be on since there is no sunlight on the panels.
• The LEDs may also not come on if the sky is 100% overcast and with very dark storm clouds. With that said, please know that your solar panels will still put charge into your battery on a typical overcast day that does not have the thick dark gray clouds. It’s the extremely dark gray overcast clouds that don’t pass sufficient light to the solar panel(s).
14
Do’s and Don’tsWe wanted to provide you with as many useful tips as possible to help you be success-ful with your solar panel system, for years to come. The Do This and Don’t Do This sections below are helpful hints to ensure you maximize the benefit of your new solar panel system.
Do This• Always connect your new solar panel system to a fully charged battery. If you start
with a half charged battery, then the panels may not be able to maintain the battery charge. Use an automotive 12V battery charger to charge your battery as needed.
• Ensure your panel is facing south to maximize the amount of daily sunlight on your panels.
• Mount your solar panels where they will get maximum sunlight and as little shade as possible.
• If you don’t use your panels all year around, then store them during seasons of non-use.
• Use a solar regulator if your have a total of 10 watts or more of solar panels. • A deep cycle-type battery is the best type for battery energizer applications. Some
people use automotive-type batteries, but a deep cycle-type is preferred.
Don’t Do This• Don’t face your solar panels to the east, west, or north since you will get much less
daily sunlight on your solar panels compared to when you face the panels to the south.
• Don’t mount the solar panels in the shade of a tree, building, or any other structure or you will limit the amount of sunlight on the panels, and thus limit the energy the solar panels can put into your battery.
• Do not use abrasive cleansers to clean the solar panel glass.• Do not build more than an 80 watt system. 80 watts is the maximum size for our
solar panel kits. • Do not use more than one solar regulator per solar panel system. Even if you have
80 watts of panels you only need one solar panel regulator for that system.
TroubleshootingProblem:Batteries are not staying charged.Possible solutions:• Test your solar panels – if you have a system with 10 watts or more of solar panels,
then you should have a solar regulator between the panel and your battery. Refer to pages 9-10 for installation of the solar regulator. Ensure that each individual panel is working correctly (page 6).
7
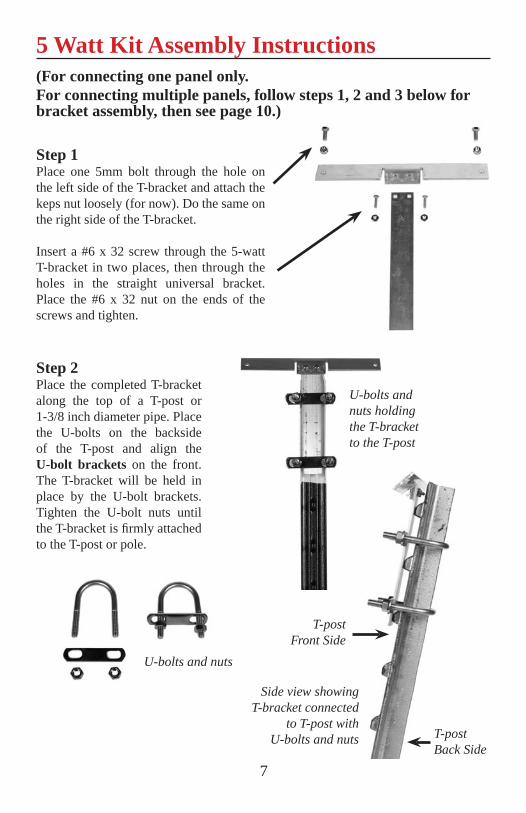
5 Watt Kit Assembly Instructions
Step 1Place one 5mm bolt through the hole on the left side of the T-bracket and attach the keps nut loosely (for now). Do the same on the right side of the T-bracket.
Insert a #6 x 32 screw through the 5-watt T-bracket in two places, then through the holes in the straight universal bracket. Place the #6 x 32 nut on the ends of the screws and tighten.
Step 2Place the completed T-bracket along the top of a T-post or 1-3/8 inch diameter pipe. Place the U-bolts on the backside of the T-post and align the U-bolt brackets on the front.The T-bracket will be held in place by the U-bolt brackets. Tighten the U-bolt nuts until the T-bracket is firmly attached to the T-post or pole.
U-bolts and nuts
U-bolts and nuts holding the T-bracket to the T-post
Side view showing T-bracket connected
to T-post with U-bolts and nuts
(For connecting one panel only.For connecting multiple panels, follow steps 1, 2 and 3 below for bracket assembly, then see page 10.)
T-post Front Side
T-post Back Side
Battery clamp harness
8
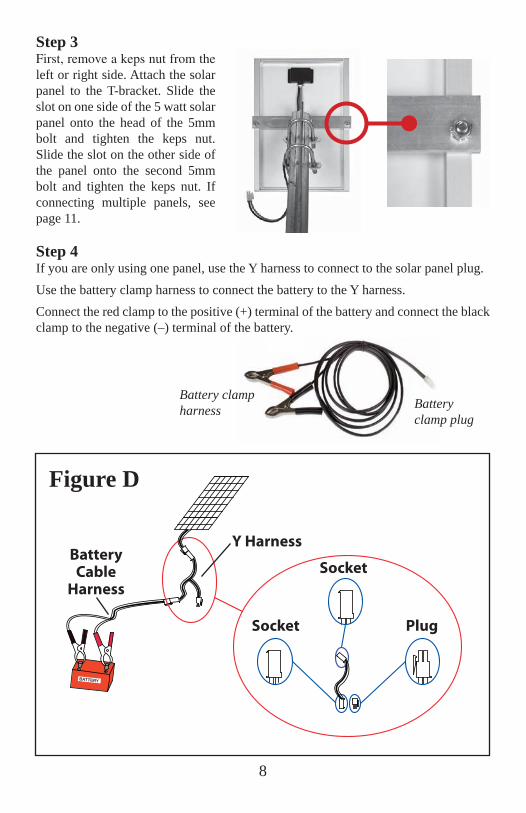
Step 3First, remove a keps nut from the left or right side. Attach the solar panel to the T-bracket. Slide the slot on one side of the 5 watt solar panel onto the head of the 5mm bolt and tighten the keps nut. Slide the slot on the other side of the panel onto the second 5mm bolt and tighten the keps nut. If connecting multiple panels, see page 11.
Step 4If you are only using one panel, use the Y harness to connect to the solar panel plug.
Use the battery clamp harness to connect the battery to the Y harness.
Connect the red clamp to the positive (+) terminal of the battery and connect the black clamp to the negative (–) terminal of the battery.
BATTERY
Figure D
Batteryclamp plug
BatteryCable
Harness
Y Harness
Plug
Socket
Socket
13
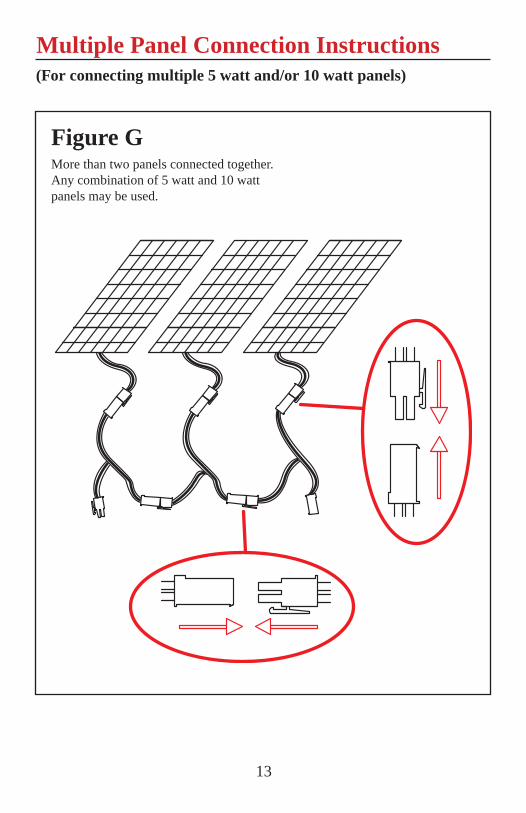
Multiple Panel Connection Instructions(For connecting multiple 5 watt and/or 10 watt panels)
Figure GMore than two panels connected together. Any combination of 5 watt and 10 watt panels may be used.
REGULATOR
12
Step 3Connect the second solar panel of your system to the second side of the Y harness (see Figure F). This creates a two solar panel system.
Step 4Finally, connect the red clamp to the positive (+) terminal of the battery and the black clamp to the negative (–) terminal of the battery.
Figure F
U-bolts and nuts holding the T-bracket to the T-post
9
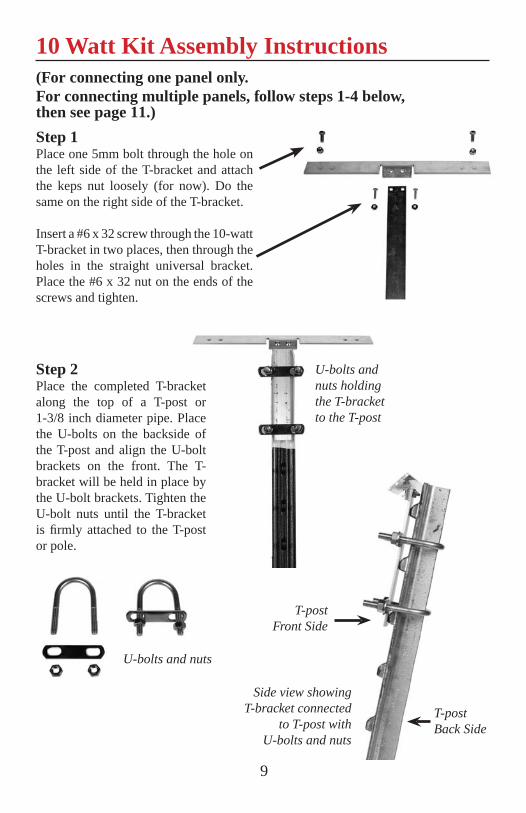
10 Watt Kit Assembly Instructions
Step 1Place one 5mm bolt through the hole on the left side of the T-bracket and attach the keps nut loosely (for now). Do the same on the right side of the T-bracket.
Insert a #6 x 32 screw through the 10-watt T-bracket in two places, then through the holes in the straight universal bracket. Place the #6 x 32 nut on the ends of the screws and tighten.
U-bolts and nuts
Side view showing T-bracket connected
to T-post with U-bolts and nuts
Step 2Place the completed T-bracket along the top of a T-post or 1-3/8 inch diameter pipe. Place the U-bolts on the backside of the T-post and align the U-bolt brackets on the front. The T-bracket will be held in place by the U-bolt brackets. Tighten the U-bolt nuts until the T-bracket is firmly attached to the T-post or pole.
(For connecting one panel only.For connecting multiple panels, follow steps 1-4 below, then see page 11.)
T-post Front Side
T-post Back Side
10
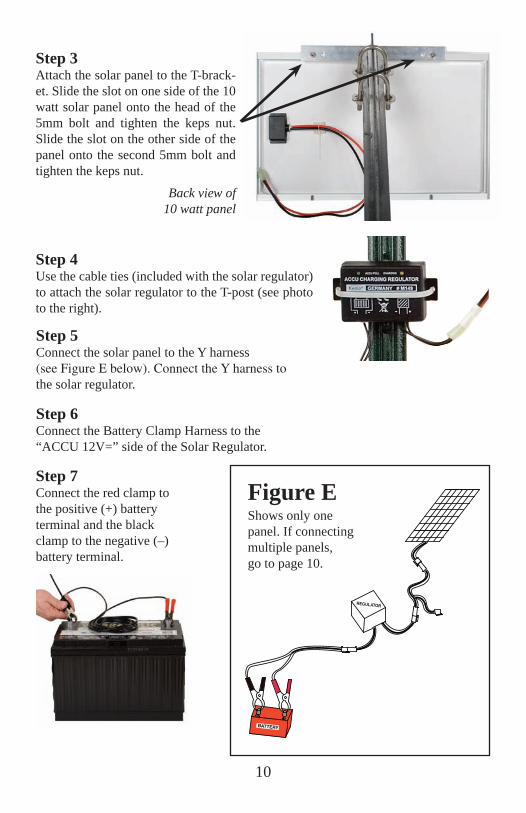
Step 3Attach the solar panel to the T-brack-et. Slide the slot on one side of the 10 watt solar panel onto the head of the 5mm bolt and tighten the keps nut. Slide the slot on the other side of the panel onto the second 5mm bolt and tighten the keps nut.
Back view of10 watt panel
Step 5Connect the solar panel to the Y harness(see Figure E below). Connect the Y harness tothe solar regulator.
Step 6Connect the Battery Clamp Harness to the “ACCU 12V=” side of the Solar Regulator.
Step 7Connect the red clamp to the positive (+) battery terminal and the black clamp to the negative (–) battery terminal.
REGULATOR
Figure EShows only onepanel. If connecting multiple panels, go to page 10.
Step 4Use the cable ties (included with the solar regulator) to attach the solar regulator to the T-post (see photo to the right).
11
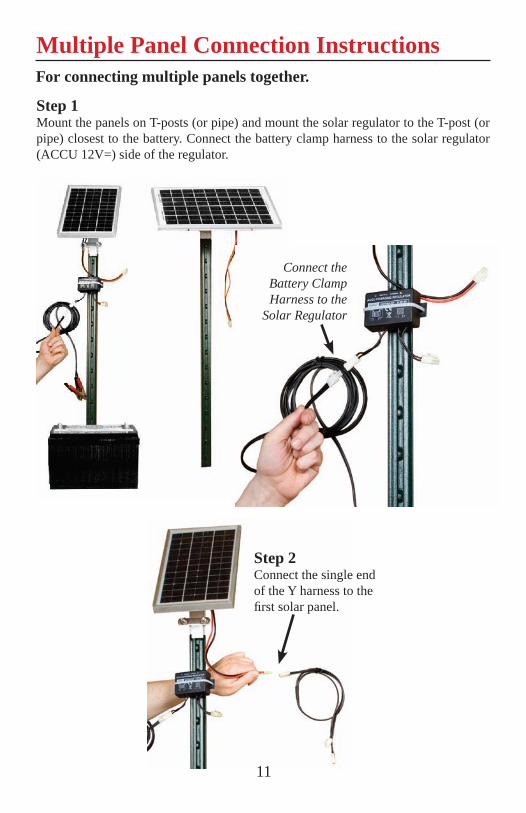
Step 2Connect the single end of the Y harness to the first solar panel.
Multiple Panel Connection Instructions
Step 1Mount the panels on T-posts (or pipe) and mount the solar regulator to the T-post (or pipe) closest to the battery. Connect the battery clamp harness to the solar regulator (ACCU 12V=) side of the regulator.
Connect theBattery ClampHarness to the
Solar Regulator
For connecting multiple panels together.
10
Step 3Attach the solar panel to the T-brack-et. Slide the slot on one side of the 10 watt solar panel onto the head of the 5mm bolt and tighten the keps nut. Slide the slot on the other side of the panel onto the second 5mm bolt and tighten the keps nut.
Back view of10 watt panel
Step 5Connect the solar panel to the Y harness(see Figure E below). Connect the Y harness tothe solar regulator.
Step 6Connect the Battery Clamp Harness to the “ACCU 12V=” side of the Solar Regulator.
Step 7Connect the red clamp to the positive (+) battery terminal and the black clamp to the negative (–) battery terminal.
REGULATOR
Figure EShows only onepanel. If connecting multiple panels, go to page 10.
Step 4Use the cable ties (included with the solar regulator) to attach the solar regulator to the T-post (see photo to the right).
11
Step 2Connect the single end of the Y harness to the first solar panel.
Multiple Panel Connection Instructions
Step 1Mount the panels on T-posts (or pipe) and mount the solar regulator to the T-post (or pipe) closest to the battery. Connect the battery clamp harness to the solar regulator (ACCU 12V=) side of the regulator.
Connect theBattery ClampHarness to the
Solar Regulator
For connecting multiple panels together.
REGULATOR
12
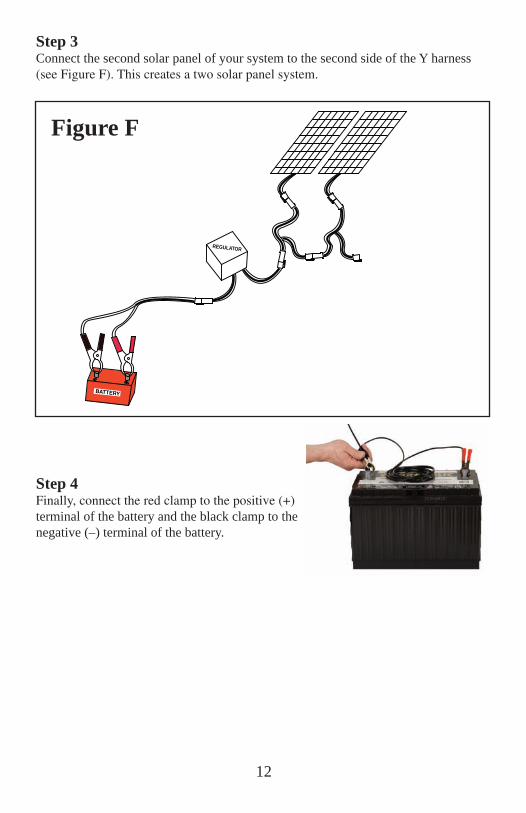
Step 3Connect the second solar panel of your system to the second side of the Y harness (see Figure F). This creates a two solar panel system.
Step 4Finally, connect the red clamp to the positive (+) terminal of the battery and the black clamp to the negative (–) terminal of the battery.
Figure F
U-bolts and nuts holding the T-bracket to the T-post
9
10 Watt Kit Assembly Instructions
Step 1Place one 5mm bolt through the hole on the left side of the T-bracket and attach the keps nut loosely (for now). Do the same on the right side of the T-bracket.
Insert a #6 x 32 screw through the 10-watt T-bracket in two places, then through the holes in the straight universal bracket. Place the #6 x 32 nut on the ends of the screws and tighten.
U-bolts and nuts
Side view showing T-bracket connected
to T-post with U-bolts and nuts
Step 2Place the completed T-bracket along the top of a T-post or 1-3/8 inch diameter pipe. Place the U-bolts on the backside of the T-post and align the U-bolt brackets on the front. The T-bracket will be held in place by the U-bolt brackets. Tighten the U-bolt nuts until the T-bracket is firmly attached to the T-post or pole.
(For connecting one panel only.For connecting multiple panels, follow steps 1-4 below, then see page 11.)
T-post Front Side
T-post Back Side
Battery clamp harness
8
Step 3First, remove a keps nut from the left or right side. Attach the solar panel to the T-bracket. Slide the slot on one side of the 5 watt solar panel onto the head of the 5mm bolt and tighten the keps nut. Slide the slot on the other side of the panel onto the second 5mm bolt and tighten the keps nut. If connecting multiple panels, see page 11.
Step 4If you are only using one panel, use the Y harness to connect to the solar panel plug.
Use the battery clamp harness to connect the battery to the Y harness.
Connect the red clamp to the positive (+) terminal of the battery and connect the black clamp to the negative (–) terminal of the battery.
BATTERY
Figure D
Batteryclamp plug
BatteryCable
Harness
Y Harness
Plug
Socket
Socket
13
Multiple Panel Connection Instructions(For connecting multiple 5 watt and/or 10 watt panels)
Figure GMore than two panels connected together. Any combination of 5 watt and 10 watt panels may be used.
14
Do’s and Don’tsWe wanted to provide you with as many useful tips as possible to help you be success-ful with your solar panel system, for years to come. The Do This and Don’t Do This sections below are helpful hints to ensure you maximize the benefit of your new solar panel system.
Do This• Always connect your new solar panel system to a fully charged battery. If you start
with a half charged battery, then the panels may not be able to maintain the battery charge. Use an automotive 12V battery charger to charge your battery as needed.
• Ensure your panel is facing south to maximize the amount of daily sunlight on your panels.
• Mount your solar panels where they will get maximum sunlight and as little shade as possible.
• If you don’t use your panels all year around, then store them during seasons of non-use.
• Use a solar regulator if your have a total of 10 watts or more of solar panels. • A deep cycle-type battery is the best type for battery energizer applications. Some
people use automotive-type batteries, but a deep cycle-type is preferred.
Don’t Do This• Don’t face your solar panels to the east, west, or north since you will get much less
daily sunlight on your solar panels compared to when you face the panels to the south.
• Don’t mount the solar panels in the shade of a tree, building, or any other structure or you will limit the amount of sunlight on the panels, and thus limit the energy the solar panels can put into your battery.
• Do not use abrasive cleansers to clean the solar panel glass.• Do not build more than an 80 watt system. 80 watts is the maximum size for our
solar panel kits. • Do not use more than one solar regulator per solar panel system. Even if you have
80 watts of panels you only need one solar panel regulator for that system.
TroubleshootingProblem:Batteries are not staying charged.Possible solutions:• Test your solar panels – if you have a system with 10 watts or more of solar panels,
then you should have a solar regulator between the panel and your battery. Refer to pages 9-10 for installation of the solar regulator. Ensure that each individual panel is working correctly (page 6).
7
5 Watt Kit Assembly Instructions
Step 1Place one 5mm bolt through the hole on the left side of the T-bracket and attach the keps nut loosely (for now). Do the same on the right side of the T-bracket.
Insert a #6 x 32 screw through the 5-watt T-bracket in two places, then through the holes in the straight universal bracket. Place the #6 x 32 nut on the ends of the screws and tighten.
Step 2Place the completed T-bracket along the top of a T-post or 1-3/8 inch diameter pipe. Place the U-bolts on the backside of the T-post and align the U-bolt brackets on the front.The T-bracket will be held in place by the U-bolt brackets. Tighten the U-bolt nuts until the T-bracket is firmly attached to the T-post or pole.
U-bolts and nuts
U-bolts and nuts holding the T-bracket to the T-post
Side view showing T-bracket connected
to T-post with U-bolts and nuts
(For connecting one panel only.For connecting multiple panels, follow steps 1, 2 and 3 below for bracket assembly, then see page 10.)
T-post Front Side
T-post Back Side
6
Testing Your Solar PanelsIf you have several solar panels in your system and one solar regulator, here is how you ensure each panel works. Test each individual panel, using only one solar panel connected to the regulator, by following the instructions below.
Connect one solar panel to the regulator. Connect the solar regulator to the battery and ensure the regulator’s “Charging” LED (amber color light) or “Accu-Full” (green bat-tery full light) comes on when the solar panel is in the sunlight (this even works on a mostly cloudy sky). If an LED comes on, then the solar panel is working. Disconnect the panel and set it aside. Test your next solar panel the exact same way. If neither LED comes on, then you may have a bad connection.
Ensure all connectors are locked and ensure the battery clamp polarity (+ (positive) to the red clamp and – (negative) to the black) is correct. If connections are good, then the battery is not charged, the solar regulator is bad, or the solar panel is bad. If another solar panel works with the solar regulator, then the solar regulator and battery are OK. When performing this test, never have more than one panel connected to the solar regulator at a time. This will allow verification that each solar panel is working.
This test allows you to verify each individual panel before connecting the entire sys-tem. You may have to cup your hands around the solar regulator to reduce ambient light to see the lights well. If your battery is full, then the “Charging” LED may only light for a few seconds after it is connected, and then the “Accu-Full” (accumulator/battery full) green LED will light. On a fully charged battery, you will often see the “Accu-Full” and “Charging” LEDs alternate being lit for 5-10 seconds at a time. Only one LED will be on at any given time. This is a safe condition and only means that the battery is full.
15
• Charge your battery – ensure that your rechargeable battery is fully charged before connecting it to the system. The quickest way to fully charge your battery is to use a 12V automotive battery charger. An alternate way is to connect your solar panel system to your battery but leave the battery energizer disconnected. Depending on the number of panels and battery amp hour rating, this may take 6 or more days of pure sunlight. The 12V automotive battery charger is the quickest way to ensure your battery is fully charged.
• Extra panels – you may need an extra 5 watt or 10 watt solar panel. Selecting the correct solar panel size is difficult due to the month-to-month and year-to-year variation in average hours of daily solar radiation in your geographic region. One year you may get an extra 2 hours of daily sunlight over a given month, and the next year 2 hours less per day. Thus, if your battery normally lasts 1 month without solar panels, but with the solar panel system connected it only lasts 5 months, then you may need to add another panel or two to your system. You can add either a 5 watt or 10 watt panel and see how much longer the battery lasts. If saving money is critical, then add panels in increments of 5 watts. If buying a 10 watt panel is an option for your budget, then the best thing to do is to add an extra 10 watt panel to your system (for systems greater than 30 watts). Remember to use a 12V automotive battery charger and recharge your battery prior to connecting an extra solar panel to your system.
• Battery condition – if your battery has ever been fully discharged one or more times, then it may have permanent damage due to sulfation of the terminals inside of the battery. There is no easy way to identify this condition other than your battery won’t hold a charge. Try using an automotive battery charger to fully recharge your bat-tery. If your automotive battery charger has a “battery conditioning” mode then use that to recondition the battery before charging it.
Problem:Both solar regulator LEDs (lights) are off (not lit).
Possible solutions:NOTE: When the LEDs toggle, both will be off for 1-2 seconds. • With the solar regulator connected between the solar panels and battery, cup your
hand so the front of the regulator case is shaded, and look closely to see if one of the LEDs is lit. One LED light should always be on when the sun is shining (if the battery is not depleted). If not, then ensure all cable connectors are locked, and the battery connections are correct. The green and amber LEDs are difficult to see in the ambient light.
• At night time, the solar regulator LEDs will not be on since there is no sunlight on the panels.
• The LEDs may also not come on if the sky is 100% overcast and with very dark storm clouds. With that said, please know that your solar panels will still put charge into your battery on a typical overcast day that does not have the thick dark gray clouds. It’s the extremely dark gray overcast clouds that don’t pass sufficient light to the solar panel(s).
16
• Check for proper polarity on the solar regulator to battery clamps to the battery. The red clamp goes to the positive (+) battery terminal and the black clamp goes to the negative (–) terminal.
• If your 12V battery is fully discharged, then neither regulator LED will light since the battery voltage is too low to run the solar regulator. Use a 12V automotive bat-tery charger to charge your battery. The solar regulator gets its operating energy directly from the battery.
Care, Maintenance, and Storage• For maximum efficiency, clean the solar panel glass once a year with water and
paper towels or any other glass cleaning product. Do not use abrasive cleansers to clean the solar panel glass. Scratches in the glass will negatively affect the solar panel performance.
• Store your solar panels if you do not use them for a month or more.
• Keep the solar regulator off the ground. Strap it to the battery if needed.
5
General Assembly and Installation Tips
NOTE: For more specific details on the assembly of the 5 watt solar kit, please see page 7. For more specific details on the assembly of the 10 watt solar kit, please see page 9.
Fully Charged BatteryEnsure your 12V rechargeable battery is fully charged. Use a 12V automotive battery charger for this purpose. Even new batteries can be slightly discharged.
Select Site LocationFind a sunny location that is free from the shade of nearby buildings, trees, and other objects that cast shadows. Ensure the panel faces due south to maximize the amount of daily sunlight your panels will collect throughout the day.
Solar Regulator ConnectionIf you only have one 5 watt solar panel, you do not need a solar regulator. If you have a total of 10 watts or more (10W, 15W, 20W, 30W, up to 80W) of solar panels then you must use one solar regulator in your system. The solar regulator keeps the panels from overcharging your battery during the months with the maximum number of sunny days, or when your geographic region is getting above-aver-age number of daily sunlight hours.
Connect the solar regulator to the battery.
MountingRefer to the following pages for assembling the mount-ing hardware bracket. Mount your solar panels on T-posts (or small pipe with a maximum outer diameter of 1-3/8 inches) so they are close enough together that the wire harness will reach from one panel to the next (if using a multiple solar panel system). Mount your panels per the directions on the following pages. The first solar panel in the chain will be connected to the solar regulator for a system with 10 watts or more of solar panels. The panel angle is fixed by the mounting brackets.
If you are using multiple solar panels, daisy chain the panels. Refer to the instructions on page 11 for connecting multiple panels. Ensure the connectors are pushed together and locked.
PlugConnector
SocketConnector
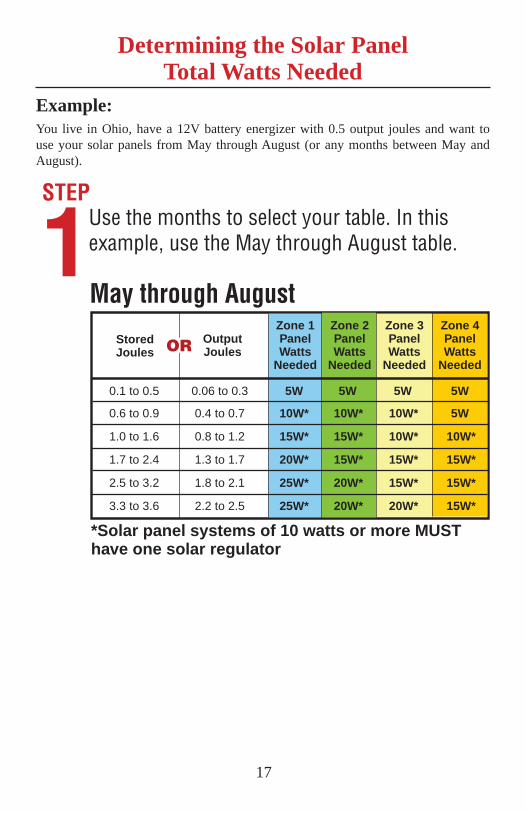
Figure AY Harness
4
Figure BBattery Clamp Harness
Figure C
Socket
Socket Plug
Plug
Plug
17
Determining the Solar Panel Total Watts Needed
Example:You live in Ohio, have a 12V battery energizer with 0.5 output joules and want to use your solar panels from May through August (or any months between May and August).
STEP
1Use the months to select your table. In thisexample, use the May through August table.
Zone 4PanelWatts
Needed
Zone 3PanelWatts
Needed
Zone 2PanelWatts
Needed
Zone 1PanelWatts
Needed
OutputJoules
StoredJoules
0.1 to 0.5 0.06 to 0.3 5W 5W 5W 5W
10W* 10W* 10W* 5W
15W* 15W* 10W* 10W*
20W* 15W* 15W* 15W*
25W* 20W* 15W* 15W*
25W* 20W* 20W* 15W*
0.4 to 0.7
0.8 to 1.2
1.3 to 1.7
1.8 to 2.1
2.2 to 2.5
0.6 to 0.9
1.0 to 1.6
1.7 to 2.4
2.5 to 3.2
3.3 to 3.6
*Solar panel systems of 10 watts or more MUSThave one solar regulator
May through August
OR
18
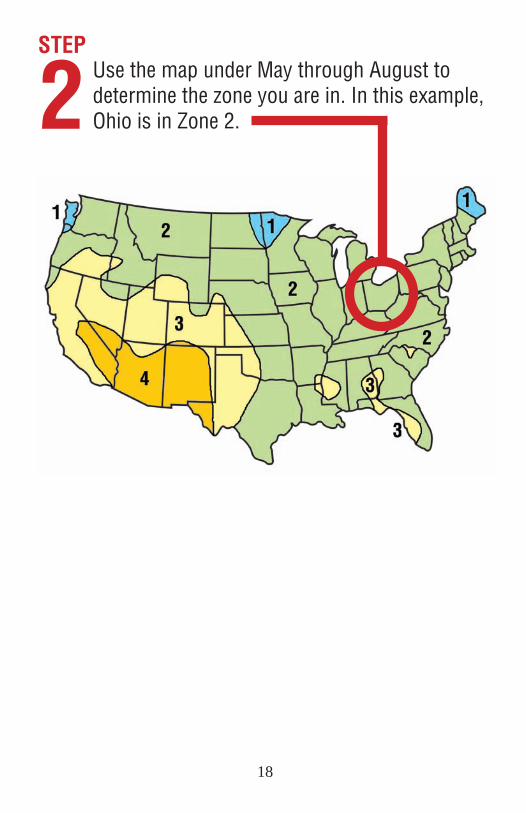
STEP
2 Use the map under May through August to determine the zone you are in. In this example, Ohio is in Zone 2.
3
10 WATT PANEL KIT
3
4 5
6
7
1 5mm bolts and keps nuts2 #6 x 32 screws and nuts3 Connecting cables (Y harness and battery clamp harness)4 U-clamps and bolts5 Universal bracket6 10-watt T-bracket7 Solar panel with connector
1
2 Y Harness
BatteryClamp Harness
2
Parts Included5 WATT PANEL KIT
1
2
3
4 5
6
7
1 5mm bolts and keps nuts2 #6 x 32 screws and nuts3 Connecting cables (Y harness and battery clamp harness)4 U-clamps and bolts5 Universal bracket6 5-watt T-bracket7 Solar panel with connector
19
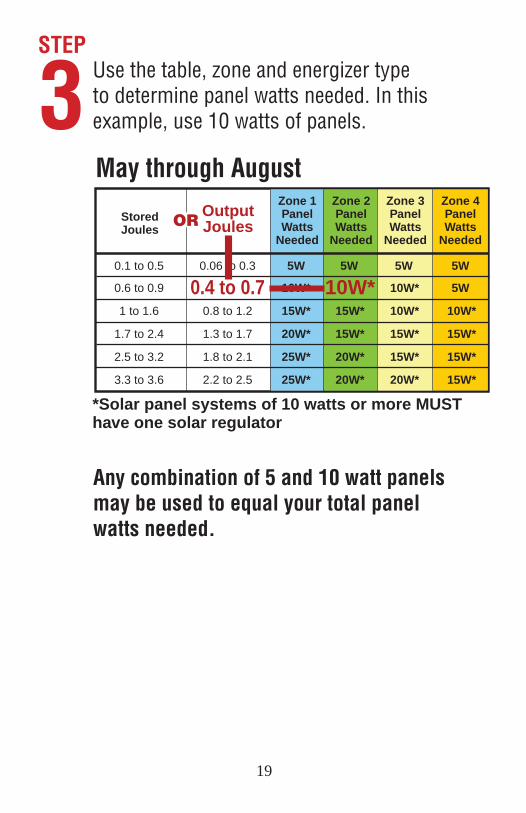
STEP
3 Use the table, zone and energizer type to determine panel watts needed. In this example, use 10 watts of panels.
Zone 4PanelWatts
Needed
Zone 3PanelWatts
Needed
Zone 1PanelWatts
Needed
OutputJoules
StoredJoules
0.1 to 0.5 0.06 to 0.3 5W 5W 5W 5W
10W* 10W* 10W* 5W
15W* 15W* 10W* 10W*
20W* 15W* 15W* 15W*
25W* 20W* 15W* 15W*
25W* 20W* 20W* 15W*
0.4 to 0.70.8 to 1.2
1.3 to 1.7
1.8 to 2.1
2.2 to 2.5
0.6 to 0.9
1 to 1.6
1.7 to 2.4
2.5 to 3.2
3.3 to 3.6
*Solar panel systems of 10 watts or more MUSThave one solar regulator
May through AugustZone 2PanelWatts
Needed
OR
Any combination of 5 and 10 watt panels may be used to equal your total panel watts needed.
20
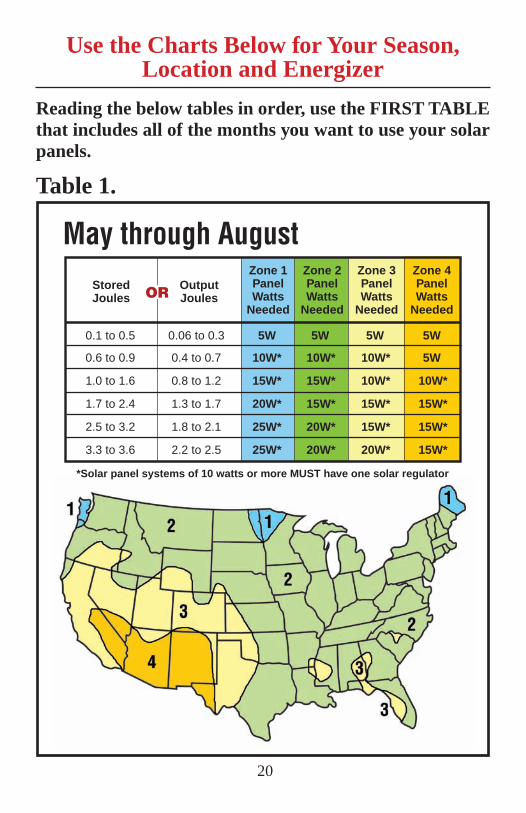
Use the Charts Below for Your Season,Location and Energizer
Reading the below tables in order, use the FIRST TABLE that includes all of the months you want to use your solar panels.
May through AugustZone 4PanelWatts
Needed
Zone 3PanelWatts
Needed
Zone 2PanelWatts
Needed
Zone 1PanelWatts
Needed
OutputJoules
StoredJoules
0.1 to 0.5 0.06 to 0.3 5W 5W 5W 5W
10W* 10W* 10W* 5W
15W* 15W* 10W* 10W*
20W* 15W* 15W* 15W*
25W* 20W* 15W* 15W*
25W* 20W* 20W* 15W*
0.4 to 0.7
0.8 to 1.2
1.3 to 1.7
1.8 to 2.1
2.2 to 2.5
0.6 to 0.9
1.0 to 1.6
1.7 to 2.4
2.5 to 3.2
3.3 to 3.6
*Solar panel systems of 10 watts or more MUST have one solar regulator
OR
Table 1.
1
Warnings• Alterations – Do not alter the solar panels, mounting brackets, regulator or the
cable harnesses and do not connect them in any manner other than recommended in this manual.
• Maximum Panels – Do not connect more than a total of 80 watts (80W) of solar panels.
• Animals – Ensure that animals contained within your fence cannot come in contact with any part of your solar panel kit (wires, solar panels, battery clamps, energizer or your battery).
• Battery Charger – Do not simultaneously connect a battery charger and solar panel to your battery.
• You must use our solar regulator on any system with a total of 10 watts or more of solar panels.
IntroductionEach year, more and more people use battery electric fence energizers, especially for electric fences that are located away from utility power. The main inconvenience of battery energizers is the need to swap out the battery. Power Wizard has now devised a way for battery electric fence energizer owners to convert their unit into a solar fence energizer.
Changing a battery every month is not only inconvenient, but is also tedious. Now you can take advantage of the sun’s “free energy” to keep your 12 volt battery charged. This will eliminate the need to change your battery every month or so. We are the first company to offer a creative way to convert any 12 volt battery energizer into a solar energizer (when using a rechargeable 12 volt battery). Believe us when we say, “You will be glad you bought this product!”
NOTE: More than likely your battery energizer manufacturer recommends a deep cycle-type rechargeable battery since they work best in electric fence energizer ap-plications. Use the type of rechargeable 12 volt battery that your energizer manufac-turer recommends.
April through SeptemberZone 4PanelWatts
Needed
Zone 3PanelWatts
Needed
Zone 2PanelWatts
Needed
Zone 1PanelWatts
Needed
OutputJoules
StoredJoules
0.1 to 0.5 0.06 to 0.3 5W 5W 5W 5W
10W* 10W* 10W* 5W
15W* 15W* 10W* 10W*
20W* 15W* 15W* 15W*
25W* 20W* 15W* 15W*
25W* 20W* 20W* 15W*
0.4 to 0.7
0.8 to 1.2
1.3 to 1.7
1.8 to 2.1
2.2 to 2.5
0.6 to 0.9
1.0 to 1.6
1.7 to 2.4
2.5 to 3.2
3.3 to 3.6
*Solar panel systems of 10 watts or more MUST have one solar regulator
OR
21
April through SeptemberZone 4PanelWatts
Needed
Zone 3PanelWatts
Needed
Zone 2PanelWatts
Needed
Zone 1PanelWatts
Needed
OutputJoules
StoredJoules
0.1 to 0.5 0.06 to 0.3 5W 5W 5W 5W
10W* 10W* 10W* 5W
15W* 15W* 10W* 10W*
20W* 15W* 15W* 15W*
25W* 20W* 15W* 15W*
25W* 20W* 20W* 15W*
0.4 to 0.7
0.8 to 1.2
1.3 to 1.7
1.8 to 2.1
2.2 to 2.5
0.6 to 0.9
1.0 to 1.6
1.7 to 2.4
2.5 to 3.2
3.3 to 3.6
*Solar panel systems of 10 watts or more MUST have one solar regulator
OR
Table 2.
22
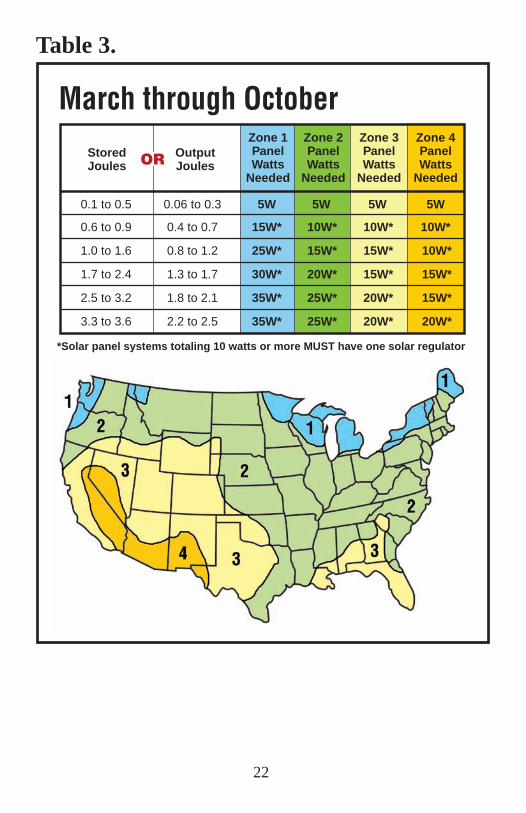
March through OctoberZone 4PanelWatts
Needed
Zone 3PanelWatts
Needed
Zone 2PanelWatts
Needed
Zone 1PanelWatts
Needed
OutputJoules
StoredJoules
0.1 to 0.5 0.06 to 0.3 5W 5W 5W 5W
15W* 10W* 10W* 10W*
25W* 15W* 15W* 10W*
30W* 20W* 15W* 15W*
35W* 25W* 20W* 15W*
35W* 25W* 20W* 20W*
0.4 to 0.7
0.8 to 1.2
1.3 to 1.7
1.8 to 2.1
2.2 to 2.5
0.6 to 0.9
1.0 to 1.6
1.7 to 2.4
2.5 to 3.2
3.3 to 3.6
*Solar panel systems totaling 10 watts or more MUST have one solar regulator
OR
Table 3. Table of Contents
Page
Warnings ......................................................................................................................1
Introduction ..................................................................................................................1
Parts Included in Kit ................................................................................................ 2-3
Assembly and Installation Tips ....................................................................................5
DO’s and DON’Ts ......................................................................................................14
Troubleshooting ................................................................................................... 14-16
Care, Maintenance and Storage .................................................................................16
Determining Solar Panel Total Watts Needed ..............................................................2
Table 1. March through August ............................................................................4
Table 2. April through September .........................................................................5
Table 3. March through October ...........................................................................6
Table 4. All Year ...................................................................................................7
PLEASE READ THIS MANUAL BEFORE INSTALLATION.It will only take about 10 minutes to read it from cover to cover
and may save you hours of time.
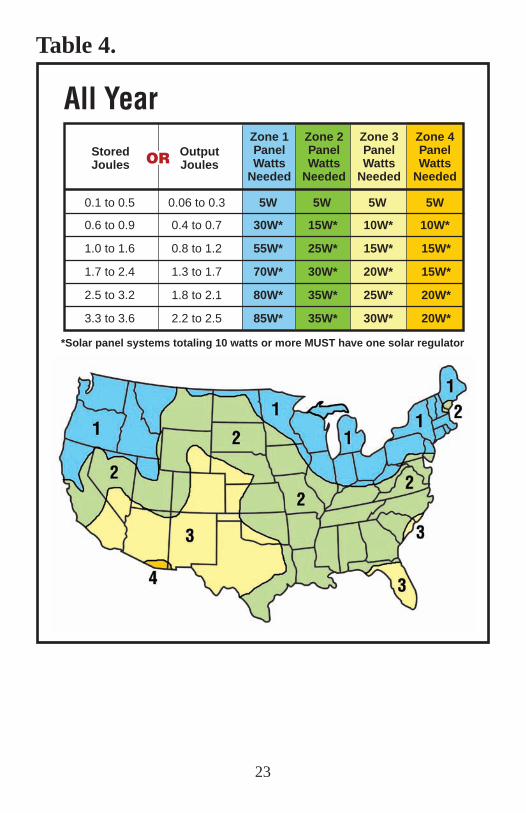
All YearZone 4PanelWatts
Needed
Zone 3PanelWatts
Needed
Zone 2PanelWatts
Needed
Zone 1PanelWatts
Needed
OutputJoules
StoredJoules
0.1 to 0.5 0.06 to 0.3 5W 5W 5W 5W
30W* 15W* 10W* 10W*
55W* 25W* 15W* 15W*
70W* 30W* 20W* 15W*
80W* 35W* 25W* 20W*
85W* 35W* 30W* 20W*
0.4 to 0.7
0.8 to 1.2
1.3 to 1.7
1.8 to 2.1
2.2 to 2.5
0.6 to 0.9
1.0 to 1.6
1.7 to 2.4
2.5 to 3.2
3.3 to 3.6
*Solar panel systems totaling 10 watts or more MUST have one solar regulator
OR
23
Table 4.
WARRANTY30 DAY SATISFACTION GUARANTEEAgraTronix guarantees your complete satisfaction with this Power WizardSolar Conversion Kit. If you are not satisfied with this product, you can return the kit to the original place of purchase within 30 days of purchase for a full refund. Proof of purchase is required for a full refund.
LIMITED WARRANTYAgraTronix warranties this Power Wizard Solar Conversion Kit to the original purchaser for a period of two (2) years from the date of purchase, when installed and used in accordance with the enclosed installation instructions. You must retain your receipt for proof of purchase. This warranty covers defects in mate-rials and workmanship for all of the parts.
TERMS THAT APPLY TO BOTH THEGUARANTEE AND WARRANTYImproper installation, misuse, neglect and tampering of any kind are NOT covered under the 30-Day Guarantee or the Limited Warranty. No warranty other than the above is express or implied. Implied warranties of merchant-ability and fitness for a particular application, are hereby disclaimed unless the law specifically precludes this disclaimer. The manufacturer and seller have no liability for damages, incidental or consequential, resulting from or caused by any failure, malfunction or defect of any product. The sole obligation of AgraTronix shall be limited to repair or replacement, at its option, of the defective part and prepaid return to the owner.
1-800-866-2161www.powerwizardinc.com
10375 State Route 43, Streetsboro, Ohio 44241 USA330-562-2222 • Fax 330-562-7403www.agratronix.com
04-0378-00 4-09
WARNING: READ AND SAVE ALLINSTRUCTIONS BEFORE INSTALLATION
DISCLAIMER – This product is only intended to charge a 12V rechargeable battery for battery electric fence energizer applications. DO NOT USE these solar panels in any other application. Maximum solar system size is 80 watts of solar panels. Do not exceed a total of 80 watts for your solar panel system. Any system of 10 watts or more must use a solar regulator.
INSTALLATION INSTRUCTIONS
Works with 12V DC Battery Fence Energizers • Up to 2.5 Stored Joules / 3.6 Output Joules
For 5 and 10 WattSolar Conversion Kits