Embed Size (px)
Citation preview
DIGITAL BOND, INC.
Installation Instructions Virtual PLC Honeynet
Overview: This document describes the steps necessary to install a single computer, virtual honeynet that appears to be a Modicon Quantum PLC to attackers1. The honeynet exposes a number of services to attackers:
Modbus TCP – A realistic set of points and data have been programmed into the honeynet, and this data changes pseudo-randomly to simulate a live PLC. The points can be polled and set. In addition, many administrative Modbus function codes have been implemented and respond appropriately to requests.
HTTP – A portion of the web administrative interface has been implemented. The web interface is available to anyone accessing the service and requires no credentials.
FTP – A portion of the FTP administrative interface has been implemented. The FTP interface login credentials have been left as the Quantum defaults.
SNMP – A SNMP service interface has been implement that responds to SNMP read requests. The SNMP service replies with MIB information obtained from a PLC.
VxWorks Debugger – The host appears to have the VxWorks Debugger service listening on udp/17185. This service provides low interaction, by only accepting connection to the UDP port.
Telnet – A low interaction telnet service is available with banners resembling that of a PLC. The service does not allow any interaction and every attempt will fail to login.
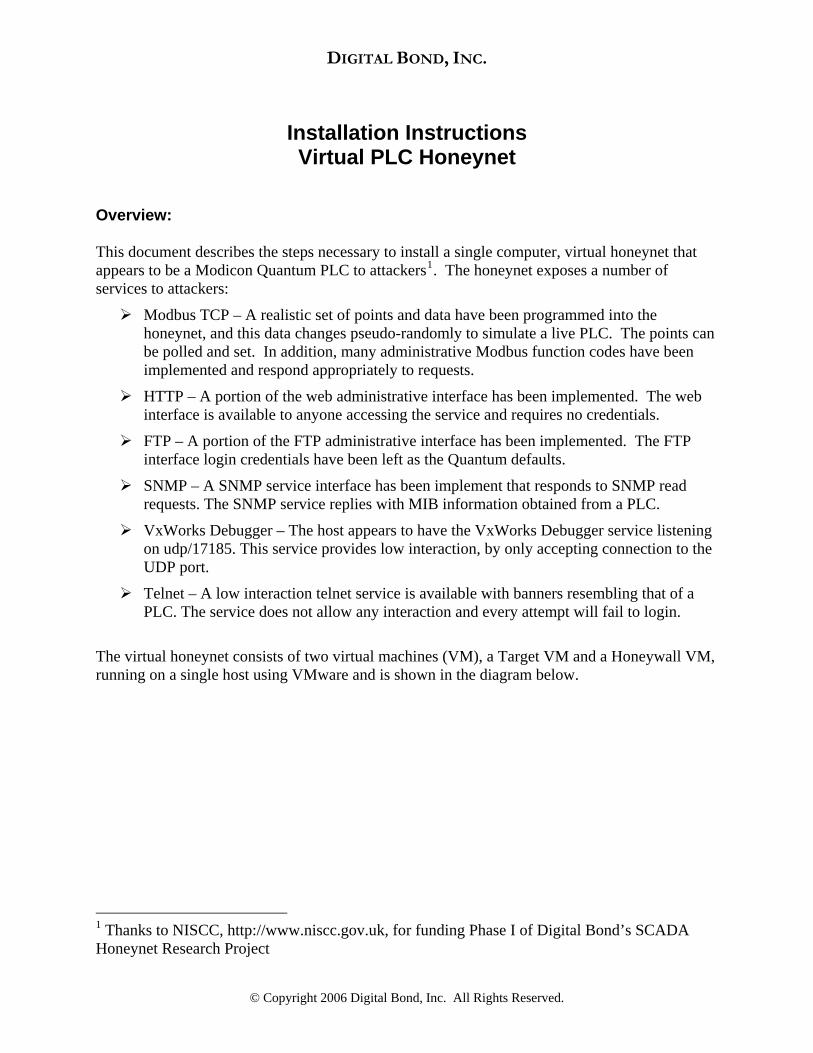
The virtual honeynet consists of two virtual machines (VM), a Target VM and a Honeywall VM, running on a single host using VMware and is shown in the diagram below.
1 Thanks to NISCC, http://www.niscc.gov.uk, for funding Phase I of Digital Bond’s SCADA Honeynet Research Project
© Copyright 2006 Digital Bond, Inc. All Rights Reserved.
DIGITAL BOND, INC.
eth1
eth0
eth1
eth2
eth0
eth0
ManagementVia Cellular Modem. Router, FW, etc.
InternetExposed Interface
Via Internet, SCADA, wireless
br0
VM Bridged Mode
.3 Virtual Management172.16.1.1/29 .2
Host-Only
Virtual SCADA Network10.0.0.0/24
vmnet1
No
IP’s
security analyst
HoneywallVM
Physical Server
attacker (s)
HoneydEvaluation
10.0.0.5
Host-Only
vmnet2
eth1
eth0
Honeyd & Honeypot Services
.3
Logging
Name PortFTP tcp/21HTTP tcp/80Modbus tcp/502
Proxied SCADA Services
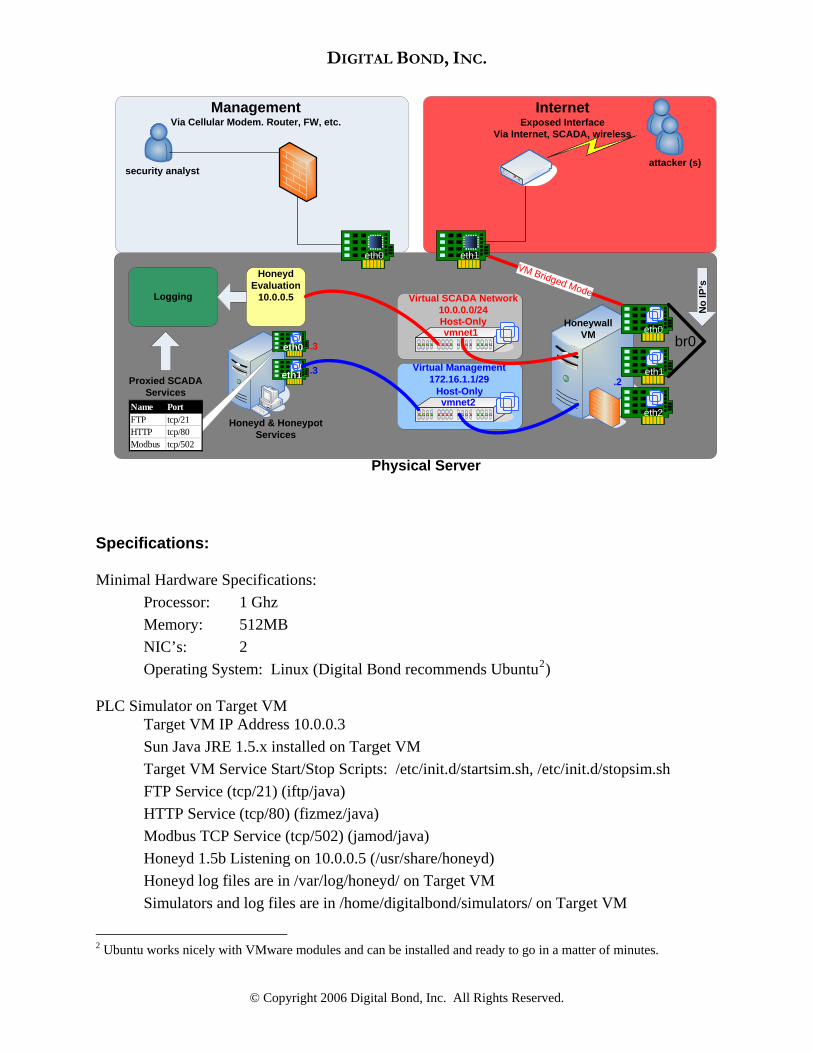
Specifications: Minimal Hardware Specifications:
Processor: 1 Ghz Memory: 512MB NIC’s: 2 Operating System: Linux (Digital Bond recommends Ubuntu2)
PLC Simulator on Target VM Target VM IP Address 10.0.0.3
Sun Java JRE 1.5.x installed on Target VM Target VM Service Start/Stop Scripts: /etc/init.d/startsim.sh, /etc/init.d/stopsim.sh FTP Service (tcp/21) (iftp/java) HTTP Service (tcp/80) (fizmez/java) Modbus TCP Service (tcp/502) (jamod/java) Honeyd 1.5b Listening on 10.0.0.5 (/usr/share/honeyd) Honeyd log files are in /var/log/honeyd/ on Target VM Simulators and log files are in /home/digitalbond/simulators/ on Target VM
2 Ubuntu works nicely with VMware modules and can be installed and ready to go in a matter of minutes.
© Copyright 2006 Digital Bond, Inc. All Rights Reserved.

DIGITAL BOND, INC.
User ‘digitalbond’ with sudo privileges with a default password of “abc123” Root password is “abc123”
Honeywall on Honeywall VM
Roo Gen III distribution of the Honeynet Project User “roo” with a password of “Abc123!” Root password is “abc123” Walleye Web Interface Credentials, User: roo, Password: Abc123!!!
SSH Port is TCP/2222 Installation Instructions:
1. Install Ubuntu Server, or your favorite Linux package, as your host OS. The text-based installation cd-rom can be obtained from here. Remember to change the default password.
2. Set the IP address of the physical eth0 interface to the honeynet management address and use this interface for initial network connectivity.
3. Install the required Linux packages for VMware Server.
apt-get install ssh linux-kernel-headers* libx11-6 libx11-dev libxtst6 xlibs-dev xinetd \ wget gcc binutils-doc cpp-doc make manpages-dev autoconf automake1.9 libtool flex \ bison gdb * - This package may be different depending on the version of Ubuntu. For instance one version may use linux-headers or linux-headers-kernelversion. Use apt-cache search to find the appropriate package.
4. Log into the system and install VMware Server for Linux. The TAR binary installation
package can be obtained from here. There is a guide available online describing how to install VMware Server here.
5. The VMware Server guide above provided instructions for configuring the virtual
networks, these settings will need to be changed to what is shown below. The rest of the system specific settings can remain at their defaults [], only the network parameters will be changed.
vmware-config.pl
…
You have already setup networking.
Would you like to skip networking setup and keep your old settings as they are?
(yes/no) [no] no
Do you want networking for your virtual machines? (yes/no/help) [yes] yes
Would you prefer to modify your existing networking configuration using the
© Copyright 2006 Digital Bond, Inc. All Rights Reserved.
DIGITAL BOND, INC.
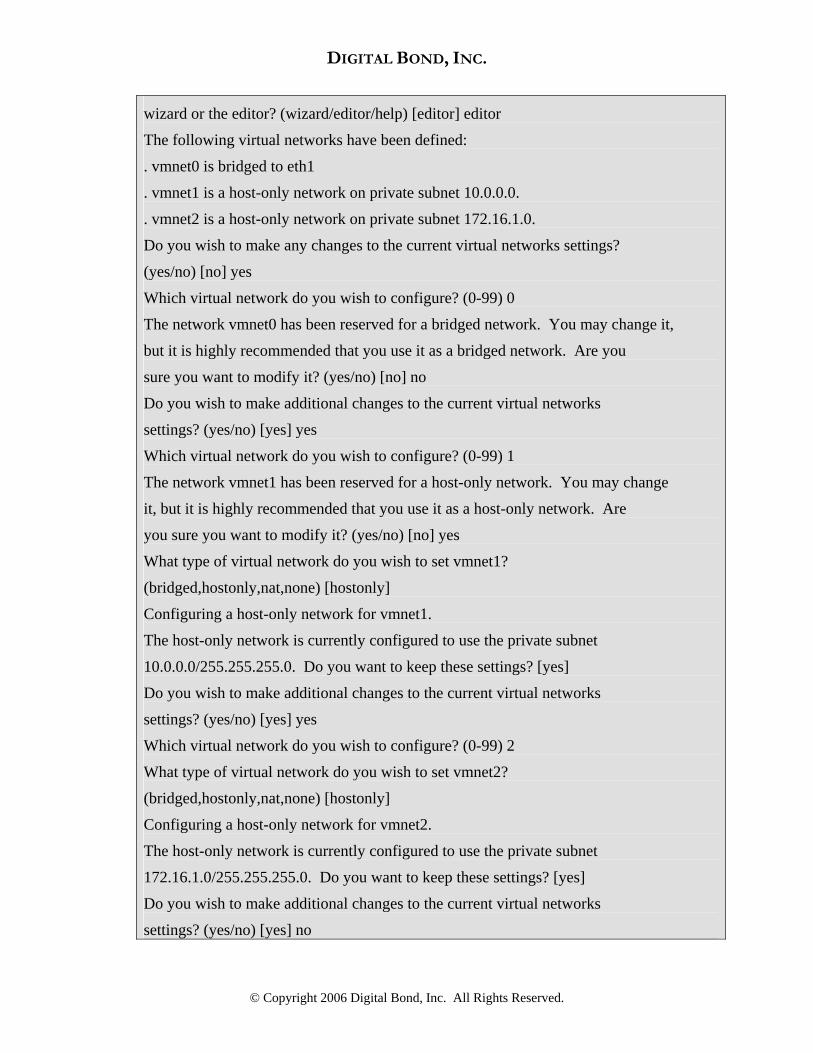
wizard or the editor? (wizard/editor/help) [editor] editor
The following virtual networks have been defined:
. vmnet0 is bridged to eth1
. vmnet1 is a host-only network on private subnet 10.0.0.0.
. vmnet2 is a host-only network on private subnet 172.16.1.0.
Do you wish to make any changes to the current virtual networks settings?
(yes/no) [no] yes
Which virtual network do you wish to configure? (0-99) 0
The network vmnet0 has been reserved for a bridged network. You may change it,
but it is highly recommended that you use it as a bridged network. Are you
sure you want to modify it? (yes/no) [no] no
Do you wish to make additional changes to the current virtual networks
settings? (yes/no) [yes] yes
Which virtual network do you wish to configure? (0-99) 1
The network vmnet1 has been reserved for a host-only network. You may change
it, but it is highly recommended that you use it as a host-only network. Are
you sure you want to modify it? (yes/no) [no] yes
What type of virtual network do you wish to set vmnet1?
(bridged,hostonly,nat,none) [hostonly]
Configuring a host-only network for vmnet1.
The host-only network is currently configured to use the private subnet
10.0.0.0/255.255.255.0. Do you want to keep these settings? [yes]
Do you wish to make additional changes to the current virtual networks
settings? (yes/no) [yes] yes
Which virtual network do you wish to configure? (0-99) 2
What type of virtual network do you wish to set vmnet2?
(bridged,hostonly,nat,none) [hostonly]
Configuring a host-only network for vmnet2.
The host-only network is currently configured to use the private subnet
172.16.1.0/255.255.255.0. Do you want to keep these settings? [yes]
Do you wish to make additional changes to the current virtual networks
settings? (yes/no) [yes] no
© Copyright 2006 Digital Bond, Inc. All Rights Reserved.

DIGITAL BOND, INC.
6. Set permissions so a bridge will operate correctly when run as a virtual machine.
chmod a+rw /dev/vmnet*
7. Download the Virtual Machines from the Digital Bond subscriber site to the /var/lib/vmware/Virtual\ Machines/ directory.
8. After the VM’s are downloaded you will need to uncompress them. This will expand the disk images, configuration files, and empty log files utilized by the virtual machines.
tar xjvf filename.tbz2
9. Install VMware Server console. If you will be managing the honeynet from a Windows desktop get the console here. If you will be managing honeynet from a Linux desktop get the package here.
10. Connect to the VMware Server from the VMware Server console and provide the root credentials, “abc123” are the default.
11. Start the Honeywall VM from the VMware console interface. Wait for the OS to completely boot before continuing to the next step.
12. Start the Target VM from the VMware console interface. Wait for the OS to completely boot before continuing to the next step.
13. Set the IP address on eth0 interface of the Target VM to the address that will be exposed to attackers3.
14. Login into both VM’s and change the default passwords. The default accounts and passwords are listed in the Specifications above.
15. Consider providing the ability for the VM’s to reach the Internet on an intranet via the management interface to get updates or mail out alerts. This will require NAT on the VM’s management interface.
16. Incoming traffic from the physical eth1 interface is expected to be forwarded to 10.0.0.5, Honeyd will process all traffic and route services appropriately.
17. The Walleye web interface for the Honeywall requires a SSH tunnel to the eth0 physical interface and then port forwarding to the SSL port on the virtual Honeywall. If you have a Linux SSH client try the following commands:
ssh -N -p 22 eth0_ip -L 5443/172.16.1.2/443 (where eth0_ip is the physical eth0 address)
Then browse to https://localhost:5443
3 The physical eth1 interface will bridge all communications to the eth0 virtual interface on the Target VM.
© Copyright 2006 Digital Bond, Inc. All Rights Reserved.