Embed Size (px)
Citation preview
Xythos WFS OEM WebDAV 2.2 Installation Instructions
Copyright Notice The correct bibliographic citation for this manual is as follows: SAS Institute Inc., Xythos WFS OEM WebDAV2.2 Installation Instructions, Cary, NC: SAS Institute Inc., 2006.
Xythos WFS OEM WebDAV 2.2 Installation Instructions Copyright © 2006, SAS Institute Inc., Cary, NC, USA.
All rights reserved. Printed in the United States of America. No part of this publication may be reproduced, stored in a retrieval system, or transmitted, by any form or by any means, electronic, mechanical, photocopying, or otherwise, without the prior written permission of the publisher, SAS Institute Inc. Limited permission is granted to store the copyrighted material in your system and display it on terminals, print only the number of copies required for use by those persons responsible for installing and supporting the SAS programming and licensed programs for which this material has been provided, and to modify the material to meet specific installation requirements. The SAS Institute copyright notice must appear on all printed versions of this material or extracts thereof and on the display medium when the material is displayed. Permission is not granted to reproduce or distribute the material except as stated above.
U.S. Government Restricted Rights Notice. Use, duplication, or disclosure of the software by the government is subject to restrictions as set forth in FAR 52.227-19 Commercial Computer Software-Restricted Rights (June 1987).
SAS Institute Inc., SAS Campus Drive, Cary, North Carolina 27513.
SAS and all other SAS Institute Inc. product or service names are registered trademarks or trademarks of SAS Institute Inc. in the USA and other countries.
® indicates USA registration.
Other brand and product names are trademarks of their respective companies.
i
9 June 2006
Table of Contents
Chapter 1—Installing Xythos WFS OEM WebDAV................................................ 1 Planning ......................................................................................................... 1
User accounts ............................................................................................................ 1 Port allocation............................................................................................................ 1 Migration .................................................................................................................. 1 JAVA_HOME environment variable ................................................................................ 1
Installation..................................................................................................... 2 Configuration ................................................................................................. 3 Notes.............................................................................................................. 6
Using the file system for content (highly recommended) .................................................. 6 Tuning the Java Virtual Machine (JVM) .......................................................................... 7 What backup strategy should I use for my WFS deployment?............................................ 7 Database backup........................................................................................................ 7 External storage backup.............................................................................................. 8 Deployment options.................................................................................................... 8
Custom User Model......................................................................................... 8 Example configuration................................................................................................. 8 User directories.......................................................................................................... 8 Defining User/Login Information in the Metadata Server .................................................. 9
Logins without passwords...........................................................................................................................9 Logins with passwords..............................................................................................................................10
Configuration Information.......................................................................................... 11 Deploying Xythos WFS to WebLogic ............................................................. 11 Deploying Xythos WFS to WebSphere Application Server (WAS) Network Deployment .................................................................................................. 12
Chapter 2 – Migration Procedures........................................................................ 15 Migrating Content......................................................................................... 15 Dump/Restore Applications ......................................................................... 15
WFSDump............................................................................................................... 15 WFSRestore............................................................................................................. 16
Chapter 3 – PostgreSQL........................................................................................ 19 Install the Database ..................................................................................... 19 Create the Required WFS Databases ............................................................ 19 Connections from machines other than localhost ......................................... 19 Database Maintenance ................................................................................. 20
Reindex PostgreSQL ................................................................................................. 20 PostgreSQL Database Management System.................................................. 21
Chapter 4 – SQL Server......................................................................................... 23 Install MS SQL.............................................................................................. 23 Configure MS SQL......................................................................................... 23
Create the Global Schema and the "xythos" User .......................................................... 23 Create the Xythos Document Stores and the "files" User ................................................ 23 Creation Script......................................................................................................... 24 Answers to Xythos WFS installation prompts (for MSSQL JDBC driver) ............................. 24 Miscellaneous Information ......................................................................................... 25
ii
Chapter 5 – Oracle ................................................................................................. 27 Install Oracle................................................................................................ 27 Configure Oracle........................................................................................... 27
Create the Global Schema ......................................................................................... 27 Create the Document Store ....................................................................................... 27
Chapter 6 – DB2 ..................................................................................................... 29 Install DB2 ................................................................................................... 29 Configure DB2 .............................................................................................. 29 Database Maintenance ................................................................................. 30 User Managed Tablespaces Example ............................................................ 30
Page 1
Chapter 1—Installing Xythos WFS OEM WebDAV Xythos Web File Server (WFS) is a content management application that provides a WebDAV protocol layer for access. Xythos WFS is installed on top of a Database Management System (DBMS) which must be one of these four—PostgreSQL, SQL Server, Oracle or DB2. Installing Xythos requires one of the listed Database Management Systems to be installed, a task normally performed by the site's database administrator (DBA). A version of PostgreSQL (open source DBMS) can be installed from the SAS media if required, but this should be done before continuing with the Xythos part of the installation.
Two databases or schemas (depending on the DBMS nomenclature; these are substructures in the DBMS) are required to store information for each Xythos WFS instance. The first is for the "Global Schema" and the other is for a "Document Store". The first step in the installation then is to create the required databases/schemas. This might also require the involvement of the DBA, but the specifics are detailed in the DBMS specific chapters that follow. On some databases there is enough information to create these substructures from the installation program (PostgreSQL and SQL Server); on other systems it is imperative that these be set up before the installation program is run (Oracle and DB2). Depending on the topology of the deployment, these substructures may still need to be created manuallyfor PostgreSQL and SQL Server (for example, database is on another machine and no DBMS client application exists on the installation machine).
Specific information for the supported databases can be found in these sections in the chapters that follow for each database.
Planning The DBMS should be up and running before the installation and configuration of Xythos WFS.
User accounts On Windows, Xythos WFS will be installed as a service. In the default case, the service is run under the LocalSystem account. If this is not desirable, then another account, maybe even a local user account, will be needed to run the Xythos WFS service.
Port allocation Xythos WFS will automatically be installed to listen on port 8300. However, there may be other WebDAV servers running on this port. If so, the port number will have to be changed to avoid a conflict. In addition, if you are running any other Tomcat instances, then the server shutdown port may need to be changed too.
Migration If a previous installation of Xythos WFS exists, “Chapter 2 – Migration Procedures”, beginning on page 15, describes the method for moving the information out of the old instance and into the new instance. This new instance should be installed side-by-side with an existing installation, so that this migration can be performed. There is no direct upgrade path.
JAVA_HOME environment variable The JAVA_HOME environment variable must be set prior to installation, if you want to deploy to Weblogic or Websphere, without first configuring the bundled Tomcat container (the recommended approach). After getting the bundled Tomcat container to work, follow the instructions for WebLogic, beginning on page 11 or WebSphere, beginning on page 12.
Xythos WFS OEM WebDAV 2.2 Installation Instructions
2
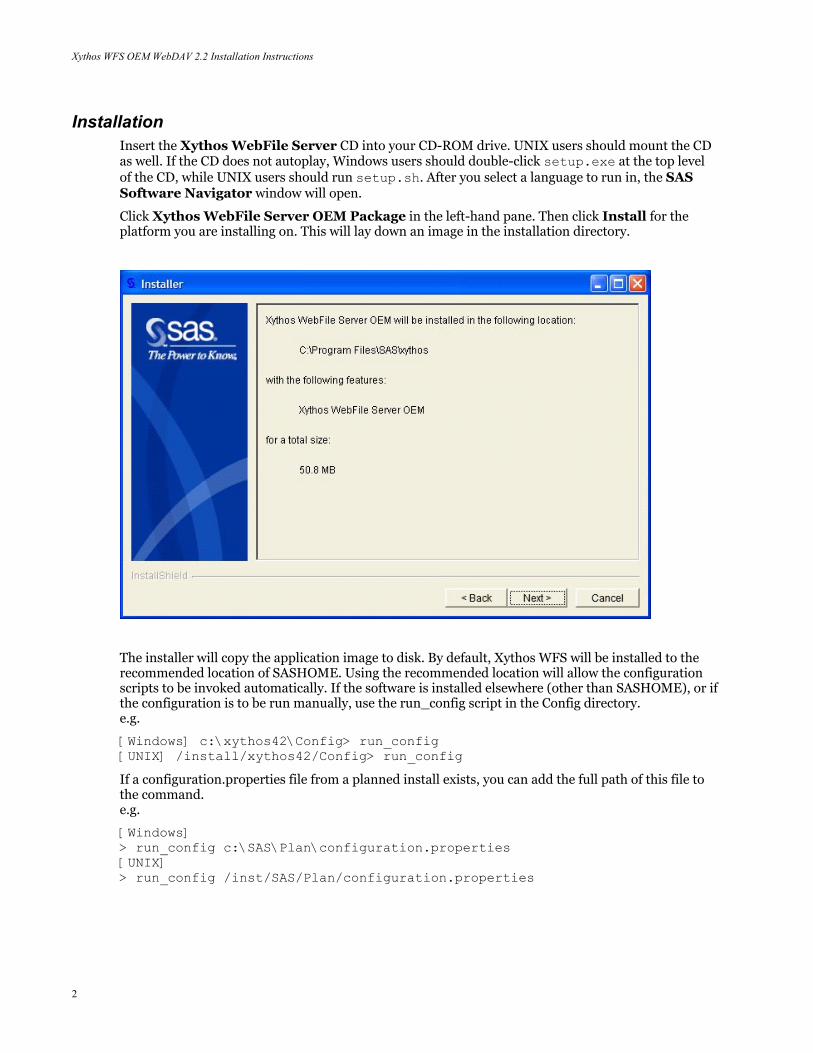
Installation Insert the Xythos WebFile Server CD into your CD-ROM drive. UNIX users should mount the CD as well. If the CD does not autoplay, Windows users should double-click setup.exe at the top level of the CD, while UNIX users should run setup.sh. After you select a language to run in, the SAS Software Navigator window will open.
Click Xythos WebFile Server OEM Package in the left-hand pane. Then click Install for the platform you are installing on. This will lay down an image in the installation directory.
The installer will copy the application image to disk. By default, Xythos WFS will be installed to the recommended location of SASHOME. Using the recommended location will allow the configuration scripts to be invoked automatically. If the software is installed elsewhere (other than SASHOME), or if the configuration is to be run manually, use the run_config script in the Config directory. e.g.
[Windows] c:\xythos42\Config> run_config [UNIX] /install/xythos42/Config> run_config
If a configuration.properties file from a planned install exists, you can add the full path of this file to the command. e.g.
[Windows] > run_config c:\SAS\Plan\configuration.properties [UNIX] > run_config /inst/SAS/Plan/configuration.properties
Xythos WFS OEM WebDAV .1 Installation Instructions
3
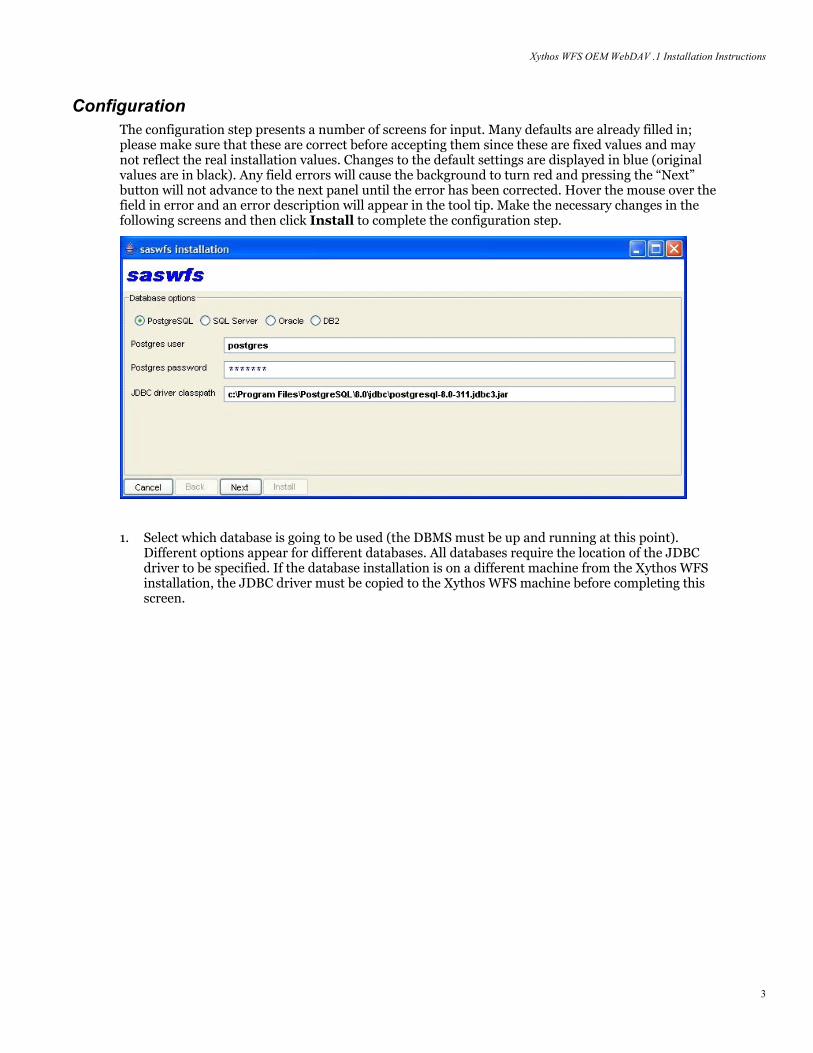
Configuration The configuration step presents a number of screens for input. Many defaults are already filled in; please make sure that these are correct before accepting them since these are fixed values and may not reflect the real installation values. Changes to the default settings are displayed in blue (original values are in black). Any field errors will cause the background to turn red and pressing the “Next” button will not advance to the next panel until the error has been corrected. Hover the mouse over the field in error and an error description will appear in the tool tip. Make the necessary changes in the following screens and then click Install to complete the configuration step.
1. Select which database is going to be used (the DBMS must be up and running at this point). Different options appear for different databases. All databases require the location of the JDBC driver to be specified. If the database installation is on a different machine from the Xythos WFS installation, the JDBC driver must be copied to the Xythos WFS machine before completing this screen.

Xythos WFS OEM WebDAV 2.2 Installation Instructions
4
2. In this screen, specify the information for the Global Schema and Document Store. These correspond to a database or schema in the DBMS and depending on which database was chosen, there will be different parameters required (this information may need to be obtained from the DBA). A default PostgreSQL installation will only be configured to accept connections from localhost, and so one should use localhost instead of the ip-name, if the DBMS is on the same machine as the WFS installation. See PostgreSQL section on how to configure the database to accept connection from machines other than localhost.
Note: If you are installing side-by-side with another (possibly older installation), make sure to specify new database names for the Global Schema and Document Store (such as xythos42 and files42). If existing database names are specified, they will be reinitialized and their contents will be lost, and migration will not be possible. This is very important; specify new database names for a new installation.
For Oracle and DB2, the required database/schema definitions must have been defined. For PostgreSQL and SQL Server these may have already been defined, but the installation program also provides the ability to create these on the fly. The location of the correct database utility (psql for PostgreSQL and osql for SQL Server) will need to be specified in this screen. Selecting the Create databases? option will attempt to drop the databases and then create new databases with the given information. If you just want to reuse an existing set of databases, this option does not need to be selected; the installation will overwrite an existing database set, if necessary. New requirements for PostgreSQL and SQL Server databases for WFS 4.2 require new databases to be created (do not reuse databases created for WFS 4.0).
Xythos WFS OEM WebDAV .1 Installation Instructions
5
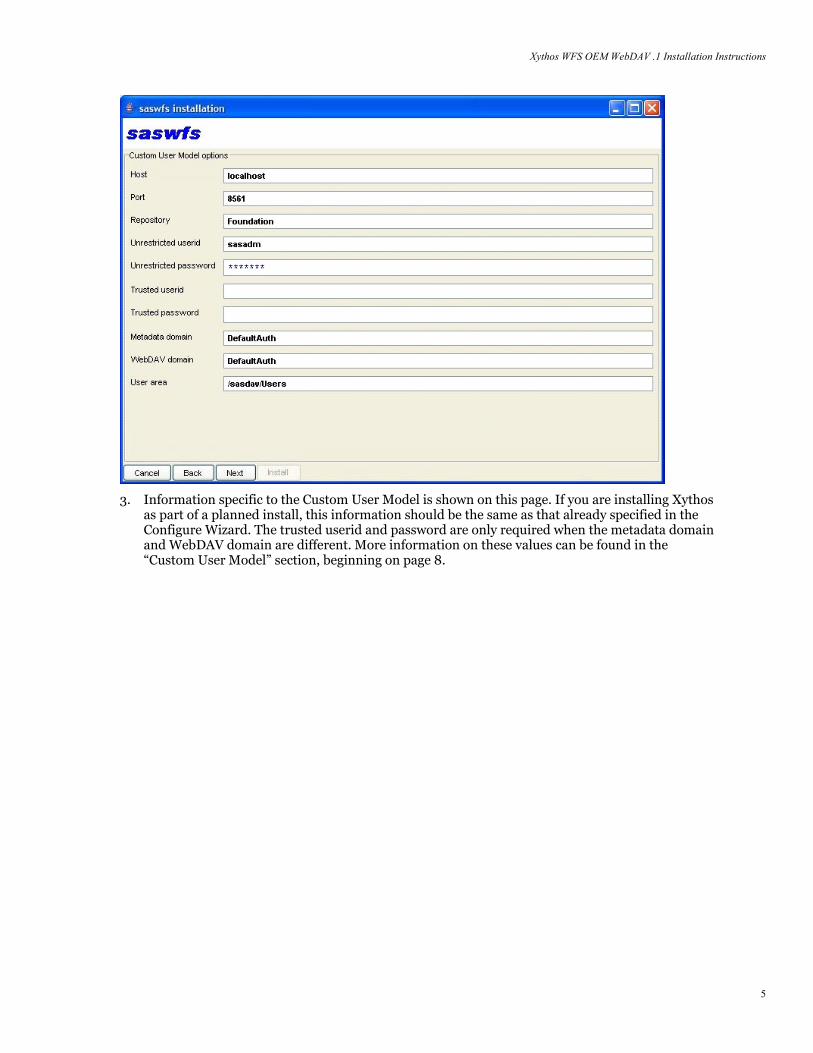
3. Information specific to the Custom User Model is shown on this page. If you are installing Xythos as part of a planned install, this information should be the same as that already specified in the Configure Wizard. The trusted userid and password are only required when the metadata domain and WebDAV domain are different. More information on these values can be found in the “Custom User Model” section, beginning on page 8.
Xythos WFS OEM WebDAV 2.2 Installation Instructions
6
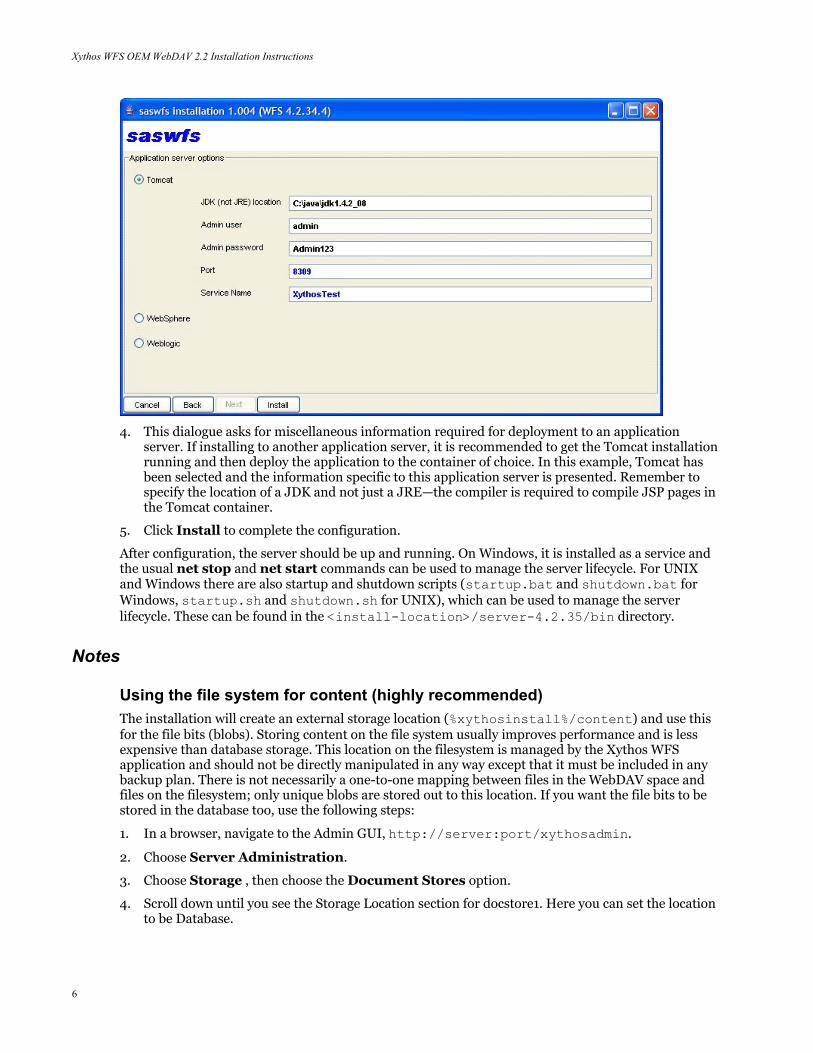
4. This dialogue asks for miscellaneous information required for deployment to an application server. If installing to another application server, it is recommended to get the Tomcat installation running and then deploy the application to the container of choice. In this example, Tomcat has been selected and the information specific to this application server is presented. Remember to specify the location of a JDK and not just a JRE—the compiler is required to compile JSP pages in the Tomcat container.
5. Click Install to complete the configuration.
After configuration, the server should be up and running. On Windows, it is installed as a service and the usual net stop and net start commands can be used to manage the server lifecycle. For UNIX and Windows there are also startup and shutdown scripts (startup.bat and shutdown.bat for Windows, startup.sh and shutdown.sh for UNIX), which can be used to manage the server lifecycle. These can be found in the <install-location>/server-4.2.35/bin directory.
Notes
Using the file system for content (highly recommended) The installation will create an external storage location (%xythosinstall%/content) and use this for the file bits (blobs). Storing content on the file system usually improves performance and is less expensive than database storage. This location on the filesystem is managed by the Xythos WFS application and should not be directly manipulated in any way except that it must be included in any backup plan. There is not necessarily a one-to-one mapping between files in the WebDAV space and files on the filesystem; only unique blobs are stored out to this location. If you want the file bits to be stored in the database too, use the following steps:
1. In a browser, navigate to the Admin GUI, http://server:port/xythosadmin.
2. Choose Server Administration.
3. Choose Storage , then choose the Document Stores option.
4. Scroll down until you see the Storage Location section for docstore1. Here you can set the location to be Database.
Xythos WFS OEM WebDAV .1 Installation Instructions
7
Tuning the Java Virtual Machine (JVM) The Tomcat servlet container's JVM can be started with a number of options that affect its behavior. For a detailed overview of settings that can be used, see the SAS Intelligence Platform: Planning and Administration Guide.
If you are installing the WebDAV server as a Windows service, specify the options on the install_service.bat command line. Otherwise, make changes to the setclasspath script and change the %JAVA_OPTS% variable. These scripts are in the <install-location>/server-4.2.35/bin directory
The default settings are probably not good for a heavily loaded server environment. So for the bundled Apache Tomcat servlet container, the changes might look something like this (depending on the hardware available in the machine):
Windows service
install.service.bat -name ServiceName -jvmopt -server -Xms512m -Xmx768m
setclasspath.bat/.sh
set JAVA_OPTS=%JAVA_OPTS% -server -Xms512m -Xmx768m
What backup strategy should I use for my WFS deployment? There are three components to the Xythos Architecture: the Java Application Server, the relational database, and the file system. The details of each of these components are left to other explanations as to their requirements, scaling, and sizing requirements.
The relational database should be run under the instructions of the chosen relational database vendor. This component should be backed up with a schedule that the DBA feels is appropriate for the installation. Backup procedures are determined by the DBMS type. Notice that most databases use redo logs to allow a DBA to perform point-in-time recovery. Thus if the disk that a database is running on fails, a DBA can use a backup and redo logs from another disk to place the system back to the state it was in when the disk crashed.
The file system component is simply set up files written to disk. This disk can be NAS, SAN or directly attached. The backup procedure for this type of file system is NOT determined by Xythos. Customers can use the systems they already have in place to back up the series of file systems used by Xythos. What Xythos does add is a temporary storage, which works a lot like a database redo log. When a file is added to the system, the file is written to its primary disk and a temporary disk. Thus if the primary disk crashes, a sysadmin can restore the primary disk using a backup. Once this is done, Xythos will move the files that are missing (files that were written after the backup but before the primary disk crash) from the temporary storage to the primary. The temporary storage is cleaned up on a time schedule that corresponds to your file system backup schedule.
In this way both components (database and file system) can always be restored to the same point in time of any system crash.
All files in the WFS system are stored in one or more Document Stores. Each document store writes files across both a database and file systems (external storage locations). The file metadata (name, location, permissions, etc) are stored in the DB while the file content (bytes, blobs, etc) are stored on external storage locations. Both of these systems must be backed up.
Database backup Backup of the database should be performed using the same processes you would normally use today.
Xythos WFS OEM WebDAV 2.2 Installation Instructions
8
External storage backup The storage page of the Xythos Admin defines two locations for each document store, "Storage Location", and "Temporary Storage Location". We recommend that the "Storage Location" (that is, primary storage) be an external storage location (file system). If redo/recovery of the file system is not required (that is, backups are good enough), then set the Temporary Storage Location to None. If point-in-time recovery of the file system is required then in order to reduce the amount of data in the database, you may want the temp storage location to also be a file system.
The primary storage location should be backed up at some interval. The amount of time between backups of the primary storage location drives how long files should be kept in the temp storage location (Temporary Storage Period). The Temporary Storage Period, configured on the storage page of the Xythos Admin, should be about twice your primary storage backup interval. If you have a crash on primary storage, you can recover the primary to its most recent backup, and then use the External Storage Recovery feature in the Xythos Admin to replay the files that were written since the last primary backup and the time of the crash (files are moved from your temp storage to the primary). The temp storage location acts as your "redo/recovery" buffer, capturing new file content that hasn't been backed up yet.
Deployment options The database and webapps can be installed on one machine. In the long term, however, a more scalable deployment might have the database on one machine and the webapps on another (or even many other) machines. See the Xythos WFS documentation for further deployment scenarios. It is possible to make this change after some period of testing; simply move the database to another machine and modify the Global schema and Document store JDBC URLs to point to the new database machine.
Custom User Model The SAS Custom User Model is a plug-in for Xythos WFS that provides a view to the User and Group information stored in an associated SAS Metadata Server. It automatically allows users and groups defined there to be used as principals (valid users) in the WebDAV server. Authentication can also be passed on to the metadata server.
Example configuration This example assumes a SAS Metadata Server is running on machine example.org at port 8561 and the repository to be used is called "Foundation". This example also assumes that the SAS Metadata Server and Xythos WFS WebDAV server are associated with the same authentication domain, DefaultAuth.
The Custom User Model requires the use of an unrestricted metadata user. The default unrestricted user is the SAS Administrator. This account is able to search for users by userid (as part of the login associated with the person). There might also be a requirement to use the SAS Trusted User in some scenarios (see the “Logins with passwords” section, beginning on page 10, for more information.)
User directories For best performance, there should not be too many top-level directories in a Xythos WFS system. This means that if the root is being used as the base, you will want to create the user areas below this location in their own directory. You might want to do this whether the root is being used as a base or not.
Note: This directory must be called "Users" (case-sensitive), if the client is to detect this location automatically.
During the installation below, answer the question about the path to the user area, as follows.
Xythos WFS OEM WebDAV .1 Installation Instructions
9
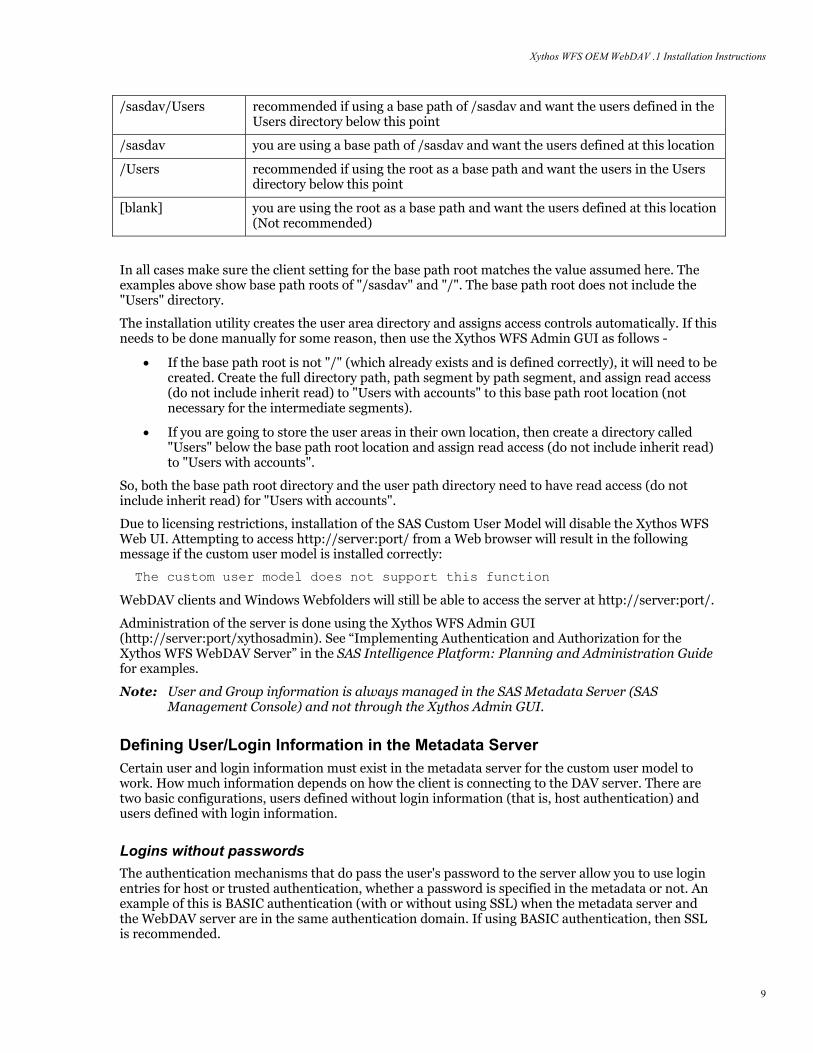
/sasdav/Users recommended if using a base path of /sasdav and want the users defined in the Users directory below this point
/sasdav you are using a base path of /sasdav and want the users defined at this location
/Users recommended if using the root as a base path and want the users in the Users directory below this point
[blank] you are using the root as a base path and want the users defined at this location (Not recommended)
In all cases make sure the client setting for the base path root matches the value assumed here. The examples above show base path roots of "/sasdav" and "/". The base path root does not include the "Users" directory.
The installation utility creates the user area directory and assigns access controls automatically. If this needs to be done manually for some reason, then use the Xythos WFS Admin GUI as follows -
• If the base path root is not "/" (which already exists and is defined correctly), it will need to be created. Create the full directory path, path segment by path segment, and assign read access (do not include inherit read) to "Users with accounts" to this base path root location (not necessary for the intermediate segments).
• If you are going to store the user areas in their own location, then create a directory called "Users" below the base path root location and assign read access (do not include inherit read) to "Users with accounts".
So, both the base path root directory and the user path directory need to have read access (do not include inherit read) for "Users with accounts".
Due to licensing restrictions, installation of the SAS Custom User Model will disable the Xythos WFS Web UI. Attempting to access http://server:port/ from a Web browser will result in the following message if the custom user model is installed correctly:
The custom user model does not support this function
WebDAV clients and Windows Webfolders will still be able to access the server at http://server:port/.
Administration of the server is done using the Xythos WFS Admin GUI (http://server:port/xythosadmin). See “Implementing Authentication and Authorization for the Xythos WFS WebDAV Server” in the SAS Intelligence Platform: Planning and Administration Guide for examples.
Note: User and Group information is always managed in the SAS Metadata Server (SAS Management Console) and not through the Xythos Admin GUI.
Defining User/Login Information in the Metadata Server Certain user and login information must exist in the metadata server for the custom user model to work. How much information depends on how the client is connecting to the DAV server. There are two basic configurations, users defined without login information (that is, host authentication) and users defined with login information.
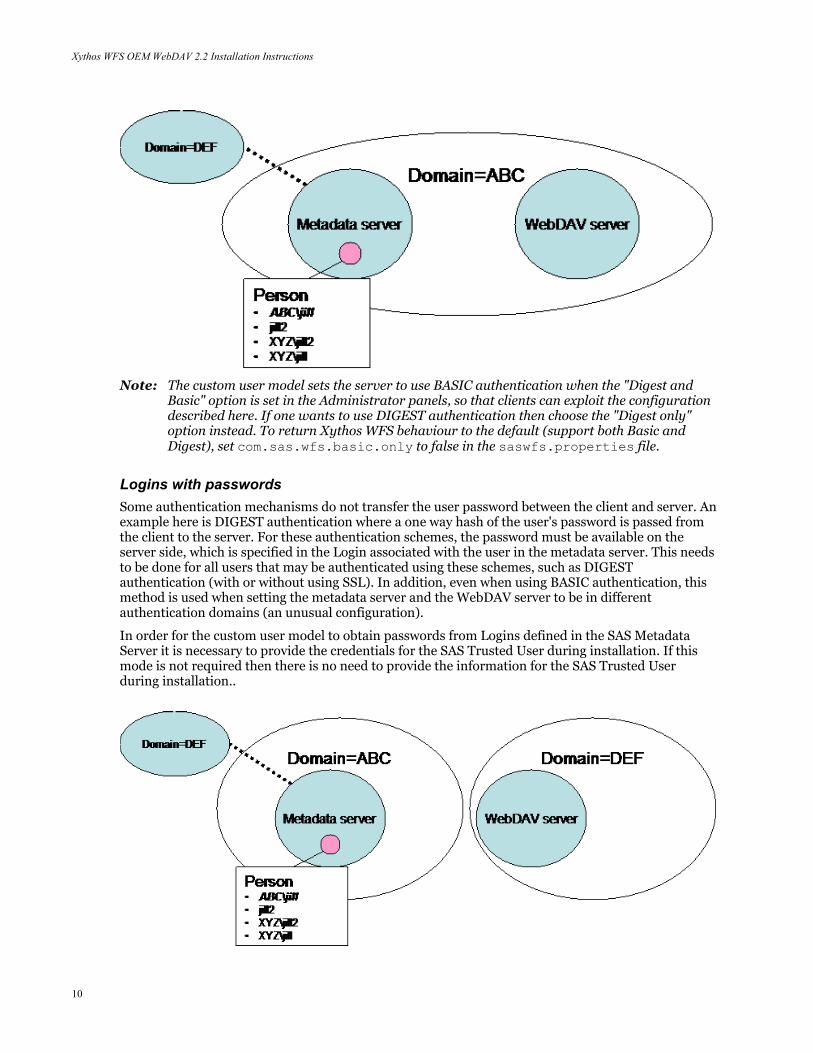
Logins without passwords The authentication mechanisms that do pass the user's password to the server allow you to use login entries for host or trusted authentication, whether a password is specified in the metadata or not. An example of this is BASIC authentication (with or without using SSL) when the metadata server and the WebDAV server are in the same authentication domain. If using BASIC authentication, then SSL is recommended.
Xythos WFS OEM WebDAV 2.2 Installation Instructions
10
Note: The custom user model sets the server to use BASIC authentication when the "Digest and Basic" option is set in the Administrator panels, so that clients can exploit the configuration described here. If one wants to use DIGEST authentication then choose the "Digest only" option instead. To return Xythos WFS behaviour to the default (support both Basic and Digest), set com.sas.wfs.basic.only to false in the saswfs.properties file.
Logins with passwords Some authentication mechanisms do not transfer the user password between the client and server. An example here is DIGEST authentication where a one way hash of the user's password is passed from the client to the server. For these authentication schemes, the password must be available on the server side, which is specified in the Login associated with the user in the metadata server. This needs to be done for all users that may be authenticated using these schemes, such as DIGEST authentication (with or without using SSL). In addition, even when using BASIC authentication, this method is used when setting the metadata server and the WebDAV server to be in different authentication domains (an unusual configuration).
In order for the custom user model to obtain passwords from Logins defined in the SAS Metadata Server it is necessary to provide the credentials for the SAS Trusted User during installation. If this mode is not required then there is no need to provide the information for the SAS Trusted User during installation..
Xythos WFS OEM WebDAV .1 Installation Instructions
11
Configuration Information The Custom User Model stores its configuration data in a file called <install-location>/custom/classes/saswfs.properties. Changes can be made to this file, but the server will have to be restarted to pick up the changes. Also, if passwords are required to be encoded in this file, rather run the WFSInstaller application (in <install-location>/custom/bin) to produce the saswfs.properties file, instead of just editing the file and typing in the passwords.
Deploying Xythos WFS to WebLogic The recommended container for Xythos WFS is the bundled Tomcat container. However, it can be deployed in a WebLogic application server in its own managed node. Here are some directions on the process.
1. Generate an EAR file. If this wasn't done at configuration time (by selecting WebLogic as the target application server), or if a new EAR file needs to be generated, then use the following steps:
a. Run the install program to create the EAR file using the following command
java -cp . installxythos
and choose option 7 ( Build J2EE deployment .EAR file).
b. At the J2EE configuration screen, choose option 6, (Change EAR type [standard]).
c. At the next screen, choose option 2 (BEA 8.1).
d. At the final screen, choose option 7 (Build EAR file) to generate the actual EAR file.
The admin role name specified here will be used as the role required for users trying to access the Admin GUI. A weblogic.xml with a role-principal mapping is not generated and so this means that this value will also be the principal name (user name or group name). In the default case, the value is "admin" and this generally means that the userid "admin" will be the only principal allowed to use the Admin GUI. If you specify another name here, you will need to make sure that a user principal with that name exists, or a group principal with this name exists and it contains the members who should be able to access the Admin GUI.
2. Using the Weblogic Server Administration Console, under Security, then Realms, configure a new user ("admin"), and assign it to a group that has the "admin" role (Administrators is such a group).
3. Now Configure a new server, enter its name (such as XythosServer), and its own listen port. Click Create. Choose the Protocols tab, and choose HTTP, then click off the Enable Keep-Alives option.
4. Start the new server and wait until it is successfully started - TASK COMPLETED.
5. Under Deployments, then Applications, choose Deploy a New Application and point it to the EAR file created earlier. Click Target Application and then choose the server to target this application (such as XythosServer). Click Continue. Choose make application available from the following location. Select Deploy.
You can modify the Java 2 Security policy for the enterprise application by editing the weblogic.policy file.
You should be able to access the applications from this point forward.
Xythos WFS OEM WebDAV 2.2 Installation Instructions
12
Deploying Xythos WFS to WebSphere Application Server (WAS) Network Deployment
The recommended container for Xythos WFS is the bundled Tomcat container. However, it can be deployed in a WebSphere application server. Here are some directions on the process
1. Generate an EAR file. If this wasn't done at configuration time (by selecting WebLogic as the target application server), or if a new EAR file needs to be generated, use the following steps:
a. Run the install program to create the EAR file using the following command
java -cp . installxythos
and choose option 7 ( Build J2EE deployment .EAR file).
b. At the J2EE configuration screen, choose option 6, (Change EAR type [standard]).
c. At the next screen, choose option 1 (standard).
d. At the final screen, choose option 7 (Build EAR file) to generate the actual EAR file.
The ear file needs to be modified to add a <security-role> element to application.xml and change DIGEST to BASIC authentication in xythosadmin’s web.xml. An ant script is provided to make these changes. Change directory to the Config directory and run the WASear.xml script as follows apache-ant-1.6.5\bin\ant –f WASear.xml
2. Choose an existing user or define a new user (default "admin") which will be assigned the "admin" role later. If defining a new user, add it to one of the user registries in admin console. For example, if LDAP is being used, then add the "admin" user to LDAP.
3. Using the Administrative Console, define a new Application Server (such as XythosServer). Click New and fill in the server name. Click Next to confirm new application server. Click Finish then save your changes.
From Additional Properties choose Web container and from Additional Properties select HTTP Transport settings. Set Host=* Port=8300. Click OK. Save changes.
Open Environment, choose Virtual Hosts, then default_host. From additional properties, choose Host Aliases, and click New (set Host=*, Port=8300). Select OK. Save changes. Start application server XythosServer.
4. In the Administrative Console, under Applications, choose Enterprise Applications, and click Install. Specify the location of the EAR file, then click Next. Do not generate default bindings on the next screen; instead click Next.
Step 1 : Provide options to perform the installation nothing to change
Step 2 : Map virtual hosts for web modules nothing to change
Step 3 : Map modules to application servers Make sure that the modules are mapped to the new application server defined above
Step 4 : Map security roles to users/groups Map the "admin" role to the admin user defined above
Step 5 : Summary 5. Modify the Java 2 Security policy for the enterprise application by editing the was.policy file
located in the${user.install.root}/config/cells/(yourCellName)/applications/ (yourAppName).ear/deployments/(yourAppName)/META-INF directory after the application is installed. Alternatively, you can add this was.policy file to the EAR file and
Xythos WFS OEM WebDAV .1 Installation Instructions
13
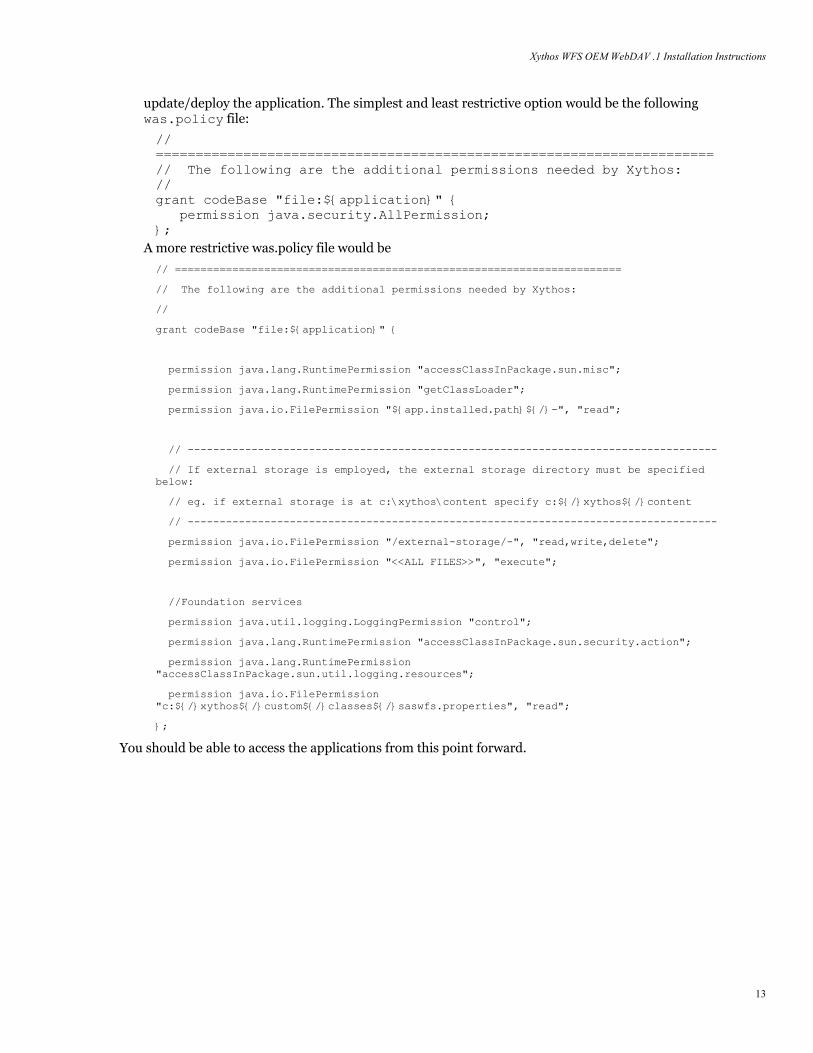
update/deploy the application. The simplest and least restrictive option would be the following was.policy file:
// ====================================================================== // The following are the additional permissions needed by Xythos: // grant codeBase "file:${application}" { permission java.security.AllPermission; };
A more restrictive was.policy file would be
// ======================================================================
// The following are the additional permissions needed by Xythos:
//
grant codeBase "file:${application}" {
permission java.lang.RuntimePermission "accessClassInPackage.sun.misc";
permission java.lang.RuntimePermission "getClassLoader";
permission java.io.FilePermission "${app.installed.path}${/}-", "read";
// -----------------------------------------------------------------------------------
// If external storage is employed, the external storage directory must be specified below:
// eg. if external storage is at c:\xythos\content specify c:${/}xythos${/}content
// -----------------------------------------------------------------------------------
permission java.io.FilePermission "/external-storage/-", "read,write,delete";
permission java.io.FilePermission "<<ALL FILES>>", "execute";
//Foundation services
permission java.util.logging.LoggingPermission "control";
permission java.lang.RuntimePermission "accessClassInPackage.sun.security.action";
permission java.lang.RuntimePermission "accessClassInPackage.sun.util.logging.resources";
permission java.io.FilePermission "c:${/}xythos${/}custom${/}classes${/}saswfs.properties", "read";
};
You should be able to access the applications from this point forward.
Xythos WFS OEM WebDAV 2.2 Installation Instructions
14
Page 15
Chapter 2 – Migration Procedures
Migrating Content The WebDAV model defines resources that contain both content and metadata (WebDAV properties). In addition there is other metadata (quotas, permissions, versions) that is important if one is going to migrate from one server to another. A set of utilities provide the basic dump/restore functionality for WebDAV and the process is described here. WFSDump/WFSRestore would be used for a Xythos WFS server (and runs as an admin utility), and WebDAVDump/WebDAVRestore would be used for any general WebDAV server (runs as a client application).
Dump/Restore Applications Since this document chapter describes the process of migrating data from one Xythos instance to another, we will concentrate on the WFSDump/WFSRestore utilities which came with the installation image.
To move content from an existing Xythos 4.0.48 installation to a new Xythos WFS 4.2.35 installation, one would run WFSDump on the old system and run WFSRestore on the new system.
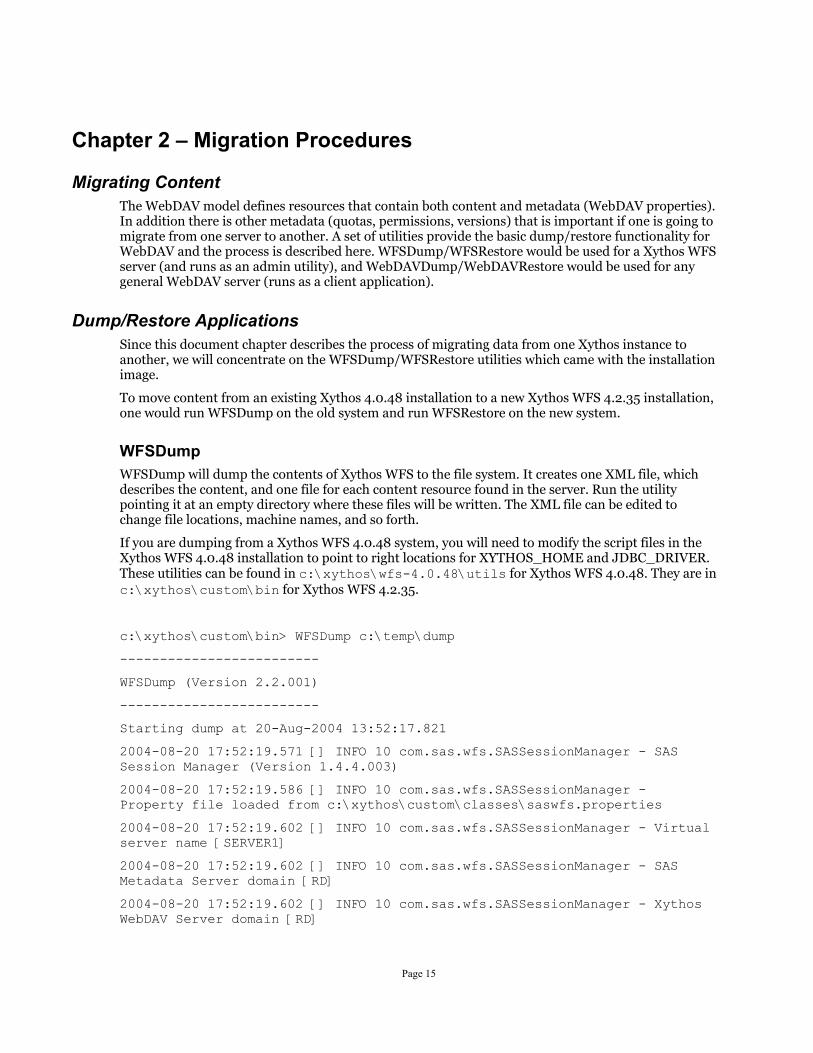
WFSDump WFSDump will dump the contents of Xythos WFS to the file system. It creates one XML file, which describes the content, and one file for each content resource found in the server. Run the utility pointing it at an empty directory where these files will be written. The XML file can be edited to change file locations, machine names, and so forth.
If you are dumping from a Xythos WFS 4.0.48 system, you will need to modify the script files in the Xythos WFS 4.0.48 installation to point to right locations for XYTHOS_HOME and JDBC_DRIVER. These utilities can be found in c:\xythos\wfs-4.0.48\utils for Xythos WFS 4.0.48. They are in c:\xythos\custom\bin for Xythos WFS 4.2.35.
c:\xythos\custom\bin> WFSDump c:\temp\dump
-------------------------
WFSDump (Version 2.2.001)
-------------------------
Starting dump at 20-Aug-2004 13:52:17.821
2004-08-20 17:52:19.571 [] INFO 10 com.sas.wfs.SASSessionManager - SAS Session Manager (Version 1.4.4.003)
2004-08-20 17:52:19.586 [] INFO 10 com.sas.wfs.SASSessionManager - Property file loaded from c:\xythos\custom\classes\saswfs.properties
2004-08-20 17:52:19.602 [] INFO 10 com.sas.wfs.SASSessionManager - Virtual server name [SERVER1]
2004-08-20 17:52:19.602 [] INFO 10 com.sas.wfs.SASSessionManager - SAS Metadata Server domain [RD]
2004-08-20 17:52:19.602 [] INFO 10 com.sas.wfs.SASSessionManager - Xythos WebDAV Server domain [RD]
Xythos WFS OEM WebDAV 2.2 Installation Instructions
16
2004-08-20 17:52:19.602 [] INFO 10 com.sas.wfs.SASSessionManager - SAS Metadata Server address [localhost:9999]
2004-08-20 17:52:19.618 [] INFO 10 com.sas.wfs.SASSessionManager - User directory base [/sasdav/Users]
Dumped resource /sasdav
...
...
...
10 resources dumped.
Completed dump at 20-Aug-2004 13:52:20.977
Press any key to continue . . .
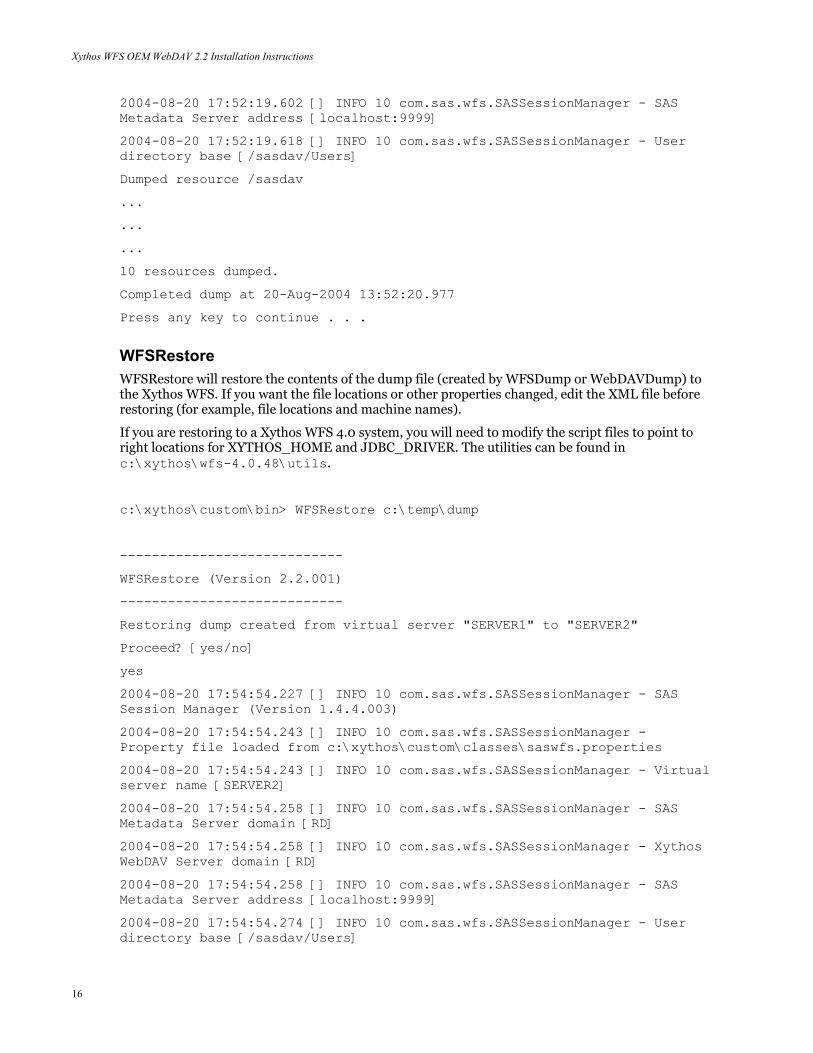
WFSRestore WFSRestore will restore the contents of the dump file (created by WFSDump or WebDAVDump) to the Xythos WFS. If you want the file locations or other properties changed, edit the XML file before restoring (for example, file locations and machine names).
If you are restoring to a Xythos WFS 4.0 system, you will need to modify the script files to point to right locations for XYTHOS_HOME and JDBC_DRIVER. The utilities can be found in c:\xythos\wfs-4.0.48\utils.
c:\xythos\custom\bin> WFSRestore c:\temp\dump
----------------------------
WFSRestore (Version 2.2.001)
----------------------------
Restoring dump created from virtual server "SERVER1" to "SERVER2"
Proceed? [yes/no]
yes
2004-08-20 17:54:54.227 [] INFO 10 com.sas.wfs.SASSessionManager - SAS Session Manager (Version 1.4.4.003)
2004-08-20 17:54:54.243 [] INFO 10 com.sas.wfs.SASSessionManager - Property file loaded from c:\xythos\custom\classes\saswfs.properties
2004-08-20 17:54:54.243 [] INFO 10 com.sas.wfs.SASSessionManager - Virtual server name [SERVER2]
2004-08-20 17:54:54.258 [] INFO 10 com.sas.wfs.SASSessionManager - SAS Metadata Server domain [RD]
2004-08-20 17:54:54.258 [] INFO 10 com.sas.wfs.SASSessionManager - Xythos WebDAV Server domain [RD]
2004-08-20 17:54:54.258 [] INFO 10 com.sas.wfs.SASSessionManager - SAS Metadata Server address [localhost:9999]
2004-08-20 17:54:54.274 [] INFO 10 com.sas.wfs.SASSessionManager - User directory base [/sasdav/Users]
Xythos WFS OEM WebDAV .1 Installation Instructions
17
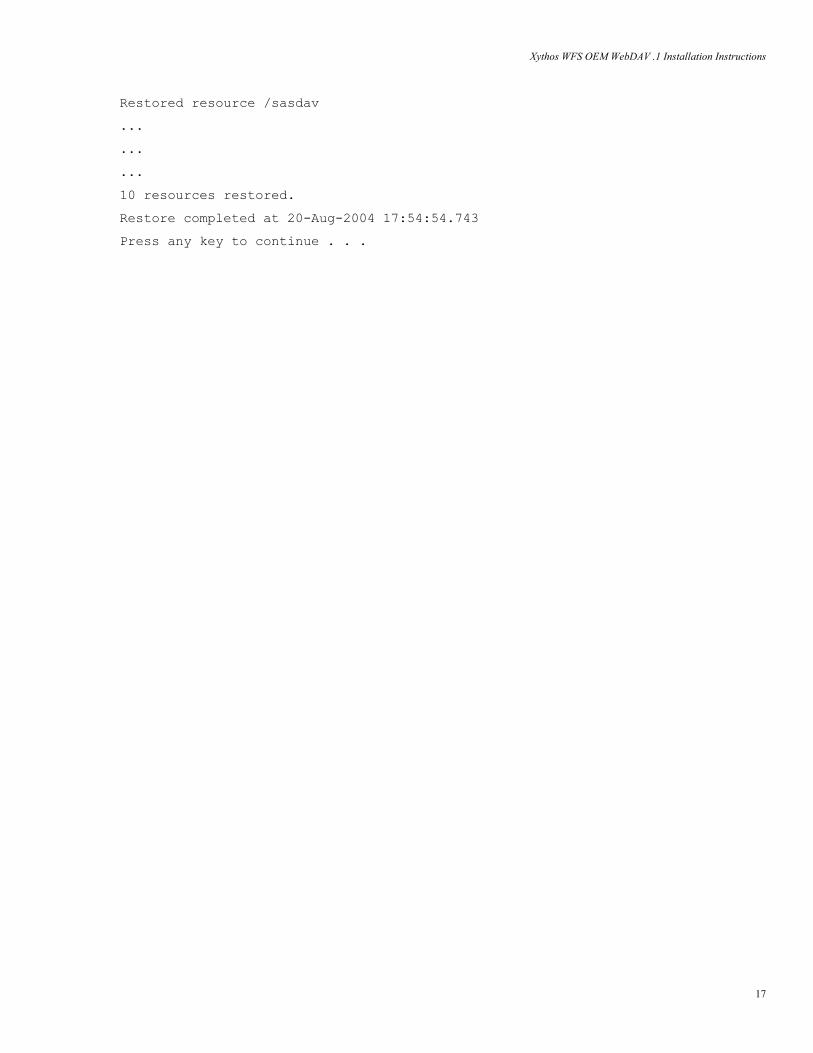
Restored resource /sasdav
...
...
...
10 resources restored.
Restore completed at 20-Aug-2004 17:54:54.743
Press any key to continue . . .

Xythos WFS OEM WebDAV 2.2 Installation Instructions
18
Page 19
Chapter 3 – PostgreSQL
Install the Database Install the database from the media, or go to the PostgreSQL web site to retrieve a PostgreSQL install package. On Windows the installation must happen on the machine's console, or if you are using Windows 2003 Server, remote desktop with the /console option will work. Also the database must be run under an account without admin privileges and this user account should be setup before installation.
Create the Required WFS Databases If the install program did not create these databases or if you are doing this manually, WFS requires two databases be created with the 'unicode' character set. The WFS Global database is used to store system-wide parameters which WFS loads upon startup. WFS also requires at least one Document Store to store file metadata (such as creation date and permissions) and, optionally, the files themselves. To create these databases, use the following commands (using the -E unicode option). For example, the <global_database_name> might be "xythos" and the <document_store_database_name> might be "files":
createdb -E unicode <global_database_name> createdb -E unicode <document_store_database_name> createlang plpgsql <global_database_name> createlang plpgsql <document_store_database_name>
psql -c "create user xythos with password 'xythos';" <global_database_name>
psql -c "grant all privileges on database <global_database_name> to xythos;" <global_database_name>
psql -c "grant all privileges on database <document_store_database_name> to xythos;" <global_database_name>
Connections from machines other than localhost If installed from the SAS media, PostgreSQL will be configured to listen on all interfaces. Otherwise check for the following line in the postgresql.conf in the data directory of the PostgreSQL installation and set to ‘*’.
listen_addresses = '*' # what IP interface(s) to listen on;
Now edit the pg_hba.conf file and add the following line to the table
host all all <ipaddress> 255.255.255.255/32 md5
where <ipaddress> is theIP address of the machine that will be connecting to PostgreSQL (IP names are not allowed, only IP addresses). This could be the IP address of the same machine if you want a client to refer to the database using the machine name instead of localhost. Note that this is just an example. Read the instructions at the top of the file for full explanations of the options.
Restart PostgreSQL for the changes to take effect.
Xythos WFS OEM WebDAV 2.2 Installation Instructions
20
Database Maintenance For optimal performance, the PostgreSQL database requires a few routine maintenance tasks that must be performed on a regular basis. Vacuum is the process of reclaiming space in PostgreSQL. When data is updated or deleted, the remaining space is not reclaimed until vacuum is run. Therefore, for optimum performance, it is very important to run vacuum on a regular basis. More information on this topic can be found in Chapter 8 of the PostgreSQL Documentation. It is very important that the PostgreSQL VACUUM command be run regularly. It is suggested that this happen once a day during low activity and be part of the standard set of database maintenance tasks. These commands can be automated easily through scheduled tasks, for example. Also, run this task after the Xythos WFS installation is complete.
There are two methods of issuing the VACUUM command, either through psql or using the script wrapper vacuumdb. In these examples, the -U option does not need to be used if you are running as the user who owns the database. In this example, it is assumed that the database was initialized using the postgres account. Both psql and vacuumdb are found in the bin directory of the PostgreSQL installation.
psql -U postgres -c "vacuum analyze verbose" xythos psql -U postgres -c "vacuum analyze verbose" files vacuumdb -U postgres -d xythos -z -v vacuumdb -U postgres -d files -z -v
In general, running Vacuum approximately four times per day is sufficient. However, certain tables experience a higher number of updates and deletes, and require a more frequent vacuum. On a heavily loaded system, the below tables could require vacuuming as often as every fifteen minutes.
• xyf_size_offset - This table will need more frequent vacuuming if there are a lot of files being added to or deleted from the system.
• xyf_bandwidth_usage - This table will need more frequent vacuuming if bandwidth tracking is being used.
• xyf_blob_storage - This table will need more frequent vacuuming if the database is used as the temporary or permanent storage location and numerous files are being deleted and updated.
Reindex PostgreSQL Vacuum is not always sufficient maintenance for fully freeing space in the PostgreSQL indexes. Therefore, it may be necessary to occasionally rebuild the indexes to fully reclaim all space. Xythos recommends reindexing the database tables approximately once a month.
In particular, Xythos recommends periodically reindexing the following tables:
Xythos Global Schema Tables
• idg_sessions
• xy_nonces
Document Store
• xyf_bandwidth_usage
• xyf_delete_history
• xyf_file_locks
• xyf_locks
• xyf_tickets

Xythos WFS OEM WebDAV .1 Installation Instructions
21
Although WFS functions correctly without reindexing, failure to do so will decrease overall performance of the system.
You may want to reindex other tables periodically – running vacuumdb –verbose –analyze can help identify tables whose indexes may need to be reindexed.
PostgreSQL Database Management System (formerly known as Postgres, then as Postgres95)
Portions Copyright © 1996-2002, The PostgreSQL Global Development Group Portions Copyright © 1994, The Regents of the University of California
IN NO EVENT SHALL THE UNIVERSITY OF CALIFORNIA BE LIABLE TO ANY PARTY FOR DIRECT, INDIRECT, SPECIAL, INCIDENTAL, OR CONSEQUENTIAL DAMAGES, INCLUDING LOST PROFITS, ARISING OUT OF THE USE OF THIS SOFTWARE AND ITS DOCUMENTATION, EVEN IF THE UNIVERSITY OF CALIFORNIA HAS BEEN ADVISED OF THE POSSIBILITY OF SUCH DAMAGE.
THE UNIVERSITY OF CALIFORNIA SPECIFICALLY DISCLAIMS ANY WARRANTIES, INCLUDING, BUT NOT LIMITED TO, THE IMPLIED WARRANTIES OF MERCHANTABILITY AND FITNESS FOR A PARTICULAR PURPOSE. THE SOFTWARE PROVIDED HEREUNDER IS ON AN "AS IS" BASIS, AND THE UNIVERSITY OF CALIFORNIA HAS NO OBLIGATIONS TO PROVIDE MAINTENANCE, SUPPORT, UPDATES, ENHANCEMENTS, OR MODIFICATIONS.

Xythos WFS OEM WebDAV 2.2 Installation Instructions
22
Page 23
Chapter 4 – SQL Server These instructions are specific to installing an MS SQL Server database with WFS.
Install MS SQL Install a WFS-compliant version of MS SQL according to the instructions provided by Microsoft. During the install:
• Use the option for "Mixed Mode" authentication mode • Disable lock escalation by enabling trace flag 1211.
o To add a server startup parameter, right-click the server in SQL Enterprise Manager. o Click Properties and then on the General tab, choose Startup Parameters. o Add the following parameter (exactly as shown): -T1211 Note: Disabling this trace flag disables all lock escalation globally in the instance of MS
SQL Server. However, it is necessary to disable lock escalation to avoid interruptions in service when moving and deleting large directories of files.
Product documentation for MS SQL is available on Microsoft's Web site.
Configure MS SQL WFS requires at least two databases. Use MS SQL Server's Enterprise Manager option in the Microsoft SQL Server program folder to create the following databases. These should be created as the System Administrator which is typically the user 'sa'. See below for a script that can be used to create these databases. The installation program is also able to create these tables for most configurations.
Create the Global Schema and the "xythos" User The WFS Global Schema stores system-wide parameters which WFS loads upon startup. As the MS SQL Server System Administrator (typically the user 'sa'), create a "xythos" database to serve as the WFS Global Schema. Additionally, use MS SQL Server's Enterprise Manager to create a "xythos" user to connect to the "xythos" database. Grant this user both "db_datareader" and "db_datawriter" rights on the "xythos" database.
Although the master MS SQL database may be installed as case-insensitive, each WFS database schema must be created as case-sensitive. Xythos recommends using the collation, 'SQL_Latin1_General_CP1_CS_AS' to fulfill this requirement. The Collation Name is selected at the bottom of the General tab when creating a new database in SQL Server’s Enterprise manager.
Create the Xythos Document Stores and the "files" User WFS requires at least one Document Store to store file metadata (such as creation date and permissions) and, optionally, the files themselves. As the MS SQL Server System Administrator (typically the user 'sa'), create a "files" database to serve as the WFS Document Store. Additionally, use MS SQL Server's Enterprise Manager to create a "files" user to connect to the "files" database. Grant this user both "db_datareader" and "db_datawriter" rights on the "files" database.
Although the master MS SQL database may be installed as case-insensitive, each WFS database schema must be created as case-sensitive. Xythos recommends using the collation, 'SQL_Latin1_General_CP1_CS_AS' to fulfill this requirement. The Collation Name is selected at the bottom of the General tab when creating a new database in SQL Server’s Enterprise manager.
It is recommended the database components be set to start automatically on reboot.
Xythos WFS OEM WebDAV 2.2 Installation Instructions
24
Creation Script The following is a script for creating databases which can be used with the osql utility (for example, osql -U sa -i xythos_msde.sql).
xythos_msde.sql
CREATE DATABASE xythos COLLATE SQL_Latin1_General_CP1_CS_AS
go
EXEC sp_addlogin @loginame='xythos',@passwd='xythos',@defdb='xythos'
USE xythos
EXEC sp_grantdbaccess @loginame='xythos',@name_in_db='xythos'
EXEC sp_addrolemember @rolename='db_datareader',@membername='xythos'
EXEC sp_addrolemember @rolename='db_datawriter',@membername='xythos'
go
CREATE DATABASE files COLLATE SQL_Latin1_General_CP1_CS_AS
go
EXEC sp_addlogin @loginame='files',@passwd='files',@defdb='files'
USE files
EXEC sp_grantdbaccess @loginame='files',@name_in_db='files'
EXEC sp_addrolemember @rolename='db_datareader',@membername='files'
EXEC sp_addrolemember @rolename='db_datawriter',@membername='files'
go
Although a variety of JDBC drivers are available for SQL Server, we recommend the MSSQL JDBC driver (SP3 and above), which can be downloaded from http://www.microsoft.com/sql/downloads/.
Answers to Xythos WFS installation prompts (for MSSQL JDBC driver) The following is a list of responses for the installation utility prompts, if you are installing manually. The installation program should create a response file and read them automatically, so this shouldn't normally need to be done.
These examples assume that the MSSQL JDBC jars are installed in c:\mssqljdbc\lib.
• Enter the JDBC connection URL for the Xythos Global Schema Database. A general example of a connection URL string is jdbc:protocol://host:port/database. > jdbc:microsoft:sqlserver://localhost:1433;DatabaseName=xythos; SelectMethod=cursor
• Enter the JDBC driver name for the Xythos Global Schema. A general form example of an sql server driver name is com.someDriver.mssqlDriver. > com.microsoft.jdbc.sqlserver.SQLServerDriver
• Enter the full path for the Jar file or directory containing the JDBC driver for MS SQL. > c:\mssqljdbc\lib\msbase.jar;c:\mssqljdbc\lib\msutil.jar; c:\mssqljdbc\lib\mssqlserver.jar
Xythos WFS OEM WebDAV .1 Installation Instructions
25
• Enter the JDBC driver name for Document Store Database. A general form example of an sql server driver name is com.someDriver.mssqlDriver. > com.microsoft.jdbc.sqlserver.SQLServerDriver
• Enter the full path for the Jar file or directory containing the JDBC driver for MS SQL. > c:\mssqljdbc\lib\msbase.jar;c:\mssqljdbc\lib\msutil.jar; c:\mssqljdbc\lib\mssqlserver.jar
• Enter the JDBC connection URL for this document store. A general example of a connection URL string is jdbc:protocol://host:port/database. > jdbc:microsoft:sqlserver://localhost:1433;DatabaseName=files; SelectMethod=cursor
Miscellaneous Information 1. The installation instructions document creating a user "xythos" for the database "xythos", and a
user "files" for the database "files". In a manual install, the prompts from the Xythos installation program provide the wrong default for the "files" database user. If you accept the default, it will try to use the user "xythos" for the "files" database. So, make sure that you change this default and enter the "files" user name for the "files" database.
... Enter the username to connect to the Xythos Global Schema [xythos]: Enter the password to connect to the Xythos Global Schema []: xythos ... Enter the username to connect to the Xythos Document Store [xythos]: files Enter the password to connect to the Xythos Document Store []: files
2. If you are installing MSDE, make sure that you set the authentication mode to Mixed Mode (Windows Authentication and SQL Server Authentication). When this mode is selected, you are prompted to enter and confirm the system administrator password.
To turn on Mixed Mode Authentication during installation run the install with the following command parameter: SECURITYMODE=SQL. NOTE: By default, for Windows NT and later, MSDE installs by using Windows Authentication. On computers running Windows 98, MSDE uses SQL authentication.
This is described in the Microsoft Knowledge Base article 325022, located at http://support.microsoft.com/default.aspx?scid=kb;en-us;325022#9.
An example of the command to install MSDE (with a password of Sa1234) would be
setup DISABLENETWORKPROTOCOLS=0 SAPWD="Sa1234" SECURITYMODE=SQL /L*v C:\MSDERelA\MSDELog.log
To confirm this has been setup correctly, try the following:
a. Open a command prompt (cmd) and verify the sa password by issuing the command
osql -U sa
b. At the prompt supply the password.
Xythos WFS OEM WebDAV 2.2 Installation Instructions
26
• If you receive a prompt of 1> the password is correct, the mode is mixed (SQL and Windows authentication), and you can type exit to proceed with the database creation steps.
• If you receive a message of "Login Failed for user 'sa'." then the password is incorrect. Refer to http://support.microsoft.com/default.aspx?scid=kb;en-us;Q322336#3 if you need to change the password.
• If you receive a message of “Login failed for user 'sa'. Reason: Not associated with a trusted SQL Server connection.” then the computer that is running SQL Server is set to Windows Authentication only. Refer to http://support.microsoft.com/default.aspx?scid=kb;en-us;Q322336#4 to change to mixed mode.
Page 27
Chapter 5 – Oracle These instructions are specific to installing an Oracle database with Xythos WFS.
Install Oracle Install a WFS-compliant version of Oracle according to the instructions provided by Oracle. During the install:
• The database must be created with UTF8 or AL16UTF16 for the National character set. The Standard database character set can be any value but, in general, should not be UTF8 for maximum performance. Therefore, it is acceptable to use the default value.
• The database must be created with a block size of 8K or greater. • If you are installing Oracle 8.x, the database must be created with the 8.1.0, as opposed to
8.0.5, compatibility option. • The database must be created with its "open_cursors" startup parameter equal to the value of
150 or higher. Note that on NT/Windows 2000 installations, the default is 100.
Configure Oracle As previously noted, WFS requires at least one database and two schemas. To perform the following steps, it is necessary to know the system account password which was set during database installation.
Because Oracle typically uses only one database instance, Xythos WFS requires schemas, also known as users, to be created. WFS uses one schema for the Xythos Global Schema and at least one other schema for a Xythos Document Store.
Create the Global Schema The WFS Global Schema is used to store system-wide parameters which WFS loads upon startup. Use Oracle 'sqlplus' to create a “xythos” schema to serve as the WFS Global Schema. Choose an appropriate password and grant connect and resource privileges to this schema.
CREATE USER XYTHOS IDENTIFIED BY <password>; GRANT RESOURCE, CONNECT TO XYTHOS;
Create the Document Store WFS requires at least one Document Store to store file metadata (such as creation date and permissions) and, optionally, the files themselves. Use Oracle 'sqlplus' to create a “files” schema to serve as the WFS Document Store. Choose an appropriate password and grant connect and resource privileges to this schema.
CREATE USER FILES IDENTIFIED BY <password>; GRANT RESOURCE, CONNECT TO FILES;
It is recommended the database components be set to start automatically on reboot.

Xythos WFS OEM WebDAV 2.2 Installation Instructions
28
Page 29
Chapter 6 – DB2 These instructions are specific to installing a DB2 database with Xythos WFS.
Install DB2 Install a WFS-compliant version of DB2 according to the instructions provided by IBM. The database must be created with UTF8 for the National character set.
Configure DB2 Create a buffer pool of size 1024 and pagesize 32K. This buffer pool should be used by both the Regular and System Temporary tablespaces created below.
For the global schema database, administrators must create two tablespaces: one Regular tablespace with a pagesize of at least 32K for tables and indexes and one System Temporary tablespace with a pagesize of at least 32K for system space for joins.
For each document store, administrators must create three tablespaces: one Regular with a pagesize of at least 32K for tables and indexes, one System Temporary tablespace with a pagesize of at least 32K for system space for joins, and one User Temporary tablespace with a pagesize of at least 4K for declared global temporary tables.
The following is an example of the command script used for creating the appropriate database and tablespaces required for using DB2 as the WFS database:
CREATE DATABASE XYTHOS ON <installation_drive> USING CODESET UTF-8 TERRITORY US \
COLLATE USING SYSTEM
CONNECT TO XYTHOS
CREATE BUFFERPOOL SB ALL NODES SIZE 1024 PAGESIZE 32K
CREATE TABLESPACE XYTHOS PAGESIZE 32K MANAGED BY SYSTEM USING \
('<installation_drive>:\db2tablespaces\xythos') EXTENTSIZE 32 BUFFERPOOL SB
CREATE SYSTEM TEMPORARY TABLESPACE XYTHOS_ST PAGESIZE 32K \
MANAGED BY SYSTEM USING ('<installation_drive>:\db2tablespaces\xythos_st') \
EXTENTSIZE 32 BUFFERPOOL SB
DISCONNECT XYTHOS
CREATE DATABASE FILES ON <installation_drive>: USING CODESET UTF-8 TERRITORY US \
COLLATE USING SYSTEM
CONNECT TO FILES
CREATE BUFFERPOOL SB ALL NODES SIZE 1024 PAGESIZE 32K
CREATE TABLESPACE FILES PAGESIZE 32K MANAGED BY SYSTEM USING \
('<installation_drive>:\db2tablespaces\files') EXTENTSIZE 32 BUFFERPOOL SB
CREATE SYSTEM TEMPORARY TABLESPACE FILES_ST PAGESIZE 32K \
MANAGED BY SYSTEM USING ('<installation_drive>:\db2tablespaces\files_st') \
Xythos WFS OEM WebDAV 2.2 Installation Instructions
30
EXTENTSIZE 32 BUFFERPOOL SB
CREATE USER TEMPORARY TABLESPACE FILES_UT PAGESIZE 4K \
MANAGED BY SYSTEM USING ('<installation_drive>:\db2tablespaces\files_ut') \
EXTENTSIZE 32
DISCONNECT FILES
In this example, <installation_drive> is the drive letter where DB2 is installed, SB is the name of the bufferpool, XYTHOS is the name of the global schema tablespace, XYTHOS_ST is the name of the global schema system temporary tablespace, FILES is the name of the document store tablespace, FILES_ST is the name of the document store system temporary tablespace, and FILES_UT is the name of the document store user temporary tablespace.
Database Maintenance The administrator should periodically manage data statistics using the statistics utility, RUNSTAT. Specifically, use the command reorgchk update statistics on table all from the command center to manage data statistics.
User Managed Tablespaces Example The DB2 tablespaces can be system-managed, but if you put the tables and indexes in separate tablespaces, you must define an additional tablespace for the indexes and make them user-managed because DB2 prohibits keeping indexes and tables in separate tablespaces.
CREATE DATABASE XYTHOS ON <installation_drive> USING CODESET UTF-8 TERRITORY US \
COLLATE USING SYSTEM
CONNECT TO XYTHOS
CREATE BUFFERPOOL SB ALL NODES SIZE 1024 PAGESIZE 32K
CREATE TABLESPACE XYTHOS_TABLES PAGESIZE 32K MANAGED BY DATABASE USING \
('<installation_drive>:\db2tablespaces\xythostables') EXTENTSIZE 32 BUFFERPOOL SB
CREATE TABLESPACE XYTHOS_INDEXES PAGESIZE 32K MANAGED BY DATABASE USING \
('<installation_drive>:\db2tablespaces\xythosindexes') EXTENTSIZE 32 BUFFERPOOL SB
CREATE SYSTEM TEMPORARY TABLESPACE XYTHOS_ST PAGESIZE 32K \
MANAGED BY SYSTEM USING ('<installation_drive>:\db2tablespaces\xythos_st') \
EXTENTSIZE 32 BUFFERPOOL SB
DISCONNECT XYTHOS
CREATE DATABASE FILES ON <installation_drive>: USING CODESET UTF-8 TERRITORY US \
COLLATE USING SYSTEM
CONNECT TO FILES
CREATE BUFFERPOOL SB ALL NODES SIZE 1024 PAGESIZE 32K
CREATE TABLESPACE FILES_TABLES PAGESIZE 32K MANAGED BY DATABASE USING \
('<installation_drive>:\db2tablespaces\filestables') EXTENTSIZE 32 BUFFERPOOL SB
CREATE TABLESPACE FILES_INDEXES PAGESIZE 32K MANAGED BY DATABASE USING \
Xythos WFS OEM WebDAV .1 Installation Instructions
31
('<installation_drive>:\db2tablespaces\filesindexes') EXTENTSIZE 32 BUFFERPOOL SB
CREATE SYSTEM TEMPORARY TABLESPACE FILES_ST PAGESIZE 32K \
MANAGED BY SYSTEM USING ('<installation_drive>:\db2tablespaces\files_st') \
EXTENTSIZE 32 BUFFERPOOL SB
CREATE USER TEMPORARY TABLESPACE FILES_UT PAGESIZE 4K \
MANAGED BY SYSTEM USING ('<installation_drive>:\db2tablespaces\files_ut') \
EXTENTSIZE 32
DISCONNECT FILES

Xythos WFS OEM WebDAV 2.2 Installation Instructions
32

support.sas.com SAS is the world leader in providing software and services that enable customers to transform data from all areas of their business into intelligence. SAS solutions help organizations make better, more informed decisions and maximize customer, supplier, and organizational relationships. For more than 25 years, SAS has been giving customers around the world The Power to Know®. Visit us at www.sas.com.