Embed Size (px)
Citation preview

Installation Overview

Legal Notices
Autodesk® Media and Entertainment Products 2013
© 2012 Autodesk, Inc. All Rights Reserved. Except as otherwise permitted by Autodesk, Inc., this publication, or parts thereof, may notbe reproduced in any form, by any method, for any purpose.
Certain materials included in this publication are reprinted with the permission of the copyright holder.
Trademarks
The following are registered trademarks or trademarks of Autodesk, Inc., and/or its subsidiaries and/or affiliates in the USA and other countries:123D, 3ds Max, Algor, Alias, Alias (swirl design/logo), AliasStudio, ATC, AUGI, AutoCAD, AutoCAD Learning Assistance, AutoCAD LT, AutoCADSimulator, AutoCAD SQL Extension, AutoCAD SQL Interface, Autodesk, Autodesk Homestyler, Autodesk Intent, Autodesk Inventor, AutodeskMapGuide, Autodesk Streamline, AutoLISP, AutoSketch, AutoSnap, AutoTrack, Backburner, Backdraft, Beast, Beast (design/logo) Built withObjectARX (design/logo), Burn, Buzzsaw, CAiCE, CFdesign, Civil 3D, Cleaner, Cleaner Central, ClearScale, Colour Warper, Combustion,Communication Specification, Constructware, Content Explorer, Creative Bridge, Dancing Baby (image), DesignCenter, Design Doctor, Designer'sToolkit, DesignKids, DesignProf, DesignServer, DesignStudio, Design Web Format, Discreet, DWF, DWG, DWG (design/logo), DWG Extreme,DWG TrueConvert, DWG TrueView, DWFX, DXF, Ecotect, Evolver, Exposure, Extending the Design Team, Face Robot, FBX, Fempro, Fire, Flame,Flare, Flint, FMDesktop, Freewheel, GDX Driver, Green Building Studio, Heads-up Design, Heidi, Homestyler, HumanIK, IDEA Server, i-drop,Illuminate Labs AB (design/logo), ImageModeler, iMOUT, Incinerator, Inferno, Instructables, Instructables (stylized robot design/logo),Inventor,Inventor LT, Kynapse, Kynogon, LandXplorer, LiquidLight, LiquidLight (design/logo), Lustre, MatchMover, Maya, Mechanical Desktop, Moldflow,Moldflow Plastics Advisers, Moldflow Plastics Insight, Moldflow Plastics Xpert, Moondust, MotionBuilder, Movimento, MPA, MPA (design/logo),MPI, MPI (design/logo), MPX, MPX (design/logo), Mudbox, Multi-Master Editing, Navisworks, ObjectARX, ObjectDBX, Opticore, Pipeplus, Pixlr,Pixlr-o-matic, PolarSnap, PortfolioWall, Powered with Autodesk Technology, Productstream, ProMaterials, RasterDWG, RealDWG, Real-timeRoto, Recognize, Render Queue, Retimer, Reveal, Revit, RiverCAD, Robot, Scaleform, Scaleform GFx, Showcase, Show Me, ShowMotion,SketchBook, Smoke, Softimage, Softimage|XSI (design/logo), Sparks, SteeringWheels, Stitcher, Stone, StormNET, Tinkerbox, ToolClip, Topobase,Toxik, TrustedDWG, U-Vis, ViewCube, Visual, Visual LISP, Voice Reality, Volo, Vtour, WaterNetworks, Wire, Wiretap, WiretapCentral, XSI.
ACE™, TAO™, CIAO™, and CoSMIC™ are copyrighted by Douglas C. Schmidt and his research group at Washington University, University ofCalifornia, Irvine, and Vanderbilt University, Copyright © 1993-2009, all rights reserved.
Python is a registered trademark of Python Software Foundation.
Fonix and the circled (f) logo are registered trademarks of Fonix Speech, Inc.
mental ray is a registered trademark of mental images GmbH licensed for use by Autodesk, Inc.
All other brand names, product names or trademarks belong to their respective holders.
Disclaimer
THIS PUBLICATION AND THE INFORMATION CONTAINED HEREIN IS MADE AVAILABLE BY AUTODESK, INC. "AS IS." AUTODESK, INC. DISCLAIMSALL WARRANTIES, EITHER EXPRESS OR IMPLIED, INCLUDING BUT NOT LIMITED TO ANY IMPLIED WARRANTIES OF MERCHANTABILITY ORFITNESS FOR A PARTICULAR PURPOSE REGARDING THESE MATERIALS.

Contents
Chapter 1 Offline Installation Help . . . . . . . . . . . . . . . . . . . . . . 1
Chapter 2 Overview . . . . . . . . . . . . . . . . . . . . . . . . . . . . . . 3Installation Overview . . . . . . . . . . . . . . . . . . . . . . . . . . . 3
Prepare for Installation . . . . . . . . . . . . . . . . . . . . . . . . 3Select Install Type . . . . . . . . . . . . . . . . . . . . . . . . . . . 4Specify License . . . . . . . . . . . . . . . . . . . . . . . . . . . . 5Configure and Install . . . . . . . . . . . . . . . . . . . . . . . . . 6Activate Products . . . . . . . . . . . . . . . . . . . . . . . . . . . 6Create Deployment . . . . . . . . . . . . . . . . . . . . . . . . . . 7Change Product Language . . . . . . . . . . . . . . . . . . . . . . 7
Chapter 3 Frequently Asked Questions . . . . . . . . . . . . . . . . . . . . 9Frequently Asked Questions . . . . . . . . . . . . . . . . . . . . . . . . 9
What if I have lost my serial number or product key? . . . . . . . . 9Why do I need to activate a product after installation? . . . . . . . 9Can I install Autodesk products from a website? . . . . . . . . . . 10How does a trial license work in a product suite or bundle?
. . . . . . . . . . . . . . . . . . . . . . . . . . . . . . . . . . . 10How do I switch my license from stand-alone to network or
network to stand-alone? . . . . . . . . . . . . . . . . . . . . . . 10Where can I find product license information after
installation? . . . . . . . . . . . . . . . . . . . . . . . . . . . . 11
iii

After installation, how can I change product configuration,repair, or uninstall the product? . . . . . . . . . . . . . . . . . 11
Chapter 4 Configure Autodesk Products in your Entertainment Creation
Suite . . . . . . . . . . . . . . . . . . . . . . . . . . . . . . . 13Installation Information Specific to Autodesk 3ds Max . . . . . . . . . 13
Limited Language Support in Windows XP . . . . . . . . . . . . . 13Switch from Online (Default) to Local Help . . . . . . . . . . . . 14Sub-Components Installed with 3ds Max . . . . . . . . . . . . . 14
3ds Max Composite 2013 . . . . . . . . . . . . . . . . . . . 14Autodesk Material Libraries . . . . . . . . . . . . . . . . . . 15Autodesk Backburner 2013 . . . . . . . . . . . . . . . . . . 16
Tools and Utilities . . . . . . . . . . . . . . . . . . . . . . . . . . 17Installing a 32-bit Product on a 64-bit Operating System . . . . . 19Switching from Standalone to Network License Mode . . . . . . . 19
Installation Information Specific to Autodesk Maya . . . . . . . . . . . 21Installation Information Specific to Autodesk Maya 2013 . . . . . 21Installing a 32-bit Product on a 64-bit Operating System . . . . . 21Install Maya on Mac OS X . . . . . . . . . . . . . . . . . . . . . 22Install Maya on Linux . . . . . . . . . . . . . . . . . . . . . . . . 24
Install Maya on Linux using the installation wizard . . . . . 24Install Maya on Linux using the rpm utility . . . . . . . . . 26Additional Linux notes . . . . . . . . . . . . . . . . . . . . 30Optimize the Maya Hotbox and marking menus on
Linux . . . . . . . . . . . . . . . . . . . . . . . . . . . . 35Uninstall Maya on Mac OS X or Linux . . . . . . . . . . . . . . . 38Install the Maya Help . . . . . . . . . . . . . . . . . . . . . . . . 39Install MatchMover, Composite, Backburner, and
DirectConnect . . . . . . . . . . . . . . . . . . . . . . . . . . . 43Install mental ray for Maya satellite . . . . . . . . . . . . . . . . 44
Overview of mental ray (satellite) . . . . . . . . . . . . . . 44Slave machine installation . . . . . . . . . . . . . . . . . . 45Slave machine additional setup . . . . . . . . . . . . . . . . 46Slave machine port setup . . . . . . . . . . . . . . . . . . . 47Licensing of satellite rendering . . . . . . . . . . . . . . . . 49
Installation Information Specific to Autodesk MotionBuilder2013 . . . . . . . . . . . . . . . . . . . . . . . . . . . . . . . . . . . 50
Installation Information Specific to Autodesk Mudbox . . . . . . . . . 52Install the Mudbox Help locally . . . . . . . . . . . . . . . . . . 53Installing a 32-bit Product on a 64-bit Operating System . . . . . 56
Installation Information Specific to Autodesk Softimage . . . . . . . . . 57
Index . . . . . . . . . . . . . . . . . . . . . . . . . . . . . . . . 59
iv | Contents

Offline Installation Help
You can install Entertainment Creation Suites from a USB or downloaded installationfiles when you are not connected to the internet (offline).
Advantages to online installation include:■ Automatic inclusion of service packs.
■ Access to complete and updated installation help. Offline Installation help is a subset ofthe online help.
■ Access to online content packs.
If you are not connected to the internet, it is recommended that you downloadservice packs and install them after the initial Install.
If you create a deployment in a connected (online) environment, the latest servicepacks are included.
To access the Entertainment Creation Suite installation help you can visitwww.autodesk.com/me-install-2013-enu from a connected device.
1
1

2
Overview
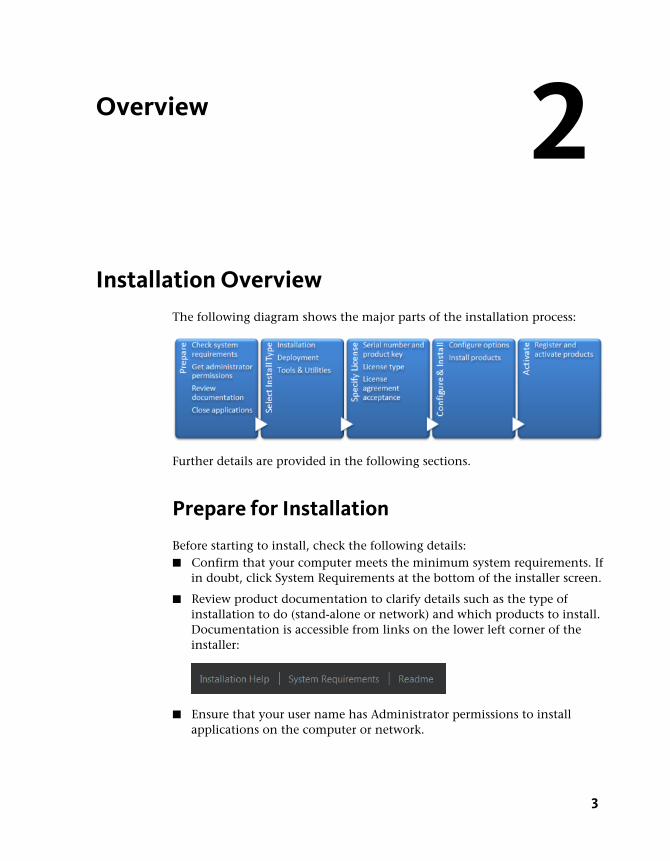
Installation OverviewThe following diagram shows the major parts of the installation process:
Further details are provided in the following sections.
Prepare for Installation
Before starting to install, check the following details:■ Confirm that your computer meets the minimum system requirements. If
in doubt, click System Requirements at the bottom of the installer screen.
■ Review product documentation to clarify details such as the type ofinstallation to do (stand-alone or network) and which products to install.Documentation is accessible from links on the lower left corner of theinstaller:
■ Ensure that your user name has Administrator permissions to installapplications on the computer or network.
2
3

■ Obtain serial numbers and product keys for all products you want to install.These are on the product package or provided at the time you downloadthe software.
■ Close all running applications.
Select Install Type
Here is some basic information to help you choose the right path.■ Install is recommended for individual users or small groups. The key
point is that you will repeat the installation process on each computer.This is the only valid installation type for a stand-alone license, but it canalso be used with a multi-seat stand-alone or network license.
■ Create Deployment is recommended for network administrators, usingeither a multi-seat stand-alone or network license. In the deploymentprocess, the installation is configured once, stored on the network, andthen distributed efficiently to users' computers.
For more information on deployments, see Create Deployment (page 7)or the Network Administrator's Guide.
■ Install Tools & Utilities is used to install tools and utilities related toyour suite or product. If you have a network license for your Autodeskproduct, you will need to use this option to install the Network LicenseManager before any users can run the product. Consult the documentationfor your suite or product to identify the available tools and utilities ofinterest.
Select Installer Language
On the first screen of the installer, you can select the language for the installerscreens, using this control on the upper right:
For some Autodesk products, later in the install process you can select thelanguage for installed products. For more information, see Change ProductLanguage (page 7).
4 | Chapter 2 Overview

Specify License
The following notes provide a general overview. For more detailed information,see the Licensing Guide for your product.
License Types
You can install most Autodesk products for a trial period of 30 days to evaluatethe product. If you purchase a license, it is configured as either stand-aloneor network, and for a specific number of users. These license types are brieflydescribed as follows:■ A stand-alone license is intended for use by one person. The licensed
products can be installed on two computers, as long as both instances arenot running concurrently.
■ A multi-seat stand-alone license is intended to support a specifiedmaximum number of users, but it can be installed on a larger number ofcomputers for convenient access.
■ A network license supports a specified number of users who areconnected to a network. The Network License Manager is installed on oneor more servers on the network to manage the distribution of licenses tousers.
Network License Server Models
If you are using a network license, choose the server configuration for theNetwork License Manager that was specified at the time of license purchase:■ Single License Server
One server manages all licenses on the network.
■ Distributed License Server
Licenses are distributed across a pool of multiple servers in the network.You enter the name of each server in the pool.
■ Redundant License Server
Three servers are available to authenticate each license. You enter thenames of the three servers.
Installation Overview | 5

Configure and Install
Installation Path
This path specifies where the product folder will be installed. If you changethe location, use only valid ASCII characters in the install path.
Configuration
Most products have a number of configuration settings. On the Install >Configure Installation page, for any product you have selected to install, yousee a triangular control for access to a configuration panel:
Click anywhere in the product box to open the configuration panel. For manyproducts, you can select an installation type, either Typical to accept thedefault configuration settings, or Custom to review the settings and decidewhether to modify them. More information on the configuration settings foryour product may exist in an appendix to this guide. After you have configuredthe settings as required, click the triangle to close the configuration panel.
Activate Products
When you run an Autodesk product for the first time, you will be asked toactivate the product. If it is connected to the Internet, your computer cancommunicate directly with Autodesk to complete the activation process.
If your computer is disconnected from the Internet, you can activate laterwhen you are connected. Some products also permit you to activate offlineby sending the serial number, request code, and registration data to Autodeskover the Web or by email. For more information on activation, go to AutodeskLicensing and select the FAQ link.
6 | Chapter 2 Overview
Create Deployment
Administrative Image
This is a customized set of installation files created by the deployment process.It is used to install a consistent configuration of programs on each computer.Other settings:■ Administrative image path. Specify a shared network location where
you have Full Control permissions. Users will go to this path to install theprograms.
■ Target platform. Select either 32-bit or 64-bit to match the operatingsystem of the computers that will use the deployment.
■ Include only products required by this deploymentconfiguration. If selected, the deployment cannot be modified in thefuture to include additional products. If unselected, the administrativeimage will include all possible products, and the deployment can bemodified in the future in any way.
Installation Settings
■ Silent mode runs the installation in background, without user input.
IMPORTANT In silent mode, the user's computer can restart automatically andwithout warning when the installation is complete.
■ A log file records installation data for each computer.
■ A network log file keeps a central record of installation data for allcomputers that run the deployment. It has the same name as yourdeployment, and must reside in a shared folder where users have Changepermissions, so that their computers can write to the log file.
Change Product Language
IMPORTANT This topic does not apply to Autodesk products that provide eachlanguage version on separate media. For these products, you must specify theproduct language when purchasing, and cannot change it.
For some Autodesk products, you can select the product language at the timeof installation, using this drop-down menu on the installer:
Installation Overview | 7

Language Selection Menu
If the language you want is not on this menu, your available options vary byAutodesk product. Many products, such as 3ds Max, Inventor, and allAutoCAD-based products, use language packs to support additional languages.
These conditions apply to language selection:
■ Each suite installation uses a single language. If you need to install one ormore products in a different language, that requires a separate installation.
■ All deployments must be in a single language. One administrative imagecan support deployments for different languages, but each deployment isfor one language.
■ If you are installing multiple products and select a language that is notsupported by some products, these products use a default language.
■ After you leave the Product Information page of the installer, the menufor selecting a language or adding a language pack is disabled. If you laterdecide to change the language or add a language pack, you cannot go backto the Product Information page and use the menu. Instead, you mustcancel the installation, start the installer again, and then make the correctlanguage selection on the Product Information page.
About Language Packs
A language pack is a software module that can be added to an Autodesk productto change the language used throughout the user interface and thedocumentation. A single instance of the product software can support multiplelanguages by adding language packs. Each language pack is matched to aspecific Autodesk product, and includes an installer. You must install theAutodesk product before installing a language pack. Each installed languagepack creates a separate icon on the Windows Start menu, such as "Inventor -French (Francais)" that you can use to start the product in that language.Depending on your product, language packs may be available on theinstallation media or from a website.
A language pack installer provides an option to create a language packdeployment for a particular product. The language pack deployment can beinstalled on multiple computers, after the related product is installed, to addanother language version.
8 | Chapter 2 Overview

Frequently Asked Ques-tions
Frequently Asked QuestionsFor advice and assistance with topics not covered here, go to Autodesk Support,click your product name, and search in the Knowledgebase for your product.
What if I have lost my serial number or productkey?
Check your product packaging or purchase records, if available, or contactAutodesk Customer Service for assistance.
Why do I need to activate a product after install-ation?
Activation verifies for Autodesk and for you as a license holder that yourAutodesk product is installed on an eligible computer. The activation processimproves license security and management. For example, it ensures that amulti-seat license is not in use by more than the authorized number of users.
3
9

Can I install Autodesk products from a website?
Several Autodesk websites are being set up to support product downloads,including Subscription, Education, eStore, My Account, and the Trial site. Oneach site where downloads have been implemented, you have a choice ofseveral download methods to suit different requirements. If you want to installproducts directly on your computer, you can use a Web Installer. If you wantto download the files to install products later, or to create a deployment, youcan use Download Manager, or Browser Download. More details are providedon the download websites.
How does a trial license work in a product suiteor bundle?
A single trial period, usually 30 days, applies to all Autodesk products in thesuite or bundle. When the first product is started, the trial period begins forall products. If the user does not activate one of the products before the trialperiod ends, access to all of the products is denied. After the trial period ends,the user can restore access to the products by entering an activation code.
How do I switch my license from stand-alone tonetwork or network to stand-alone?
If you simply entered the wrong license type by mistake, and are still runningthe installer, use the Back button to return to the Product Information dialog,and change the license type.
If you want to change the license type for an installed product, contact yourAutodesk reseller or license supplier to obtain the new license and serialnumber. Then uninstall your product and run a new install to change thelicense type and enter the new serial number.
10 | Chapter 3 Frequently Asked Questions

Where can I find product license informationafter installation?
Select Help menu ➤ About, or About [Product Name]. If your product usesInfoCenter, that is where you can find the Help menu.
After installation, how can I change productconfiguration, repair, or uninstall the product?
1 Go to the Windows control panel:■ Windows XP: On the Start menu, click Settings ➤ Control
Panel ➤ Add or Remove Programs.
■ Windows 7: On the Start menu, click Settings ➤ ControlPanel ➤ Programs/Uninstall a Program.
2 In Windows control panel, click the product name, and then clickChange/Remove (Windows XP) or Uninstall/Change (Windows 7).
The Installer opens in maintenance mode, and directs you through theprocess.
Frequently Asked Questions | 11

12

Configure AutodeskProducts in your Enter-tainment Creation Suite
Installation Information Specific to Autodesk 3dsMax
Certain items are unique to the Autodesk® 3ds Max® / Autodesk® 3ds Max®
Design install process (in contrast with other Autodesk products). In this chapter,learn about the process for switching to the local version of the help and thesub-components and tools and utilities that ship with 3ds Max (also includes3ds Max Design unless otherwise noted). Also, learn how to install the 32-bitversion of 3ds Max on a 64-bit machine.
Limited Language Support in Windows XP
The XP operating system runs 3ds Max / 3ds Max Design in English only. Touse 3ds Max / 3ds Max Design in another language, you must also use Windows7.
4
13

Switch from Online (Default) to Local Help
By default, the Help in 3ds Max is internet-based. If you do not have adedicated internet connection, you can download a local version of your help.To override the default behavior you then need to change the correspondingpreference.
1 Download and run the Help installer from www.autodesk.com/3dsmax-helpdownload-enu.
2 Once installed, in 3ds Max / 3ds Max Design go to Customize ➤
Preferences ➤ Help tab and select Local Computer / Network.
NOTE If you are using the default path this is all you need to do. Change the pathif you have not used the default location. To revert to the default location (whichmatches the Help installer's default), click Reset. You can switch back to the onlineversion of the Help at any time, which is the most up-to-date version of the Helpavailable.
Sub-Components Installed with 3ds Max
The sub-components installed with Autodesk 3ds Max 2013 include 3ds MaxComposite 2013, the various Autodesk Material Libraries, and AutodeskBackburner 2013. The only optional sub-component is 3ds Max Composite.
3ds Max Composite 2013
When installing 3ds Max, 3ds Max Composite installs by default. 3ds MaxComposite 2013 includes:■ Raster and Vector Paint
■ Image Processing
■ Color Correction
■ Keying and Rotoscoping
■ Stereoscopic Production Support
■ Motion Blur
■ Advanced 2D Tracking
■ Camera Mapping
14 | Chapter 4 Configure Autodesk Products in your Entertainment Creation Suite

■ Depth of Field
■ Node and Layer-based Compositing Options
■ Spline-Based Warping
■ Enhanced Render Passes
■ Data Managing and Collaborating
Autodesk Material Libraries
The Autodesk Material Libraries are shared libraries installed with Autodeskproducts such as Inventor, AutoCAD, Revit and 3ds Max. These three itemsare selected for install by default when you install 3ds Max. If one of the otherapplications is already installed, the material libraries might be installedalready.
WARNING If you uninstall or remove a library, the library is no longer availablefor any products. Uninstalling also means you will be unable to view or displayscenes that have Autodesk Materials currently in them.
The Autodesk Material Library consists of three sub-libraries:■ Autodesk Material Library 2013: Contains the material appearances used
for Realistic Appearance in color styles. This component is installed bydefault, and it is required for 3ds Max to have full visual style and colorstyle functionality. It is recommended you do not uninstall this componentunless you are also uninstalling all Autodesk products that require thislibrary.
■ Autodesk Material Library 2013 Base Image Library: Contains low-resolution(approximately 512 x 512) images for use with Autodesk Materials. This isalso installed by default.
■ Autodesk Material Library 2013 Medium Image Library: Containsmedium-resolution (approximately 1024 x 1024) images for renderingmaterials in medium detail. This library is used for close-ups and forrendering objects at a larger scale. This library is an installation optionavailable on the Select Products to Install page in the installation wizard.
Installation Information Specific to Autodesk 3ds Max | 15

NOTE To reinstall the material libraries, run the corresponding MSI:■ Autodesk Material Library 2013:
\Content\ADSKMaterials\2013\CM\MaterialLibrary2013.msi
■ Autodesk Material Library 2013 Base Image Library:\Content\ADSKMaterials\2013\ILB\BaseImageLibrary.msi
■ Autodesk Material Library 2013 Medium Image Library:\Content\ADSKMaterials\2013\ILM\MediumImageLibrary.msi
Autodesk Backburner 2013
Autodesk® Backburner™
is the 3ds Max network-rendering managementsoftware, also used by products such as Autodesk® Flame® and Autodesk®
Smoke®. Backburner is a required install and is installed by default when youinstall Autodesk 3ds Max 2013 / Autodesk 3ds Max Design 2013. You mustuninstall older versions of Backburner before installing Backburner 2013.Backburner 2013 is backward compatible, but settings do not migrate fromearlier versions. For information about using Backburner from inside 3ds Max,refer to the "Network Rendering" section in the "Rendering" chapter of the 3dsMax Help. For further information about installing and using Backburner seethe Help menu in the Backburner Manager.
Backburner for Managing and Monitoring Only
You can install Autodesk Backburner on a machine without 3ds Max or 3dsMax Design. However, such an installation of Autodesk Backburner cannotbe used for rendering. You can use this machine only to manage or monitorjobs. Although the Autodesk Backburner server can be installed on a singlemachine, it will not do anything; it will work only if it detects a supportedprogram such as Autodesk 3ds Max, Autodesk 3ds Max Design, AutodeskFlame, or Autodesk Smoke. This means that you must have AutodeskBackburner installed with at least one additional Autodesk product for amachine in your configuration to be capable of rendering.
16 | Chapter 4 Configure Autodesk Products in your Entertainment Creation Suite

Tools and Utilities
The following table summarizes the optional installs available from the 3dsMax / 3ds Max Design Tools and Utilities section in the installer.
Website:Description:Tool or Utility:
www.autodesk.com/devel-op3dsmax
Use the SDK to create newAutodesk 3ds Max featuresand tools by writing yourown plug-ins.
Autodesk 3ds Max 2013SDK
NOTE The SDK is notshipped with Autodesk 3dsMax Design.
www.autodesk.com/me-licens-ing-2013-enu
You must install the Net-work License Manager ifyou are using network licens-ing.
Network License Manager
www.allegorithmic.com/Install the AllegorithmicSubstance Bonus Pack (Extra
Allegorithmic SubstanceBonus Pack (Designer andPlayer) Content) for additional sub-
stances that work with theSubstance Designer trial,that is also included.
www.archvision.com/Manage the content ac-quired using RPC
™ Plug-ins
ArchVision™
Dashboard
with the ArchVision Dash-board.
Add photorealistic objects(such as cars, people, and
ArchVision™
RPC™
Plug-In
so on) with the RPC Plug-Ins.
Installation Information Specific to Autodesk 3ds Max | 17

Website:Description:Tool or Utility:
See the Civil View menu in3ds Max Design for Helpand Tutorial information.
NOTE The first time you ac-cess Civil View you will needto initialize it and set somebasic settings. After that youhave access to the completeCivil View menu where youcan find the Help and Tutori-als.
Convert 3D civil-engineer-ing data into 3D visualiza-tions. Autodesk Civil View isintegrated into Autodesk3ds Max Design and is ac-cessed from the Civil Viewmenu.
NOTE Autodesk Civil Viewis included only withAutodesk 3ds Max Design.
Autodesk Civil View
www.bionatics.com/EASYnat/Drop virtual seeds from theincluded samples and
EASYnat® 2.5 for 3ds Max
2013 (Demo)“grow” them in your modelto add life-like plants. Thisincludes 2D, 3D, and hybridmodels with branch and leafdetail.
www.craftanimations.comUse the Craft Director Stu-dio Plug-in Bundle to per-
Craft Director Studio™
Plug-
in Bundleform advanced, in-the-box,rigging and physics simula-tions. These features helpyou animate cameras andvehicles more quickly andrealistically.
www.okino.com/A demo version of PolyTransand NuGraf, from Okino
Okino Plug-ins (Demo)
Okino PolyTrans™
and Nu-
Graf™
Demos
Computer Graphics, letsyou evaluate dozens ofCAD, DCC, and VisSim dataconverters directly within3ds Max or 3ds MaxDesign.
18 | Chapter 4 Configure Autodesk Products in your Entertainment Creation Suite

Installing a 32-bit Product on a 64-bit OperatingSystem
Manually override the installer's default behavior, which automatically installsthe 64-bit product on a 64-bit computer. For a standalone installation, navigateto the root directory of the install media and launch the 32-bit installer, whichhas a file name of Setup_32.exe, or something similar. For a deployment, youcan select the 64-bit target platform, and specify the 32-bit version of a product.
Switching from Standalone to Network LicenseMode
After you install, switch the licensing mode from Standalone to Network.
1 Ensure that the Network License Manager is set up and configured witha valid network license file for 3ds Max or 3ds Max Design.
2 Close 3ds Max or 3ds Max Design on the client machine.
3 On the Windows desktop, right-click the 3ds Max or 3ds Max Designshortcut icon and choose Properties from the pop-up menu.
Installation Information Specific to Autodesk 3ds Max | 19
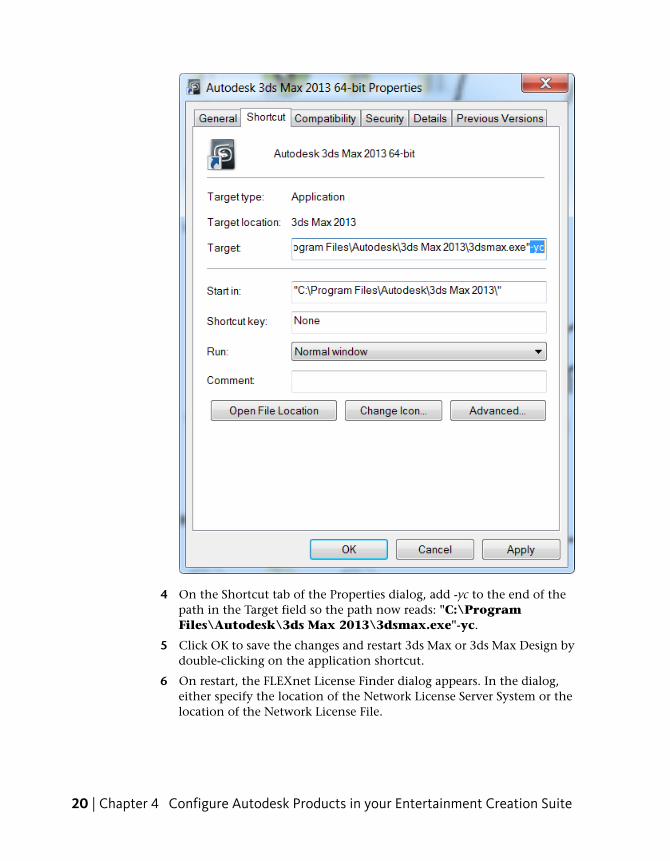
4 On the Shortcut tab of the Properties dialog, add -yc to the end of thepath in the Target field so the path now reads: "C:\ProgramFiles\Autodesk\3ds Max 2013\3dsmax.exe"-yc.
5 Click OK to save the changes and restart 3ds Max or 3ds Max Design bydouble-clicking on the application shortcut.
6 On restart, the FLEXnet License Finder dialog appears. In the dialog,either specify the location of the Network License Server System or thelocation of the Network License File.
20 | Chapter 4 Configure Autodesk Products in your Entertainment Creation Suite

7 After specifying the License Server System or the Network License file,the 3ds Max will start and continue to run in Network license mode.
NOTE If you wish to switch from a Network to a Standalone license, you need toperform a full uninstall/reinstall with the Strandalone License mode selected duringreinstallation.
Installation Information Specific to AutodeskMaya
Installation Information Specific to AutodeskMaya 2013
Certain items are unique to the Autodesk® Maya® install process (in contrastwith other Autodesk products). In this chapter, learn how to install the 32-bitversion of Maya on a 64-bit machine, and how to install a local copy of theMaya Help.
This chapter also includes information on installing and uninstalling AutodeskMaya for Mac OS X and Linux.
Installing a 32-bit Product on a 64-bit OperatingSystem
You can manually override the installer's default behavior, which automaticallyinstalls the 64-bit product on a 64-bit computer. For a stand-alone installation,navigate to the root directory of the install media, and launch the 32-bitinstaller, which has a file name of Setup_32.exe or similar. For a deployment,you can select the 64-bit target platform, and specify the 32-bit version of aproduct.
Installation Information Specific to Autodesk Maya | 21

Install Maya on Mac OS X
To install Maya on Mac OS X
1 Do one of the following to launch the installer:■ If you are installing from a DVD, insert the DVD into your drive,
then double-click the Maya DVD icon that appears on your desktop.
Navigate to the Maya/Mac OS X folder on the DVD drive.
■ If you are installing from a download package, double-click the Maya.dmg.
2 In the Finder window, double-click the Install Maya 2013 program.
The Maya Installer starts.
3 Follow the instructions in the Maya Installer to install the product.
For example, in the License window, do the following:
■ Enter your 11-digit serial number.
■ Enter your Product Key.
■ Select your License type: Standalone or Network.
If you select the Network license type, click Use existing licenseserver and enter your license server name in the Server Name field.Contact your network administrator to find your license server name.If you have access to the license server machine, you can also findits name by opening a Terminal window (Applications > Utilities> Terminal) and typing:
22 | Chapter 4 Configure Autodesk Products in your Entertainment Creation Suite

hostname <enter>
■ Click Continue.
4 In the final window that confirms a successful installation, click Done.
By default, Maya is installed in the following directory:/Applications/Autodesk/maya2013/.
Installation Information Specific to Autodesk Maya | 23
NOTE As indicated in the final installer screen, the Maya Help isInternet-based. When you press F1 or select Help > Maya Help, the Helplaunches from an Autodesk web server. If you do not have reliable Internetaccess, you can download a copy of the Help from www.autodesk.com/maya-helpdownload-enu.
Install Maya on Linux
This section provides detailed information on installing Maya on Linux.
Install Maya on Linux using the installation wizard
To install Maya on Linux
1 Do one of the following to start the Maya install:■ If you are installing from a DVD or USB, insert the install media into
your drive.
■ If you are installing from a download package, extract the Mayapackages from the compressed file.
2 Open a shell as a super user (using su -) and navigate to the directorywhere you extracted the packages.
NOTE Recent Linux distributions may require a full super user environmentto run the installer as root. You can use su - to obtain the proper level.(Note the trailing dash.)
3 Type ./setup and press Enter.
This starts the Maya Installer.
24 | Chapter 4 Configure Autodesk Products in your Entertainment Creation Suite

4 Follow the instructions in the Maya Installer to install the product.
For example, in the License information window, do the following:
■ Enter your 11-digit serial number.
■ Enter your Product key.
■ Select your License type: Standalone or Network.
If you select the Network license type, enter your license server namein the Server name field that appears. Contact your networkadministrator to find your license server name.
■ Click Continue.
Installation Information Specific to Autodesk Maya | 25

5 In the final window that confirms a successful installation, click Done.
By default, Maya is installed in the following directory:/usr/autodesk/maya2013-x64.
NOTE The Maya Help is now Internet-based. When you press F1 or selectHelp > Maya Help, the Help launches from an Autodesk web server. If youdo not have reliable Internet access, you can download a copy of the Helpfrom www.autodesk.com/maya-helpdownload-enu.
Install Maya on Linux using the rpm utility
With the rpm command line utility, you can use either the -i flag or the -ivhflag to install the programs. The -ivh flag provides you with more informationduring the installation.
To install Maya on Linux using the rpm utility
1 Open a shell as a super user (using su -).
2 Do one of the following:■ Insert the install media (DVD or USB) and mount the drive. For
example, type: mount -r /dev/dvd /mnt/dvd.
26 | Chapter 4 Configure Autodesk Products in your Entertainment Creation Suite
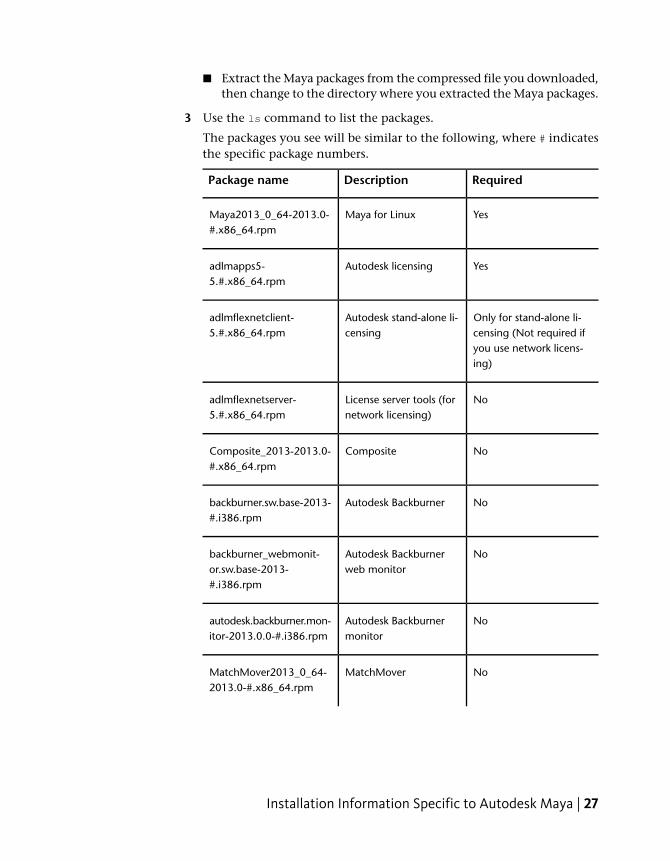
■ Extract the Maya packages from the compressed file you downloaded,then change to the directory where you extracted the Maya packages.
3 Use the ls command to list the packages.
The packages you see will be similar to the following, where # indicatesthe specific package numbers.
RequiredDescriptionPackage name
YesMaya for LinuxMaya2013_0_64-2013.0-#.x86_64.rpm
YesAutodesk licensingadlmapps5-5.#.x86_64.rpm
Only for stand-alone li-censing (Not required if
Autodesk stand-alone li-censing
adlmflexnetclient-5.#.x86_64.rpm
you use network licens-ing)
NoLicense server tools (fornetwork licensing)
adlmflexnetserver-5.#.x86_64.rpm
NoCompositeComposite_2013-2013.0-#.x86_64.rpm
NoAutodesk Backburnerbackburner.sw.base-2013-#.i386.rpm
NoAutodesk Backburnerweb monitor
backburner_webmonit-or.sw.base-2013-#.i386.rpm
NoAutodesk Backburnermonitor
autodesk.backburner.mon-itor-2013.0.0-#.i386.rpm
NoMatchMoverMatchMover2013_0_64-2013.0-#.x86_64.rpm
Installation Information Specific to Autodesk Maya | 27

4 To install the required software, enter either of the following commands(where # indicates the specific package numbers), depending on whetheryou are installing Maya on a computer with Mudbox already installed:■ To install Maya alone, enter:
rpm -ivh Maya2013_0_64-2013.0-#.x86_64.rpmadlmapps5-5.#.x86_64.rpmadlmflexnetclient-5.#.x86_64.rpm
■ To install Maya with Mudbox, enter:
rpm -ivh --force Maya2013_0_64-2013.0-#.x86_64.rpmadlmapps5-5.#.x86_64.rpmadlmflexnetclient-5.#.x86_64.rpm
Maya 2013 adds the required libXm.so.3 library to the Maya lib directoryas part of its standard install, so installing the openMotif runtime rpmis not required.
5 Look for a file named libGL.so in the /usr/lib/ or /usr/X11R6/libdirectory to verify that OpenGL is installed.
NOTE /usr/lib is normally 32-bit on Red Hat, Fedora, and SuSEdistributions, but may be 64-bit for Ubuntu and Debian distributions. Somedistributions include the system OpenGL driver mesa-GL, which is not idealfor running Maya. Maya is a 64-bit application and requires a 64-bit OpenGL3D-accelerated driver for best performance.
TIP To easily check which OpenGL driver is installed, use the glxinfoprogram to list the top portion of the output, then look for the driver andrenderer strings. For example:
glxinfo | less
6 (Optional) For information on installing the Maya documentationpackage, see Install the Maya Help (page 39).
By default, the Maya Help is Internet-based, so launching the Help withinMaya calls an Autodesk web server to display the documentation.
7 Run the following command to set whether you are using a network ora stand-alone license:
/usr/autodesk/maya2013-x64/bin/licensechooser/usr/autodesk/maya2013-x64/ <licensetype> unlimited
where you specify standalone or network for <licenseType>.
28 | Chapter 4 Configure Autodesk Products in your Entertainment Creation Suite

This updates the license.env file (used by the Autodesk licensing software)with your license type information.
8 Add /opt/Autodesk/Adlm/R5/lib64/to LD_LIBRARY_PATH to set yourshared libraries for this session.
For example, you can run the following command in a BASH shell:
export LD_LIBRARY_PATH=/opt/Autodesk/Adlm/R5/lib64/
9 Run the following commands to register Maya with the Autodesklicensing software, where <productKey1> and <productKey2> are your productkeys, and <serialNum> is your serial number.
NOTE
If you purchased Maya as part of a suite, enter your Maya product keyas productKey1, and your suite product key as productKey2.If you purchased Maya alone and received only one product key, you canenter the Maya product key for both <productKey1> and <productKey2>.
■ (Stand-alone licensing)
/usr/autodesk/maya2013-x64/bin/adlmreg -i S<productKey1> <productKey2> 2013.0.0.F <serialNum>/var/opt/Autodesk/Adlm/Maya2013/MayaConfig.pit
■ (Network licensing)
/usr/autodesk/maya2013-x64/bin/adlmreg -i N<productKey1> <productKey2> 2013.0.0.F <serialNum>/var/opt/Autodesk/Adlm/Maya2013/MayaConfig.pit
For example:
/usr/autodesk/maya2013-x64/bin/adlmreg -i S 657E1 657E1
2013.0.0.F 000-00000000/var/opt/Autodesk/Adlm/Maya2013/MayaConfig.pit
This step updates the product information .pit file, which you can copyto other machines that have the same configuration if you are installingmany instances of Maya.
These commands return a Registration succeeded message, and youcan now run Maya using your stand-alone or network license.
Installation Information Specific to Autodesk Maya | 29

Additional Linux notes
This section provides information for configuring Maya to run on Linux,describes differences between Maya for Linux and other versions of Maya, andprovides other information specific to using Maya on the Linux operatingsystem. For complete information on limitations and possible workarounds,also refer to the Maya Release Notes, available at www.autodesk.com/maya-readme-2013-enu.
Compiling plug-ins and standalone programs
To compile plug-ins and standalone applications for Maya 2013 on Linux,use the released gcc 4.1.2 compiler. Maya has been compiled with this compilerunder CentOS 6.0 WS.
In addition, Maya uses some component libraries that may already exist onyour system (for example, Qt, Python, OpenAL, Intel TBB, MKL, Cg). Theselibraries are installed in the /lib directory under your Maya installationdirectory, and should not interfere with the normal operation of your Linuxsystem. In some cases, your system may include newer versions of theselibraries, which may or may not be compatible with Maya.
NOTE Maya requires its own versions of the Qt libraries to run properly.
For more information, see the API Guide at www.autodesk.com/maya-sdkdoc-2013-enu.
Installing additional required packages and fonts
On Linux, especially on Fedora systems, not all system libraries required torun Maya are included in the default installation of the operating system. Youcan use yum to find any additional system-dependent library packages and getthe required runtime libraries.
For example, to install some of the following dependent libraries, you canexecute the following commands:■ yum install mesa-libGLw
■ yum install libXp
■ yum install gamin audiofile audiofile-devel e2fsprogs-libs
Dependent OpenGL libraries (vendor Nvidia/AMD supplied)
■ libGL.so from Nvidia/AMD 3rd party library
30 | Chapter 4 Configure Autodesk Products in your Entertainment Creation Suite

■ libGLw.so.1 from mesa-libGLw
Dependent X Windows libraries
■ libXp.so.6 from package libXp
■ libXmu.so.6 from package libXmu
■ libXpm.so.4 from package libXp
■ libXt.so.6 from package libXt
■ libXi.so.6 from package libXi
■ libXext.so.6 from package libXext
■ libX11.so.6 from package libX11
■ libXinerama.so.1 from package libinerama
■ libXau.so.6 from package libXau
■ libxcb.so.1 from package libxcb
Dependent System libraries
■ libfam.so.0 from package gamin
■ libaudiofile.so.0 from package audiofile
■ libaudiofile.so from package audiofile-devel
■ libuuid.so.1 from package e2fsprogs-libs
■ ibpthread.so.0
■ llibc.so.6
■ libdl.so.2
■ libz.so.1
■ librt.so.1
■ libSM.so.6
■ libICE.so.6
■ libutil.so.1
■ libssl.so.6
■ libcrypto.so.6
IMPORTANT Note the following additional information on libssl.so.6 andlibcrypto.so.6.
Installation Information Specific to Autodesk Maya | 31

libssl.so.x and libcrypto.so.x are versions of the OpenSSL library that ship withRHEL. The version number for the required system libraries depends on yourLinux distribution. For example, Fedora 14 uses libcrypto.so.10 and libssl.so.10.
RHEL 6 and CentOS 6 provide a compatibility package for libssl.so.6 andlibcyrpto.so.6. Install this package before installing Maya.
yum install openssl098e-0.9.8e
The Maya installer checks to see if there are existing system library versions,and if so, automatically creates the symbolic links in the Maya lib directory.In some cases, for example if you are running Maya from a network server,this process cannot be done automatically.
If the system versions of the library exist, use them.
sucd /usr/autodesk/maya2013-x64/libln –s /usr/lib64/libssl.so.10 libssl.so.6ln –s /lib64/libcrypto.so.10 libcrypto.so.6
If there are no versions of libssl.so and libcrypto.so on the system, as a lastresort you can use the files located in/usr/autodesk/maya2013-x64/support/openssl/.
If you need to use the files found in the support directory, copy the files tothe Maya lib directory with the following names:
sucd /usr/autodesk/maya2013-x64/libcp ./support/openssl/libssl.so.6 libssl.so.6cp ../support/openssl/libcrypto.so.6 libcrypto.so.6cp ../support/openssl/libcrypto.so.6 libcrypto.so.0.9.8
Dependent applications
■ tcsh
This is a command language interpreter application. Run the commandyum install tcsh to install.
Dependent 32-bit Backburner monitor libraries
■ php
■ elfutils-libelf
■ glibc
■ libgcc
32 | Chapter 4 Configure Autodesk Products in your Entertainment Creation Suite

■ libstdc++
■ httpd
To ensure that you install the required 32-bit version of these libraries, runthe following commands to install:
(RHEL 6.x/CentOS 6.0/Fedora 14)
yum install elfutils-libelf.i586 glibc.i686libstdc++.i586 httpd php
Fonts
Maya also uses some fonts that may not be installed by default. Execute thefollowing to install these fonts:
yum install xorg-x11-fonts-ISO8859-1-100dpiyum install xorg-x11-fonts-ISO8859-1-75dpiyum install liberation-mono-fonts liberation-fonts-commonliberation-sans-fonts liberation-serif-fonts
Differences in operation
When installed on a Linux system, Maya works in much the same way aswhen installed on Windows.
Unsupported Maya features
■ Some of the features in the Windows version are not currently supported.These include output to AVI or SGI movie formats. Please refer to refer tothe Maya Release Notes, available at www.autodesk.com/maya-readme-2013-enu for more information.
■ You can install most Autodesk products for a trial period of 30 days toevaluate the product. The 30 day trial for Maya is not available for theLinux platform.
Linux desktop configuration
To use Maya on Linux, certain default keyboard and mouse bindings must bechanged from the factory settings. These default bindings prevent commandsfrom being received by Maya, such as the ones that let you tumble or pan aview in a panel.
Different Linux window managers have different key bindings and differentprocedures for setting them. Linux systems are highly customizable, and many
Installation Information Specific to Autodesk Maya | 33

combinations of Linux system components are possible for use withMaya—more than can be described (or tested) by Autodesk.
The following instructions give the procedures necessary for changing themost common configurations.
KDE and Gnome desktop configuration
For Maya to work properly with KDE and Gnome, some modifications shouldbe made to the mouse control. The default bindings of the Alt key and mousebuttons do not work well with Maya. Maya 2013 adds support to use the Meta(Windows) key to act as the Alt key for tumbling. If you want to use theAlt+mouse buttons for scene tumbling, ensure the bindings do not conflict.
Different versions of KDE and Gnome may have different methods of selectingthe key bindings. See the KDE and Gnome documentation for instructions ifthe following steps don’t work for your particular window manager.
KDE under Red Hat
1 Open the KDE Control Center.
2 Select Desktop and then select Window Behavior.
3 Do one of the following:■ (Red Hat Enterprise Linux WS 6.x) Open the Actions tab.
■ (Fedora 14) Open the Window Actions tab.
4 In the following section:■ (Red Hat Enterprise Linux WS 6.x) Inner Window, Titlebar & Frame
■ (Fedora 14) Interactive Inner Window, Inner Window, Titlebar &
Frame
For modifier key Meta, set all mouse action combinations to Nothing.
5 Click Apply and close the Control Center.
Gnome under Red Hat
1 Open the Gnome Panel.
2 Do one of the following:■ (Red Hat Enterprise Linux WS 6.x) Select Applications, then
Preferences and then select Windows.
■ (Fedora 14) Select System, then Preferences and then select Windows.
34 | Chapter 4 Configure Autodesk Products in your Entertainment Creation Suite

3 In the Window Preferences dialog box, set the “To move a window...”key to Super.
(Setting either Control or Alt here can cause problems when using Maya.)
4 Click Close.
Optimize the Maya Hotbox and marking menus onLinux
Modifications to operating system and window manager settings arerecommended to optimize the performance of Maya’s hotbox and markingmenus on Linux systems.
There are three display methods that the hotbox and marking menus can use:RGB Overlay, X Compositing, and Internal Software Compositing.
In general, you should try using RGB Overlay and X Compositing to see whichmethod works best in practice. The Internal Software Compositing methodis the slowest method and should be avoided if possible.
Certain limiting factors may determine which method you can use:■ RGB Overlay
Use this method if you intend to use the Stereo feature in Maya. Do notuse this method with AMD graphics cards.
■ X Compositing
Use this method with AMD graphics cards (the Linux drivers with AMDgraphics do not support RGB Overlay).
■ Internal Software Compositing
Only use this method if both RGB Overlay and X Compositing Mode areunsuitable. This is the Maya default.
Using RGB Overlay
The RGB Overlay method uses the hardware RGB overlay to display the hotboxand marking menu. This method removes flickering that occurs with InternalSoftware Compositing.
To turn on RGB Overlay
1 Open the /etc/X11/xorg.conf file.
2 Replace the "CIOverlay" option (Color Index Overlay) as follows:
Installation Information Specific to Autodesk Maya | 35

Section "Device"Option "Overlay" "on"
EndSection
ORSection "Screen"
Option "Overlay" "on"EndSection
3 Turn off X Compositing as follows:
Section "Extensions"Option "Composite" "false"
EndSection
4 Save the xorg.conf file.
Using X Compositing
To use the X Compositing method, the X Composite Extension must beenabled, and your window manager must have compositing enabled. Thismethod removes flickering that occurs with Internal Software Compositing.
To turn on X Compositing
NOTE X Compositing is turned on by default on Red Hat 6 and Fedora 14 systems,so you do not have to modify the xorg.conf file.
1 Open the /etc/X11/xorg.conf file.
2 Turn on X Compositing as follows:
Section "Extensions"Option "Composite" "true"
EndSection
3 Save the xorg.conf file.
36 | Chapter 4 Configure Autodesk Products in your Entertainment Creation Suite

To turn on window manager compositing
The following table outlines how to turn on window manager compositing.
To turn on compositing…Window Manager
Select System Settings > Desktop Ef-fects, and under Activation, turn on En-able desktop effects at startup.
KDE
Open the Configuration Editor, then goto Metacity > General, and turn oncompositing_manager.
Metacity
Consult the window manager’s Help for in-formation.
Others
Using Internal Software Compositing
Internal Software Compositing takes a screen shot and draws the hotbox andmarking menus on top of that image to simulate the transparency.
This is a fallback method and should only be used if RGB Overlay and XCompositing methods are not suitable. You may find this method is slow andis likely to cause flickering when the hotbox or marking menu disappearsfrom the screen.
Other Recommended Settings
Focus Settings
To further improve interaction with the hotbox and marking menus in Maya,use the following focus policy settings for the window manager you are using.
Recommended settingWindow Manager
KDE ■ Use the Focus follows the MousePointer policy.
■ Turn off Click raises active window.
■ For Inactive Inner Window, set Activate& Pass Click for LMB, MMB and RMB.
Installation Information Specific to Autodesk Maya | 37

Recommended settingWindow Manager
Metacity (with Gnome) ■ Set focus_mode to sloppy.
■ Set raise_on_click to false.
Environment Variables
The following adjustments to Maya environment variables are alsorecommended to improve interaction with the hotbox.
In your Maya.env file, set the following:■ MAYA_SET_PARENT_HINT=0
Controls the automatic parenting of windows, where setting it to 0 disablesthe default parenting. (The behavior is similar to Maya 2010 on Linuxsystems.)
■ MAYA_HBFreeFocus=1
When set to 1, does not force the focus back to the window that had focusprior to the hotbox appearing on screen. (This is an additional controlwhen MAYA_SET_PARENT_HINT=0 is set on Linux systems.)
■ MAYA_HBFreeRaise=1
When set to 1, does not force the previously focused window to be raisedwhen the hotbox disappears from screen. (This is an additional controlwhen MAYA_SET_PARENT_HINT=0 is set on Linux systems.)
Uninstall Maya on Mac OS X or Linux
To uninstall Maya on Mac OS X
1 Navigate to the Maya directory (by default,/Applications/Autodesk/Maya2013/).
2 Drag the Maya2013 application to the trash.
3 Open a Terminal window and execute both of the following commands,where <productKey> is your product key:
adlmreg –u S <productKey> 2013.0.0.Fadlmreg –u N <productKey> 2013.0.0.F
This ensures that product information is properly removed from theProductInformation.pit file.
38 | Chapter 4 Configure Autodesk Products in your Entertainment Creation Suite

To uninstall Maya on Linux
To uninstall Maya on Linux you can use the rpm utility.
1 Open a shell as a super user.
2 Add /opt/Autodesk/Adlm/R4/lib64/ to LD_LIBRARY_PATH to set yourshared libraries for this session.
For example, by running the following command: exportLD_LIBRARY_PATH=/opt/Autodesk/Adlm/R4/lib64/
3 Run both of the following commands, where <productKey> is your productkey:
/usr/autodesk/Maya2013-x64/bin/adlmreg -u S<productKey> 2013.0.0.F
/usr/autodesk/Maya2013-x64/bin/adlmreg -u N<productKey> 2013.0.0.F
4 List the installed package names by entering:
rpm -qa |egrep 'adlm|Maya'
5 Identify each package name you want to uninstall. For example, theMaya2013_# package (where # is the package number).
6 Uninstall each package using the following command:
rpm -e PackageName
Install the Maya Help
By default, your installed version of Maya 2013 launches the Help from theAutodesk.com Web site. You can download and install a copy of the Maya2013 Help using the following instructions.
Prepare to install the Maya Help
Before you install the Maya Help, ensure that you have done the following:■ Install Maya 2013.
■ Download the Autodesk Maya 2013 English Documentation installer foryour platform from www.autodesk.com/maya-helpdownload-enu.
This file installs Maya Help for 32-bit and 64-bit systems.
Installation Information Specific to Autodesk Maya | 39

Install Maya Help on Windows
This section describes how to install a local version of the Maya Help on yoursystem. You can also install the Maya Help on a shared location such as aninternal network or web server. See Install the Maya Help on a shared location(page 42).
1 Double-click the Autodesk Maya 2013 English Documentation executablefile.
The installation wizard appears.
2 Extract the Help files to a temporary directory, then click Next.
These files are automatically removed from your system after theinstallation completes.
3 Follow the instructions in the installation wizard.
By default, the Maya Help is installed in the following directory:
■ C:\Program Files\Autodesk\Maya2013\docs\Maya2013\en_US onWindows 32-bit systems.
■ C:\Program Files(x86)\Autodesk\Maya2013\docs\Maya2013\en_USon Windows 64-bit systems.
You can change the install location of the docs directory during theinstallation if necessary.
4 Start Maya.
5 In Maya, open the Help preferences window by selecting Window >Settings/Preferences > Preferences.
The Preferences window appears.
6 Under Categories, click Help.
7 In the Help Location section, select Installed Local Help.
8 Click Save and exit the Preferences window.
The Maya 2013 Help is now available from the Help, F1, and contextsensitive help menus.
Install Maya Help on Mac OS X
1 Double-click the Autodesk Maya 2013 English Documentation .dmg.
The Maya English Documentation disk image mounts on the desktop.
2 Double-click the disk image.
A Finder window opens.
40 | Chapter 4 Configure Autodesk Products in your Entertainment Creation Suite

3 Double-click the Install Maya 2013 Documentation icon.
The installation wizard appears.
4 Follow the instructions in the installation wizard.
By default, the Maya Help is installed in the following directory:
/Applications/Autodesk/maya2013/docs/Maya2013/en_US.
You cannot change the install location of the docs directory.
5 Start Maya.
6 In Maya, open the Help preferences window by selecting Window >Settings/Preferences > Preferences.
The Preferences window appears.
7 Under Categories, click Help.
8 In the Help Location section, select Installed Local Help.
9 Click Save and exit the Preferences window.
The Maya 2013 Help is now available from the Help, F1, and contextsensitive help menus.
Install Maya Help on Linux
This section describes how to install a local version of the Maya Help on yoursystem. You can also install the Maya Help on a shared location such as aninternal network or web server. See Install the Maya Help on a shared location(page 42).
1 Extract the Maya Help package from the compressed files youdownloaded.
2 Open a shell as a super user (using su -) and navigate to the directorywhere you extracted the packages.
3 Type ./setup and press Enter.
The installation wizard appears.
4 Follow the instructions in the installation wizard.
By default, the Maya Help is installed in the following directory:
/usr/autodesk/maya2013-x64/docs/Maya2013/en_US.
You can change the install location of the docs directory during theinstallation if necessary.
5 Start Maya.
6 In Maya, open the Help preferences window by selecting Window >Settings/Preferences > Preferences.
Installation Information Specific to Autodesk Maya | 41

The Preferences window appears.
7 Under Categories, click Help.
8 In the Help Location section, select Installed Local Help.
9 Click Save and exit the Preferences window.
The Maya 2013 Help is now available from the Help, F1, and contextsensitive help menus.
Install Maya Help on a shared location
On Windows and Linux platforms, you can install the Maya Help to a sharedlocation, such as internal network or web server, so that it can be accessed bymultiple users. You can then set the Maya Help preferences on individualsystems to access Help from this location.
NOTE On the Mac OS X systems, you can only install the Maya Help to the defaultdirectory. To use the Maya Help from a shared location, you must copy the docsdirectory to a shared location. Individual systems can then set their Help preferencesso they access Help from this location.
When choosing a shared location, ensure that the directory path to the MayaHelp does the following:■ Points directly to the Help location. For example,
\\CompanyServer\SharedLocation\MayaHelp\docs\Maya2013\en_US.
Do not use an alias path.
■ Points to the directory containing the index.html file. For example, thepath pointing to the English Maya Help ends at the \en_US directory.
■ Uses either http or https protocol for a web server location.
To install Maya Help to a shared location
1 Extract the Maya Help files for your platform and start the installationwizard as described in steps 1 and 2 of the Maya Help installationinstructions.
See Install the Maya Help on Windows (page 40) and Install the MayaHelp on Linux (page 41).
2 During the installation when asked to confirm the destination folder forthe Help install, depending on your platform, click Change (Windows)or Browse (Linux), then specify a shared location for the Help.
Individual systems can then set their Help preferences so they accessHelp from this location.
42 | Chapter 4 Configure Autodesk Products in your Entertainment Creation Suite

To set Help preferences for a shared location
1 Start Maya.
2 In Maya, open the Help preferences window by selecting Window >Settings/Preferences > Preferences.
The Preferences window appears.
3 Under Categories, click Help.
4 In the Help Location section, select Custom, and then click the icon to browse to the shared location of the Maya Help, or type thedirectory of http path directly in the Custom field.
5 Click Save and exit the Preferences window.
The Maya 2013 Help is now available from the shared location.
Install MatchMover, Composite, Backburner,and DirectConnect
The Maya installer gives you the option of installing Maya Composite,Autodesk® MatchMover™ camera tracker, Autodesk® Backburner™ networkrender queue manager, and Autodesk® DirectConnect. You do not need aseparate license to install and run these applications.
NOTE You must install Maya if you want to install and run MatchMover orComposite. You can install and run Backburner without Maya.
Installation Information Specific to Autodesk Maya | 43

Install mental ray for Maya satellite
Overview of mental ray (satellite)
mental ray for Maya supports a different form of network rendering: mentalray satellite rendering. The new network rendering capability, based on mentalray satellite technology, allows you to install a version of mental ray (satellite)on any networked computer. This special version of mental ray resides onthat machine and waits for rendering tasks from Maya. It supplements themental ray rendering capabilities in Maya with the additional rendering powerprovided by the networked computers’ CPUs.
A mental ray distributed rendering can speed up all of the following tasks:■ interactive rendering (through the Maya interface)
■ IPR rendering with mental ray for Maya
■ interactive batch rendering (a batch render started by Maya)
44 | Chapter 4 Configure Autodesk Products in your Entertainment Creation Suite

■ command-line rendering
The rendering process is typically initiated from the master machine (themachine running Maya or where the command-line render starts from). Theslave machines (satellite rendering computers) process rendering tasks theyreceive over the network from the master and send back results. The mastermachine handles task distribution, load balancing, and the collection ofreceived rendering tasks which make up the rendered image.
For more information about mental ray satellite, including how to set up therayhosts file to get and receive data from Maya, see the Maya Help. In theMaya Help, navigate to User Guide > Rendering and Render Setup >mental ray Rendering > mental ray for Maya Rendering > Networkrendering using mental ray for Maya.
Setting up the rayhosts file is required for mental ray for Maya satelliterendering to work.
Slave machine installation
The special version of mental ray standalone with satellite renderingtechnology must be installed on all slave machines. The satellite-enabledversions of mental ray for Windows, Mac OS X, and Linux are included withthis release of Maya on the Maya DVD.
(Windows) To install mental ray standalone with satellite licensing
1 On each slave machine, begin the installation process by inserting theMaya DVD, opening the mental ray satellite folder and theplatform-specific Windows folder, and double-clicking the mental raystandalone installer.
The installer appears.
2 Follow the installation steps.
During the installation, you can click Custom to change the installationdirectory. The default installation directory is:
C:\ProgramFiles\Autodesk\mrsat3.10.1-maya2013
Installation Information Specific to Autodesk Maya | 45

(Mac OS X) To install mental ray standalone with satellite licensing
1 On each slave machine, begin the installation process by inserting theMaya DVD, opening the mental ray satellite folder and double-clickingthe mental ray standalone installer.
2 Follow the installation steps.
During the installation, you can change the installation directory. Thedefault installation directory is:
/Applications/Autodesk/mrsat3.10.1-maya2013
(Linux) To install mental ray standalone with satellite licensing using rpm
1 Log in as root.
2 On each slave machine, begin the installation process by inserting theMaya DVD.
3 Mount the DVD drive, if necessary. For example, type:
mount-r /dev/dvd /mnt/dvd
4 Open the mental ray satellite directory, go to the Linux directory, andenter the following command (where # is the specific package number):
rpm –ivh mentalraySatellite3.10.1_maya2013-3.10-#.x86_64.rpm
NOTE 64-bit Windows releases of mental ray for Maya satellite use the sameport and service name as the 32-bit version. You will run into problems ifyou install both the 32-bit and the 64-bit versions on a 64-bit system. Thereis only one service entry/xinetd config, so installing a 64-bit package afterthe 32-bit (or the other way around) leaves only the last installed versionworking.
Slave machine additional setup
Once this version of mental ray is installed and running, a service on themachine (the Ray Sat server) waits for rendering tasks from mental ray forMaya on the master machine. The satellite-enabled version of mental ray doesnot require its own licensing; it is activated through Maya’s licensing.
On the slave machine, the Ray Sat server (service name: mental ray Satellite3.10.1 for Maya 2013) must be running. To verify that it is running onWindows, follow this procedure.
46 | Chapter 4 Configure Autodesk Products in your Entertainment Creation Suite
To verify that Ray Sat server is running (Windows)
1 Open a Windows command prompt.
2 Navigate to the bin directory of the mental ray satellite standalone. Bydefault this is C:\Program Files\Autodesk\mrsat3.10.1-maya2013\bin\.
3 Type the following:
raysat2013server/query
A message should be returned that the RaySat2013 Server service isrunning.
If you do not get this message, make sure that RaySat2013 Server hasbeen installed as a service, and start it from the Services Control Panel(Settings > Control Panel > Administrative Options > Services)or type the following:
raysat2013server/start
Slave machine port setup
On the slave machine, port number 7413 is set by default. This works well inthe majority of cases and you won’t need to change the port number.
If you want to change the port number that mental ray satellite uses to a valueother than 7413, you must edit the services file. The port value would bedetermined by your network administrator (a free TCP/IP port).
To change the port number (Windows, Linux)
1 Edit the services file with a text editor.
The services file is located at:
■ (Windows XP) C:\Windows\system32\drivers\etc\services
■ (Linux) /etc/services
2 Change the number in the following line (here, 7413) to the desired portnumber:
mi-raysat20137413/tcp
Installation Information Specific to Autodesk Maya | 47

To change the port number (Mac OS X 10.4, Tiger)
1 Log in as superuser (sudo -s).
2 Open the file /etc/services using your preferred text editor.
3 Edit the line: mi-raysat2013 7413/tcp.
4 Save the file.
5 From the Finder menu, select Go > Applications and then double-clickthe Utilities folder.
6 Double-click the NetInfo Manager icon.
7 Under the Services directory of the NetInfo database, find and select theappropriate service (mental ray Satellite 3.10.1 for Maya 2013).
8 Click the lock icon at the bottom of the panel and then enter youradministrator user name and password. This allows you to unlock theNetInfo database and make changes.
9 Select the port field and change its value to the desired port number.
10 Click the lock icon again when you’re done.
11 From the Finder menu, select Domain > Save Changes to commityour changes to the NetInfo database.
12 Reboot your machine.
To change the port number (Mac OS X 10.5, Leopard)
1 Log in as superuser (sudo -s).
2 Open the file /etc/services using your preferred text editor.
3 Edit the line: mi-raysat2013 7413/tcp.
4 Save the file.
5 Open a Terminal window and do the following:
sudo/usr/bin/dscl . -change /Services/mi-raysat2013port<currentportnumber><newportnumber>
For example:
sudo/usr/bin/dscl . -change /Services/mi-raysat2013 port7109 7413
48 | Chapter 4 Configure Autodesk Products in your Entertainment Creation Suite

NOTE To determine the port you’re currently using, in a Terminal window,type: /bin/dscl . -read /Services/mi-raysat2013
6 Reboot your machine.
Licensing of satellite rendering
For standalone licenses, the use of mental ray for Maya with satellite can onlybe initiated from the specified host for which your received your Maya key.The workstation can distribute mental ray for Maya rendering to up to fourslave CPUs.
For networked licenses, use of the functionality is slightly more flexible. Fornetworked license setups, the license running Maya and the license runningmental ray for Maya can be logged out separately, allowing certain renderingtasks to be initiated remotely.
There are two possible cases when using mental ray for Maya with networkedlicenses:■ (Interactive) With Maya running interactively on a workstation, initiate a
mental ray for Maya render (either a single frame in the Render View, Batchrender or command line render) on the workstation. The networked mentalray for Maya portion of your license is logged out. This allows the mentalray satellite slaves indicated in your rayhost file to participate in the render.
■ (Offline) If you launch a command line mental ray for Maya render, thecomputer you launched the command from then becomes the mastermachine for mental ray for Maya satellite rendering.
NOTE If you have launched Maya but have not yet rendered with mental rayfor Maya since the start of your interactive session, no mental ray for Maya lineitem from your networked license is checked out. You may therefore start acommand line mental ray for Maya render from another host. This checks outthe mental ray for Maya portion of the license, making it unavailable for anyother workstation, including the workstation of the user who launched Maya.
For more details on mental ray rendering, see the Rendering sections of theMaya Help (for example, Rendering), as well as the mental ray referenceincluded with the Maya Help.
Installation Information Specific to Autodesk Maya | 49

Installation Information Specific to AutodeskMotionBuilder 2013
This chapter covers the default installation paths of the 32-bit and 64-bitMotionBuilder software products, the installation of the ClipArt sample files,and the procedures for switching from the default online Help to the localHelp or the Japanese local Help.
Installation and Registration
Install and register the MotionBuilder software product by following theon-screen installation instructions.
MotionBuilder 32-bit Version Default Installation
The default installation path for the 32-bit version of the MotionBuildersoftware product is C:\Program Files\Autodesk\MotionBuilder 2013 on thefollowing Operating System (OS):■ Microsoft® Windows® XP Professional
The default installation path for the 32-bit version of the MotionBuildersoftware product is C:\Program Files (x86)\Autodesk\Autodesk MotionBuilder2013 on the following OS:■ Microsoft Windows XP Professional x64 Edition
■ Microsoft Windows 7 Professional x64 Edition
MotionBuilder 64-bit Version Default Installation
The default installation path for the 64-bit version of the MotionBuildersoftware product is C:\Program Files\Autodesk\MotionBuilder 2013 on thefollowing OS:■ Microsoft Windows XP Professional x64 Edition
■ Microsoft Windows 7 Professional x64 Edition
The MotionBuilder installer installs by default the 64-bit version of the softwareon a 64-bit OS. You can override this default stand-alone installation bynavigating to the root directory of the install media and launching the 32-bitinstaller (Setup32.exe). For a deployment, you can select the 64-bit targetplatform, and specify the 32-bit version of the product.
50 | Chapter 4 Configure Autodesk Products in your Entertainment Creation Suite
ClipArt Sample Files Default Installation
The default installation path for the ClipArt sample files folder is:C:\Autodesk\MotionBuilder 2013 32bit\Content for the 32-bit MotionBuilderversion and C:\Autodesk\MotionBuilder 2013 64bit\Content for the 64-bitMotionBuilder version.
NOTE If you are installing the MotionBuilder software product from the (DVD orUSB) media, the ClipArt sample files do not get installed by default. You need tocopy the ClipArt sample files folder from the media (located under the Contentfolder) to your system.
Switching from Default Online Help to Local Help
The MotionBuilder Help is Internet-based by default. If you prefer to have theMotionBuilder Help available on your system, proceed with the followingprocedure.
To change the Help preferences from online Help to local Help:
1 Download the MotionBuilder Help executable from ht-tp://www.autodesk.com/motionbuilder-helpdownload-enu.
2 Run the installer by following the on-screen installation instructions.
NOTE Although the default Help installation path is C:\Program Files(x86)\Autodesk\Help\motionbuilder2013, you can specify another installationlocation.
3 Once installed, launch MotionBuilder.
4 In the MotionBuilder menu bar, select Settings > Preferences.
5 In the Preferences window, click Help.
6 Click Local Computer/Network.
7 Click Browse, locate, and select the MotionBuilder Help folder, thenclick OK.
The Help is now accessible via the MotionBuilder Help menu and theMotionBuilder F1 keyboard shortcut.
NOTE The Help launches in your system's default browser.
Installation Information Specific to Autodesk MotionBuilder 2013 | 51
Accessing the Japanese Help via MotionBuilder
The Japanese MotionBuilder Help is internet-based by default. If you preferto have the Japanese MotionBuilder Help available on your system, proceedwith the following procedure.
To access the Japanese MotionBuilder Help via MotionBuilder:
1 Download the MotionBuilder .zip file from http://www.autodesk.com/mo-tionbuilder-helpdownload-enu to your system.
2 Extract the contents of the Japanese Help .zip file to the desired location.
3 Launch MotionBuilder.
4 In the MotionBuilder menu bar, select Settings > Preferences.
5 In the Preferences window, click Help.
6 Click Local Computer/Network.
7 Click Reset.
8 Click Browse, locate, and select the Japanese MotionBuilder Help folder,then click OK.
The Help is now accessible via the MotionBuilder Help menu and theMotionBuilder F1 keyboard shortcut.
NOTE The Help launches in your system's default browser.
Installation Information Specific to AutodeskMudbox
Certain items are unique to the Autodesk® Mudbox® install process (in contrastwith other Autodesk products). In this chapter learn about the process forswitching to the local version of the Help and how to install the 32-bit versionof Mudbox on a 64-bit machine. Refer to the following sections:■ Install the Mudbox Help locally (page 53)
■ Install a 32-bit Product on a 64-bit Operating System (page 21)
If you are installing Mudbox on Mac OS X or Linux, refer to the AutodeskMudbox 2013 Installation Help at www.autodesk.com/mudbox-install-2013-enu.
52 | Chapter 4 Configure Autodesk Products in your Entertainment Creation Suite

For late-breaking information, you can also review the Mudbox release notesavailable at www.autodesk.com/mudbox-readme-2013-enu.
Additional Mudbox resources
You can find the following additional Mudbox resources online:■ The Autodesk Mudbox 2013 Help at www.autodesk.com/mudbox-help-2013-
enu.
■ A listing of the most current qualified hardware and operating systems atwww.autodesk.com/mudbox-systemreq-2013-enu.
■ The full Mudbox Installation Help at www.autodesk.com/mudbox-install-2013-enu.
■ Mudbox licensing information at www.autodesk.com/me-licensing-2013-enu.
Install the Mudbox Help locally
By default, Mudbox calls an Autodesk web server to display the Mudbox Help.You must have Internet access to view the Help. This ensures you have themost up-to-date version of the Help and allows Autodesk to make updates tothe Help between software releases.
If you do not have reliable Internet access, you can download the MudboxHelp from the Autodesk Web site and install it locally as follows.
Prepare to install the Mudbox Help
Before you install the Mudbox Help, ensure that you do the following:■ Install Mudbox
■ Download the Autodesk Mudbox English Documentation executable filefor your version and platform from www.autodesk.com/mudbox-helpdownload-enu. This file installs Mudbox Help for 32-bit and 64-bit systems.
Install the Mudbox Help
(Windows)
1 Download and run the Help installer from www.autodesk.com/mudbox-helpdownload-enu, following the instructions in the installer.
Installation Information Specific to Autodesk Mudbox | 53

By default, the Mudbox Help is installed in the following directory:Program Files\Autodesk\Help\mudbox<version>\.
2 Start Mudbox.
3 Select Windows > Preferences to open the Preferences window.
4 Expand the Help section and set Help Location to Installed LocalHelp.
5 Click Ok to exit the Preferences window.
Once installed, the local Mudbox Help is available when you select Help> Mudbox Help, press F1, or click the Help button in various Mudboxwindows.
(Mac OS X)
1 Double-click the Autodesk Mudbox English Documentation executablefile you download from www.autodesk.com/mudbox-helpdownload-enu.
The Mudbox Help package appears in a Finder window.
2 Double-click the package (.pkg) file.
3 Follow the instructions in the Help installer that appears.
By default, the Mudbox Help is installed in the following directory:/Applications/Autodesk/Mudbox<version>/docs/mudbox<version>/en_US.
4 Start Mudbox.
5 Select Mudbox > Preferences to open the Preferences window.
6 Expand the Help section and set Help Location to Installed LocalHelp.
7 Click Ok to exit the Preferences window.
Once installed, the local Mudbox Help is available when you select Help> Mudbox Help, press F1, or click the Help button in various Mudboxwindows.
(Linux)
1 Extract the Mudbox Help package from the compressed files youdownload from www.autodesk.com/mudbox-helpdownload-enu.
2 Open a shell as a super user (using su -) and navigate to the directorywhere you extracted the packages.
3 Type ./setup and press Enter.
4 Follow the instructions in the Help installer that appears.
54 | Chapter 4 Configure Autodesk Products in your Entertainment Creation Suite

By default, the Mudbox Help is installed in the following directory:/usr/Autodesk/Mudbox<version>-x64/docs/mudbox<version>/en_US.
5 Start Mudbox.
6 Select Windows > Preferences to open the Preferences window.
7 Expand the Help section and set Help Location to Installed LocalHelp.
8 Click Ok to exit the Preferences window.
Once installed, the local Mudbox Help is available when you select Help> Mudbox Help, press F1, or click the Help button in various Mudboxwindows.
NOTE You can also set the Help Location preference to Custom if you havemanually copied the Mudbox Help files to your computer, or if you want to accessthe Help from a location not on your own machine (for example, to point to acommon location on your network). Refer to the instructions in the followingsection, Install the Mudbox Help in a shared location.
Install the Mudbox Help in a shared location
You can install the Mudbox Help on a shared location, such as internal networkor web server, so that it can be accessed by multiple users. You can then setthe Mudbox Help preferences on individual systems to access the Help fromthe shared location.
When designating a directory path to the shared location of the Mudbox Help,ensure that:■ The path points directly to the Help location. For example,
\\CompanySever\SharedLocation\MudboxHelp\docs\Mudbox<version>\en_US.
Do not use an alias path.
■ The path points to the directory containing the index.html file. Forexample, the path pointing to the English Mudbox Help ends at the \en_USdirectory.
■ Either http or https protocol is used for a web server location.
To install Mudbox Help to a shared location
1 Download and run the Help installer from www.autodesk.com/mudbox-helpdownload-enu, following the instructions in the installer.
Installation Information Specific to Autodesk Mudbox | 55

2 When asked where to install the Mudbox Help files, click Change(Windows) or Browse (Linux) and specify a shared location for theHelp.
NOTE
On Mac OS X, you can only install the Help to the default location. Toinstall the Mudbox Help in a shared location, you must first install tothe default location (/Applications/Autodesk/Mudbox<version>/docs/mudbox<version>/en_US),then manually copy the docs directory to your desired location.
Individual users can then set their Help preferences to access the MudboxHelp from this shared location.
To access Mudbox Help from a shared location
1 Start Mudbox.
2 (Windows and Linux) Select Windows > Preferences to open thePreferences window.
(Mac OS X) Select Mudbox > Preferences to open the Preferenceswindow.
3 Expand the Help section and set Help Location to Custom, thenenter the shared location of the Mudbox Help in the Help Path field.
4 Click Ok to exit the Preferences window.
The Mudbox Help is now accessed from the shared location.
Installing a 32-bit Product on a 64-bit OperatingSystem
You can manually override the installer's default behavior, which automaticallyinstalls the 64-bit product on a 64-bit computer. For a stand-alone installation,navigate to the root directory of the install media, and launch the 32-bitinstaller, which has a file name of Setup_32.exe or similar. For a deployment,you can select the 64-bit target platform, and specify the 32-bit version of aproduct.
56 | Chapter 4 Configure Autodesk Products in your Entertainment Creation Suite

Installation Information Specific to AutodeskSoftimage
The answers to many of your Softimage-specific installation and licensingquestions can be found on the Softimage Support site where you can quicklyaccess the top support issues or search the Support knowledge base.
Late-breaking information and troubleshooting tips are always available fromthe Softimage Support Blog and in the Softimage Release Notes on the wiki.
Important Information Links
■ Softimage Product Center: www.autodesk.com/softimage
■ Softimage Support: www.autodesk.com/softimage-support
■ Softimage Support Blog: xsisupport.wordpress.com
■ Softimage Wiki: www.autodesk.com/softimage-wiki
■ Softimage Release Notes: www.autodesk.com/softimage-whatisnew
Installation Information Specific to Autodesk Softimage | 57

58

Index
32-bit install on 64-bit machine 193ds Max Composite 143ds Max specific information
A
activationadministrative imageAutodesk Material Libraries
3ds Max 15
B
Backburner 16
C
change license typeComposite, MatchMover, Backburner,
DirectConnect 43configuration settingscustom settings
D
distributed license serverdocumentation linksDownload Manager
I
InfoCenterinstall Maya Help 39installation loginstallation process diagram
K
Knowledgebase
L
languageslicense server modelslicense types
changeLinux 21, 39local help
installing for 3ds Max 14log files
M
Mac OS X 21, 38master machine 45mental ray
satellite rendering 44mental ray for Maya satellite 44Mudbox 52Mudbox Help
Local install 53
N
network license
O
operating system selection
P
port numberchanging 47
product settings
R
ray sat server 46
59 | Index

redundant license serverrepair product
S
satellite renderingchanging port number 47master 45mental ray 44ray sat server 46slave 45slave machine installation 45
serial numbersilent modesingle license serverslave machine 45stand-alone licensesub-components
3ds Max 14
suitesystem requirements
T
tools and utilities3ds Max 17
typical settings
U
uninstall Maya 38, 39uninstall product
W
web-based installation
60 | Index