Embed Size (px)
Citation preview

PC 506 SPRINKLER TIMERInstallation, Programming, and Operation Guide
RAIN BIRD IRRIGATION CORPORATIONTechnical Services: 800-247-3782 • http://www.rainbird.com

Special Upgrade O�er
Save an extra 15% o� new sprinkler timers and irrigation controllers at the Rain Bird Online Store.*
Enter discount code:
UPGRADE15 at checkout to save an extra 15% o�*
* Additional discount not valid on clearance items, bundles or store specials. Discount applies to controller products only. Cannot be combined with
other store discount codes. Valid at the Rain Bird Online Store only. Subject to change without notice.
Still struggling with your old sprinkler timer? Having a hard time complying with local watering restrictions? Upgrading to a new Rain Bird sprinkler timer is easier than you might think.
New timers are easier to program than ever before, with powerful features to help save you time and water while keeping your yard healthy and vibrant.
There are lots of models to meet your needs, including indoor and outdoor versions, �exible modular timers and even smart controllers that automatically adjust themselves based on the weather.
Shop Now at store.rainbird.com and enjoy exclusive upgrade savings!
® Registered trademark of Rain Bird Corporation.

CONTENTSINTRODUCTION .............................. 1
Features & Benefits ............................... 1Timer Stations ........................................ 2Controls & Indicators ............................. 3
INSTALL TIMER ............................... 4Select a Location ................................... 4Mount Timer ........................................... 5Install Battery ......................................... 6Connect Field Wiring ............................. 7Connect Transformer ........................... 13
PROGRAM TIMER .......................... 15Set Current Time and Day ................... 16Basic “Dial” Programming ................... 17Custom Programming ......................... 23
OPERATING THE TIMER ................ 30Manual Operation ................................ 30Manual Cycle ....................................... 30Other Timer Features ........................... 32
WINTERIZING THE SYSTEM .......... 33TROUBLESHOOTING ..................... 34

English
Page 1PC-506 Series Sprinkler Timer
INTRODUCTIONThank you for choosing a Rain Bird PC-506 SeriesTimer. PC-506 timers provide simple programmingand flexible schedules to meet your watering needs.
This manual describes how to install, program, andoperate your timer. Read this manual carefully andkeep it handy for future reference.
If you have any problems with your PC-506 Timer,please call the Rain Bird Technical Assistancehotline at 800-247-3782. You may also find helpfulinformation on the Rain Bird Web site:www.rainbird.com.
Features & BenefitsThe PC-506 Sprinkler Timer is an electronic clockthat controls when your sprinkler system turns onand how long the sprinklers run. The PC-506 timeroffers several advanced features, including:
• Separate schedules for each station with just aturn of the dial
• 12 popular schedules to choose from, or setyour own custom schedule
• Ability to water up to six zones
• Exclusive “new lawn” watering cycle for lawnseed germination or sod
• Large, easy-to-use dials save your scheduleseven during power outage
• Automatic watering up to three times per day, upto three hours per zone (ideal for drip watering)
• Large, easy-to-read LCD screen for setting timeof day, watering start times, and customschedules
• “Pause” feature to interrupt watering schedule foryard activity
• Pump start output standard (pump relays soldseparately)
English
PC-506 Series Sprinkler TimerPage 2
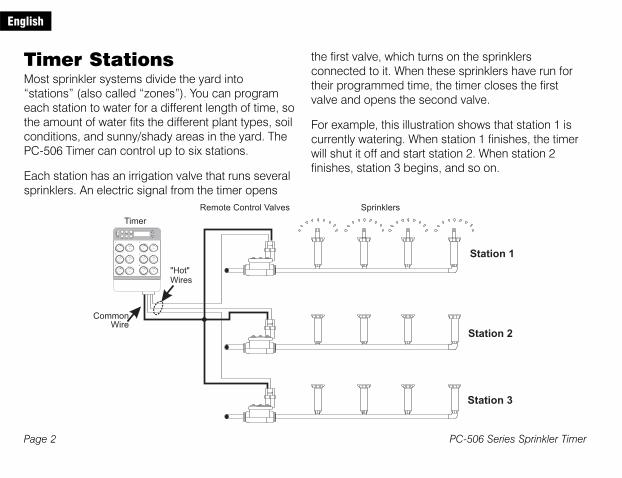
Timer StationsMost sprinkler systems divide the yard into“stations” (also called “zones”). You can programeach station to water for a different length of time, sothe amount of water fits the different plant types, soilconditions, and sunny/shady areas in the yard. ThePC-506 Timer can control up to six stations.
Each station has an irrigation valve that runs severalsprinklers. An electric signal from the timer opens
the first valve, which turns on the sprinklersconnected to it. When these sprinklers have run fortheir programmed time, the timer closes the firstvalve and opens the second valve.
For example, this illustration shows that station 1 iscurrently watering. When station 1 finishes, the timerwill shut it off and start station 2. When station 2finishes, station 3 begins, and so on.

English
Page 3PC-506 Series Sprinkler Timer
Controls & IndicatorsThis illustration shows the programming controls onthe face of the PC-506 Timer. These controls include:
On/Off button
Pause button
Set Time/Day button
Review Station button
Set Start button
Manual Cycle button
Set Custom button
LCD display
Up/Down arrow buttons
➓ Station dials (6 sets, each with a Schedule and aDuration dial)

English
PC-506 Series Sprinkler TimerPage 4
INSTALL TIMERBefore installing your PC-506 Timer, make sure youhave the following tools and equipment:
• Two #10 screws and mounting anchors
• Screwdriver
• 9-volt battery
• Color-coded, multi-strand, direct burial wire (18-gauge for runs of less than 800 feet; 14-gauge forlonger runs)
• Wire strippers
Select a LocationNOTE::::: The PC-506 Timer is forINDOOR use only. If you must install itoutdoors, use a water-resistant cabinet,such as the Rain Bird Model TC-2 TimerCabinet. The TC-2 is a heavy-duty,weather-resistant plastic case that letsyou convert any indoor-only timer tooutdoor use.
Select a convenient indoor location within 6 feet(1.9 m) of a 120-volt AC electrical outlet. Themounting location should be completely protectedfrom moisture, direct sunlight, and freezingtemperatures.

English
Page 5PC-506 Series Sprinkler Timer
Mount TimerBefore securing your timer to the wall, make surethat there is enough room on the left side for thedoor to swing open.
Screw two #10 screws into the wall 315/16 inchesapart, leaving about ¼ inch of each screw headprotruding from the wall. Use plastic anchors tosecure the screws to plaster or masonry walls.
Hang the timer on the screws using the keyholeslots on its back.
OPTIONAL: To further secure the timer, removethe lower access cover by gently prying it out ofthe slots on the lower left and right corners. Thendrive screws through the lower three mountingholes.

English
PC-506 Series Sprinkler TimerPage 6
Install BatteryDuring a power outage, the battery preserves yourprogrammed watering schedules. A newly installedbattery will hold information for up to 24 hours.
If the power is out for more than 24 hours, or if thebattery fails, the timer will revert to the pre-set starttimes of 6:00 a.m., 6:00 p.m., and 12 noon. Stationsset for custom programs A and B will start once aday in a cycle beginning at 6:00 a.m. The time ofday, all custom start times, and any A or B custom-program schedules will have to be re-programmed.
NOTES: The battery serves as memoryback-up only. You can program the timeron battery power, but the system will notwater without AC power.
Replace the battery once a year. If poweroutages occur frequently, you may need tochange the battery more often.
When replacing the battery, DO NOTunplug the transformer or you will lose allprogrammed information.

English
Page 7PC-506 Series Sprinkler Timer
To install the battery, remove the timer’s loweraccess cover by gently prying it out of the slotson the bottom corners of the timer.
Place a 9-volt alkaline battery, with the “+” sidefacing up, in the slot directly below the fuse. DONOT use a rechargeable battery.
Replace the cover, or connect the field wiring asdescribed in “Connect Field Wiring.”
NOTES: : : : : DO NOT let the batterycontact the timer’s terminal strip.
For your convenience, there is a spare0.5 amp fuse on the inside of the cover.
Connect Field WiringIf you have not done so, remove the timer’s loweraccess cover. On the bottom right-hand corner ofthe timer, near the battery compartment, you will seea row of small, black switches. These are theterminals where you will connect the field wires.

English
PC-506 Series Sprinkler TimerPage 8
Select Proper WireFor wire runs of less than 800 feet, use 18-gaugecolor-coded, multi-strand, direct burial wire. Forlonger runs, use 14-gauge wire of the same type.
Choose wire that has one strand for each valve inyour system, plus one for the common wire. Forexample, use five-strand wire if you have fourvalves, seven-strand wire for six valves, etc.
Tape off spare wire strands for future system use ortroubleshooting. Wire that is buried undergroundmust have watertight connections (use grease caps)and be code-approved for underground use. Avoidplacing underground wire in places where it may bedamaged by digging or other activities.
Connect Valve Wires to TimerEach valve connects to the timer with two wires: a“hot wire” of its own, and a “common wire” that itshares with the other valves.
Remove the timer’s lower access cover bygently prying it out of the slots on the bottomcorners of the timer.

English
Page 9PC-506 Series Sprinkler Timer
NOTE::::: Make sure all wire connectionsare tight and in firm contact with theterminals. Use watertight spliceconnectors to prevent corrosion andavoid short circuits.
Make sure ½” of wire extends from eachstrand. If not, use wire strippers to cut ½”of insulation from each strand.
Splice together one wire from each valve(usually the white strand) to create a singlecommon wire. Connect the common wire to theterminal marked “COM:”
a. Open the terminal by pushing theswitch up.
b. Insert the end of the wire into the terminal.
c. Close the terminal by pushing theswitch back down.
Connect each valve “hot” wire to the numberedterminal for the corresponding valve station:
a. Open the appropriate terminal (terminal#1 for valve #1, terminal #2 for valve#2, etc.) by pushing the switch up.

English
PC-506 Series Sprinkler TimerPage 10
b. Insert the end of the wire into the terminal.
c. Close the terminal by pushing theswitch back down.
CAUTION: DO NOT connect more thanone valve wire to each terminal; this willdamage the timer. If using more than onetimer, DO NOT share the “common” wiresbetween them.
If any terminal does not connect to a valve, turnthe corresponding Duration dial to “Manual Off.”
NOTE::::: To save water and money, youcan also use a rain sensor, such as RainBird’s RS-1 Rain Shut Off. The RS-1measures rainfall and stops unnecessarywatering.
English
Page 11PC-506 Series Sprinkler Timer
If Using a Master Valve or PumpStart Relay(Optional)
NOTE::::: Complete this section only if yoursystem requires a master valve (anautomatic valve installed on the mainlinepipe upstream from the station valves) ora pump start relay. The timer does notprovide the main power for a pump.
PC-506 Timers allow a master valve or pump startrelay to operate whenever a station valve is on.Some systems use a pump to draw water from awell or other source.
If you are activating a pump from the timer, you mustuse a Pump Control Relay, such as Rain Bird’sPCR-1. The PCR-1 offers solid-state reliability andcan activate most 120- or 240-volt pump motors upto two horsepower.

English
PC-506 Series Sprinkler TimerPage 12
Connect the color-coded “hot” wire from themaster valve or pump start relay to the timerterminal marked “MV.”
Connect the common wire from the mastervalve / pump start relay to the common wirecoming from the station valves. This wireconnects to the timer terminal marked “COM.”
NOTE::::: Make sure that the total draw ofthe master valve or pump start relay plusthe draw of the valve does not exceed0.650 Amps at 24 VAC, 60 Hz.
To avoid possible pump damage, connect ashort “jumper” wire from any unused stationterminal(s) to the nearest terminal in use. Forexample, if you have a six-station timer with onlyfour stations in use, jumper stations five throughsix to the nearest active station (four).

English
Page 13PC-506 Series Sprinkler Timer
Connect TransformerAfter installing the battery and connecting the fieldwires, you are ready to connect the timer’stransformer.
CAUTION: DO NOT plug in thetransformer until you have completed andchecked all wiring connections. Also, donot attempt to link two or more timerstogether with a single transformer.
If you have not done so, remove the timer’slower access cover.
Turn the On/Off button to “Off.”
Insert the two ends of the transformer wire intothe transformer terminals marked 24 VAC.
a. Open the transformer terminals bypushing the switches up.
b. Insert the end of each transformer wire intoone of the terminals. It does not matterwhich wire you connect to whichtransformer terminal.

English
PC-506 Series Sprinkler TimerPage 14
c. Push the switches back down tohold the wire in place.
NOTE::::: If the display does not come on,verify that the battery is new and securelyconnected.
Plug the transformer into an electrical outlet.
Turn the On/Off button to “On.” This completesthe installation and wiring process. You are nowready to program your timer.

English
Page 15PC-506 Series Sprinkler Timer
PROGRAM TIMERProgramming is the process of telling the timer whenand how long you want to water each station. Whenyou set a program, you schedule three things:
Watering days — the specific days of the weekon which watering takes place (for example, everythird day).
Start time — the time(s) of day that wateringbegins. This is the time the first station in theprogram begins watering; all other stations thenfollow in sequence.
Watering duration (run time) — the numberof minutes that each station runs.
When programming, you can only change the fieldthat is flashing in the LCD display. To changesomething else, press the appropriate button untilthe item you want to change flashes. For example, tochange the minutes, press “Set Time/Day” until theminutes field is flashing.
There are two ways to program your timer:
The “basic dial” program lets you set wateringdays, times, and durations just by turning twodials for each station. These dials offer severalwatering cycles, such as “every day” or “every 3rd
day.” To learn about using the basic program,see “Basic Dial Programming” on page 18.
The “custom programs A and B” option lets youselect specific days of the week rather than thecycles on the dials. You can also program a setof start times to use with the new cycles. To learnmore about setting custom programs, see“Custom Programming” on page 24.
Before you program your watering schedule, set thecurrent time and day on the timer.

English
PC-506 Series Sprinkler TimerPage 16
Set Current Time and DayYou must set the current time and day the first timeyou program the timer, and after any powerinterruption.
Turn the “On/Off” button to ON.
Make sure nonenonenonenonenone of the Duration dials are set to“manual on.”
Press the “Set Time/Day” button once. The hourdigits will flash in the LCD screen.
Use the and buttons to set the current hour.Keep scrolling until the desired time, includingthe AM/PM indicator, appears.
Press “Set Time/Day” again. The minute digitswill flash in the LCD screen.
Use the and buttons to set the minutes.
Press “Set Time/Day” again. A day of the weekwill flash in the LCD display.
Use and buttons to select the current day.
Press “Set Time/Day” to exit this function.

English
Page 17PC-506 Series Sprinkler Timer
Basic “Dial” ProgrammingOn the front of your PC-506 timer, you will see sixpairs of dials, numbered 1 through 6. Each pair ofdials represents a watering station (or “zone”) in yourirrigation system.
NOTE::::: For more information aboutstations, see “Timer Stations” on page 2of this manual.
The two dials for each station are:
• Schedule Dial — To select what days andhow many times per day to water.
• Duration Dial — To select the length of eachwatering (“run time”).

English
PC-506 Series Sprinkler TimerPage 18
Watering Days and Number ofWaterings Per Day (Schedule Dial)For each station in your irrigation system, use theSchedule dial to select a cycle (i.e., how many daysshould pass before the system waters), and howmany times per day to water. The Schedule dial letsyou choose between Normal Watering, New LawnCycling, or Custom Programs.
Normal WateringSelect a watering cycle of every day, every secondday, every third day, or every fourth day. For example,if today is Monday and you turn the Schedule dial to“every third day,” then watering will take place todayand again on Thursday, Sunday, Wednesday, and soon — every third day.
Within each of these cycles, you can choose to wateronce, twice, or three times per day. Just turn the dial tothe number of times you want the system to run onwatering days. This illustration shows Station 1 set towater twice on every third day.

English
Page 19PC-506 Series Sprinkler Timer
New Lawn CyclingIf you have a newly seeded lawn that requires frequentwatering, turn the Schedule dial to “new lawn.” The NewLawn selection waters eight times a day, for up to 15minutes at a time. The first cycle begins at 6:00 a.m. andrepeats every two hours until 8:00 p.m.
NOTE: If a station is set to “New Lawn,” it willnot water for more than 15 minutes, even if theDuration dial is set for longer.
New Lawn stations have priority, and will interrupt any otherongoing cycles. After the New Lawn Cycle is complete, theinterrupted cycle will resume.
Once your lawn is established, change the Schedule dial toone of the other watering schedules.
Custom Programs (A and B)The Schedule dial also has a “Custom” setting, which letsyou select specific days of the week on which to water. Forexample, you could choose to water every Monday,Wednesday, and Saturday. For instructions, see “CustomProgramming.”

English
PC-506 Series Sprinkler TimerPage 20
Watering Run Time (Duration Dial)The Duration dials let you do either of two things:
Program the length of each watering period (“run time”)so that the timer will turn the sprinklers on and offautomatically.
Run the sprinklers manually for as long as you want.
Automatic OperationBy now, you have used the Schedule dial to tell the timerhow often to turn the sprinklers on. Now you will use theDuration dial to tell the timer how long to run the sprinklers.
For each station, turn the Duration dial to the number ofminutes or hours you want to water. This illustration showsthat every time Station 1 comes on, it will run for 10minutes.
Manual OperationYou can also use the Duration dial to turn the sprinklers onor off. To start watering a station immediately, turn itsDuration dial to ON. To turn a station off indefinitely, turn thedial to OFF. Be sure to return the dial to the desired lengthof time when you want to resume automatic operation.
English
Page 21PC-506 Series Sprinkler Timer
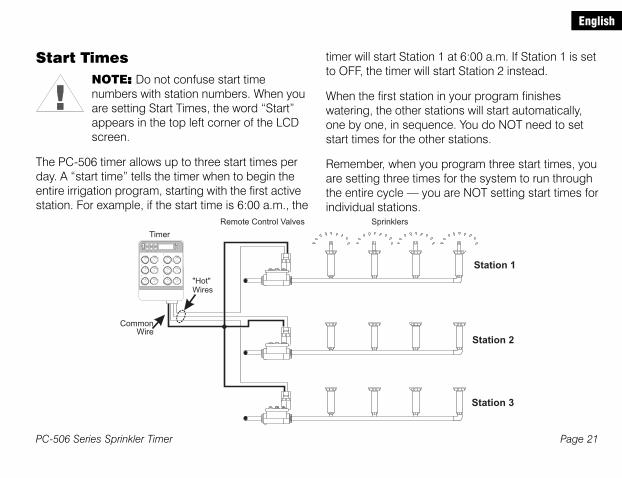
Start TimesNOTE::::: Do not confuse start timenumbers with station numbers. When youare setting Start Times, the word “Start”appears in the top left corner of the LCDscreen.
The PC-506 timer allows up to three start times perday. A “start time” tells the timer when to begin theentire irrigation program, starting with the first activestation. For example, if the start time is 6:00 a.m., the
timer will start Station 1 at 6:00 a.m. If Station 1 is setto OFF, the timer will start Station 2 instead.
When the first station in your program finisheswatering, the other stations will start automatically,one by one, in sequence. You do NOT need to setstart times for the other stations.
Remember, when you program three start times, youare setting three times for the system to run throughthe entire cycle — you are NOT setting start times forindividual stations.

English
PC-506 Series Sprinkler TimerPage 22
Use Pre-Programmed Start Time(s)NOTE::::: Each “start time” you set affects allthe watering stations. If you have questionsabout start times, be sure to read theexplanation at the beginning of this section.
Your timer comes with three pre-set start times:
• Start #1: 6:00 a.m.
• Start #2: 6:00 p.m.
• Start #3: 12 noon
To use the pre-programmed start times, set thewatering cycle (using the Schedule dials) and run times(using the Duration dials). Watering will begin on thenext scheduled start time.
Set Your Own Start Times (Optional)To change the Start Times:
Press “Set/Start.” START 1 will appear in the upperleft corner of the display.
Use the and buttons to adjust Start Times in1/2 hour increments. Keep scrolling until the desiredtime, including the AM/PM setting, appears.
Example: With the Schedule DIal set as pictured,the sprinklers will come on every second day,twice a day, at 6:00 a.m. and 6:00 p.m.
English
Page 23PC-506 Series Sprinkler Timer
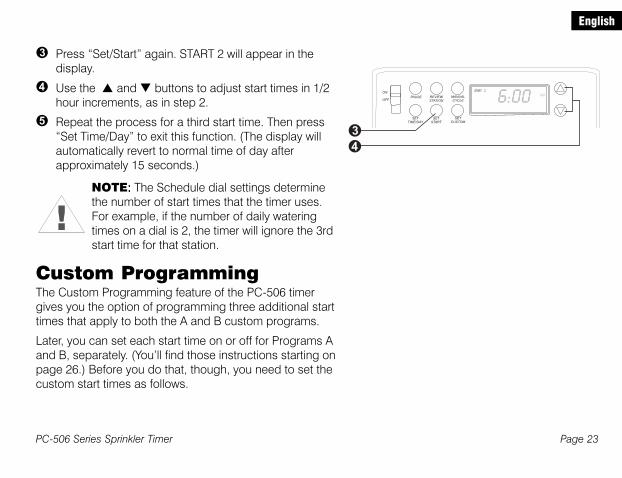
Press “Set/Start” again. START 2 will appear in thedisplay.
Use the and buttons to adjust start times in 1/2hour increments, as in step 2.
Repeat the process for a third start time. Then press“Set Time/Day” to exit this function. (The display willautomatically revert to normal time of day afterapproximately 15 seconds.)
NOTE: : : : : The Schedule dial settings determinethe number of start times that the timer uses.For example, if the number of daily wateringtimes on a dial is 2, the timer will ignore the 3rdstart time for that station.
Custom ProgrammingThe Custom Programming feature of the PC-506 timergives you the option of programming three additional starttimes that apply to both the A and B custom programs.
Later, you can set each start time on or off for Programs Aand B, separately. (You’ll find those instructions starting onpage 26.) Before you do that, though, you need to set thecustom start times as follows.

English
PC-506 Series Sprinkler TimerPage 24
Set Custom Start Time(s) forPrograms A and B
Press the “Set/Start” button four times until the displayshows START 1 CUSTOM AB in the upper left corner.
Use the up & down buttons to adjust Start Times in 1/2hour increments. Keep scrolling until the desired time,including the AM/PM setting, appears.
Press “Set/Start” again. START 2 CUSTOM AB willappear in the display.
Use the up & down buttons to adjust start times in 1/2hour increments, as in step 2.
Repeat the process for a third custom start time. Thenpress “Set Time/Day” to exit this function. (The displaywill automatically revert to normal time of day afterapproximately 15 seconds.)

English
Page 25PC-506 Series Sprinkler Timer
Set Custom Program A
Set Watering Start Time(s)The three custom start times you programmed in theprevious section will affect both Programs A and B.Now you need to set Program A to accept or ignoreeach of those custom start times.
Push the “Set Custom” button. CUSTOM A willappear in the display and the number 1 will flash,indicating that the time shown in the display isthe first custom start time.
If you want to water at this time, press toaccept it and advance to the next start time.
If you not want to water at the time shown, press to turn the start time OFF. Then press to
advance to the next start time. The number 2 willflash when the second start time appears.
NOTE::::: If you make a mistake, use the button to advance through the customstart times until you get back to the oneyou want to change. Then press tochange the status. Press again toadvance to the next start time.

English
PC-506 Series Sprinkler TimerPage 26
Repeat the process to assign the second andthird custom start times.
Set Watering Days
Press “Set Custom” again to set specific days towater. (If the display has returned to the currenttime, press “Set Custom” twice.)
The display will show CUSTOM A in the upperleft corner, and the first day of the week will flash.“ON” or “OFF” will appear, indicating whetherthe system will water on that day.
Press to retain the current setting. The displaywill automatically advance to the next day.Press to change the setting, and then press to advance to the next day.
Continue in this manner until all seven days ofthe week have been set to either ON or OFF.
English
Page 27PC-506 Series Sprinkler Timer
Set Custom Program B
Set Watering Start Time(s)The three custom start times you programmed affect bothPrograms A and B. Now you need to set Program B toaccept or ignore each of these custom start times.
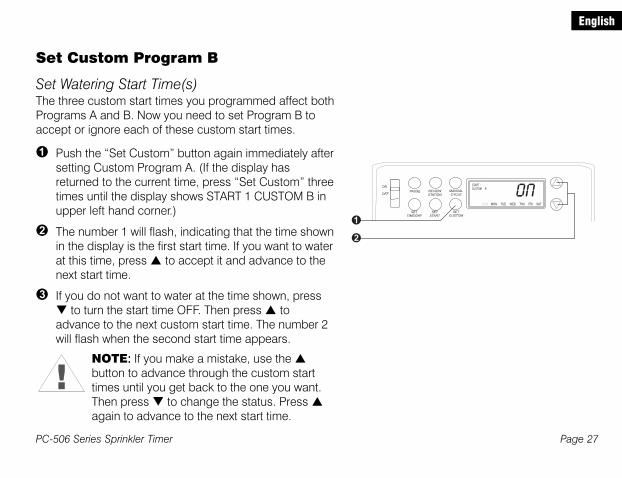
Push the “Set Custom” button again immediately aftersetting Custom Program A. (If the display hasreturned to the current time, press “Set Custom” threetimes until the display shows START 1 CUSTOM B inupper left hand corner.)
The number 1 will flash, indicating that the time shownin the display is the first start time. If you want to waterat this time, press to accept it and advance to thenext start time.
If you do not want to water at the time shown, press to turn the start time OFF. Then press to
advance to the next custom start time. The number 2will flash when the second start time appears.
NOTE::::: If you make a mistake, use the button to advance through the custom starttimes until you get back to the one you want.Then press to change the status. Press again to advance to the next start time.

English
PC-506 Series Sprinkler TimerPage 28
Repeat the process to assign the second andthird custom start times.
Setting Watering Days
Press “Set Custom” again to set specific days towater. (If the display has returned to the currenttime, press “Set Custom” four times.)
The display will show CUSTOM B in the upperleft corner, and the first day of the week will flash.“ON” or “OFF” will appear, indicating whetherthe system will water on that day.
Press to retain the current setting. The displaywill automatically advance to the next day.Press to change the setting, and then press to advance to the next day.
Continue in this manner until all seven days ofthe week have been set to either ON or OFF.

English
Page 29PC-506 Series Sprinkler Timer
Assigning a Station to Program A or BTo assign a station to Custom Program A or B, turn thatstation’s Schedule dial to “A” or “B.” For example, thisillustration shows Station 1 assigned to Custom Program B.
Setting the Watering DurationAfter you assign each station to Program A or B, use theDuration dials to set the length of time you want eachstation to run. Turn each Duration dial to the number ofminutes or hours you want to water.
For example, this illustration shows that Station 1 will run for5 minutes at a time.

English
PC-506 Series Sprinkler TimerPage 30
OPERATING THE TIMERManual OperationTo operate a station manually, you can use theManual Cycle button, the Pause button, or theDuration dial.
Manual CycleThe “Manual Cycle” button lets you run all thestations immediately, in sequence (#1 through #6).
Press “Manual Cycle.” The first station in yourprogram will begin watering, and the display willshow a countdown of time remaining. Forexample, this illustration shows Station #1counting down a five-minute water duration.
To advance to next station before the currentstation finishes its run time, press “ManualCycle” again.
Press “Set Time/Day” to end the manual cycle.The display will return to the current time of day.

English
Page 31PC-506 Series Sprinkler Timer
Pause FunctionThe “Pause” function temporarily suspends wateringon all stations. This can come in handy when youneed to do maintenance or other yard activities.
Press “Pause” to interrupt watering immediately.The word PAUSE will appear in the lower leftcorner of the LCD display.
To resume watering, press “Pause” again. Thesystem will continue its normal wateringschedule.
Duration Dial OperationThe Duration dial for each station has a “manual”setting that you can use to start or stop watering forthat station. This is helpful when you need to test astation or skip an unused station.
Turn the Duration dial to ON to start watering thatstation immediately, and OFF to eliminatewatering for that station.
Return the dial to the desired length of time toresume automatic operation.
English
PC-506 Series Sprinkler TimerPage 32
Other Timer FeaturesON / OFF Switch for Rainy PeriodsYour timer’s “On/Off” switch lets you stop wateringwithout erasing programmed information. Normally,you will keep the timer on. However, if you want tosuspend watering indefinitely (for example, duringthe rainy season), turn it off. The display will alternatebetween the time of day and OFF.
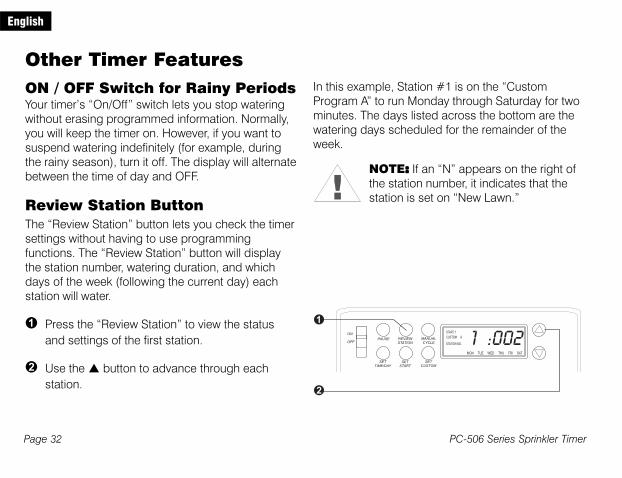
Review Station ButtonThe “Review Station” button lets you check the timersettings without having to use programmingfunctions. The “Review Station” button will displaythe station number, watering duration, and whichdays of the week (following the current day) eachstation will water.
Press the “Review Station” to view the statusand settings of the first station.
Use the button to advance through eachstation.
In this example, Station #1 is on the “CustomProgram A” to run Monday through Saturday for twominutes. The days listed across the bottom are thewatering days scheduled for the remainder of theweek.
NOTE::::: If an “N” appears on the right ofthe station number, it indicates that thestation is set on “New Lawn.”

English
Page 33PC-506 Series Sprinkler Timer
WINTERIZING THE SYSTEMIn cold-weather areas, you may want to turn off yourtimer during winter months. Before shutting down thesystem for the winter, make sure to drain the waterfrom all irrigation lines to prevent freezing damage topipes and valves.
Then turn the switch on the timer to the OFFposition.
For more information about “winterizing” yoursystem, please call your local irrigation professional,visit our Web site at www.rainbird.com, or call 800-RAINBIRD.
In lightning-prone areas, Rain Bird recommends thatyou disconnect the field wires from the timer’sterminal strip, and unplug the transformer from theoutlet. This will protect the timer from lightning-caused power surges.

English
PC-506 Series Sprinkler TimerPage 34
Symptom Cause Correction
Electrical Issues1. LCD display is blank,
says PO OFF, orflashes OFF and thetime.
a. Timer is off. Turn the switch at the top, left-hand corner of thetimer to ON.
b. Fuse isburned out.
Remove the burned out fuse located just above thebattery. Replace it with the spare 0.5 amp fuse onthe inside of the timer’s lower access cover.
c. Transformer isnot pluggedin.
Make sure the transformer wire is connected andthe transformer is securely plugged in.
d. Wall socket isnot supplyingpower.
Make sure the main AC power supply is workingproperly.
TROUBLESHOOTING

English
Page 35PC-506 Series Sprinkler Timer
Symptom Cause CorrectionElectrical Issues2. LCD display is “frozen”
and the timer will notaccept programming.
An electrical surge mayhave damaged the timer’selectronics.
Unplug the timer and remove the batteryand fuse. Let the timer sit for three minuteswithout power. Then reinstall the batteryand fuse, and plug in the timer.
If there is no permanent damage, the timerwill accept programming and resumenormal operation.
3. Fuse blows out frequentlyand the display goesblank.
a. Possible shortbetween the valveand timer.
Check all field wiring for nicked or“skinned” wires. Check all wiringconnectors. Repair or replace as needed.
b. Possible shortedsolenoid on one ormore valves.
Check all valve solenoids for properoperation. Replace as needed.
4. Fuse blows as soon asthe timer is plugged in.
a. Faulty transformer. Replace the transformer.
b. Electrical short in thetimer.
Call the Rain Bird Technical AssistanceHotline at 800-247-3782.

English
PC-506 Series Sprinkler TimerPage 36
Symptom Cause CorrectionWatering Issues5. Automatic and
Manual cycles donot water.
a. Water source notsupplying water.
Make sure the main water line and all supplylines are open and operating properly.
b. Wires not properlyconnected.
Make sure all field wires and master valve/pumpstart relay wiring is connected properly.
c. Wires loose or cut;corrodedconnections.
Check field wiring for broken, cut, or “skinned”wires. Replace if necessary. Check all wireconnections and replace with watertight spliceconnectors, as needed.
d. Timer is set toOFF.
Turn the switch at the top, left-hand corner of thetimer to ON.
e. All stations set toMANUAL OFF.
Check all stations’ watering duration. Turn eachstation’s Duration dial to the appropriate runtime.
6. A single stationdoes not shut offafter watering.
Valve may be stuckopen due to debris.
Inspect the valve and remove any debris.

English
Page 37PC-506 Series Sprinkler Timer
Symptom Cause CorrectionWatering Issues7. Valve does not shut
off after watering atthe scheduled time.
a. Valve may beclogged.
Inspect the valve and remove any debris.
b. Timer’s memoryboard is “lockedon.”
Unplug the timer and remove the battery andfuse. Let the timer sit for three minutes withoutpower. Then reinstall the battery and fuse, andplug in the timer. If the surge did no permanentdamage, the timer will accept programming andresume normal operation. If the timer still doesnot work, contact your Rain Bird distributor or theTechnical Assistance Hotline (800-247-3782) fora service referral.
8. A station won’t stopwatering and thetimer will not acceptprogramming.
The Duration dial forthat station is setto”Manual On”
Turn the Duration dial to another setting.
9. A single stationdoes not shut offafter watering.
Valve may be suckopen due to debris.
Inspect the valve and remove any debris.

NOTE: This irrigation timer generates radiofrequency energy and may cause interference toradio and television reception. It has been typetested and found to comply with the limits for aClass B computing device in accordance with thespecifications in Subpart J of Part 15 of FCC Rules,which are designed to provide reasonableprotection against such interference in a residentialinstallation.
However, there is no guarantee that interference willnot occur in a particular installation. If thisequipment does cause interference to radio ortelevision reception, which can be determined byturning the equipment off and on, the user isencouraged to try to correct the interference by oneor more of the following measures:
• reorient the receiving antenna
• move the timer away from the receiver
• plug the timer into a different outlet so the timerand receiver are on different branch circuits.
If necessary, the user should consult the dealer or anexperienced radio and television technician foradditional suggestions. The user may find thefollowing booklet prepared by the FederalCommunications Commission helpful: How Toldenfify and Resolve Radio-TV lnferference Problems.This booklet is available from the US GovernmentPrinting Office, Washington D.C. 20402, Stock No.004-000-0034504. (Price is $2.00 postpaid.)
Rain Bird Corporation Customer Support Center6640 S. Bonney Ave.
Tucson, AZ 857061-800-RAIN-BIRD
(520) 434-6290 FAX© 2001 Rain Bird Sprinkler Mfg. Corp.