Embed Size (px)
Citation preview
SCS-VR™ VIRTUAL RECEIVERDIGITAL MONITORING PRODUCTS, INC.
© 2022
INSTALLATION SETUP GUIDE

TABLE OF CONTENTS
SYSTEM OVERVIEW ...........................................................................1What is SCS‑VR?........................................................................................................................................................................1
Benefits ..........................................................................................................................................................................................1
Recommended Server Specifications ...............................................................................................................................1
SCS‑VR Application Server (Each Primary and Backup Server) .......................................................................1
SQL Server (Each Primary and Backup Database) .................................................................................................1
General Requirements ............................................................................................................................................................2
California State Fire Marshall Listing ...........................................................................................................................2
256‑bit AES Encryption ....................................................................................................................................................2
UL Listed Compliance Specifications ...............................................................................................................................3
Hardware Installation Requirements ............................................................................................................................3
SQL Local Database Configuration Requirements .................................................................................................3
SQL Remote Database Configuration Requirements ............................................................................................3
Minimum Hardware Requirements ...............................................................................................................................3
UL Listed Hardware Setup ................................................................................................................................................... 4
INSTALLING SCS-VR .........................................................................6SCS‑VR Configuration using Database Configurator Utility .................................................................................. 6
Test Connection ...................................................................................................................................................................7
Distinguishing Primary and Backup Servers ................................................................................................................. 8
Test Panel Communication to SCS‑VR ............................................................................................................................ 8
Configure Windows Authentication Login .................................................................................................................... 9
Launch the Service ............................................................................................................................................................ 9
Setup Console ...................................................................................................................................................................... 9
User Login Management .................................................................................................................................................10
Login Permissions .............................................................................................................................................................. 11
Updating SCS‑VR ................................................................................................................................................................... 12
Upgrade Process for Recommended Configuration ................................................................................................14
Upgrade Process for Non‑Existing Backup Database .............................................................................................16
Upgrade Process for SCS‑VR with Full Disaster Recovery .................................................................................... 17
SYSTEM OVERVIEWWhat is SCS-VR?The SCS‑VR is a UL Classified software solution that runs on a server as a virtual receiver for network, IP, and cellular communications. SCS‑VR manages alarm signals and supervision messages without the maintenance, space, or power requirements of a rack‑mounted hardware receiver.
The SCS‑VR communicates with panels and central stations using DMP network alarm messaging. The SCS‑VR works with Microsoft® SQL Server® and can run on more than one server from the same database. The SCS‑VR software accepts alarms from network, Internet, or cellular communicators.
BenefitsThe SCS‑VR offers a wide range of benefits for alarm dealers and central station operators, including:
• Scalability: SCS‑VR can support small network monitoring organizations to central stations monitoring thousands of accounts.
• Wide Area Network (WAN) support: WAN inputs monitor the status and condition of one another and back each input up, enhancing the panels’ ability to reach the receiver. This supports redundant communications service providers on a single receiver.
• Dispersed server support: Software can be deployed on multiple servers to support a geographically distributed approach with path protection and minimize nuisance supervision failure messages for high‑security applications.
• Advanced diagnostics: Full data logging for reliable service and fast troubleshooting.• Unique server programming: Group capability enables a single receiver to function as multiple separate receivers
equipped with their own unique programming.• Power and space savings.• Supports 128‑bit and 256‑bit AES encryption.
Recommended Server SpecificationsYou will need to meet the following requirements to successfully use the SCS‑VR:
SCS-VR Application Server (Each Primary and Backup Server)• Intel® Core™ iSeries Processor or better (Dual Core)• 12 GB RAM• Gigabit Ethernet adapter or better• 20 GB HDD or greater• Microsoft Windows Server 2012 or newer• Java 8
If using encryption, Java Cryptography Extension (JCE) is required.
SQL Server (Each Primary and Backup Database)• Intel Core iSeries Processor or better (Quad Core)• 16 GB RAM• Gigabit Ethernet adapter or better• Microsoft Windows Server 2012 or newer• 160 GB HDD or SSD: RAID 1 for Redundancy (recommended, not required)
SCS-VR INSTALLATION SETUP GUIDE 1
General Requirements• All servers must be operating at all times including monitors.• Do not use screen savers on any SCS‑VR server.• All servers must be connected to an uninterruptible power supply suitable for use with security systems.• All servers must have a keyboard, mouse, monitor, and network connected. Refer to the manufacturer’s
instructions.• The installation must provide supply line transient protection complying with the Standard for Transient Voltage
Surge Suppressors, UL 1449, with a maximum marked rating of 330 V.• The source of power for the equipment shall be within the rated voltage range of the signal processing
equipment.• The installation must provide supply line transient protection complying with the Standard for Protectors for Data
Communications and Fire Alarm Circuits, UL 497B, with a maximum marked rating of 50 V.• The communication circuits and network components connected to the telecommunications network must be
protected by secondary protectors for communication circuits. These protectors must comply with the Standard for Secondary Protectors for Communications Circuits, UL 497A, with a marked rating of 150 V or less. These protectors must be used only in the protected side of the telecommunications network.
• All equipment must be installed in a temperature‑controlled environment that can be maintained between 13 ‑ 35°C (55 ‑ 95°F) by the HVAC system. The environment shall also be maintained within the humidity range rating of the equipment. Twenty‑four hours of standby power must be provided for the HVAC system. The standby power system for the HVAC system may be supplied by an engine driven generator alone. A standby battery is not required to be used. A maintenance contract that provides for restoring operation of the HVAC system within 24 hours, 7 days a week shall be in place.
• In addition to the 110/240 VAC, 50/60 Hz main and secondary power supplies that are required to be provided at the central supervisory station, the system must also be provided with an uniterruptible power supply (UPS) with sufficient capacity to operate the server equipment for a minimum of 15 minutes. If more than 15 minutes is required for the secondary power supply to supply the UPS input power, the UPS must be capable of providing input power for at least that amount of time.
• UPS systems must comply with the Standard for Uninterruptible Power Supply Equipment, UL 1778, or the Standard for Fire Protective Signaling Devices, UL 1481.
• In order to perform maintenance and repair service, a means for disconnecting the input to the UPS while maintaining continuity of power to the automation system shall be provided.
• A polling error “non check‑in message” alarm must be responded to as a compromise attempt by proper authorities.
• The central station’s primary power supply is monitored for AC loss. A tamper switch is also provided to monitor the control unit’s front cover removal. For either condition, a change of status display occurs at the central station.
• Equipment must be installed within a locked room or a locked rack provided with a tamper switch.• A power conditioner used with the system shall comply with the applicable requirements in the Standard for
Power Units Other Than Class 2, UL 1012.• All equipment connected to the signal processing equipment must be located in the same room as the signal
processing equipment.• All equipment must be self‑contained in a rack with means for connection to the branch circuit supply which
includes installing the supply conductors in conduit.• The self‑contained rack with the SCS‑VR servers shall also have speakers for audible annunciation for local
operation and must be located in proximity of the supervising station for operator interface.• All interconnected equipment used in conjunction with the SCS‑VR or SQL servers such as monitor, keyboard, and
mouse must not have cabling exceeding 8 feet in length.
California State Fire Marshall ListingSCS‑VR is approved by the California State Fire Marshall (CSFM) for fire installations. Refer to Listing No. 7168‑1157:0133.
256-bit AES EncryptionThe SCS‑VR virtual receiver, version 1.4.0 or higher, supports the 256‑bit AES encryption option for XR550E control panels using version 104 or higher software. SCS‑VR supports both the new 256‑bit option and 128‑bit to maintain compatibility with exiting control panels. Either 128‑bit or 256‑bit encryption can be enabled in panel programming for NET or CELL communication paths. Once enabled in the panel, SCS‑VR automatically communicates with that panel using the appropriate encryption. Refer to Listing NIST AES Algorithm Certificate #3027 256‑bit.
To support AES Encryption, Java Cryptography Extension (JCE) must be deployed.
2 SCS-VR INSTALLATION SETUP GUIDE
UL Listed Compliance SpecificationsThe UL Classified Compliance Specifications are for SCS‑VR software version 1.4.0 or higher used in conjunction with UL listed ITE Equipment.
Hardware Installation Requirements• The UL 864, UL 1076, and UL 1610 installations must consist of at least two completely duplicated servers running
SCS‑VR version 1.4.0 or higher. The SCS‑VR backup must be programmed to accept alarm communication as if it was the SCS‑VR primary.
• No software unrelated to the processing of alarm signals other than the operating system software and anti‑virus/security protection shall be installed on the primary and backup servers.
• Configurations employing virtual servers are permitted where applicable requirements for supervision and redundancy are met. These configurations must include at least two physical servers.
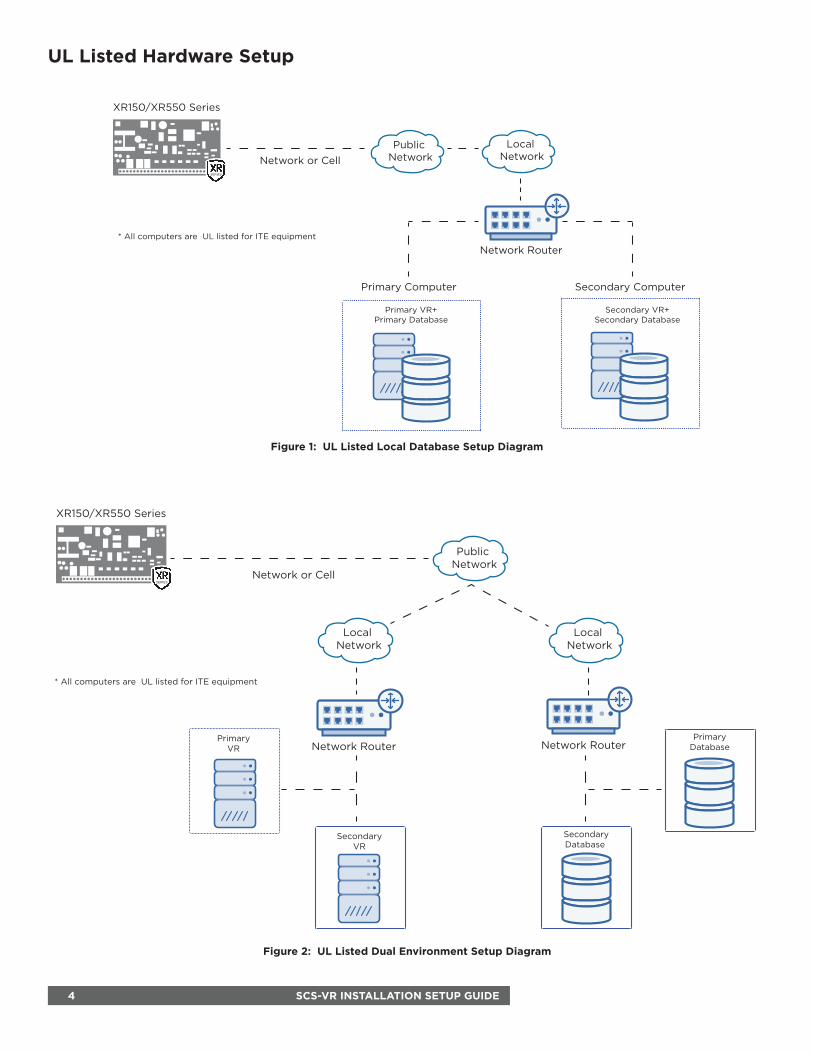
SQL Local Database Configuration Requirements• All SCS‑VR servers must share a primary SQL Server database located on the SCS‑VR primary server. A duplicate
SQL Server database must be available on the SCS‑VR backup server.• The databases of both SQL servers must be structured to communicate with either SCS‑VR primary or SCS‑VR
backup including database name and password.• If the SQL primary fails, both SCS‑VR servers will produce a pop‑up window indicating that SCS‑VR cannot
communicate with the SQL database. SCS‑VR automatically switches to the backup SQL database.• For an example setup of the local database configuration, see Figure 1
SQL Remote Database Configuration Requirements• All SCS‑VR servers must share a primary SQL Server database located on a third server. A fourth server with
a duplicate backup SQL Server database must be available. At the installer’s choice, one SQL server is to be designated as the SQL primary and the second SQL server is to be designated as the SQL backup.
• The databases of both SQL servers must be structured to communicate with either SCS‑VR primary or SCS‑VR backup including database name and password.
• The local operator monitoring the systems must know the IP addresses of each SQL server.• If the SQL primary fails, both SCS‑VR servers will produce a pop‑up window indicating that SCS‑VR cannot
communicate with the SQL database. SCS‑VR automatically switches to the backup SQL database.• For an example setup of the remote database configuration, see Figure 2.
Minimum Hardware RequirementsSCS‑VR was evaluated by UL with the following minimum configuration:
General Requirements• 160 GB storage• 2 GB RAM• CD drive• 10/100 network (NIC) card• Video card
SCS-VR Application Server• Intel® Core™ i3‑540, 3.06 GHz processor • Windows Server 2012 Standard R2 or newer• SCS‑VR version 1.4.0 or higher (version number is displayed on the SCS‑VR console Configuration tab).
SQL Server• Intel® Core™ 2 Duo E6300, 2.80 GHz processor• Windows Server 2012 Standard R2 or newer• Microsoft SQL Server 2012 or newer• .NET Framework 3.5 or higher• Windows PowerShell 1.0 or higher
SCS-VR INSTALLATION SETUP GUIDE 3
UL Listed Hardware Setup
Network RouterNetwork Router
Local Network
Local Network
Public Network
Network or CellSERIES
XR150/XR550 Series
Secondary VR
Primary VR
Secondary Database
Primary Database
* All computers are UL listed for ITE equipment
SERIES
Primary Computer
Network Router
Local Network
Public NetworkNetwork or Cell
XR150/XR550 Series
Secondary Computer
Primary VR+ Primary Database
Secondary VR+ Secondary Database
* All computers are UL listed for ITE equipment
Figure 1: UL Listed Local Database Setup Diagram
Figure 2: UL Listed Dual Environment Setup Diagram
4 SCS-VR INSTALLATION SETUP GUIDE
Microsoft SQL Server Best PracticesFor optimal SCS‑VR performance, do the following processes regularly to maintain the Microsoft SQL database:
Rebuild and reorganize indexes (daily/weekly)As data is added, indexes become inaccurate because data is added to the end instead of in order. It is a maintenance best practice to reorganize daily and rebuild weekly. Reorganizing is faster and puts less overhead on the system. Rebuilding takes more system resources and automatically updates statistics.
Update statistics (nightly)Microsoft SQL tries to optimize its performance by making the most used data the most readily available. Updating statistics allows Microsoft SQL to come up with query plans to find popular data the fastest. Those statistics can be set to auto update or run nightly. Always update statistics manually after performing a database reorganization.
Check for free space (weekly)If auto grow is turned on, set it as close to 10% as possible. Ensure there is enough actual drive space to accommodate growth.
Check disk drive contention (weekly)Check disk drive contention weekly. Ideally, data files and log files are on different physical disks. Use Windows Performance Monitor to monitor the disks and ensure that the read and write queue lengths are always less than 1. If the queue length is longer than 1, the disk is receiving more requests for data than it can process. This will slow down performance significantly.
Check database integrity (weekly)Use the DBCC check to verify the health of the database in general. Also, run the DBCC check table and check ALLOC and the DBCC check catalog. These commands verify that the database is not corrupt.
SCS-VR INSTALLATION SETUP GUIDE 5
INSTALLING SCS-VRThe SCS‑VR must be able to communicate with a SQL database.
• Enable Mixed Mode authentication on your SQL Server Instance.• Ensure that proper permissions for the login used by the SCS‑VR can create a database and fully read, write, and
modify all content within. (For example: DB Owner privileges or better)
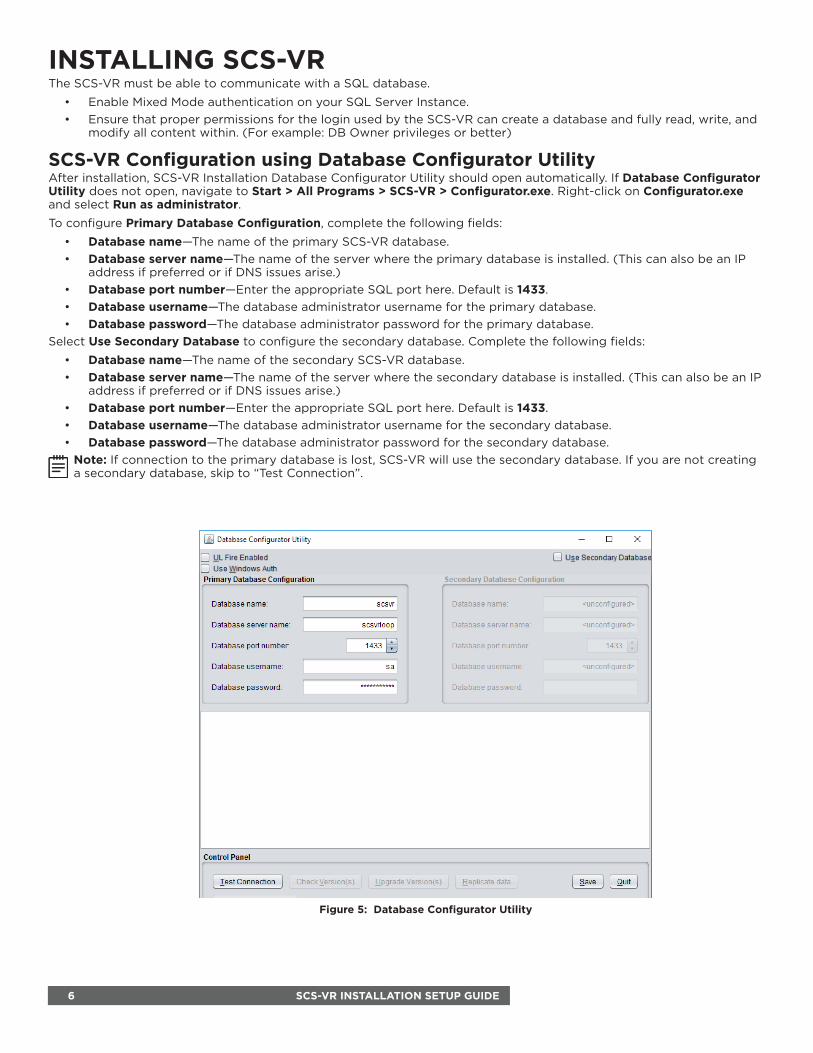
SCS-VR Configuration using Database Configurator UtilityAfter installation, SCS‑VR Installation Database Configurator Utility should open automatically. If Database Configurator Utility does not open, navigate to Start > All Programs > SCS-VR > Configurator.exe. Right‑click on Configurator.exe and select Run as administrator.To configure Primary Database Configuration, complete the following fields:
• Database name—The name of the primary SCS‑VR database.• Database server name—The name of the server where the primary database is installed. (This can also be an IP
address if preferred or if DNS issues arise.)• Database port number—Enter the appropriate SQL port here. Default is 1433.• Database username—The database administrator username for the primary database.• Database password—The database administrator password for the primary database.
Select Use Secondary Database to configure the secondary database. Complete the following fields:
• Database name—The name of the secondary SCS‑VR database.• Database server name—The name of the server where the secondary database is installed. (This can also be an IP
address if preferred or if DNS issues arise.)• Database port number—Enter the appropriate SQL port here. Default is 1433.• Database username—The database administrator username for the secondary database.• Database password—The database administrator password for the secondary database.
Note: If connection to the primary database is lost, SCS‑VR will use the secondary database. If you are not creating a secondary database, skip to “Test Connection”.
Figure 5: Database Configurator Utility
6 SCS-VR INSTALLATION SETUP GUIDE
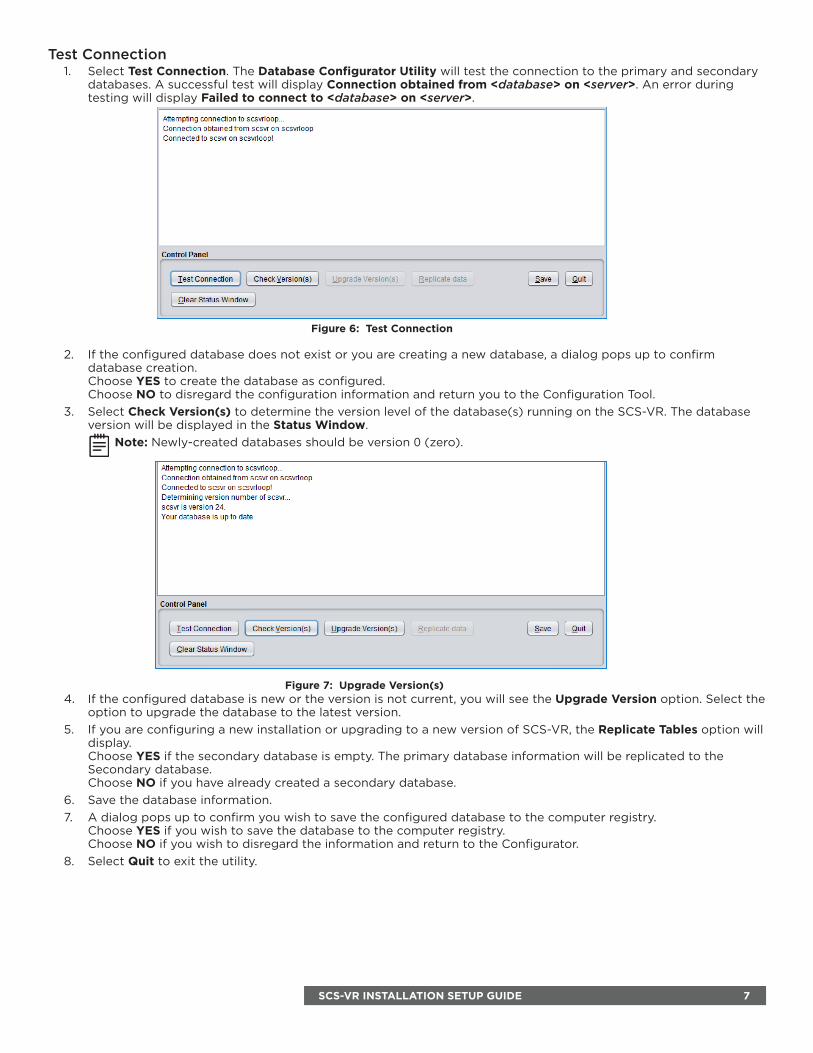
Test Connection1. Select Test Connection. The Database Configurator Utility will test the connection to the primary and secondary
databases. A successful test will display Connection obtained from <database> on <server>. An error during testing will display Failed to connect to <database> on <server>.
2. If the configured database does not exist or you are creating a new database, a dialog pops up to confirm database creation. Choose YES to create the database as configured. Choose NO to disregard the configuration information and return you to the Configuration Tool.
3. Select Check Version(s) to determine the version level of the database(s) running on the SCS‑VR. The database version will be displayed in the Status Window.
Note: Newly‑created databases should be version 0 (zero).
4. If the configured database is new or the version is not current, you will see the Upgrade Version option. Select the option to upgrade the database to the latest version.
5. If you are configuring a new installation or upgrading to a new version of SCS‑VR, the Replicate Tables option will display. Choose YES if the secondary database is empty. The primary database information will be replicated to the Secondary database. Choose NO if you have already created a secondary database.
6. Save the database information.7. A dialog pops up to confirm you wish to save the configured database to the computer registry.
Choose YES if you wish to save the database to the computer registry. Choose NO if you wish to disregard the information and return to the Configurator.
8. Select Quit to exit the utility.
Figure 6: Test Connection
Figure 7: Upgrade Version(s)
SCS-VR INSTALLATION SETUP GUIDE 7
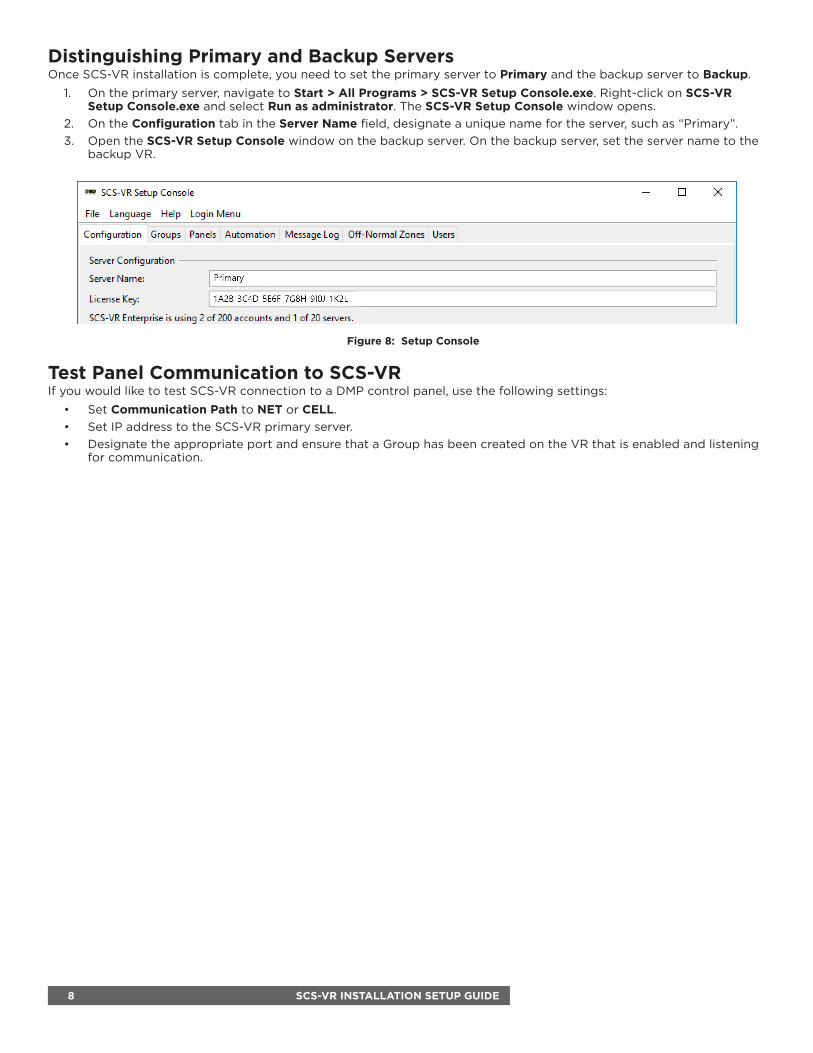
Distinguishing Primary and Backup ServersOnce SCS‑VR installation is complete, you need to set the primary server to Primary and the backup server to Backup.
1. On the primary server, navigate to Start > All Programs > SCS-VR Setup Console.exe. Right‑click on SCS-VR Setup Console.exe and select Run as administrator. The SCS-VR Setup Console window opens.
2. On the Configuration tab in the Server Name field, designate a unique name for the server, such as “Primary”.3. Open the SCS-VR Setup Console window on the backup server. On the backup server, set the server name to the
backup VR.
Test Panel Communication to SCS-VRIf you would like to test SCS‑VR connection to a DMP control panel, use the following settings:
• Set Communication Path to NET or CELL.• Set IP address to the SCS‑VR primary server.• Designate the appropriate port and ensure that a Group has been created on the VR that is enabled and listening
for communication.
Figure 8: Setup Console
8 SCS-VR INSTALLATION SETUP GUIDE
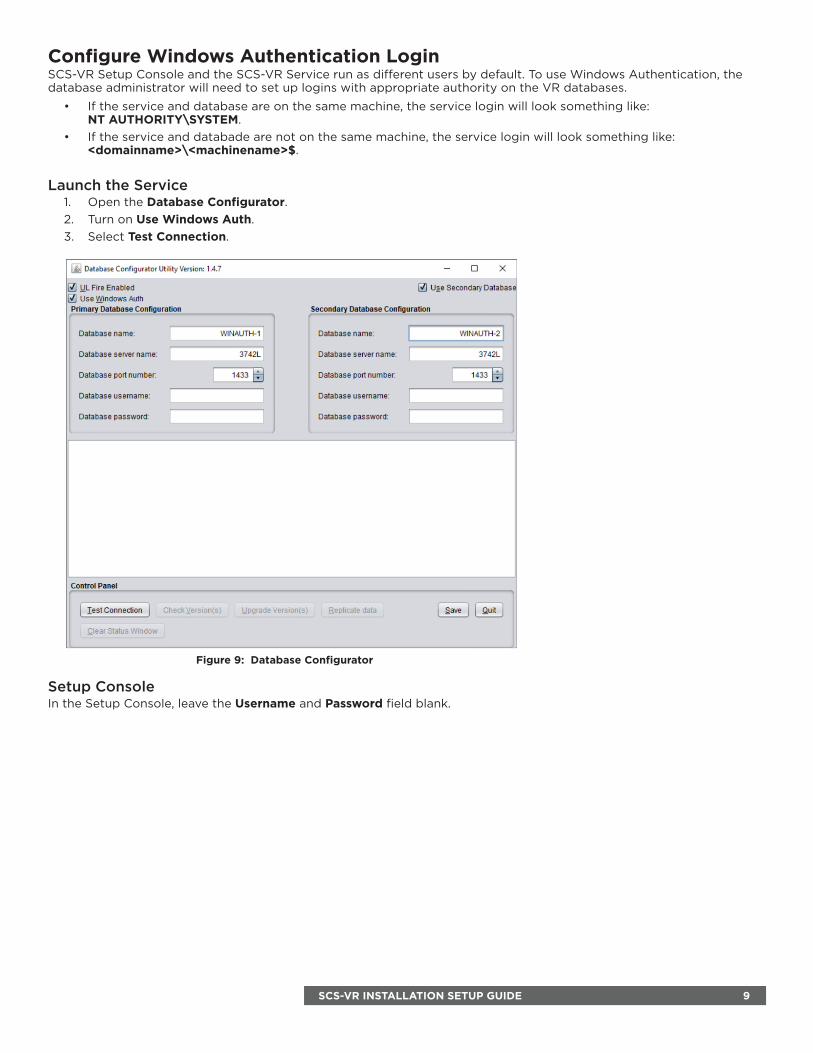
Configure Windows Authentication LoginSCS‑VR Setup Console and the SCS‑VR Service run as different users by default. To use Windows Authentication, the database administrator will need to set up logins with appropriate authority on the VR databases.
• If the service and database are on the same machine, the service login will look something like: NT AUTHORITY\SYSTEM.
• If the service and databade are not on the same machine, the service login will look something like: <domainname>\<machinename>$.
Launch the Service1. Open the Database Configurator.2. Turn on Use Windows Auth.3. Select Test Connection.
Setup ConsoleIn the Setup Console, leave the Username and Password field blank.
Figure 9: Database Configurator
SCS-VR INSTALLATION SETUP GUIDE 9
User Login Management
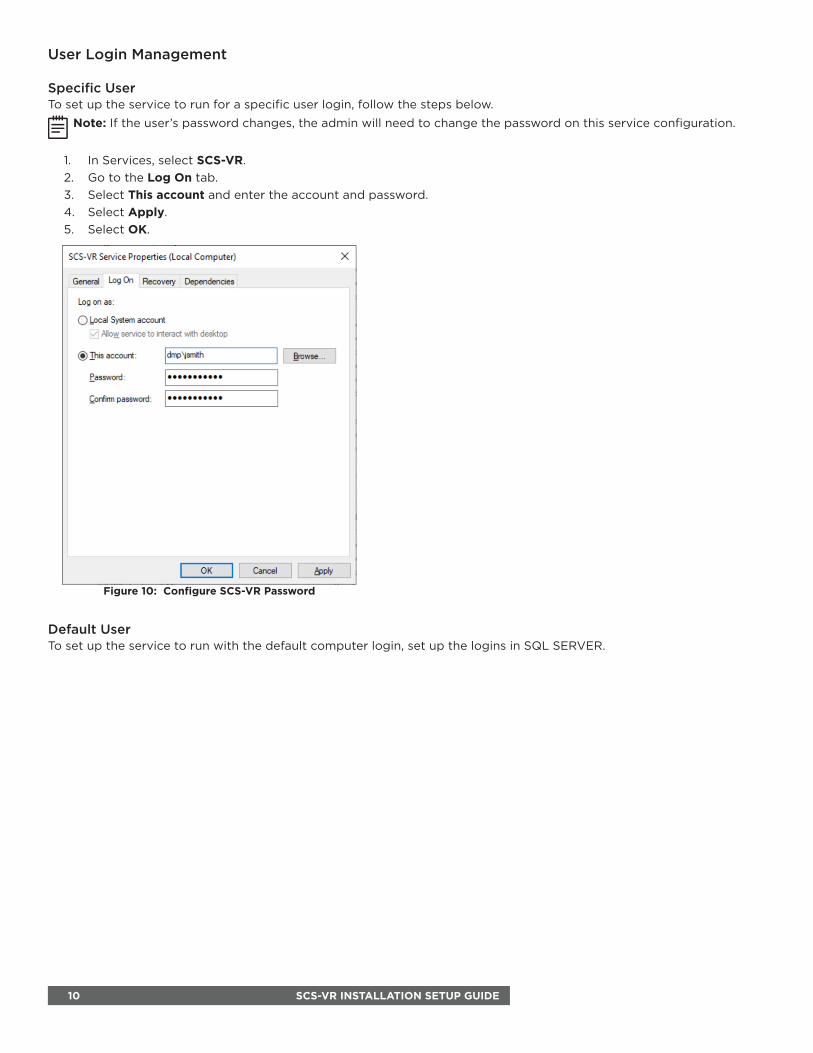
Specific User To set up the service to run for a specific user login, follow the steps below.
Note: If the user’s password changes, the admin will need to change the password on this service configuration.
1. In Services, select SCS-VR.2. Go to the Log On tab.3. Select This account and enter the account and password.4. Select Apply.5. Select OK.
Default UserTo set up the service to run with the default computer login, set up the logins in SQL SERVER.
Figure 10: Configure SCS-VR Password
10 SCS-VR INSTALLATION SETUP GUIDE
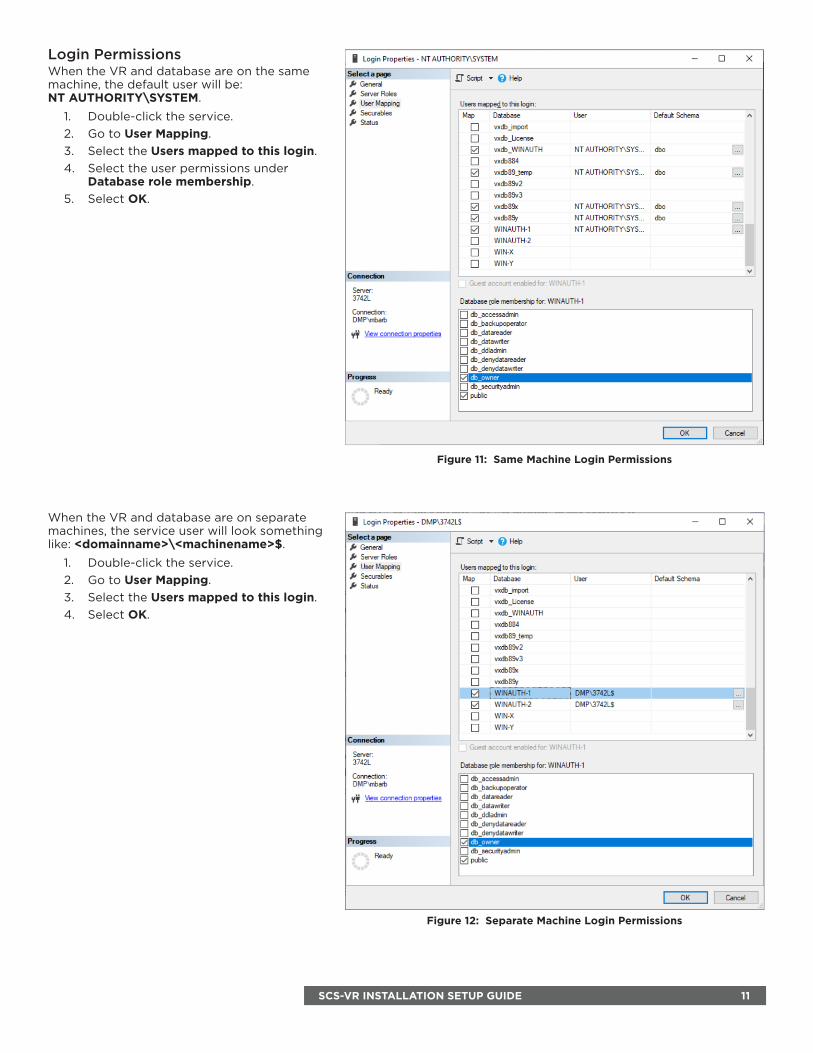
Login PermissionsWhen the VR and database are on the same machine, the default user will be: NT AUTHORITY\SYSTEM.
1. Double‑click the service.2. Go to User Mapping.3. Select the Users mapped to this login.4. Select the user permissions under
Database role membership.5. Select OK.
Figure 11: Same Machine Login Permissions
Figure 12: Separate Machine Login Permissions
When the VR and database are on separate machines, the service user will look something like: <domainname>\<machinename>$.
1. Double‑click the service.2. Go to User Mapping.3. Select the Users mapped to this login.4. Select OK.
SCS-VR INSTALLATION SETUP GUIDE 11
Updating SCS-VR
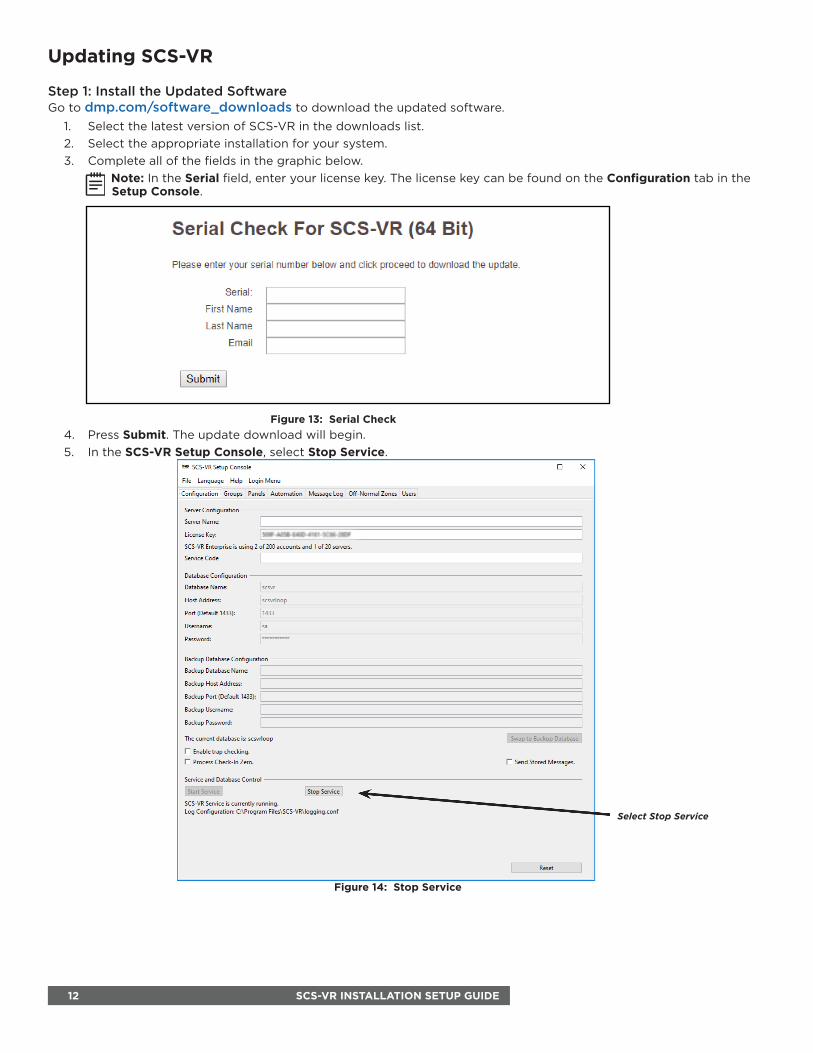
Step 1: Install the Updated SoftwareGo to dmp.com/software_downloads to download the updated software.
1. Select the latest version of SCS‑VR in the downloads list.2. Select the appropriate installation for your system.3. Complete all of the fields in the graphic below.
Note: In the Serial field, enter your license key. The license key can be found on the Configuration tab in the Setup Console.
4. Press Submit. The update download will begin.5. In the SCS-VR Setup Console, select Stop Service.
Figure 13: Serial Check
Figure 14: Stop Service
Select Stop Service
12 SCS-VR INSTALLATION SETUP GUIDE
6. Close the Setup Console.7. Right‑click on the installer and select Run as administrator. The installer will detect that the VR has been
previously installed and prompt you to update the existing installation or choose no to install to a different directory.
8. Select YES, updating the existing installation. Select Next to continue.9. Accept the license agreement and select Next.10. Select Next to continue.11. If the service was not stopped and the console was not closed, the updater notifies you. If you close the console
and select Retry to continue, the updater will stop the service and continue. If you select NO, the update will stop.12. If you chose to retry, the updater will copy JAR files over the previous installation and then display the license key
for verification. Select Next to continue.13. Select Finish when the updater notifies you that it has finished installing SCS‑VR on your server.
Step 2: Test the Connection1. Run the Configurator as administrator.2. Select Test Connection. After you receive a response, select Check Version and when that response is returned,
you will select Upgrade Version(s).3. Select Save and the GUI will prompt you to save the settings to the registry.4. Select YES.5. Select QUIT.
Note: When you save and quit the database utility, the SCS‑VR console launches and the SCS‑VR service restarts.
6. Acknowledge any pending messages and verify the configuration of groups and automation connections.
SCS-VR INSTALLATION SETUP GUIDE 13
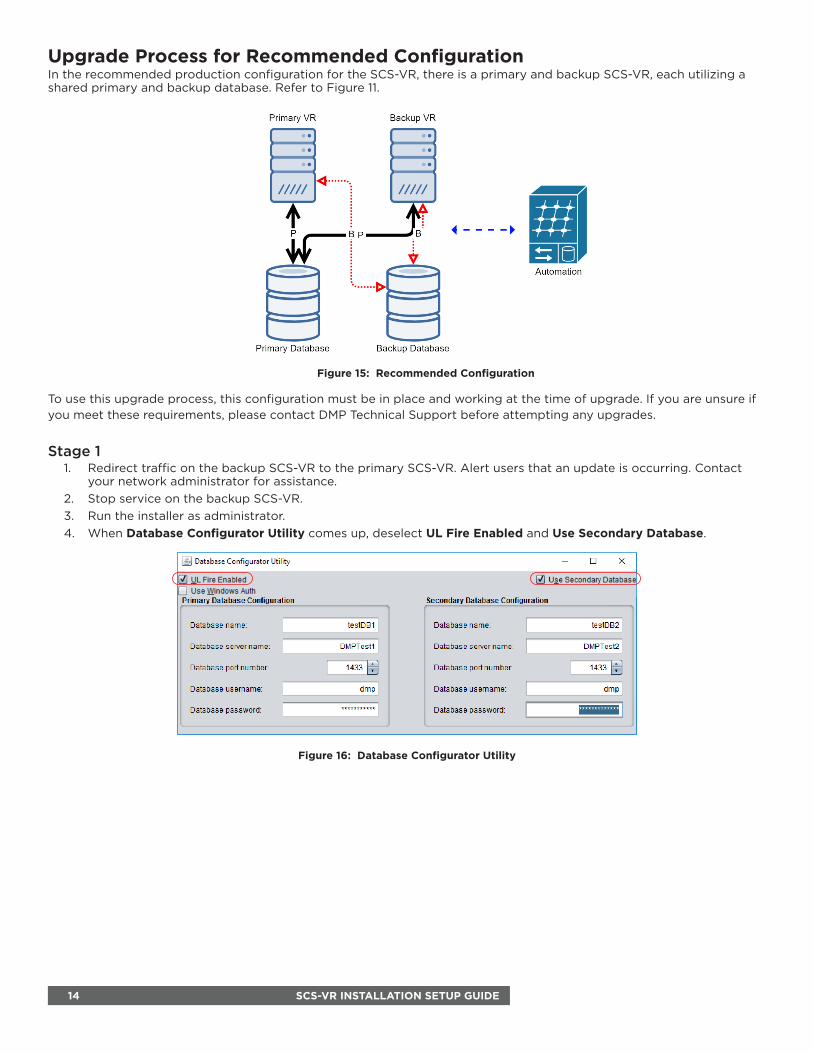
Upgrade Process for Recommended ConfigurationIn the recommended production configuration for the SCS‑VR, there is a primary and backup SCS‑VR, each utilizing a shared primary and backup database. Refer to Figure 11.
To use this upgrade process, this configuration must be in place and working at the time of upgrade. If you are unsure if you meet these requirements, please contact DMP Technical Support before attempting any upgrades.
Stage 11. Redirect traffic on the backup SCS‑VR to the primary SCS‑VR. Alert users that an update is occurring. Contact
your network administrator for assistance.2. Stop service on the backup SCS‑VR.3. Run the installer as administrator. 4. When Database Configurator Utility comes up, deselect UL Fire Enabled and Use Secondary Database.
Figure 15: Recommended Configuration
Figure 16: Database Configurator Utility
14 SCS-VR INSTALLATION SETUP GUIDE
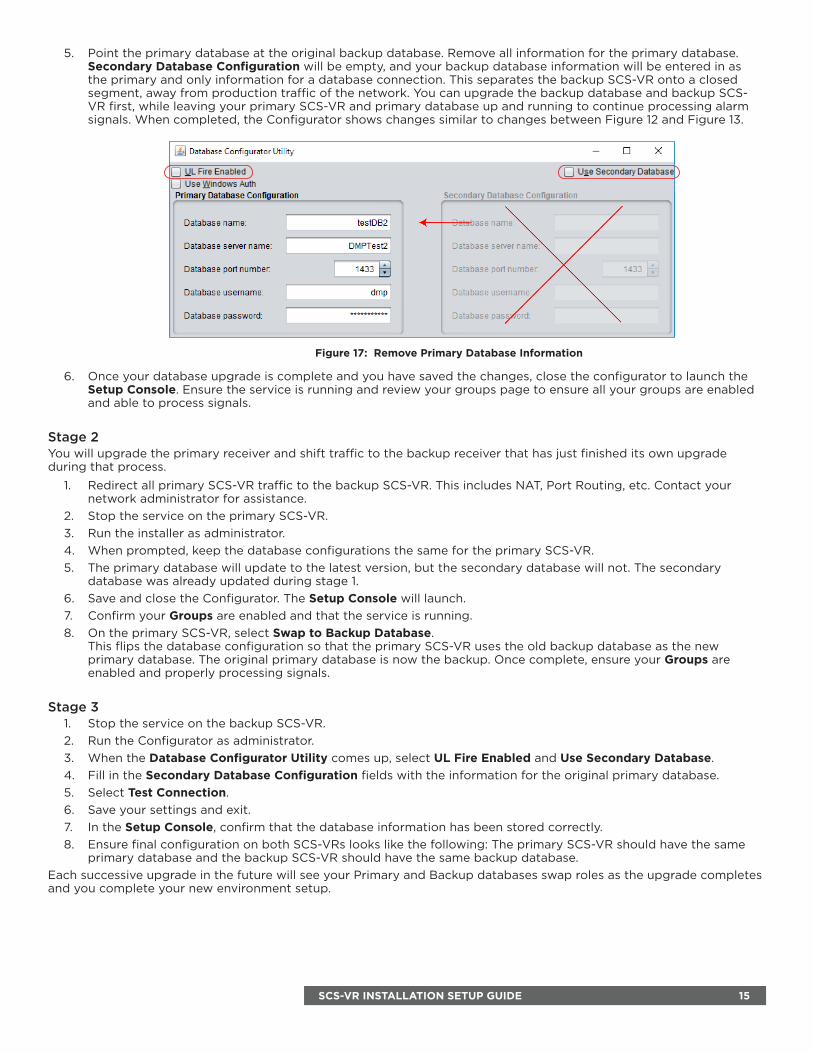
5. Point the primary database at the original backup database. Remove all information for the primary database. Secondary Database Configuration will be empty, and your backup database information will be entered in as the primary and only information for a database connection. This separates the backup SCS‑VR onto a closed segment, away from production traffic of the network. You can upgrade the backup database and backup SCS‑VR first, while leaving your primary SCS‑VR and primary database up and running to continue processing alarm signals. When completed, the Configurator shows changes similar to changes between Figure 12 and Figure 13.
6. Once your database upgrade is complete and you have saved the changes, close the configurator to launch the Setup Console. Ensure the service is running and review your groups page to ensure all your groups are enabled and able to process signals.
Stage 2You will upgrade the primary receiver and shift traffic to the backup receiver that has just finished its own upgrade during that process.
1. Redirect all primary SCS‑VR traffic to the backup SCS‑VR. This includes NAT, Port Routing, etc. Contact your network administrator for assistance.
2. Stop the service on the primary SCS‑VR.3. Run the installer as administrator.4. When prompted, keep the database configurations the same for the primary SCS‑VR.5. The primary database will update to the latest version, but the secondary database will not. The secondary
database was already updated during stage 1.6. Save and close the Configurator. The Setup Console will launch.7. Confirm your Groups are enabled and that the service is running. 8. On the primary SCS‑VR, select Swap to Backup Database.
This flips the database configuration so that the primary SCS‑VR uses the old backup database as the new primary database. The original primary database is now the backup. Once complete, ensure your Groups are enabled and properly processing signals.
Stage 31. Stop the service on the backup SCS‑VR.2. Run the Configurator as administrator.3. When the Database Configurator Utility comes up, select UL Fire Enabled and Use Secondary Database.4. Fill in the Secondary Database Configuration fields with the information for the original primary database.5. Select Test Connection.6. Save your settings and exit. 7. In the Setup Console, confirm that the database information has been stored correctly.8. Ensure final configuration on both SCS‑VRs looks like the following: The primary SCS‑VR should have the same
primary database and the backup SCS‑VR should have the same backup database.Each successive upgrade in the future will see your Primary and Backup databases swap roles as the upgrade completes and you complete your new environment setup.
Figure 17: Remove Primary Database Information
SCS-VR INSTALLATION SETUP GUIDE 15
Upgrade Process for Non-Existing Backup DatabaseDo the following steps prior to beginning the installation process.
1. Create a new database for the backup SCS‑VR using a restoral of the primary database.2. Install Sync Manager Utility. Configure Sync Manager Utility to sync with database 1 and database 2. DMP will
assist with Sync Manager Setup.
Before Installing the Upgrade1. Redirect all the backup SCS‑VR traffic to the primary SCS‑VR. This includes NAT, Port Routing, etc. Contact your
network administrator for assistance.2. Stop the service on the backup SCS‑VR. Use the Database Configurator Utility to change the primary database to
database 2. Start the service again to confirm operation.3. Navigate to SQL Management Studio. Check that the backup SCS‑VR has its own UUID in the Servers table of
database 2. Select * from Servers and Select * from ServerGroups to confirm. Each Server should have its own entry in the Servers table in the primary database. There should be matching entries in the secondary database. If both databases do not have matching entries, contact DMP Technical Support for assistance.
4. Stop the service on the backup SCS‑VR. Rename SCS‑VR file folder to SCS-VRbkp once service is stopped to create an immediate restore point.
Installing the Upgrade1. Install the latest SCS‑VR version on the backup SCS‑VR. When prompted, upgrade the database as well. Once
complete, start the service.2. Restore any previous panel traffic to the backup SCS‑VR. Use network manipulation or panel failover. Contact
your network administrator for assistance.3. Shift all primary SCS‑VR traffic to the backup SCS‑VR. This includes NAT, Port Routing, etc. Contact your network
administrator for assistance.4. Stop the service on the primary SCS‑VR. Rename SCS‑VR file folder to SCS-VRbkp once service is stopped to
create an immediate restore point.5. Install the latest SCS‑VR version on the primary SCS‑VR. When prompted, upgrade the database as well. Once
complete, start the service.6. Once both SCS‑VR’s and databases have been fully upgraded, enter database 2 as backup for the primary
SCS‑VR. This establishes the primary/backup database failover relationship.7. Establish database 1 as backup for the backup SCS‑VR. This prepares the backup SCS‑VR to establish
synchronization of both SCS‑VR servers using the same primary and backup databases.8. On the backup SCS‑VR, failover the database from database 2 to database 1. Do this by navigating to the Setup
Console and selecting the Configuration tab, then selecting Swap Database.Both the primary SCS‑VR and the backup SCS‑VR application servers are upgraded to the latest versions as well as the databases. The primary SCS‑VR and the backup SCS‑VR should both use database 1 as the primary database and database 2 as the backup database.
16 SCS-VR INSTALLATION SETUP GUIDE
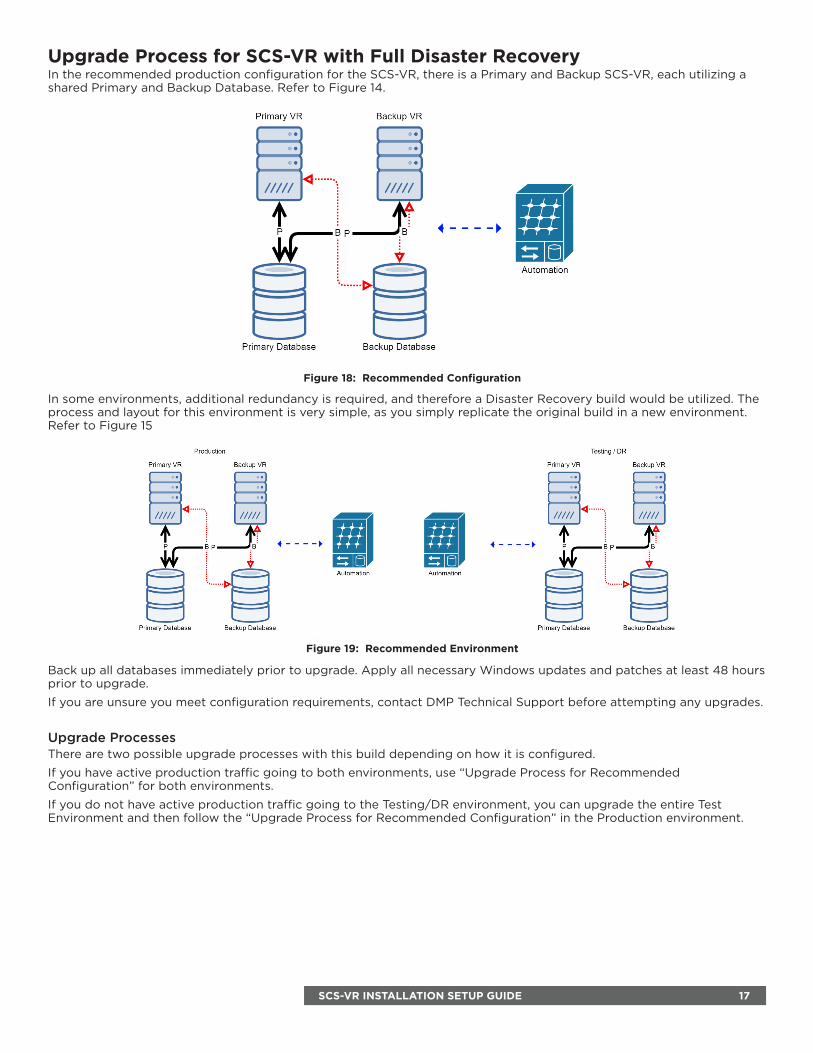
Upgrade Process for SCS-VR with Full Disaster RecoveryIn the recommended production configuration for the SCS‑VR, there is a Primary and Backup SCS‑VR, each utilizing a shared Primary and Backup Database. Refer to Figure 14.
In some environments, additional redundancy is required, and therefore a Disaster Recovery build would be utilized. The process and layout for this environment is very simple, as you simply replicate the original build in a new environment. Refer to Figure 15
Back up all databases immediately prior to upgrade. Apply all necessary Windows updates and patches at least 48 hours prior to upgrade.
If you are unsure you meet configuration requirements, contact DMP Technical Support before attempting any upgrades.
Upgrade ProcessesThere are two possible upgrade processes with this build depending on how it is configured.
If you have active production traffic going to both environments, use “Upgrade Process for Recommended Configuration” for both environments.
If you do not have active production traffic going to the Testing/DR environment, you can upgrade the entire Test Environment and then follow the “Upgrade Process for Recommended Configuration” in the Production environment.
Figure 18: Recommended Configuration
Figure 19: Recommended Environment
SCS-VR INSTALLATION SETUP GUIDE 17

Designed, engineered, and manufactured in Springfield, MO
using U.S. and global components.LT-1135 22071 1.04
I N T R U S I O N • F I R E • A C C E S S • N E T W O R K S
2500 North Partnership BoulevardSpringfield, Missouri 65803-8877
800.641.4282 | DMP.com© 2022