Embed Size (px)
Citation preview
X-Analysis Installation & Upgrade Guide Software Version 11.0, 03032015
Publication Information
Installation & Upgrade Guide 11.0 © 2015 Fresche Legacy Inc. Page 2
Publication Information
© 2015 Fresche Legacy Inc. Published by:
Fresche Legacy Inc. 995 Wellington Suite 200 Montreal, QC Canada, H3C 1V3
Tel.: (514) 747.7007 (toll-free in US and Canada): 1.800.361.6782 (toll-free in Belgium, France, Germany, UK): 00 800 361 67 82 0 (toll-free in Australia): 0011 800 361 6782 0
E-mail for inquiries: [email protected] E-mail for support: [email protected]
Web: www.freschelegacy.com
Title: X-Analysis Installation & Upgrade Guide, Software Version 11.0
Publication Date: March 2015
Note: <Activation information or other notes>
Fresche Legacy documentation team Kim Chan, Shilpi Khan Chaudhary, Vincent Gardner
Trademarks <X-Analysis, X-Analysis Professional and X-2E Modernize> are trademarks or registered trademarks of Fresche Legacy Inc. or its subsidiary, Databorough Ltd. <iSeries, Power Systems, Power8> are registered trademarks of IBM Corporation. Microsoft and Microsoft Windows are registered trademarks of Microsoft Corporation. All other brand and product names are trademarks or registered trademarks of their respective companies.
No part of this document may be reproduced or transmitted in any form or by any means, without prior permission in writing from Fresche Legacy.
The information in this manual is believed to be correct at the time of publication. However, Fresche Legacy Inc. makes no warranty, express or implied, about the accuracy of this information and reserves the right to revise this document or make changes to the products described herein at any time without notice and without obligation. Fresche Legacy Inc. is not liable for any loss of data, damage to databases or other software, or any other losses arising from the use of this manual.
Contents
Installation & Upgrade Guide 11.0 © 2015 Fresche Legacy Inc. Page 3
Contents
Publication Information ........................................................................................... 2
Contents .................................................................................................................. 3
Preface..................................................................................................................... 4
Installation Overview ............................................................................................... 6
X-Analysis Server Components .................................................................................... 6
X-Analysis Client Components ..................................................................................... 6
User Profile Requirements ........................................................................................... 7
System requirements ................................................................................................... 7
Installing the Server Software ................................................................................... 9
FTP Commands ........................................................................................................... 10
Installing the Client Software ................................................................................. 11
Installing XA2E Library ............................................................................................ 12
Cool/2E (Synon Model) Libraries ............................................................................... 12
Initialization ................................................................................................................ 12
Installing the License File ........................................................................................ 15
Obtain & Apply the License Code............................................................................... 15
Uninstalling X-Analysis from an IBM i (AS/400) ....................................................... 23
Uninstall the Cross-Reference Libraries ..................................................................... 23
Uninstall the Product Libraries ................................................................................... 23
Troubleshooting ..................................................................................................... 24
Index ...................................................................................................................... 25
Preface
Installation & Upgrade Guide 11.0 © 2015 Fresche Legacy Inc. Page 4
Preface
ABOUT THIS GUIDE
This Installation & Upgrade Guide describes how to set up X-Analysis. In particular it discusses the following topics:
Installation Overview
Installing XA2E library
Post-installation activities
Uninstalling X-Analysis from IBM i (AS/400)
Troubleshooting
Version
This is version 11.0 of the X-Analysis Installation & Upgrade Guide.
How to use this guide
The three main sections in this guide focus on how to correctly install and/or upgrade X-Analysis. The guide covers important aspects like the required Server and Client components and their installation. There are comprehensive sub-sections that specify the User Profile and System requirements. Besides these, there are chapters that cover the Installation specifics for the XA2E Library, and the Uninstallation procedure for X-Analysis. A separate section contains some Troubleshooting tips.
The X-Analysis suite of products contains a total of eight modules. This guide only covers the Installation & Upgrade of X-Analysis. For information about all the eight X-Analysis modules, please contact your Fresche Legacy representative, or visit www.freschelegacy.com.
Important Note
The X-Analysis Library structure has changed since version 9.1.
The new library to be used is XAOBJ.
After the upgrade is successfully completed, the older libraries – XAN4 and XREV – should be removed from the IBM i server.
Preface
Installation & Upgrade Guide 11.0 © 2015 Fresche Legacy Inc. Page 5
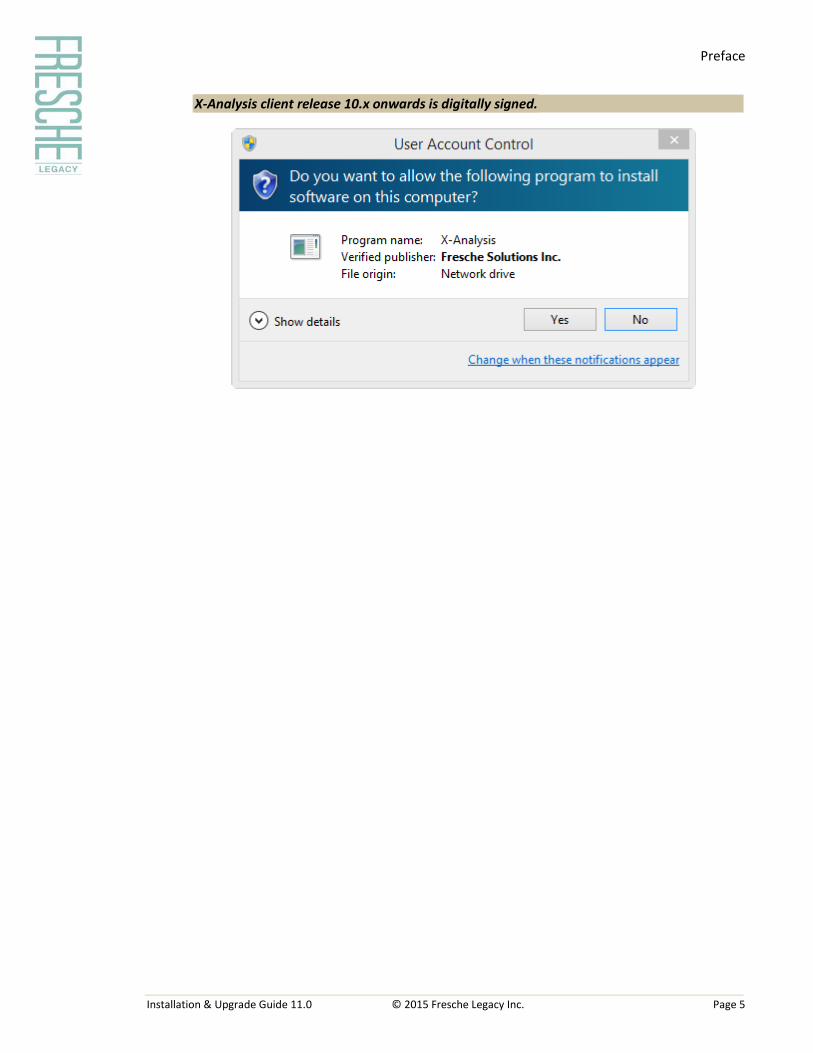
X-Analysis client release 10.x onwards is digitally signed.
Installation Overview
Installation & Upgrade Guide 11.0 © 2015 Fresche Legacy Inc. Page 6
Installation Overview
This document gives an overview of installing and upgrading the X-Analysis software. If you need any further help, kindly contact our support team at [email protected], or call any of our offices displayed on our website at: www.freschelegacy.com.
X-ANALYSIS SERVER COMPONENTS
XAN4LOAD.zip – This zip file contains various programs and files objects organized in the following libraries:
XAOBJ
XADTA
X-ANALYSIS CLIENT COMPONENTS
The X-Analysis client software comprises the following:
XASetup<version>.msi – This installs all necessary X-Analysis components at the following location:
<C|D>:\Program Files\Databorough\X-Analysis\
<C|D>:\Program Files\Databorough\X-Browse\
XARuntimeEnv<version>.msi – INSTALL THIS ONLY WHEN NEITHER IBM Rational product 7.5 and above nor Eclipse 3.4 and above is installed on machine. The MSI installs Eclipse JEE 3.4 (Ganymede), having Java Runtime Environment (JRE) 1.6.x, on the machine.
Note: From release 10.2.21 and above, the minimum requirement specified for installation is X-Analysis Runtime Environment 10.2.1.
XAUML<version>.msi – This installs the X-Analysis UML Support components for X-Analysis installed on Eclipse 3.4 or RDi 7.5 / RDp 7.6 (and above).
XRedoSetup<version>.msi – This installs the redevelopment components. This is for users who intend to use X-Analysis to redevelop legacy applications and have purchased the X-Redo module.
Installation Overview
Installation & Upgrade Guide 11.0 © 2015 Fresche Legacy Inc. Page 7
USER PROFILE REQUIREMENTS
Server
User Profile with rights to perform FTP and save/restore operations.
Client
A local Administrator profile for proper installation of software. Note that after installation, if using X-Analysis through any other profile, the set-up will have to be performed again.
SYSTEM REQUIREMENTS
In order to use X-Analysis, it is important to ensure that all necessary components are installed on your IBM i and PC. Please ensure that all items listed below are in place.
Server
Connection to IBM i running OS/400 V5R4 and above having the relevant Java toolbox.
Disk space required on IBM i for installation – approximately 3 GB.
Client
PC running Windows 2000 or above.
2 GB RAM if using IBM Rational products 7.5 and above; 1 GB RAM when using Eclipse 3.4 and above.
LAN Card.
Active Physical connection with IBM i via TCP/IP.
MS Office 2000 or above/Open Office (optional for documentation)
Visio 2000 and above/Open Office Draw (optional for flowcharting).
Adobe Reader 5.x and above.
Client-Server Connections
X-Analysis uses IBM's Toolbox for Java, JTOpen, to access data on the IBM i. The following ports should be accessible on the IBM i:
Port 8471 for JDBC Database requests
Port 8475 for Command Call
Port 8476 for Sign on
Installation Overview
Installation & Upgrade Guide 11.0 © 2015 Fresche Legacy Inc. Page 8
Port 449
Installing the Server Software
Installation & Upgrade Guide 11.0 © 2015 Fresche Legacy Inc. Page 9
Installing the Server Software
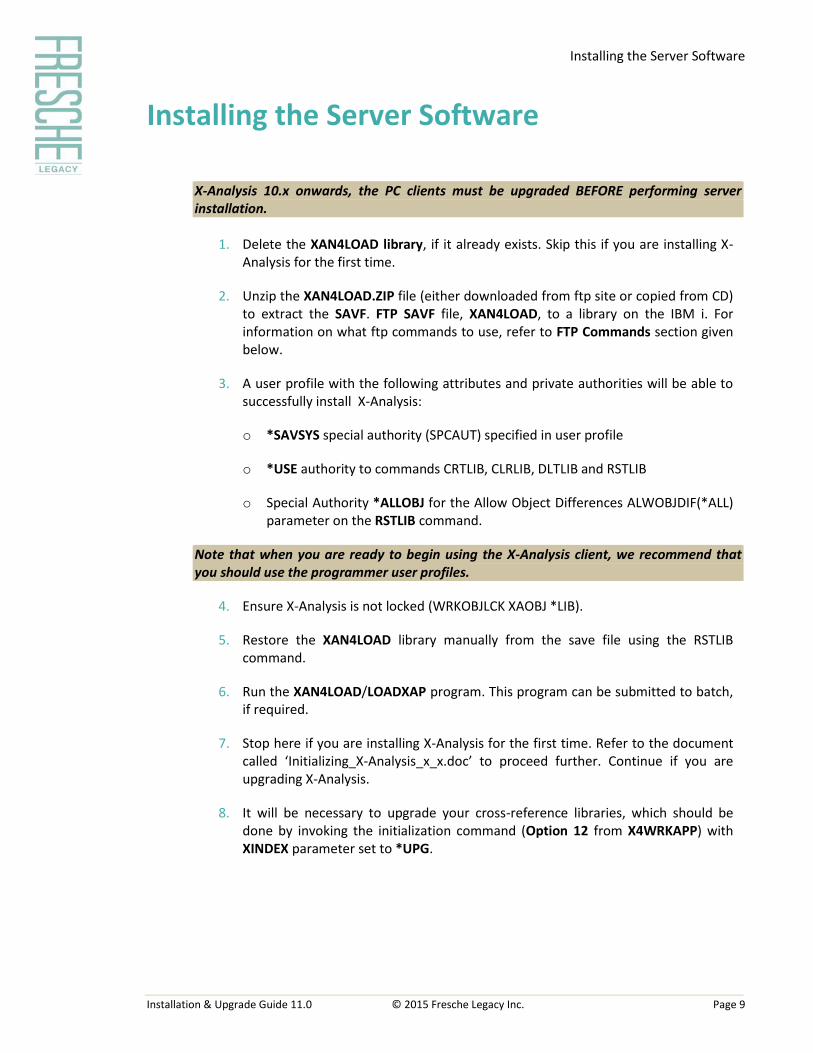
X-Analysis 10.x onwards, the PC clients must be upgraded BEFORE performing server installation.
1. Delete the XAN4LOAD library, if it already exists. Skip this if you are installing X-
Analysis for the first time.
2. Unzip the XAN4LOAD.ZIP file (either downloaded from ftp site or copied from CD) to extract the SAVF. FTP SAVF file, XAN4LOAD, to a library on the IBM i. For information on what ftp commands to use, refer to FTP Commands section given below.
3. A user profile with the following attributes and private authorities will be able to successfully install X-Analysis:
o *SAVSYS special authority (SPCAUT) specified in user profile
o *USE authority to commands CRTLIB, CLRLIB, DLTLIB and RSTLIB
o Special Authority *ALLOBJ for the Allow Object Differences ALWOBJDIF(*ALL) parameter on the RSTLIB command.
Note that when you are ready to begin using the X-Analysis client, we recommend that you should use the programmer user profiles.
4. Ensure X-Analysis is not locked (WRKOBJLCK XAOBJ *LIB).
5. Restore the XAN4LOAD library manually from the save file using the RSTLIB command.
6. Run the XAN4LOAD/LOADXAP program. This program can be submitted to batch, if required.
7. Stop here if you are installing X-Analysis for the first time. Refer to the document called ‘Initializing_X-Analysis_x_x.doc’ to proceed further. Continue if you are upgrading X-Analysis.
8. It will be necessary to upgrade your cross-reference libraries, which should be done by invoking the initialization command (Option 12 from X4WRKAPP) with XINDEX parameter set to *UPG.
Installing the Server Software
Installation & Upgrade Guide 11.0 © 2015 Fresche Legacy Inc. Page 10
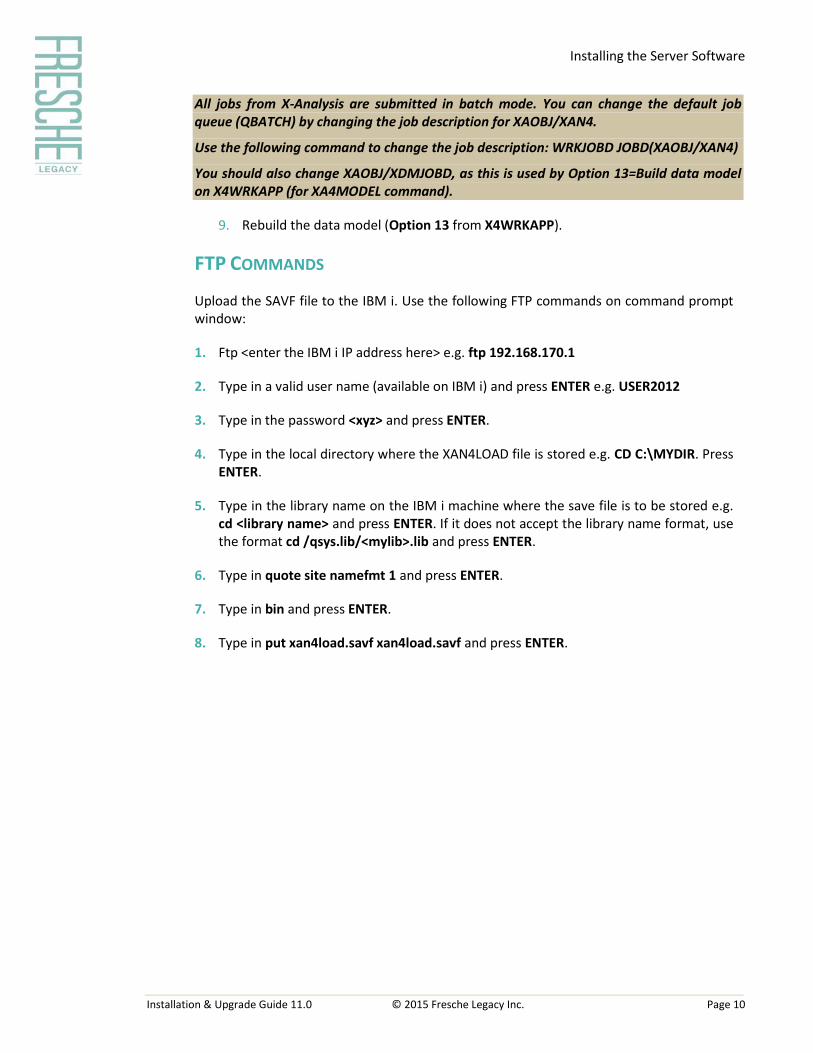
All jobs from X-Analysis are submitted in batch mode. You can change the default job queue (QBATCH) by changing the job description for XAOBJ/XAN4.
Use the following command to change the job description: WRKJOBD JOBD(XAOBJ/XAN4)
You should also change XAOBJ/XDMJOBD, as this is used by Option 13=Build data model on X4WRKAPP (for XA4MODEL command).
9. Rebuild the data model (Option 13 from X4WRKAPP).
FTP COMMANDS
Upload the SAVF file to the IBM i. Use the following FTP commands on command prompt window:
1. Ftp <enter the IBM i IP address here> e.g. ftp 192.168.170.1
2. Type in a valid user name (available on IBM i) and press ENTER e.g. USER2012
3. Type in the password <xyz> and press ENTER.
4. Type in the local directory where the XAN4LOAD file is stored e.g. CD C:\MYDIR. Press ENTER.
5. Type in the library name on the IBM i machine where the save file is to be stored e.g. cd <library name> and press ENTER. If it does not accept the library name format, use the format cd /qsys.lib/<mylib>.lib and press ENTER.
6. Type in quote site namefmt 1 and press ENTER.
7. Type in bin and press ENTER.
8. Type in put xan4load.savf xan4load.savf and press ENTER.
Installing the Client Software
Installation & Upgrade Guide 11.0 © 2015 Fresche Legacy Inc. Page 11
Installing the Client Software
Version 10.x onwards of the X-Analysis Setup (XASetup<version>.msi) works in one of the following ways for a new user:
Those who have IBM Rational products 7.5 and higher or Eclipse 3.4 and above, installed on their PC, should install XASetup which will add X-Analysis as a plugin to the relevant Eclipse environments available on the PC.
Those who do not have IBM Rational products 7.5 and higher or Eclipse 3.4 and above, installed on their PC, must install X-Analysis Runtime Environment using XARuntimeEnv<version>.msi before installing the XASetup.
X-Analysis 10.x onwards can be extended to redevelop legacy applications on the IBM i. For this, you need to install X-Redo.
X-Redo options work from within X-Analysis only if you have the X-Redo module activated on the server.
After the X-Analysis Client installation/upgrade, we recommend that the first invocation be done by selecting the ‘Clean start Eclipse’ shortcut from the X-Analysis program group.
The subsequent X-Analysis sessions can be started by selecting the ‘X-Analysis for Eclipse’ shortcut.

Installing XA2E Library
Installation & Upgrade Guide 11.0 © 2015 Fresche Legacy Inc. Page 12
Installing XA2E Library
COOL/2E (SYNON MODEL) LIBRARIES
The Synon model library(s) can be specified by putting the library type as "M". The Initialization process picks the Data model information in the Synon model library(s) when creating X-Ref library.
After adding the Source, Object and Model libraries, your screen should look something like this:
X-Analysis/4 Work with X-Analysis/4 Application Libraries Databorough Ltd.
XARWKLIB 12:10:13
03 Feb 2015
Selected x-ref Library -> : AB2EDEMO
Enter options, press Enter.
2=Change 4=Delete 5=Display
Type Sequence Library
S 1.00 SRCLIB
O 1.00 OBJLIB
M 1.00 MODLIB
Before moving on to the initialization step, confirm that the 2E product library is – Y2SY. If this is different, change the ‘XA2EPROLIB’ data area value accordingly.
Run the following command on your IBM i:
DSPDTAARA DTAARA(AB2EDEMO/XA2EPROLIB)
Display Data Area
System: DBSPW6
Data area . . . . . . . : XA2EPROLIB
Library . . . . . . . : AB2EDEMO
Type . . . . . . . . . : *CHAR
Length . . . . . . . . : 10
Text . . . . . . . . . : X-Analysis: 2E Prototype Library
Value
Offset *...+....1....+....2....+....3....+....4....+....5
0 'Y2SY '
If the 2E product library name is different from ‘Y2SY’ – for example ‘Y2SYVENG’ then the value of the XADTA/XA2EPROLIB data area should be changed to ‘Y2SYVENG’.
INITIALIZATION
The initialization can now be executed. From the master command (X4WRKAPP) screen, select Option 12 against the cross-reference library for initialization.
Installing XA2E Library
Installation & Upgrade Guide 11.0 © 2015 Fresche Legacy Inc. Page 13
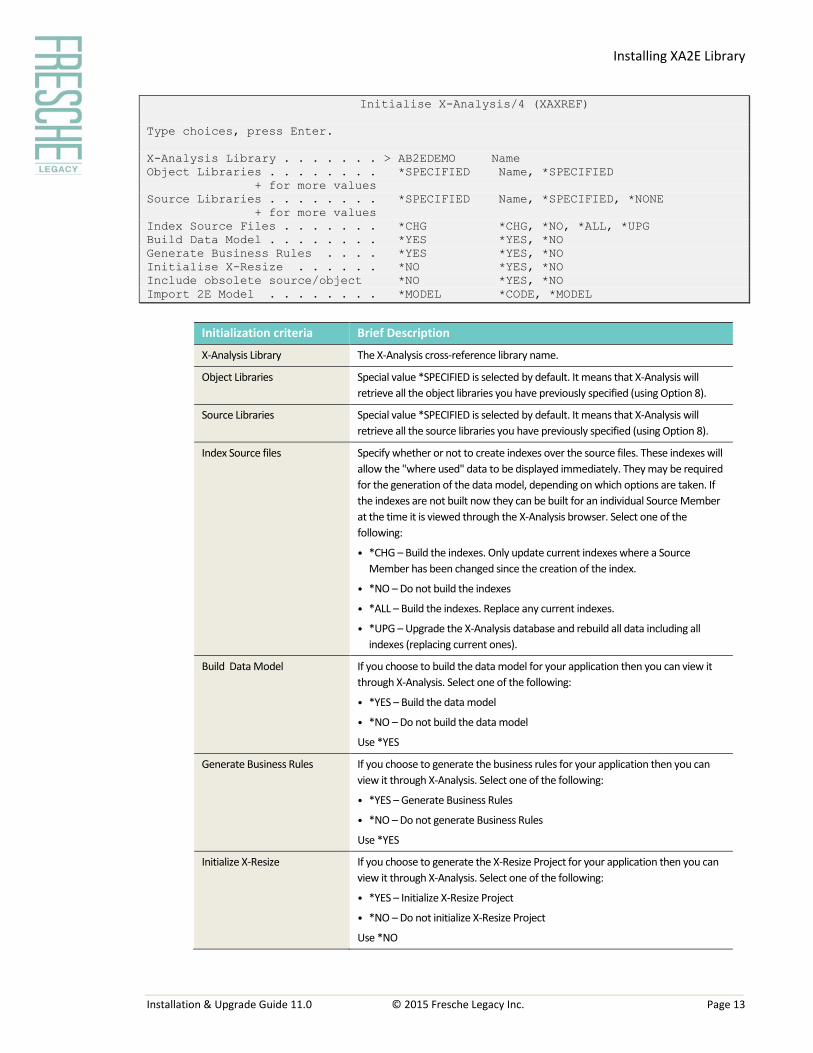
Initialise X-Analysis/4 (XAXREF)
Type choices, press Enter.
X-Analysis Library . . . . . . . > AB2EDEMO Name
Object Libraries . . . . . . . . *SPECIFIED Name, *SPECIFIED
+ for more values
Source Libraries . . . . . . . . *SPECIFIED Name, *SPECIFIED, *NONE
+ for more values
Index Source Files . . . . . . . *CHG *CHG, *NO, *ALL, *UPG
Build Data Model . . . . . . . . *YES *YES, *NO
Generate Business Rules . . . . *YES *YES, *NO
Initialise X-Resize . . . . . . *NO *YES, *NO
Include obsolete source/object *NO *YES, *NO
Import 2E Model . . . . . . . . *MODEL *CODE, *MODEL
Initialization criteria Brief Description
X-Analysis Library The X-Analysis cross-reference library name.
Object Libraries Special value *SPECIFIED is selected by default. It means that X-Analysis will
retrieve all the object libraries you have previously specified (using Option 8).
Source Libraries Special value *SPECIFIED is selected by default. It means that X-Analysis will
retrieve all the source libraries you have previously specified (using Option 8).
Index Source files Specify whether or not to create indexes over the source files. These indexes will
allow the "where used" data to be displayed immediately. They may be required
for the generation of the data model, depending on which options are taken. If
the indexes are not built now they can be built for an individual Source Member
at the time it is viewed through the X-Analysis browser. Select one of the
following:
• *CHG – Build the indexes. Only update current indexes where a Source
Member has been changed since the creation of the index.
• *NO – Do not build the indexes
• *ALL – Build the indexes. Replace any current indexes.
• *UPG – Upgrade the X-Analysis database and rebuild all data including all
indexes (replacing current ones).
Build Data Model If you choose to build the data model for your application then you can view it
through X-Analysis. Select one of the following:
• *YES – Build the data model
• *NO – Do not build the data model
Use *YES
Generate Business Rules If you choose to generate the business rules for your application then you can
view it through X-Analysis. Select one of the following:
• *YES – Generate Business Rules
• *NO – Do not generate Business Rules
Use *YES
Initialize X-Resize If you choose to generate the X-Resize Project for your application then you can
view it through X-Analysis. Select one of the following:
• *YES – Initialize X-Resize Project
• *NO – Do not initialize X-Resize Project
Use *NO
Installing XA2E Library
Installation & Upgrade Guide 11.0 © 2015 Fresche Legacy Inc. Page 14
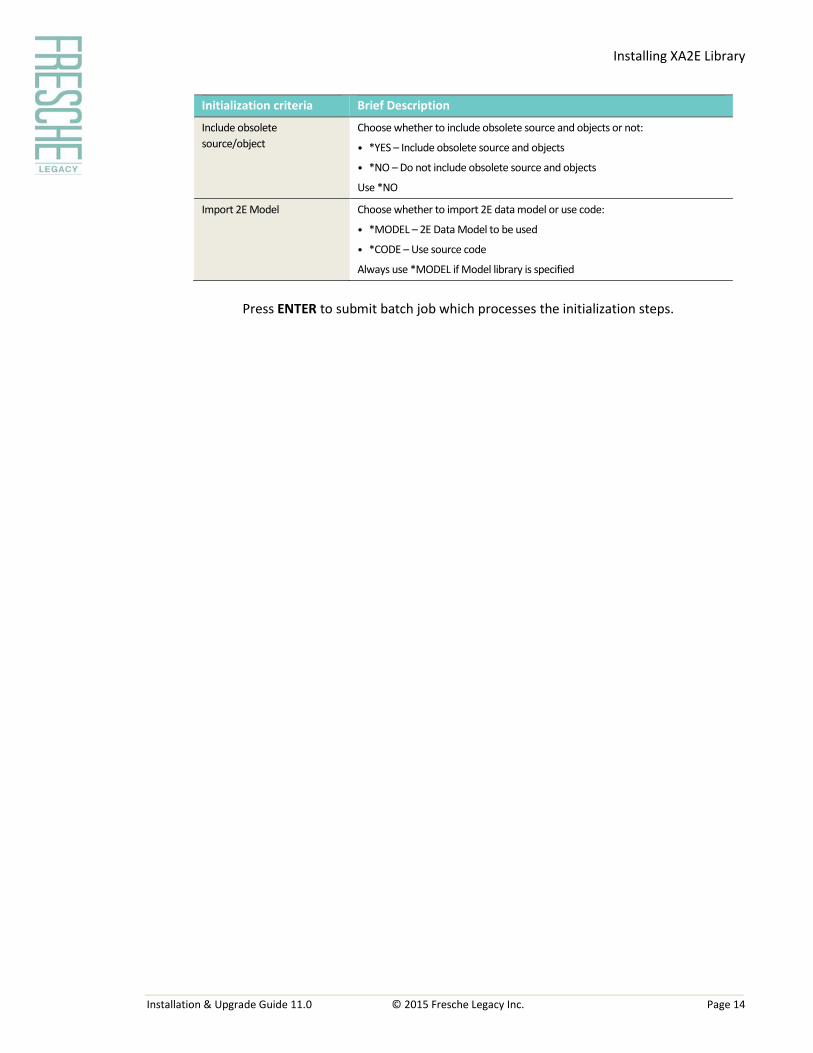
Initialization criteria Brief Description
Include obsolete
source/object
Choose whether to include obsolete source and objects or not:
• *YES – Include obsolete source and objects
• *NO – Do not include obsolete source and objects
Use *NO
Import 2E Model Choose whether to import 2E data model or use code:
• *MODEL – 2E Data Model to be used
• *CODE – Use source code
Always use *MODEL if Model library is specified
Press ENTER to submit batch job which processes the initialization steps.
Installing the License File
Installation & Upgrade Guide 11.0 © 2015 Fresche Legacy Inc. Page 15
Installing the License File
OBTAIN & APPLY THE LICENSE CODE
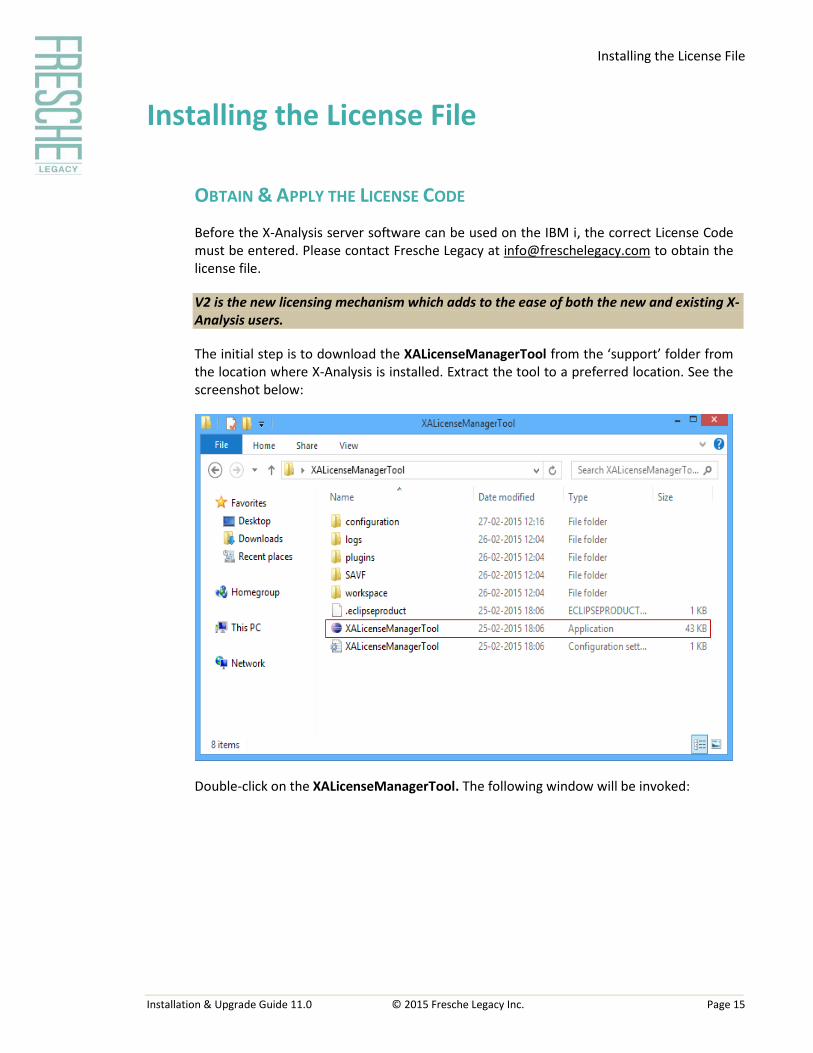
Before the X-Analysis server software can be used on the IBM i, the correct License Code must be entered. Please contact Fresche Legacy at [email protected] to obtain the license file.
V2 is the new licensing mechanism which adds to the ease of both the new and existing X-Analysis users.
The initial step is to download the XALicenseManagerTool from the ‘support’ folder from the location where X-Analysis is installed. Extract the tool to a preferred location. See the screenshot below:
Double-click on the XALicenseManagerTool. The following window will be invoked:
Installing the License File
Installation & Upgrade Guide 11.0 © 2015 Fresche Legacy Inc. Page 16
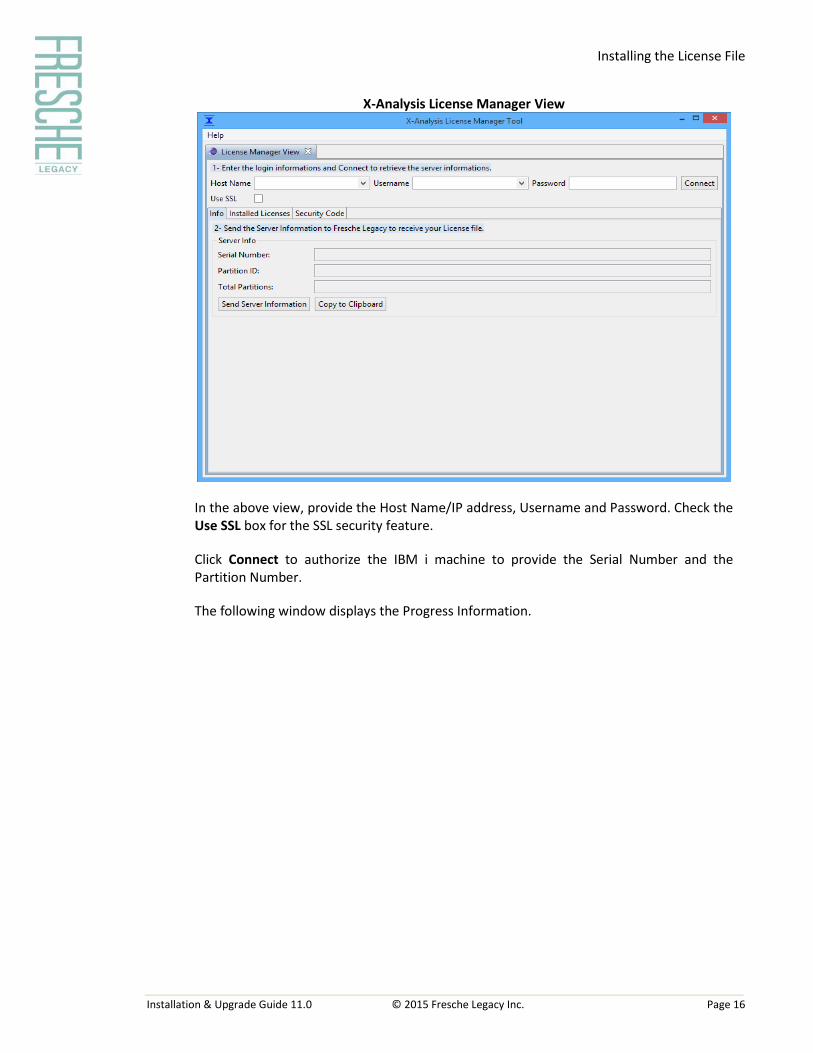
X-Analysis License Manager View
In the above view, provide the Host Name/IP address, Username and Password. Check the Use SSL box for the SSL security feature.
Click Connect to authorize the IBM i machine to provide the Serial Number and the Partition Number.
The following window displays the Progress Information.

Installing the License File
Installation & Upgrade Guide 11.0 © 2015 Fresche Legacy Inc. Page 17
Progress Information
Once the connection is established, the following window is displayed:
Click OK. The Server Info will now show the Serial No., Partition ID, and Total Partitions.
Installing the License File
Installation & Upgrade Guide 11.0 © 2015 Fresche Legacy Inc. Page 18
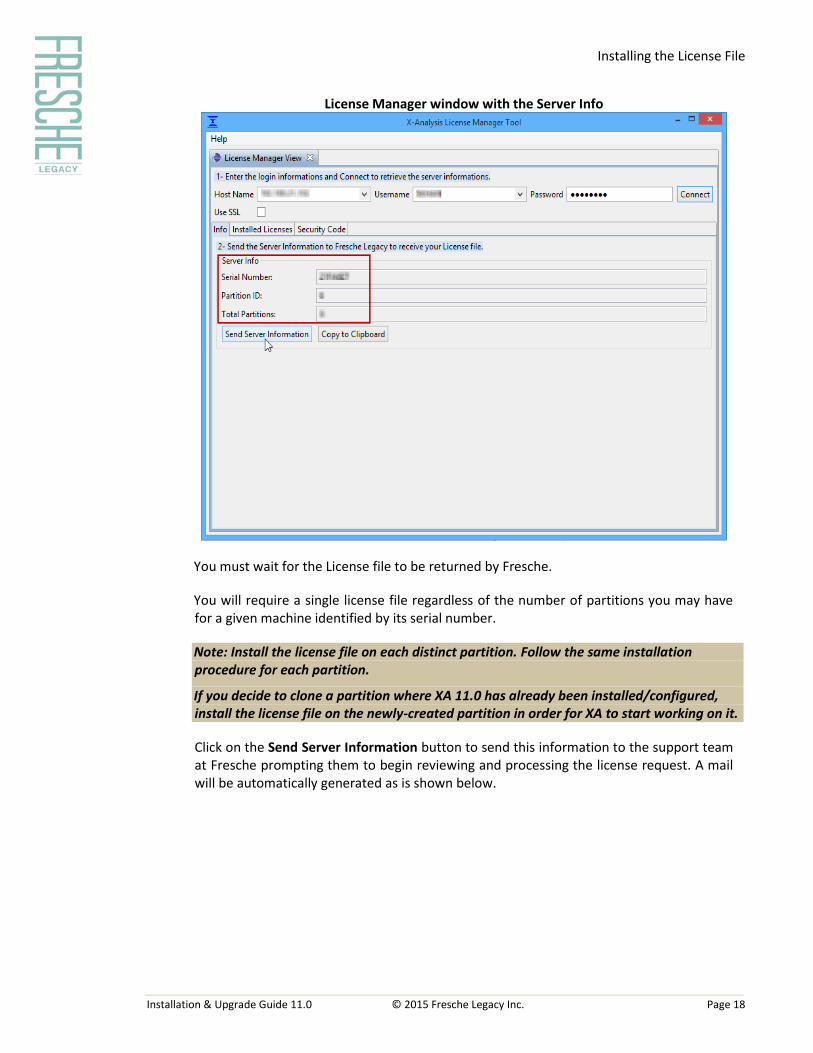
License Manager window with the Server Info
You must wait for the License file to be returned by Fresche.
You will require a single license file regardless of the number of partitions you may have for a given machine identified by its serial number.
Note: Install the license file on each distinct partition. Follow the same installation procedure for each partition.
If you decide to clone a partition where XA 11.0 has already been installed/configured, install the license file on the newly-created partition in order for XA to start working on it.
Click on the Send Server Information button to send this information to the support team at Fresche prompting them to begin reviewing and processing the license request. A mail will be automatically generated as is shown below.
Installing the License File
Installation & Upgrade Guide 11.0 © 2015 Fresche Legacy Inc. Page 19
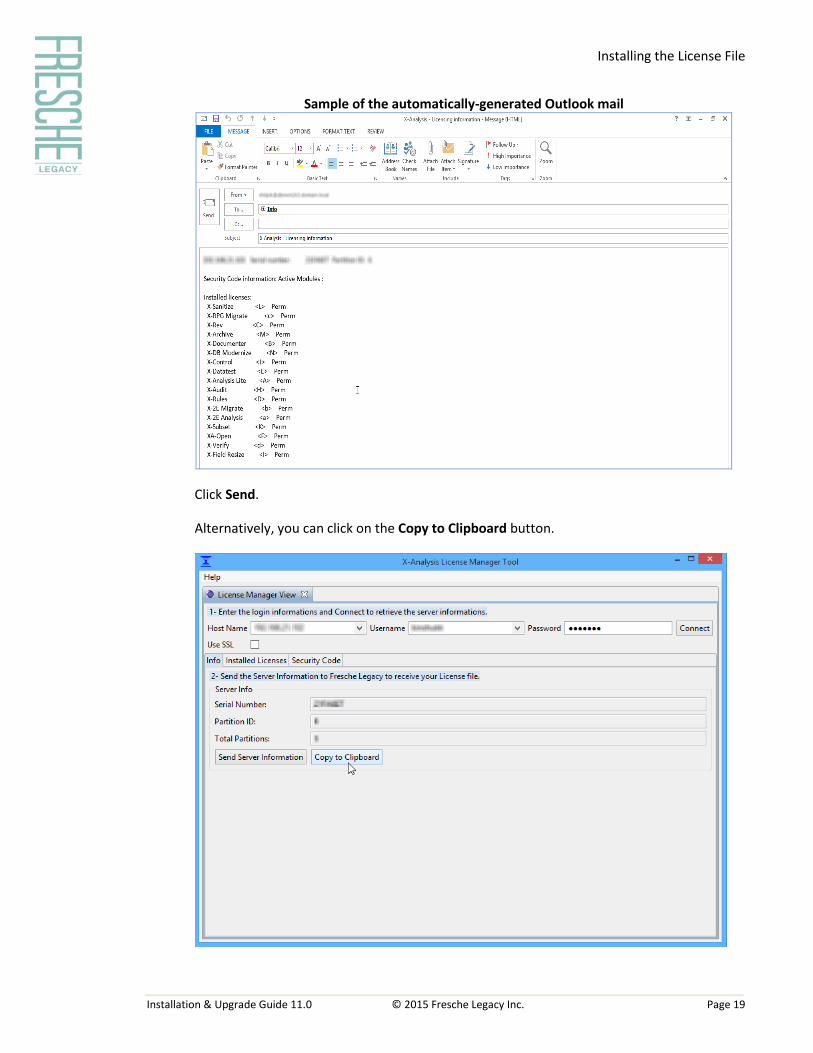
Sample of the automatically-generated Outlook mail
Click Send.
Alternatively, you can click on the Copy to Clipboard button.
Installing the License File
Installation & Upgrade Guide 11.0 © 2015 Fresche Legacy Inc. Page 20
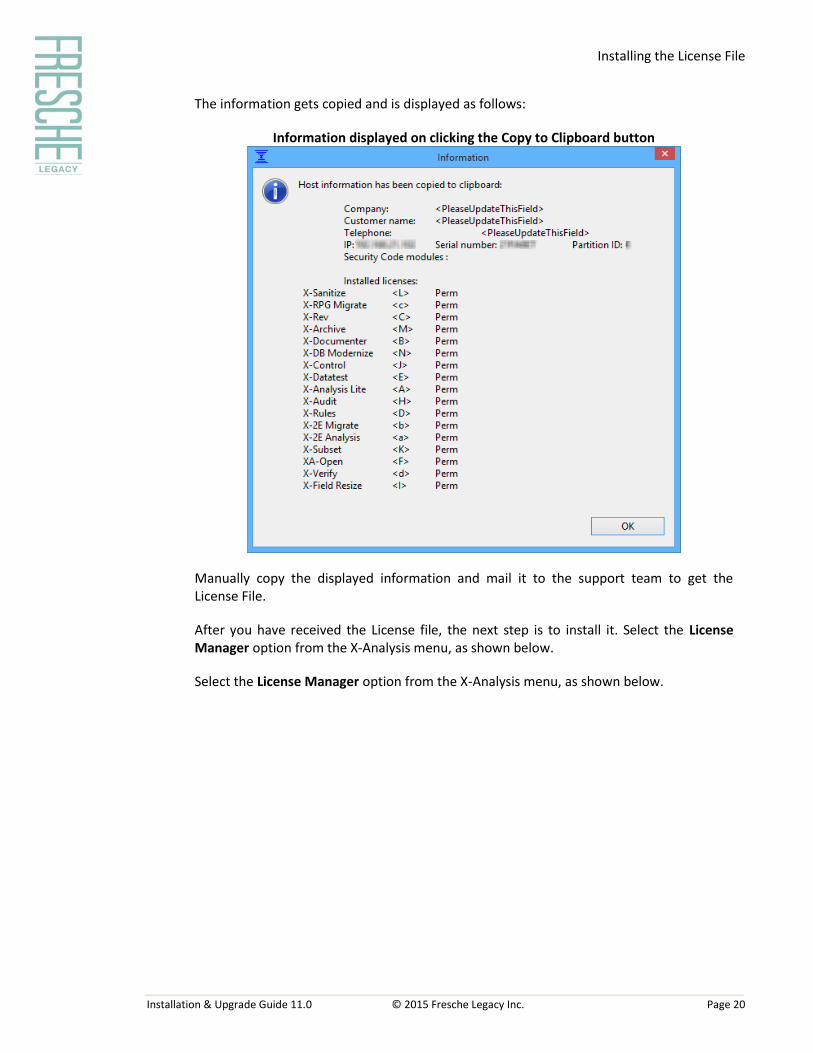
The information gets copied and is displayed as follows:
Information displayed on clicking the Copy to Clipboard button
Manually copy the displayed information and mail it to the support team to get the License File.
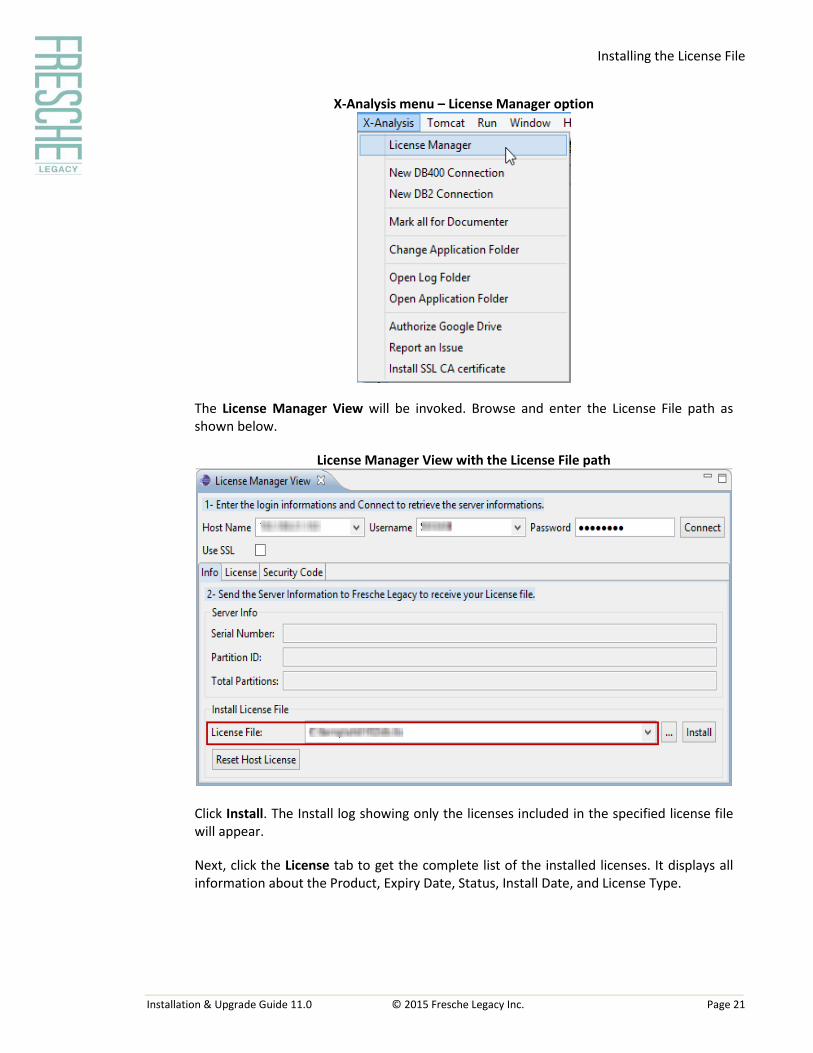
After you have received the License file, the next step is to install it. Select the License Manager option from the X-Analysis menu, as shown below.
Select the License Manager option from the X-Analysis menu, as shown below.
Installing the License File
Installation & Upgrade Guide 11.0 © 2015 Fresche Legacy Inc. Page 21
X-Analysis menu – License Manager option
The License Manager View will be invoked. Browse and enter the License File path as shown below.
License Manager View with the License File path
Click Install. The Install log showing only the licenses included in the specified license file will appear.
Next, click the License tab to get the complete list of the installed licenses. It displays all information about the Product, Expiry Date, Status, Install Date, and License Type.
Installing the License File
Installation & Upgrade Guide 11.0 © 2015 Fresche Legacy Inc. Page 22
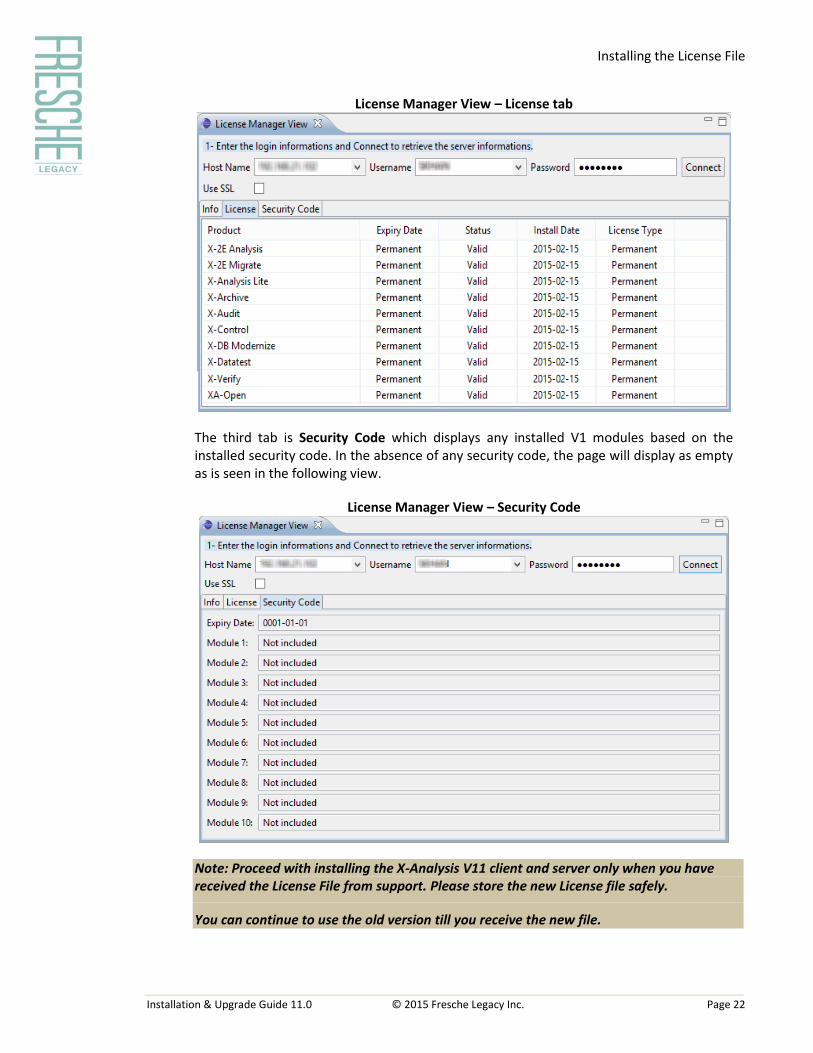
License Manager View – License tab
The third tab is Security Code which displays any installed V1 modules based on the installed security code. In the absence of any security code, the page will display as empty as is seen in the following view.
License Manager View – Security Code
Note: Proceed with installing the X-Analysis V11 client and server only when you have received the License File from support. Please store the new License file safely.
You can continue to use the old version till you receive the new file.
Uninstalling X-Analysis from an IBM i (AS/400)
Installation & Upgrade Guide 11.0 © 2015 Fresche Legacy Inc. Page 23
Uninstalling X-Analysis from an IBM i (AS/400)
Terminate all X-Analysis Client (Windows/Eclipse) sessions, if any. After terminating X-Analysis client session, invoke a fresh 5250 session and check that none of the following libraries are in use:
XAN4
XREV
XRESIZE
For Version 9.x onwards of the X-Analysis server products, you only need to check XAOBJ.
Terminate all the 5250 sessions using the above-mentioned libraries.
UNINSTALL THE CROSS-REFERENCE LIBRARIES
Delete all X-Analysis application libraries (cross-reference libraries), which were created using the X4WRKAPP master command menu on IBM i. After deleting all X-Analysis application libraries, remove the supplied Tutorial Application – XAN4CDXA, and its data library – XAN4CDEM.
UNINSTALL THE PRODUCT LIBRARIES
After application libraries are deleted, remove the following product libraries:
XAN4
XREV
XBRWBASA
XBRWBASL
XBRWBASS
XAN4MODS
XREVMODS
XRESIZE
For Version 9.x onwards of the X-Analysis server products you need to remove XAOBJ and XADTA libraries only.
Use the following command to delete libraries: DLTLIB LIB(<Library Name>)
Deleting the above-mentioned libraries removes X-Analysis from your IBM i.
Troubleshooting
Installation & Upgrade Guide 11.0 © 2015 Fresche Legacy Inc. Page 24
Troubleshooting
The X-Analysis installation client (MSI) creates the following log files to help troubleshoot installation problems:
InitialXaSetup.log is created in the C:\ folder in case the setup ends prematurely.
InitialXaSetup.log & XASetup.log are created in installation folder after installation completes.
X-RedoSetup.log is created under installation location when X-Redo install completes.
InstallXAUML.log is created in C:\ folder.
To obtain a detailed log of the X-Analysis setup, perform the steps below:
1. Paste "msiexec -i XASetup<Version>.msi /lv* C:\XASetup.log" (minus the quotes) on the command prompt and press Enter.
2. Wait until the XASetup completes or ends prematurely.
3. XASetup.log is created in the C:\ folder.
Send appropriate log file(s) to [email protected] to help us support you better.
Index
Installation & Upgrade Guide 11.0 © 2015 Fresche Legacy Inc. Page 25
Index
Client, 4, 6, 7, 11, 23, 24 Client Components, 6 Client-Server Connections, 7 Cross-Reference Libraries, 23 FTP commands, 10 FTP Commands, 9, 10 IBM i, 4, 7, 9, 10, 11, 12, 15, 23 License Manager, 16, 18, 20 Post-installation Activities, 15 Server, 4, 6, 7, 9 Server Components, 6 Synon, 12 System requirements, 4, 7 Troubleshooting, 4, 24 User Profile Requirements, 7 V2, 15 XALicenseManagerTool, 15 X-Analysis, 1, 2, 4, 5, 6, 7, 9, 10, 11, 15, 23, 24
Suite of products, 4 X-Analysis Client installation (MSI), 24