Embed Size (px)
Citation preview
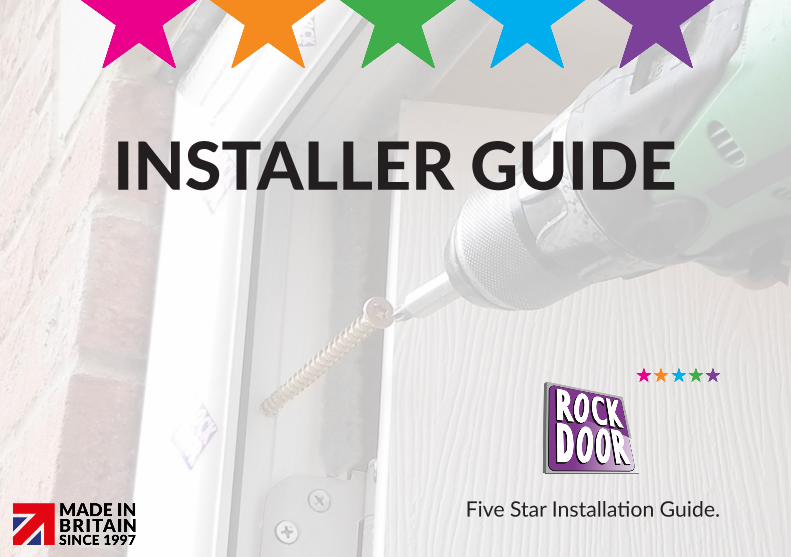
Five Star Installation Guide.
INSTALLER GUIDE
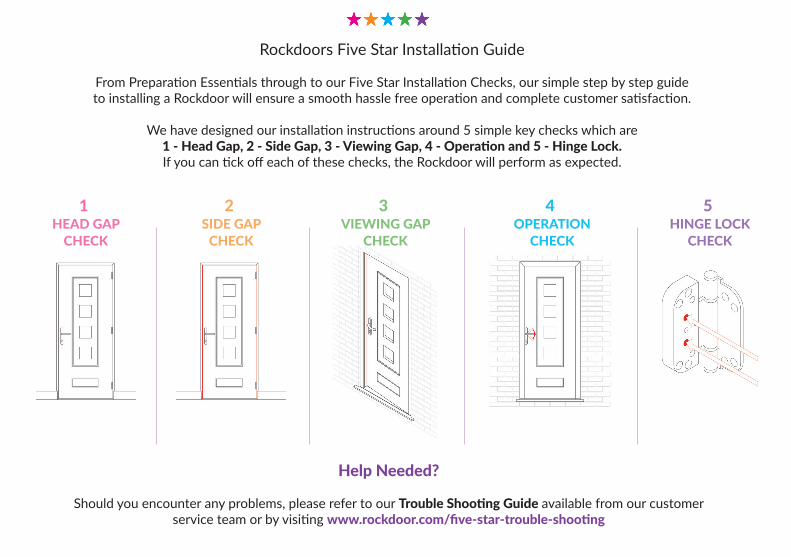
Rockdoors Five Star Installation Guide
From Preparation Essentials through to our Five Star Installation Checks, our simple step by step guide to installing a Rockdoor will ensure a smooth hassle free operation and complete customer satisfaction.
We have designed our installation instructions around 5 simple key checks which are 1 - Head Gap, 2 - Side Gap, 3 - Viewing Gap, 4 - Operation and 5 - Hinge Lock. If you can tick off each of these checks, the Rockdoor will perform as expected.
HINGE LOCKCHECK
5HEAD GAP
CHECK
1SIDE GAP
CHECK
2VIEWING GAP
CHECK
3OPERATION
CHECK
4
Help Needed?
Should you encounter any problems, please refer to our Trouble Shooting Guide available from our customer service team or by visiting www.rockdoor.com/five-star-trouble-shooting
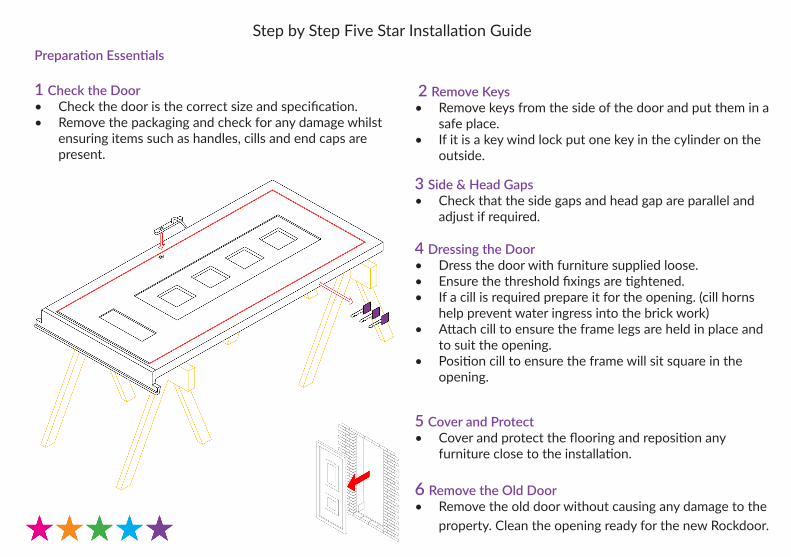
Preparation Essentials 1 Check the Door• Check the door is the correct size and specification.• Remove the packaging and check for any damage whilst
ensuring items such as handles, cills and end caps are present.
2 Remove Keys• Remove keys from the side of the door and put them in a
safe place.• If it is a key wind lock put one key in the cylinder on the
outside. 3 Side & Head Gaps• Check that the side gaps and head gap are parallel and
adjust if required. 4 Dressing the Door• Dress the door with furniture supplied loose.• Ensure the threshold fixings are tightened. • If a cill is required prepare it for the opening. (cill horns
help prevent water ingress into the brick work)• Attach cill to ensure the frame legs are held in place and
to suit the opening.• Position cill to ensure the frame will sit square in the
opening.
5 Cover and Protect• Cover and protect the flooring and reposition any
furniture close to the installation. 6 Remove the Old Door• Remove the old door without causing any damage to the
property. Clean the opening ready for the new Rockdoor.
Step by Step Five Star Installation Guide
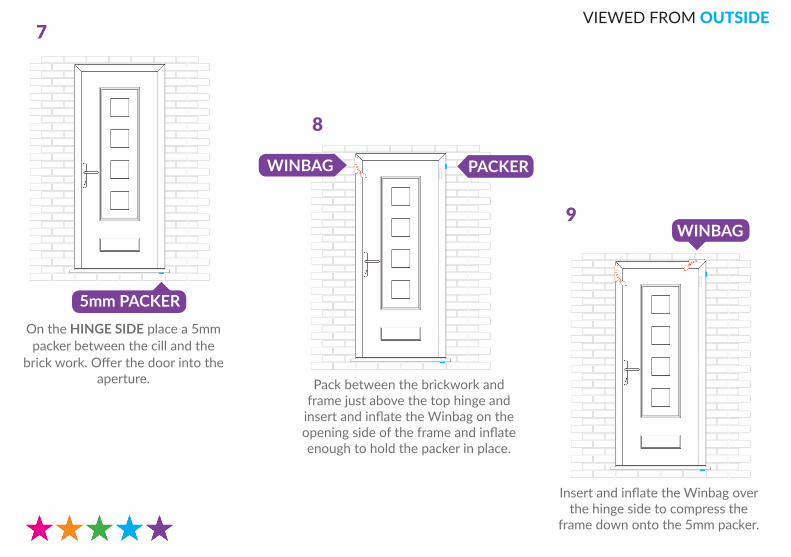
On the HINGE SIDE place a 5mm packer between the cill and the
brick work. Offer the door into the aperture.
5mm PACKER
WINBAG PACKER
WINBAG
7
8
9
Pack between the brickwork and frame just above the top hinge and
insert and inflate the Winbag on the opening side of the frame and inflate enough to hold the packer in place.
Insert and inflate the Winbag over the hinge side to compress the
frame down onto the 5mm packer.
VIEWED FROM OUTSIDE
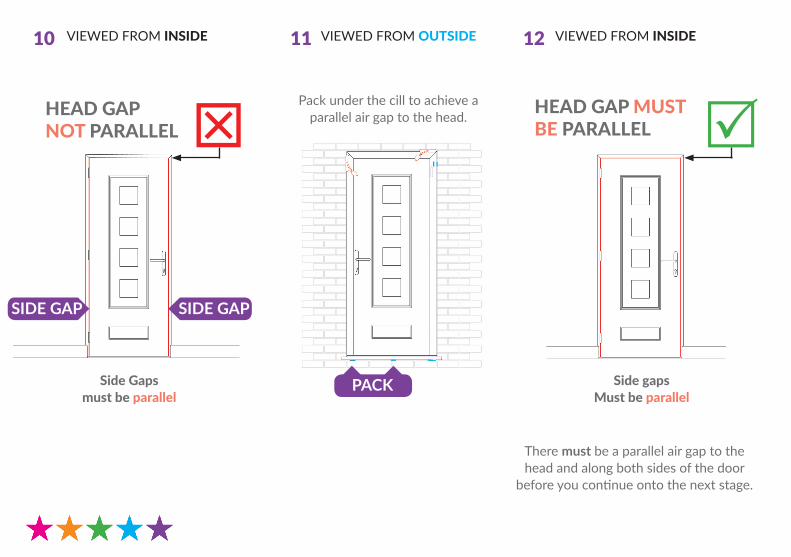
HEAD GAP MUST BE PARALLEL R
10 12
There must be a parallel air gap to the head and along both sides of the door
before you continue onto the next stage.
VIEWED FROM INSIDE VIEWED FROM INSIDE11 VIEWED FROM OUTSIDE
Pack under the cill to achieve a parallel air gap to the head.
PACK Side Gaps must be parallel
SIDE GAP SIDE GAP
Side gaps Must be parallel
THEAD GAP NOT PARALLEL
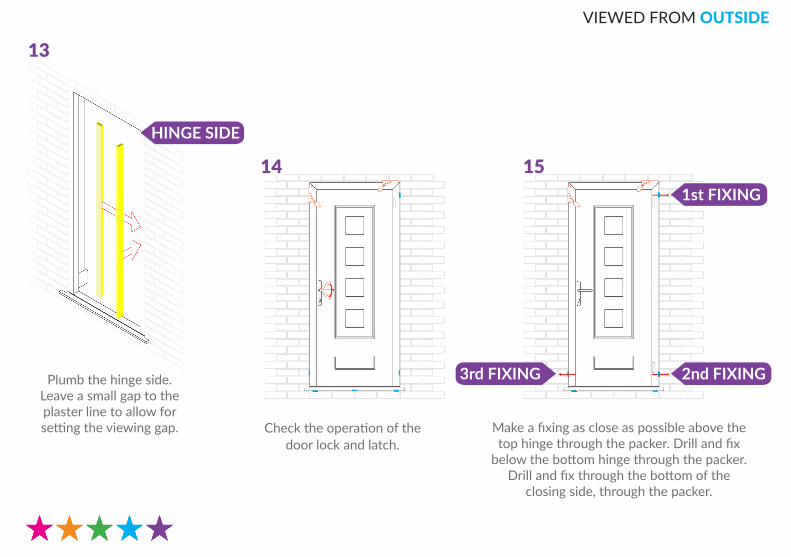
13
1st FIXING
2nd FIXING 3rd FIXING
15
Plumb the hinge side. Leave a small gap to the plaster line to allow for setting the viewing gap. Check the operation of the
door lock and latch.
14
Make a fixing as close as possible above the top hinge through the packer. Drill and fix
below the bottom hinge through the packer. Drill and fix through the bottom of the
closing side, through the packer.
HINGE SIDE
VIEWED FROM OUTSIDE
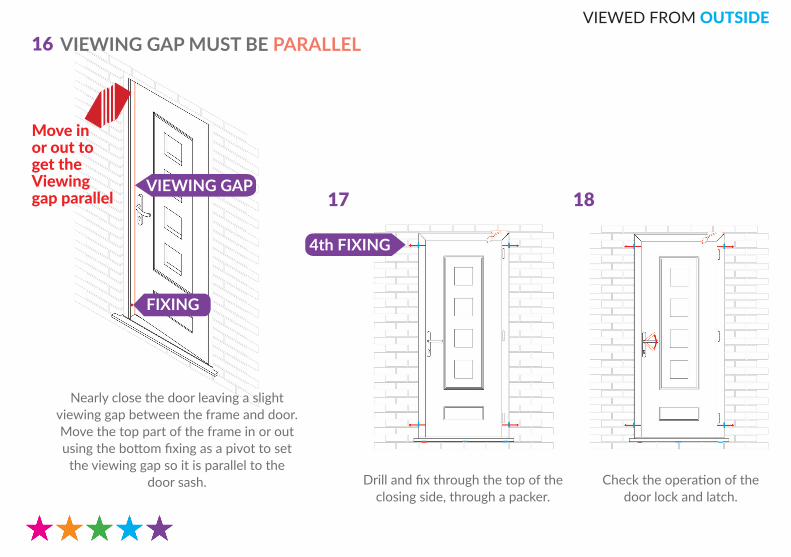
16VIEWED FROM OUTSIDE
VIEWING GAP
FIXING
Check the operation of the door lock and latch.
18
4th FIXING
17
Drill and fix through the top of the closing side, through a packer.
Nearly close the door leaving a slight viewing gap between the frame and door.Move the top part of the frame in or out using the bottom fixing as a pivot to set
the viewing gap so it is parallel to the door sash.
VIEWING GAP MUST BE PARALLEL
Move in or out to get the Viewing gap parallel
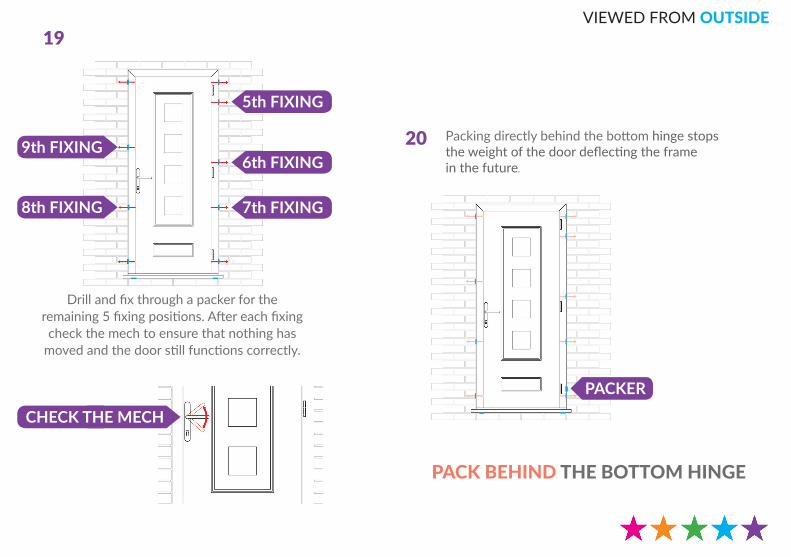
PACK BEHIND THE BOTTOM HINGE
19
7th FIXING 8th FIXING
9th FIXING 6th FIXING
5th FIXING
PACKER
20
Drill and fix through a packer for the remaining 5 fixing positions. After each fixing check the mech to ensure that nothing has
moved and the door still functions correctly.
Packing directly behind the bottom hinge stops the weight of the door deflecting the framein the future.
VIEWED FROM OUTSIDE
CHECK THE MECH
LOCKED TIGHT
LOCKED TIGHT
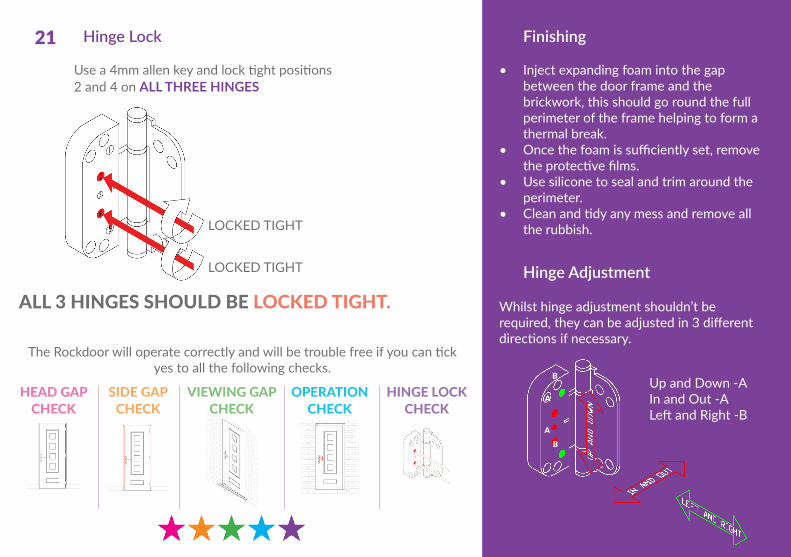
• Inject expanding foam into the gap between the door frame and the brickwork, this should go round the full perimeter of the frame helping to form a thermal break.
• Once the foam is sufficiently set, remove the protective films.
• Use silicone to seal and trim around the perimeter.
• Clean and tidy any mess and remove all the rubbish.
21 Hinge Lock
ALL 3 HINGES SHOULD BE LOCKED TIGHT.
Use a 4mm allen key and lock tight positions 2 and 4 on ALL THREE HINGES
Finishing
HINGE LOCKCHECK
HEAD GAPCHECK
SIDE GAPCHECK
VIEWING GAPCHECK
OPERATIONCHECK
Hinge Adjustment
The Rockdoor will operate correctly and will be trouble free if you can tick yes to all the following checks.
Whilst hinge adjustment shouldn’t be required, they can be adjusted in 3 different directions if necessary.
B
A
AB
Up and Down -AIn and Out -ALeft and Right -B
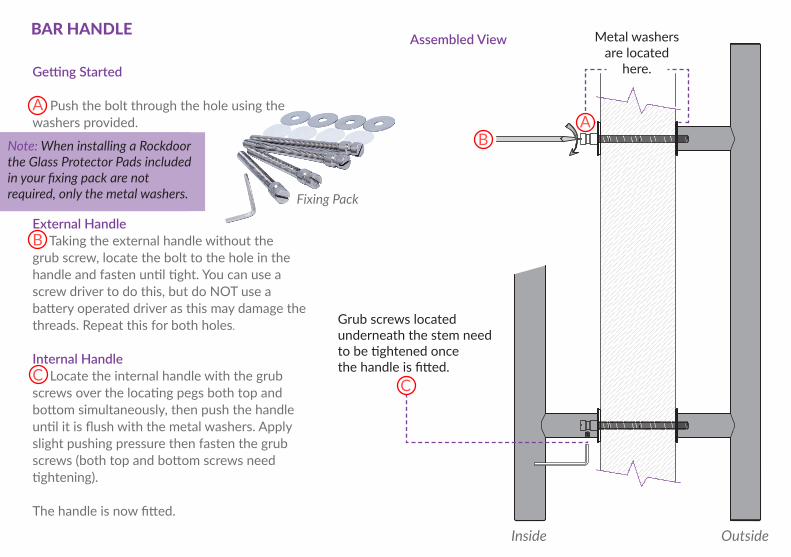
Assembled View
Grub screws locatedunderneath the stem needto be tightened oncethe handle is fitted.
Metal washers are located
here.
Inside Outside
BAR HANDLE
Getting Started
A Push the bolt through the hole using the washers provided.
External HandleB Taking the external handle without the grub screw, locate the bolt to the hole in the handle and fasten until tight. You can use a screw driver to do this, but do NOT use a battery operated driver as this may damage the threads. Repeat this for both holes.
Internal HandleC Locate the internal handle with the grub screws over the locating pegs both top and bottom simultaneously, then push the handle until it is flush with the metal washers. Apply slight pushing pressure then fasten the grub screws (both top and bottom screws need tightening).
The handle is now fitted.
Note: When installing a Rockdoor the Glass Protector Pads included in your fixing pack are not required, only the metal washers. Fixing Pack
A B
C
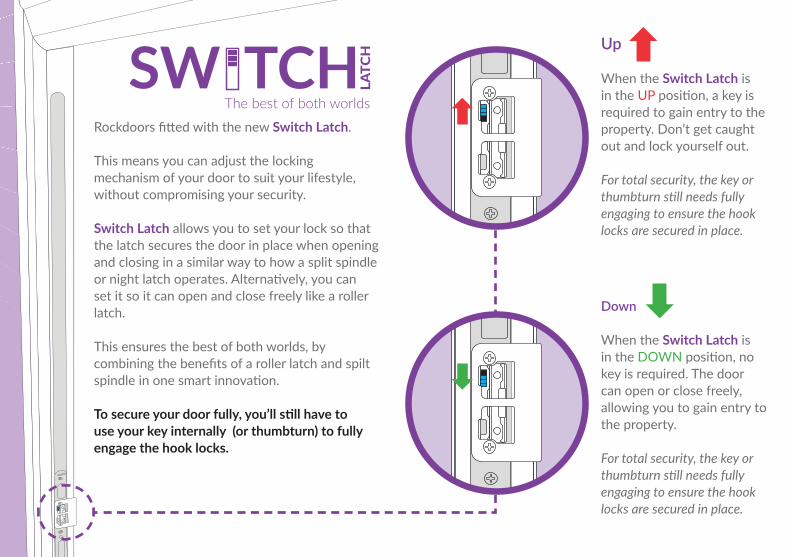
Up
When the Switch Latch is in the UP position, a key is required to gain entry to the property. Don’t get caught out and lock yourself out.
For total security, the key or thumbturn still needs fully engaging to ensure the hook locks are secured in place.
Down
When the Switch Latch is in the DOWN position, no key is required. The door can open or close freely, allowing you to gain entry to the property.
For total security, the key or thumbturn still needs fully engaging to ensure the hook locks are secured in place.
Rockdoors fitted with the new Switch Latch.
This means you can adjust the locking mechanism of your door to suit your lifestyle, without compromising your security.
Switch Latch allows you to set your lock so that the latch secures the door in place when opening and closing in a similar way to how a split spindle or night latch operates. Alternatively, you can set it so it can open and close freely like a roller latch.
This ensures the best of both worlds, by combining the benefits of a roller latch and spilt spindle in one smart innovation.
To secure your door fully, you’ll still have to use your key internally (or thumbturn) to fully engage the hook locks.
The best of both worlds
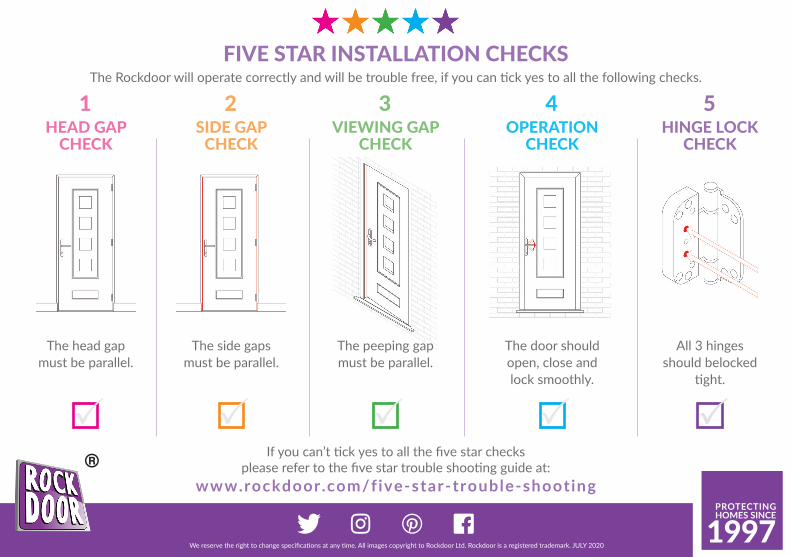
FIVE STAR INSTALLATION CHECKS
HINGE LOCKCHECK
The Rockdoor will operate correctly and will be trouble free, if you can tick yes to all the following checks.
5HEAD GAP
CHECK
1
The head gap must be parallel.
SIDE GAPCHECK
2
The side gaps must be parallel.
VIEWING GAPCHECK
3
The peeping gap must be parallel.
OPERATIONCHECK
4
The door should open, close and lock smoothly.
All 3 hinges should belocked
tight.
If you can’t tick yes to all the five star checks please refer to the five star trouble shooting guide at:
www.rockdoor.com/five-star-trouble-shootingPROTECTING HOMES SINCE
1997We reserve the right to change specifications at any time. All images copyright to Rockdoor Ltd. Rockdoor is a registered trademark. JULY 2020
®
P P P P P