Embed Size (px)
Citation preview


2
Installing BFD Eco: Mac OSX 10.5 or above
1. Insert the BFD Eco installer disc and open the new DVD image that mounts to your desktop
2. Double-click on the BFD Eco Installer OSX package.
3. You may need to enter an administrator password to continue.
4. The first screen of the installer is displayed – click Next to continue.
Note: You MUST install from the DVD before installing any updates!

3
4. You must read and agree to the license conditions in order to continue. When you have ticked the ‘I agree...’ checkbox, click the Next button.
5. You now need to enter a location to which to install the audio data. We highly recommend installing onto a dedicated drive, or any drive that is not used for audio tracks or other streaming libraries at the same time as BFD Eco.
Click the Browse button to navigate to and choose a suitable location.
Click the Next button to continue.

4
6. BFD Eco can be installed in 3 sizes. The two smaller sizes install less velocity layers so the detail level is lower, but the hard disk and RAM footprint when using the sounds is also reduced.
Small: approx. 2.2 GB Medium: approx. 3.0 GB Large: approx. 5.5 GB
Click the selector and choose the appropriate size, then click the Install button.
7. Installation will now commence. Please be patient, as installation can take a long time!

5
8. The installer asks if you want to check for updates at our website. It is highly recommended to use the very latest version of BFD Eco, as it is constantly being updated for optimum performance.
9. Once the installation has completed, click the Done button.
You are now ready to authorize BFD Eco – turn to page 11.

6
Installing BFD Eco: Windows XP or later
1. Insert the BFD Eco DVD and open its contents.
2. Double-click on the BFD Eco Installer Win.exe file.
3. You may see the following message after running the installer. Click the Run button to continue.
4. The first screen of the installer is displayed – click Next to continue.
Note: You MUST install from the DVD before installing any updates!

7
5. You must read and agree to the license conditions in order to continue. When you have ticked the ‘I agree...’ checkbox, click the Next button.
6. You now need to specify the location of your VSTplugins folder. The installer tries to detect your folder automatically.
If you require a different location for the VST plugin component of BFD Eco, click the Browse button to navigate to and select another location. Click Next to continue.
8
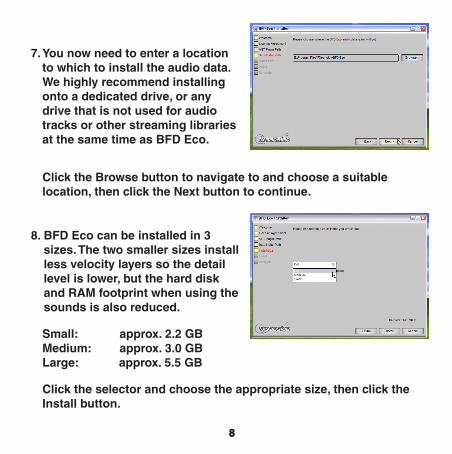
7. You now need to enter a location to which to install the audio data. We highly recommend installing onto a dedicated drive, or any drive that is not used for audio tracks or other streaming libraries at the same time as BFD Eco.
Click the Browse button to navigate to and choose a suitable location, then click the Next button to continue.
8. BFD Eco can be installed in 3 sizes. The two smaller sizes install less velocity layers so the detail level is lower, but the hard disk and RAM footprint when using the sounds is also reduced.
Small: approx. 2.2 GB Medium: approx. 3.0 GB Large: approx. 5.5 GB
Click the selector and choose the appropriate size, then click the Install button.

9
9. Installation will now commence. Please be patient, as installation can take a long time!
10. Before the installation is complete, you may see this message again. Click Run in order to continue with the installation.
10
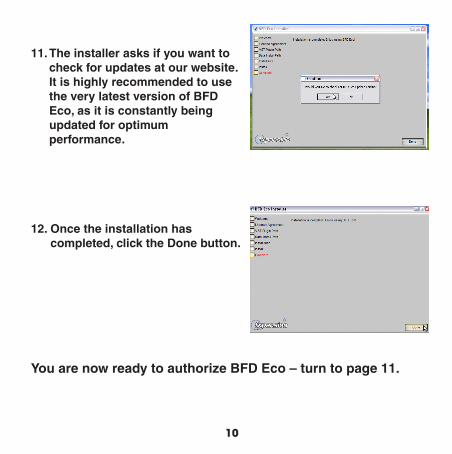
11. The installer asks if you want to check for updates at our website. It is highly recommended to use the very latest version of BFD Eco, as it is constantly being updated for optimum performance.
12. Once the installation has completed, click the Done button.
You are now ready to authorize BFD Eco – turn to page 11.

11
Authorizing BFD Eco: License ManagerThe License Manager application is used to manage licenses and authorizations for BFD Eco and add-on BFD / BFD2 expansion packs for use with BFD Eco, as well as other FXpansion software products. To use our products, you need to authorize them to be run on your computer.
The computer on which you want to use the product does NOT need to be on the internet.
License Manager features 3 methods to get your new software authorized:
• With License Manager and an internet connection on the same computer
• With License Manager and an internet connection on a different computer
• Using a web browser and a generated Authorization Request file, on the same or a different computer
Note: Authorization files generated from an Authorization Request file are unique to a single computer. An Authorization file is only valid on the computer that created the Authorization Request file.
Starting the authorizationThe best way to authorize BFD Eco is by launching the supplied standalone application. This is found in your Applications folder (Mac) or in C:\Program Files\FXpansion\BFD Eco (Windows). See Appendix 1 of the PDF manual for more details of the standalone application.
When BFD Eco detects it is not yet authorized, it runs License Manager automatically.
Once you have authorized the standalone application, all plugin versions are also authorized.

12
Running License ManagerWhen BFD Eco launches and detects it has not yet been authorized, it automatically runs License Manager, or asks if you want to run it. However, you can also run it manually at any time:
Mac OS X: Applications / FX License Manager
Windows: Start•Programs•FXpansion•LicenseManager
Enter your serial numberWhen License Manager runs, it may first prompt you for your BFD Eco serial number.
If it does so, type in your serial number, hit ENTER and then press the OK button.
Each time License Manager runs, it performs a quick system scan of installed FXpansion products to make sure any licenses are OK. This can take a few seconds on slower computers.
13
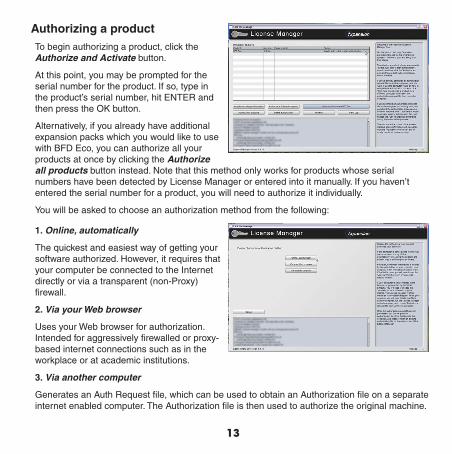
Authorizing a product To begin authorizing a product, click the Authorize and Activate button.
At this point, you may be prompted for the serial number for the product. If so, type in the product’s serial number, hit ENTER and then press the OK button.
Alternatively, if you already have additional expansion packs which you would like to use with BFD Eco, you can authorize all your products at once by clicking the Authorize all products button instead. Note that this method only works for products whose serial numbers have been detected by License Manager or entered into it manually. If you haven’t entered the serial number for a product, you will need to authorize it individually.
You will be asked to choose an authorization method from the following:
1. Online, automatically The quickest and easiest way of getting your software authorized. However, it requires that your computer be connected to the Internet directly or via a transparent (non-Proxy) firewall.
2. Via your Web browser
Uses your Web browser for authorization. Intended for aggressively firewalled or proxy-based internet connections such as in the workplace or at academic institutions.
3. Via another computer
Generates an Auth Request file, which can be used to obtain an Authorization file on a separate internet enabled computer. The Authorization file is then used to authorize the original machine.

14
Option 1. Online authorization
1. To begin authorizing online, choose Online, automatically as the authorization method.
2. On the next page, you are prompted for your FXpansion web site user name & password. Enter it and go to step 4.
3. If you don’t have an account, click Create a new account on the right; if you’ve forgotten your details or you aren’t sure if you have an account, click the Retreive Login Details link.
The Create a new account button opens your Web browser to a short form on our Web site. Once you’ve
created an account, return to the License Manager and log in with your new details.
4. The License Manager connects to our server. If it cannot connect, it reports an error message. This is either because our server is down or there is a firewall block or fault with your internet connection.
You should try the Via your Web browser authorization method described below.
5. Once the License Manager has logged in, you are given a confirmation screen detailing the product, the serial number and your user account name.
Click Request Authorization – the authorization process completes, and, all being well, your software is ready to use!

15
Option 2. Authorization via your Web browser
1. To authorize via your Web browser, choose Via your Web browser as the authorization method.
2. License Manager creates an Authorization Request file on your Desktop -- for example, “BFD Eco.AuthRequest” -- and prompts you to launch your Web browser.
Note: If for some reason your browser fails to launch, you should launch it manually and point it to:
http://www.fxpansion.com/authorize
3. You are now be prompted to log in to your user account, or create a new account if you don’t have one yet.

16
4. Once you’ve logged in, or created an account and logged in, you are prompted to select the Authorization Request file. Click the Browse... button, and, when the file dialog pops up, choose the Authorization Request file that was created by the License Manager earlier.
Then click the Submit button – the server now processes your authorization request.
If successful, you are prompted to download the Authorization file – choose Save to Disk and save it to your desktop (if you are using Mac OSX Leopard, downloaded files go to the Users/<user>/Downloads folder).
5. Close your web browser and return to the License Manager application. On the main screen, click Import an existing authorization file. Select the Authorization file you just downloaded to your desktop, (it ends in “.Auth”). The License Manager imports the Authorization file, and your software is now authorized and ready to use.
Note: The Authorization file you need to import is NOT the same file as the Authorization Request generated by License Manager.
To reiterate, the file you need to import is the one you downloaded to your desktop from your web browser (ending in “.Auth”), NOT the file that License Manager generated (ending in “.AuthRequest”).

17
Option 3. Authorizing via a different computer
This method is somewhat more time consuming, and should only be used if the machine on which you need to authorize your software does not have an internet connection of any kind.
1. To authorize via a different computer, choose Via another computer as the authorization method.
2. License Manager creates an Authorization Request file on your Desktop -- for example, “BFD Eco.AuthRequest”.
3. You need to take this file to an internet-connected computer (via local network, floppy disk, thumb drive, CDR, Zip disk etc.).
A small USB thumb drive can be bought for around $10 at any electronics retailer and is ideal for this.
4. Once you are at the other, Internet-connected computer, you have one of two options -- you can either download License Manager from our website and install on that computer, or you can simply use your web browser.
• Using License Manager
Once you’ve downloaded and installed License Manager on your internet-connected computer, run it and choose Authorize a different computer.
You are prompted to select the Authorization Request file – choose the file on your USB drive and then follow the instructions in the ‘Option 1: Online Authorization’ guide above.
When the process completes, an Authorization file is generated on your Desktop. You now need to copy this file to your thumb drive (or floppy, etc.), and take it back to your non-internet-connected machine.

18
• Using a web browser
Instead of installing and using License Manager, you can use a web browser (Firefox, Safari, Internet Explorer etc.) on your internet-connected computer and open the following page:
http://www.fxpansion.com/authorize
.. and follow the instructions for ‘Option 2: Authorization via your Web browser’ above.
When the authorization process completes, download the Authorization file from our web server directly to your thumb drive (or floppy, etc.) and take it back to your non-internet-connected machine.
5. Whichever method you used above, you now need to import the generated Authorization file back into License Manager in order to complete the authorization process.
On the main screen of License Manager, click the Import an existing authorization button, and point it at the file on your thumb drive (or floppy, etc.)
License Manager imports the license file, and your software is ready to use.
Other functions in the License Manager applicationDelete Authorization
This can be used to remove an Authorization from your computer – for example, if you are uninstalling the associated software.
Refresh
This refreshes the list of installed products and their status.
View Log
This opens a detailed log of License Manager’s activity in Notepad (Windows) or TextEdit (Mac OSX). You can then copy and paste from there to your email application, if our Tech Support team needs this information.

19
Possible problems during authorizationWe issue only a certain number of authorizations per serial number, and a serial number can only belong to one user. We appreciate these restrictions can be inconvenient in some circumstances – however, preventing abuse of the license helps keep prices down, and facilitates continued development, free updates and responsive technical support.
You may encounter the following problems:
• Your serial number is registered to a different account.
Your serial number belongs to you - it identifies you as the legitimate owner of the software. As such, only one person can be the owner of a given serial number, and only that user account can generate authorizations based on that serial number. Occasionally, users end up with more than one account, with some serials registered in one and some in another. If this applies to you, contact our support team to resolve the situation.
• Too many authorizations have been issued for a serial number.
If you’ve run out of authorizations (perhaps if you’ve installed the software on several different computers, or if you reinstall or upgrade your computer hardware frequently), you will need to contact our technical support team at:
www.fxpansion.com/support

20
After authorization is complete• Once you have authorized BFD Eco, you are ready to use it, whether as a standalone
application, or as a plugin within a compatible host. On DVD1, you’ll find projects for most popular hosts with BFD Eco launched and ready to use.
• The BFD Eco manual is supplied as a PDF file, and can be launched from the BFD Eco Help menu. It is vital to read the manual in order to get the most out of BFD Eco!
Software updates
We highly recommend that you should check our site for updates as soon as possible. BFD Eco is constantly under development in order to increase its performance.
If you encounter a problem with the software, it is very likely that the issue will be fixed by simply updating to the latest version available on our website.
Important note about expansion packs
You MUST authorize any expansion packs you own if you want to use them in BFD Eco. See the BFD Eco FAQ for up-to-date information on using expansion packs with BFD Eco.
TroubleshootingIf you encounter any unresolvable problems during the installation or authorization process, please follow these steps:
1. Consult the BFD Eco FAQ, which is frequently updated with current issues and advice.
www.fxpansion.com/bfdecofaq
2. If you cannot resolve your problem with the information provided in the FAQ, please contact our technical support team, who will endeavour to get you up and running as quickly as possible.
Please note that you must register your copy of BFD Eco before being able to receive support.
www.fxpansion.com/support


![Detection (BFD) protocol to measure BFD stability ... · The Bidirectional Forwarding Detection (BFD) [RFC5880] protocol operates by transmitting and receiving control frames, generally](https://img.pdfslide.net/doc/110x75/5f3c0dfd2926a831b774cd23/detection-bfd-protocol-to-measure-bfd-stability-the-bidirectional-forwarding.jpg)