Embed Size (px)
Citation preview

oAW TutorialPrev Part I. Getting Started Next
oAW TutorialInstalling the pre-built tutorialTutorial overviewDefining an EMF metamodelGenerating the EMF toolingSetting up the generator projectDefining an Example Data ModelUsing Dynamic EMFGenerating code from the example modelChecking Constraints with the Check LanguageExtensionsIntegrating RecipesTransforming ModelsThis example uses Eclipse EMF as the basis for code generation. One of the essential new features ofopenArchitectureWare 4 is EMF support. While not all aspects of EMF as good and nice to use as onewould wish, the large amount of available third party tools makes EMF a good basis. Specifically, bettertools for building EMF metamodels are available already (Xtext, GMF, etc.). To get a deeperunderstanding of EMF, we recommend that you first read the EMF tutorial at
http://www-128.ibm.com/developerworks/library/os-ecemf1/http://www-128.ibm.com/developerworks/library/os-ecemf2/http://www-128.ibm.com/developerworks/library/os-ecemf3/
You can also run the tutorial without completely understanding EMF, but the tutorial might seemunnecessarily complex to you.
Installing the pre-built tutorialYou need to have openArchitectureWare 4.3 installed. Please considerhttp://www.eclipse.org/gmt/oaw/download for details.You can also install the code for the tutorial. It can be downloaded from the URL above, it is part of theEMF samples ZIP file. Installing the demos is easy: Just add the projects to your workspace. Note, thatin the openArchitectureWare preferences (either globally for the workspace, or specific for the sampleprojects, you have to select EMF metamodels for these examples to work.
Tutorial overviewThe purpose of this tutorial is to illustrate code generation with openArchitectureWare from EMFmodels. The process, we are going to go through, will start by defining a metamodel (using EMFtooling), coming up with some example data, writing code generation templates, running the generatorand finally adding some constraint checks.
The actual content of the example is rather trivial – we will generate Java classes following theJavaBean conventions. The model will contain entities (such as Person or Vehicle) including someattributes and relationships among them – a rather typical data model. From these entities in the model,we want to generate the Beans for implementation in Java. In a real setting, we might also want togenerate persistence mappings, etc. We will not to this for this simple introduction.
Defining an EMF metamodelTo illustrate the metamodel, before we deal with the intricacies of EMF, here is the metamodel in UML:
Figure 1. Sample metamodel

Creating an EMF projectCreate an EMF project as depicted below:Figure 2. Create EMF project
It is important that you create an EMF project, not just a simple or a Java project. Name itoaw4.demo.emf.datamodel.
Defining the (meta)modelCreate a new source folder metamodel in that project. Then, create a new Ecore model in that sourcefolder named data.ecore. Use EPackage as the model object.
Figure 3. Create new Ecore model

This opens the Ecore Editor. You will see a root package with name null. Open the Properties View (context menu). Set the following properties for the package:
Name: dataNs prefix: dataNs URI: http://www.openarchitectureware.org/oaw4.demo.emf.datamodel
Figure 4. Adjust namespace settings
Create the following Ecore model.[1] Make sure you set the following properties exactly as described next:
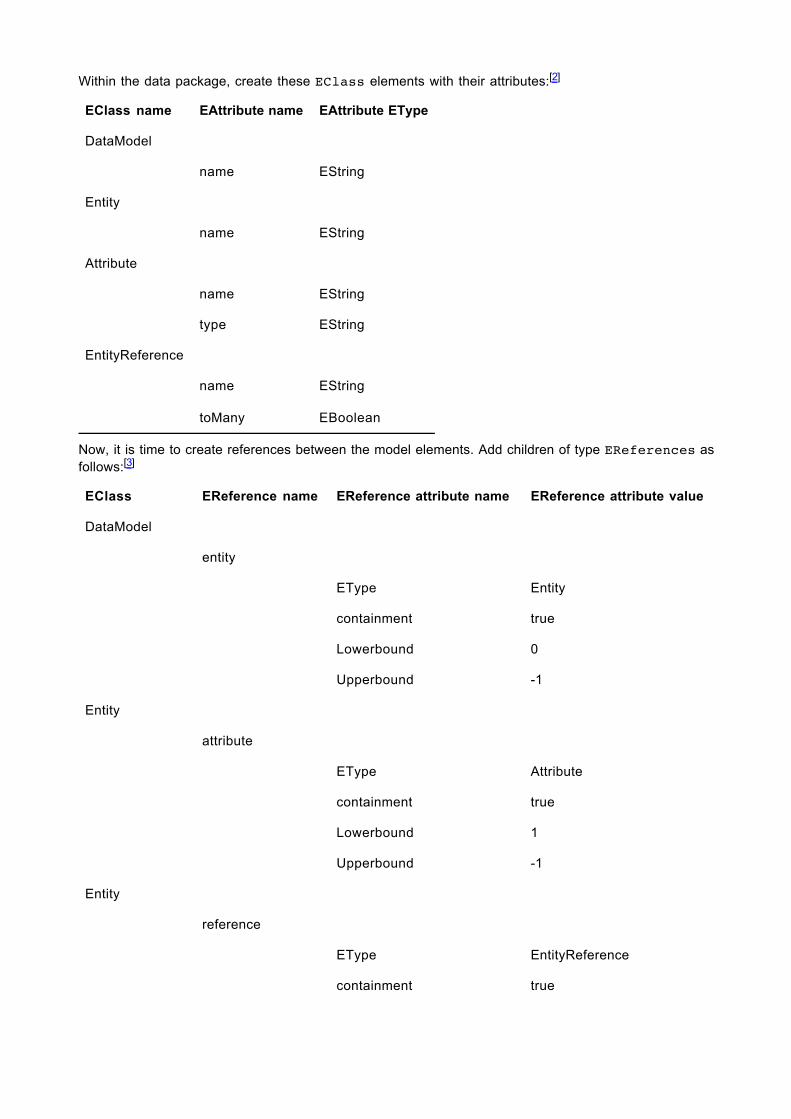
Within the data package, create these EClass elements with their attributes:[2]
EClass name EAttribute name EAttribute EType
DataModel
name EString
Entity
name EString
Attribute
name EString
type EString
EntityReference
name EString
toMany EBoolean
Now, it is time to create references between the model elements. Add children of type EReferences asfollows:[3]
EClass EReference name EReference attribute name EReference attribute value
DataModel
entity
EType Entity
containment true
Lowerbound 0
Upperbound -1
Entity
attribute
EType Attribute
containment true
Lowerbound 1
Upperbound -1
Entity
reference
EType EntityReference
containment true

EClass EReference name EReference attribute name EReference attribute value
Lowerbound 0
Upperbound -1
EntityReference
target
EType Entity
containment false
Lowerbound 1
Upperbound 1
Figure 5. Metamodel structure
EMF saves the model we created above in its own dialect of XMI. To avoid any ambiguities, here is thecomplete XMI source for the metamodel. It goes into the file data.ecore:
<?xml version="1.0" encoding="UTF-8"?><ecore:EPackage xmi:version="2.0" xmlns:xmi="http://www.omg.org/XMI" xmlns:xsi="http://www.w3.org/2001/XMLSchema-instance" xmlns:ecore="http://www.eclipse.org/emf/2002/Ecore" name="data" nsURI="http://www.openarchitectureware.org/oaw4.demo.emf.datamodel" nsPrefix="data"> <eClassifiers xsi:type="ecore:EClass" name="DataModel"> <eStructuralFeatures xsi:type="ecore:EAttribute" name="name" eType="ecore:EDataType http://www.eclipse.org/emf/2002/Ecore#//EString"/> <eStructuralFeatures xsi:type="ecore:EReference" name="entity" upperBound="-1" eType="#//Entity" containment="true"/> </eClassifiers> <eClassifiers xsi:type="ecore:EClass" name="Entity"> <eStructuralFeatures xsi:type="ecore:EAttribute" name="name" eType="ecore:EDataType http://www.eclipse.org/emf/2002/Ecore#//EString"/> <eStructuralFeatures xsi:type="ecore:EReference" name="attribute" lowerBound="1" upperBound="-1" eType="#//Attribute" containment="true"/> <eStructuralFeatures xsi:type="ecore:EReference" name="reference" upperBound="-1" eType="#//EntityReference" containment="true"/> </eClassifiers> <eClassifiers xsi:type="ecore:EClass" name="Attribute">

<eStructuralFeatures xsi:type="ecore:EAttribute" name="name" eType="ecore:EDataType http://www.eclipse.org/emf/2002/Ecore#//EString"/> <eStructuralFeatures xsi:type="ecore:EAttribute" name="type" eType="ecore:EDataType http://www.eclipse.org/emf/2002/Ecore#//EString"/> </eClassifiers> <eClassifiers xsi:type="ecore:EClass" name="EntityReference"> <eStructuralFeatures xsi:type="ecore:EAttribute" name="name" eType="ecore:EDataType http://www.eclipse.org/emf/2002/Ecore#//EString"/> <eStructuralFeatures xsi:type="ecore:EAttribute" name="toMany" eType="ecore:EDataType http://www.eclipse.org/emf/2002/Ecore#//EBoolean"/> <eStructuralFeatures xsi:type="ecore:EReference" name="target" lowerBound="1" eType="#//Entity"/> </eClassifiers></ecore:EPackage>
Generating the EMF toolingIn addition to providing the Ecore meta-meta-model, EMF also comes with support for building (more orless usable) editors. These are generated automatically from the metamodel we just defined. In order todefine example models (which we will do below) we have to generate these editors. Also, we have togenerate the implementation classes for our metamodel. To generate all these things, we have todefine a markup model that contains a number of specifics to control the generation of the variousartifacts. This markup model is called genmodel.
So we have to define the genmodel first. Select the data.ecore model in the explorer and right mouse click to New → Other → Eclipse Modelling Framework → EMF Model. Follow the following five steps; note that they are also illustrated in the next figure.
Select EMF model1.Define the name2.Select the folder3.Select Ecore model as source4.Press the Load button and then Finish5.
Figure 6. Creating the genmodel
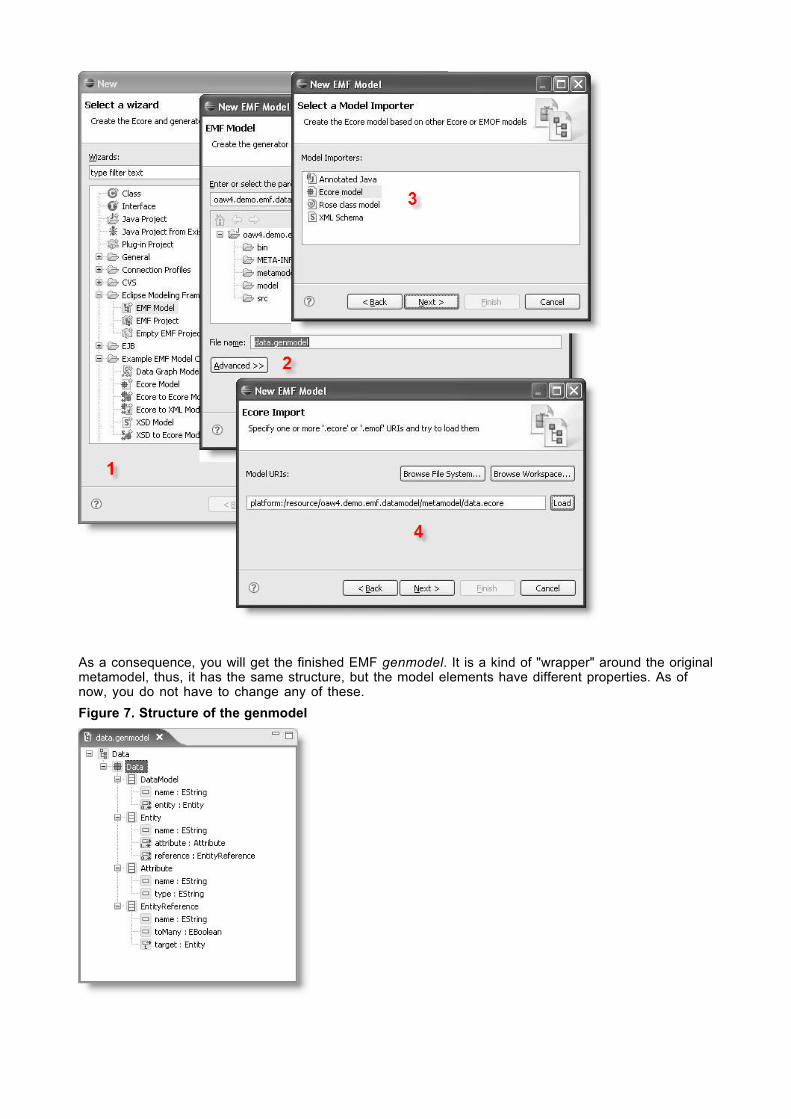
As a consequence, you will get the finished EMF genmodel. It is a kind of "wrapper" around the originalmetamodel, thus, it has the same structure, but the model elements have different properties. As ofnow, you do not have to change any of these.Figure 7. Structure of the genmodel

You can now generate the other projects. Figure 8. Generate editing projects
You now have all the generated additional projects.
Figure 9. Generated projects
We will not look any deeper at these additional projects for now. However, there is one important thingto point out: The generator also generated the implementation classes for the metamodel. If you take alook into oaw4.demo.emf.datamodel/src folder, you can find classes (actually, interfaces at the toplevel) that represent the concepts defined in your metamodel. These can be used to access the model.For some more details on how to use the EMF model APIs as well as the reflective cousins, take a look
at http://voelterblog.blogspot.com/2005/12/codeblogck-emf_10.html.
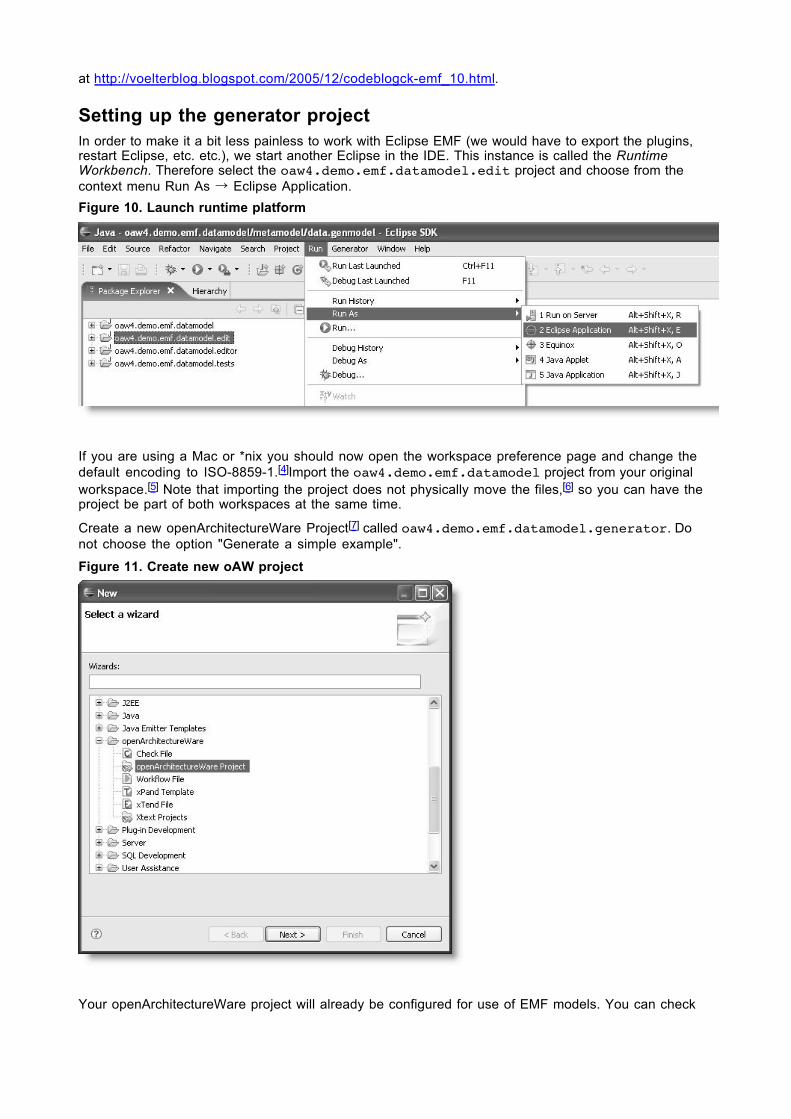
Setting up the generator projectIn order to make it a bit less painless to work with Eclipse EMF (we would have to export the plugins,restart Eclipse, etc. etc.), we start another Eclipse in the IDE. This instance is called the RuntimeWorkbench. Therefore select the oaw4.demo.emf.datamodel.edit project and choose from thecontext menu Run As → Eclipse Application. Figure 10. Launch runtime platform
If you are using a Mac or *nix you should now open the workspace preference page and change thedefault encoding to ISO-8859-1.[4]Import the oaw4.demo.emf.datamodel project from your originalworkspace.[5] Note that importing the project does not physically move the files,[6] so you can have the project be part of both workspaces at the same time.
Create a new openArchitectureWare Project[7] called oaw4.demo.emf.datamodel.generator. Do not choose the option "Generate a simple example".
Figure 11. Create new oAW project
Your openArchitectureWare project will already be configured for use of EMF models. You can check
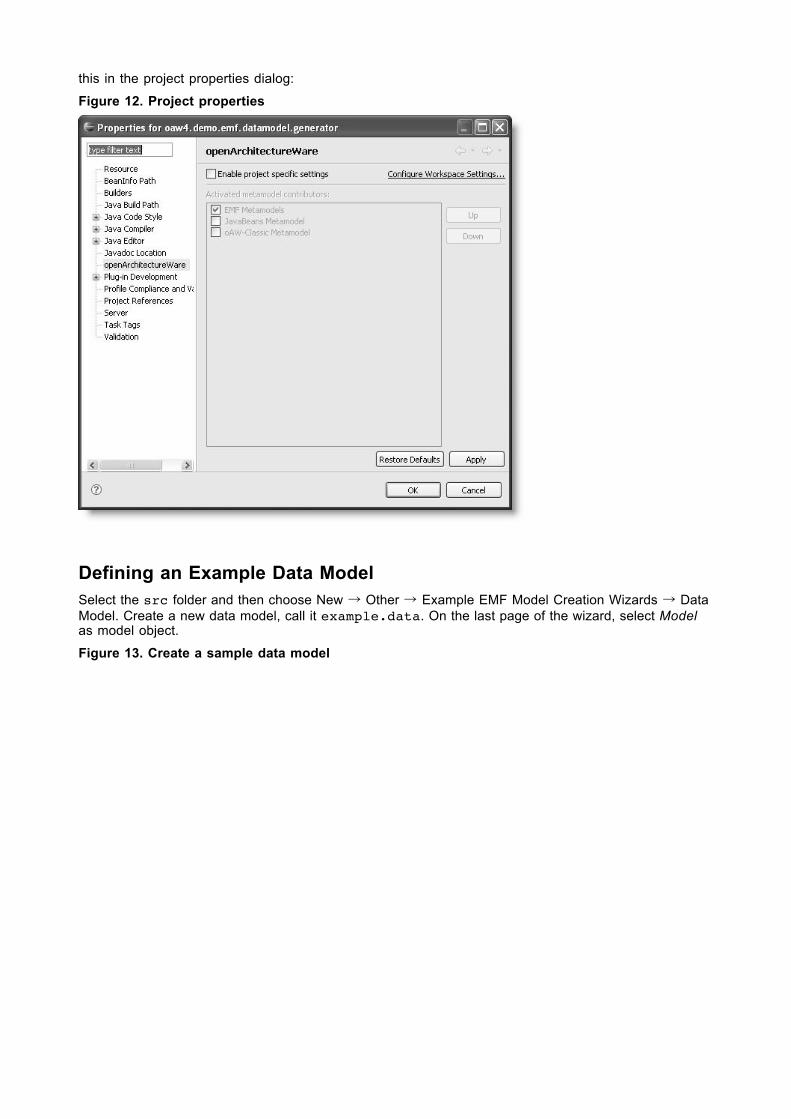
this in the project properties dialog:
Figure 12. Project properties
Defining an Example Data ModelSelect the src folder and then choose New → Other → Example EMF Model Creation Wizards → Data Model. Create a new data model, call it example.data. On the last page of the wizard, select Modelas model object.
Figure 13. Create a sample data model

Next, populate this very model as following. Please note that in the case of attributes you have todefine a type as well (i.e. String), not just a name.Figure 14. Sample data model
Again, to avoid any typos here is the XMI for example.data:<?xml version="1.0" encoding="UTF-8"?><data:DataModel xmi:version="2.0" xmlns:xmi="http://www.omg.org/XMI" xmlns:data="http://www.openarchitectureware.org/oaw4.demo.emf.datamodel">
<entity name="Person"> <attribute name="name" type="String"/> <reference name="autos" toMany="true" target="//@entity.1"/> </entity> <entity name="Vehicle"> <attribute name="plate" type="String"/> </entity></data:DataModel>
Using Dynamic EMFInstead of generating editors and metaclasses, you can also use dynamic EMF. This works byselecting, in the opened metamodel, the root class of the model you want to create (here: DataModel) and then selecting from the context menu. This opens an editor that can dynamically edit therespective instance. The created file by default has an .xmi extension.
Note that openArchitectureWare can work completely with dynamic models, there is no reason togenerate code. However, if you want to programmatically work with the model, the generatedmetaclasses (not the editors!) are really helpful. Please also keep in mind: in subsequent parts of thetutorial, you will specify the metaModelPackage in various component configurations in the workflow file,like this:
<metaModel id="mm" class="org.openarchitectureware.type.emf.EmfMetaModel"> <metaModelPackage value="data.DataPackage"/></metaModel>
In case of dynamic EMF, there has no metamodel package been generated. So, you have to specifythe metamodel file instead, that is, the .ecore file you just created. Note that the .ecore file has to be in the classpath to make this work.
<metaModel id="mm" class="org.openarchitectureware.type.emf.EmfMetaModel"> <metaModelFile value="data.ecore"/></metaModel>
Generating code from the example model
The workflow definitionTo run the openArchitectureWare generator, you have to define a workflow. It controls which steps(loading models, checking them, generating code) the generator executes. For details on how workflowfiles work, please take a look at the Workflow Reference Documentation.
Create a workflow.oaw and a workflow.properties in the src folder. The contents of these files is shown below:
<workflow> <property file="workflow.properties"/>
<component id="xmiParser" class="org.openarchitectureware.emf.XmiReader"> <modelFile value="${modelFile}"/> <metaModelPackage value="data.DataPackage"/> <outputSlot value="model"/> <firstElementOnly value="true"/> </component></workflow>
workflow.properties:modelFile=example.datasrcGenPath=src-genfileEncoding=ISO-8859-1
The workflow tries to load stuff from the classpath; so, for example, the data.DataPackage class is resolved from the classpath, as is the model file specified in the properties

(modelFile=example.data)
This instantiates the example model and stores in a workflow slot named model. Note that in themetamodelPackage slot, you have to specify the EMF package object (here: data.DataPackage), not the Java package (which would be data here).
Running the workflowBefore you actually run the workflow, make sure you have a log4j configuration in the classpath; forexample, you can put the following log4j.properties file directly into your source folder:
# Set root logger level to DEBUG and its only appender to A1.log4j.rootLogger=INFO, A1
# A1 is set to be a ConsoleAppender.log4j.appender.A1=org.apache.log4j.ConsoleAppenderlog4j.appender.A1.layout=org.apache.log4j.PatternLayoutlog4j.appender.A1.layout.ConversionPattern=%-4r %-5p - %m%n
Also, please make sure your metamodel can be found on the classpath. In our case, this can beachieved by adding the oaw4.demo.emf.datamodel project to the plug-in dependencies ofoaw4.demo.emf.datamodel.generator. To do this, double click the fileoaw4.demo.emf.datamodel.generator/META-INF/MANIFEST.MF. The manifest editor will appear.Go to the Dependencies tab and click on Add... to add a new dependency. In the dialog appearing,choose oaw3.demo.emf.datamodel:
Figure 15. Add metamodel dependency
Do not forget to save the manifest file!
Now, you can run the workflow from within Eclipse:
Figure 16. Sample data model

The following should be the output:
0 INFO - --------------------------------------------------------------------------------------171 INFO - openArchitectureWare 4.1.2, Build v20070314171 INFO - (c) 2005-2007 openarchitectureware.org and contributors171 INFO - --------------------------------------------------------------------------------------171 INFO - running workflow: D:/oAW-emftutorial/oaw4.demo.emf.datamodel.generator/src/workflow.oaw171 INFO -750 INFO - xmiParser: file 'example.data' => slot 'model'875 INFO - workflow completed in 125ms!
TemplatesNo code is generated yet. This is not surprising, since we did not yet add any templates. Let us changethis. Create a package templates in the srcfolder and within the package a file called Root.xpt.
The Root.xpt looks as follows. By the way, if you need to type the guillemets (« and »), the editorprovides keyboard shortcuts with Ctrl+< and Ctrl+>.
«DEFINE Root FOR data::DataModel» «EXPAND Entity FOREACH entity»«ENDDEFINE»
«DEFINE Entity FOR data::Entity» «FILE name + ".java"» public class «name» { «FOREACH attribute AS a» // bad practice private «a.type» «a.name»; «ENDFOREACH»

} «ENDFILE»«ENDDEFINE»
We have to extend the workflow.oaw file, in order to use the template just written:<?xml version="1.0" encoding="windows-1252"?><workflow> <property file="workflow.properties"/>
<component id="xmiParser" class="org.openarchitectureware.emf.XmiReader"> ... </component>
First, we clean up the directory where we want to put the generated code. <component id="dirCleaner" class="org.openarchitectureware.workflow.common.DirectoryCleaner" > <directories value="${srcGenPath}"/> </component>
Then, we start the generator component. Its configuration is slightly involved. <component id="generator" class="org.openarchitectureware.xpand2.Generator">
First of all, you have to define the metamodel. In our case, we use the EmfMetaModel since we want to work with EMF models. Also, you have to specific the class name of the EMF package thatrepresents that metamodel. It has to be on the classpath.
<metaModel id="mm" class="org.openarchitectureware.type.emf.EmfMetaModel"> <metaModelPackage value="data.DataPackage"/> </metaModel>
Then, you have to define the entry statement for Xpand. Knowing that the model slot contains aninstance of data.DataModel (the XMIReader had put the first element of the model into that slot, andwe know from the data that it is a DataModel), we can write the following statement. Again, notice thatmodel refers to a slot name here!
<expand value="templates::Root::Root FOR model"/>
We then specify where the generator should put the generated code and that this generated codeshould be processed by a code beautifier:
<outlet path="${srcGenPath}/"> <postprocessor class="org.openarchitectureware.xpand2.output.JavaBeautifier"/> </outlet>
Now, we are almost done. </component></workflow>
You also need to add the srcGenPath to the workflow.properties file.modelFile=example.datasrcGenPath=src-gen
Running the generator againSo, if you restart the generator now, you should get a file generated that looks like this:
public class Person { // bad practice public String lastName;}
Checking Constraints with the Check Language

An alternative to checking constraints with pure Java, is the declarative constraint checking languageCheck. For details of this language take a look at the Check language reference. We will provide a simple example here.
Defining the constraintWe start by defining the constraint itself. We create a new file called checks.chk in the src folder of our project. It is important that this file resides in the classpath! The file has the following content:
import data;context Attribute ERROR "Names must be more than one char long" : name.length > 1;
This constraint says that for the metaclass data::Attribute, we require that the name be more thanone characters long. If this expression evaluates to false, the error message given before the colon willbe reported. A checks file can contain any number of such constraints. They will be evaluated for allinstances of the respective metaclass.
To show a somewhat more involved constraint example, this one ensures that the names of theattributes have to be unique:
context Entity ERROR "Names of Entity attributes must be unique": attribute.forAll(a1| attribute.notExists(a2| a1 != a2 && a1.name == a2.name ) );
Integration into the workflow fileThe following piece of XML is the workflow file we have already used above.
<?xml version="1.0" encoding="windows-1252"?><workflow> <property file="workflow.properties"/>
<component id="xmiParser" class="org.openarchitectureware.emf.XmiReader"> ... </component>
After reading the model, we add an additional component, namely the CheckComponent. <component class="org.openarchitectureware.check.CheckComponent">
As with the code generator, we have to explain to the checker what meta-meta-model and whichmetamodel we use.
<metaModel id="mm" class="org.openarchitectureware.type.emf.EmfMetaModel"> <metaModelPackage value="data.DataPackage"/> </metaModel>
We then have to provide the checks file. The component tries to load the file by appending .chk to thename and searching the classpath – that is why it has to be located in the classpath.
<checkFile value="checks"/>
Finally, we have to tell the engine on which model or part of the model the checks should work. Ingeneral, you can use the <expressionvalue="..."/> element to define an arbitrary expression onslot contents. For our purpose, where we want to use the complete EMF data structure in the modelslot, we can use the shortcut emfAllChildrenSlot property, which returns the complete subtree below thecontent element of a specific slot, including the slot content element itself.
<emfAllChildrenSlot value="model"/> </component>
Running the workflow produces an error in case the length of the name is not greater than one. Again,it makes sense to add the skipOnError="true" to those subsequent component invocations thatneed to be skipped in case the constraint check found errors (typically code generators ortransformers).
Extensions

It is often the case that you need additional properties in the templates; these properties should not beadded to the metaclasses directly, since they are often specific to the specific code generation targetand thus should not "pollute" the metamodel.
It is possible to define such extensions external to the metaclasses. For details see the Xtend Language Documentation, we provide an simple example here.
Expression ExtensionsAssume we wanted to change the Attributes part of the template as follows:
«FOREACH attribute AS a» private «a.type» «a.name»;
public void «a.setterName()»( «a.type» value ) { this.«a.name» = value; }
public «a.type» «a.getterName()»() { return this.«a.name»; }«ENDFOREACH»
To make this work, we need to define the setterName() and getterName() operations. We do this by writing a so-called extension file; we call it java.ext. It must have the .ext suffix to be recognized by oAW; the Java name is because it contains Java-generation specific properties. We put this filedirectly into the templates directory under src, i.e. directly next to the Root.xpt file. The extension file looks as follows:
First, we have to import the data metamodel; otherwise we would not be able to use the Attributemetaclass.
import data;
We can then define the two new operations setterName and getterName. Note that they take the type on which they are called as their first parameter, a kind of "explicitly this". After the colon we usean expression that returns the to-be-defined value.
String setterName(Attribute ele) : 'set'+ele.name.toFirstUpper();
String getterName(Attribute ele) : 'get'+ele.name.toFirstUpper();
To make these extensions work, we have to add the following line to the beginning of the Root.xpttemplate file:
«EXTENSION templates::java»
Java ExtensionsIn case you cannot express the "business logic" for the expression with the expression language, youcan fall back to Java. Take a loot at the following extension definition file. It is called util.ext and is located in src/datamodel/generator/util:
String timestamp() : JAVA datamodel.generator.util.TemplateUtils.timestamp();
Here, we define an extension that is independent of a specific model element, since it does not have aformal parameter! The implementation of the extension is delegated to a static operation of a Javaclass. Here is its implementation:
public class TemplateUtils { public static String timestamp() { return String.valueOf( System.currentTimeMillis() ); }}
This element can be used independent of any model element – it is available globally.
Sometimes, it is necessary to access extensions not just from templates (and Wombat scripts) but also

from Java code. The following example is of this kind: We want to define properties that derive thename of the implementation class from the entity name itself; we will need that property in the nextsection, the one on recipes. The best practice for this use case is to implement the derived property asa Java method, as above. The following piece of code declares properties for Entity:
package datamodel;
import data.Entity;
public class EntityHelper {
public static String className( Entity e ) { return e.getName()+"Implementation"; }
public static String classFileName( Entity e ) { return className(e)+".java"; }
}
In addition, to access the properties from the template files, we define an extension that uses thehelper methods. The helper.ext file is located right next to the helper class shown above, i.e. in thedatamodel package:
import data;
String className( Entity e ) : JAVA datamodel.EntityHelper.className(data.Entity);
String classFileName( Entity e ) : JAVA datamodel.EntityHelper.classFileName(data.Entity);
In addition to these new properties being accessible from Java code by invokingEntityHelper.className(someEntity), we can now write the following template:
«EXTENSION templates::java»«EXTENSION datamodel::generator::util::util»«EXTENSION datamodel::helper»
«DEFINE Root FOR data::DataModel» «EXPAND Entity FOREACH entity»«ENDDEFINE»
«DEFINE Entity FOR data::Entity» «FILE classFileName()» // generated at «timestamp()» public abstract class «className()» { «FOREACH attribute AS a» private «a.type» «a.name»; public void «a.setterName()»( «a.type» value ) { this.«a.name» = value; }
public «a.type» «a.getterName()»() { return this.«a.name»; } «ENDFOREACH» } «ENDFILE»«ENDDEFINE»
For completeness, the following illustration shows the resulting directory and file structure.
Figure 17. What has happened so far

Integrating RecipesLet us assume, we wanted to allow developers to add their own business logic to the entities, maybeadding a couple of derived properties. In that case, we have to integrate the generated code withmanually written fragments. Let us further assume that you – just like me – do not like protected regionsbecause the end up in versioning chaos. In such case, you might want to let the generator create abase class that contains all generated aspects and developers have to inherit from this class to addtheir own logic. Let us first change the generator accordingly.
Adjusting project settingsWe will now use the Recipe framework of openArchitectureWare to achieve our task. Since thisframework is an add-on we need to set up an additional dependency to it for our generator project.Otherwise the required classes will not be found.
Open the projects Manifest file META-INF/MANIFEST.MF, go to the Dependencies page and add theorg.openarchitectureware.recipe.* plugins.
Adapting the existing generatorFirst, let us look at the template. Here we have to change the name of the generated class, and wehave to make it abstract:
«DEFINE Entity FOR data::Entity» «FILE baseClassFileName()» // generated at «timestamp()» public abstract class «baseClassName()» {
«FOREACH attribute AS a» ... «ENDFOREACH» } «ENDFILE»«ENDDEFINE»
To make this work, our extensions must be adapted; we now need baseClassName andbaseClassFileName.

import data;
String baseClassName( Entity e ) : JAVA datamodel.EntityHelper.baseClassName(data.Entity);
String baseClassFileName( Entity e ) : JAVA datamodel.EntityHelper.baseClassFileName(data.Entity);
The implementation helper class must be adapted, too:package datamodel;
import data.Entity;
public class EntityHelper {
public static String baseClassName( Entity e ) { return e.getName()+"ImplBase"; }
public static String baseClassFileName( Entity e ) { return baseClassName(e)+".java"; }
public static String implementationClassName( Entity e ) { return e.getName(); }
}
Note the additional property implementationClassName. This is the name of the class thatdevelopers have to write manually. While we expect that the generated code goes into the src-gendirectory, we want the manually written code in man-src. Here is the generated base class for thePerson entity:
// generated at 1138622360609public abstract class PersonImplBase { private String name;
public void setName(String value) { this.name = value; }
public String getName() { return this.name; }}
The manually written subclass could look as follows:public class Person extends PersonImplBase {
}
Now, here is the issue: how do you make sure that developers actually write this class, that it has theright name, and that it actually extends the generated base class? This is where the recipe frameworkcomes into play. We want to define rules that allow Eclipse to verify that these "programmingguidelines" have been met by developers.
Implementing the RecipesAs of now, there is no specific language to implement those recipe checks, you have to write a bunchof Java code. In summary, you have to implement a workflow component that produces the checks. Letus look at what you need to do.
In order to simplify life, your recipe creation component should use the RecipeCreationComponentbase class.

public class RecipeCreator extends RecipeCreationComponent {
You then have to override the createRecipes operation. protected Collection createRecipes(Object modelSlotContent, String appProject, String srcPath) {
We now create a list that we use to collect all the checks we want to pass back to the framework. List checks = new ArrayList();
Since we need to implement such a check for each Entity in the model, we have to find all entities anditerate over them.
Collection entities = EcoreUtil2.findAllByType( ((DataModel)modelSlotContent).eAllContents(), Entity.class ); for (Iterator iter = entities.iterator(); iter.hasNext();) { Entity e = (Entity) iter.next();
We then create a composite check whose purpose is to act as a container for the more specific checksthat follow. It will show as the root of a tree in the Recipe Framework view.
ElementCompositeCheck ecc = new ElementCompositeCheck(e, "manual implementation of entity");
Then we add a check that verifies the existence of a certain class in a given project in a certaindirectory. The name of the class it needs to check for can be obtained from our EntityHelper!
JavaClassExistenceCheck javaClassExistenceCheck = new JavaClassExistenceCheck( "you have to provide an implementation class.", appProject, srcPath, EntityHelper.implementationClassName(e) );
We then define a second check that checks that the class whose existence has been verified with thecheck above actually inherits from the generated base class. Again we use the EntityHelper to come up with the names. Note that they will be consistent with the names used in the code generationtemplates because both use the same EntityHelper implementation.
JavaSupertypeCheck javaSuperclassCheck = new JavaSupertypeCheck( "the implementation class has to extend the "+ "generated base class", appProject, EntityHelper.implementationClassName(e), EntityHelper.baseClassName(e) );
We then add the two specific checks to the composite check... ecc.addChild( javaClassExistenceCheck ); ecc.addChild( javaSuperclassCheck );
... add the composite check to the list of checks we return to the framework, ... checks.add( ecc ); }
... and return all the created checks to the framework after we finish iteration over Entities: return checks; }}
Workflow IntegrationHere is the modified workflow file. We integrate our new component as the last step in the workflow.
[<?xml version="1.0" encoding="windows-1252"?><workflow> <property file="workflow.properties"/>

<component id="xmiParser" class="org.openarchitectureware.emf.XmiReader"> <modelFile value="${modelFile}"/> <metaModelPackage value="data.DataPackage"/> <outputSlot value="model"/> <firstElementOnly value="true"/> </component>
<!-- all the stuff from before -->
The parameters we pass should be self-explanatory. The recipeFile parameter is where the checkswill written to – it must have the recipes extension.
<component id="recipe" class="datamodel.generator.RecipeCreator"> <appProject value="oaw4.demo.emf.datamodel.generator"/> <srcPath value="man-src"/> <modelSlot value="model"/> <recipeFile value="recipes.recipes"/> </component>
</workflow>
Running the Workflow and seeing the EffectWe can now run the workflow. After running it, you should see a recipes.recipes file in the root of your project. Right clicking on it reveals the button. Since the manual implementation of the VehicleEntity is missing, we get the respective error.
We can now implement the class manually, in the man-src folder:
public class Vehicle extends VehicleImplBase {}
After doing that, the remaining errors in the recipe view should go away automatically.
Transforming ModelsIt is often necessary to transform models before generating code from it. There are actually two forms oftransformations:
An actual model transformation generates a completely new model – usually based on a differentmetamodel – from an input model. The transformation has no side effects with respect to the inputmodel.
1.
A model modification completes/extends/finishes/modifies a model. No additional model is created.2.Please take a look at the xTend Example tutorial to understand model transformations with the xTendlanguage.
Model Modifications in JavaOne way of doing modifications is to use Java. Take a look at the following piece of Java code. Weextend from a class called SimpleJavaTransformerComponent. Instead of directly implementing theWorkflowComponent interface, we inherit from a more comfortable base class and implement thedoModification operation.
public class Transformer extends SimpleJavaModificationComponent {
protected void doModification(WorkflowContext ctx, ProgressMonitor monitor, Issues issues, Object model) {
We know that we have a DataModel object in the model slot (you can see in a moment where themodel comes from).
DataModel dm = (DataModel)model;
We then get us the factory to create new model elements (what this code does exactly you shouldlearn from the EMF docs).
DataFactory f = DataPackage.eINSTANCE.getDataFactory();

We then iterate over all entities. for (Iterator iter = dm.getEntity().iterator(); iter.hasNext();) { Entity e = (Entity) iter.next(); handleEntity(e, f); } }
For each Entity... private void handleEntity(Entity e, DataFactory f) { for (Iterator iter = EcoreUtil2.clone( e.getAttribute() ).iterator(); iter.hasNext();) { Attribute a = (Attribute) iter.next();
We create a new attribute with the same type, and a name with a "2" postfixed. We then add this newattribute to the entity.
Attribute a2 = f.createAttribute(); a2.setName( a.getName()+"2" ); a2.setType( a.getType() ); e.getAttribute().add(a2); } }}
To execute this component, we just have to add it to the workflow:[<component class="datamodel.generator.Transformer"> <modelSlot value="model"/></component>
We have to specify the model slot. The superclass (SimpleJavaTransformerComponent) provides the slot setter and passes the object from that slot to the doTransform operation.
[1] To add children, right-click on the element to which you want to add these children and select thetype of the child from the list. To configure the properties, open the properties dialog by selecting Show Properties View at the bottom of any of the context menus. Note that this is not an EMF tutorial. Formore details on how to build EMF (meta-)models, please refer to the EMF documentation.[2] Attributes are children of type EAttribute. Please fill in the Name and the EType properties.[3] Note: there are a couple of -1's ... don't miss the minus! Also, the containment flag is essential. Ifcontainment is true you will be able to create children of the referenced type, otherwise you can onlyreference them.[4] Window → Preferences → General → Workspace → Text file encoding. This is necessary to have theguillemet brackets available.[5] File → Import → General → Existing Project into Workspace[6] Unless you checked the option "Copy projects into workspace"[7] File → New → Project → openArchitectureWare → openArchitectureWare Project
Prev Up NextPart I. Getting Started Home Xtext Tutorial