Embed Size (px)
Citation preview
IN THIS CHAPTER
• Preplanning and Preparing aServer Installation
• Setting Up the WindowsServer 2003 Operating System
• Upgrading to Windows Server 2003
• Using Alternative Methods ofInstallation
• Performing an UnattendedWindows Server 2003Installation
• Installing Windows Server2003 from an Image
• Installing Windows Server2003 with Group Policy and Systems ManagementServer
• Updating a Windows 2003Server with a Service Pack
• Preparing a System andInstalling the Windows 2003R2 Components
CHAPTER 3
Installing WindowsServer 2003
This chapter describes the process for installing theMicrosoft Windows Server 2003 operating system (32-bitand 64-bit), Windows 2003 Service Packs, and the Windows2003 R2 update. With the advances in Microsoft technolo-gies over the years, many steps in the installation processhave been simplified. For example, you still must verifythat your hardware is supported by the operating system,but the Plug and Play capability of the application auto-matically detects and configures most hardware items.Thankfully, the days of determining the IRQ, base I/Oaddress, and memory range of your system devices are, forthe most part, in the past. In fact, Windows Server 2003has the easiest and most intuitive installation procedure ofany Microsoft operating system to date.
The server, however, will not install itself. You still mustmake several decisions to ensure that your completedinstallation will meet your needs. This chapter walks youthrough these key decisions and helps you make thecorrect choices for your environment.
Preplanning and Preparing a Server InstallationBefore you begin the actual installation of Windows Server2003, you must make several decisions. How well you planthese steps will determine how successful your installation is.
Verifying Minimum Hardware RequirementsThe first step of the installation is verifying that your hard-ware meets the system requirements. Keep in mind that,although there is a minimum requirement for the CPU and
05_0672328984_ch03.qxd 4/6/06 11:10 AM Page 75
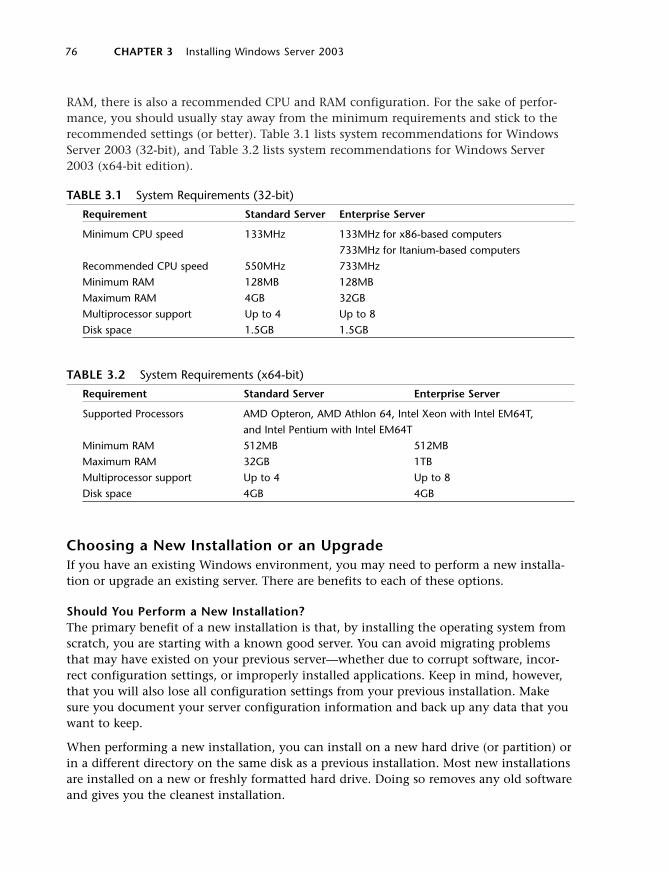
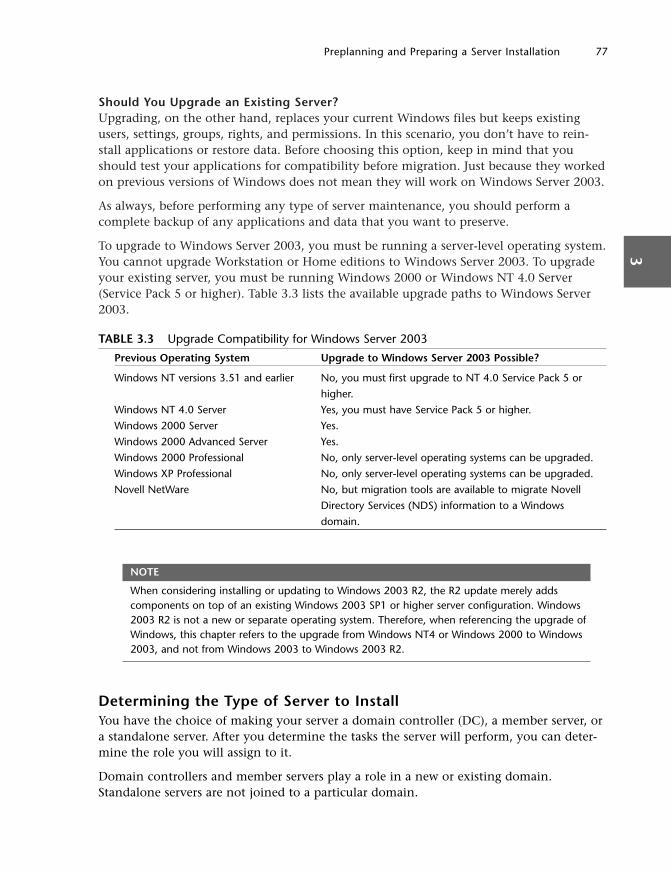
RAM, there is also a recommended CPU and RAM configuration. For the sake of perfor-mance, you should usually stay away from the minimum requirements and stick to therecommended settings (or better). Table 3.1 lists system recommendations for WindowsServer 2003 (32-bit), and Table 3.2 lists system recommendations for Windows Server2003 (x64-bit edition).
TABLE 3.1 System Requirements (32-bit)
Requirement Standard Server Enterprise Server
Minimum CPU speed 133MHz 133MHz for x86-based computers
733MHz for Itanium-based computers
Recommended CPU speed 550MHz 733MHz
Minimum RAM 128MB 128MB
Maximum RAM 4GB 32GB
Multiprocessor support Up to 4 Up to 8
Disk space 1.5GB 1.5GB
TABLE 3.2 System Requirements (x64-bit)
Requirement Standard Server Enterprise Server
Supported Processors AMD Opteron, AMD Athlon 64, Intel Xeon with Intel EM64T,
and Intel Pentium with Intel EM64T
Minimum RAM 512MB 512MB
Maximum RAM 32GB 1TB
Multiprocessor support Up to 4 Up to 8
Disk space 4GB 4GB
Choosing a New Installation or an UpgradeIf you have an existing Windows environment, you may need to perform a new installa-tion or upgrade an existing server. There are benefits to each of these options.
Should You Perform a New Installation?The primary benefit of a new installation is that, by installing the operating system fromscratch, you are starting with a known good server. You can avoid migrating problemsthat may have existed on your previous server—whether due to corrupt software, incor-rect configuration settings, or improperly installed applications. Keep in mind, however,that you will also lose all configuration settings from your previous installation. Makesure you document your server configuration information and back up any data that youwant to keep.
When performing a new installation, you can install on a new hard drive (or partition) orin a different directory on the same disk as a previous installation. Most new installationsare installed on a new or freshly formatted hard drive. Doing so removes any old softwareand gives you the cleanest installation.
CHAPTER 3 Installing Windows Server 200376
05_0672328984_ch03.qxd 4/6/06 11:10 AM Page 76
Should You Upgrade an Existing Server?Upgrading, on the other hand, replaces your current Windows files but keeps existingusers, settings, groups, rights, and permissions. In this scenario, you don’t have to rein-stall applications or restore data. Before choosing this option, keep in mind that youshould test your applications for compatibility before migration. Just because they workedon previous versions of Windows does not mean they will work on Windows Server 2003.
As always, before performing any type of server maintenance, you should perform acomplete backup of any applications and data that you want to preserve.
To upgrade to Windows Server 2003, you must be running a server-level operating system.You cannot upgrade Workstation or Home editions to Windows Server 2003. To upgradeyour existing server, you must be running Windows 2000 or Windows NT 4.0 Server(Service Pack 5 or higher). Table 3.3 lists the available upgrade paths to Windows Server2003.
TABLE 3.3 Upgrade Compatibility for Windows Server 2003
Previous Operating System Upgrade to Windows Server 2003 Possible?
Windows NT versions 3.51 and earlier No, you must first upgrade to NT 4.0 Service Pack 5 or
higher.
Windows NT 4.0 Server Yes, you must have Service Pack 5 or higher.
Windows 2000 Server Yes.
Windows 2000 Advanced Server Yes.
Windows 2000 Professional No, only server-level operating systems can be upgraded.
Windows XP Professional No, only server-level operating systems can be upgraded.
Novell NetWare No, but migration tools are available to migrate Novell
Directory Services (NDS) information to a Windows
domain.
NOTE
When considering installing or updating to Windows 2003 R2, the R2 update merely addscomponents on top of an existing Windows 2003 SP1 or higher server configuration. Windows2003 R2 is not a new or separate operating system. Therefore, when referencing the upgrade ofWindows, this chapter refers to the upgrade from Windows NT4 or Windows 2000 to Windows2003, and not from Windows 2003 to Windows 2003 R2.
Determining the Type of Server to InstallYou have the choice of making your server a domain controller (DC), a member server, ora standalone server. After you determine the tasks the server will perform, you can deter-mine the role you will assign to it.
Domain controllers and member servers play a role in a new or existing domain.Standalone servers are not joined to a particular domain.
Preplanning and Preparing a Server Installation 773
05_0672328984_ch03.qxd 4/6/06 11:10 AM Page 77
As in Windows 2000, you are able to promote or demote server functions as you like.Standalone servers can be joined to the domain to become member servers. Using theDCPromo utility, you can promote member servers to domain controllers. And, by unin-stalling the Active Directory service from a domain controller, you can return it tomember server status.
Gathering the Information Necessary to ProceedDuring the installation of Windows Server 2003, you will have to tell the Setup Wizardhow you want your server configured. The wizard will take the information you provideand will configure the server settings to meet your specifications.
Taking the time to gather the information described in the following sections before start-ing your installation will likely make your installation go faster and easier.
Selecting the Computer NameEach computer on a network must have a name that is unique within that network.Many companies have a standard naming convention for their servers and workstations.If not, you can use the following information as a guideline for creating your own.Although the computer name can contain up to 63 characters, workstations and serversthat are pre–Windows 2000 recognize only the first 15 characters. It is widely considered abest practice to use only Internet-standard characters in your computer name. Thisincludes the letters A–Z (upper- and lowercase), the numbers 0–9, and the hyphen (-).
Although it’s true that implementing the Microsoft domain name system (DNS) service inyour environment could allow you to use some non-Internet standard characters (such asUnicode characters and the underscore), you should keep in mind that this is likely tocause problems with any non-Microsoft DNS servers on your network. You should thinkcarefully and test thoroughly before straying from the standard Internet characters notedin the preceding paragraph.
Name of the Workgroup or DomainDuring the server installation, the Setup Wizard will ask for the name of the workgroup ordomain that the server will be joining. You can either enter the name of an existing orga-nizational structure or enter a new name, creating a new workgroup or domain.
Users new to Microsoft networking may ask, “What is the difference between a work-group and a domain?” Simply put, a domain is a collection of computers and supportinghardware that share the same security database. Grouping the equipment in this mannerallows you to set up centralized security and administration. Conversely, a workgroup hasno centralized security or administration. Each server or workstation is configured inde-pendently and locally for all security and administration settings.
Network Protocol and IP Address of the ServerWhen installing Windows Server 2003, you must install and configure a network protocolthat will allow it to communicate with other machines on the network. Currently, themost commonly used protocol is called TCP/IP, which stands for Transmission Control
CHAPTER 3 Installing Windows Server 200378
05_0672328984_ch03.qxd 4/6/06 11:10 AM Page 78
Protocol/Internet Protocol. This protocol allows computers throughout the Internet tocommunicate. After you install the TCP/IP protocol, you need to configure an IP addressfor the server. You can choose one of the following three methods to assign an IP address:
• Automatic Private IP Addressing (APIPA)—APIPA can be used if you have a smallnetwork that does not have a Dynamic Host Configuration Protocol (DHCP) server,which is used for dynamic IP addresses. A unique IP address is assigned to thenetwork adapter using the LINKLOCAL IP address space. The address always startswith 169.254 and is in the format 169.254.x.x. Note that if an APIPA is in use, and aDHCP server is brought up on the network, the computer will detect this and willuse the address that is assigned by the DHCP service instead.
• Dynamic IP address—A dynamic IP address is assigned by a DHCP server. Thisallows a server to assign IP addresses and configuration information to clients. Someexamples of the information that is distributed include IP address, subnet mask,default gateway, domain name system (DNS) server address, and Windows InternetNaming Service (WINS) server address. As the dynamic portion of the namesuggests, this address is assigned to the computer for a configurable length of time,known as a lease. When the lease expires, the workstation must again request an IPaddress from the DHCP server. It may or may not get the same address that it hadpreviously. Although servers and workstations can both be configured to use thismethod of addressing, it is generally used for workstations rather than servers.
• Static IP address—Using a static IP address is the most common decision for aserver configuration. By static, we mean that the address will not change unless youchange the configuration of the server. This point is important because clients andresources that need to access the server must know the address to be able to connectto it. If the IP address changed regularly, connecting to it would be difficult.
Backing Up FilesWhether you are performing a new installation on a previously used server or upgradingan existing server, you should perform a complete backup of the data and operatingsystem before you begin your new installation. This way, you have a fallback plan if theinstallation fails or the server does not perform the way you anticipated.
When performing a new installation on a previously used server, you overwrite any datathat was stored there. In this scenario, you will have to use your backup tape to restoreany data that you want to preserve.
On the other hand, if you are going to upgrade an existing server, a known good backupwill allow you to recover to your previous state if the upgrade does not go as planned.
NOTE
Many people back up their servers but never confirm that the data can be read from the backupmedia. When the time comes to recover their data, they find that the tape is unusable orunreadable, or that they do not know the proper procedures for restoring their server. You
Preplanning and Preparing a Server Installation 793
05_0672328984_ch03.qxd 4/6/06 11:10 AM Page 79

should perform backup/recovery procedures on a regular basis in a lab environment to makesure that your equipment is working properly and that you are comfortable with performing theprocess.
Setting Up the Windows Server 2003 Operating SystemIf you have installed Microsoft server operating systems before, you will be familiar withthe look and feel of the Windows Server 2003 installation process. The familiar blue back-ground with white text is still there for the first half of the installation and, for the mostpart, the questions are the same. You still have to press F8 to accept the license agree-ment, but unlike with some older versions, you aren’t required to page down to read thewhole thing first anymore. The next step is to set up the hard drive and partitions youwant to install to. Although the process is similar to previous versions, you have somenew options to choose from. Follow the instructions to prepare and select your desiredpartition for installation.
Formatting the PartitionWith older versions of the Windows operating system, you had two options when parti-tioning the hard drive: NTFS or FAT. You still have these familiar options, but two newones for quick formatting have been added to the list, as shown in Figure 3.1.
CHAPTER 3 Installing Windows Server 200380
FIGURE 3.1 Options for formatting the Windows Server 2003 partition.
Quick Formatting or Regular FormattingWhen you select NTFS or FAT to format the partition, the drive must be formatted. Thisprocess can take a significant amount of time.
The new “quick” option can format the partitions much faster—in some cases more than25 times faster! But be aware, in this instance the drive is not being truly formatted. TheQuick Format option performs only a high-level format of a disk—using the tracks and
05_0672328984_ch03.qxd 4/6/06 11:10 AM Page 80

sectors already defined by an earlier formatting. This option is most helpful when you’reinstalling servers that did not previously contain any confidential information. And itreally comes in handy when you’re installing a server over and over in the lab.
FAT or NTFSOne of the most commonly asked questions when installing a Windows-based server is,“Should I select FAT or NTFS?” FAT (which stands for file allocation table) has beenaround for a long time—since the days of MS-DOS. It was upgraded with Windows 95 SR-2, when FAT16 became FAT32, giving us the functionality of long filenames and allowingus to create larger disk and volume sizes.
Although the theoretical partition size with FAT32 is up to 2 terabytes, Windows Server2003 places a limitation that allows volumes only up to 32GB in size. Your file sizes arealso limited; no file can be larger than 4GB (2GB in FAT16).
There are two scenarios in which you would have to use the FAT file system. First, you useit if you are building Windows 2003 on a machine that will have to dual-boot to an oper-ating system that does not support NTFS (such as Windows 95). And second, you use it ifyou want the ability to boot the server to a floppy disk (such as a DOS or Win95 bootdisk) to access the files on the root partition.
CAUTION
Keep in mind, however, that if you can boot your server to a floppy to access the files stored onthe hard drive, so can someone else!
NTFS (NT File System) is the recommended file system for use with Windows Server 2003,as it was for Windows 2000 and Windows NT servers. NTFS is actually NTFS5 and wasupgraded with NT 4.0 Service Pack 4. This file system is less likely to become corrupt andis able to recognize errors and bad sectors of a hard drive. When one of these problems isdiscovered, the file system repairs itself automatically.
Windows Server 2003 allows supported volume sizes up to 16 terabytes (minus 4KB), andthe maximum file size is 16TB (minus 64KB). Additionally, NTFS has better file security,disk compression, and encryption capabilities, and it can use fault-tolerant disk configura-tions such as mirroring and disk striping. So, which file system do you use for WindowsServer 2003? The rule of thumb is if you don’t have to use FAT for one of the reasonsmentioned here, go with NTFS.
Customizing Regional and Language OptionsAfter the boot partition is configured, all the operating system files will be copied there.The system will reboot, and the GUI portion of the installation will commence.
When customizing the Regional Options section, you can configure the Standards andFormats. These settings control how the workstation formats numbers, currencies, dates,and times. The Location setting provides you with local information, such as news andweather.
Setting Up the Windows Server 2003 Operating System 813
05_0672328984_ch03.qxd 4/6/06 11:10 AM Page 81

In the Languages section, you can modify the text services and input languages.Additionally, you can install supplemental language support for East Asian languages andsupport for complex script and right-to-left languages, including Thai.
Personalizing the SoftwareThe Setup Wizard next asks for your name and that of your organization. This informa-tion is used during the setup to determine the default computer name. Additionally, itwill be displayed on the Windows Server 2003 screen in the Registered To section.
Many companies have a policy in place detailing how these fields are to be filled out. Acommon practice is to put the department or location (such as Human Resources orOakland) in the Name field and the name of the company in the Organization field.
Inserting a Product KeyIf you have installed previous versions of the Windows operating systems, the process ofinserting a product key will be familiar to you. In the past, server and workstation instal-lations required the inserting of a product key to activate the software.
With Windows Server 2003, you still have to input a product key, but there are a fewdifferent scenarios. The Windows Server 2003 activation key initiative is described in thefollowing sections.
Using a Retail Media Activation KeyWhen you purchase the installation media from a retail source, you will have to contactMicrosoft (either online or by telephone) to activate your product key. This key is uniquefor each installation. Fortunately, you still can automate the installation by using tech-nologies such as Windows Scripting Host (WSH) and Windows ManagementInstrumentation (WMI).
Using a Volume Media Activation KeyWhen you purchase the installation media as part of a Microsoft volume licensingprogram (such as Open or Select), no activation is required. Additionally, you will be ableto use a common product key across all your installations.
Selecting Licensing ModesAnother point of confusion for many installers is the topic of licensing modes. Wheninstalling Windows Server 2003, as in Windows 2000 and NT, you must select one of twolicensing modes for the server. You can specify Per Server or Per Device.
NOTE
If you are not sure which licensing mode to use for your environment, select Per Server. If neces-sary, you can make a one-time switch from Per Server to Per Device, but the licensing does notallow the reverse switch from Per Device to Per Server.
CHAPTER 3 Installing Windows Server 200382
05_0672328984_ch03.qxd 4/6/06 11:10 AM Page 82

Per Server LicensingIn Per Server licensing mode, each server has a defined number of clients that are allowedto connect at any one time. Each server in the network that uses this mode must haveenough client access licenses (CALs) purchased to cover the maximum number of concur-rent connections the server is going to support. If the number of connections exceeds theconfigured number of CALs, clients may be locked out or receive Access Denied messageswhen they attempt to connect to network resources.
This option is typically selected by small companies with only one Windows Server 2003system because smaller organizations have a smaller number of users. You may also wantto select this option if you are configuring a Web server or Remote Access Service (RAS)server. You can configure the maximum number of users who will connect and, even ifthe client is not licensed as a Windows Server 2003 networking client, you are not break-ing your licensing agreement.
Per Device LicensingIn the Per Device licensing mode, a CAL is required for each workstation (or seat) thatconnects to any licensed server. This includes users running any Windows operatingsystem, Macintosh, or Unix computers connecting to a Windows file server.
In this scenario, a workstation is not limited to connecting to only one server; clientcomputers are allowed access to any server within a Windows network, as long as eachclient machine is licensed with a CAL.
This is the most common licensing option because most companies have more than oneserver. Although the cost of a CAL is more expensive than a Per Server client license, youhave to pay only once for that user to access an unlimited number of Windows-basedservers.
Setting Computer Name and Administrator PasswordNext, you are prompted to enter a computer name and administrator password for yourcomputer.
Choosing Your Computer NameBy default, the setup program suggests a computer name based on the information youprovided earlier in the Organization field of the Personalize Your Software section. Youcan (and, in most instances, should) change that default name here. Insert the name youdecided on earlier in the “Gathering the Information Necessary to Proceed” section of thischapter.
Selecting an Administrator PasswordThe Setup Wizard automatically creates a default account for the administrator called,surprisingly enough, Administrator. This account has local administrative privileges andenables you to manage all local configuration settings for the server. For the sake of secu-rity, you can (and should) rename this account after you complete the installation.
Setting Up the Windows Server 2003 Operating System 833
05_0672328984_ch03.qxd 4/6/06 11:10 AM Page 83

You need to decide on a password for this account. You must enter it twice—first in thePassword box and then again in the Confirmation box.
As in previous Windows operating systems, the password is case sensitive and can containup to 127 characters. You should choose your password carefully to ensure the security ofthe system.
If you enter a password that does not meet Microsoft’s criteria for strong passwords, youwill receive a Windows Setup warning, as shown in Figure 3.2.
CHAPTER 3 Installing Windows Server 200384
FIGURE 3.2 Password strength warning during setup.
For security reasons, you should never choose a password that does not meet theminimum criteria listed.
Modifying Date and Time SettingsThe next step is to set the correct date and time, and select the appropriate time zone foryour location. Additionally, if your location uses daylight saving time, make sure the boxfor that option is checked. A dialog box may or may not pop up, depending on installedhardware.
Modifying Network SettingsNext, you need to decide on the appropriate network settings for the server. Thesesettings configure your computer so that it can connect to other computers, networks,and the Internet. You can select either Typical Settings or Custom Settings.
Typical SettingsWhen you choose Typical Settings, the Setup Wizard automatically configures the defaultnetwork settings for the server. These default settings include the installation of the Clientfor Microsoft Networks, file and print access, and TCP/IP as the default protocol.Additionally, when configuring the TCP/IP settings, the server searches for a DHCP server.
05_0672328984_ch03.qxd 4/6/06 11:10 AM Page 84

If it finds one, it will configure the server for a dynamic IP address. If no DHCP server isfound, it will configure an Automatic Private IP Address (APIPA).
For most companies, the default client, services, and protocols selected will meet theirneeds, though you will likely want to change the TCP/IP settings and assign a staticaddress for the server. See the earlier section “Network Protocol and IP Address of theServer” for more information.
Custom SettingsSelecting Custom Settings allows you to manually configure the networking components.By default, the Client for Microsoft Networks, File and Printer Sharing for MicrosoftNetworks, and Internet Protocol (TCP/IP) are selected.
If you want to install additional clients, services, and/or protocols, or if you want tochange the default configuration for these selections, selecting the Custom Settingsoption may be in order.
Joining a Workgroup or Computer DomainIf you are joining an existing domain, you will need the login name and password for adomain administrator in that domain. Alternatively, you can have the administrator ofthe domain add your computer name into the domain so that your server can connect.
If you do not know the name of the domain that the server will be a member of, or if youdo not have the administrative rights to join the server to the domain, select a workgroupinstallation. You can easily join the server to a domain at a later time.
Completing the InstallationAfter you click Next, the Setup Wizard will complete the installation of the server, applyall the configuration settings that you specified, and remove all temporary setup files.Upon completion, the computer will reboot and will load Windows Server 2003.
Logging InWhen you’re prompted, press Ctrl+Alt+Delete to log in to Windows Server 2003. Thedefault administrator name should be displayed for you. You must type in the passwordthat you assigned and click OK to continue.
Activating Windows Server 2003If your copy of Windows Server 2003 needs to be activated, you can either click the iconin the system tray that looks like a pair of gold and silver keys, or you can choose Start,All Programs, Activate Windows. You have the choice of activating Windows via theInternet or by telephone.
Activating Windows over the InternetTo activate your system via the Internet, select that option and click Next. You then areasked whether you want to register with Microsoft. This step is optional and not required
Setting Up the Windows Server 2003 Operating System 853
05_0672328984_ch03.qxd 4/6/06 11:10 AM Page 85
to activate Windows. If you register, Microsoft will (with your consent) notify you ofproduct updates, new products, events, and special offers.
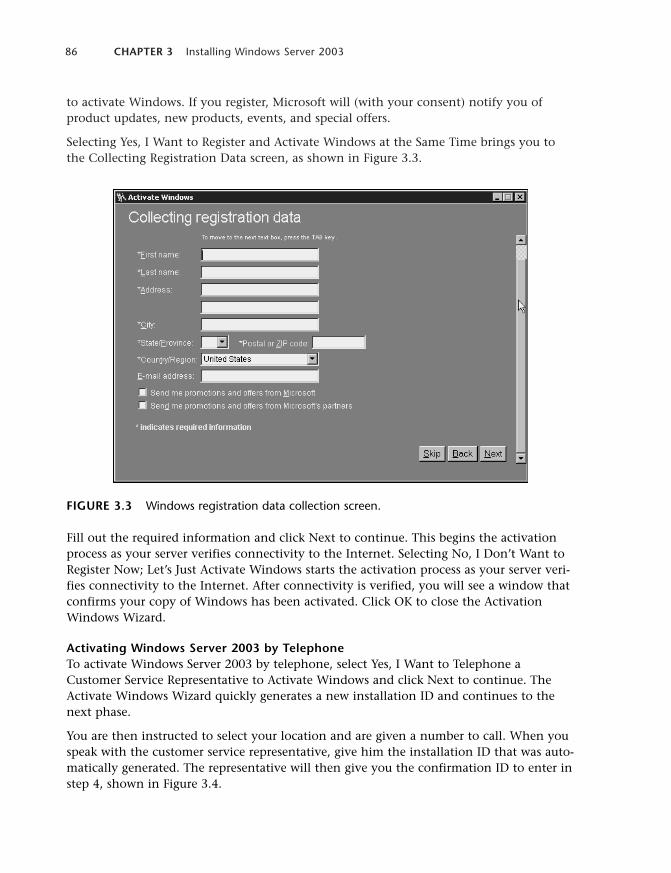
Selecting Yes, I Want to Register and Activate Windows at the Same Time brings you tothe Collecting Registration Data screen, as shown in Figure 3.3.
CHAPTER 3 Installing Windows Server 200386
FIGURE 3.3 Windows registration data collection screen.
Fill out the required information and click Next to continue. This begins the activationprocess as your server verifies connectivity to the Internet. Selecting No, I Don’t Want toRegister Now; Let’s Just Activate Windows starts the activation process as your server veri-fies connectivity to the Internet. After connectivity is verified, you will see a window thatconfirms your copy of Windows has been activated. Click OK to close the ActivationWindows Wizard.
Activating Windows Server 2003 by TelephoneTo activate Windows Server 2003 by telephone, select Yes, I Want to Telephone aCustomer Service Representative to Activate Windows and click Next to continue. TheActivate Windows Wizard quickly generates a new installation ID and continues to thenext phase.
You are then instructed to select your location and are given a number to call. When youspeak with the customer service representative, give him the installation ID that was auto-matically generated. The representative will then give you the confirmation ID to enter instep 4, shown in Figure 3.4.
05_0672328984_ch03.qxd 4/6/06 11:10 AM Page 86
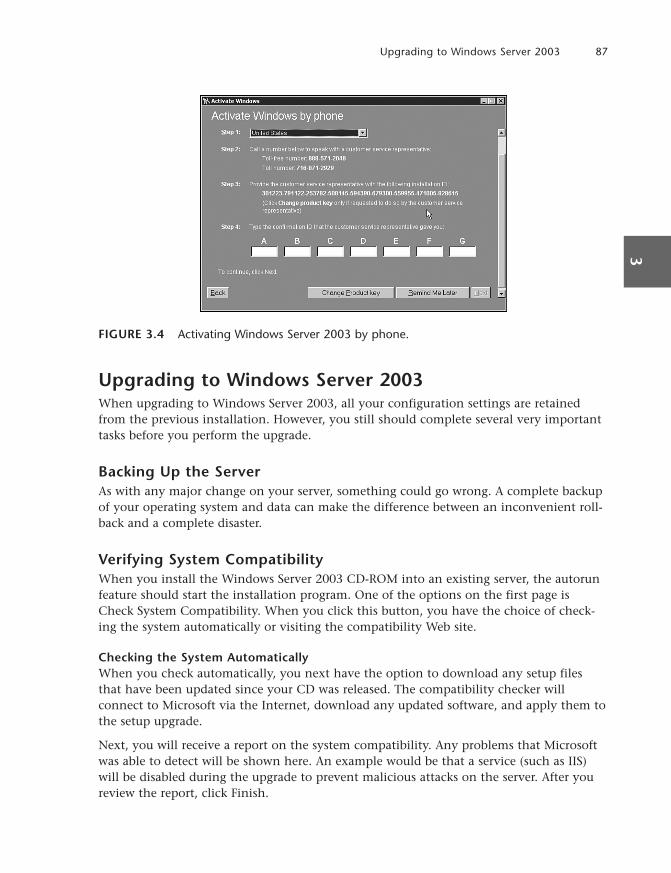
FIGURE 3.4 Activating Windows Server 2003 by phone.
Upgrading to Windows Server 2003When upgrading to Windows Server 2003, all your configuration settings are retainedfrom the previous installation. However, you still should complete several very importanttasks before you perform the upgrade.
Backing Up the ServerAs with any major change on your server, something could go wrong. A complete backupof your operating system and data can make the difference between an inconvenient roll-back and a complete disaster.
Verifying System CompatibilityWhen you install the Windows Server 2003 CD-ROM into an existing server, the autorunfeature should start the installation program. One of the options on the first page isCheck System Compatibility. When you click this button, you have the choice of check-ing the system automatically or visiting the compatibility Web site.
Checking the System AutomaticallyWhen you check automatically, you next have the option to download any setup filesthat have been updated since your CD was released. The compatibility checker willconnect to Microsoft via the Internet, download any updated software, and apply them tothe setup upgrade.
Next, you will receive a report on the system compatibility. Any problems that Microsoftwas able to detect will be shown here. An example would be that a service (such as IIS)will be disabled during the upgrade to prevent malicious attacks on the server. After youreview the report, click Finish.
Upgrading to Windows Server 2003 873
05_0672328984_ch03.qxd 4/6/06 11:10 AM Page 87

Performing Additional TasksBefore proceeding with the installation, you can also select Perform Additional Tasks.These tasks enable you to set up a Remote Desktop Connection (RDC), browse thecontents of the installation CD, and review the setup instructions and release notes.
Performing the UpgradeAt this point, your data is backed up, you have verified compatibility with the new oper-ating system, and you have read the release notes. It’s time to upgrade, so proceed withthe following steps:
1. Select Install Windows Server 2003, Enterprise Edition Server to begin the WindowsServer 2003 Setup Wizard.
2. From the setup screen, you need to select the installation type. Select Upgrade andclick Next to continue.
3. After reviewing the license agreement, select I Accept This Agreement and click Nextto continue.
4. If the installation media you are using require a product key, enter it here. The 25-character product key can be found on a sticker on the back of your Windows CDcase. Enter the product key and click Next to continue.
5. The Setup Wizard next checks your computer for compatibility with WindowsServer 2003. You can review details about each item by clicking the Details button.Also, you can save the compatibility report by clicking the Save As button.
6. After reviewing any discrepancies and ensuring that no show-stoppers exist on thelist, click Next to continue.
7. The Setup Wizard then finishes copying installation files and restarts the computer.
NOTE
After installing the core Windows operating system but before adding the server to the produc-tion network, make sure to install the latest Service Pack and apply the most current securityupdates.
The process of completing the installation and activating Windows is the same for anupgrade as it is for an initial installation.
Using Alternative Methods of InstallationSeveral alternative methods can be used to install Windows Server 2003. By using deploy-ment tools such as Remote Installation Services (RIS), System Preparation (Sysprep),Remote Installation Preparation (RIPrep), Unattend files, and Group Policy (with Systems
CHAPTER 3 Installing Windows Server 200388
05_0672328984_ch03.qxd 4/6/06 11:10 AM Page 88
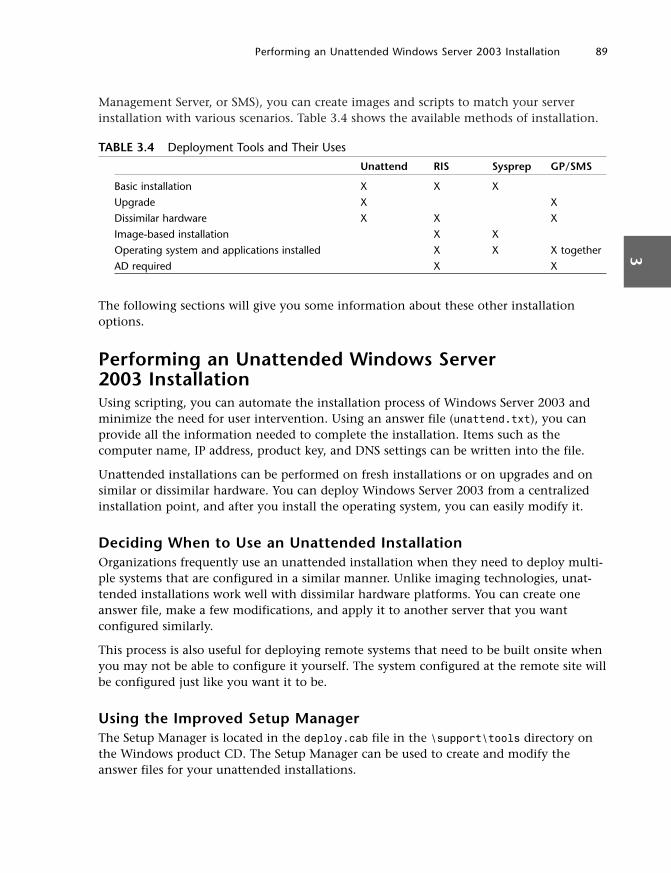
Management Server, or SMS), you can create images and scripts to match your serverinstallation with various scenarios. Table 3.4 shows the available methods of installation.
TABLE 3.4 Deployment Tools and Their Uses
Unattend RIS Sysprep GP/SMS
Basic installation X X X
Upgrade X X
Dissimilar hardware X X X
Image-based installation X X
Operating system and applications installed X X X together
AD required X X
The following sections will give you some information about these other installationoptions.
Performing an Unattended Windows Server2003 InstallationUsing scripting, you can automate the installation process of Windows Server 2003 andminimize the need for user intervention. Using an answer file (unattend.txt), you canprovide all the information needed to complete the installation. Items such as thecomputer name, IP address, product key, and DNS settings can be written into the file.
Unattended installations can be performed on fresh installations or on upgrades and onsimilar or dissimilar hardware. You can deploy Windows Server 2003 from a centralizedinstallation point, and after you install the operating system, you can easily modify it.
Deciding When to Use an Unattended InstallationOrganizations frequently use an unattended installation when they need to deploy multi-ple systems that are configured in a similar manner. Unlike imaging technologies, unat-tended installations work well with dissimilar hardware platforms. You can create oneanswer file, make a few modifications, and apply it to another server that you wantconfigured similarly.
This process is also useful for deploying remote systems that need to be built onsite whenyou may not be able to configure it yourself. The system configured at the remote site willbe configured just like you want it to be.
Using the Improved Setup ManagerThe Setup Manager is located in the deploy.cab file in the \support\tools directory onthe Windows product CD. The Setup Manager can be used to create and modify theanswer files for your unattended installations.
Performing an Unattended Windows Server 2003 Installation 893
05_0672328984_ch03.qxd 4/6/06 11:10 AM Page 89
Enhancements to the Setup Manager for Windows Server 2003 include the capability toencrypt the administrator password, which was formerly stored as plain text in theanswer file. The Setup Manager also has an improved interface and an improved help file.
Preparing for an Unattended InstallationTo prepare for an unattended installation, you must first install and run the SetupManager. Although this application is included with the Windows Server 2003 installationmedia, it is not installed by default.
To install the Setup Manager, perform the following steps:
1. Insert the Windows Server 2003 CD-ROM into the CD-ROM drive of your computer.If you hold down the Shift key as you do so, you can bypass the CD’s autorunfeature.
2. Open My Computer, right-click the CD-ROM drive, and select Explore.
3. Open the support\tools directory and double-click the deploy.cab file to open it.
4. Select all the files that are in the right pane, right-click, and select Extract.
5. Select the folder where you want to place the files (or make a new folder) and clickExtract.
6. Open the folder where you placed the files and double-click the Setupmgr.exe file.
7. When the Setup Manager Wizard starts, follow the instructions to create youranswer file.
Creating an Unattended Installation ScriptTo create an unattended answer file, open the folder where you placed the files youextracted. Double-click the Setupmgr.exe file and follow the instructions in the SetupManager Wizard.
Sample unattend.txt FileThe unattend.txt file can be extremely simple or extremely complex, ranging in sizefrom a few dozen lines of code to a few hundred.
The following is a sample unattend.txt file that was created in about five minutes usingthe Setup Manager:
;SetupMgrTag
[Data]
AutoPartition=1
MsDosInitiated=”0”
UnattendedInstall=”Yes”
[Unattended]
UnattendMode=FullUnattended
CHAPTER 3 Installing Windows Server 200390
05_0672328984_ch03.qxd 4/6/06 11:10 AM Page 90
OemSkipEula=Yes
OemPreinstall=Yes
TargetPath=\WINDOWS
[GuiUnattended]
AdminPassword=xxxxxxxx
EncryptedAdminPassword=Yes
OEMSkipRegional=1
TimeZone=4
OemSkipWelcome=1
[UserData]
ProductKey=XXXXX-XXXXX-XXXXX-XXXXX-XXXXX
FullName=”Rand Morimoto”
OrgName=”Convergent Computing”
ComputerName=WNS-Server-One
[Display]
Xresolution=800
YResolution=600
[LicenseFilePrintData]
AutoMode=PerServer
AutoUsers=10
[TapiLocation]
CountryCode=1
Dialing=Tone
AreaCode=510
[SetupMgr]
DistFolder=C:\windist
installation
DistShare=windist
[Components]
accessopt=On
calc=On
charmap=On
clipbook=On
deskpaper=On
templates=On
mousepoint=On
paint=On
freecell=Off
Performing an Unattended Windows Server 2003 Installation 913
05_0672328984_ch03.qxd 4/6/06 11:10 AM Page 91

hearts=Off
zonegames=Off
minesweeper=Off
solitaire=Off
spider=Off
indexsrv_system=On
msnexplr=Off
certsrv=Off
certsrv_client=Off
certsrv_server=Off
iis_www=Off
iis_ftp=Off
iis_smtp=Off
iis_smtp_docs=Off
iis_nntp=Off
iis_nntp_docs=Off
reminst=Off
rstorage=Off
TerminalServer=On
wms=Off
wms_admin_asp=Off
wms_admin_mmc=Off
wms_server=Off
chat=On
dialer=On
hypertrm=On
cdplayer=On
mplay=On
media_clips=On
media_utopia=On
rec=On
vol=On
[Identification]
JoinDomain=companyabc
DomainAdmin=companyabc\administrator
DomainAdminPassword=password
[Networking]
InstallDefaultComponents=No
[NetAdapters]
Adapter1=params.Adapter1
CHAPTER 3 Installing Windows Server 200392
05_0672328984_ch03.qxd 4/6/06 11:10 AM Page 92
[params.Adapter1]
INFID=*
[NetClients]
MS_MSClient=params.MS_MSClient
[NetServices]
MS_SERVER=params.MS_SERVER
[NetProtocols]
MS_TCPIP=params.MS_TCPIP
[params.MS_TCPIP]
DNS=No
UseDomainNameDevolution=No
EnableLMHosts=Yes
AdapterSections=params.MS_TCPIP.Adapter1
[params.MS_TCPIP.Adapter1]
SpecificTo=Adapter1
DHCP=No
IPAddress=10.100.100.10
SubnetMask=255.255.255.0
DefaultGateway=10.100.100.1
DNSServerSearchOrder=10.100.100.50,10.100.100.51
WINS=Yes
WinsServerList=10.100.100.60
NetBIOSOptions=0
As you customize and begin using unattended script files, you will find that they can saveyou an enormous amount of time installing Windows Server 2003 on multiple systems.
Launching an Unattended Installation ScriptWhen the Setup Manager creates the unattend.txt file, it will also create a batch filecalled unattend.bat. The batch file gives the name of the answer file (unattend.txt) andthe location of the source files (\\WINSERVER\windist\I386). Next, the installation processis kicked off by the winnt32 command and the switches to call the files.
NOTE
Because the setup files (in this case) are located on a Windows server, you will need networkconnectivity before starting the batch file.
Performing an Unattended Windows Server 2003 Installation 933
05_0672328984_ch03.qxd 4/6/06 11:10 AM Page 93
Sample unattend.bat FileThe unattend.bat file is the batch file used to launch the unattended installation. Thesteps of the batch file can be executed manually; however, if the process is repeatedseveral times, running a batch file like the following one will simplify the process:
@rem SetupMgrTag
@echo off
set AnswerFile=.\unattend.txt
set SetupFiles=\\WINSERVER\windist\I386
\\WINSERVER\windist\I386\winnt32 /s:%SetupFiles% /unattend:%AnswerFile%
Installing Windows Server 2003 from an ImageTo deploy multiple servers that are configured the same way and that have similar hard-ware, you can’t beat using an image-based installation. You can use Remote InstallationServices (RIS) with the Remote Installation Preparation Wizard (RIPrep), the SystemPreparation tool (Sysprep) to prepare a server for imaging using Xcopy or third-partyimaging software, or use the Feature Pack add-in Automated Deployment Services.
An image-based installation might be the answer for you if you have the following needs:
• Installing identical operating systems, applications, and configurations on multipleservers
• Performing clean installations (no upgrades)
Using Remote Installation ServicesUsing Remote Installation Services, better known as RIS, allows for a setup that is networkinitiated. When you combine this service with the Remote Installation PreparationWizard (RIPrep), you can install a clean, imaged installation.
This method of installation, combined with PXE network cards, allows the setup programto be initiated with minimal user intervention. Boot floppy disks can also be used forcertain PCI network interface cards that are not PXE compliant.
When using RIS, the client requests an IP address from a DHCP server. The client thencontacts the RIS server, which in turn checks Active Directory to see whether the clienthas been prestaged. The RIS server either responds to the client or forwards the request toanother RIS server. When the proper RIS server has been contacted, it sends Startrom.comto the client, which then launches OSChoice. OSChoice begins the remote installationservice process.
Improvements to Remote Installation ServicesWith Windows Server 2003, Microsoft has enhanced RIS technology. RIS now has supportfor deploying all versions of Windows 2000, Windows XP Professional, and all 32-bitversions of the Windows Server 2003 family. And there is a significant performanceimprovement when compared to all previous versions.
CHAPTER 3 Installing Windows Server 200394
05_0672328984_ch03.qxd 4/6/06 11:10 AM Page 94
Several security enhancements have been made as well. When a system is configured withRIS and is joined to the domain, the Domain Administrators group is added to the LocalAdministrators group; then the local administrator account is disabled. Also, as stated inthe “Performing an Unattended Windows Server 2003 Installation” section, there is theability to encrypt the administrator password.
Client Requirements for RISTo use RIS to deploy a server, the computer must meet PXE 1.0 or 2.0 specifications. Itmust have a network interface card (NIC) that supports PXE or that is supported by theRIS boot floppy. Finally, the hardware must meet the minimum requirements for theversion of Windows being installed.
Using the System Preparation ToolIn the past, one problem with imaging systems was that when the new (copied) systemwas brought online, there were conflicts with the old (original) system. The security iden-tifier (SID), computer name, and IP address all were identical on the image and the origi-nal, and all of them are supposed to be unique on your network.
One way to resolve this problem is to use the System Preparation tool—otherwise knownas Sysprep. This tool prepares a system for imaging by removing certain configurationdetails, such as the SID, IP address, and computer name. The system is then imaged and,when the image is deployed, a mini-setup is run instead of the normal full setup. The usercan answer just a few questions, and the installation is on its way.
To use Sysprep, you perform the installation once on the source computer, installing theoperating system and any applications that you want deployed. After the source system isinstalled and configured, Sysprep is run on that system, which then powers off. Using animaging tool, the system is then copied to a network location for distribution. A newsystem is booted using an imaging tool, connected to the network, and the image iscopied from the network. When this new system is powered on, the mini-setup is run,and the installer is asked a few configuration questions. When the setup application iscomplete, the server can be turned off and is ready to distribute.
Improvements to the System Preparation ToolSysprep has been around for a while, and Microsoft has added some improvements thathave made it easier to deploy imaged installations. One such enhancement, the –factoryswitch, allows updated drivers to be picked up by the image before the system is fully setup. Also, you can now image products in the Windows Server 2003 family running IIS.And, as a time-saver, you no longer have to use the –PnP switch to force Plug and Playenumeration on the next restart. In the past, this process added 5 to 10 minutes to themini-setup.
Using the Automated Deployment Services ToolFor organizations looking to deploy identically configured Windows Server 2003 images tomultiple servers, the Automated Deployment Services (ADS) tool simplifies the imaging task.
Installing Windows Server 2003 from an Image 953
05_0672328984_ch03.qxd 4/6/06 11:10 AM Page 95
ADS uses the Preboot Execution Environment (PXE), which is similar to the RemoteInstallation Service (RIS), to deploy images to new servers. The significant benefit of ADSover RIS is the administrative tool that comes with ADS. The ADS administration toolprovides administrators with a centralized view of stored images, the flexibility to auto-matically reconfigure images from a central location, and the ability to process imagesbased on the needs of the organization.
ADS can be downloaded from the Microsoft Feature Pack Downloads page athttp://www.microsoft.com/windowsserver2003/downloads/featurepacks/default.mspx.
Installing Windows Server 2003 with Group Policy andSystems Management ServerAs a final note, you can use Group Policy to upgrade Windows Server 2003 in the existingActive Directory or Systems Management Server (SMS) infrastructure. You can performcomplete operating system upgrades or just install service packs.
You can also use SMS to inventory and confirm system compatibility before you upgradeand then to confirm that the upgrade to Windows Server 2003 was successful.
The combination of Group Policy and SMS can use a central installation point to performupgrades on similar or dissimilar hardware. It can be used for the prestaging of servers aswell, and is easy to reconfigure if your needs change.
Updating a Windows 2003 Server with a Service PackAs with all Microsoft applications, Windows 2003 has periodic updates that become avail-able for the software. Interim updates can be downloaded and installed via the WindowsUpdate option on the system, or a visit to the Windows Update website (http://update.microsoft.com) will initiate the installer to check for the latest updates for Windows.
Major updates come in Service Packs that roll up patches and updates into a single instal-lation. Installing a Service Pack brings a server up to date with all the updates to the pointin time when the Service Pack was issued. The Service Packs for Windows 2003 are cumu-lative, so the installation of Service Pack 2 includes all the updates released prior toService Pack 2, including the Service Pack 1 update.
There are three ways to install a Service Pack update:
• Windows Update—You can download and automatically install the Service Pack aspart of the normal update process.
• Download and Install—You can download the Service Pack as a file and thenlaunch it to install the update. Do this when your system is not connected to theInternet, or when you prefer to schedule an installation instead of performing animmediate installation after you’ve downloaded the file from the Internet.
• Slipstream Installation—For a new installation of Windows, you can merge theService Pack into an existing copy of the Windows 2003 code, and then install theupdated Windows 2003 code with Service Pack updates on your system.
CHAPTER 3 Installing Windows Server 200396
05_0672328984_ch03.qxd 4/6/06 11:10 AM Page 96
Installing the Service PackThe Windows Update method and the download and install method of updating a serverwith a Service Pack merely requires a copy of the Service Pack to be installed on an exist-ing Windows 2003 server. The installation process will overwrite any old versions ofdrivers and files, and will update the system with the latest version that comes in theService Pack.
If the Service Pack was downloaded, the file must be executed to install the files. Theexecution might be as follows:
WindowsServer2003-KB889101-SP1-x86-enu.exe
If the Service Pack is to be installed by the use of Windows Update to automaticallyinstall the Service Pack from the update screen, then choosing to “update” from theWindows Update screen will initiate the installation process of the Service Pack onto thesystem.
Slipstreaming the Service Pack into a New Installation MediaLike many other Microsoft products, Windows 2003 allows Service Packs to be mergedinto the original application code so that the installation can be a single process, insteadof installing the original code and then applying the Service Pack. This merging of theservice pack into the original code is called slipstreaming. Effectively, the updated codeoverwrites the original code and then is burned to a new CD that becomes the updatedversion of the installation software.
To prepare a slipstream copy of Windows 2003, do the following:
1. Insert the Windows 2003 disc into the CD-ROM drive and copy the contents of thei386 directory into an empty directory on a hard drive.
2. Extract the contents of the Service Pack into a different empty directory on the harddrive so that the files for the Service Pack are available. The following is an exampleof the command to extract the files:
WindowsServer2003-KB889101-SP1-x86-enu.exe /x
3. Go into the update folder of the Service Pack directory and run the followingcommand to slipstream the contents of the Service Pack into the original code direc-tory (where c:\win2003\ is the location of the original Windows 2003 software, andc:\sp1\ is the directory of the Service Pack software):
c:\sp1\i386\update\update.exe –s c:\win2003
The resulting files in the original Windows 2003 directory (c:\win2003 in this example)will be the original code updated with the Service Pack updates. This entire directory cannow be burned back to a bootable CD-ROM as a CD that is now a Windows 2003 SP1installation disc.
Updating a Windows 2003 Server with a Service Pack 973
05_0672328984_ch03.qxd 4/6/06 11:10 AM Page 97
Preparing a System and Installing the Windows 2003R2 ComponentsWindows 2003 R2 is a series of add-on components to Windows 2003 and is not a newoperating system installation. The operating system off which Windows 2003 R2 runs isWindows 2003 SP1 or higher. If a system needs to be updated to support the Windows2003 R2 components, a Service Pack version of Windows should be installed. If a systemalready has a Service Pack installed, the Windows 2003 R2 components can be installedright on the service packed system.
Preparing the Installation of Windows 2003 R2There are three scenarios of configurations where Windows 2003 R2 would be installed.One scenario is where a system either already has Windows 2003 installed but without aService Pack; another scenario is where a system has Windows 2003 with a Service Packinstalled; and the third scenario is where a system is being installed from scratch with theWindows 2003 R2 CDs.
Preparing a System Without Service PacksFor a Windows 2003 system that does not have a Service Pack installed, the system willfirst need to be updated with the latest Service Pack. See the “Updating a Windows 2003Server with a Service Pack” section, earlier in this chapter, for instructions on installing aService Pack for Windows 2003. When the system has Service Pack 1 or higher installed,the Windows 2003 R2 components can be added to the system.
Preparing a System with a Service PackIf a Windows 2003 server already has Service Pack 1 or higher installed, the Windows2003 R2 components can be installed right on the system.
Preparing Windows 2003 R2 from Windows 2003 R2 MediaFor a system being configured from the Windows 2003 R2 media, you will noticeWindows 2003 R2 comes with two CDs. One CD is the core operating system, which isthe Windows 2003 operating system that has a slipstream copy of the Service Pack on themedia. When installing Windows from the Windows 2003 R2 CD-1, the Service Pack willautomatically be installed at the time of installation.
After CD-1 has been installed, the Windows 2003 R2 CD-2 can be inserted and theWindows 2003 R2 update can be installed on the system.
Installing the Windows 2003 R2 Component FilesAfter the base configuration of a system has been installed that includes Windows 2003with Service Pack 1 or higher, the Windows 2003 R2 components can be installed. Not allthe Windows 2003 R2 components need to be installed on the system at the same time.In fact, it is better to install only the desired components; otherwise, a system will haveunneeded components that can take up system CPU performance or will open up a secu-rity “surface area” that can be attacked by worms and viruses. By selectively installing
CHAPTER 3 Installing Windows Server 200398
05_0672328984_ch03.qxd 4/6/06 11:10 AM Page 98
only the necessary components for Windows 2003 R2, the organization can limit its secu-rity exposure and also keep a system configured to have only necessary components oper-ating on the system.
To access the Windows 2003 R2 components, do the following:
1. Insert the Windows 2003 R2 CD-2 disc into the disc drive.
2. Autoplay will launch a installation window that will allow you to install theWindows 2003 R2 components. Choose Continue Windows 2003 R2 Setup.
3. Depending on whether the server has a Service Pack installed, you might get awarning notifying you that you will not be able to uninstall the Windows 2003 R2update once you proceed with the installation. Click Yes if you do not plan todowngrade the server of its Service Pack.
4. From the Welcome screen of the Windows 2003 R2 component installer, chooseNext to proceed.
5. A Setup Summary screen will appear, notifying you that it will begin copying theWindows 2003 R2 components onto the system. Click Next to continue.
6. After all the Windows 2003 R2 files have been copied, click Finished whenprompted.
NOTE
Although the Windows 2003 R2 components will now be copied to the system, none of the R2components will have been installed or activated on the server yet. The specific R2 componentswill need to be added and configured to make them work properly. See the next section,“Installing Specific Windows 2003 R2 Components.”
Installing Specific Windows 2003 R2 ComponentsAfter the Windows 2003 R2 components have been copied onto the server, the serveradministrator can choose which Windows 2003 R2 components should be installed andenabled on the server. To install Windows 2003 R2 components, do the following:
1. Determine which Windows 2003 R2 components you want to be enabled.
2. From the desktop of the Windows 2003 server, click Start, Control Panel,Add/Remove Programs.
3. Click the Add/Remove Windows Components option.
4. Select the desired Windows components to add (those familiar with the normal listof Windows components to choose from will notice that new components nowexist). After selecting the desired components to install, click Next to begin theinstallation process.
Preparing a System and Installing the Windows 2003 R2 Components 993
05_0672328984_ch03.qxd 4/6/06 11:10 AM Page 99
5. After the Windows components have been installed on the system, click Finishedwhen prompted.
NOTE
Although selective components have now been installed on the server, each component typicallyneeds to be configured before the component works. See the next section, “Configuring theIndividual Windows 2003 R2 Components,” for more details.
Configuring the Individual Windows 2003 R2 ComponentsWith the Windows 2003 R2 components installed and enabled on the server, each of thenew components will typically need to be customized and configured. Sections through-out this book will cover the detailed component installation and configuration stepsapplicable to the component installed. The following chapters have more details on theconfiguration of individual Windows 2003 R2 components:
• Active Directory Federation Services is covered in Chapter 8, “Integrating ActiveDirectory with Novell, Oracle, Unix, and NT4 Directories.”
• Active Directory in Application Mode is covered in Chapter 8.
• Network File System (NFS) is covered in Chapter 8.
• Print Management Console (PMC) is covered in Chapter 19, “Windows Server2003 Administration.”
• Distributed File System Replication (DFS) is covered in Chapter 30, “File SystemFault Tolerance.”
• SharePoint Services is covered in Chapter 36, “Windows SharePoint Services.”
• File Server Resource Manager is covered in Chapter 19.
• Subsystem for UNIX Applications/Identity Management for UNIX is covered inChapter 8.
SummaryThe Windows Server 2003 installation process and deployment tools bear similarities tothose found in previous versions of Windows. However, feature and performanceenhancements have improved the installation experience—whether you are installing asingle system by hand or deploying thousands of systems across your corporate environ-ment.
CHAPTER 3 Installing Windows Server 2003100
05_0672328984_ch03.qxd 4/6/06 11:10 AM Page 100
Best Practices• Verify that your hardware is supported.
• Stick to using the recommended or better hardware and software requirements.
• Make sure you document your server configuration information and perform abackup of any data that you want to keep.
• Test your applications for compatibility before migration.
• Use a consistent naming convention to name the servers and client machines.
• Use only Internet-standard characters in your computer name. This would includethe letters A–Z (upper- and lowercase), the numbers 0–9, and the hyphen (-).
• Periodically verify that system backups can be used to recover a system in a labenvironment.
• Use the regular formatting option to perform a true format.
• Use NTFS to create an efficient and secured filesystem.
• If you are not sure which licensing mode to use for your environment, select PerServer.
• Rename the Administrator account, for the sake of security, after you complete theinstallation.
• Automate installation by using deployment tools such as RIS, Sysprep, RIPrep,Unattend files, and Group Policy (with SMS).
• Choose and install Windows 2003 R2 components to a server to take advantage ofnew capabilities built in to Windows 2003.
Best Practices 1013
05_0672328984_ch03.qxd 4/6/06 11:10 AM Page 101

05_0672328984_ch03.qxd 4/6/06 11:10 AM Page 102