Embed Size (px)
Citation preview

INSTRUCTION MANUALBLENDER
ITENEN
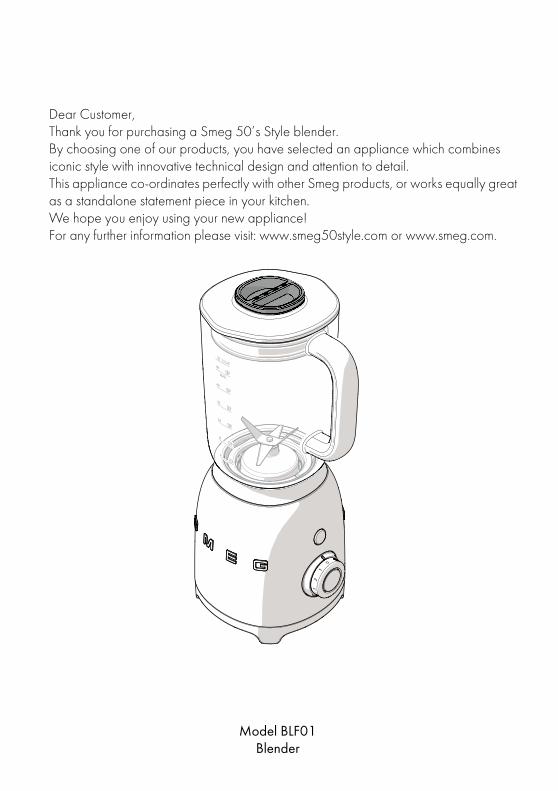
Dear Customer, Thank you for purchasing a Smeg 50’s Style blender.By choosing one of our products, you have selected an appliance which combines iconic style with innovative technical design and attention to detail.This appliance co-ordinates perfectly with other Smeg products, or works equally great as a standalone statement piece in your kitchen.We hope you enjoy using your new appliance! For any further information please visit: www.smeg50style.com or www.smeg.com.
Model BLF01Blender
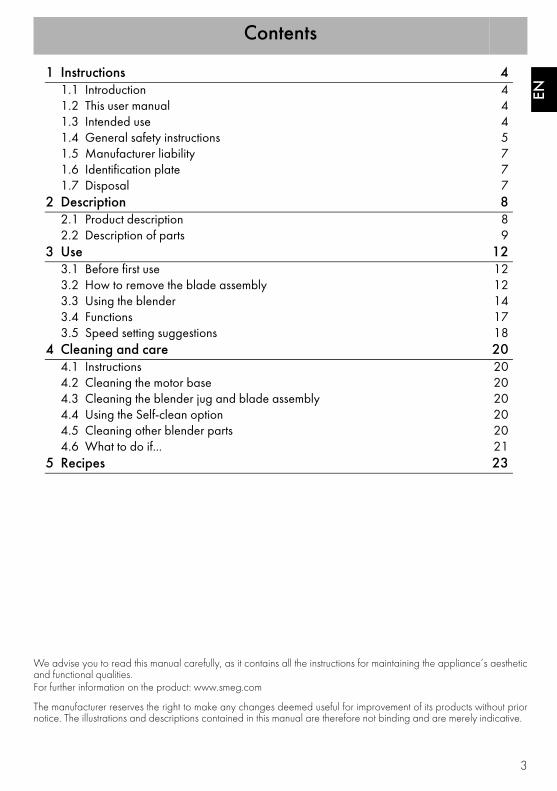
Contents
3
ITENEN
1 Instructions 41.1 Introduction 41.2 This user manual 41.3 Intended use 41.4 General safety instructions 51.5 Manufacturer liability 71.6 Identification plate 71.7 Disposal 7
2 Description 82.1 Product description 82.2 Description of parts 9
3 Use 123.1 Before first use 123.2 How to remove the blade assembly 123.3 Using the blender 143.4 Functions 173.5 Speed setting suggestions 18
4 Cleaning and care 204.1 Instructions 204.2 Cleaning the motor base 204.3 Cleaning the blender jug and blade assembly 204.4 Using the Self-clean option 204.5 Cleaning other blender parts 204.6 What to do if... 21
5 Recipes 23
We advise you to read this manual carefully, as it contains all the instructions for maintaining the appliance’s aestheticand functional qualities.For further information on the product: www.smeg.com
The manufacturer reserves the right to make any changes deemed useful for improvement of its products without priornotice. The illustrations and descriptions contained in this manual are therefore not binding and are merely indicative.
Instructions
4
1 Instructions
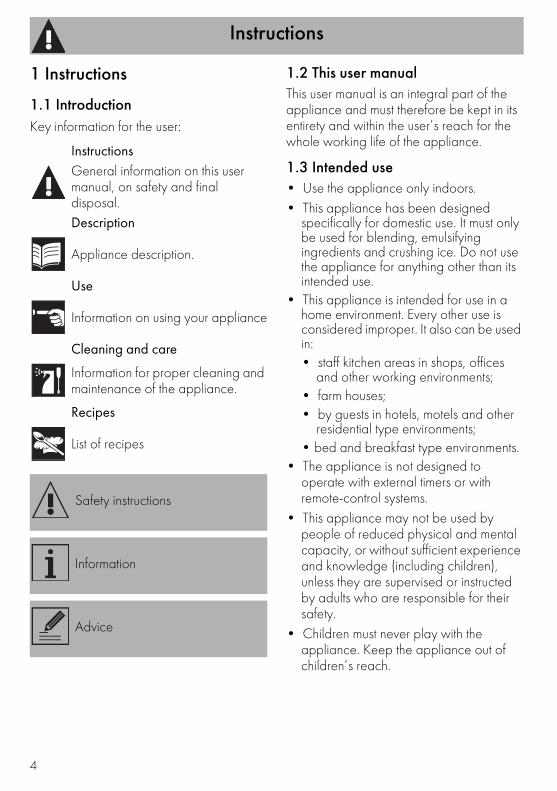
1.1 IntroductionKey information for the user:
1.2 This user manualThis user manual is an integral part of the appliance and must therefore be kept in its entirety and within the user’s reach for the whole working life of the appliance.
1.3 Intended use• Use the appliance only indoors.• This appliance has been designed
specifically for domestic use. It must only be used for blending, emulsifying ingredients and crushing ice. Do not use the appliance for anything other than its intended use.
• This appliance is intended for use in a home environment. Every other use is considered improper. It also can be used in:• staff kitchen areas in shops, offices
and other working environments;• farm houses;• by guests in hotels, motels and other
residential type environments;• bed and breakfast type environments.
• The appliance is not designed to operate with external timers or with remote-control systems.
• This appliance may not be used by people of reduced physical and mental capacity, or without sufficient experience and knowledge (including children), unless they are supervised or instructed by adults who are responsible for their safety.
• Children must never play with the appliance. Keep the appliance out of children’s reach.
InstructionsGeneral information on this user manual, on safety and final disposal.Description
Appliance description.
Use
Information on using your appliance
Cleaning and care
Information for proper cleaning and maintenance of the appliance.
Recipes
List of recipes
Safety instructions
Information
Advice
Instructions
5
ITENEN
1.4 General safety instructionsFollow all safety instructions in order to be able to use the appliance safely.• Read this user manual carefully before
using the appliance.• Switch off the appliance immediately
after use.• Do not leave the appliance unattended
while it is operating.• Disconnect the appliance from the
power socket as soon as you have finished using it and before cleaning it.
• Do not immerse the appliance, the power cord or the plug in water or any other liquid.
• Do not use the appliance when the power cord or the plug is damaged or when the appliance has been dropped or is damaged in any manner.
• If the supply cord is damaged, it must be replaced by the service agent in order to avoid a hazard.
• The cable is short to prevent accidents. Do not use an extension cord.
• Ensure the cord does not come into contact with sharp edges.
• Do not pull on the cord to unplug it from the power socket.
• Do not place the appliance above or near lit hob burners or electric rings, inside an oven or near other heat sources.
• Do not try to repair the appliance yourself or without the intervention of a qualified engineer.
• In the event of a fault, repairs should only be carried out by a qualified engineer.
• Do not modify the appliance.• Never try to put out a fire or flames with
water: turn off the appliance and remove the plug from the socket and smother the flames with a fire blanket or other appropriate cover.
• Disconnect the appliance from the power socket as soon as you have finished using it and before cleaning it.
Instructions
6
For this appliance
• Avoid touching moving parts. Keep hands, hair and clothing, and utensils away from the blades during operation, to prevent personal injury and/or damage to the appliance.
• Care shall be taken when handling and emptying the jug and during cleaning.
• Always disconnect the blender from the supply if it is left unattended and before assembly, disassembly or cleaning. Unplug the blender when it is not being used, before cleaning it and if you notice any fault. Let the appliance cool down before cleaning.
• Always use the blender with the lid in place.
• Check that the lid is correctly closed before turning on the blender.
• Do not overfill the blender (max. 1.5 litres).
• Do not use the blender with parts or accessories of other manufacturers.
• Only use original spare parts. The use of spare parts not approved by the manufacturer could lead to fires, electric shocks or personal injury.
• Only place the blender on level and dry surfaces.
• Do not run the blender empty.
• Do not use the blender as a storage compartment. Keep it empty before and after use.
• Let liquids cool down to room temperature before placing them in the blender.
• Avoid touching moving parts, such as the blade assembly.
• To avoid the risk of cuts, and damage to the blender, do not put your hands or tools like cutlery, etc. into the blender jug while it is operating. You can use a wood or plastic spatula only when the blender is off.
• Do not use harsh detergents or sharp objects to wash or remove residues from the blender jug.

Instructions
7
ITENEN
1.5 Manufacturer liabilityThe manufacturer shall not be liable for damage to persons or property caused by:• Use of the appliance other than as
envisaged• Not having read the user manual• Tampering with any part of the
appliance• Use of non-original spare parts• Failure to observe the safety instructions
1.6 Identification plateThe identification plate bears the technical data, serial number and brand name of the appliance. Do not remove the identification plate for any reason.
1.7 DisposalThis appliance must be disposed of separately from other waste (Directive 2012/19/EU). The
appliance does not contain substances in quantities sufficient to be considered hazardous to health and the environment, in accordance with current European directives.
• Old appliances do not belong in household waste! To comply with current legislation, old appliances, on reaching the end of their useful lives, should be taken to a disposal facility where they can be sorted. In this way, any valuable material contained in the old appliances can be recycled, helping to protect the environment. The relevant local authorities or their waste disposal operators can provide further information.
The appliance is packed in non-polluting and recyclable materials.• Dispose of the packing materials at an
appropriate disposal facility.
Electrical voltage Danger of electrocution
• Disconnect the main power supply.• Disconnect the power cable from the
electrical system.
Plastic packagingDanger of suffocation
• Do not leave the packaging or any part of it unattended.
• Do not let children play with the plastic bags.
Description
8
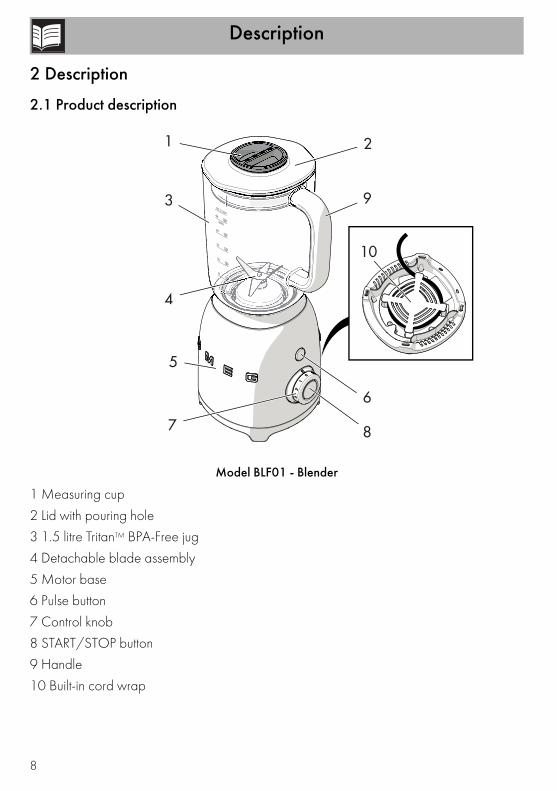
2 Description
2.1 Product description
Model BLF01 - Blender
1 Measuring cup
2 Lid with pouring hole
3 1.5 litre TritanTM BPA-Free jug
4 Detachable blade assembly
5 Motor base
6 Pulse button
7 Control knob
8 START/STOP button
9 Handle
10 Built-in cord wrap
1 2
9
6
10
87
5
4
3
Description
9
ITENEN
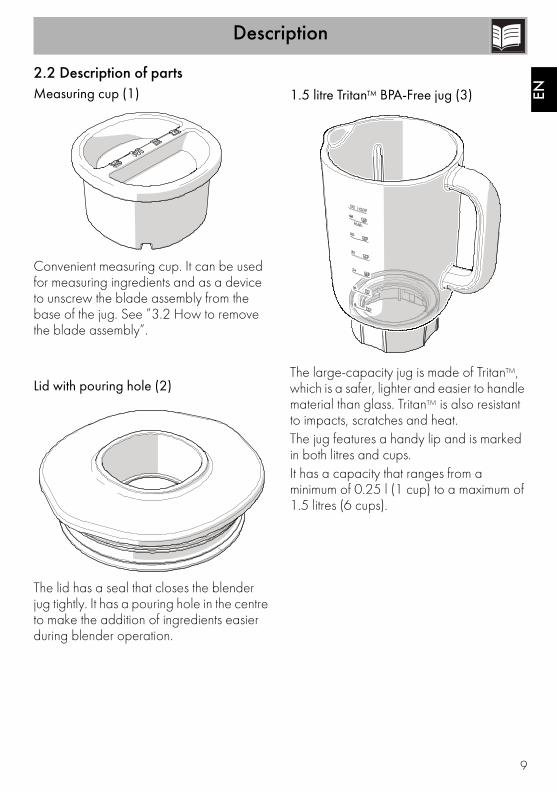
2.2 Description of partsMeasuring cup (1)
Convenient measuring cup. It can be used for measuring ingredients and as a device to unscrew the blade assembly from the base of the jug. See ”3.2 How to remove the blade assembly”.
Lid with pouring hole (2)
The lid has a seal that closes the blender jug tightly. It has a pouring hole in the centre to make the addition of ingredients easier during blender operation.
1.5 litre TritanTM BPA-Free jug (3)
The large-capacity jug is made of TritanTM, which is a safer, lighter and easier to handle material than glass. TritanTM is also resistant to impacts, scratches and heat. The jug features a handy lip and is marked in both litres and cups.It has a capacity that ranges from a minimum of 0.25 l (1 cup) to a maximum of 1.5 litres (6 cups).
Description
10
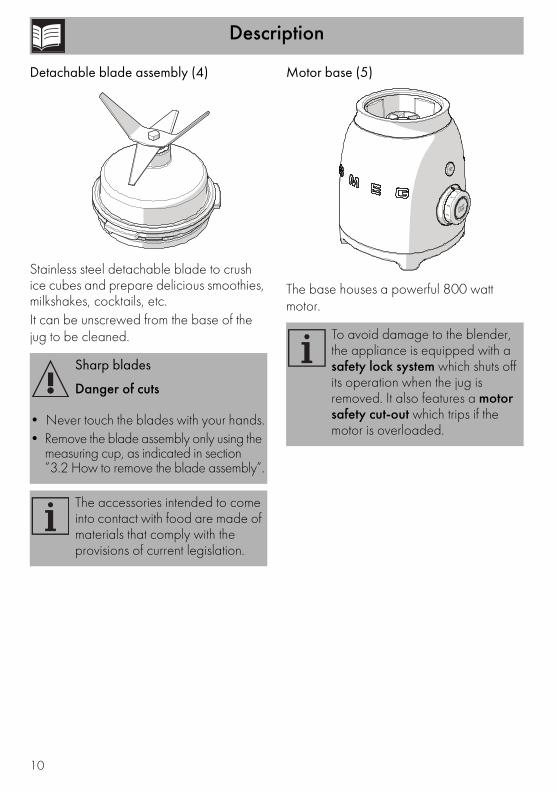
Detachable blade assembly (4)
Stainless steel detachable blade to crush ice cubes and prepare delicious smoothies, milkshakes, cocktails, etc.It can be unscrewed from the base of the jug to be cleaned.
Motor base (5)
The base houses a powerful 800 watt motor.
Sharp blades
Danger of cuts
• Never touch the blades with your hands.• Remove the blade assembly only using the
measuring cup, as indicated in section ”3.2 How to remove the blade assembly”.
The accessories intended to come into contact with food are made of materials that comply with the provisions of current legislation.
To avoid damage to the blender, the appliance is equipped with a safety lock system which shuts off its operation when the jug is removed. It also features a motor safety cut-out which trips if the motor is overloaded.
Description
11
ITENEN
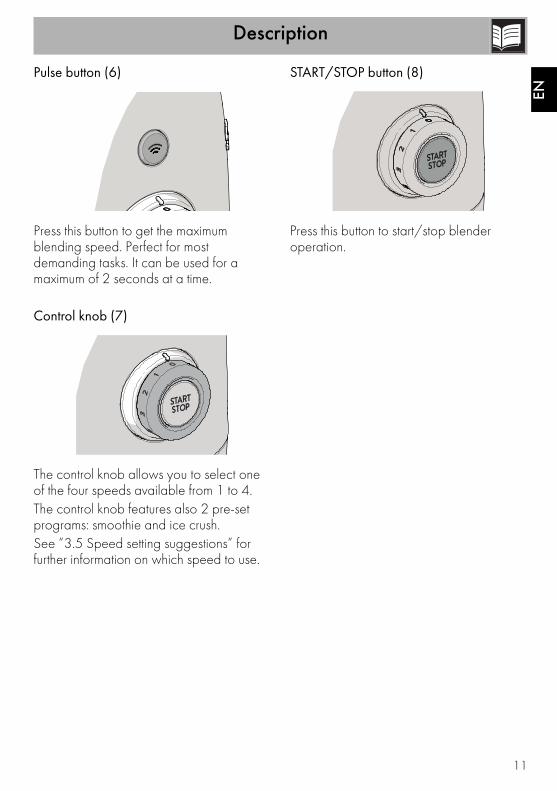
Pulse button (6)
Press this button to get the maximum blending speed. Perfect for most demanding tasks. It can be used for a maximum of 2 seconds at a time.
Control knob (7)
The control knob allows you to select one of the four speeds available from 1 to 4.The control knob features also 2 pre-set programs: smoothie and ice crush.See ”3.5 Speed setting suggestions” for further information on which speed to use.
START/STOP button (8)
Press this button to start/stop blender operation.
Use
12
3 Use
3.1 Before first use1. Remove all stickers and labels from the
blender and clean the motor base with a damp cloth.
2. Remove the blender jug.
3. Remove the blade assembly (see ”3.2 How to remove the blade assembly”).
4. Wash and dry thoroughly (see ”4.3 Cleaning the blender jug and blade assembly”).
3.2 How to remove the blade assembly
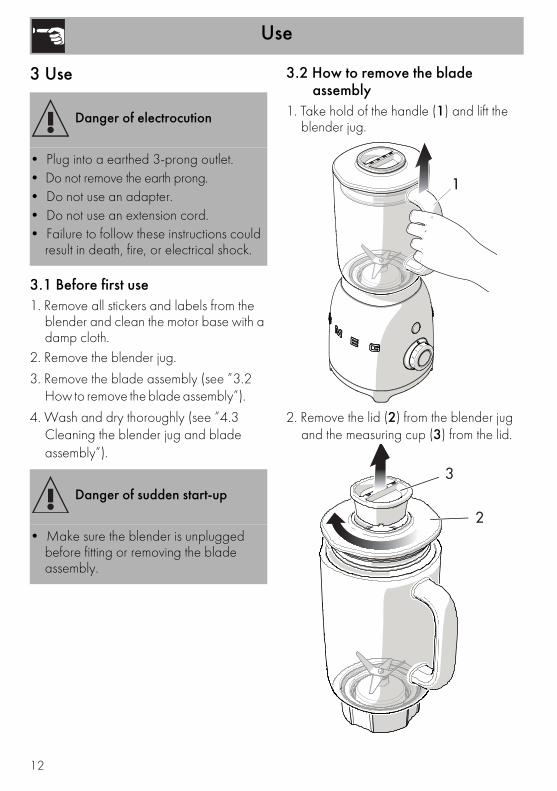
1. Take hold of the handle (1) and lift the blender jug.
2. Remove the lid (2) from the blender jug and the measuring cup (3) from the lid.
Danger of electrocution
• Plug into a earthed 3-prong outlet.• Do not remove the earth prong.• Do not use an adapter.• Do not use an extension cord.• Failure to follow these instructions could
result in death, fire, or electrical shock.
Danger of sudden start-up
• Make sure the blender is unplugged before fitting or removing the blade assembly.
1
3
2
Use
13
ITENEN
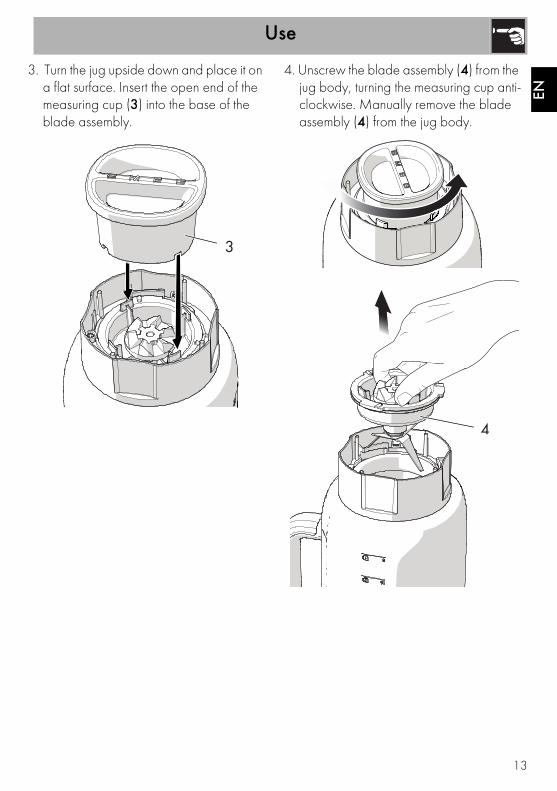
3. Turn the jug upside down and place it on a flat surface. Insert the open end of the measuring cup (3) into the base of the blade assembly.
4. Unscrew the blade assembly (4) from the jug body, turning the measuring cup anti-clockwise. Manually remove the blade assembly (4) from the jug body.
3
4
Use
14
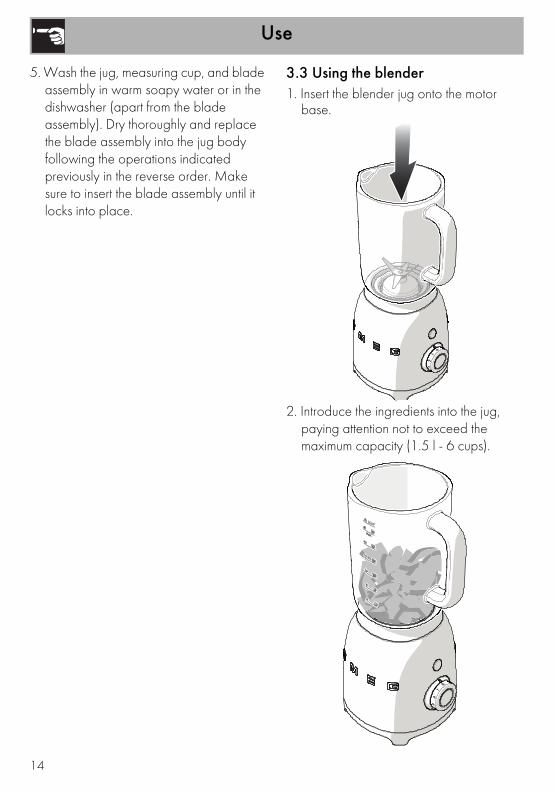
5. Wash the jug, measuring cup, and blade assembly in warm soapy water or in the dishwasher (apart from the blade assembly). Dry thoroughly and replace the blade assembly into the jug body following the operations indicated previously in the reverse order. Make sure to insert the blade assembly until it locks into place.
3.3 Using the blender1. Insert the blender jug onto the motor
base.
2. Introduce the ingredients into the jug, paying attention not to exceed the maximum capacity (1.5 l - 6 cups).
Use
15
ITENEN
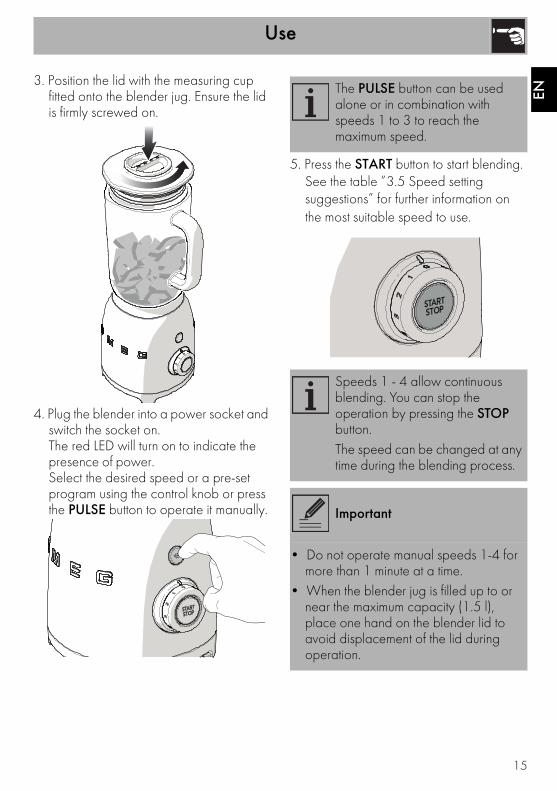
3. Position the lid with the measuring cup fitted onto the blender jug. Ensure the lid is firmly screwed on.
4. Plug the blender into a power socket and switch the socket on. The red LED will turn on to indicate the presence of power. Select the desired speed or a pre-set program using the control knob or press the PULSE button to operate it manually.
5. Press the START button to start blending. See the table ”3.5 Speed setting suggestions” for further information on the most suitable speed to use.
The PULSE button can be used alone or in combination with speeds 1 to 3 to reach the maximum speed.
Speeds 1 - 4 allow continuous blending. You can stop the operation by pressing the STOP button.The speed can be changed at any time during the blending process.
Important
• Do not operate manual speeds 1-4 for more than 1 minute at a time.
• When the blender jug is filled up to or near the maximum capacity (1.5 l), place one hand on the blender lid to avoid displacement of the lid during operation.
Use
16
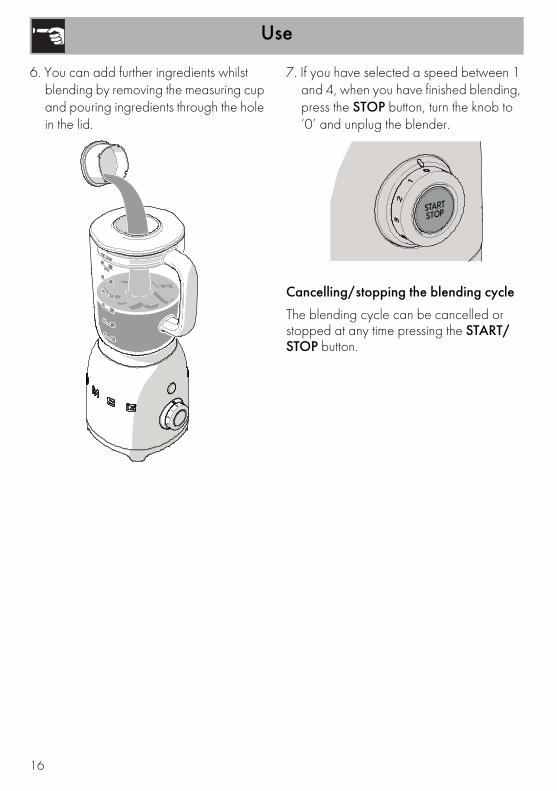
6. You can add further ingredients whilst blending by removing the measuring cup and pouring ingredients through the hole in the lid.
7. If you have selected a speed between 1 and 4, when you have finished blending, press the STOP button, turn the knob to ‘0’ and unplug the blender.
Cancelling/stopping the blending cycle
The blending cycle can be cancelled or stopped at any time pressing the START/ STOP button.

Use
17
ITENEN
3.4 Functions
Safety lock system
The blender has a safety lock system which automatically shuts off the blender when the jug is removed from the base. It also features a motor safety cut-out which trips if the motor is overloaded.
Smooth Start
The Smooth Start function starts the appliance up with a reduced initial speed, regardless of the speed set with the control knob. The speed progressively increases until the set speed is reached.The Smooth Start function allows you to process ingredients gradually to improve the blending results.
PULSE function
Pressing the PULSE button operates the blender at maximum speed.The blender shuts off immediately when the button is released. You should use a minimum quantity of 100g, not blending for more than 5 seconds consecutively, or 2 seconds when using dry ingredients.
Ice Crush and Smoothie
The pre-set ‘Ice Crush’ and ‘Smoothie’ programs automatically adjust the speed to optimise blending results for a certain factory set time, then turn off automatically.Use the ICE CRUSH program with short bursts of power when blending drinks containing ice cubes or frozen fruit.Use the SMOOTHIE program to blend fruits, ice cream and yoghurt into thick smoothies, blended drinks and milkshakes.
Pre-set timeIce crush: approximately 50 secondsSmoothie: approximately 60 seconds
When one of the two above mentioned pre-set programs is selected, and after you have pressed the START button, the blender will automatically start to operate and the central knob LED lights up to indicate that the cycle is activated.
The Smooth Start only works when a speed between 0 and 4 is selected and does not work with the PULSE mode, ICE CRUSH or SMOOTHIE programs.
The PULSE function does not work in combination with the ICE CRUSH or SMOOTHIE programs.
Use
18
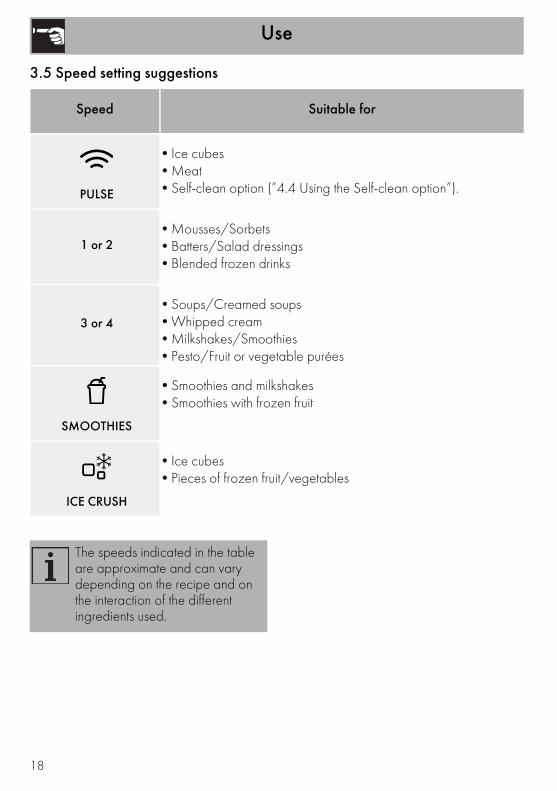
3.5 Speed setting suggestions
Speed Suitable for
PULSE
•Ice cubes•Meat•Self-clean option (”4.4 Using the Self-clean option”).
1 or 2•Mousses/Sorbets•Batters/Salad dressings•Blended frozen drinks
3 or 4•Soups/Creamed soups•Whipped cream•Milkshakes/Smoothies•Pesto/Fruit or vegetable purées
SMOOTHIES
•Smoothies and milkshakes•Smoothies with frozen fruit
ICE CRUSH
•Ice cubes•Pieces of frozen fruit/vegetables
The speeds indicated in the table are approximate and can vary depending on the recipe and on the interaction of the different ingredients used.
Use
19
ITENEN
Tips for using your blender
• Cut into cubes the food to be blended to obtain better results.
• Use the PULSE function for no more than 2 seconds at a time when blending dry mixtures. You might need to stop operation to push the ingredients down the sides of the blender jug with a spatula.
• When blending together liquid and dry ingredients, blend liquids first and then add the dry ingredients.
• Always remove stones from fruit and bones from meat as they can damage the blade assembly.
• Do not leave food residues dry on the jug and blades for too long, as they could be very difficult to remove. If you cannot clean it right away, pour a little warm water and let it soak.
• Do not process hot food. Let it cool to room temperature before blending.
Cleaning and care
20
4 Cleaning and care
4.1 Instructions
4.2 Cleaning the motor baseTo keep the blender’s motor base outside surfaces in good condition, they should be cleaned regularly after use. Use a damp and soft cloth with mild detergent.
4.3 Cleaning the blender jug and blade assembly
Clean the appliance following the instructions in section ”3.2 How to remove the blade assembly”.
4.4 Using the Self-clean optionThe blender jug and blade assembly can be cleaned using the Self-clean option:1. Fill the jug with warm water and mild
detergent.2. Turn the control knob to the setting 1.
3. Press the START button.
4. Press the PULSE button for 2 seconds at a time. Repeat the operation about 10 times.
5. Remove the jug, empty and rinse it.
6. Dry thoroughly.
4.5 Cleaning other blender partsThe blender lid and measuring cup can be washed in warm soapy water or in the dishwasher.Make sure they have dried completely before fitting them back on the blender.
Improper useDanger of electrocution
• Unplug the blender before cleaning it.• Do not immerse the motor base in water
or other liquids.
Improper useRisk of damage to surfaces
• Do not use steam jets to clean the appliance.
• Do not use cleaning products containing chlorine, ammonia or bleach on parts with metallic finishes (e.g. anodised, nickel- or chrome-plated).
• Do not use abrasive or corrosive detergents (e.g. powder products, stain removers and metallic scourers).
• Do not use rough or abrasive materials or sharp metal scrapers.
Sharp blades
Danger of cuts
• Never touch the blades with your hands.• Remove the blade assembly only using the
measuring cup.
Cleaning and care
21
ITENEN
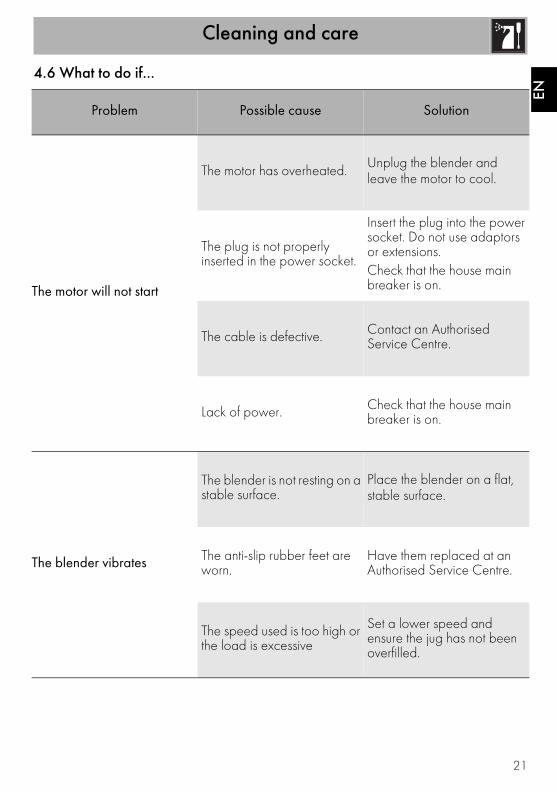
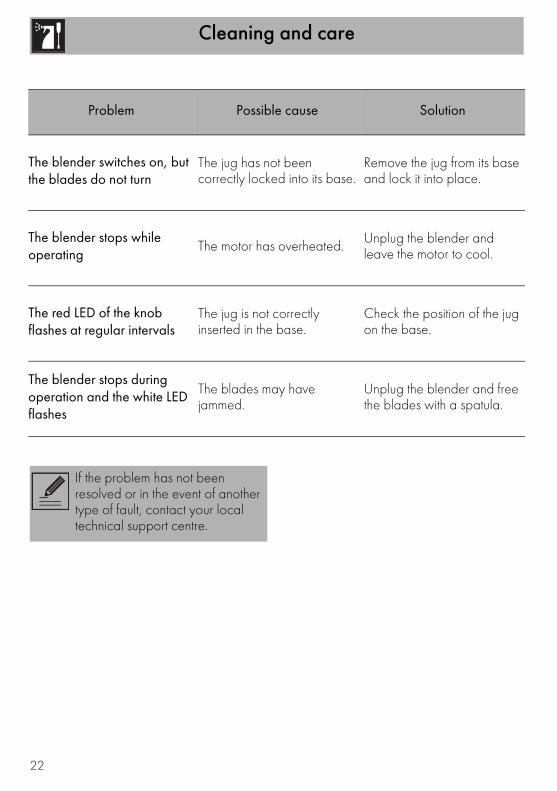
4.6 What to do if...
Problem Possible cause Solution
The motor will not start
The motor has overheated. Unplug the blender and leave the motor to cool.
The plug is not properly inserted in the power socket.
Insert the plug into the power socket. Do not use adaptors or extensions.Check that the house main breaker is on.
The cable is defective. Contact an Authorised Service Centre.
Lack of power. Check that the house main breaker is on.
The blender vibrates
The blender is not resting on a stable surface.
Place the blender on a flat, stable surface.
The anti-slip rubber feet are worn.
Have them replaced at an Authorised Service Centre.
The speed used is too high or the load is excessive
Set a lower speed and ensure the jug has not been overfilled.
Cleaning and care
22
Problem Possible cause Solution
The blender switches on, but the blades do not turn
The jug has not been correctly locked into its base.
Remove the jug from its base and lock it into place.
The blender stops while operating
The motor has overheated. Unplug the blender and leave the motor to cool.
The red LED of the knob flashes at regular intervals
The jug is not correctly inserted in the base.
Check the position of the jug on the base.
The blender stops during operation and the white LED flashes
The blades may have jammed.
Unplug the blender and free the blades with a spatula.
If the problem has not been resolved or in the event of another type of fault, contact your local technical support centre.
Recipes
23
ITENEN
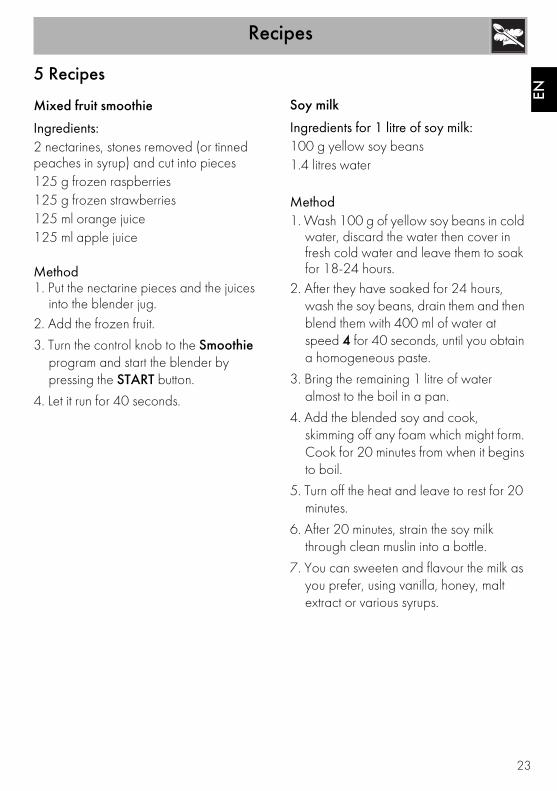
5 Recipes
Mixed fruit smoothie
Ingredients:2 nectarines, stones removed (or tinned peaches in syrup) and cut into pieces 125 g frozen raspberries125 g frozen strawberries125 ml orange juice125 ml apple juice
Method1. Put the nectarine pieces and the juices
into the blender jug.2. Add the frozen fruit.
3. Turn the control knob to the Smoothie program and start the blender by pressing the START button.
4. Let it run for 40 seconds.
Soy milk
Ingredients for 1 litre of soy milk:100 g yellow soy beans1.4 litres water
Method1. Wash 100 g of yellow soy beans in cold
water, discard the water then cover in fresh cold water and leave them to soak for 18-24 hours.
2. After they have soaked for 24 hours, wash the soy beans, drain them and then blend them with 400 ml of water at speed 4 for 40 seconds, until you obtain a homogeneous paste.
3. Bring the remaining 1 litre of water almost to the boil in a pan.
4. Add the blended soy and cook, skimming off any foam which might form. Cook for 20 minutes from when it begins to boil.
5. Turn off the heat and leave to rest for 20 minutes.
6. After 20 minutes, strain the soy milk through clean muslin into a bottle.
7. You can sweeten and flavour the milk as you prefer, using vanilla, honey, malt extract or various syrups.

Recipes
24
Whipped cream
Ingredients:500 g cold whipping cream50 g icing sugar
Method1. Whip the cream in the blender at speed
3 for approximately 30 seconds.2. Stop the operation by pressing the STOP
button.
3. Add the icing sugar.
4. Select speed 4 and whip for a further 15 seconds, until the cream is fully whipped.
Vegetable purée
Ingredients:300 g courgettes100 g water or vegetable stock
Method1. Steam the courgettes and cut them into
rounds.2. Put the pieces in the blender and blend
for 45 seconds at speed 4, adding a little water or vegetable stock at a time until you obtain a homogeneous purée.
The cream can also be whipped without icing sugar. In this case, select speed 4 and whip for 40 seconds.