Embed Size (px)
Citation preview

Owner’sManualINSTRUCTION

Hardware, Tools & Accessories
Congratulations
Large Cam Lock Pins 1-1/4”
Hand-HeldRemote(Battery included)
Screwdriver
Small Cam Lock Pins 5/8”
Shelf Support Pins 5/8” for Adjustable
Shelf
Included: Hand-Held Remote*, #2 x 1-1/2” Screwdriver, Large Cam Lock Pins 1-1/4”, Small Cam Lock Pins 5/8” and Shelf Support Pins 5/8”
You are now the proud owner of a Koala Studio. A Koala Studio complements your style and your creativity. It’s more than a home for your machine, it’s a reflection of you.
Every detail of your Koala Studio – from the environmentally friendly, highest grade engineered wood base to the steel components and decorative handles – were chosen with quality, elegance and luxury in mind.
This owner’s instruction manual will guide you through the care of your studio along with assembly instructions. After all, your studio is where you create and you should be able to do it easily and comfortably. Enjoy!
Pull out of base and flip to use either Phillips or Flathead
*Battery Replacement: Use a LRV08 Battery

Moving Your Studio .....................................................................................2
Care and Cleaning...................................................................................... 2
Lifts . ............................................................................................................ 3-4
Machine Insert Installation .....................................................................5
Fabric and Notions Palette Installation ......................................... 6-9
Fabric and Notions Palette Removal .................................................. 10
Door Shelving Installation ................................................................ 11-12
Door Alignment .......................................................................................... 12
Door Removal and Re-Attachment ..................................................... 13
Drawer Removal and Re-Insertion...................................................... 14
Foot Rest Platform Installation ........................................................... 15
Outback Shelves Installation .......................................................... 16-17
Contents
1

Moving Your Studio
Care & Cleaning
When moving your Studio, be sure to remove door shelves and Outback shelves, lower the Outback leaf and close the doors.
Koala casters are meant for positioning your Studio inside your home - they are not designed for rolling on sidewalks or driveways, or over door frames. Ensure caster latch is in the unlocked up position when moving your studio. The casters may be locked; latch in the downward position when your studio is in place. When moving your Studio in or out of your home, it should be team-lifted and carried or moved on furniture dollies.
Your Koala Studio may be cleaned with a damp cloth, then wiped dry. If necessary, mild soap and water may be used. Do not use oils, waxes, bleach or abrasives. Don’t place near sources of mosture. Avoid setting anything hot on the tabletop. Avoid exposure to extreme temperatures and extreme sunlight exposure.
LOCKED UNLOCKED
2

Koala Studios’ innovative lift design enables you to effortlessly position your machine at any level with just the push of a button. The remote control can stop the machine in any position with no effort. The machine platform remains solid and steady while evenly supporting your machine in every position.
Operates with a hand-held remote control or built-in toggle switch. The Koala E-Lift supports most machines and provides a stable platform at every position, while the XL-Lift safely supports the largest, heaviest, top-of-the-line sewing and quilting machines.
1) Hand-held ergonomically designed remote control. Battery included.
2) To operate the hand-held remote, switch the remote control power button on the front of the control box to the “on” position.
Note: When the Power switch is in the “on” position, it is lit in blue. To save energy it is recommended to turn the Power Switch “off” when not operating the Glide Lift.
3) The Lift operates with thehand-held remote control or a built-in toggle switch. Each operates with a simple up/down button that raises and lowers the lift and machine.
RemoteControlSwitch
PowerButton
21 3
Lifts XLLIFTXL E
LIFTE
Hand Held Remote or Built-In Toggle Switch
3

4 5
4) The Glide Lift can stop at any level (shown in stored position with filler board in place).
5) With the filler board removed, your lift can be raised or lowered.
Lifts XLLIFTXL E
LIFTE
4
6 7
6) This shows the machine positioned level with the Studio top surface with a custom machine insert in place for sewing and quilting. For embroidery and free-arm applications the machine should be positioned at the top level.
7) When filler board is not in use it can be stored underneath your studio.

1
3
1) Remove filler board before raising your machine. Remove all accessory trays surrounding the machine’s free arm.
Height is Incorrect if: The insert is raised while resting against the machine. The free arm is higher than the insert. (Lower the lift).
Height is Correct if: Insert fits flush with the needle plate of the machine within 1/16 of an inch of the studio top.
2) Adjust the studio lift so the needle plate area of the free arm is level with the top of the studio. The insert will not fit if the machine is too high.
2
3) Place insert around the machine and lay in studio.This is the correct fit.
Refer to troubleshooting chart for fit issues.
5
Machine Insert Installation
Troubleshooting Insert Fit Issues
Reason Solution
Machine won’t fit around arm
Accessory tray is attached
Remove tray
Insert won’t fit flush Studio lift is too high
Lower lift
Insert sits up and over the machine
The machine has a downward sloped or curved sewing
surface to the right of the machine
This is the correct fit
(Fig. 3)
Table or insert still won’t fit
Contact your Koala Retailer
Machine Insert Trouble Shooting
Studio Inserts are designed to fit your specific make and model of sewing machine and studio. The Insert fills the gap between the sewing machine and the opening of the studio to create a flat working surface.

Palettes add to your studio’s work surface, and come in a set of two. The left side is the smooth tabletop surface called a Fabric Palette, and the right side is the organization compartment called a Notions Palette.
Left Fabric Palette - Wide Doors
1) To install the left Fabric Palette, position the Palette so that the 8 brass fittings are facing up (as shown in Fig. 1). Screw the large Cam Lock Pins, with your Phillips head screwdriver, (as shown in Fig. 2) into brass fittings B & F. Tighten the Cam Lock Pins snugly, but do not over tighten.
Wide Door Studios include: Artisan Embroidery, Astisan Quilter, Artisan DesignPro, Artisan Bernina Studio, Artisan QuiltMate, Artisan QuiltPro, Artisan StorageCenter, Artisan Small StorageCenter and Heritage Cub Left Hand.
C F
B GD
A H
E
Fabric & Notions Palettes Installation - Wide Doors
Use Large Cam Lock Pins 1-1/4”
6
1
Left Fabric Palette
2

Right Notions Palette - Wide Doors
C F
B GD
A H
E
Fabric & Notions Palettes Installation - Wide Doors
3
3) Before placing the palette down on top of the studio doors, make sure the built-in Cam Locks are open with the arrow facing up. Look down through the openings on top of the door to ensure that the Cam Lock is open (Fig 3).
4) Line the Cam Lock Pins up with the openings on top of the Studio doors, positioining the Cam Lock Pin on the door closest to the Studio (Fig. 4). Put the Cam Lock Pins in the openings and make sure the Palette lays flush on top of the doors.
5) Tighten down the two Cam Locks from underneath by turning them clockwise.
OPEN
4 5
CLOSED
7
1) To install the right Notions Palette, position the Palette so that the 8 brass fittings are facing up (as shown in Fig. 1). Screw the large Cam Lock Pins, with your Phillips head screwdriver, (as shown in Fig. 2) into brass fittings C & G. Tighten the Cam Lock Pins snugly, but do not over tighten.
1
Wide Door Studios include: Artisan Embroidery, Astisan Quilter, Artisan DesignPro, Artisan Bernina Studio, Artisan QuiltMate, Artisan QuiltPro, Artisan StorageCenter, Artisan Small StorageCenter, Heritage Cub Right Hand & Heritage Embroidery Center.
2

Left Fabric Palette - Narrow Doors
C F
B GD
A H
E
Fabric & Notions Palettes Installation - Narrow Doors
Narrow Door Studios include: Narrow door studios include: Slimline Artisan Embroidery, Slimline Artisan Quilter, Artisan SewMate and Heritage SewMate.
1) To install the left Fabric Palette, position the Palette so that the 8 brass fittings are facing up (as shown in Fig. 1). Screw the large Cam Lock Pins, with your Phillips head screwdriver, (as shown in Fig. 2) into brass fittings A & D. Tighten the Cam Lock Pins snugly, but do not over tighten. (To complete, follow steps 3-5 above).
8
1
3
3) Before placing the palette down on top of the studio doors, make sure the built-in Cam Locks are open with the arrow facing up. Look down through the openings on top of the door to ensure that the Cam Lock is open (Fig 3).
4) Line the Cam Lock Pins up with the openings on top of the Studio doors, positioining the Cam Lock Pin on the door closest to the Studio (Fig. 4). Put the Cam Lock Pins in the openings and make sure the Palette lays flush on top of the doors.
5) Tighten down the two Cam Locks from underneath by turning them clockwise.
OPEN
4 5
CLOSED
2

Fabric & Notions Palettes Installation - Narrow Doors
Right Notions Palette - Narrow Doors
C F
B GD
A H
E
1) To install the right Notions Palette, position the Palette so that the 8 brass fittings are facing up (as shown in Fig. 1). Screw the large Cam Lock Pins, with your Phillips head screwdriver, (as shown in Fig. 2) into brass fittings E & H. Tighten the Cam Lock Pins snugly, but do not over tighten. (To complete, follow steps 3-5 on page 8)
9
1
Narrow Door Studios include: Narrow door studios include: Slimline Artisan Embroidery, Slimline Artisan Quilter, Artisan SewMate &Heritage SewMate.
Use Large Cam Lock Pins 1-1/4”
Palettes add to your studio’s work surface, and come in a set of two. The left side is the smooth tabletop surface called a Fabric Palette, and the right side is the organization compartment called a Notions Palette.
Right Notions Palette
2

Fabric & Notions Palettes Removal
Note: The Fabric Palette and Notion Palette must be removed to close the Studio doors. To remove these Palettes and store them away, unlock the two Cam Locks, with your Phillips screwdriver, by turning them counter clockwise from underneath the Palettes. If the Lock is turned too far, the Palettes will not lift off easily; you will need to turn the Cam Locks back until the arrow is lined up.
Storing your Palettes: A convenient storage space is designed for the Fabric Palette and Notion Palette or the Studio Filler Board and Machine Insert. It is located in the very back of the Studio.
Note: Before storing the Notion and Fabric Palettes, the Cam Lock Pins must be removed.
OPEN
10

The optional Door Shelves adds convenient storage options to your studio.
Door Shelving Installation
1
1) To install the shelves on the Studio doors, screw 4 Small Cam Lock Pins in the brass fittings on the inside door panel and tighten with Phillips screwdriver flush to the door surface. Do not over tighten.
2) Add 2 Small Cam Lock Pins on the outside door panel for each shelf. Tighten all Small Cam Lock Pins flush to the doors. Do not over tighten.
2
Use small Cam Lock Pins 5/8”
11

Door Shelving Installation
3
3) Before placing the shelves on the Cam Lock Pins, make sure the built-in Cam Locks are opened. Look through the openings on the sides of the shelves to ensure that they are opened.
54
4) Place the shelf on the Cam Lock Pins and position the shelf top into place.
5) Tighten the Cam Locks from underneath by turning them clockwise. Repeat for all four shelves.
Door AlignmentPush to lock hinge
The Studio Doors may need to be raised or lowered as a result of the levelness of the floor or floor surface. The door hinges, attached to the Studio side wall, can be raised or lowered slightly by turning the adjustment screw a quarter turn clockwise or counter clockwise with your Phillips screwdriver. The adjustment needs to be done to both the top and bottom hinges simultaneously.
OPEN CLOSED
12

Each Studio Door can be removed if needed when pairing Studios together or for storage. The hinges are designed to detach and separate by using a flat head screwdriver to pop it out of the hinge face attached to the door.
Some models may have a push to lock hinge. Some models may have a screw lock hinge.
Door Removal
31
1
2
2
1) Place your flat head screwdriver,as shown above, to release the hinge.
3) Carefully lift off the door.2) Open both hinges all the way.
1) To re-attach your hinges, line up both ends of the hinge.
1) The mounting screw is pre-installed loose. Installer may have to loosen screw counterclockwise to ensure mating hinge fits under screw.
2) Make sure hinge mounted on studio is pushed all the way forward before tightening the screw.
2) Snap close and repeat for top and bottom hinges.
13
Door Re-Attachment
1
2
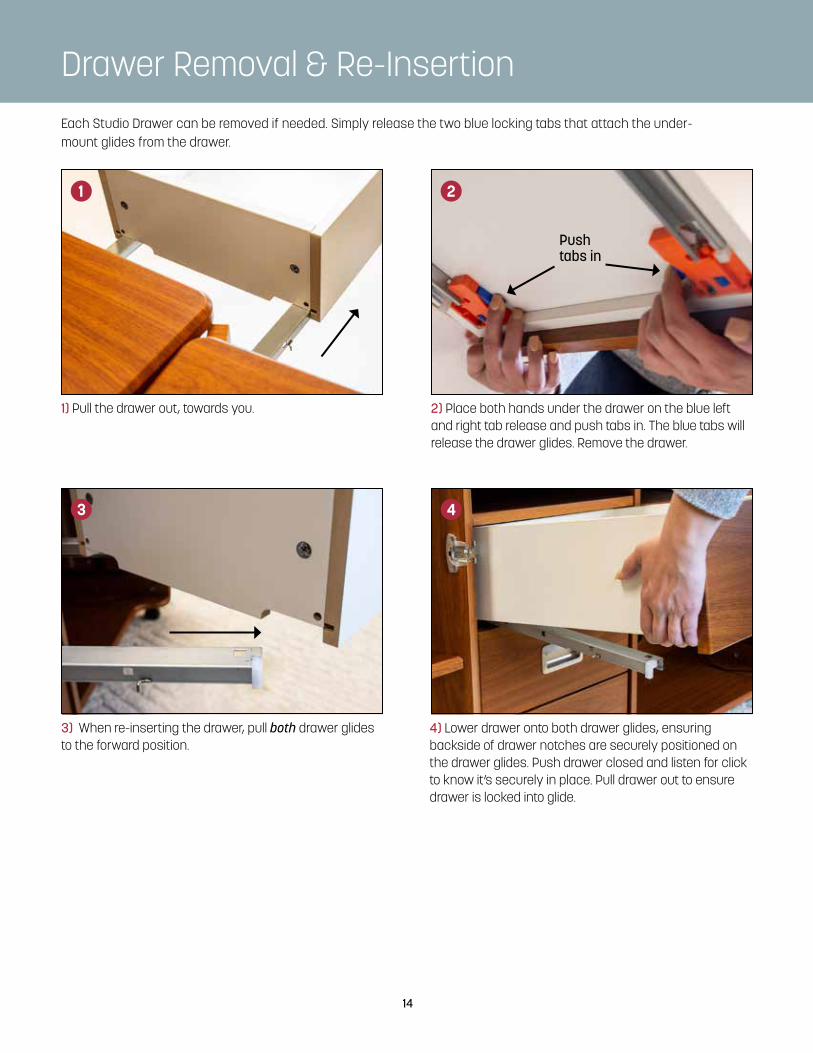
Drawer Removal & Re-InsertionEach Studio Drawer can be removed if needed. Simply release the two blue locking tabs that attach the under-mount glides from the drawer.
3
2
1) Pull the drawer out, towards you. 2) Place both hands under the drawer on the blue left and right tab release and push tabs in. The blue tabs will release the drawer glides. Remove the drawer.
3) When re-inserting the drawer, pull both drawer glides to the forward position.
4) Lower drawer onto both drawer glides, ensuring backside of drawer notches are securely positioned on the drawer glides. Push drawer closed and listen for click to know it’s securely in place. Pull drawer out to ensure drawer is locked into glide.
1
14
4
Pushtabs in

Foot Rest Platform InstallationThe adjustable Foot Rest Platform is designed to position your sewing machine foot rest at a comfortable height. It fits on top of the base of the studio. (Your studio can also be used without the Foot Rest).
1
1) Choose the height that best suits your needs. (Base by itself, 1-3/4”, 2-3/4” or 3-3/4”). Screw in your platform supports (clockwise) into the holes on the bottom of the Foot Rest Platform.
Note: Platform supports must be removed to store under the cabinet.15
2
2) With all five platform supports in place carefully slide into the bottom base of your studio as shown.
Underside of Foot Rest Platform

Ordered as a set of two, the optional Outback Shelves adds convenient storage space.
Outback Shelves Installation
1 2
1) Position the Gate Legs perpendicular to the back wall of the Studio so that they are at a 90-degree angle.
2) Locate the 10 Cam Lock brass fittings (Six on the back wall and two each on the outside of each gate leg).
Gate leg
Back wall
3 4
3) Insert the small Cam Lock Pins into the 10 Cam Lock brass fittings. With your Phillips screwdriver, tighten them in until they are flush against the Studio. Do not over tighten.
4) All Cam Lock Pins in place.
Use small Cam Lock Pins 5/8”
16

Outback Shelves Installation
6
9
5
5) This is the underside of the Outback Leaf shelf. Before placing the shelves down on top of the Cam Lock Pins, make sure the built-in Cam Locks are opened. 6) Look through the openings on
the sides of the shelves to ensure that they are opened.
9) This shows closed position.
7
10
8
7) Starting with the lower shelf, lift and position the shelf in place on top of the Cam Lock Pins along the back wall of the studio. Now lower the shelf onto the Cam Lock Pins attached to the gate legs.
8) On the underside side of the shelf, tighten each Cam Lock by inserting the screwdriver and turning the Cam Lock clockwise 1/2 turn.
10) Repeat steps for the top shelf.
17

KLCB-OM • 0719
CRAFTED W I T H P R I D EKoala Studios are customized for you in our Midwest facility with the utmost in craftsmanship and quality. Every detail of your Koala Studio – from the environmentally-friendly, highest-grade engineered wood base to the steel components and decorative handles – were chosen with quality, elegance and luxury in mind.
www.mykoalastudio.comBrought to You by Tacony Corporation®.
Koala furniture is assembled with globally sourced parts. Koala Studios are manufactured and distributed by Tacony Corporation.