Embed Size (px)
Citation preview

pi-top
INSTRUCTION MANUAL


WelcomeWelcome to the pi-top family!
pi-top is very special to us (and so are you, of course!). We are hugely passionate about this product and are thrilled to provide excellent content so you can learn to make anything. Your support has helped to make this a reality and we thank you for joining us on this exciting maker journey!
We believe pi-top is the best way to get started with hardware and software. Open up your box and immediately immerse yourself in a new way of exploring computing - unlocking a world of possibilities. As you grow and learn, pi-top will be part of your journey to expand your knowledge - the only limit is your imagination!
So, let’s get started! We’ve kept the manual simple, with a focus on easy image-based instructions. After assembly you can immediately log-in and start your own cool projects, play our educational game CEEDuniverse and more!
Step through the world’s gateway to technology.
With love,
The pi-top Team


1
ContentsGetting Ready
Step 1: Prepare PCBs
Step 2: Prepare Base
Step 3: Attach Lid
Step 4: Secure Hub
Step 5: Install Micro Computer
Step 6: Plug in Cables
Step 7: Prepare Base Top
Step 8: Attach Base Top
Using your pi-top
2
5
6
7
12
17
18
20
22
29

2
Getting Ready: What’s in the Box?
LID
BASE TOP
*BASE
ACRYLIC SLICE
*Warning: Base houses pi-top’s Smart Battery Pack which contains lithium polymer cells – handle with great care.

3
Getting Ready: What’s in the Box?
HUB
GPIO BREAKOUT CABLE POWER CONTROL CABLE
*PCB SCREWS X8(Silver)
AC TO DC ADAPTER MAINS AC CABLE
*PCB SPACERS X8(Brass)
*M2.5 NUTS X9 *SML ALLEN KEY
1.25mm 2mm
*LRG ALLEN KEY *MICRO SD CARD
KEYBOARD CABLE
MICRO COMPUTER HDMI CABLE MICRO USB CABLE
*Warning: Small parts can be choking hazards and should be kept away from children under 3 yr old.

4
Step 1.1: Prepare PCBs
x 8x 8
YOU WILL NEED
Caution: Be sure to work on a surface free of static electricity.
PCB SPACER(Brass)
5
Caution: Keep spacers and nuts away from PCB tracks and components to avoid damaging PCB
Insert micro SD Card into slot underneath your Micro Computer
Step 1.2: Prepare PCBs
Remove the micro SD Card from the adapter.

6
Step 2: Prepare Base
1.25mm
YOU WILL NEED
Remove Rail Covers from bottom of the Base. They can be gently pushed out from inside Base useing the Small Allen Key. They are magnetically attached and you can re-attach them after you finish the whole assembly to keep your pi-top looking neat.

7
YOU WILL NEED
1.25mm
Step 3.1: Attach Lid
8
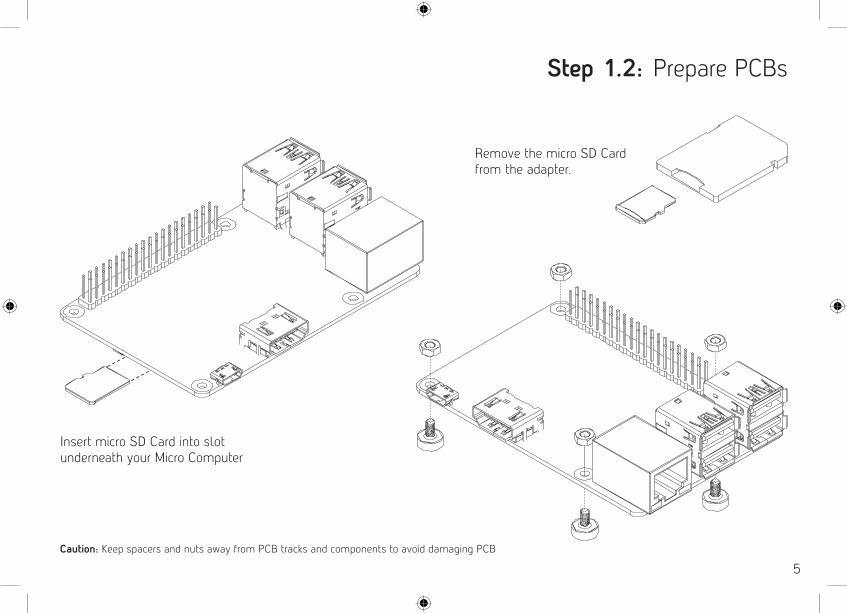
Step 3.2: Attach Lid
Caution: Ensure hinge is fully inserted. Failure to do so could lead to damage of the hinge or base.
Ensure Lid is aligned with base and insert until it clicks into the back hinge.

9
Keep the Lid aligned as you gently tighten screw.
Caution: Do not over tighten to avoid damaging screw head.
Step 3.3: Attach Lid

10
Step 3.4: Attach Lid
Before opening please make sure the hinge is fully inserted and secured in place.

11
12
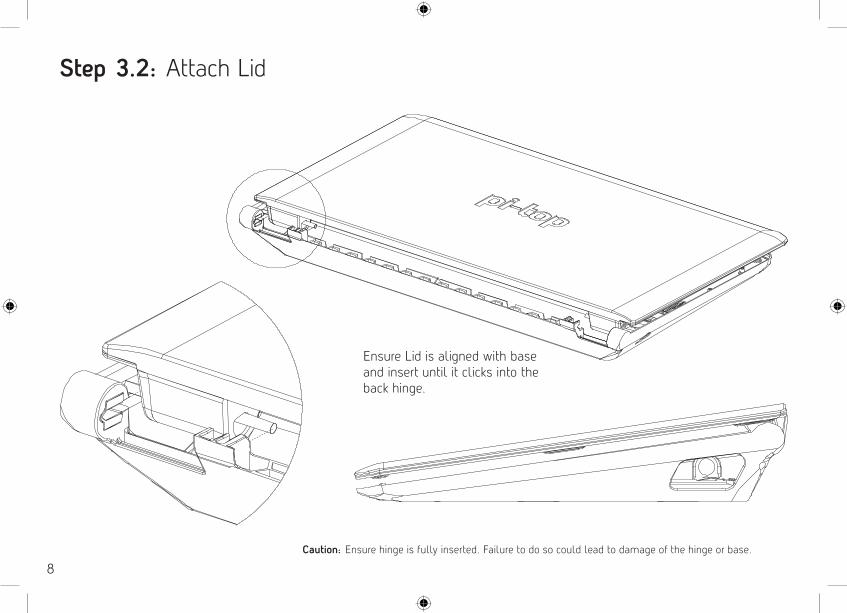
YOU WILL NEED
x 4
2mm
We recommend that you connect the screen cable before you insert the Hub as it’s easier this way.
Step 4.1: Secure Hub
Caution: Ensure battery connector on Hub doesn’t make contact with battery until Step 4-3.
PCB SCREW (Silver)

13
Step 4.2: Secure Hub
Align and insert
Caution: Take extra care to properly align and do not use excessive force.
Rotate locking bar Gently push down on both sides until it clicks and is secured

14
While keeping the left-side of the Hub aligned to the Base, press down on the battery symbol on the Hub until you feel the connector insert fully into battery.
We recommend putting it on this spigot as it’s easier this way!
Step 4.3: Secure Hub

15
Step 4.4: Secure Hub
Caution: Do not over tighten as this could damage the screw head.
16
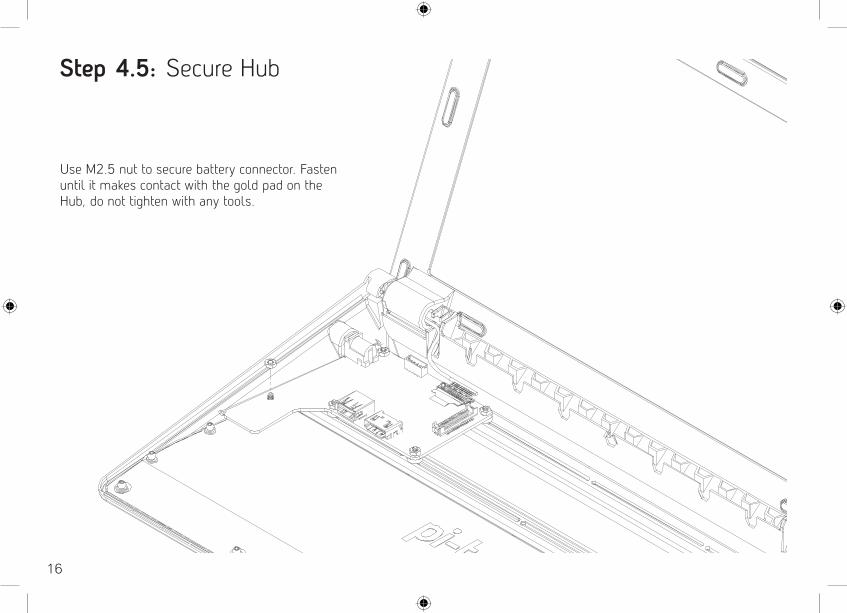
Use M2.5 nut to secure battery connector. Fasten until it makes contact with the gold pad on the Hub, do not tighten with any tools.
Step 4.5: Secure Hub
17
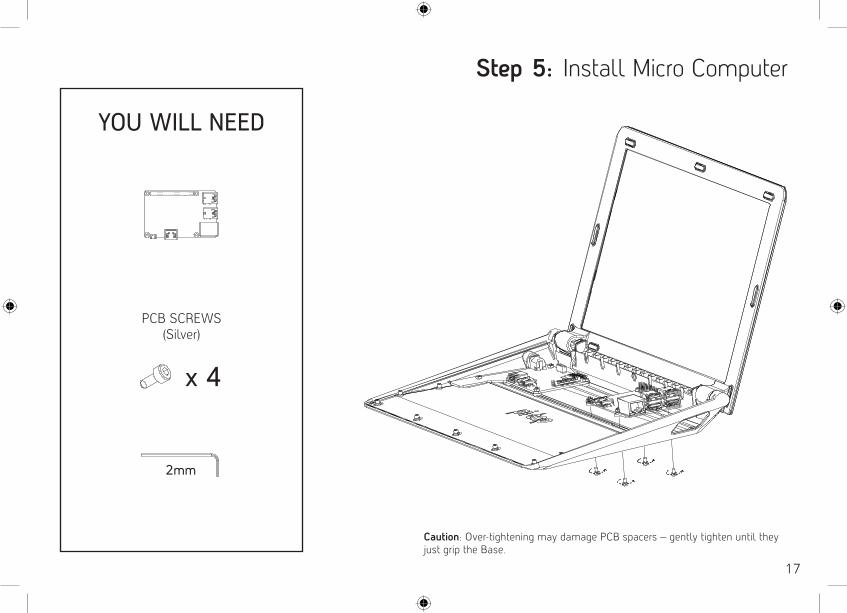
Step 5: Install Micro Computer
YOU WILL NEED
x 4
2mm
Caution: Over-tightening may damage PCB spacers – gently tighten until they just grip the Base.
PCB SCREWS(Silver)

18
YOU WILL NEED
Step 6.1: Plug in Cables

19
Step 6.2: Plug in Cables
Be sure to insert the breakout cable the right way into the hub to avoid damaging the pins inside!
Correct connector orientation from looking front on at the Hub.

20
Step 7.1: Prepare Base Top
YOU WILL NEED

21
Step 7.2: Prepare Base Top
Keyboard Connector can become loose with excessive cable movement, ensure it is fully inserted before attaching Base Top

22
Step 8.1: Attach Base Top
YOU WILL NEEDInsert the Keyboard USB cable.
*Tip: The Acrylic Slice is wrapped in brown protective paper, remove before use..
23
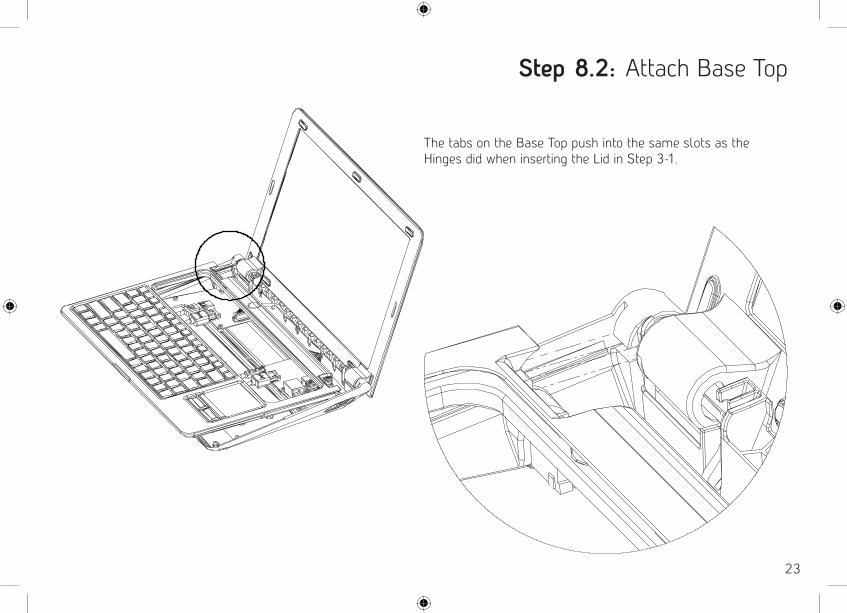
Step 8.2: Attach Base Top
The tabs on the Base Top push into the same slots as the Hinges did when inserting the Lid in Step 3-1.

24
Step 8.3: Attach Base Top
Insert Power Control Cable into Hub.

25
Step 8.4: Attach Base Top
Ball Headed Screws

26
Step 8.5: Attach Base Top
Once Base Top is aligned and in position, it can be pushed down to pop onto the Ball Headed Screws. Each ball position should be squeezed together to ensure it has popped into place.

Step 8.6: Attach Base Top
27
Remove the brown protective paper from Acrylic Slice and insert.
28
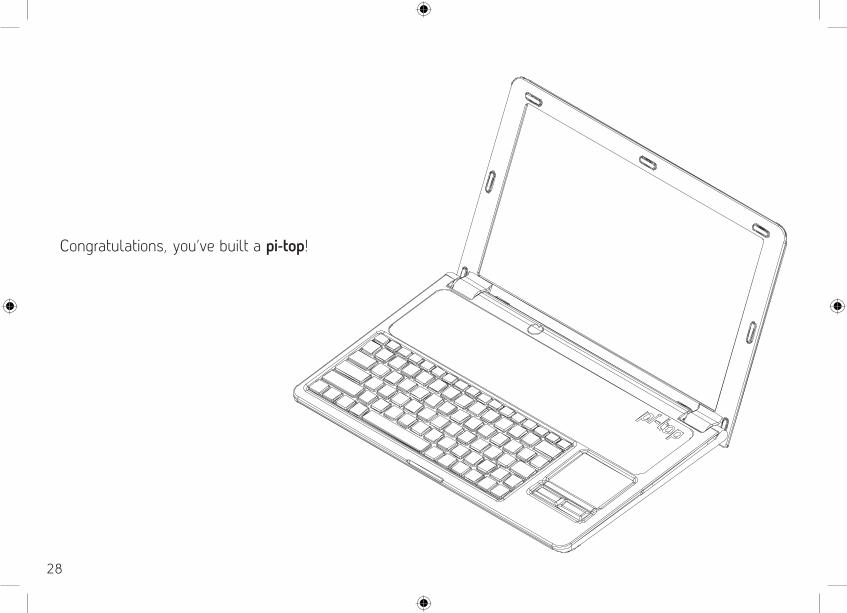
Congratulations, you’ve built a pi-top!
29
Step 9: Using Your pi-top
Powering Up
• Plug in the mains adapter. This will wake the battery up from shipping mode.
• After a few seconds, the green LED underneath the power button will start to pulse.
• Press and hold the power button for 1-2 seconds
Using pi-topOS
• Visit www.pi-top.com/#/help/OS
Powering Down
• To communicate with the Micro Computer that you wish to shut down, hold down the power button for 2-3 seconds.
• Shutdown can also be triggered from pi-topOS.
• To force shutdown, hold down the power button for 5-6 seconds. Warning: this can cause SD Card corruption.

30

31
This is a build-it-yourself device, we ask you take extra care when putting together your pi-top. Remember, circuit boards, although durable, will break if you don’t treat them with care. CEED LTD is not responsible for any of the below:
• Personal injury or damage to product resulting from removal of battery cover and/or Smart Battery PCB (located underneath metal battery cover). Working with lithium polymer cells is dangerous and should only be carried out by a trained engineer, hence why the battery pack is provided fully assembled and protected by a sheet of stainless steel. Do not remove!
• Data loss as a result of SD Card corruption.
• Damage to cables from excessive force and/or misalignment when plugging in connectors.
• Any electrical injury resulting from misuse of pi-top components.
• Damage to the PCB resulting from user error. Please ensure that you are free of static electricity when handling PCBs to prevent unwanted electrostatic discharges from damaging sensitive electronics components.
• Malfunction of components as a result of mishandling.
• Damage to the screen as a result of tampering or accidental breakage.
• All damage as a result of contact with liquids, including any injuries electrical or otherwise as a result of such action.
Disclaimer
• Use of solder - this product comes in a modular design and no soldering is required.
• Choking of any user; all children under age of 8 using pi-top must be supervised during assembly and play, adults not excluded from liability disclaimer if choking also occurs. There are small parts to any electronic device and you must be sure your child or student uses pi-top in its intended fashion.
We ask that if you are in doubt of how to use pi-top or are unsure about the instructions provided within that you please contact us on [email protected] for any support you require.

32


T H E M A K E R ’ S L A P T O P


![PI-TOP [3] - Ligra · Pi-top [3] è il laptop modulare in grado di fornirti tutto ciò che serve per trasformare la tua creatività in fantastici progetti: le tue invenzioni prendono](https://img.pdfslide.net/doc/110x75/6034c45e350ab337745604d3/pi-top-3-ligra-pi-top-3-il-laptop-modulare-in-grado-di-fornirti-tutto-ci.jpg)


![EdTech Europe 2015 [Track 3]: [Pi-Top], ([Jesse Lozano], [CEO])](https://img.pdfslide.net/doc/110x75/55c371cabb61ebb9498b46d8/edtech-europe-2015-track-3-pi-top-jesse-lozano-ceo.jpg)