Embed Size (px)
Citation preview

Rev. 00 (12/2004) - DS - TES92e_Druck00.DOC 0
Tissue Embedding System TES 99
Dispenser Unit TES 99.250 + TES 99.350
Instruction Manual
IMPORTANT: Read this manual before starting the instrument
Rev. 00 (05/2007)
© Copyright: Duplication of this manual by any means for any purpose without written consent of medite GmbH is prohibited.
Wollenweberstr. 12 - D-31303 Burgdorf - Tel: +49 5136 888 4 0 Fax: + 49 5136 888 4 55 [email protected] www.medite.de

Rev. 00 (12/2004) - DS - TES92e_Druck00.DOC
Konformitätserklärung Certificate of Conformity
Attestation de Conformité
Type of instrument: Dispenser Unit
Model: TES 99
Serial No.: We do hereby certify that the above mentioned product meets the requirements set forth in the CE Guidelines indicated below including all changes and addendums to date thereto. The above mentioned product has been controlled by an authorized test center and meets the following standards and guidelines:
EU Directive 89/336/EEC EMC
EU Directive 73/23/EEC Low Voltage
DIN EN ISO 9001
VDE 701 Burgdorf, 20.05.2007 M. Ott – Managing Director
Wollenweberstr. 12 - D-31303 Burgdorf - Tel: +49 5136 888 4 0 Fax: + 49 5136 888 4 55 [email protected] www.medite.de
Rev. 00 (12/2004) - DS - TES92e_Druck00.DOC
Contents
1 Safety 1
1.1 Introduction 1
1.2 Intended Use 1
1.3 Authorized Operator 1
1.4 Safety on site 1
2 Transport/ Installation 2 2.1 Technical Data 2 2.2 Transport/ Storage 2 2.3 Unpacking 2 2.4 Installation 3
3 Operation
4
3.1 Switch the unit on 4
3.2 Adjust the temperature controller/timer 5
3.3. Adjust the timer 7
4 Errors 13
4.1 Change of fuses 13
4.2 Error messages of the controller 13
5 Cleaning/ Maintenance 14
6 Putting out of operation 14
7 Wiring diagram 15

Rev. 00 (12/2004) - DS - TES92e_Druck00.DOC 1
1 Safety
1.1 Introduction With the purchase of the Tissue Embedding System TES 99 you decided for a high quality product of medite Medizintechnik GmbH. These instructions shall help you to use the instrument. Please read it thoroughly and follow the advices.
If you see this symbol in the instruction manual, it indicates dangers (including warnings)
1.2 Intended use The TES 99 is to be used for the embedding of tissue specimens in histology, pathology and cytology laboratories. It must not be used for the processing of food. Unauthorized changes and technical modifications of the instruments are not permitted for safety reasons. For the exchange of defective parts only original medite spare parts have to be used. The conditions for operation, maintenance and service mentioned in this instruction manual have to be strictly observed.
1.3 Authorized operator The TES 99 must be used by those persons only, who have been authorized by the owner. In his working area, the operator is responsible with regard to third persons. The owner must give the operator access to the instruction manual and make sure that the operator has read and understood its contents.
1.4 Safety on site The TES 99 must be placed on an even and solid basis. An overturning instrument means an accident risk.
Any failure to comply with the approved technical regulations for the operation of technical equipment or any non-intended use of the instrument will void the the manufacturer’s liability.

Rev. 00 (12/2004) - DS - TES92e_Druck00.DOC 2
2 Transport/Installation
2.1 Technical Data Dispenser Unit TES 99.200/99.300
Width : 360 mm Depth : 570 mm Height : 300 mm Working plate : 360 x 245 mm Temperature : von 30° C bis 70°C Paraffin tank capacity : 3,5 Liter Cold spot : -5° C 40 mm Ø Heating for 6 forceps Weight: 22 kg Power supply : 230V / 50Hz / 350VA 115V / 60 Hz / 350VA
2.2 Transport/ Storage
The dispenser unit TES 99 is delivered in a protecting box. Please move it only upright and avoid shock.
2.3 Unpacking
Put the instrument on an even, solid surface and remove the protecting box and plastic wrap. If possible, keep the packing material to avoid damages in case of a later transport of the unit. Check whether the equipment is complete. The dispenser unit TES 99.200 / TES 99.300 is supplied with one power cord, one foot switch one hand switch bow and one instruction manual.

Rev. 00 (12/2004) - DS - TES92e_Druck00.DOC 3
2.4 Installation Before starting the instrument, please make sure that your mains voltage corresponds to the value indicated on the instrument (example: for an istrument requiring 240 Volts, 200 - 240 Volts should be available; for a 115 Volts-instrument, there should be 100 - 125 Volts.) The instrument is supplied ready to use. For connection to mains the included power cord for heating devices must be used. It must be connected to a socket with intact ground wire.
The minimum distance of the instrument to the wall or other instruments
should at least be 10 cm to guarantee a sufficient ventilation. Furthermore pay attention that no inflammable objects are in the heating area of the instrument
Do not place any inflammable or combustible material near the instrument.

Rev. 00 (12/2004) - DS - TES92e_Druck00.DOC 4
3 Operation
3.1 Switch the unit on Press the mains switch at the rear of the instrument.
The unit is now in standby mode, which is indicated by an illuminated dot in the display of the controller.
Press the ON/OFF key on the controller keyboard. The display shows the actual temperature of the working plate or the paraffin tank, respectively.
Switch on working plate (BASE) - is illuminated.
Switch on paraffin tank (TOP) - is illuminated.
Illumination of the warning signal means, the temperature of the surface passed 45°C (113°F) and there is a burn risk.
Magnifier (optional extra)
Temperature control
Cold light lamp
Paraffin tank
Foot switch
Regulating screw for wax flow
Cold spot Hand switch bow
Forceps heating
Timer
Working plate

Rev. 00 (12/2004) - DS - TES92e_Druck00.DOC 5
The illumination of the respective LED below the display indicates which temperature is shown on the display (working plate = BASE/ Paraffin tank = TOP). Now the heating up to the adjusted temperature starts.
3.2 Adjust the temperature controller
Features
Key 1: UP Press this key together with the key „SET TOP“ or „SET BASE“ to increase the temperature value.
Key 2: DOWN Press this key together with the key „SET TOP“ or „SET BASE“ to decrease the temperature value.
Key 3: SET TOP (Paraffin tank) Press this key to switch to the indication of the temperature value set for the paraffin tank in the display.
Key 4: Standby TOP (Paraffin tank) Press this key to switch the heating for the paraffin tank (TOP) off or on.
Key 5: SET BASE (Working plate) Press this key to switch to the indication of the temperature value set for the working plate in the display.
Key 6: Standby BASE (Working plate) Press this key to switch the heating for the working plate (BASE) on or off.

Rev. 00 (12/2004) - DS - TES92e_Druck00.DOC 6
Both temperature control circuits operate independently from each other and work even if there is no visible indication on the display. If the key „SET TOP" is touched, the temperature of the paraffin tank appears on the display, whereas touching the key „SET BASE" shows the temperature of the working plate. If the temperature control circuit actually visible in the display is switched off, the indication changes to the other control circuit, in case that one is switched on. If both control circuits are switched off, the indication and the lamps for “TOP“ and „BASE“ go off. In the display only the decimal point on the right remains on. If both control circuits are switched on, the lamp „ALL“ is illuminated.
Adjustment of desired temperature If the key „SET TOP" or „SET BASE" , respectively, is pressed the actually set temperature of the paraffin tank or the working plate is indicated. The value is changed by additionally pressing “UP“ or „DOWN“. Both temperatures can be set independently from each other.
Adjustment of the temperature for the working plate (BASE)
+ or
Adjustment of the temperature for the paraffin tank (TOP)
+ or
Meaning of ther LEDs at the temperature controller:
TOP – Paraffin tank is heating
BASE – Working plate is heating
ALL – Both working plates are on.
°C - Display in degrees °C
°F - Display in degrees °F
! - Temperature above 45°C or 113°F, burn risk.
Change of parameter, for example from degrees °C to degrees °F. These parameters are pre-adjusted by the manufacturer and should not be changed.
Rev. 00 (12/2004) - DS - TES92e_Druck00.DOC 7
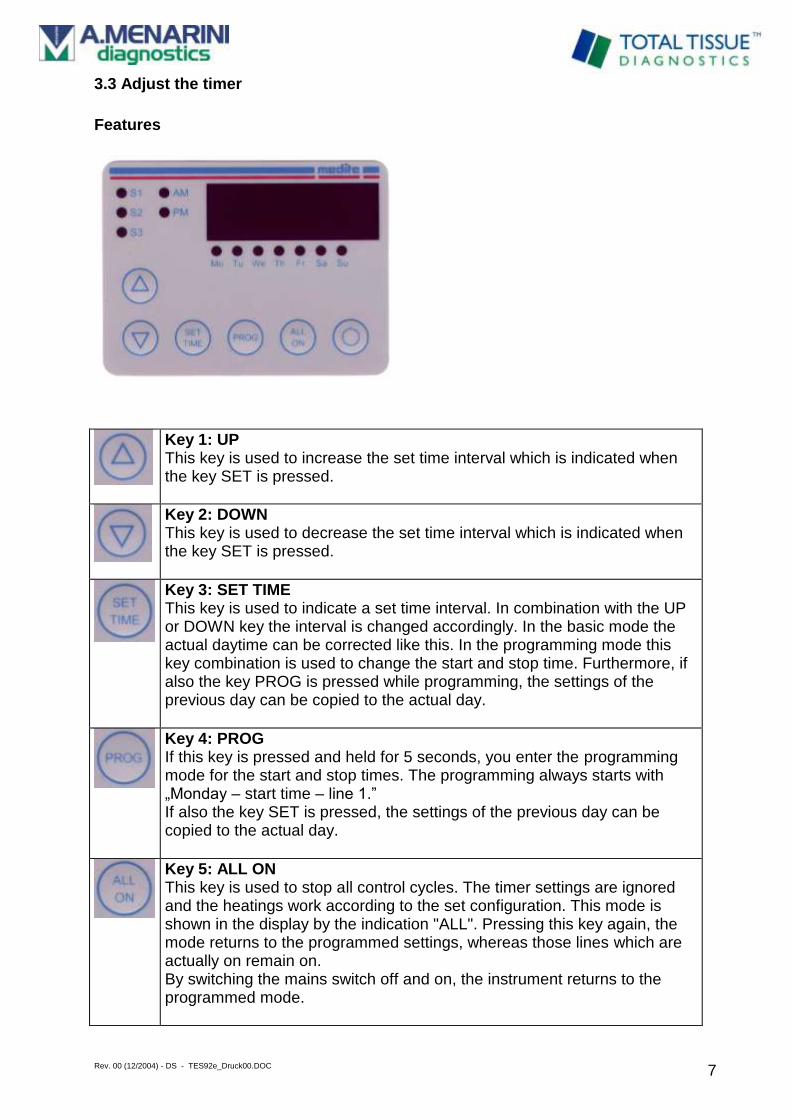
3.3 Adjust the timer
Features
Key 1: UP This key is used to increase the set time interval which is indicated when the key SET is pressed.
Key 2: DOWN This key is used to decrease the set time interval which is indicated when the key SET is pressed.
Key 3: SET TIME This key is used to indicate a set time interval. In combination with the UP or DOWN key the interval is changed accordingly. In the basic mode the actual daytime can be corrected like this. In the programming mode this key combination is used to change the start and stop time. Furthermore, if also the key PROG is pressed while programming, the settings of the previous day can be copied to the actual day.
Key 4: PROG If this key is pressed and held for 5 seconds, you enter the programming mode for the start and stop times. The programming always starts with „Monday – start time – line 1.” If also the key SET is pressed, the settings of the previous day can be copied to the actual day.
Key 5: ALL ON This key is used to stop all control cycles. The timer settings are ignored and the heatings work according to the set configuration. This mode is shown in the display by the indication "ALL". Pressing this key again, the mode returns to the programmed settings, whereas those lines which are actually on remain on. By switching the mains switch off and on, the instrument returns to the programmed mode.
Rev. 00 (12/2004) - DS - TES92e_Druck00.DOC 8
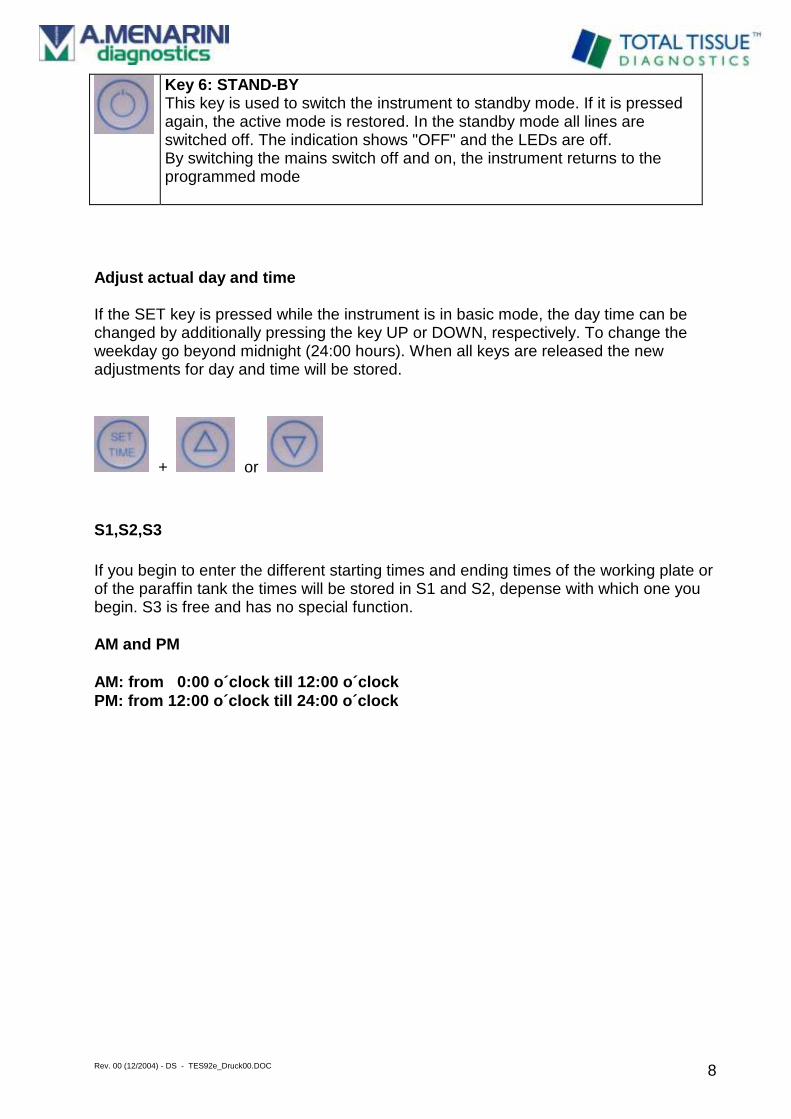
Key 6: STAND-BY This key is used to switch the instrument to standby mode. If it is pressed again, the active mode is restored. In the standby mode all lines are switched off. The indication shows "OFF" and the LEDs are off. By switching the mains switch off and on, the instrument returns to the programmed mode
Adjust actual day and time If the SET key is pressed while the instrument is in basic mode, the day time can be changed by additionally pressing the key UP or DOWN, respectively. To change the weekday go beyond midnight (24:00 hours). When all keys are released the new adjustments for day and time will be stored.
+ or
S1,S2,S3
If you begin to enter the different starting times and ending times of the working plate or of the paraffin tank the times will be stored in S1 and S2, depense with which one you begin. S3 is free and has no special function.
AM and PM
AM: from 0:00 o´clock till 12:00 o´clock
PM: from 12:00 o´clock till 24:00 o´clock

Rev. 00 (12/2004) - DS - TES92e_Druck00.DOC 9
Adjustment of the start and stop times
Having entered the programming cycle by pressing the key PROG for 3 seconds the different positions are activated in the following sequence by pressing the UP or DOWN key Indication LED ON1 Monday OFF1 ON2 OFF2 ON1 Tuesday OFF1 ON2 OFF2 ON1 Wednesday OFF1 ON2 OFF2 ON1 Thursday OFF1 ON2 OFF2 ON1 Friday OFF1 ON2 OFF2 ON1 Saturday OFF1 ON2 OFF2 ON1 Sunday OFF1 ON2 OFF2 ON1 Monday OFF1...

Rev. 00 (12/2004) - DS - TES92e_Druck00.DOC 10
For every weekday 1 start and 1 stop time can be set each for the paraffin tank
(ON1/OFF1) and the working plate (ON2/OFF2). After having reached the desired program position, by pressing the key SET the set time is indicated and can be changed by using the key UP or DOWN. When all keys are released, the new value is stored.
+ or
Adjustment advice The programming is made similar to that of an analogue timer, where one tag per day
can be set each for start and stop time , but it is not a must. The endless loop in the programming cycle enables a quick access to the weekend days Saturday and Sunday by pressing the DOWN key. Please note that there is no action if the start and stop time for the same day are identical. Between the times 23:59 and 0:00 or between 11:59 PM and 12:00 AM there is the special position "----". This adjustment deactivates the time setting. It is used to leave the instrument on during the day change or to keep it in on or off mode during several days. If during programming the PROG key is pressed while the SET key is held after a day
has been chosen, all times set for the previous day are copied to the chosen day and the display shows "COPY".
Return to basic mode When the PROG key is pressed for at least 3 seconds or all other keys are released for more than 60 seconds, the instrument returns to basic mode.

Rev. 00 (12/2004) - DS - TES92e_Druck00.DOC 11
Example: weekdays start time 06:00 h and stop time 14:00 h:
1. Hold key „PROG“ pressed for 3 seconds to enter the programming mode.
3 seconds
2. The display shows „ON1“ and the weekday indication says Monday. This is the start time for the paraffin tank on Monday.
or
3. Now press and hold the key „SET TIME“ and adjust the start time to 06:00 h using the “UP” or “DOWN” keys.
+ or
4. Release the key „SET TIME“ Use the key „UP“ to change to the next position „OFF1“. This is the stop time for the paraffin tanks on Monday.
5. Now press and hold the key „SET TIME“ and adjust the start time to 14:00 h using the “UP” or “DOWN” keys.
+ or
6. Release the key „SET TIME“ Use the key „UP“ to change to the next position „ON2“. This is the start time for the working plate on Monday.
7. Now press and hold the key „SET TIME“ and adjust the start time to 06:00 h using the “UP” or “DOWN” keys.
+ or
8. Release the key „SET TIME“ Use the key „UP“ to change to the next position „OFF2“. This is the stop time for the working plate.
9. Now press and hold the key „SET TIME“ and adjust the start time to 14:00 h using the “UP” or “DOWN” keys.
+ or

Rev. 00 (12/2004) - DS - TES92e_Druck00.DOC 12
10. Release the key „SET TIME“ Use the key „UP“ to change to the next position „ON1“. This is the
start time for the paraffin tank on Tuesday.
11. You can now repeat the programming as done for Monday or you copy the data of Monday to Tuesday.
12. For copying the data from the previous day press and hold the key „SET TIME“and press also the key „PROG“. The action is confirmed by the indication „COPY“ in the display. The start or stop time, respectively of the previous day is transferred.
+
13. Go to the next weekdays Wednesday to Friday and repeat the steps mentioned before.
+
14. As the instrument is usually not used on
Saturdays and Sundays, go now to these weekdays (LED Sa or Su , respectively, is
illuminated) and make sure the value "---" is set for start and stop times.
+ or
15. When the PROG key is pressed for at least 3 seconds or all other keys are released for more than 60 seconds, the instrument returns to basic mode.
3 seconds

Rev. 00 (12/2004) - DS - TES92e_Druck00.DOC 13
4 Errors
4.1 Change of fuses In case of failure of the instrument check the fuses in the fuse holder integrated in the instrument socket at the rear. Proceed as follows: pull out the mains plug, using a screw driver the fuse holder can be opened easily and the fuses can be changed.
Caution: first pull out the mains plug !
In case of any other defect please contact the service department.
4.2 Error messages of the controller
Indication Cause Measures
F1L Sensor error, short circuit call service engineer
F1H Sensor error, broken sensor call service engineer
F2L Sensor error, short circuit call service engineer
F2H Sensor error, broken sensor call service engineer
EP Lost data in the parameter memory call service engineer
These errors must be corrected by an authorized service engineer only! Never remove any parts of the casing while the instrument is on power. The exchange of defective parts (except fuses) and other intervention may be made by authorized service engineers only.
Fuse Holder

Rev. 00 (12/2004) - DS - TES92e_Druck00.DOC 14
5 Cleaning/Maintenance
The surfaces of the Dispenser Unit TES 99 can be cleaned with commercial, non scratching detergents. For safety reasons the mains plug must be pulled before cleaning the instrument. Maintenance of the instrument includes the cleaning of the ventilation slots approximately once a year to make sure that the chamber is continuously ventilated and no overheating may occur.
6 Putting out of operation
After end of the total period of use please deliver the equipment to a regular disposal facility. The company medite as manufacturer is also prepared to take back the equipment for disposal against payment for the disposal fee.
Rev. 00 (12/2004) - DS - TES92e_Druck00.DOC 15
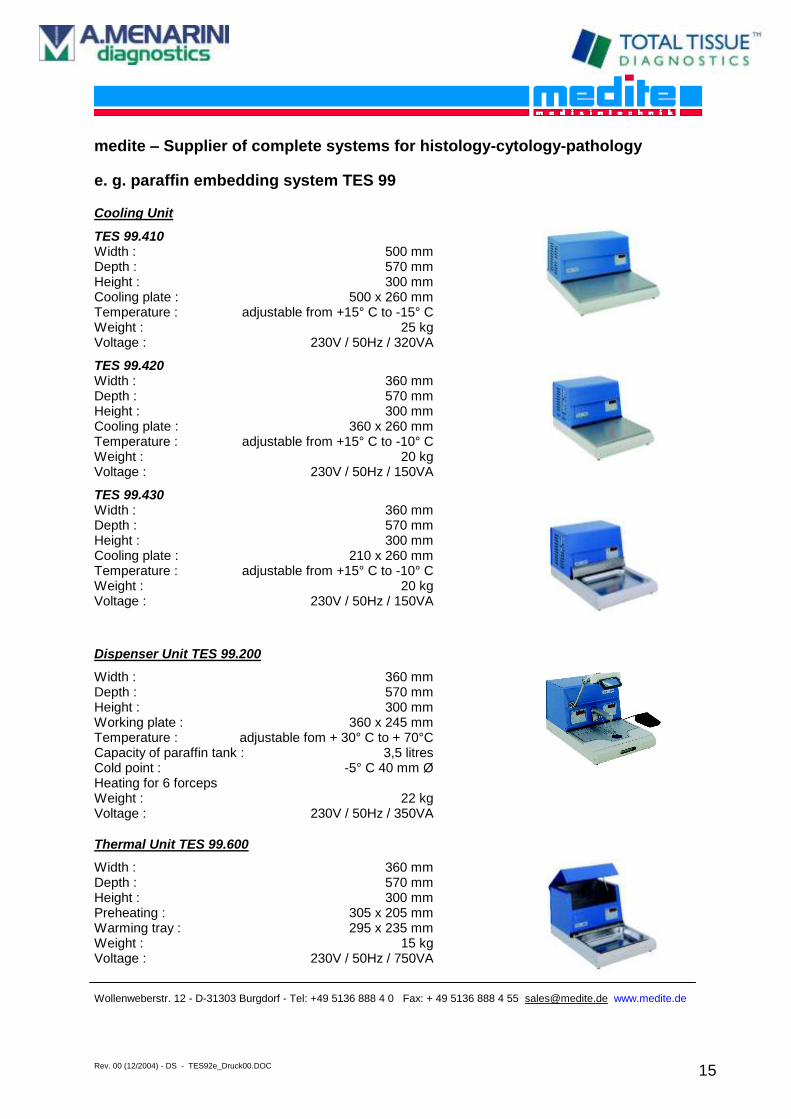
medite – Supplier of complete systems for histology-cytology-pathology
e. g. paraffin embedding system TES 99
Cooling Unit
TES 99.410 Width : 500 mm Depth : 570 mm Height : 300 mm Cooling plate : 500 x 260 mm Temperature : adjustable from +15° C to -15° C Weight : 25 kg Voltage : 230V / 50Hz / 320VA
TES 99.420 Width : 360 mm Depth : 570 mm Height : 300 mm Cooling plate : 360 x 260 mm Temperature : adjustable from +15° C to -10° C Weight : 20 kg Voltage : 230V / 50Hz / 150VA
TES 99.430 Width : 360 mm Depth : 570 mm Height : 300 mm Cooling plate : 210 x 260 mm Temperature : adjustable from +15° C to -10° C Weight : 20 kg Voltage : 230V / 50Hz / 150VA
Dispenser Unit TES 99.200
Width : 360 mm Depth : 570 mm Height : 300 mm Working plate : 360 x 245 mm Temperature : adjustable fom + 30° C to + 70°C Capacity of paraffin tank : 3,5 litres Cold point : -5° C 40 mm Ø Heating for 6 forceps Weight : 22 kg Voltage : 230V / 50Hz / 350VA
Thermal Unit TES 99.600
Width : 360 mm Depth : 570 mm Height : 300 mm Preheating : 305 x 205 mm Warming tray : 295 x 235 mm Weight : 15 kg Voltage : 230V / 50Hz / 750VA
Wollenweberstr. 12 - D-31303 Burgdorf - Tel: +49 5136 888 4 0 Fax: + 49 5136 888 4 55 [email protected] www.medite.de

Rev. 00 (12/2004) - DS - TES92e_Druck00.DOC
1
1
2
2
3
3
4
4
5
5
6
6
7
7
8
8
D D
C C
B B
A A
Titel:
medite Medizintechnik GmbHWollenweberstraße 12 ; 31303 Burgdorf - Germany
Datum:Datei:
Arbeitsblatt:Erstellt:
Rev:H.KaiserTES99-200REVA.SCHDOC
12.05.2003
L
N
GND
T3,15A
F
T3,15A
F
Schalter - Power switch
BK
BU
BK
BU
4
1
Gerätestecker - Power plug 70-7600-00
5
2
Relay - Platine - Board
Pri
Sec
1
2
3
4
5
6
7
8
9
10
11
12
13
14
Si
20
0m
A
PE
PE
PE
PE
1
2
3
4
5
6
7
8
9
10
11
12
13
14
15
16
17
18
EL0045 / Pinzette - Tweezers** nur Optional
Ventil - Valv e
Handschalter - Manual control switch
Peltierelement
GN
YE
BK
BU
L
N
Lampe - Lamp
Paraf f intank
BK
Heizung - Heating element
BK
BK
Transf ormator - Transf ormer
0
-5%
23
0
+5
% 0
24
AC
+8
V=
-
F 8
00
mA
T
BK
BK
RD
BU
BK
BK
Zeitschaltuhr - Timer Anzeigemodul - Display
BK
BK
L
N
Zeit
sch
alt
uh
r -
Tim
er
An
zeig
em
od
ul
- D
isp
lay
Zeitschaltuhr - Timer Anzeigemodul - Display
GNYE
BK
PE
PE
Obergehäuse - Upper cabinetUntergehäuse - Lower cabinet
GNYE
GN
YE
BK
RD
BN
BN
RD
RD
BU
BU
GY
GNYE
BN BN
BN
BK
BK
GY
GN
YE
70-0051-00
72-0101-00
72-9210-00
70-0050-00
72-0101-00
72-8211-00
72-8230-00
73-1221-0073-1212-00
12-8210-00
61-8200-00
26-8201-00
11-9201-00
72-7140-00 72-7150-00
11-8207-00
72-7150-00
Auslassdüsen - outlet nozzle
Fußschalter - Foot switch
Pinzettenheizung - Tweezers heater
Vorschaltgerät - Choke
C°
Lüf ter - Fan
C°
Begrenzer - Limiter
Temperaturf ühler - Temperature sensor
Kabelbaum - Wire assembly: 73-9203-01
BK - schwarz - blackBN - braun - brownRD - rot - redOG - orange - orangeYE - gelb - yellowGN - grün - greenBU - blau - blueVT - violett - violetGY - grau - grayWH - weiß - whitePK - rosa - pinkTQ - türkis - turquoise
2x 62-9200-00
2x 72-8220-00
1 von 1 ATES99.200 230V
Artbeitsf läche - Work plate
Rev. 0
0 (1
2/2
00
4) - D
S - T
ES
99
2e
_D
RU
CK
.DO
C
1
6
7 W
iring
dia
gra
m
Rev. 00 (12/2004) - DS - TES92e_Druck00.DOC
medite – Supplier of complete systems for histology-cytology-pathology
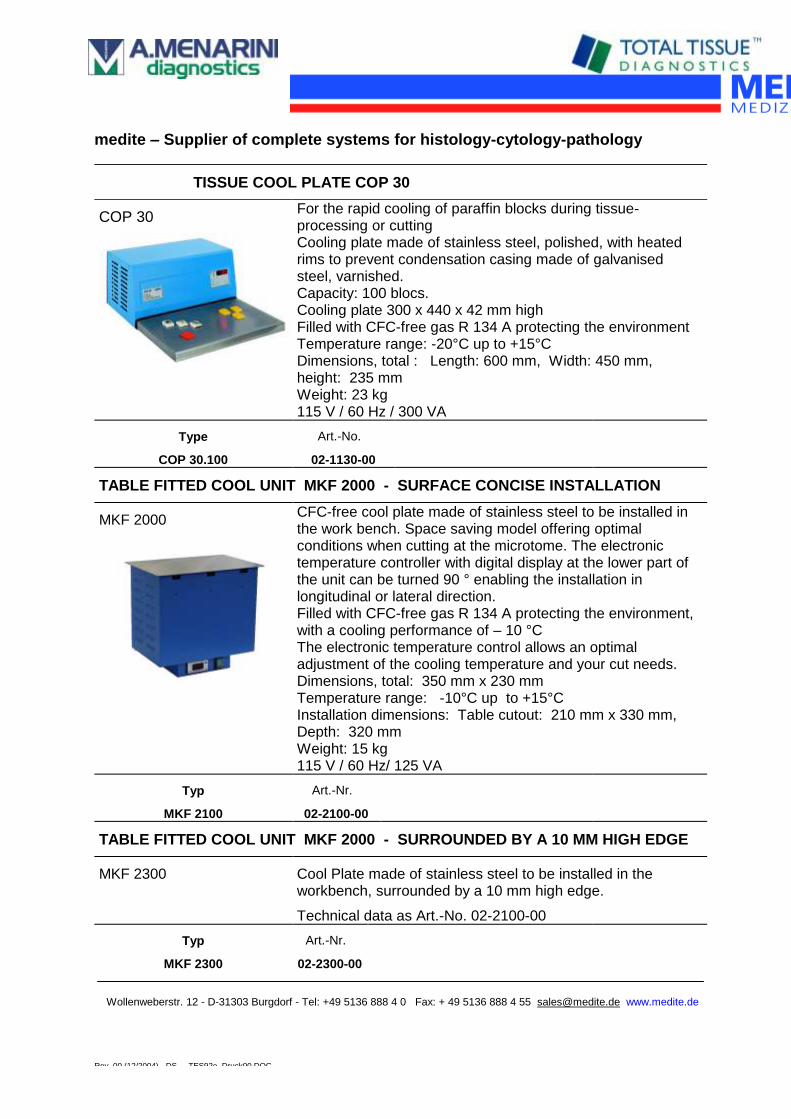
TISSUE COOL PLATE COP 30
COP 30
For the rapid cooling of paraffin blocks during tissue-processing or cutting Cooling plate made of stainless steel, polished, with heated rims to prevent condensation casing made of galvanised steel, varnished. Capacity: 100 blocs. Cooling plate 300 x 440 x 42 mm high Filled with CFC-free gas R 134 A protecting the environment Temperature range: -20°C up to +15°C Dimensions, total : Length: 600 mm, Width: 450 mm, height: 235 mm Weight: 23 kg 115 V / 60 Hz / 300 VA
Type Art.-No.
COP 30.100 02-1130-00
TABLE FITTED COOL UNIT MKF 2000 - SURFACE CONCISE INSTALLATION
MKF 2000
CFC-free cool plate made of stainless steel to be installed in the work bench. Space saving model offering optimal conditions when cutting at the microtome. The electronic temperature controller with digital display at the lower part of the unit can be turned 90 ° enabling the installation in longitudinal or lateral direction. Filled with CFC-free gas R 134 A protecting the environment, with a cooling performance of – 10 °C The electronic temperature control allows an optimal adjustment of the cooling temperature and your cut needs. Dimensions, total: 350 mm x 230 mm Temperature range: -10°C up to +15°C Installation dimensions: Table cutout: 210 mm x 330 mm, Depth: 320 mm Weight: 15 kg 115 V / 60 Hz/ 125 VA
Typ Art.-Nr.
MKF 2100 02-2100-00
TABLE FITTED COOL UNIT MKF 2000 - SURROUNDED BY A 10 MM HIGH EDGE
MKF 2300
Cool Plate made of stainless steel to be installed in the workbench, surrounded by a 10 mm high edge.
Technical data as Art.-No. 02-2100-00
Typ Art.-Nr.
MKF 2300 02-2300-00 Wollenweberstr. 12 - D-31303 Burgdorf - Tel: +49 5136 888 4 0 Fax: + 49 5136 888 4 55 [email protected] www.medite.de