Embed Size (px)
Citation preview

Instruction Manualv1.2

Loading the OARs
There is a little preparation you will need to do before you load the OARS into your simulator. This tutorial assumes you have the basic knowledge to get OpenSimulator up and running and is only intended to be a guide to get the OAR archives loaded.
The minimum required version of OpenSimulator to run this archive is v0.7.3 the NPC's and Sit poses will not work properly in anything older than this version.
You will need to start by configuring OpenSim.ini to the optimal settings for this archive. You can see the example ini here at
http://uc.onikenkon.com/OpenSim.ini
You can just simply copy this ini file to your simulators /bin folder and use it to get started and insure everything is proper.
Once you have the Opensim.ini file in place you will need to open it up in an editor, I suggest using notepad++ ( http://notepad-plus-plus.org/ ) in Windows or just whatever editor you are most familiar with. You will need to find the [Xengine] section down on line 573 in my example, the line number may vary depending on which version of OpenSimulator you are running. On line 573 you will see Enable = true you need to change this to Enable = false, after we are done loading the oar we will change this back to true, turning this off will make the loading go much faster and be more reliable insuring there will be less problems after the first restart. Once this change is made and your confident your simulator is ready to load the oars, start it up and wait for the console. For this example I am going to assume you have placed the oar files you have downloaded into your simulators /bin folder, this however is not required you can load them from anywhere you just need to add the path on to the file name after the load oar ie: “load oar c:\path\to\my\downloads\universal_campus_01.oar”
Once you are at the console you will type the following.
change region <region 1 name>load oar universal_campus_01_02102012.oar
it will take some time for this oar to load 01 contains 99% of the content, once this says the archive has successfully loaded you will then type “backup” on the sim console, this will force it to store the data to the database, and will lock the console for a moment until it completes. Once the console is back you can proceed with loading the remaining oars as follows
change region <region 2 name>load oar universal_campus_02_02102012.oar
change region <region 3 name>load oar universal_campus_03_02102012.oar
change region <region 4 name>load oar universal_campus_04_02102012.oar
backup
Once this completes and the console is back, you can now go back to your OpenSim.ini file around line 573 and re-enable Xengine by setting Enable = true again, once you have made this change you can go back to the simulator console and type “shutdown” and you are now done the OARs are now restored and your ready to use the Universal Campus just start your simulator up again!
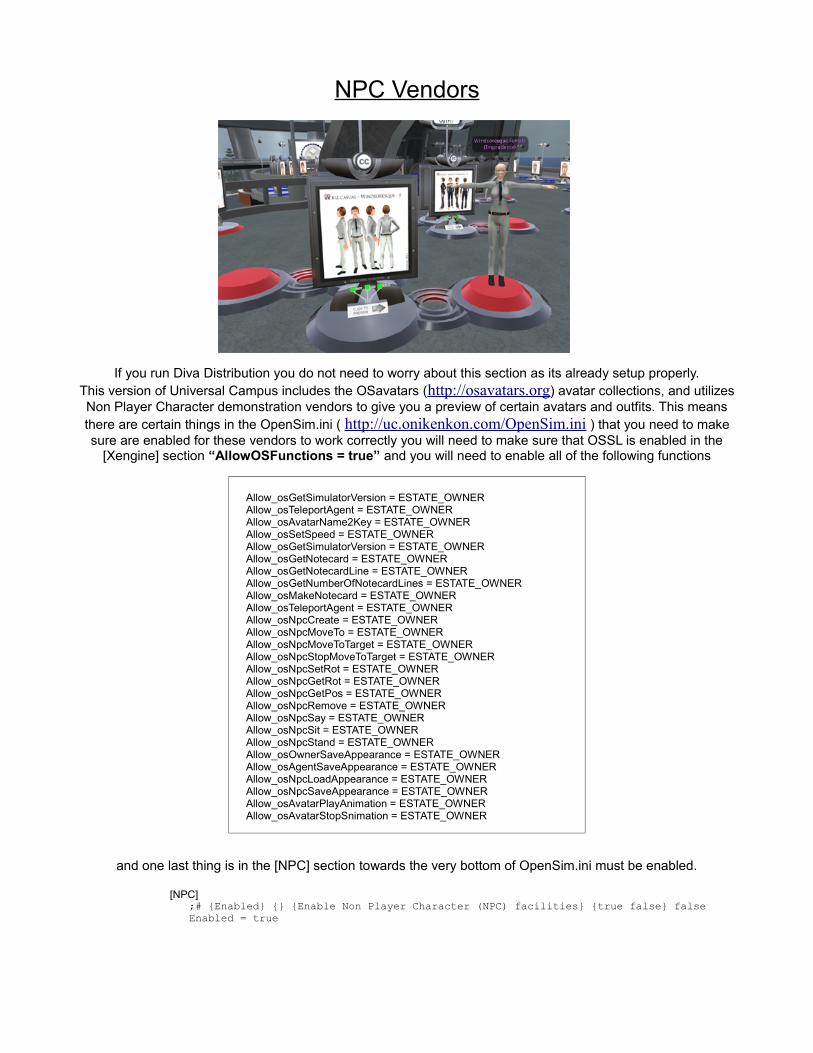
NPC Vendors
If you run Diva Distribution you do not need to worry about this section as its already setup properly.This version of Universal Campus includes the OSavatars (http://osavatars.org) avatar collections, and utilizes Non Player Character demonstration vendors to give you a preview of certain avatars and outfits. This means there are certain things in the OpenSim.ini ( http://uc.onikenkon.com/OpenSim.ini ) that you need to make sure are enabled for these vendors to work correctly you will need to make sure that OSSL is enabled in the
[Xengine] section “AllowOSFunctions = true” and you will need to enable all of the following functions
and one last thing is in the [NPC] section towards the very bottom of OpenSim.ini must be enabled.
[NPC] ;# {Enabled} {} {Enable Non Player Character (NPC) facilities} {true false} false Enabled = true
Allow_osGetSimulatorVersion = ESTATE_OWNER Allow_osTeleportAgent = ESTATE_OWNER Allow_osAvatarName2Key = ESTATE_OWNER Allow_osSetSpeed = ESTATE_OWNER Allow_osGetSimulatorVersion = ESTATE_OWNER Allow_osGetNotecard = ESTATE_OWNER Allow_osGetNotecardLine = ESTATE_OWNER Allow_osGetNumberOfNotecardLines = ESTATE_OWNER Allow_osMakeNotecard = ESTATE_OWNER Allow_osTeleportAgent = ESTATE_OWNER Allow_osNpcCreate = ESTATE_OWNER Allow_osNpcMoveTo = ESTATE_OWNER Allow_osNpcMoveToTarget = ESTATE_OWNER Allow_osNpcStopMoveToTarget = ESTATE_OWNER Allow_osNpcSetRot = ESTATE_OWNER Allow_osNpcGetRot = ESTATE_OWNER Allow_osNpcGetPos = ESTATE_OWNER Allow_osNpcRemove = ESTATE_OWNER Allow_osNpcSay = ESTATE_OWNER Allow_osNpcSit = ESTATE_OWNER Allow_osNpcStand = ESTATE_OWNER Allow_osOwnerSaveAppearance = ESTATE_OWNER Allow_osAgentSaveAppearance = ESTATE_OWNER Allow_osNpcLoadAppearance = ESTATE_OWNER Allow_osNpcSaveAppearance = ESTATE_OWNER Allow_osAvatarPlayAnimation = ESTATE_OWNER Allow_osAvatarStopSnimation = ESTATE_OWNER
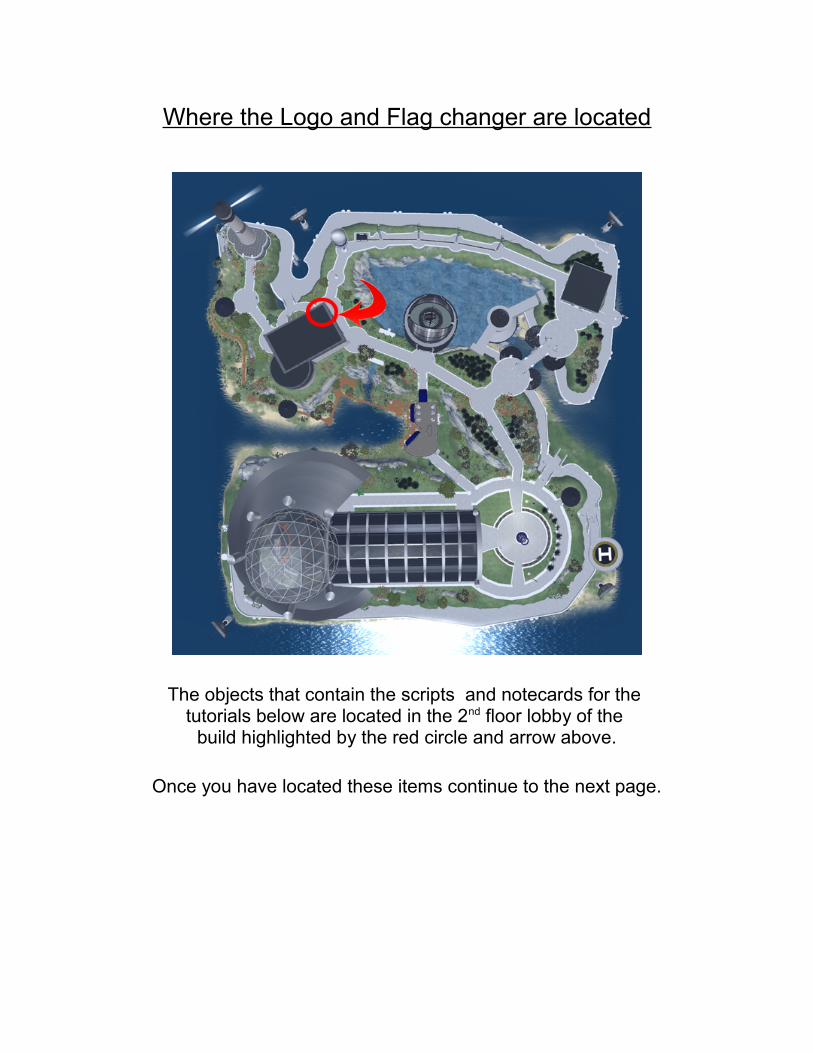
Where the Logo and Flag changer are located
The objects that contain the scripts and notecards for the tutorials below are located in the 2nd floor lobby of the
build highlighted by the red circle and arrow above.
Once you have located these items continue to the next page.
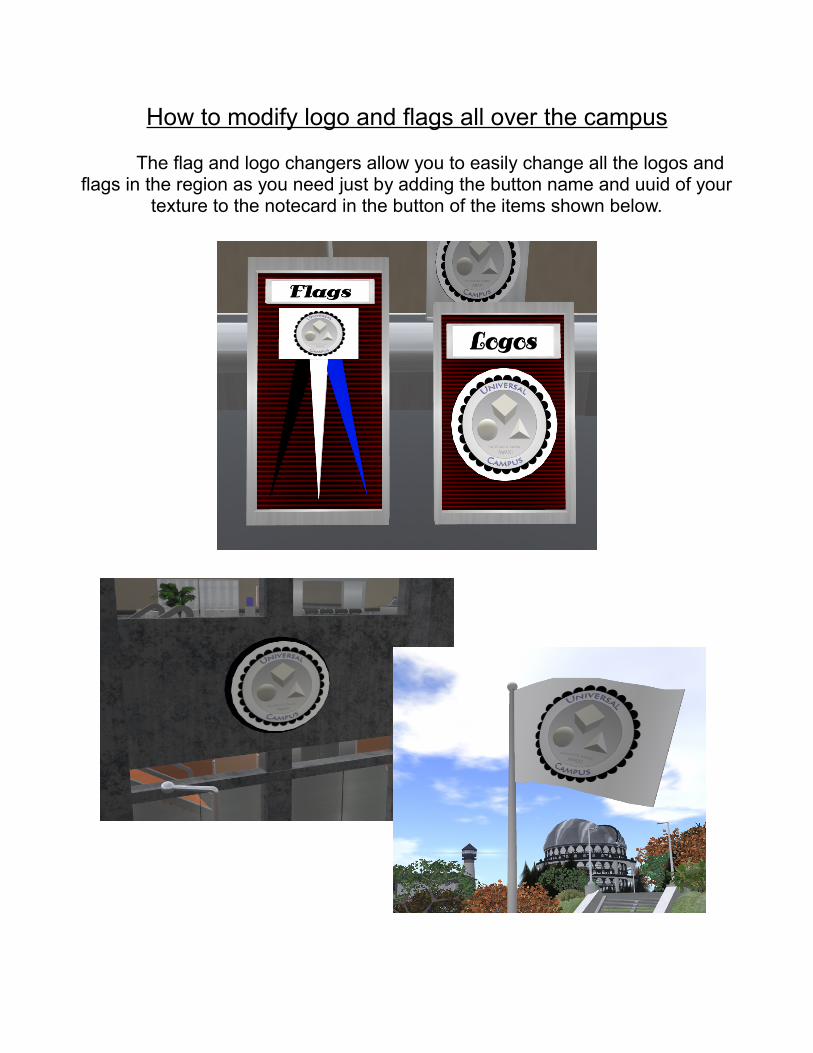
How to modify logo and flags all over the campus
The flag and logo changers allow you to easily change all the logos and flags in the region as you need just by adding the button name and uuid of your
texture to the notecard in the button of the items shown below.

First you must start by taking a copy of the hud by right clicking and selecting Take Copy from the menu, then rez a new
copy from your inventory on to the desk
Start editing the hud by right clicking it and select edit from menusee mouse pointer highlighted in red below
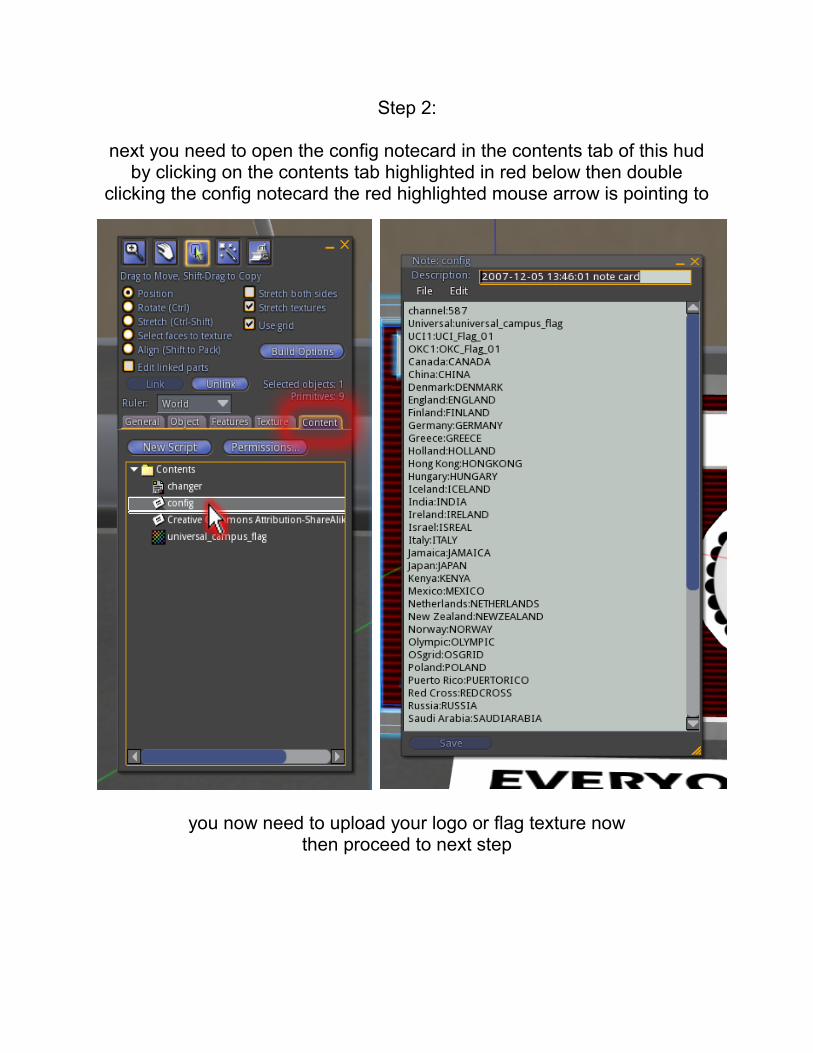
Step 2:
next you need to open the config notecard in the contents tab of this hudby clicking on the contents tab highlighted in red below then double
clicking the config notecard the red highlighted mouse arrow is pointing to
you now need to upload your logo or flag texture nowthen proceed to next step
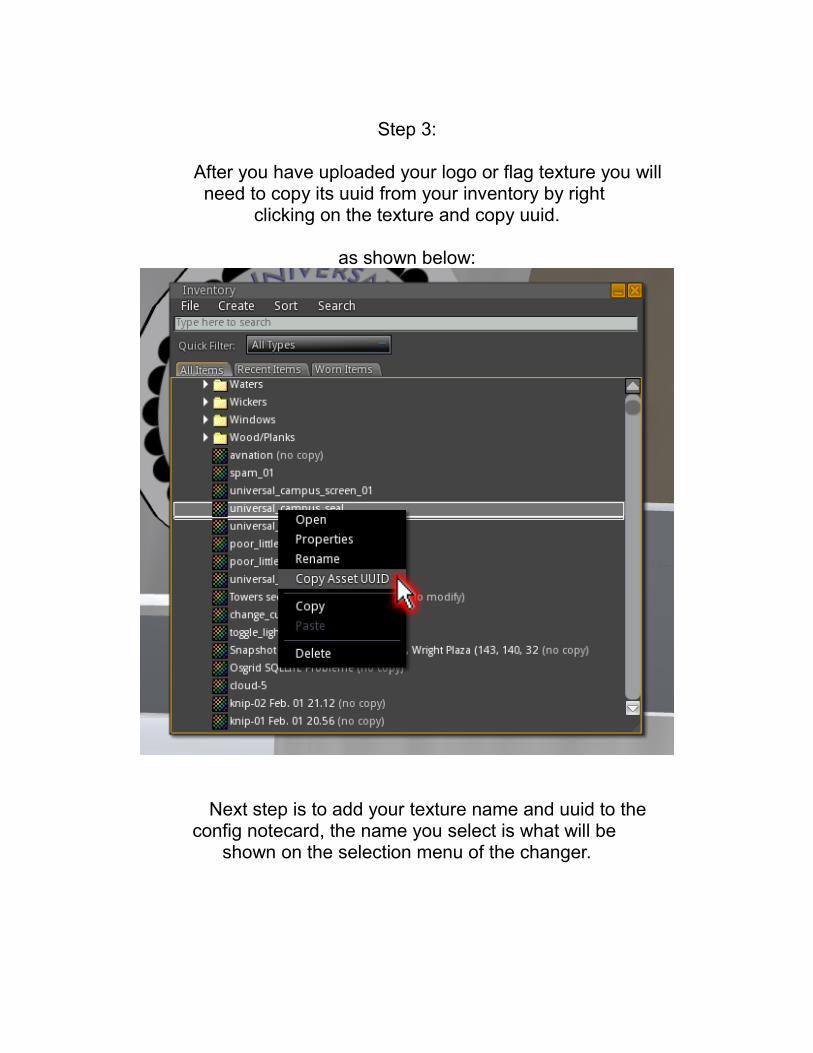
Step 3:
After you have uploaded your logo or flag texture you will need to copy its uuid from your inventory by right
clicking on the texture and copy uuid.
as shown below:
Next step is to add your texture name and uuid to the config notecard, the name you select is what will be
shown on the selection menu of the changer.
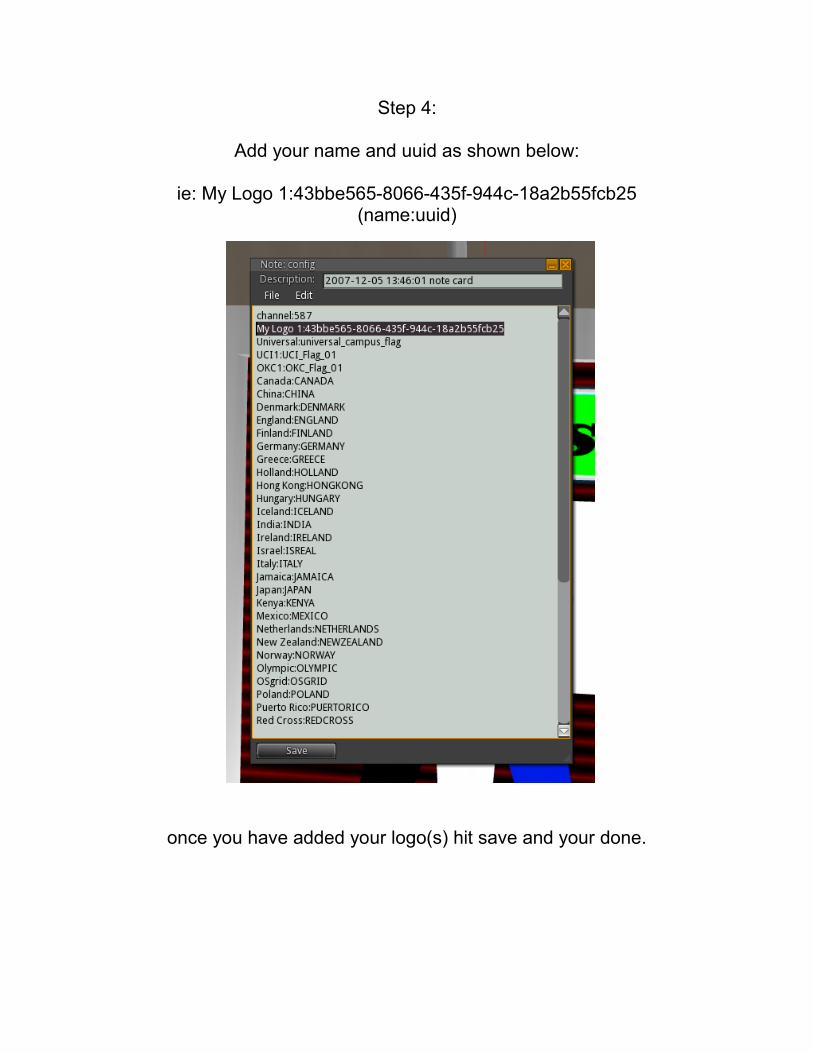
Step 4:
Add your name and uuid as shown below:
ie: My Logo 1:43bbe565-8066-435f-944c-18a2b55fcb25(name:uuid)
once you have added your logo(s) hit save and your done.
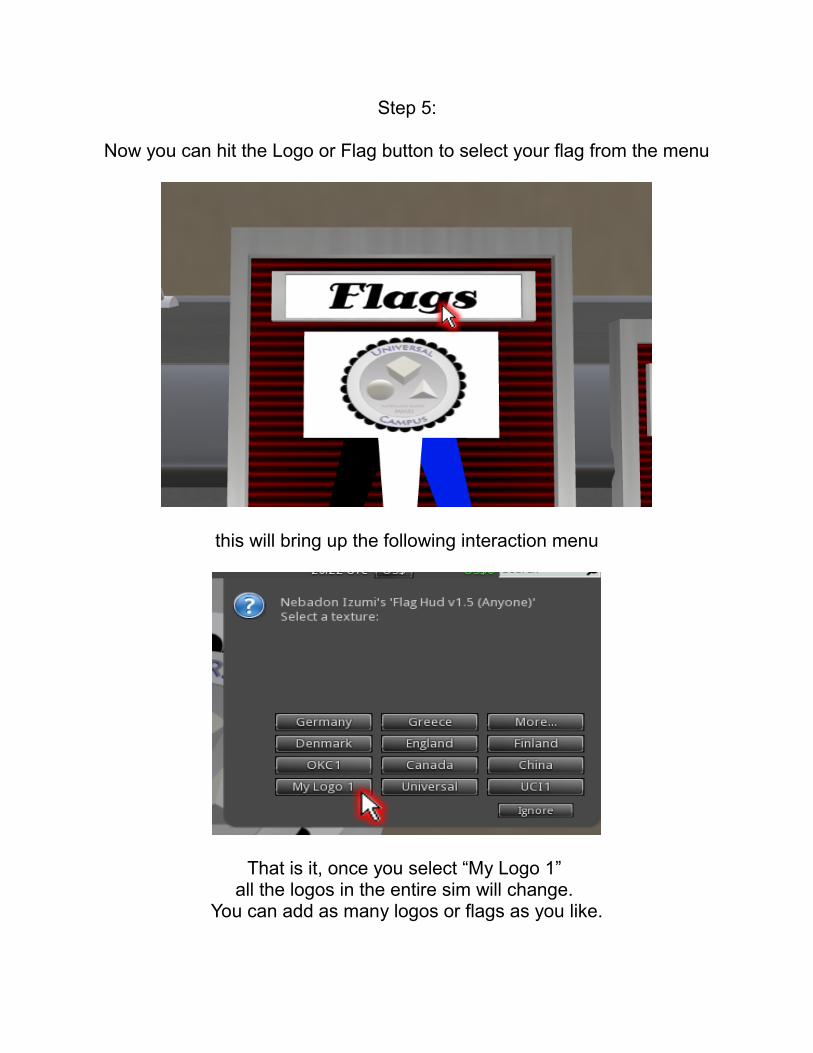
Step 5:
Now you can hit the Logo or Flag button to select your flag from the menu
this will bring up the following interaction menu
That is it, once you select “My Logo 1” all the logos in the entire sim will change.
You can add as many logos or flags as you like.
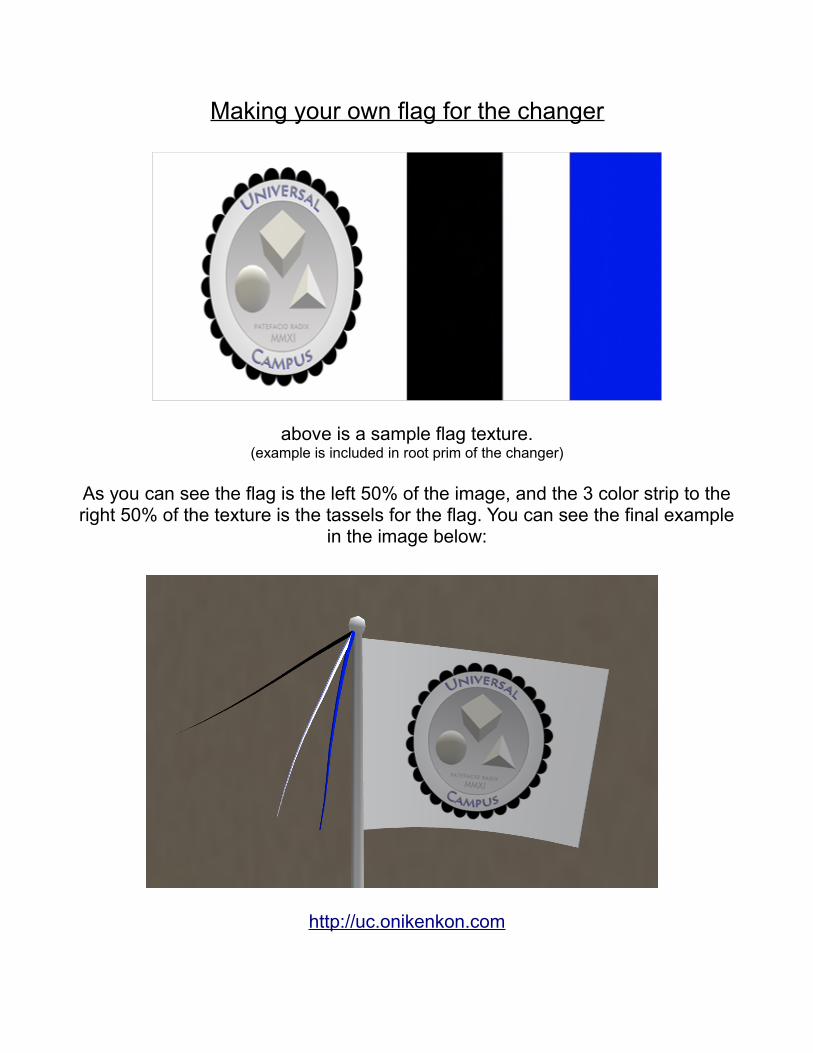
Making your own flag for the changer
above is a sample flag texture.(example is included in root prim of the changer)
As you can see the flag is the left 50% of the image, and the 3 color strip to the right 50% of the texture is the tassels for the flag. You can see the final example
in the image below:
http://uc.onikenkon.com


![SL3488 instruction manual -V1[1].52-20080429 · Instruction Manual Rev 1.2 ... will be affected the meter’s working and reduce the meter’s life or cause some malfunctions.](https://img.pdfslide.net/doc/110x75/5c91f5ae09d3f26a458bae12/sl3488-instruction-manual-v1152-instruction-manual-rev-12-will-be.jpg)