Embed Size (px)
Citation preview

Instructional Guide to the Functional Behavioral
Assessment (FBA) in CYBER
June 2014
1
Instructions for Use
Table of Contents I. Introduction ........................................................................................................................................................................ 2
II. Accessing CYBER ................................................................................................................................................................ 3
III. CYBER Welcome Page - Managing Treatment Plans/Assessments .................................................................................. 4
IV. Accessing and Creating an FBA ........................................................................................................................................ 5
V. The Plan Approval Window ............................................................................................................................................. 16
2
I. Introduction Intensive In-Home services (IIH) have been introduced into the Children’s System of Care (CSOC) and are
managed/authorized by PerformCare. The goal of these services is to restore or assist the youth and family in achieving
their best functional level; these services are designed to assist a youth with Intellectual/Developmental Disabilities in
improving skills such as self-help, socialization and adaptive skills that are necessary for functioning in the home, at
school and in the community.
This guide will review the CYBER functionality related to accessing a youth’s record and completing the Functional
Behavior Assessment (FBA). For the time being, the Behavioral Support Plan (BSP) will be completed manually until that
functionality is placed in the system at a later date. These documents are to be completed by users that are offering
behavioral intervention services to youth and families.
For those users that are offering clinical therapeutic services, they must be certified to complete a CANS tool in CYBER
(the Strength and Needs Assessment); this certification is offered by Rutgers University of Behavioral Health Center
(UBHC). Their training calendar can be found at: http://www.nj.gov/dcf/providers/csc/training/. These users will have
access to an IIH-specific treatment plan in CYBER in the near future.
If an agency choses to do so, security can be set-up (by the agency’s Systems Administrator) so that plans and
assessments are submitted through a hierarchy within the agency prior to submittal to PerformCare for review. For
example, a user with a CM (Care/Case Manager) designation on their profile would submit their FBA to another user
within the agency with an MGR (Manager) or SUP (Supervisor) designation. That individual can review, edit and return
the document back to the author; this user can also submit directly to PerformCare. Individuals with these designations
can also assign plans and assessments to any user within the agency via the Plan Approval screen. (Note: Setting up
hierarchy is currently not a CSOC requirement for IIH agencies.) These settings can be assigned to a user’s CYBER profile
by the agencies System Administrator; information about that role and the functionality associated with it can be found
in Training #102, posted on the Training page of the PerformCare website:
https://apps.performcarenj.org/NJTraining/CourseList.aspx .
3
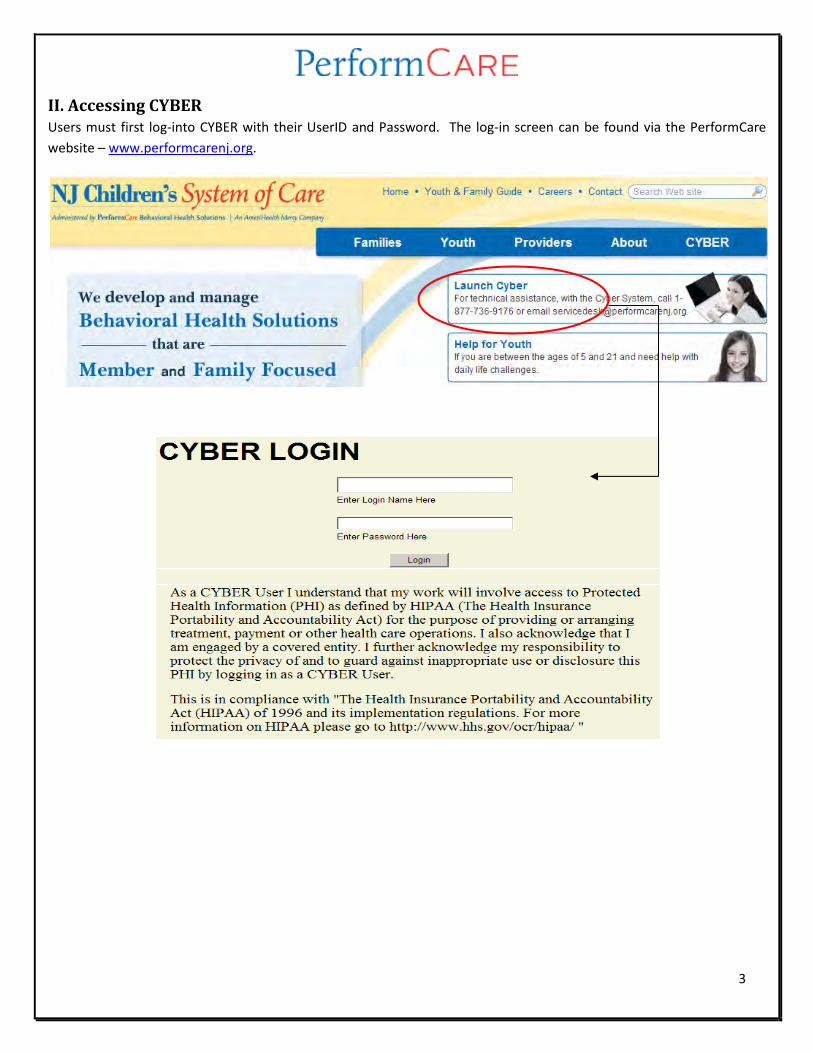
II. Accessing CYBER Users must first log-into CYBER with their UserID and Password. The log-in screen can be found via the PerformCare
website – www.performcarenj.org.
4
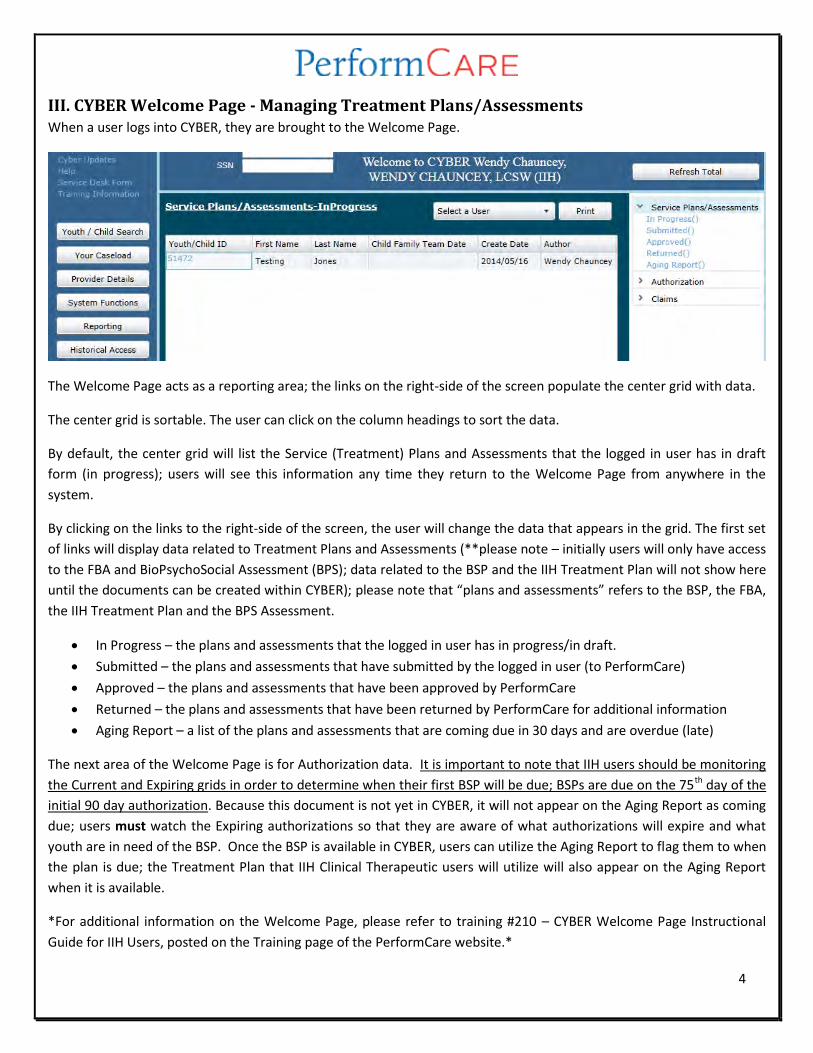
III. CYBER Welcome Page - Managing Treatment Plans/Assessments When a user logs into CYBER, they are brought to the Welcome Page.
The Welcome Page acts as a reporting area; the links on the right-side of the screen populate the center grid with data.
The center grid is sortable. The user can click on the column headings to sort the data.
By default, the center grid will list the Service (Treatment) Plans and Assessments that the logged in user has in draft
form (in progress); users will see this information any time they return to the Welcome Page from anywhere in the
system.
By clicking on the links to the right-side of the screen, the user will change the data that appears in the grid. The first set
of links will display data related to Treatment Plans and Assessments (**please note – initially users will only have access
to the FBA and BioPsychoSocial Assessment (BPS); data related to the BSP and the IIH Treatment Plan will not show here
until the documents can be created within CYBER); please note that “plans and assessments” refers to the BSP, the FBA,
the IIH Treatment Plan and the BPS Assessment.
In Progress – the plans and assessments that the logged in user has in progress/in draft.
Submitted – the plans and assessments that have submitted by the logged in user (to PerformCare)
Approved – the plans and assessments that have been approved by PerformCare
Returned – the plans and assessments that have been returned by PerformCare for additional information
Aging Report – a list of the plans and assessments that are coming due in 30 days and are overdue (late)
The next area of the Welcome Page is for Authorization data. It is important to note that IIH users should be monitoring
the Current and Expiring grids in order to determine when their first BSP will be due; BSPs are due on the 75th day of the
initial 90 day authorization. Because this document is not yet in CYBER, it will not appear on the Aging Report as coming
due; users must watch the Expiring authorizations so that they are aware of what authorizations will expire and what
youth are in need of the BSP. Once the BSP is available in CYBER, users can utilize the Aging Report to flag them to when
the plan is due; the Treatment Plan that IIH Clinical Therapeutic users will utilize will also appear on the Aging Report
when it is available.
*For additional information on the Welcome Page, please refer to training #210 – CYBER Welcome Page Instructional
Guide for IIH Users, posted on the Training page of the PerformCare website.*
5
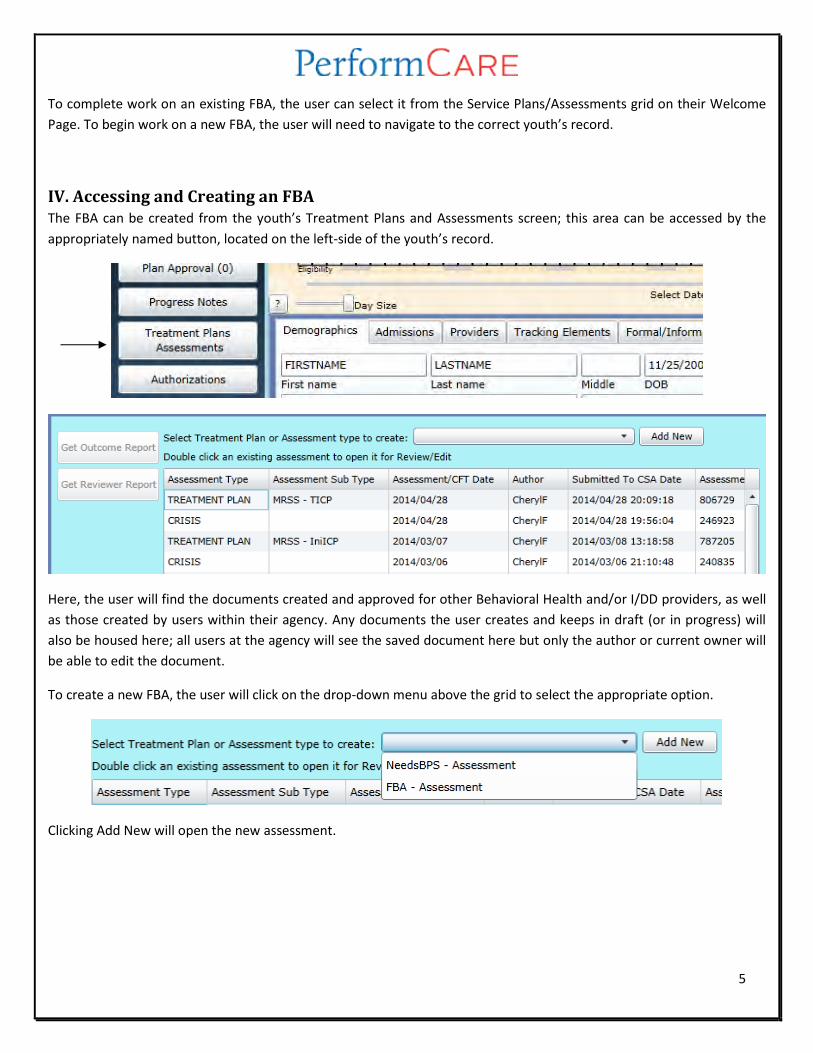
To complete work on an existing FBA, the user can select it from the Service Plans/Assessments grid on their Welcome
Page. To begin work on a new FBA, the user will need to navigate to the correct youth’s record.
IV. Accessing and Creating an FBA The FBA can be created from the youth’s Treatment Plans and Assessments screen; this area can be accessed by the
appropriately named button, located on the left-side of the youth’s record.
Here, the user will find the documents created and approved for other Behavioral Health and/or I/DD providers, as well
as those created by users within their agency. Any documents the user creates and keeps in draft (or in progress) will
also be housed here; all users at the agency will see the saved document here but only the author or current owner will
be able to edit the document.
To create a new FBA, the user will click on the drop-down menu above the grid to select the appropriate option.
Clicking Add New will open the new assessment.
6
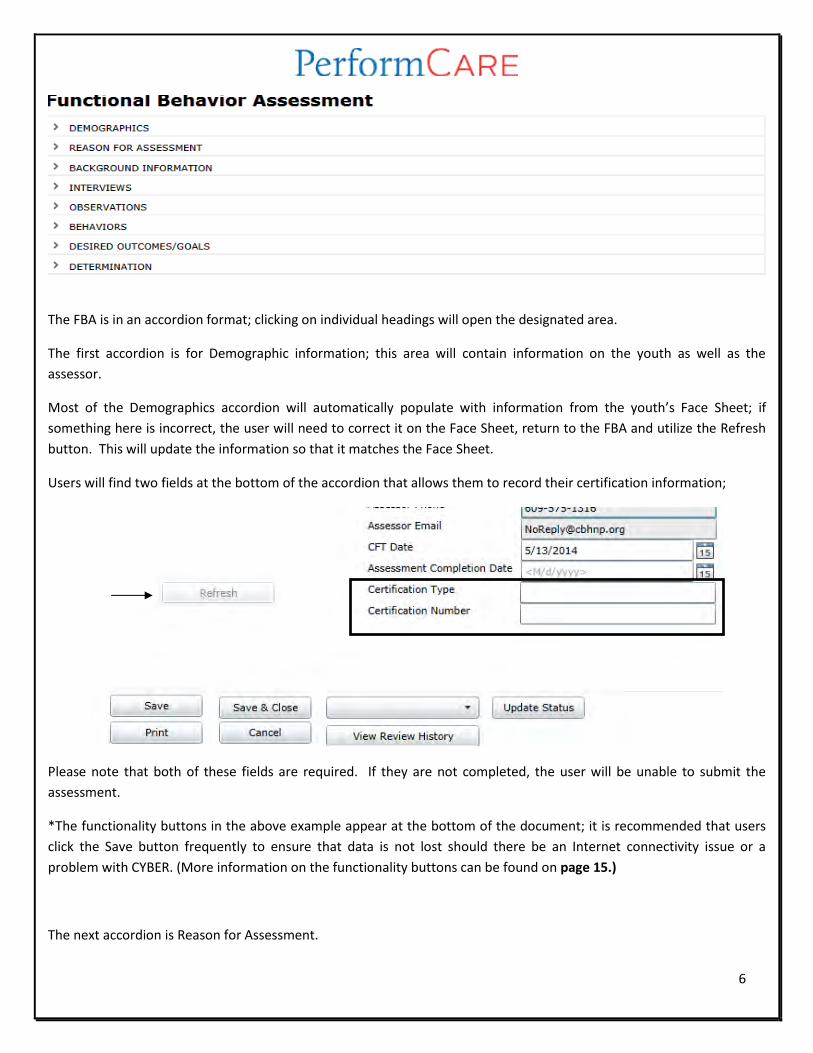
The FBA is in an accordion format; clicking on individual headings will open the designated area.
The first accordion is for Demographic information; this area will contain information on the youth as well as the
assessor.
Most of the Demographics accordion will automatically populate with information from the youth’s Face Sheet; if
something here is incorrect, the user will need to correct it on the Face Sheet, return to the FBA and utilize the Refresh
button. This will update the information so that it matches the Face Sheet.
Users will find two fields at the bottom of the accordion that allows them to record their certification information;
Please note that both of these fields are required. If they are not completed, the user will be unable to submit the
assessment.
*The functionality buttons in the above example appear at the bottom of the document; it is recommended that users
click the Save button frequently to ensure that data is not lost should there be an Internet connectivity issue or a
problem with CYBER. (More information on the functionality buttons can be found on page 15.)
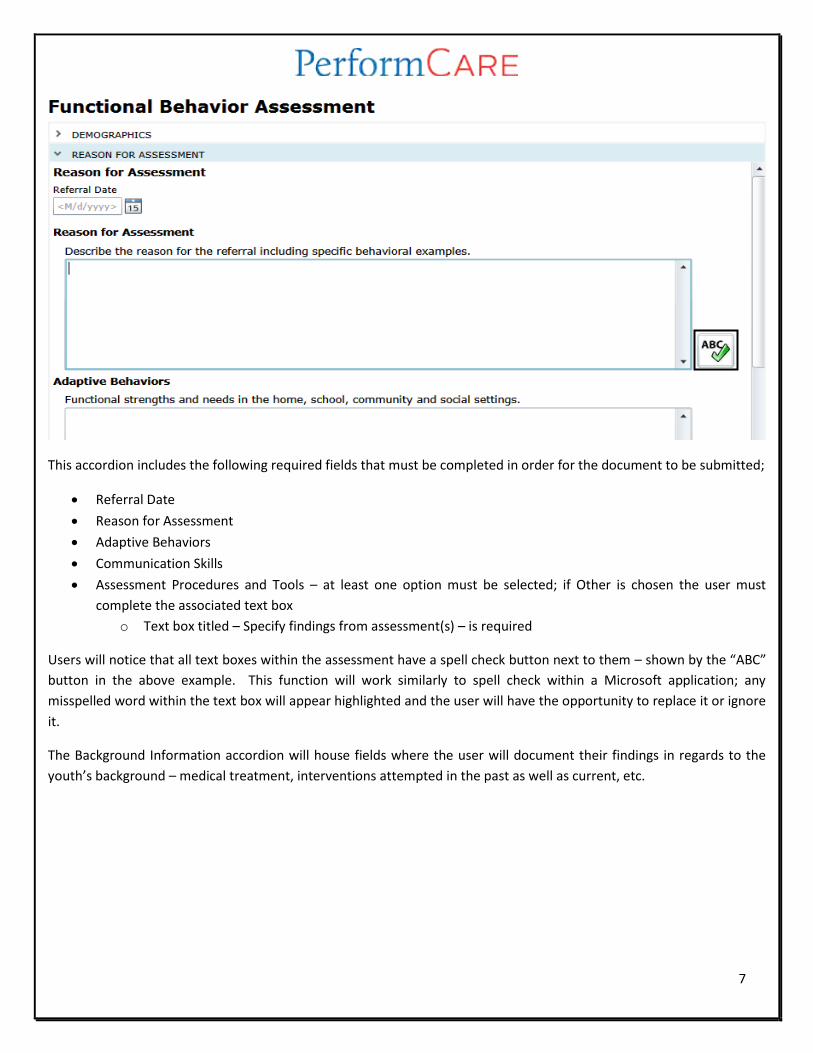
The next accordion is Reason for Assessment.
7
This accordion includes the following required fields that must be completed in order for the document to be submitted;
Referral Date
Reason for Assessment
Adaptive Behaviors
Communication Skills
Assessment Procedures and Tools – at least one option must be selected; if Other is chosen the user must
complete the associated text box
o Text box titled – Specify findings from assessment(s) – is required
Users will notice that all text boxes within the assessment have a spell check button next to them – shown by the “ABC”
button in the above example. This function will work similarly to spell check within a Microsoft application; any
misspelled word within the text box will appear highlighted and the user will have the opportunity to replace it or ignore
it.
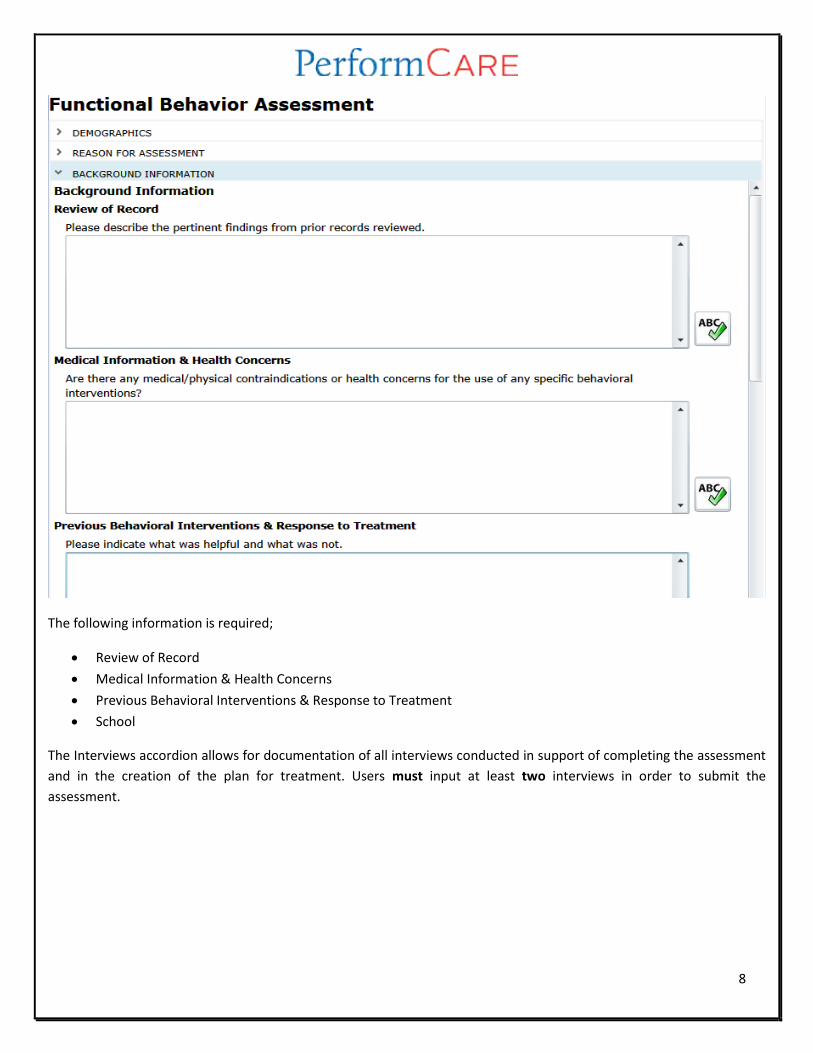
The Background Information accordion will house fields where the user will document their findings in regards to the
youth’s background – medical treatment, interventions attempted in the past as well as current, etc.
8
The following information is required;
Review of Record
Medical Information & Health Concerns
Previous Behavioral Interventions & Response to Treatment
School
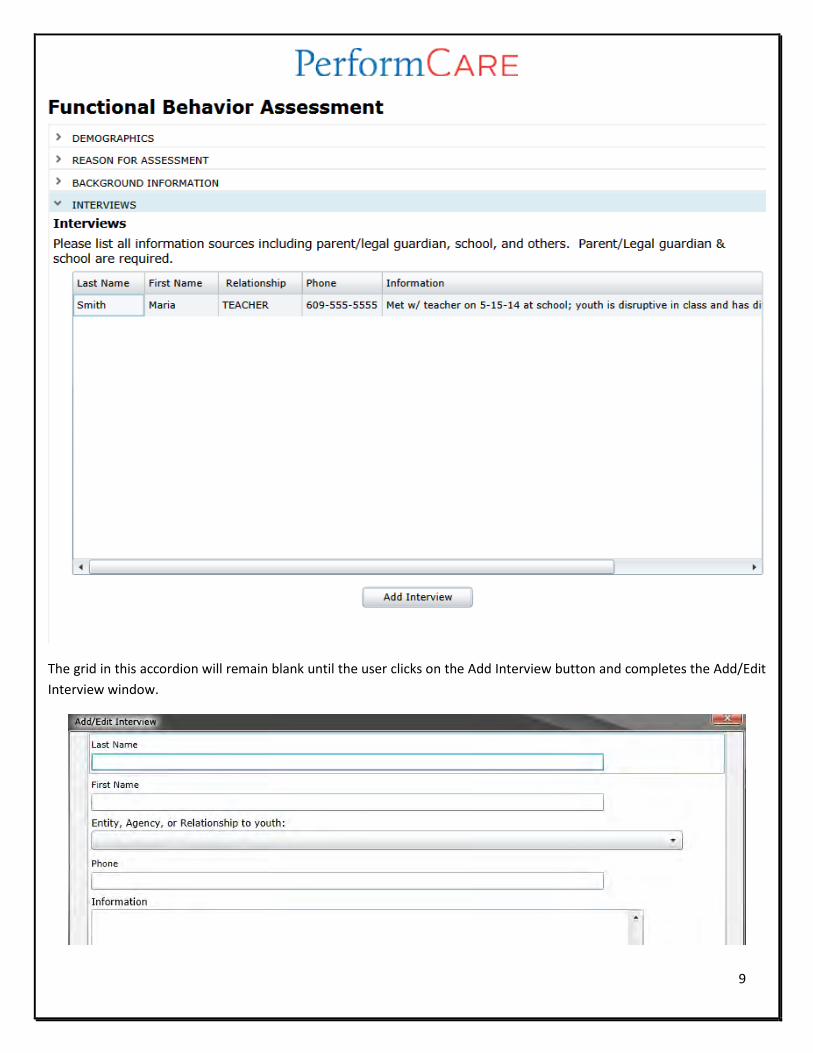
The Interviews accordion allows for documentation of all interviews conducted in support of completing the assessment
and in the creation of the plan for treatment. Users must input at least two interviews in order to submit the
assessment.
9
The grid in this accordion will remain blank until the user clicks on the Add Interview button and completes the Add/Edit
Interview window.
10
Users must complete all of the fields in order to save the interview record.
Double-clicking in a record in the grid will allow the user to edit or delete the interview record; the interview records
cannot be edited once the assessment has been submitted.
Utilizing the Observations accordion allows the user to document the observations that were completed in support of
completing the assessment.
*It is expected that at least one face-to-face interview will take place with the parent/guardian AND school personnel
(child study team members, school counselor, teacher, etc.)
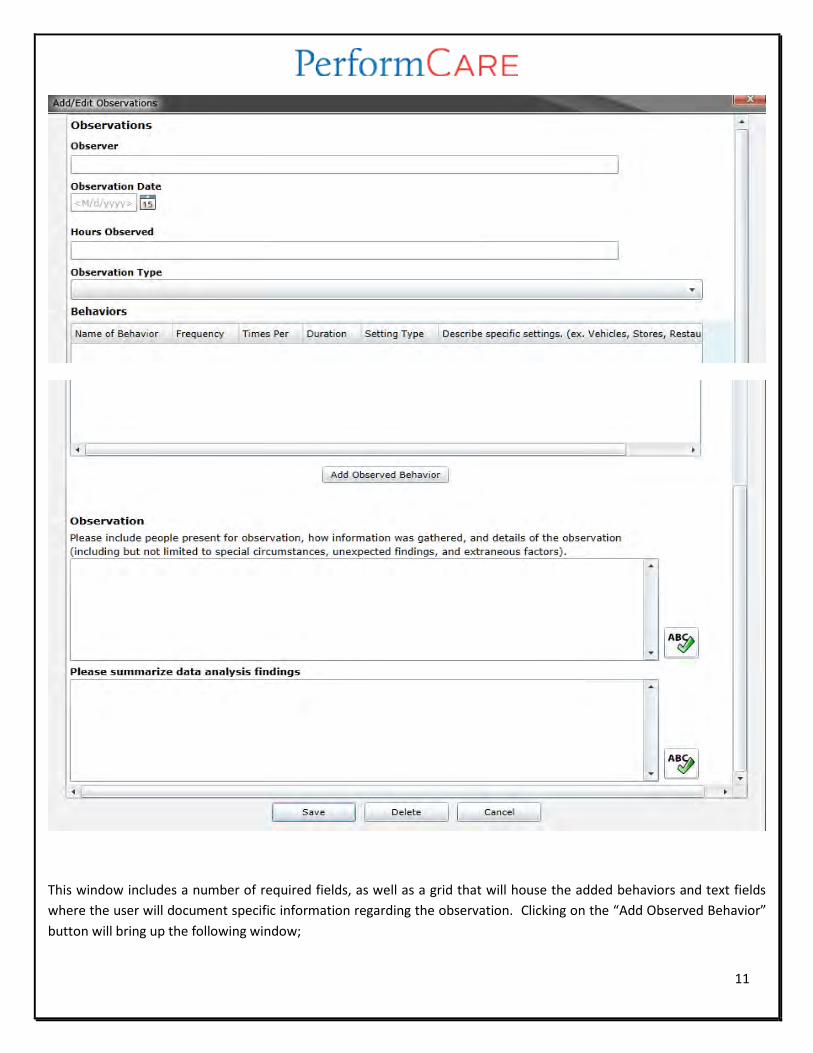
Clicking the Add Observation button will open the Add/Edit Observation window.
11
This window includes a number of required fields, as well as a grid that will house the added behaviors and text fields
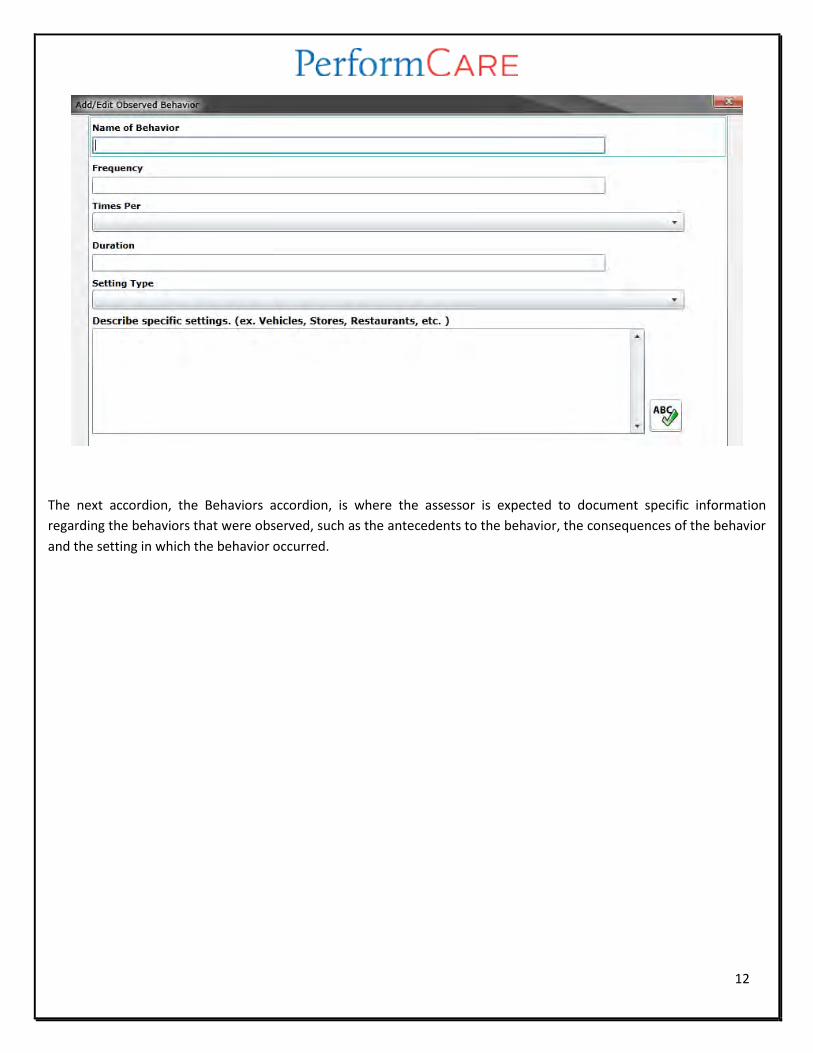
where the user will document specific information regarding the observation. Clicking on the “Add Observed Behavior”
button will bring up the following window;
12
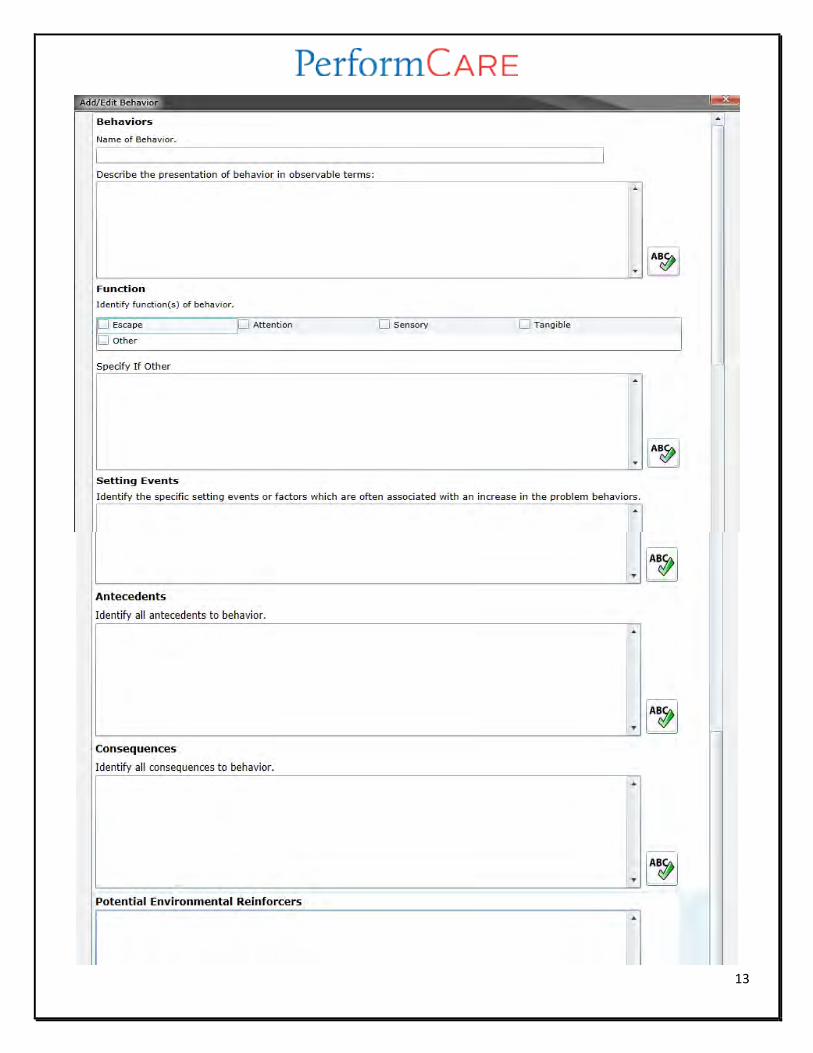
The next accordion, the Behaviors accordion, is where the assessor is expected to document specific information
regarding the behaviors that were observed, such as the antecedents to the behavior, the consequences of the behavior
and the setting in which the behavior occurred.
13
14
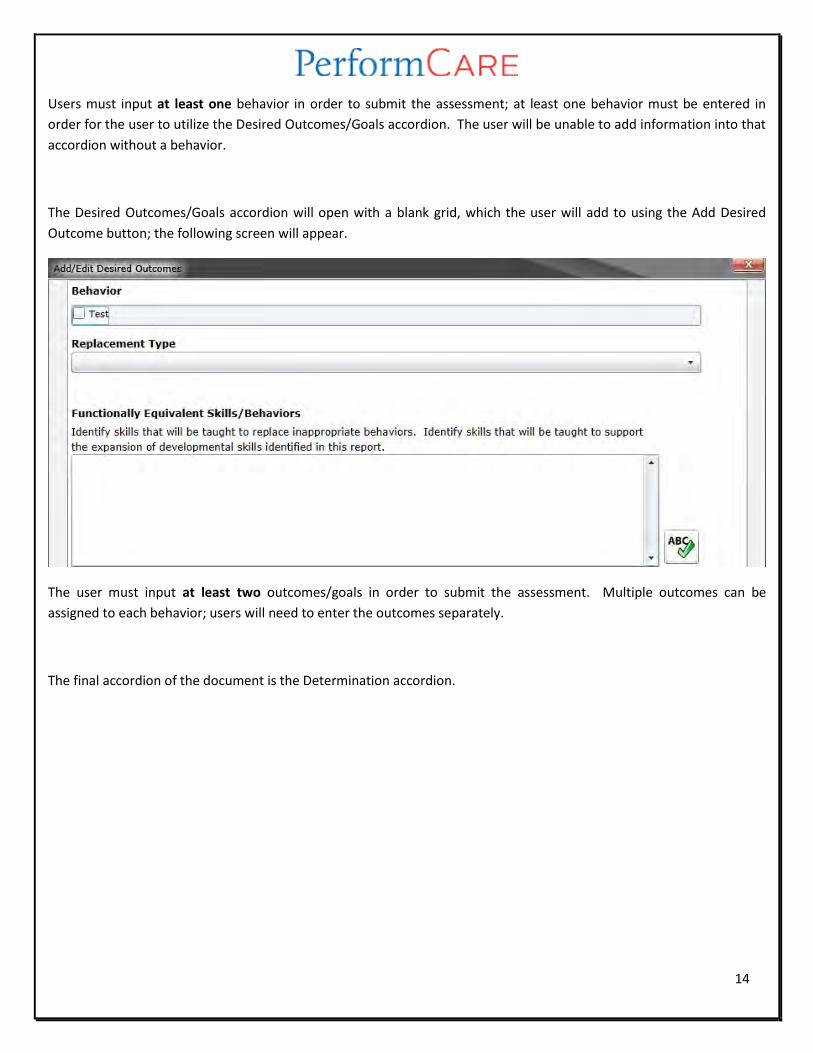
Users must input at least one behavior in order to submit the assessment; at least one behavior must be entered in
order for the user to utilize the Desired Outcomes/Goals accordion. The user will be unable to add information into that
accordion without a behavior.
The Desired Outcomes/Goals accordion will open with a blank grid, which the user will add to using the Add Desired
Outcome button; the following screen will appear.
The user must input at least two outcomes/goals in order to submit the assessment. Multiple outcomes can be
assigned to each behavior; users will need to enter the outcomes separately.
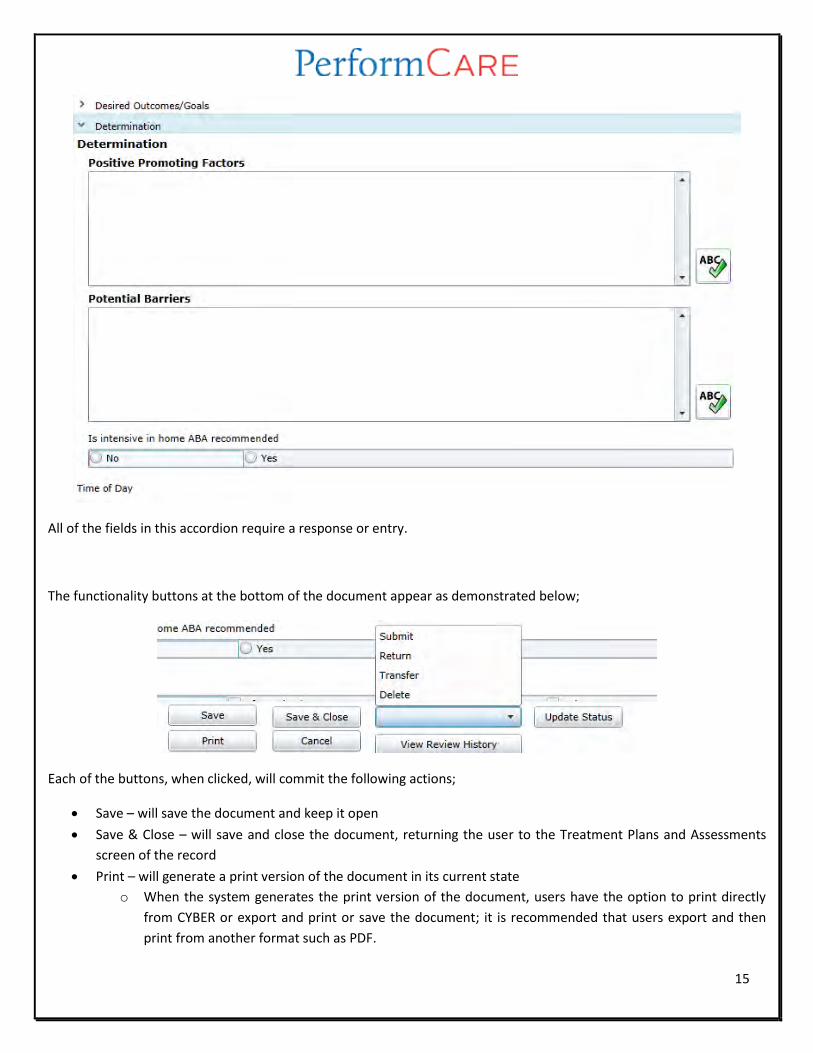
The final accordion of the document is the Determination accordion.
15
All of the fields in this accordion require a response or entry.
The functionality buttons at the bottom of the document appear as demonstrated below;
Each of the buttons, when clicked, will commit the following actions;
Save – will save the document and keep it open
Save & Close – will save and close the document, returning the user to the Treatment Plans and Assessments
screen of the record
Print – will generate a print version of the document in its current state
o When the system generates the print version of the document, users have the option to print directly
from CYBER or export and print or save the document; it is recommended that users export and then
print from another format such as PDF.
16
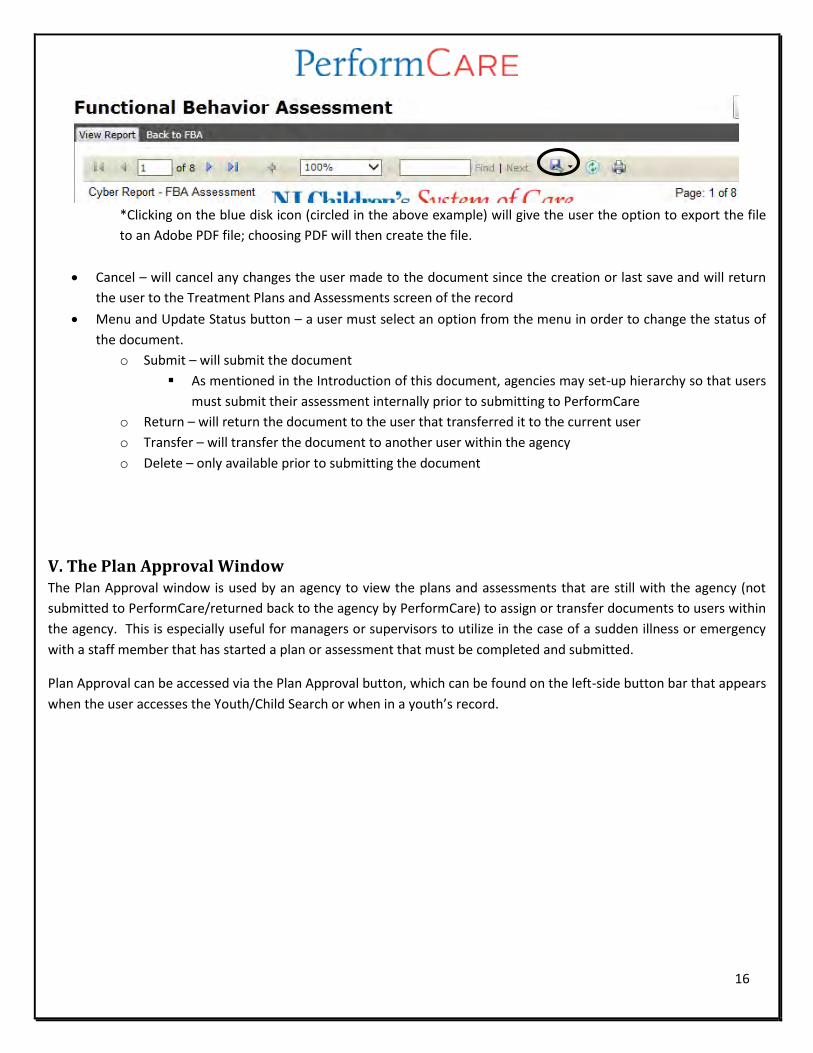
*Clicking on the blue disk icon (circled in the above example) will give the user the option to export the file
to an Adobe PDF file; choosing PDF will then create the file.
Cancel – will cancel any changes the user made to the document since the creation or last save and will return
the user to the Treatment Plans and Assessments screen of the record
Menu and Update Status button – a user must select an option from the menu in order to change the status of
the document.
o Submit – will submit the document
As mentioned in the Introduction of this document, agencies may set-up hierarchy so that users
must submit their assessment internally prior to submitting to PerformCare
o Return – will return the document to the user that transferred it to the current user
o Transfer – will transfer the document to another user within the agency
o Delete – only available prior to submitting the document
V. The Plan Approval Window The Plan Approval window is used by an agency to view the plans and assessments that are still with the agency (not
submitted to PerformCare/returned back to the agency by PerformCare) to assign or transfer documents to users within
the agency. This is especially useful for managers or supervisors to utilize in the case of a sudden illness or emergency
with a staff member that has started a plan or assessment that must be completed and submitted.
Plan Approval can be accessed via the Plan Approval button, which can be found on the left-side button bar that appears
when the user accesses the Youth/Child Search or when in a youth’s record.
17
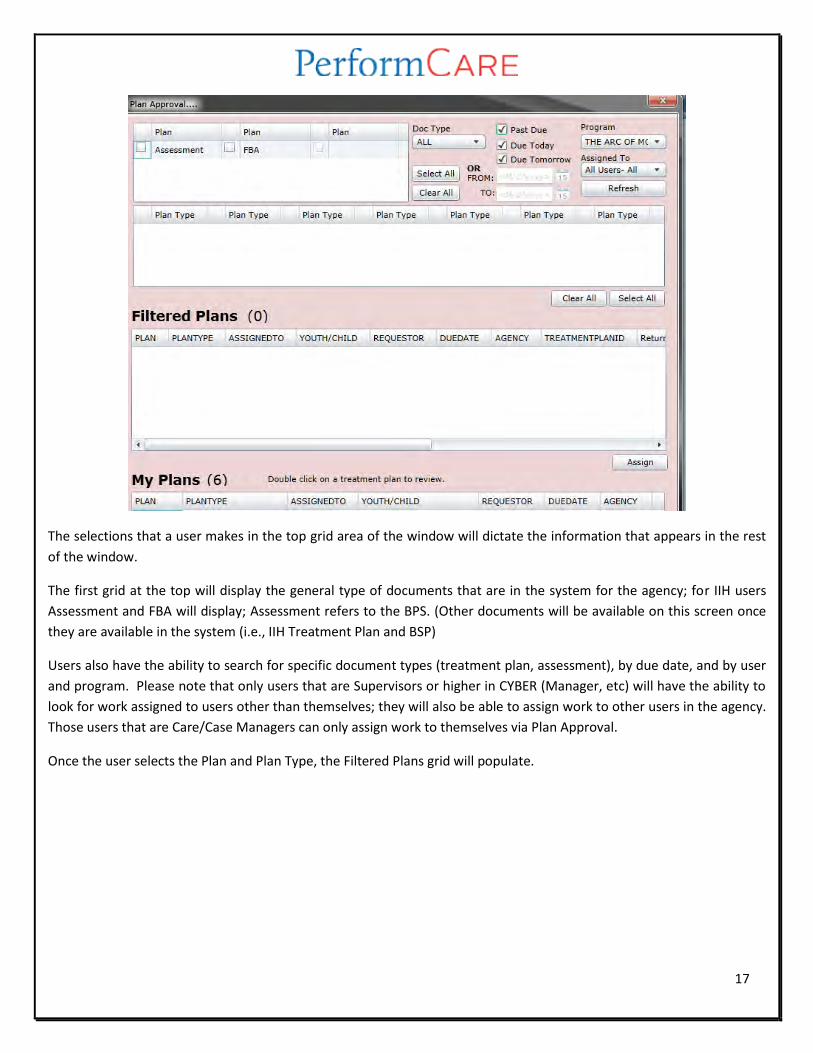
The selections that a user makes in the top grid area of the window will dictate the information that appears in the rest
of the window.
The first grid at the top will display the general type of documents that are in the system for the agency; for IIH users
Assessment and FBA will display; Assessment refers to the BPS. (Other documents will be available on this screen once
they are available in the system (i.e., IIH Treatment Plan and BSP)
Users also have the ability to search for specific document types (treatment plan, assessment), by due date, and by user
and program. Please note that only users that are Supervisors or higher in CYBER (Manager, etc) will have the ability to
look for work assigned to users other than themselves; they will also be able to assign work to other users in the agency.
Those users that are Care/Case Managers can only assign work to themselves via Plan Approval.
Once the user selects the Plan and Plan Type, the Filtered Plans grid will populate.
18
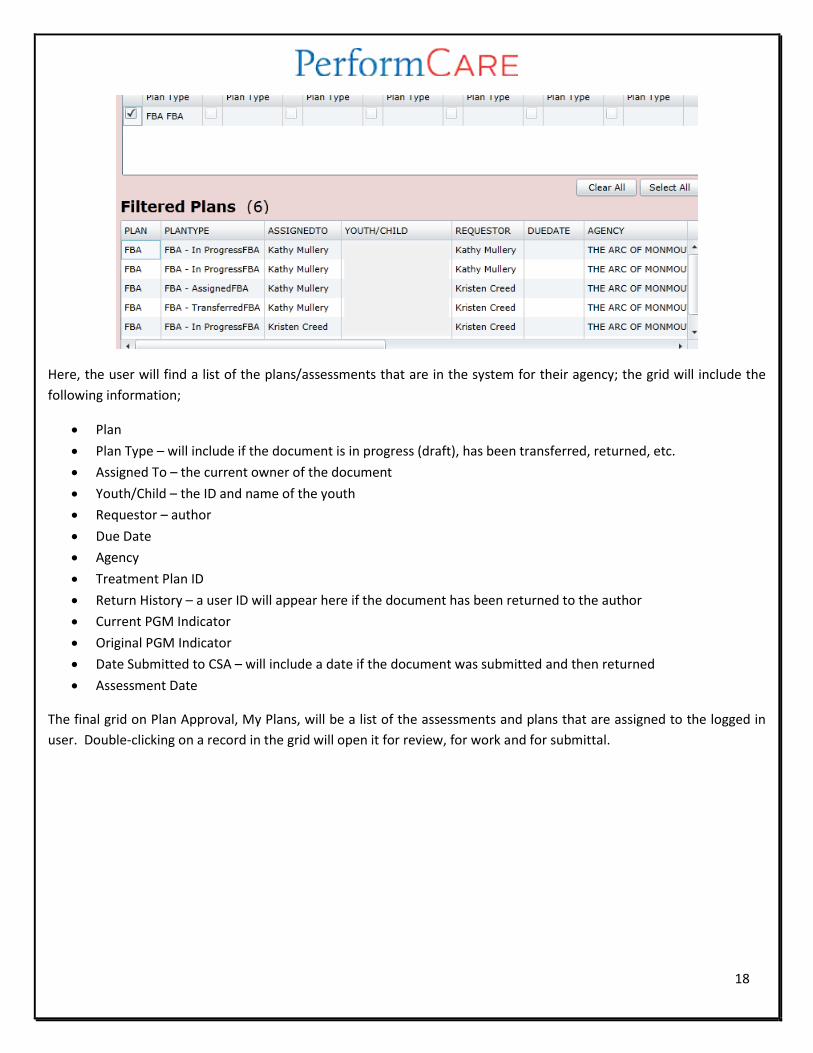
Here, the user will find a list of the plans/assessments that are in the system for their agency; the grid will include the
following information;
Plan
Plan Type – will include if the document is in progress (draft), has been transferred, returned, etc.
Assigned To – the current owner of the document
Youth/Child – the ID and name of the youth
Requestor – author
Due Date
Agency
Treatment Plan ID
Return History – a user ID will appear here if the document has been returned to the author
Current PGM Indicator
Original PGM Indicator
Date Submitted to CSA – will include a date if the document was submitted and then returned
Assessment Date
The final grid on Plan Approval, My Plans, will be a list of the assessments and plans that are assigned to the logged in
user. Double-clicking on a record in the grid will open it for review, for work and for submittal.


![Functional Behavioral Assessment - Weeblynicolettesabatino.weebly.com/uploads/6/3/8/8/6388359/... · Web view[Functional Behavioral Assessment] Nicolette Sabatino Description of student:](https://img.pdfslide.net/doc/110x75/5e50d84bbab50454102ca1c8/functional-behavioral-assessment-wee-web-view-functional-behavioral-assessment.jpg)