Embed Size (px)
Citation preview
INSTRUCTIONS - BRS RO/DI SYSTEMS6 Stage DELUXE Replacement Filter Kit:
6 Stage DELUXE (SKU 200103)
Red Intake, Black Waste Water
and Blue Output Tubing
Purtrex 5 Micron Depth Sediment Filter
75 GPD Dow Filtmtec Membrane
Membrane Flush Kit & Flow Restrictor
Automatic Shut Off Valve
Top View
DELUXE FEATURES:Oil-Filled Pressure GaugeFM-2 Filter Monitor with Volumizer Deluxe Dual Inline TDS MeterDual Deionization CanistersMembrane Flush Kit (seen in Top View)Float Valve (seen in Parts Bag)
MATRIKX CTO 5 MicronCarbon Block
MATRIKX CTO PLUS 0.6 Micron Carbon Block
RECOMMENDED ITEMS:Drill with ¼” drill bitAdjustable WrenchMarkerPlumber’s tapeTube Cutter (highly recommended)
Please make sure all parts are included and undamaged. If a part is found missing or damaged, please contact our customer service department. LIFETIME
PARTS BAG INCLUDES:
Drain Saddle Clamp
EZ Angle Stop Adapter
Inline Ball Valve
Filter Wrench
Kitchen Faucet Diverter Valve
Garden Hose/Utility Sink Adapter
Float Valve
©2012 Bulk Reef Supplybulkreefsupply.com
FAQs
Q: Is it normal for the DI stage to not fill completely with water?
A: Yes, air gets caught in the top of the canister and has no way to escape. This does not interfere with system performance, but if desired open the canister slightly while the unit is running to allow the air to escape. Retighten the canister when the water reaches the top.
Q: Is it normal for TDS to be higher when the system is first turned on?
A: Yes, this is called “TDS creep” and normal on all RO systems. Please allow the RO system to run for 10 minutes before testing TDS.
Q: Is it okay to leave water in the canisters between uses?
A: Yes, it is advised to keep them wet between uses and to store in a cool, dark location.
Self-piercing Saddle Valve
6 Stage Deluxe Instructions.indd 1 10/22/2012 2:05:45 PM
SET UP & MAINTENANCE
1 TURN THE WATER SUPPLY TO THE CONNECTION POINT OFF
SYSTEM OPERATION
During operation, the system will produce up to 75 gallons of purified RO water per day (3.125 gallons per hour) under the correct water temperature and pressure.
> HOT WATER SHOULD NEVER BE USED with the RO system as it can damage the RO membrane and may also contain additional contaminants. For this reason, only water from the COLD water supply should be used.
> For optimal results, water pressure should be at least 50 psi entering the membrane. If operating pressure is under 50 psi, a reduction in water production and a lower rejection rate may be experienced. If water pressure is approaching 35 psi, consider adding a booster pump to increase performance.
> A ratio of 4:1 waste water to purified RO water is normal. The waste water contains the dissolved solids from the source water and should not be used in your aquarium.
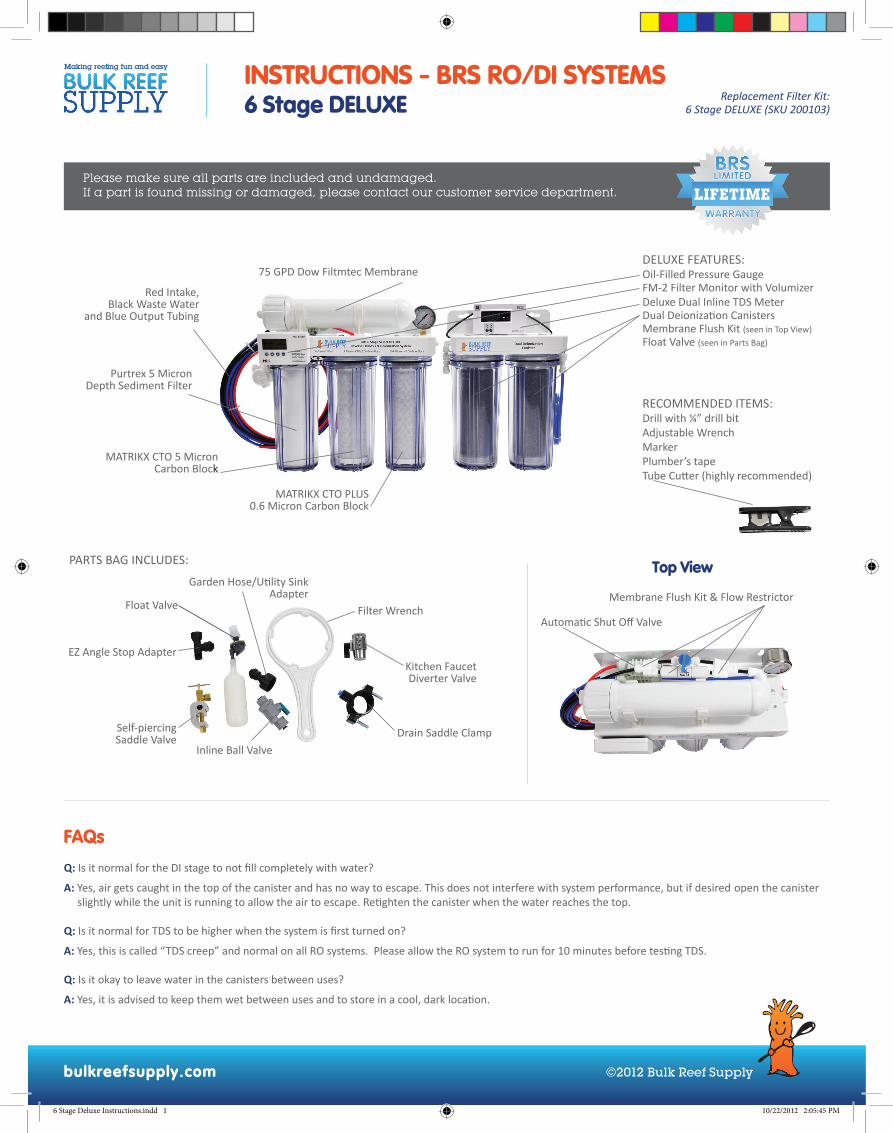
2 CHOOSE AND INSTALL YOUR CONNECTOR/ADAPTER
NON-PERMANENT
Garden Hose/Utility Sink Adapter
Thread onto a hose, laundry sink faucet or fittings with similar threads.
NON-PERMANENT
Kitchen Faucet Diverter Valve
Attaches easily to the majority of kitchen sink faucets. If faucet has
a different thread, thread adapters are available at most hardware stores.
Easy installation. Adapter has built in valve to switch between faucet use and sending water to RO system.
Hose to fitting connection is made by sliding the tubing over the barbed connection on the kitchen sink adapter.
SEMI-PERMANENT
EZ Angle Stop Adapter
PERMANENT
Self-piercing Saddle Valve
Allows for a clean “under the sink, out of the way” connection.
Use on copper pipe up to ⅝” thick.
This fitting actually pierces the copper line and CANNOT BE REMOVED.
PERMANENT INSTALLATION.
Provides a quick connect fitting for the RO/DI tubing.
Great option for quick installation.
This fitting only works on flexible water line likethis one pictured.
Installs inline above the watershut off valve and flexible tubing to faucet.
Can be removed if needed.
Makes a permanent connectionto your household water supply.
For this installation you will need a magic marker, adjustable wrench and a drill with a ¼” drill bit.
1. Separate the drain clamp and use the clamp half with the push connect fitting as you find a suitable location for the clamp. The location should be at least a few inches above the trap and as close to the sink drain as possible. Place a mark where the whole will be drilled.
2. At this mark, drill a ¼” hole through ONE side of the pipe and clear away burrs.
3. Peel the backing from the gasket in the parts bag. Position the gasket centered around the freshly drilled hole.
4. Now position both halves of the clamp on the pipe. Be sure to line up the drain clamp hole with the hole in the pipe. Secure with the included bolts and nuts.
Drain saddle clamps are installed on standard 1 ½” OD drain pipe, above the trap and as close to the sink drain as possible. Do not install the clamp close to disposal outlets or clogging may occur.
3 OPTIONAL - INSTALL DRAIN SADDLE CLAMP
6 Stage Deluxe Instructions.indd 2 10/22/2012 2:05:45 PM
7 MAINTAIN YOUR RO SYSTEM Replacement Filter Kit - 6 Stage DELUXE RO/DI (SKU 200103)
5 INSTALL YOUR RO SYSTEM
RED Tubing - intake from home water line BLACK Tubing - waste water BLUE Tubing - output of purified water
1. Attach the water source to the RED line of the RO system using the installed connector/adapter. Push connect fittings are connected by firmly pushing one end of the tube into the fitting. Remove tube by holding the round retention ring tightly against the fitting and pull the tube. Visit bulkreefsupply.com/instructions for more detailed information on push connect fittings.
2. Direct the BLUE line to a suitable collection/storage container.
3. Guide the BLACK line down a drain or to the Drain Saddle Clamp you installed in Step 3.
6 FLUSH YOUR RO SYSTEM
On initial installation or filter changes, the RO/DI system must be flushed for one hour before making final product water.
1. Ensure that all fittings and hoses are correctly hooked up.2. Direct the purified RO/DI water from the BLUE line into a sink or drain. 3. Turn on the household water supply.4. Allow the system to run for one hour to flush dusty fines from carbon blocks and preservatives from the RO Membrane. This is a good time to check all fittings and connections for leaks.5. Return the BLUE line to your purified water storage container. Your BRS RO/DI System is now ready for use.
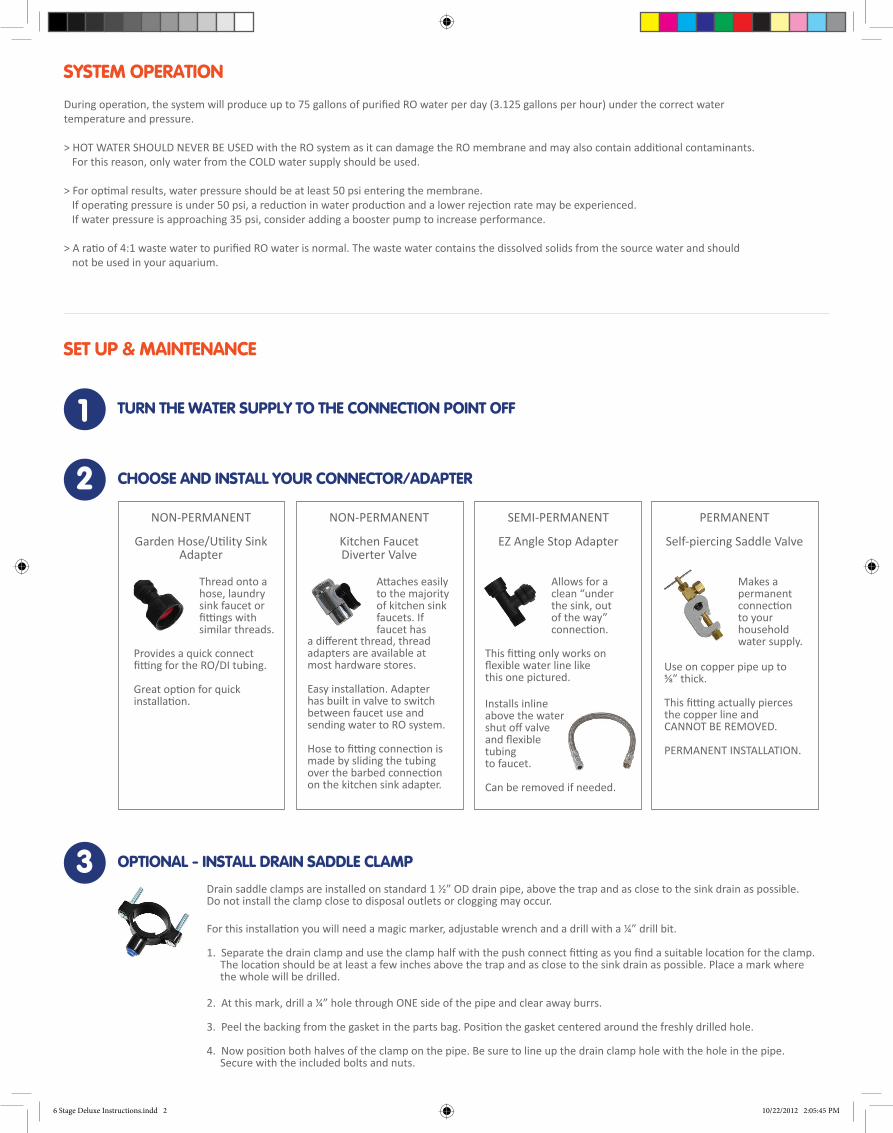
4 OPTIONAL - INSTALL INLINE BALL VALVE
Installing the ball valve is optional. The ball valve is commonly used to turn the RO/DI system on and off.
To install the ball valve:Cut the inlet RED line in an easily accessible location. Be sure that the cut ends are clean, even and smooth.Firmly push the ends of the hose into the ball valve.
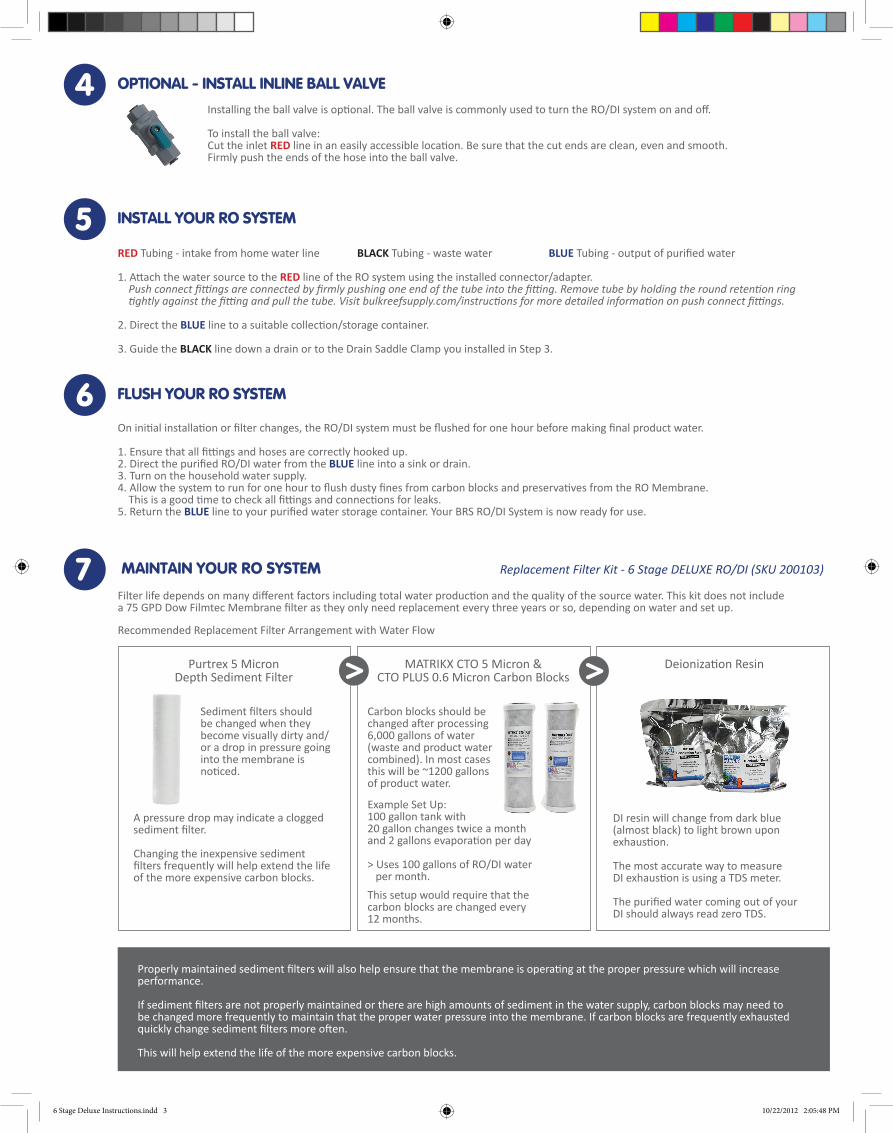
Filter life depends on many different factors including total water production and the quality of the source water. This kit does not include a 75 GPD Dow Filmtec Membrane filter as they only need replacement every three years or so, depending on water and set up.
Recommended Replacement Filter Arrangement with Water Flow
Properly maintained sediment filters will also help ensure that the membrane is operating at the proper pressure which will increase performance.
If sediment filters are not properly maintained or there are high amounts of sediment in the water supply, carbon blocks may need to be changed more frequently to maintain that the proper water pressure into the membrane. If carbon blocks are frequently exhausted quickly change sediment filters more often.
This will help extend the life of the more expensive carbon blocks.
Sediment filters should be changed when they become visually dirty and/or a drop in pressure going into the membrane is noticed.
Purtrex 5 Micron Depth Sediment Filter
MATRIKX CTO 5 Micron & CTO PLUS 0.6 Micron Carbon Blocks
Carbon blocks should be changed after processing 6,000 gallons of water (waste and product water combined). In most cases this will be ~1200 gallons of product water.
Example Set Up: 100 gallon tank with 20 gallon changes twice a month and 2 gallons evaporation per day
> Uses 100 gallons of RO/DI water per month. This setup would require that the carbon blocks are changed every 12 months.
A pressure drop may indicate a clogged sediment filter.
Changing the inexpensive sediment filters frequently will help extend the life of the more expensive carbon blocks.
Deionization Resin
DI resin will change from dark blue (almost black) to light brown upon exhaustion.
The most accurate way to measure DI exhaustion is using a TDS meter.
The purified water coming out of your DI should always read zero TDS.
> >
6 Stage Deluxe Instructions.indd 3 10/22/2012 2:05:48 PM
DELUXE FEATURES
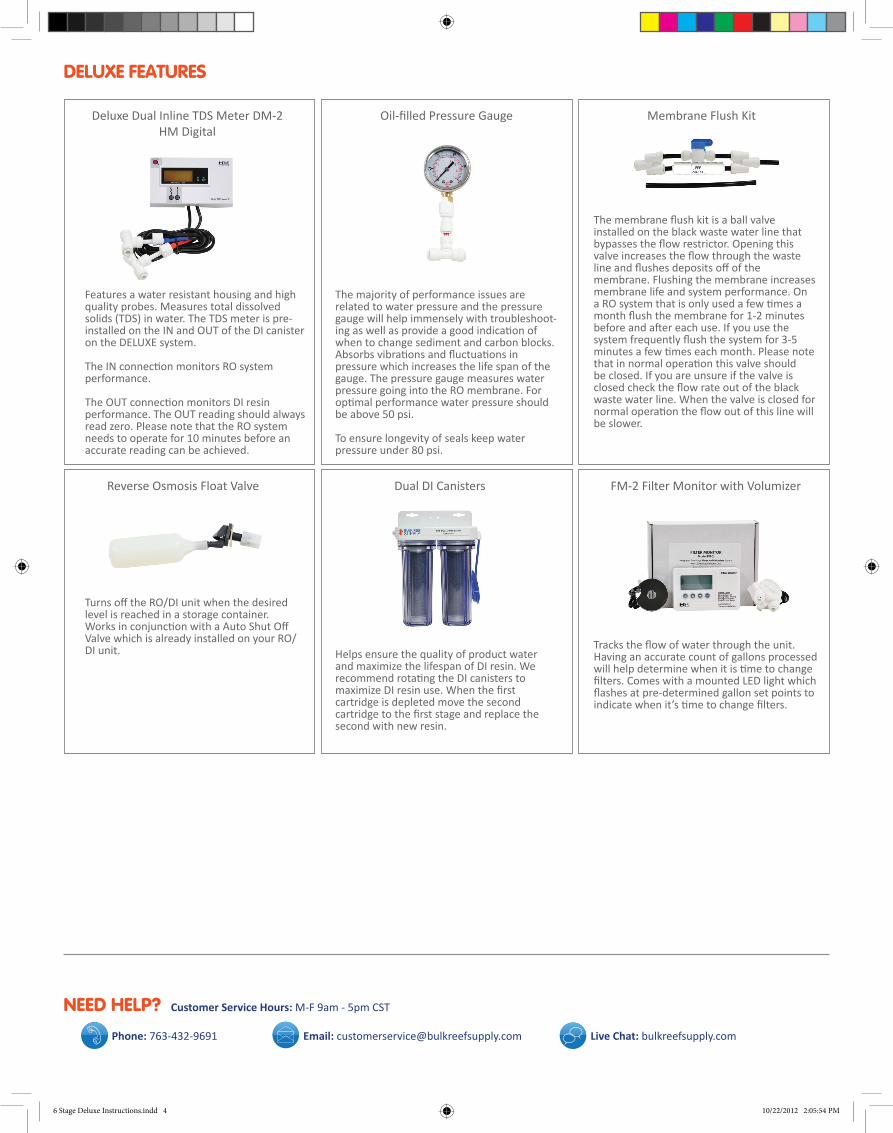
Features a water resistant housing and high quality probes. Measures total dissolved solids (TDS) in water. The TDS meter is pre-installed on the IN and OUT of the DI canister on the DELUXE system.
The IN connection monitors RO system performance.
The OUT connection monitors DI resin performance. The OUT reading should always read zero. Please note that the RO system needs to operate for 10 minutes before an accurate reading can be achieved.
The majority of performance issues are related to water pressure and the pressure gauge will help immensely with troubleshoot-ing as well as provide a good indication of when to change sediment and carbon blocks. Absorbs vibrations and fluctuations in pressure which increases the life span of the gauge. The pressure gauge measures water pressure going into the RO membrane. For optimal performance water pressure should be above 50 psi.
To ensure longevity of seals keep water pressure under 80 psi.
Reverse Osmosis Float Valve
Turns off the RO/DI unit when the desired level is reached in a storage container. Works in conjunction with a Auto Shut Off Valve which is already installed on your RO/DI unit.
Dual DI Canisters
Helps ensure the quality of product water and maximize the lifespan of DI resin. We recommend rotating the DI canisters to maximize DI resin use. When the first cartridge is depleted move the second cartridge to the first stage and replace the second with new resin.
FM-2 Filter Monitor with Volumizer
Tracks the flow of water through the unit. Having an accurate count of gallons processed will help determine when it is time to change filters. Comes with a mounted LED light which flashes at pre-determined gallon set points to indicate when it’s time to change filters.
Deluxe Dual Inline TDS Meter DM-2HM Digital
Oil-filled Pressure Gauge Membrane Flush Kit
The membrane flush kit is a ball valve installed on the black waste water line that bypasses the flow restrictor. Opening this valve increases the flow through the waste line and flushes deposits off of the membrane. Flushing the membrane increases membrane life and system performance. On a RO system that is only used a few times a month flush the membrane for 1-2 minutes before and after each use. If you use the system frequently flush the system for 3-5 minutes a few times each month. Please note that in normal operation this valve should be closed. If you are unsure if the valve is closed check the flow rate out of the black waste water line. When the valve is closed for normal operation the flow out of this line will be slower.
NEED HELP? Customer Service Hours: M-F 9am - 5pm CST Phone: 763-432-9691 Email: [email protected] Live Chat: bulkreefsupply.com
6 Stage Deluxe Instructions.indd 4 10/22/2012 2:05:54 PM