Embed Size (px)
Citation preview

NM V313 A 09-2012 MANTION SAS - 25000 Besançon - Tel +33 3 81 50 56 77 - Fax +33 3 81 85 38 79 - www.mantion.com 1/16
NM V313INSTRUCTIONS DE MONTAGEMONTAGEANLEITUNGINSTRUCTIONS FOR ASSEMBLYINSTRUCCIONES DE MONTAJE
Poids maximal des panneauxMaximales GewichtMaximum weightPeso máximo por hoja
80 Kg
Epaisseur des panneauxLadendickeShutter thicknessEspesor de las hojas
27 - 40 mm
F24
calcule instantanément le détail des composants (quantitatif, dimensionnement ...)
listet sofort die benötigten Artikel auf
list instantaneoulsy the required items
Calcula al momento el despiece completo del sistema
www.mantion.com
SLIDSOFT®
VOLETS COULISSANTS MOTORISÉS : 3 PANNEAUXMOTORISERTE SCHIEBEFENSTERLÄDEN : 3 FLÜGEL
MOTORIZED SLIDING SHUTTERS – 3 PANELSMALLORQUINAS CORREDERAS MOTORIZADAS : 3 HOJAS
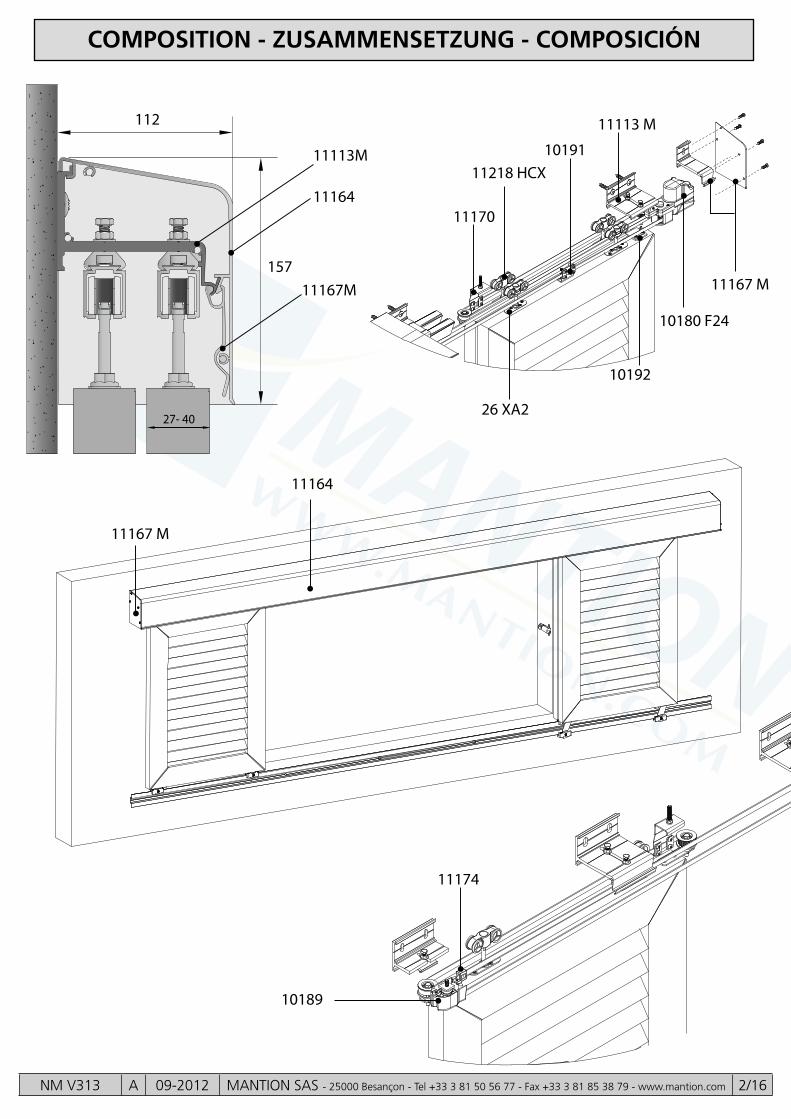
COMPOSITION - ZUSAMMENSETZUNG - COMPOSICIÓN
NM V313 A 09-2012 MANTION SAS - 25000 Besançon - Tel +33 3 81 50 56 77 - Fax +33 3 81 85 38 79 - www.mantion.com 2/16
11167 M
11218 HCX10191
10180 F24
26 XA2
10189
10192
11113 M
11164
11167 M
157
112
27- 40
11113M
11164
11167M
11170
11174

P* + 150
Ø20
125
1600
Max
Ø67
IMPORTANT: le boitier de gestion doit être toujours accessible pour les opérations de réglage et les éventuelles interventions qui pourraient se rendre nécessaires.WICHTIG: die Steuerungseinheit muss für Einstellungen sowie Wartungsarbeit immer zugänglich sein.WARNING: the electronic board must be accessible for any further setting operationIMPORTANTE: El cajetín de gestión tiene que quedar siempre accesible para las operaciones de ajuste o eventuales intervenciones que podrían ser necesarias.
SORTIE DE CABLE ET POSITIONNEMENT DU BOITIERKABELAUSLAUF UND POSITIONIERUNG DER STEUERUNGSEINHEIT
CABLE OUTLET AND ELECTRONIC BOARD POSITIONINGSALIDA DEL CABLE Y POSICIONAMIENTO DEL CAJETIN
P* + 150
Ø20
125
1600
Max
Ø67
*P = Largeur des panneaux = Flügelsbreite = Panels width = Ancho hojas
Vue de l’extérieurAussenansichtOutside view
Visto desde el exterior
Vue de l’intérieurInnenansichtInside view
Visto desde el interior
NM V313 A 09-2012 MANTION SAS - 25000 Besançon - Tel +33 3 81 50 56 77 - Fax +33 3 81 85 38 79 - www.mantion.com 3/16
NM V313 A 09-2012 MANTION SAS - 25000 Besançon - Tel +33 3 81 50 56 77 - Fax +33 3 81 85 38 79 - www.mantion.com 4/16
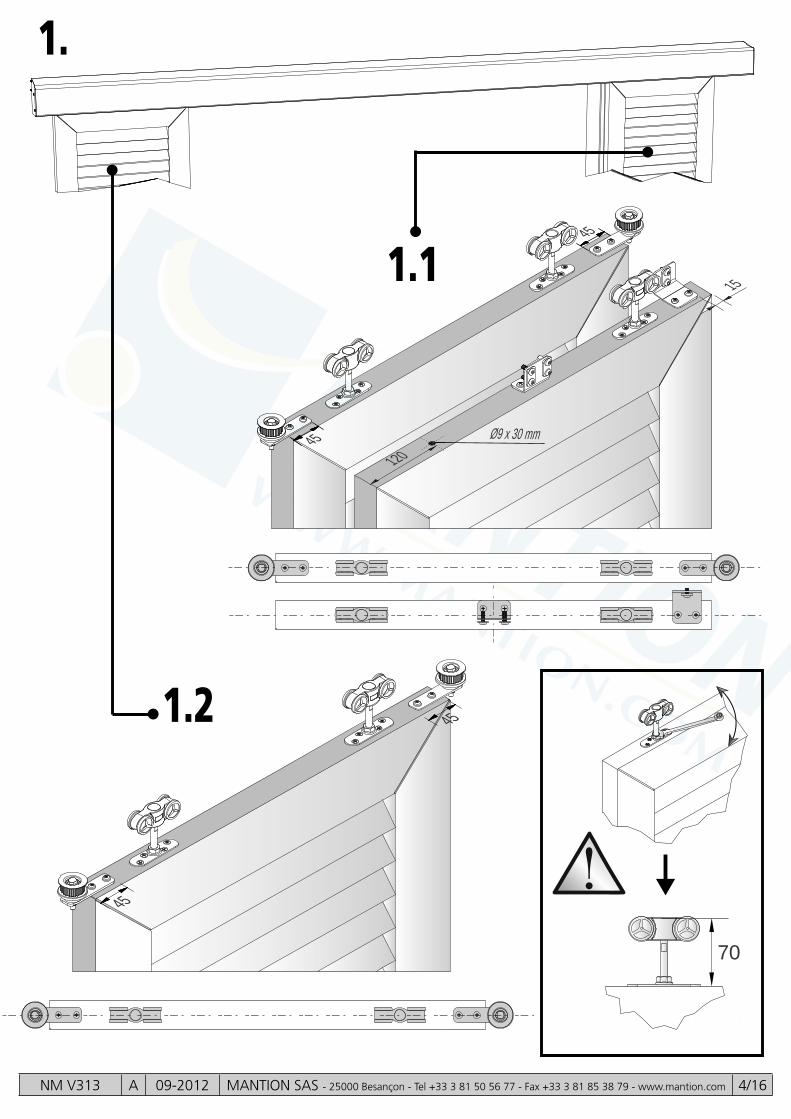
1.
70
120
15
Ø9 x 30 mm
45
45
1.1
1.2
45
45

NM V313 A 09-2012 MANTION SAS - 25000 Besançon - Tel +33 3 81 50 56 77 - Fax +33 3 81 85 38 79 - www.mantion.com 5/16
160
2.
=
=
MAX = 500 mm
a
bc
P +80
125
85
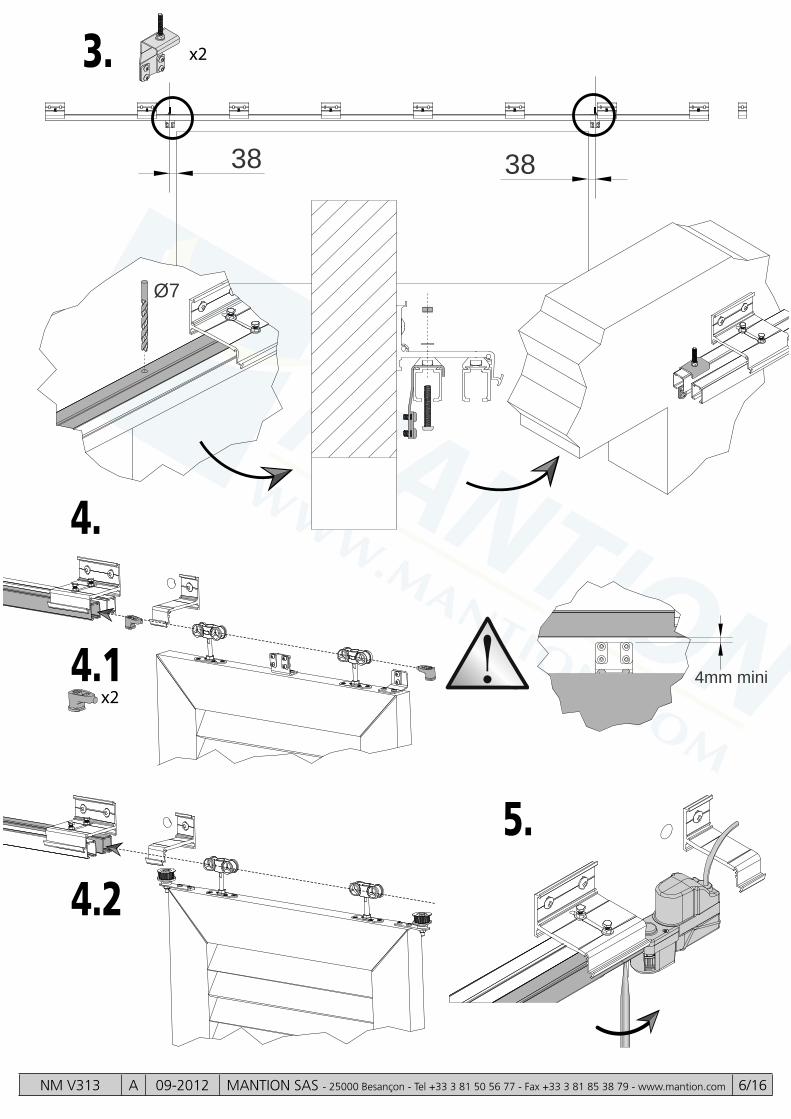
4.
4.1
4.2
4mm mini
5.
3838
3.
Ø7
x2
x2
NM V313 A 09-2012 MANTION SAS - 25000 Besançon - Tel +33 3 81 50 56 77 - Fax +33 3 81 85 38 79 - www.mantion.com 6/16

6. 7.
60
8.
8.1 8.2
NM V313 A 09-2012 MANTION SAS - 25000 Besançon - Tel +33 3 81 50 56 77 - Fax +33 3 81 85 38 79 - www.mantion.com 7/16

9.
a.
c.
b./d.
a./c.
b.
d.
Ne pas serrezDo not tightenNicht anziehen
No apriete
NM V313 A 09-2012 MANTION SAS - 25000 Besançon - Tel +33 3 81 50 56 77 - Fax +33 3 81 85 38 79 - www.mantion.com 8/16

NM V313 A 09-2012 MANTION SAS - 25000 Besançon - Tel +33 3 81 50 56 77 - Fax +33 3 81 85 38 79 - www.mantion.com 9/16
10.
a.
c.
b.
b.
a./c.

NM V313 A 09-2012 MANTION SAS - 25000 Besançon - Tel +33 3 81 50 56 77 - Fax +33 3 81 85 38 79 - www.mantion.com 10/16
11.
e.f.
g.
h./e. f.g. / i.
h.
i.
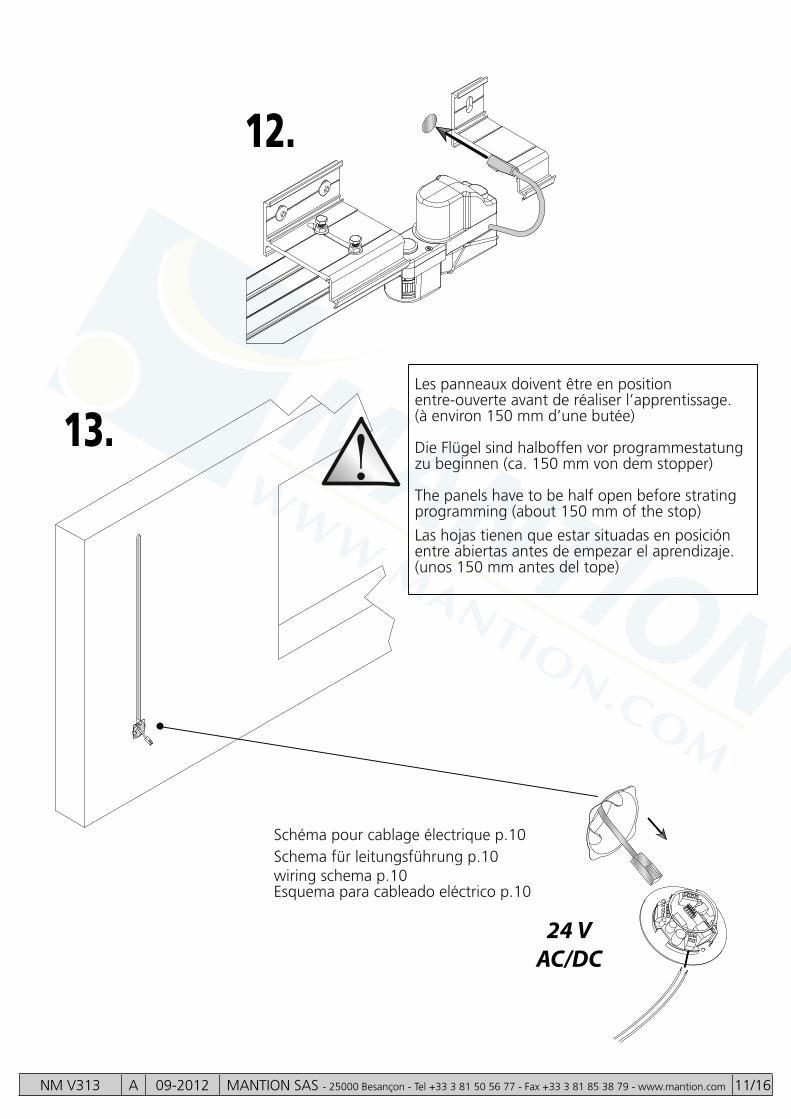
12.
13.
24 VAC/DC
Schéma pour cablage électrique p.10Schema für leitungsführung p.10wiring schema p.10Esquema para cableado eléctrico p.10
Les panneaux doivent être en position entre-ouverte avant de réaliser l’apprentissage.(à environ 150 mm d’une butée)
Die Flügel sind halboffen vor programmestatung zu beginnen (ca. 150 mm von dem stopper)
The panels have to be half open before strating programming (about 150 mm of the stop)
Las hojas tienen que estar situadas en posición entre abiertas antes de empezar el aprendizaje. (unos 150 mm antes del tope)
NM V313 A 09-2012 MANTION SAS - 25000 Besançon - Tel +33 3 81 50 56 77 - Fax +33 3 81 85 38 79 - www.mantion.com 11/16

14.
15.
a. b.
16.
17.18.
Clipser une pince tous les 1 m environAufclipsen jeder 1 m (cerca)Clip the clamps approximately every 1 m.Engatillar los clips cada metro mas o menos
NM V313 A 09-2012 MANTION SAS - 25000 Besançon - Tel +33 3 81 50 56 77 - Fax +33 3 81 85 38 79 - www.mantion.com 12/16

� ��
��
� �
� �
220 AC
30 mA
2 A
24V DC2.5A
swicth
LED rougerote LEDred LED
LED rojo
LED vertegrüne LEDgreen LEDLED verde
BP
RELAY
Cable souple 0.75 mm²Anschlusskabel 0.75 mm²
0.75 mm² soft cableCablecillo 0.75 mm²
OUVERTURE / ÖFFNUNG / OPENING / APERTURA FERMETURE / SCHLIESSEN / CLOSING / CIERRE
MotoréducteurGetriebemotorGeared motor
Moto reductor
L = 1.8 m
Alimentation 24V non fournie.Stromversorgung 24V nicht geliefert
24V Power supply not included.alimentación 24V (no incluida)
SCHEMA POUR CABLAGE ELECTRIQUE / SCHEMA FÜR LEITUNGSFHÜRUNG / WIRING SHEMA ESQUEMA PARA CABLEADO ELECTRICO
Couper l’alimentation de la motorisation avant de procéder au branchement d’un dispositif optionnel
Die Motorisierung unbedingt abschalten vor den Anschluss eines optionalen Betätigungsgeräts an das Netz
Disconnect power before connecting any optional device
Cortar la alimentación de la motorización antes de hacer la conexión de un dispositivo opcional
NM V313 A 09-2012 MANTION SAS - 25000 Besançon - Tel +33 3 81 50 56 77 - Fax +33 3 81 85 38 79 - www.mantion.com 13/16

NM V313 A 09-2012 MANTION SAS - 25000 Besançon - Tel +33 3 81 50 56 77 - Fax +33 3 81 85 38 79 - www.mantion.com 14/16
PROGRAMMATION Avant de démarrer le mode apprentissage, il faut positionner les volets proches de la position ‘ouvert’- environ 10 à 15 cm L’état de programmation est visualisé par le clignotement de la LED verte. Mode apprentissage (LED verte)Effectuer 1 pression >5 secondes sur le Bouton Poussoir.La LED clignote rapidement (|.|.|.), puis s’éteint, démarrage du mode apprentissageLes volets se déplacent en butées ouverture puis en butées fermeture pour mémoriser la distance de déplacement : Ces mouvements s’effectuent en vitesse lenteUn deuxième cycle d’ouverture/fermeture s’effectue à la vitesse normale d’utilisation.Le mode apprentissage est terminé.
Programmation d’un émetteur (LED verte)-Effectuer une pression courte <2 secondes sur le Bouton Poussoir.La LED s’allume en continu
-Appuyer 1 fois simultanément sur les 2 touches de l’émetteur. Pression >1 secondeL’enregistrement de l’émetteur est confi rmé par le clignotement rapide de la LED ( . . . )
Effacement de toute les émetteurs (LED verte)-Effectuer 2 pressions courtes <2 secondes sur le Bouton Poussoir.La LED clignote rapidement ( . . . )
-Effectuer 1 pression > 10 secondes sur le Bouton Poussoir.L’effacement total de la mémoire est confi rmé par le clignotement rapide de la LED ( . . . )
Gestion de la sortie RELAY (1A 30VDC ; 0.5A 110VAC) :Pour pouvoir utiliser cette sortie, il faut position le switch 3 de la carte déportée sur ONCette sortie est pilotée à chaque demande d’ouverture.Elle n’est plus pilotée lorsque les volets sont refermés.
AIDE AU DIAGNOSTIC
Symptômes Causes probables Solutions
Le cycle d’apprentissage ne démarre pas
Le boîtier de commande n’est pas alimenté
Vérifi er le branchement de l’alimentation au secteur (voir notice de montage)
Le cycle d’apprentissage ne démarre pas La led rouge clignote 1 fois toutes les 4 secondes environ
Le motoréducteur n’est pas relié au boîtier de commande
Vérifi er le branchement moteur-boîtier de commande (voir notice de montage)
Le cycle d’apprentissage est terminé mais l’émetteur n’actionne pas le volet La led rouge clignote rapidement 5 fois
Aucun dispositif de commande n’est relié au boîtier de commande
Procéder à la programmation de l’émetteur radio (voir notice de montage) ou vérifi er le branchement du bouton fi laire
La commande d’ouverture déclenche la fermeture du volet
Commande inversée
Refaire un apprentissage en positionnant le volet à 10cm de la position de fermeture. Si le problème persiste, relancer un apprentissage en positionnant le volet à 10cm de la position d’ouverture
Le volet ne s’ouvre pas sur une demande d’ouverture
La commande est défectueuse
Pour le fi laire, vérifi er le raccordement du bouton. Pour le radio, vérifi er que les piles ne soient pas défectueuses ( Led allumée sur un appui)
Le volet ne se ferme pas complètementPrésence d’un obstacle ou mauvais apprentissage
Supprimer l’obstacle ou/et refaire un apprentissage
Le volet ne s’ouvre pas complètementPrésence d’un obstacle ou mauvais apprentissage
Supprimer l’obstacle ou/et refaire un apprentissage
L’entraînement est bruyant (bruit de claquement)
Courroie détendueVérifi er la tension de la courroie. Elle ne doit être ni détendue, ni trop tendue.
LED rouge
LED verte
BP
NM V313 A 09-2012 MANTION SAS - 25000 Besançon - Tel +33 3 81 50 56 77 - Fax +33 3 81 85 38 79 - www.mantion.com 15/16
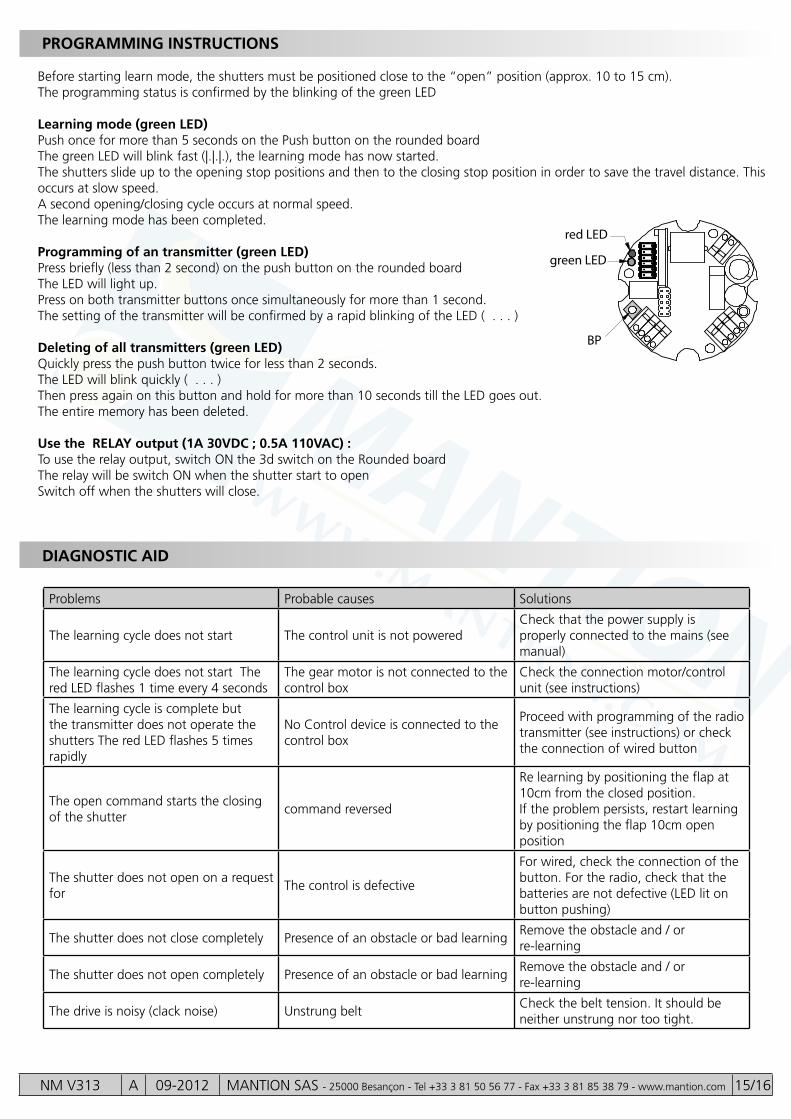
PROGRAMMING INSTRUCTIONS Before starting learn mode, the shutters must be positioned close to the “open” position (approx. 10 to 15 cm). The programming status is confi rmed by the blinking of the green LED Learning mode (green LED)Push once for more than 5 seconds on the Push button on the rounded boardThe green LED will blink fast (|.|.|.), the learning mode has now started. The shutters slide up to the opening stop positions and then to the closing stop position in order to save the travel distance. This occurs at slow speed.A second opening/closing cycle occurs at normal speed.The learning mode has been completed.
Programming of an transmitter (green LED)Press briefl y (less than 2 second) on the push button on the rounded boardThe LED will light up.Press on both transmitter buttons once simultaneously for more than 1 second.The setting of the transmitter will be confi rmed by a rapid blinking of the LED ( . . . )
Deleting of all transmitters (green LED)Quickly press the push button twice for less than 2 seconds.The LED will blink quickly ( . . . ) Then press again on this button and hold for more than 10 seconds till the LED goes out.The entire memory has been deleted.
Use the RELAY output (1A 30VDC ; 0.5A 110VAC) :To use the relay output, switch ON the 3d switch on the Rounded boardThe relay will be switch ON when the shutter start to openSwitch off when the shutters will close.
DIAGNOSTIC AID
Problems Probable causes Solutions
The learning cycle does not start The control unit is not poweredCheck that the power supply is properly connected to the mains (see manual)
The learning cycle does not start The red LED fl ashes 1 time every 4 seconds
The gear motor is not connected to the control box
Check the connection motor/control unit (see instructions)
The learning cycle is complete but the transmitter does not operate the shutters The red LED fl ashes 5 times rapidly
No Control device is connected to the control box
Proceed with programming of the radio transmitter (see instructions) or check the connection of wired button
The open command starts the closing of the shutter
command reversed
Re learning by positioning the fl ap at 10cm from the closed position.If the problem persists, restart learning by positioning the fl ap 10cm open position
The shutter does not open on a request for
The control is defective
For wired, check the connection of the button. For the radio, check that the batteries are not defective (LED lit on button pushing)
The shutter does not close completely Presence of an obstacle or bad learningRemove the obstacle and / or re-learning
The shutter does not open completely Presence of an obstacle or bad learningRemove the obstacle and / or re-learning
The drive is noisy (clack noise) Unstrung beltCheck the belt tension. It should be neither unstrung nor too tight.
red LED
green LED
BP

NM V313 A 09-2012 MANTION SAS - 25000 Besançon - Tel +33 3 81 50 56 77 - Fax +33 3 81 85 38 79 - www.mantion.com 16/16
FUNKTIONSBESCHREIBUNG Bevor Sie den Einlernvorgang (Learning mode) anfangen, soll der Schiebeladen in eine fast „offene Position“ gebracht werden (10 bis 15 cm vom Stopper entfernt).
EINLERNVORGANG (LEARNING MODE - grüne LED)Unterstützung von mehr als 5 Sekunden auf den Knopf LED-Diode blinkt dann scnell (|.|.|.)Der Schiebeladen geht langsam in Anschlag „Öffnung“ und in Anschlag „Schliessen“, um die Fahrtlänge zu speichern. Eine zusätzliche „Auf und Zu“ Fahrt erfolgt dann zu einer normalen Geschwindigkeit.Der „Einlernvorgang“ beendet sich dann in geschlossener Position des Schiebeladens. PROGRAMMIERUNG EINES SENDER (grüne LED)Unterstützung weniger als 2 Sekunden auf den KnopfLED leuchtet dann.Gleichtzeitig auf beiden Sendertasten, für mehr als 1 Sekunde drücken. Die Speicherung wird durch ein schnellen Blinken der LED bestätigt ( . . . )
LÖSCHEN DER GANZEN SPEICHERUNG (grüne LED)2 Mal kurz (weniger als 2 Sekunden) auf den KnopfDie LED blinkt schnell laut folgender Frequenz ( . . . ) Dann für länger als 10 Sekunden auf diesen Knopf drücken.Das gesamte Löschen der Speicherung wird durch ein schnelles Blinken der LED bestätigt ( . . . )
Verwenden Sie die Ausgabe-Relais (30VDC 1A, 110VAC 0.5A)Positionieren Sie den Schalter 3 auf ONDas Relais wird betätigt, wenn sich die Tür öffnet
Fehlerbeschreibung Mögliche Ursachen Lösungen
Lernzyklus startet nicht.Das Steuergerät bekommt keinen Strom
Netzanschluss der Stromversorgung prüfen (s. Bedienungsanleitung)
Lernzyklus startet nicht. Rote LED blinkt ca. alle 4 Sekunden einmal auf
Der Getriebemotor ist nicht mit dem Steuergerät verbunden.
Anschluss von Motor und Steuergerät überprüfen (s. Bedienungsanleitung)
Lernzyklus beendet, aber die Tür wird vom Sender nicht betätigt
No Control device is connected to the control box
Proceed with programming of the radio transmitter (see instructions) or check the connection of wired button
Rote LED blinkt 5 Mal schnell aufMit dem Steuergerät ist keine Steuervorrichtung verbunden
Den Funksender programmieren (s. Montageanleitung) bzw. den Anschluss des kabelgebundenen Bedienungsknopfs überprüfen
Der Öffnungsbefehl löst das Schließen des Fensterladens aus
Steuerung vertauscht
Den Laden 10cm vor der Schließung positionieren und dann erneut eine Lernphase durchführen. Wiederholt sich erneut dieses Problem, muss wieder eine Lernphase 10cm vor der Schließung erfolgen.
Der Fensterladen wird auf Öffnungsanforderung nicht geöffnet
Steuerung defekt
Bei kabelgebundenen Ausführungen den Anschluss des Bedienknopfs überprüfen. Bei funkgesteuerten Ausführungen den Batteriezustand überprüfen (LED leuchtet auf Knopfdruck auf)
Der Fensterladen schließt nicht vollständig
Hindernis im Weg oder falsches Anlernen
Hindernis entfernen und/oder Anlernen wiederholen
Der Fensterladen wird nicht vollständig geöffnet
Hindernis im Weg oder falsches Anlernen
Hindernis entfernen und/oder Anlernen wiederholen
Der Antrieb ist laut (Schlaggeräusch) Riemen locker Riemen nachspannen
DIAGNOSE EBENE
rote LED
grüne LED
BP

NM V313 A 09-2012 MANTION SAS - 25000 Besançon - Tel +33 3 81 50 56 77 - Fax +33 3 81 85 38 79 - www.mantion.com 15/16
INSTRUCIONES DE PROGRAMACION antes de entrar en el modo aprendizaje, posicionar las mallorquinas casi en posición abierta más o menos 10 o15 cm La situación de la programación se visualiza por el parpadeo del LED Modo aprendizaje y memorización de una emisora (LED verde)Presionar >5 segundos el Botón Pulsador.El LED parpadea rápidamente ( . . . ), arranque del modo aprendizajeLas mallorquinas se desplazarán hasta sus topes de apertura luego hasta topes de cierre para memorizar la distancia de recorrido: Estos movimientos se hacen a velocidad lenta.Un segundo ciclo de apertura y cierre se hará a velocidad normal de uso.El modo aprendizaje esta terminado.
Programación de una emisora (LED verde)- Hacer una presión corta <2 segundo sobre el Botón Pulsador.
El LED se enciende en continuo- Presionar 1 vez simultáneamente las 2 teclas de la emisora. Presión >1 segundo
La grabación de la emisora esta confi rmada por el parpadeo rápido del LED ( . . . )
Borrado de toda los emisoras (LED verde)- Hacer 2 presiones cortas <2 segundos sobre el Botón Pulsador.
El LED parpadea rápidamente ( . . . )- Hacer 1 presión > 10 segundos sobre el Botón Pulsador.
El Borrado total de la memoria esta confi rmado por el parpadeo rápido del LED ( . . . )
Gestión de la salida de relé (30VDC 1A, 110V 0,5 A):Para utilizar esta salida, tiene que cambiar la posición 3 de la tarjeta de mando a distancia ONEl relé funciona cuando la mallorquina se abreYa no esta controlado, cuando la mallorquina está cerrada.
Síntomas Causas probables Soluciones
El ciclo de aprendizaje no arranca. La unidad de control no funcionaCompruebe la conexión del sector de la energía (ver instrucciones)
El ciclo aprendizaje no arranca. El led parpadea 1 vece
El motor no está conectado a la caja de control
Compruebe la conexión de la unidad de control del motor (ver instrucciones)
El ciclo de aprendizaje ha terminado, pero el transmisor no funciona con la puerta de El LED rojo parpadea 5 veces más rápido
No hay transmisor conectado a la caja de control
Proceder a la programación de una emisora (ver instrucciones)
El mando de apertura provoca el cierre de la mallorquina
El mando esta invertido.
Iniciar el modo aprendizaje: posicionar las mallorquinas casi en posición cerrada más o menos 10 o 15 cm. Si no es esto, iniciar de nuevo el aprendizaje y posicionar las mallorquinas en posición abierta, más o menos 10 o 15 cm
La mallorquina no se abre a petición de una apertura o de un cierre
El mando esta defectuoso
Para la parte cableada, compruebe la conexión del interruptor. Para el mando radio, compruebe que las pilas no estén defectuosas (Led encendido por una pulsación)
La mallorquina no se cierra del todoExistencia de un obstáculo o aprendizaje incorrecto
Quitar el obstáculo y/o hacer de nuevo el aprendizaje
La mallorquina no se abre del todoExistencia de un obstáculo o aprendizaje incorrecto
Quitar el obstáculo y/o hacer de nuevo el aprendizaje
El arrastre esta ruidoso (ruido de chasquido)
correa destensadaCompruebe la tensión de la correa. No tiene que estar fl oja ni tampoco muy tensada
AYUDA AL DIAGNÓSTICO
LED rojo
LED verde
BP