Embed Size (px)
Citation preview
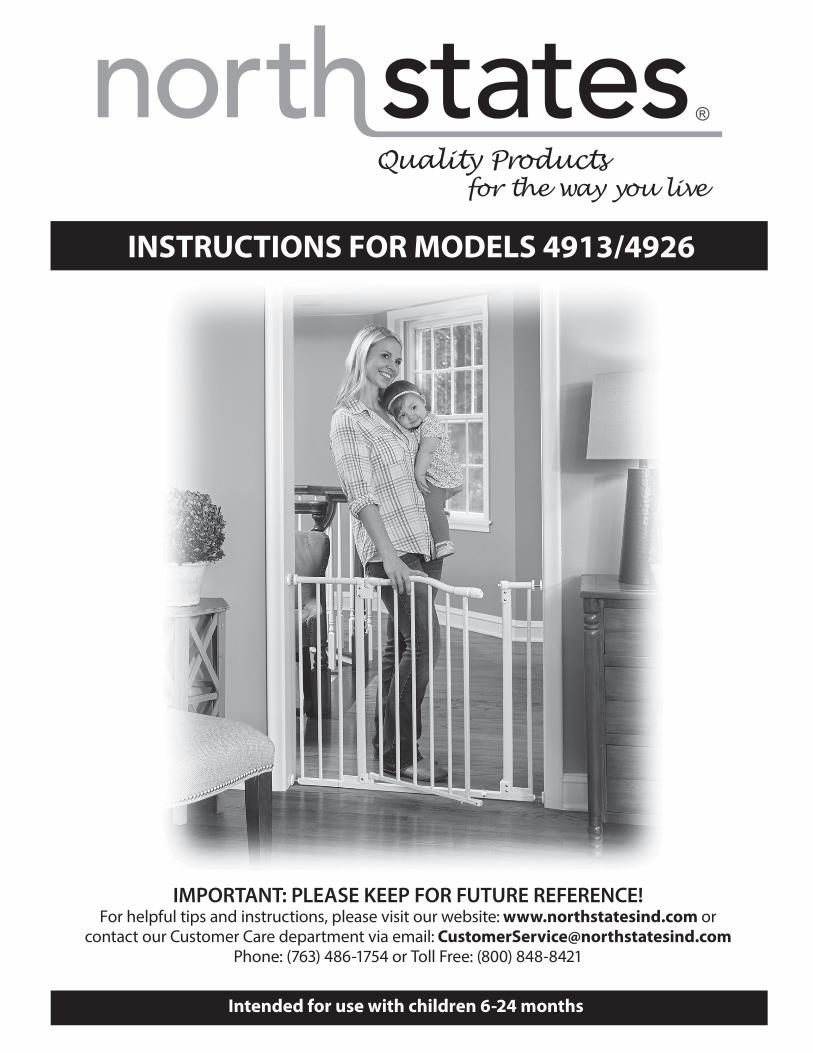
Quality Products for the way you live
IMPORTANT: PLEASE KEEP FOR FUTURE REFERENCE!For helpful tips and instructions, please visit our website: www.northstatesind.com or
contact our Customer Care department via email: [email protected]: (763) 486-1754 or Toll Free: (800) 848-8421
INSTRUCTIONS FOR MODELS 4913/4926
Intended for use with children 6-24 months
®
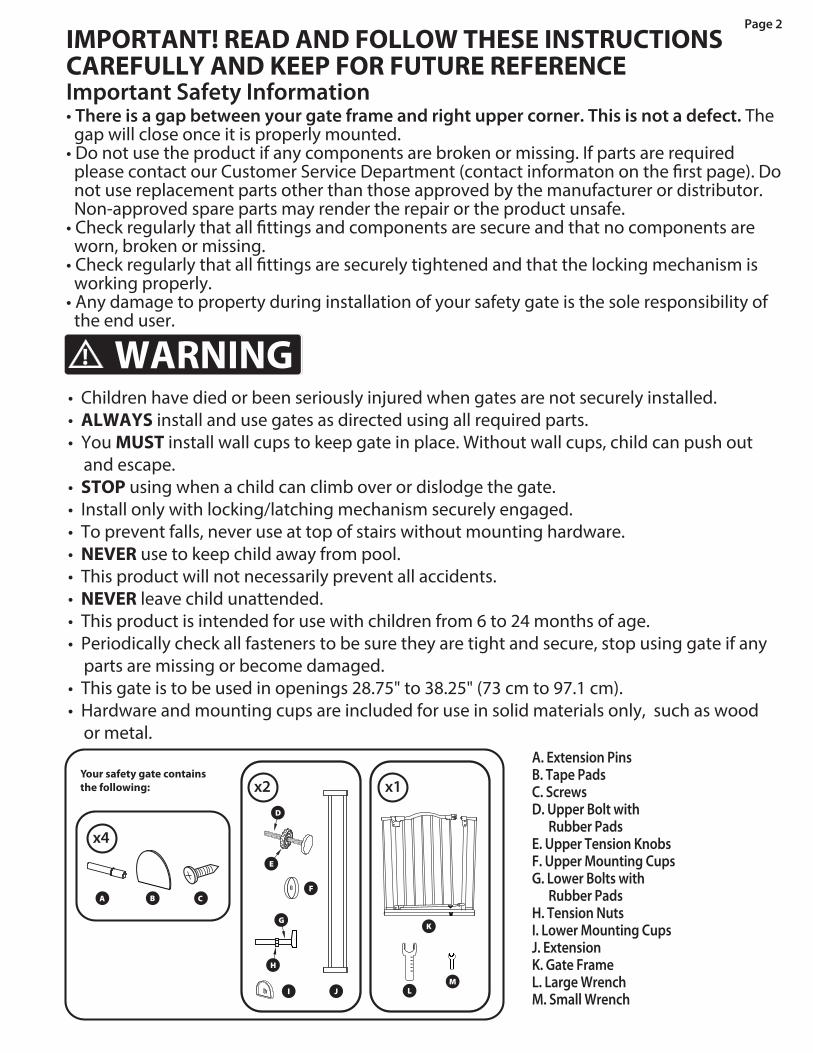
! WARNING
Important Safety Information• There is a gap between your gate frame and right upper corner. This is not a defect. The
gap will close once it is properly mounted.• Do not use the product if any components are broken or missing. If parts are required
please contact our Customer Service Department (contact informanot use replacement parts other than those approved by the manufacturer or distributor. Non-approved spare parts may render the repair or the product unsafe.
• Check regularly that all �ttings and components are secure and that no components are worn, broken or missing.
• Check regularly that all �ttings are securely tightened and that the locking mechanism is working properly.
• Any damage to property during installation of your safety gate is the sole responsibility of the end user.
• Children have died or been seriously injured when gates are not securely installed. • ALWAYS install and use gates as directed using all required parts.• You MUST install wall cups to keep gate in place. Without wall cups, child can push out and escape.• STOP using when a child can climb over or dislodge the gate.• Install only with locking/latching mechanism securely engaged.• To prevent falls, never use at top of stairs without mounting hardware.• NEVER use to keep child away from pool.• This product will not necessarily prevent all accidents.• NEVER leave child unattended.• This product is intended for use with children from 6 to 24 months of age.• Periodically check all fasteners to be sure they are tight and secure, stop using gate if any parts are missing or become damaged.• This gate is to be used in openings 28.75" to 38.25" (73 cm to 97.1 cm).• Hardware and mounting cups are included for use in solid materials only, such as wood or metal.
IMPORTANT! READ AND FOLLOW THESE INSTRUCTIONS CAREFULLY AND KEEP FOR FUTURE REFERENCE
Page 2
Your safety gate containsthe following:
A. Extension PinsB. Tape PadsC. ScrewsD. Upper Bolt with Rubber PadsE. Upper Tension KnobsF. Upper Mounting CupsG. Lower Bolts with Rubber PadsH. Tension NutsI. Lower Mounting CupsJ. ExtensionK. Gate FrameL. Large WrenchM. Small Wrench
x4
A B C
D
F
x2 x1
G
E
H
I J
K
LM
Installation
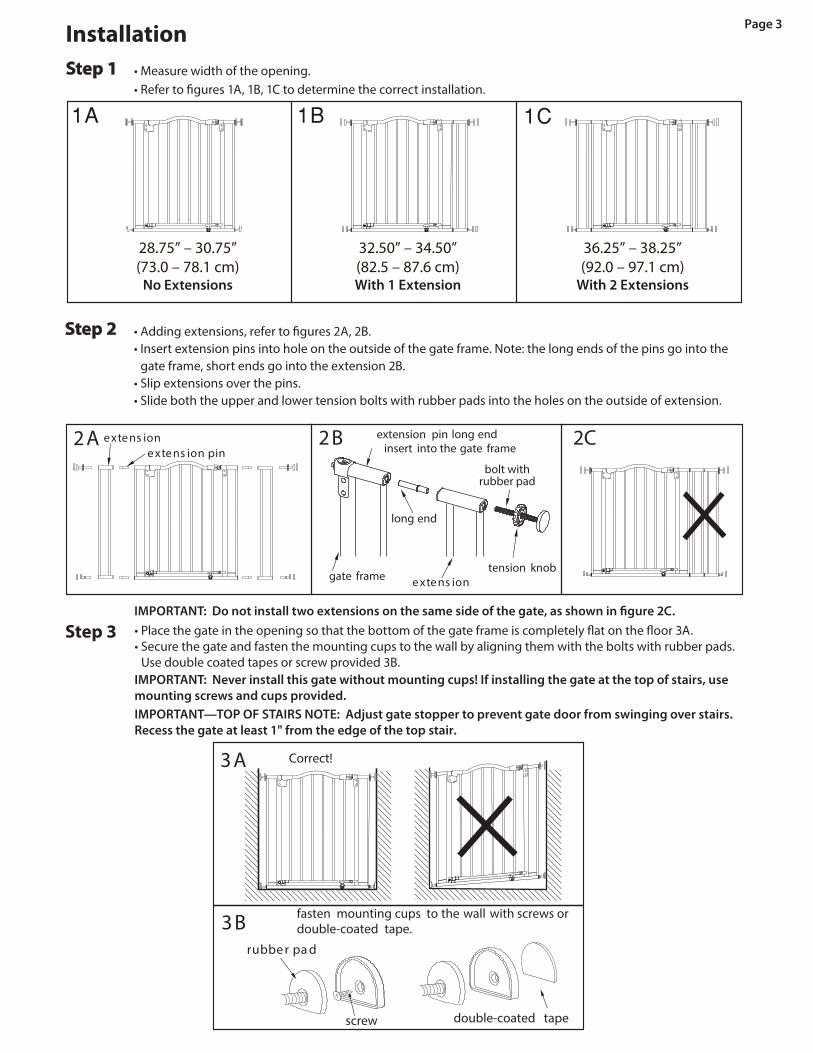
28.75” – 30.75”(73.0 – 78.1 cm)
No Extensions
32.50” – 34.50”(82.5 – 87.6 cm)With 1 Extension
36.25” – 38.25”(92.0 – 97.1 cm)
With 2 Extensions
2A 2 2CB
tension knob
bolt withrubber pad
e xte ns ione xte ns ion pin
extension pin long end insert into the gate frame
long end
gate frame e xte ns ion
rubbe r pa d
double-coated tapescrew
fasten mounting cups to the wall with screws or double-coated tape. 3B
3A Correct!
• Measure width of the opening.1A, 1B, 1C to determine the correct installation.
Step 1
Step 2
Step 3• Secure the gate and fasten the mounting cups to the wall by aligning them with the bolts with rubber pads.
Use double coated tapes or screw provided 3B.IMPORTANT: Never install this gate without mounting cups! If installing the gate at the top of stairs, use mounting screws and cups provided. IMPORTANT—TOP OF STAIRS NOTE: Adjust gate stopper to prevent gate door from swinging over stairs.Recess the gate at least 1" from the edge of the top stair.
• Insert extension pins into hole on the outside of the gate frame. Note: the long ends of the pins go into the gate frame, short ends go into the extension 2B.
• Slip extensions over the pins. • Slide both the upper and lower tension bolts with rubber pads into the holes on the outside of extension.
Page 3
.060" - .078"
4C
4E 4F 4G
4D
3 4 1 2 5A 5B
To Close the gate by switching the side part of locking handle to horizontal position.
1
2
4
4A 4B
distances should be equal
tension nuts
tighten inward
gate frame
tighten inward
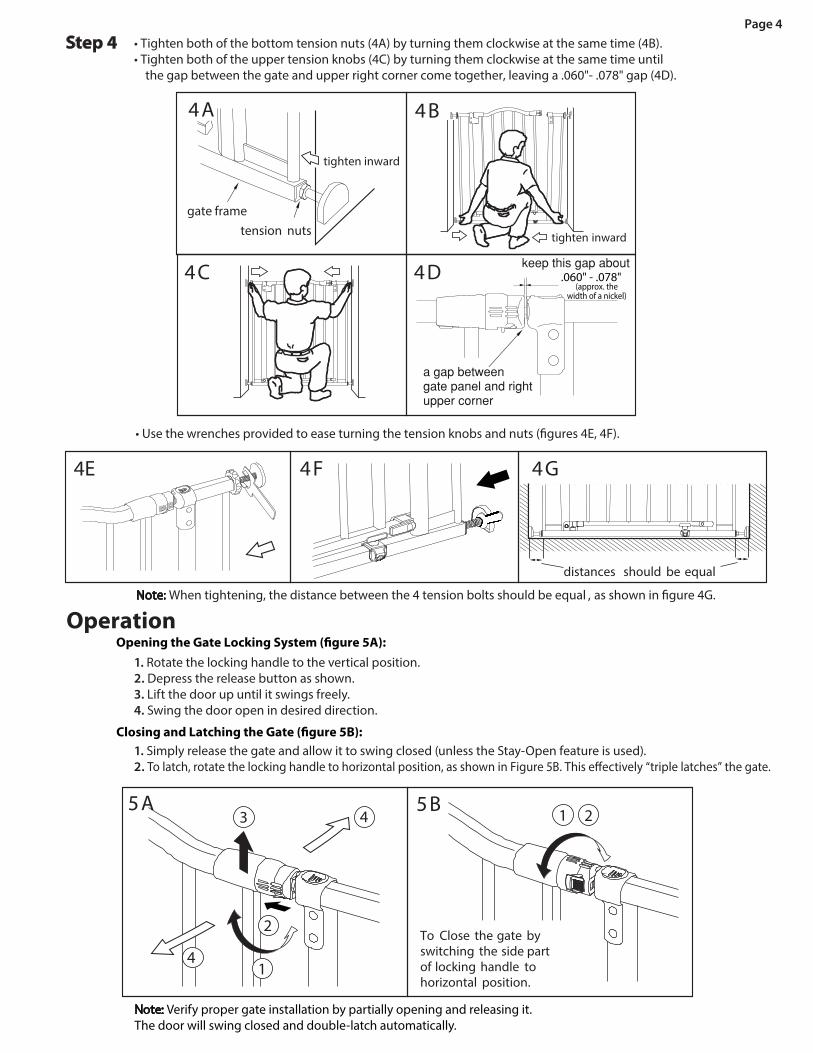
Step 4 • Tighten both of the bottom tension nuts (4A) by turning them clockwise at the same time (4B).• Tighten both of the upper tension knobs (4C) by turning them clockwise at the same time until the gap between the gate and upper right corner come together, leaving a .060"- .078" gap (4D).
• Use the wrenches provided to ease turning the tension knobs and nuts (�gures 4E, 4F).
1. Rotate the locking handle to the vertical position.2. Depress the release button as shown.3. Lift the door up until it swings freely.4. Swing the door open in desired direction.
Operation
1. Simply release the gate and allow it to swing closed (unless the Stay-Open feature is used). 2. To latch, rotate the locking handle to horizontal position, as shown in Figure 5B. This e�ectively “triple latches” the gate.
Note: Verify proper gate installation by partially opening and releasing it. The door will swing closed and double-latch automatically.
Opening the Gate Locking System (�gure 5A):
Closing and Latching the Gate (�gure 5B):
Note: When tightening, the distance between the 4 tension bolts shoul
Page 4
(approx. the width of a nickel)
,
Swing to the open positions
gate stopper
Stay-Open Feature
Swing control operation
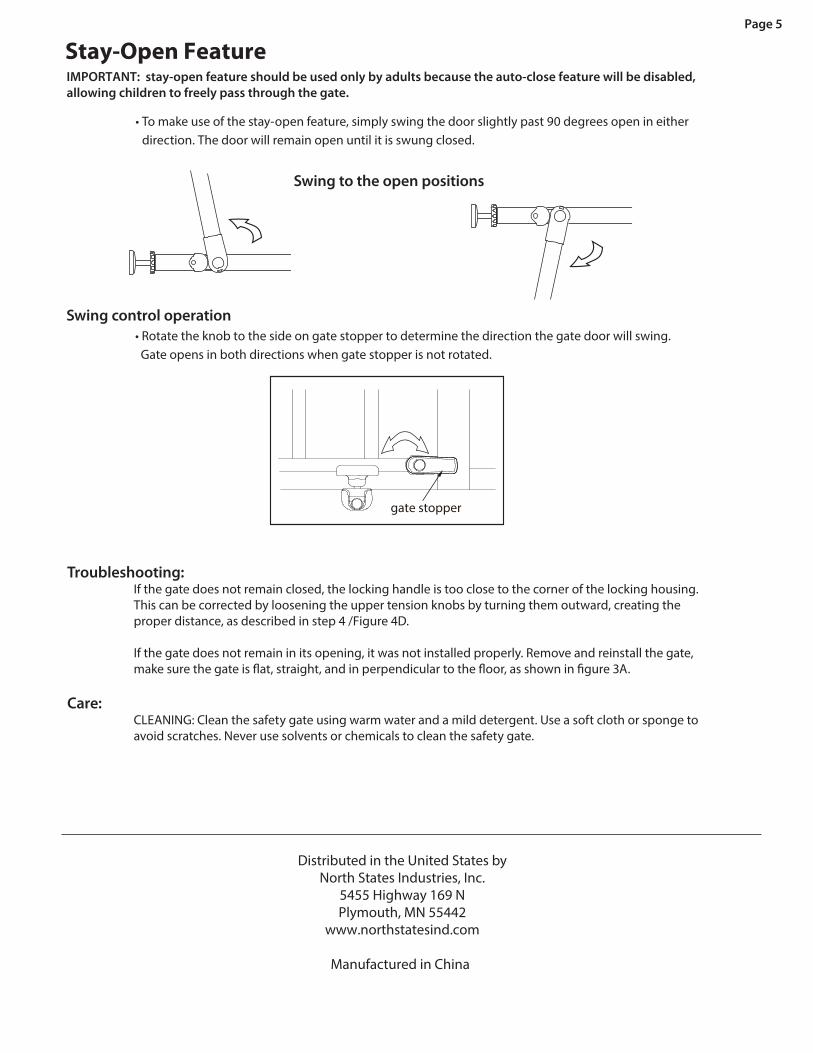
Troubleshooting:If the gate does not remain closed, the locking handle is too close to the corner of the locking housing. This can be corrected by loosening the upper tension knobs by turning them outward, creating the proper distance, as described in step 4 /Figure 4D.
If the gate does not remain in its opening, it was not installed properly. Remove and reinstall the gate,
Care:CLEANING: Clean the safety gate using warm water and a mild detergent. Use a soft cloth or sponge to avoid scratches. Never use solvents or chemicals to clean the safety gate.
IMPORTANT: stay-open feature should be used only by adults because the auto-close feature will be disabled, allowing children to freely pass through the gate.
• To make use of the stay-open feature, simply swing the door slightly past 90 degrees open in either direction. The door will remain open until it is swung closed.
• Rotate the knob to the side on gate stopper to determine the direction the gate door will swing. Gate opens in both directions when gate stopper is not rotated.
Distributed in the United States byNorth States Industries, Inc.
5455 Highway 169 NPlymouth, MN 55442
www.northstatesind.com
Manufactured in China
Page 5
Productos de calidad para su estilo de vida
IMPORTANTE: ¡CONSERVE COMO REFERENCIA FUTURA!Para obtener consejos útiles e instrucciones, visite nuestro sitio web: www.northstatesind.com, o
Comuníquese con nuestro Departamento de Atención al Cliente por correo electrónico: [email protected]
Teléfono: +1 (763) 486-1754 o número gratuito: (800) 848-8421
INSTRUCCIONES PARA MODELOS 4913/4926
Diseñado para usarse con niños de 6 a 24 meses de edad
Página 6
®

! ADVERTENCIA
Información importante sobre seguridad• Hay un espacio entre el marco y la esquina superior derecha de la puerta. Esto no es un defecto.
El espacio se cerrará una vez que esta esté correctamente instalada.• No use el producto si alguno de los componentes está roto o ausente. Si se requieren piezas,
comuníquese con nuestro Departamento de atención al cliente (la información de contacto se encuentra en la primera página). No utilice piezas de repuesto distintas de aquellas aprobadas por el fabricante o distribuidor. Las piezas de repuesto no aprobadas pueden provocar que la reparación del producto sea insegura.
• Revise regularmente que todos los conectores y componentes ecomponentes desgastados, rotos o ausentes.
apretados y que el mecanismo de bloqueo funcione de manera correcta.
• Cualquier daño a la propiedad durante la instalación de su puerta de seguridad es exclusiva
• Recomendamos que lleve a cabo la instalación lejos de los niñ
• Niños han muerto o sufrido lesiones graves porque una puerta no estaba instalada de manera segura. • SIEMPRE instale y use la puerta conforme a las instrucciones, utilizando todas las piezas requeridas. • DEBES instalar copas de pared para mantener la puerta en su lugar. Sin vasos de pared, el niño puede empujar y escapar.• DEJE de usarla cuando un niño pueda trepar sobre la puerta o desprenderla. • Instálela únicamente con el mecanismo de bloqueo y enganche debida mente enganchado.• Para evitar caídas, nunca utilice la puerta en la parte superior de las escaleras sin los componentes de montaje debidamente instalados.• NUNCA debe usarse para mantener a un niño alejado de una piscina.• Este portón no necesariamente evita todos los accidentes. • NUNCA deje a los niños sin supervisión. • Este producto está diseñado para usarse con niños de 6 a 24 meses de edad.• Revisar periódicamente todos los aÿanzadores para asegurarse de que estén apretados y ÿrmes, deje de usar si alguna de sus partes está dañada.• Esta barrera se debe usar en portales de 28.75" to 38.25" (73 cm to 97.1 cm).• Los accesorios y receptáculos de montaje se incluyen para usarse única mente en materiales sólidos, tales como madera o metal.
os pequeños, ya que algunos de los sueltos.
¡IMPORTANTE! LEA Y SIGA ESTAS INSTRUCCIONES DETENIDAMENTE, Y CONSÉRVELAS PARA REFERENCIA
Página 7
Su puerta de seguridadincluye lo siguiente:
A. pasador de extensiónB. almohadillas adhesivasC. tornillosD. pernos superiores con almohadillas de gomaE. perillas de tensión superioresF. receptáculos de montaje superioresG. pernos inferiores con almohadillas de gomaH. tuercas de tensiónI. receptáculos de montaje inferioresJ. extensiónK. panel de la puertaL. llave grandeM. llave pequeña
x4
A B C
D
F
x2 x1
G
E
H
I J
K
LM
Instalación
28.75” – 30.75”(73.0 – 78.1 cm)Sin extensiones
32.50” – 34.50”(82.5 – 87.6 cm)Con 1 extensión
36.25” – 38.25”(92.0 – 97.1 cm)
Con 2 extensiones
2A 2 2CB
perillade tensión
perno con almohadillade goma
extensiónpasador de extensión
extremo largo del pasador de extensión introdúzcalo en el marco de la puerta
extremolargo
marco de la puertaextensión
almohadilla de goma
cinta doble caratornillo
Fije los receptáculos de montaje a la paredcon tornillos o cinta doble cara.
3B
3A ¡Correcto!
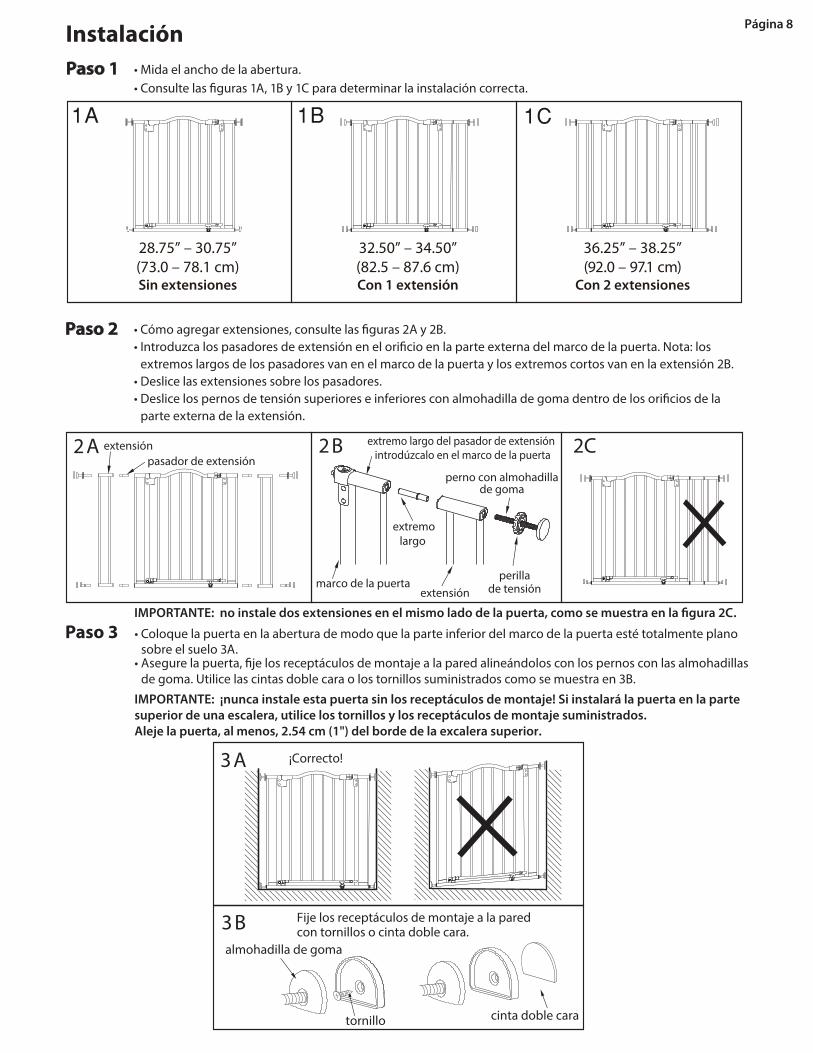
• Mida el ancho de la abertura.Paso 1
Paso 2
Paso 3 • Coloque la puerta en la abertura de modo que la parte inferior del marco de la puerta esté totalmente plano sobre el suelo 3A.
de goma. Utilice las cintas doble cara o los tornillos suministrados como se muestra en 3B.
IMPORTANTE: ¡nunca instale esta puerta sin los receptáculos de montaje! Si instalará la puerta en la parte superior de una escalera, utilice los tornillos y los receptáculos de montaje suministrados.Aleje la puerta, al menos, 2.54 cm (1") del borde de la excalera superior.
extremos largos de los pasadores van en el marco de la puerta y los extremos cortos van en la extensión 2B. • Deslice las extensiones sobre los pasadores.
parte externa de la extensión.
Página 8

4C
4E 4F 4G
4D
3 4 1 2 5A 5B
1
2
4
4A 4B
Las distancias deben ser iguales
tuercas de tensión
ajuste haciaadentro
una distancia entreel panel de la puerta yla esquina superior derecha
ajuste hacia adentro
marco de la puerta
mantenga esta distancia aproximadamente0.15 cm - 0.078 cm (0.060" - 0.078")
Paso 4 • Ajuste las dos tuercas de tensión inferiores (4A) girándolas en sentido horario al mismo tiempo (4B).• Ajuste los pernos de tensión superiores (4C)girándolas en sentido horario al mismo tiempo de modo que el
espacio entre la puerta y la esquina superior derecha se reduzca, deje un espacio de 0.15 cm - 0.078 cm
• Use las llaves suministradas para girar con más facilidad las perillas y tuercas de tensión (�guras 4E, 4F).
1. Gire la manija de bloqueo a la posición vertical.2. Presione el botón de liberación como se muestra.3. Levante la puerta hacia arriba hasta que se mueva libremente.4. Abra la puerta en la dirección que desee.
Funcionamiento
1. Simplemente libere la puerta y deje que esta se cierre (a menos que esté usando la característica “Stay-Open”). 2. Para engancharla, gire la manija de bloqueo a la posición horizontal, como se muestra en la Figura 5B. Esto “engancha
Nota: La puerta se cerrará y se enganchará doblemente en forma automática.
Cómo abrir el sistema de bloqueo de la puerta (�gura 5A):
Cómo cerrar y enganchar la puerta (�gura 5B):
Nota: al ajustar, la distancia entre los 4 pernos de tensión debe ser igual, como se muestra en la Figura 4G.
Página 9
Para cerrar la puerta moviendo la pieza lateral de la manija de bloqueo a la posición horizontal.
(aproximadamente la anchura de una
moneda mediana)
(4D).
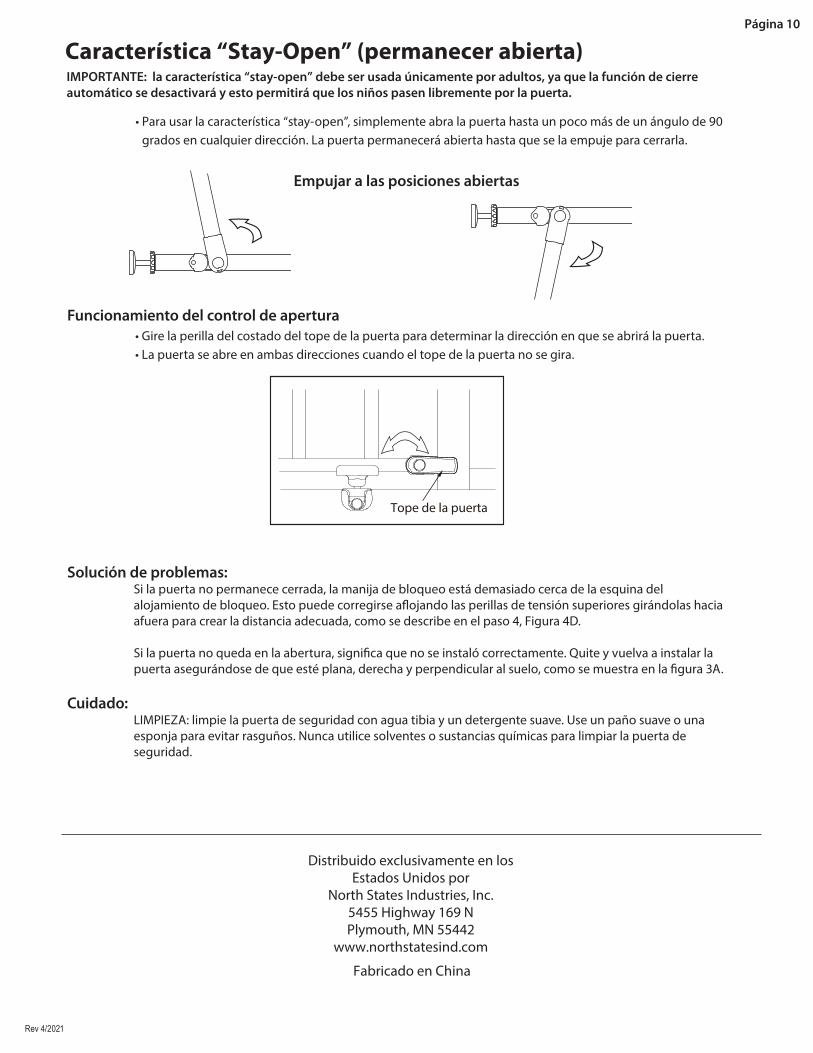
Empujar a las posiciones abiertas
Tope de la puerta
Característica “Stay-Open” (permanecer abierta)
Funcionamiento del control de apertura
Solución de problemas:Si la puerta no permanece cerrada, la manija de bloqueo está demasiado cerca de la esquina del
afuera para crear la distancia adecuada, como se describe en el paso 4, Figura 4D.
Cuidado:LIMPIEZA: limpie la puerta de seguridad con agua tibia y un detergente suave. Use un paño suave o una esponja para evitar rasguños. Nunca utilice solventes o sustancias químicas para limpiar la puerta de seguridad.
IMPORTANTE: la característica “stay-open” debe ser usada únicamente por adultos, ya que la función de cierre automático se desactivará y esto permitirá que los niños pasen libremente por la puerta.
• Para usar la característica “stay-open”, simplemente abra la puerta hasta un poco más de un ángulo de 90 grados en cualquier dirección. La puerta permanecerá abierta hasta que se la empuje para cerrarla.
• Gire la perilla del costado del tope de la puerta para determinar la dirección en que se abrirá la puerta. • La puerta se abre en ambas direcciones cuando el tope de la puerta no se gira.
Distribuido exclusivamente en los Estados Unidos por
North States Industries, Inc.5455 Highway 169 NPlymouth, MN 55442
www.northstatesind.com
Fabricado en China
Página 10
Rev 4/2021


![ICANCERRESEARCH56.4922-4926.NovemberI,1996 ...cancerres.aacrjournals.org/content/56/21/4922.full.pdf · ICANCERRESEARCH56.4922-4926.NovemberI,1996] ABSTRACT Phenolphthalein(atriphenylmethanederivative)hasbeencommonly](https://img.pdfslide.net/doc/110x75/5b8864627f8b9a46538dca9a/icancerresearch564922-4926novemberi1996-icancerresearch564922-4926novemberi1996.jpg)