Embed Size (px)
Citation preview

1
• Enduro® Outboard Bearing Replacement Kit• Bottom Bracket Bearing Puller/Press Tool• 8mm Allen wrench• 5mm Allen wrench• Outboard bearing cup tool (Park BBT-9 or similar)• Shimano TL-FC16 Crank Arm Cap Tool (cap tool included as part of the Park BBT-9) • Rubber-faced mallet • “Pocket” screw driver (very small, flat blade)• High-grade bicycle grease• Anti-seize compound• Torque wrench
enduro fork seals .com
REAL WORLD CYCLING
©2006 Real World Cycling/enduroforkseals .com All rights reserved.
PICTORIAL INSTALLATION MANUAL
INSTRUCTIONS FOR THE
SHIMANO HOLLOWTECH II®
OUTBOARD BEARING SYSTEM
ENDURO® OUTBOARD BOTTOM BRACKET REBUILD KIT
RECOMMENDED TOOLS AND SUPPLIES
2
1) Loosen the left-side crank arm bolts using the 5mm Allen wrench. Loosen them in an alternating pat-tern.
3) Pull the left crank arm off.
enduro fork seals .com
REAL WORLD CYCLING
©2006 Real World Cycling/enduroforkseals .com All rights reserved.
2) Remove the crank arm “cap” using the appropriate Shimano or Park tool.
NOTE: REMOVE YOUR BICYCLE CHAIN BEFORE BEGINNING
HOLLOWTECH II®
PICTORIAL INSTRUCTIONS
3
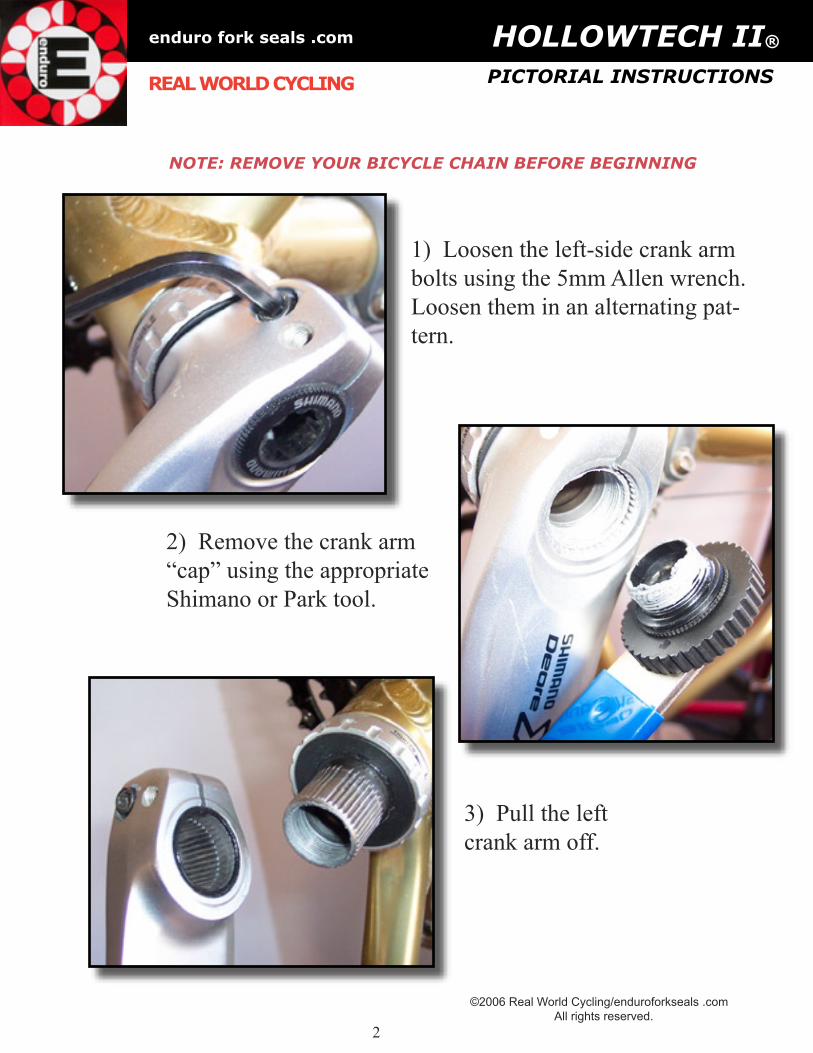
4) Remove the right crank unit. If resists being pulled out by hand, a gentle whack with a rubber-faced mallet will get it moving.
enduro fork seals .com
REAL WORLD CYCLING
©2006 Real World Cycling/enduroforkseals .com All rights reserved.
HOLLOWTECH II®
PICTORIAL INSTRUCTIONS

4
enduro fork seals .com
REAL WORLD CYCLING
©2006 Real World Cycling/enduroforkseals .com All rights reserved.
5) Remove the left, or non-drive side bearing cup.
Make a note of the spacers for re-assembly.
6) Place a large screwdriver into the “V” opening of the puller and use it as a “T” handle to pull the dust cap off. Repeat for the other side.
HOLLOWTECH II®
PICTORIAL INSTRUCTIONS

5
enduro fork seals .com
REAL WORLD CYCLING
©2006 Real World Cycling/enduroforkseals .com All rights reserved.
HOLLOWTECH II®
PICTORIAL INSTRUCTIONS
6) Remove the DRIVE (right) side cup.
a) Turn the bottom bracket cup wrench clockwise.
b) Set the inner sleeve and the spacers aside (take note of the spacers for proper re-assembly).
6a
6b
6
enduro fork seals .com
REAL WORLD CYCLING
©2006 Real World Cycling/enduroforkseals .com All rights reserved.
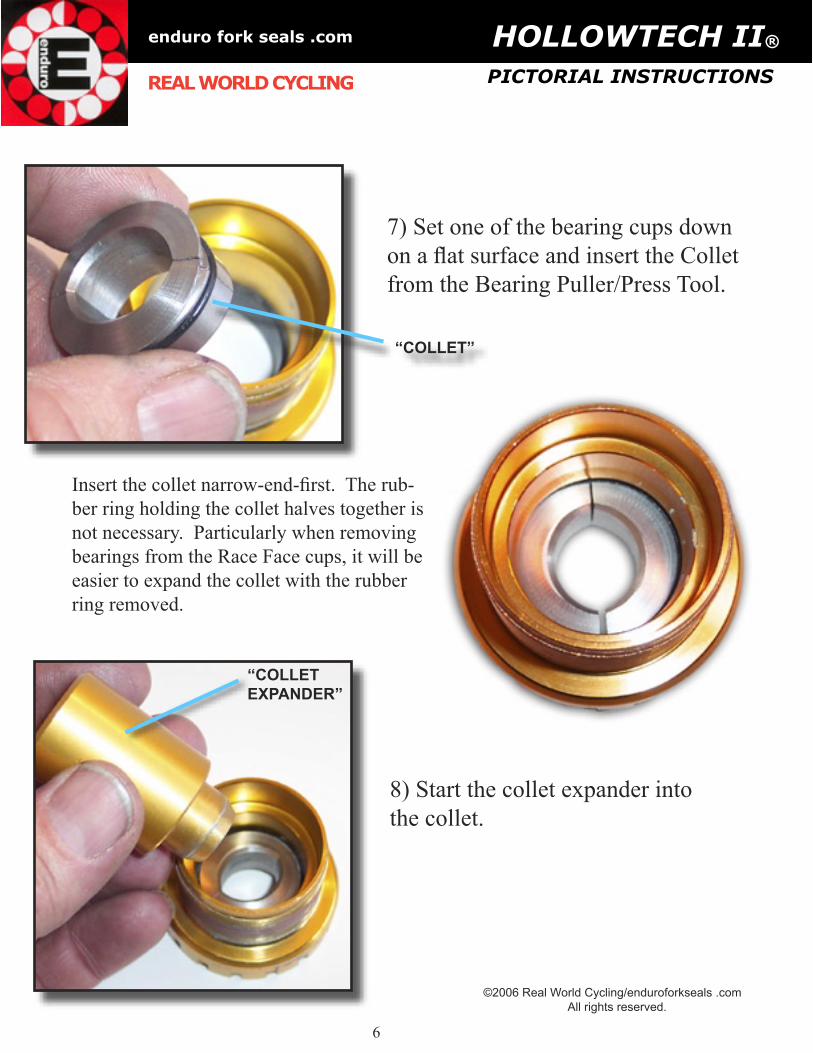
7) Set one of the bearing cups down on a flat surface and insert the Collet from the Bearing Puller/Press Tool.
Insert the collet narrow-end-first. The rub-ber ring holding the collet halves together is not necessary. Particularly when removing bearings from the Race Face cups, it will be easier to expand the collet with the rubber ring removed.
8) Start the collet expander into the collet.
“COLLET EXPANDER”
“COLLET”
HOLLOWTECH II®
PICTORIAL INSTRUCTIONS

7
enduro fork seals .com
REAL WORLD CYCLING
©2006 Real World Cycling/enduroforkseals .com All rights reserved.
HOLLOWTECH II®
PICTORIAL INSTRUCTIONS
9) Apply pressure to the Collet Ex-pander until it “seats” between the collet halves.
If you encounter difficulty in getting the expander to seat between the collet halves, lift the cup off of the flat surface and push on the expander until it fully seats as shown.
8
enduro fork seals .com
REAL WORLD CYCLING
©2006 Real World Cycling/enduroforkseals .com All rights reserved.
HOLLOWTECH II®
PICTORIAL INSTRUCTIONS
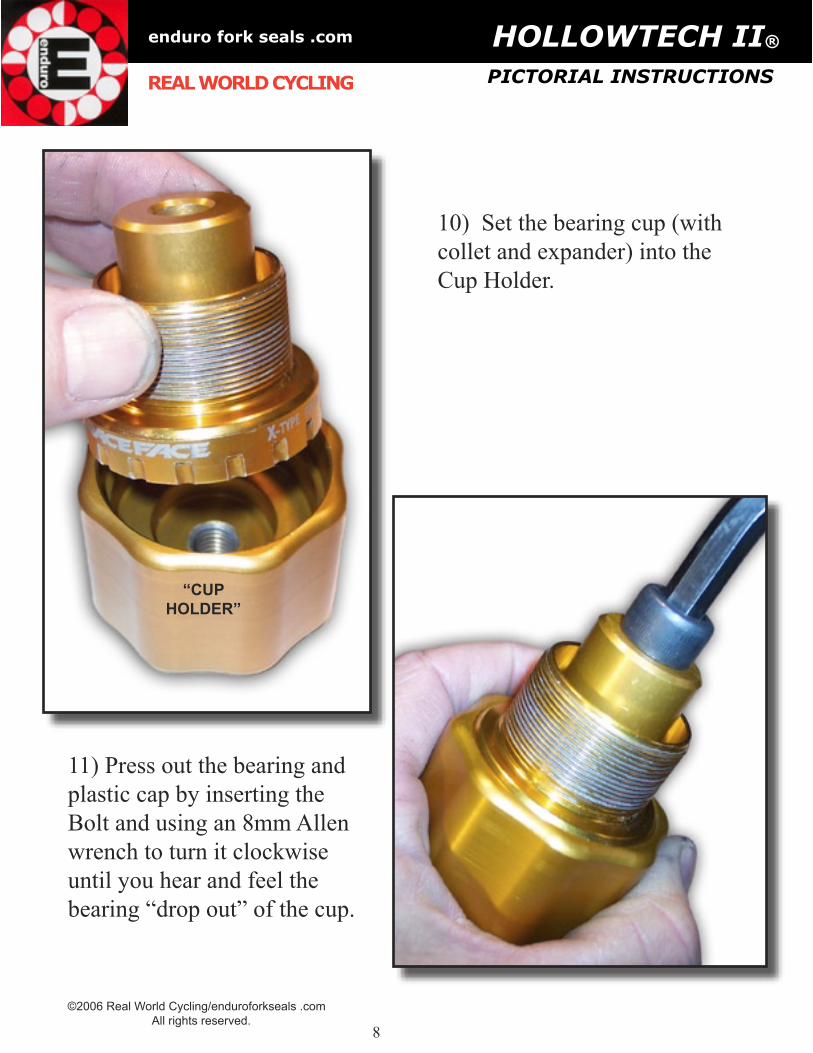
10) Set the bearing cup (with collet and expander) into the Cup Holder.
11) Press out the bearing and plastic cap by inserting the Bolt and using an 8mm Allen wrench to turn it clockwise until you hear and feel the bearing “drop out” of the cup.
“CUPHOLDER”

9
enduro fork seals .com
REAL WORLD CYCLING
©2006 Real World Cycling/enduroforkseals .com All rights reserved.
HOLLOWTECH II®
PICTORIAL INSTRUCTIONS
12) Lift the cup off of the Collet Expander.
13) Unthread the Bolt from the Cup Holder and remove the old bearing and plas-tic cap.
10
enduro fork seals .com
REAL WORLD CYCLING
HOLLOWTECH II®
PICTORIAL INSTRUCTIONS
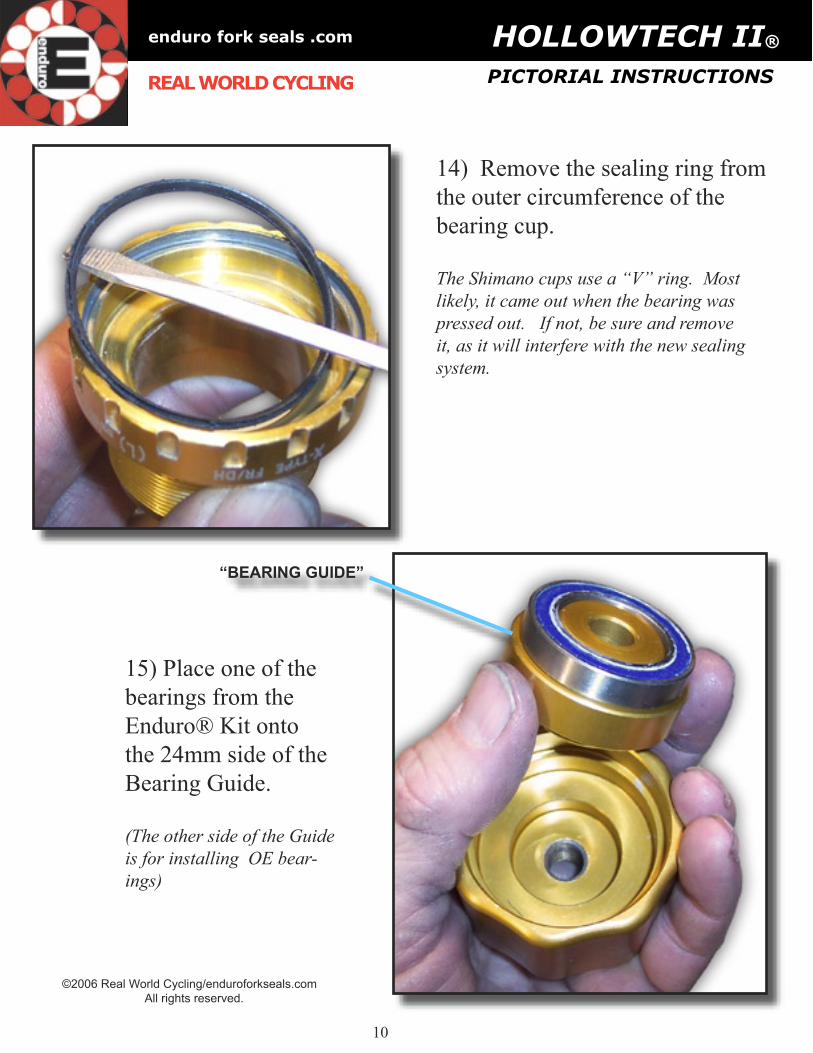
14) Remove the sealing ring from the outer circumference of the bearing cup.
The Shimano cups use a “V” ring. Most likely, it came out when the bearing was pressed out. If not, be sure and remove it, as it will interfere with the new sealing system.
15) Place one of the bearings from the Enduro® Kit onto the 24mm side of the Bearing Guide.
(The other side of the Guide is for installing OE bear-ings)
“BEARING GUIDE”
©2006 Real World Cycling/enduroforkseals.com All rights reserved.

11
enduro fork seals .com
REAL WORLD CYCLING
HOLLOWTECH II®
PICTORIAL INSTRUCTIONS
16) Place the Bearing Guide into the Cup Holder.
17) Place the bearing cup on top of the new bearing.
©2006 Real World Cycling/enduroforkseals.com All rights reserved.

12
enduro fork seals .com
REAL WORLD CYCLING
HOLLOWTECH II®
PICTORIAL INSTRUCTIONS
18) Place the Support into the threaded end of the bearing cup.
©2006 Real World Cycling/enduroforkseals.com All rights reserved.
19) Insert the Bolt and turn it clockwise with the 8mm Allen wrench until it “bottoms.”
Then, remove the bolt and take out the bearing cup.
“SUPPORT”

13
enduro fork seals .com
REAL WORLD CYCLING
HOLLOWTECH II®
PICTORIAL INSTRUCTIONS
©2006 Real World Cycling/enduroforkseals.com All rights reserved.
20) Re-install the left (non-drive side) cup and spacer(s).
a) Apply anti-seize compound to the cup threads.
b) Replace original spacer(s).
c) Start the cup into the frame by hand. The left side threads in normal-ly (clockwise).
d) Use a proper BB Cup Tool to tighten the cup firmly in place.

14
enduro fork seals .com
REAL WORLD CYCLING
HOLLOWTECH II®
PICTORIAL INSTRUCTIONS
©2006 Real World Cycling/enduroforkseals.com All rights reserved.
21) Re-install the right, or drive side cup and spacer(s).
Remember:a) Apply anti-seize to the cup threads.
b) Replace the proper number of spacers.
c) Install the inner sleeve!
d) The drive side cup has reverse, or left-hand threads. Tighten by turning counter-clockwise.
22) Although the bearing is sealed, you may wish to ap-ply a layer of Super-Web Grease® for extra protection.
21a-c
21d

15
enduro fork seals .com
REAL WORLD CYCLING
©2006 Real World Cycling/enduroforkseals .com All rights reserved.
23) Put one of the new seals onto the crank spindle. The reddish, silicone side of the seal will face away from the bearing.
24) Apply a thin coat of grease on the spindle.
HOLLOWTECH II®
PICTORIAL INSTRUCTIONS

16
26) Install the other seal onto the spindle. Remem-ber that the reddish sili-cone surface faces away from the bearing.
enduro fork seals .com
REAL WORLD CYCLING
©2006 Real World Cycling/enduroforkseals .com All rights reserved.
You will notice that the Enduro® BB system does not use a plastic shim. The inner race of the Enduro® bearing has a smaller ID that di-rectly contacts the spindle. This allows room for larger ball bearings, improving strength and stiffness.
25) Insert the right crank assembly. If your bike’s bottom bracket faces are parallel and the bearings are properly seated, the spindle should line up with the opposite bearing and come through with very little effort. If the spindle tightens up at the last few millemeters, you may lightly tap the drive side with the rubber-faced mallet.
HOLLOWTECH II®
PICTORIAL INSTRUCTIONS

17
27) Lubricate the axle splines and push the left crank arm onto the axle (the crank arm will only slide on if it is aligned correctly--notice the one wide groove).
enduro fork seals .com
REAL WORLD CYCLING
©2006 Real World Cycling/enduroforkseals .com All rights reserved.
28) Apply some anti-seize compound to the crank arm cap and thread it in by hand. Use the Shimano or Park tool to tighten the cap. Note that it requires very little torque to correctly tighten the assembly (recommended 4-6 INCH LBS).
HOLLOWTECH II®
PICTORIAL INSTRUCTIONS

18
29) Remove the crank arm Allen bolts and coat the threads with anti-seize compound. Using the 5mm Allen wrench, tighten the opposing bolts in an alternating pattern. Speci-fied torque is 88-132 INCH LBS for each bolt.
enduro fork seals .com
REAL WORLD CYCLING
©2006 Real World Cycling/enduroforkseals .com All rights reserved.
30) Check that there is no side-to-side play (looseness) and that the crankset spins freely and smoothly. If so, put your chain back on and hit the dirt!
HOLLOWTECH II®
PICTORIAL INSTRUCTIONS

19
enduro fork seals .com
REAL WORLD CYCLING
HOLLOWTECH II®
PICTORIAL INSTRUCTIONS
©2006 Real World Cycling/enduroforkseals.com All rights reserved.
Outboard Bottom Bracket Bearing Puller/Pressby Sonny’s Bike Tools
Outboard Bottom Bracket Bearing Replacement Kitby Enduro Bearings
These great products available at:
www.enduroforkseals.com