Embed Size (px)
Citation preview
1
NA
ARXL 129 W SP
Instructions for useWASHING MACHINE
English,1
NA
Contents
Important safety instructions 2-3Important safety instructionsGrounding InstructionsSafety
Installation instructions 4-5-6Unpacking and levelingMinimum Installation SpacingConnecting Water InletDrainageConnecting the drain hoseElectricalUnder Sink MethodTechnical data
Description of the washing machine and starting a wash cycle 7-8Control panelIndicator lightsStarting a wash cycle
Wash cycles 9Table of wash cyclesSpecial wash cycles
Personalization 10-11Setting the temperatureSetting the spin speedFunctions
Detergents and laundry 12Detergent dispenser drawerBleach cyclePreparing the laundryGarments requiring special careLoad balancing systemHelpful Hints
Care and maintenance instructions 13Cutting off the water and electricity suppliesCleaning the washing machineCleaning the detergent dispenser drawerCaring for the door and drum of your applianceCleaning the pumpChecking the water inlet hose
Troubleshooting 14
Service 15
Warranty, 16-17
2
NAIMPORTANT SAFETY INSTRUCTIONS
WARNING - To reduce the risk of fire, electrical shock, or injury to persons when using your appliance, follow basic precautions, including the following:
•Readallinstructionsbeforeusingtheappliance.
•Donotwasharticlesthathavebeenpreviouslycleanedin, washed in, soaked in, or spotted with gasoline, dry cleaning solvents, other flammable, or exlosive substan-cesastheygiveoffvaporsthatcouldigniteorexplode.
•Donotallowchildrentoplayonorintheappliance.Clo-se supervision of children is necessary when the applian-ceisusednearchildren.
•Beforetheapplianceisremovedfromserviceordiscar-ded,removethedoortothewashingcompartment.
•Donotaddgasoline,drycleaningsolvents,orotherflam-mableorexplosivesubstancestothewashwater.Thesesubstancesgiveoffvaporsthatcouldigniteorexplode.
•Donotinstallorstorethisappliancewhereitwillbeexposedtotheweather.
•Donottamperwithcontrols.
•UndercertainconditionsHydrogengasmaybeprodu-ced in a hot water system that has not been used for 2 weeksormore.HYDROGENGASISEXPLOSIVE.Ifthehot water system has not been used for such a period, before using the appliance, turn on all hot water faucets andletthewaterflowfromeachforseveralminutes.Thiswillreleaseanyaccumulatedhydrogengas.Asthegas is flammable do not smoke or use an open flame duringthistime.
•Turnoffwaterfaucetstorelievepressureonhosesandvalves and to minimize leakage if a break or rupture occurs.
•Donotreachintotheapplianceifthetubordrumismoving.
•Donotrepairorreplaceanypartoftheapplianceorattempt any servicing unless specifically recommended in the user-maintenance instructions or in published user-repair instructions that you understand and have theskillstocarryout.
•Good,safepracticesandcautionMUSTbeappliedwhen installing, operating, and maintaining any applian-ce.Followbasicprecaution.
•Disconnectpowertothewasheratthecircuitbreakeror fuse box, or unplug the machine in an emergency or whenservicingrequired.Havetheinstallershowyouandlabel the proper switch or fuse at the electrical discon-nectbox.
•Theinterioroftheapplianceshouldbecleanedperiodi-callybyqualifiedservicepersonnel.
•Beforeloadingthewasher,makesurethedrumisempty.
SAVE THESE INSTRUCTIONS
GROUNDING INSTRUCTIONSThisappliancemustbegrounded.Intheeventofmal-function or breakdown, grounding will reduce the risk of electric shock by providing a path of least resistence for electriccurrent.Thisapplianceisequippedwithacordha-ving an equipment-grounding conductor and a grounding plug.Theplugmustbepluggedintoanappropriateoutletthat is properly installed and grounded in accordance with alllocalcodesandordinances.
WARNING-Improperconnectionoftheequipment-groun-dingconductorcanresultinaelectricshock.
Check with a qualified electrician or service representative or personnel if you are in doubt as to whether the applian-ceisproperlygounded.
Do not modify the plug provided with the appliance: if it will not fit outlet, have a proper outlet installed by a qualified electrician.
Important safety instructions
3
NASafety
CAUTION:To reduce the risk of electric shock, DO NOT remove cover (or back)/no user servicable parts inside.
Refer for servicing to qualified services personnel.
Themodelandserialnumberofthisproductcanbefoundinsidethedoorandonthebackoftheunit.
Youshouldnotethemodelandserialnumbersofthisunitinthespaceprovided.Retainthisbookletasapermanentrecordofyourpurchasetoaidinidentificationintheeventoftheft.
MODELN.
SERIALN.
WARNING:TO PREVENT FIRE OR SHOCK HAZARD DO NOT EXPOSE THIS PRODUCT TO RAIN OR MOISTURE.
The lightning flash with arrowhead symbol, within an equilateral triagle, is intended to alert the user to the presence of uninsulated “dangerous voltage” within the product’s enclosure that may be of sufficient magnitude to constitute a
riskofelectricshocktopersons.
The exclamation point within an equilateral triangle is intended to alert the user to the presence of important opera-
tingandmaintenance(servicing)instructionsinthebooklet.
IndesitCompanyofferstheircustomersproductswiththeENERGYSTARLabel.
ThisappliancewastestedbyULandconformswithbothCanadianandU.S.ULsafetyrequirements
and displays their Mark
CAUTION RISK OF ELECTRIC
SHOCK DO NOT OPEN
!
!
C UL US LISTED®
!
4
NA! This instruction manual should be kept in a safe place forfuturereference.Ifthewasherissold,transferredormoved, make sure that the instruction manual remains with the machine so that the new owner is able to familiarize himself/herselfwithitsoperationandfeatures.
!Readtheseinstructionscarefully:theycontainvitalinfor-mation relating to the safe installation and operation of the appliance.
Unpacking and levelling
Unpacking
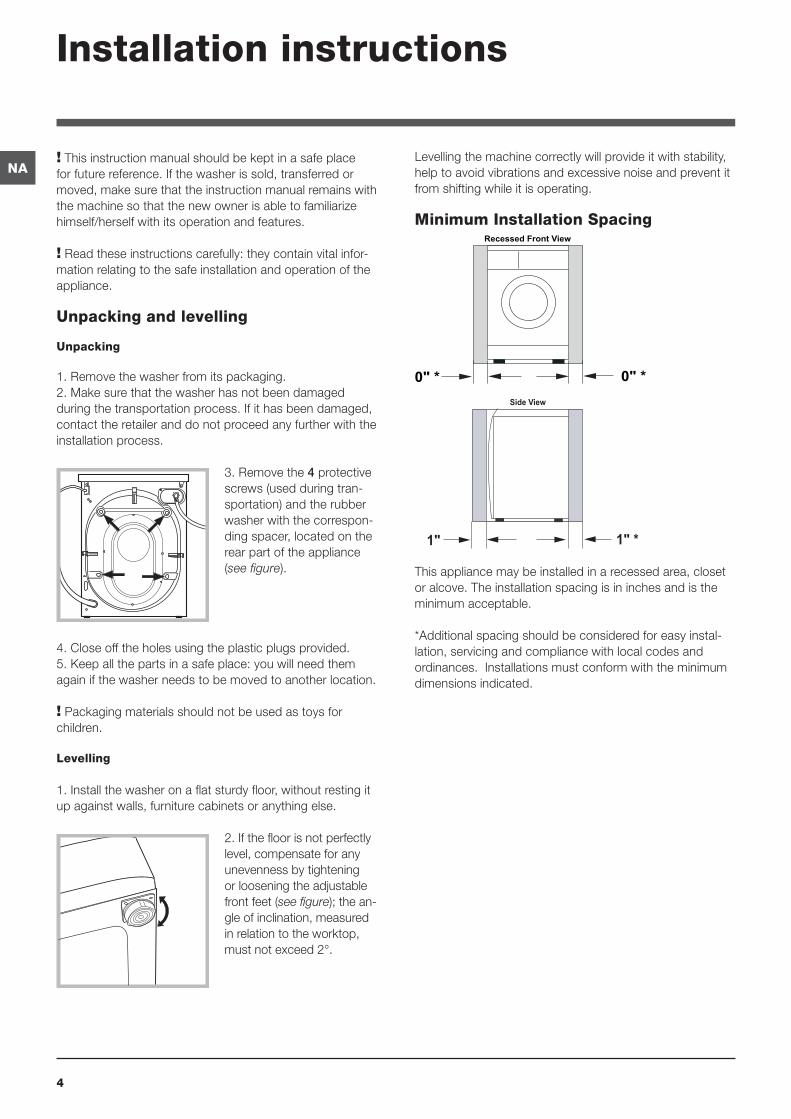
1.Removethewasherfromitspackaging.2.Makesurethatthewasherhasnotbeendamagedduringthetransportationprocess.Ifithasbeendamaged,contact the retailer and do not proceed any further with the installationprocess.
3.Removethe4 protective screws (used during tran-sportation) and the rubber washer with the correspon-ding spacer, located on the rear part of the appliance (see figure).
4.Closeofftheholesusingtheplasticplugsprovided.5.Keepallthepartsinasafeplace:youwillneedthemagainifthewasherneedstobemovedtoanotherlocation.
! Packaging materials should not be used as toys for children.
Levelling
1.Installthewasheronaflatsturdyfloor,withoutrestingitupagainstwalls,furniturecabinetsoranythingelse.
2.Ifthefloorisnotperfectlylevel, compensate for any unevenness by tightening or loosening the adjustable front feet (see figure); the an-gle of inclination, measured in relation to the worktop, mustnotexceed2°.
Levelling the machine correctly will provide it with stability, help to avoid vibrations and excessive noise and prevent it fromshiftingwhileitisoperating.
Minimum Installation Spacing
This appliance may be installed in a recessed area, closet oralcove.Theinstallationspacingisininchesandistheminimumacceptable.
*Additionalspacingshouldbeconsideredforeasyinstal-lation, servicing and compliance with local codes and ordinances.Installationsmustconformwiththeminimumdimensionsindicated.
0" * 0" *
Recessed Front View
1" *1"
Side View
Installation instructions
5
NA
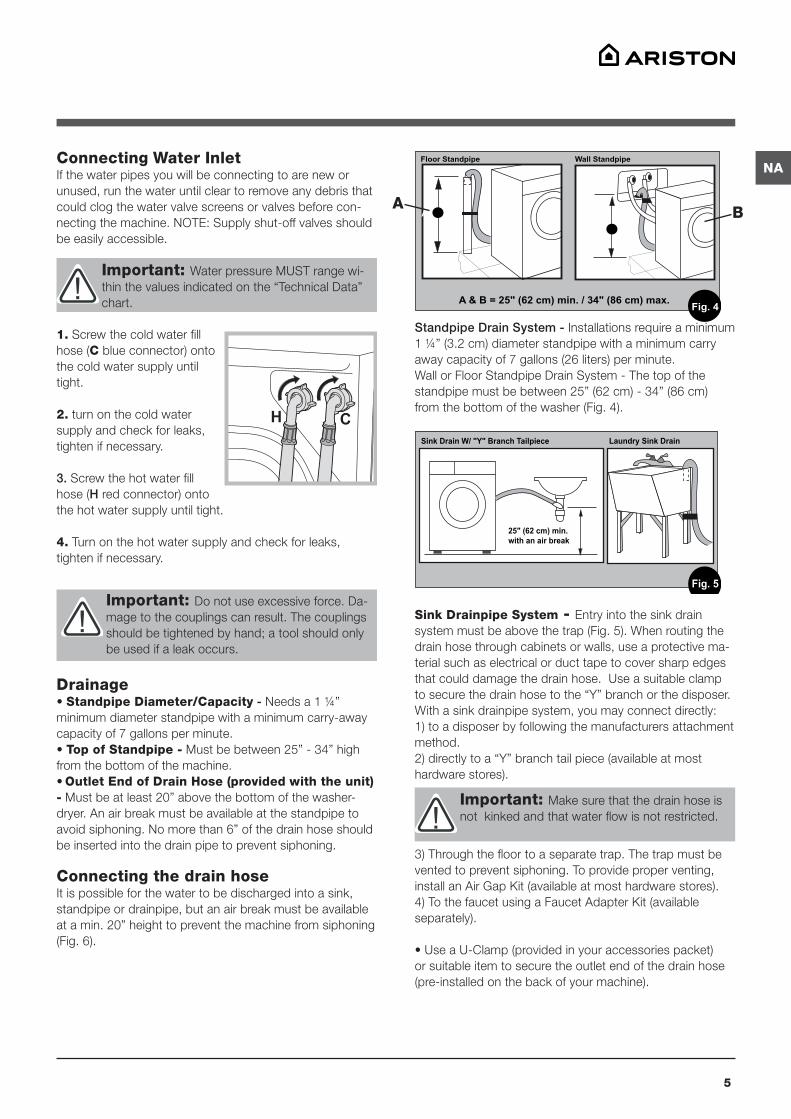
A & B = 25" (62 cm) min. / 34" (86 cm) max.
Floor Standpipe Wall Standpipe
AB
Fig. 4
Standpipe Drain System - Installations require a minimum 1¼”(3.2cm)diameterstandpipewithaminimumcarryawaycapacityof7gallons(26liters)perminute.Wall or Floor Standpipe Drain System - The top of the standpipe must be between 25” (62 cm) - 34” (86 cm) fromthebottomofthewasher(Fig.4).
Sink Drainpipe System - Entry into the sink drain systemmustbeabovethetrap(Fig.5).Whenroutingthedrain hose through cabinets or walls, use a protective ma-terial such as electrical or duct tape to cover sharp edges thatcoulddamagethedrainhose.Useasuitableclamptosecurethedrainhosetothe“Y”branchorthedisposer.With a sink drainpipe system, you may connect directly: 1) to a disposer by following the manufacturers attachment method.2)directlytoa“Y”branchtailpiece(availableatmosthardwarestores).
3)Throughthefloortoaseparatetrap.Thetrapmustbeventedtopreventsiphoning.Toprovideproperventing,installanAirGapKit(availableatmosthardwarestores).4)TothefaucetusingaFaucetAdapterKit(availableseparately).
•UseaU-Clamp(providedinyouraccessoriespacket)or suitable item to secure the outlet end of the drain hose (pre-installedonthebackofyourmachine).
25" (62 cm) min.with an air break
Laundry Sink Drain
Fig. 5
Sink Drain W/ "Y" Branch Tailpiece
Important: Make sure that the drain hose is notkinkedandthatwaterflowisnotrestricted.!
H C
Connecting Water InletIf the water pipes you will be connecting to are new or unused, run the water until clear to remove any debris that could clog the water valve screens or valves before con-nectingthemachine.NOTE:Supplyshut-offvalvesshouldbeeasilyaccessible.
1. Screw the cold water fill hose (C blue connector) onto the cold water supply until tight.
2. turn on the cold water supply and check for leaks, tightenifnecessary.
3. Screw the hot water fill hose (H red connector) onto thehotwatersupplyuntiltight.
4. Turn on the hot water supply and check for leaks, tightenifnecessary.
Drainage•Standpipe Diameter/Capacity -Needsa1¼”minimum diameter standpipe with a minimum carry-away capacityof7gallonsperminute.•Top of Standpipe - Must be between 25” - 34” high fromthebottomofthemachine.•Outlet End of Drain Hose (provided with the unit) - Must be at least 20” above the bottom of the washer-dryer.Anairbreakmustbeavailableatthestandpipetoavoidsiphoning.Nomorethan6”ofthedrainhoseshouldbeinsertedintothedrainpipetopreventsiphoning.
Connecting the drain hoseIt is possible for the water to be discharged into a sink, standpipe or drainpipe, but an air break must be available atamin.20”heighttopreventthemachinefromsiphoning(Fig.6).
Important: Water pressure MUST range wi-thin the values indicated on the “Technical Data” chart.
!
!Important: Donotuseexcessiveforce.Da-magetothecouplingscanresult.Thecouplingsshould be tightened by hand; a tool should only beusedifaleakoccurs.
A B

6
NAElectrical•MachineVoltage/Amperage-120V,60Hz,4Amp.•Connection-3-prongplugwith6’cordisprovidedwiththemachine.•Circuit/Protector-3-wiresinglephase,120V,60Hz,AC,onaseparate15Ampcircuit.
Technical Information
Technical data
Model ARXL129WSP
Dimensionswidth:23.4””(59.5cm)height:33.24””-33.75””(84.5-85.7cm)depth:22””(55.9)cm
Weight 148 lbs
Minimum Installa-
tion ClearancesSides: 0””Front / Back: 1””
Capacity Washing:2to15lbs.(1to7kg)
Electrical
connectionsVoltage:120Volts,4A,60Hz
Water
connectionsMax.Pressure:0.69MPa(6.9bar),100psiMin.Pressure:0.05MPa(0.5bar),7.2psi
Max. Spin speed upto1200RPM
Indesit Company offers their customers productswiththeENERGYSTARLabel.
This appliance was tested by UL and conformswithbothCanadianandU.S.UL safety requirements and displaystheirMark.
C UL US LISTED®
•Inserttheoutletendofthedrainhoseintothestandpipe,wallorfloordrain(Fig.6).NOTE:Theoutletendofthedrain hose MUST be at least 20” (50 cm) above the base ofthemachine.Nomorethan6”ofthedrainhoseshouldbeinsertedintothedrainpipetopreventsiphoning.
•Useastrap,cabletie,orsimilaritemtoholdthehoseortheU-Clampinplace.
Under Sink Method
1. Cut the blocked end of theundersinkdrainageunit.
2. Fix the hooked end sup-porta minimum of 620 mm fromthefloor.
3. Use a hose clip clamp to securely attach the grey drai-nage hose end to the under sink drainage unit using a hose.clamp
20" (62 cm) min.
34" (86 cm) max.
Sta
ndpip
e
"Y" Tail Piece
This connection MUST be
before drain trap and at
least 20" (50.8 cm) above
the floor where washer will
be installed.
Cable tie
Floor Standpipe w/ "Y" Branch Tail Piece
Fig. 7
20" (50 cm) min.
with an air break
25" (62 cm) min.
34" (86 cm) max.
6" max.
Sta
ndpip
e
Floor Standpipe
Fig. 6
U-Clamp
7
NA
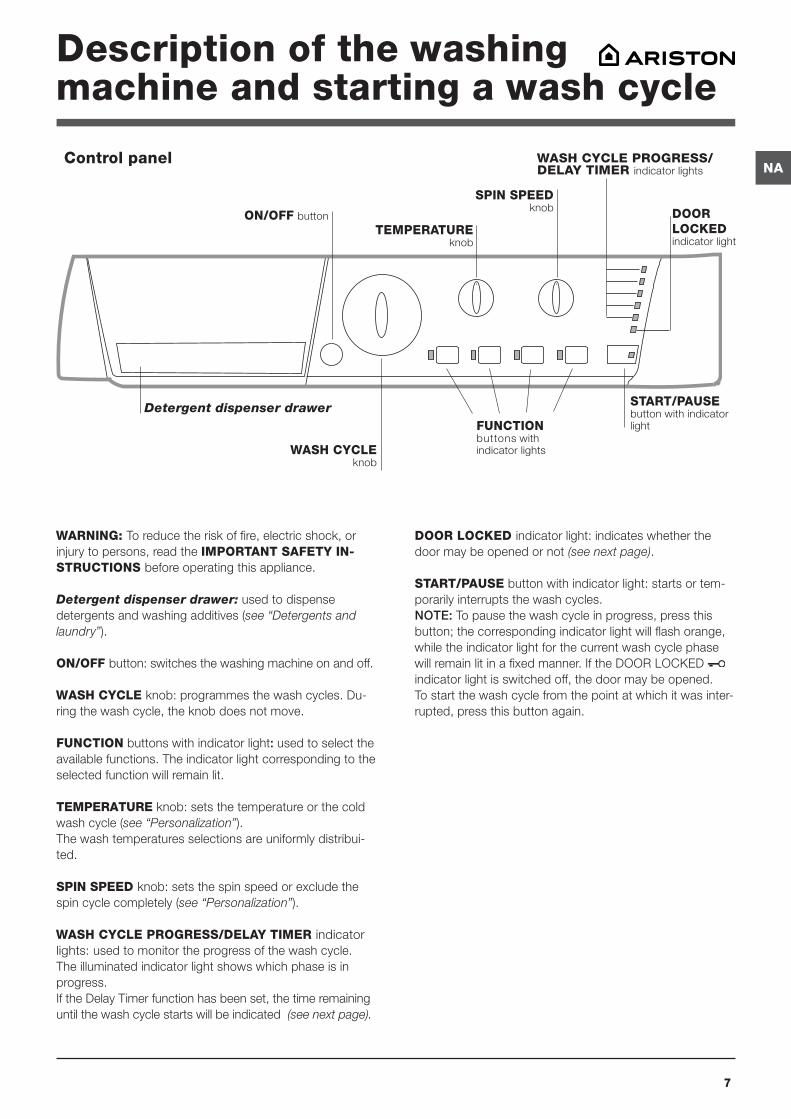
WARNING: To reduce the risk of fire, electric shock, or injury to persons, read the IMPORTANT SAFETY IN-STRUCTIONS beforeoperatingthisappliance.
Detergent dispenser drawer: used to dispense detergents and washing additives (see “Detergents and laundry”).
ON/OFF button:switchesthewashingmachineonandoff.
WASH CYCLE knob:programmesthewashcycles.Du-ringthewashcycle,theknobdoesnotmove.
FUNCTION buttons with indicator light: used to select the availablefunctions.Theindicatorlightcorrespondingtotheselectedfunctionwillremainlit.
TEMPERATURE knob: sets the temperature or the cold wash cycle (see “Personalization”).The wash temperatures selections are uniformly distribui-ted.
SPIN SPEED knob: sets the spin speed or exclude the spin cycle completely (see “Personalization”).
WASH CYCLE PROGRESS/DELAY TIMER indicator lights: usedtomonitortheprogressofthewashcycle.The illuminated indicator light shows which phase is in progress.If the Delay Timer function has been set, the time remaining until the wash cycle starts will be indicated (see next page).
DOOR LOCKED indicator light: indicates whether the door may be opened or not (see next page).
START/PAUSE button with indicator light: starts or tem-porarilyinterruptsthewashcycles.NOTE: To pause the wash cycle in progress, press this button; the corresponding indicator light will flash orange, while the indicator light for the current wash cycle phase willremainlitinafixedmanner.IftheDOORLOCKED indicatorlightisswitchedoff,thedoormaybeopened.To start the wash cycle from the point at which it was inter-rupted,pressthisbuttonagain.
Description of the washing machine and starting a wash cycle
TEMPERATURE knob
Detergent dispenser drawer
WASH CYCLE PROGRESS/DELAY TIMER indicator lights
FUNCTION buttons with indicator lights
ON/OFF button
SPIN SPEED knob DOOR
LOCKED indicator light
START/PAUSE button with indicator light
Control panel
WASH CYCLE knob
8
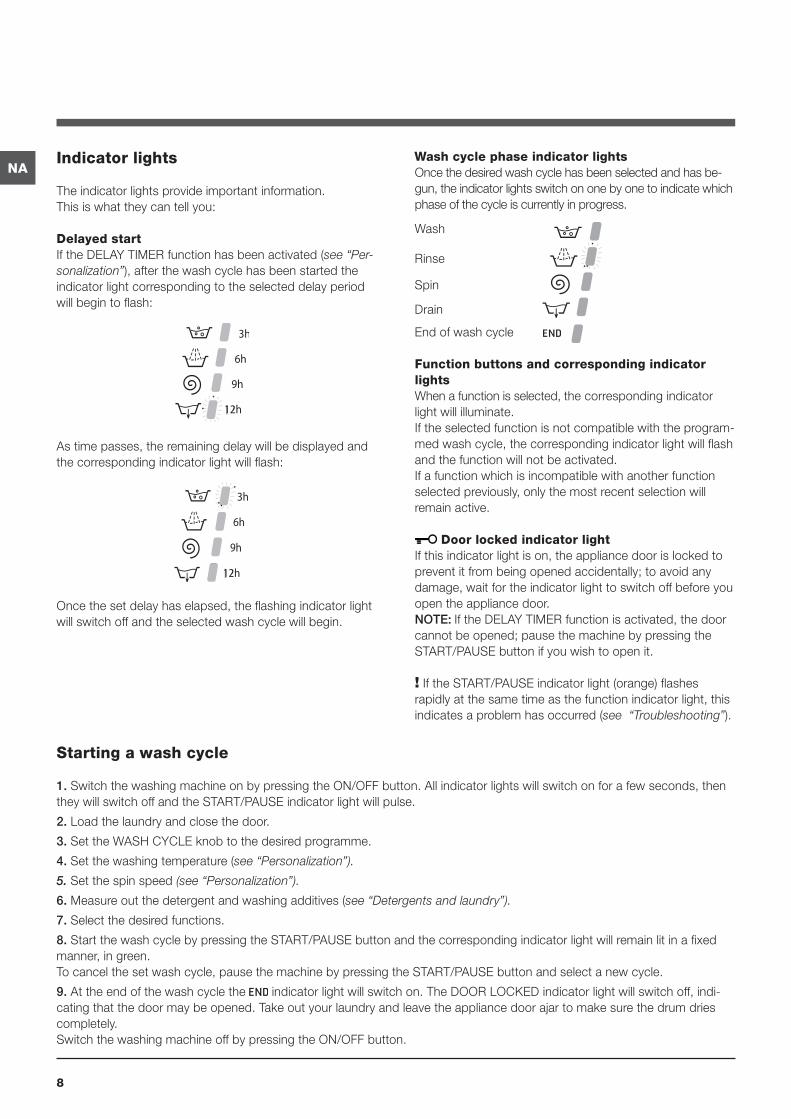
NAIndicator lights
Theindicatorlightsprovideimportantinformation.This is what they can tell you:
Delayed startIftheDELAYTIMERfunctionhasbeenactivated(see “Per-sonalization”), after the wash cycle has been started the indicator light corresponding to the selected delay period will begin to flash:
Astimepasses,theremainingdelaywillbedisplayedandthe corresponding indicator light will flash:
Oncethesetdelayhaselapsed,theflashingindicatorlightwillswitchoffandtheselectedwashcyclewillbegin.
Wash cycle phase indicator lightsOncethedesiredwashcyclehasbeenselectedandhasbe-gun, the indicator lights switch on one by one to indicate which phaseofthecycleiscurrentlyinprogress.
Function buttons and corresponding indicator lightsWhen a function is selected, the corresponding indicator lightwillilluminate.If the selected function is not compatible with the program-med wash cycle, the corresponding indicator light will flash andthefunctionwillnotbeactivated.If a function which is incompatible with another function selected previously, only the most recent selection will remainactive.
Door locked indicator lightIf this indicator light is on, the appliance door is locked to prevent it from being opened accidentally; to avoid any damage, wait for the indicator light to switch off before you opentheappliancedoor.NOTE: IftheDELAYTIMERfunctionisactivated,thedoorcannot be opened; pause the machine by pressing the START/PAUSEbuttonifyouwishtoopenit.
!IftheSTART/PAUSEindicatorlight(orange)flashesrapidly at the same time as the function indicator light, this indicates a problem has occurred (see “Troubleshooting”).
Starting a wash cycle
1. SwitchthewashingmachineonbypressingtheON/OFFbutton.Allindicatorlightswillswitchonforafewseconds,thentheywillswitchoffandtheSTART/PAUSEindicatorlightwillpulse.
2.Loadthelaundryandclosethedoor.
3.SettheWASHCYCLEknobtothedesiredprogramme.
4. Set the washing temperature (see “Personalization”).
5. Set the spin speed (see “Personalization”).
6. Measure out the detergent and washing additives (see “Detergents and laundry”).
7.Selectthedesiredfunctions.
8.StartthewashcyclebypressingtheSTART/PAUSEbuttonandthecorrespondingindicatorlightwillremainlitinafixedmanner,ingreen.Tocancelthesetwashcycle,pausethemachinebypressingtheSTART/PAUSEbuttonandselectanewcycle.
9.Attheendofthewashcyclethe indicatorlightwillswitchon.TheDOORLOCKEDindicatorlightwillswitchoff,indi-catingthatthedoormaybeopened.Takeoutyourlaundryandleavetheappliancedoorajartomakesurethedrumdriescompletely.SwitchthewashingmachineoffbypressingtheON/OFFbutton.
Wash
Rinse
Spin
Drain
End of wash cycle
9
NA
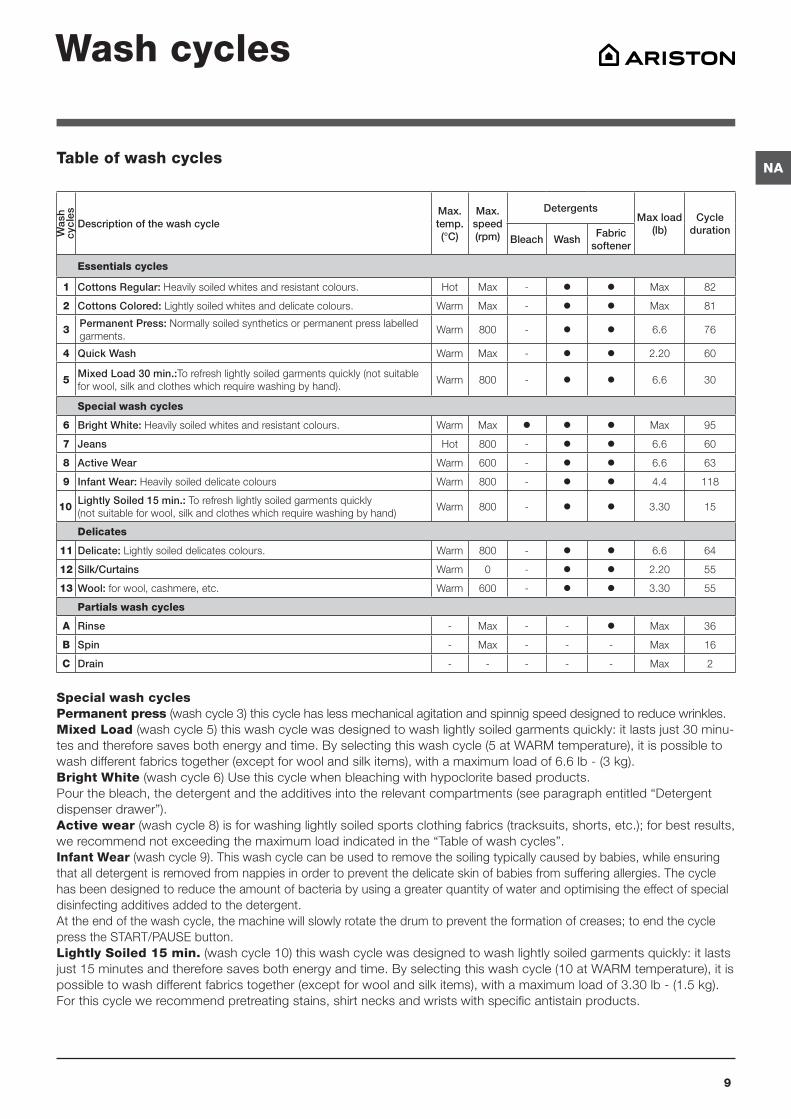
Wash cycles
Table of wash cycles
Was
h cy
cles
Description of the wash cycleMax. temp. (°C)
Max. speed (rpm)
DetergentsMax load
(lb)Cycle
durationBleach Wash
Fabric softener
Essentials cycles
1 Cottons Regular: Heavilysoiledwhitesandresistantcolours. Hot Max - Max 82
2 Cottons Colored: Lightlysoiledwhitesanddelicatecolours. Warm Max - Max 81
3 Permanent Press: Normallysoiledsyntheticsorpermanentpresslabelledgarments.
Warm 800 - 6.6 76
4 Quick Wash Warm Max - 2.20 60
5 Mixed Load 30 min.:To refresh lightly soiled garments quickly (not suitable forwool,silkandclotheswhichrequirewashingbyhand).
Warm 800 - 6.6 30
Special wash cycles
6 Bright White: Heavilysoiledwhitesandresistantcolours. Warm Max Max 95
7 Jeans Hot 800 - 6.6 60
8 Active Wear Warm 600 - 6.6 63
9 Infant Wear: Heavily soiled delicate colours Warm 800 - 4.4 118
10 Lightly Soiled 15 min.: To refresh lightly soiled garments quickly (not suitable for wool, silk and clothes which require washing by hand)
Warm 800 - 3.30 15
Delicates
11 Delicate: Lightlysoileddelicatescolours. Warm 800 - 6.6 64
12 Silk/Curtains Warm 0 - 2.20 55
13 Wool: forwool,cashmere,etc. Warm 600 - 3.30 55
Partials wash cycles
A Rinse - Max - - Max 36
B Spin - Max - - - Max 16
C Drain - - - - - Max 2
Special wash cyclesPermanent press (washcycle3)thiscyclehaslessmechanicalagitationandspinnigspeeddesignedtoreducewrinkles.Mixed Load (wash cycle 5) this wash cycle was designed to wash lightly soiled garments quickly: it lasts just 30 minu-tesandthereforesavesbothenergyandtime.Byselectingthiswashcycle(5atWARMtemperature),itispossibletowashdifferentfabricstogether(exceptforwoolandsilkitems),withamaximumloadof6.6lb-(3kg).Bright White (washcycle6)Usethiscyclewhenbleachingwithhypocloritebasedproducts.Pour the bleach, the detergent and the additives into the relevant compartments (see paragraph entitled “Detergent dispenserdrawer”).Active wear(washcycle8)isforwashinglightlysoiledsportsclothingfabrics(tracksuits,shorts,etc.);forbestresults,werecommendnotexceedingthemaximumloadindicatedinthe“Tableofwashcycles”.Infant Wear(washcycle9).Thiswashcyclecanbeusedtoremovethesoilingtypicallycausedbybabies,whileensuringthatalldetergentisremovedfromnappiesinordertopreventthedelicateskinofbabiesfromsufferingallergies.Thecyclehas been designed to reduce the amount of bacteria by using a greater quantity of water and optimising the effect of special disinfectingadditivesaddedtothedetergent.Attheendofthewashcycle,themachinewillslowlyrotatethedrumtopreventtheformationofcreases;toendthecyclepresstheSTART/PAUSEbutton.Lightly Soiled 15 min. (wash cycle 10) this wash cycle was designed to wash lightly soiled garments quickly: it lasts just15minutesandthereforesavesbothenergyandtime.Byselectingthiswashcycle(10atWARMtemperature),itispossibletowashdifferentfabricstogether(exceptforwoolandsilkitems),withamaximumloadof3.30lb-(1.5kg).Forthiscyclewerecommendpretreatingstains,shirtnecksandwristswithspecificantistainproducts.
10
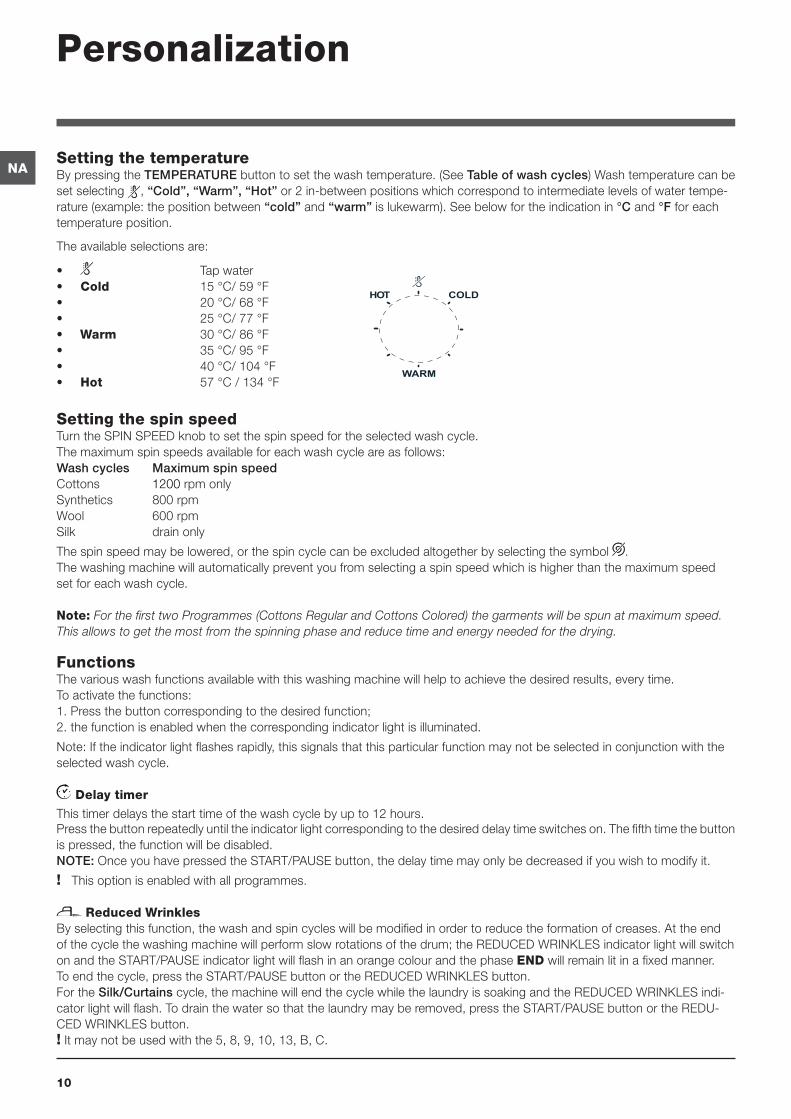
NASetting the temperatureBy pressing the TEMPERATUREbuttontosetthewashtemperature.(SeeTable of wash cycles) Wash temperature can be set selecting , “Cold”, “Warm”, “Hot” or 2 in-between positions which correspond to intermediate levels of water tempe-rature (example: the position between “cold” and “warm”islukewarm).Seebelowfortheindicationin°C and °F for each temperatureposition.
The available selections are:
Setting the spin speedTurntheSPINSPEEDknobtosetthespinspeedfortheselectedwashcycle.The maximum spin speeds available for each wash cycle are as follows:Wash cycles Maximum spin speedCottons 1200 rpm onlySynthetics 800 rpmWool 600 rpmSilk drain only
The spin speed may be lowered, or the spin cycle can be excluded altogether by selecting the symbol .The washing machine will automatically prevent you from selecting a spin speed which is higher than the maximum speed setforeachwashcycle.
Note: For the first two Programmes (Cottons Regular and Cottons Colored) the garments will be spun at maximum speed. This allows to get the most from the spinning phase and reduce time and energy needed for the drying.
FunctionsThevariouswashfunctionsavailablewiththiswashingmachinewillhelptoachievethedesiredresults,everytime.To activate the functions:1.Pressthebuttoncorrespondingtothedesiredfunction;2.thefunctionisenabledwhenthecorrespondingindicatorlightisilluminated.
Note:Iftheindicatorlightflashesrapidly,thissignalsthatthisparticularfunctionmaynotbeselectedinconjunctionwiththeselectedwashcycle.
Delay timer
Thistimerdelaysthestarttimeofthewashcyclebyupto12hours.Pressthebuttonrepeatedlyuntiltheindicatorlightcorrespondingtothedesireddelaytimeswitcheson.Thefifthtimethebuttonispressed,thefunctionwillbedisabled.NOTE:OnceyouhavepressedtheSTART/PAUSEbutton,thedelaytimemayonlybedecreasedifyouwishtomodifyit.
! Thisoptionisenabledwithallprogrammes.
Reduced WrinklesByselectingthisfunction,thewashandspincycleswillbemodifiedinordertoreducetheformationofcreases.Attheendofthecyclethewashingmachinewillperformslowrotationsofthedrum;theREDUCEDWRINKLESindicatorlightwillswitchonandtheSTART/PAUSEindicatorlightwillflashinanorangecolourandthephaseENDwillremainlitinafixedmanner.Toendthecycle,presstheSTART/PAUSEbuttonortheREDUCEDWRINKLESbutton.For the Silk/Curtainscycle,themachinewillendthecyclewhilethelaundryissoakingandtheREDUCEDWRINKLESindi-catorlightwillflash.Todrainthewatersothatthelaundrymayberemoved,presstheSTART/PAUSEbuttonortheREDU-CEDWRINKLESbutton.!Itmaynotbeusedwiththe5,8,9,10,13,B,C.
Personalization
• Tap water• Cold 15°C/59°F• 20 °C/ 68 °F• 25 °C/ 77 °F• Warm 30 °C/ 86 °F• 35°C/95°F• 40 °C/ 104 °F• Hot 57 °C / 134 °F
COLDHOT
WARM
11
NA Extra rinseByselectingthisfunction,theefficiencyoftherinseisincreasedandoptimaldetergentremovalisguaranteed.Itisparticularlyusefulforsensitiveskin.
!Thisfunctionmaynotbeusedinconjunctionwithwashcycles5,10,B,C.
Super WashBecause a greater quantity of water is used in the initial phase of the cycle, and because of the increased cycle duration, this functionoffersahigh-performancewash.
!Thisfunctionmaynotbeusedinconjunctionwithwashcycles4,5,7,10,12,13,A,B,C.
12
NA
Detergents and laundry
Detergent dispenser drawerGood washing results also depend on the correct dose of detergent: adding too much detergent will not necessa-rily result in a more efficient wash, and may in fact cause build up on the inside of your appliance and contribute to environmentalpollution.
! Do not use hand washing detergents because these createtoomuchfoam.
Openthedetergentdi-spenser drawer and pour in the detergent or washing additive,asfollows.
compartment 1: Deter-gent for the wash cycle (powder or liquid)Liquid detergent should only be poured in immediately prior tothestartofwashcycle.
compartment 2: Additives (fabric softeners, etc.)Thefabricsoftenershouldnotoverflowthegrid.extra compartment 3: Bleach
Bleach cycleBleaching may only be performed in conjunction with wash cycles 6.Pourthebleachintoextracompartment 3; pour the detergent and softener into the corresponding com-partments, then select one of the abovementioned wash cycles.This option is recommended only for very soiled cotton garments.
Preparing the laundry•Dividethelaundryaccordingto: -thetypeoffabric/thesymbolonthelabel. - the colours: separate coloured garments from whites•Emptyallgarmentpocketsandcheckthebuttons.•Donotexceedthelistedvalues,whichrefertotheweight
of the laundry when dry: Durablefabrics:max.15lb-(7kg) Syntheticfabrics:max.6.6lb-(3kg) Delicatefabrics:max.4.4lb-(2kg) Wool:max.3.30lb-(1,5kg)
How much does your laundry weigh?
1 sheet 14-17 oz - (400-500 g) 1 pillow case 5-7 oz - (150-200 g) 1 tablecloth 14-17 oz - (400-500 g) 1bathrobe31-42oz-(900-1200g) 1 towel 5-8 oz - (150-250 g)
MAX
1
3
2
Garments requiring special careJeans: Turngarmentsinside-outbeforewashing.Usepro-gramme 7.Silk: use special wash cycle 12towashallsilkgarments.We recommend the use of special detergent which has beendesignedtowashdelicateclothes.Curtains: fold curtains and place them in a pillow case or meshbag.Usewashcycle12.Wool:Aristonistheonlywashermanufacturertohavebeenawarded the prestigious Woolmark Platinum Care endorse-ment(M.0508)bytheWoolmarkCompany,whichmeansthatall woollen garments may be washed in the washer, even tho-se which state “hand wash only” onthelabel.Washcycle13 therefore offers complete peace of mind when washing woollengarmentsinthewasher(max.load3.30lb-1,5kg)andguaranteesoptimalperformance.
Load balancing systemBefore every spin cycle, to avoid excessive vibrations and to distribute the load in a uniform manner, the drum rotates continuously at a speed which is slightly greater than the washingrotationspeed.If,afterseveralattempts,theloadisnot balanced correctly, the machine spins at a reduced spin speed.Iftheloadisexcessivelyunbalanced,thewasher-performsthedistributionprocessinsteadofspinning.Toencourage improved load distribution and balance, we recommendsmallandlargegarmentsaremixedintheload.
Helpful HintsYour washer features three different speeds during the wash cycle.DuringtheCottoncyclethedrumspinsat1,200or800rpm.DuringPermanentPressthedrumspinsat850rpm.Duringdelicates,thedrumspinsat500rpm.
Use Liquid Fabric Softener. Fill the softener compartment uptothelevelmarked.Usingfabricsoftnerfluffsoutclothesimmediatelyafterthawashcycle.Thishelpsspeeddryingtimeandreducewrinkles.
Use Low sudsing Detergent. This is recommended for allfrontloadingwashers.Itensuresthereisnooversudsing,whichmayreducetheperformanceofyourmachine.SplendideAll-NaturalPremiumLaundryPowder(PartNo.1005)
When sorting laundry always take into consideration thequantityandtypeoffabriccontainedintheload.Highlyabsorbent fabrics such as those used in towels or jeans will abosorbmorewaterandbecomeveryheavywhensaturated.If you notice that your clothes are taking longer than usual to dry may be overloading the machine, or washing too many highlyabsorbentarticlesforasingleload.
13
NA
Care and maintenance
Cutting off the water and electricity supplies
•Turnoffthewatertapaftereverywashcycle.Thiswilllimit wear on the hydraulic system inside the washing machineandhelptopreventleaks.
•Unplugthewashingmachinewhencleaningitanddu-ringallmaintenancework.
Cleaning the washing machine
The outer parts and rubber components of the appliance can be cleaned using a soft cloth soaked in lukewarm soapywater.Donotusesolventsorabrasives.
Cleaning the detergent dispenser dra-wer
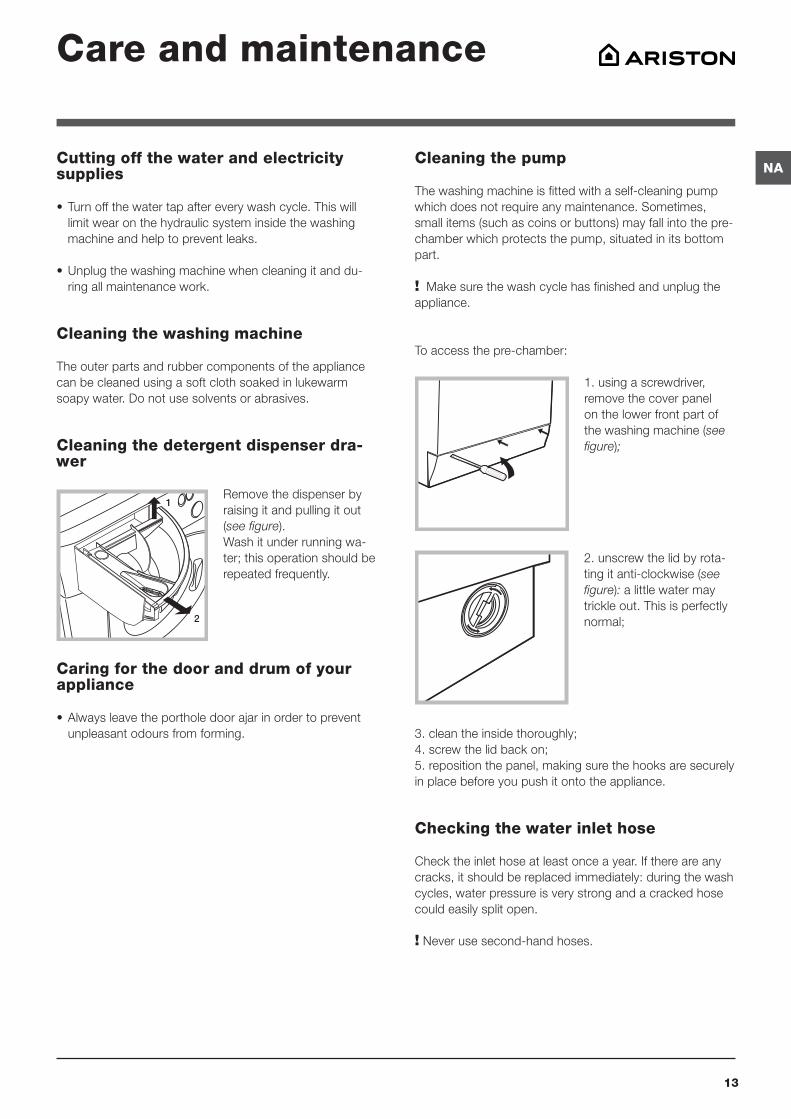
Removethedispenserbyraising it and pulling it out (see figure).Wash it under running wa-ter; this operation should be repeatedfrequently.
Caring for the door and drum of your appliance
•Alwaysleavetheportholedoorajarinordertopreventunpleasantodoursfromforming.
Cleaning the pump
The washing machine is fitted with a self-cleaning pump whichdoesnotrequireanymaintenance.Sometimes,small items (such as coins or buttons) may fall into the pre-chamber which protects the pump, situated in its bottom part. ! Make sure the wash cycle has finished and unplug the appliance.
To access the pre-chamber:
1.usingascrewdriver,remove the cover panel on the lower front part of the washing machine (see figure);
2.unscrewthelidbyrota-ting it anti-clockwise (see figure): a little water may trickleout.Thisisperfectlynormal;
3.cleantheinsidethoroughly;4.screwthelidbackon;5.repositionthepanel,makingsurethehooksaresecurelyinplacebeforeyoupushitontotheappliance.
Checking the water inlet hose
Checktheinlethoseatleastonceayear.Ifthereareanycracks, it should be replaced immediately: during the wash cycles, water pressure is very strong and a cracked hose couldeasilysplitopen.
!Neverusesecond-handhoses.
1
2

14
NA
Troubleshooting
Yourwashingmachinecouldfailtowork.BeforecontactingtheTechnicalAssistanceCentre(see “Assistance”), make sure thattheproblemcannotbenotsolvedeasilyusingthefollowinglist.
Problem:
The washing machine does not switch on.
The wash cycle does not start.
The washing machine does not take in water (the indicator light for the first wash cycle stage flashes rapidly).
The washing machine continuously takes in and drains water.
The washing machine does not drain or spin.
The washing machine vibrates a lot during the spin cycle.
The washing machine leaks.
The START/PAUSE indicator light (orange) and the function indicator lights flash rapidly.
There is too much foam.
Possible causes / Solutions:
•Theapplianceisnotpluggedintothesocketfully,orisnotmakingcontact.•Thereisnopowerinthehouse.
•Thewashingmachinedoorisnotclosedproperly.•TheON/OFFbuttonhasnotbeenpressed.•TheSTART/PAUSEbuttonhasnotbeenpressed.•Thewatertaphasnotbeenopened.•Adelayedstarthasbeenset(see “Personalization”).
•Thewaterinlethoseisnotconnectedtothetap.•Thehoseisbent.•Thewatertaphasnotbeenopened.•Thereisnowatersupplyinthehouse.•Thepressureistoolow.•TheSTART/PAUSEbuttonhasnotbeenpressed.
•Thedrainhoseisnotfittedataheightbetween65and100cmfromthefloor(see “Installation”).
•Thefreeendofthehoseisunderwater(see “Installation”).•Thewalldrainagesystemisnotfittedwithabreatherpipe.If the problem persists even after these checks, turn off the water tap, switch theapplianceoffandcontacttheAssistanceService.Ifthedwellingisononeofthe upper floors of a building, there may be problems relating to water drainage, causingthewashingmachinetofillwithwateranddraincontinuously.Specialanti-drainingvalvesareavailableinshopsandhelptoavoidthisinconvenience.
•Thewashcycledoesnotincludedraining:somewashcyclesrequirethedrainphasetobestartedmanually.
•TheREDUCEDWRINKLESfunctionhasbeenactivated:Tocompletethewashcycle,presstheSTART/PAUSEbutton(“Personalization”).
•Thedrainhoseisbent(see “Installation”).•Thedrainageductisclogged.
•Thedrumwasnotunlockedcorrectlyduringinstallation(see “Installation”).•Thewashingmachineisnotlevel(see “Installation”).• Thewashingmachineistrappedbetweencabinetsandwalls(see “Installation”).
•Thewaterinlethoseisnotscrewedonproperly(see “Installation”).•Thedetergentdispenserdrawerisblocked(forcleaninginstructions,see
“Care and maintenance”).•Thedrainhoseisnotfixedproperly(see “Installation”).
•Switchoffthemachineandunplugit,waitforapproximately1minuteandthenswitchitbackonagain.
Iftheproblempersists,contacttheTechnicalAssistanceService.
•Thedetergentisnotsuitableformachinewashing(itshoulddisplaythetext“forwashingmachines”or“handandmachinewash”,orthelike).
•Toomuchdetergentwasused.
15
NA
Service
Before calling for Assistance:•Check whether you can solve the problem alone (see “Troubleshooting”);•Restarttheprogrammetocheckwhethertheproblemhasbeensolved;• Ifthisisnotthecase,contactanauthorisedTechnicalAssistanceCentreusingthetelephonenumberprovidedontheguaranteecertificate.
! Alwaysrequesttheassistanceofauthorisedtechnicians.
Have the following information at hand:• thetypeofproblem;• theappliancemodel(Mod.);• theserialnumber(S/N).This information can be found on the data plate applied to the rear of the washing machine, and can also be found onthefrontoftheappliancebyopeningthedoor.
All Splendide parts are availabledirect from Westland Sales: 1-800-356-0766
If You Have You’ll Need to Buy
No access to Hot/Cold water hookups
Splendide Faucet Adapter kit, PartNo.154187104A(8ft,2.4m)
Water damageConcerns
Splendide Drain-A-Way™ Pan, Part No.PI-22,PI-24(orsimilar)
Floor drain Siphon break kit (sold at most har-dware stores)
Disposer drain “Y”connector(soldatmosthardwarestores)
Shifting Concerns(RV and Marine
Installations)
Splendide SecureFit™ instal-lation Brackets,PartNo.MK01.Keepswasherinplaceduringtravelto prevent:•Kinkedinlethoses•Disconnecteddryerventhoses•Crusheddryerventhose•Blockeddispenserdrawer•Knobsrubbingagainstcloseddoors•Scuffedcabinetwoodwork
16
NAARISTON ONE-YEAR LIMITED WARRANTY
(USA & CANADA ONLY)
WHO IS COVERED BY THIS WARRANTY
This limited one-year warranty (“Warranty”) is given only to the original end-use/retail purchaser (the “First Using Purchaser”) of the accompanyingAriston product(s) (the“AristonProduct”).
IfyoupurchasedthisAristonProductfromsomeoneotherthananauthorizedAristonreseller/dealerintheUnitedStatesorCanada,oriftheAristonProductwasused(includingbutnot limited to floor models or refurbished products) prior to your purchase, then you are not the First Using Purchaser andtheAristonProductthatyoupurchasedisnotcoveredbythisWarranty.ThisWarrantyisnot transferable.
WHAT IS COVERED BY THIS WARRANTY
AristonwillrepairorreplaceanypartoftheAristonProductwhich fails due to a defect in materials or workmanship when usedundernormalhome-useconditions.Aristonwillalsoprovide, free of charge, all labor and related services to repair orreplacethedefectivepart.
ThisWarrantyappliesonly toAristonProductspurchasedandusedintheUnitedStatesorCanada.Subjecttotheexclusionsbelow, forAristonProducts purchased in, butused outside, the United States or Canada, this Warranty covers only warranty service within the United States or Canada (and does not include shipping outside the United StatesorCanada).
LENGTH OF THE WARRANTY
This Warranty runs for a period of one (1) year from the date oftheoriginalpurchasebytheFirstUsingPurchaser.Pleasenote that a copy of your original purchase receipt showing the purchase date and the vendor’s name and address are requiredtoobtainserviceunderthisWarranty.Forthepur-poses of determining the applicable warranty period, please note that any and all replaced or repaired parts shall assume theidentityoftheoriginal.
WHAT IS NOT COVERED BY THE WARRANTY (EXCLUSIONS)
This Warranty does not cover:
1. Improper installation, delivery,maintenance and/or im-properoperationoftheAristonProduct.2.DamagecausediftheAristonProducthasnotbeenusedin compliance with the electricity or gas supply specifications printedontheratingplate.3.FailureofordamagetotheAristonProductifitisaltered,abused, misused, or used for other than the intended pur-pose,orifitisusedcommercially.4.ServicetripstoyourhometoprovideinstructionsontheuseofyourAristonProduct.
5.Replacementofhousefusesorcorrectionoftheplumbingorelectricwiringinyourhome.6.Damagecausedbyneglect,accident,fire,floodsoractsofGod.7. Physical Damage to the appearance of your AristonProduct including, without limitation, scratches, rust, dents, warping,peelingandthelike.8.Damagecausedbytransportation.9.Replacementofanyconsumableordegradableitemoraccessory including, but not limited to: plugs, cables, bat-teries, light bulbs, fluorescent tubes and starters, covers and filters, or replacement of any removable parts made of glassorplastic.10.Damagecausedafterdelivery.11.Waterdamageofanykind.12.AnAristonProductnotaccessibletoproviderequiredservice.13.Problemsarisingfromotherthandefectsinmaterialsorworkmanship.14. Travel timewhen installed in a recreational vehicle ormarineapplication.This Warranty is voidiftheAristonProductisaltered,ser-viced, maintained, dismantled, or otherwise interfered with byanypersonwhoisnotauthorizedbyAriston.15.Non-standardlaborwheninstalledinamarineapplica-tion.16.Waterleaksofanykind.
TOTHEEXTENTPERMITTEDBYLAW,THISWARRANTYISINLIEUOFALLOTHERWARRANTIES,WRITTENORORAL,WHETHEREXPRESSEDBYAFFIRMATION,PROMISE,DESCRIPTION,DRAWING,MODELORSAMPLE.ANYANDALLWARRANTIESOTHERTHANTHISONE,WHETHEREXPRESSORIMPLIED,INCLUD-INGIMPLIEDWARRANTIESOFMERCHANTABILITYANDFITNESSFORAPARTICULARPURPOSE,AREHEREBYDISCLAIMED.IMPLIEDWARRANTIESINCLUDING,BUTNOTLIMITEDTO,THEIMPLIEDWARRANTIESOFMERCHANTABILITYANDFITNESSTHATCANNOTBEEXCLUDEDBYLAW,SHALLBELIMITEDTOTHESAMEDURATIONASTHISWARRANTY.EXCEPTFORTHATREPAIRORREPLACEMENTASDESCRIBEDABOVE,ARISTONSHALLNOTBELIABLEFORANYDIRECT,IN-DIRECT,INCIDENTALORCONSEQUENTIALDAMAGESORSPECIFICRELIEF.
Some States and Provinces do not allow the exclusion or limitation of incidental or consequential damages and/or implied warranties, so the above limitations or exclusions maynotapplytoyou.ThisWarrantygivesyouspecificlegalrights and you may also have other legal rights which vary fromStatetoStateorProvincetoProvince.
Warranty
17
NAWHAT YOU SHOULD DO TO OBTAIN WARRANTY SERVICE
AllrepairsorwarrantyservicemustbyprovidedbyAristonoranAuthorizedAristonServiceCenter.
To schedule warranty service please call 1-877-356-0766, email [email protected]. Please remember toprovideuswithyourAristonProduct’smodelnumberandserialnumber.
Please note that a copy of your original purchase receipt showing the purchase date and the vendor’s name and ad-dressarerequiredtoobtainserviceunderthisWarranty.IftheAristonProductislocatedinanareawhereservicebyanAuthorizedAristonServiceCenterisnotavailable,youmaybe responsible for a trip charge or you may be required to bringtheAristonProducttoanAuthorizedAristonServiceCenterforservice.
Theforegoingareyoursole(i.e.,only)andexclusiverem-ediesunderthisWarranty.ThisWarrantyistheonlywar-rantythatAristonisgivingforthisAristonProduct.ThisWarranty replaces all other agreements and understand-ingsthatyoumayhavewithAristonoritsrepresentatives.

18
NA
195081703.0009/2009 - Xerox Fabriano