Embed Size (px)
Citation preview

Instructions for use CaTop UD 300UDB-A
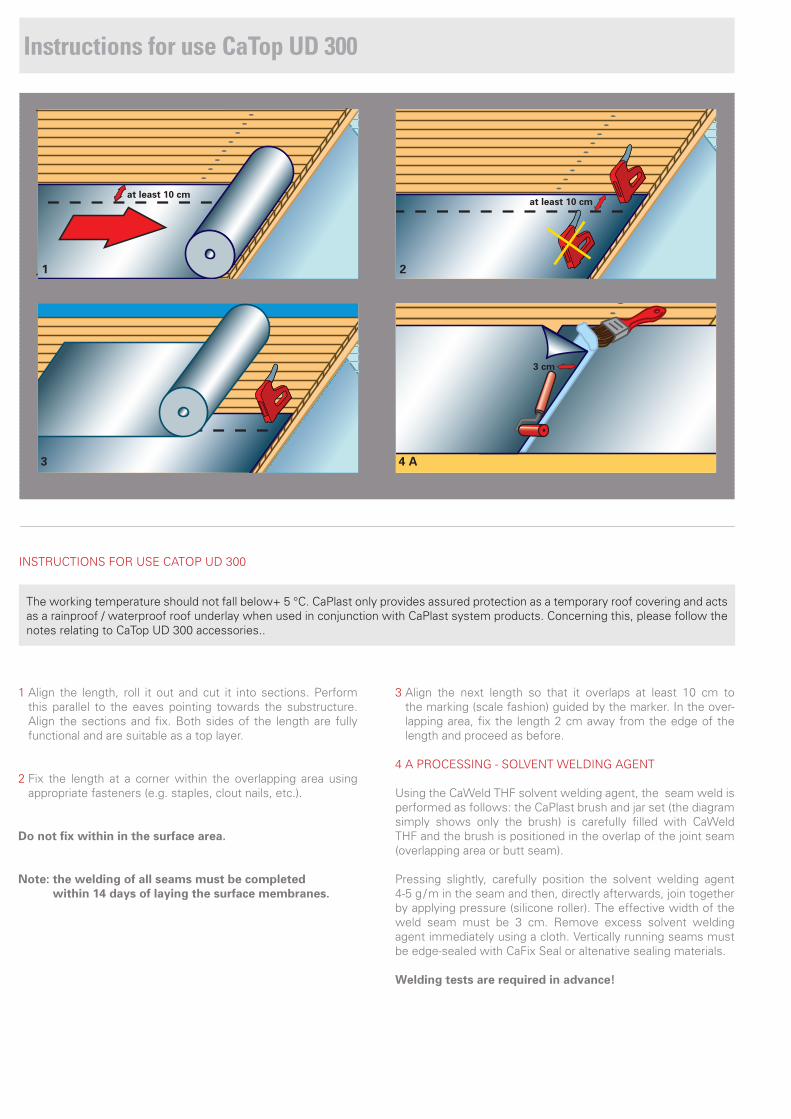
INSTRUCTIONS FOR USE CATOP UD 300
1 Align the length, roll it out and cut it into sections. Perform this parallel to the eaves pointing towards the substructure. Align the sections and fix. Both sides of the length are fully functional and are suitable as a top layer.
2 Fix the length at a corner within the overlapping area using appropriate fasteners (e.g. staples, clout nails, etc.).
Do not fix within in the surface area.
Note: the welding of all seams must be completed within 14 days of laying the surface membranes.
3 Align the next length so that it overlaps at least 10 cm to the marking (scale fashion) guided by the marker. In the over-lapping area, fix the length 2 cm away from the edge of the length and proceed as before.
4 A PROCESSING - SOLVENT WELDING AGENT
Using the CaWeld THF solvent welding agent, the seam weld is performed as follows: the CaPlast brush and jar set (the diagram simply shows only the brush) is carefully filled with CaWeld THF and the brush is positioned in the overlap of the joint seam (overlapping area or butt seam).
Pressing slightly, carefully position the solvent welding agent 4-5 g / m in the seam and then, directly afterwards, join together by applying pressure (silicone roller). The effective width of the weld seam must be 3 cm. Remove excess solvent welding agent immediately using a cloth. Vertically running seams must be edge-sealed with CaFix Seal or altenative sealing materials.
Welding tests are required in advance!
Instructions for use CaTop UD 300
The working temperature should not fall below+ 5 °C. CaPlast only provides assured protection as a temporary roof covering and acts as a rainproof / waterproof roof underlay when used in conjunction with CaPlast system products. Concerning this, please follow the notes relating to CaTop UD 300 accessories..
at least 10 cmat least 10 cm
3 cm
1 2
3 4 A

4 B PROCESSING - HOT AIR
Introduce the hot air equipment to the overlapping area of the joint seam (overlapping area or butt weld) and by means of the pressure roller, join the layers together. Depending on ambient temperature, the welding window is between 200 °C - 300 °C. The effective width of the weld seam must be 2 cm. Welding tests must be carried out prior to laying! For detail connections, the 20 mm orifice is recommended, and for surface seams, the 40 mm orifice. Vertically running seams must be edge-sealed with CaFix Seal or altenative sealing materials.
5 A Using the fibre-reinforced, liquid plastic CaFix Seal, apertures, or rising masonry such as fireplaces can be permanently embedded so that they are windproof and waterproof. For this proceed as follows:
1. Throw back the length.2. Pre-treat the substrate surface as necessary using a standard
primer.3. Thickly coat (approx. 1 mm) the substrate using CaFix Seal
(5 -10 cm wide).4. Allow to evaporate for a short period and tuck the length in
whilst the CaFix Seal is still wet and treat rising (construction) elements as in 2 +3.
5. Tuck the CaTop UD 300 into the CaFix Seal whilst it is still wet making sure that the CaFix Seal remains free for the 1/3 surface portion.
6. Smear the edge of the UD 300 with CaFix Seal (approx. 5 cm wide) and seal.
5 B Using pre-fabricated CaTop Edge corners, quick and practical solutions can be implemented for internal and external corners. For a good, long-term, secure connection, it is necessary for absorbent surfaces e.g. wood, stone, etc. to be pre - treated with a standard primer. All other substrates are to be cleaned using a standard cleaner before applying CaFix Seal. Generally speaking, these should be kept free of any separating substances that are present such e.g. fat, frost, wetness, dust, silicone etc.
6 Pipe apertures can be made using the CaPlast CaCap PU pipe sleeve by simply slipping the unit over the top and welding the base into the surface area. Alternatively, a connection can be made using the liquid plastic CaFix Seal. For this, a makeshift sleeve (about 20 cm wider than the pipe diameter) is cut from the CaTop UD 300.
This is positioned centrally with a circular opening (1.5 to 2 cm smaller than the pipe diameter). The pipe is ground and cleaned. After this, slip the prepared sleeve over the pipe and using a standard primer pre-treat the tube and sleeve collar. Finally, coat with CaFix Seal (approx. 1 mm thick) so that it is covered.
The surface can either be embedded using CaFix Seal or
CaWeld THF (for this, see point 4 A).
2 cm
4 B
6
5 A
5 B

CaPlast Kunststoffverarbeitungs GmbH - Magdheide 7 - D-59394 Nordkirchen, Germany - Phone: +49 25 99 / 913-0 - Fax: +49 25 99 / 913-33 - e-mail: [email protected] - www.caplast.de
VH
C 0
9/16
UK
- W
e re
serv
e th
e rig
ht t
o m
ake
chan
ges
of a
tec
hnic
al
natu
re. P
leas
e fo
llow
the
info
rmat
ion
stat
ed in
the
pro
duct
inse
rt.
Instructions for use CaTop UD 300
7 When using CaTop UD 300 as waterproof roofing underlay the counter batten is embedded so that is waterproof with the aid of a welding strip (CaTop UD 300 S). The border strip is welded with the length to the left and right of the coun-ter batten. This is performed in the same way as with the surface seam using hot air or the solvent welding agent (see point 4).
Alternatively, the length can be over drawn over the counter batten observing the technical information which is published by professional bodies.
8 In the case of residential roof window installations, the surface length is unsealed and the window itself is embedded by means of the CaTop UD 300 S welding strip or a suitable section of the length. For this, the sides of the window frames are pre-treated with a standard primer, a short period is allowed for evaporation and then the sides are coated with CaFix Seal. After another short evaporation period, the connecting strips are inserted two thirds of the way and once again the whole area is coated with CaFix Seal along the edge of the length so that it is covered. The area is either integrated using hot air or with CaWeld THF. For this, see points 4 and 5. Vertically running seams must be edge-sealed with CaFix Seal or altenative sealing materials.
9 A SOLUTION FOR EAVES IN THE CASE OF SUSPENDED GUTTERING WITHOUT FORMWORK
Clean the gutter mounting sheet with a standard cleaner and then coat it with CaFix Seal. Briefly allow to evaporate and insert the lengths so that 2/3 is covered whilst the substrate is still wet with CaFix Seal. After this, smear both areas with CaFix Seal.
The connection will be waterproof after approx. 2 - 3 hours. If PVC-coated sheets are present or used, it may be possible to direct welding of the length to the sheet by means of the solvent welding agent. This must be determined in advance.
The markings on the membrane are guidance lines and are not an exact measurement. During work and implementation, observe the latest versions of the relevant standards, technical regulations, German Energy conservation regulation (EnEV) requirements and other applicable specifications. All details are provided to the best of our knowledge and belief. No warranty may be inferred.
7 8 A
8 B 9