Embed Size (px)
Citation preview
INSTRUCTIONS
Thank you for purchasing this Rain Harvesting product. Please read this manual in its entirety to fully enjoy the benefits and features of this product. Please keep this manual for future reference.
PACKAGING CONTENTSInstruction Sheeta. Transmitter b. Receiverc. Float d. Screws x 2
What you need 4 x AAA Batteries
A. Transmitter B. Receiver
C. Float D. Screws
Overview of Features
Receiver Front1.LCD Display2. Set Button3.“+” Button 4.“-“ Button
1
4
2
3
Receiver Back1. Battery cover1
Transmitter Back1. LCD Display2. SET Button3. “+” Button4. “-“ Button5. Battery cover6. Rear Cover
(not shown)
1
4
2
5
3
Transmitter Front1. Front Clear Cover
(not shown)2.Level Indicator3. Empty and Full
Indicators
1
2
3
View our installation video on
www.youtube.com/user/rainwaterknowledge
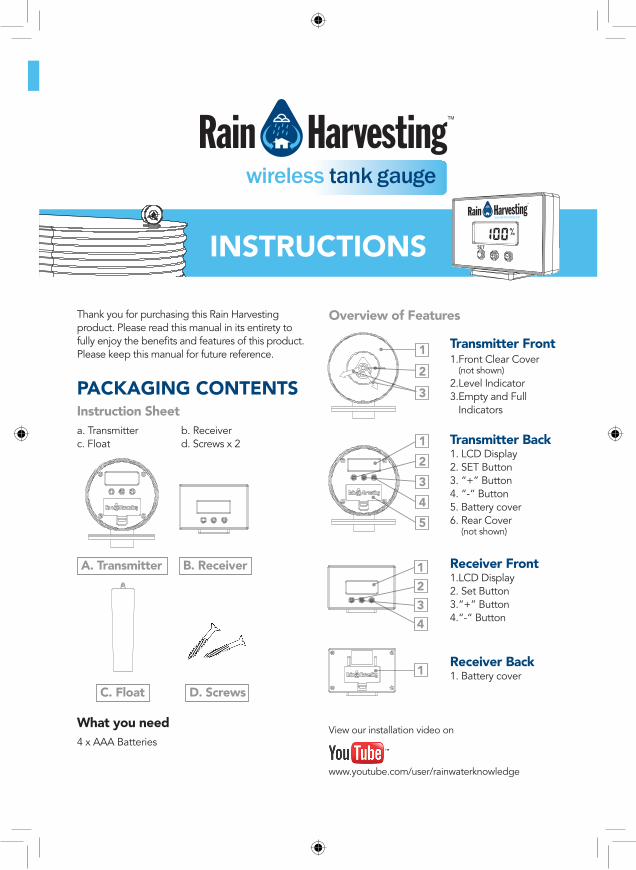
INSTALLATIONCREATE A HOLE FOR TRANSMITTER FLOATTools required:
• Power drill
• Spade bit or hole saw (35mm)
• Star/Phillips head screwdriver or drill bit
1. Select an installation site on the top of your tank for the Transmitter and mark it. It is preferable that this is a flat area and that once installed will allow you to view the Tank Gauge face easily.
2. Using a power drill fitted with the appropriate spade bit or hole saw,� create a 35mm hole in the tank at marked location.
NOTE: Do NOT drill tanks in a potentially explosive atmosphere.
WIRELESS TANK GAUGE SET UP1. Carefully remove the front clear cover and rear
cover from the Transmitter to enable access to the movable “Empty” and “Full” indicators,� and the LCD screen and buttons.
2. Remove the battery cover from the Receiver and insert 2 x AAA batteries. After insertion of batteries into the Receiver,� the antenna icon “ ” will be flashing and “-----“will be displayed on the Receiver LCD. If data is being shown on the Receiver before inserting the batteries in to the Transmitter then,� the Receiver is picking up another transmitter signal or other radio interference near your location. You will need to change the Receiver Code (see Changing Code) until you are no longer receiving any interference.
3. Remove the battery cover on the Transmitter and insert 2 x AAA batteries into Transmitter. After insertion of batteries,� the LCD screen lights up,� antenna icon “ ” flashes once indicating a signal has been sent to the Receiver and the default display is alternating between “100% & 3000L (792gal)”.
4. Wait 3 minutes for the Transmitter and Receiver to automatically finish synchronising. Do not press any buttons or move the float during this time.
Measurement Change – Litres or GallonsTo change between Litres and Gallons hold “–” button on Transmitter and Receiver for 4 seconds.
Tank Volume Setting1. Press SET twice on Transmitter to navigate to the
Volume menu so that 3000L (792gal) is showing on the LCD display and then hold SET for 4 seconds to enter into the Volume Setting Mode.
(The LCD screen will be displaying SET,� L/GAL and all text flashing.)
2. Adjust volume value with “+” and “-” buttons to match your own tank volume,� and press SET once to confirm. Holding down the “+” or “-“button will increase the rate the volume changes.
NOTE: If you cannot program the exact volume of your tank then input the volume to the nearest 500L (132gal).
Tank Height Setting (Two people are recommended for set up)
NOTE: Ensure that the float does not move faster than 10cm/sec at any point during set up, or you may incur inaccuracies in readings.
1. Press SET three times on Transmitter to navigate to the Height menu,� and then hold SET for 4 seconds to enter into the Height Setting Mode. (The LCD screen will be displaying SET,� FULL and MM with all text flashing).
2. Whilst holding the base of the Transmitter at the same height as the previously drilled installation
hole,� slowly lower the float (no faster than 10cm/second) until the top of the float is level to the bottom of the overflow outlet (see Figure 1),� and press SET once to confirm FULL height.
Move the green “Full” indicator to where the black water level indicator is pointing. (The LCD screen will now be displaying SET,� EMPTY and MM with all text flashing.)
3. Whilst maintaining the same height of the Transmitter body slowly lower the float (no faster
than 10cm/sec) until the top of the float is level with the bottom of the pump outlet (see Figure 2) and press SET once to confirm EMPTY height. Again,� maintaining the same height of the Transmitter body and float move the red “Empty” indicator to where the black water level is pointing.
4. Important: Slowly retract (no faster than 10cm/sec) the string to 90% level, pinch the string with your finger against the Transmitter body to prevent the string retracting any further than this point, or you may incur inaccuracies in readings.
5. Bring the Transmitter and float up to the installation hole and slowly lower the float (no faster than 10cm/sec) through the installation hole until it rests in the water and position the Transmitter body in the installation hole.
FCC ID: PS4TAWG01 This device (model TAWG01) complies with part 15 of the FCC Rules. Operation is subject to the following two conditions: (1) This device may not cause harmful interference,� and (2) this device must accept any interference received,� including interference that may cause undesired operation.IMPORTANT: This device is NOT intended for use by young children unless they have been adequately supervised by a responsible person to ensure that they can use the device safely. Young children should be supervised to ensure that they do not play with this device.
INSTRUCTIONS
Pump outlet
Bottom of TankFigure 2
Figure 1
Pump outlet
Bottom of TankFigure 2
Figure 1
PAIRING YOUR WIRELESS TANK GAUGE1. Hold “+” for 4 seconds on Receiver and ensure
the antenna icon “ ” is flashing and screen is displaying “-----“.
2. Press “+” button once on Transmitter to manually transmit a signal and confirm the signal was received by ensuring information is the same on both Transmitter and Receiver. If Receiver is still displaying “-----“ then additional presses of “+” on the Transmitter may be required to pair the devices.
3. Replace rear cover and the front clear cover on the Transmitter.
SECURING TRANSMITTER TO TANKPosition the Transmitter so that the Full and Empty indicating arrows are easily visible from the ground and using the supplied screws secure the Transmitter to the top of the tank.
PLACEMENT OF RECEIVERPlace the Receiver indoors (in a dry area free of dirt and dust). The Wireless Tank Gauge has a clear line of sight signal range of 100m (328ft). When obstacles are placed between the Transmitter and Receiver the range will reduce. The signal will transmit through common building materials such as concrete,� glass and sheet metal; however signal range may be reduced.
NOTE: The Wireless Tank Gauge uses radio frequency for communication,� which is susceptible to interference from other electronic devices and large metallic items or thick walls. Always place the receiver at least 1m (3ft) away from appliances (TV,� microwaves,� radios etc.) or objects (large metal surfaces,� thick stone walls,� etc.) that may interfere with the wireless communication.
BATTERY REPLACEMENTNOTE: A low battery icon “ ” will display on both the Transmitter and Receiver LCD screens when the battery power is low in the Transmitter only. The Receiver LCD screen will be faded when it’s battery power is low.
Transmitter battery replacement – with power remaining1. Take Receiver outside to your tank and Transmitter.
2. Remove the rear cover from the Transmitter.
3. Press “-“once on Transmitter. This ensures the current settings are stored.
4. Hold “+” on Receiver for 4 secs and ensure that the antenna icon “ ” is flashing and screen is displaying “-----“.
5. Remove old batteries and insert fresh batteries into Transmitter,� and a signal will send automatically to the Receiver. Confirm that the signal was received by ensuring that the information is the same on both the Transmitter and Receiver.
6. If the Receiver is still displaying “-----“and antenna icon “ ” is still flashing,� then additional presses of “+” on the Transmitter may be required to pair the devices.
7. Replace the rear cover on the Transmitter.
Transmitter battery replacement – with no power remaining1. Take Receiver outside to your tank and Transmitter.
2. Remove the Transmitter and the float from the tank and remove the rear cover.
3. Hold the base of the Transmitter at the same height as the installation hole and move the float so its top is level to the bottom of the overflow outlet,� see Figure 1 in “Tank Height Setting”.
4. Whilst maintaining this height,� replace the old batteries with new batteries,� a second person may be required for this (LCD will now be displaying 100%).
NOTE: If 100% was not displayed on the Transmitter LCD screen at ‘Step 4’,� a recalibration of the Transmitter will be required,� see “Tank Height Setting”.
5. Slowly lower the float back through the installation hole (no faster than 10cm/sec) until it rests in the water and position the Transmitter back in the installation hole.
6. Pair your devices together again,� see “Pairing your Wireless Tank Gauge”,� and secure the Transmitter back onto the tank using the screws provided.
Receiver battery replacement Option 1 – automatic pairing
1. Replace old batteries and insert new batteries intothe Receiver (Receiver LCD will be displaying “-----“ and antenna icon “ ” will be flashing).
2. Wait approx. 2 hours for the devices to automatically pair up.
Option 2 – manual pairing
1. Take the Receiver outside to your tank and Transmitter.
2. Remove the rear cover from the Transmitter.
3. Replace old batteries and insert new batteries intothe Receiver (Receiver LCD will be displaying “-----“ and antenna icon “ ” will be flashing).
4. Press “+” button once on Transmitter to manually transmit a signal and confirm the signal was received by ensuring information is the same on both Transmitter and Receiver. If Receiver is still displaying “-----“then additional presses of “+” on the Transmitter may be required to pair the devices.
5. Replace rear cover on the Transmitter.
INSTRUCTIONS

INSTRUCTIONS
Changing CODEPress SET once to navigate to the CODE menu. Hold SET for 4 seconds on CODE menu to enter into the Code Setting Mode. The default code is “001” and the range is “001-999”. Use the “+” and “–” buttons to adjust and press SET once to confirm. Ensure that you change the CODE on both the Receiver and Transmitter.
Warranty Information Rain Harvesting Pty Ltd guarantees this product for 12 months from date of purchase. Under this warranty we will replace the product or repair it free of charge. Claims must be received by Rain Harvesting Pty Ltd at the address below within 12 months of the date of purchase. The benefits conferred by this warranty are in addition to all other rights and remedies available in law in respect to the goods and services to which it relates. Our goods come with guarantees that can not be excluded under the Australian Consumer Law. You are entitled to a replacement or refund for a major failure and for compensation for any other reasonable foreseeable loss or damage. You are also entitled to have the goods repaired or replaced if the goods fail to be of acceptable quality and the failure does not amount to a major failure.
INSTRUCTIONS
TroubleshootingSymptom Possible cause Action neededTank is full of water but Wireless Tank Gauge is only showing between 95% and 99% full?
General accuracy range of the Wireless Tank Gauge is +/- 5%.
No action is needed, this is within working range.
i) Tank is full of water but Wireless Tank Gauge is showing less than 95% full?
ii) Wireless Tank Gauge is displaying 100% full but the tank is not full of water?
(i,ii) Inaccuracy due to the float moving too fast (greater than 10cm/sec) during set up.
Re-calibrate the Full/Empty water level heights and ensure that the float does not move faster than 10cm/sec, see Tank Height Setting.
(i,ii) Inaccuracy upon setting the Full & Empty levels of the water.
Re-calibrate the Full/Empty water level heights if accuracy is not satisfactory. Ensure that you slowly retract (no faster than 10cm/sec) the string to 90% level, pinch the string with your finger against the Transmitter body to prevent the string retracting any further than this point, or you may incur inaccuracies in readings. See Tank Height Setting.
(ii) User may have a high level overflow that raises the height the water overflows from on the inside of the tank.
Determine height of high level overflow if able and re-calibrate the Full/Empty water level heights.
Tank is empty and no more water can be drawn from it but the Wireless Tank Gauge still says there is more than 5% left?
Inaccuracy due to the float moving too fast (greater than 10cm/sec) during set up.
Re-calibrate the Full/Empty water level heights and ensure that the float does not move faster than 10cm/sec. See Tank Volume Setting.
Inaccuracy upon setting the Full & Empty levels of the water.
Re-calibrate the Full/Empty water level heights and ensure that the Empty measurement is set when the top of the float is at the same level as the bottom of the pump outlet. Ensure that you slowly retract (no faster than 10cm/sec) the string to 90% level, pinch the string with your finger against the Transmitter body to prevent the string retracting any further than this point, or you may incur inaccuracies in readings. See Tank Height Setting.
Receiver is only displaying "-----" and no numbers?
The Transmitter and Receiver have become unpaired due to the distance being too great between them.
Pair the Transmitter and Receiver again and place the Receiver closer to the Transmitter. Walls and other obstacles will reduce signal strength and ensure the Receiver is at least 1m away from other appliances.
The Transmitter and Receiver have become unpaired due to other radio frequency in the local area.
Adjust the CODE on both devices and pair them again. See Changing CODE.
Batteries have run flat in the Transmitter. Replace batteries in Transmitter as per instructions. Transmitter and Receiver are on different CODES.
Pair the devices again and ensure that they are using the same CODE. See Changing CODE.
Receiver periodically displays “-----” on the LCD instead of the water level in my tank?
The Transmitter and Receiver have become unpaired due to the distance being too great between them, and then automatically pairing again later.
Pair the Transmitter and Receiver again and place the Receiver closer to the Transmitter. Walls and other obstacles will reduce signal strength and ensure the Receiver is at least 1m away from other appliances. See Pairing Your Wireless Tank Gauge
The Transmitter and Receiver are becoming unpaired due to other radio frequency in the local area, and then automatically pairing again later.
Adjust the CODE on both devices and pair them again. See Changing CODE.
Battery icon is flashing on the Receiver LCD and I have replaced the batteries but the battery icon is still there?
Battery icon refers only to the Transmitter battery being low, NOT the Receiver.
Replace batteries in Transmitter, see Battery Replacement.
Receiver LCD display is very dull and becoming hard to read?
The batteries are running out in the Receiver. Replace batteries in Receiver, see Battery Replacement.
Its raining outside but my Receiver is not updating me on my tank water level changing?
Receiver only gets updated data every 10 minutes from the Transmitter.
None, wait 10 minutes until the Transmitter updates the Receiver with the latest data.
Receiver will not update if it is raining too heavy.
None, wait until the rain intensity eases and the Transmitter will update the Receiver with the latest data when available.
Transmitter will only update data if the float moves more than 1cm inside the tank.
None. Transmitter will update Receiver when more water enters or leaves the tank.
I am trying to pair my devices but they do not seem to pair?
Different CODES are set on the Transmitter and the Receiver.
Adjust CODES on the Transmitter and Receiver so that they are the same. See Changing CODE.
Rain Harvesting Pty Ltd,� 28-34 Reginald Street,� Rocklea Qld 4106 AUSTRALIA
[email protected] TOLL FREE 1800 06 77 44