Embed Size (px)
Citation preview
1.Click "Settings - Smart Detection" to select to enable motion
detection alarm. (You can set up Human Detection, Abnormal
sound Detection and Baby Crying Detection after cloud storage
is enabled.)
2.Human Detection: effectively avoids "false positives" caused
by flying insects, pets, and light changes, and will detects
humanoid start alarms.
3.Abnormal sound Detection: When an abnormal sound or a
baby crying, etc, is detected, an "abnormal sound" or "baby
crying" alarm message will be sent to the mobile phone.
4.Alert settings : Select alert sensitivity, alert frequency, alert
period and the sound decibel to adjust the alert requirements.
5.Click "Alerts" to view the pushed alarm messages and view
the alarm video.
Intelligent PTZ Camera
Instruction
HOME
Click "Cruise- Motion Tracking". When the motion tracking is turned on, if there is a change in the position of the object, the motion track will be tracked.
Click "Settings-Smart Camera Settings-Call mode" to select
the intercom mode or the phone mode.
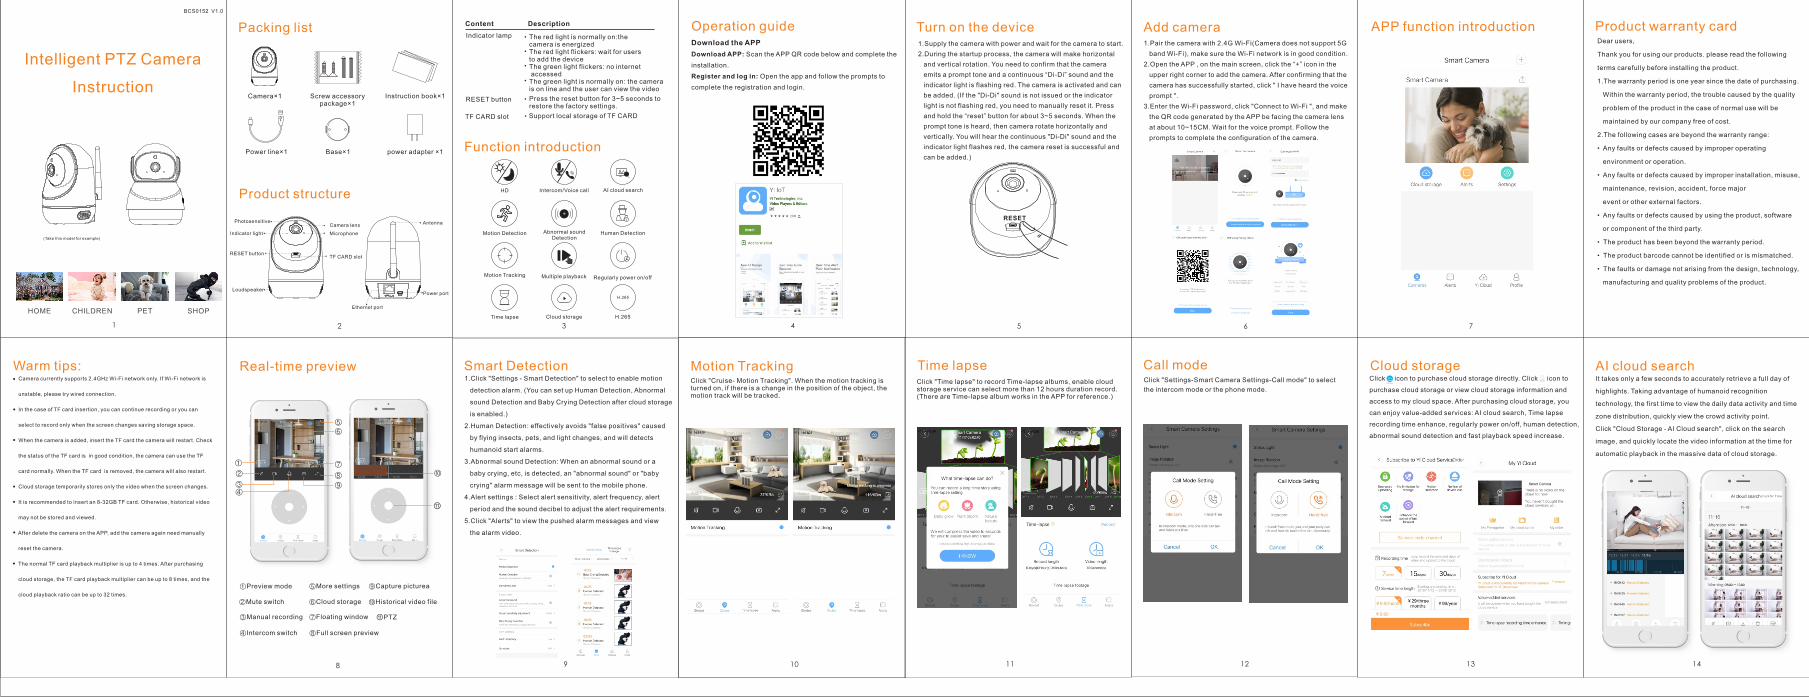
Click icon to purchase cloud storage directly. Click icon to
purchase cloud storage or view cloud storage information and
access to my cloud space. After purchasing cloud storage, you
can enjoy value-added services: AI cloud search, Time lapse
recording time enhance, regularly power on/off, human detection,
abnormal sound detection and fast playback speed increase.
It takes only a few seconds to accurately retrieve a full day of
highlights. Taking advantage of humanoid recognition
technology, the first time to view the daily data activity and time
zone distribution, quickly view the crowd activity point.
Click "Cloud Storage - AI Cloud search", click on the search
image, and quickly locate the video information at the time for
automatic playback in the massive data of cloud storage.
Dear users,
Thank you for using our products. please read the following
terms carefully before installing the product.
1.The warranty period is one year since the date of purchasing.
Within the warranty period, the trouble caused by the quality
problem of the product in the case of normal use will be
maintained by our company free of cost.
2.The following cases are beyond the warranty range:
• Any faults or defects caused by improper operating
environment or operation.
• Any faults or defects caused by improper installation, misuse,
maintenance, revision, accident, force major
event or other external factors.
• Any faults or defects caused by using the product, software
or component of the third party.
• The product has been beyond the warranty period.
• The product barcode cannot be identified or is mismatched.
• The faults or damage not arising from the design, technology,
manufacturing and quality problems of the product.
1 2 4 5 6 7
8 9 10 11
3
12 13 14
CHILDREN PET SHOP
Product structure
Operation guideDownload the APP
Download APP: Scan the APP QR code below and complete the
installation.
Register and log in: Open the app and follow the prompts to
complete the registration and login.
1.Supply the camera with power and wait for the camera to start.
2.During the startup process, the camera will make horizontal
and vertical rotation. You need to confirm that the camera
emits a prompt tone and a continuous “Di-Di” sound and the
indicator light is flashing red. The camera is activated and can
be added. (If the "Di-Di" sound is not issued or the indicator
light is not flashing red, you need to manually reset it. Press
and hold the “reset” button for about 3~5 seconds. When the
prompt tone is heard, then camera rotate horizontally and
vertically. You will hear the continuous "Di-Di" sound and the
indicator light flashes red, the camera reset is successful and
can be added.)
Turn on the device1.Pair the camera with 2.4G Wi-Fi(Camera does not support 5G
band Wi-Fi), make sure the Wi-Fi network is in good condition.
2.Open the APP , on the main screen, click the “+” icon in the
upper right corner to add the camera. After confirming that the
camera has successfully started, click " I have heard the voice
prompt ".
3.Enter the Wi-Fi password, click "Connect to Wi-Fi ", and make
the QR code generated by the APP be facing the camera lens
at about 10~15CM. Wait for the voice prompt. Follow the
prompts to complete the configuration of the camera.
Real-time preview Smart Detection Motion Tracking Time lapse Call mode AI cloud searchWarm tips:
Product warranty cardAPP function introductionPacking list
Camera×1
Base×1
Instruction book×1
power adapter ×1 Power line×1 Function introduction
Screw accessory package×1
(Take this model for example)
Antenna
Power port
Ethernet port
Photosensitive
Indicator light
RESET button
Camera lens
Microphone
TF CARD slot
Loudspeaker
RESET
H.265
HD Intercom/Voice call AI cloud search
Motion Detection Abnormal sound Detection
Human Detection
Motion Tracking Multiple playback Regularly power on/off
Time lapse Cloud storage H.265
Add camera
①Preview mode
②Mute switch
③Manual recording
④Intercom switch
⑤More settings
⑥Cloud storage
⑦Floating window
⑧Full screen preview
⑨Capture picturea
⑩Historical video file
⑩
Click "Time lapse" to record Time-lapse albums, enable cloud storage service can select more than 12 hours duration record. (There are Time-lapse album works in the APP for reference.)
Cloud storage
Press the reset button for 3~5 seconds to restore the factory settings.
Indicator lamp The red light is normally on:thecamera is energizedThe red light flickers: wait for usersto add the deviceThe green light flickers: no internet accessedThe green light is normally on: the camera is on line and the user can view the video
RESET button
TF CARD slot Support local storage of TF CARD
⑪PTZ
Camera currently supports 2.4GHz Wi-Fi network only. If Wi-Fi network is
unstable, please try wired connection.
In the case of TF card insertion, you can continue recording or you can
select to record only when the screen changes saving storage space.
When the camera is added, insert the TF card the camera will restart. Check
the status of the TF card is in good condition, the camera can use the TF
card normally. When the TF card is removed, the camera will also restart.
Cloud storage temporarily stores only the video when the screen changes.
It is recommended to insert an 8-32GB TF card. Otherwise, historical video
may not be stored and viewed.
After delete the camera on the APP, add the camera again need manually
reset the camera.
The normal TF card playback multiplier is up to 4 times. After purchasing
cloud storage, the TF card playback multiplier can be up to 8 times, and the
cloud playback ratio can be up to 32 times.
●
●
●
●
●
●
●
⑪
BCS0152 V1.0
Cloud storage
YI Cloud
①
②
③④
⑤
⑥
⑦
⑧
⑨